Documents: Go to download!
User Manual
- User Manual - (English, French, Spanish)
- Energy Guide - (English)
- Setting up
- Operating
- Troubleshooting
Table of contents
User manual Refrigerator
Setting up
Removing the refrigerator doors
1. Removing the Front Leg Covers
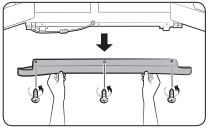
Open both the freezer and refrigerator doors.
Unscrew the three screws holding the front leg cover in place by turning them counterclockwise.
When the screws are loose, remove the front leg cover.
2. Separate the water supply line from the refrigerator

Remove one or two water lines, depending on the model, by pressing each coupler (1) and pulling the water lines (2) away.
NOTE Your refrigerator may have one or two water lines, depending on the model. If it has two, the lines are different colors. Make sure you match the colors when you re-attach them.
3. Remove the freezer door
A few things to mention first.
- Make sure that you lift the door straight up so the hinges are not bent or broken.
- Be careful not to pinch the water tubing and wire harness on the door.
- Place doors on a protected surface to prevent scratching or damage.
- Is necessary, have two people disassemble the doors.

1. With the Freezer door closed, remove the upper hinge cover (1) using a screwdriver, and then disconnect the wires by gently pulling them apart (2).
NOTE Be careful not to damage the sensor harness with the hinge cover.
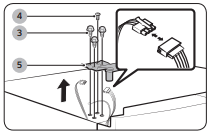
2. Remove the hinge bolts (3) with a 13/32” (10 mm) Socket Wrench. Remove the ground screw (4) by turning it counter-clockwise. Take off the upper hinge (5) in the direction of the arrow. Take care that the door does not fall on you.
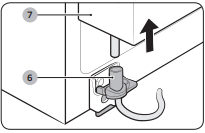
3. Open the Freezer door, and then remove the door from the lower hinge (6) by carefully lifting it up (7).

4. Remove the lower hinge (8) from the lower hinge bracket (9) by lifting the lower hinge up in the direction of the arrow.
4. Remove the fridge door
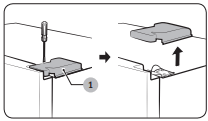
1. With the door closed, remove the upper hinge cover (1) using a screwdriver.
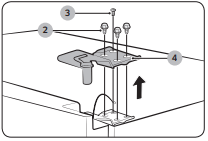
2. Remove the hinge bolts (2) with a 13/32” (10 mm) Socket Wrench. Remove the ground screw (3) by turning it counter-clockwise. Take off the upper hinge (4) in the direction of the arrow. Take care that the door does not fall on you.

3. Remove the door from the lower hinge (6) by lifting the door (7).

4. Remove the lower hinge (8) from the lower hinge bracket (9) by lifting the lower hinge up in the direction of the arrow.
Re-attaching the Fridge Door
To re-attach the fridge door, replace parts in reverse order.
Re-attaching the Freezer Door
To re-attach the freezer door, replace parts in reverse order.
Making minor adjustments between doors
A level refrigerator is necessary for getting the doors perfectly even.
Make sure your refrigerator is level before you begin.
If you need help leveling, review the previous section on leveling the refrigerator.
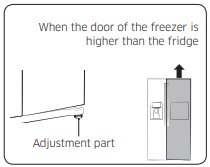
The process for adjusting each door is the same.
Open the doors and adjust them, one at a time, as follows:
1. Unscrew the nut (1) from the lower hinge until it reaches the upper end of the bolt (2).

NOTE When you release the nut (1), make sure that you use the hex wrench provided (3) to loosen the bolt (2) in a counterclockwise ( ) direction. You should then be able to unscrew the nut (1) with your fingers.

2. Adjust the height difference between the doors by turning the bolt (2) clockwise ( ) or counter clockwise (
 ).
).
NOTE When you turn clockwise ( ), the door will move up.
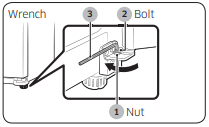
3. After adjusting the doors, turn the nut (1) clockwise ( ) until it reaches the lower end of the bolt, then tighten the bolt again with the wrench (3) to fix the nut in place (1).
NOTE If you do not secure the nut firmly, the bolt may release.
Installing the water dispenser line
- A water dispenser is one of the helpful features on your new Samsung Refrigerator.
- To help promote better health, the Samsung water filter removes unwanted particles from your water.
- However, it does not sterilize or destroy microorganisms.
- You may need to purchase a water purifying system to do that.
- The water line also connects to the ice maker.
- For the ice maker to operate properly, water pressure of 20 ~ 125 psi (138 ~ 862 kPa) is required.
- If the refrigerator is installed in an area with low water pressure (below 20 psi), you can install a booster pump to compensate for the low pressure.
- After you have connected the water line, make sure the water storage tank inside the refrigerator is properly filled.
- To do this, press the water dispenser lever until water runs from the water dispenser.
- NOTE Water line installation kits are available at extra cost from your dealer. We recommend using a water supply kit that contains copper tubing.
Connecting to the water supply line
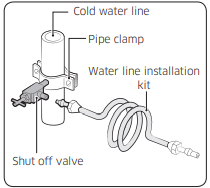
1. First, shut off the main water supply line and turn the ice-maker off.
NOTE The refrigerator should NOT be plugged in at this point.
2. Locate the nearest cold water drinking water line.
3. Install the pipe clamp and shut off valve.
4. Connect the water line installation kit to the shut off valve.
Completing the set up
Now that you have your new refrigerator installed in place, you are ready to set up and enjoy the features and functions of the appliance.
By completing the following steps, your refrigerator should be fully operational.
- Make sure your refrigerator is in an appropriate location with reasonable clearance between it and the wall. Refer to installation instructions in this manual.
- Once the refrigerator is plugged in, make sure the interior light comes on when you open the doors.
- Set the Temperature control to the coldest temperature and wait for an hour. The freezer will get slightly chilled and the motor will run smoothly. Reset the refrigerator and freezer to the temperatures you want.
- After you plug the refrigerator in, it will take a few hours to reach the appropriate temperature. You can store food and drinks in the refrigerator after the temperature is sufficiently cool.
NOTE If condensation or water drops appear on both sides of the fridge door’s central part, turn the Energy Saver mode off after removing the condensation. (See the explanation of the Energy Saver button in “Using the control panel” on page 38.)
Preventing Power Cord Damage
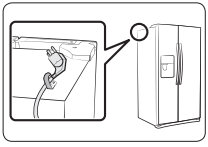
To prevent power cord damage, fix any excess power cord to the top rear of the refrigerator as shown in the illustration below.
Operating
Checking the control panel
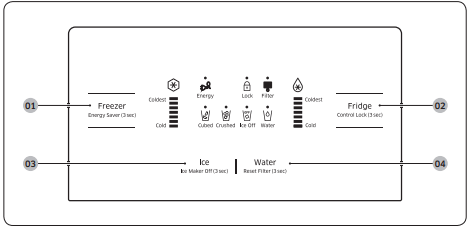
01 Freezer / Energy Saver (3 sec)
Press the Freezer button to set the freezer temperature between cold and coldest.
Press Freezer button for several times to activate the Power Freeze icon which speeds up the freezing process in the freezer.
This can be helpful if you need to quickly freeze items that spoil easily or if the temperature in the freezer has warmed dramatically (For example, if the door was left open).
If you need to freeze a large amount of food, activate the Power Freeze function at least 20 hours before you put the food into the freezer.
Press and hold the Freezer button for 3 seconds to activate the Energy Saver function for better energy efficiency.
If condensation occurs on the doors, turn the Energy Saver function off.
02 Fridge / Control Lock (3 sec)
Press the Fridge button to set the Fridge temperature between cold and coldest.
Press and hold the Fridge button for several times to activate the Power Cool function which speeds up the cooling process in the refrigerator.
If you press and hold the Fridge button for 3 seconds, all buttons will be locked and the dispenser pad will not work.
03 Ice / Ice Maker Off (3 sec)
Press the Ice button to select cubed ice or crushed ice.
Press and hold the Ice button for 3 seconds to turn the ice making function off.
Press and hold the Ice button again for 3 seconds to turn the ice making function back on.
04 Water / Reset Filter (3 sec)
Press the Water button to turn the water dispenser on.
Press and hold the Water button for 3 seconds after changing the filter to reset the water filter indicator.
NOTE To deactivate the secondary functions (such as Ice Off and Control Lock), press and hold the corresponding button again for 3 seconds.
Using the control panel
Freezer / Fridge (Temperature adjustment)
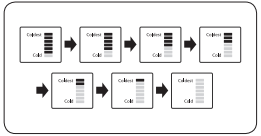
Press the Freezer or Fridge button until the desired temperature is set.
For a lower temperature, press the Freezer or Fridge button until more LEDs light (colder).
For a higher temperature, press the Freezer or Fridge button until fewer LEDs light (less cold).
Each time you press the Freezer or Fridge button, the temperature indicator changes in the order shown below.
 Power Freeze
This icon lights when you activate the Power Freeze function. Power Freeze function generates cool air for 50 hours continuously, chilling the freezer more quickly.
This function is useful when you need to decrease the temperature in the freezer quickly or to make more ice rapidly.
When the freezer is cold enough or you have enough ice, just press the Freezer button again to cancel the Power Freeze function.
NOTE
- When you use this function, the energy consumption of the refrigerator may increase.
- Remember to turn it off when you do not need it and return the freezer to your original temperature setting.
 Energy Saver
This icon lights when you activate the Energy Saver function.
The Energy Saver function is automatically set to “ON” when power is supplied to the Refrigerator.
If condensation occurs on the doors, turn the Energy Saver function off.
 Control Lock
This icon lights when you activate the Lock function. When the Lock icon is lit, all the panel buttons, including the Ice button and the dispensers, are locked and de-activated.
Press and hold the Fridge button for 3 seconds to turn Lock off and re-activate the panel buttons.
 Filter Indicator
This icon turns red when you need to change the filter, usually after the refrigerator has dispensed about 300 gallons of water (or after about 6 months).
The icon will blink red for several seconds when you open or close the door.
The filter Indicator will be Off when you initially insert the water filter.
 Power Cool
This icon lights when you activate the Power Cool function.
Power Cool function is great for a quick fridge cool down.
If you activate the Power Cool function, the inside temperature of the Fridge decreases for about two and a half hours.
When you want to turn Power Cool off, press Fridge button again.
 Cubed
Cubed  Crushed
Enjoy cubed or crushed ice by selecting your preference from the digital control panel.
The ice type light indicates the type of ice that is currently chosen.
 Ice Off
This icon lights when you activate the Ice Off function.
When the Ice Off icon is lit, the ice maker is turned off.
 Water
Water
This icon lights when you activate the Water function.
When the Water icon is lit, the water dispenser is on.
Display Off
To conserve energy, the Panel Display turns off automatically under the following conditions:
When no button has been pressed, when no doors have been opened, or when no Dispenser Lever has been pushed for a period of time.
However, the icon indicating your Water or Cubed / Crushed selection, stays on.
When you press a button, open a door, or push a Dispenser Lever, the Panel Display turns on again. Except for the Water and Ice buttons, all function buttons will become operational after you remove your finger from the button you are currently pressing.
Using the ice and cold water dispenser
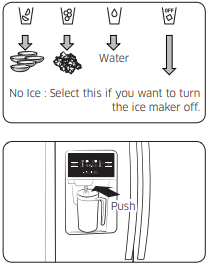
Using the water dispenser
Press the Water button on the control panel.
Place your glass under the water outlet, and then push against the dispenser pad until you hear a click.
Make sure the glass is in line with the dispenser to prevent the water from splashing out.
Storing food
The Samsung Side-By-Side Refrigerator has been designed to provide you with maximum space saving features and functions.
Here are some of the customized compartments we have created to keep your food fresher, longer.
Important: To prevent odors from penetrating the ice in the ice maker, store all food securely in wraps or containers that are as airtight as possible.
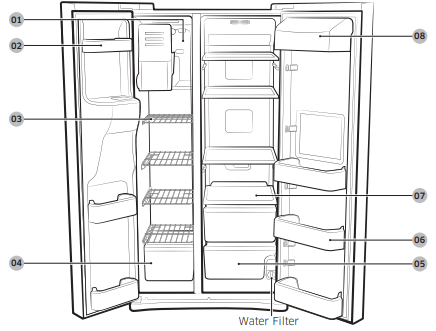
Storing Food in the Freezer
01 Xtra Space
- Can be used for frozen foods such as pizza, pasta, burritos, and fajitas.
- To prevent odor penetration of the ice, stored food should be wrapped securely.
02 Door Bins
- Can be used for small packages of frozen food.
03 Shelves
- Can be used to store frozen food.
04 Freezer Drawer
- Best used for storing meat or other frozen items. For safe keeping, stored food should be wrapped securely in foil or other suitable wrapping materials or containers.
Storing Food in the Fridge
05 Fruit & Vegetable Drawer
- Used to preserve the freshness of your stored vegetables and fruits.
06 Door Bin
- Designed to handle large, bulky items such as gallons of milk or other large bottles and containers.
07 Glass Shelf
- Designed to be crack-resistant.
- They can be used to store food and drinks. Circular marks on the glass surface are a normal phenomenon and can usually be wiped clean with a damp cloth.
08 Dairy Bin
- Can be used to store smaller dairy items like butter or margarine, yogurt, or cream-cheese bricks.
Cleaning the refrigerator
Caring for your Samsung Side-By-Side Refrigerator prolongs the life of your appliance and helps keep it odor and germ-free.
Cleaning the Interior
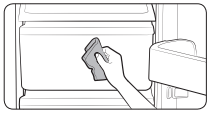
Clean the inside walls and accessories with a mild detergent, and then wipe dry with a soft cloth.
You can remove the drawers and shelves for a more thorough cleaning.
Just make sure to dry them before putting them back into place.
Cleaning the Exterior
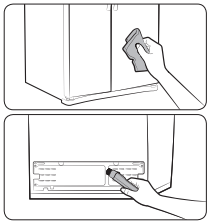
Wipe the digital panel and display panel with a clean, soft cloth.
Spray water onto the cleaning cloth instead of spraying directly on the surface of the refrigerator. This helps ensure an even distribution of moisture on the surface.
The doors, handles, and cabinet surfaces should be cleaned with a mild detergent, and then wiped dry with a soft cloth.
To keep your appliance looking its best, the exterior should be polished once or twice a year.
Cleaning the rubber door seals

If the rubber door seals are dirty, the doors may not close properly, and the refrigerator will not operate efficiently.
Keep the door seals free of grit or grime by cleaning the doors with a mild detergent and damp cloth. Wipe dry with a clean, soft cloth.
Changing the LED type lighting
CAUTION
- Do not disassemble or replace the LED type lighting.
- To change the LED type lighting, contact a Samsung service center.
Changing the water filter

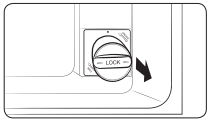
1. Turn the water filter 90˚ counterclockwise.
2. Pull the water filter out of the filter housing.

3. Insert a new water filter into the filter housing.
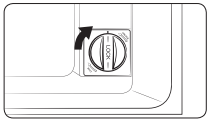
4. Turn the new water filter 90° clockwise.
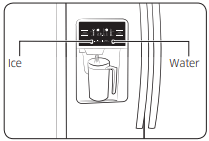
5. Press and hold the Water button for 3 seconds after changing the filter to reset the filter indicator. Confirm the indicator turns blue. When you replace the water filter, some water may leak from the water filter housing. Make sure to wipe up any leakage that may have occurred.
Troubleshooting
The refrigerator does not work at all or it does not chill sufficiently
- Confirm that the power plug is properly connected.
- Is the temperature control on the display panel set to the correct temperature? Try setting it to a lower temperature.
- Is the refrigerator in direct sunlight or located too near a heat source?
- Is the back of the refrigerator too close to the wall and therefore keeping air from circulating?
- Check if the Cooling Off Mode is on. If the Freezer/Fridge temperature indicator is moving, refer to page 40 to cancel the Cooling Off Mode.
The food in the fridge is frozen.
- Is the temperature control on the display panel set to the correct temperature? Try setting it to a warmer temperature.
- Is the temperature in the room very low?
- Did you store the food with a high water content in the coldest part of the fridge?
You hear unusual noise or sounds.
- Confirm that the refrigerator is level and stable.
- If the refrigerator’s water supply line is not connected and water is not being supplied to the refrigerator, the refrigerator will make unusual noises if the ice maker is on or if you push the water dispenser lever. To stop the noises, press the Ice button for at least 3 seconds until the Ice Off icon lights indicating that the ice maker is off.
- You hear a ticking sound from inside the refrigerator. This is normal and occurs because various parts in the refrigerator’s interior contract or expand in response to temperature changes.
The front corners of the appliance are hot and condensation is occurring.
- Some heat is normal as anti-condensators are installed in the front corners of the refrigerator to prevent condensation.
- Is the refrigerator door ajar? Condensation can occur when you leave the door open for a long time.
Ice is not dispensing.
- Did you wait for 12 hours after installation of the water supply line before making ice?
- Is the water line connected and the shut-off valve open?
- Did you manually stop the ice making function? Make sure Ice Type is set to Cubed or Crushed.
- Is there any ice clumped in the ice maker bucket?
- Is the freezer temperature too warm? Try setting the freezer temperature lower
You can hear water bubbling in the refrigerator.
- This is normal. The bubbling comes from the refrigerant coolant liquid circulating through the refrigerator.
There is a bad smell in the refrigerator.
- Has a food item spoiled?
- Make sure that strong smelling food (for example, fish) is wrapped so that it is airtight.
- Clean out your freezer periodically and throw away any spoiled or suspect food.
Frost forms on the walls of the freezer.
- Is the air vent blocked? Remove any obstructions so air can circulate freely.
- Allow sufficient space between the foods stored for efficient air circulation.
- Is the freezer door closed properly?
Water dispenser is not functioning.
- Is the water line connected and the shut-off valve open?
- Has the water supply line tubing been crushed or kinked? Make sure the tubing is free and clear of any obstruction.
- Is the water tank frozen because the refrigerator temperature is too low? Try selecting a warmer setting on the main display panel.
See other models: RF23J9011SG/AA RF263BEAESG RF28JBEDBSG/AA RF26HFENDBC/AA RF28K9070SR/AA
