Documents: Go to download!
- Owner's manual - (English, French, Spanish)
- safety information
- Setting up your French Door Refrigerator
- Operating your French Door Refrigerator
- Troubleshooting
Table of contents
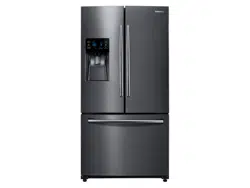
user manual samsung Refrigerator
safety information
Before operating the appliance, please read this manual thoroughly and retain it for your reference. Use this appliance only for its intended purpose as described in this instruction manual. This appliance is not intended for use by persons (including children) with reduced physical, sensory or mental capabilities, or lack of experience and knowledge, unless they have been given supervision or instruction concerning use of the appliance by a person responsible for their safety. Because these following operating instructions cover various models, the characteristics of your refrigerator may differ slightly from those described in this manual. When disposing of this or other refrigerator/s, remove the door/door seals, door latch so that children or animals cannot become trapped inside. Children should be supervised to ensure that they do not enter and play with the appliance.
- If trapped inside, the child may become injury and suffocate to death.
Important safety symbols and precautions:
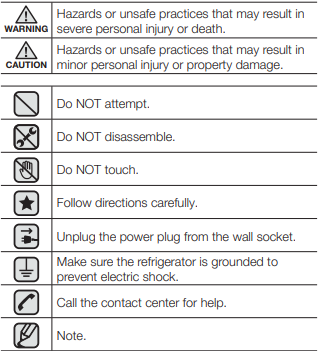
 SEVERE WARNING SIGNS FOR INSTALLATION
- Do not install the refrigerator in a damp place or place where it may come in contact with water. - Deteriorated insulation of electrical parts may cause an electric shock or fi re.
- Do not place this refrigerator in direct sunlight or expose to the heat from stoves, room heaters or other appliance.
- Do not plug several appliances into the same multiple power strip. The refrigerator should always be plugged into its own individual electrical outlet which has a voltage rating that matches the voltage listed on the refrigerator’s rating plate. - This provides the best performance and also prevents overloading house wiring circuits, which could cause a fi re hazard from overheated wires.
- If the wall socket is loose, do not insert the power plug. - There is a risk of electric shock of fi re
- Do not use a cord that shows cracks or abrasion damage along its length or at either end.
- Do not bend the power cord excessively or place heavy articles on it. - Do not pull or excessively bend the power cord.
- Do not twist or tie the power cord.
- Do not hook the power cord over a metal object, place a heavy object on the power cord, insert the power cord between objects, or push the power cord into the space behind the appliance.
 INSTALLATION CAUTIONS
- Allow suffi cient space to install the refrigerator on a fl at surface. - If your refrigerator is not level, the internal cooling system may not work correctly.
- Keep the ventilation space in the appliance enclosure or mounting structure clear of obstruction.
- Allow the appliance to stand for 2 hours after installation.
- We recommend you have installed this refrigerator by a qualifi ed technician or service company. - Failing to do so may result in an electric shock, fi re, explosion, problems with the product, or injury.
- This appliance must be properly grounded.
- Do not ground the appliance to a gas pipe, plastic water pipe, or telephone line. - You must ground the refrigerator to prevent any power leakages or electric shocks caused by current leakage from the refrigerator. - This may result in an electric shock, fi re, explosion, or problems with the product
- Plug the power plug into the wall socket fi rmly. Do not use a damaged power plug, damaged power cord or loose wall socket. - This may result in an electric shock or fi re.
- The installation or any service of this appliance is recommended by a qualifi ed technician or service company.
- Failing to do so may result in an electric shock, fi re, explosion, problems with the product, or injury.
- Do not touch the power plug with wet hands. - This may result in an electric shock.
- Do not store articles on the top of the appliance.
- When you open or close the door, the articles may fall and cause personal injury and/or material damage.
- Do not use or place any substances sensitive to temperature such as infl ammable sprays, infl ammable objects, dry ice, medicine, or chemicals near or inside of the refrigerator.
- Do not keep volatile or infl ammable objects or substances (benzene, thinner, propane gas, alcohol, ether, LP gas and other such products etc.) in the refrigerator. - This refrigerator is for storing food only. - This may result in fi re or explosion.
- If you smell pharmaceutical or smoke, pull out power plug immediately and contact your Samsung Electronics service center
Setting up your French Door Refrigerator
GETTING READY TO INSTALL THE REFRIGERATOR
Selecting the best location for the refrigerator
Choose:
- A location with easy access to a water supply.
- A location without direct exposure to sunlight.
- A location with a level floor.
- A location with enough space for the refrigerator doors to open easily.
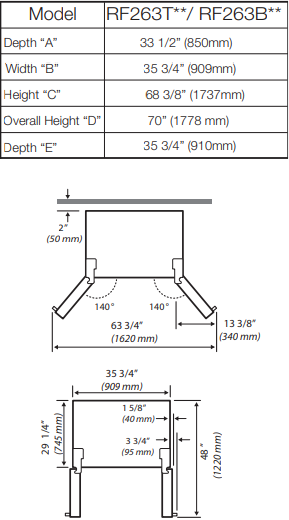
- A location that allows sufficient space to the right, left, back and top for air circulation.
- A location that allows you to move the refrigerator easily if it needs maintenance or service. Do not install the refrigerator where the temperature will go below 50ºF (10ºC).
- Do not locate the refrigerator where it may become wet.
When moving your refrigerator
 To prevent floor damage, be sure the front adjusting legs are in the up position (above the floor). Refer to ‘Adjusting the Level’ in the manual (on page 9).
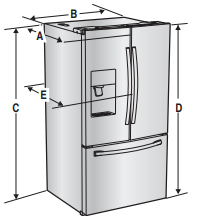
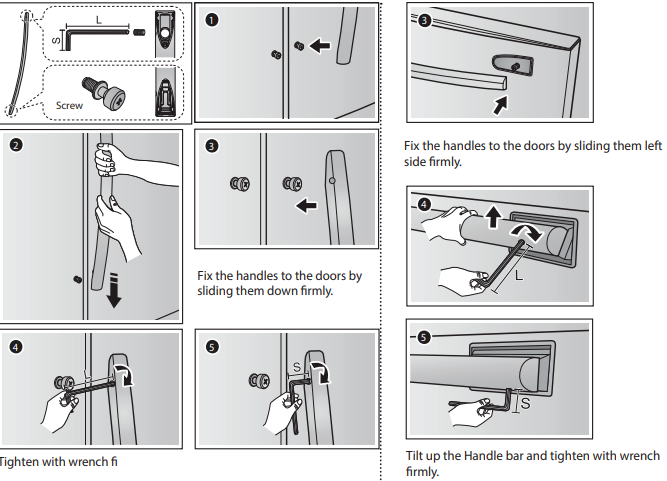
HOW TO ASSEMBLE THE HANDLE
Orient each handle so that the end with the sticker attached is at the top and the holes with the tightening screws are facing each other. Then, follow the directions below to install each handle
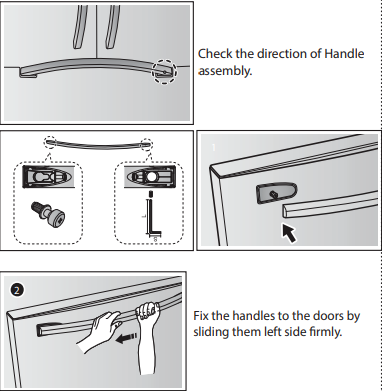
Drawer door handle assembly
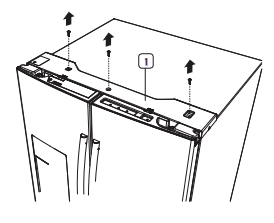
Disassemble the refrigerator doors
 Be careful not to drop and scratch the WARNING doors while removing them.
With the door opened
- Remove 3 screws holding down the TOP TABLE ( 1 ) and turn it with wires connected
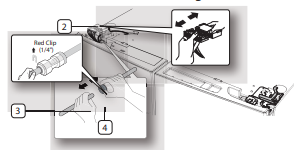
- Disconnect two connectors ( ) on the left side door. To remove the water coupler from the hinge, twist and pull it from the hinge. Remove the water line ( 3 ) while pressing the marked part ( 4 ) of the water line coupler.
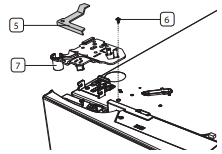
- Pull and remove the hinge lever ( 5) . Remove the ground screw ( 6 ) attached to the upper left door hinges with a philips screwdriver (+). Remove the upper left and right door hinges ( 7 ).
- Lift the door straight up to remove.
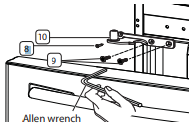
- Remove the screw ( 8 ) attached to the lower left and right door hinges with a philips screwdriver (+). Remove the 2 hex head bolts ( 9 ) attached to the lower left and right door hinges with an allen wrench (3/16”). Remove the lower left and right door hinges ( 10 ).
REATTACHING THE REFRIGERATOR DOORS
To reattach the fridge doors after you have moved the fridge to its final location, assemble the parts in reverse order.
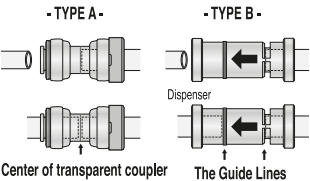
- The Water Line must be fully Inserted to the center of transparent coupler to prevent water leakage from the dispenser.
- Insert the clip in the top plate and check that it
DISASSEMBLE THE FLEX DOOR
- Take out the upper drawer by lifting it up.
- Take out the lower basket ( 1 ) by lifting the basket up from the rail system.
- Press the fixing hook of rail system.
- Holding the top of the Freezer Drawer, pull it out all the way and then remove it from the rail system.
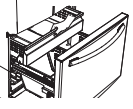

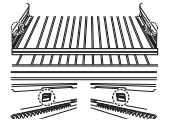
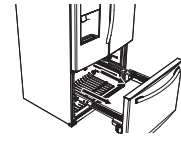
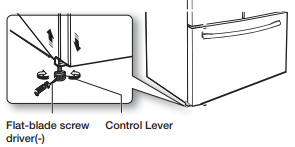
How to adjust the level
- Open the freezer drawer and remove the lower basket.
- Insert a flat-blade screwdriver (-) into a notch on the left control lever, and turn it counter clockwise to level the refrigerator. (You turn the lever clockwise to lower the refrigerator and counterclockwise to raise it.)
 Both control levers must be touching the floor to avoid possible personal injury or property damage because of tipping.
INSTALLING THE WATER DISPENSER LINE
A water dispenser with a filter is one of the helpful features on your new refrigerator. To help promote better health, the water filter removes unwanted particles from your water. However, it does not sterilize or destroy microorganisms. You may need to purchase a water purifying system to do that. The water line also connects to the ice maker. For the ice maker to operate properly, water pressure of 20~125psi (138~862 kPa) is required. If the refrigerator is installed in an area with low water pressure (below 20psi), you can install a booster pump to compensate for the low pressure.
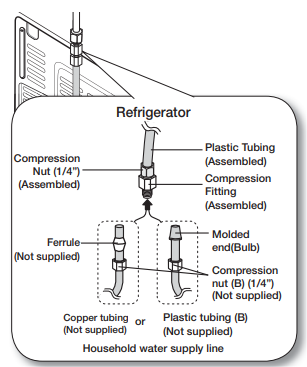
- Connect the household water line to the assembled compression fitting. -If you are using copper tubing, slip the compression nut ( B ) (not supplied) and ferrule (not supplied) on the copper tubing (not supplied) as shown. -If you are using plastic tubing ( B ) , insert the molded end (Bulb) of the plastic tubing ( B ) into the compression fitting. Do not use without the molded end (Bulb) of the plastic tubing ( B ).
- B Tighten the compression nut ( ) onto the compression fitting. Do not over-tighten the compression nut ( B ) .
- Turn water on and check for any leakage. If you find water drops or leakage in the connection the connections and, if necessary, tighten.
- Flush 1 gallon of water through the filter before drinking or using the water from the refrigerator. (Flush approximately 6 minutes.) To flush, press a large glass or cup against the water dispenser lever. Fill the glass, empty it into the kitchen sink after it is filled, and then repeat.
- After you turn on the refrigerator, let the ice maker make ice for 1 to 2 days. Over that period of time, throw out the first 1 or 2 buckets of ice the freezer makes to ensure all impurities have been removed from the water line.
COMPLETING THE SET UP
Now that you have your new refrigerator installed in place, you are ready to set up and enjoy the features and functions of the appliance. By completing the following steps, your refrigerator should be fully operational.
- Make sure your refrigerator is in an appropriate location with reasonable clearance between it and the wall. Refer to installation instructions in this manual.
- Once the refrigerator is plugged in, make sure the interior light comes on when you open the doors.
- Set the Temperature control to the coldest temperature and wait for an hour. The freezer will get slightly chilled and the motor will run smoothly. Reset the refrigerator and freezer to the temperatures you want
- After you plug the refrigerator in, it will take a few hours to reach the appropriate temperature. You can store food and drinks in the refrigerator after the temperature is sufficiently cool.
Operating your French Door Refrigerator
USING THE CONTROL PANEL
- Energy Saver Hold 3 sec for °C °F Touching this button turns Energy Saver Saver on, the Energy Saver icon lights. automatically turns on when power is supplied to the refrigerator. If condensation or water drops appear on the doors, turn the Energy Saver Touch and hold this button for 3 seconds to switch the temperature units between °C and °F
- ) Freezer (Hold 3 sec for Power Freeze) Touch this button to set the freezer to your desired temperature. You can set the temperature between -8°F and 5°F (between -23°C and -15°C). Touch and hold this button for 3 seconds to decrease the time needed to freeze products in the Freezer. It can be helpful if you need to quickly freeze easily spoiled items or if the temperature in the freezer has warmed dramatically (For example, if the door was left open).
- Ice Type/Water Hold 3 sec for Filter Reset Touch this button to select the ice or water function. You can select water or the types of ice(cubed/crushed ice). Each time you press the button, the cubed and crushed ice modes alternate and the Cubed or Crushed ice icon lights up, indicating your selection. After you replace the water filter, touch and hold this button for 3 seconds to reset the water filter life indicator
- Alarm Hold 3 sec for Lighting If the door alarm is set to On, an alarm beeps if any refrigerator door is left open for more than three minutes. The beeping stops when you close the door. The door alarm function is preset to On int the factory back on in the same fashion. The icon lights up when the function is on. releasing this button. You can turn it back If you touch and hold the Alarm/Lighting button for 3 seconds, the dispenser LED the button for 3 seconds again
- Fridge Hold 3 sec for Power Cool Touch this button to set the fridge to your desired temperature. You can set the temperature between 34 °F and 44 °F (between 1°C and 7 °C ). Touch and hold this button for 3 seconds to decrease the time needed to cool products in the Refrigerator. It can be helpful if you need to quickly cool easily spoiled items or if the temperature in the fridge has warmed dramatically (For example, if the door was left open).
- Ice Off Hold 3 sec for Child Lock If you don’t want to make more ice, for 3 seconds turns Touching this button the display on Child Lock which locks panel and dispenser buttons so the buttons can not be used. The Child Lock icon lights up to indicate you’ve activated the Child Lock function. Press 3 seconds to unlock. The Child Lock are not going to lock the Cool Pantry. The lights and
- Ice Off If you don’t want to make more ice, The icon will light up and the Ice-Maker stops making ice. We recommend you to stop ice making if the following occur: - There is enough ice in the ice bucket. - You want to save water and energy. ot deilppus gnieb ton si retaW - the refrigerator. If the ice maker function is ON, and the water Line is not connected, there will be a water valve noise from the back of the unit, press the Ice Off (Hold 3sec for child lock) button for less than 3 seconds until the Ice Off Indicator illuminates.
- Filter Water filter usage This icon will light up when you need to change the filter. After you use about 300 gallons of water, the filter indicator lights up. (about 6 months). After you install the new water filter, reset the filter indicator by touching the Ice Type/ Water Hold 3 sec for Filter Reset button
Removing any residual matter inside the water supply line after installing the water filter.
- Turn ON the main water supply and supply water to the refrigerator.
- Select water in the button “ICE TYPE/WATER”,pour 1 Gal (6-7 minutes) to clean the water supplier system and it will take the air out from the lines. possible an additional flushing in the household lines.
- If after pour 1 Gal the water doesn’t turn clear is
- Open the Refrigerator door and make sure there are no water leaks coming from the water filter.
The pressure of the water supply coming out of a reverse osmosis system going to the water inlet valve of the refrigerator needs to be between 35 and 120 psi (241 and 827 kPa). If a reverse osmosis water filtration system is connected to your cold water supply, the water pressure to the reverse osmosis system needs to be a minimum of 40 to 60 psi (276 to 414 kPa.) If the water pressure to the reverse osmosis system is less than 40 to 60 psi (276 to 414 kPa):
- Check to see whether the sediment filter in the reverse osmosis system is blocked. Replace the filter if necessary.
- Allow the storage tank on the reverse osmosis system to refill after heavy usage.
- If your refrigerator has a water filter, it may further reduce the water pressure when used in conjunction with a reverse osmosis system. Remove the water filter.
USING THE COLD WATER DISPENSER
Push the appropriate ice type button to select what you want dispensed.
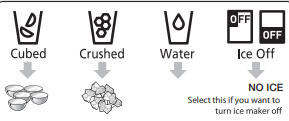
Using the ice Dispenser
Place a glass underneath the ice dispenser and push gently against the dispenser lever with your glass. Make sure the glass is in line with the dispenser to prevent the ice from bouncing out.
 Please wait 2 seconds before removing the glass under the dispenser to prevent spills. If the Refrigerator door opens, the Dispenser does not work.
 When Cubed Ice is selected after using the Crushed Ice mode, a small amount of residual crushed ice might be produced.
 Do not pull the lever out. You could damage or break the lever’s spring.
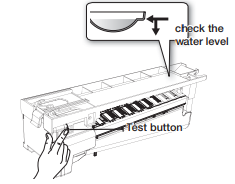
Maintaining the Ice Bucket
- To clean the ice bin/bucket, wash with a mild detergent, rinse well, and dry thoroughly it. Do not use harsh or abrasive cleaners or solvents.
- The ice cubes generated by the rapid ice making process will look white, which indicates they are generated normally.
- As the ice maker in the refrigerator room makes ice cubes even faster, move the ice cubes from the refrigerator ice bin to the freezer ice bin if you need more ice cubes.
- If ice doesn’t come out, pull out the ice bucket and press the test button located on the right side of ice maker.
- Do not press the test button continuously when the tray is filled with ice or water. Water may overflow or ice may jam the bucket.
- Normal Use To fill the ice bucket to maximum capacity after installation, follow these steps: Water may overflow or ice may jam the bucket.
Troubleshooting
The refrigerator does not work at all or it does not chill sufficiently
- Check if the power plug is properly connected.
- Check if the set temperature on the digital display is warmer than the freezer or fridgeinner temperature. If it is, set the refrigerator colder.
- Is the refrigerator in direct sunlight or located near a heat source?
- Is the back of the refrigerator too close to the wall, preventing proper ventilation?
The food in the fridge is frozen.
- Check if the set temperature on the digital display is too low.
- Try setting the refrigerator to a warmer temperature.
- Is the temperature in the room too low? Set the refrigerator warmer.
- Did you store the food which is juicy in the coldest part of the refrigerator? Try moving those items to the other shelves in the fridge instead of keeping them in the colder areas or bins.
You hear unusual noise or sounds.
- Check if the refrigerator is level and stable.
- Is the back of the refrigerator too close to the wall, preventing proper ventilation? Try moving the back of the refrigerator at least 2 inches from the wall.
- Was anything dropped behind or under the refrigerator?
- A “ticking” sound is heard from inside the refrigerator. This is normal and occurs because various accessories are contracting or expanding according to the temperature of the refrigerator interior.
- If it sounds as if something is hitting something else inside the refrigerator, this is normal. The sound is caused by the compressor operating at high capacity.
The cabinet-door sealing area of the appliance is hot and condensation is occurring
- Some heat is normal as anti-condensators are installed in the vertical hinged section of the refrigerator to prevent condensation.
- Is the refrigerator door ajar? Condensation can occur when you leave the door open for a long time.
Ice Maker is not producing ice.
- Did you wait for 12 hours after installation of the water supply line before making ice?
- Did you manually stop the ice making function?
- Is the freezer temperature too warm? Try setting the freezer temperature lower.
You can hear water bubbling in the refrigerator
- This is normal. The bubbling comes from refrigerant circulating through the refrigerator.
There is a bad smell in the refrigerator.
- Check for spoiled food.
- Foods with strong odors (for example, fish) should be tightly covered.
- Clean out your freezer periodically and throw away any spoiled or suspicious food.
Frost forms on the walls of the freezer
- Is the air vent blocked? Remove any obstructions so air can circulate freely.
- Allow sufficient space between the stored foods for efficient air circulation.
- Is the freezer drawer closed properly?
Water dispenser is not functioning.
- Has the water supply line tubing been crushed or kinked?
- Make sure the tubing is free and clear of any obstruction.
- Is the water tank frozen because the fridge temperature is too low? Try selecting a warmer setting on the Digital display.
Auto close system does not work with the freezer door.
- Is there an imbalance between the right and left parts of the door?
- Open and close the door smoothly 1~2 times. After you do this, the auto close system usually works properly again.
- Try opening the door smoothly to avoid unbalancing the right part and the left part of the door
See other models: RF28JBEDBSG/AA RF26HFENDBC/AA RF28K9070SR/AA RF22KREDBSR/AA RF30KMEDBSR/AA
