User Guide Washer
Operating Instructions
IMPORTANT: Before washing clothes for the first time, a complete cycle must be run without a load. This will remove any water remaining in the washer from the manufacturer’s test run.
Load the Clothes Washer
- The tub can be loaded completely full with dry, unfolded clothes. However, DO NOT pack the tub tightly.
- Overloading may reduce washing efficiency, cause excess wear and possibly cause creasing or wrinkling of the load.
- Wash delicate items such as bras, hosiery and other lingerie in the “Delicates” or “Handwash” cycle with similar lightweight items.
- When washing smaller, bulky items that do not fill the tub completely such as a rug, one pillow, stuffed toys or one or two sweaters, a few towels should be added for improved tumbling and spin performance.
- When washing heavily soiled loads, it is very important to avoid overloading the washer to assure good cleaning results.
- To add a forgotten item in the Normal, Colors, Heavy Duty or Quick Wash cycles, press Start/Pause, wait for the Door Lock light to go out, add the item, close the door and press Start/Pause. After a pause of one to two minutes, the cycle will resume.
- Close door carefully to avoid slamming.
Note: To ensure that your additional items get clean, do not wait more than five minutes after the cycle has started to add the items.
Start the Washer
- Press any pad or turn the cycle selector dial.
- Load the washer loosely – DO NOT overload.
- Close the door.
- Add detergent and additives to the dispenser (see pages 7-8).
- Select the appropriate cycle and options for the load, (see pages 4-6).
- Press the Start/Pause pad.

- The Wash indicator light will illuminate.
- The estimated cycle time will appear in the display.
The time may fluctuate to better indicate the wash time remaining in the cycle.
Notes
- When the cycle is complete, the Door Lock light will go out and “End” will appear in the display after one to two minutes.
- DO NOT attempt to open the door until the Door Lock light is off. To add a forgotten item, see Load The Clothes Washer section.
- When the washer is restarted after a pause, there will be a pause of up to 15 seconds before the cycle will continue.
- Pressing Power Off cancels the cycle and stops the washer.
- The Wash, Rinse and Spin indicator lights will illuminate during those portions of the cycle.
Water Use
The amount of water used will vary with each load. The washer will automatically provide the appropriate amount of water for efficient cleaning performance and conservation of water and energy. Fill time will vary depending on water pressure.
Using the Controls
Turn the Washer On
Press any pad or turn the cycle selector knob to Notes turn the washer on. Press the Power Off pad to turn the washer off.
If the washer power is left on for longer than 10 minutes without starting the washer, the power automatically turns off.

Select Cycle
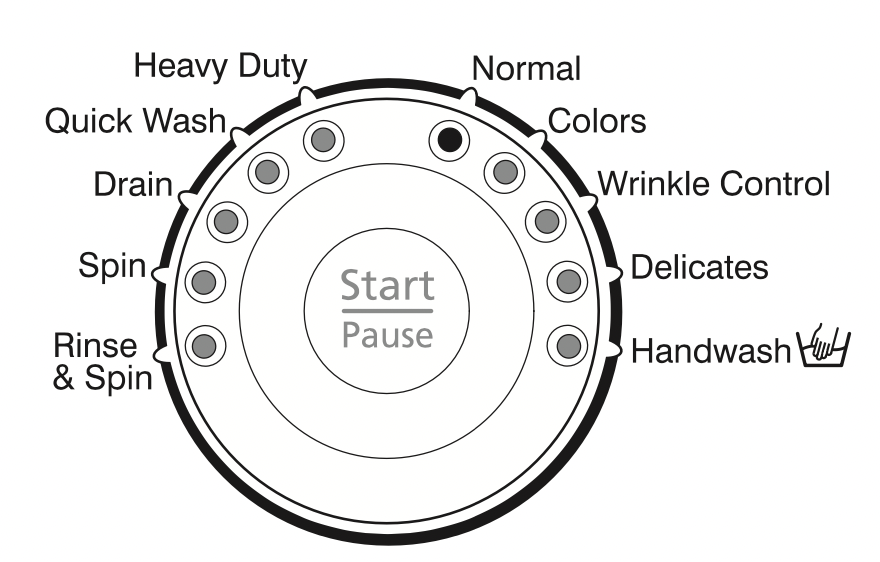
Turn the cycle selector dial to select the appropriate cycle for your load. The indicator light by the cycle name will illuminate.
- Rinse & Spin – For all fabrics needing a rinse and spin only.
- Spin – For all fabrics and garments needing a spin only.
- Drain – To drain water from tub without spinning.
- Quick Wash – For lightly soiled or wrinkled garments needed quickly. For best results, use liquid detergent.
- Heavy Duty – For sturdy, colorfast fabrics and heavily soiled garments.
- Normal – For most fabrics including cottons, linens and normally soiled garments.
- Colors – For bright fabrics or fabrics that may bleed.
- Wrinkle Control – For “wash and wear” and synthetic fabrics and lightly to normally soiled garments.
- Delicates – For sheer fabrics, bras and lingerie.
- Handwash – For wool, silk and other hand-washonly fabrics. For best results, use liquid detergent.
Note: To minimize wrinkling of loads, select the Wrinkle Control cycle.
Select Wash/Rinse Temperature
Press the Temperature pad to select the wash and Notes rinse temperatures. The light next to the temperature will illuminate. Press the pad repeatedly to scroll through the temperature settings.
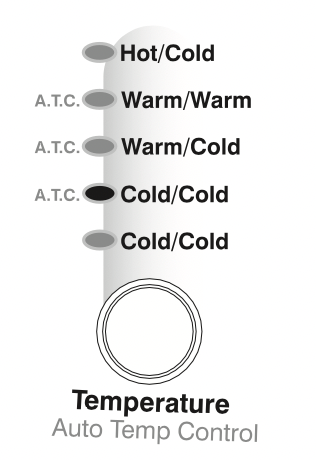
Hot/Cold – Whites and heavily soiled color-fast items.
ATC Warm/Warm – Color-fast items. When warm rinse is selected, only the final rinse will be warm. The other rinses will be cold to conserve energy.
ATC Warm/Cold – Moderately soiled, color-fast items; most wrinkle free items
ATC Cold/Cold – Brightly colored, lightly soiled items
Cold/Cold – Brightly colored, very lightly soiled items; washable woolens
IMPORTANT: The washer features an automatic temperature control (ATC) to provide a warm wash of approximately 105˚ F, a warm rinse of approximately 80˚ F and cold wash of approximately 65˚ F on the ATC temperature selections.
REMEMBER: In wash water temperatures below 60 F, detergents do not dissolve well or clean well.
Select Spin Speed
Press the Spin pad to select the appropriate spin speed for the load. The light next to the spin speed will illuminate. Press the pad repeatedly to scroll through the spin speed settings.
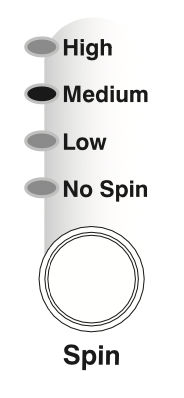
High – Use for underwear, t-shirts and sturdy cottons.
Medium – Use for jeans, wrinkle free or “wash-and-wear” items and synthetics.
Low – Use for delicate items needing a slow spin speed because of fabric and construction and for hang-dry items.
No Spin – Drains the washer without spinning. Use for extremely delicate items that cannot tolerate any spin.
Select Soil Level
Press the Soil Level pad to select the appropriate soil level for the load. The light next to the Soil Level pad will illuminate. Press the pad repeatedly to scroll through the soil level settings.
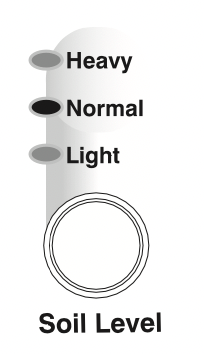
Heavy – Use for cleaning heavily soiled loads.
Normal – Use for cleaning moderately soiled loads. This setting will be appropriate for most loads.
Light – Use for cleaning lightly soiled loads.
Select Cycle Options
Press the pads to select one or more options.
Extra Rinse
Adds an additional rinse at the end of the cycle to more thoroughly remove laundry additives and perfumes.
Chime
Press the Chime pad to activate audio Power on, start and end-of-cycle signals.
Delay Start
Any cycle can be delayed for up to 19 hours in one hour increments.
- Make the appropriate selections for your load.
- Press the Delay Start pad until the desired delay time appears in the display.
- Press the Start/Pause pad. The delay time will start counting down.
- To cancel a delay, press Start/Pause and reselect the cycle.
Child Lock
The washer controls can be locked to prevent unwanted use by children.
- Press the Chime and Delay Start pads at the same time for three seconds.
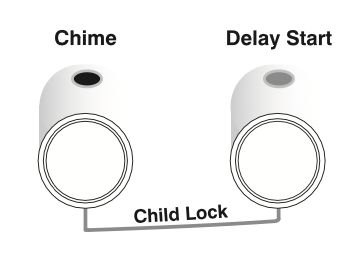
- The Child Lock light will illuminate.
- To unlock, press the Chime and Delay Start pads at the same time for three seconds. The Child Lock light will go out.
Start the Washer
To start the washer, press the Start/Pause Pad.

Changing a Cycle
If an incorrect cycle has been accidentally selected:
- Press the Start/Pause pad.

- Turn the Cycle selector dial to the desired cycle.
- Set the desired options for the cycle.
- Press the Start/Pause pad. The Wash indicator lights stops flashing and the new cycle starts.
Canceling a Cycle
To cancel a cycle:
- Press the Power Off pad.
- Turn the Cycle selector dial to Drain or Spin.
- Press the Start/Pause pad. The Spin light illuminates and the washer starts the drain or spin.
Cycle Indicator Lights

The Wash, Rinse and Spin lights at the top of the control panel will illuminate progressively to indicate when the washer is in those portions of the cycle.
The Washer light will flash when the cycle has been paused.
Features
Your Maytag washer is designed to use high efficiency (HE) detergents. Cycles,options,lights
Detergent
- For best cleaning results, use a high efficiency What detergent can & cannot such e b as Tide HE, washed Cheer HE or Wisk HE*. High efficiency detergents contain suds suppressors which reduce or eliminate suds. When less suds oper are ating produced, tips the load tumbles more efficiently and cleaning results are maximized.

- When using regular detergent formulated for toploading washers, it is important to pay close attentiondishwasher to the soiluse level of the load, load size, and water hardness**. To avoid over-sudsing which causes extended cycle times, reduce the amount of detergent used with soft water or with small or lightly soiled clothes. loading
* Brand names are trademarks of the respective manufacturers.
** To determine water hardness in your area, contact your localControls watert utility or State University Extension aa glance office in your area.
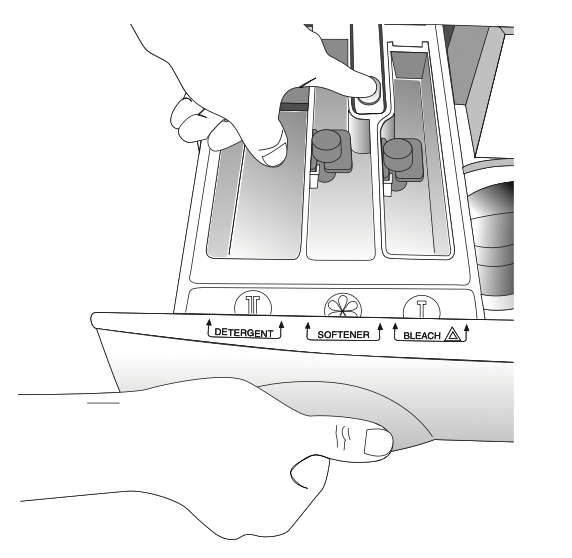
Automatic Dispenser
The washer has separate compartments for dispensing detergent and color-safe bleach, chlorine bleach and fabric softener. All laundry additives are added to their respective compartments before starting the washer.
The Automatic Dispenser MUST ALWAYS be in place before starting the washer. DO NOT open the Automatic Dispenser when the washer is running.
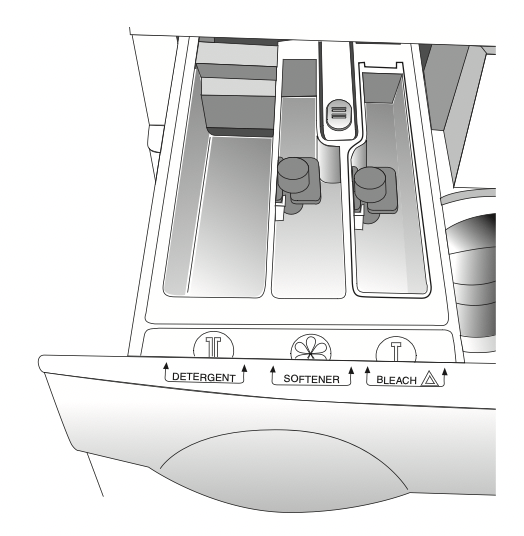
To use:
- Pull out the dispenser drawer on the left side of the control panel.
- Fill appropriate compartments with laundry additives, being careful not to overfill or spill additives.
- Slide the dispenser drawer carefully and completely back into the compartment.
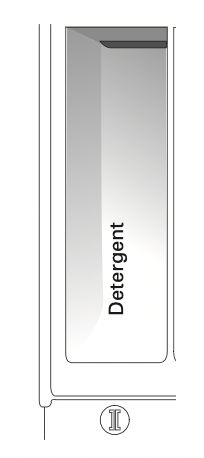
Detergent Compartment
- Pour the recommended amount of laundry detergent directly into the detergent compartment before starting the washer.
- If color-safe bleach is to be used, it should be added with detergent to the detergent compartment.
When adding color-safe bleach with detergent, it is best if both laundry products are in the same form; granular or liquid.
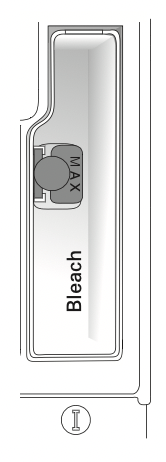
Bleach Compartment
(Liquid Chlorine Bleach Only)
- Add chlorine bleach to the bleach compartment. DO NOT exceed the fill line.
- Avoid splashing or over-filling washed compartment.
- The washer automatically dispenses bleach into the tub at the appropriate time.
- The dispenser automatically dilutes liquid chlorine bleach before it reaches the wash load.
Notes
- Never pour undiluted liquid chlorine bleach directly onto the load or into the tub. It is a powerful chemical and can cause fabric damage, such as weakening of the fibers or color loss if not loading used properly.
- If you prefer to use color-safe non-chlorine bleach, add it to the detergent compartment. Do not pour color-safe bleach into the bleach compartment.
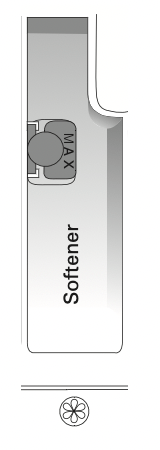
Fabric Softener Compartment
- Pour the recommended amount of liquid fabric softener into the softener compartment. For smaller loads, use less than one cap full.
- Fabric softener should be diluted with warm water until it reaches the MAX FILL line on the compartment.
- The dispenser automatically releases liquid fabric softener at the proper time during the rinse cycle.
Notes
- Use the softener compartment ONLY for liquid fabric softeners.
- Using the Downy Ball* is not recommended with this washer. It will not add fabric softener at the appropriate time. Use the automatic dispenser.
* Brand names are trademarks of the respective manufacturers.
Care & Cleaning
Turn off the water faucets after finishing the day’s washing. This will shut off the water supply to the clothes washer and prevent the unlikely possibility of damage from escaping water. Leave the door open to allow the inside of the washer to dry out.
Use a soft cloth to wipe up all detergent, bleach or other spills as they occur.
Clean the following as recommended:
Control Panel – clean with a soft,loading damp cloth. Do not use abrasive powders or cleaning pads. Do not spray cleaners directly on the panel.
Cabinet – clean with soap and water.
Cleaning the Interior
Clean the interior of the washer periodically to remove any dirt, soil, odor, mold, mildew or bacteria residue that may remain in the washer as a result of washing clothes. We recommend taking the following steps every 60 to 120 days to clean and freshen your washer interior. The frequency with which the washer should be cleaned and freshened depends on factors such as usage, the amount of dirt, soil or bacteria being run through your washer, or the use of cold water. Failure to follow these instructions may result in unsatisfactory conditions, including unpleasant odor and/or permanent stains on the washer or washload.
To clean and freshen the washer interior:
- Make a solution of one cup chlorine bleach and two cups warm water. Be careful not to spill or splash the bleach solution.
- Wipe the door seal with bleach solution and a soft cloth.
- Fill bleach dispenser with chlorine bleach.
- Run the washer through a complete cycle using hot water.
- Repeat the wash cycle if necessary.
Hard water deposits may be removed, if needed. Use a recommended cleaner labeled clothes washer safe.
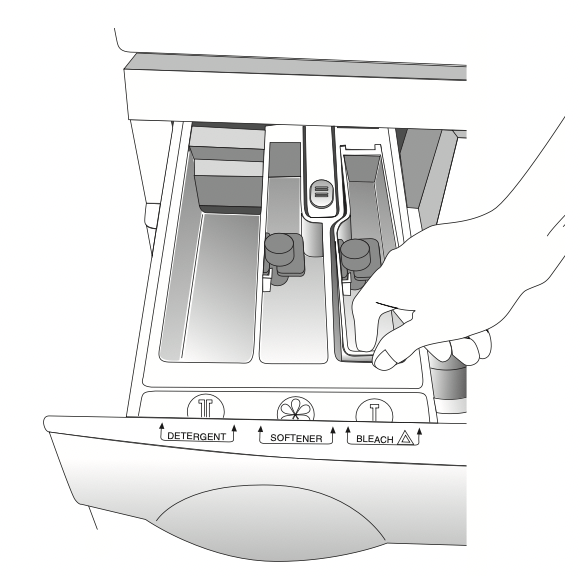
Cleaning the Automatic Dispenser and Compartment
The Automatic Dispenser may need to be cleaned periodically due to laundry additive buildup.
- Press the release lever on the inside of the dispenser and pull out.
- Remove the cups from the fabric softener and No bleach compartments.
- Wash all of the parts under running water.
- Clean the dispenser recess with a soft brush.
- Reinsert the cups, pushing them firmly into place.
- Push the dispenser back into place.
- Run a Rinse & Spin cycle without any load in the washer.
Storing the Clothes Washer
Washers can be damaged if water is not removed from hoses and internal components before storage. Prepare the washer for storage as follows:
- Select the Quick Wash cycle and add bleach to the automatic dispenser. Run the washer through the cycle without a load.
- Turn the water faucets off and disconnect the inlet hoses.
- Disconnect the clothes washer from the electrical supply and leave the washer door open to let air circulate inside the tumbler.
- If the washer has been stored in below-freezing temperatures, allow time for any water left over in the washer to thaw out prior to use.
Troubleshooting
Information codes may be displayed to help you better understand what is occurring with the washer.
| Code Symbol |
Meaning |
Solution
|
 |
Unbalanced load prevented the washer from spinning.
|
Redistribute the load, press Start/Pause. |
 |
Door lock is open when washer is running. |
Press Power Off pad then restart the cycle. If the code reappears, call for service, see below.
|
 |
The washer failed to lock the door.
|
Close the door tightly and restart the cycle. |
 |
Water temperature control problem. |
Call for service, see below.
|
 |
The washer has tried to fill but has not reached the proper water level.
|
Call for service, see below.
|
 |
The door will not unlock. |
Make sure the door is firmly closed.
Push the Power Off pad and wait two minutes for the door to unlock.
OR
Unplug the washer for two minutes and plug back in.
|
 |
Motor not running properly. |
Call for service, see below.
|
 |
The washer is not draining. |
See Troubleshooting “The washer does not drain and/or spin”, page 13. If problem continues, call for service, see below.
|
 |
The washer has tried to fill but was unsuccessful. |
Make sure the water faucets are open all the way.
Check for kinked hoses.
Check inlet screens on fill hoses.
|
 |
Problem with control.
|
Call for service, see below. |
|
The washer will not start
|
- Make sure door is firmly closed.
- Make sure the washer isplugged in.
- Make sure the water source faucet is turned on.
- Make sure to press the Start/Pause pad.
- Make sure the Child Lock is not activated, see page 6.
|
|
No water or insufficient water supply
|
- Turn both faucets on fully.
- Make sure the door is tightly closed.
- Make sure the washer is plugged in.
- Check fuse or reset circuit breaker.
- Press the Start/Pause pad.
- Straighten water inlet hoses.
- Disconnect hoses and clean screens. Hose filter screens may be plugged.
- Open and close the door, then press the Start/Pause pad.
|
|
Detergent remains in the automatic dispenser after the wash cycle is complete
|
- Make sure the washer is running with sufficient water pressure.
See Installation Instructions.
- Put the detergent in the inner parts of the dispenser (away from outside edges).
|
|
Washer vibrates or is too noisy
|
- Make sure the washer is set on a level surface. If the surface is not level, adjust the washer feet to level the appliance.
See Installation Instructions.
- Make sure that the shipping bolts are removed.
See Installation Instructions.
- Make sure the washer is not touching any other object.
- Make sure the laundry load is balanced.
|
|
Stops
|
- Plug cord into live electrical outlet.
- Check fuse or reset circuit breaker.
- Close door and push the Start/Pause pad to start the washer.
For your safety, the washer will not tumble or spin unless the door is closed.
- This may be a pause or soak period in the cycle.
Wait briefly and it may start.
- Check screens on inlet hoses at the faucets for obstructions.
Clean screens periodically.
|
|
Fills with the wrong temperature water
|
- Turn both faucets on fully.
- Make sure temperature selection is correct.
- Make sure hoses are connected to correct faucets. Flush water lines.
- Check the water heater. It should be set to deliver a minimum 120°F (49°C) hot water at the tap. Also check water heater capacity and recovery rate.
- Disconnect hoses and clean screens. Hose filter screens may be plugged.
- As the washer is filling, the water temperature may change as the automatic temperature control feature checks incoming water temperature. This is normal.
- While the washer is filling, you may notice just hot and/or just cold water going through the dispenser when cold or warm wash temperatures are selected. This is a normal function of the automatic temperature control feature as the washer determines the temperature of the water.
|
|
Won’t tumble
|
- Check fuse or reset circuit breaker.
- Close the door and press the Start/Pause pad. For your safety, the washer will not tumble or spin unless the door is closed.
|
|
Door locked shut; will not open
|
- Press the Start/Pause pad to stop the machine.
- It may take a few moments for the door lock mechanism to disengage.
|
|
Freshening your washer
|
- See Cleaning the Interior, page 9.
|
|
The washer does not drain and/or spin
|
- Check fuse or reset circuit breaker.
- Straighten drain hoses. Eliminate kinked hoses. If there is a drain restriction, call for service.
- Close the door and press the Start/Pause pad. For your safety, the washer will not tumble or spin unless the door is closed.
|
|
Load is too wet at end of cycle
|
- Use the High spin speed.
- Use high efficiency detergent to reduce over-sudsing.
- Load is too small. Very small loads (one or two items) may become unbalanced and not spin out completely.
|
|
Leaks Water
|
- Make sure door is firmly closed.
- Make sure hose connections are tight.
- Make sure end of drain hose is correctly inserted and secured to drain facility.
- Avoid overloading.
- Use high efficiency detergent to prevent over-sudsing.
|
Operating Sounds
|
High-pitched sound during a spin cycle.
|
- The motor increases speed to spin the tub to remove moisture from the load.
|
|
Flushing water sound coming from the dispenser area.
|
- Detergent is dispensed at the start of the cycle. Bleach is dispensed during final minutes of wash. Fabric softener is dispensed during the third rinse while the washer is filling.
|
|
Whirring or sloshing sound followed by a pause, repeated throughout the wash cycle.
|
- The tub rotates one direction followed by a pause. The tub reverses direction and pauses. This action continues throughout the cycle.
|
|
Washer maintains a slightly reduced spin speed after achieving a higher spin speed.
|
- After reaching the maximum spin speed, the machine may reduce spin speed slightly for maximum performance.
|
|
The spin speed slows down dramatically when it sounds like an out-of-balance load.
|
- The tumbler will begin to accelerate to speed, then slows back down to redistribute the load more evenly when an unbalanced load occurs.
|
|
Water is added after the washer has been tumbling for a while.
|
- The Maytag Neptune® clothes washer uses a true adaptive fill and adds more water during the wash cycle as it is needed.
- Water flows through the dispenser to dilute and add bleach or fabric softener at the appropriate time. This will occur even if bleach and fabric softener are not used.
|
|
Clicking/draining sounds when washer is started.
|
- Before the washer starts to fill, it will make a series of clicking noises to check the door lock and do a quick drain.
|
|
Washer beeps after cycle has started.
|
- This is audio confirmation the door has locked successfully.
|
|
Rhythmic air rushing during spin.
|
- Due to tub movement during the spin cycle, air is transferred in and out of the tub to provide optimum performance.
|
|
Rapid snapping and/or popping sound from the rear of the washer during spin.
|
- Water is being extracted through the drain holes in the spinner and is hitting theouter tub before draining out of the machine.
|