Documents: Go to download!
User Manual
- User Manual - (English)
- Dimension Guide - (English)
- Quick Specification - (English)
- Connecting Antenna and External devices
- Connecting to a Computer
- Using the Remote Control and Peripherals
- Internet Connection
- Smart Features
- Picture and Sound Settings
- Troubleshooting
Table of contents
User Manual Smart TV
Connecting Antenna and External devices
Antenna Connection
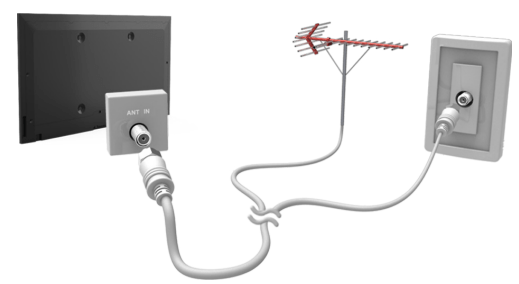
If you are not connecting your TV to a cable or satellite box, you must connect an antenna or a cable outlet to the TV to receive broadcast signals. Connect a cable from an antenna or cable outlet to the ANT IN connector as shown in the diagram below.
Video Device Connections
Your TV has a variety of connectors for video input from external devices such as cable boxes, satellite receivers, Blu-ray players, DVD players, camcorders, and gaming consoles. Below is a list of featured connectors shown in descending order of picture quality
● HDMI
● Component
● Composite (A/V)
Connect a video device to the TV via an HDMI connector for the best picture quality. If the device does not have an HDMI connector, try a component connector to get the next best picture quality
HDMI Connection
The following types of HDMI cables are recommended:
● High-Speed HDMI Cable
● High-Speed HDMI Cable with Ethernet
Refer to the diagram and connect the HDMI cable to the video device's HDMI output connector and the TV's HDMI input connector.
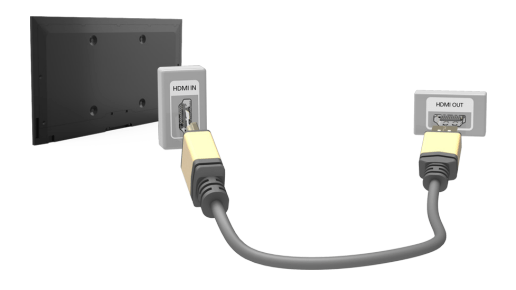
Once the connection has been made, press the SOURCE button to select the connected external device.
Component Connection
Refer to the diagram and connect the Component cable to the TV's component input connectors and the device's component output connectors. Make sure the cable colors match the connector colors.
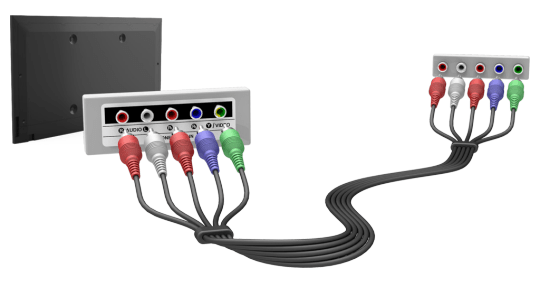
Once the connection has been made, press the SOURCE button to select the connected external device.
Composite (A/V) Connection
Refer to the diagram and connect the AV cable to the TV's AV input connectors and the device's AV output connectors. If you are using the TV's AV input connectors, connect the device's audio output to the TV using a Y connector.
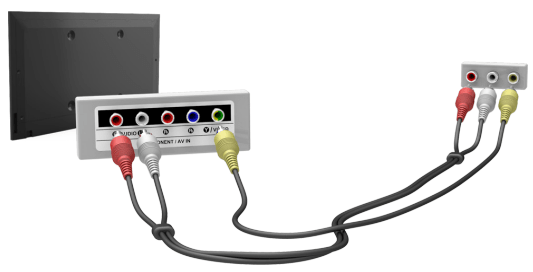
Once the connection has been made, press the SOURCE button to select the connected external device.
Audio Input and Output Connections
Your TV has a variety of connections for audio input from devices such as Blu-ray players and DVD players and for audio output to such devices as amplifiers. The connections are listed below.
● Digital Audio (Optical)
● Audio (Analog)
Digital Audio (Optical) Connection
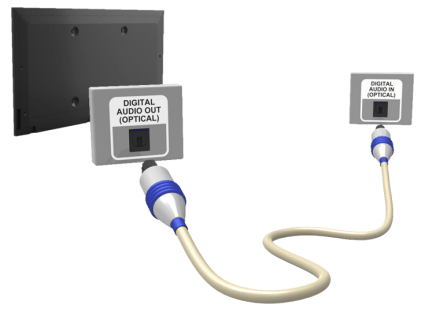
Connecting an AV receiver to the TV via a digital audio (optical) connector lets you listen to digital audio.
Refer to the diagram and connect the optical cable to the TV's digital audio output connector and the device's digital audio input connector.Refer to the diagram and connect the optical cable to the TV's digital audio output connector and the device's digital audio input connector.
Audio Output Connection
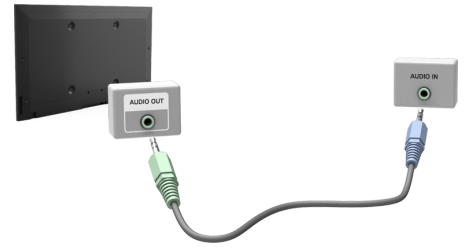
Refer to the diagram and connect an audio cable to the TV's audio output connector and the device's audio input connector.
Connecting to a Computer
You can connect a computer directly to the TV using an HDMI or DVI to HDMI cable and use the TV as a monitor. You can also connect the TV to a computer via your home network and access media files saved on the computer on the TV screen. The kinds of connections you can make are listed below.
To use the TV as a Computer Monitor
● Connect through the HDMI Port using an HDMI cable. You can connect the computer to the TV using an HDMI cable and display the computer screen on the TV.
● Connect though the HDMI (DVI) port using a DVI to HDMI cable. You can connect a computer to the TV by connecting the computer's DVI port to the TV's HDMI (DVI) port with a DVI to HDMI cable and display the computer screen on the TV.
To Access Media Files on a Computer and View or Play Them on the TV
● Connect Through Home Network.
Quickly access photo, video, and music files saved on a computer by connecting the TV and the computer to the same router or AP.
Connecting Through the HDMI Port
For an HDMI connection, we recommend one of the following HDMI cable types:
● High-Speed HDMI Cable
● High-Speed HDMI Cable with Ethernet
Refer to the diagram and connect an HDMI cable to the computer's HDMI output connector and the TV's HDMI input connector
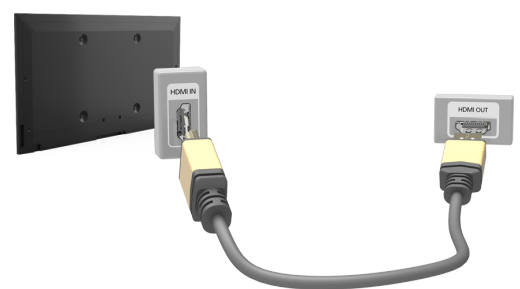
Once the connection has been made, press the SOURCE button to select the connected external device.
Connecting With a DVI to HDMI Cable
If the graphics adapter of your computer does not support the HDMI interface, connect the computer to the TV with a DVI (Digital Visual Interactive) to HDMI cable. Note that the DVI to HDMI connection is only supported by the HDMI (DVI) port and does not support audio signal transmission. To listen to the computer sound, connect external speakers to the computer’s audio output connector.
Refer to the diagram and connect the DVI to HDMI cable to the TV's HDMI (DVI) port and the computer's DVI output port.
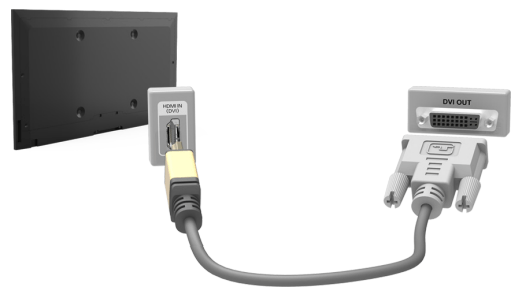
Once the connection has been made, press the SOURCE button to select the connected external device.
Connecting Through Home Network
Quickly access and play photo, video, and music files stored on a computer on the TV
1. Connect the TV and the computer to the same router or AP. Once you connect them to the same router or AP, a home network is configured.
2. On the computer, select [Control Panel] > [Network and Internet] > [Network and Sharing Center] > [Change advanced sharing settings], and then select [Choose media streaming options...] to activate media streaming.
3. From the list, set the TV to [Allowed].
4. Launch Windows Media Player on a computer. Select [Settings] > [Library Management], and then add the location where photo, video, and music files are saved to play them on the TV.
Connecting To a Mobile Device
You can connect a mobile device such as a smartphone or tablet directly to the TV, or connect it to the network and display the mobile device's screen or play its content on the TV. The kinds of connections you can make are listed below.
● Connect Using an MHL to HDMI cable
Connect the USB port of the mobile device and the HDMI port of the TV with an MHL to HDMI cable to view the mobile device's screen on the TV screen.
● Connect by Mirroring the Mobile Device's Screen on the TV (Screen Mirroring)
Wirelessly connect the TV and the mobile device with the mirroring function. You can view the mobile device's screen on the TV screen.
● Connect Mobile Devices without a Wireless Router (Wi-Fi Direct)
Wi-Fi Direct enables you to connect the TV and the mobile device without a router or AP. Quickly access and play photo, video, and music files in the connected mobile device on the TV.
● Connect Through Home Network
You can conveniently play photo, video, and music files saved on a mobile device by connecting the mobile device and the TV to the same router or AP.
Connecting With an MHL to HDMI Cable
MHL (Mobile High-definition Link) lets you display a mobile device’s screen on the TV. However, MHL is only available through the TV's HDMI (MHL) port and only when used in conjunction with an MHL-enabled mobile device. For information on configuring MHL on your mobile device, refer to the device's User Manual.
Refer to the diagram and connect the MHL-to-HDMI cable to the TV's HDMI (MHL) port and the mobile device's USB port.
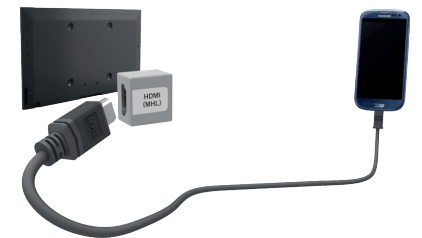
Once the connection has been made, press the SOURCE button to select the connected external device.
Screen Mirroring

Wirelessly connect a mirroring-enabled mobile device to the TV and play the video and audio files stored on the device on the TV. Mirroring refers to the function that plays the video and audio files located on a mobile device on a TV and on the mobile device simultaneously
Connecting via a mobile device
1. On the mobile device, run Screen Mirroring. The mobile device searches for available devices to connect to.
2. In the search result list, select the TV. The TV displays a pop-up at the top of the screen.
3. In the pop-up, select Allow to connect the mobile device.
Connecting by Automatically Allowing the Connection
1. Navigate to Network > Screen Mirroring, and then select Screen Mirroring. The Screen Mirroring function starts. You can also start screen mirroring by pressing the SOURCE button on your remote, and then selecting Screen Mirroring from the list at the top of the screen.
2. Launch Screen Mirroring on your mobile device. The device searches for available devices.
3. Select the TV from the list. The TV automatically allows the connection and the device connects.
Managing the Connection Status of Previously Connected Mobile Devices
1. Navigate to Network > Screen Mirroring > Device Manager. The TV displays a list of devices that have previously connected to the TV or have tried to connect to the TV and been denied. The status of the connection (Allow/Deny) is also displayed.
2. Select a device. A pop-up appears.
3. In the pop-up, you can select Allow connection, Deny connection, or Delete the device from the list.
Connecting Mobile Devices without a Wireless Router (Wi-Fi Direct)
Navigate to 
You can connect a mobile device with the Wi-Fi Direct feature directly to the TV without using a wireless router or AP. By connecting a mobile device to the TV through Wi-Fi Direct, you can play photo, video, and music files saved on the mobile device on the TV.
1. Enable Wi-Fi Direct on the mobile device, and then navigate to Network and select Wi-Fi Direct on the TV. The TV automatically scans for and displays a list of available devices. The TV's name also appears on the mobile device.
2. Select the device from the list to initiate a connection. If a connection request is made by the TV, a permission message appears on the mobile device and vice versa.
3. Allow the connection. The TV and mobile device connect
Connecting Through Home Network
Quickly access and play photo, video, and music files stored on a mobile device on the TV.
1. Connect both the TV and the mobile device to the same router or AP. Once you connect them to a single router or AP, a home network is configured.
2. Enable File Sharing on the mobile device. You can play the content shared on the mobile device on the TV.
Specifying the Name of the TV on a Network

Choose or specify a name for the TV that will appear on mobile devices and laptop computers.
1. Select Device Name from the Network menu, and then choose a name from the list that appears. Alternatively, select User Input to enter a name manually.
2. Check the name from a mobile device or laptop computer.
Switching Between Video Sources
Press the SOURCE button to switch between external devices connected to the TV. For example, to switch to a game console connected to the second HDMI connector, press the SOURCE button. The Source List appears across the top of the screen. From the Source List, select HDMI2.
Other Functions Available When You Display the Source List
A number of functions are available in the pop-up Options menu when the TV displays the Source List. The functions that appear in the Options menu vary, depending on the source you selected in the Source List and the external device connected to the source. To view the Options menu, press the TOOLS button or press and hold the E button. The functions that appear in the Options menu can include any of the following:
● Edit Name: Lets you assign a device name to an input source, for example, Blu-ray to HDMI1. To assign a device name to an input source, follow these steps:
1. Open the Source List. The list appears in a horizontal line across the top of the TV. Using your remote, highlight the source you want to assign a device name to.
2. Select Edit Name in the Options menu. The on-screen keyboard appears.
3. Using the keyboard, enter a new name. You can enter up to 15 characters.
4. When finished, select DONE on the keyboard, and then press the  button.
● Information: View information about the connected devices.
● Remove USB: Use to safely remove a USB device connected to the TV. This option is only available when a USB device has been selected.
● Anynet+ (HDMI-CEC): Displays a list of Anynet+ (HDMI-CEC)-compliant devices that are connected to the TV.
Using the Remote Control and Peripherals
Controlling the TV with a Keyboard

Connecting a keyboard makes it easy to control most of the functions on the TV.
Connecting a Keyboard
Connecting a USB Keyboard : Plug the keyboard cable into the TV's USB port. A connection message appears on the screen.
Using the Keyboard
Use the following remote features with the USB keyboard connected to the TV.
● Arrow Keys (moving the focus), Windows Key (MENU Button), Menu List Key (TOOLS Button), Enter Key (Select/run item), ESC (RETURN Button), Number Keys (Number Buttons)
● F1  , F2
, F2 , F3
, F3  , F4
, F4 , F5 (SMART HUB), F6 (SOURCE Button), F7 (CH List), F8 (
 Button), F9/F10 (Volume Buttons), F11 / F12 (Channel Buttons)
● Page Up/Page Down: Scroll web browser pages up/down.
● Press and hold the Enter key: On the Smart Hub screen, navigate to an item and press and hold the Enter key to display the Options menu.
Changing Keyboards : Select System > Device Manager > Keyboard Settings > Select Keyboard. Designate which keyboard to use.
Input Languages, Keyboard Type, and Switch Language Key
Select System > Device Manager > Keyboard Settings > Keyboard Options. The following options are available
● Keyboard Language : If the keyboard supports multiple languages, choose the language you want to use from the displayed list.
● Keyboard Type : Match the Keyboard Type to the language selected in Keyboard Language
● Switch Input Language : If the keyboard supports multiple languages, choose the key you want to use to switch between languages.
Controlling the TV with a Mouse

Connecting a mouse makes it easy to control most of the functions on the TV
Connecting a Mouse
Connecting a USB Mouse : Plug the mouse cable into the TV's USB port. A connection message appears on the screen.
Using the Mouse
Once a USB mouse is connected to the TV, a pointer appears on the TV's screen. You can use this pointer to control the TV in the same way you use a pointer on a computer
● Selecting and Running an Item : Left-click using the mouse.
● Showing Tools Buttons : Right-clicking displays the Tools buttons on the screen so that you can easily use the TV's functions.
● Scrolling the TV Menu or Screen : Move the mouse wheel up or down. This scrolls the TV menu or screen up/down.
● Exiting the TV Menu or Feature : Click the X button. This closes the menu.
Changing Mice
Select System > Device Manager > Mouse Settings > Select Mouse. Designate which mouse to use.
Changing Mouse Buttons and Pointer Speed
Select System > Device Manager > Mouse Settings > Mouse Options. The following options are available:
● Primary Button : Choose which button (left or right) to use to select and run items.
● Pointer Speed : Adjust the movement speed of the pointer that appears on the screen.
Entering Text Using the On-Screen QWERTY Keypad
Using Additional Functions
Select  on the QWERTY keyboard screen. The following options are available:
● Recommended text : Enable/disable the Recommended Text feature Enabling the Recommended text feature allows you to quickly enter text starting with the characters you typed in by displaying recommended words. To enter the word "Internet," for example, all you have to do is enter "In" and select the word "Internet" from the list of recommended words. The word is memorized so that you can enter the same text again more easily.
● Reset recommended text data : Delete both the recommended words and the memorized words to clear the list.
● Predict Next Letter : Enable/disable the Text Prediction feature. Enabling the Text Prediction feature eliminates the need to find and select individual character keys. To enter the word "Internet," for example, select "I". A predicted word will then appear next to the I key. Simply select the predicted word to enter "Internet".
Internet Connection
Establishing a Wired Internet Connection
Connecting the TV to the Internet gives you access to online services and SMART features, and lets you update the TV's software quickly and easily through the Internet.
Using Cat 7 LAN Cables
We recommend using Cat 7 LAN cables to link your TV to the Internet Access Points.
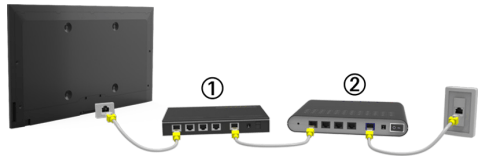
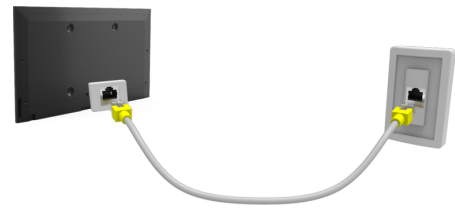
There are three ways to connect the TV to your Internet Access Points. Using Cat 7 cables, connect the TV to the Access Points as shown in one of the following illustrations.
● External Modem
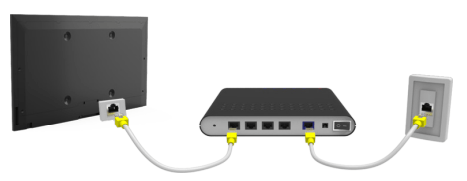
● ① IP Router + ② External Modem
● Wall-mounted LAN Outlet
Connecting to a Wired Internet Network Automatically

Automatically connect to an available network.
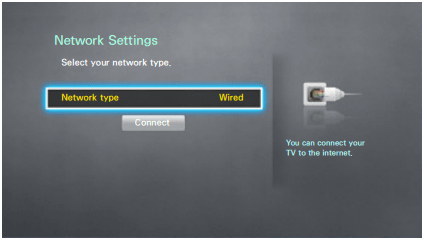
1. Set the Network type to Wired, and then select Connect.
2. The TV attempts to connect to an available network. Once it is successful, you will see a confirmation message. Select OK. If the attempt fails, try again, or connect manually.
Connecting to a Wired Internet Network Manually

With networks that require a static IP address, you will need to enter the IP address, subnet mask, gateway, and DNS values manually to connect to the network. To get these values, contact your Internet Service Provider (ISP).
1. Set the Network type to Wired, and then select Connect.
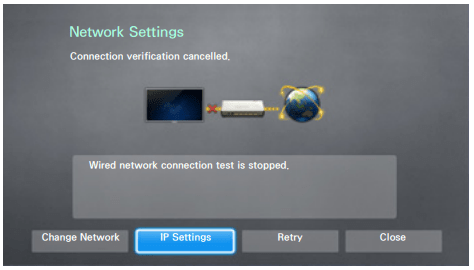
2. Select Stop when the TV attempts to connect to the network. Once the network connection has been interrupted, select IP Settings.
3. In the IP Settings screen, set IP Setting to Enter Manually.
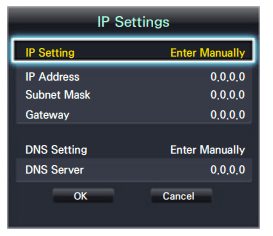
4. Select IP Address. When the IP Address entry window appears, enter three digits into each field on the IP Address line. If the value has less than three digits, add leading zeroes. For example, to enter 10, enter 010. After three digits have been entered in a field, the highlight automatically jumps to the next field.
5. Repeat the process for Subnet Mask, Gateway, and DNS Server.
6. When done, select OK.
7. The TV attempts to connect to the network again using the settings you entered. Once it has established the connection, it displays a confirmation message. Select OK.
Establishing a Wireless Internet Connection
Connecting the TV to the Internet gives you access to online services and SMART features, and lets you update the TV's software quickly and easily through the Internet.
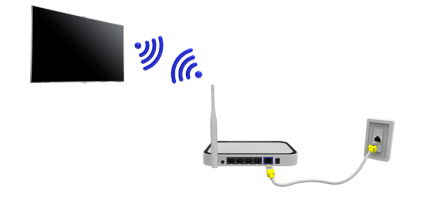
Connecting to a Wireless Internet Network Automatically

Connect the TV to the Internet via a wireless router. Make sure you have the wireless router's SSID (name) and password settings before attempting to connect. The password can be found on the wireless router's configuration screen.
1. On the Network Settings screen, set Network type to Wireless. The TV automatically displays a list of available wireless networks.
2. Select a network. If the network you want doesn't appear in the list, select Add Network, and enter the network's SSID (name) manually.
3. Using the on-screen keyboard that appears, enter the password. When finished, select Done. If the selected network is not security-enabled, the TV will by-pass the on-screen keyboard and attempt to connect right away.
– To select a character on the on-screen keyboard, highlight the character and then select it. Select Caps to view capital letters. Select the 123#& key to view additional characters.
– To view the password as you enter it, select Show Password.
4. The TV attempts to connect to the network. Once a connection is established, the TV displays a confirmation message. Select OK. If the attempt fails, try again or connect manually
Connecting to a Wireless Internet Network Manually

With networks that require a static IP address, you will need to enter the IP address, subnet mask, gateway, and DNS values manually to connect to the network. To get the IP address, subnet mask, gateway and DNS values, contact your Internet Service Provider (ISP).
1. On the Network Settings screen, set Network type to Wireless. The TV automatically displays a list of available wireless networks.
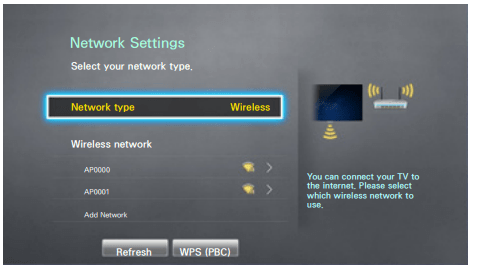
2. Select a network. If the network you want doesn’t appear in the list, select Add Network, and enter the network’s SSID (name) manually.
3. Using the on-screen keyboard that appears, enter the password. When finished, select Done. If the selected network is not security-enabled, the TV will by-pass the on-screen keyboard and attempt to connect right away
– To select a character on the on-screen keyboard, highlight the character and then select it. Select Caps to view capital letters. Select the 123#& key to view additional characters.
– To view the security password as you enter it, select Show Password.
4. Select Stop when the TV attempts to connect to the network. Once the network connection has been interrupted, select IP Settings.
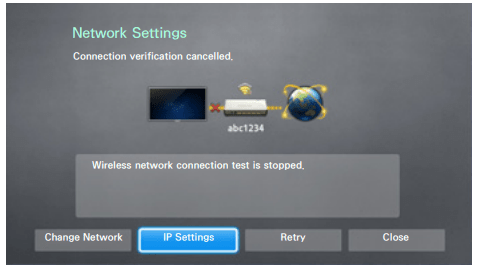
5. In the IP Settings screen, set IP Setting to Enter Manually.
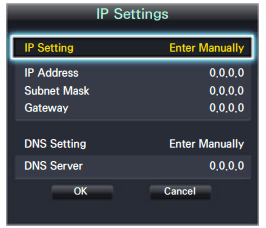
6. Select IP Address. When the IP Address entry window appears, enter three digits into each field on the IP Address line. If the value has less than three digits, add leading zeroes. For example, to enter 10, enter 010. After three digits have been entered in a field, the highlight automatically jumps to the next field.
7. Repeat the process for Subnet Mask, Gateway, and DNS Server.
8. When done, select OK.
9. The TV attempts to connect to the network again using the entered settings. Once it has established the connection, it displays a confirmation message. Select OK.
Connecting to a Wireless Internet Network with WPS

If the router has a WPS push button, you can use it to connect the TV to the router automatically. WPS automatically configures the SSID and WPA key settings.
● Your router must support WPS to use the WPS functionality.
1. On the Network Settings screen, set Network type to Wireless. The TV automatically displays a list of available wireless networks.
2. Select WPS (PBC), and then press the router’s WPS or PBC button within two minutes.
3. The TV automatically acquires the SSID and password settings, and then connects to the network. Once a connection is established, the TV displays a connection message. Select OK.
Troubleshooting Internet Connectivity Issues
Troubleshooting Wired Internet Connectivity Issues
No network cable found : Make sure the network cable is plugged in. If it is connected, make sure the router is turned on. If it is on, try turning if off and on again.
IP auto setting failed : Do the following or configure the IP Settings manually.
1. Ensure that the DHCP server is enabled on the router and reset the router.
2. If this does not work, contact your Internet Service Provider for more information.
Unable to connect to the network : Do the following:
1. Check all IP Settings.
2. Ensure that the DHCP server is enabled on the router. Then, unplug the router and plug it back in.
3. If this does not work, contact your Internet Service Provider for more information.
Connected to a local network, but not to the Internet :
1. Make sure that the Internet LAN cable is connected to the router's external LAN port.
2. Check the DNS values in IP Settings.
3. If the problem persists, contact your Internet Service Provider.
Network setup is complete, but unable to connect to the Internet : If the problem persists, contact your Internet Service Provider
Troubleshooting Wireless Internet Connectivity Issues
Wireless network connection failed : Selected wireless router not found. Go to Network Settings and select the correct router.
Unable to connect to a wireless router : Check the following:
1. Check if the router is turned on. If it is, turn it off and on again.
2. Enter the correct password if required.
IP auto setting failed : Do the following or configure the IP Settings manually
1. Make sure that the DHCP server is enabled on the router. Then, unplug the router and plug it back in.
2. Enter the correct password if required.
3. If this does not work, contact your Internet Service Provider for more information.
Unable to connect to the network : Do the following:
1. Check all IP Settings.
2. Enter the correct password if required.
3. If this does not work, contact your Internet Service Provider for more information.
Connected to a local network, but not to the Internet
1. Make sure that the Internet LAN cable is connected to the router's external LAN port.
2. Check the DNS values in IP Settings.
3. If the problem persists, contact your Internet Service Provider.
Network setup is complete, but unable to connect to the Internet : If the problem persists, contact your Internet Service Provider.
Smart Features
Smart Hub

With Smart Hub, you can surf the web and download apps.
Testing Smart Hub connections

If Smart Hub is not functioning, navigate to Support > Self Diagnosis > Smart Hub Connection Test. Diagnose the problem by checking the internet connection, your ISP, the Samsung server and the Samsung Apps panels.
Opening the First Screen
Press the SMART HUB button while watching TV to open the First Screen. On the First Screen, search through favorite apps, channels, or sources and access previously run or frequently used functions.
Setting your favorite item
1. Press the SMART HUB button to open the First Screen, and move to a desired item.
2. Press and hold the  button. The Options menu appears.
3. In the Options menu, select Add to Favorites to add the selected item to the favorite list, which will move top of the list.
Deleting browsing history
1. Press the SMART HUB button to open the First Screen, and select Reset. You will be asked to confirm your selection.
2. Select Yes on the screen. Your browsing history is deleted completely
Moving to the Panel Screen
Press the SMART HUB button to open the First Screen, and select the Panel icon. On the Panel screen for each service panel, the following are available:
●  SAMSUNG APPS : You can enjoy a variety of free and for pay news, sports, weather, and gaming apps on the TV as you would on a smart phone or tablet.
Resetting Smart Hub's First Screen

Reset lets you reset Smart Hub's first screen and remove your favorite lists.
Using Smart Hub with a Samsung Account
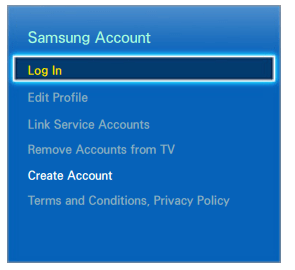
Creating a Samsung Account

Some of the Smart Hub services are for pay services. To use a for pay service, you must have an account with the service provider or a Samsung Apps TV account (a Samsung account). You can create a Samsung account using your email address as your ID.
Creating a Samsung Account Using the Create Samsung Account Menu
1. Press the MENU button on your remote, and then select Smart Hub > Samsung Account > Create Account > Create Samsung Account. The Terms and Conditions screen appears.
2. Press the  button to agree to the Terms and Conditions, and then press
  button again. " If you want to reveiw the Terms and Conditions, select the View Details buttons.
3. Select the Email field. The keyboard pop-up appears. Enter your e-mail address. Use the directional keys to move from character to character, and then press the  button to select a character. Select the Caps button on the left to enter capital letters. Select the 123#& button to view and select additional symbols. Select .com at the bottom of the keyboard to enter .com.
4. When finished, select Done on the keyboard. The Create Account screen reappears.
5. Enter a password, your first name, and last name in the same fashion.
6. Select the Date of Birth field, and then select numbers pressing the up or down directional buttons, or, on a standard remote, using the number pad. Move from month to day to year by pressing the left or right directional buttons. Press the RETURN button on the remote when done.
7. After you have finished with all the fields, select Next. The Image Selection screen appears.
8. Select an image to use to identify your account. The Account Created screen appears. Press the  button. You are signed in to your Samsung account.
Creating a Samsung Account using a Facebook Account
If you have a Facebook account, you can use the account to create a Samsung account
1. Press the MENU button on your remote, select Smart Hub > Samsung Account. And then select Log In. The Sign In screen appears.
2. Select , and then select Create with Facebook on the Sign In screen.
3. Enter your Facebook ID and password and select Sign In.
4. The Terms and Conditions screen appears.
5. Press the  button to agree to the Terms and Conditions, and then press the
  button again.
6. Follow the directions on the Create Account screen to create a Samsung account.
7. Once a Samsung account is created, you are automatically signed in.
Signing in to a Samsung Account

1. Press the MENU button on your remote, and then select Smart Hub > Samsung Account > Log In.
2. On the Log In screen, select your account. And then select Sign In on the Sign In screen.
3. If you don't need to enter a password, login proceeds. If you need to enter a password, the onscreen keyboard appears. Enter your password. When finished, select Done.
Linking Your Samsung Account to External Service Accounts

Linking your Samsung account to an external service accounts lets you automatically log in to the linked account when you log into your Samsung account. For example, you can download the Facebook application - which lets you access Facebook from your TV - and then link your Facebook account to your Samsung account. Logging into your Samsung account then automatically logs you into your Facebook account as well and lets you access it directly from the TV.
Linking a Service Account
1. Log in to your Samsung Account.
2. Navigate to Smart Hub > Samsung Account, and then select Link Service Accounts. The accounts you can link to your Samsung account are displayed.
3. Select an account from the list. The Link to other accounts window appears on the screen.
4. Enter the current ID and password of the account to log in and select OK.
5. When the login is complete, the account is linked to the Samsung account.
Disconnecting a Linked Account
1. Navigate to Smart Hub > Samsung Account, select Link Service Accounts. Select an account to unlink.
2. A confirmation dialog box appears. Select Yes to unlink the account.
Changing and Adding Information to a Samsung Account

Using the Samsung Account menu, you can manage your Samsung account.
1. Navigate to Smart Hub > Samsung Account, and then select Edit Profile. The keyboard appears.
2. Enter your password, and then selec Done. The Edit Profile screen appears.
The Edit Profile screen lets you do the following:
● Change Your Profile Image Select Edit Profile Picture to change your profile image.
● Choose a Samsung Account Sign-in Method Select Sign-in Method and choose a sign-in method from the drop down that appears.
● Turn Auto Login On or Off Select Sign me in automatically. Auto Login automatically logs you in to your Samsung account when you turn the TV on. A check mark indicates that Auto Login is on.
● Enter Basic User Information You can enter your first name, last name, and date of birth.
● Add a Credit Card to Your Samsung Account Select Add Card to add a credit card to your Samsung Account. Adding a credit card to your account makes it easier to purchase online movies and TV shows. Follow the easy directions on the screen.
● Subscribe to the Samsung e-Newsletter You can receive emails containing information about Samsung products, new service announcements, special offers, and events.
Deleting a Samsung Account from the TV

Navigate to Smart Hub > Samsung Account and select Remove Accounts from TV. The account and password information for the currently signed in account is deleted from the TV. The account information for any external accounts linked to the signed in account is also deleted from the TV.
Using the SAMSUNG APPS Panel
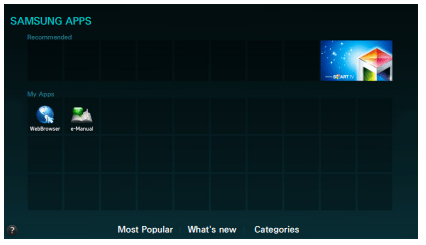
Smart Hub offers a variety of free news, sports, weather, and gaming apps you can install directly to and enjoy on your TV. The first line on the screen contains apps recommended by Samsung. These apps were automatically downloaded to your TV when you set up Smart Hub. The lines of apps below the first line contain some apps that were automatically downloaded to your TV and other apps you have selected and downloaded.
Using Supported Features via the Pop-Up Menu - Downloaded Apps
Move the focus to an app in the second row or below, and then press and hold the  button. The Tools menu appears displaying the following functions.
● Move : Lets you relocate an app on the screen.
● Delete : Lets you remove a selected app from your TV.
● Multi Delete: Lets you remove multiple apps from the TV.
● View Details : Displays detailed information about a selected app.
● Change View : Lets you change how the apps are sorted on the screen, by Custom or Most Played.
● Lock/Unlock : Lets you lock or unlock an app.
● Update Apps : Displays a list of apps that have updates available. You can select which apps to update
Using Supported Features via the Pop-Up Menu - Recommended Apps
Move the focus to a recommended app in the top row, and then press and hold the  button. A drop down list appears with the following functions.
● View Details : Displays detailed information for a selected app.
● Update Apps : Lets you update the apps when updates are available.
● Lock/Unlock : Lets you lock or unlock an app.
Installing an App
Quick Installation
1. On the SAMSUNG APPS screen, select Most Popular, What's new, or Categories
2. Move the focus to an app, and then press and hold the E button. A pop-up menu appears.
3. On the pop-up menu, select Download.
4. The selected app is installed on the TV.
Installing an App from the Detailed App Information Screen
1. On the SAMSUNG APPS screen, select Most Popular, What's new, or Categories.
2. Select an app from the list. Detailed information about your selection appears on the screen.
3. Select Download to install the selected app on the TV.
Launching an App
Select an app on the SAMSUNG APPS screen, and then press the  button. You can also start an app from its Detail screen.
Picture and Sound Settings
Changing the Picture Mode and Adjusting the Picture Quality
Adjusting the Picture Quality for Each Picture Mode

Select one of the settings below from the Picture menu to display the slide bar for the selected setting. Adjust the value by pressing the  or
or button on your remote. Choose a different setting by pressing the
  or
or button. Adjusted values are applied to the current source and picture mode.
Choose a Picture Mode - Dynamic, Standard, Natural, Movie - and then adjust the settings.
● Backlight : Adjusts the brightness of individual pixels. Decreasing the brightness reduces power consumption.
● Contrast : Adjusts the screen contrast.
● Brightness : Adjusts the overall brightness
● Sharpness : Sharpens or dulls the edges of objects
● Color : Adjusts the overall color saturation.
● Tint (G/R) : Adjusts the ratio of green to red. Increase the green value to saturate the greens and the red value to saturate the reds.
Applying the Current Picture Settings to Other Input Sources

You can apply the picture quality setting that you configured for the TV to all external devices connected to the TV or to the current source only. To apply the setting to all external devices connected to the TV, select All Sources. To apply the setting to the current input only, select Current Source.
Fine-Tuning Each Picture Mode (Advanced Settings)

Select Picture > Advanced Settings to fine-tune how images are displayed on the TV screen for each Picture Mode.
Choose a Picture Mode and then adjust the settings.
● Dynamic Contrast : Automatically adjusts the screen contrast. Use this option to achieve the optimal contrast setting.
● Black Tone : Adjusts the black color depth.
● Flesh Tone : Darkens or lightens skin tones.
● RGB Only Mode : Adjusts the red, green, and blue levels individually
● Color Space : Adjusts the range of colors (the color space) that the TV can display. Auto automatically adjusts the color space depending on the input signal. Native applies a range that is wider than the input signal.
● White Balance : You can adjust the color temperature of the picture to make white objects look white and the overall picture appear natural. You can adjust each of the 3 color's luminosity with the offset menu and the brightness with the gain menu. To restore the default values, select Reset.
● Gamma : Adjusts the primary color intensity.
● Motion Lighting : Adjusts the brightness in response to on-screen movements to reduce power consumption
Adjusting the Picture for Easier Viewing (Picture Options)

Select Picture > Picture Options to make additional adjustments for a better viewing experience.
Choose a Picture Mode and then adjust the settings.
● Color Tone : Adjusts the color tone. The setting is applied on an individual Picture Mode basis. When you select a new Picture Mode, the TV applies the Color Tone you selected for that mode automatically
● Digital Clean View : Reduces static and ghosting caused by a weak signal. Selecting Auto Visualization displays the signal strength on the screen. Green indicates the best possible signal.
● MPEG Noise Filter : Reduces MPEG noise and improves video quality
● HDMI Black Level : Some external devices connected to the TV via an HDMI cable can have issues such as low black level, low contrast, and dull colors. Use HDMI Black Level to adjust the black level to compensate.
● Film Mode : Optimizes the picture quality for movies. Select this mode for watching movies.
● Auto Motion Plus : Removes blurring and judder from scenes with rapid movement. If you select Custom, you can configure Blur Reduction and Judder Reduction manually and set LED Clear Motion to On for a sharper LED image. To return to the default settings, select Reset.
● LED Clear Motion : Removes drag from fast scenes with a lot of movement to provide a clear picture.
Changing the Sound Mode and Using Sound Effects
Choosing the Right Sound Mode for the Environment

Sound modes apply preset adjustments to the sound output, optimized for different viewing and listening circumstances.
● Standard : This is the normal sound mode
● Music : This mode emphasizes normal music instead of voices.
● Movie : This mode is calibrated to provide the best sound for movies.
● Clear Voice : This mode emphasizes voices.
● Amplify : This mode increases the overall intensity of high-frequency sounds for a better listening experience. It is designed for hearing-impaired listeners.
● Stadium : Setting Soccer Mode (System > Soccer Mode) to On automatically configures Sound Mode to Stadium for a more realistic viewing experience.
Using Sound Effects

Use sound effects to alter how the TV projects sound.
Choose a Sound Effect and then adjust the settings.
● DTS TruSurround HD : Produces sound that will make you feel like you are sitting in a movie theater or concert hall.
● DTS TruDialog : Increases voice intensity to make dialog clearer.
● Equalizer : Lets you adjust the speaker balance and make bandwidth adjustments. Select Reset to reset the settings.
Troubleshooting
Testing the Picture

The Problem | Try this! |
| Flickering and Dimming | If your Samsung Television is flickering or dimming sporadically, you may need to disable some of the energy efficiency features. Disable Energy Saving (System > Eco Solution > Energy Saving) or Eco Sensor (System > Eco Solution > Eco Sensor). |
| Component Connections/Screen Color | If the color on your Samsung television screen is not correct or the black and white colors are off, run Picture Test (Support > Self Diagnosis > Picture Test). If the test results indicate that the problem is not caused by the TV, do the following: ● Confirm that the TV's video input connectors are connected to the correct external device video output connectors. ● Check the other connections as well. If the TV is connected to an external device via a component cable, confirm that the Pb, Pr, and Y jacks are plugged into their proper connectors. |
| Screen Brightness | If the colors on your Samsung TV are correct but just a little too dark or bright, try adjusting the following settings first. ● Go to the Picture menu and adjust the Backlight/Cell Light (available on different models) Contrast, Brightness, Sharpness, Color, and Tint (G/R) settings. |
| Ghosting, Blurring, or Juddering | If you notice ghosting or blurring on the screen, use the LED Clear Motion option (Picture > Picture Options > LED Clear Motion) to resolve the issue. |
| Unwanted Powering Off | If your Samsung TV appears to turn off by itself, try disabling some of the TV's energy efficiency features. See if Sleep Timer (System > Time > Sleep Timer) has been enabled. The Sleep Timer automatically turns the TV off after a specified period of time. If the Sleep Timer has not been enabled, see if No Signal Power Off (System > Eco Solution > No Signal Power Off) or Auto Power Off (System > Eco Solution > Auto Power Off) has been enabled and disable them. |
| Problems Powering On | When the TV is turned on, the remote control receiver flashes 5 times before the screen turns on. If you are having problems powering on your Samsung television, there are a number of things to check before calling the service department. Confirm that the TV's power cord is connected correctly at both ends and that the remote control is operating normally. Make sure that the antenna cable or cable TV cable is firmly connected. If you have a cable/satellite box confirm that it is plugged in and turned on. |
| Unable to find a Channel | If your TV is not connected to a cable box or satellite box, run Setup (System > Setup) or Auto Program (Broadcasting > Auto Program). |
| The TV image does not look as good as it did in the store. | Store displays are all tuned to digital, HD (high definition) channels. If you have an analog cable/set top box, upgrade to a digital set top box. Use HDMI or Component cables to deliver HD (high definition) picture quality. Many HD channels are upscaled from SD (Standard Definition) content. Look for a channel that is broadcasting true HD content. ● Cable/Satellite Subscribers: Try HD channels from the channel lineup. ● Air/Cable Antenna Connection: Try HD channels after running the Auto Program function. Adjust the cable/satellite box's video output resolution to 1080i or 720p. |
| The picture is distorted. | The compression of video content may cause picture distortions, especially in fast moving pictures from sports programs and action movies. A weak or bad quality signal can cause picture distortions. This is not an issue with the TV. Mobile phones used close to the TV (within 3.2 ft) may cause noise in analog and digital channels. |
| The color is wrong or missing. | If you’re using a Component connection, make sure that the Component cables are connected to the correct jacks. Incorrect or loose connections may cause color problems or a blank screen. |
| The color is poor or the picture is not bright enough. | Go to the Picture menu and then adjust the Picture Mode, Brightness, Sharpness, and Color settings. See if Energy Saving (System > Eco Solution > Energy Saving) has been enabled. Try resetting the picture. (Picture > Picture Reset) |
| There is a dotted line on the edge of the screen. | If the Picture Size has been set to Screen Fit, change the setting to 16:9. Change the cable/satellite box resolution. |
| The picture is black and white. | If you are using AV composite input, connect the video cable (yellow) to the TV's green component jack. |
Testing the Sound

The Problem | Try this! |
| There is no sound or the sound is too low at maximum volume. | Check the volume control of the device (cable/satellite box, DVD, Blu-ray, etc.) connected to your TV. |
| The picture is good but there is no sound. | Set Sound > Speaker Settings > TV Sound Output to TV Speaker. If you are using an external device, check the device’s audio output option. (For example, you may need to change your cable box’s audio option to HDMI if the box connected to your TV is using an HDMI cable.) To listen to the computer sound, connect the external speaker to the computer’ s audio output connector. If your TV has a headphone jack, make sure there is nothing plugged into it. Reboot the connected device by disconnecting and then reconnecting the device’s power cable. |
| The speakers are making an odd sound. | Make sure that the audio cable is connected to the correct audio output connector on the external device. For antenna or cable connections, check the signal information. A low signal level may cause sound distortions. Run Sound Test (Support > Self Diagnosis > Sound Test). |
There is a problem with the broadcast.
The Problem | Try this! |
| The TV is not receiving all channels. | If your TV is not connected to a cable box or satellite box: ● Confirm that the coaxial cable is securely connected to the TV. ● If you are using an antenna, verify it is positioned correctly and the all the connections are secure. ● Run Setup (System > Setup) or Auto Program (Broadcasting > Auto Program) |
| There are no captions with digital channels. | Go to Caption (System > Accessibility > Caption) and change the Caption Mode. Some channels may not have caption data. |
| The picture is distorted. | The compression of the video content may cause picture distortions. This is especially true with fast moving pictures from sports programs and action movies. A weak signal can cause picture distortions. This is not a problem with the TV. |
My computer won't connect.
The Problem | Try this! |
| The "Mode Not Supported" message appears | Set your PC’s output resolution so it matches a resolution supported by the TV. |
| The video is OK but there is no audio. | If you are using an HDMI connection, check the audio output setting on your PC. If you are using a DVI to HDMI cable, a separate audio cable is required. |
I can't connect to the Internet.
The Problem | Try this! |
| The wireless network connection failed. | Confirm your wireless modem/router is on and connected to the Internet. Reset your wireless modem/router by turning it off, waiting for 15 seconds, and then turning it on again. Run Network Setup (MENU > Network > Network Settings). |
| The software update over the Internet has failed. | Check the network connection status (MENU > Network > Network Status). If the TV is not connected to a network, connect to a network. The upgrade stops if you already have the latest software version. |
I am having trouble launching/using apps.
The Problem | Try this! |
| I launched an app, but it's in English. How can I change the language? | Languages supported by the app may be different from the user interface language. The ability to change the language depends on the service provider. |
| My application is not working. | Check with the service provider. Refer to the help section on the application service provider's website. |
My file won't play
The Problem | Try this! |
| Some files can't be played. | This problem may occur with high-bitrate files. Most files can be played back, but you might experience problems with high-bitrate files. |
I want to reset the TV.
Reset | Path | Description |
| Reset Settings | MENU > Support > Self Diagnosis > Reset | Reset Picture, Sound, Channel, Smart Hub, and all other settings, except for the network settings, default settings. |
| Resetting Smart Hub | MENU > Smart Hub > Smart Hub Reset | Resets all Smart Hub settings to their factory defaults and deletes all information related to Samsung accounts, linked service accounts, Smart Hub service agreements, and Smart Hub applications |
Other Issues
The Problem | Try this! |
| The TV is hot. | Watching TV for an extended period of time causes the panel to generate heat. The heat from the panel is dissipated through internal vents running along the top of the TV. The bottom, however, may feel hot to the touch after extended use. Children watching TV need constant adult supervision to prevent them from touching the TV. This heat, however, is not a defect and does not affect the TV's functionality |
| The picture won’t display in full screen. | HD channels will have black bars on either side of the screen when displaying upscaled SD (4:3) content. Black bars will appear at the top and bottom of the screen when you watch movies that have aspect ratios different from your TV. Adjust the picture size options on your external device or set the TV to full screen. |
| The "Mode Not Supported" message appears. | The output resolution of the attached device is not supported by the TV. Check the TV's supported resolutions and adjust the external device’s output resolution accordingly. |
| The Captions item in the TV menu is grayed out. | You cannot select the Caption menu if you have selected a source connected to the TV via HDMI or Component. To view captions, turn on the external device's caption function. |
| The TV smells of plastic. | This smell is normal and will dissipate over time. |
| The Signal Information option under Self Diagnosis isn't activated. | Verify that the current channel is a digital channel. The Signal Information is only available for digital channels. |
| The TV is tilted to the side. | Remove the base stand from the TV and reassemble it. |
| The Broadcasting option has been deactivated. | Broadcasting is only available when the Source is set to TV. The Broadcasting menu cannot be accessed while you watch TV using a cable box or satellite receiver. |
| The settings are lost after 5 minutes or every time the TV is turned off. | If the Use Mode is set to Store Demo, the TV's audio and video settings are automatically reset every 5 minutes. Change the Use Mode (Support > Use Mode) to Home Use. |
| There is an intermittent loss of audio or video. | Check the cable connections and reconnect them. Loss of audio or video can be caused by using overly rigid or thick cables. Make sure the cables are flexible enough for long term use. If you are mounting the TV to a wall, we recommend using cables with 90-degree connectors. |
| There are small particles on the TV's bezel. | This is part of the product’s design and is not a defect. |
| The PIP menu is not available. | PIP functionality is only available when you are viewing video from an HDMI or Component source on the main screen. |
| A POP (TV’s internal banner ad) appears on the screen. | Change the Use Mode (Support > Use Mode) to Home Use. |
| The TV is making a popping noise. | The expansion and contraction of the TV's outer casing may cause a popping noise. This does not indicate a product malfunction. The TV is safe to use. |
| The TV is making a humming noise. | Your TV utilizes high-speed switching circuits and high levels of electrical current. Depending on the TV's brightness level, the TV may seem slightly noisier than a conventional TV. Your TV has undergone strict quality control procedures that meet our demanding performance and reliability requirements. Some noise coming from the TV is considered normal and is not an acceptable cause for an exchange or refund. |
See other models: UN58NU7100FXZA 550DX LN37C530 P64FP UN65LS003AFXZA
