Documents: Go to download!
- Owner's manual - (English)
- OPERATION
- SMART FUNCTIONS EN
- MAINTENANCE
- TROUBLESHOOTING
Table of contents
User manual Washer Dryer Combo
OPERATION
Operation Overview
Using the Appliance
Before the first wash, select the Cotton wash programme and add a half amount of the detergent. Start the appliance without laundry. This will remove possible residues and water from the drum that may have been left during manufacturing.
1. Sort laundry and load items.
• Sort laundry by fabric type, soil level, colour and load size as needed. Open the door and load items into the appliance.
2. Add detergent or softener.
• Add the proper amount of detergent to the detergent dispenser drawer. If desired, add bleach or fabric softener to the appropriate areas of the dispenser.
3. Turn on the appliance.
• Press the Power button to turn on the appliance.
4. Choose the desired cycle.
• Press the cycle button repeatedly or turn the cycle selector knob until the desired cycle is selected.
• Now select a wash temperature and spin speed. Pay attention to the care labeling of your clothes.
5. Begin cycle.
• Press the Start/Pause button to begin the cycle. The appliance will agitate briefly without water to measure the weight of the load. If the Start/Pause button is not pressed within 15 minutes, the appliance will shut off and all settings will be lost.
6. End of cycle.
• When the cycle is finished, a melody will sound. Immediately remove your clothing from the appliance to reduce wrinkling. Check around the door seal when removing the load for small items that may be caught in the seal.
Adding Detergents and Softeners
Detergent Dosage
• Detergent should be used according to the instruction of the detergent manufacturer and selected according to type, colour, soiling of the fabric and the washing temperature. Use only detergents that are suitable for Drum (front load) type washers.
• If too many suds occur, reduce the detergent amount.
• If too much detergent is used, too many suds can occur and this will result in poor washing results or cause heavy load to the motor.
• If you wish to use liquid detergent, follow the guidelines provided by the detergent manufacturer.
• You can pour liquid detergent directly into the main detergent drawer if you are starting the wash cycle immediately.
• Do not use liquid detergent if you are using Delay End function, or if you have selected Pre Wash option, as the liquid will dispense immediately and may harden in the drawer or the tub.
• Detergent usage may need to be adjusted for water temperature, water hardness, size and soil level of the load. For best results, avoid oversudsing.
• Refer to the label of the clothes, before choosing the detergent and water temperature.
• Use only suitable detergents for the respective type of clothing:
− Liquid detergent is often designed for special applications, e.g. for coloured fabric, wool, delicate or dark laundry.
− Powdered detergent is suitable for all types of fabric.
− For better washing results of white and pale garments, use powdered detergent with bleach.
− Detergent is flushed from the dispenser at the beginning of the wash cycle.
NOTE
• Do not let the detergent harden. Doing so may lead to blockages, poor rinse performance or odour.
• Full load: According to manufacturer’s recommendati or less.
• Part load: ½ of the normal amount
• Minimum load: ⅓ of full load
Adding Detergent
• Detergent for main wash  only
only 
• Detergent for pre wash  and main wash

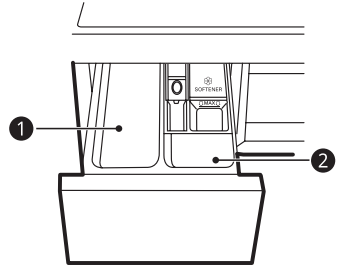
NOTE
• Use the appropriate amount of detergent. Too much detergent, bleach or softener may cause an overflow.
• When selecting Pre Wash on a full load, divide the dosage into ⅓ for pre wash and ⅔ for main wash.
Adding Detergent Tablet
Detergent tablets can also be used when washing as an alternative to powder or liquid.
1. Open the door and put detergent tablets into the drum.
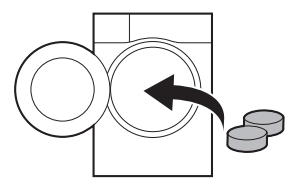
2. Load the clothes into the drum and close the door.
NOTE Do not put tablets into the drawer.
Adding Fabric Softener
• Do not exceed the maximum fill line. Overfilling can cause early dispensing of the fabric softener, which may stain clothes. Close the dispenser drawer slowly.
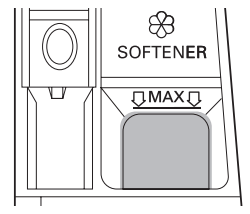
• Do not leave the fabric softener in the detergent drawer for more than 1 day (Fabric softener may harden).
• Softener will automatically be added during the last rinse cycle.
• Do not open the drawer when water is being supplied.
• Solvents (e.g. benzene, etc.) must not be used.
NOTE Do not pour fabric softener directly onto the garments, as this may cause stains on your clothing.
Adding Water Softener
A water softener, such as anti-limescale can be used to cut down on the use of detergent in areas with high water hardness level.
• First add detergent, and then the water softener. Dispense according to the amount specified on the packaging.
Control Panel
Control Panel Features
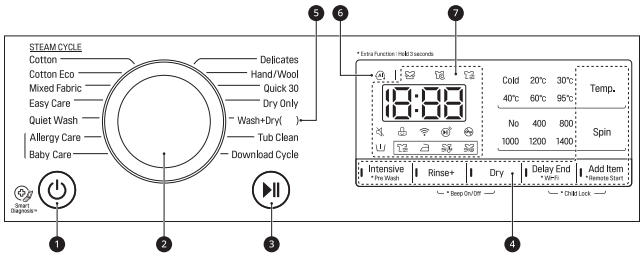
1. Power Button
• Press the Power button to turn on or off the appliance.
2. Programme Knob
• Programmes are available according to the laundry type.
• The lamp will light up to indicate the selected programme.
3. Start/Pause Button
• This Start/Pause button is used to start the wash cycle or pause the wash cycle.
• If a temporary stop of the wash cycle is needed, press the Start/Pause button.
4. Extra Options and Functions
• Extra options and functions are available for better washing performance. Several options and functions can be customized.
• To use the extra functions, press and hold the corresponding button for 3 seconds. The corresponding symbol lights up in the display.
• In order to use the Remote Start function, refer to SMART FUNCTIONS.
• This allows you to select an additional programmes and will light when selected.
 : When this icon is illuminated, the beep sound is off simultaneously.
 :When this icon is illuminated, the control panel is locked except for the power button.
 :This icon is illuminated when the appliance is connected to WLAN network.
5. Wash+Dry ( )
• ( ) indicates the drying capacity, which varies depending on the model.
6. AI DD
• AI DD  provides automatic load sensing that determines the best wash action.
•  is activated when Cotton, Mixed Fabric and Easy Care programmes are selected and operates when these selected programmes are in operation.
7. Display
• The display shows the settings, estimated remaining time, options, and status messages. When the appliance is turned on, the default settings in the display will illuminate.
 : When a programme is selected, the default time for that programme is displayed. The default time can be changed according to the selected option.
 : When the laundry is being washed, this icon is illuminated.
 : When the laundry is being dried after completion of washing programme, this icon is illuminated.
 : When the laundry is spun to remove the water in the laundry, this icon is illuminated.
 : When this icon is illuminated, the door cannot be opened.
Extra Options and Functions
You can use the extra options and functions to customize the programmes.
Intensive
You can use this option to wash heavily soiled laundry.
1. Press the Power button.
2. Select a washing programme.
3. Press the Intensive button.
4. Press the Start/Pause button.
Rinse 
You can select an additional Rinse by pressing the Rinse+ button. This option is recommended for people with detergent allergies.
Rinse+
This option is used to add an additional rinse to the wash cycle.
Pre Wash 
This option is recommended when washing a heavily soiled load.
1. Press the Power button.
2. Select a washing programme.
3. Press the Pre Wash button.
4. Press the Start/Pause button.
Delay End
You can set this function so that the appliance starts automatically and finishes after a specified time interval.
1. Press the Power button.
2. Select a washing programme.
3. Press the Delay End button to set a required time.
4. Press the Start/Pause button.
NOTE
• The delay time is the time to the end of the programme, not the start. The actual running time may vary due to water temperature, wash load and other factors.
• To cancel the function, the Power button should be pressed.
• Avoid using liquid detergent for this function.
CAUTION
• When adding the laundry, ensure the load is completely within the drum before closing the door. If the laundry is caught in the door seal or door latch, the door gasket may get damaged. It may cause water leakage and malfunctions.
• Forcing the door open will cause damage to parts and create safety hazards.
• If you open the door of drum whilst there is excessive suddsing, water may leak and cause damage to the flooring.
Wi-Fi 
When WLAN is connected, the Wi-Fi icon on the control panel is lit.
Add Item
You can use this option in order to add or remove the laundry after the washing programme has started.
1. Press the Add Item button when the LED is turned on. If the LED is not illuminated, the Add item opportunity time has expired and the function will not operate.
2. Open the door after it unlocks itself.
3. Add or remove laundry.
4. Close the door and press the Start/Pause button.
NOTE For safety reasons, the door remains locked when the water level or temperature inside of the drum is high. It is not possible to add laundry at this time.
Temp.
You can use this option to select the wash temperature for the selected programme. Press this button until the desired setting is lit. Not all temperatures will be available in certain cycles. All rinses are in cold water.
• Select the water temperature suitable for the type of load you are washing. Follow the garment fabric care labels for best results.
Spin 
Spin speed can be selected by pressing the Spin button repeatedly.
1. Press the Power button.
2. Select a washing programme.
3. Press the Spin button to select the appropriate spin speed.
4. Press the Start/Pause button.
NOTE When you select No, the tub will still rotate for a short time to drain quickly.
Beep On/Off 
This function can only be selected when the appliance is in operation and a wash is in progress.
• Press and hold the Rinse+ and Dry button simultaneously for 3 seconds to set the this function.
NOTE
• Once this function is set, the setting is memorized even after the power is turned off.
• If you want to turn the beeper off, simply repeat this process.
Child Lock 
Use this function to disable the controls. This function can prevent children from changing cycles or operating the appliance.
Locking the Control Panel
1. Press and hold the Delay End and Add Item button for 3 seconds.
2. A beeper will sound, and CL will appear on the display. When the Child Lock is set, all buttons are locked except for the Power button.
NOTE Turning off the power will not reset this function. You must deactivate this function before you can access any other functions.
Unlocking the Control Panel
Press and hold the Delay End and Add Item button for 3 seconds.
Dry 
Use the automatic programmes to dry most loads. Electronic sensors measure the temperature of the exhaust to increase or decrease drying temperatures for faster reaction time and tighter temperature control.
• Cold water tap must be left on during drying cycles.
• This washing machine’s automatic process from washing to drying can be selected easily.
• For most drying, make sure all laundry are similar in material and thickness.
• Do not overload the washing machine by stuffing too many articles into the drum. Items must be able to tumble freely.
• If you open the door and remove the load before the washing machine has finished its programme, remember to press the Start/Pause button.
• By pressing the Dry button, you can select: Normal -Time (30-60-120)-Iron -Low Temp.- Normal Eco.
• Drying programme can last up to about 7 hours.
• These drying times are given as a guide to help you set your washing machine for manual drying.
• After the end of dry, ‘Cool Down’ is displayed. ‘Cool Down’ means crease decreasing. The drying programme is already done. Press any button and take out clothes. If you do not press the Start/Pause button, the programme ends after about 4 hours.
Woolen Articles
Do not tumble dry woolen articles. Pull them to their original shape and dry them flat.
Woven and Loopknit Materials
Some woven and loopknit materials may shrink, by varying amounts, depending on their quality.
Always stretch these materials out immediately after drying.
Permanent Press and Synthetics
Do not overload your washing machine.
Take out permanent press articles as soon as the washing machine stops to reduce wrinkles.
Baby Clothes and Night Gowns
Always check the manufacturer’s instructions.
Rubber and Plastics
Do not dry any items made from or containing rubber or plastics, such as:
- Aprons, bibs, chair covers
- Curtains and table cloths
- Bathmats
Fiber Glass
Do not dry fiber glass articles in your washing machine. Glass particles left in the washing machine may be picked up by your clothes and cause skin irritation.
NOTE
• When you turn off the drying cycle of the washing machine, the drying fan motor can be operated to save itself for 60 seconds.
• Be careful when removing your clothing from the washing machine, as the clothing or washing machine may be hot.
• The estimated drying time varies from the actual drying time during the Automatic cycle. The type of fabric, size of the load, and the dryness selected affect drying time.
• When you select drying only, spinning runs automatically for energy efficiency.
SMART FUNCTIONS EN
Using LG ThinQ Application
This feature is only available on the model with  or
or  logo.
logo.
Before Using LG ThinQ
1. Check the distance between the appliance and the wireless router (WLAN network).
• If the distance between the appliance and the wireless router is too far, the signal strength becomes weak. It may take a long time to register or installation may fail.
2. Turn off the Mobile data or Cellular Data on your smartphone.
3. Connect your smartphone to the wireless router.
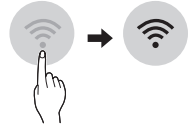
NOTE
• To verify the WLAN connection, check that Wi-Fi f icon on the control panel is lit.
• The appliance supports 2.4 GHz WLAN networks only. To check your network frequency, contact your internet service provider or refer to your wireless router manual.
• LG ThinQ is not responsible for any network connection problems or any faults, malfunctions, or errors caused by network connection.
• If the appliance is having trouble connecting to the WLAN network, it may be too far from the router. Purchase a WLAN repeater (range extender) to improve the WLAN signal strength.
• The WLAN connection may not connect or maybe interrupted because of the home network environment.
• The network connection may not work properly depending on the Internet service provider.
• The surrounding wireless environment can make the wireless network service run slowly.
• The appliance cannot be registered due to problems with the wireless signal transmission. Unplug the appliance and wait about a minute before trying again.
• If the firewall on your wireless router is enabled, disable the firewall or add an exception to it.
• The wireless network name (SSID) should be a combination of English letters and numbers. (Do not use special characters.)
• Smartphone user interface (UI) may vary depending on the mobile operating system (OS) and the manufacturer.
• If the security protocol of the router is set to WEP, you may fail to set up the network. Please change it to other security protocols (WPA2 is recommended.) and register the product again.
Installing LG ThinQ
Search for the LG ThinQ application from the Google Play Store or Apple App Store on a smartphone. Follow instructions to download and install the application.
Wi-Fi Function
Communicate with the appliance from a smartphone using the convenient smart features.
Washer Cycle (Remote Start, Download Cycle)
Set or download any preferred cycle and operate by remote control.
Tub Clean Coach
This function shows how many cycles remain before It is time to run the Tub Clean cycle.
Energy Monitoring
Check the energy consumption of the recently used cycles and monthly average.
Smart Diagnosis
This function provides useful information for diagnosing and solving issues with the appliance based on the pattern of use.
Settings
Various functions are available.
Push Alert
This function is to notify the status notification so that the user can recognize the appliance status. The notifications are triggered even if the LG ThinQ application is off.
NOTE
• If you change your wireless router, internet service provider, or password, delete the registered appliance from the LG ThinQ application and register it again.
• The application is subject to change for appliance improvement purposes without notice to users.
• Functions may vary by model.
Using the Appliance Remotely
Remote Start 
Use a smartphone to control your appliance remotely. You can also monitor your cycle operation so you know how much time is left in the cycle.
Using this function
1. Press the Power button.
2. Put the laundry into the drum.
3. Press and hold Remote Start button for 3 seconds to enable this function.
4. Start a cycle from the LG ThinQ application on your smartphone.
NOTE
• Once this function is enabled, you can only start a cycle from the LG ThinQ smartphone application. If the cycle is not started, the appliance will wait to start the cycle until it is turned off remotely from the application or this function is disabled.
• When this function is turned on, the door is automatically locked.
Disabling this function manually
When this function is activated, press and hold Remote Start button for 3 seconds to disable this function. This function must be turned off, so that the appliance can be used manually.
Download Cycle
Download a new and special cycle that is not included in the basic cycles on the appliance. A variety of specialty cycles specific to the appliance can be downloaded to the successfully registered appliances. Only one cycle can be stored on the appliance at any one time. Once cycle download is completed in the appliance, the product keeps the downloaded cycle until a new cycle is downloaded.
MAINTENANCE
Cleaning After Every Wash
Care After Wash
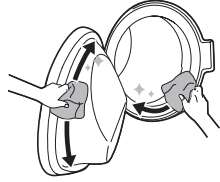
• After the wash cycle is finished, wipe the door and door seal to remove any moisture.
• Leave the door slightly open to dry the drum.
• Wipe the appliance with a dry cloth to remove any moisture.
Cleaning the Exterior
Proper care of your appliance can extend the service life.
Door
Wash with a damp cloth on the outside and inside and then dry with a soft cloth.
Exterior
Immediately wipe off any spills. Wipe with a damp cloth.
Cleaning the Interior
• Use a towel or soft cloth to wipe around the door opening and door glass.
• Always remove items from the appliance as soon as the cycle is complete. Leaving damp items in the appliance can cause wrinkling, colour transfer, and odour.
Cleaning the Appliance Periodically
Tub Clean
This function is used to clean inside of the appliance.
A higher water level is used in this programme at higher spin speed. Run this function once a month (or more often if needed) to remove detergent buildup and other residue.
1. Remove any clothing or items from the appliance and close the door.
2. Open the dispenser drawer and add anti-limescale powder to the main wash compartment.
• Tablets can be placed directly into the drum as an alternative to powder.
3. Close the dispenser drawer slowly.
4. Turn on the power, and then select the Tub Clean.
•  will be displayed on the display.
5. Press the Start/Pause button to start.
6. After the programme is complete, leave the door open to dry the door opening, gasket, and door glass.
Cleaning the Water Inlet Filter
The water inlet filter collects lime or any sediment that may be in water that is supplied to the appliance. If the water is very hard or contains traces of limescale, the filter on the water inlet may clog regularly.
1. Turn off the water tap and unscrew the water inlet hose.
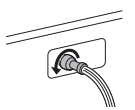
2. Remove the Hot and Cold filters with tweezers and clean them by using a medium bristle tooth brush.
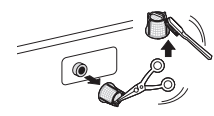
NOTE
• Turn off the supply tap to the appliance if the appliance is to be left for a certain period of time (e.g. holiday), especially if there is no floor drain (gully) in the immediate vicinity.
• 1E will be displayed on the control panel when the water is not entering the detergent drawer.
Cleaning the Drain Pump Filter and Performing an Emergency Water Evacuation
The drain filter collects threads and small objects that may have been accidently left in the laundry. Check regularly that the filter is clean to ensure smooth running of your appliance.
Allow the water to cool before cleaning the drain pump filter. Open the door in an emergency or perform an emergency water evacuation.
1. Unplug the appliance.
2. Open the cover cap and pull out the drain tube.
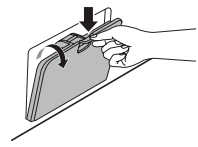
3. Remove the drain plug from the drain tube first  , and then drain the water. Then slowly unscrew the drain pump filter
  to drain the remaining water and then proceed to remove any debris or objects from the filter.
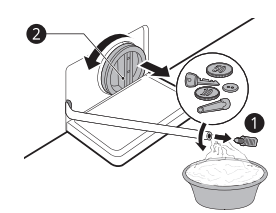
4. After cleaning the drain pump filter, carefully reinsert the filter and screw the Drain cap back in clockwise carefully to avoid cross threading and leakage. Reinsert the plug back into the drain tube and place the tube into its holder.
5. Close the cover cap.
Cleaning the Dispenser Drawer
Detergent and fabric softener can build up in the dispenser drawer. Remove the drawer and the components of the drawer in the drawer and check for build-up of detergents or softeners once or twice a month.
1. Remove the detergent dispenser drawer by pulling the drawer straight out until the drawer stops.
• Then gently pull the drawer outward while pressing the disengage button.
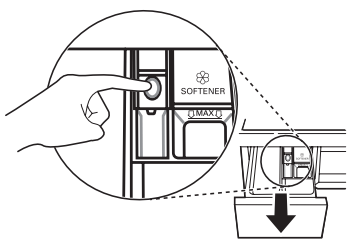
2. Remove the build-up of detergent and softener.
• Rinse the drawer and the components of the drawer with warm water to remove the buildup from detergent and softener. Use only water to clean the dispenser drawer. Dry the drawer and the components of the drawer with a soft cloth or towel.
3. To clean the drawer opening, use a cloth or small, non-metal brush to clean the recess.
• Remove all residue from the upper and lower parts of the recess.
4. Wipe any moisture off the recess with a soft cloth or towel.
5. Re-assemble the components of the drawer to the proper compartments and insert the drawer.
TROUBLESHOOTING
Operation of your appliance can lead to errors and malfunctions. The following tables contain possible causes and notes for resolving an error message or malfunction. It is recommended to read the tables carefully below in order to save your time and money that may cost for calling to LG Electronics service centre.
Before Calling for Service
Your appliance is equipped with an automatic error-monitoring system to detect and diagnose problems at an early stage. If the appliance does not function properly or does not function at all, check the following tables before calling to LG Electronics service centre.
Error Messages
Symptoms | Possible Cause & Solution |
IE INLET ERROR | Water supply is not adequate in that location. Water does not enter appliance or it enters slowly. • Check another tap in the house. Water supply tap is not completely open. Water does not enter the appliance or it enters slowly. • Open fully tap. Water supply hose(s) are kinked. • Straighten hose or reinstall the water inlet hose The filter of the supply hose(s) are clogged. • Check and clean the filter of the inlet hose. If water leakage occurs in the aqua stop supply hose, indicator will become red. • Replace the aqua stop supply hose. |
OE WATER OUTLET ERROR | Drain hose is kinked or clogged. Water in the appliance does not drain or drains slowly. • Clean and straighten the drain hose. The drain filter is clogged. • Check and clean the drain filter. |
UE UNBALANCE ERROR | The appliance has a system which detects and corrects the unbalance of the appliance. • The laundry may be too wet at the end of the cycle, rearrange the load to allow proper spinning. Close the door and press Start/Pause button. It may take a few moments before the appliance begins to spin. The door must be locked before spin can be achieved. Load is too small. This system may stop spinning or even interrupt the spin cycle altogether if individual heavy articles (e.g. bath mat, bath robe, etc.) are loaded. • Add 1 or 2 similar items or smaller articles of laundry to help balance the load. Close the door and press Start/Pause button. It may take a few moments before the appliance begins to spin. The door must be locked before spin can be achieved. |
Symptoms | Possible Cause & Solution |
dE dEi dEZ dE4 DOOR ERROR | Door sensor malfunctions. • Please call LG Electronics service centre. You can find your local LG Electronics service centre phone number in the warranty card. |
tE CONTROL ERROR | This is a control error. • Unplug the power plug and call for service. |
LE MOTOR LOCKED ERROR | Over load in motor • Let the appliance wait for 30 minutes until the motor is cooled down and then, restart the cycle. |
FE OVERFLOW ERROR | Water overfills due to the faulty water valve. • Close the water tap. • Unplug the power plug. • Call for service. |
PE PRESSURE SENSOR ERROR | Water level sensor malfunctions. • Close the water tap. • Unplug the power plug. • Call for service. |
uS VIBRATION SENSOR ERROR | Vibration sensor malfunctions. • Call for service. |
FF FROZEN FAILURE | Is supply/drain hose or drain pump frozen? • Supply warm water into the drum in order to unfreeze the drain hose and the drain pump. Cover the supply hose with wet and warm towel. |
RE WATER LEAKAGE | Water leaks. • Call for service. |
PF POWER FAILURE | The appliance experienced a mains power failure. • Restart the cycle. |
dHE DRY ERROR | Does not dry. • Call for service. |
Noises You Might Hear
Symptoms | Possible Cause & Solution |
Rattling and clanking noise | Foreign objects, such as keys, coins, or safety pins may be in the drum. • Stop the appliance, check the drum for foreign objects. If the noise continues after the appliance is restarted, call for service. |
Thumping sound | Heavy wash loads may produce a thumping sound. This is usually normal. • If the sound continues, the appliance is probably out of balance. Stop and redistribute the wash load. |
Symptoms | Possible Cause & Solution |
Thumping sound | Wash load may be out of balance. • Pause the cycle and redistribute the load after the door unlocks. |
Vibrating noise | Package materials are not removed. • Remove package materials. Wash load may be unevenly distributed in the drum. • Pause the cycle and redistribute the load after the door unlocks. Not all leveling feet are resting firmly and evenly on the floor. • See the Leveling the Appliance to adjust the leveling of the appliance. Floor not rigid enough. • Check if the floor is sold and does not flex. See the Installation Place Requirements to select the proper location. |
Operation
Symptoms | Possible Cause & Solution |
Water is leaking. | House drain pipes are clogged. • Unclog waste pipes. Contact plumber if necessary. Leakage is caused by improper installation of drain hose or clogged drain hose. • Clean and straighten the drain hose. Check and clean the drain filter regularly. Drain pump filter cap is not fitted correctly. • Refit the drain pump filter. |
Appliance does not operate. | Control panel has powered off due to inactivity. • This is normal. Press the Power button to turn the appliance on. Appliance is unplugged. • Make sure that the cord should be plugged securely into a working outlet. Water supply is turned off. • Turn the water supply tap completely. Controls are not set properly. • Make sure that the cycle should be correctly set. Close the door and press the Start/Pause button. Door is open. • Close the door and make sure that nothing should be caught under the door preventing it from closing completely. Circuit breaker/fuse is tripped/blown. • Check house circuit breakers/fuses. Replace fuses or reset breaker. The appliance should be on a dedicated branch circuit. The appliance will resume the cycle where it stopped once power is restored. |
Symptoms | Possible Cause & Solution |
Appliance does not operate. | Control needs to be reset. • Press the Power button, then reselect the desired programme and press the Start/Pause button. |
| Start/Pause was not pressed after a cycle was set. • Press the Power button, then reselect the desired programme and press the Start/Pause button. The appliance is turned off if the Start/Pause button is not pressed within 15 minutes. |
| Extremely low water pressure. • Check another tap in the house to make sure that household water pressure should be adequate. |
| Appliance is heating the water or making steam. • The drum may stop operating temporarily during certain cycles, while water is safely heated to a set temperature. |
Buttons may not function properly. | The door cannot be opened for safety reasons once the appliance starts. • Check if the CL is illuminated. You can safely open the door after the Door Lock icon turns off. |
Door does not open. | The door cannot be opened for safety reasons once the appliance starts. • Check if the |
Appliance is not filling properly. | Inlet Filter clogged. • Make sure the inlet filters on the fill valves are not clogged. |
| Inlet hoses may be kinked. • Check that inlet hoses are not kinked or clogged. |
| Insufficient water supply. • Make sure that both hot and cold water taps are turned on all the way. |
| Hot and cold inlet hoses are reversed. • Check inlet hose connections. |
Appliance does not drain water. | Kinked drain hose. • Ensure that the drain hose is not kinked. |
| Drain located higher than 1.2 m above the floor. • Make sure that the drain hose should not be higher than 1.2 m above the bottom of the appliance. |
Detergent is not dispensed completely or not dispensed at all. | Too much detergent is used. • Follow the guidelines provided by the detergent manufacturer. |
Drain Pump Filter may be blocked. • Clean the Drain filter. |
Symptoms | Possible Cause & Solution |
Cycle time is longer than usual. | The load is too small. • Add more items to allow the appliance to balance the loads. |
Heavy articles are mixed with lighter items. • Always try to wash articles with similar weight in order to allow the appliance to evenly distribute the weight of the load for spinning. | |
The load is out of balance. • Manually redistribute the load if articles have become tangled. | |
Cycle end is delayed | Unbalance is detected or suds removing programme is on. • This is normal. The time remaining shown on the display is only an estimated duration. Actual time may vary. |
Drying
Symptoms | Possible Cause & Solution |
Dry problem | Check water supply tap. • Do not overload. Check that the washing machine is draining properly to extract adequate water from the load. When load of laundry is too small to tumble properly. Add a few towels. • Turn off water supply tap. |
Drying performance is too low or bad. | Water is not properly supplied. The water is used for auto-cleaning of lint-filter on drum during the drying. • Make sure the water supply tap is open. |
Water does not properly drain. • Make sure the drain filter is not clogged. | |
The appliance is overloaded. • Check the load capacity for the selected cycle. If necessary, add a time dry cycle. | |
The spin speed is too low. • Select the highest spin speed allowed for the wash cycle. | |
Drying time is too long. | The ambient temperature is low. • Make sure the temperature is allowable range. |
A warm air comes out from the rear side of the appliance. | This appliance makes a warm air to dry the laundry. • This warm air dries the laundry and comes out from the rear side of the appliance. |
Performance
Symptoms | Possible Cause & Solution |
Poor stain removal | Previously set stains. • Articles that have been previously washed may have stains which have been set. These stains may be difficult to remove and may require hand washing or pre-treating to aid in stain removal. |
Staining | Bleach or softener is dispensed too soon. • Dispenser compartment is overfilled. It makes bleach or softer dispensed rapidly. Always measure bleach or softener to prevent overfilling. • Close the dispenser drawer slowly. Bleach or softener was added directly to the wash load in the drum. • Always use the dispensers to ensure that laundry products are properly dispensed at the right time in the cycle. Clothes were not properly sorted. • Always wash dark colours separately from light colours and whites to prevent discolouration. • Never wash heavily soiled items with lightly soiled items. |
Wrinkling | Appliance is not unloaded promptly. • Always remove items from the appliance as soon as the cycle is complete. Appliance is overloaded. • The appliance can be fully loaded, but the drum should not be tightly packed with items. The door of the appliance should be closed easily. Hot and cold water inlet hoses are reversed. • Hot water rinse can set wrinkles in garments. Check the inlet hose connections. Spin speed may be too high. • Set the spin speed to suit the garment type. |
Symptoms | Possible Cause & Solution |
Musty or mildewy odour in appliance | Inside of drum is not cleaned properly. • Run the Tub Clean function regularly. The drain hose is not properly installed, causing siphoning (water flowing back inside of the appliance). • When installing the drain hose, make sure that it does not get kinked or blocked. The detergent dispenser drawer is not cleaned regularly. • Clean the detergent dispenser drawer, especially the top and the bottom of the drawer's opening. Odours can occur if the drain hose is not properly installed, causing siphoning (water flowing back inside of the appliance). • When installing the drain hose, make sure that it does not get kinked or blocked. If the detergent dispenser drawer is not cleaned regularly, odours can occur from mold or foreign substances. • Clean the detergent dispenser drawer, especially the top and bottom of the drawer's opening. |
Wi-Fi
Symptoms | Possible Cause & Solution |
Your home appliance and smart phone is not connected to the Wi-Fi network. | The password for the Wi-Fi that you are trying to connect to is incorrect. • Find the Wi-Fi network connected to your smartphone and remove it, then register your appliance on LG ThinQ. Mobile data for your smartphone is turned on. • Turn off the Mobile data of your smartphone and register the appliance using the Wi-Fi network. The wireless network name (SSID) is set incorrectly. • The wireless network name (SSID) should be a combination of English letters and numbers. (Do not use special characters). The router frequency is not 2.4 GHz. • Only a 2.4 GHz router frequency is supported. Set the wireless router to 2.4 GHz and connect the appliance to the wireless router. To check the router frequency, check with your internet service provider or the router manufacturer. The distance between the appliance and the router is too far. • If the distance between the appliance and the router is too far, the signal may be weak and the connection may not be configured correctly. Move the location of the router so that it is closer to the appliance. |
See other models: WV9-1412W WV9-1409B WVC9-1410W GF-L570MBL GF-V910MBL
 icon is illuminated. You can safely open the door after the