User Manual
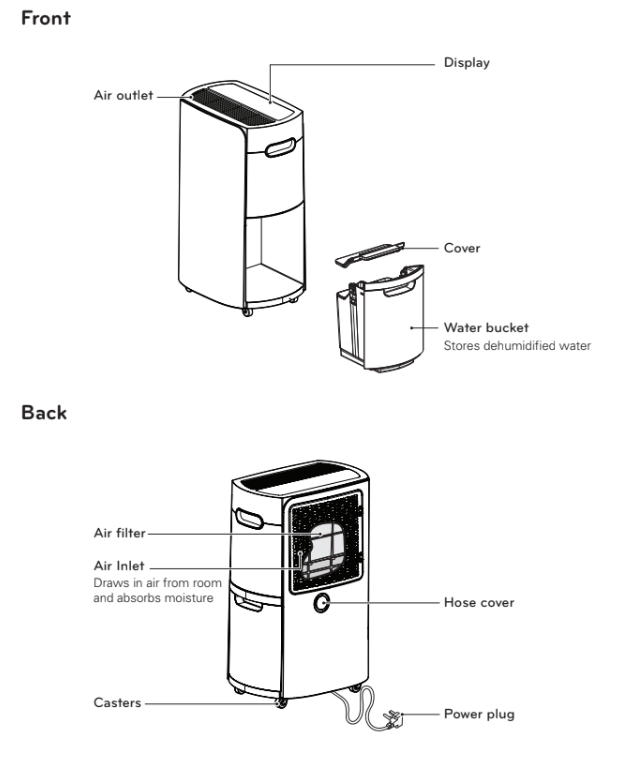
PRODUCT OVERVIEW
BEFORE USE
Indoor temperature and relative humidity affect dehumidification.
- Dehumidification is decreased if the temperature or relative humidity is low.
- The product does not operate unless the desired humidity level is lower than the current humidity level.
This product operates at temperatures from 41 °F - 90 °F (5 °C - 32 °C).
- At temperatures of 32 °F (0 °C) or less, water freezes inside the product.
- At temperatures over 90 °F (32 °C), the internal temperature of the product trips a protective device which deactivates the product to avoid product damage.
When the dehumidifier is operating, the indoor temperature will rise.
- The dehumidifier does not have a cooling/heating function.
- Heat is generated during operation, so the room temperature may be increased by about 5 °F
C) depending on the usage conditions (indoor temperature, size of the room).
The compressor has a 3-minute delay before restarting.
- If the product is stopped and immediately restarted, to protect the compressor there is a 3-minute delay until the compressor restarts.
The product cannot be operated continuously for more than 23 hours.
After 23 hours of continuous operation, the compressor automatically shuts off for one hour to prevent product damage. The compressor will restart after one hour. This Safety Standby function is normal.
Install the product at least 11 13/ 16" (30 cm) from walls or other obstacles.
The product needs clearance for air intake and exhaust purposes
There may be water in the drain water bucket before first use.
Water may remain in the drain water bucket from the product's outgoing inspection to check operation. This is normal.
OPERATION
Control Panel and Display
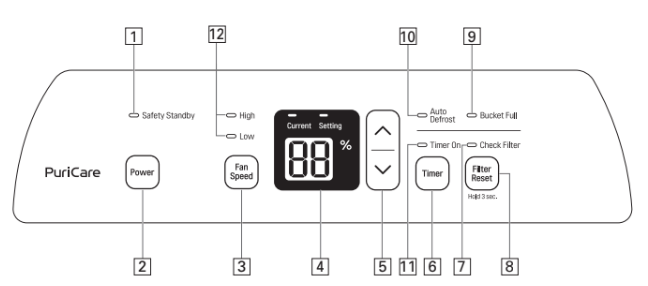
1. Safety Standby light (red): After 23 hours of continuous operation, the red lamp lights up for 1 hour.
2. Power button: Starts and stops the product.
3. Fan Speed control button: Adjusts the fan speed and air volume.
4. Humidity display: Displays the current humidity (25-90%) and the humidity setting (30-80%).
5. Humidity control button: Adjusts the humidity setting. Desired humidity levels can be set in 5-percent increments from 30-80%.
6. Timer button: Sets a time for the product to automatically turn off.Press the button repeatedly to increase the time until shutoff in 1-hour increments up to 12 hours.
7. Check Filter light: Lights up after 350 hours of operation. Check and clean the filter.
8. Filter Reset button: After cleaning the filter, press for three seconds to reset operating time.
9. Bucket Full light: Lights up when drain water bucket is full.
10. Auto Defrost light: Lights up when the product is defrosting.
11. Timer On light: Lights up when the Timer function is set.
12. Fan Speed indicator lights: Light up to indicate fan speed (High/Low).
Dehumidifying
1. Press  to turn on the power.
- It takes 30 minutes of continuous operation to reach the desired humidity level the first time the product is used.
- The display shows the current humidity level.
2. Press  to change humidity.
- The desired humidity level can be set in percent increments from 30-80%.
- The display shows the desired humidity level while it is being set, then reverts to the current humidity level after 5 seconds.
- The current humidity level is displayed in percent increments from 25-90%. If the humidity level is outside the range, the display continues to show either 25% or 90%.
3. Press  to change the fan speed.
The fan speed has two levels: low or high.
4. Press  to turn off the product.
NOTE
- If the product is restarted immediately after being shut down, to protect the compressor there is a 3-minute delay until the compressor begins operating.
- It is normal for the compressor to cause the product to vibrate while starting or stopping.
Setting the Timer
1. Press  to turn on the power.
2. Press  to set the automatic shut off time.
- Press the button repeatedly to increase the time until shut off in 1-hour increments up to 12 hours.
3. Press to cancel the Timer function.
- Press the Timer button repeatedly until the Timer On light turns off.
NOTE: Empty the drain water bucket before setting the Timer function. If the water bucket becomes full during the Timer function, the Bucket Full light goes on and dehumidification stops.
Safety Standby Light
- After 23 hours of continuous operation, the red Safety Standby light turns on for one hour and the fan and compressor shut off to prevent product malfunction.
- After an hour with the fan and compressor shut off, the Safety Standby light turns off and the fan and compressor automatically restart.
Bucket Full Light
- Empty the water bucket within three minutes of the Bucket Full light turning on.
- After the light turns on, the fan operates for an additional three minutes to remove remaining condensed water and then the product shuts off.
- See Emptying the Water Bucket for further instructions.
Checking the Filter
Check and clean the filter when the Check Filter light turns on.
- After 350 hours of operation, the Check Filter light turns on. Check the filter and clean it if necessary or wait 24 hours for the light to go off automatically.
- After cleaning the filter, press and hold
 for three seconds to reset the operating time.
Auto Defrost Light
The Auto Defrost function automatically removes any frost in the heat exchanger caused by low indoor temperatures.
- The Auto Defrost light turns on while the product automatically defrosts the heat exchanger.
- The compressor stops during the automatic defrost function.
Continuous Drainage Setup
Items Needed:
3/4 " outer diameter) threaded garden hose nearby sink or drain.
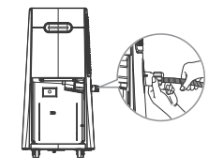
1. Unplug the product. Turn the hose cover at the back of the product counterclockwise to open it.
2. Remove the water bucket.
3. Insert the drainage adapter into the opening for the hose and turn it clockwise. Insert the provided screw to secure it in place.

4. Turn the end of the garden hose clockwise to attach it to the drainage adapter.
- Firmly attach the garden hose to avoid leaks. Hand tighten; then make an additional 1/8 turn with pliers.
CAUTION: Take care not to injure hands while connecting drainage hose.
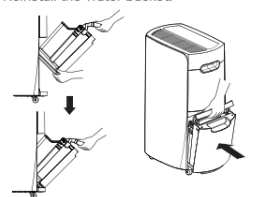
5. Reinstall the water bucket.
NOTE
- The product does not work without the water bucket installed.
- A hose for continuous drainage can be purchased, through the LG customer information center
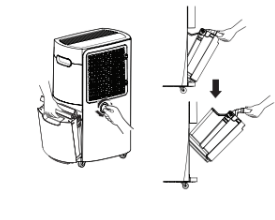
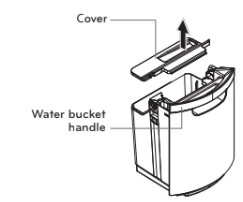
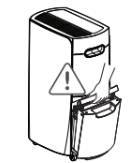
Emptying the Water Bucket
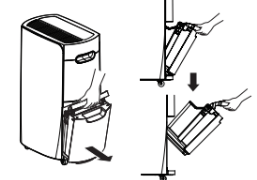
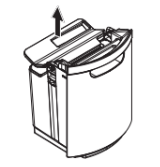
1. Gently pull the top handle of the water bucket to remove the bucket from the product.
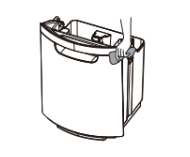
2. Lift off the cover of the water bucket.
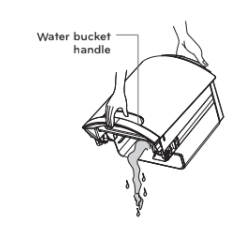
3. Pour the water out of the bucket.
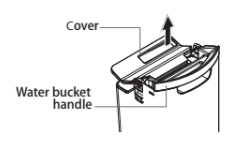
4. Put the cover back on the water bucket.
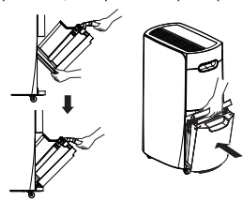
5. Angle the bottom of the water bucket into place first, then push the top into place.
NOTE
- If the water bucket is removed immediately after turning off the dehumidifier, the water remaining in the heat exchanger may drip inside the water bucket storage area. Remove the water with a soft cloth.
- While cleaning, do not touch the water detection device on the inside top of the water bucket storage area.
- Clean the water bucket once a week during use.
- If the ambient temperature is low, there is less moisture in the air for the product to remove.
- Unplug the product before removing the water bucket. If the bucket is removed while the product is operating, the compressor stops. The fan operates for another three minutes to clear the remaining water inside the heat exchanger and then also stops.
CAUTION: Watch pinch points to avoid injuring fingers when installing the water bucket.
MAINTENANCE
Cleaning the Exterior
Wipe the exterior of the dehumidifier with a soft, damp cloth.
- Do not spray water directly on the product. Doing so may cause damage to the insulation or stains on the surface of the product.
Use a vacuum cleaner or soft brush to remove dust from the filter case.

CAUTION: Do not use materials such as thinners, benzene, acid, or sponges to clean the product. They may damage the surface of the product.
Cleaning the Water Bucket
1. Lift off the cover of the bucket.
2. Empty the water bucket and use a soft cloth to remove any remaining moisture inside it.
CAUTION: Operating the product with the cover of the water bucket missing or assembled improperly may result in leaking.
Cleaning the Air Filter
CAUTION
- Unplug the unit before cleaning it.
- Allow the filter to dry completely, out of direct sunlight, before reinserting it in the product. Operating the product with a damp filter may cause product failure.
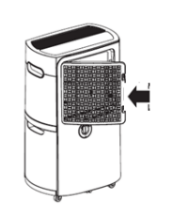
1. Release the two hooks at the right of the filter case and swing it open to remove it.
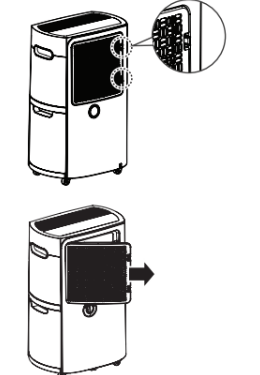
2. Pull the center tab on the air filter to remove it from the filter case.

3. Clean the air filter with a vacuum cleaner or soft brush.
- If the filter is very dirty, wash it in water and a neutral detergent.
- Clean the air filter once a month.
4. Bend the sides of the air filter inward slightly to reinsert it. Make sure the filter is seated under the tabs inside the filter case.
5. Align the hinges on the filter case with the hinge openings on the product and then swing the case to the right to reattach the two hooks.
NOTE: Service calls to clean the air filter are not covered under the product warranty.
Storing the Product
1. Unplug the product.
2. Empty the water bucket completely.
- Remove the lid from the water bucket and use a soft cloth to wipe up any remaining water in the bucket.
3. Clean the filter.
- Let the filter thoroughly dry for several hours in a shaded, well-ventilated area before reinstalling it.
- Placing the filter in direct sunlight or near a fire may cause product deformation.
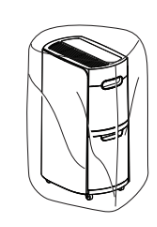
4. While the filter is drying, place the dehumidifier out of direct sunlight in a well-ventilated area and allow it to thoroughly dry for several hours. Reinstall the filter and cover the dehumidifier before storing it in an upright position. (A dust cover for storing the dehumidifier is not included.)
TROUBLESHOOTING
If the product does not function properly or does not function at all, check the following before calling for service.
The product is not running.
- Power plug is not inserted correctly.
- Power outage.
- Water bucket is not installed properly.
- Install the water bucket correctly.
- Bucket Full light is on.
- Auto Defrost light is
- Press the Power button when Auto Defrost ends.
- Set humidity level is higher than room humidity level.
- Set the desired humidity level below the current humidity level of the room.
There is little dehumidification.
- Room temperature or humidity level is too low.
- Check the target humidity.
- It is normal for less dehumidification to take place in the winter and in dry areas.
- Air inlet or outlet is blocked.
- Remove the obstruction.
- Clean the filter.
Humidity does not seem to decrease much even though the product is running.
- Door or window is open.
- Room is too large for capacity of dehumidifier.
- Use the dehumidifier in an adequately sized room.
- Product is placed near a steam- producing appliance.
- Do not use the dehumidifier near appliances which produce steam.
The displayed humidity level is incorrect.
- The air intake and exhaust of the dehumidifier are obstructed.
- Keep the dehumidifier away from walls or other large obstructions.
- The dehumidifier is placed too far from the humid area.
- The dehumidifier’s display shows the humidity level in its current position, which may be different from the level in other positions.
Water is dripping from within the product when water bucket is removed.
- Water bucket was removed while the product was in operation.
- Turn off the product before removing the water bucket. Clean off any drips with a soft cloth.