Documents: Go to download!
User Manual
- User Manual - (English, Spanish)
- Specification - (English)
- Spec Sheet (web) - (English)
User Manual Air Conditioner
PRODUCT OVERVIEW
Exterior Parts
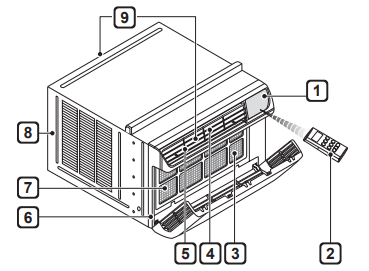
- Control Panel
- Remote Controller
- Air Filter
- Vertical Air Deflector (Horizontal Louver)
- Horizontal Air Deflector (Vertical Louver)
- Front Grille
- Air Inlet
- Cabinet
- Air Outlet
Interior Parts
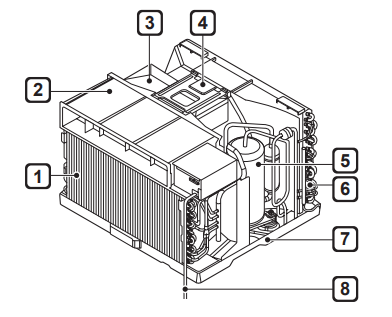
1 Evaporator
2 Air Guide
3 Control Box
4 Brace
5 Compressor
6 Condenser
7 Base Pan
8 Power Cord
INSTALLATION
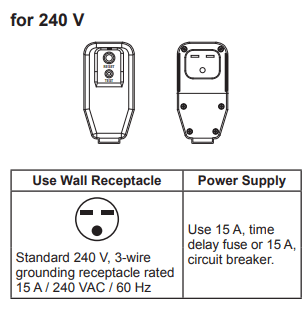
Electrical Data
Power cord may include a current interrupter device. TEST and RESET buttons are provided on the plug case. The device should be tested on a periodic basis by first pressing the TEST button and then the RESET button. If the TEST button does not trip or if the RESET button will not stay engaged, discontinue use of the air conditioner and contact a qualified service technician.
Installation Overview
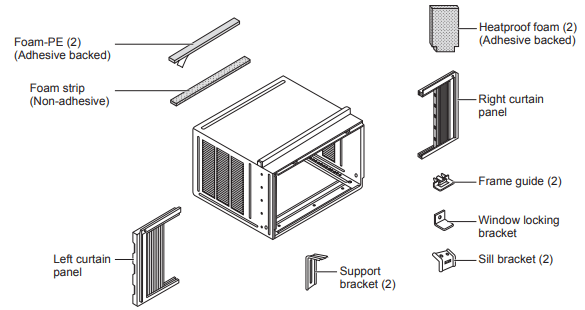
Accessories

Tools Needed
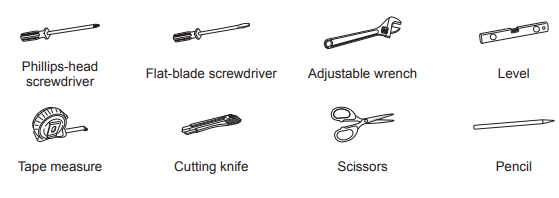
How to Install the Unit
1. To prevent vibration and noise, make sure the unit is installed securely and firmly
2. Install the unit where the sunlight dose not shine directly on the unit.
3. The outside of the cabinet must extend outward for at least 12" and there should be no obstacles, such as a fence or wall, within 20" from the back of the cabinet because it will prevent heat radiation of the condenser. Restriction of outside air will greatly reduce the cooling efficiency of the air conditioner
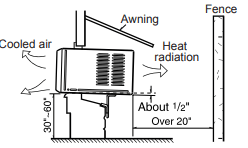
4. Install the unit slightly tilted so the back is slightly lower than the front (about 1/2"). This will force condensed water to flow to the outside
5. Install the unit with the bottom between 30" ~60" above the floor level.
Window Requirements
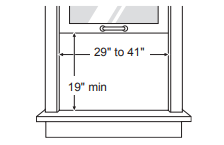
- This unit is designed for installation in standard double hung windows with actual opening widths from 29" to 41". The top and bottom window sashes must open sufficiently to allow a clear vertical opening of 19" from the bottom of the upper sash to the inside sill.
- The height offset between the inside sill and outside sill must be less than 1 ¼".
Preparation of Cabinet
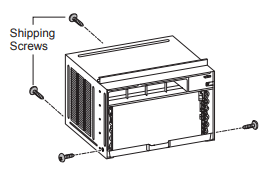
1. Remove 4 screws which fasten the cabinet at both sides and at the back. (Keep the screws for later use.)
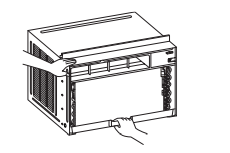
2. Slide the unit from the cabinet by gripping the base pan handle and pulling forward while bracing the cabinet.
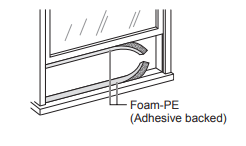
3. Cut the window sash seals (Foam-PE) to the proper length. Peel off the backing and attach the adhesive-backed foam to the underside of the window sash and the bottom of the window frame.
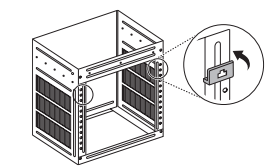
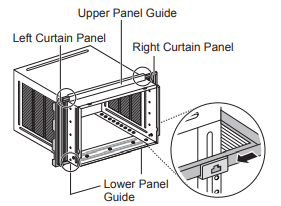
4. Insert the lower curtain panel guides into the bottom of the cabinet. Insert the guides so that the flange faces to the rear of the cabinet.
5. Insert the top and bottom rails of the curtain panels into the upper and lower panel guides
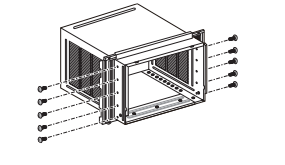
6. Fasten the curtain panels to the unit with 10 type A screws.
Cabinet Installation
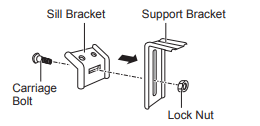
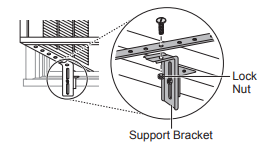
1 Open the window. Mark a line on the center of the inside sill and extending across the center of the outside sill. Loosely attach each sill bracket to a support bracket using a carriage bolt and a lock nut.
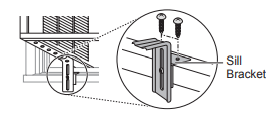
2 Carefully place the cabinet in the window and align the center hole on the cabinet bottom front with the center line marked on the window sills. Align the support brackets with the cabinet track holes and mark the sill along the sides of each sill bracket. Remove the cabinet from the window and attach each sill bracket on the outside sill between the marks using 2 type B screws.
3 Carefully place the cabinet back in the window and align the cabinet track holes with the support brackets. Attach each support bracket to the cabinet through a cabinet track hole, using a type D screw and a lock nut. Use the first track hole past the sill bracket on the outer edge of the window sill. Tighten the lock nuts on the support brackets to secure them to the sill brackets. Be sure the cabinet slants down toward the outside.
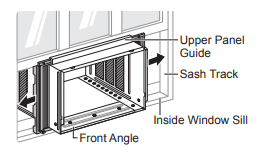
4 Pull each curtain panel out until it meets the window sash track. Pull the bottom window sash down behind the upper panel guide until they meet.
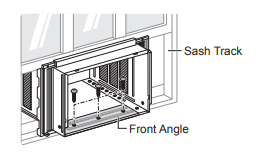
5 Attach the cabinet to the inside sill by driving 3 type B screws through the cabinet and into the sill.
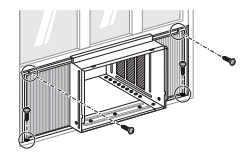
6 Use a screwdriver or power drill to attach the curtain panels to the window sashes by driving type C screws into the sashes through the cabinet holes shown in the figure below
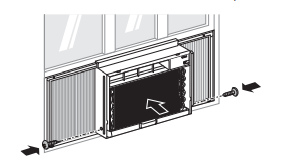
7 With the aid of an assistant, slide the unit into the cabinet. Reinstall the screws removed from the cabinet sides in step 1.
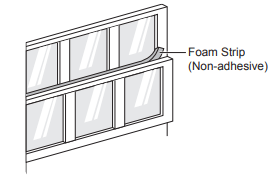
8 Cut the non-adhesive foam strip to the proper length and insert it between the upper window sash and the lower window sash.
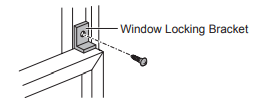
9 Attach the window locking bracket with a type C screw.
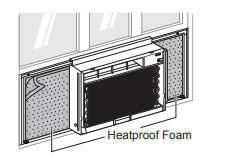
10 Cut the adhesive-backed heatproof foam to match the size of the curtain panels. Remove the backing from the heatproof foam and attach it to the curtain panels.
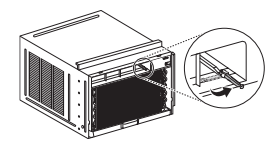
11 Fold out the vent control lever located to the left of the control panel, as shown.
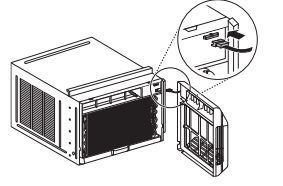
12 Connect the wire harness from the front grille assembly to the air conditioner.
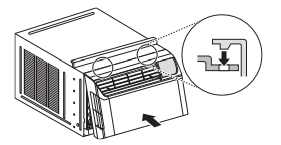
13 Attach the front grille assembly to the cabinet by inserting the grille tabs into the slots on the front of the cabinet. Push the grille in until it snaps into place.
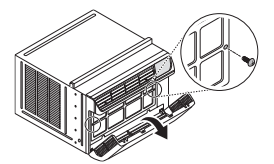
14 Open the air inlet grille and secure the front grille assembly with 2 type A screws through the both sides of the front grille. (There are 2 type A screws packed in a small bag.)
OPERATION
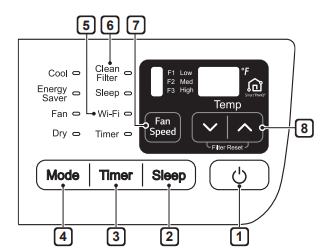
Control Panel and Remote Control
Remote Control
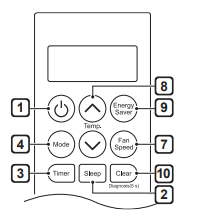
1 Power
Press to turn the air conditioner ON or OFF.
2 Sleep Mode
This mode keeps operating noise to a minimum and turns the air conditioner off after a set time. The timer can be set from 1 to 7 hours
- In the Sleep Mode, the setting temperature increases by 2 °F after 30 minutes and additional 2 °F after another 30 minutes for a more comfortable sleep.
- The setting temperature increases up to 4 °F from the preset temperature.
3 Delay ON/OFF Timer
Delay ON - When the air conditioner is off, set it to automatically turn on from 1 to 24 hours later, at its previous mode and fan settings.
Delay OFF - When the air conditioner is on, set it to automatically turn off from 1 to 24 hours later.
4 Operation Mode
Press the Mode button to cycle between 4 types of air conditioner operation: Cool / Energy Saver / Fan Only / Dry
Cool - This mode is ideal on hot days to cool and dehumidify the room quickly. Use the Temp buttons to set the desired room temperature and use the Fan Speed button to set the desired fan circulation speed.
Energy Saver - In this mode the compressor and fan turn off when the set temperature is achieved. Approximately every 3 minutes the fan turns on to allow the unit sensor to accurately determine if more cooling is needed.
Fan Only - In this mode the fan circulates air but the compressor does not run. Use the Fan Speed button to set fan speed to High, Medium or Low. In this mode, you cannot adjust the set temperature.
Dry - This mode is ideal for rainy and damp days to dehumidify the room rather than cooling it significantly. Humidity is removed from the room by the combination of compressor operation and the fan speed fixed at low. The compressor and fan turn off once the set temperature is reached. Fan speed cannot be adjusted in Dry mode
5 Wi-Fi
Enables connection of the air conditioner to the home Wi-Fi.
6 Clean Filter
The Clean Filter LED lights up to notify you that the filter needs to be cleaned. After cleaning the filter, press Temp and
and together on the control panel to turn off the Clean Filter light.
7 Fan Speed
Press to set the fan speed to Low (F1), Medium (F2), or High (F3).
8 Temperature Control
The thermostat monitors room temperature to maintain the desired temperature. The thermostat can be set between 60 °F–86 °F (16 °C–30 °C). Press  or
or arrows to increase or decrease temperature setting.
9 Energy Saver
In this mode the compressor and fan turn off when the set temperature is achieved. Approximately every 3 minutes the fan turns on to allow the unit sensor to accurately determine if more cooling is needed.
10 Clear
Cancel Sleep and Timer settings.
Wireless Remote Control
Inserting Batteries
If the display screen of the remote control begins to fade, replace the batteries. Insert AAA (1.5 V) batteries before using the remote control.
1 Remove the cover on the back of the remote control.
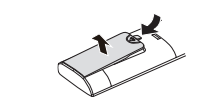
2 Insert the new batteries and make sure that the + and - terminals of the batteries are installed correctly

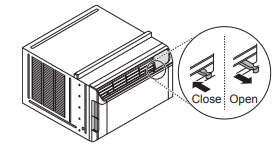
Ventilation
Push the ventilation lever in to the closed position to maintain the best cooling performance. Pull the ventilation lever out to open the vent and draw fresh air into the room.
Air Direction
Airflow can be adjusted by changing the direction of the air conditioner’s louvers.
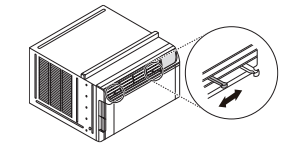
Adjusting Horizontal Airflow Direction
The horizontal airflow is adjusted by moving the levers of the vertical louvers to the left or right.
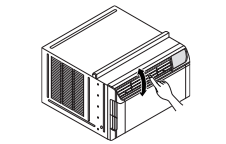
Adjusting Vertical Airflow Direction
Touch the horizontal louvers to adjust the airflow up or down.
Additional Features
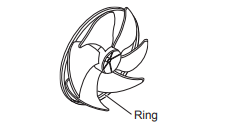
Slinger Fan
This air conditioner is equipped with a slinger fan. (See drawing.) The fan’s outer ring picks up the condensed water from the base pan if the water level gets high enough. The water is then picked up by the fan and expelled through the condenser, making the air conditioner more efficient.
SMART FUNCTIONS
Using LG ThinQ Application
Things to check before using LG ThinQ
• For appliances with the  or ThinQ logo
1 Check the distance between the appliance and the wireless router (Wi-Fi network).
• If the distance between the appliance and the wireless router is too far, the signal strength becomes weak. It may take a long time to register or installation may fail.
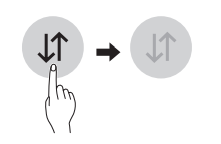
2 Turn off the Mobile data or Cellular Data on your smartphone.
• For iPhones, turn data off by going to Settings → Cellular → Cellular Data.
3 Connect your smartphone to the wireless router
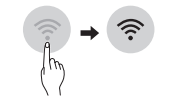
NOTE
- To verify the Wi-Fi connection, check that Wi-Fi
 icon on the control panel is lit.
 - The appliance supports 2.4 GHz Wi-Fi networks only. To check your network frequency, contact your Internet service provider or refer to your wireless router manual.
- LG ThinQ is not responsible for any network connection problems or any faults, malfunctions, or errors caused by network connection.
- If the appliance is having trouble connecting to the Wi-Fi network, it may be too far from the router. Purchase a Wi-Fi repeater (range extender) to improve the Wi-Fi signal strength. • The Wi-Fi connection may not connect or may be interrupted because of the home network environment.
- The network connection may not work properly depending on the Internet service provider.
- The surrounding wireless environment can make the wireless network service run slowly.
- The appliance cannot be registered due to problems with the wireless signal transmission. Unplug the appliance and wait about a minute before trying again.
- If the firewall on your wireless router is enabled, disable the firewall or add an exception to it.
- The wireless network name (SSID) should be a combination of English letters and numbers. (Do not use special characters.)
- Smartphone user interface (UI) may vary depending on the mobile operating system (OS) and the manufacturer.
- If the security protocol of the router is set to WEP, you may fail to set up the network. Please change it to other security protocols (WPA2 is recommended) and register the product again.
Installing LG ThinQ
Search for the LG ThinQ application from the Google Play Store or Apple App Store on a smart phone. Follow instructions to download and install the application
Wi-Fi Function
• For appliances with the  or ThinQ logo Communicate with the appliance from a smart phone using the convenient smart features.
Settings
Allows you to set various options on the appliance and in the application.
Wireless LAN Module
Specifications
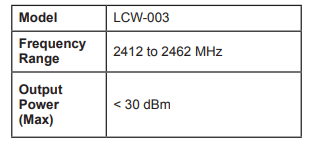
FCC Notice (For transmitter module contained in this product)
This equipment has been tested and found to comply with the limits for a Class B digital device, pursuant to Part 15 of the FCC Rules. These limits are designed to provide reasonable protection against harmful interference in a residential installation. This equipment generates, uses, and can radiate radio frequency energy and, if not installed and used in accordance with the instructions, may cause harmful interference to radio communications. However, there is no guarantee that interference will not occur in a particular installation. If this equipment does cause harmful interference to radio or television reception, which can be determined by turning the equipment off and on, the user is encouraged to try to correct the interference by one or more of the following measures
- Reorient or relocate the receiving antenna.
- Increase the separation between the equipment and the receiver
- Connect the equipment to an outlet on a circuit different from that to which the receiver is connected.
- Consult the dealer or an experienced radio/TV technician for help.
This device complies with part 15 of the FCC Rules. Operation is subject to the following two conditions:
1) This device may not cause harmful interference and
2) This device must accept any interference received, including interference that may cause undesired operation of the device.
Any changes or modifications in construction of this device which are not expressly approved by the party responsible for compliance could void the user’s authority to operate the equipment.
FCC RF Radiation Exposure Statement
This equipment complies with FCC radiation exposure limits set forth for an uncontrolled environment. This transmitter must not be colocated or operating in conjunction with any other antenna or transmitter. This equipment should be installed and operated with a minimum distance of 20 cm (7.8 inches) between the antenna and your body. Users must follow the specific operating instructions for satisfying RF exposure compliance.
Open Source Software Notice Information
To obtain the source code under GPL, LGPL, MPL, and other open source licenses, that is contained in this product, please visit http:// opensource.lge.com. In addition to the source code, all referred license terms, warranty disclaimers and copyright notices are available for download. LG Electronics will also provide open source code to you on CD-ROM for a charge covering the cost of performing such distribution (such as the cost of media, shipping, and handling) upon email request to [email protected]. This offer is valid for a period of three years after our last shipment of this product. This offer is valid to anyone in receipt of this information.
MAINTENANCE
Air Filter
Check the air filter at least twice a month to see if cleaning is necessary. Trapped particles in the filter can build up and block the airflow, reducing cooling capacity and causing an accumulation of frost on the evaporator.
Cleaning the Air Filter
1 Remove the air filter from the front grille by pulling the filter forward and then up slightly
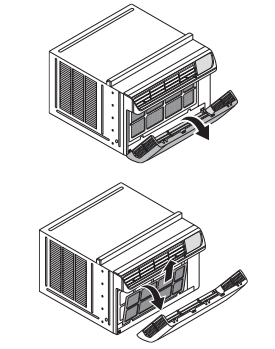
2 Wash the filter using lukewarm water below 40 °C (104 °F)
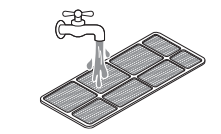
3 Gently shake the excess water from the filter and replace.
Cleaning the Air Conditioner
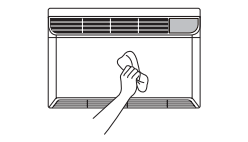
- Wipe the front grille and inlet grille with a cloth dampened in a mild detergent solution.
- Wash the cabinet with mild soap or detergent and lukewarm water, then polish using liquid appliance wax.
TROUBLESHOOTING
Before Calling for Service
The appliance is equipped with an automatic error-monitoring system to detect and diagnose problems at an early stage. If the appliance does not function properly or does not function at all, check the following before you call for service.
Normal Sounds You May Hear
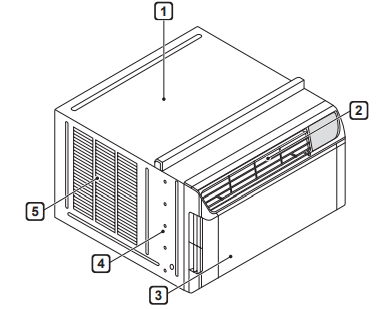
1. High Pitched Chatter
Today's high efficiency compressors may have a high pitched chatter during the cooling cycle.
2. Sound of Rushing Air
At the front of the unit, you may hear the sound of rushing air being moved by the fan
3. Gurgle/Hiss
Gurgling or hissing noise may be heard due to refrigerant passing through evaporator during normal operation.
4. Vibration
Unit may vibrate and make noise because of poor wall or window construction or incorrect installation.
5. Pinging or Swishing
Droplets of water hitting condenser during normal operation may cause pinging or swishing sounds.
| Problem | Possible Cause | Solutions |
| Air conditioner does not start. | The air conditioner is unplugged. | Make sure the air conditioner plug is pushed completely into the outlet |
| The fuse is blown/circuit breaker is tripped. | Check the house fuse/circuit breaker box and replace the fuse or reset the breaker. | |
| Power failure. | If power failure occurs, turn the mode control to off. When power is restored, wait 3 minutes to restart the air conditioner to prevent tripping of the compressor overload. | |
| The current interrupter device is tripped. | Press the RESET button located on the power cord plug. If the RESET button will not stay engaged, discontinue use of the air conditioner and contact a qualified service technician. | |
| Air conditioner does not cool as it should. | Airflow is restricted. | Make sure there are no curtains, blinds, or furniture blocking the front of the air conditioner. |
| The temp control may not be set correctly. | Set the desired temperature to a level lower than the current temperature. | |
| The air filter is dirty. | Clean the filter at least every 2 weeks. See the 'MAINTENANCE' section. | |
| The room may have been hot. | When the air conditioner is first turned on, you need to allow time for the room to cool down. | |
| Cold air is escaping | Check for open furnace floor registers and cold air returns. | |
| Cooling coils have iced up. | See 'Air conditioner freezing up' below. | |
| Air conditioner freezing up. | The cooling coils are iced over. | Ice may block the air flow and obstruct the air conditioner from properly cooling the room. Set the mode control at High Fan or High Cool. |
| Water drips outside. | Hot, humid weather. | This is normal. |
| Water drips indoors. | The air conditioner is not tilted to the outside. | For proper water disposal, make sure the air conditioner slants slightly from the cabinet front to the rear |
| Water collects in base pan. | Moisture removed from air and drains into base pan. | This is normal for a short period in areas with little humidity; normal for a longer period in very humid areas. |
| Air conditioner turns on and off rapidly | Dirty air filter-air restricted | Clean air filter |
| Outside temperature extremely hot. | Refer to installation instructions or check with installer. | |
| Noise when unit is cooling. | Air movement sound. | This is normal. If too loud, set to lower FAN setting. |
| Window vibration - poor installation. | Refer to installation instructions or check with installer | |
| Remote sensing deactivating prematurely | Remote control not located within range. | Place remote control within 20 feet & 120° radius of the front of the unit. |
| Remote control signal obstructed. | Remove obstruction. | |
| Room too cold. | Set temperature too low. | Increase set temperature. |
| Can't connect the LG ThinQ App. to the air conditioner. | Air conditioner is turned off. | Turn the air conditioner on. |
| Wireless router is turned off. | Turn the router on. | |
| The air conditioner is not connecting to the Wi-Fi. | The Wi-Fi router is too far from the air conditioner. | Move the router closer to the air conditioner or purchase and install a Wi-Fi repeater (signal booster). |
| You do not have permission to use the router or it is incompatible. | Make sure you are selecting the correct wireless router from the list. The router must be set to 2.4 GHz. |
Wi-Fi
| Problem | Possible Cause | Solutions |
| Trouble connecting appliance and smartphone to Wi-Fi network. | The password for the Wi-Fi network was entered incorrectly | Delete your home Wi-Fi network and begin the registration process again |
| Mobile data for your smartphone is turned on. | Turn off the Mobile data on your smartphone before registering the appliance. | |
| The wireless network name (SSID) is set incorrectly | The wireless network name (SSID) should be a combination of English letters and numbers. (Do not use special characters.) | |
| The router frequency is not 2.4 GHz. | Only a 2.4 GHz router frequency is supported. Set the wireless router to 2.4 GHz and connect the appliance to the wireless router. To check the router frequency, check with your Internet service provider or the router manufacturer | |
| The distance between the appliance and the router is too far. | If the appliance is too far from the router, the signal may be weak and the connection may not be configured correctly. Move the router closer to the appliance or purchase and install a Wi-Fi repeater |
See other models: LSWC307ST IPS235V-BN 43UM7300AUE OLED65C8PUA 27MP37HQ-B
