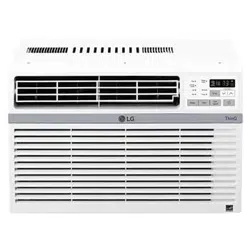
Documents: Go to download!
User Manual
- User Manual - (English, Spanish)
- Specification - (English)
- INSTALLATION
- OPERATION
- MAINTENANCE
- TROUBLESHOOTING
Table of contents
OWNER’S MANUAL AIR CONDITIONER
INSTALLATION
Installation Overview
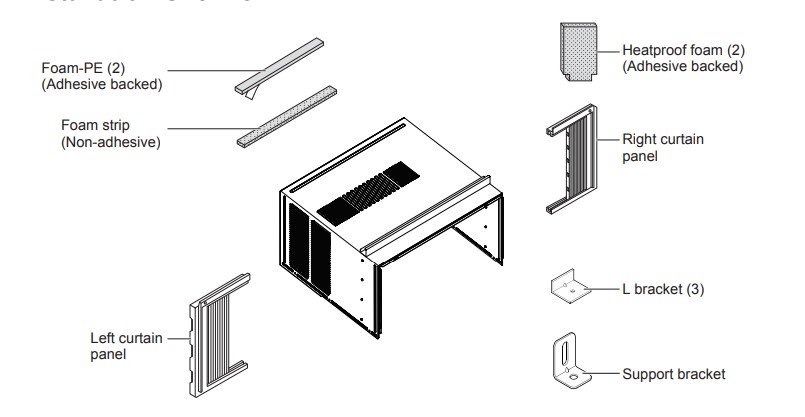
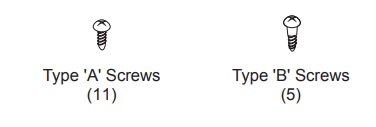
Accessories
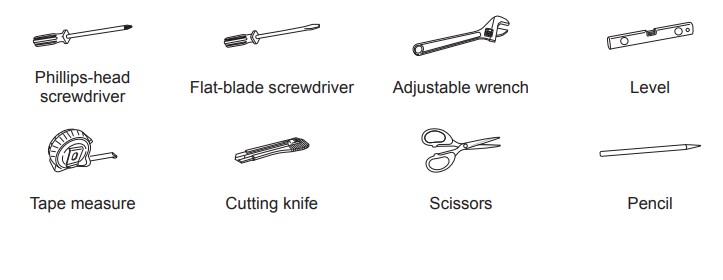
Tools Needed
Window Requirements
- This unit is designed for installation in standard double hung windows with actual opening widths from 22" to 36".
The top and bottom window sashes must open sufficiently to allow a clear vertical opening of 13" from the bottom of the upper sash to the inside sill.
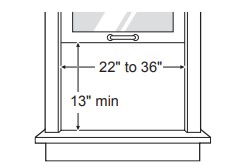
NOTE: This prodcut is a WINDOW AIR CONDITIONER. As such, a standard single-hung or double-hung window is required for proper installation. No-window installations, including using sleeves, holes in walls, and other installations are not recommended.
Clearance
Proper clearance enhances the cooling efficiency of the product.
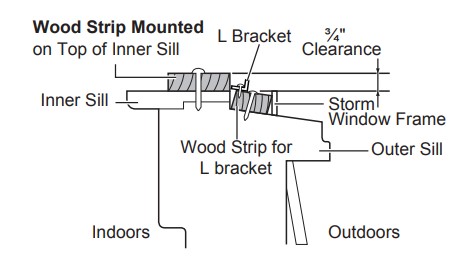
- If a storm window presents interference, fasten a 2” wide wood strip to the inner window sill across the full width of the sill. The wood strip should be thick enough to raise the height of the window sill so that the unit can be installed without interference by the storm window frame.
- (See drawing.) The top of the wood strip on the inside sill should be approximately ¾” higher than the storm window frame or wood strip on the outside sill to help condensation to drain properly to the outside.
- If necessary, install a second wood strip (same thickness as first strip) in the center of sill flush against the back off the inner sill. This will raise the L bracket as shown in the drawing.
Preparation of Chassis
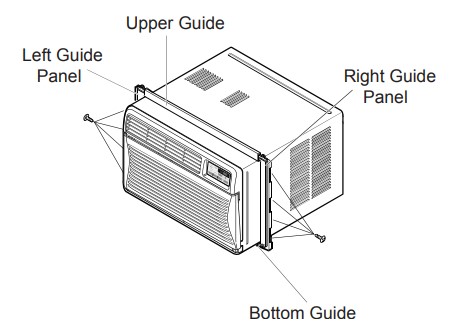
1. Insert the guide panels into the upper and bottom guide. Fasten the curtains to the unit with 4 type A screws on each side.
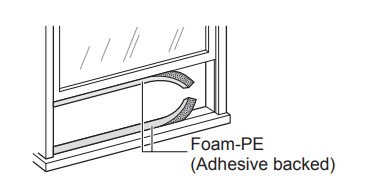
2. Cut the window sash seals to the proper length. Peel off the backing and attach the Foam-PE(Adhesive backed) to the underside of the window sash and bottom of window frame.
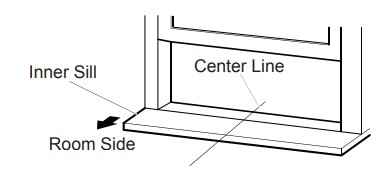
3. Open the window and mark center line on the center of the inner sill.
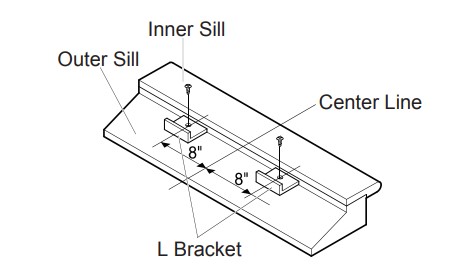
4. Install the L bracket behind the inner window sill, with short side of bracket as shown. Use the 2 Type A screws provided.
Unit Installation
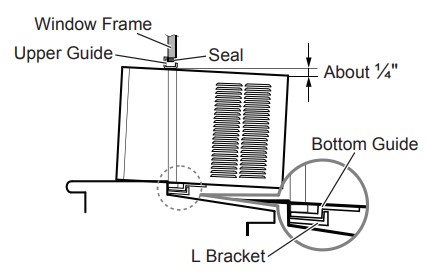
1. Set the air conditioner in the window so that is centered. Place the air conditioner so that front edge of the bottom guide is against the back edge of the sill.
Bring the window down so that the front edge of the upper guide is in front of the window. Make sure that air conditioner is level or tilting slightly to the outside.
2. Extend the guide panels to fill the window opening using 4 Type B screws to secure them.
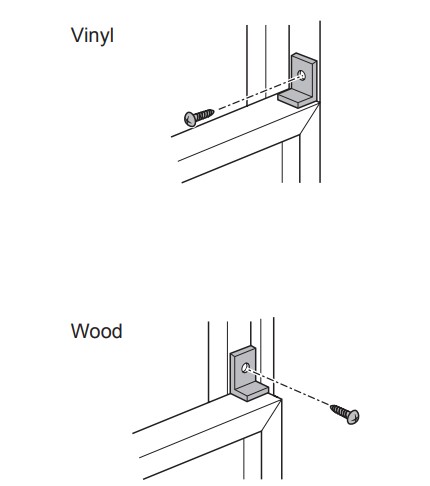
3. Cut the foam strip to the window width. Stuff the foam strip between the glass and the window to prevent air and insects from getting into the room. Fasten the L bracket using a Type A screw.
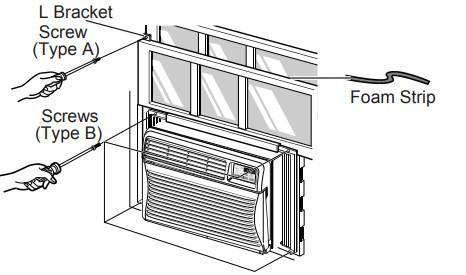
NOTE: Fasten the remaining L bracket to the outer window sash with 1 type A screw as shown.
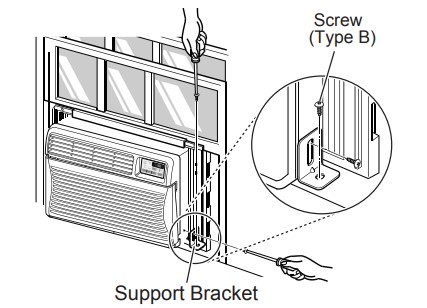
4. Remove the screw form the right side of cabinet. Fasten the support bracket using a removed from the air conditioner cabinet. Attach the support bracket to the inner window sill with a Type B screw.
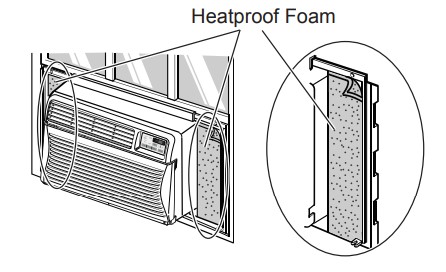
5. Cut the adhesive-backed heatproof foam to match the size of the curtain panels. Remove the backing from the heatproof foam and attach it to the curtain panels.
NOTE: Heatproof foam improves the cooling capability of the air conditioner
NOTE: See the 'Electrical Data' section for information on attaching the power cord to an electrical outlet.
OPERATION
Control Panel and Remote Control
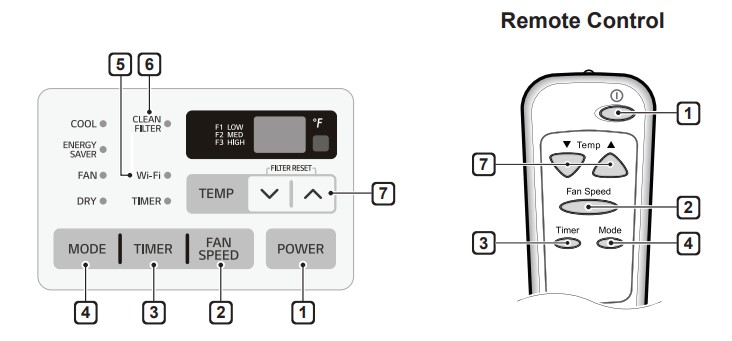
1. Power
Press to turn the air conditioner ON or OFF.
2. Fan Speed
Press to set the fan speed to Low (F1), Medium (F2), or High (F3).
3. Delay ON/OFF Timer
Delay ON - When the air conditioner is off, set it to automatically turn on from 1 to 24 hours later, at its previous mode and fan settings.
Delay OFF - When the air conditioner is on, set it to automatically turn off from 1 to 24 hours later.
NOTE: Each press of the Timer button advances the timer by 1 hour. After the last press the display returns to the temperature setting.
4. Operation Mode
Press the Mode button to cycle between 4 types of air conditioner operation: Energy Saver / Cool / Fan / Dry.
Energy Saver - In this mode the compressor and fan turn off when the set temperature is achieved. Approximately every 3 minutes the fan turns on to allow the unit sensor to accurately determine if more cooling is needed.
Cool - This mode is ideal on hot days to cool and dehumidify the room quickly. Use the Temp  buttons to set the desired room temperature and use the Fan Speed button to set the desired fan circulation speed.
Fan - In this mode the fan circulates air but the compressor does not run. Use the Fan Speed button to set fan speed to High, Medium or Low. In this mode, you cannot adjust the set temperature.
Dry - This mode is ideal for rainy and damp days to dehumidify the room rather removed from the room by the combination of compressor operation and the fan speed off once the set temperature is reached. Fan speed cannot be adjusted in Dry mode.
5. Wi-Fi
Enables connection of the air conditioner to the home Wi-Fi.
6. Clean Filter
The Clean Filter LED lights up to notify you that the filter needs to be cleaned. After cleaning the filter, press Temp  and
and  together on the control panel to turn off the Clean Filter light.
7. Temperature Control
The thermostat monitors room temperature to maintain the desired temperature. The thermostat can be set between 60 °F–86 °F (16 °C–30 °C). Press  or
or  arrows to increase or decrease temperature setting.
NOTE
- Auto Restart: If the air conditioner turns off due to a power outage, it will restart automatically once the power is restored, with the same settings as were set before the unit turned off.
- Energy Saver: The unit defaults to the Energy Saver mode each time the unit is switched on except in Fan mode or when power is restored after an electrical power outage.
- The remote control will not function properly if the AC infrared sensor is exposed to direct light or if there are obstacles between the remote controller and the air conditioner.
Wireless Remote Control
Inserting Battery
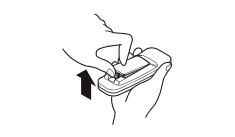
1. Push out the cover on the back of the remote control with your thumb.
2. Pay attention to polarity and insert one new AAA 1.5 V battery
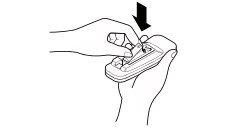
3. Reattach the cover.
NOTE
- One new battery is supplied with the air conditioner for use in the remote control.
- Do not use a rechargeable battery. Make sure that the battery is new.
- In order to prevent discharge, remove the battery from the remote control if the air conditioner is not going to be used for an extended period of time.
- Keep the remote control away from extremely hot or humid places.
- To maintain optimal operation of the remote control, the remote sensor should not be exposed to direct sunlight.
Ventilation
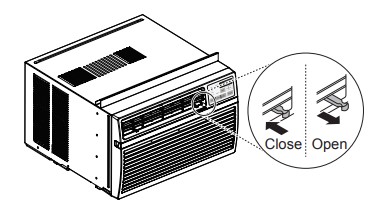
Push the ventilation lever into the closed position to maintain the best cooling performance. Pull the ventilation lever out to open the vent and draw fresh air into the room.
Air Direction
Airflow can be adjusted by changing the direction of the air conditioner’s louvers.
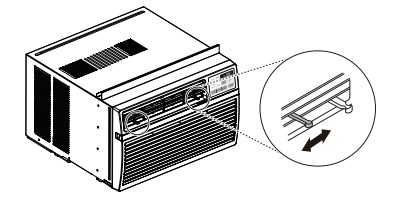
Adjusting Horizontal Airflow Direction
The horizontal airflow is adjusted by moving the levers of the vertical louvers to the left or right.
Adjusting Vertical Airflow Direction
Touch the horizontal louvers to adjust the airflow up or down.
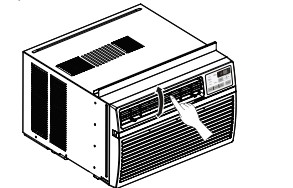
NOTE: When the weather is extremely hot, the unit may turn off automatically to protect the compressor.
Additional Features
Slinger Fan
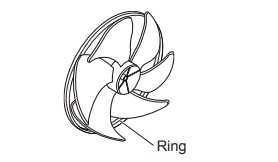
This air conditioner is equipped with a slinger fan. (See drawing.)
The fan’s outer ring picks up the condensed water from the base pan if the water level gets high enough. The water is then picked up by the fan and expelled through the condenser, making the air conditioner more efficient.
MAINTENANCE
Air Filter
Check the air filter at least twice a month to see if cleaning is necessary. Trapped particles in the filter can build up and block the airflow. reducing cooling capacity and causing an accumulation of frost on the evaporator.
Cleaning the Air Filter
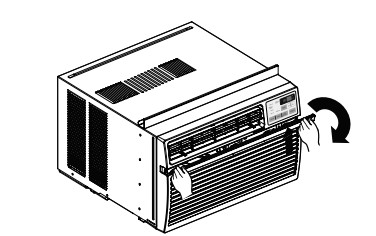
1. Remove the air filter from the front grille by pulling the filter forward and then up slightly.
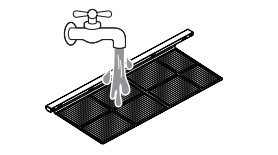
2. Wash the filter using lukewarm water below 40 °C (104 °F).
3. Gently shake the excess water from the filter and replace
Cleaning the Air Conditioner
- Wipe the front grille and inlet grille with a cloth dampened in a mild detergent solution.
- Wash the cabinet with mild soap or detergent and lukewarm water, then polish using liquid appliance wax.
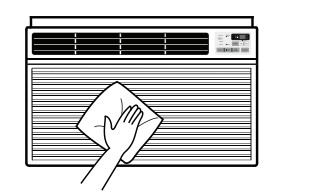
NOTE
- To ensure continued peak efficiency, the condenser coils (outside of unit) should be checked periodically and cleaned if clogged with soot or dirt from outside air.
- For repair and maintenance, contact an Authorized Service Center. See the warranty page for details or call 1-800-243-0000. Have your model number and serial number available. They should be written on page 26 of this manual.
TROUBLESHOOTING
Before Calling for Service
The appliance is equipped with an automatic error-monitoring system to detect and diagnose problems at an early stage. If the appliance does not function properly or does not function at all, check the following before you call for service.
Normal Sounds You May Hear
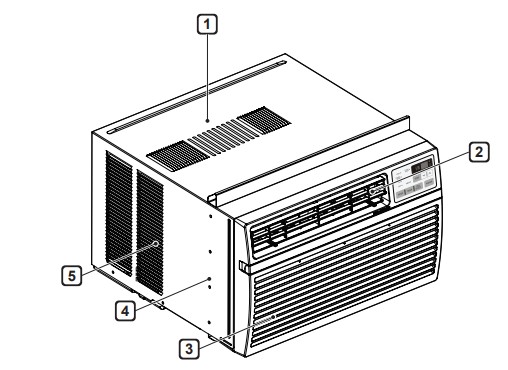
1. High Pitched Chatter
Today's high efficiency compressors may have a high pitched chatter during the cooling cycle.
2. Sound of Rushing Air
At the front of the unit, you may hear the sound of rushing air being moved by the fan.
3. Gurgle/Hiss
Gurgling or hissing noise may be heard due to refrigerant passing through evaporator during normal operation.
4. Vibration
Unit may vibrate and make noise because of poor wall or window construction or incorrect installation.
5. Pinging or Swishing
Droplets of water hitting condenser during normal operation may cause pinging or swishing sounds.
| Problem | Possible Cause | Solutions |
|---|---|---|
| Air conditioner does not start. | The air conditioner is unplugged. | Make sure the air conditioner plug is pushed completely into the outlet. |
| The fuse is blown/circuit breaker is tripped. | Check the house fuse/circuit breaker box and replace the fuse or reset the breaker. | |
| Power failure. | If power failure occurs, turn the mode control to off. When power is restored, wait 3 minutes to restart the air conditioner to prevent tripping of the compressor overload. | |
| The current interrupter device is tripped. | Press the RESET button located on the power cord plug. If the RESET button will not stay engaged, discontinue use of the air conditioner and contact a qualified service technician. | |
| Air conditioner does not cool as it should. | Airflow is restricted. | Make sure there are no curtains, blinds, or furniture blocking the front of the air conditioner. |
| The temp control may not be set correctly. | Set the desired temperature to a level lower than the current temperature. | |
| The air filter is dirty. | Clean the filter at least every 2 weeks. See the 'MAINTENANCE' section. | |
| The room may have been hot. | When the air conditioner is first turned on, you need to allow time for the room to cool down. | |
| Cold air is escaping. | Check for open furnace floor registers and cold air returns. | |
| Cooling coils have iced up. | See 'Air conditioner freezing up' below. | |
| Air conditioner freezing up. | The cooling coils are iced over. | Ice may block the air flow and obstruct the air conditioner from properly cooling the room. Set the mode control at High Fan or High Cool. |
| Water drips outside. | Hot, humid weather. | This is normal. |
| Water drips indoors. | The air conditioner is not tilted to the outside. | For proper water disposal, make sure the air conditioner slants slightly from the cabinet front to the rear. |
| Water collects in base pan. | Moisture removed from air and drains into base pan. | This is normal for a short period in areas with little humidity; normal for a longer period in very humid areas. |
| Air conditioner turns on and off rapidly | Dirty air filter - air restricted. | Clean air filter. |
| Outside temperature extremely hot. | Refer to installation instructions or check with installer. | |
| Noise when unit is cooling. | Air movement sound. | This is normal. If too loud, set to lower FAN setting. |
| Window vibration - poor installation. | Refer to installation instructions or check with installer. | |
| Remote sensing deactivating prematurely | Remote control not located within range. | Place remote control within 20 feet & 120° radius of the front of the unit. |
| Remote control signal obstructed. | Remove obstruction | |
| Room too cold. | Set temperature too low. | Increase set temperature. |
| Can't connect the LG SmartThinQ App. to the air conditioner. | Air conditioner is turned off. | Turn the air conditioner on. |
| Wireless router is turned off. | Turn the router on. | |
| The air conditioner is not connecting to the Wi-Fi. | The Wi-Fi router is too far from the air conditioner. | Move the router closer to the air conditioner or purchase and install a Wi-Fi repeater (signal booster). |
| You do not have permission to use the router or it is incompatible. | Make sure you are selecting the correct wireless router from the list. The router must be set to 2.4 GHz. |
Wi-Fi
| Problem | Possible Cause | Solutions |
|---|---|---|
| Trouble connecting appliance and smartphone to Wi-Fi network. | The password for the Wi-Fi network was entered incorrectly. | Delete your home Wi-Fi network and begin the registration process again. |
| Mobile data for your smartphone is turned on. | Turn off the Mobile data on your smartphone before registering the appliance | |
| The wireless network name (SSID) is set incorrectly. | The wireless network name (SSID) should be a combination of English letters and numbers. (Do not use special characters.) | |
| The router frequency is not 2.4 GHz. | Only a 2.4 GHz router frequency is supported. Set the wireless router to 2.4 GHz and connect the appliance to the wireless router. To check the router frequency, check with your Internet service provider or the router manufacturer. | |
| The distance between the appliance and the router is too far. | If the appliance is too far from the router, the signal may be weak and the connection may not be router closer to the appliance or purchase and install a Wi-Fi repeater. |
See other models: 27MP37VQ-B SP60NB50 28LM400B-PU LGUS110 LGVM670
