www.lg.com
ESPAÑOL
Copyright © 2018 LG Electronics Inc. All Rights Reserved.
OWNER’S MANUAL
AIR
CONDITIONER
Read this owner’s manual thoroughly before operating the appliance
and keep it handy for reference at all times.
TYPE: WINDOW
MFL70960615
Rev.01_112818
ENGLISH
OWNER’S MANUAL
AIR
CONDITIONER
LW8019ER

2
TABLE OF CONTENTS
TABLE OF CONTENTS
3 SAFETY INSTRUCTIONS
3 IMPORTANT SAFETY INSTRUCTIONS
8 PRODUCT OVERVIEW
8 Exterior Parts
8 Interior Parts
18 MAINTENANCE
18 Air Filter
19 TROUBLESHOOTING
19 Before Calling for Service
19 Normal Sounds You May Hear
22 WARRANTY
11 How to Install the Unit
11 Window Requirements
11 Preparation of Cabinet
12 Cabinet Installation
15 OPERATION
15 Control Panel and Remote Control
16 Wireless Remote Control
17 Ventilation
17 Air Direction
17 Additional Features
9 INSTALLATION
9 Electrical Data
10 Installation Overview
ENGLISH
3
SAFETY INSTRUCTIONS
SAFETY INSTRUCTIONS
READ ALL INSTRUCTIONS BEFORE USE
Your safety and the safety of others are very important.
We have provided many important safety messages in this manual and on your appliance. Always
read and follow all safety messages.
This is the safety alert symbol.
This symbol alerts you to potential hazards that can kill or injure you and others.
All safety messages will follow the safety alert symbol and either the word WARNING or
CAUTION.
These words mean:
WARNING
You may be killed or seriously injured if you do not follow instructions.
CAUTION
You may be injured or cause damage to the product if you do not follow instructions.
All safety messages will tell you what the potential hazard is, tell you how to reduce
the chance of injury, and tell you what may happen if the instructions are not followed.
IMPORTANT SAFETY INSTRUCTIONS
WARNING
injury to persons when using this product, follow basic precautions,
including the following:
INSTALLATION
● Before use, the appliance must be properly installed as described in this manual.
● Contact the authorized service technician for repair or maintenance of this unit.
● Contact the installer for installation of this unit.
● The air conditioner is not intended for use by young children or invalids without supervision.
● Young children should be supervised to ensure that they do not play with the air conditioner.
4
SAFETY INSTRUCTIONS
● When the power cord is to be replaced, replacement work shall be performed by authorized
personnel only using only genuine replacement parts.
and authorized personnel only.
● Connect to a properly rated, protected, and sized power circuit to avoid electrical overload.
● Always plug into a grounded outlet.
● Do not under any circumstances, cut or remove the third (ground) prong from the power cord.
● When installing or moving the appliance, be careful not to pinch, crush, or damage the power
cord.
● Plug in the power plug properly.
● Do not modify or extend the power cord.
● Do not start/stop operation by plugging/unplugging the power cord.
● If the cord/plug is damaged, have it replaced by an authorized service person using authorized
replacement parts.
● Use a dedicated circuit.
● Do not disassemble or modify the product.
● Adhere to all industry recommended safety procedures including the use of long-sleeved gloves
and safety glasses.
● Use care when unpacking and installing. The edges of the product may be sharp.
● Disconnect the power cord or circuit breaker before installing or servicing the appliance.
● Keep packaging materials out of the reach of children. These materials can pose a suffocation
risk to children.
● Store and install the product where it will not be exposed to temperatures below freezing or
exposed to outdoor weather conditions.
other appliance.
OPERATION
● Use this appliance only for its intended purpose.
● Never attempt to operate this appliance if it is damaged, malfunctioning, partially disassembled,
or has missing or broken parts, including a damaged cord or plug.
● Repair or immediately replace all power cords that have become frayed or otherwise damaged.
Do not use a cord that shows cracks or abrasion damage along its length or at either end.
● Do not run cord under carpets or mats where it could be stepped on and damaged.
● Keep the cord out from under heavy objects like tables or chairs.
● Do not place the power cord near a heat source.
● Do not use an adaptor or plug the product into a shared outlet.
● Do not tamper with controls.
● If you detect a strange sound, a chemical or burning smell, or smoke coming from the appliance,
unplug it immediately, and contact an LG Electronics Customer Information Center.
straight out from the outlet.
● Do not grasp the power cord or touch the appliance controls with wet hands.
ENGLISH
5
SAFETY INSTRUCTIONS
● If water enters the product, turn off the power at the main circuit, then unplug the product and call
for service.
● If the product has been submerged, contact an LG Electronics Customer Information Center for
instructions before resuming use.
● Unplug the product when unused for long periods.
● Unplug the product before cleaning.
● In the event of a gas leak (propane gas, etc.) do not operate this or any other appliance. Open a
window or door to ventilate the area immediately.
● This appliance is not intended for use by persons (including children) with reduced physical,
sensory or mental capabilities, or lack of experience and knowledge, unless they have been
given supervision or instruction concerning the use of the appliance by a person responsible for
their safety.
● The interior of the product must only be cleaned by an authorized service center or a dealer.
● Do not use solvent-based detergent on the product. Doing so can cause corrosion or damage,
GROUNDING INSTRUCTIONS
● The power cord of this appliance is equipped with a three-prong (grounding) plug. Use this with
a standard three-slot (grounding) wall power outlet to minimize the hazard of electric shock. The
sure the receptacle is properly grounded. DO NOT CUT OR REMOVE THE THIRD (GROUND)
PRONG FROM THE POWER PLUG.
- Situations when the appliance will be disconnected occasionally; Because of potential safety
hazards, we strongly discourage the use of an adapter plug. However, if you wish to use an
adapter, a TEMPORARY CONNECTION may be made. Use UL-listed adapter, available from
most local hardware stores.
The large slot in the adapter must be aligned with the large slot in the receptacle to assure a
proper polarity connection.
● Attaching the adapter ground terminal to the wall receptacle cover screw does not ground the
appliance unless the cover screw is metal, and not insulated, and the wall receptacle is grounded
to make sure the receptacle is properly grounded.
● Disconnect the power cord from the adapter, using one hand on each. Otherwise, the adapter
ground terminal might break. Do not use the appliance with a broken adapter plug.
- Situations when the appliance will be disconnected often; Do not use an adapter plug in these
situations. Unplugging the power cord frequently can lead to an eventual breakage of the
ground terminal. The wall power outlet should be replaced by a three-slot (grounding) outlet
instead.
6
SAFETY INSTRUCTIONS
CAUTION
To reduce the risk of minor or moderate injury to persons, malfunction, or
damage to the product or property when using this product, follow basic
precautions, including the following:
INSTALLATION
● Take care when installing the product that exhaust or condensation does not damage nearby
property.
● Follow installation instructions exactly to avoid excessive vibration or water leakage.
OPERATION
● This appliance is not intended for use as a precision refrigeration system. Do not use it for special
purposes such as maintaining pets, food, precision machinery, or art objects.
● When installing or moving the appliance, be careful not to pinch, crush, or damage the power
cord.
● Make sure the air inlet and outlet are free from obstructions.
● Use a soft cloth to clean the appliance. Do not use waxes, thinners, or harsh detergents.
● Do not step on or place heavy objects on top of the appliance.
● Do not drink water drained from the appliance.
are used simultaneously.
● Remove the batteries if the remote control is not to be used for an extended period of time.
● Never mix different types of batteries, or old and new batteries for the remote control.
f with clean water.
consult a doctor.
● Do not recharge or disassemble the batteries.
MAINTENANCE
● Never use strong cleaning agents or solvents when cleaning the air conditioner or spray water.
Use a smooth cloth.
Do not expose people, animals, or plants to the cold or hot wind from the air conditioner for
extended periods of time.
ENGLISH
7
SAFETY INSTRUCTIONS
REFRIGERANT (FOR R32 ONLY)
WARNING
● Do not use means to accelerate the defrosting process or to clean, other than those
recommended by the manufacturer.
● The appliance shall be stored in a room without continuously operating ignition sources (for
CAUTION
associated with older units. Please follow all precautions and advisories.
- Use caution while handling and prevent damage to unit. Do not put any holes into product for
any reason. This can cause damage to product and prevent unit from cooling.
- Maintenance and cleaning of unit should be performed by trained personnel. Failure to properly
clean unit can result in damage to the refrigeration system and or the electrical system.
- Make certain that all the air circulation/ventilation openings are free from obstruction.
-
warranties.
-
water heaters or furnaces. Also keep away from electric heaters. Damaged units should be
repaired before storage.
SAVE THESE INSTRUCTIONS
8
PRODUCT OVERVIEW
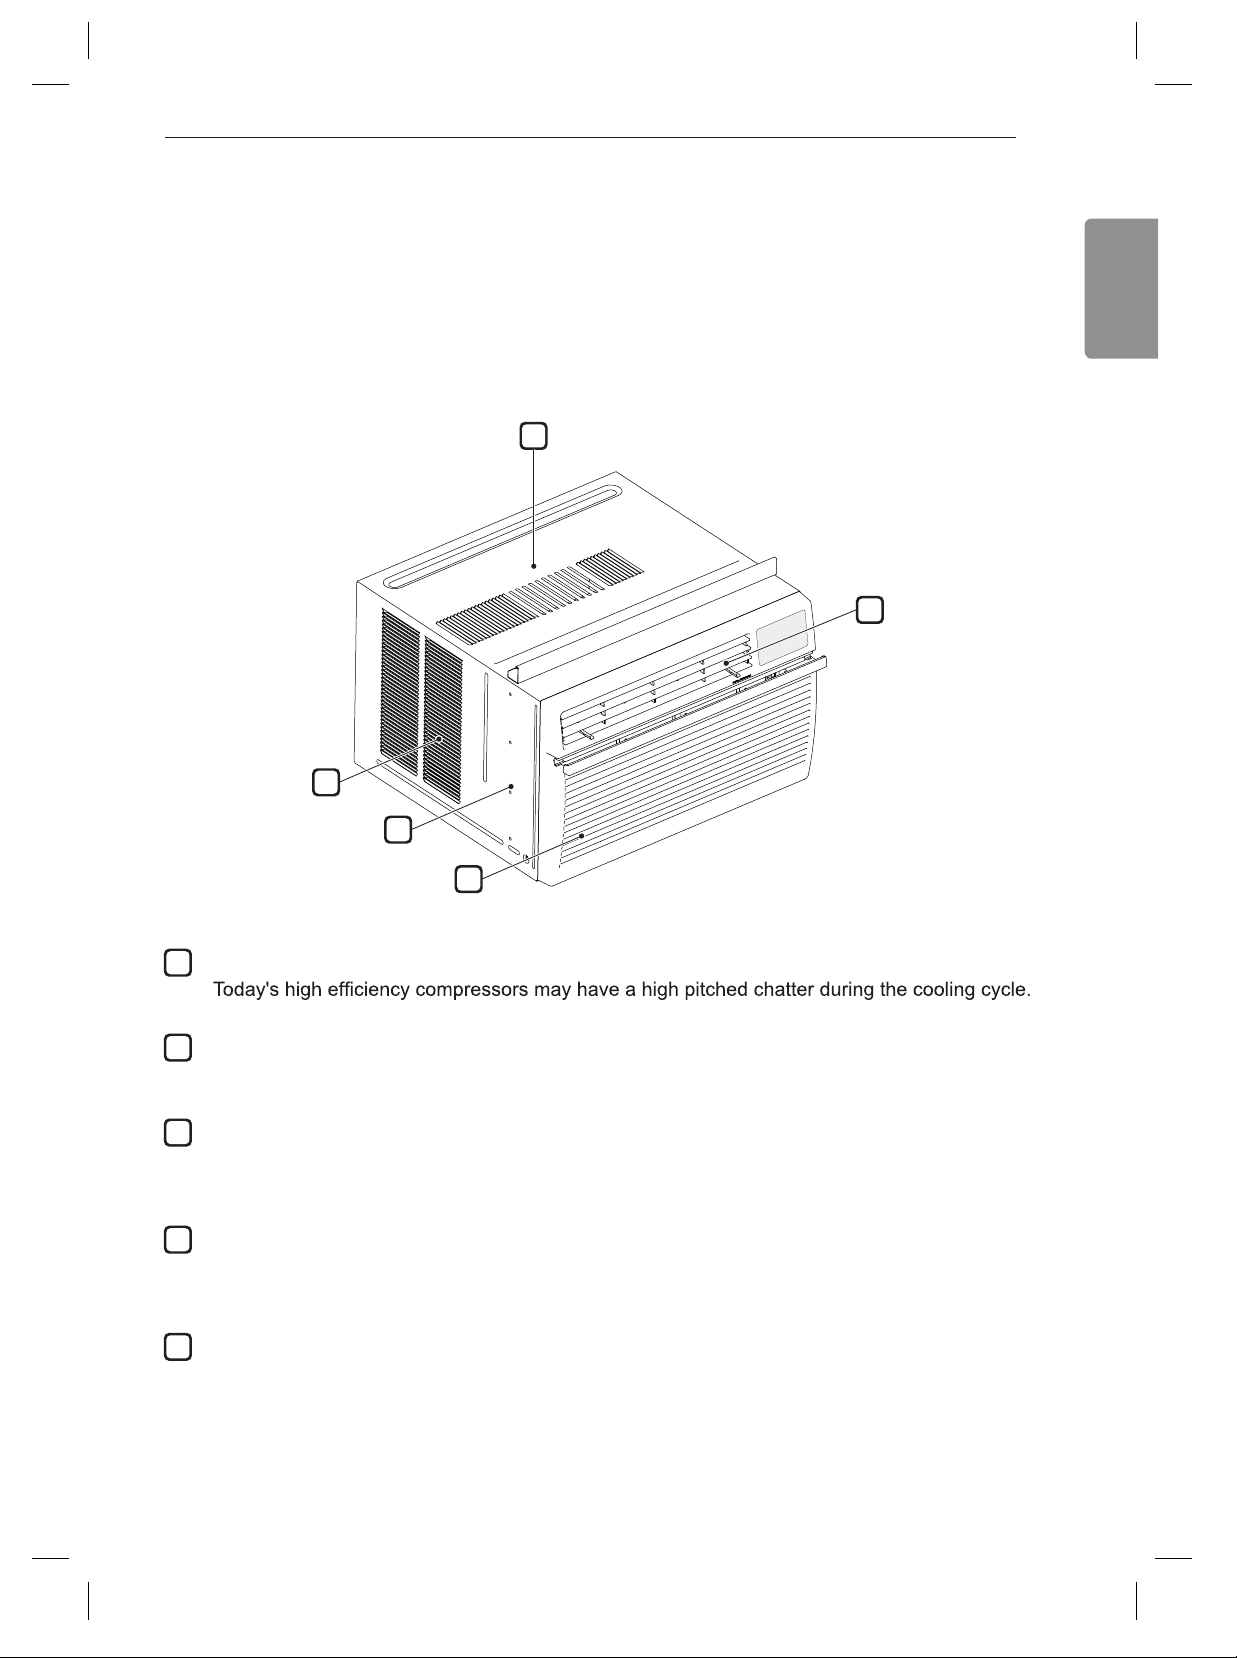
PRODUCT OVERVIEW
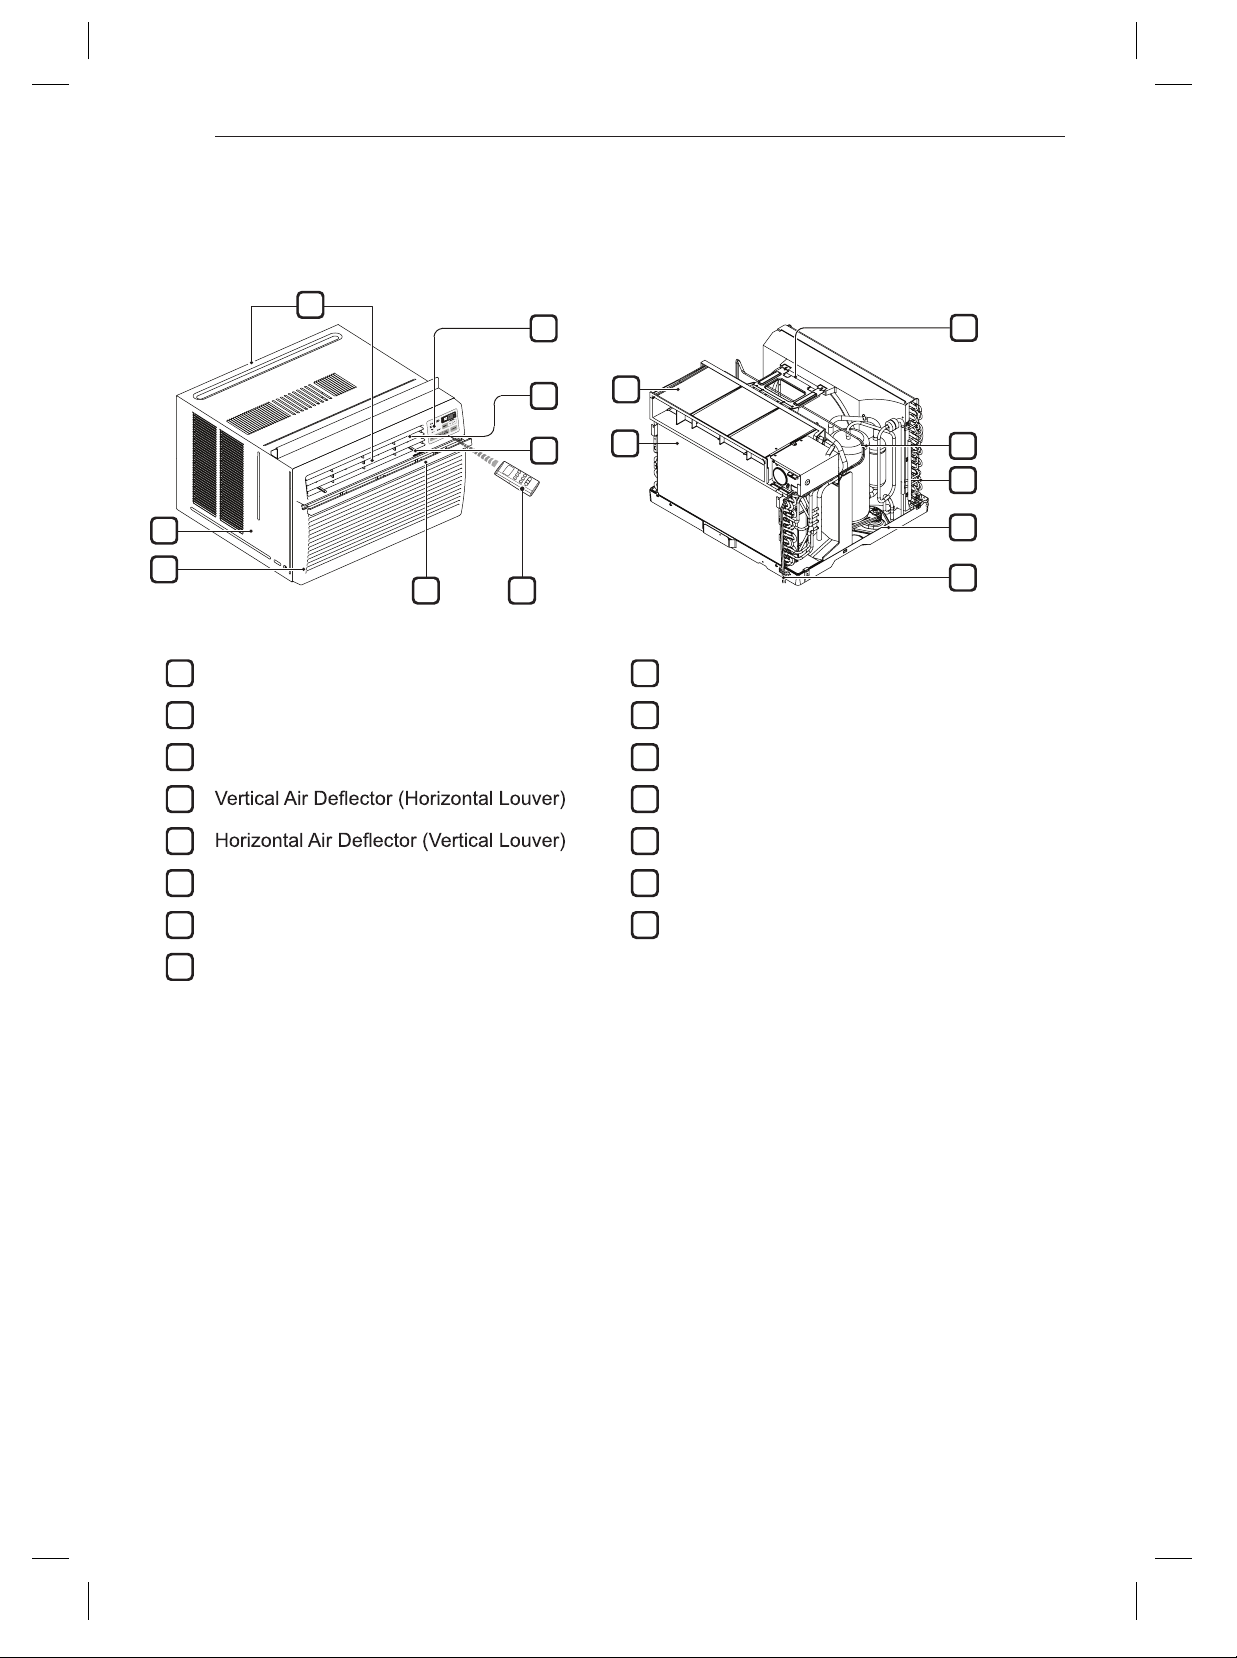
Exterior Parts Interior Parts
8
6
3
1
4
5
7
3
4
5
6
7
1
2
1
Evaporator
2
Air Guide
3
4
Brace
5
Compressor
6
Condenser
7
Base Pan
Power Cord
1
Control Panel
2
Remote Controller
3
Air Filter
4
5
6
Front Grille
7
8
Cabinet
Air Outlet
2
ENGLISH
9
INSTALLATION
INSTALLATION
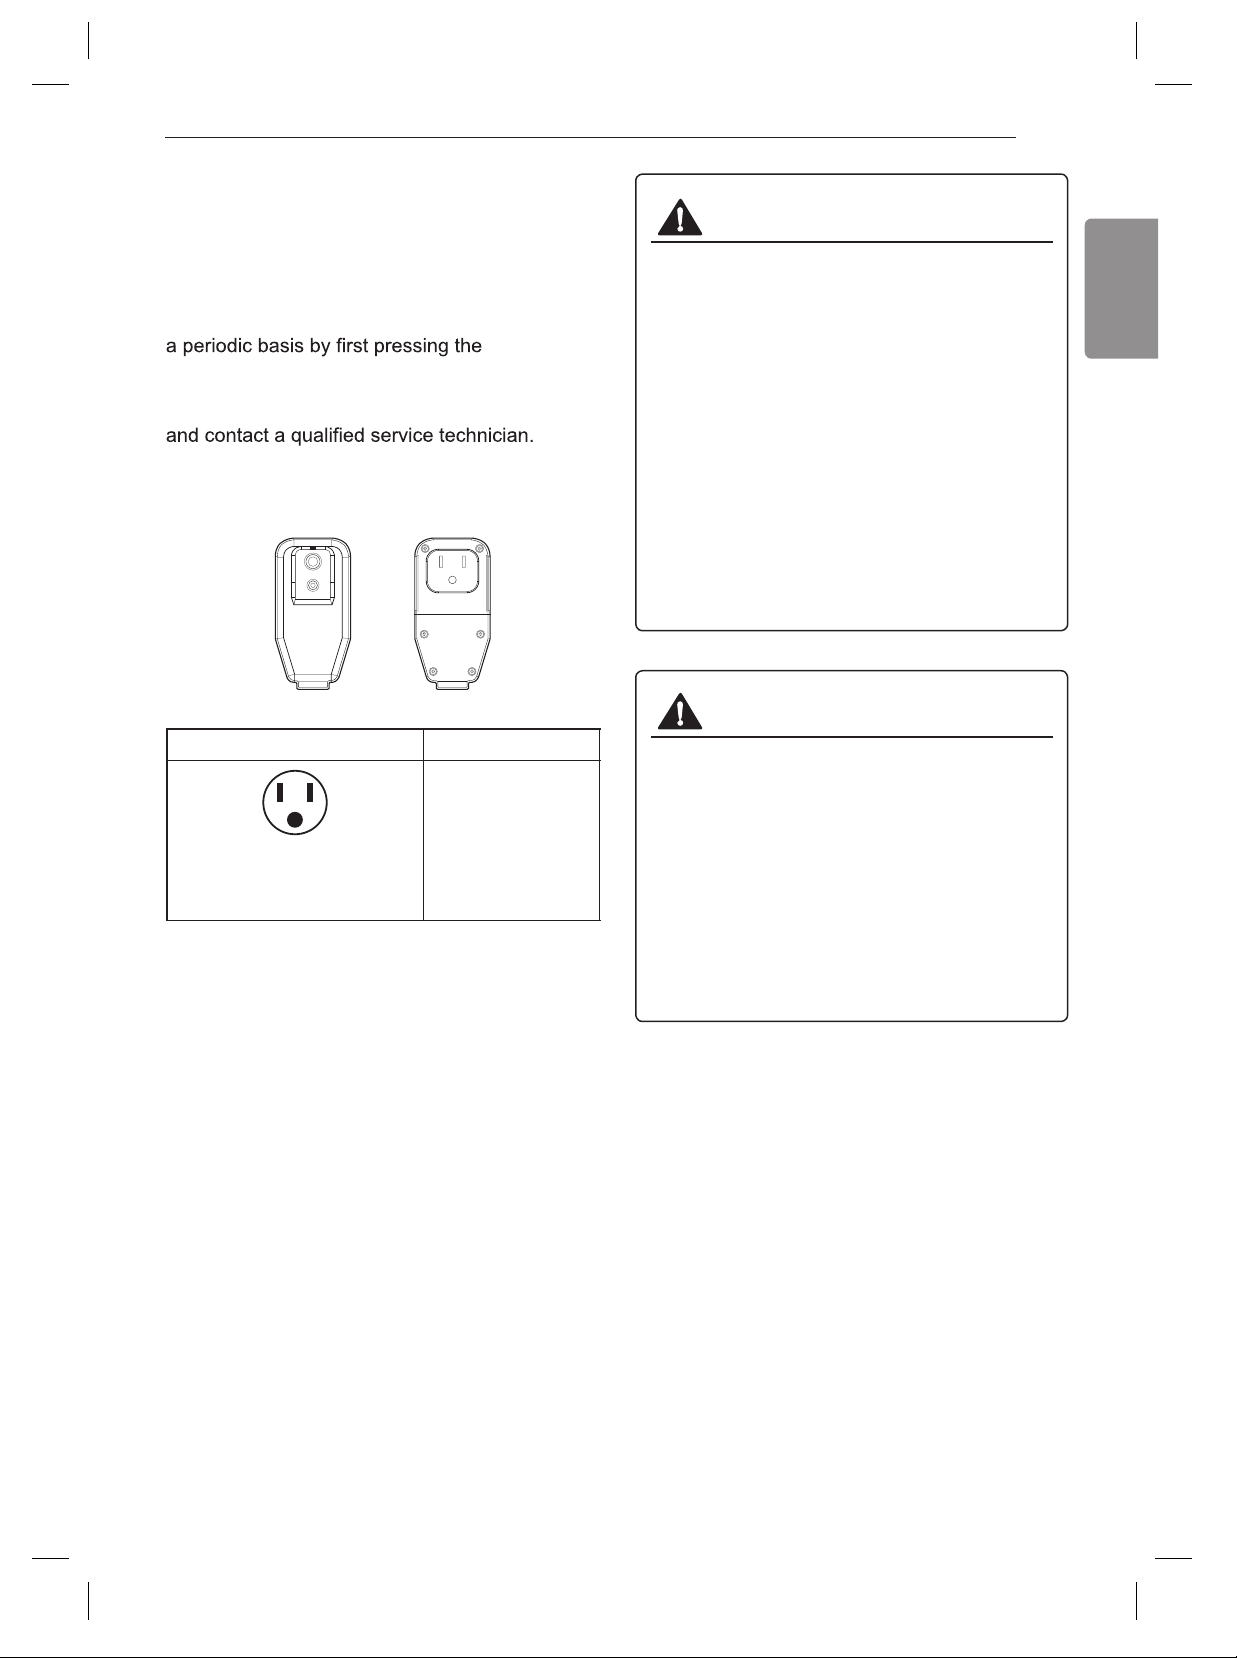
Electrical Data
Power cord may include a current interrupter
device. TEST and RESET buttons are provided
on the plug case. The device should be tested on
TEST button
and then the RESET button. If the TEST button
does not trip or if the RESET button will not stay
engaged, discontinue use of the air conditioner
WARNING
● This appliance should be installed in
accordance with the National Electrical
Code.
● Use of extension cords could cause serious
injury or death.
siht htiw droc noisnetxe na esu ton oD-
window air conditioner.
teltuo-itlum ro srotcetorp egrus esu ton oD-
adapters with this window air conditioner.
● Never push the TEST button during
operation. Doing so can damage the plug.
siht esremmi ro ,yfidom ,evomer ton oD-
plug. If this device trips, the cause should
be corrected before further use.
CAUTION
● The conductors inside this cord are
surrounded by shields, which monitor
leakage current. These shields are not
grounded. Periodically examine the cord
for any damage. Do not use this product
in the event the shields become exposed.
Avoid shock hazard. This unit cannot be
user-serviced. Do not open the tamper-
resistant sealed portion. All warranties and
performance will be voided. This unit is not
intended to be used as an ON/OFF switch.
Use Wall Receptacle Power Supply
Use 15 A, time
delay fuse or 15 A,
circuit breaker.
Standard 120 V, 3-wire
grounding receptacle rated
15 A / 120 VAC / 60 Hz
for 120 V
RESET
TEST
10
INSTALLATION
Installation Overview
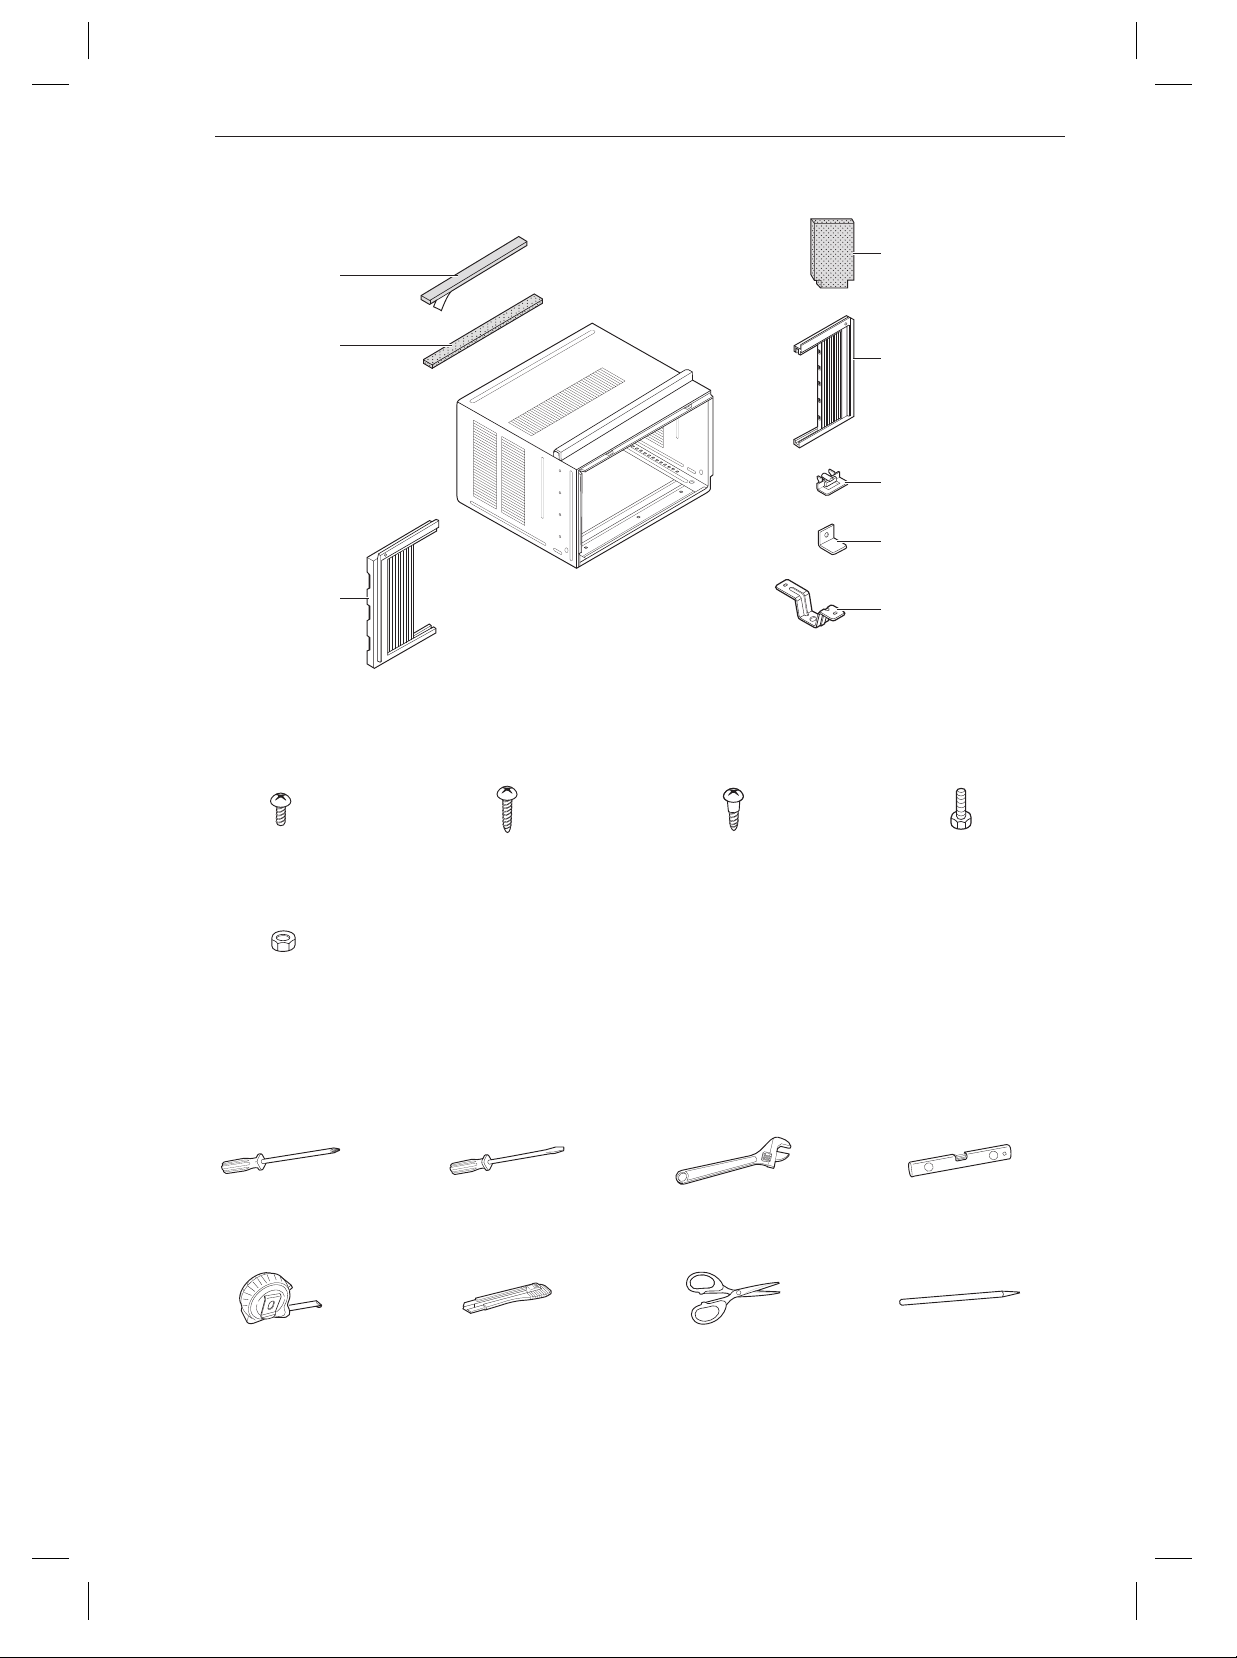
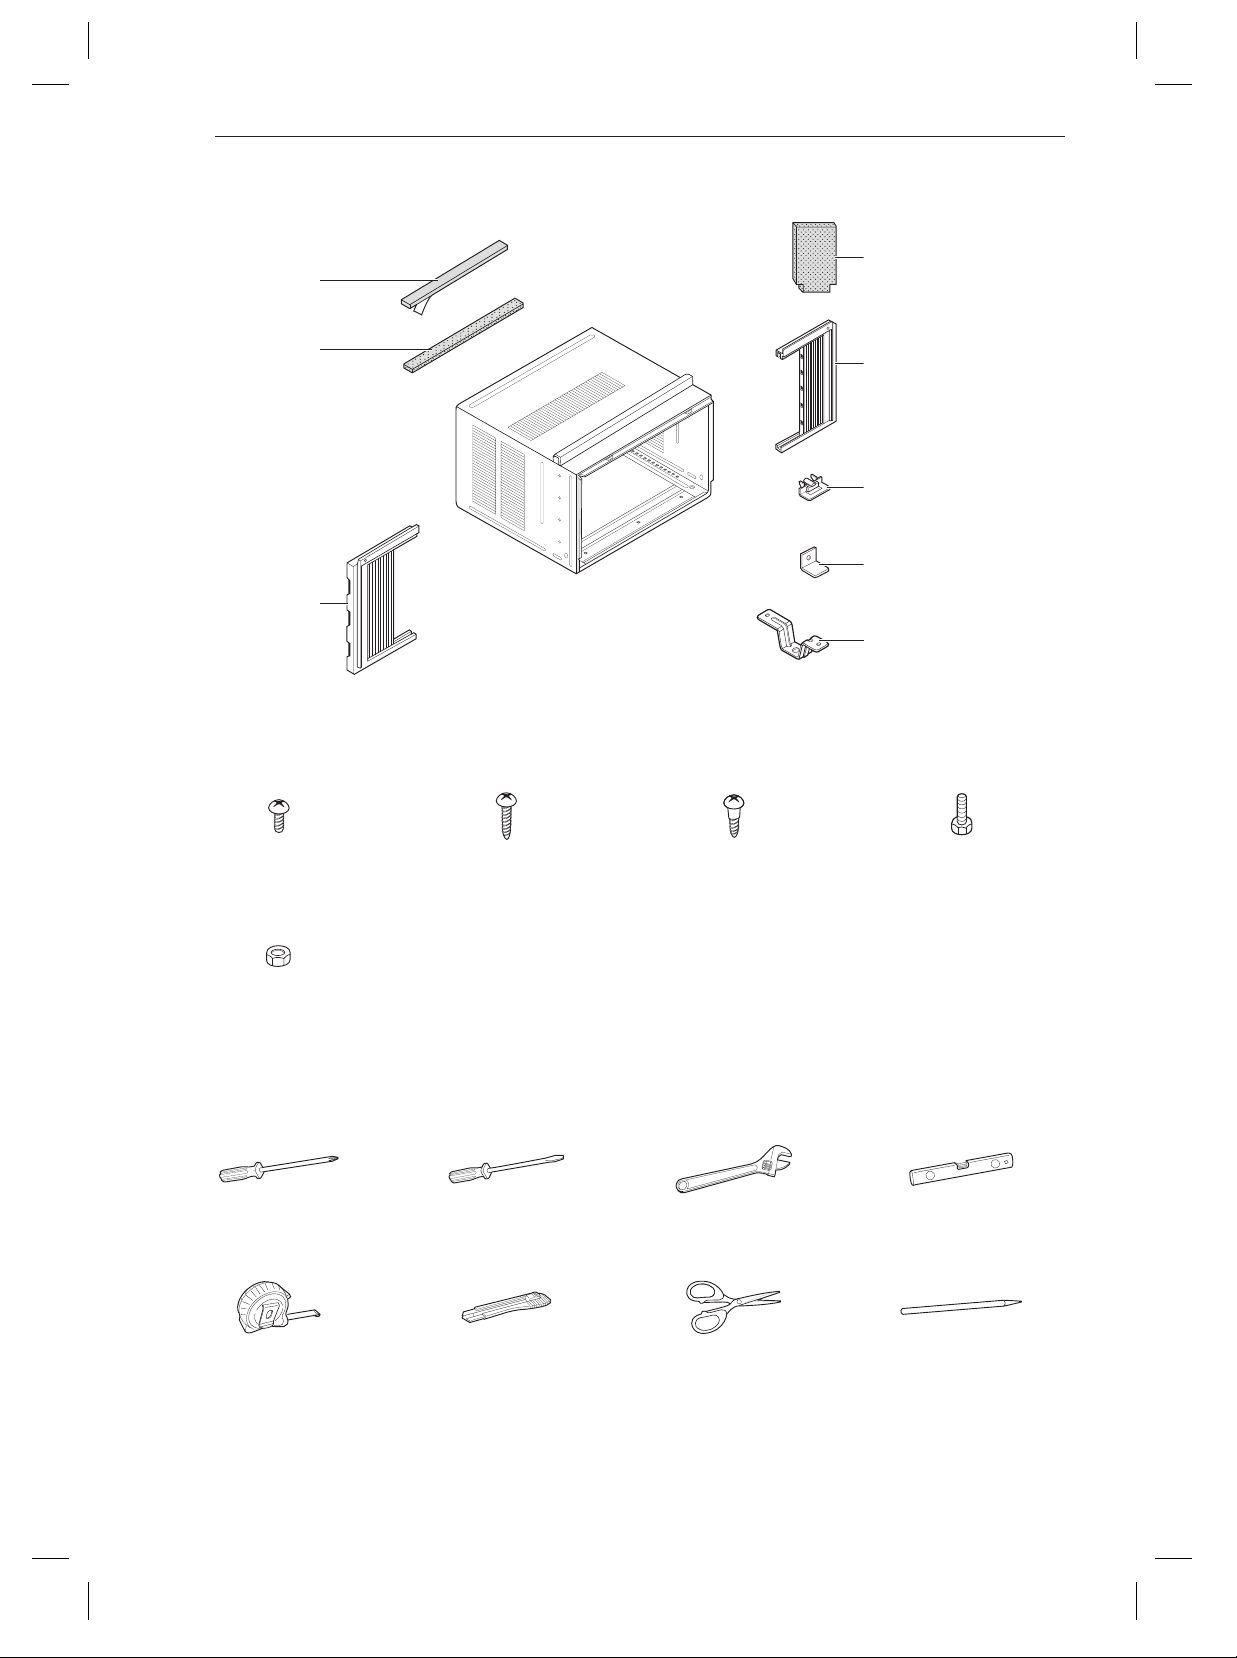
Accessories
Type 'A' Screws
(14)
Type 'B' Screws
(3)
Type 'C' Screws
(5)
Carriage Bolt
(2)
Lock Nut
(2)
Tools Needed
Phillips-head
screwdriver
Flat-blade screwdriver Adjustable wrench Level
Tape measure Cutting knife Scissors Pencil
Heatproof foam (2)
(Adhesive backed)
Right curtain
panel
Left curtain
panel
Foam strip
(Non-adhesive)
Foam-PE (2)
(Adhesive backed)
Lower panel
guide (2)
Window locking
bracket
Sill bracket (2)
ENGLISH
11
INSTALLATION
How to Install the Unit
Window Requirements
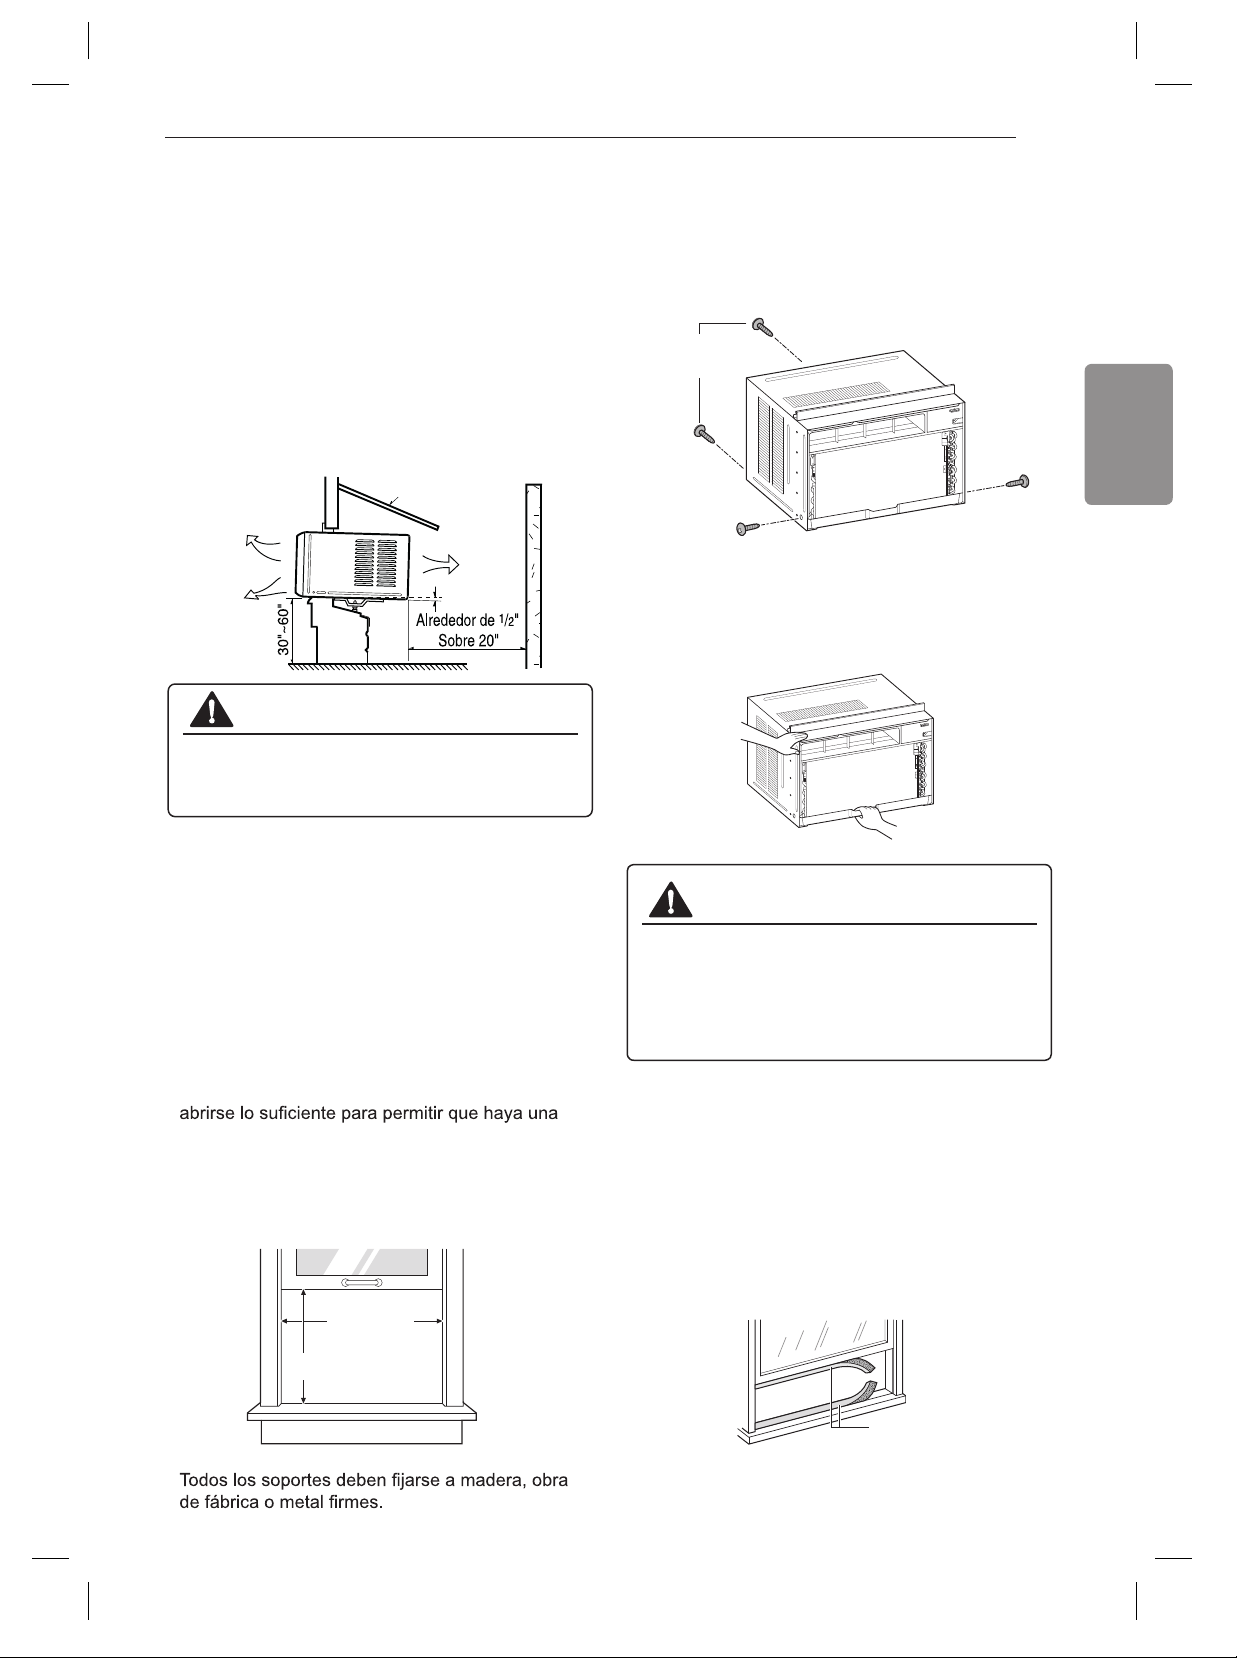
● This unit is designed for installation in standard
double hung windows with actual opening
widths from 27" to 39".
The top and bottom window sashes must open
16" from the bottom of the upper sash to the
inside sill.
● The height offset between the inside sill and
outside sill must be less than 1 ¼".
27" to 39"
16" min
NOTE
●
wood, masonry, or metal.
Preparation of Cabinet
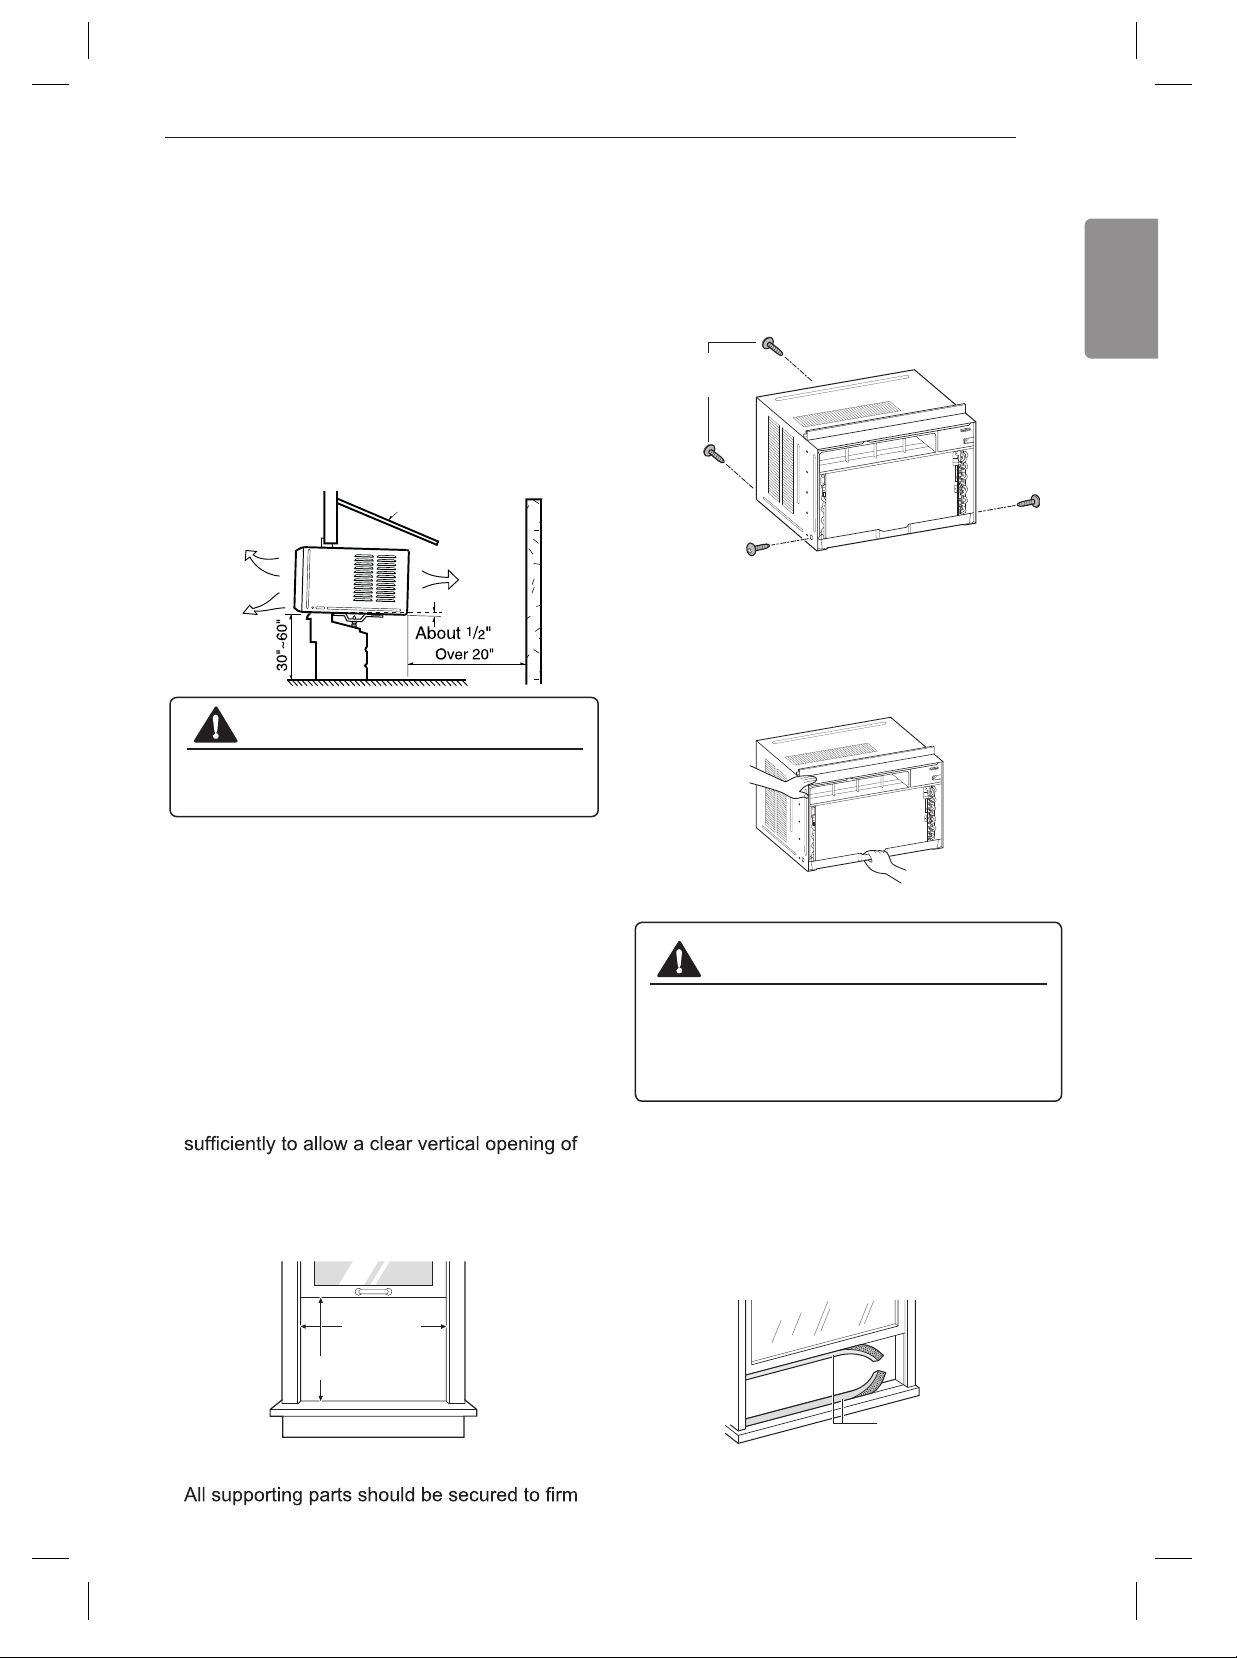
1
Remove 4 screws which fasten the cabinet
at both sides and at the back. (Keep the
screws for later use.)
1
To prevent vibration and noise, make sure
the unit is installed securely and firmly.
4
Install the unit slightly tilted so the back is
slightly lower than the front (about 1/2").
This will force condensed water to flow to
the outside.
5
Install the unit with the bottom between
30" ~60" above the floor level.
2
Install the unit where the sunlight dose not
shine directly on the unit.
3
The outside of the cabinet must extend out-
ward for at least 12" and there should be no
obstacles, such as a fence or wall, within 20"
from the back of the cabinet because it will
prevent heat radiation of the condenser.
Restriction of outside air will greatly reduce
the cooling efficiency of the air conditioner.
Fence
Awning
Heat
radiation
Cooled air
CAUTION
● All side louvers of the cabinet must remain
exposed to the outside of the structure.
Shipping
Screws
CAUTION
● The unit is heavy. To prevent injury, use
proper lifting techniques when pulling unit
forward from cabinet. Obtain assistance
from another person if possible.
3
Cut the window sash seals (Foam-PE)
to the proper length. Peel off the backing
and attach the adhesive-backed foam to
the underside of the window sash and the
bottom of the window frame.
Foam-PE
(Adhesive backed)
2
Slide the unit from the cabinet by gripping
the base pan handle and pulling forward
while bracing the cabinet.
12
INSTALLATION
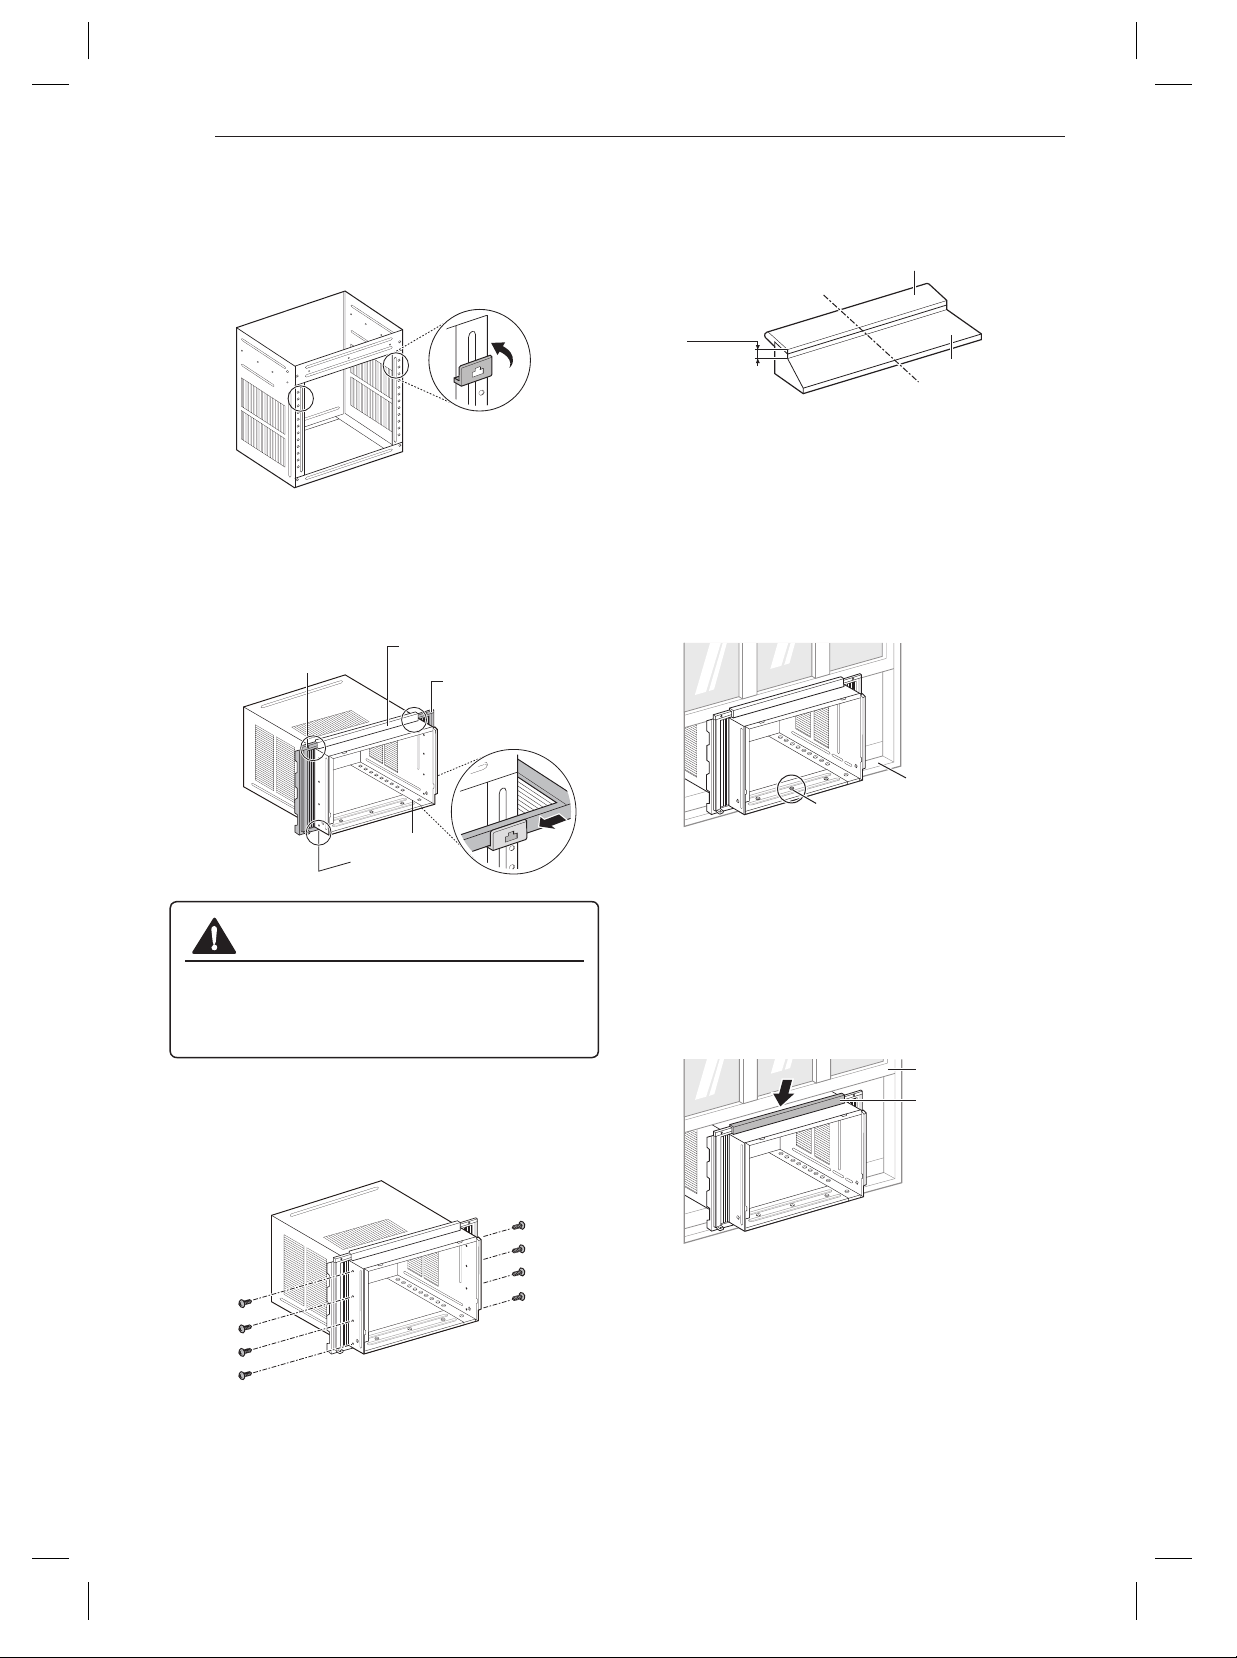
Cabinet Installation
1
Open the window. Mark a line on the center
of the inside sill.
Carefully place the cabinet in the window and
align the center hole on the cabinet bottom
front with the bracket using a carriage bolt
and a lock nut.
2
Pull the bottom window sash down behind
the upper guide until they meet.
Center Line
Outside Sill
Inside Sill
1 ¼" max.
Center Hole
Inside Sill
Upper Guide
Window Sash
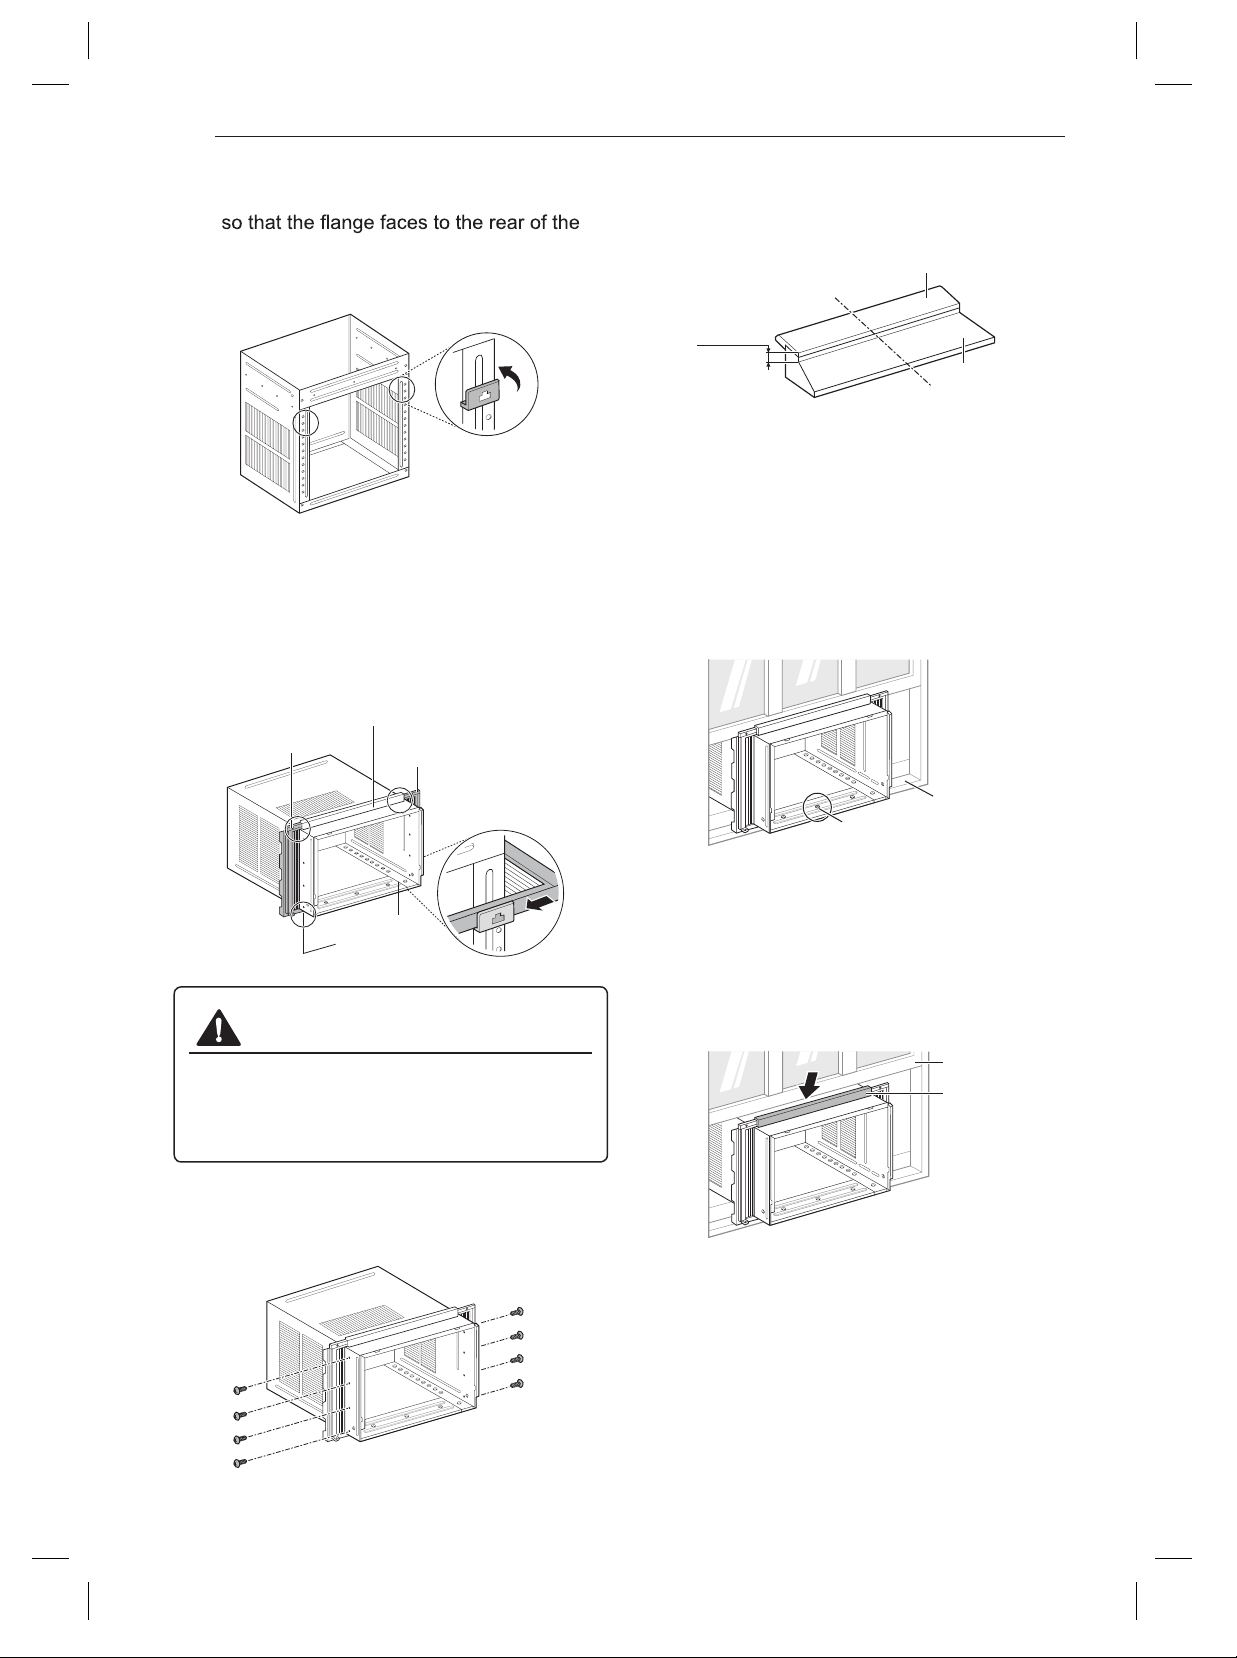
4
Insert the lower curtain panel guides into
the bottom of the cabinet. Insert the guides
cabinet.
5
Upper Panel Guide
Right Curtain Panel
Left Curtain Panel
Lower Panel
Guide
Insert the top and bottom rails of the curtain
panels into the upper and lower panel
guides.
CAUTION
● The lower panel guides are easily broken.
Be careful with them when installing the
cabinet.
6
Fasten the curtain panels to the unit with 8
type A screws.
Do not pull the window sash down so
tightly that the movement of the curtain
panels is restricted.
NOTE
●
ENGLISH
13
INSTALLATION
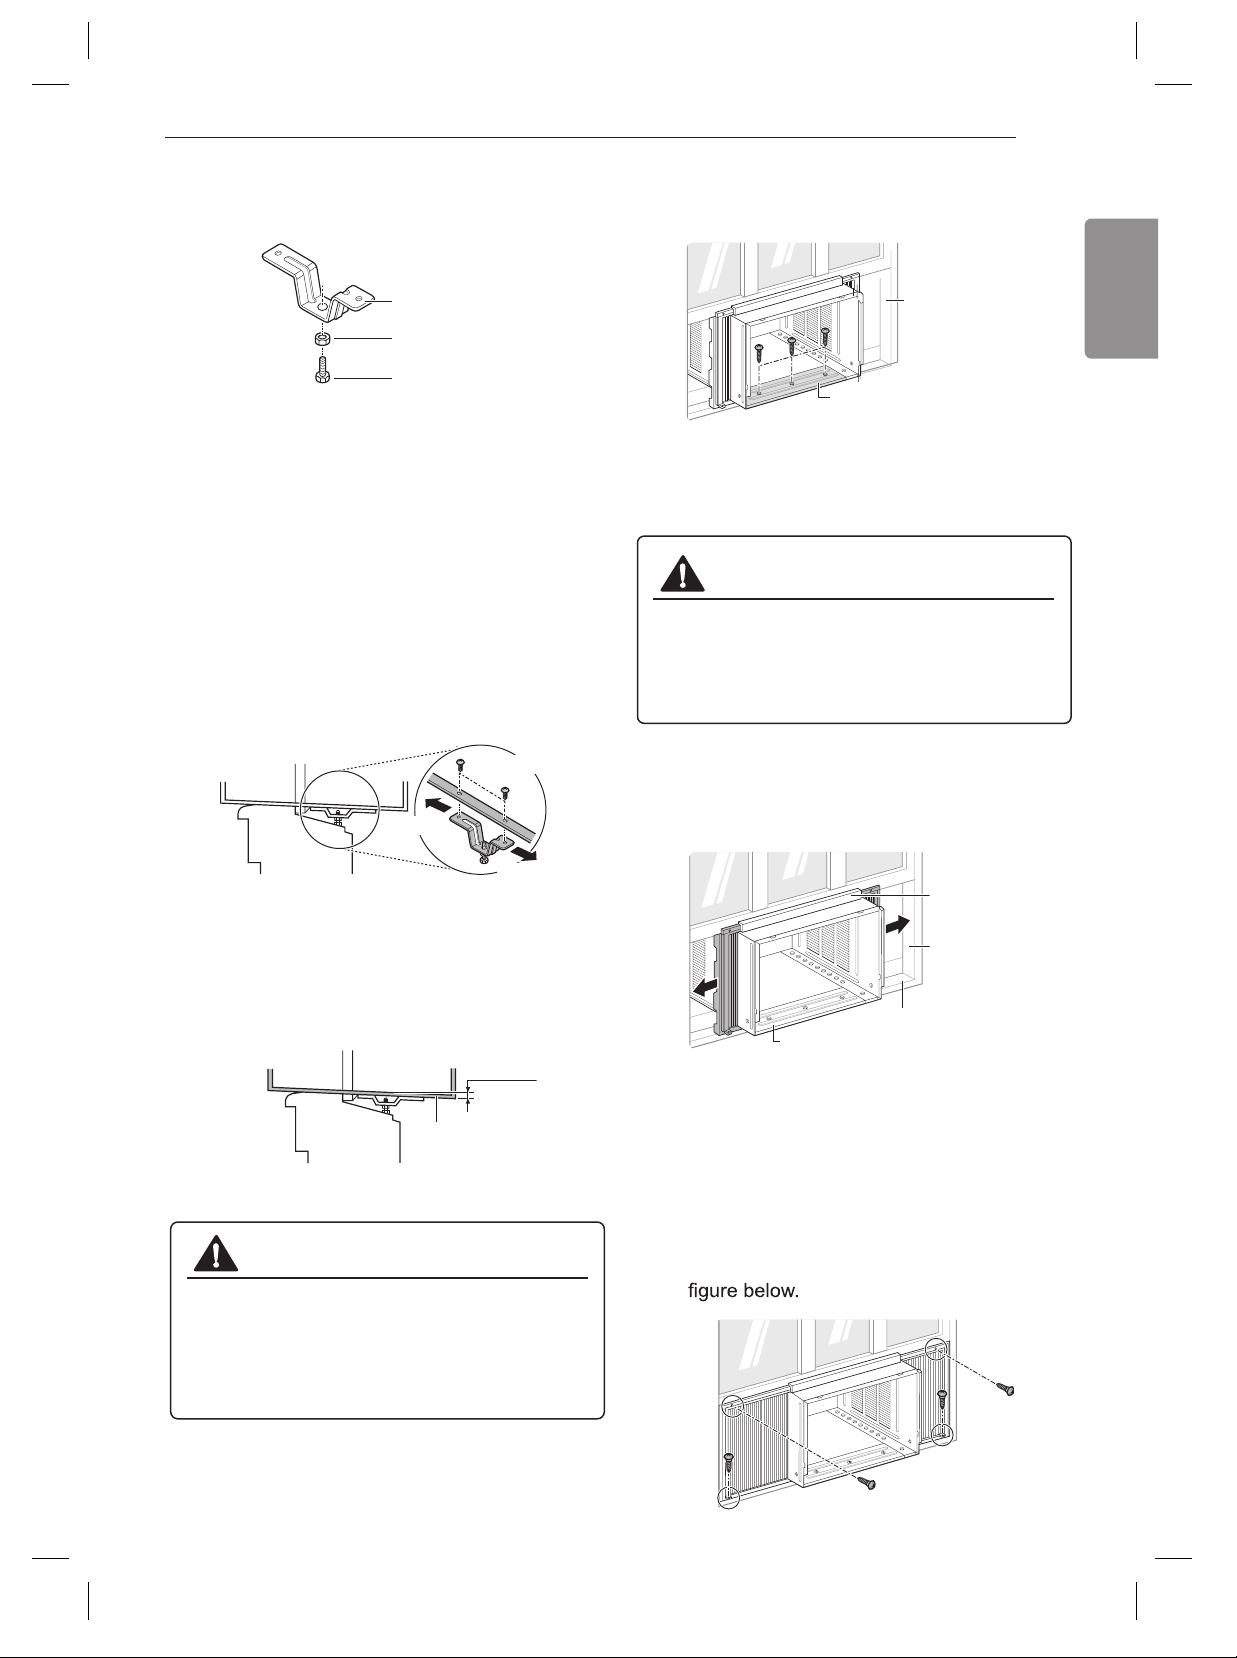
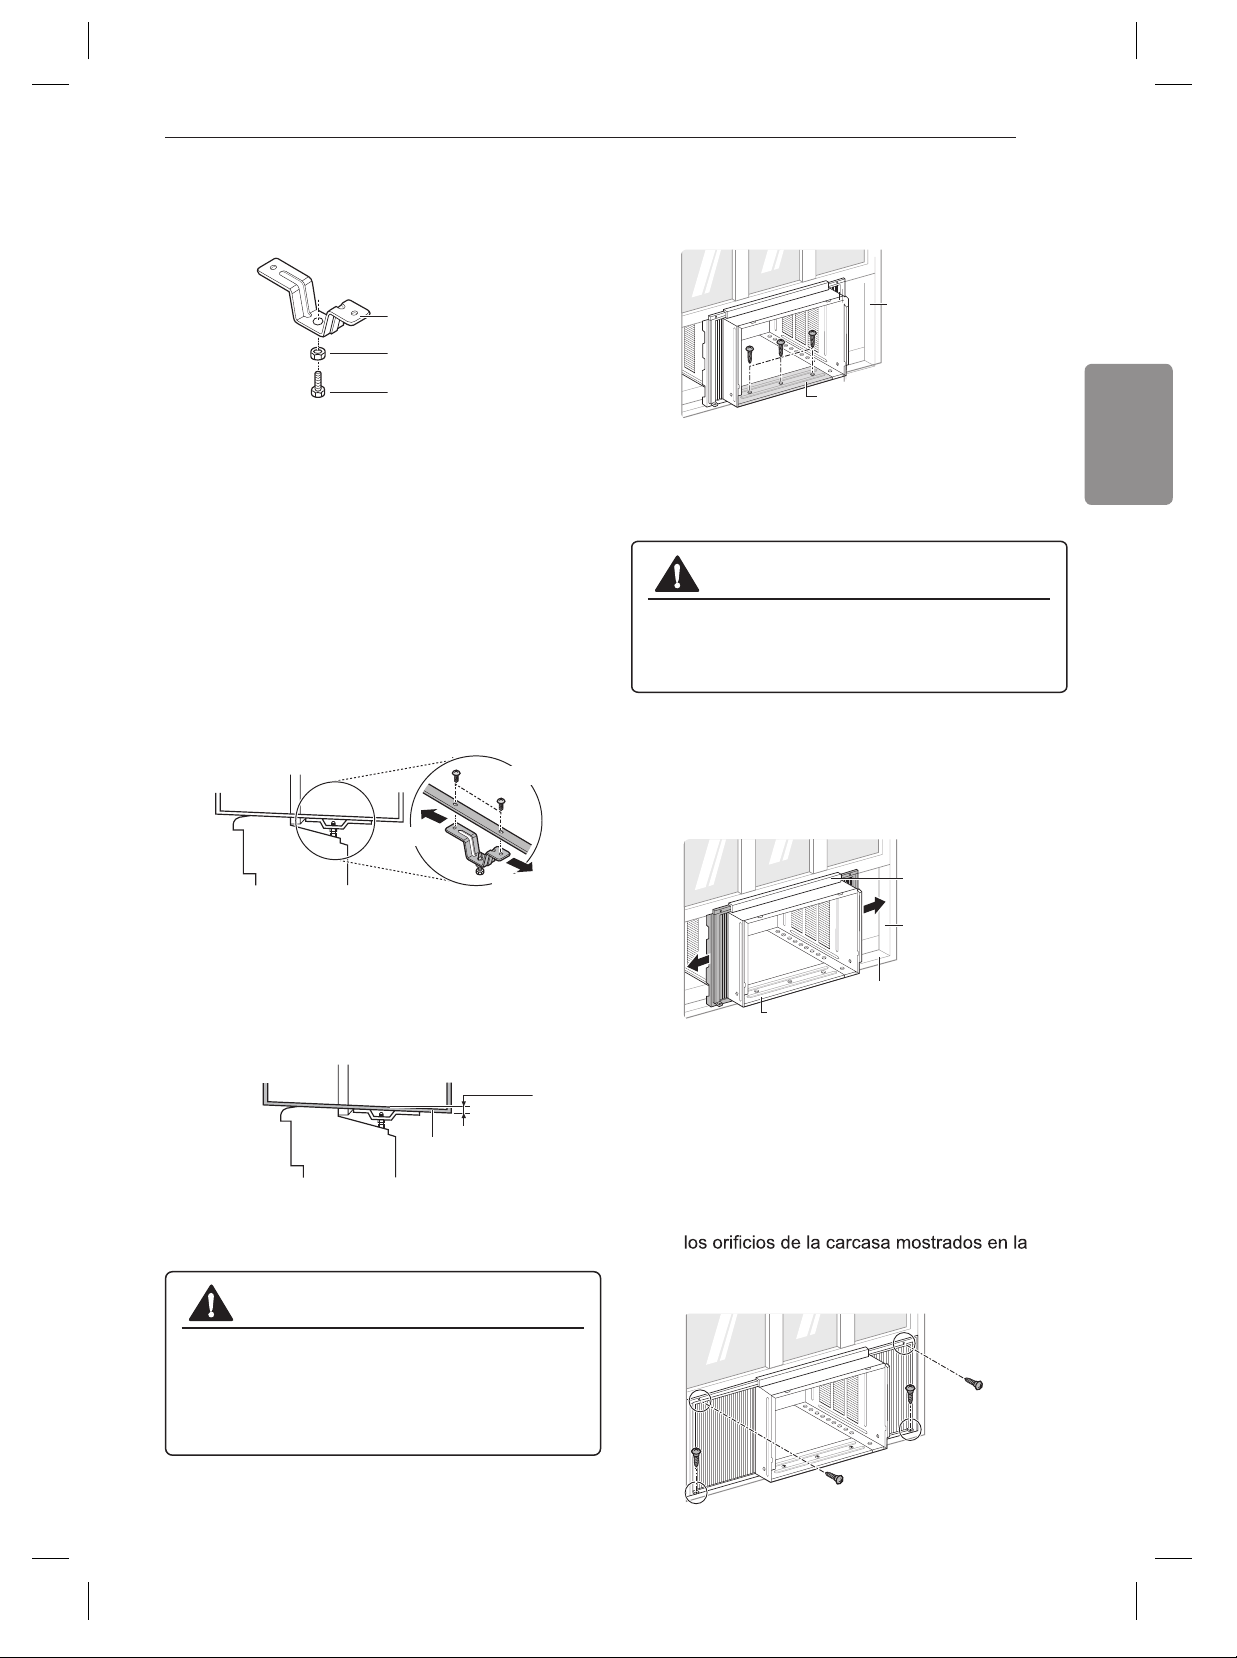
4
Use 2 type A screws to attach a sill support
to the cabinet track holes on one side. Use
the cabinet track holes that will place the sill
support nearest to the outer edge of the sill.
Repeat with the second sill support on the
opposite side of the cabinet.
5
Install the cabinet with a slight tilt (about ½”)
downward on the outside.
Use the bolt and nut to adjust the tilt of the
cabinet.
CAUTION
● Do not drill a hole in the bottom pan.
The product is designed to operate with
approximately ½” of water in the bottom
pan. There is no need to add water if the
pan is dry.
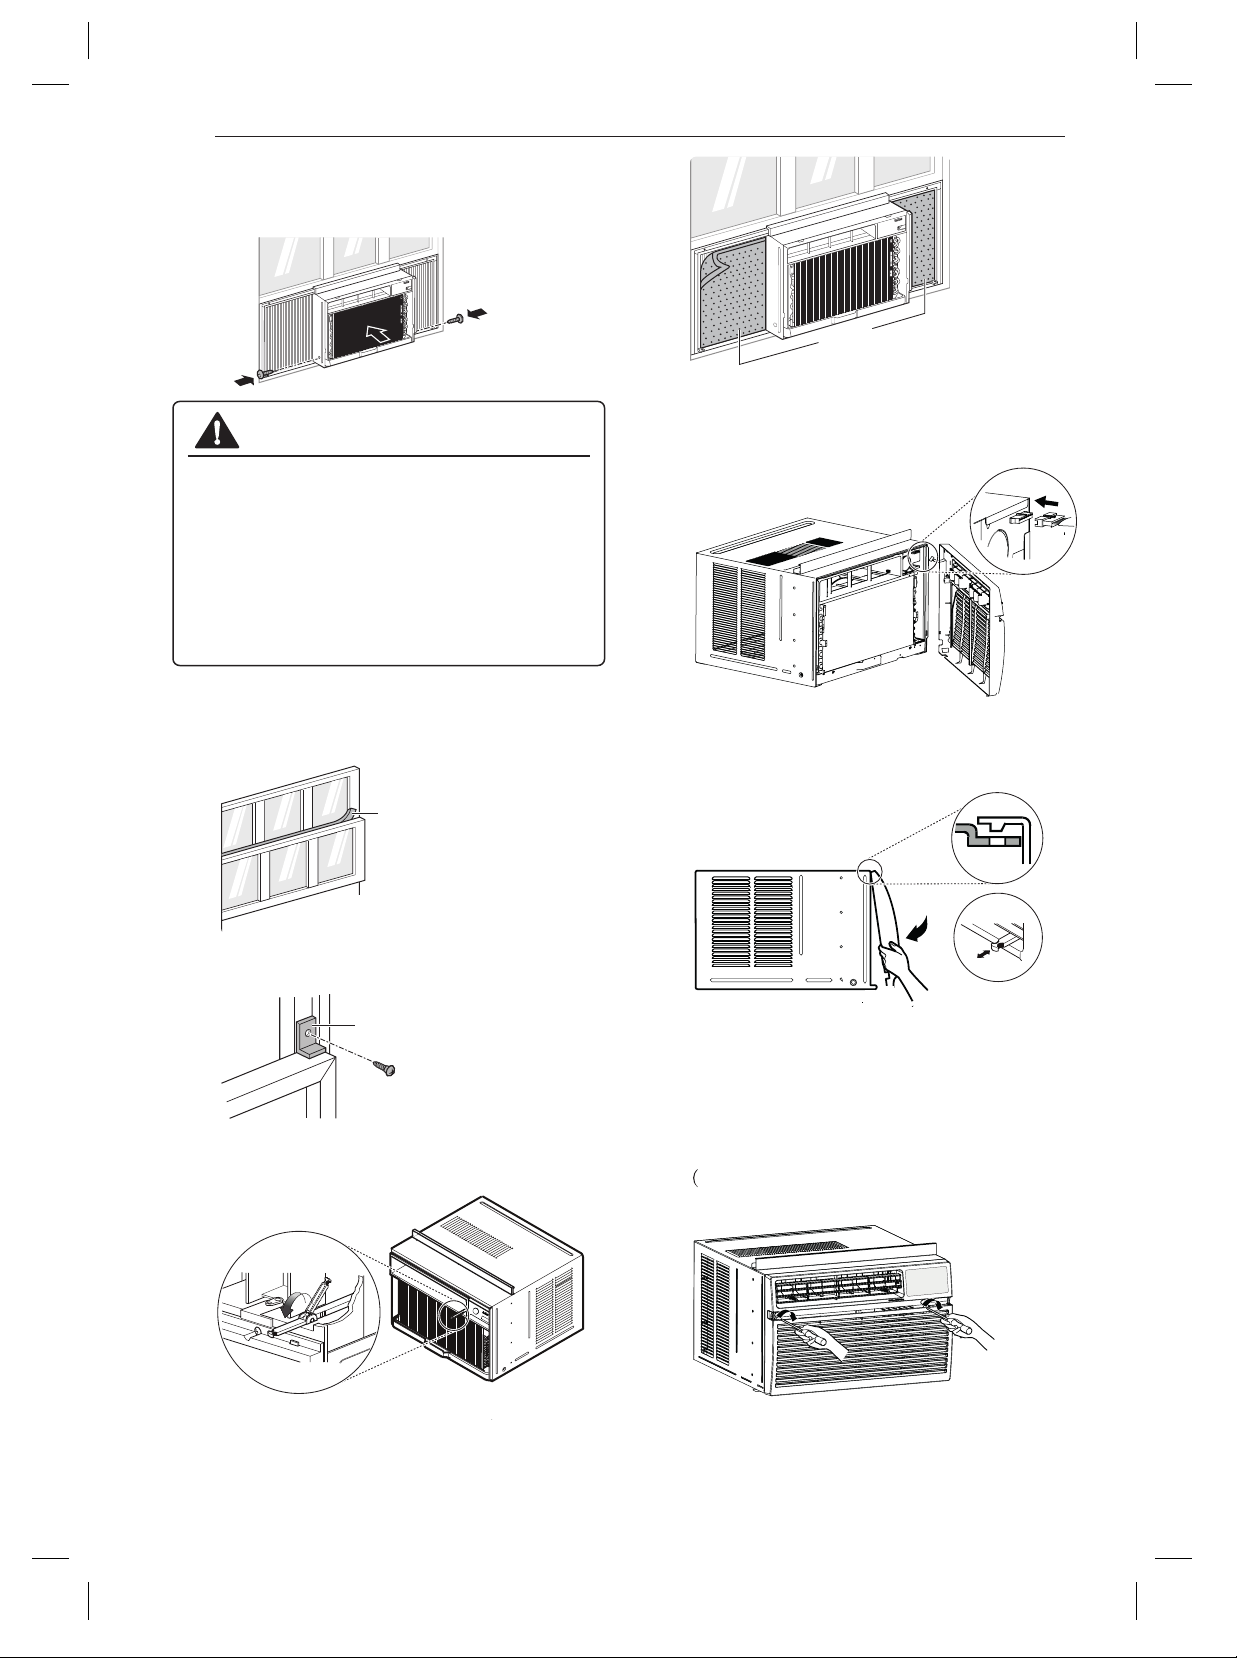
8
Use a screwdriver or power drill to attach
the curtain panels to the window sashes
by driving type C screws into the sashes
through the cabinet holes shown in the
Screws (Type A)
Indoor
Outdoor
about
½”
Cabinet
7
Pull each curtain panel out until it meets the
window sash track. Pull the bottom window
sash down behind the upper panel guide
until they meet.
Front Angle
Sash Track
Upper Panel
Guide
Inside Window Sill
NOTE
● Do not pull the window sash down so
tightly that the movement of the curtain
panels is restricted.
6
Attach the cabinet to the inside sill by
driving 3 type B screws through the cabinet
and into the sill.
Sash Track
Front Angle
NOTE
● Install the cabinet with a very slight
downward tilt toward the outside.
CAUTION
● Do not drill a hole in the bottom pan.
The product is designed to operate with
approximately ½” of water in the bottom
pan.
3
Loosely assemble each sill support.
Sill Support
Nut
Bolt
If the distance to the outer window sill is
not that deep, you may not need the bolt
and nut.
NOTE
●
14
INSTALLATION
10
Cut the non-adhesive foam strip to the
proper length and insert it between the
upper window sash and the lower window
sash.
Foam Strip
(Non-adhesive)
11
Attach the window locking bracket with a
type C screw.
Window Locking Bracket
12
Before installing the front grille, pull out the
vent control lever located above the unit
14
Connect the housing.
15
Attach the front grille to the cabinet by
insertingthe tabs the grille into the slots on
the front the cabinet.Push the grille in until
it snaps into place.
13
NOTE
● Guide the lever carefully through the grille
as you push it in.
NOTE
●
NOTE
● See the 'Electrical Data' section for
information on attaching the power cord
to an electrical outlet.
16
Take out the air filter and secure it with 2
type A screws through the front grille.
9
With the aid of an assistant, slide the
unit into the cabinet. Reinstall the screws
removed from the cabinet sides in step 1.
CAUTION
●
The unit is heavy. Use an assistant to help lift the
●
Hold the unit firmly in place until the window
unit and set it in place. Lifting and maneuvering
the unit by yourself could result in injury.
frameis lowered to meet the top surface of the
unit directly behind the upper guide. If the unit
falls from the window, it could cause personal
injury orproperty damage.
control knobs, as shown.
Cut the adhesive-backed heatproof foam
to match the size of the curtain panels.
Remove the backing from the heatproof
foam and attach it to the curtain panels.
Heatproof Foam
Heatproof foam improves the cooling
capability of the air conditioner.
These 2 Type A screws are packaged by
bag on the Front Grille.)
ENGLISH
15
OPERATION
Control Panel and Remote Control
Remote Control
OPERATION
4 3 2
1
5
7
6
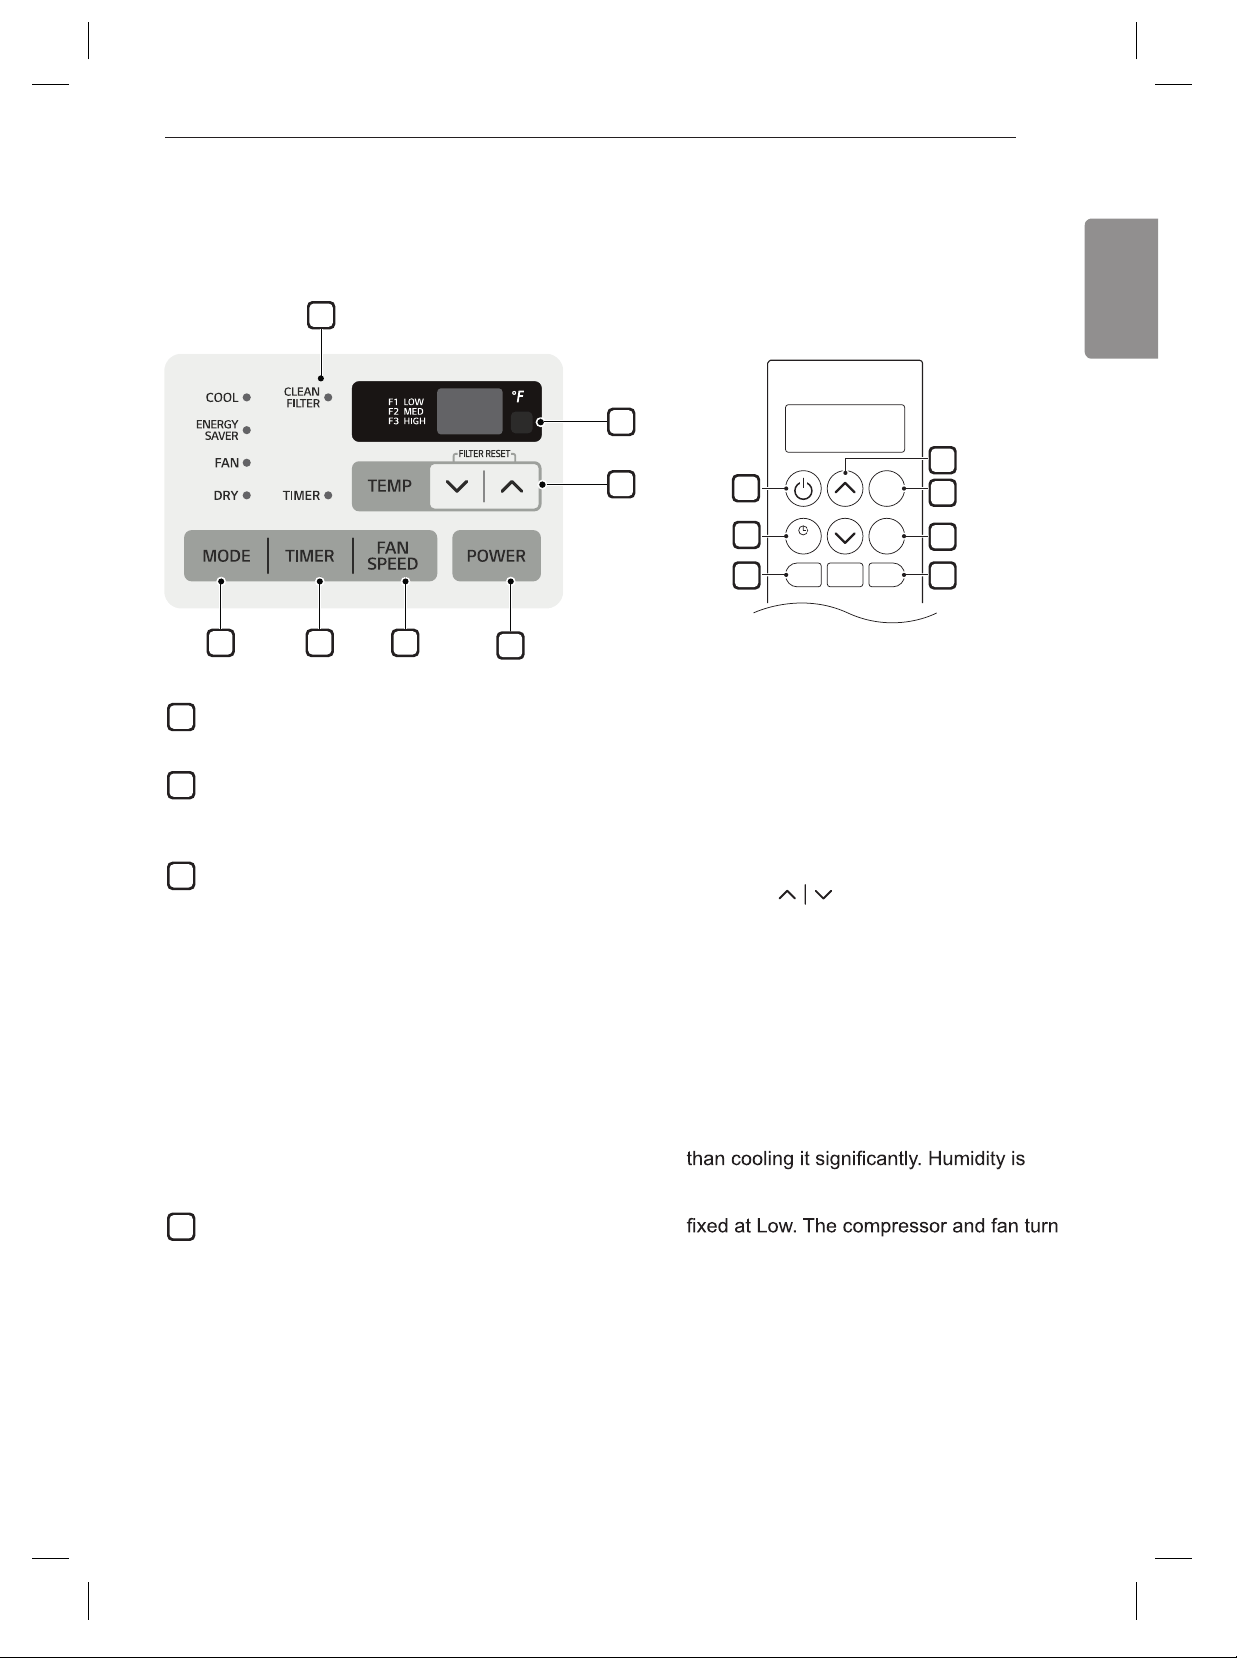
1
Power
Press to turn the air conditioner ON or OFF.
2
Fan Speed
Press to set the fan speed to Low (F1),
Medium (F2), or High (F3).
3
Delay ON/OFF Timer
Delay ON - When the air conditioner is off,
set it to automatically turn on from 1 to 24
hours later, at its previous mode and fan
settings.
Delay OFF - When the air conditioner is on,
set it to automatically turn off from 1 to 24
hours later.
NOTE
● Each press of the Timer button advances
the timer by 1 hour. After the last press
the display returns to the temperature
setting.
4
Operation Mode
Press the Mode button to cycle between
4 types of air conditioner operation:
Energy Saver / Cool / Fan / Dry.
Cool
Fan - In this mode the fan circulates air
but the compressor does not run. Use
the Fan Speed button to set fan speed to
High, Medium or Low. In this mode, you
cannot adjust the set temperature.
Dry - This mode is ideal for rainy and
damp days to dehumidify the room rather
removed from the room by the combination
of compressor operation and the fan speed
off once the set temperature is reached.
Fan speed cannot be adjusted in Dry mode.
- This mode is ideal on hot days to
cool and dehumidify the room quickly. Use
the Temp
buttons to set the desired
room temperature and use the Fan Speed
button to set the desired fan circulation
speed.
Energy Saver - In this mode the
compressor and fan turn off when the set
temperature is achieved. Approximately
every 3 minutes the fan turns on to allow
the unit sensor to accurately determine if
more cooling is needed.
1
3
9
2
8
4
5
TEMP
MODE
FAN
SPEED
ENERGY
SAVER
TIMER
TIMER
CLEAR
16
OPERATION
Wireless Remote Control
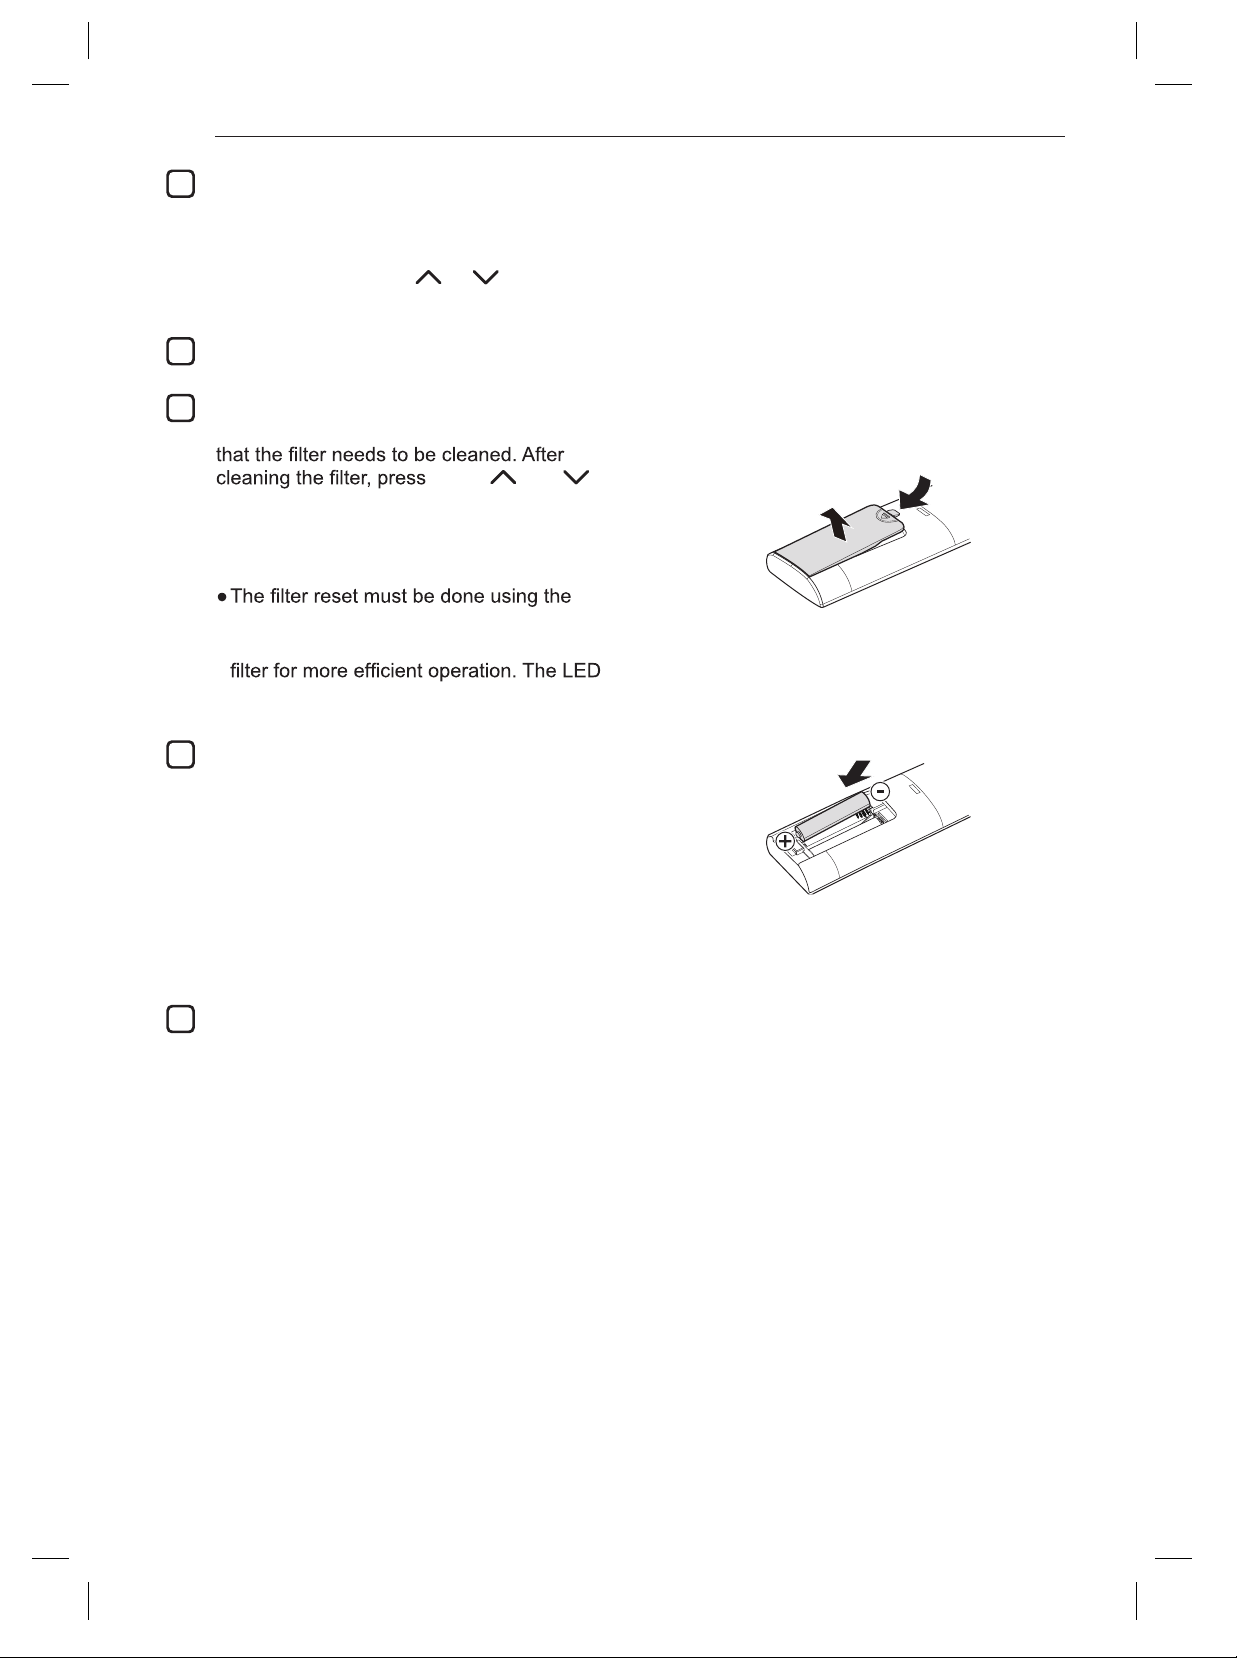
Inserting Battery
1
Remove the cover on the back of the
remote control.
2
Insert the new batteries and make sure that
the + and - terminals of the batteries are
installed correctly.
NOTE
● New batteries are supplied with the air
conditioner for use in the remote control.
NOTE
● This function is available with Cooling
Mode.
● Do not use a rechargeable battery. Make sure
that the battery is new.
● In order to prevent discharge, remove the
battery from the remote control if the air
conditioner is not going to be used for an
extended period of time.
● Keep the remote control away from extremely
hot or humid places.
● To maintain optimal operation of the remote
control, the remote sensor should not be
exposed to direct sunlight.
5
Temperature Control
The thermostat monitors room temperature
to maintain the desired temperature. The
thermostat can be set between 60 °F–86 °F
(16 °C–30 °C). Press
or arrows to
increase or decrease temperature setting.
6
Remote Control Sensor
Clean Filter
The Clean Filter LED lights up to notify you
Temp
and
together on the control panel to turn off the
Clean Filter light.
NOTE
control panel, not the remote control.
● This feature is a reminder to clean the air
light turns on after 250 hours of operation.
7
Energy Saver
In this mode the compressor and fan turn
off when the set temperature is achieved.
Approximately every 3 minutes the fan turns
on to allow the unit sensor to accurately
determine if more cooling is needed.
8
Timer Clear
Cancel Timer setting.
9
NOTE
● Auto Restart: If the air conditioner turns off due
to a power outage, it will restart automatically
once the power is restored, with the same
settings as were set before the unit turned off.
● Energy Saver: The unit defaults to the Energy
Saver mode each time the unit is switched on
except in Fan mode or when power is restored
after an electrical power outage.
● The remote control will not function properly if
the AC infrared sensor is exposed to direct light
or if there are obstacles between the remote
controller and the air conditioner
.
If the display screen of the remote control begins
to fade, replace the batteries. Insert AAA (1.5 V)
batteries before using the remote control.
ENGLISH
17
OPERATION
Close Open
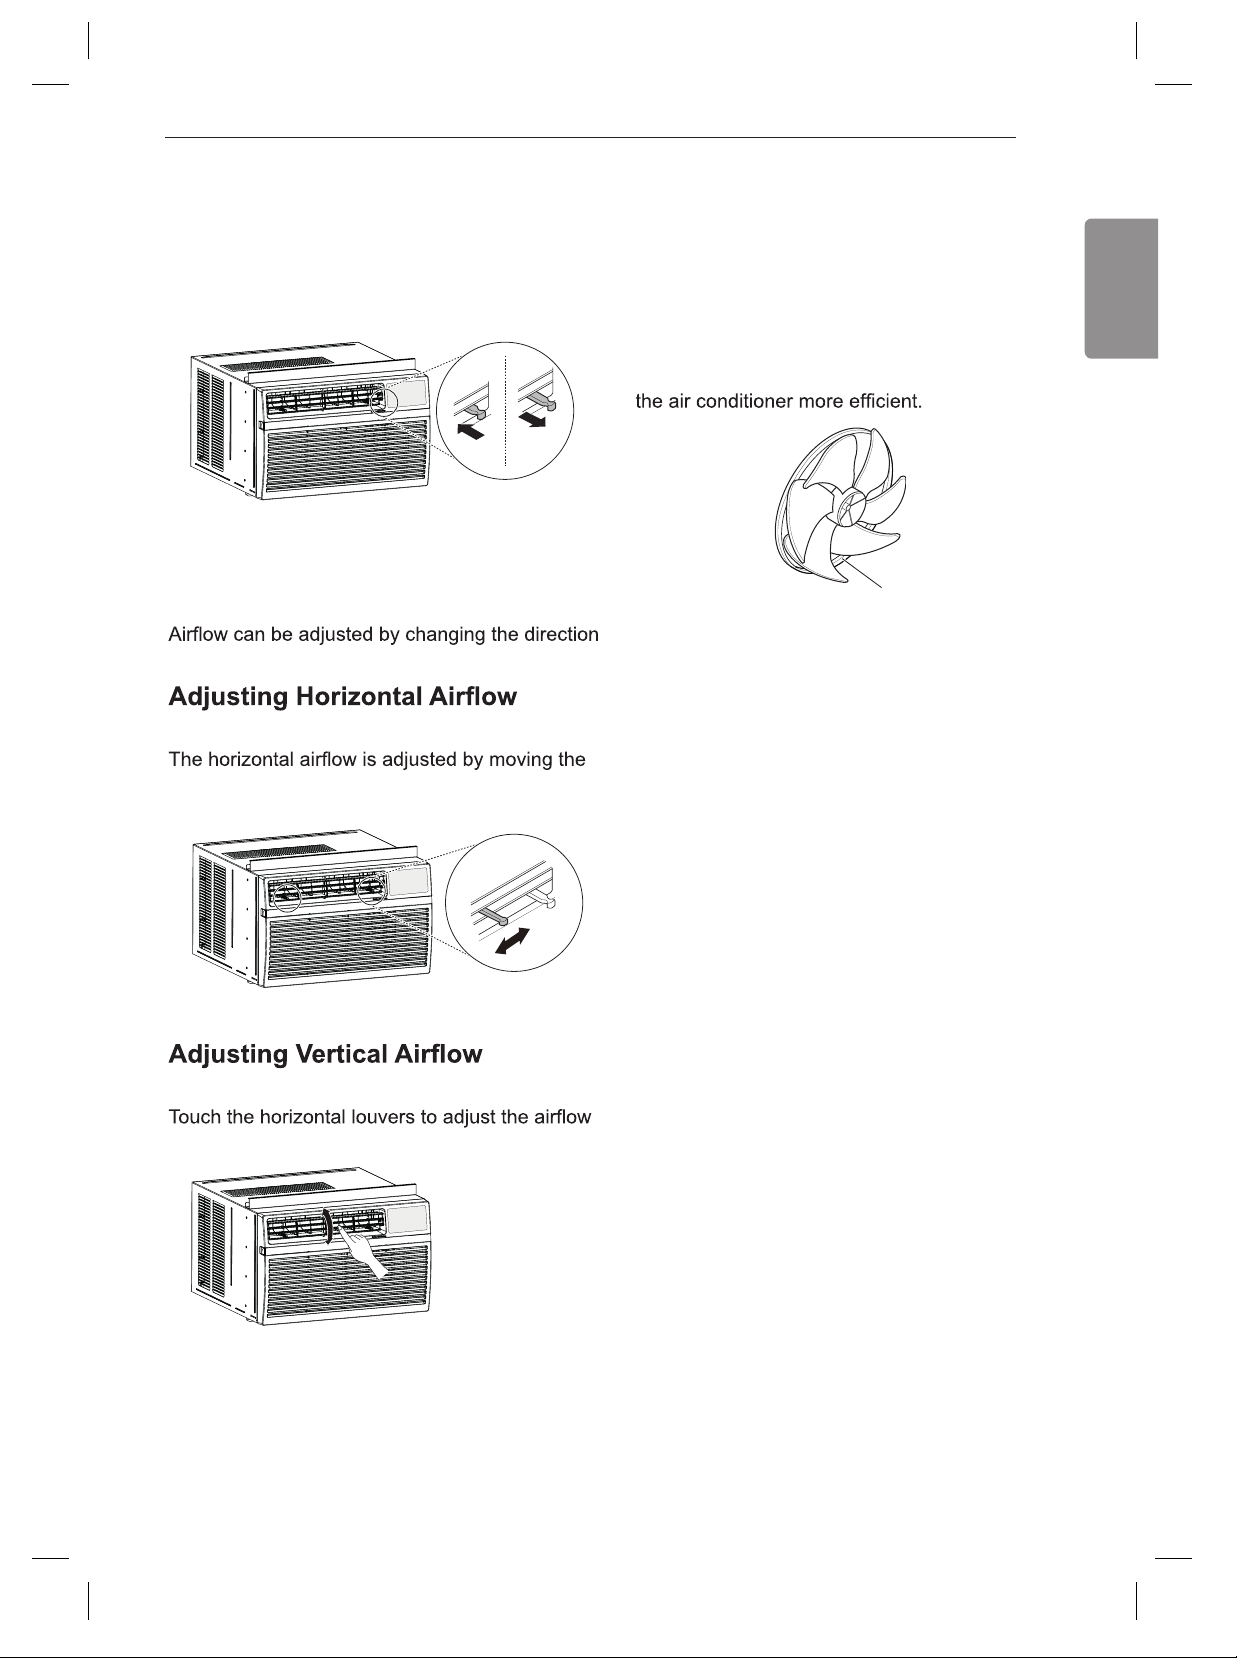
Air Direction
Ventilation
Push the ventilation lever in to the closed position
to maintain the best cooling performance. Pull
the ventilation lever out to open the vent and
draw fresh air into the room.
of the air conditioner’s louvers.
Direction
levers of the vertical louvers to the left or right.
Direction
up or down.
NOTE
● When the weather is extremely hot, the unit
may turn off automatically to protect the
compressor.
Additional Features
Slinger Fan
This air conditioner is equipped with a slinger
fan. (See drawing.)
The fan’s outer ring picks up the condensed
water from the base pan if the water level gets
high enough. The water is then picked up by the
fan and expelled through the condenser, making
Ring
18
MAINTENANCE
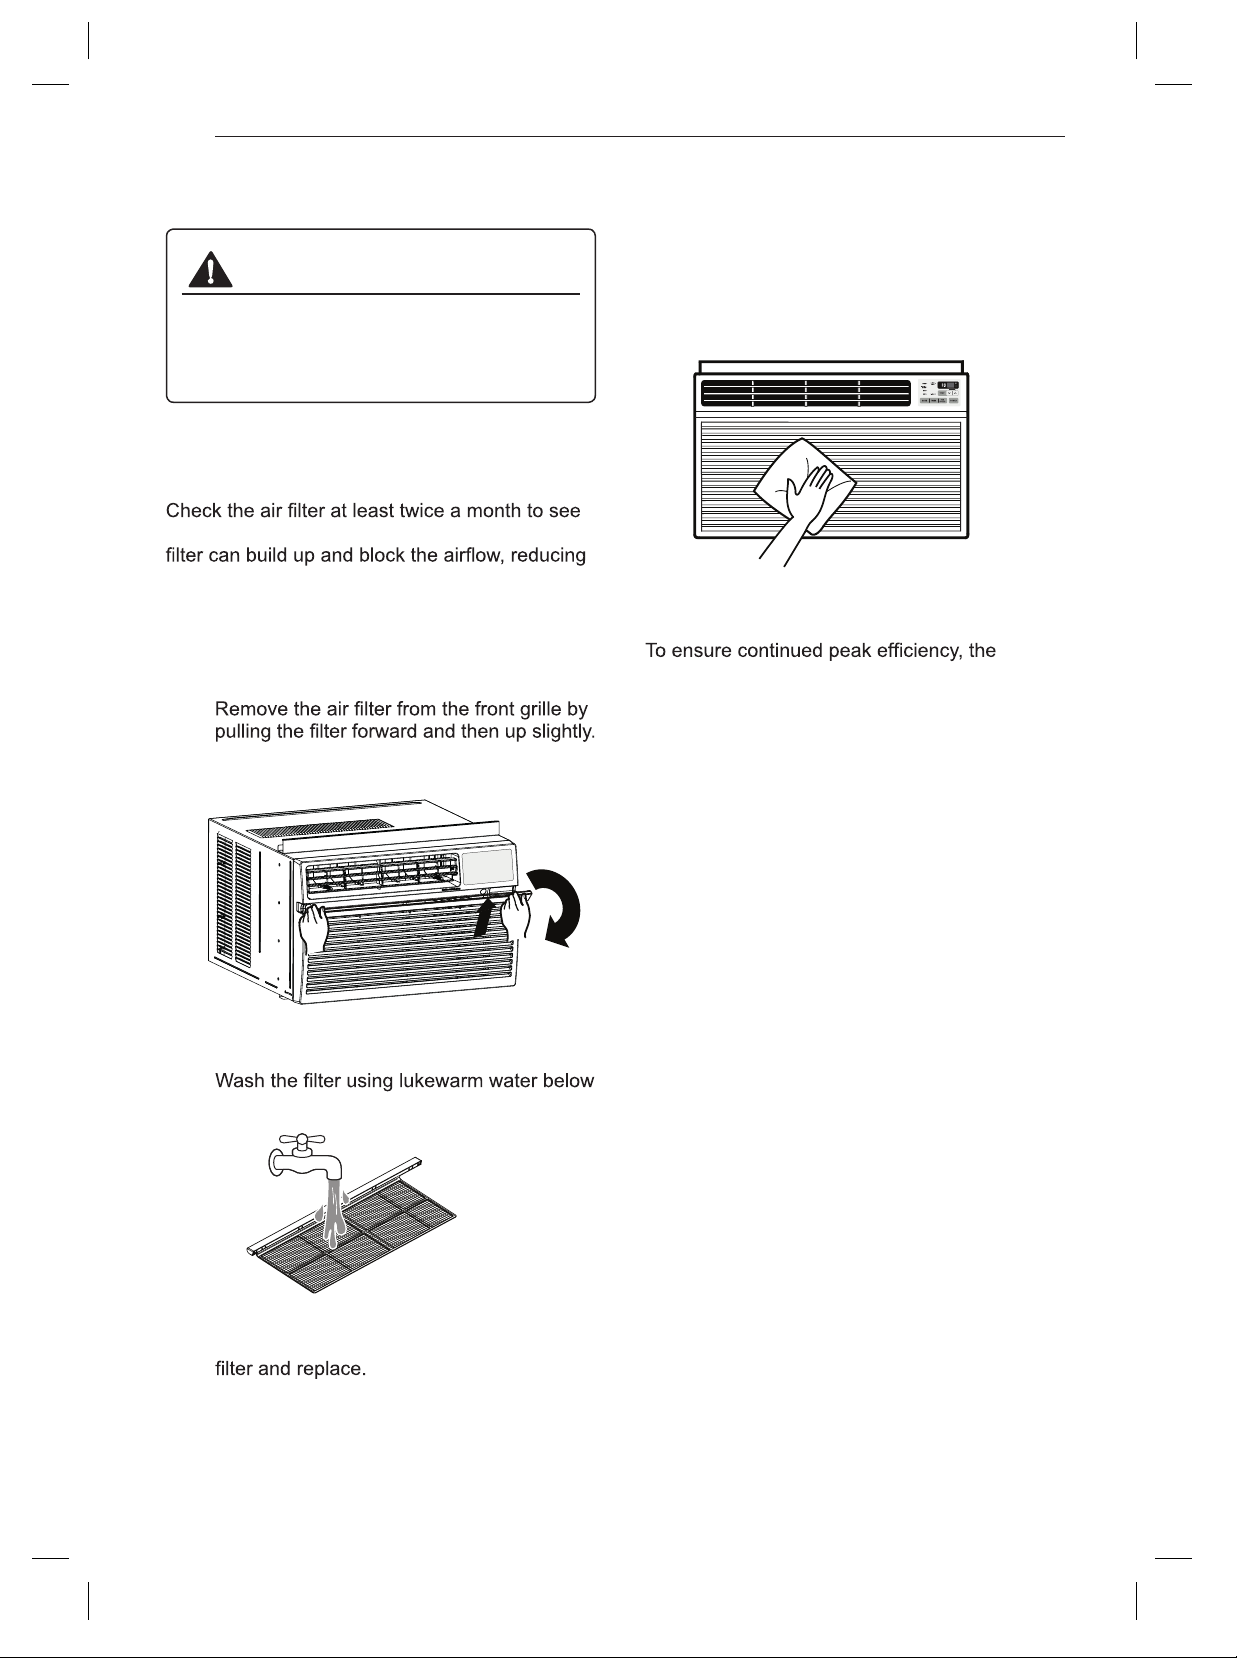
2
40 °C (104 °F).
3
Gently shake the excess water from the
Cleaning the Air Conditioner
● Wipe the front grille and inlet grille with a cloth
dampened in a mild detergent solution.
● Wash the cabinet with mild soap or detergent
and lukewarm water, then polish using liquid
appliance wax.
NOTE
●
condenser coils (outside of unit) should be
checked periodically and cleaned if clogged
with soot or dirt from outside air.
● For repair and maintenance, contact an
Authorized Service Center. See the warranty
page for details or call 1-800-243-0000.
Have your model number and serial number
available. They should be written on page 23 of
this manual.
MAINTENANCE
WARNING
Before cleaning or performing maintenance,
disconnect the power supply and wait until
the fan stops.
Air Filter
if cleaning is necessary. Trapped particles in the
cooling capacity and causing an accumulation of
frost on the evaporator.
Cleaning the Air Filter
1
ENGLISH
19
TROUBLESHOOTING
TROUBLESHOOTING
Before Calling for Service
The appliance is equipped with an automatic error-monitoring system to detect and diagnose problems
at an early stage. If the appliance does not function properly or does not function at all, check the
following before you call for service.
Normal Sounds You May Hear
1
High Pitched Chatter
2
Sound of Rushing Air
At the front of the unit, you may hear the sound of rushing air being moved by the fan.
3
Gurgle/Hiss
Gurgling or hissing noise may be heard due to refrigerant passing through evaporator during
normal operation.
4
Vibration
Unit may vibrate and make noise because of poor wall or window construction or incorrect
installation.
5
Pinging or Swishing
Droplets of water hitting condenser during normal operation may cause pinging or swishing
sounds.
1
2
3
4
5
20
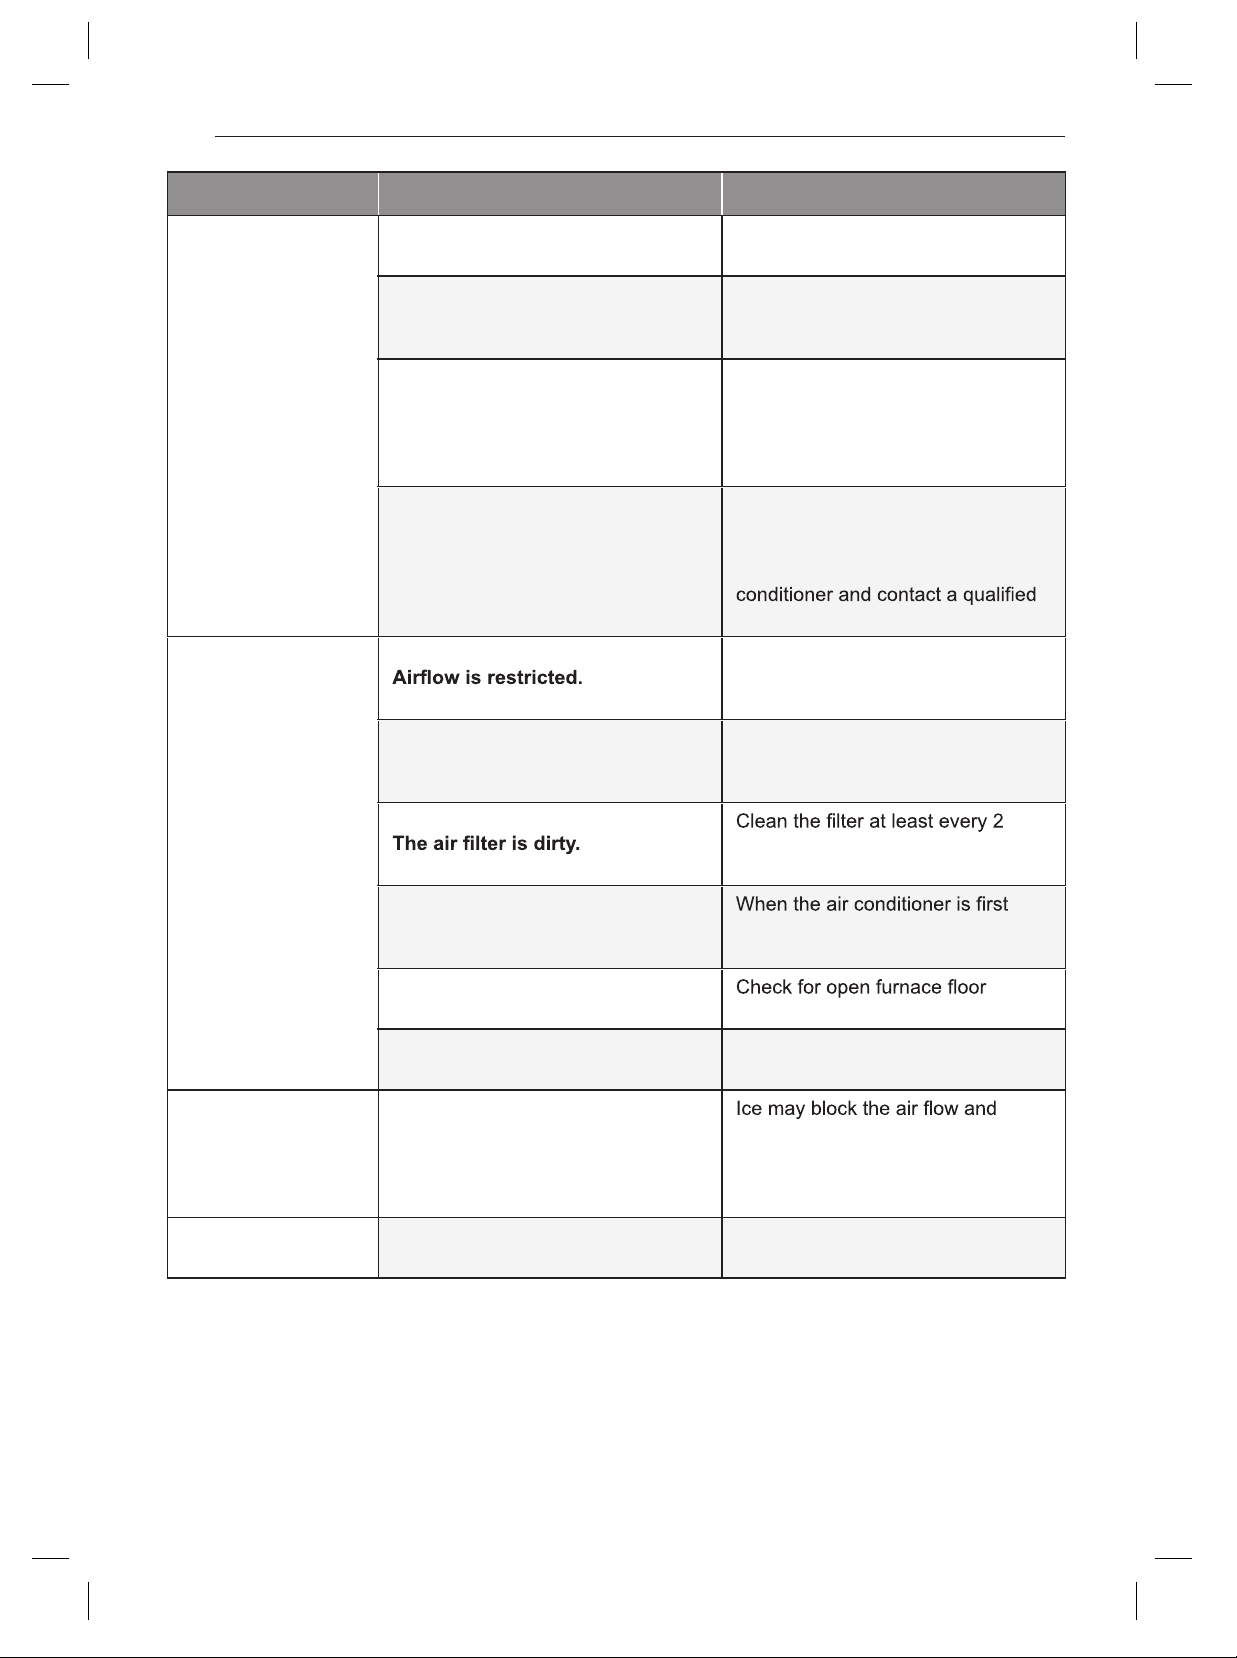
TROUBLESHOOTING
Problem Possible Cause Solutions
Air conditioner
does not start.
The air conditioner is unplugged.
Make sure the air conditioner plug
is pushed completely into the outlet.
The fuse is blown/circuit breaker
is tripped.
Check the house fuse/circuit
breaker box and replace the fuse or
reset the breaker.
Power failure.
If power failure occurs, turn the
mode control to off. When power is
restored, wait 3 minutes to restart
the air conditioner to prevent
tripping of the compressor overload.
The current interrupter device is
tripped.
Press the RESET button located
on the power cord plug. If the
RESET button will not stay
engaged, discontinue use of the air
service technician.
Air conditioner
does not cool as it
should.
Make sure there are no curtains,
blinds, or furniture blocking the front
of the air conditioner.
The temp control may not be set
correctly.
Set the desired temperature to
a level lower than the current
temperature.
weeks. See the 'MAINTENANCE'
section.
The room may have been hot.
turned on, you need to allow time
for the room to cool down.
Cold air is escaping.
registers and cold air returns.
Cooling coils have iced up.
See 'Air conditioner freezing up'
below.
Air conditioner
freezing up.
The cooling coils are iced over.
obstruct the air conditioner from
properly cooling the room. Set the
mode control at High Fan or High
Cool.
Water drips
outside.
Hot, humid weather. This is normal.
ENGLISH
21
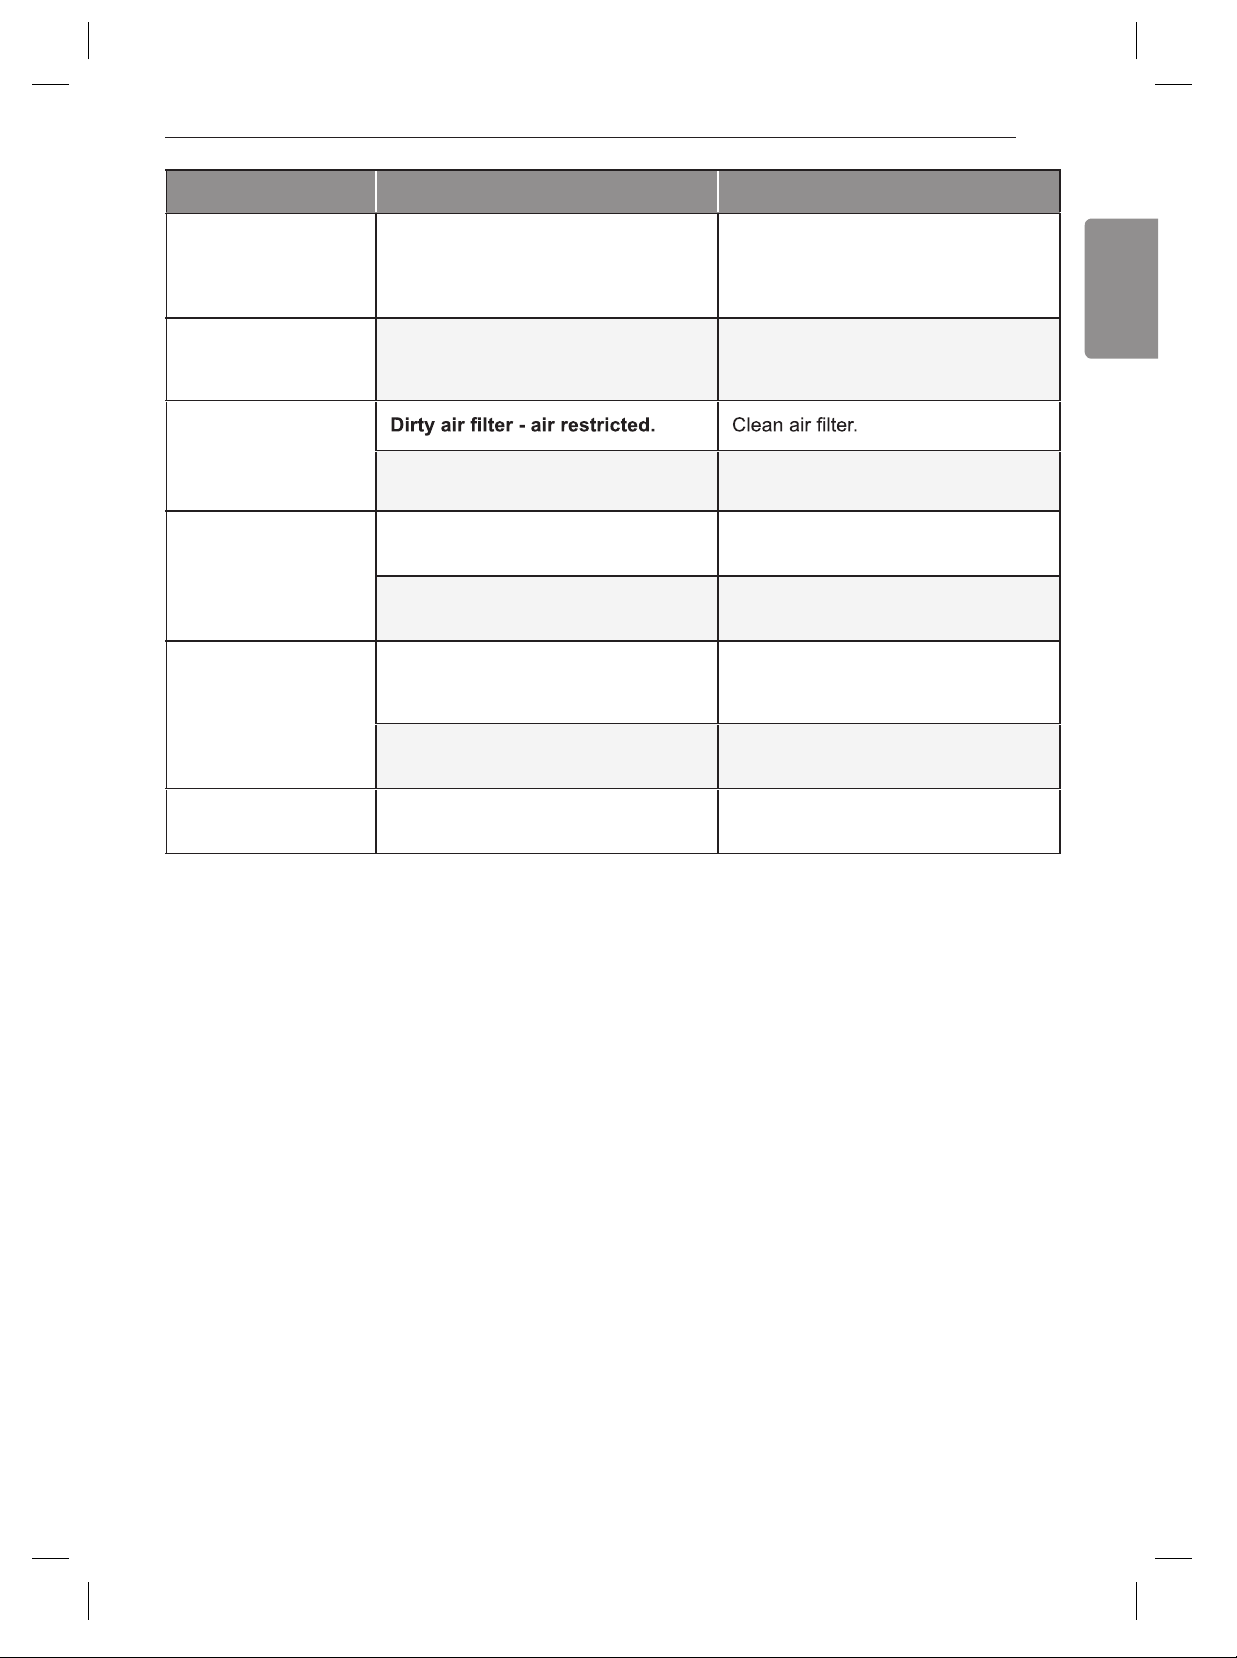
TROUBLESHOOTING
Problem Possible Cause Solutions
Water drips
indoors.
The air conditioner is not tilted to
the outside.
For proper water disposal, make
sure the air conditioner slants
slightly from the cabinet front to the
rear.
Water collects in
base pan.
Moisture removed from air and
drains into base pan.
This is normal for a short period in
areas with little humidity; normal for
a longer period in very humid areas.
Air conditioner
turns on and off
rapidly.
Outside temperature extremely
hot.
Refer to installation instructions or
check with installer.
Noise when unit is
cooling.
Air movement sound.
This is normal. If too loud, set to
lower FAN setting.
Window vibration - poor
installation.
Refer to installation instructions or
check with installer.
Remote sensing
deactivating
prematurely.
Remote control not located
within range.
Place remote control within 20 feet
& 120° radius of the front of the
unit.
Remote control signal
obstructed.
Remove obstruction.
Room too cold. Set temperature too low. Increase set temperature.
NOTE
● You can refer to the Energy Star program in detail at www.energystar.gov.
● If you see "CH" in the display, please call 1-800-243-0000.
22
WARRANTY
WARRANTY
WHAT THIS WARRANTY COVERS:
LG Electronics U.S.A., Inc. (“LG”) warrants your LG Room Air Conditioner ("product") against defect in
THIS LIMITED WARRANTY CONTAINS AN ARBITRATION PROVISION THAT
REQUIRES YOU AND LG TO RESOLVE DISPUTES BY BINDING ARBITRATION INSTEAD OF IN
COURT, UNLESS YOU CHOOSE TO OPT OUT. IN ARBITRATION, CLASS ACTIONS AND JURY
TRIALS ARE NOT PERMITTED. PLEASE SEE THE SECTION TITLED “PROCEDURE FOR RESOLVING
DISPUTES” BELOW.
materials or workmanship under normal household use, during the warranty period set forth below, LG
will, at its option, repair or replace the product. This limited warranty is valid only to the original retail
purchaser of the product, is not assignable or transferrable to any subsequent purchaser or user, and
applies only when the product is purchased through an LG authorized dealer or distributor and used
within the United States (“U.S.”) including U.S. Territories.
NOTE
● Replacement products and repair parts may be new or factory-remanufactured and are warranted
for the remaining portion of the original unit’s warranty period or ninety (90) days, whichever is
longer. Please retain dated receipt or delivery ticket as evidence of the Date of Purchase for proof of
warranty (you may be required to submit a copy to LG or authorized representative).
WARRANTY PERIOD:
ARBITRATION NOTICE:
1 year from the Date of Purchase: Any internal/ functional Parts and Labor
HOW SERVICE IS HANDLED: In-Home Service
In-home service will be provided during the warranty period subject to availability within the United
States. In-home service may not be available in all areas. To receive in-home service, the product
must be unobstructed and accessible to service personnel. If during in-home service repair cannot
be completed, it may be necessary to remove, repair and return the product. If in-home service is
unavailable, LG may elect, at our option, to provide for transportation of our choice to and from a LG
authorized service center.
THIS LIMITED WARRANTY DOES NOT COVER:
● Service trips to deliver, pick up, or install the product or for instruction on product use.
● Replacing house fuses or resetting of circuit breakers, correction of house wiring or plumbing, or
correction of product installation.
● Damage or failure caused by leaky / broken / frozen water pipes, restricted drain lines, inadequate or
interrupted water supply or inadequate supply of air.
●
● Damage or failure resulting from misuse, abuse, improper installation, repair or maintenance.
●
● Damage or failure caused by incorrect electrical current, voltage, or plumbing codes.
●
unless such damage results from defects in materials or workmanship and is reported to LG within
seven (7) calendar days from the date of delivery.
● Damage or missing items to any display, open box, discounted, or refurbished product.
ENGLISH
23
● Product where the original factory serial numbers have been removed, defaced or changed in any
way.
● Repairs when product is used in other than normal and usual household use (e.g. rental, commercial
’s manual.
● The removal and reinstallation of the Product if it is installed in an inaccessible location.
THIS WARRANTY
IS IN LIEU OF ANY OTHER WARRANTY, EXPRESS OR IMPLIED, INCLUDING
AND WITHOUT LIMITATION TO, ANY WARRANTY OF MERCHANTABILITY OR FITNESS FOR A
PARTICULAR PURPOSE. TO THE EXTENT ANY IMPLIED WARRANTY IS REQUIRED BY LAW,
THIS WARRANTY IS LIMITED IN DURATION TO THE TERM PERIOD EXPRESSED ABOVE.
REPAIR OR REPLACEMENT AS PROVIDED UNDER THIS WARRANTY IS THE EXCLUSIVE
REMEDY FOR THE CUSTOMER. NEITHER THE MANUFACTURER NOR ITS U.S. DISTRIBUTOR
SHALL BE LIABLE FOR ANY INCIDENTAL, CONSEQUENTIAL, INDIRECT, SPECIAL, OR
PUNITIVE DAMAGES OF ANY NATURE, INCLUDING AND WITHOUT LIMITATION TO, LOST
REVENUES OR PROFITS, OR ANY OTHER DAMAGE, WHETHER BASED IN CONTRACT, TORT,
OR OTHERWISE.
Some states do not allow the exclusion or limitation of incidental or consequential damages or
limitations on how long an implied warranty lasts, so the above exclusion or limitation may not apply
state to state.
HOW TO OBTAIN WARRANTY SERVICE & ADDITIONAL INFORMATION:
Call 1-800-243-0000 or visit our website at www.lg.com.
Mail to: LG Customer Information Center (ATTN: CIC)
201 James Record Road, Huntsville, AL 35824
FOR YOUR RECORDS
Write the model and serial numbers here:
Model No.
Serial No.
Dealer's Name
Date Purchased
● Staple your receipt to this page in the event you need it to prove date of purchase or for warranty
issues.
WARRANTY

24
WARRANTY
PROCEDURE FOR RESOLVING DISPUTES:
ALL DISPUTES BETWEEN YOU AND LG ARISING OUT OF OR RELATING IN ANY WAY TO THIS
Definitions. For the purposes of this section, references to “LG” mean LG Electronics U.S.A., Inc., its
parents, subsidiaries and affiliates, and each of their officers, directors, employees, agents, beneficiaries,
predecessors in interest, successors, assigns and suppliers; references to “dispute” or “claim” shall
include any dispute, claim or controversy of any kind whatsoever (whether based in contract, tort, statute,
regulation, ordinance, fraud, misrepresentation or any other legal or equitable theory) arising out of or
relating in any way to the sale, condition or performance of the product or this Limited Warranty.
LIMITED WARRANTY OR THE PRODUCT SHALL BE RESOLVED EXCLUSIVELY THROUGH
BINDING ARBITRATION, AND NOT IN A COURT OF GENERAL JURISDICTION. BINDING
ARBITRATION MEANS THAT YOU AND LG ARE EACH WAIVING THE RIGHT TO A JURY TRIAL
AND TO BRING OR PARTICIPATE IN A CLASS ACTION.
Notice of Dispute. In the event you intend to commence an arbitration proceeding, you must first notify
LG in writing at least 30 days in advance of initiating the arbitration by sending a letter to LG at LG
Electronics, USA, Inc. Attn: Legal Department- Arbitration 1000 Sylvan Ave, Englewood Cliffs 07632.
You and LG agree to engage in good faith discussions in an attempt to amicably resolve your claim.
The notice must provide your name, address, and telephone number; identify the product that is the
subject of the claim; and describe the nature of the claim and the relief being sought. If you and LG are
unable to resolve the dispute within 30 days, either party may proceed to file a claim for arbitration.
Agreement to Binding Arbitration and Class Action Waiver. Upon failure to resolve the dispute
To begin arbitration of a claim, either you or LG must make a written
during the 30 day period after sending written notice to LG, you and LG agree to resolve any claims
between us only by binding arbitration on an individual basis, unless you opt out as provided below.
Any dispute between you and LG shall not be combined or consolidated with a dispute involving any
other person’s or entity’s product or claim. More specifically, without limitation of the foregoing, any
dispute between you and LG shall not under any circumstances proceed as part of a class or
representative action. Instead of arbitration, either party may bring an individual action in small claims
court, but that small claims court action may not be brought on a class or representative basis.
Arbitration Rules and Procedures.
demand for arbitration. The arbitration will be administered by the American Arbitration Association
(“AAA”) and will be conducted before a single arbitrator under the AAA’s Consumer Arbitration Rules
that are in effect at the time the arbitration is initiated (referred to as the “AAA Rules”) and under the
procedures set forth in this section. The AAA Rules are available online at www.adr.org/consumer.
Send a copy of your written demand for arbitration, as well as a copy of this provision, to the AAA in
the manner described in the AAA Rules. You must also send a copy of your written demand to LG at
LG Electronics, USA, Inc. Attn: Legal Department- Arbitration 1000 Sylvan Avenue Englewood Cliffs,
NJ 07632. If there is a conflict between the AAA Rules and the rules set forth in this section, the rules
set forth in this section will govern. This arbitration provision is governed by the Federal Arbitration Act.
Judgment may be entered on the arbitrator’s award in any court of competent jurisdiction. All issues are
for the arbitrator to decide, except that issues relating to the scope and enforceability of the arbitration
provision and to the arbitrability of the dispute are for the court to decide. The arbitrator is bound by the
terms of this provision.
The law of the state of your residence shall govern this Limited Warranty and any Governing Law.
disputes between us except to the extent that such law is preempted by or inconsistent with applicable
federal law.
You do not need to pay any fee to begin an arbitration. Upon receipt of your written Fees/Costs.
demand for arbitration, LG will promptly pay all arbitration filing fees to the AAA unless you seek more
than $25,000 in damages, in which case the payment of these fees will be governed by the AAA Rules.
Except as otherwise provided for herein, LG will pay all AAA filing, administration and arbitrator fees for
any arbitration initiated in accordance with the AAA Rules and this arbitration provision. If you prevail in

ENGLISH
25
WARRANTY
the arbitration, LG will pay your attorneys’ fees and expenses as long as they are reasonable, by
If your claim is for $25,000 or less, you may choose to have the arbitration Hearings and Location.
conducted solely on the basis of (1) documents submitted to the arbitrator, (2) through a telephonic
hearing, or (3) by an in-person hearing as established by the AAA Rules. If your claim exceeds $25,000,
the right to a hearing will be determined by the AAA Rules. Any in-person arbitration hearings will be
held at a location within the federal judicial district in which you reside unless we both agree to another
location or we agree to a telephonic arbitration.
considering factors including, but not limited to, the purchase amount and claim amount. Notwithstanding
the foregoing, if applicable law allows for an award of reasonable attorneys’ fees and expenses, an
arbitrator can award them to the same extent that a court would. If the arbitrator finds either the
substance of your claim or the relief sought in the demand is frivolous or brought for an improper
purpose (as measured by the standards set forth in Federal Rule of Civil Procedure 11(b)), then the
payment of all arbitration fees will be governed by the AAA Rules. In such a situation, you agree to
reimburse LG for all monies previously disbursed by it that are otherwise your obligation to pay under
the AAA Rules. Except as otherwise provided for, LG waives any rights it may have to seek attorneys’
fees and expenses from you if LG prevails in the arbitration.
You may opt out of this dispute resolution procedure. If you opt out, neither you nor LG can Opt Out.
require the other to participate in an arbitration proceeding. To opt out, you must send notice to LG no
later than 30 calendar days from the date of the first consumer purchaser’s purchase of the product by
either: (i) sending an e-mail to [email protected], with the subject line: “Arbitration Opt Out” or (ii) calling
1-800-980-2973. You must include in the opt out e-mail or provide by telephone: (a) your name and
address; (b) the date on which the product was purchased; (c) the product model name or model
number; and (d) the serial number (the serial number can be found (i) on the product; or (ii) online by
accessing https://www.lg.com/us/support/repair-service/schedule-repair-continued and clicking on
“Find My Model & Serial Number”).
You may only opt out of the dispute resolution procedure in the manner described above (that is, by
e-mail or telephone); no other form of notice will be effective to opt out of this dispute resolution
procedure. Opting out of this dispute resolution procedure will not affect the coverage of the Limited
Warranty in any way, and you will continue to enjoy the full benefits of the Limited Warranty. If you keep
this product and do not opt out, then you accept all terms and conditions of the arbitration provision
described above.
26
MEMO
Memo

www.lg.com
ESPAÑOL
Copyright © 2018 LG Electronics Inc. Todos los Derechos Reservados.
MANUAL DEL PROPIETARIO
Lea detenidamente el manual del propietario antes de poner el
electrodoméstico en funcionamiento y consérvelo a mano en todo
momento para su referencia.
TIPO: DE VENTANA
AIRE
ACONDICIONADO
LW8019ER

2
TABLA DE CONTENIDOS
TABLA DE CONTENIDOS
3 INSTRUCCIONES DE
SEGURIDAD
3 INSTRUCCIONES IMPORTANTES DE
SEGURIDAD
8 DESCRIPCIÓN GENERAL
DEL PRODUCTO
8 Piezas exteriores
8 Piezas interiores
18 MANTENIMIENTO
18 Filtro de aire
19 SOLUCIÓN DE PROBLEMAS
19 Antes de llamar al servicio técnico
19 Sonidos Normales Que Puede Escuchar
22 GARANTÍA
10 Descripción general de la instalación
11 Cómo instalar la unidad
11 Requisitos de la ventana
11 Preparación de la carcasa
12 Instalación de la carcasa
15 FUNCIONAMIENTO
15 Panel de control y control remoto
16 Control remoto inalámbrico
17 Ventilación
17 Dirección del aire
17 Funciones adicionales
9 INSTALACIÓN
9 Datos eléctricos
3
ESPAÑOL
INSTRUCCIONES DE SEGURIDAD
INSTRUCCIONES DE SEGURIDAD
LEA TODAS LAS INSTRUCCIONES ANTES DE UTILIZAR
Su seguridad y la de los demás son muy importantes.
Tanto en este manual como en el equipo, hemos proporcionado muchos mensajes de seguridad
importantes. Siempre debe leer y respetar todos los mensajes de seguridad.
Este es el símbolo de alerta de seguridad.
Este símbolo le advierte sobre posibles riesgos que pueden ocasionar lesiones o la muerte a
usted o a otros.
El símbolo de alerta de seguridad siempre estará acompañado de las palabras "ADVERTENCIA"
o "PRECAUCIÓN" y seguido de un mensaje de seguridad importante.
ADVERTENCIA
Podría sufrir lesiones graves o la muerte si no sigue las instrucciones.
PRECAUCIÓN
Puede resultar lesionado o causar daño al producto si no sigue las instrucciones.
Todos los mensajes de seguridad le indicarán cuál es el riesgo potencial, le indicarán
cómo reducir la probabilidad de lesiones y le proporcionarán información sobre qué
podría suceder si no se siguen las instrucciones.
INSTRUCCIONES IMPORTANTES DE SEGURIDAD
ADVERTENCIA
Para disminuir el riesgo de explosiones, incendios, descargas eléctricas,
quemaduras, lesiones o muerte para las personas que usen este
artefacto, siga las precauciones básicas, incluidas las siguientes:
INSTALACIÓN
● Antes de ser utilizado, este artefacto debe ser correctamente instalado, conforme a lo descrito en este
manual.
● Póngase en contacto con el técnico de servicio autorizado para reparar o mantener esta unidad.
● Póngase en contacto con el instalador para instalar esta unidad.
● Los niños y las personas con discapacidad no deben utilizar el acondicionador de aire sin supervisión.
● Se debe supervisar a los niños para asegurarse de que no jueguen con el acondicionador de aire.
4
INSTRUCCIONES DE SEGURIDAD
● Cuando sea necesario sustituir el cable de alimentación, el trabajo de sustitución deberá realizarlo
personal autorizado utilizando únicamente piezas de repuesto originales.
estadounidense National Electrical Code (NEC).
protegido para evitar la sobrecarga eléctrica.
● Enchúfelo siempre a una toma conectada a tierra.
● No corte ni quite la tercera clavija (tierra) del enchufe del cable de alimentación bajo ninguna
circunstancia.
● Cuando traslade o instale el aparato, tenga especial cuidado en no apretar, aplastar o dañar el cable de
alimentación.
● Conecte el enchufe del cable de alimentación correctamente.
● No ponga en marcha ni detenga el aparato enchufando o desenchufando el cable de alimentación.
● Si el cable o el enchufe están dañados, una persona del servicio técnico autorizado debe sustituirlos
utilizando piezas de repuesto autorizadas.
● Utilice un circuito exclusivo.
● Cumpla con todos los procedimientos de seguridad del sector recomendados, incluido el uso de guantes
de manga larga y gafas de seguridad.
● Desconecte el cable de alimentación o el disyuntor antes de instalar el aparato o realizar operaciones
de servicio técnico.
● Mantenga los materiales de embalaje fuera del alcance de los niños. Estos materiales pueden suponer
● Almacene e instale el producto en lugares en los que no esté expuesto a temperaturas bajo cero ni a la
intemperie.
otro.
FUNCIONAMIENTO
● Nunca intente operar este artefacto si se encuentra dañado, si no funciona correctamente, si no está
ensamblado por completo o si tiene piezas faltantes o rotas, incluido un cable o enchufe dañado.
● Repare o reemplace de inmediato todos los cables de alimentación deshilachados o dañados de otra
forma. No use un cable que exhiba roturas o abrasión en su longitud o en sus extremos.
● No pase cables bajo alfombras ni esteras donde pueda pisarse y dañarse.
● No coloque cables bajo objetos pesados como mesas o sillas.
● No coloque el cable de alimentación cerca de fuentes de calor.
● No utilice adaptadores ni enchufe el producto a una toma compartida.
● No utilice indebidamente los controles.
● Si detecta un sonido extraño, olor a quemado o a químico, o humo provenientes del artefacto,
desconéctelo de inmediato y contáctese con un Centro de Información al Cliente de LG Electronics.
y tire derecho para extraerlo del tomacorriente.
● No sujete el cable de alimentación ni toque los controles del artefacto con las manos húmedas.

5
ESPAÑOL
INSTRUCCIONES DE SEGURIDAD
● Si entra agua en el producto, interrumpa la alimentación del circuito principal y, a continuación,
desenchufe el producto y llame al servicio técnico.
● Si el producto se ha mojado accidentalmente, comuníquese con el Centro de Información al Cliente de
LG Electronics para que le den instrucciones antes de reanudar el uso.
● Desenchufe el producto cuando vaya a estar largos períodos sin utilizarse.
● Desenchufe el producto antes de limpiar.
● Si se produce una fuga de gas (propano, etc.), no utilice ni este ni ningún otro aparato. Abra una
ventana o una puerta para ventilar la zona inmediatamente.
● Este artefacto no ha sido diseñado para ser utilizado por personas con capacidades físicas, sensoriales
o mentales disminuidas (incluidos niños) o que no cuenten con la experiencia o los conocimientos
necesarios para operarlo, salvo que una persona responsable de su seguridad les brinde la supervisión
o la instrucción pertinente en cuanto al uso del artefacto.
● El interior del producto solo debe limpiarlo personal de un centro de servicio técnico autorizado o un
distribuidor.
● No utilice detergentes con disolventes en el producto. Hacerlo puede causar corrosión o daños, el fallo
del producto, una descarga eléctrica o un incendio.
INSTRUCCIONES DE CONEXIÓN A TIERRA
● El cable de alimentación de este aparato está equipado con un enchufe de tres clavijas (tierra). Utilícelo
en una toma de pared estándar de tres ranuras (tierra) para reducir al mínimo el peligro de descarga
do que revise la toma de la pared y el circuito
para asegurarse de que la toma esté correctamente conectada a tierra. NO CORTE NI QUITE LA
TERCERA CLAVIJA (TIERRA) DEL ENCHUFE DEL CABLE DE ALIMENTACIÓN.
- Situaciones en las que el aparato se desconecta ocasionalmente; Debido a posibles riesgos para la
seguridad, recomendamos encarecidamente no utilizar enchufes adaptadores. Sin embargo, si desea
utilizar un adaptador, puede establecer una CONEXIÓN TEMPORAL. Utilice adaptadores aprobados
por UL, disponibles en la mayoría de las ferreterías. La ranura grande del adaptador debe alinearse
con la ranura grande de la toma para garantizar una conexión con la polaridad correcta.
● Conectar el terminal de tierra del adaptador al tornillo de cierre de la toma de la pared no conecta a
tierra el aparato a menos que el tornillo de cierre sea de metal y no esté aislado y la toma de la pared
se conecte a tierra a través del cableado doméstico. El cliente
que revise el circuito para asegurarse de que la toma esté correctamente conectada a tierra.
● Desconecte el cable de alimentación del adaptador sujetando cada uno de estos elementos con una
mano. De lo contrario, el terminal de tierra del adaptador podría romperse. NO UTILICE el aparato con
un enchufe adaptador roto.
- Situaciones en las que el aparato se desconecta con frecuencia; No utilice enchufes adaptadores
en estas situaciones. Si se desenchufa el cable de alimentación con frecuencia, el terminal de tierra
puede romperse. En lugar de utilizar adaptadores, la toma de pared debe sustituirse por una toma de
tres ranuras (tierra).
6
INSTRUCCIONES DE SEGURIDAD
PRECAUCIÓN
Para reducir el riesgo de lesiones leves o moderadas a personas, el
mal funcionamiento o daño al producto o propiedad cuando use este
producto, siga las precauciones básicas, incluido lo siguiente:
INSTALACIÓN
● Al instalar el producto, tenga cuidado de que los gases de escape o la condensación no produzcan
daños materiales a su alrededor.
● Siga escrupulosamente las instrucciones de instalación para evitar vibraciones excesivas o fugas de
agua.
FUNCIONAMIENTO
especiales como la preservación de mascotas, alimentos, maquinaria de precisión u obras de arte.
● Cuando traslade o instale el aparato, tenga especial cuidado en no apretar, aplastar o dañar el cable de
alimentación.
● Asegúrese de que ni la entrada ni la salida de aire estén obstruidas.
● Utilice un paño suave para limpiar el aparato. No utilice ceras, diluyentes ni detergentes fuertes.
● No pise el aparato ni coloque objetos pesados sobre él.
● No beba agua generada por el producto.
● Asegúrese de ventilar bien el ambiente cuando el aire acondicionado y un artefacto calentador (como,
por ejemplo, un calefactor) se utilicen simultáneamente.
● Retire las pilas del control remoto si no lo va a utilizar durante un período prolongado.
● Nunca mezcle diferentes tipos de baterías o baterías viejas y nuevas en el control remoto.
● Deje de usar el control remoto si existe una pérdida de líquido de las baterías. Si su ropa o su piel
entran en contacto con el líquido proveniente de la batería, lave con agua limpia.
● Ante la ingesta de líquido proveniente de una batería que pierde, lave el interior de la boca a fondo y
consulte a un médico.
No exponga a personas, animales o plantas a la corriente fría o caliente del aire acondicionado durante
períodos prolongados.
● No recargue ni desarme las baterías.
MANTENIMIENTO
● Nunca utilice solventes o productos de limpieza fuertes para limpiar el aire acondicionado ni lo rocíe con
agua. Utilice un paño suave.
7
ESPAÑOL
INSTRUCCIONES DE SEGURIDAD
REFRIGERANTE (SOLO PARA R32)
ADVERTENCIA
● No utilice medios para acelerar el proceso de descongelación ni para limpiar que no sean los
recomendados por el fabricante.
● El aparato debe almacenarse en una habitación sin fuentes de ignición que estén continuamente
activas (por ejemplo: llamas abiertas, un aparato de gas en funcionamiento o un calentador eléctrico en
funcionamiento).
PRECAUCIÓN
no suelen ser necesarias en unidades más antiguas. Tenga en cuenta todos los avisos y precauciones.
- Tenga cuidado durante la manipulación y evite que se dañe la unidad. No perfore el producto por
ningún motivo. Esto puede dañarlo e impedir que la unidad enfríe.
- El mantenimiento y la limpieza de la unidad debe llevarlos a cabo personal formado. Si la unidad no se
limpia correctamente, pueden dañarse el sistema de refrigeración o el sistema eléctrico.
- Asegúrese de que ninguna abertura de circulación del aire o ventilación esté obstruida.
- Del servicio técnico solo deben encargarse técnicos adecuadamen
alizado
por técnicos o personas sin autorización.
- Cuando almacene el aparato, no lo coloque en habitaciones con aparatos en los que haya llamas
abiertas, como calentadores de agua u hornos de gas. También debe mantener el aparato alejado de
calentadores eléctricos. Las unidades dañadas deben repararse antes de almacenarse.
GUARDE ESTAS INSTRUCCIONES
8
DESCRIPCIÓN GENERAL DEL PRODUCTO
DESCRIPCIÓN GENERAL DEL PRODUCTO
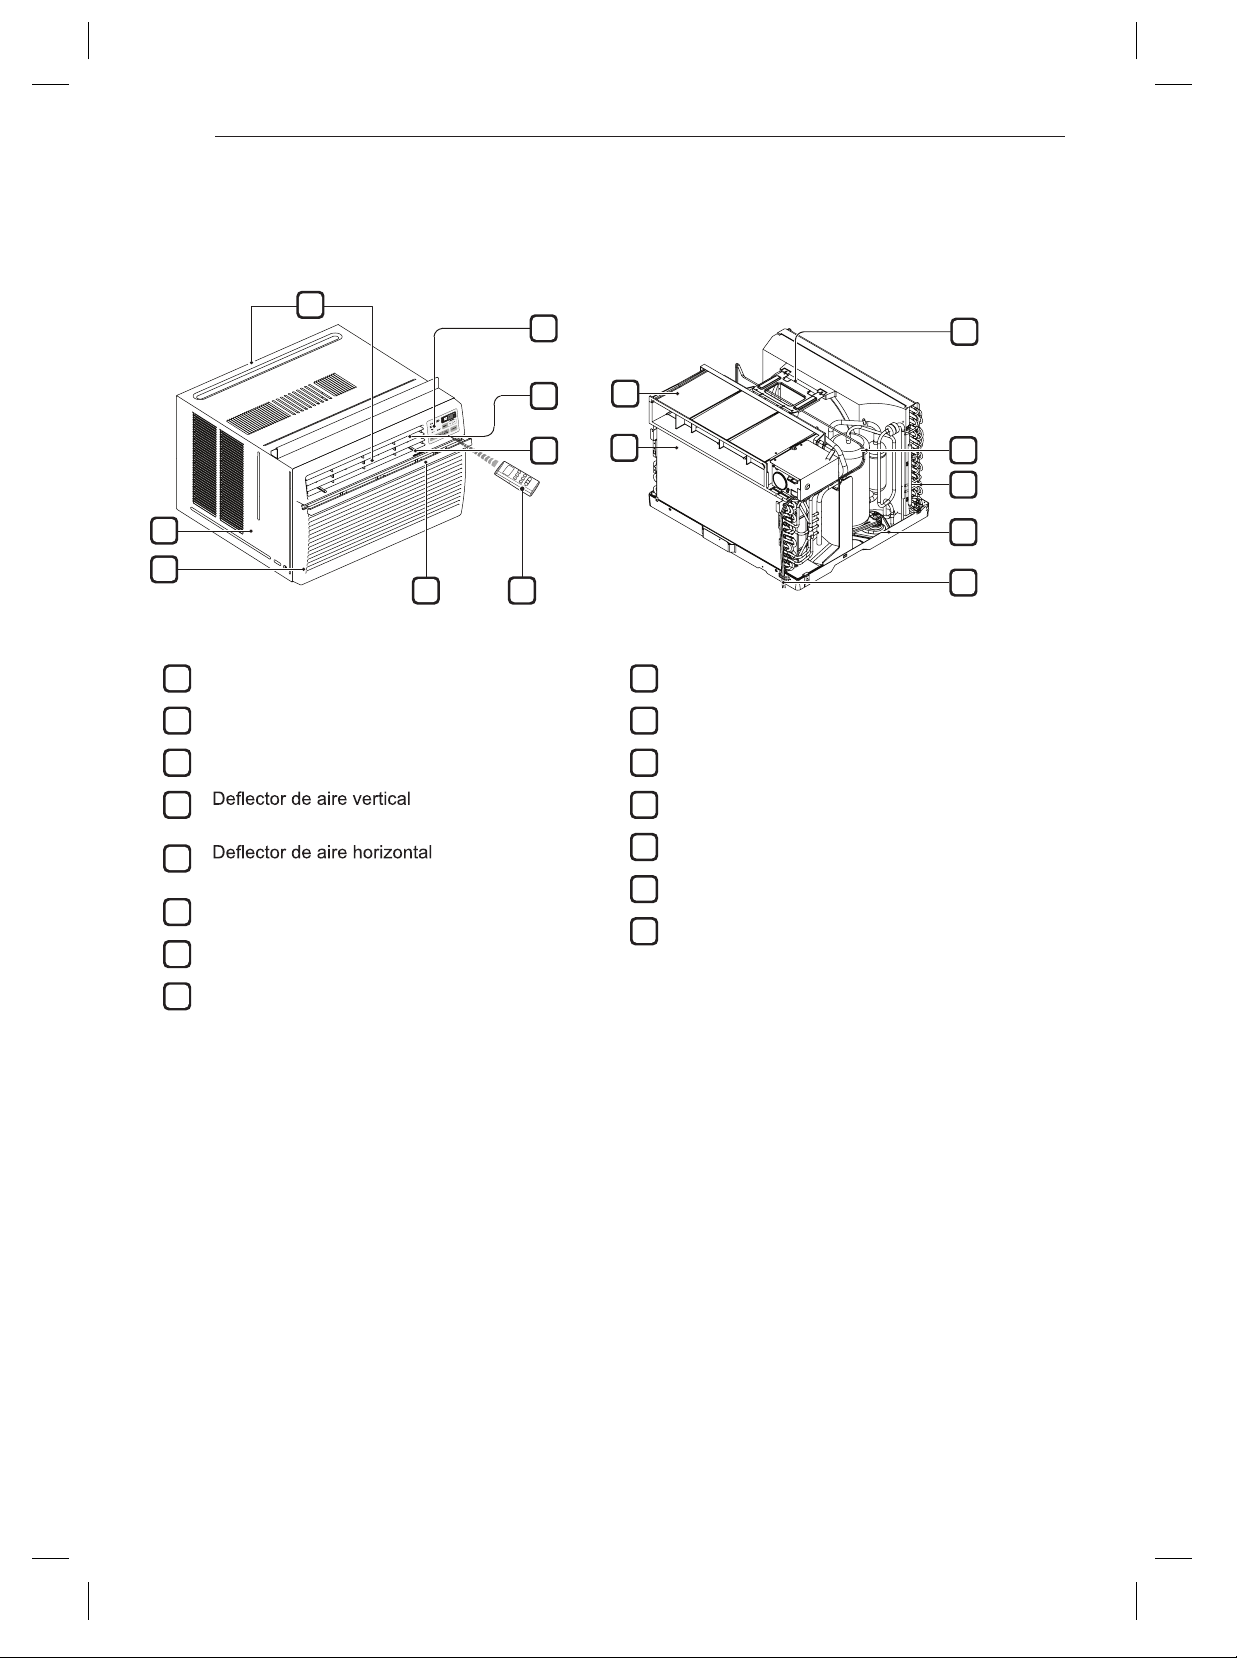
Piezas exteriores Piezas interiores
3
4
5
6
7
1
2
1
Evaporador
2
Guía de aire
3
4
Abrazadera
5
Compresor
6
Condensador
7
Bandeja base
Cable de alimentación
1
Panel de control
2
Mando a distancia
3
Filtro de aire
4
(Lamas horizontales)
5
(Lamas verticales)
6
Rejilla delantera
7
8
Carcasa
Salida de aire
8
6
3
1
4
5
7
2
9
ESPAÑOL
INSTALACIÓN
INSTALACIÓN
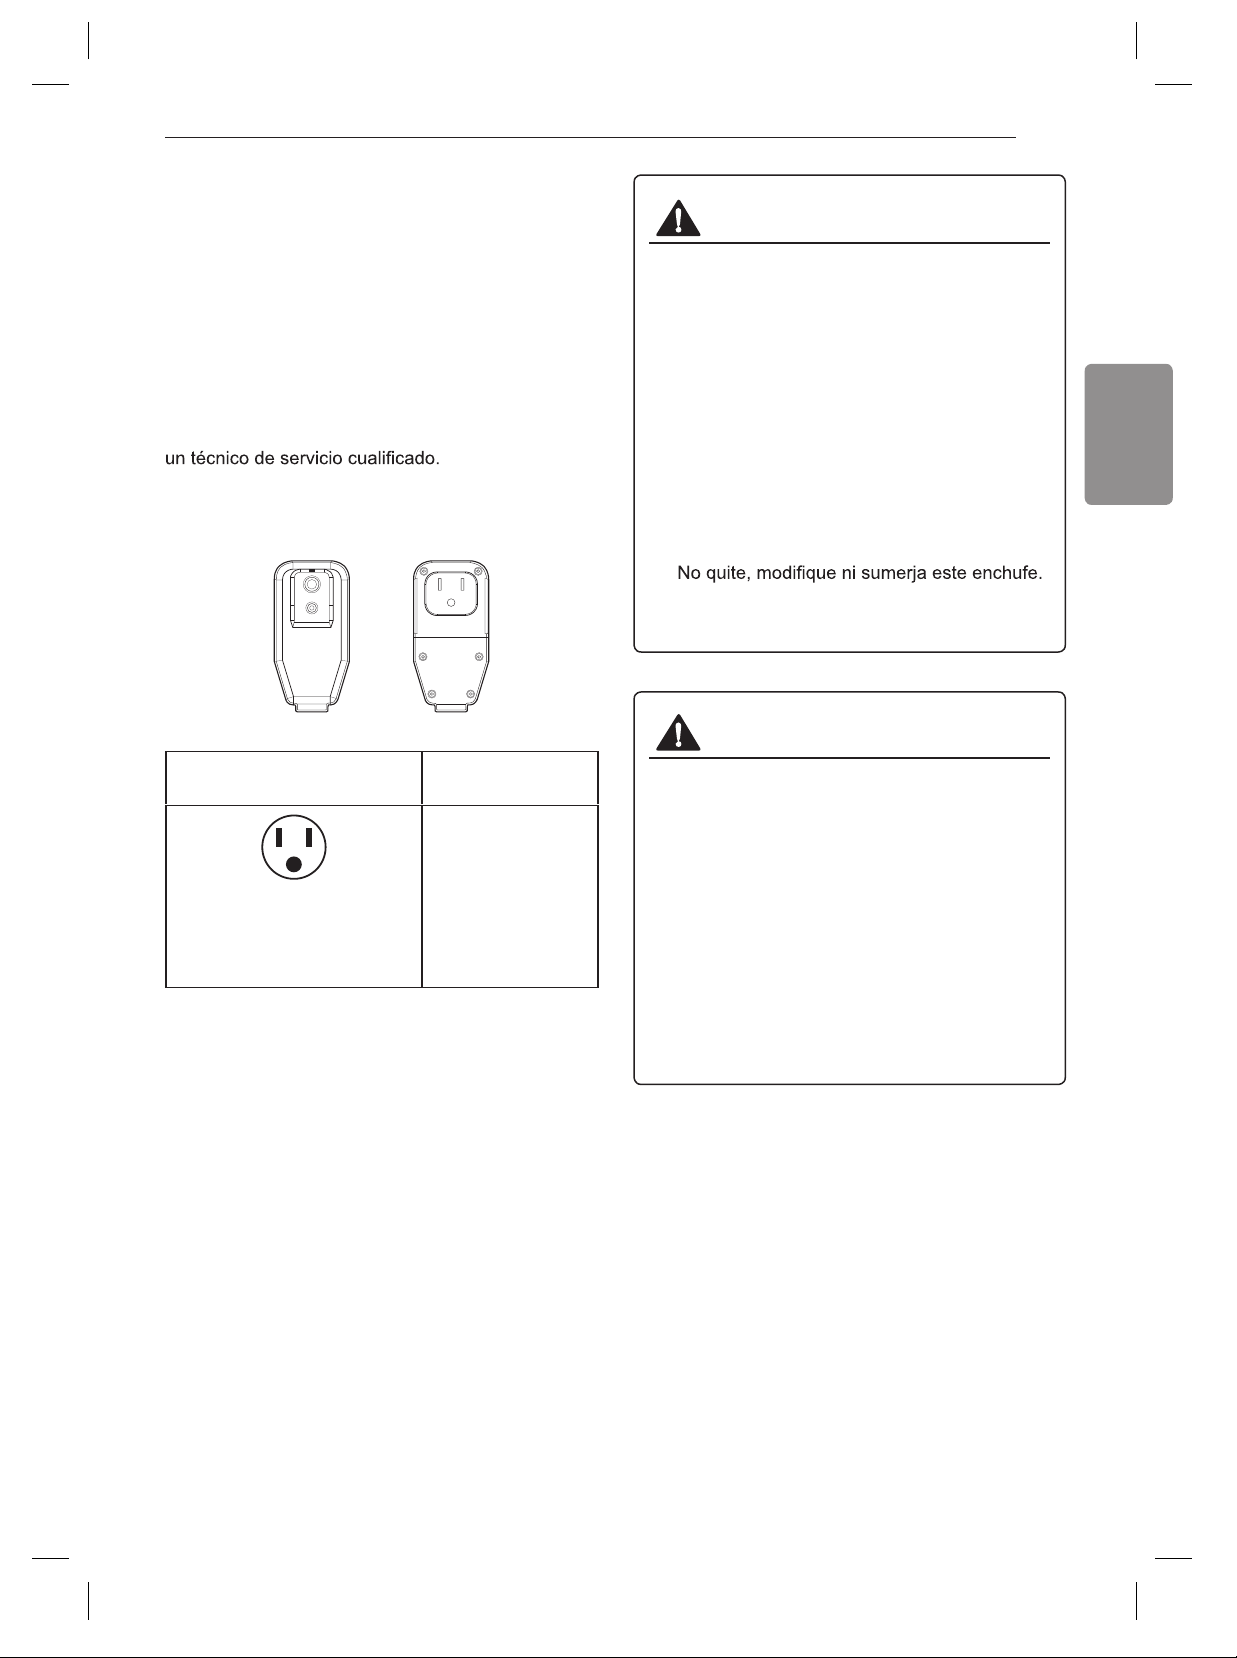
Datos eléctricos
El cable de alimentación puede incluir un interruptor
de corriente. En la carcasa del enchufe hay un botón
de TEST (prueba) y otro de RESET (restablecer). El
dispositivo debe probarse periódicamente pulsando
en primer lugar el botón TEST y, a continuación, el
botón RESET. Si el botón TEST no funciona o si el
botón RESET no permanece pulsado, deje de utilizar
el acondicionador de aire y póngase en contacto con
ADVERTENCIA
● Este aparato debe instalarse de acuerdo con el
estándar estadounidense NEC.
● El uso de alargadores eléctricos puede
provocar lesiones graves o la muerte.
etse noc socirtcéle serodagrala ecilitu oN-
acondicionador de aire de ventana.
in nóisneterbos ed serotcetorp ecilitu oN-
adaptadores de varias tomas con este
acondicionador de aire de ventana.
● Nunca pulse el botón de TEST durante el
funcionamiento. Hacerlo podría dañar el
enchufe.
-
Si este dispositivo se activa, debe corregirse
la causa antes de volver a utilizar el aparato.
PRECAUCIÓN
● Los conductores del interior de este cable
están rodeados por un blindaje, que controla
la corriente residual. Estos blindajes no están
conectados a tierra. Examine periódicamente
el cable para comprobar que no esté dañado.
No utilice este producto si los blindajes quedan
expuestos. Evite el peligro de descarga. El
usuario no puede encargarse del servicio
técnico de esta unidad. No abra la parte
sellada antimanipulación. Todas las garantías
de rendimiento quedarán anuladas. Esta
unidad no debe utilizarse como un interruptor
de encendido y apagado.
Solo para 120 V
RESET
TEST
Utilice la toma de la pared
Fuente de
alimentación
Utilice 15 A, Fusible
de retardo o 15 A,
Disyuntor.
Toma estándar de 120 V
conectada a tierra para
enchufes de 3 clavijas de
15 A, 120 VCA y 60 Hz
10
INSTALACIÓN
Descripción general de la instalación
Accesorios
Tornillos de tipo “A”
(14)
Tornillos de tipo “B”
(3)
Tornillos de tipo “C”
(5)
Tuerca de cierre
(2)
Herramientas necesarias
Destornillador Phillips Destornillador de hoja
plana
Llave ajustable Nivel
Cinta medidora Cuchilla Tijeras Lápiz
Tornillo
(2)
Aislamiento de
espuma (2)
Panel de cortina
derecho
Panel de cortina
izquierda
Tira de espuma
(no adhesiva)
Espuma de PE (2)
(cara adhesiva)
Guía de los panels
inferiore (2)
Soporte para la
ventana
Soporte de umbral (2)
11
ESPAÑOL
INSTALACIÓN
Requisitos de la ventana
● Esta unidad ha sido diseñada para instalarse en
ventanas dobles de guillotina estándar con anchos
de abertura de 27" (68,58 cm) a 39" (99,06 cm).
Las ventanas de guillotina superior e inferior deben
abertura vertical libre de 16" (40,64 cm) desde la
parte inferior de la ventana de guillotina superior
hasta el alféizar interior.
● La diferencia de altura entre el alféizar interior y el
exterior debe ser inferior a 1 ¼" (3,175 cm).
27" a 39"
16" min
NOTA
●
Preparación de la carcasa
1
Quite los 4 tornillos que sujetan la carcasa en
ambos lados y en la parte posterior. (Guárdelos
para utilizarlos más adelante).
Cómo instalar la unidad
1
Para prevenir la vibración y el ruido, asegúrese que
la unidad esté instalada con seguridad y firmeza.
2
Instale la unidad donde la luz del sol no caiga
directamente en la misma.
4
Instale la unidad un poco inclinada para que la parte
posterior quede ligeramente m
ás baja que le frente
(alrededor de 1/2
"
). Esto forzar
á al agua conden-
sada a fluir hacia el exterior.
5
Instale la unidad con el fondo aproximadamente
30
" ~60" por encima del nivel del piso.
3
La parte exterior del gabinete debe extenderse
hacia afuera por lo menos a 12
" sin obstáculos,
como por ejemplo un cerco o una pared, dentro de
los 20
" desde la parte posterior del gabinete
porque evitar
á la radiac
ión de calor del condensador.
La restricción del aire exterior reduce en gran parte
la eficiencia de enfriar del acondicionador de aire.
PRECAUCIÓN
● Todos los álabes laterales del gabinete deben
premanecer expuestos a la parte exterior de
la estructura.
Cerco
Protección
Radiación
de calor
Aire fresco
Tornillos
incluidos
2
Saque la unidad de la carcasa sujetando el
asa de la bandeja base y tirando de ella hacia
adelante mientras sostiene la carcasa.
PRECAUCIÓN
● La unidad es pesada. Para evitar lesiones,
utilice técnicas de elevación adecuadas
cuando tire de ella hacia adelante. Si es
posible, es recomendable contar con la ayuda
de otra persona.
3
Corte los sellos para ventanas de guillotina
(espuma de PE) de forma que obtenga
la longitud adecuada. Despegue la capa
protectora y aplique la espuma con cara
adhesiva a la parte inferior de la ventana de
guillotina y a la parte inferior del marco de la
ventana.
Espuma de PE
(cara adhesiva)
12
INSTALACIÓN
4
Inserte las guías de los paneles de cortina
inferiores en la parte inferior de la carcasa.
Inserte las guías de modo que el reborde mire
hacia la parte posterior de la carcasa.
5
Inserte los rieles superior e inferior de las
paneles de cortina en las guías de los paneles
superior e inferior.
PRECAUCIÓN
● Las guías de los paneles inferiores se rompen
fácilmente. Tenga cuidado con ellas al instalar
la carcasa.
6
Sujete los paneles de cortina a la unidad con
8 tornillos de tipo A.
Instalación de la carcasa
1
Abra la ventana. Marque una línea en el
centro del umbral interno.
Con cuidado, coloque el gabinete en la
ventana y alinee el agujero del centro en la
parte inferior frontal del gabinete con la línea
central marcada en el umbral de la ventana.
2
Jale el marco inferior de la ventana hacia
abajo por detrás de la guía superior hasta
que se junten.
Linea central
Umbral externo
Umbral interno
1 ¼" max.
Agujero central
Umbral interno
Guía superior
Marco de la ventana
Guía de los panele superior
Panel de cortina
Panel de cortina
Guías de los
paneles inferiores
izquierda
derecho
13
ESPAÑOL
INSTALACIÓN
Extraiga cada panel de cortina hasta que
se encuentre con el carril de la ventana
de guillotina. Baje la ventana de guillotina
inferior situada detrás de la guía de los panele
superior hasta que se encuentren.
● No baje la ventana de guillotina tanto que el
movimiento de los paneles de cortina quede
limitado.
Carril de la
ventana de
guillotina
● Instale la carcasa con una inclinación hacia
abajo muy ligera en la parte que mira hacia
el exterior.
½” (12,7 mm) de agua en la bandeja inferior.
8
Utilice un destornillador o un taladro eléctrico
para unir los paneles de cortina a las ventanas
de guillotina pasando tornillos de tipo C por
imagen e introduciéndolos en las ventanas de
guillotina.
4
Use 2 tornillos tipo A para sujetar un soporte
de umbral a los agujeros del gabinete, por
un lado. Use los agujeros del gabinete que
coloquen el soporte del umbral más cerca
del borde externo del umbral. Repita con el
segundo soporte de umbral en el lado
opuesto del gabinete.
5
Instale el gabinete con una ligera inclinación
(aprox. ½”) hacia abajo en la parte exterior.
Use el tornillo y la tuerca para ajustar la
inclinación del gabinete.
PRECAUCIÓN
● No perfore la bandeja base. El producto está
diseñado para operar con aprox. ½” de agua
en la bandeja base. No hay necesidad de
agregar agua si la bandeja está seca.
Tornillos (Tipo A)
Interior
Exterior
aprox.
½”
Gabinete
7
NOTA
6
Sujete la carcasa al alféizar interior pasando
3 tornillos de tipo B por la carcasa e
introduciéndolos en el alféizar.
NOTA
PRECAUCIÓN
● No perfore la bandeja inferior. El producto está
diseñado para funcionar con aproximadamente
3
Coloque los soportes del umbral
holgadamente.
Soporte del umbral
Tuerco
Tornillo
Si la distancia hacia el umbral externo de
la ventana no es tan profunda, quizá no
necesite el tornillo y la tuerca.
NOTA
●
Ángulo
delantero
Carril de la
ventana de
guillotina
Guía de los
panele superior
Alféizar interior
Ángulo
delantero

14
INSTALACIÓN
Tira de espuma (no
adhesiva)
Despliegue la palanca de control de ventilación
situada a la izquierda del panel de control,
como se muestra.
Conecte el mazo de cables entre la rejilla
delantera y el acondicionador de aire.
Coloque la rejilla delantera en la carcasa
insertando las lengüetas de la rejilla en las
ranuras de la parte delantera de la carcasa.
Empuje la rejilla hasta que encaje.
NOTA
● Guíe con cuidado la palanca de control de
ventilación a través de la rejilla cuando la
empuje.
Con ayuda de otra persona, introduzca la
unidad en la carcasa. Coloque de nuevo los
tornillos quitados de los lados de la carcasa
● La unidad es pesada. Pida ayuda a otra
persona para levantarla y colocarla en su sitio.
Si levanta y mueve la unidad sin ayuda, puede
lesionarse.
hasta que se baje el marco de la ventana de
superior de la unidad directamente detrás de la
guía superior. Si la unidad cae por la ventana,
podría causar lesiones o daños personales.
10
Corte la tira de espuma no adhesiva de forma
que obtenga la longitud adecuada e insértela
entre la ventana de guillotina superior y la
inferior.
11
Coloque el soporte para la ventana con un
tornillo de tipo C.
Soporte para la ventana
12
13
14
15
9
PRECAUCIÓN
en el paso 1.
NOTA
● Consulte la sección "Datos eléctricos" para
obtener información sobre cómo conectar el
cable de alimentación a una toma eléctrica.
16
NOTA
●
Corte la aislamiento de espuma con cara adhesiva
según el tamaño de las paneles de cortina.
Quite la capa protectora de la aislamiento de
espuma y péguela a las paneles de cortina.
La espuma ignífuga mejora la capacidad de
enfriar del acondicionador de aire.
Aislamiento de espuma
tornillos a través de la rejilla frontal.
Saque el filtro de aire y fijarlo con 2 Tipo Unos
(Estos dos tornillos Tipo A están empacados
en una bolsa en la Parrilla Frontal.)
15
ESPAÑOL
FUNCIONAMIENTO
FUNCIONAMIENTO
Panel de control y control remoto
Remote ControlRemote Control
4 3 2
1
5
7
6
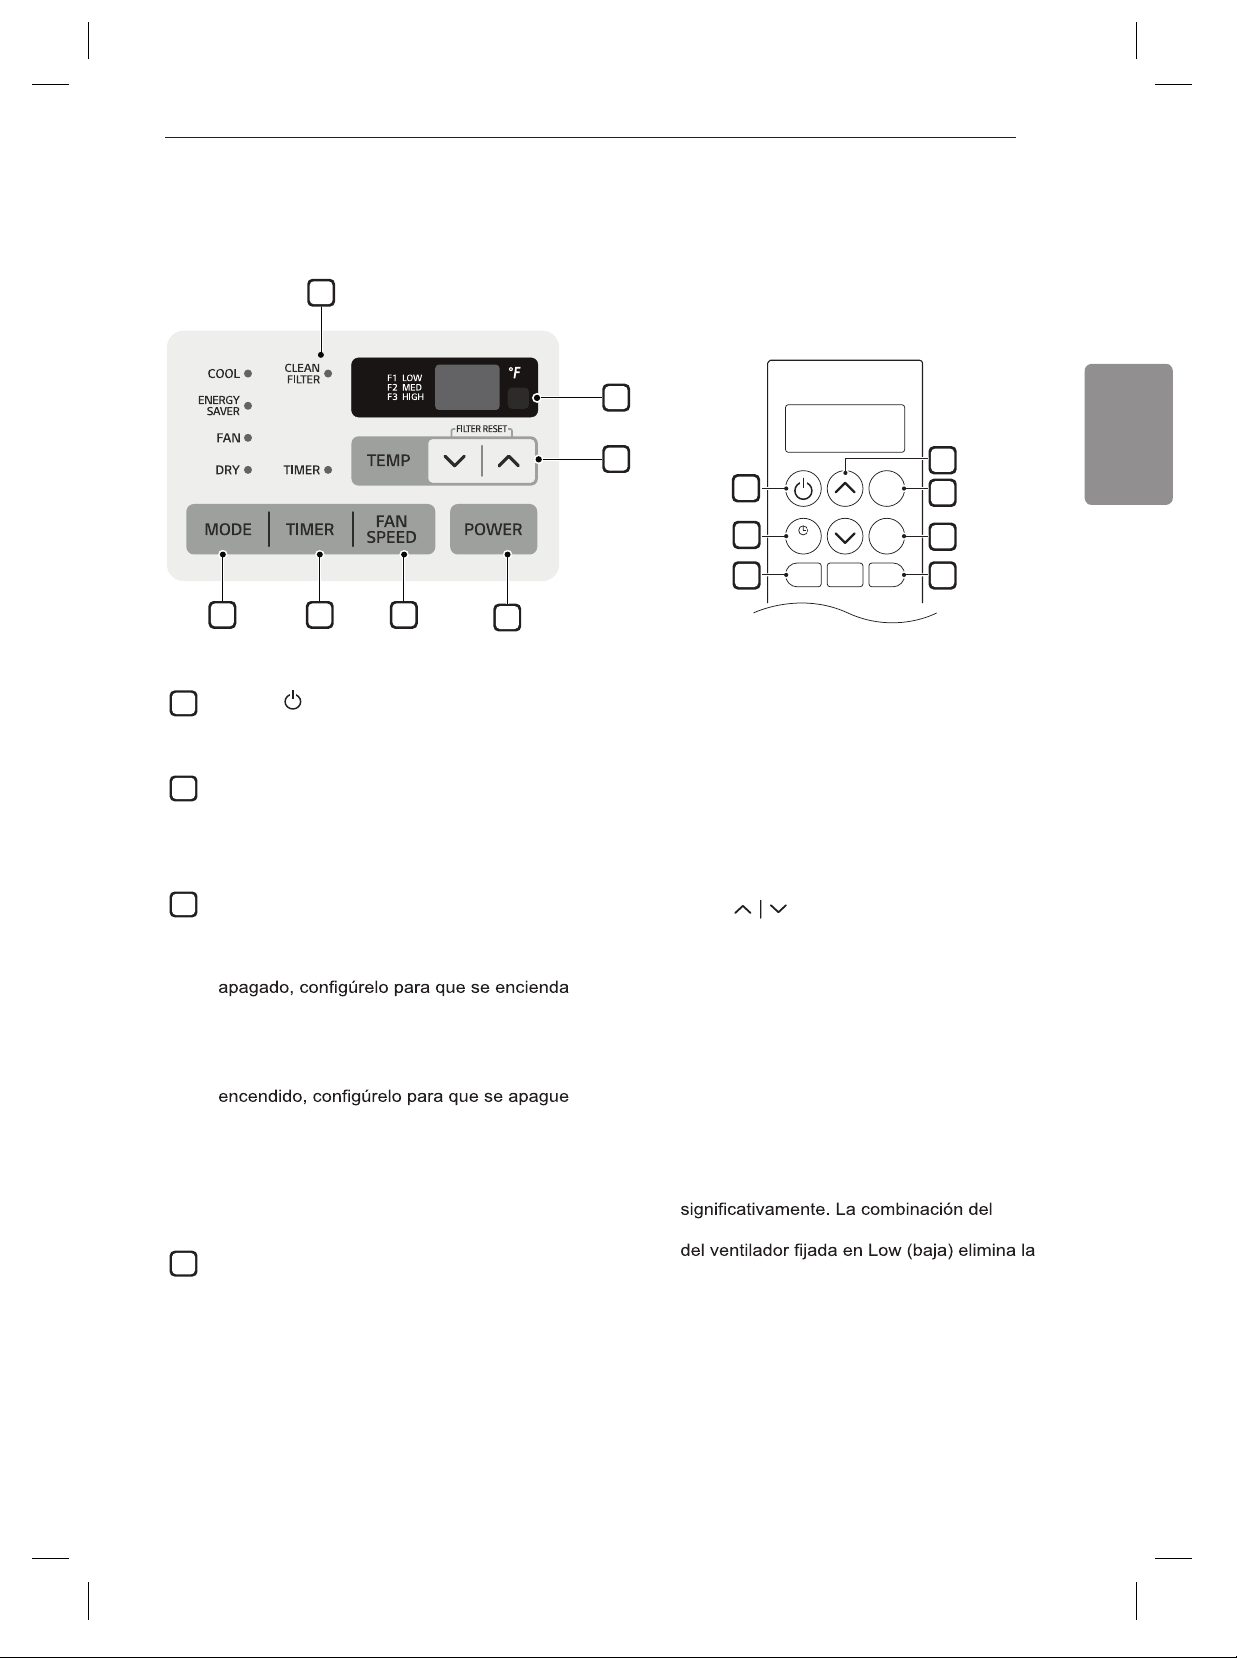
1
Power (
) (Alimentación)
Pulse este botón para encender o apagar el
acondicionador de aire.
2
3
Delay ON/OFF Timer (Temporizador de
retraso de encendido o apagado)
Delay ON (Retraso de encendido) -
cuando el acondicionador de aire esté
automáticamente de 1 a 24 horas después,
con los ajustes previos de modo y ventilador.
Delay OFF (Retraso de apagado) -
cuando el acondicionador de aire esté
automáticamente de 1 a 24 horas después.
NOTA
● Cada vez que se pulsa el botón Timer, este
avanza 1 hora. Tras la última pulsación, la
pantalla vuelve al ajuste de temperatura.
4
Operation Mode (Modo de funcionamiento)
Pulse el botón Mode (modo) para ver
sucesivamente los 4 tipos de funcionamiento
del acondicionador de aire: Energy Saver
(Ahorro de energía), Cool (Frío), Fan Only
Ventilador) y Dry (Secar).
- en este modo, el
Fan
- este modo es ideal en días
Fan (Ventilador)
ventilador hace circular el aire, pero el
compresor no funciona. Utilice el botón
Speed para establecer la velocidad del
ventilador en High (alta), Medium (media) o
Low (baja). En este modo, no puede ajustar
la temperatura establecida.
Dry (Secar)
lluviosos y húmedos para deshumedecer
la habitación en lugar de enfriarla
funcionamiento del compresor y la velocidad
humedad de la habitación. El compresor y el
ventilador se desactivan cuando se alcanza
la temperatura establecida. En el modo Dry
(secar) no se puede ajustar la velocidad del
ventilador.
Fan Speed (Velocidad del ventilador)
Púlselo para establecer la velocidad del
ventilador en Low (baja) (F1), MED (media)
(F2) o High (alta) (F3).
Fan
Cool (Frío)
calurosos para enfriar y deshumedecer la
habitación rápidamente. Utilice los botones
Temp
deseada para la habitación y el botón
Speed para establecer la velocidad del
ventilador deseada.
para establecer la temperatura
- este modo es ideal en días
- en Energy Saver (Ahorro de energía)
este modo, el compresor y el ventilador se
desactivan cuando se alcanza la temperatura
establecida. El ventilador se activa cada 3
minutos aproximadamente para que el sensor
de la unidad pueda determinar con precisión
si es necesario continuar enfriando.
1
3
9
2
8
4
5
TEMP
MODE
FAN
SPEED
ENERGY
SAVER
TIMER
TIMER
CLEAR
16
FUNCIONAMIENTO
Control remoto inalámbrico
Inserción de las batería
NOTA
●
● No utilice pilas recargables. Asegúrese de que las
pilas sean nuevas.
● Para que no se descarguen, saque las pilas del
mando a distancia cuando el acondicionador de
aire vaya a estar un largo período sin utilizarse.
● Mantenga el control remoto alejado de lugares
extremadamente cálidos o húmedos.
● Para que el mando a distancia continúe
funcionando correctamente, el sensor remoto no
debe exponerse directamente a la luz del sol.
NOTA
● Auto Restart (Reinicio automático): Si el
acondicionador de aire se apaga debido a una
interrupción del suministro eléctrico, se reiniciará
automáticamente cuando este se restablezca, con
los ajustes establecidos antes de que se apagara.
● Energy Saver (Ahorro de energía): La unidad
entra de forma predeterminada en el modo Energy
Saver (ahorro de energía) cada vez que se
enciende, excepto en el modo Fan (ventilador) o
cuando se restablece el suministro eléctrico tras
una interrupción.
● El control remoto no funcionará correctamente
si el sensor de infrarrojos de CA está expuesto
directamente a la luz o si hay algún obstáculo
entre el control remoto y el acondicionador de aire.
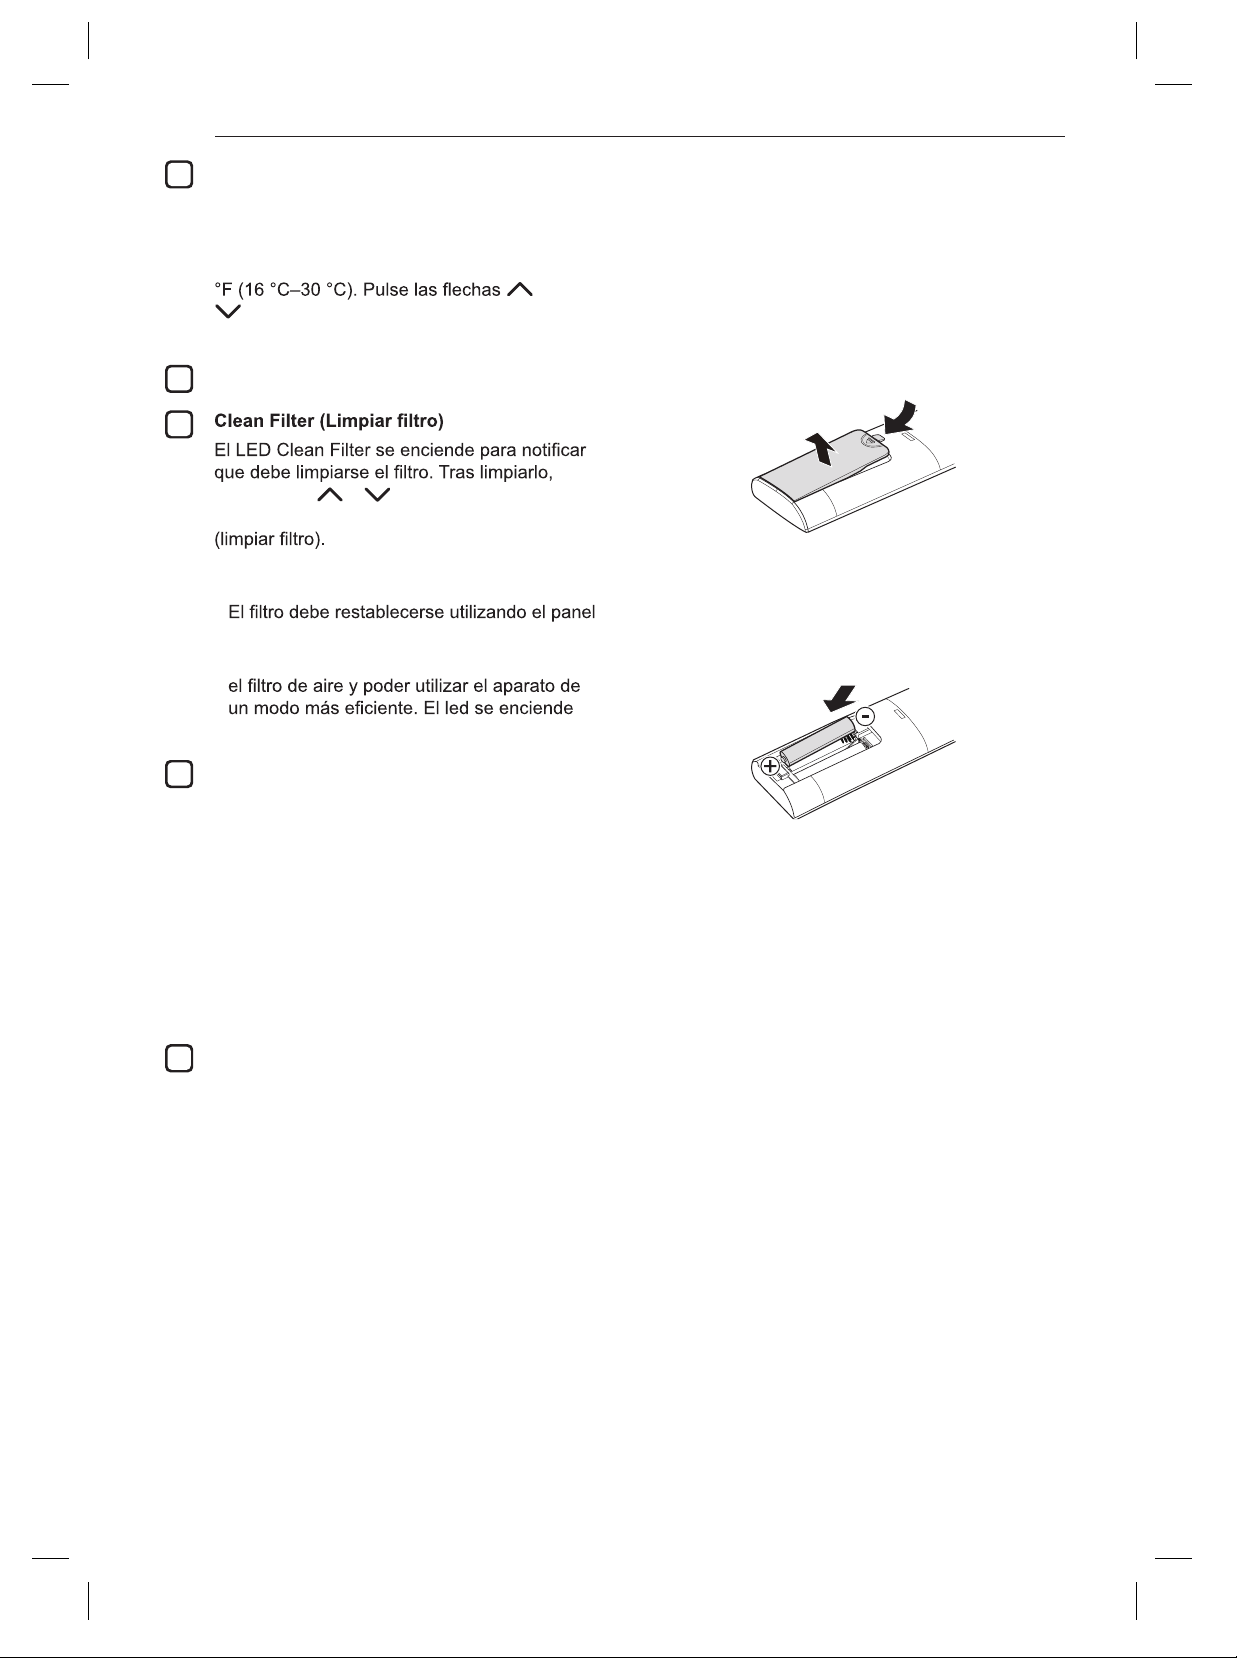
1
Quite la tapa de la parte posterior del control
remoto.
2
Coloque las baterías nuevas y asegúrese
de que los polos + y - estén ubicados
correctamente.
El acondicionador de aire incluye pilas nuevas
NOTA
●
Esta función está disponible en el modo
Enfriamiento.
para el control remoto.
5
6
7
pulse Temp
y al mismo tiempo en el
panel de control para apagar la luz Clean Filter
NOTA
●
de control, no el control remoto.
● Esta función es un recordatorio para limpiar
tras 250 horas de uso.
Sensor Del Control Remoto
Temperature Control (Control de
temperatura)
El termostato controla la temperatura de la
habitación para mantener la deseada. El
termostato puede ajustarse entre 60 °F–86
o
para aumentar o reducir el ajuste de
temperatura.
8
Energy Saver (Ahorro de energía)
En este modo, el compresor y el ventilador se
desactivan cuando se alcanza la temperatura
establecida. El ventilador se activa cada 3
minutos aproximadamente para que el sensor
de la unidad pueda determinar con precisión
si es necesario continuar enfriando.
Si la pantalla del control remoto comienza a hacerse
tenue, cambie las baterías. Coloque baterías AAA
(1.5 V) antes de utilizar el control remoto.
9
Timer Clear (Temporizador Borrar)
Para cancelar los ajustes de Timer
(temporizador).
17
ESPAÑOL
FUNCIONAMIENTO
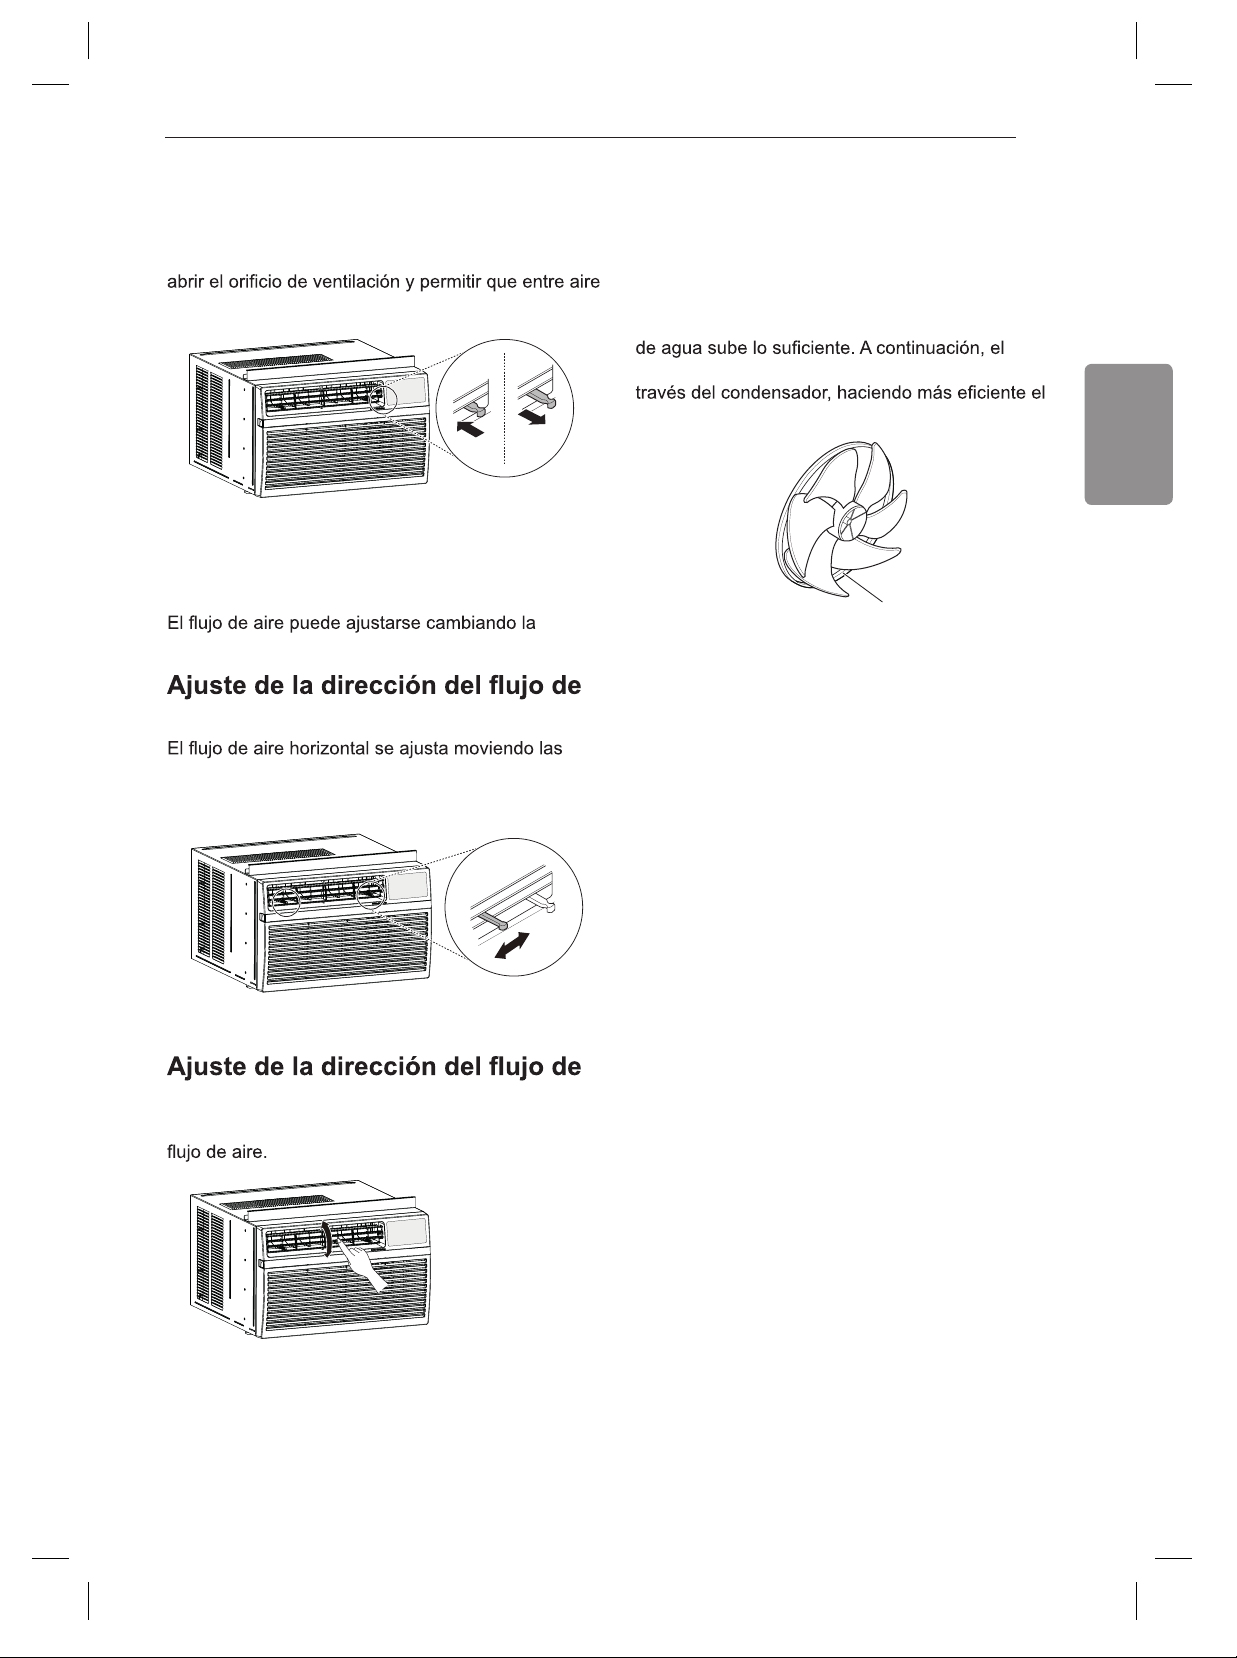
Ventilación
Empuje la palanca de ventilación hacia la posición
de cierre para mantener el mejor rendimiento del
enfriamiento. Tire de la palanca de ventilación para
fresco en la habitación.
Dirección del aire
dirección de las lamas del acondicionador de aire.
aire horizontal
palancas de las lamas verticales hacia la izquierda o
hacia la derecha.
aire vertical
Toque las lamas horizontales para subir o bajar el
NOTA
● Cuando haga mucho calor, la unidad puede
apagarse automáticamente para proteger el
compresor.
Funciones adicionales
Ventilador Slinger
Este acondicionador de aire está equipado con un
ventilador Slinger. (Ver dibujo).
El anillo exterior del ventilador recoge el agua
condensada de la bandeja base si el nivel
ventilador recoge el agua, que se expulsa a
acondicionador de aire.
Anillo
Cerrar Abrir
18
MANTENIMIENTO
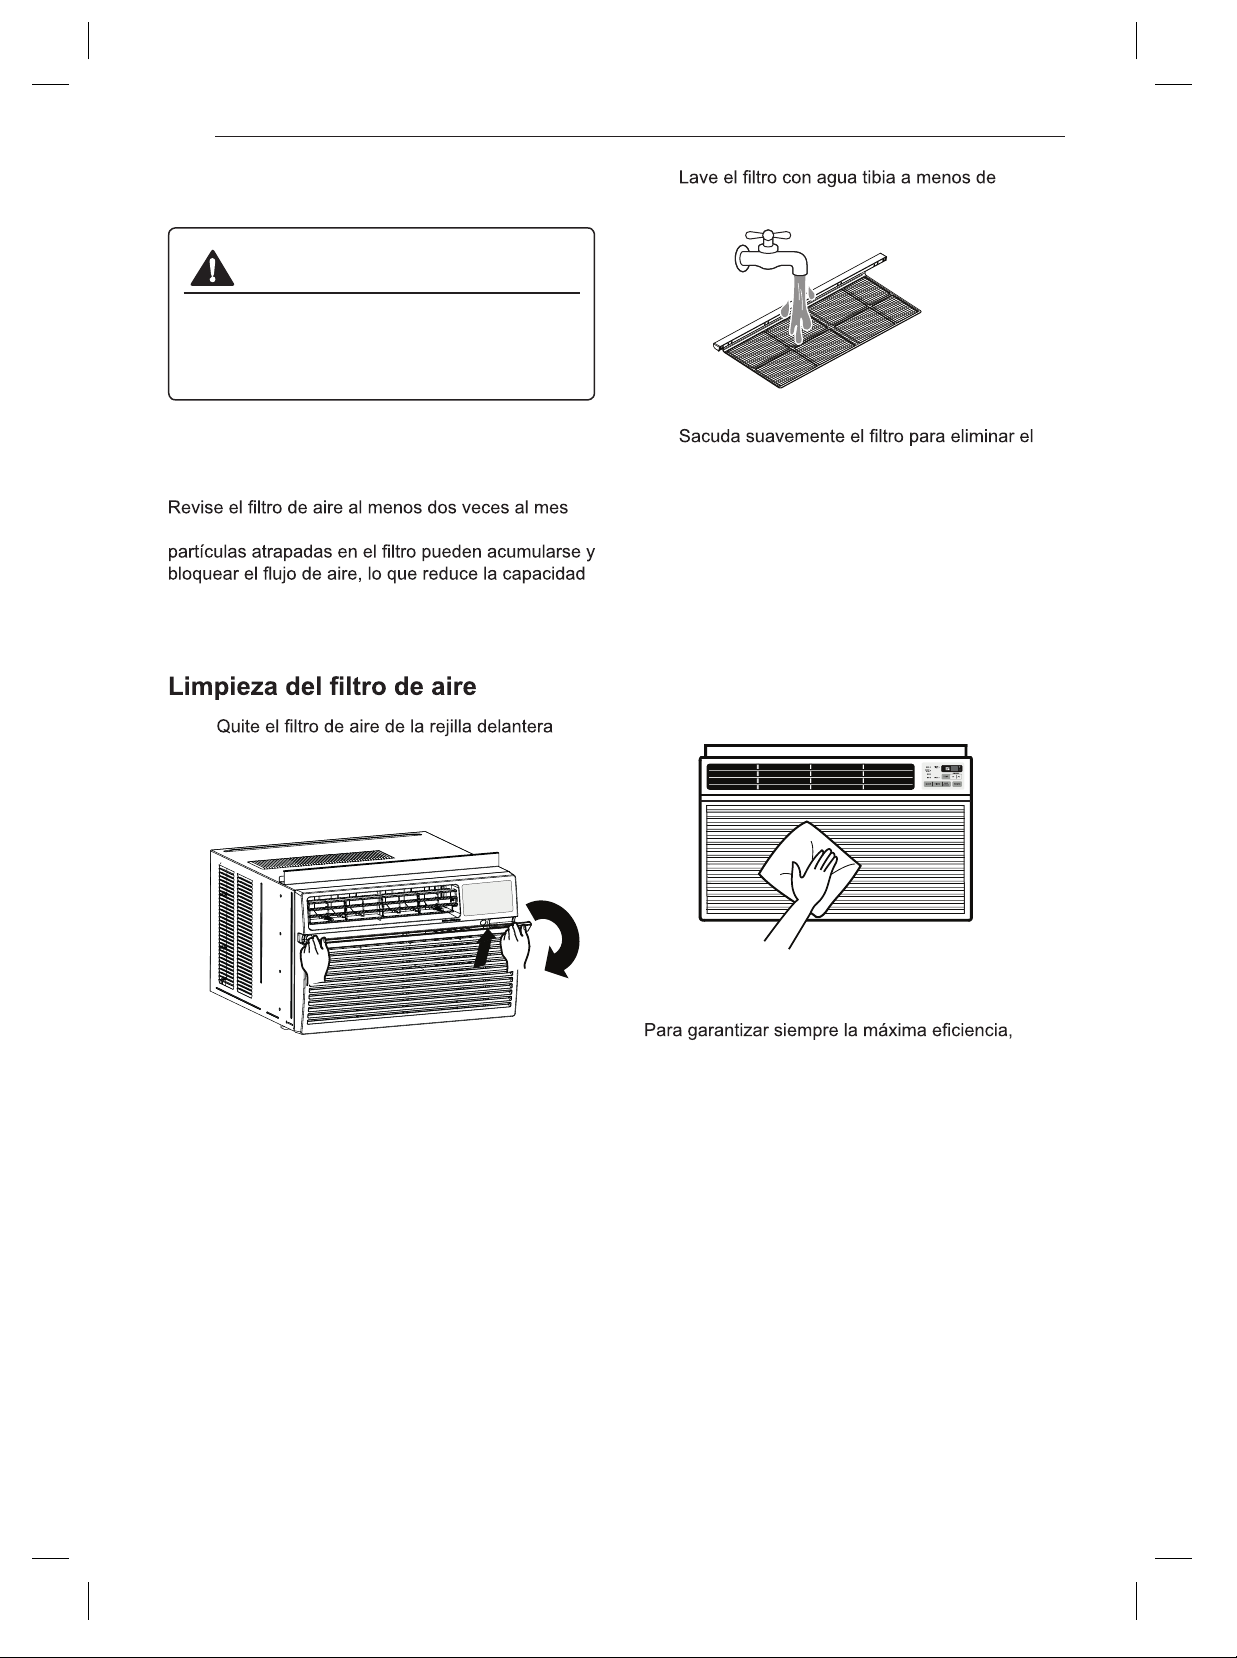
40 °C (104 °F).
3
exceso de agua y vuelva a colocarlo.
Limpieza del acondicionador de
aire
● Limpie la rejilla delantera y la rejilla de entrada
con un paño humedecido en una solución de
detergente suave.
● Lave la carcasa con jabón o detergente suaves y
agua tibia y, a continuación, púlala utilizando cera
líquida para aparatos.
NOTA
●
las bobinas del condensador (fuera de la unidad)
deben revisarse periódicamente y limpiarse si
están obstruidas por hollín o suciedad procedentes
del aire exterior.
● Para las reparaciones y el mantenimiento, póngase
en contacto con un Centro de servicio técnico
autorizado. Si desea más información, consulte
la página de la garantía o llame al 1-800-243-
0000. Tenga a mano el número de modelo y el de
serie. Deben estar escritos en la página 23 de este
manual.
MANTENIMIENTO
ADVERTENCIA
Antes de limpiar o realizar el mantenimiento,
desconecte el suministro de electricidad y espere
que el ventilador se detenga.
Filtro de aire
para comprobar si es necesaria su limpieza. Las
de enfriar y ocasiona una acumulación de escarcha
en el evaporador.
1
tirando de él hacia adelante y, a continuación,
ligeramente hacia arriba.
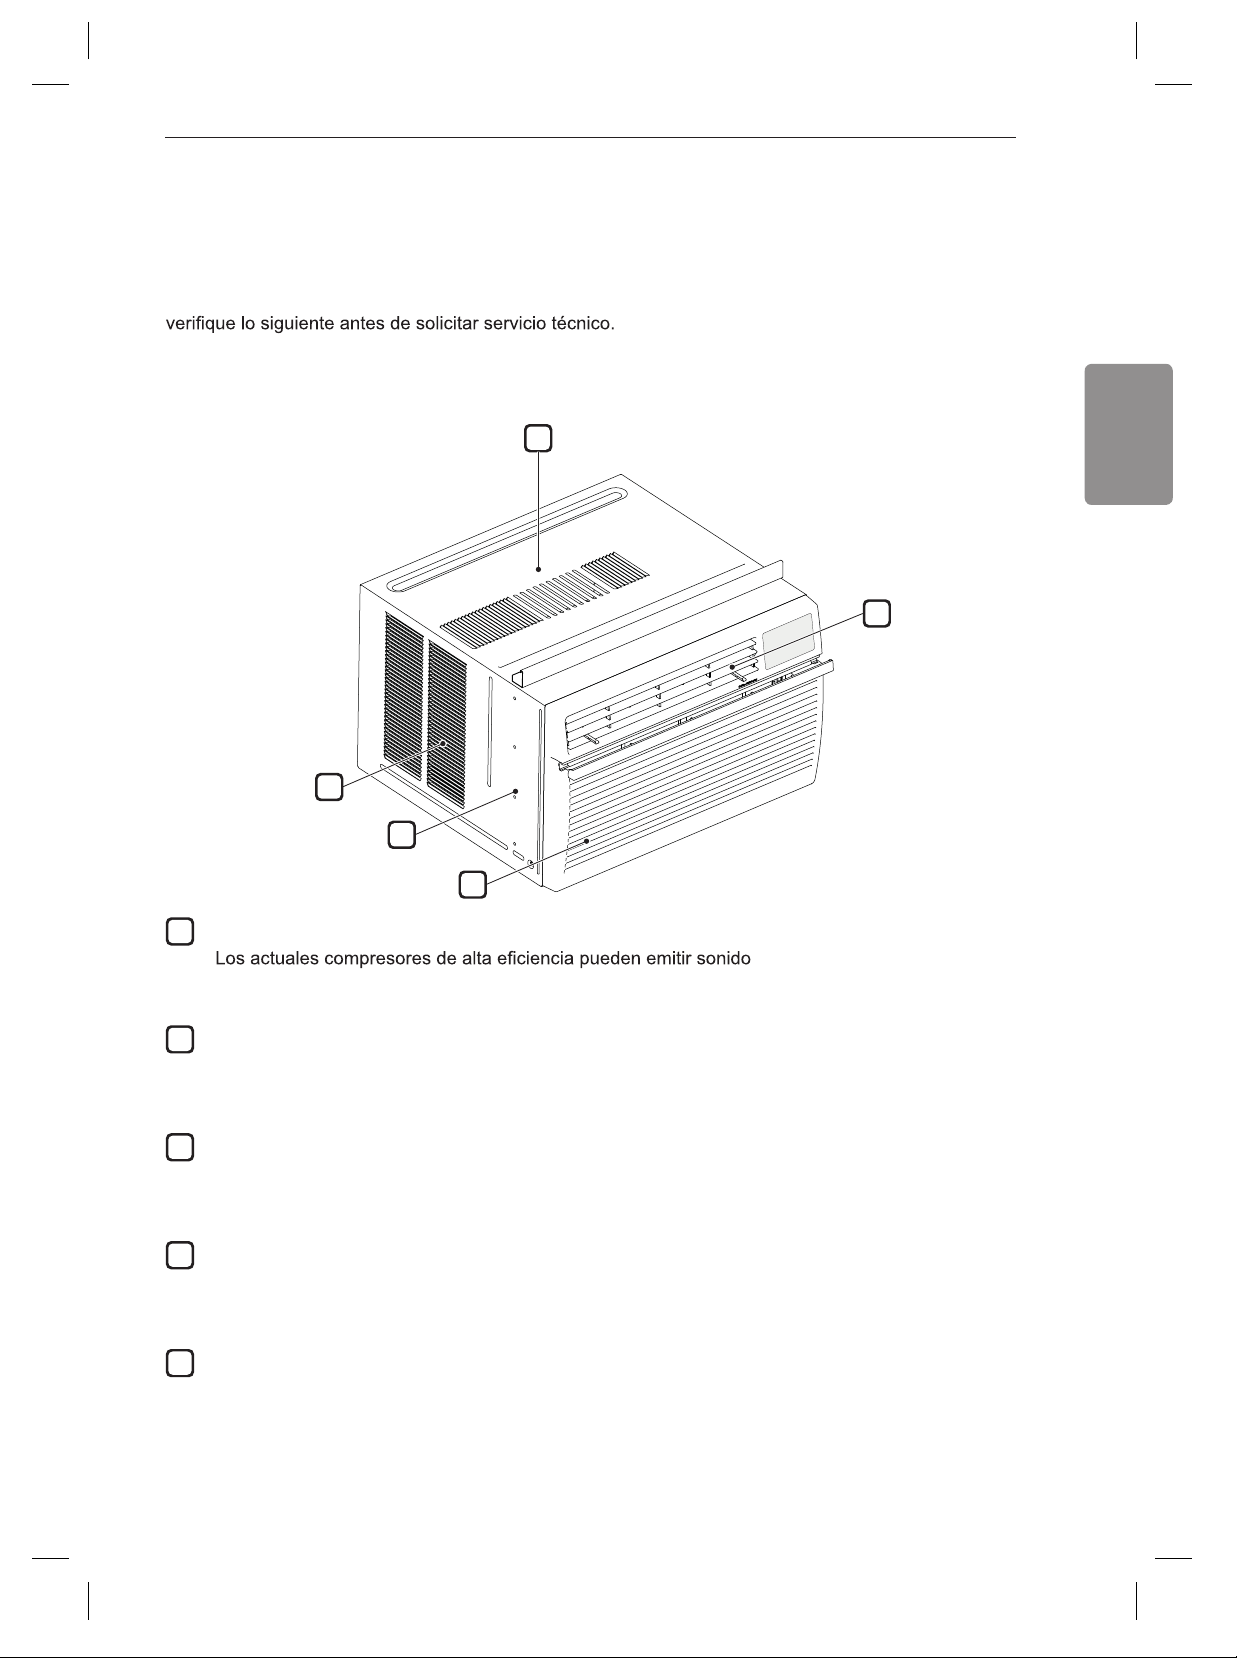
19
ESPAÑOL
SOLUCIÓN DE PROBLEMAS
SOLUCIÓN DE PROBLEMAS
Antes de llamar al servicio técnico
El artefacto está equipado con un sistema automático de monitoreo de errores para detectar y diagnosticar
problemas en una etapa temprana. Si el artefacto no funciona adecuadamente o si no funciona en absoluto,
Sonidos Normales Que Puede Escuchar
1
Sonidos agudos
s agudos durante el ciclo de
refrigeración.
2
Sonido de corriente de aire
En la parte delantera de la unidad puede escuchar el sonido de la corriente de aire producida por el
ventilador.
3
Gorgoteo o silbido
Puede escucharse ruido de gorgoteo o silbido cuando el refrigerante pasa por el evaporador durante el
funcionamiento normal.
4
Vibración
La unidad puede vibrar y hacer ruido debido a una mala construcción de la pared o la ventana o a una
instalación incorrecta.
5
Tintineo o silbido
Las gotas de agua que caen sobre el condensador durante el funcionamiento normal pueden causar
sonidos de tintineo o silbido.
1
2
3
4
5
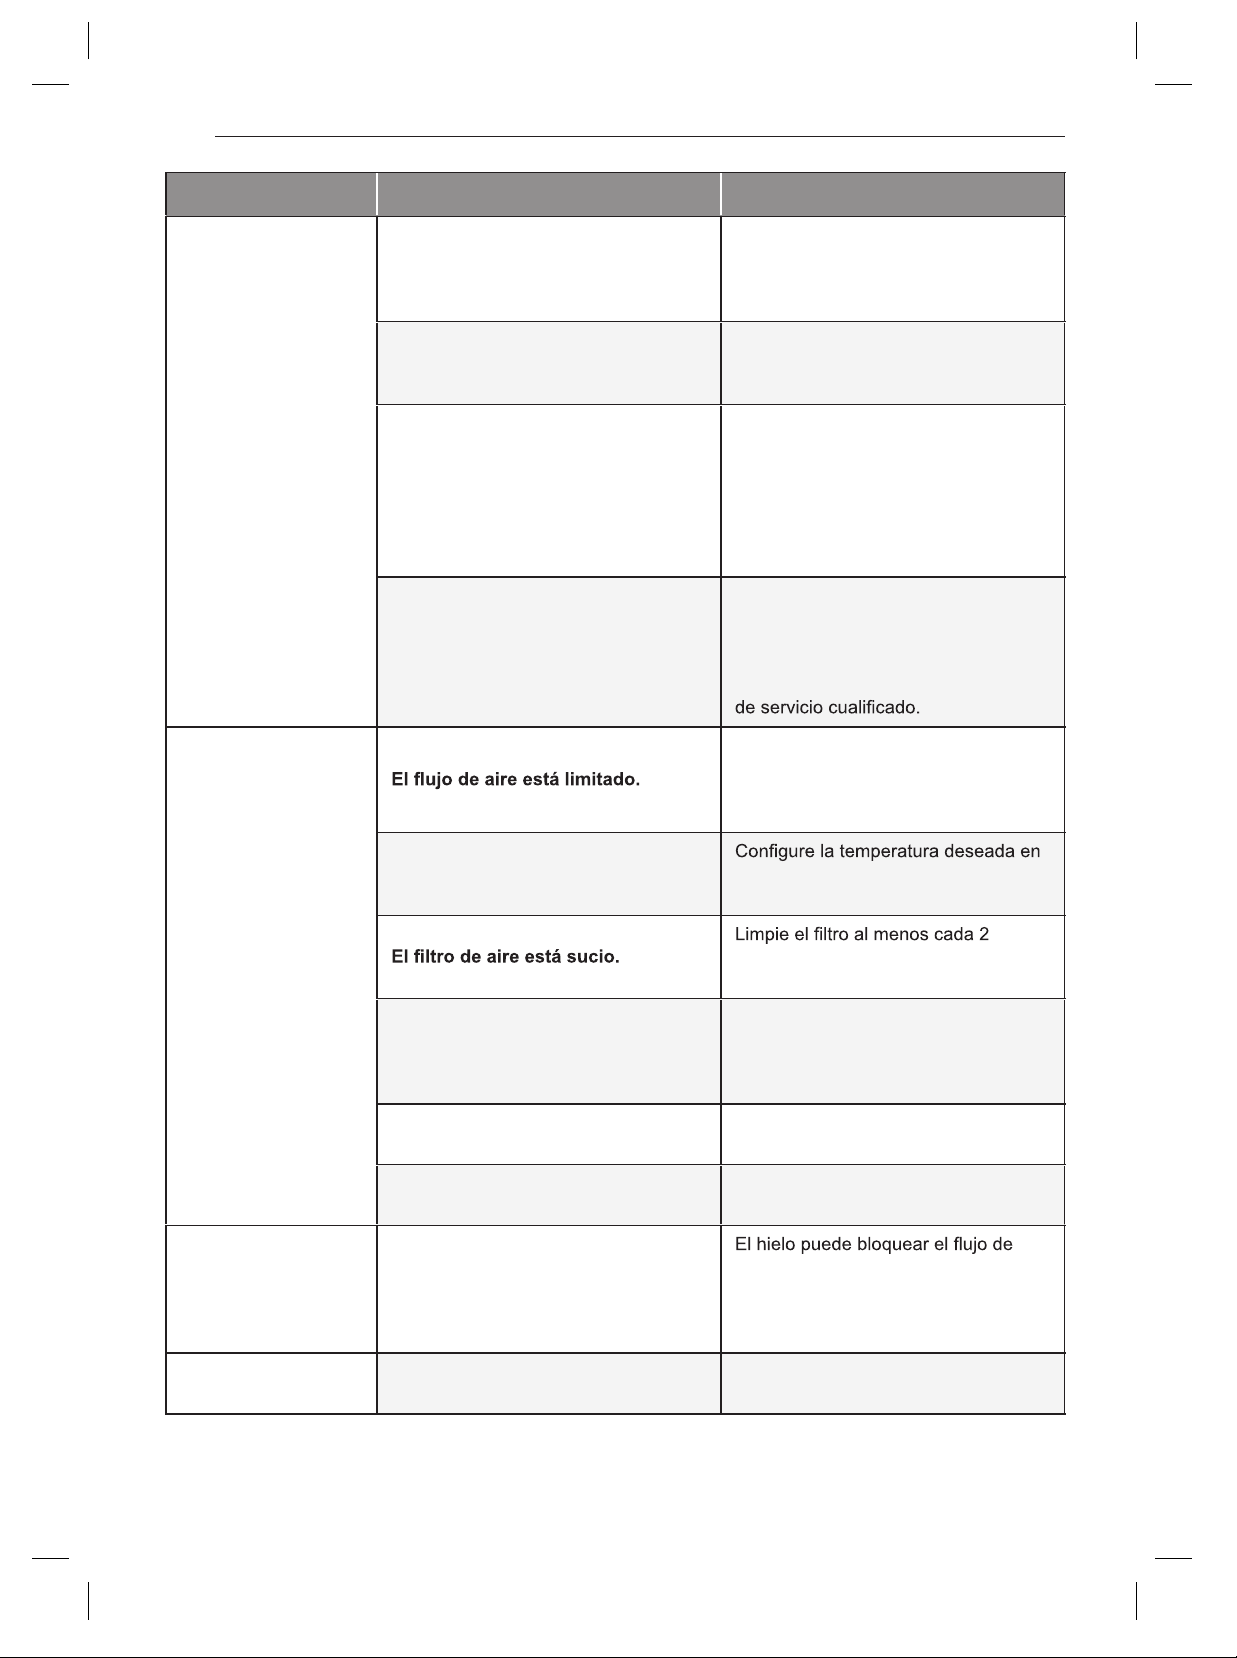
20
SOLUCIÓN DE PROBLEMAS
Problema Causa posible Soluciones
El acondicionador
de aire no se inicia.
El aire acondicionado está
desenchufado.
Asegúrese de que el enchufe
del acondicionador de aire esté
completamente introducido en la
toma.
El fusible se ha fundido o el
disyuntor se ha activado.
Revise la caja de fusibles o de
disyuntores de la casa y sustituya el
fusible o restablezca el disyuntor.
Interrupción del suministro
eléctrico.
Si se interrumpe el suministro
eléctrico, ajuste el control de modo
en Off (apagado). Cuando se
restablezca el suministro eléctrico,
espere 3 minutos para reiniciar el
acondicionador de aire; así evitará la
sobrecarga del compresor.
El interruptor de corriente se ha
activado.
Pulse el botón RESET del enchufe
del cable de alimentación. Si el botón
RESET no permanece pulsado, deje
de utilizar el acondicionador de aire y
póngase en contacto con un técnico
El acondicionador
de aire no enfría
como debería.
Asegúrese de que no haya cortinas,
persianas ni muebles que bloqueen la
parte delantera del acondicionador de
aire.
Es posible que el control de
temperatura no esté correctamente
ajustado.
un nivel inferior que la temperatura
actual.
semanas. Consulte la sección
"MANTENIMIENTO" y servicio técnico.
Es posible que en la habitación
haya hecho calor.
La primera vez que se enciende el
acondicionador de aire transcurre
algún tiempo hasta que la habitación
se enfría.
El aire frío se escapa.
Revise las rejillas del suelo abiertas y
el retorno de aire frío.
Las bobinas de enfriamiento se han
congelado.
Consulte más arriba "El
acondicionador de aire se congela".
El acondicionador
de aire se congela.
Las bobinas de enfriamiento se han
helado.
aire e impedir que el acondicionador
de aire enfríe adecuadamente la
habitación. Ajuste el control de modo
en High Fan o High Cool.
Gotea agua en el
exterior.
Tiempo caluroso y húmedo. Esto es normal.
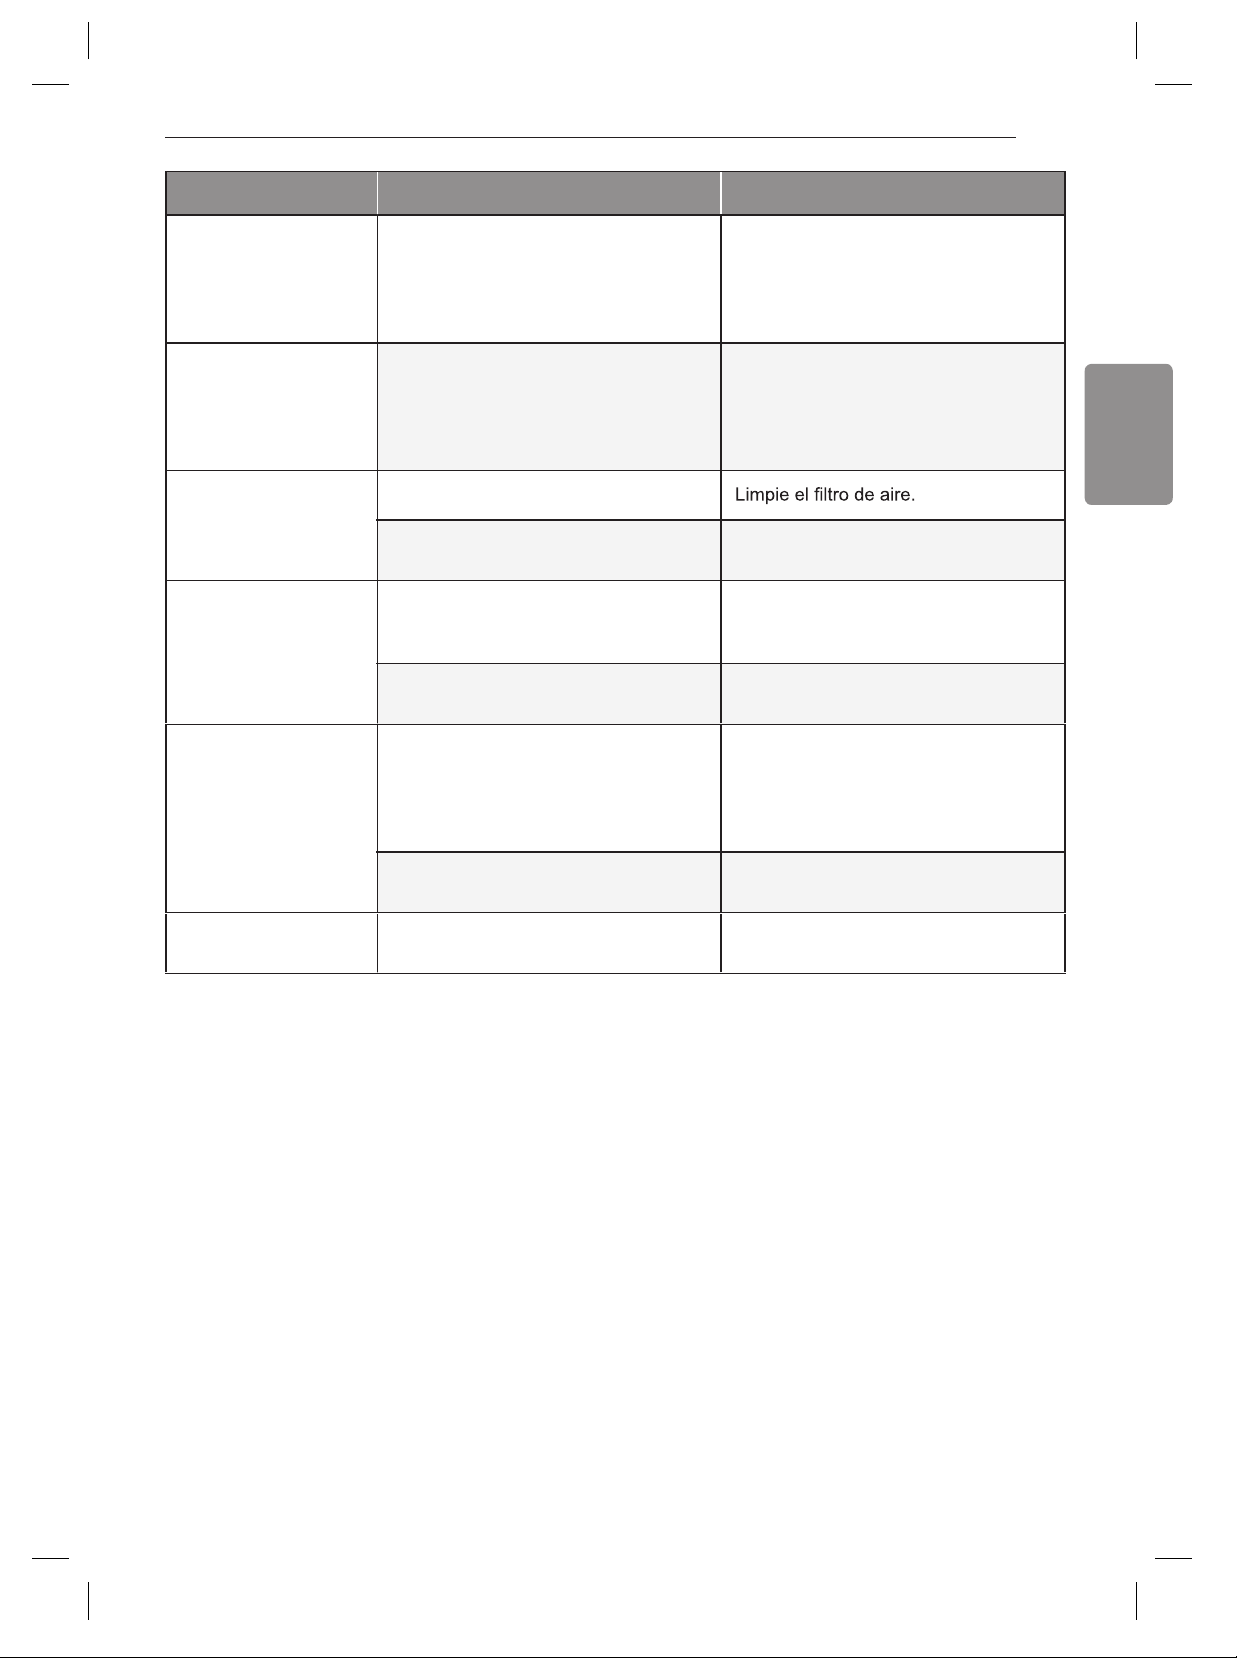
21
ESPAÑOL
SOLUCIÓN DE PROBLEMAS
Problema Causa posible Soluciones
Gotea agua en el
interior.
El acondicionador de aire no está
inclinado hacia el exterior.
Para que el agua se elimine
correctamente, asegúrese de que
el acondicionador de aire se incline
ligeramente desde la carcasa hacia la
parte posterior.
Se acumula agua en
la bandeja base.
La humedad eliminada del aire se
acumula en la bandeja base.
Esto es normal durante períodos
breves en zonas con poca humedad;
es normal durante períodos más
prolongados en zonas muy húmedas.
El acondicionador
de aire se enciende y
apaga rápidamente.
Filtro de aire sucio: aire limitado.
Temperatura exterior
extremadamente alta.
Consulte las instrucciones de
instalación o al instalador.
Hay ruido cuando la
unidad enfría.
Sonido de movimiento de aire.
Esto es normal. Si es demasiado alto,
seleccione un ajuste más lento de la
velocidad del VENTILADOR.
Vibración de la ventana: instalación
incorrecta.
Consulte las instrucciones de
instalación o al instalador.
El sensor remoto
se desactiva
prematuramente.
El mando a distancia no tiene
cobertura.
Utilice el mando a distancia a una
distancia máxima de 20 pies (6,096 m)
y en un radio de 120° respecto a la
parte delantera de la unidad.
Obstrucción de la señal del mando
a distancia.
Elimine la obstrucción.
La habitación está
demasiado fría.
La temperatura establecida es
demasiado baja.
Aumente la temperatura establecida.
NOTA
● Puede obtener más información sobre el programa Energy Star en www.energystar.gov.
● Si ve "CH" en la pantalla, llame al 1-800-243-0000.
22
GARANTÍA
GARANTÍA
COBERTURA DE LA GARANTÍA:
LG Electronics Inc. ("LG") garantiza que reparará o sustituirá, gratuitamente, su producto si resulta defectuoso
ESTA GARANTÍA LIMITADA CONTIENE UNA CLÁUSULA DE ARBITRAJE QUE LE
DEMANDA A USTED Y A LG RESOLVER CONFLICTOS A TRAVÉS DE UN ARBITRAJE VINCULANTE EN
LUGAR DE HACERLO EN LA CORTE, A MENOS QUE USTED DECIDA NO PARTICIPAR. EN EL ARBITRAJE
NO ESTÁN PERMITIDAS LAS ACCIONES COLECTIVAS NI LOS JUICIOS CON JURADO. POR FAVOR, VEA
A CONTINUACIÓN LA SECCIÓN TITULADA "PROCEDIMIENTO PARA RESOLVER CONFLICTOS".
en materiales o mano de obra bajo condiciones normales de uso durante el periodo de garantía mencionado
más abajo, efectivo a partir de la fecha de compra del producto original por parte del consumidor. Esta
garantía limitada sólo es válida para el comprador original del producto y no es asignable ni transferible a
nicamente cuando el producto se compra a
través de un distribuidor autorizado de LG y se utiliza en los Estados Unidos ("EE UU") o en cualquiera de sus
territorios.
NOTA
● Los recambios y piezas de repuesto pueden ser nuevos o estar reconstruidos de fábrica y están
garantizados durante el tiempo restante del periodo de garantía de la unidad original o noventa días (90),
el periodo de los dos que sea más largo. Por favor, guarde el recibo de compra o la nota de entrega como
prueba de la fecha de compra como comprobante de garantía (se le puede pedir que presente una copia a
LG o a su representante autorizado).
PERÍODO DE GARANTÍA:
AVISO DE ARBITRAJE:
1 año desde la fecha de compra: Cualquier repuesto interno/funcional y mano de obra
CÓMO SE MANEJA EL SERVICIO TÉCNICO: Servicio a domicilio
Los servicios a domicilio se prestarán durante el periodo de garantía sujeto a disponibilidad en los Estados
Unidos. El servicio a domicilio puede no estar disponible en todas las áreas. Para recibir asistencia técnica
a domicilio, el producto debe estar en un entorno despejado y accesible al personal técnico. Si durante el
servicio a domicilio la reparación no se puede llevar a cabo, es posible que sea necesario desplazarlo a
nuestras instalaciones, repararlo y devolverlo a su hogar. Si este fuera el caso, LG puede optar, a petición
nuestra, a utilizar el transporte de nuestra elección para desplazar la unidad al y del centro de servicio
autorizado de LG.
ESTA GARANTÍA LIMITADA NO CUBRE LO SIGUIENTE:
● Las visitas de Asistencia a domicilio para entregar, recoger y/o instalar el producto, instruir o sustituir
fusibles.
● Sustitución de fusibles de la casa o reajuste de interruptores de circuito, la corrección del cableado de la
casa o de la tubería, o la corrección de la instalación del producto.
● Los daños o averías causados por fugas / roturas / congelación de tuberías de agua, líneas de drenaje
● Los daños o averías causados por accidentes, plagas e insectos, rayos, viento, fuego, inundaciones o actos
de Dios.
● Los daños o fallos ocasionados por el mal uso, abuso, instalación inadecuada, reparación o mantenimiento.
por LG.
●
alteraciones del producto.
● Daños o fallos causados por corriente o voltaje eléctrico incorrecto, o por códigos de fontanería.
23
ESPAÑOL
GARANTÍA
● Los productos cuyos números de serie de fábrica originales hayan sido quitados, borrados o cambiados de
ninguna manera.
● Las reparaciones cuando el producto se utiliza para cualquier cosa fuera de lo normal y del uso doméstico
instrucciones que se indican en el manual del propietario.
● La extracción y reinstalación del producto si está instalado en un lugar inaccesible.
ESTA GARANTÍA SE OTORGA EN SUSTITUCIÓN O EXCLUSIÓN DE TODA OTRA GARANTÍA, EXPRESA
O IMPLÍCITA, INCLUYENDO SIN LIMITAR CUALQUIER GARANTÍA DE CALIDAD O IDONEIDAD CON UN
PROPÓSITO CONCRETO. EN LA MEDIDA EN QUE CUALQUIER GARANTÍA IMPLÍCITA ES OBLIGADA
POR LA LEY, ESTÁ LIMITADA EN DURACIÓN AL PERIODO DE GARANTÍA YA MENCIONADO. LA
REPARACIÓN O REEMPLAZO DE PIEZAS, SEGÚN LO ESTABLECIDO EN ESTA GARANTÍA, ES EL
ÚNICO QUE PUEDE RECLAMAR EL CLIENTE. NI EL FABRICANTE NI SU DISTRIBUIDOR EN LOS
EE.UU. SE HACE RESPONSABLE DE CUALQUIER DAÑO (DERIVADO, INDIRECTO, ESPECIAL O
PENAL) DE CUALQUIER NATURALEZA, INCLUYENDO, SIN LIMITACION, LA PÉRDIDA DE INGRESOS
O BENEEICIOS O CUALQUIER OTRO TIPO DE DAÑO, AÚN BASADO EN UN CONTRATO, SEA UN
AGRAVIO O DE CUALQUIER OTRA MANERA.
Algunos estados no permiten la exclusión o limitación de daños incidentales o emergentes, o limitaciones a la
duración de la garantía implícita, por lo que la exclusión o limitación anteriormente mencionadas podrían no
corresponder en su caso. Esta garantía le otorga derechos legal
con otros derechos que varían según el estado.
COMO OBTENER EL SERVICIO DE ESTA GARANTÍA E INFORMACIÓN ADICIONAL:
Llame al 1-800-243-0000 o visite nuestra página web: www.lg.com.
Dirección de correo ordinario: LG Customer Information Center (ATTN: CIC)
201 James Record Road, Huntsville, AL 35824
PARA SUS REGISTROS
Anote aquí los números de modelo y de serie:
N.º de modelo
N.º de serie
● Los encontrará en la etiqueta del lateral de cada unidad.
Nombre del distribuidor
Fecha de compra
● Grape el recibo a esta página si lo necesita para demostrar la fecha de compra o para cuestiones
relacionadas con la garantía.
● Daños estéticos, incluyendo arañazos, abolladuras, desportilladuras u otros daños en el acabado del
producto, a menos que dichos daños sean el resultado de defectos en los materiales o mano de obra y se
informe a LG en el plazo de siete días naturales (7) a partir de la fecha de entrega.
● Daños o artículos faltantes a productos reacondicionados, comprados con descuento, con la caja abierta o
que hayan estado en exhibición.

24
GARANTÍA
PROCEDIMIENTO PARA RESOLVER CONFLICTOS:
TODOS LOS CONFLICTOS ENTRE USTED Y LG QUE SURJAN FUERA DE O RELACIONADOS DE
Definiciones. Para el propósito de esta sección, las referencias a “LG” significan: LG Electronics U.S.A.,
Inc., sus empresas matrices, subsidiarias y filiales y cada uno de sus directivos, directores, empleados,
agentes, beneficiarios, predecesores en interés, sucesores, cesionarios y proveedores; las referencias a
"conflicto" o "reclamación" incluirán cualquier conflicto, reclamo o controversia de cualquier tipo, sin
importar (ya sea basado en contrato, agravio, estatuto, regulación, ordenanza, fraude, falsa
representación o cualquier teoría legal o equitativa) que surja de o esté relacionada con cualquier forma
de venta, condición o desempeño del producto o de esta Garantía Limitada.
ALGUNA MANERA CON ESTA GARANTÍA LIMITADA O CON EL PRODUCTO, SE RESOLVERÁN
EXCLUSIVAMENTE A TRAVÉS DE UN ARBITRAJE VINCULANTE Y NO EN UNA CORTE DE
JURISDICCIÓN GENERAL. ARBITRAJE VINCULANTE SIGNIFICA QUE USTED Y LG RENUNCIAN
AL DERECHO DE UN JUICIO CON JURADO Y A REALIZAR O PARTICIPAR EN UNA DEMANDA
COLECTIVA.
Aviso de disputa. En caso de que usted desee iniciar un procedimiento de arbitraje, primero debe
notificar a LG por escrito al menos 30 días antes de iniciar el arbitraje enviando una carta a LG a LG
Electronics, USA, Inc. Atención: Legal Department- Arbitration 1000 Sylvan Ave, Englewood Cliffs
07632. Usted y LG aceptan participar en discusiones de buena fe en un intento de resolver su reclamo
de manera amistosa. En la carta debe proporcionar su nombre, dirección y número de teléfono;
identificar el producto que es objeto de la reclamación; y describir la naturaleza del reclamo y el
remedio que busca. Si usted y LG no pueden resolver la disputa dentro de 30 días, cualquiera de las
partes puede proceder a presentar una demanda de arbitraje.
Acuerdo de arbitraje vinculante y renuncia de demanda colectiva. En caso de no resolver la
disputa durante el período de 30 días después de enviar una notificación por escrito a LG, Usted y LG
se comprometen a resolver cualquier reclamo entre nosotros, solamente a través de arbitraje vinculante
sobre una base individual, a menos que usted se excluya, conforme a lo dispuesto a continuación.
Cualquier conflicto entre usted y LG no estarán combinados o consolidados con una controversia
relacionada con cualquier otro producto o reclamo de otra persona o entidad. Más específicamente y
sin prejuicio de lo anterior, no procederá bajo ninguna circunstancia cualquier disputa entre usted y LG
como parte de una acción colectiva o representativa. En lugar del arbitraje, cualquiera de las partes
podrá iniciar una acción individual en la corte de reclamos menores, pero tales acciones en la corte de
reclamos menores no podrán ser realizadas en una acción colectiva o representativa.
Normas y procedimientos de arbitraje. Para comenzar con el arbitraje de un reclamo, usted o LG
deben realizar una demanda escrita para arbitraje. El arbitraje será administrado por la Asociación
Americana de Arbitraje (AAA) y se llevará a cabo ante un árbitro único bajo las Normas de Arbitraje
del Consumidor de la AAA, que tienen efecto al momento de inicio del arbitraje (en adelante "Normas
de la AAA") y bajo los procedimientos establecidos en esta sección. Las Normas de la AAA están
disponibles en línea en www.adr.org/consumer. Envíe una copia de su solicitud de arbitraje por escrito,
así como una copia de esta disposición, a la AAA de la forma descrita en las Normas de la AAA.
También debe enviar una copia de su solicitud por escrito a LG en LG Electronics, USA, Inc. Atención:
Legal Department- Arbitration 1000 Sylvan Ave, Englewood Cliffs 07632. Si hay un conflicto entre las
Normas de la AAA y las reglas establecidas en esta sección, prevalecerán dichas reglas de esta sección.
Esta disposición de arbitraje se rige por la Ley Federal de Arbitraje. El juicio se puede introducir en el
laudo arbitral en cualquier tribunal de jurisdicción competente. Todos son temas para que el árbitro
tome sus decisiones, excepto aquellos asuntos relativos al alcance y aplicabilidad de la cláusula de
arbitraje y de la capacidad de arbitraje de la controversia para que el tribunal decida. El árbitro se regirá
por los términos de esta disposición.
Legislación vigente. La legislación del estado de su residencia regirá esta Garantía Limitada, así
como todas las disputas entre nosotros, salvo que sea invalidada o inconsistente con leyes federales
aplicables.

25
ESPAÑOL
GARANTÍA
Tarifas / Costos. Usted no debe pagar ninguna tarifa para comenzar un arbitraje. Al recibir su solicitud
de arbitraje por escrito, LG pagará todos los gastos administrativos rápidamente a la AAA, a menos que
usted solicite más de $25,000.00 por daños, en cuyo caso el pago de estos gastos se regirá por las
Normas de la AAA. Salvo disposición contraria prevista en el presente documento, LG pagará a la AAA
todos los gastos documentales, administrativos y de arbitraje para cualquier arbitraje iniciado, de
conformidad con las Normas de la AAA y esta disposición de arbitraje. Si usted prevalece en el arbitraje,
LG pagará los honorarios y gastos de sus abogados, siempre y cuando sean razonables, considerando
factores que incluyen, entre otros, el monto de la compra y el monto del reclamo. No obstante lo anterior,
si la ley aplicable permite una adjudicación de honorarios y gastos razonables de abogados, un árbitro
puede otorgarlos en la misma medida que lo haría un tribunal. Si el árbitro considera que la sustancia
de su reclamo o la reparación solicitada en la demanda es frívola o se utiliza para un propósito
inadecuado (calificado según las normas establecidas en la Norma Federal de Procedimiento Civil 11
(b)), el pago de todos los honorarios de arbitraje se regirá por las Normas de la AAA. En tal situación
usted se compromete a reembolsar a LG todos los fondos erogados previamente por ella, cuyo pago
es, por otra parte, su obligación, según las Normas de la AAA. Salvo disposición contraria, LG renuncia
a cualquier derecho que pudiera tener para solicitarle los honorarios y gastos de sus abogados, si LG
prevalece en el arbitraje.
Audiencias y ubicación. Si su reclamo es por $25,000 o menos, usted puede optar que el arbitraje
sea realizado únicamente sobre la base de: (1) documentos presentados al árbitro, (2) a través de una
audiencia telefónica o (3) por una audiencia en persona, según lo establecido por las Normas de la AAA.
Si su reclamo excede $25,000, el derecho a una audiencia estará determinado por las Normas de la
AAA. Cualquier audiencia de arbitraje en persona se realizará en un lugar dentro del distrito judicial
federal en el cual resida, a menos que ambos acuerden otra ubicación o estemos de acuerdo con el
arbitraje telefónico.
Exclusión. Usted puede quedarse fuera de este procedimiento de resolución de la disputa. Si se
excluye, ni usted ni LG pueden solicitar al otro que participe en un procedimiento de arbitraje. Para
excluirse usted debe enviar una notificación a LG, en un lapso de hasta 30 días continuos, contados a
partir de la fecha de la primera compra del consumidor del producto, ya sea por: (i) el envío de un
correo electrónico a [email protected] con el siguiente Asunto: "Exclusión del arbitraje" o (ii) llamada al
1-800-980-2973. Debe incluir en el correo electrónico de exclusión o suministrar por teléfono: (a) su
nombre y dirección; (b) la fecha en la cual el producto fue comprado; (c) el nombre o el número del
modelo del producto; y (d) el número del serial (el número del serial puede ser hallado (i) en el producto,
o (ii) en la dirección de https://www.lg.com/us/support/repair-service/schedule-repair-continued al hacer
clic en “Find My Model & Serial Number”).
Sólo puede excluirse del procedimiento de resolución de conflictos en la forma descrita anteriormente
(es decir, por correo electrónico o por teléfono); ninguna otra forma de notificación será efectiva para
hacerlo. Excluirse de este procedimiento de resolución de controversias no afectará de ninguna manera
la cobertura de la Garantía Limitada, por lo que usted continuará disfrutando de todos sus beneficios.
Si conserva este producto y no se excluye, usted acepta todos los términos y condiciones de la cláusula
de arbitraje descrita anteriormente.
LG Customer Information Center
1-800-243-0000
Register your product Online!
www.lg.com
LG Electronics Inc.
1000 Sylvan Ave., Englewood Cliffs, NJ 07632