Read Before the First Flight
Read the following documents before using DJI Mini 2:
1. User Manual
2. Quick Start Guide
3. Disclaimer and Safety Guidelines
It is recommended to watch all tutorial videos on the official DUI website and read the disclaimer and safety guidelines before using for the first time. Prepare for your first flight by reviewing the quick start guide and refer to this user manual for more information.
Download the DJI Fly App
Make sure to use the Dul Fly app during flight. Scan the QR code on the right to download the latest version.
The Android version of Dul Fly is compatible with Android v6.0 and later. The iOS version of DUI Fly is compatible with iOS v11.0 and later.

The operating temperature of this product is 0° to 40° C. It does not meet the standard operating temperature for military grade application (-55° to 125° C), which is required to endure greater environmental variability. Operate the product appropriately and only for applications that it meets the operating temperature range requirements of that grade.
Product Profile
Introduction
DuJl Mini 2 boasts a foldable design and an ultralight weight of less than 249 g. Featuring a Downward
Vision System and Infrared Sensing System, DJ! Mini 2 can hover and fly indoors as well as outdoors and automatically initiate Return to Home (RTH). With a fully stabilized 3-axis gimbal and 1/2.3” sensor camera, DJl Mini 2 shoots 4K video and 12MP photos. Enjoy Intelligent Flight modes such as
QuickShots and Panorama, while QuickTransfer and Trimmed Download make downloading and editing photos and videos more convenient and efficient.
DJl Mini 2 comes equipped with the DJI RC-N1 remote controller, which boasts Dul’s long-range transmission OCUSYNC™ 2.0 technology, offering a maximum transmission range of 6 mi (10 km) and video quality of up to 720p from the aircraft to the DJI Fly app on a mobile device. The remote controller works at both 2.4 GHz and 5.8 GHz, and is capable of selecting the best transmission channel automatically without latency. The aircraft and camera can easily be controlled using the onboard buttons.
DuJl Mini 2 has a maximum flight speed of 36 mph (67.6 kph) and a maximum flight time of 31 minutes. while the maximum runtime of the remote controller is six hours. » Maximum flight time was tested in an environment with no wind while flying at a consistent 10.5 mph (17 kph) and the maximum flight speed was tested at sea level altitude with no wind. These values are for reference only. « The remote controller reaches its maximum transmission distance (FCC) in a wide-open area with no electromagnetic interference at an altitude of approx. 400 ft (120 m). The maximum transmission distance refers to the maximum distance that the aircraft can still send and receive transmissions. It does not refer to the maximum distance the aircraft can fly in a single flight. The maximum runtime was tested in a laboratory environment and without charging the mobile device. This value is for reference only. + 5.8 GHz is not supported in some regions. This frequency band will automatically be disabled in these regions. Observe local laws and regulations.
Preparing the Aircraft
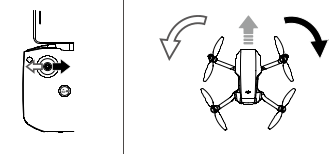
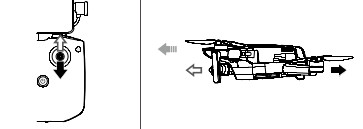
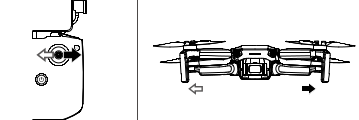
All aircraft arms are folded before the aircraft is packaged. Follow the steps below to unfold the aircraft.
1. Remove the propeller holder.
2. Remove the gimbal protector from the camera.
3. In the following order, unfold the front arms, rear arms, and all the propellers.


All Intelligent Flight Batteries are in hibernation mode before shipment to ensure safety. Use the USB charger to charge and activate Intelligent Flight Batteries for the first time.

It is recommended to install a gimbal protector to protect the gimbal and use a propeller holder to secure the propellers when the aircraft is not in use.
The propeller holder and USB charger are only included in the combo package. » Unfold the front arms before unfolding the rear arms. » Make sure the gimbal protector is removed and all arms are unfolded before powering on the aircraft.
Otherwise, it may affect the aircraft self-diagnostics.
Preparing the Remote Controller
1. Remove the control sticks from their storage slots on the remote controller and screw them into place.
2. Pull out the mobile device holder. Choose an appropriate remote controller cable based on the type of mobile device. A Lightning connector cable, Micro USB cable, and USB-C cable are included in the packaging. Connect the end of the cable without the remote controller logo to the mobile device. Make sure the mobile device is secured.

lf a USB connection prompt appears when using an Android mobile device, select the option to charge only. Otherwise, it may result in connection failure.
Aircraft Diagram

- Gimbal and Camera .
- Power Button .
- Battery Level LEDs
- Downward Vision System
- Infrared Sensing System
- Motors
- Propellers.
- Antennas
- Front LED
- Battery Compartment Cover
- USB-C Port
- MicroSD Card Slot
- Aircraft Status Indicator/QuickTransfer Button
Remote Controller Diagram

1. Power Button
Press once to check the current battery level.
Press once, then again, and hold to power the remote controller on or off.
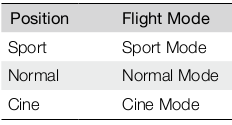
2. Flight Mode Switch
Switch between Sport, Normal, and Cine mode.

3. Flight Pause/Return to Home (RTH) Button
Press once to make the aircraft brake and hover in place (only when GPS or Downward Vision System are available). Press and hold the button to initiate RTH. The aircraft returns to the last recorded Home Point. Press again to cancel RTH.
4. Battery Level Indicators
Displays the current battery level of the remote controller.
5. Control Stick
Use the control sticks to control the aircraft movements. Set the control stick mode in DJl Fly. The control sticks are removable and easy to store.
6. Customizable Button
Press once to recenter the gimbal or tilt the gimbal downward (default settings). The button can be set in Dul Fly.
7. Photo/Video Toggle
Press once to switch between photo and video mode.
8. Remote Controller Cable
Connect to a mobile device for video linking via the remote controller cable. Select the cable
9. Mobile Device Holder
Used to securely mount the mobile device to the remote controller.
10. Antennas
Relay aircraft control and video wireless signals. . USB-C Port For charging and connecting the remote controller to the computer.
11.. Control Sticks Storage Slot
For storing the control sticks.
12. Gimbal Dial
Controls the tilt of the camera. Press and hold the customizable button to use the gimbal dial to adjust the zoom in video mode.
13. Shutter/Record Button
Press once to take photos or start or stop recording.
14. Mobile Device Slot
Used to secure the mobile device.
Activating DJl Mini 2
DJI Mini 2 requires activation before using for the first time. After powering on the aircraft and remote controller, follow the on-screen instructions to activate DJ! Mini 2 using Dul Fly. An internet connection is required for activation.
Aircraft
Dul Mini 2 contains a flight controller. video downlink system, vision system. propulsion system, and an Intelligent Flight Battery.
Flight Modes
Dul Mini 2 has three flight modes, plus a fourth flight mode that the aircraft switches to in certain scenarios. Flight modes can be switched via the Flight Mode switch on the remote controller.
Normal Mode: The aircraft utllizes GPS and the Downward Vision System to locate itself and stabilize.
Intelligent Flight Mode is enabled in this mode. When the GPS signal is strong, the aircraft uses GPS to locate itself and stabilize. When the GPS is weak and the lighting conditions are sufficient, the aircraft uses the Downward Vision System to locate itself and stabilize. When the Downward Vision System is enabled and lighting conditions are sufficient, the maximum fight altitude angle is 25° and the maximum flight speed is 10 m/s.
Sport Mode: In Sport mode, the aircraft uses GPS and the Downward Vision System for positioning. In Sport mode, aircraft responses are optimized for agllty and speed making it more responsive to control stick movements. The maximum flight speed is 16 m/s, maximum ascent speed is 5 m/s, and maximum descent speed is 3.5 m/s.
Cine Mode: Cine mode is based on Normal mode and the flight speed is limited, making the aircraft more stable during shooting. The maximum flight speed is 6 m/s, maximum ascent speed is 2 m/s, and maximum descent speed is 1.5 m/s.
The aircraft automatically changes to Attitude (ATTI) mode when the Downward Vision System is unavailable or disabled and when the GPS signal is weak or the compass experiences interference.
When the Downward Vision System is unavailable, the aircraft cannot position itself or brake automatically, which increases the risk of potential fight hazards. In ATTI mode, the aircraft may be more easily affected by its surroundings. Environmental factors such as wind can result in horizontal shifting. which may present hazards, especially when flying in confined spaces.
* The maximum speed and braking distance of the aircraft significantly increase in Sport mode. A minimum braking distance of 30 m is required in windless conditions.
* Descent speed significantly increases in Sport mode. A minimum braking distance of 10 m is required in windless conditions.
* The responsiveness of the aircraft significantly increases in Sport mode, which means a small control stick movement on the remote controller translates into the aircraft moving a large distance. Be vigilant and maintain adequate maneuvering space during fight.
* During video mode in Normal or Cine mode, the flight speed is limited when the pitch of the gimbal is near -90° or 0° in order to ensure shooting is stable. if there are strong winds, the restriction will be disabled to improve the wind resistance of the aircraft. As a resutt, the gimbal may vibrate while recording.
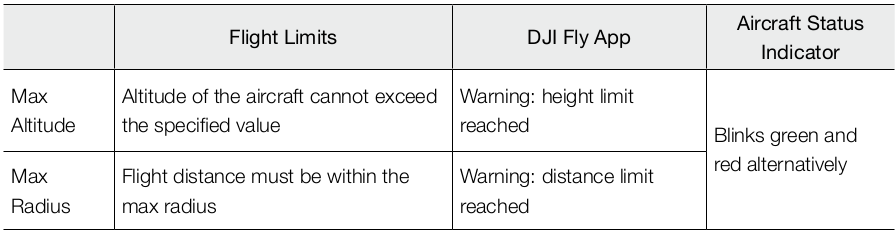
Aircraft Status Indicator
Dul Mini 2 has a front LED and aircraft status indicator.

The front LED shows the orientation of the aircraft and pulses white when the aircraft is powered on.
Front LED States

Press and hold the QuickTransfer button to switch between QuickTransfer mode (Wi-Fi connection) and flight mode (OcuSync 2.0 video transmission connection). If firmware is not updated to v1.1.0.0 or above, press the QuickTransfer button twice.
If the front LED continues to slowly blink blue when switching from Wi-Fi connection to OcuSync 2.0 video transmission connection, it indicates that the switch failed. Restart the aircraft. The aircraft will enter the flight mode (OcuSync 2.0 video transmission connection) by default after restarting.
The aircraft status indicator shows the status of the flight control system of the aircraft. Refer to the table below for more information about the aircraft status indicator.
Aircraft Status Indicator States


QuickTransfer
Dil Mini 2 can connect directly to mobile devices via Wi-Fi, enabling users to download photos and videos from the aircraft to the mobile device through Dul Fly without the need of a remote controller.
Users can enjoy faster and more convenient downloads with a transmission rate of up to 20 MB/s.
Usage
Method 1: mobile device is not connected to the remote controller
1. Power on the aircraft and wait until the self-diagnostic tests of the aircraft are complete. Press and hold the QuickTransfer button for two seconds to switch to QuickTransfer mode (if firmware is not updated to v1.1.0.0, press the aircraft status indicator twice). The front LED will blink blue slowly before pulsing blue once switching is successful.
2. Make sure Bluetooth and Wi-Fi is enabled on the mobile device. Launch DJl Fly and a prompt will automatically appear to connect to the aircraft.
3. Tap Connect. Once successfully connected, the files on the aircraft can be accessed and downloaded at a high speed. Note that when connecting the mobile device to the aircraft for the first time, you need to press the QuickTransfer button to confirm.
Method 2: mobile device is connected to the remote controller
1. Make sure that the aircraft is connected to the mobile device via the remote controller and the motors have not started.
2. Enable Bluetooth and Wi-Fi on the mobile device.
3. Launch DiI Fly, enter playback, and tap 5, in the upper right corner to access the files on the aircraft to download at high speed.
The maximum download rate can only be achieved in countries and regions where the 5.8 GHz frequency is permitted by laws and regulations, when using devices that support 5.8 GHz frequency band and Wi-Fi connection, and in an environment without interference or obstruction. If 5.8 GHz is not allowed by local regulations (such as in Japan), the mobile device of the user will not support the 5.8 GHz frequency band or the environment will have severe interference. Under these circumstances.
QuickTransfer will automatically switch to the 2.4 GHz frequency band and its maximum download rate will reduce to 6 MB/s. * Make sure that Bluetooth and Wi-Fi are enabled on the mobile device before using QuickTransfer. * The aircraft will automaticaly enter fight mode by default after restarting. QuickTransfer must be entered manually again if required. * Use QuickTransfer in an unobstructed environment with no interference and stay away from sources of interference such as wireless routers, Bluetooth speakers, or headphones.
Return to Home
The Return to Home (RTH) function brings the aircraft back to the last recorded Home Point and lands when the GPS is signal is strong. There are three types of RTH: Smart RTH, Low Battery RTH, and Failsafe RTH. If the aircraft successfully recorded the home point and the GPS signal is strong, the RTH will be triggered when either the user starts Smart RTH, the aircraft battery level is low, or the signal between the remote controller and the aircraft is lost. RTH will also be triggered in other abnormal scenarios such as if there is a loss of video transmission.
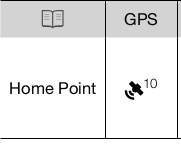 The default Home Point is the first location where the aircraft received a strong or moderately strong GPS signal (where the icon shows white). The aircraft status indicator blinks green quickly after the Home Point has been recorded.
Smart RTH if the GPS signal is sufficient, Smart RTH can be used to bring the aircraft back to the Home Point.
Smart RTH is initiated either by tapping  in Dil Fly or by pressing and holding the RTH button on the remote controller. Exit Smart RTH by tapping "X" in Dil Fly or by pressing the RTH button on the remote controller.
Low Battery RTH
When the Intelligent Flight Battery level is too low and there is not enough power to return home, land the aircraft as soon as possible. Otherwise, the aircraft will fall when it runs out of power, resulting in the aircraft being damaged and other potential hazards.
To avoid unnecessary danger due to insufficient power, DJI Mini 2 will intelligently determine whether the current battery level is sufficient to return home based on the current location. Low Battery RTH is triggered when the Intelligent Flight Battery is depleted to the point that the safe return of the aircraft may be affected.
The user can cancel RTH by pressing the RTH button on the remote controller. If RTH is cancelled following a low battery level warning, the Intelligent Flight Battery may not have enough power for the
aircraft to land safely, which may lead to the aircraft crashing or being lost.
The aircraft will land automatically if the current battery level can only support the aircraft long enough to descend from its current altitude. Auto landing cannot be canceled but the remote controller can be used to alter the direction of the aircraft during the landing process.
Failsafe RTH if the Home Point was successfully recorded and the compass is functioning normally, Failsafe RTH automatically activates after the remote controller signal is lost for more than 11 seconds.
When the firmware is updated to v1.1.0.0 and above, the aircraft will fly backwards for 50 m on its original flight route and ascend to the preset RTH altitude to enter Straight Line RTH. The aircraft enters Straight Line RTH if the remote controller signal is restored during Failsafe RTH. When the aircraft flies backwards along the original fight path and the distance from the Home Point is less than 20 m, the aircraft stops flying backward on the original fight route and enters Straight Line RTH at the current altitude.
In DJ Fly, users can change the settings of how the aircraft responds when the remote controller signal is lost. The aircraft will not execute Failsafe RTH if land or hover has been selected in the settings.
Other RTH Scenarios
There will be a prompt to initiate RTH if the video link signal is lost during flight while the remote controller is stil able to control the movements of the aircraft. RTH can be cancelled.
Other RTH Scenarios
There will be a prompt to initiate RTH if the video link signal is lost during flight while the remote controller is stil able to control the movements of the aircraft. RTH can be cancelled.
RTH Procedure (Straight Line)
1. The Home Point is recorded.
2 . RTH is triggered.
3. If the aircraft is less than 20 m from the Home Point when RTH begins, it will hover in place and not return to home (firmware version v1.1.0.0 is required. Otherwise, the aircraft will land immediately). If the aircraft is further than 20 m from the Home Point when RTH begins, it will return home at a horizontal speed of 10.5 m/s. ons
4. After reaching the Home Point, the aircraft lands and the motors stop.
* The aircraft cannot return to the Home Point if the GPS signal is weak or unavailable. If the GPS signal becomes weak or unavailable after RTH is triggered, the aircraft will hover in place for a whie before landing.
* Itis important to set a suitable RTH altitude before each flight. Launch Dul Fly and set the RTH altitude. In Smart RTH and Low Battery RTH, if the current altitude of the aircraft is less than the RTH altitude, it automatically ascends to the RTH altitude first. If the altitude of the aircraft reaches or is higher than the RTH altitude, it will fy to the Home Point at its current altitude.
* If the aircraft is at an altitude of 65 ft (20 m) or higher and has not yet reached the RTH attitude, the throttle stick can be moved to stop the aircraft from ascending and the aircraft wil fly to the Home Point at its current attitude (only available with firmware v1.0.0.0. This function is not available when the firmware is updated to v1.1.0.0 or later).
* During RTH, the speed, altitude, and orientation of the aircraft can be controlled using the remote controller if the remote controller signal is normal. However, the remote controller cannot be used to. pan left or right (only applicable to firmware v1.0.0.0). ff the aircraft is flying forward and the remote controller signal is normal, the user can use the remote controller to control the speed and altitude of the aircraft, but cannot control the orientation or fly left or right (only available with firmware v1.1.0.0 and above). When the aircraft is ascending or flying forward, the user can push the control stick completely in the opposite direction to make the aircraft hover in place.
* GEO zones will affect RTH. If the aircraft flies into a GEO zone during RTH, it will either descend unti it exits the GEO zone and continue to fly to the Home Point or hover in place due to altitude limits.
* The aircraft may not be able to return to a Home Point when the wind speed is too high. Fly with caution.
Landing Protection
Landing Protection will activate during Smart RTH.
1. During Landing Protection, the aircraft will automatically detect and carefully land on suitable ground.
2. If the ground is determined unsuitable for landing, Dl Mini 2 will hover and wait for pilot confirmation.
3. If Landing Protection is not operational, DJl Fly will display a landing prompt when the aircraft descends below 0.5 m. Tap confirm or pull down on the throttle stick to land.
Vision System and Infrared Sensing System
Dul Mini 2 is equipped with a Downward Vision System and Infrared Sensing System. The Downward Vision System consists of one camera and the Infrared Sensing System consists of two 3D infrared modules. The Downward Vision System and Infrared Sensing System helps the aircraft maintain its current position, hover in place more precisely, and to fly indoors or in other environments where GPS is unavailable.

Detection Fields
The Downward Vision System works best when the aircraft is at an altitude of 0.5 to 10 m and its operating range is 0.5 to 30 m.

Using the Vision Systems
When GPS is unavailable, the Downward Vision System is enabled if the surface has a clear texture and there is sufficient light. The Downward Vision System works best when the aircraft is at an altitude of 0.5 to 10 m. If the altitude of the aircraft is above 10 m, the Vision System may be affected. Extra caution is required.

Follow the steps below to use the Downward Vision System.
1. Make sure the aircraft is in Normal or Cine mode. Power on the aircraft.
2. The aircraft hovers in place after takeoff. The aircraft status indicator blinks green twice, indicating the Downward Vision System is working.
+ Pay attention to the flight environment. The Downward Vision System and Infrared Sensing System only work under limited conditions and cannot replace human control and judgment. During flight, always pay attention to the surrounding environment and to the warnings on Dul Fly and be responsible for and maintain control of the aircraft.
+ The aircraft has a max hovering altitude of 5 m if GPS is available.
+ The Downward Vision System may not function properly when the aircraft is flying over water.
Therefore, the aircraft may not be able to actively avoid water below when landing. It is recommended to maintain flight control at all times, make reasonable judgments based on the surrounding environment, and avoid relying on the Downward Vision System.
+ Note that the Downward Vision System and Infrared Sensing System may not function properly when the aircraft is flying too fast. The Infrared Sensing System only takes effect when the flight speed is no more than 12 m/s.
+ The Downward Vision System cannot work properly over surfaces that do not have clear pattern variations or there is weak light. The Downward Vision System cannot work properly in any of the following situations. Operate the aircraft cautiously.
a) Flying over monochrome surfaces (e.g., pure black, pure white, pure green).
b) Fiying over highly reflective surfaces. Flying over water or transparent surfaces.
c) Flying over moving surfaces or objects. Flying in an area where the lighting changes frequently or drastically.
d) Flying over extremely dark (< 10 lux) or bright (> 40,000 lux) surfaces.
e) Flying over surfaces that strongly reflect or absorb infrared waves (e.g., mirrors).
g) Fiying over surfaces without clear patterns or texture. (e.g., power pole).
h) Flying over surfaces with repeating identical patterns or textures (e.g., tiles with the same design).
j) Flying over obstacles with small surface areas (e.g., tree branches).
+ Keep the sensors clean at all times. DO NOT tamper with the sensors. DO NOT use the aircraft in environment with dust and humidity. DO NOT obstruct the Infrared Sensing System.
+ DO NOT fly when itis rainy, smoggy, or if there is no clear sight.
+ Check the following every time before takeot:
a) Make sure there are no stickers or any other obstructions over the Infrared Sensing System or Downward Vision System.
b) lf there is any dirt, dust, or water on the Infrared Sensing System or Downward Vision System. clean with a soft cloth. DO NOT use any cleanser that contains alcohol.
c) Contact DJ! Support if there is any damage to the glass of the Infrared Sensing System or
Downward Vision System.
Intelligent Flight Mode
QuickShots
QuickShot shooting modes include Drone, Rocket, Circle, Helix, and Boomerang. DJ Mini 2 records according to the selected shooting mode and automatically generates a short video. The video can be viewed, edited, or shared to social media from playback.
 Dronie: The aircraft flies backward and ascends with the camera locked on the subject.
 Rocket: The aircraft ascends with the camera pointing downward.
 Circle: The aircraft circles around the subject.
 Helix: The aircraft ascends and spirals around the subject.
 Boomerang: The aircraft flies around the subject in an oval path, ascending as it flies away from its starting point and descending as it flies back. The starting point of the aircraft forms one end of the long axis of the oval, while the other end of its long axis is at the opposite side of the subject from the starting point. Make sure there is sufficient space when using Boomerang. Allow a radius of at least 99 ft (80 m) around the aircraft and allow at least 33 ft (10 m) above the aircraft.
Using QuickShots
1. Make sure that the Intelligent Fight Battery is sufficiently charged. Take off and hover at least 6.6 ft (2 m) above the ground.

2. In Dil Fly, tap the shooting mode icon to select QuickShots and follow the prompts. Make sure that you understand how to use the shooting mode and that there are no obstacles in the surrounding area.

3. Choose a shooting mode, select your target subject in the camera view by tapping the circle on the subject or dragging a box around the subject, and tap Start to begin recording. The aircraft flies back to its original position once shooting is finished.
4. Tap  to access the short video or the original video. You can edit the video or share to social media after downloading.
Exiting QuickShots
Press the Flight Pause/RTH button once or tap "X" in Dul Fly to exit QuickShots. The aircraft will hover in place.
* Use QuickShots at locations that are clear of buildings and other obstacles. Make sure that there are no humans, animals, or other obstacles on the fight path. *Pay attention to objects around the aircraft and use the remote controller to avoid colisions with the aircratt.
* DO NOT use QuickShots in any of the following situations:
a) When the subject is blocked for an extended period or outside the line of sight.
b) When the subject is more than 50 m away from the aircraft.
c) When the subject is similar in color or pattern with the surroundings.
d) When the subject is in the air.
e) When the subject is moving fast.
f) When the lighting is extremely low (<300 lux) or high (>10,000 lux).
* DO NOT use QuickShots in places that are close to buildings or where the GPS signal is weak. Otherwise, the flight path will be unstable. *Make sure to follow local privacy laws and regulations when using QuickShots.
Flight Recorder
Flight data including fight telemetry, aircraft status information, and other parameters are automatically saved to the intemal data recorder of the aircraft. The data can be accessed using DJl Assistant 2 (Consumer Drones Series)
Propellers
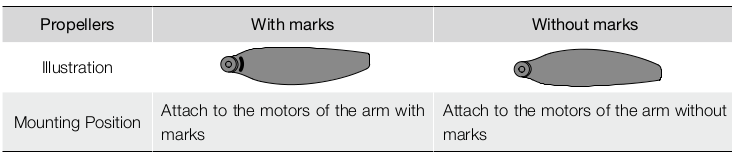
There are two types of DJI Mini 2 propellers, which are designed to spin in different directions. Marks are used to indicate which propellers should be attached to which motors. The two blades attached to one motor are the same.
Attaching the Propellers
Attach the propellers with marks to the motors of the arm with marks and the unmarked propellers to the motors of the arm without marks. Use the screwdriver to mount the propellers. Make sure the propellers are secure.

Detaching the Propellers
User the screwdriver to detach the propellers from the motors.
* Propeller blades are sharp. Handle with care.
* The screwdriver is only used to mount the propellers. DO NOT use the screwdriver to disassemble the aircraft.
* If a propeller is broken, remove the two propellers and screws on the corresponding motor and discard them. Use two propellers from the same package. DO NOT mix with propellers in other packages.
* Only use official Dul propellers. DO NOT mix propeller types.
* Purchase the propellers separately if necessary.
* Make sure that the propellers are installed securely before each flight. Check to make sure the screws on the propellers are tightened after every 30 hours of flight (approx. 60 flights).
* Make sure all propellers are in good condition before each fight. DO NOT use aged, chipped, or broken propellers.
* Stay away from the rotating propellers and motors to avoid injuries.
* Place the aircraft correctly when storing, It is recommended to use a propeller holder to fix the propellers. DO NOT squeeze or bend the propellers during transportation or storage.
* Make sure the motors are mounted securely and rotating smoothly. Land the aircraft immediately if a motor is stuck and unable to rotate freely.
* DO NOT attempt to modify the structure of the motors.
* DO NOT touch or let your hands or body come in contact with the motors after fight as they may be hot.
* DO NOT block any of the ventilation holes on the motors or the body of the aircraft. * Make sure the ESCs sound normal when powered on.
Intelligent Flight Battery
The Dil Mini 2 Intelligent Flight Battery is a 7.7 V, 2250 mAh battery with smart charging and discharging functionality.
Battery Features.
1. Balanced Charging: during charging, the voltages of the battery cells are automatically balanced.
2. Auto-Discharging Function: to prevent swelling, the battery automatically discharges to approx. 96% of the battery level when it is idle for one day, and automatically discharges to approx. 72% of the battery level when it is idle for five days. It is normal to feel moderate heat being emitted from the battery during the discharging process.
3. Overcharge Protection: the battery stops charging automatically once fully charged.
4. Temperature Detection: To prevent damage, the battery only charges when the temperature is between 5° and 40° C (41° and 104° F). Charging stops automatically if the temperature of the battery exceeds 50° C (122° F) during the charging process.
5. Overcurrent Protection: the battery stops charging if an excess current is detected.
6. Over-discharge Protection: discharging stops automatically to prevent excess discharge when the battery is not in flight use. Over-discharge protection is not enabled when the battery is in fight use.
7. Short Circuit Protection: the power supply is automatically cut ifa short circuit is detected.
8. Battery Cell Damage Protection: Dul Fly displays a warning prompt when a damaged battery cell is detected.
9. Hibernation Mode: if the battery cell voltage is lower than 3.0 V or the battery level is less than 10%. the battery enters Hibernation mode to prevent over-discharge. Charge the battery to wake it from hibernation.
10. Communication: information about the voltage, capacity, and current of the battery is transmitted to the aircraft.
* Refer to the DUI Mini 2 Disclaimer and Safety Guidelines and the stickers on the battery before use. Users take full responsibilty for all usage and operations.
* Specifications of the Intelligent Flight Battery for the Japanese version are different. Refer to the Specifications section for more information. The battery features are the same for all versions of the Dul Mini 2 Inteligent Flight Battery.
Using the Battery
Checking Battery Level
Press the power button once to check the battery level.

The battery level indicators display the power level of the flight battery during charging and discharging. The statuses of the indicator are defined as follows:

Powering On/Off
Press the power button once, then press again, and hold for two seconds to power the battery on or off. The battery level LEDs display the battery level when the aircraft is powered on.
Press the power button once and the four battery level LEDs will blink for three seconds. If LED 3 and 4 blink simultaneously without pressing the power button, this indicates the battery is abnormal. Insert the Intelligent Flight Battery again and make sure that it is securely mounted.
Low Temperature Notice
1. Battery capacity is significantly reduced when flying in low-temperature environments of 0° to 5° C (32° to 41° P). It is recommended to hover the aircraft in place for a while to heat the battery. Make sure to fully charge the battery before takeoff.
2. To ensure the optimal performance of the battery, keep the battery temperature above 20° C (68° F).
3. The reduced battery capacity in low-temperature environments reduces the wind speed resistance performance of the aircraft. Fly with caution.
4. Fly with extra caution at high sea levels.
* In cold environments, insert the battery into the battery compartment and turn on the aircraft to warm up before taking off.
Charging the Battery
Fully charge the Intelligent Flight Battery before using for the first time.
1. Connect the USB charger to an AC power supply (100-240V, 50/60 Hz). Use a power adapter if necessary.
2. Attach the aircraft to the USB charger.
3. The battery level LEDs display the current battery level during charging.
4. The intelligent Flight Battery is fully charged when all the battery level LEDs are on, Detach the USB charger when the battery is fully charged.

* The battery cannot be charged if the aircraft is powered on and the aircraft cannot be powered on during charging.
* DO NOT charge an Inteligent Flight Battery immediately after fight as the temperature may be too high. Wait until it cools down to room temperature before charging again.
* The charger stops charging the battery if the battery cell temperature is not within the operating range of 5° to 40° C (41° to 104° F). The ideal charging temperature is 22° to 28° C (71.6° to 82.4° F).
* The Battery Charging Hub (not included) can charge up to three batteries. Visit the official Dul Online
Store for more information about the Battery Charging Hub.
* Fully charge the battery at least once every three months to maintain battery health. + If the firmware has been updated to v1.1.0.0 or above, it is recommended to use a QC2.0 or PD2.0 USB charger to charge. DuI does not take any responsibility for damage caused by using a charger that does not that meet the specified requirements.
+ When using the DJI 18W USB charger, the charging time is approximately 1 hour and 22 minutes.
* It is recommended to discharge the Intelligent Flight Batteries to 30% or lower during transport or storage. This can be done by flying the aircraft outdoors until the battery level is less than 30%.
The table below shows the battery level during charging.

* The biinking frequency of the battery level LEDs will be different when using different USB chargers. If the charging speed is fast, the battery level LEDs wil blink quickly. If the charging speed is extremely slow, the battery level LEDs will blink slowly (once every two seconds). It is recommended to change the USB-C cable or USB charger. + If the battery is not correctly inserted into the aircraft, LED 3 and 4 blink simultaneously. Insert the Intelligent Flight Battery again and make sure that it is securely mounted. «The four LEDs blink simultaneously to indicate the battery is damaged.
Battery Protection Mechanisms
The battery LED indicators can display battery protection notifications triggered by abnormal charging conditions.

Ifthe charging temperature protection is enabled, the battery will resume charging once the temperature has returned to within the allowable range. If one of the other battery protection mechanisms activate. in order to resume charging, it is necessary to press the button to power off the battery, unplug the charger, and then plug it in again. If the charging temperature is abnormal, wait for the charging temperature to return to normal and the battery will automatically resume charging without the need to unplug and plug the charger again.
Installing/Removing the Battery
Install the Intelligent Flight Battery in the aircraft before use. Insert the battery in the battery compartment and secute the battery clamp. A clicking sound indicates the battery is fully engaged. Make sure that the battery is fully inserted and the battery cover is secure in place.

Press the battery clamp and detach the battery from the battery compartment to remove it.
Gimbal and Camera
Gimbal Profile
The 3-axis gimbal of Jl Mini 2 provides stabilization for the camera, allowing you to capture clear and stable images and video. The control tilt range is -90° to +20°. The default control tilt range is -90" to 0’, and the tilt range can be extended to -90" to +20" by enabling “Allow Upward Gimbal Rotation in Dul Fly.

Use the gimbal dial on the remote controller to control the tilt of the camera. Alternatively, enter the camera view in Dul Fly. Press the screen until a circle appears and drag the circle up and down to control the tit of the camera.
Gimbal Operation Modes
Two gimbal operation modes are available. Switch between the operation modes in DuJl Fly.
Follow Mode: the angle between the orientation of the gimbal and aircraft front remains constant at all times.
FPV Mode: the gimbal synchronizes with the movement of the aircraft to provide a first-person flying experience.
* Make sure there are no stickers or objects on the gimbal before taking off. When the aircraft is powered on, DO NOT tap or knock the gimbal. Take off from open and flat ground in order to protect the gimbal.
* Precision elements in the gimbal may be damaged in a collision or impact, which may cause the gimbal to function abnormally. * Avoid getting dust or sand on the gimbal, especially in the gimbal motors.
* A gimbal motor error may occur in the following situations: a. The aircraft is on uneven ground or the gimbal is obstructed. b. The gimbal experiences excessive external force, such as during a collision.
* DO NOT apply external force to the gimbal after the gimbal is powered on. DO NOT add any extra payload to the gimbal as this may cause the gimbal to function abnormally or even lead to permanent motor damage.
* Make sure to remove the gimbal protector before powering on the aircraft. Also, make sure to mount the gimbal protector when the aircraft is not in use.
* Flying in heavy fog or clouds may make the gimbal wet, leading to temporary failure. The gimbal recovers full functionality once it is dry.
Camera Profile
Dil Mini 2 uses a 1/2.3" CMOS sensor camera, which can shoot up to 4K video and 12 MP photos. and supports shooting modes such as Single, AEB, Timed Shot, and Panorama.
The aperture of the camera is F2.8 and can shoot at 1m to infinity.
* Make sure the temperature and humidity is suitable for the camera during usage and storage.
* Use a lens cleanser to clean the lens to avoid damage. *DO NOT block any ventilation holes on the camera as the heat generated may damage the device and hurt the user.
Storing Photos and Videos
Dul Mini 2 supports the use of a microSD card to store your photos and videos. A UHS-I Speed Grade 3 rating or above mictoSD card is required due to the fast read and write speeds necessary for high- resolution video data. Refer to the Specifications section for more information about recommended microSD cards.
Without a microSD card inserted, users can still capture single photos or record 720p normal videos. The file will be directly stored on the mobile device.
* Do not remove the microSD card from the aircraft while it is powered on. Otherwise, the microSD card may be damaged.
*To ensure the stability of the camera system, single video recordings are limited to 30 minutes.
* Check camera settings before use to make sure the configurations are correct.
* Before shooting important photos or videos, shoot a few images to test the camera is operating correctly.
* Photos or videos cannot be transmitted from the microSD card in the aircraft using Dul Fly if the aircraft is powered off.
* Make sure to power off the aircraft correctly. Otherwise, the camera parameters will not be saved and any recorded videos may be damaged. Dul is not responsible for any failure of an image or video to be recorded or having been recorded in a way that is not machine-readable.
Remote Controller
Remote Controller Profile
DJI Mini 2 comes equipped with the DJI RC-N1 remote controller, which boasts DJl's long-range OcuSync
2.0 transmission technology, offering a maximum transmission range of 6 mi (10 km) and 720p when displaying video from the aircraft to DJI Fly on your mobile device. Easily control the aircraft and camera using the onboard buttons. The detachable contol sticks make the remote controller easier to store.
In a wide-open area with no electromagnetic interference, OcuSyne 2.0 smoothly transmits video links at up to 720p. The remote controller works at both 2.4 GHz and 5.8 GHz, and will automatically select the best transmission channel.
OcuSyne 2.0 reduces latency to approx. 200 ms by improving the camera performance through the video decoding algorithm and the wireless link.
The built-in battery has a capacity of 5200 mAh and a maximum run time of 6 hours. The remote controller charges the mobile device with a charging ability of 500mA@5V. The remote controller automatically charges Android devices. For iOS devices, first make sure that charging Is enabled in Dul Fly. Charging for iOS devices is disabled by default and needs to be enabled each time the remote controller is powered on. + Compliance Version: The remote controller is complant with local regulations. + Control Stick Mode: The control stick mode determines the function of each control stick movement.
Three pre-programmed modes (Mode 1, Mode 2, and Mode 3) are available and custom modes can be configured in Dl Fly. The default mode is Mode 2.
Using the Remote Controller
Powering On/Off
Press the power button once to check the current battery level. If the battery level is too low, recharge before use.
Press once, then press again and hold to power the remote controller on or off.

Charging the Battery
Use a USB-C cable to connect the USB charger to the USB-C port of the remote controller. It takes approx. four hours to fully charge the remote controller.

Controlling the Gimbal and Camera
1. Shutter/Record Button: press once to take a photo or to start or stop recording.
2. Photo/Video Toggle: press once to switch between photo and video mode.
3. Gimbal Dial: use to control the tilt of the gimbal.
4. Press and hold the customizable button in order to be able to use the gimbal dial to adjust the zoom in video mode.

Controlling the Aircraft
The control sticks control the orientation (pan), forward/backward movement (pitch), altitude (throttle). and left/right movement (roll) of the aircraft. The control stick mode determines the function of each control stick movement.


Three preprogrammed modes (Mode 1, Mode 2, and Mode 8) are available and custom modes can be configured in DJl Fly. The default mode is Mode 2. The figure below explains how to use each control stick, using Mode 2 as an example.
* Stick Neutral/Center Point: Control sticks are in the center position.
* Moving the control stick: The control stick is pushed away from the center position.
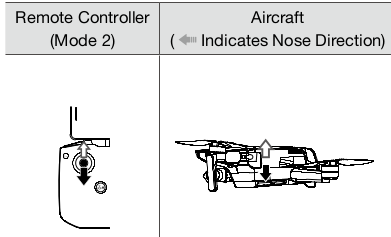 Throttle Stick: Moving the left stick up or down changes the altitude of the aircraft. Push the stick up to ascend and down to descend. The more the stick is pushed away from the center position, the faster the aircraft will change altitude. Push the stick gently to prevent sudden and unexpected changes in altitude.
 Yaw Stick: Moving the left stick to the left or right controls the orientation of the aircraft. Push the stick left to rotate the aircraft counter- clockwise and right to rotate the aircraft clockwise. The more the stick is pushed away from the center position, the faster the aircraft will rotate.
 Pitch Stick: Moving the right stick up and down. changes the pitch of the aircraft. Push the stick up to fly forward and down to fly backward. The more the stick is pushed away from the center position, the faster the aircraft will move.
 Roll Stick: Moving the right stick to the left or right changes the roll of the aircraft. Push the stick left to fly left and right to fly right. The more the stick is pushed away from the center position, the faster the aircraft will move.
Flight Mode Switch
Toggle the switch to select the desired flight mode.

Flight Pause/RTH Button
Press once to make the aircraft brake and hover in place. If the aircraft is performing a QuickShot, RTH. or auto landing, press once to exit the procedure before braking.
Press and hold the RTH button until the remote controller beeps to start RTH. Press this button again to cancel RTH and regain control of the aircraft. Refer to the Return to Home section for more information about RTH.

Customizable Button
To customize the function of this button, go to System Settings in DJl Fly and select Control. Customizable functions include recentering the gimbal and toggling between the map and live view.

Remote Controller Alert
The remote controller sounds an alert during RTH. The alert cannot be cancelled. The remote controller sounds an alert when the battery level is low (6% to 10%). A low battery alert level can be cancelled by pressing the power button. A critical battery level alert (less than 5%), however, cannot be cancelled.
Optimal Transmission Zone
The signal between the aircraft and the remote controller is most reliable when the antennas are positioned in relation to the aircraft as depicted below.

Linking the Remote Controller
The remote controller is linked to the aircraft before delivery. Linking is only required when using a new remote controller for the first time. Follow these steps to link a new remote controller:
1 . Power on the remote controller and the aircraft.
2. Launch Ddl Fly.
3. In camera view, tap eee and select Control and Pair to Aircraft (Link). The remote controller will beep continually.
4. Press and hold the power button of the aircraft for more than four seconds. The aircraft beeps once to indicate it is ready to link. The aircraft beeps twice to indicate linking is successful. The battery level LEDs of the remote controller will glow solid.
* Make sure the remote controller is within 0.5 m of the aircraft during linking.
* The remote controller will automatically unlink from an aircraft if a new remote controller is linked to the same aircraft.
* Tum off Bluetooth and Wi-Fi when using OcuSyne 2.0 video transmission connection. Otherwise. they may affect the video transmission.
* Fully charge the remote controller before each fight. The remote controller sounds an alert when the battery level is low.
* If the remote controller is powered on and not in use for five minutes, an alert will sound. After six minutes, the aircraft automatically powers off. Move the control sticks or press any button to cancel the alert.
* Adjust the mobile device holder to make sure the mobile device is secure.
Fully charge the battery at least once every three months to maintain battery health.
Flight
Once pre-flight preparation is complete, it is recommended to hone your flight skills and practice flying safely. Make sure that all flights are carried out in an open area. The flying height is limited to 500 m. DO NOT exceed this height. Strictly abide by local laws and regulations when flying. Make sure to read the DJl Mini 2 Disclaimer and Safety Guidelines to understand the safety notices before flying.
Flight Environment Requirements
1. Do not use the aircraft in severe weather conditions including wind speeds exceeding 10 m/s, snow. rain, and fog.
2. Only fly in open areas. Tall structures and large metal structures may affect the accuracy of the onboard compass and GPS system. It is recommended to keep the aircraft at least 5 m away from structures. . Avoid obstacles, crowds, high voltage power lines, trees, and bodies of water. It is recommended to keep the aircraft at least 3 m above water.
3. Minimize interference by avoiding areas with high levels of electromagnetism such as locations near power lines, base stations, electrical substations, and broadcasting towers. . Aircraft and battery performance is subject to environmental factors such as air density and temperature. Be careful when flying 13,123 ft (4,000 m) or more above sea level. Otherwise, the battery and aircraft performance may be reduced.
4. Aircraft cannot use GPS within the polar regions. Use the Downward Vision System when flying in such locations.
5. Fly with caution when taking off from moving surfaces such as a moving boat or vehicle.
Flight Limits and GEO Zones
Unmanned aerial vehicle (UAV) operators should abide by the regulations from self-regulatory organizations such as the International Civil Aviation Organization, the Federal Aviation Administration. and local aviation authorities. For safety reasons, flight limits are enabled by default to help users operate this aircraft safely and legally. Users can set flight limits on height and distance.
Altitude limits, distance limits, and GEO zones function concurrently to manage flight safety when GPS is available. Only altitude can be limited when GPS is unavailable.
Flight Altitude and Distance Limits
The flight altitude and distance limits can be changed in DJI Fly. Based on these settings, the aircraft will fly in a restricted cylinder as shown below:

When GPS is available
When GPS is weak

There will be no altitude limit if the GPS signal becomes weak during flight as long as the GPS signal was stronger than weak (white or yellow signal bars) when the aircraft was powered on.
« If the aircraft is in a GEO zone and there is a weak or no GPS signal, the aircraft status indicator will glow red for five seconds every twelve seconds.
« If the aircraft reaches an altitude or radius limit, you can still control the aircraft, but you cannot fly it any further.
« If the aircraft flies out of the max radius, it will automatically fly back within range when the GPS signal is strong.
« For safety reasons, do not fly close to airports, highways, railway stations, railway lines, city centers. or other sensitive areas. Fly the aircraft only within your line of sight.
Pre-Flight Checklist
1. Make sure the remote controller, mobile device, and Intelligent Flight Battery are fully charged.
2. Make sure the Intelligent Flight Battery and the propellers are mounted securely and the propellers are spread.
3. Make sure the aircraft arms are unfolded.
4. Make sure the gimbal and camera are functioning normally.
5. Make sure that there is nothing obstructing the motors and that they are functioning normally.
6. Make sure that DJl Fly is successfully connected to the aircraft.
7. Make sure that the camera lens and Downward Vision System sensors are clean.
8. Use only genuine DJl parts or parts certified by DJl. Unauthorized parts or parts from non-DuJl certified manufacturers may cause system malfunctions and compromise safety.
Auto Takeoff/Landing
Auto Takeoff
Use auto takeoff when the aircraft status indicator blinks green.
1. Launch DuJl Fly and enter the camera view.
2. Complete all steps in the pre-flight checklist.
3. Tap  . If conditions are safe for takeoff, press and hold the button to confirm.
4. The aircraft will take off and hover approx. 3.9 ft (1.2 m) above the ground.
The aircraft status indicator blinks green twice repeatedly to indicate that the aircraft is reliant on the Downward Vision System to fly and can only fly stable at altitudes below 30 m. It is recommended to wait until the aircraft status indicator is slowly blinking green before using auto takeoff.
DO NOT take off from a moving surface such as a moving boat or vehicle.
Auto Landing
Use auto landing when the aircraft status indicator blinks green.
1. Tap  . If conditions are safe to land, press and hold the button to confirm.
2. Auto landing can be cancelled by tapping "X"
3. If the Downward Vision System is working normally, Landing Protection will be enabled.
4. Motors stop after landing.
* Choose the proper place for landing
Starting the Motors
A Combination Stick Command (CSC) is used to start the motors. Push both sticks to the bottom inner or outer corners to start the motors. Once the motors start spinning, release both sticks simultaneously.

Stopping the Motors
There are two methods to stop the motors.
Method 1: when the aircraft has landed, push and hold the throttle stick down. The motors will stop after three seconds.
Method 2: when the aircraft has landed, push the throttle stick down, and perform the same CSC that was used to start the motors. Release both sticks once the motors have stopped.


Stopping the Motors Mid-Flight
The motors should only be stopped mid-flight in an emergency situation such as if a collision has occurred or if the aircraft is out of control and is ascending or descending very quickly, rolling in the air, or if a motor has stalled. To stop the motors mid-flight, use the same CSC that was used to start the motors. The default setting can be changed in Dul Fly.
* Stopping motors mid-flight will cause the aircraft to crash.
Flight Test
Takeoff/Landing Procedures a
1. Place the aircraft in an open, flat area with the aircraft status indicator facing towards you.
2. Power on the remote controller and the aircraft.
3.Launch DuJI Fly, connect the mobile device to the aircraft, and enter the camera view.
4. Wait until the aircraft status indicator blinks green slowly to indicate that the Home Point has been recorded and it is now safe to fly.
5. Gently push the throttle stick to take off or use auto-takeoff.
6. Pull the throttle stick or use auto-landing to land the aircraft.
7. After landing, push the throttle down and hold. The motors stop after three seconds.
8. Power off the aircraft and remote controller.
Video Suggestions and Tips
1. The pre-flight checklist is designed to help you fly safely and to ensure that you can shoot video: during flight. Go through the full pre-flight checklist before each flight.
2. Select the desired gimbal operation mode in Dul Fly.
3. It is recommended to take photos or record videos when flying in Normal or Cine mode.
4. DO NOT fly in bad weather conditions such as when it is raining or windy.
5. Choose the camera settings that best suit your needs.
6. Perform flight tests to establish flight routes and to preview scenes.
7. Push the control sticks gently to keep the aircraft movement smooth and stable.
It is important to understand the basic flight guidelines for the safety of both you and those around you. DO NOT forget to read the disclaimer and safety guidelines.