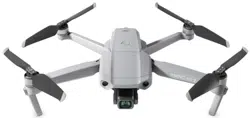
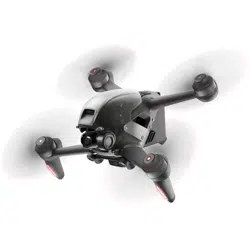
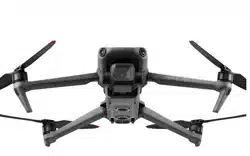
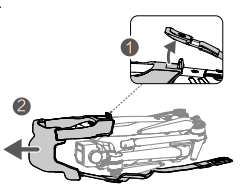
DJI Mavic 3 is folded before being package. Follow the steps below to unfold the aircraft and remove controller.
Preparing the Aircraft
Remove the gimbal protector from the camera.
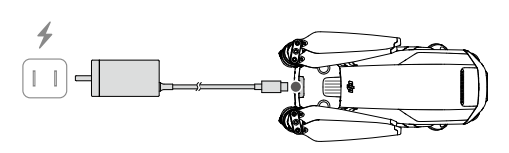
2. All Intelligent Flight Batteries are in hibernation mode before delivery to ensure safety. Use the provided charger to charge and activate the Intelligent Flight Batteries for the first time. It takes approximately 1 hour and 35 minutes to fully charge an Intelligent Flight Battery.
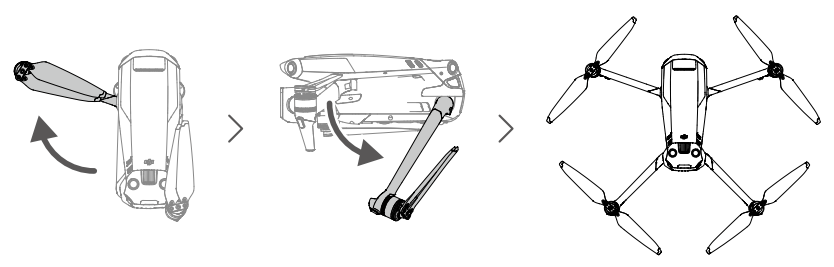
3. Unfold the front arms, followed by the rear arms, and then the propeller blades.
Make sure to unfold the front arms before unfolding the arms.
Make sure the storage cover is removed and all arms are unfolded before powering on the aircraft. Otherwise, it may affect the aircraft self - diagnostics.
Attach the storage cover when the aircraft is not in use.
Preparing the Remote Controller
Follow the steps below to prepare to use the DJI RC Pro remote controller with DJI Mavi 3 Cine
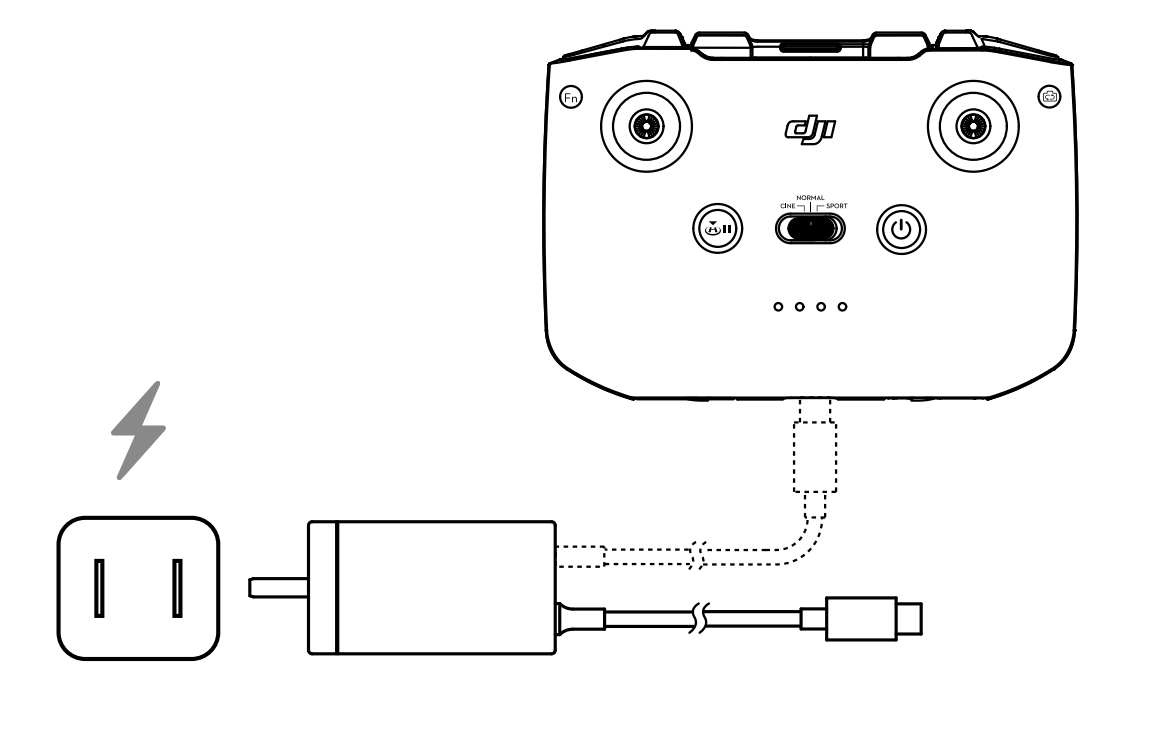
Use the provided charge to charge the remote controller via the USB - C port to active the battery
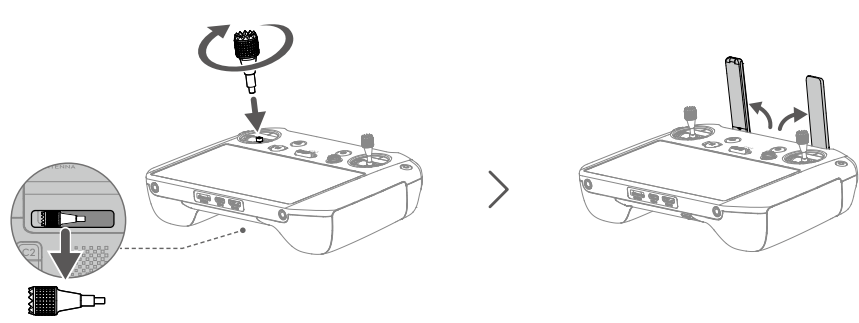
2. Remove the control sticks from their storage slots on the remote controller and screw them into place
3. Unfold the antennas
4. The remote controller needs to be activated before using for the first time and an internet connection is required for activation. Press and then press and hold the power button to power on the remote controller. Follow the on - screen prompts to activate the remote controller.
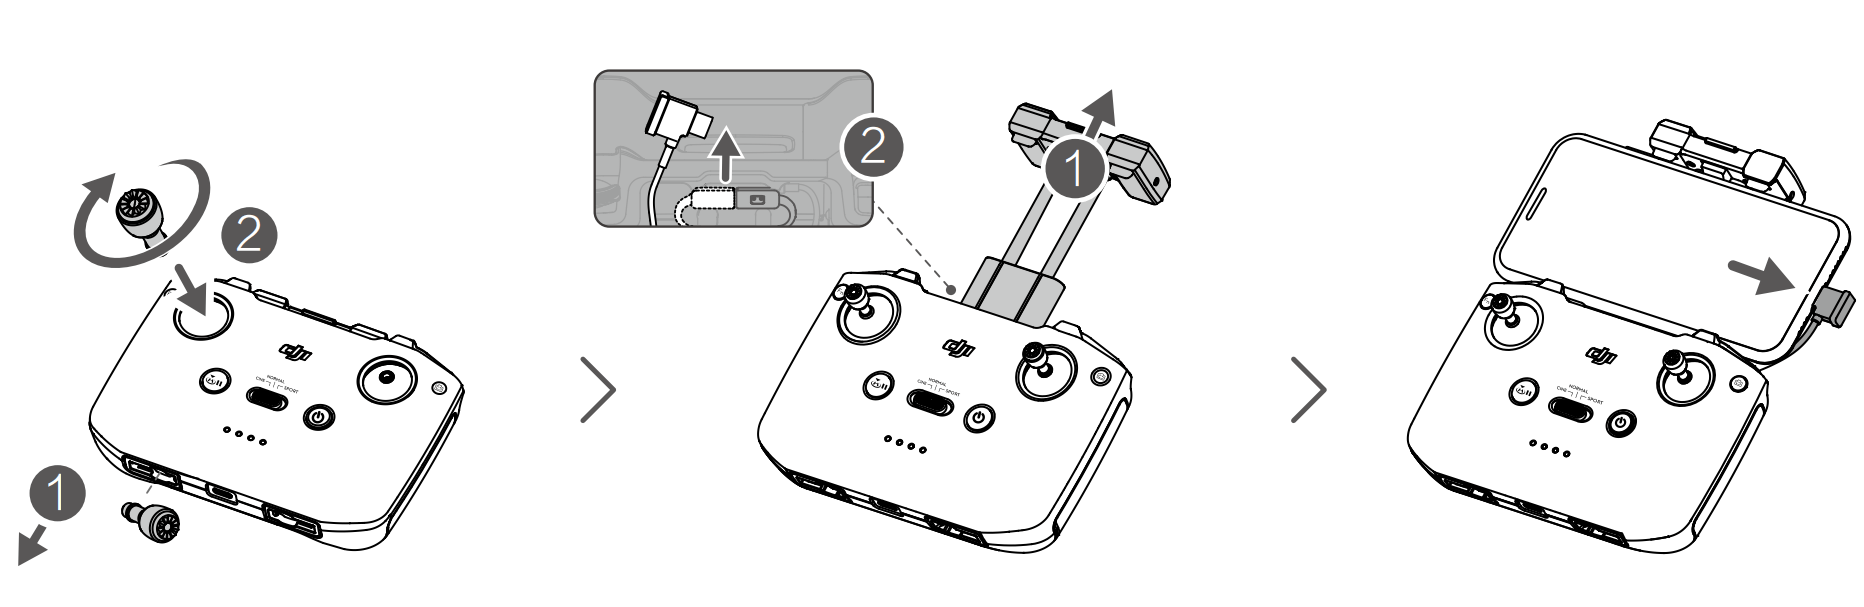
Follow the steps below to prepare the DJI RC-N1 remote controller for DJI Mavic 3.
Remove the control sticks from their storage slots on the remote controller and screw them into place.
Pull out the mobile device holder. Choose an appropriate remote controller cable based on the type of mobile device. A Lightning connector cable, Micro USB cable, and USB-C cable are included in the packaging. Connect the end of the cable with the phone icon to your mobile device. Make sure the mobile device is secured.
Activating DJI Mavic 3 Aircraft
DJI Mavic 3 requires activation before using for the first time. After powering on the aircraft and remote controller, follow the on-screen prompts to activate DJI Mavic 3 using DJI Fly. An internet connection is required for activation.
Binding the Aircraft and Remote Controller
It is recommended to bind the aircraft and remote controller to help ensure the best possible after-sales service. Follow the on-screen prompts after activation to bind the aircraft and remote controller.
Updating Firmware
A prompt will appear in DJI Fly when new firmware is available. It is recommended to update the firmware whenever prompted to do so in order to ensure the best possible user experience.
Diagram
Aircraft
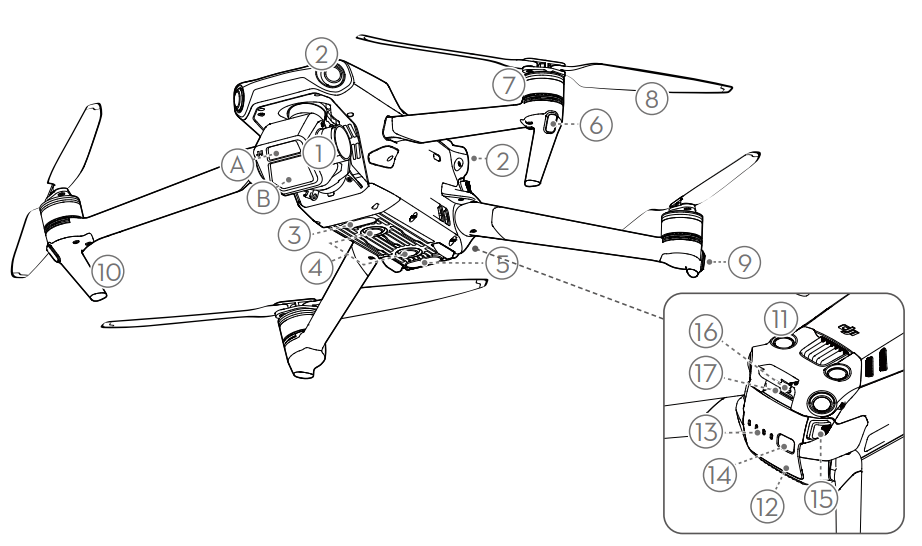
Gimbal and Camera
A. Tele Camera
B. Hasselblad L2D-20c Camera
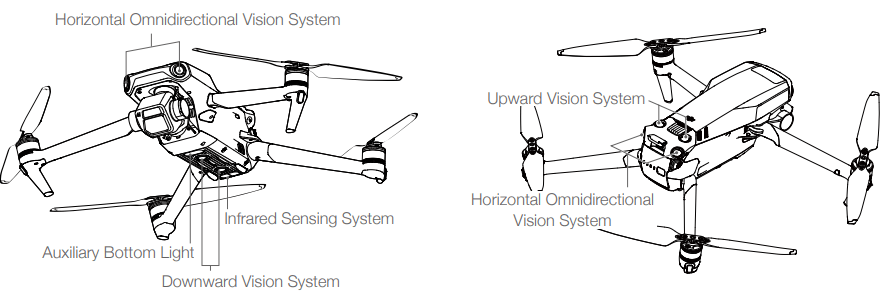
Horizontal Omnidirectional Vision System
Auxiliary Bottom Light
Downward Vision System
Infrared Sensing System
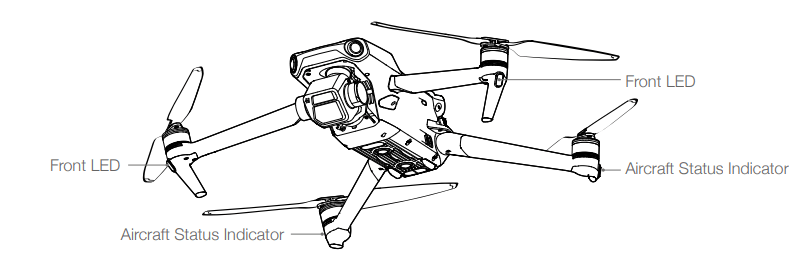
Front LEDs
Motors
Propellers
Aircraft Status Indicators
Landing Gears (Built-in antennas)
Upward Vision System
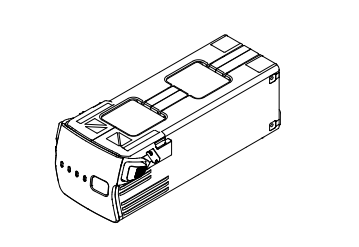
Intelligent Flight Battery
Battery Level LEDs
Power Button
Battery Buckles
USB-C Port
microSD Card Slot
DJI RC Pro
1. Antennas: Relay aircraft control and video wireless signals.
2. Back Button: Press once to return to the previous screen. Press twice to return to the home screen.
3. Control Sticks: Use the control sticks to control the aircraft movements. Set the flight control mode in DJI Fly. The control sticks are removable and easy to store.
4. Return to Home (RTH) Button: Press and hold to initiate RTH. Press again to cancel RTH.
5. Flight Pause Button: Press once to make the aircraft brake and hover in place (only when GNSS or Vision Systems are available).
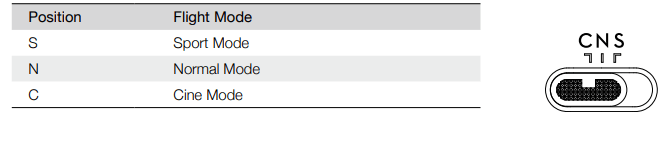
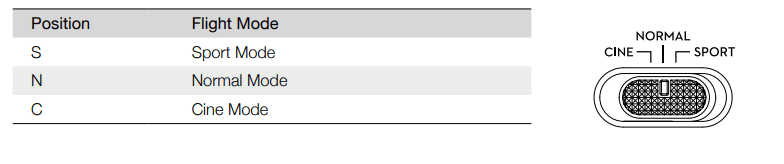
6. Flight Mode Switch: Switch between Cine, Normal, and Sport mode.
7. 5D Button: View the 5D Button features in DJI Fly by entering Camera View, Settings, and then Control.
8. Power Button: Press once to check the current battery level. Press and then press and hold to power the remote controller on or off. When the remote controller is powered on, press once to turn the touchscreen on or off.
9. Confirm Button: Press once to confirm a selection. The button does not have a function when using DJI Fly.
10. Touchscreen: Touch the screen to operate the remote controller. Note that the touchscreen is not waterproof. Operate with caution.
11. microSD Card Slot: Use to insert a microSD card.
12. USB-C port: For charging.
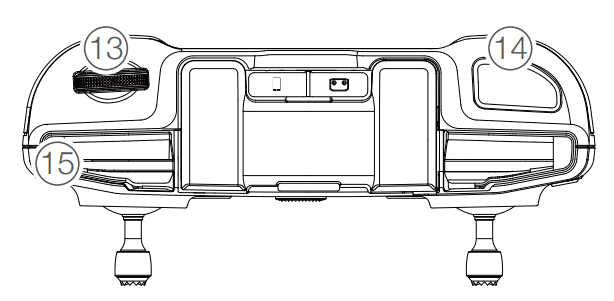
13. Mini HDMI Port: For video output.
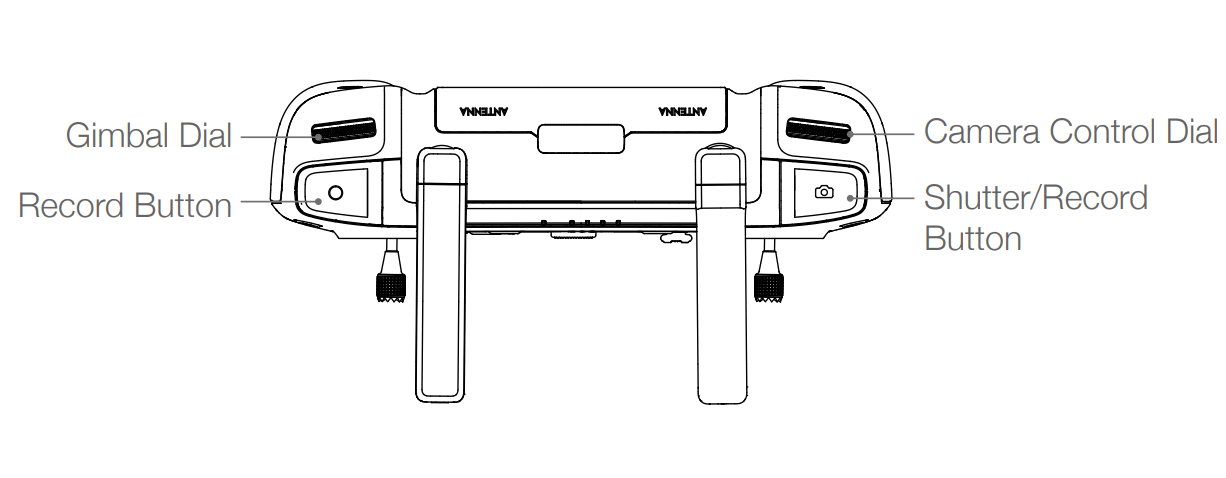
14. Gimbal Dial: Controls the tilt of the camera.
15. Record Button: Press once to start or stop recording.
16. Status LED: Indicates the status of remote controller.
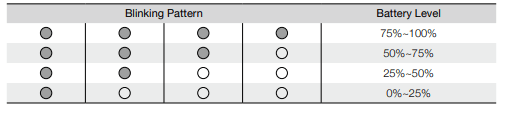
17. Battery Level LEDs: Displays the current battery level of the remote controller.
18. Focus/Shutter Button: Press halfway down on the button to auto focus and press all the way down to take a photo.
19. Camera Control Dial: For zoom control.
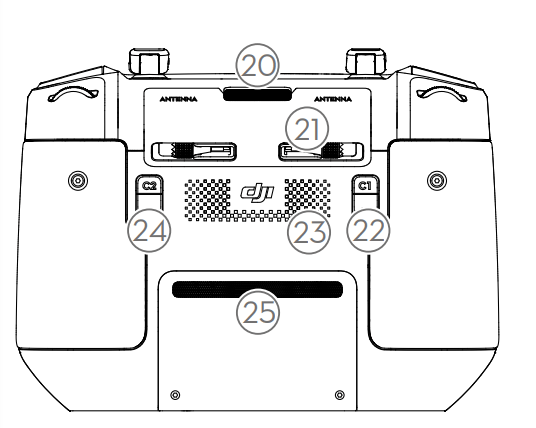
20. Air Vent: Used for heat dissipation. Do not block the air vent during usage.
21. Control Sticks Storage Slot: For storing the control sticks.
22. Customizable C1 Button: Switch between recentering the gimbal and pointing the gimbal downward. The function can be set in DJI Fly.
23. Speaker: Outputs sound.
24. Customizable C2 Button: Press once to turn the Auxiliary Bottom Light on or off. The function can be set in DJI Fly.
25. Air Intake: Used for heat dissipation. DO NOT cover the air intake during use.
RC-N1
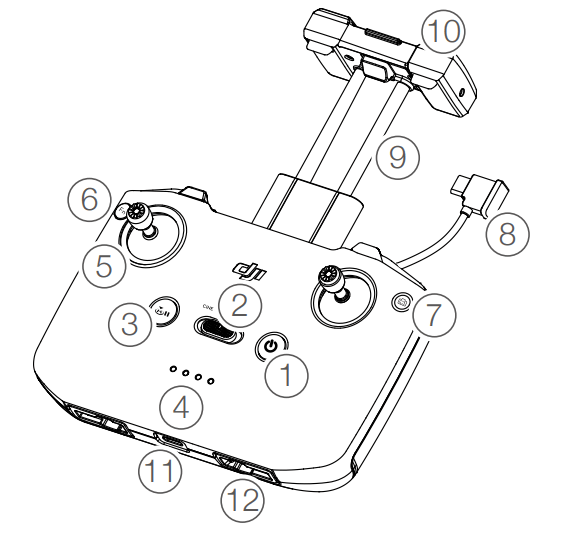
1. Power Button: Press once to check the current battery level. Press once, then again, and hold to power the remote controller on or off.
2. Flight Mode Switch: Switch between Sport, Normal, and Cine mode.
3. Flight Pause/Return to Home (RTH) Button: Press once to make the aircraft brake and hover in place (only when GNSS or Vision Systems are available). Press and hold the button to initiate RTH. Press again to cancel RTH. 20. Air Vent Used for heat dissipation. Do not block the air vent during usage.
4. Battery Level LEDs: Displays the current battery level of the remote controller.
5. Control Sticks: Use the control sticks to control the aircraft movements. Set the flight control mode in DJI Fly. The control sticks are removable and easy to store.
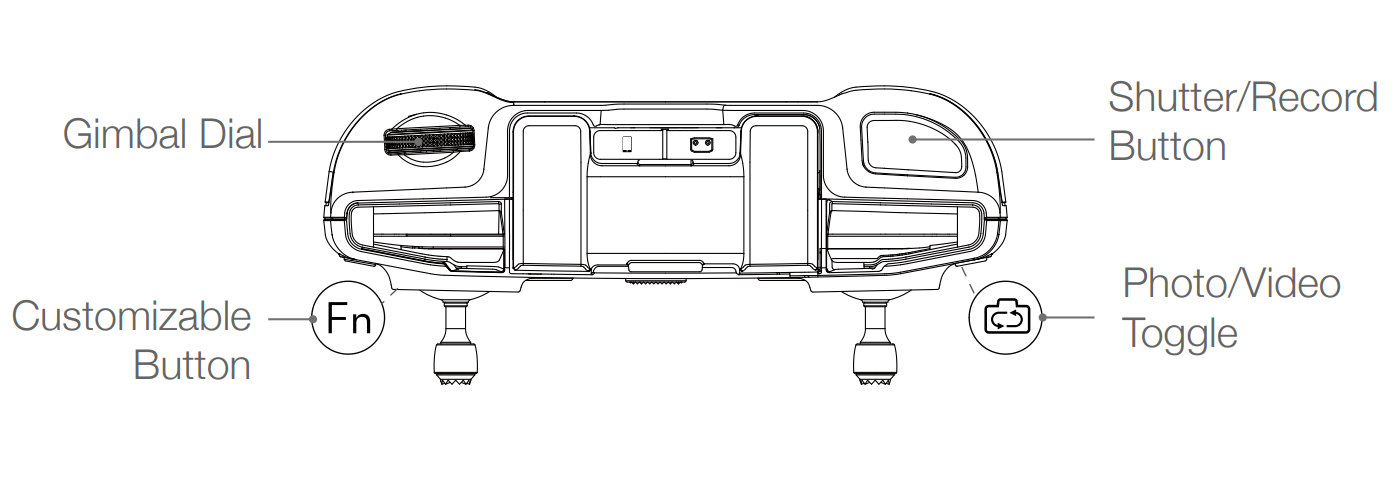
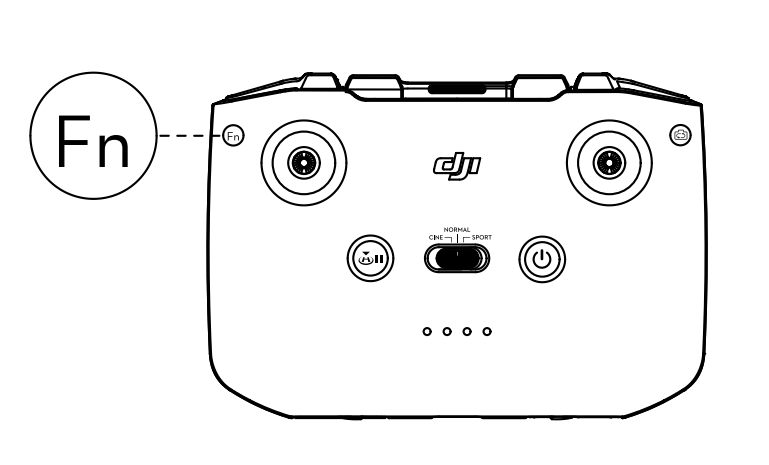
6. Customizable Button: Press once to turn the Auxiliary Bottom Light on or off. Press twice to recenter the gimbal or tilt the gimbal downward (default settings). The button can be set in DJI Fly
7. Photo/Video Toggle: Press once to switch between photo and video mode.
8. Remote Controller Cable: Connect to a mobile device for video linking via the remote controller cable. Select the cable according to the mobile device.
9. Mobile Device Holder: Used to securely mount the mobile device to the remote controller.
10.Antennas: Relay aircraft control and video wireless signals.
11.USB-C Port: For charging and connecting the remote controller to the computer.
12.Control Sticks Storage Slot: For storing the control sticks.
13.Gimbal Dial: Controls the tilt of the camera. Press and hold the customizable button to use the gimbal dial to adjust the zoom in Explore Mode.
14.Shutter/Record Button: Press once to take photos or start or stop recording.
15.Mobile Device Slot: Used to secure the mobile device.
Aircraft
DJI Mavic 3 contains a flight controller, video downlink system, vision systems, infrared sensing system, propulsion system, and an Intelligent Flight Battery
Aircraft Status Indicators
DJI Mavic 3 has front LEDs and aircraft status indicators.
When the aircraft is powered on but the motors are not running, the front LEDs glow solid red to display the orientation of the aircraft.
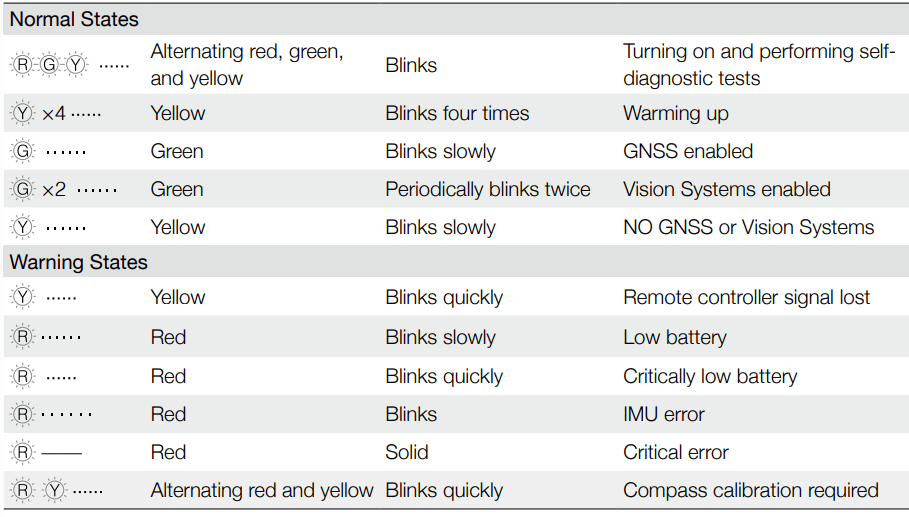
When the aircraft is powered on but the motors are not running, the aircraft status indicators display the status of the flight control system. Refer to the table below for more information about the aircraft status indicators.
Aircraft Status Indicator States
After the motor starts, the front LEDs blink red and green alternately and the aircraft status indicators blink green
To obtain better footage, the front LEDs turn off automatically when shooting if the front LEDs are set to auto in DJI Fly. Lighting requirements vary depending on region. Observe local laws and regulations
Return to Home
Return to Home (RTH) returns the aircraft to the last recorded Home Point when the positioning system is functioning normally. There are three types of RTH: Smart RTH, Low Battery RTH, and Failsafe RTH. The aircraft automatically flies back to the Home Point and lands when Smart RTH is initiated, the aircraft enters Low Battery RTH, or the video link signal is lost during flight.
GNSS
Description
Home Point
The default Home Point is the first location where the aircraft received a strong to moderately strong GNSS signal where the icon is white. The Home Point can be updated before takeoff as long as the aircraft receives a strong to moderately strong GNSS. If the GNSS signal is weak then the Home Point cannot be updated.
Smart RTH
If the GNSS signal is sufficient, Smart RTH can be used to bring the aircraft back to the Home Point. Smart RTH is initiated either by tapping in DJI Fly or by pressing and holding the RTH button on the remote controller until it beeps. Exit Smart RTH by tapping in DJI Fly or by pressing the RTH button on the remote controller.
Advanced RTH
Advanced RTH is enabled if the lighting is sufficient and the environment is suitable for vision systems when Smart RTH triggered. The aircraft will automatically plan the best RTH path, which will be displayed in DJI Fly and will adjust according to the environment.
Advanced RTH Procedure
The Home Point is recorded.
Advanced RTH is triggered.
The aircraft brakes and hover in place.
The aircraft lands immediately if it is less than 5 m from the Home Point when RTH begins.
If the aircraft is farther than 5 m from the Home Point when RTH begins, the aircraft will plan the best RTH path and fly to the Home Point while avoiding obstacles and GEO zones. The aircraft front will always point in the same direction as the flight direction.
In order to save power and time, the aircraft will automatically adjust to an angle of 19° and fly to the Home Point once it is near the Home Point. The time when the aircraft adjust the angle and flies to the Home Point varies depending on the environment and video transmission signal.
The aircraft lands and the motors stop after reaching the Home Point.
Straight Line RTH
The aircraft will enter Straight Line RTH when the lighting is not sufficient and the environment is not suitable for the vision systems. Straight Line RTH Procedure:
The Home Point is recorded.
Straight Line RTH is triggered.
The aircraft brakes and hover in place.
If the aircraft is farther than 50 m from the Home Point when RTH begins, the aircraft adjusts its orientation and ascends to the preset RTH altitude and flies to the Home Point. If the current altitude is higher than the RTH altitude, the aircraft flies to the Home Point at the current altitude.
If the aircraft is at a distance of 5 to 50 m from the Home Point when RTH begins, the aircraft adjusts its orientation and flies to the Home Point at the current altitude. If the current altitude is lower than 2 m when RTH begins, the aircraft will ascend to 2 m and files to the Home Point.
The aircraft lands immediately if it is less than 5 m from the Home Point when RTH begins.
The aircraft lands and the motors stop after reaching the Home Point.
Failsafe RTH
If the Home Point was successfully recorded and the compass is functioning normally, Failsafe RTH automatically activates after the remote controller signal is lost for more than six seconds. Note that the action the aircraft performs when the remote controller is lost must be set to Return to Home in DJI Fly.
When the lighting is sufficient and the vision systems are working normally, DJI Fly will display the RTH path that was generated by the aircraft before the remote controller signal was lost. The aircraft will return to the Home Point on the best possible path according to the environment. The aircraft will remain in RTH even if the remote controller signal is restored.
When the lighting is not sufficient and the vision systems are not available, the aircraft will enter Original Route RTH. Original Route RTH Procedure:
The aircraft brakes and hover in place.
If the aircraft is farther than 50 m from the Home Point, the aircraft adjust its orientation and flies backwards for 50 m on its original flight route before entering Straight Line RTH.
If the aircraft is farther than 5 m but less than 50 m from the Home Point, it enters Straight Line RTH.
The aircraft lands immediately if it is less than 5 m from the Home Point when RTH begins.
The aircraft lands and the motors stop after reaching the Home Point.
The aircraft will remain in Straight Line RTH even if the remote controller signal is restored during Original Route RTH.
Landing Protection
Landing Protection will activate during Smart RTH. When aircraft begins landing, Landing Protection is enabled.
During Landing Protection, the aircraft will automatically detect and carefully land on suitable ground.
If the ground is determined unsuitable for landing, the aircraft will hover and wait for pilot confirmation.
If Landing Protection is not operational, DJI Fly will display a landing prompt when the aircraft descends below 0.5 m. Pull down on the throttle stick or use the auto landing slider to land..
Precision Landing
The aircraft automatically scans and attempts to match the terrain features below during RTH. When the current terrain matches the Home Point terrain, the aircraft will land. A prompt will appear in DJI Fly if the terrain match fails.
Landing Protection is activated during Precision Landing.
The Precision Landing performance is subject to the following conditions:
The Home Point must be recorded upon takeoff and must not be changed during flight. Otherwise, the aircraft will have no record of the Home Point terrain features.
During takeoff, the aircraft must ascend at least 7 m before flying horizontally.
The Home Point terrain features must remain largely unchanged.
The terrain features of the Home Point must be sufficiently distinctive. Terrain such as snow-covered areas are not suitable.
The lighting conditions must not be too light or too dark.
The following actions are available during Precision Landing:
Press the throttle stick down to accelerate landing.
Move the control sticks in any direction to stop Precision Landing. The aircraft will descend vertically after the control sticks are released
Vision Systems and Infrared Sensing System
DJI Mavic 3 is equipped with both an Infrared Sensing System and Forward, Backward, Lateral, Upward, and Downward Vision Systems.
The Upward and Downward Vision Systems consist of two cameras each, and the Forward, Backward, and Lateral Vision Systems consist of four cameras in total.
The Infrared Sensing System consists of two 3D infrared modules. The Downward Vision System and Infrared Sensing System helps the aircraft maintain its current position, hover in place more precisely, and to fly indoors or in other environments where GNSS is unavailable.
In addition, the Auxiliary Bottom Light located on the underside of the aircraft improves visibility for the Downward Vision System in weak light conditions.
Advanced Pilot Assistance Systems (APAS 5.0)
The Advanced Pilot Assistance Systems 5.0 (APAS 5.0) feature is available in Normal and Cine mode. When APAS is enabled, the aircraft continues to respond to user commands and plans its path according to control stick inputs and the flight environment. APAS makes it easier to avoid obstacles, obtain smoother footage, and gives a better flying experience.
Keep moving the control sticks in any directions. The aircraft will avoid the obstacles by flying above, below, or to the left or right of the obstacle. The aircraft can also response to the control stick inputs while avoiding obstacles.
When APAS is enabled, the aircraft can be stopped by pressing the Flight Pause button on the remote controller or tapping the screen in DJI Fly. The aircraft hovers for three seconds and awaits further pilot commands.
To enable APAS, open DJI Fly, enter System Settings, then Safety, and enable APAS by selecting Bypass
Intelligent Flight Battery
The DJI Mavic 3 Intelligent Flight Battery is a 15.4 V, 5000 mAh battery with smart charging and discharging functionality
Battery Features
Battery Level Display: The LED indicators display the current battery level.
Auto-Discharging Function: To prevent swelling, the battery automatically discharges to 96% of the battery level when it is idle for one day, and automatically discharges to 60% of the battery level when it is idle for five days. It is normal to feel moderate heat being emitted from the battery during the discharging process.
Balanced Charging: During charging, the voltages of the battery cells are automatically balanced.
Overcharge Protection: The battery stops charging automatically once fully charged.
Temperature Detection: In order to protect itself, the battery only charges when the temperature is between 41° and 104° F (5° and 40° C).
Overcurrent Protection: The battery stops charging if an excess current is detected.
Over-Discharge Protection: Discharging stops automatically to prevent excess discharge when the battery is not in use. Over-discharge protection is not enabled when the battery is in use
Short Circuit Protection: The power supply is automatically cut if a short circuit is detected.
Battery Cell Damage Protection: DJI Fly displays a warning prompt when a damaged battery cell is detected.
Hibernation Mode: The battery switches off after 20 minutes of inactivity to save power. If the battery level is less than 5%, the battery enters Hibernation mode to prevent over-discharge after being idle for six hours. In Hibernation mode, the battery level indicators do not illuminate. Charge the battery to wake it from hibernation.
Communication: Information about the voltage, capacity, and current of the battery is transmitted to the aircraft.
Remote Controller
DJI RC Pro
The DJI RC Pro remote controller features O3+, the latest version of DJI’s signature OcuSync image transmission technology, works at both 2.4 and 5.8 GHz, is capable of selecting the best transmission channel automatically, and can transmit a live HD view from the camera of the aircraft at a distance of up to 15 km. The built-in 5.5-in high brightness 1000 cd/m2 screen boasts a resolution of 1920×1080 pixels while the remote controller comes with a wide range of aircraft and gimbal controls as well as customizable buttons. Users can connect to the internet via Wi-Fi and the Android 10 operating system comes with a variety of functions such as Bluetooth and GNSS (GPS+GLONASS+Galileo).
With the built-in speaker, the remote controller supports H.264 4K/120fps and H.265 4K/120fps video, which also supports video output via the Mini HDMI port. The internal storage of the remote controller is 32 GB and also supports the use of microSD cards to store the photos and videos.
The 5000 mAh and 36 Wh battery provides the RC Pro with a maximum operating time of 3 hours.
Using the Remote Controller
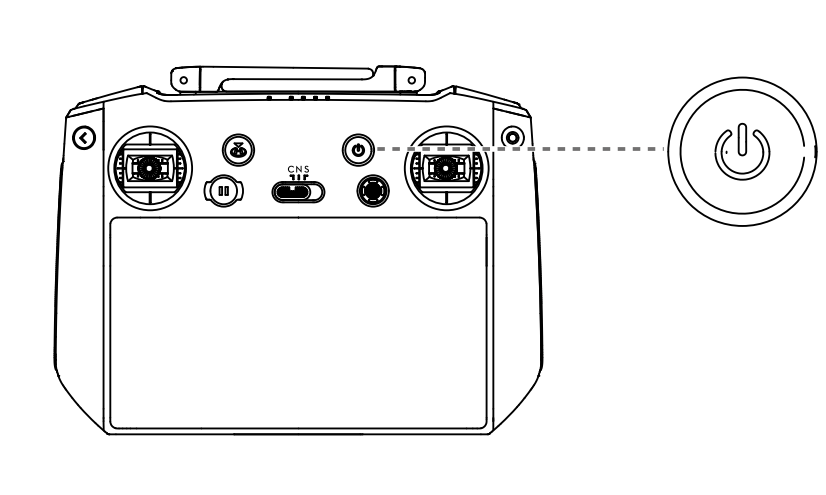
Powering On/Off
Press the power button once to check the current battery level.
Press and then press again and hold to power the remote controller on or off.
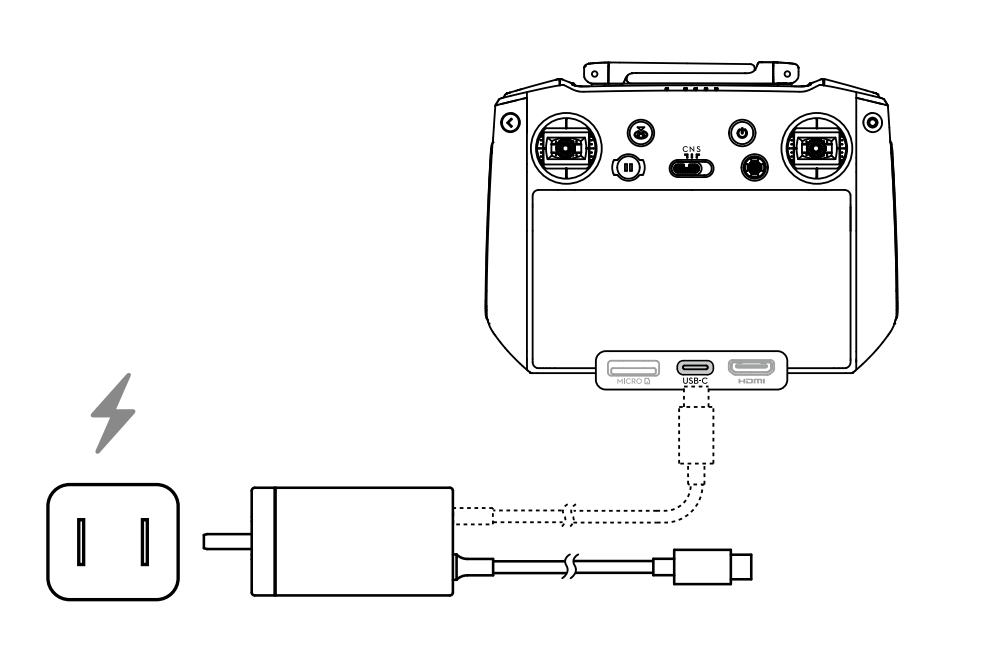
Charging the Battery
Use a USB-C cable to connect the charger to the USB-C port of the remote controller.
Controlling the Gimbal and Camera
Focus/Shutter Button: Press halfway down to auto focus and press all the way down to take a photo.
Record Button: Press once to start or stop recording.
Camera Control Dial: Use to adjust the zoom.
Gimbal Dial: Use to adjust the tilt of the gimbal.
Controlling the Aircraft
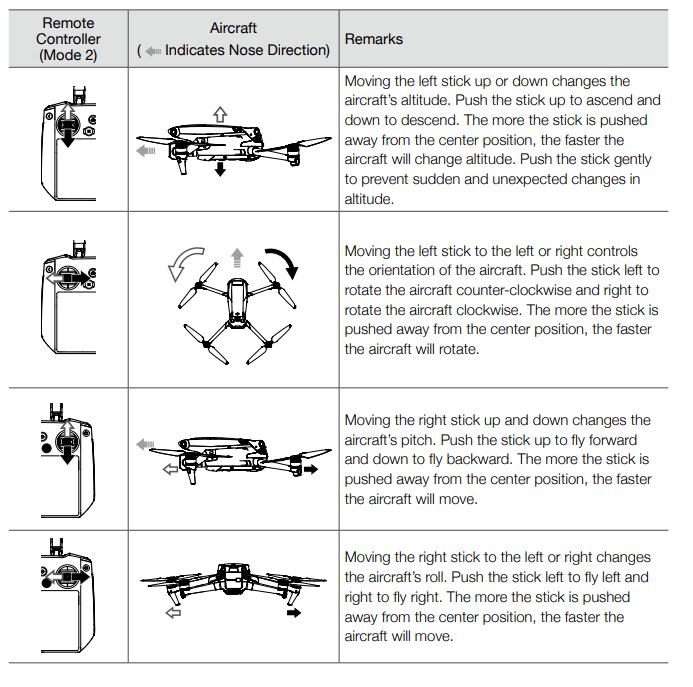
Three preprogrammed modes (Mode 1, Mode 2, and Mode 3) are available and custom modes can be configured in DJI Fly. The default mode is Mode 2.
Flight Mode Switch
Toggle the switch to select the flight mode.
RTH Button
Press and hold the RTH button until the remote controller beeps to start RTH. Press this button again to cancel RTH and regain control of the aircraft. Refer to the Return to Home section for more information about RTH.
Customizable Buttons
Including C1, C2, and the 5D button. Go to System Settings in DJI Fly and select Control to customize the function of the button.
Combination Buttons
Back + Gimbal Dial: Adjust Brightness
Back + Camera Control Dial: Adjust Volume
Back + Record Button: Record Screen
Back + Shutter Button: Screenshot
Back + 5D Button: Up - Home, Down - Shortcut Settings, Left - Recent
Status LED and Battery Level LEDs Description
Status LED
Blinking Pattern
Descriptions
Solid red
Disconnected with aircraft
Blinks red
The temperature of the remote controller is too high or the battery level of the aircraft is low
Solid green
Connected with aircraft
Blinks blue
The remote controller is linking to an aircraft
Solid yellow
Firmware update failed
Blinks yellow
The battery level of the remote controller is low
Blinks cyan
Control sticks not centered
Battery Level Indicators
Remote Controller Alert
The remote controller vibrates or beeps when there is an error or warning. Pay attention when prompts appear on the touchscreen or in DJI Fly. Slide down from the top to select Do Not Disturb or Mute to disable some alerts.
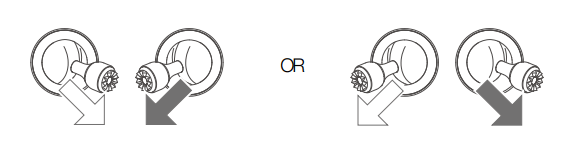
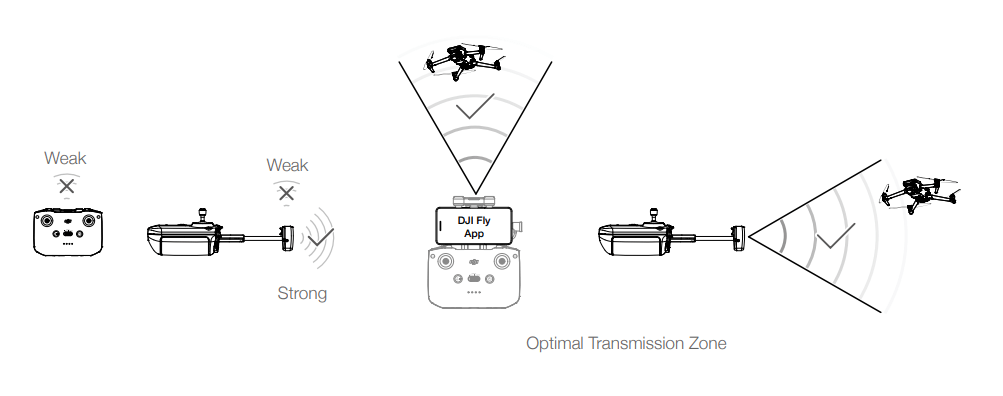
Optimal Transmission Zone
The signal between the aircraft and the remote controller is most reliable when the antennas are positioned in relation to the aircraft as illustrated below.
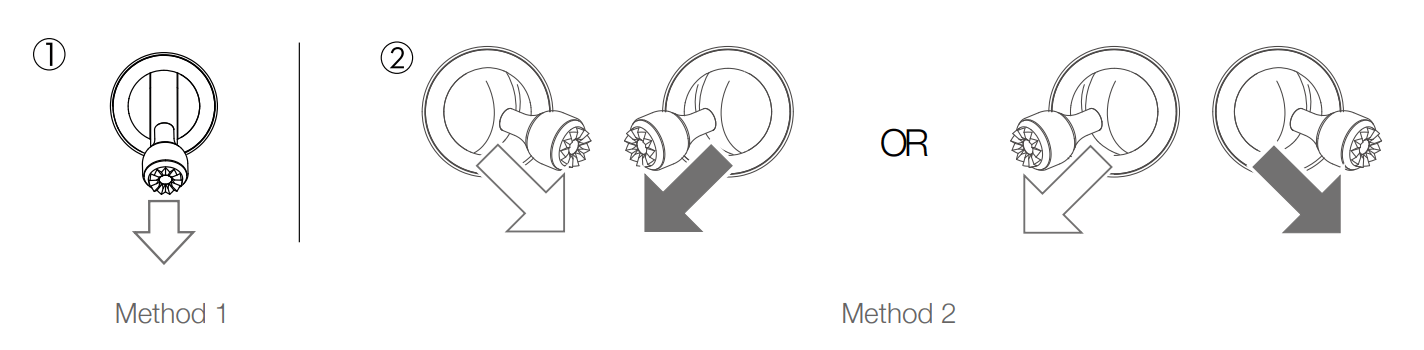
Linking the Remote Controller
The aircraft and remote controller must be linked before use. Follow these steps to link a new remote controller.
Method 1:
Power on the remote controller and the aircraft.
Press the C1, C2, and record button simultaneously until the status LED blinks blue and the remote controller beeps.
Press and hold the power button of the aircraft for more than four seconds. The aircraft beeps once to indicate it is ready to link. The aircraft beeps twice to indicate linking is successful. The battery level LEDs of the remote controller will glow solid.
Method 2:
Power on the remote controller and the aircraft.
Launch DJI Fly.
In camera view, tap and select Control and Pair to Aircraft (Link).
Press and hold the power button of the aircraft for more than four seconds. The aircraft beeps once indicating it is ready to link. The aircraft beeps twice indicating linking is successful. The battery level LEDs of the remote controller will glow solid.
Touchscreen Operations
Home
The top of the touchscreen displays the time, Wi-Fi signal, and battery level of the remote controller. Some apps are already installed by default such as DJI Fly, Gallery, Files, Firefox, Settings, and Guide. Settings includes network, display, voice, and Bluetooth configurations. Users can quickly learn about the features under Guide.
Operations
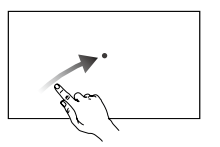
Slide from the left or right to the center of the screen to return to the previous screen.
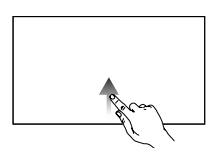
Slide up from the bottom of the screen to return to the home screen.
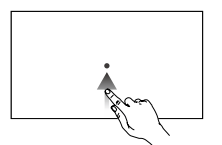
Slide up and right from the bottom of the home screen to access recently opened apps when on the home screen.
Slide up from the bottom of the screen to access the recently opened apps when not on the home screen
RC-N1
Built into the remote controller is DJI'S long-range tranmission OcuSync 2.0 technology, offering a maximum transmission range of 15 km and displaying video from the aircraft to DJI Fly on a mobile device at up to 1080p 60fps (depending on phone type). The aircraft and camera are easy to control using the onboard buttons and the detachable control sticks make the remote controller easier to store.
In a wide-open area with no electromagnetic interference, the aircraft uses O3+ and the remote controller uses OcuSync 2.0 to smoothly transmit video links at up to 1080p 60fps (depending on phone type). The remote controller works at both 2.4 GHz and 5.8 GHz, automatically selecting the best transmission channel.
The built-in battery has a capacity of 5200 mAh and energy of 18.72 Wh and a maximum run time of 6 hours. The remote controller charges the mobile device with a charging ability of 500 mA@5 V. The remote controller automatically charges Android devices. For iOS devices, first make sure that charging is enabled in DJI Fly. Charging for iOS devices is disabled by default and needs to be enabled each time the remote controller is powered on.
Compliance Version: The remote controller is compliant with local regulations.
Control Stick Mode: The control stick mode determines the function of each control stick movement. Three pre-programmed modes (Mode 1, Mode 2, and Mode 3) are available and custom modes can be configured in DJI Fly. The default mode is Mode 2
Using the Remote Controller
Powering On/Off
Press the power button once to check the current battery level. Press once, then again, and hold to power the remote controller on or off. If the battery level is too low, recharge before use
Charging the Battery
Use a USB-C cable to connect the provided charger to the USB-C port of the remote controller. It takes approximately four hours to fully charge the remote controller.
Controlling the Gimbal and Camera
Shutter/Record Button: Press once take a photo or to start or stop recording.
Photo/Video Toggle: Press once to switch between photo and video mode.
Gimbal Dial: Use to control the tilt of the gimbal.
Press and hold the customizable button in order to be able to use the gimbal dial to adjust the zoom in explore mode.
Controlling the Aircraft
The control sticks control the aircraft’s orientation (pan), forward/backward movement (pitch), altitude (throttle), and left/right movement (roll). The control stick mode determines the function of each control stick movement. Three preprogrammed modes (Mode 1, Mode 2, and Mode 3) are available and custom modes can be configured in DJI Fly. The default mode is Mode
Flight Mode Switch
Toggle the switch to select the flight mode.
Flight Pause/RTH Button
Press once to make the aircraft brake and hover in place. If the aircraft is performing Smart RTH or auto landing, press once to exit the procedure and then brake.
Press and hold the RTH button until the remote controller beeps to start RTH. Press this button again to cancel RTH and regain control of the aircraft. Refer to the Return to Home section for more information about RTH.
Customizable Button
Go to System Settings in DJI Fly and select Control to customize the function of the button. Functions include recentering the gimbal, switching the auxiliary LED, and toggling the map and live view.
Remote Controller Alert
The remote controller sounds an alert during RTH or when the battery level is low (6% to 15%). The low battery alert level can be cancelled by pressing the power button. The critical battery level alert (less than 5%), however, cannot be cancelled.
Optimal Transmission Zone
The signal between the aircraft and the remote controller is most reliable when the antennas are positioned in relation to the aircraft as depicted below.
Linking the Remote Controller
The aircraft and remote controller must be linked before using. Follow these steps to link a new remote controller:
Power on the remote controller and the aircraft.
Launch DJI Fly.
In camera view, tap and select Control and Pair to Aircraft (Link).
Press and hold the power button of the aircraft for more than four seconds. The aircraft beeps once indicating it is ready to link. The aircraft beeps twice indicating linking is successful. The battery level LEDs of the remote controller will glow solid.
Make sure the remote controller is within 0.5 m of the aircraft during linking.
The remote controller will automatically unlink from an aircraft if a new remote controller is linked to the same aircraft.
Fully charge the remote controller before each flight. The remote controller sounds an alert when the battery level is low.
If the remote controller is powered on and not in use for five minutes, an alert will sound. After 6 minutes, the aircraft automatically powers off. Move the control sticks or press any button to cancel the alert.
Adjust the mobile device holder to ensure the mobile device is secure.
Fully charge the battery at least once every three months to maintain battery health.
Flight
Once pre-flight preparation is complete, it is recommended to hone your flight skills and practice flying safely. Make sure that all flights are carried out in an open area. Refer to the Remote Controller and DJI Fly sections for information about using the remote controller and the app to control the aircraft.
Flight Environment Requirements
Do not use the aircraft in severe weather conditions including wind speeds exceeding 12 m/s, snow, rain, and fog.
Only fly in open areas. Tall structures and large metal structures may affect the accuracy of the onboard compass and GNSS system. It is recommended to keep the aircraft at least 5 m away from structures.
Avoid obstacles, crowds, high voltage power lines, trees, and bodies of water. It is recommended to keep the aircraft at least 3 m above water.
Minimize interference by avoiding areas with high levels of electromagnetism such as locations near power lines, base stations, electrical substations, and broadcasting towers.
Aircraft and battery performance is subject to environmental factors such as air density and temperature. Be careful when flying 6,000 m or more above sea level, since battery and aircraft performance may be reduced.
Aircraft cannot use GNSS within the polar regions. Use the Downward Vision System when flying in such locations.
If taking off from a moving surface, such as a moving boat or vehicle, fly with caution.
Flight Limits and GEO Zones
Unmanned aerial vehicle (UAV) operators should abide by the regulations from self-regulatory organizations such as the International Civil Aviation Organization, the Federal Aviation Administration, and local aviation authorities. For safety reasons, flight limits are enabled by default to help users operate this aircraft safely and legally. Users can set flight limits on height and distance.
Altitude limits, distance limits, and GEO zones function concurrently to manage flight safety when GNSS is available. Only altitude can be limited when GNSS is unavailable.
Flight Altitude and Distance Limits
The flight altitude and distance limits can be changed in DJI Fly. Based on these settings, the aircraft will be in a restricted cylinder, as shown below:
GEO ZonesAll
GEO zones are listed on the DJI official website at http://www.dji.com/flysafe. GEO zones are divided into different categories and include locations such as airports, flying fields where manned aircraft operate at low altitudes, borders between countries, and sensitive locations such as power plants.
There will be prompts in the DJI Fly app to fly in GEO zones
Pre-Flight Checklist
Make sure the remote controller, mobile device, and Intelligent Flight Battery are fully charged.
Make sure the Intelligent Flight Battery and the propellers are mounted securely.
Make sure the aircraft arms are unfolded.
Make sure the gimbal and camera are functioning normally.
Make sure that there is nothing obstructing the motors and that they are functioning normally.
Make sure that DJI Fly is successfully connected to the aircraft.
Make sure that the camera lens and Vision System sensors are clean.
Use only genuine DJI parts or parts certified by DJI. Unauthorized parts or parts from non-DJIcertified manufacturers may cause system malfunctions and compromise safety
Auto Takeoff/Landing
Auto Takeoff
Use auto takeoff:
Launch DJI Fly and enter the camera view.
Complete all steps in the pre-flight checklist.
Tap . If conditions are safe for takeoff, press and hold the button to confirm.
The aircraft will take off and hover 1.2 m above the ground.
Auto Landing
Use auto landing:
Tap . If conditions are safe to land, press and hold the button to confirm.
Auto landing can be cancelled by tapping
If the Vision System is working normally, Landing Protection will be enabled.
Motors stops after landing
Starting/Stopping the Motors
Starting the Motors
A Combination Stick Command (CSC) is used to start the motors. Push both sticks to the bottom inner or outer corners to start the motors. Once the motors have started spinning, release both sticks simultaneously
Stopping the Motors
There are two methods to stop the motors.
Method 1: When the aircraft has landed, push and hold the left stick down. The motors will stop after three seconds.
Method 2: When the aircraft has landed, push the left stick down and perform the same CSC that was used to start the motors. The motors will stop immediately. Release both sticks once the motors have stopped
Stopping the Motors Mid-Flight
Stopping motors mid-flight will cause the aircraft to crash. The motors should only be stopped mid-flight in an emergency situation such as if a collision has occurred or if the aircraft is out of control and is ascending or descending very quickly, rolling in the air, or if a motor has stalled. To stop the motors mid-flight use the same CSC that was used to start the motors. The default setting can be changed in DJI Fly
Flight Test
Takeoff/Landing Procedures
Place the aircraft in an open, flat area with the aircraft status indicator facing toward you.
Turn on the aircraft and the remote controller.
Launch DJI Fly and enter the camera view.
Wait until the aircraft status indicators blink green indicating that the Home Point has been recorded and it is now safe to fly.
Gently push the throttle stick to take off or use auto-takeoff.
Pull the throttle stick or use auto-landing to land the aircraft.
After landing, push the throttle stick down and hold. The motors stop after three seconds.
Turn off the aircraft and remote controller.
Video Suggestions and Tips
The pre-flight checklist is designed to help you fly safely and to ensure that you can shoot video during flight. Go through the full pre-flight checklist before each flight.
Select the desired gimbal operation mode in DJI Fly.
Use Normal or Cine mode to record video.
DO NOT fly in bad weather conditions such as when it is raining or windy.
Choose the camera settings that best suit your needs.
Perform flight tests to establish flight routes and to preview scenes
Make sure to place the aircraft on a flat and steady surface before takeoff. DO NOT takeoff from yourpalm or while holding the aircraft with your hand


 in DJI Fly or by pressing and holding the RTH button on the remote controller until it beeps. Exit Smart RTH by tapping
  in DJI Fly or by pressing the RTH button on the remote controller.
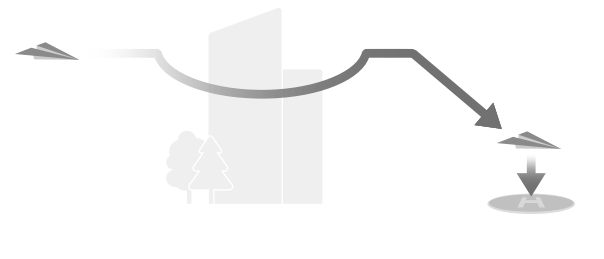


 and select Control and Pair to Aircraft (Link).
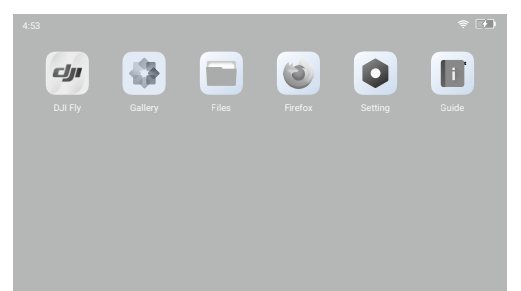


 and select Control and Pair to Aircraft (Link).


 . If conditions are safe for takeoff, press and hold the button to confirm.
 . If conditions are safe to land, press and hold the button to confirm.