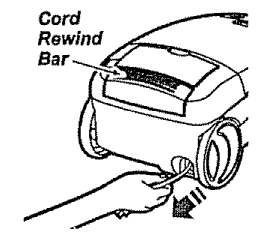
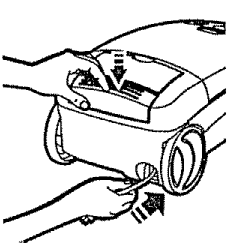
1. Pull cord out of canister to desired length, The cord will not rewind until the cord rewind bar is pushed°
NOTE: To reduce the risk of electric shock, this vacuum cleaner has a polarized plug; one blade is wider than the other. This plug will fit in a polarized outlet only one way. if the plug does not fit fully in the outlet, reverse the plug. If it still does not fit, contact a qualified electrician to install the proper outlet. Do not change the plug in any way.
2. Plug the polarized power cord into a 120 Volt outlet located near the floor
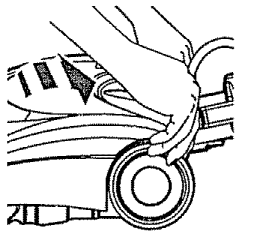
To rewind: Unplug the cleaner. Hold the plug while rewinding to prevent damage or injury from the moving cord° Push cord rewind bar.
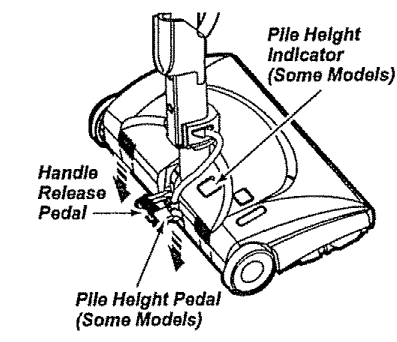
3. Lower wand from upright position by pressing on the handle release pedal,,
4. Select a pile height setting by pressing the small pedal on the rear of the PowerMate®° The pile height setting shows on the indicator. See SUGGESTED PILE HEIGHT SETTINGS_
Attention: Refer to your carpet manufacturers cleaning recommendations. Some more delicate carpets may require that they be vacuumed with the Power-Mate ® agitator turned off, to prevent carpet damage.
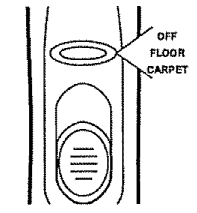
5. Select a switch position on the handle°
OFF
FLOOR - turns on the canister motor only.
CARPET - turns on both the canister and the Power-Mate ® motors
NOTE - When this switch is in the FLOOR position, the headlight and dirt sensor (some models) DO NOT function since no electricity flows to the Power-Mate ®.
PERFORMANCE FEATURES
EDGE CLEANER
Active brush edge cleaners are on both sides of the PowerMate®° Guide either side of the PowerMate ® along baseboards or next to furniture to help remove dirt trapped at carpet edges.
OVERLOAD PROTECTOR
The Power-Mate s has built-in protection against motor and belt damage should the agitator jam° If the agitator slows down or stops, the overload protector shuts off the Power-Mate ®. The canister motor will continue to run.
To correct problem: Turn off vacuum, remove obstruction, then press reset button.
To reset: Push in the overload protector button
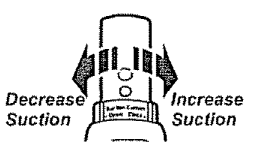
SUCTION CONTROL
The suction control allows you to change the vacuum suction for different fabric and carpet weights. Opening the control decreases suction for draperies and Iightweight rugs, while closing the control increases suction for upholsteries and carpets
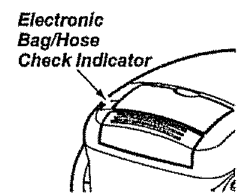
ELECTRONIC BAG/HOSE CHECK INDICATOR SOME MODELS
The light comes on whenever the airflow becomes blocked, dust bag needs changing or canister safety filter needs cleaning.
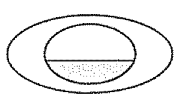
MECHANICAL BAG/HOSE CHECK INDICATOR SOME MODELS
When the unit is running, the indicator window will be green if there are no clogs. When the indicator turns completely red there is a need to check the dust bag for being full or the other areas that may be clogged, See HOW YOUR VACUUM WORKS.
NOTE: Red may appear when using attachments or when cleaning new carpet, due to reduced airflow by the attachments themselves or new carpet fuzz filling the bag quickly.
THERMAL PROTECTOR
This vacuum has a thermal protector which automatically trips to protect the vacuum from overheating. The thermal protector turns the motor off automatically to allow the motor to cool in order to prevent possible damage to the vacuum.
To reset: Turn off and unplug the vacuum from the outlet to allow the vacuum to coolo Check for and remove any clogs. Also check and replace any clogged filters. Wait approximately 50 minutes and plug the vacuum in and turn back on to see if the thermal protector has reset. In some cases, the unit may suddenly restart, DO NOT leave unattended.
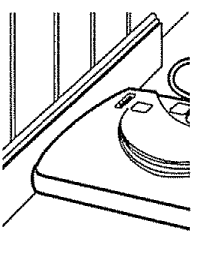
POWER-MATE STORAGE SOME MODELS
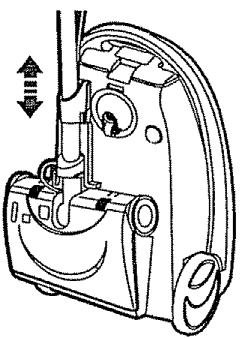
The lower wand has a "U" shaped flange in the area where the power cord attaches_ The base has a "U" shaped slot near the front caster.
The flange allows the wands and PowerMate®to be stored with the canister to conserve storage space. The canister must be stored on end for this feature to be used
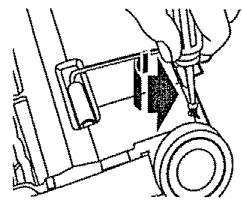
The wand will slip out of the slot as it is lifted up for use and will slide into the slot as it is lowered for storage
The Power-Mate ® must be in the flat position as shown in the illustration, Use the handle release pedal to place it in this position.
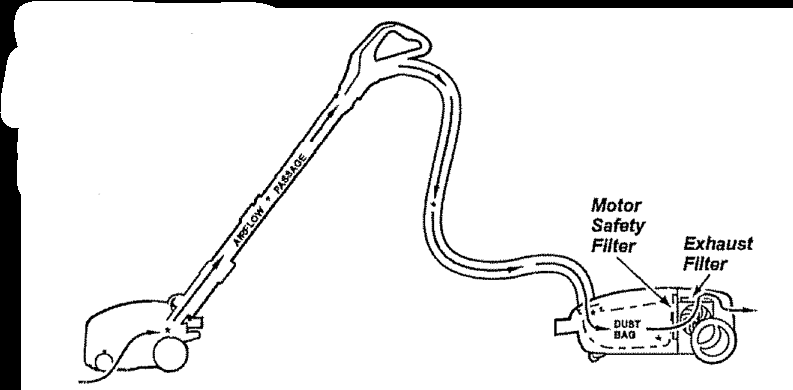
HOW YOUR VACUUM WORK
The vacuum cleaner creates suction that picks up dirt. Rapidly moving air carries the dirt to the dustbag through the airflow passages. The dust bag lets the air pass through, while it traps the dirty
For passage best cleaning open. Check results, the keep starred the areas occasionally for clogs. Unplug from outlet before checking
CANISTER CARE
BAG CHANGING
For best cleaning results, the dust bag should be changed often.. The electronic/ mechanical bag/hose check indicator will come on when the bag needs to be changed or the airflow is blocked. NOTE: See PARTS AND FEATURES for Bag Number.
1. Unplug cord from wall outlet.
2. Remove hose from canister,
3. Pull hood release out and up, then lift canister hood.
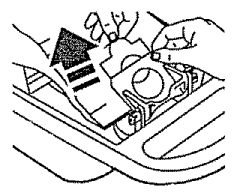
4, Disengage cardboard tab from red bag mount by pulling away and lifting up.
5, Pull bag out of the red bag mount
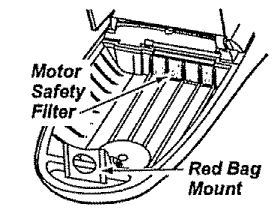
6. Check and replace, if necessary, the motor safety filter
7. The red bag mount will flip forward after removing bag. This will prevent the lid from closing until a new bag is installed°
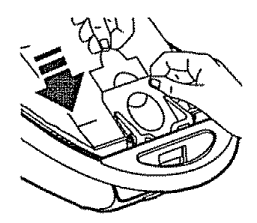
8. Rotate red bag mount down and install bag into slots per instructions pushing down until the cardboard tab locks into position and the holes align. Tuck the bag securely into the bag cavity so that none of it is able to be pinched by the hood.
9. Close and latch canister hood.
10. Reinstall hose.
11. Plug cord into wall outlet.
CLEANING EXTERIOR AND ATTACHMENTS
Unplug cord from wall outlet, DO NOT drip water on cleaner.
Clean exterior using a clean, soft cloth that has been dipped in a solution of mild liquid detergent and water, then wrung dry. Wipe dry after cleaning.
To reduce static electricity and dust buildup, wipe outer surface of cleaner and attachments.
MOTOR SAFETY FILTER CHANGING
Check motor safety filter occasionally and change when dirty.
Remove the bag as outlined in the BAG CHANGING section.
MOTOR SAFETY FILTER ELECTROSTATIC
This white and grey filter must be replaced when dirty° It should be replaced regularly depending on use conditions. The filter CANNOT be washed as it will lose its dust trapping ability
NOTE: Use motor safety filter #20-86883. In Canada, #20-86883C
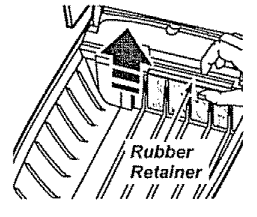
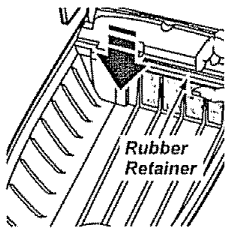
1. Lift the rubber retainer and pull out motor safety filter as shown.
2. Replace the filter, white side out, by sliding it back into place under the ribs in the bag cavity. Tuck filter in so that it fits completely under the rubber retainer.
3, Replace the bag as outlined in the BAG CHANGING section.
EXHAUST FILTER CHANGING
EXHAUST FILTER HEPA
The exhaust filter cartridge must be replaced when dirty. Replace the filter when the entire surface area is covered evenly. The filter CANNOT be washed as it will lose its dust trapping ability.
NOTE: Use exhaust filter #20-86882° In Canada, #20-86882C.
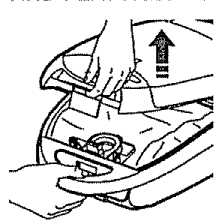
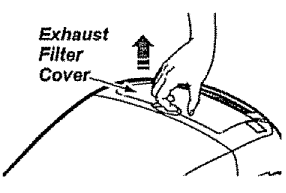
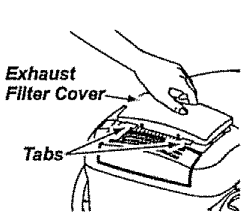
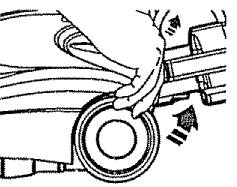
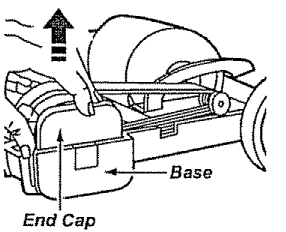
1. Pull up on the exhaust filter cover to remove from the motor cover and lay aside
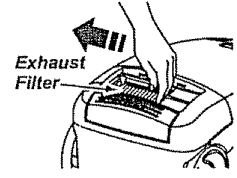
2. Slightly push the exhaust filter cartridge to the side, as shown in the illustration, and pull up to remove.
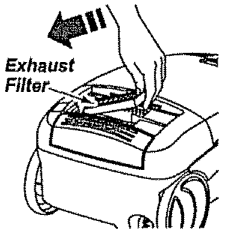
3. Replace the exhaust filter cartridge, carefully positioning it so that the side shown in the illustration goes down under the ribs,, Then push the other side down until it snaps into place. Place the new filter into the motor cover with the grey edge down.
4. Replace the exhaust filter cover by engaging the two tabs on the rear and pushing down in front until it snaps closed.
Power-Mate CARE
Always follow all safety precautions when cleaning and servicing the Power-Mate ®
BELT CHANGING AND AGITATOR CLEANING
TO CLEAN AGITATOR:
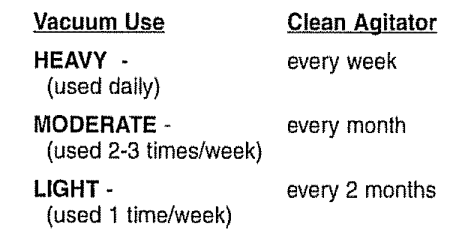
NOTE: In order to keep cleaning efficiency high and to prevent damage to your vacuum, the agitator must be cleaned every time the belt is changed
The agitator must also be cleaned according to the following schedule:
Remove any dirt or debris tn the belt path area or in the brush roller area.
Carefully remove any string or debris located on the agitator, end caps, washers or agitator shaft.
TO REMOVE BELT
1. Turn PowerMate e upside down
2. Unscrew the two (2) PowerMate ® cover screws,
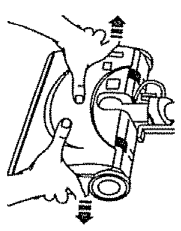
3. Turn PowerMate ® right side up. Press handle release pedal and lower the swivel Lift rear latches up.
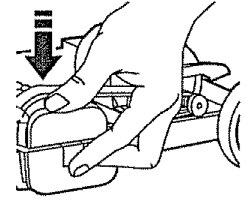
4. To remove cover, grasp the sides and pull out.
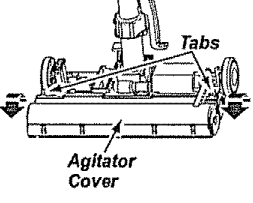
5. Depress tabs on rear of agitator cover and rotate forward to release from the PowerMate ® baser
6. Lift agitator assembly out and remove worn belt.
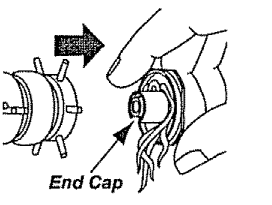
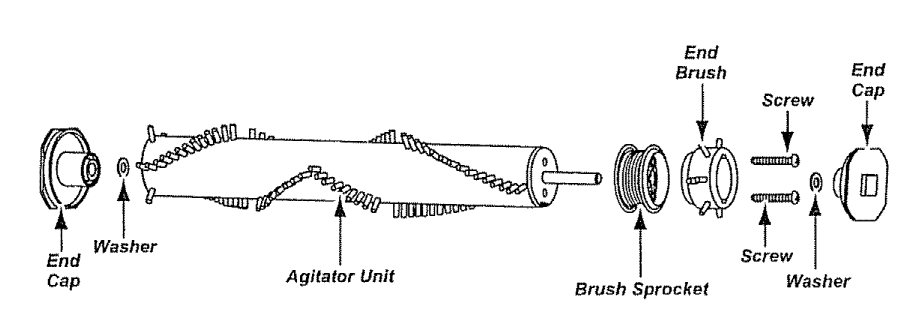
7. Slide end caps off to check and clean end cap areas. See AGITATOR ASSEMBLY for picture of complete agitator assembly.
TO REPLACE BELT
1. Slide washers and end caps onto agitator assembly.
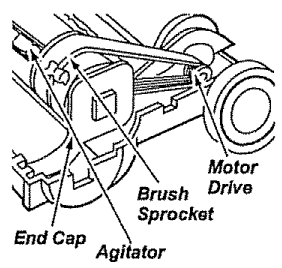
2. Install new belt over motor drive, then over brush sprocket.
3. Place agitator assembly back into Power-Mate ®
4. Reinstall agitator cover by lining up the front tabs and slots and rotating downward until the latches snap into place.
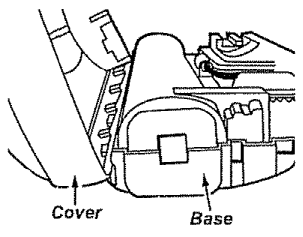
5. Line up front of cover and base. Rest cover on front edge of base as shown,
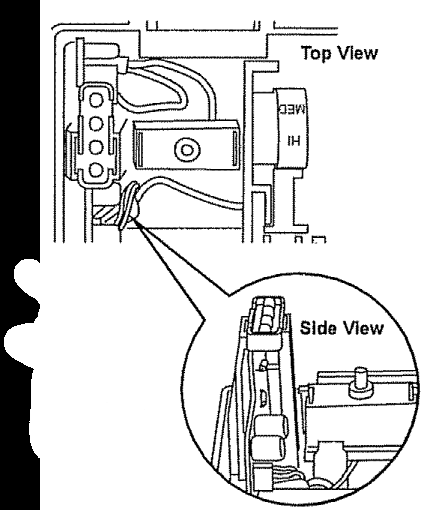
6. NOTE: On dirt sensor models be sure that the board is upright and the wires are tucked back as shown,
7. Rotate cover back, Press cover firmly until side and rear tabs snap into place. Turn Power-Mate ® upside down and replace two (2) cover screws_
LIGHT BULB CHANGING
1. Remove Power-Mate ® cover as shown in BELT CHANGING AND AGITATOR CLEANING section.
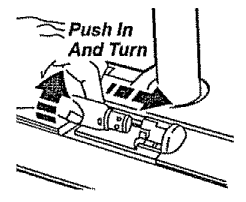
2. Push in and turn bulb counterclockwise, then pull out to remove,
3. Push in and turn bulb clockwise, to replacer Bulb must not be higher than 15 Watts(130 Volts).
4. Reinstall Power-Mate e cover as shown in BELT CHANGING AND AGITATOR CLEANING section.
AGITATOR SERVICING
TO CHECK AGITATOR ASSEMBLY
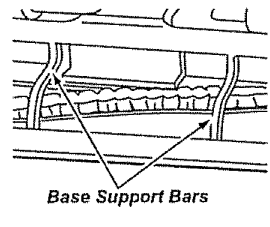
When brushes are worn to the level of the base support bars, replace the agitator assembly
TO REPLACE AGITATOR ASSEMBLY
Remove Power-Mate ® cover, agitator cover, belt and agitator assembly. See "To Remove Belt" in BELT CHANGING AND AGITATOR CLEANING.
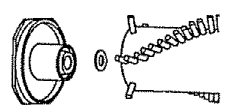
Remove end caps, washers, screws, end brush, and brush sprocket pieces from ends of old agitator assembly
Reassemble agitator assembly. To line up screw holes in dowel, sprocket and end brush, be sure all of the brush sprocket pieces align propedyo See AGITATOR ASSEMBLY.
Reinstall belt, agitator assembly, agitator cover and Power-Mate ® cover° See "To replace belt" in BELT CHANGING AND AGITATOR CLEANING
AGITATOR ASSEMBLY
TROUBLESHOOTING
PROBLEM
POSSIBLE CAUSE
POSSIBLE SOLUTION
Cleaner won't start.
1. Unplugged at wall outlet.
2. Tripped circuit breaker/blown fuse at household service panelto
3. Loose hose electrical connection.
1, Plug in firmly, push ON/OFF switch lo ON
2, Reset circuit breaker or replace fuse
3, Reconnect hose ends, (page 7).
Poor job of dirt pick-up.
1. Full of clogged dust bag
2. Clogged airflow passages
3. Dirty fillers .
4. Wrong pile height setting
5. Open suction control.
6. Hole in hose
7. Worn Power-Mate® agitator
8. Worn or broken belt
9, Dirty agitator or end caps
10. Canister hood open.
1. Change bag, (page 14)
2. Clear airflow passages, (page 14)
3. Change filters, (page 15-16)
4. Adjust setting, (page 9).
5. Adjust control, (page 12)
6. Replace hosa
7. Change agitator, (page 19).
8 & 9. See BELT CHANGING AND AGITATOR CLEANING, (pages 17-1B)
2. Remove any items that may be caught or jammed, then reset I! cleaner starts and slops again, clean agiialor and end caps, then reset, (pages 12,17-1B)
3. Turn off and unplug Ihe vacuum from outlet and wait approximately 5D minutes and plug ihe vacuum In, turn back on lo see if the protector has reset, (page 13} Change dust bag, ciaar airflow blockage, (page 12}
Power-Mate* will not run when attached.
1. Power-Mate® connections unplugged
2. Worn or broken belt
3. Dirty agitator or and caps
4. Tripped overload protector in Power-Mate®
5. Switch not in CARPET position.
1. Plug in firmly, (page 6)
2 & 3. Sea BELT CHANGING AND AGITATOR CLEANING, (pages 17-18)
4. Check agitator area for excessive lint build-up or jamming. Clean agitator and end caps, then reset, (pages 12.17-18),
5. Move switch to CARPET position, (page 8).
Constant green light sn In dirt sensor.
1. Dirt passage Is clogged
2. Lenses are dirty.
1.Check for clogs in air passages, (page 14)
2, Clean lenses, (page 10)
Any, soma, or all red lights In dirt sensor burn and never turn green.