Documents: Go to download!
- Owner's manual - (English, Spanish)
- PARTS AND FEATURES
- ASSEMBLY INSTRUCTIONS
- USE
- VACUUM TIPS
- DIRT SENSOR
- ATTACHMENTS
- ATTACHMENT USE CHART
- PERFORMANCE FEATURES
- HOW YOUR VACUUM WORKS
- CANISTER CARE
- CLEANING AND ATTACHMENTS
- MOTOR SAFTY FILTER CHANGING
- EXHAUST FILTER CHANGING
- BELT CHANGING AND AGITATOR CLEANING
- LIGHT BULB CHANGING
- TROUBLESHOOTING.
Table of contents
Owners' Guide Vacuum Cleaners
PARTS AND FEATURES
it is important to know you rvacuum cleaner's parts and features to ensure its proper and safe use. Review these before using your cleaner.

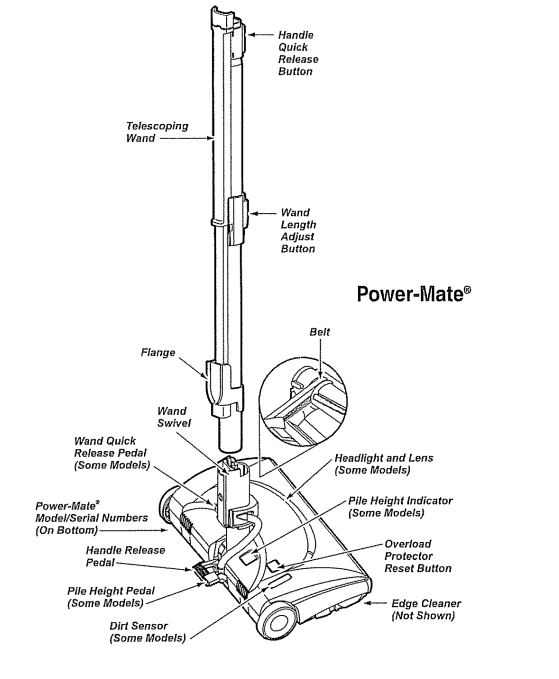
HOSE

ATTACHMENTS
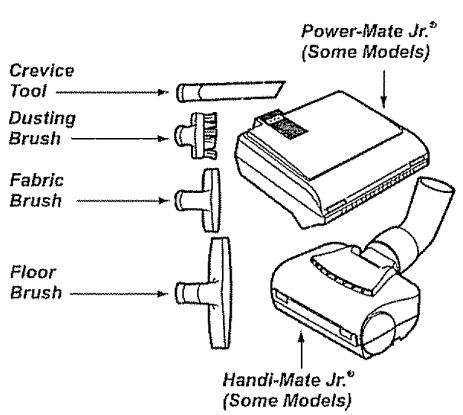
NOTE: All models have one set of attachments in the canister, Some models have an additional set, which can be kept in the accessory bag for garage use or other dirty areas,
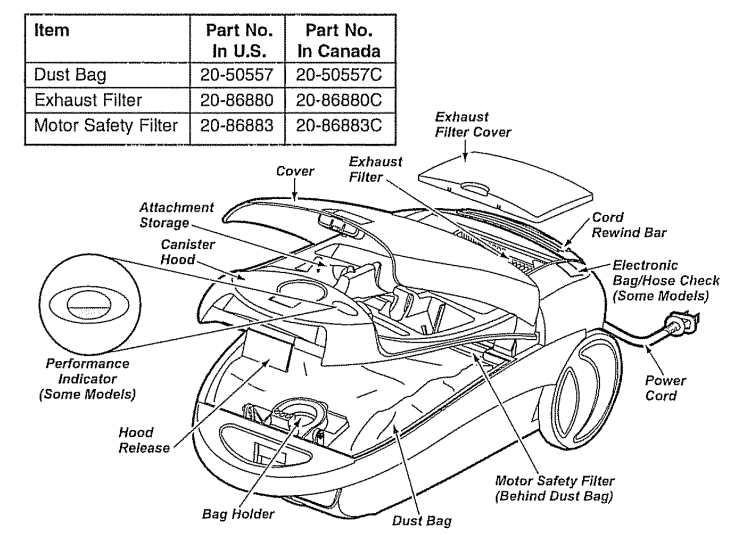
CANISTER
ASSEMBLY INSTRUCTIONS
WARNING: Electrical Shock Hazard DO NOT plug into electrical supply until assembly is complete. Failure to do so could result in electrical shock or injury.
Before assembling vacuum, check the PACKING LIST on the cover of the separate Repair Parts List. Use this list to verify that you have received all the components of your new Kenmore vacuum
WAND -TELESCOPING
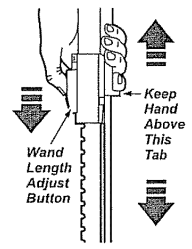
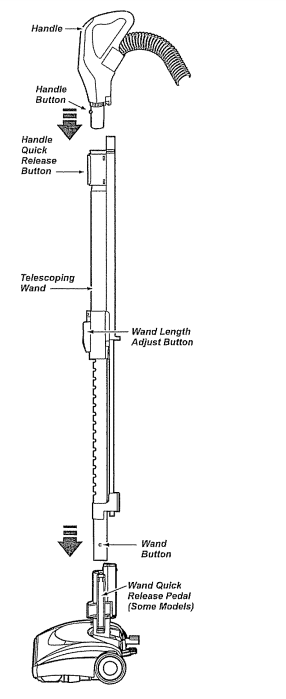
The wand length is adjustable and requires no assembly, To adjust, simply push down on the wand adjust button and slide the upper wand to the desired height.
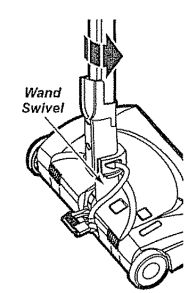
The swivel, located on the PowerMate allows you to turn the handle to the left side to reach farther under low furniture.
When adjusting the wand length you may have to hold the PowerMate ® with your hand or foot.
POWER-MATE ®
Insert wand into Power-Mate ® until the wand button snaps into place.
CANISTER
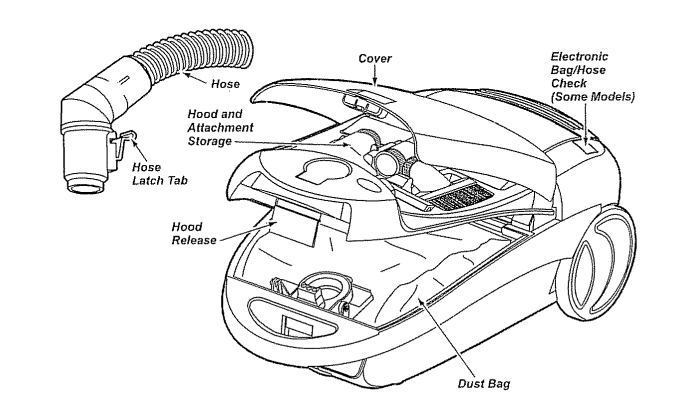
- Open the canister hood.
- Check to see that the dust bag is properly installed, See BAG CHANGING for instructions,
- Check to see that the motor safety filter is properly installed, See MOTOR SAFETY FILTER CLEANING for instructions.
HOOD AND COVER
It is normal for the canister hood and cover to come off when opened further than needed, Line up the hinge slots, insert them, and close the hood and!or cover to replace it
CAUTION: Never open canister hood with the cover open. This will help to prevent damage from occurring to the canister hood andlor cover.
HOSE
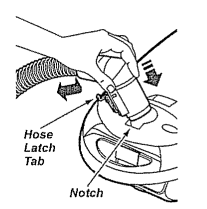
- Line up the hose latch tab and notch in canister hood and insert hose into canister until it snaps in placer
To remove: Lift hose latch tab upward and pull up on hose.
- Insert handle into wand until lock button snaps in place, Be sure hose is not twisted.
To remove: Press handle quick release button and pull up on handler
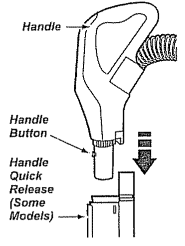
To store: Disconnect hose from wands and canister to prevent stress on hose during storage, Store hose in a loosely coiled position so the hose covering is not stressed.
USE
HOW TO START
WARNING:
Personal Injury and Product Damage Hazard
- DO NOT plug in if switch is in ON position. Personal injury or damage could result.
- The cord moves rapidly when rewinding. Keep children away and provide a clear path when rewinding the cord to prevent personal injury.
- DO NOT use outlets above counters. Damage from cord to items in surrounding area could occur.
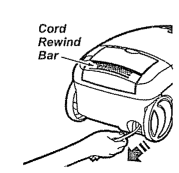
- Pull cord out of canister to desired length. The cord will not rewind until the cord rewind bar is pushed.
See other models: 79048733900 25377110510 40185042010 58715253402 59673003510
NOTE: To reduce the risk of electric shock, this vacuum cleaner has a polarized plug, one blade is wider than the other. This plug will fit in a polarized outlet only one way. If the plug does not fit fully in the outlet, reverse the plug, If it still does not fit, contact a qualified electrician to install the proper outlet Do not change the plug in any way. - Plug the polarized power cord into a 120 Volt outlet located near the floor.
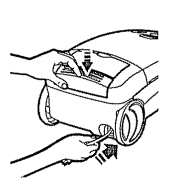
To rewind: Unplug the cleaner. Hold the plug while rewinding to prevent damage or injury from the moving cord. Push cord rewind bar
- Lower wand from upright position by pressing on the handle release pedal
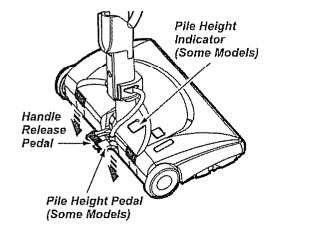
CAUTION:
DO NOT leave the Power-Mate running in one spot in the upright position for any length of time. Damage to carpet may occur - Select a pile height setting by pressing the small pedal on the rear of the PowerMate ®.The pile height setting shows on the indicator. See SUGGESTED PILE HEIGHT SETTINGS
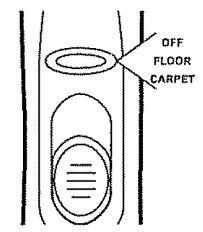
Attention: Refer to your carpet manufacturers cleaning recommendations. Some more delicate carpets may require that they be vacuumed with the Power-Mate ® agitator turned off, to prevent carpet damage. - Select a switch position on the handle,
OFF
FLOOR - turns on the canister motor only
CARPET - turns on both the canister and the Power-Mate ® motors.
NOTE -When this switch is in the FLOOR position, the headlight and dirt sensor (some models) DO NOT function since no electricity flows to the Power-Mate®.
VACUUM TIPS
Suggested sweeping pattern.
For best cleaning action, the Power-Mate ® should be pushed straight away from you and pulled straight back° At the end of each pull stroke, the direction of the Power-Mate ® should be changed to point into the next section to be cleaned. This pattern should be continued across the rug with slow, gliding motions.
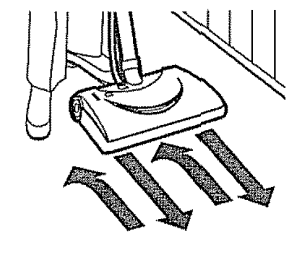
NOTE: Fast, jerky strokes do not provide complete cleaning.
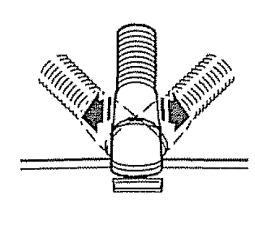
The hose swivel allows the hose to turn without moving the canister This is helpful for cleaning in small areas Check hose for twisting before pulling canister.
CAUTION:
Product Damage Hazard
Use care if the Power-Mate ® and wand is left in the upright position as it may tip over easily, Property damage can occur if tipped.
WARNING:
Personal Injury and Product Damage Hazard
- DO NOT run over power cord with Power-Mate ®. Personal injury or damage could result
- DO NOT pull plug from wall by the power cord. If there is damage to the cord or plug, personal injury or property damage could result
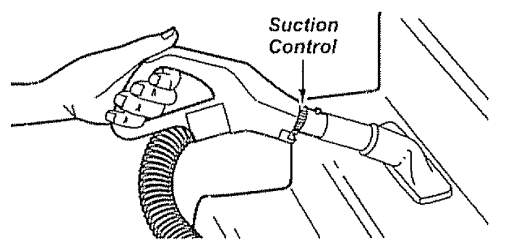
Carpeted stairs need to be vacuumed regularly. For best cleaning results, fully close the suction control.
WARNING:
Personal Injury Hazard
Use care if canister is placed on stairs. If it falls, personal injury or property damage could result.
For best cleaning results, keep the airflow passage open. Check each assembly area in HOW YOUR VACUUM WORKS occasionally for clogs Unplug from outlet before checking.
DIRT SENSOR
SOME MODELS
The dirt sensor light system is mounted on the Power-Mate s nozzle near the reset button. It consists of a series of three red lights and one green light
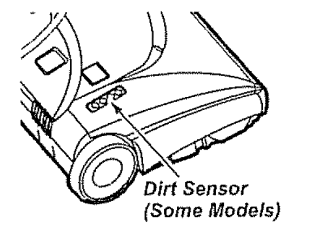
The lights give you an indication of the amount of dirt particles that are passing thru the sensor n its way to the dust bag
INITIAL START UP
When the Power-Mate ® is first started, the following light sequences occurs in a two second time frame:
- All three reds come on.
- Two reds are on
- One red is on
- One green is on and will remain on until the Power-Mate ® nozzle is placed in use.
NOTE: If the nozzle is on a surface that has dirt on it, dirt will be picked up by the vacuum and one or more red lights might stay on
IN OPERATION
When the Power-Mate s is being moved back and forth on the floor, the lights will change from one configuration to another as more dirt or less dirt is being vacuumed. As long as one or more red lights are on, dirt is passing through the wand to indicate that the surface still needs cleaning
When the green light stays on as the PowerMate ® is moved back and forth over an area, the sensor is not seeing enough dirt to warranty further cleaning of that area.
NOTE: Dirt sensor lights DO NOT function in the FLOOR setting
CLEANING LENS
Although the dirt sensor feature in your Kenmore Power-Mate s is designed for years of trouble free use, the passage of dirt through the air passage system can coat the lens causing the green light to come on and stay on - never switching to red. When this happens the lens must be cleaned.
TO CLEAN THE LENSES
- Remove the wands by pressing the quick release pedal and lifting up on the wands.
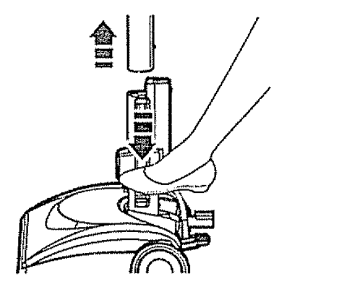
- As indicated by the illustration, the two dirt sensor elements are located on the inside of the swivel, approximately 3Y2 inches/90 mm down, (note the arrows). Each element should be cleaned periodically. To reach the sensor elements, use a small brush such as a bottle brush. Brush each sensor element several times to remove dust and dirt.
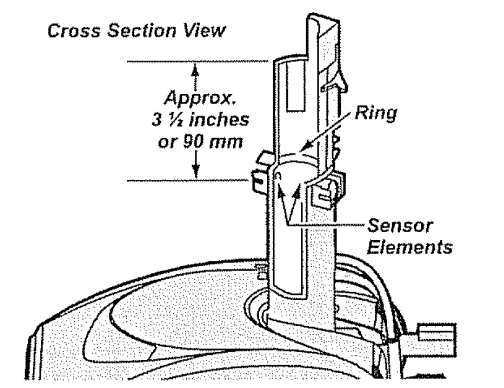
NOTE: Looking down inside the swivel you will see a ring. The sensor elements are located just slightly below this ring - Reinstall the wands after cleaning the sensors
CAUTION
Never use water or any cleaning solution when cleaning the lenses. The residue of the water or cleaners will accelerate the recoating of the lenses and make cleaning necessary sooner
ATTACHMENTS
CAUTION
DO NOT attach or remove handle or wands while cleaner is ON. This could cause sparking and damage the electrical contacts.
ATTACHMENTS ON HANDLE
NOTE: If the Power-Mate _ is attached, turn cleaner off before removing handle from wands.
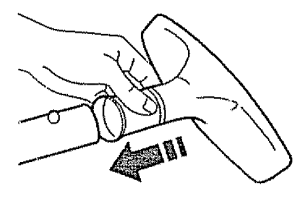
- Press lock button, then pull to remove handle from wand.
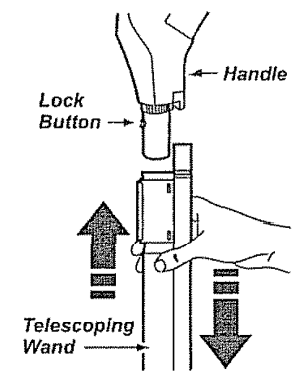
If your model has the optional feature of a press it in similarly. - Slide attachments firmly on handle as needed,See ATTACHMENT USE.
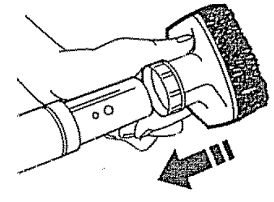
ATTACHMENTS ON WANDS SOME MODELS
- To remove wands from Power-Mate ° , lock wands in straight-up position
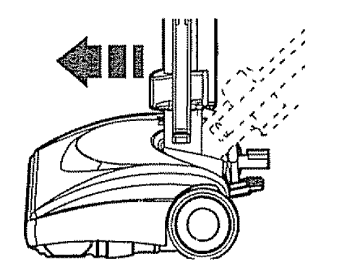
- Press wand quick release pedal with foot and pull the wands straight up out of Power-Mate
The Power-Mate plug and cord do not have to be removed to use attachments on the wands
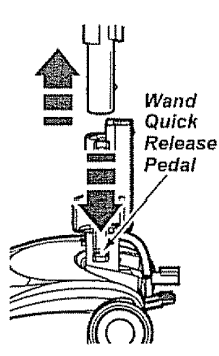
- Put attach-ments on wands as needed, See ATTACHMENT USE
ATTACHMENT USE CHART
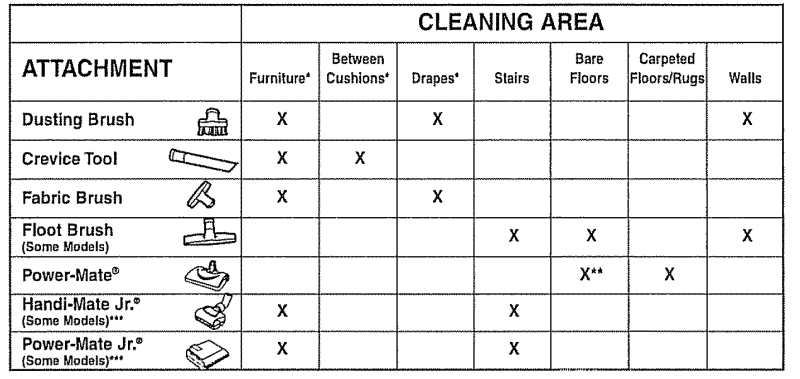
*Always clean attachments before using on fabrics. ** 3-way On/Off switch should be in FLOOR position.
*** Handi-Mate Jr and Power-Mate Jr attachment instructions are included with the products,
NOTE: When separating wands depress Iock button completely before pulling wands apart. If wand lock button is difficult to push the two wands more tightly together to line up the LOCK button with the hole. Depress LOCK button and then pull wanes apart.
PERFORMANCE FEATURES
EDGE CLEANER
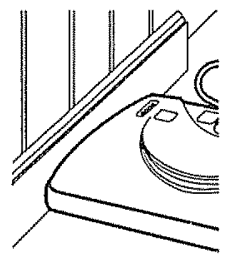
Active brush edge cleaners are on both sides of the Power° Mate . Guide either side of the PowerMate along baseboards or next to furniture to hetp remove dirt trapped at carpet edges.
OVERLOAD PROTECTOR
The Power-Mate has built-In protection against motor and belt damage should the agitator jam. if the agitator slows down or stops, the overload protector shuts off the Power-Mate ®. The canister motor will continue to run.
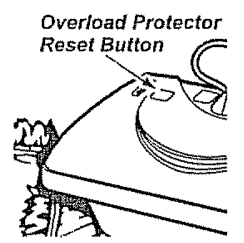
To correct problem: Turn off vacuum, remove obstruction, then press reset button
To reset: Push in the overload protector button.
SUCTION CONTROL
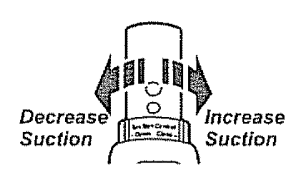
The suction control allows you to change the vacuum suction for different fabric and carpet weights. Opening the control decreases suction for draperies and lightweight rugs, while closing the control increases suction for upholsteries and carpets.
WARNING: Personal InjuryHazard Always unplug the vacuum cleaner before cleaning the agitator area as brush may suddenly restart. Failure to do so can result in personal injury.
ELECTRONIC BAG/HOSE CHECK INDICATOR SOME MODELS
The light comes on whenever the airflow becomes blocked, dust bag needs changing or canister safety filter needs cleaning.
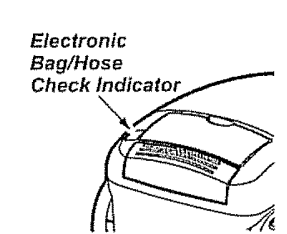
NOTE: The light may come on when using certain attachments, due to reduced airflow through attachment
In some cases, when vacuuming loose fibers, like new carpet lint, the bag may be full and the light may not come on.
In some cases, when vacuuming fine materials such as powder, soot, plaster dust, carpet freshener, the bag may not appear full but the light does come on.
Refer to TROUBLESHOOTING.
MECHANICAL BAG/HOSE CHECK INDICATOR SOME MODELS
When the unit is running, the indicator window will be green if there are no clogs. When the indicator turns completely red there is a need to check the dust bag for being full or the other areas that may be clogged. See HOW YOUR VACUUM WORKS.
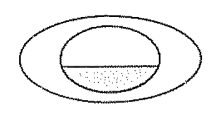
NOTE: Red may appear when using attachments or when cleaning new carpet, due to reduced airflow by the attachments themselves or new carpet fuzz filling the bag quickly.
THERMAL PROTECTOR
This vacuum has a thermal protector which automatically trips to protect the vacuum from overheating. The thermal protector turns the motor off automatically to allow the motor to cool in order to prevent possibie damage to the vacuum.
To reset: Turn off and unplug the vacuum from the outlet to allow the vacuum to cool. Check for and remove any clogs. Also check and replace any clogged filters, Wait approximately 50 minutes and plug the vacuum in and turn back on to see if the thermal protector has reset. In some cases, the unit may suddenly restart. DO NOT leave unattended.
POWER-MATE STORAGE SOME MODELS
The lower wand has a "U" shaped flange in the area where the power cord attaches, The base has a "U" shaped slot near the front caster°
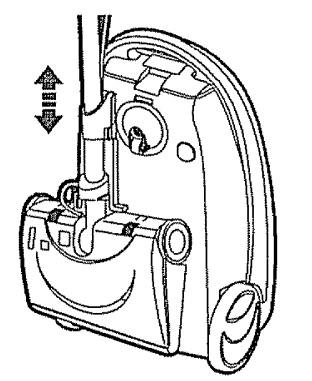
The slot allows the wands and Power-Mate to be stored with the canister to conserve storage space. The canister must be stored on end for this feature to be used,
The wand will slip out of the slot as it is lifted up for use and will slide into the slot as it is lowered for storage
The Power-Mate ® must be in the flat position as shown in the illustration. Use the handle release pedal to place it in this position.
NOTE: You may save space by lowering the telescoping wand as shown in the ASSEMBLY section.
CAUTION
To prevent tip over, never leave Power-Mate on or in the upright position with the wand fully extended. Moving the wand to a lower position and turning the handle to one side will make the Power-Mate more stable and less likely to tip over
HOW YOUR VACUUM WORKS
The vacuum cleaner creates suction that picks up dirL Rapidly moving air carries the dirt to the dust bag through the airflow passages. The dust bag lets the air pass through, while it traps the dirt.
For best cleaning results, keep the airflow passage open. Check the starred areas occasionally for clogs. Unplug from outlet before checking.

CANISTER CARE
BAG CHANGING
For best cleaning results, the dust bag should be changed often. The electronic mechanical bag/hose check indicator will come on when the bag needs to be changed or the airflow is blocked° NOTE: See PARTS AND FEATURES for Bag Number.
- Unplug cord from wall outlet.
- Remove hose from canister.
- Pull hood release out and up, then lift canister hood
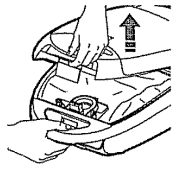
- Disengage cardboard tab from red bag mount by pulling away and lifting up
- Pull bag out of the red bag mount.
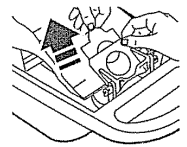
- Check and replace, if necessary, the motor safety filter
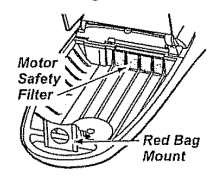
- The red bag mount will flip forward after removing bag. This will prevent the lid from closing until a new bag is installed.
- Rotate red bag mount down and install bag into slots per instructions pushing down until the cardboard tab locks into position and the holes align, Tuck the bag securely into the bag cavity so that none of it is able to be pinched by the hood,
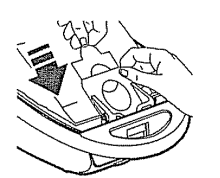
- Close and latch canister hood.
- Reinstall hose.
- Plug cord into wall outlet.
CAUTION:
NEVER REUSE A DUST BAG. Very fine materials, such as carpet freshener, face powder, fine dust, plaster, soot, new carpet lint, etc. can clog the bag and cause it to burst before it is full and may cause damage to vacuum motor. Change bag more often when vacuuming these materials.
CLEANING AND ATTACHMENTS
- Unplug cord from wall outlet. DO NOT drip water on cleaner
- Clean exterior using a clean, soft cloth that has been dipped in a solution of mild liquid detergent and water, then wrung dry. Wipe dry after cleaning°
- To reduce static electricity and dust buildup, wipe outer surface of cleaner and attachments.
CAUTION: Do not use attachments if they are wet. Attachments used in dirty areas, such as under a refrigerator, should not be used on other surfaces until they are washed. They could leave marks.
MOTOR SAFTY FILTER CHANGING
Check motor safety filter occasionally and change when dirty.
WARNING: Electrical Shock lazard Unplug power cord from electrical outlet. Do not operate the cleaner without the motor safety filter. Be sure the filter is dry and properly installed to prevent motor failure and/or electrical shock.
Remove the bag as outlined in the BAG CHANGING section.
MOTOR SAFETY FILTER ELECTROSTATIC
This white and grey filter must be replaced when dirty, it should be replaced regularly depending on use conditions. The filter CANNOT be washed as it will lose its dust trapping ability,
NOTE: Use motor safety filter #20-86883_ In Canada, #20-86883C.
- Lift the rubber retainer and pull out motor safety filter as shown.
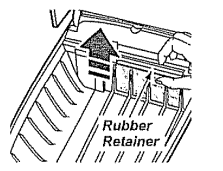
- Replace the filter, white side out, by sliding it back into place under the ribs in the bag cavity. Tuck filter in so that it fits completely under the rubber retainer.
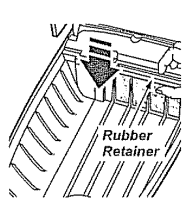
- Replace the bag as outlined in the BAG CHANGING section.
CAUTION : NEVER REUSE A DUST BAG. Very fine materials, such as carpet freshener, face powder, fine dust, plaster, soot, new carpet lint, etc. can clog the bag and cause it to burst before it is full. Change bag more often when vacuuming these materials
EXHAUST FILTER CHANGING
WARNING:
Fire andlor Electrical Shock Hazard
Do not operate with a clogged exhaust filter or without the exhaust filter or exhaust filter cover installed.
EXHAUST FILTER HEPA
The exhaust filter cartridge must be replaced when dirty. Replace the filter when the entire surface area is covered evenly. The filter CANNOT be washed as it will lose its dust trapping ability.
NOTE: Use exhaust filter #20-86880. tn Canada, #20-86880C.
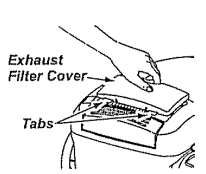
- Pull up on the exhaust filter cover to remove from the motor cover and lay aside
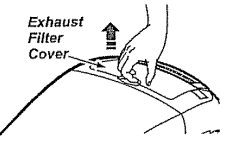
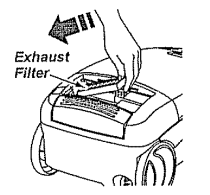
- Slightly push the exhaust filter cartridge to the side, as shown in the illustration, and pull up to remove.
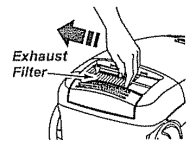
- Replace the exhaust filter cartridge, carefully positioning it so that the side shown in the illustration goes down under the ribs. Then push the other side down until it snaps into place. Place the new filter into the motor cover with the grey edge down.
- Replace the exhaust filter cover by engaging the two tabs on the rear and pushing down in front until it snaps closed
BELT CHANGING AND AGITATOR CLEANING
CAUTION:
When you remove the end caps, a small metal washer on each end may come off.DO NOT lose these two metal washers.
TO CLEAN AGITATOR
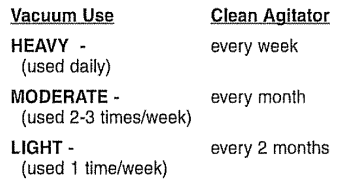
NOTE: In order to keep cleaning efficiency high and to prevent damage to your vacuum, the agitator must be cleaned every time the belt is changed.
The agitator must also be cleaned according to the following schedule:
Remove any dirt or debris in the belt path area or in the brush roller area.
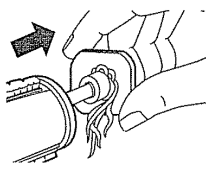
Carefully remove any string or debris located on the agitator, end caps, washers or agitator shall
IMPORTANT
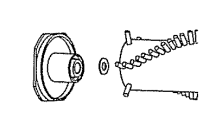
Replace the washers and the end caps. See the exploded view for correct assembly
Disconnect cleaner from electrical outlet.
Check and remove hair, string and lint buildup frequently in the Power-Mate ® agitator and end cap areas. If build-up becomes ® excessive, disconnect Power-Mate from wand and follow the steps below.
TO REMOVE BELT
- Turn PowerMate upside down,
- Unscrew the two (2) PowerMate ® cover screws.
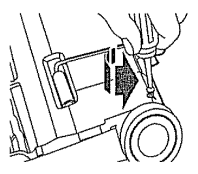
- TURN PowerMate ® right side up. Press handle release pedal and lower the swivel. Lift rear latches up.
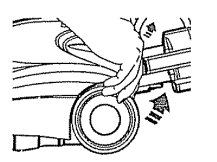
- To remove cover, grasp the sides and pull out
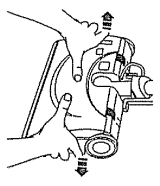
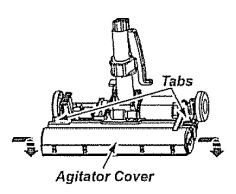
- Depress tabs on rear of agitator cover and rotate forward to release from the Power-Mate ® base.
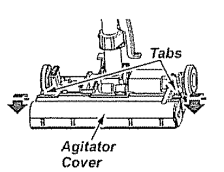
- Lift agitator assembly out and remove worn belt.
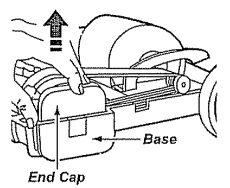
- Slide end caps off to check and clean end cap areas. See AGITATOR ASSEMBLY for picture of complete agitator assembly.
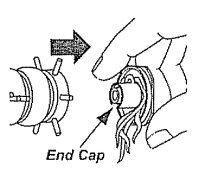
TO REPLACE BELT
- Slide washers and end caps onto agitator assembly.
- install new belt over motor drive, then over brush sprocket.
NOTE: Use belt #20-5201. In Canada, #20-40979
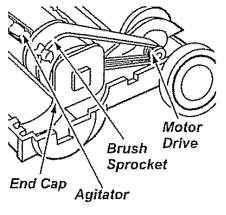
- Place agitator assembly back into Power-Mate
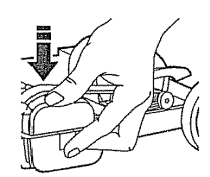
- Reinstall agitator cover by lining up the front tabs and slots and rotating downward € until the latches snap into place
- Line up front of cover and base. Rest cover on front edge of base as shown
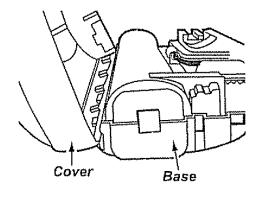
- NOTE: On dirt sensor models be sure that the board is upright and the wires are tucked back as shown

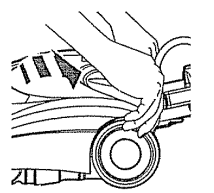
- Rotate cover back. Press cover firmly until side and rear tabs snap into place. Turn Power-Mate ® upside down and replace two (2) cover screws.
LIGHT BULB CHANGING
- Remove Power-Mate ® cover as shown in BELT CHANGING AND AGITATOR CLEANING section.
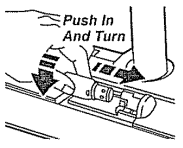
- Push in and turn bulb counterclockwise, then pull out to remove.
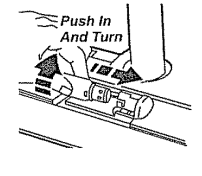
- Push in and turn bulb clockwise, to replace. Bulb must not be higher than 15 Watts(130 Volts)
- Reinstall Power-Mate e cover as shown in BELT CHANGING AND AGITATOR CLEANING section.
NOTE: Use bulb #20-5240. In Canada, #59618
TROUBLESHOOTING.
Review this table to find do-it-yourself solutions for minor performance problems. Any service needed, other than those described in this owner's manual, should be performed by an authorized Sears service representative.
WARNING: Electrical Shock Hazard
Disconnect electrical supply before servicing or cleaning the unit, Failure to do so could result in electrical shock or personal injury.
| PROBLEM | POSSIBLE CAUSES | SOLUTION |
| Cleaner won't start. |
|
|
| Poor Job of dirt pick-up. |
|
|
| Cleaner starts but cuts off. |
|
|
| Power Mate ®will net run when attached |
|
|
| Constant green light on in dirt sensor |
|
|
| Any some,or all red lights in dirt sensor burn and never turn green |
|
|
| No green or red dirt sensor lights |
|
|
| Eleetronlc/Mechanlcal Bag/Hose Check indicator activates |
|
|
| Cleaner picks up moveable rugs or Power.Mate® pushes too hard |
|
|
| Light won't work |
|
|
| Cord won't rewind |
|
|
| Cleaner leaves marks on carpet |
|
|
