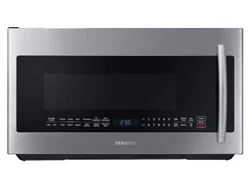
User manual Microwave Oven
Setting up your new microwave oven
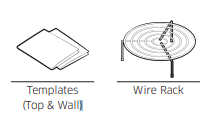
Checking the parts
Carefully unpack your microwave oven, and make sure you’ve received all the parts shown below. If your microwave oven was damaged during shipping, or if you do not have all the parts, contact the Samsung Call Center. (Refer to the WARRANTY AND SERVICE INFORMATION on page 37.)
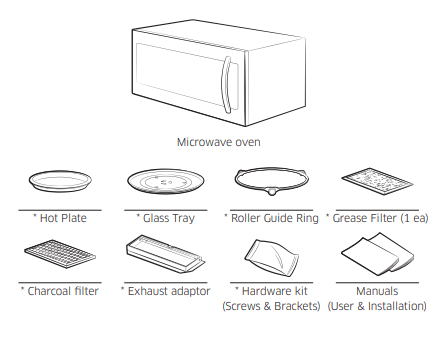
If you need an accessory marked with an * (asterisk), please contact the Samsung Call Center using the phone number listed on the last page of this manual or visit our on-line parts web site at www.samsungparts.com.
Setting up your microwave oven
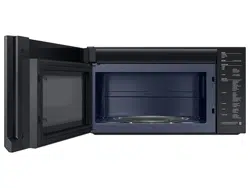
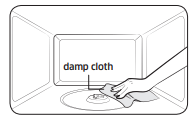
1. Open the door by pulling the handle on the right side of the door.
2. Wipe the inside of the oven with a damp cloth.
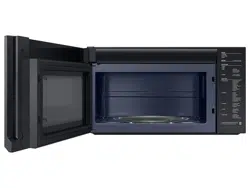
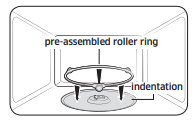
3. Install the pre-assembled ring into the indentation at the center of the microwave oven.
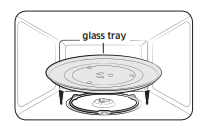
4. Place the glass tray securely in the center of the pre-assembled roller ring.
Installing the metal shelf
When you need to use the Metal Shelf, place it on the plastic hooks inside your oven and make sure it is positioned properly to avoid electrical arcing that can damage your oven.
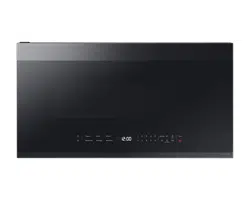
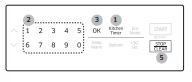
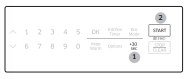
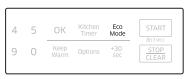
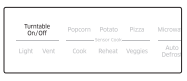
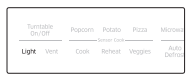
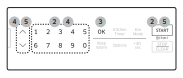
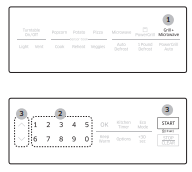
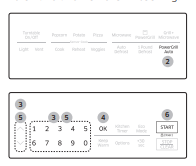
Checking the control panel
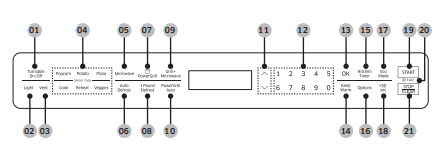
- Turntable On/Off Button
- Light Button (Hi/Low/Off)
- Vent Button (3 Speed & On/Off)
- Sensor Cooking Buttons
- Microwave Button
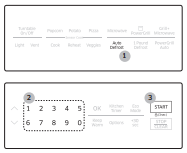
- Auto Defrost Button
- PowerGrill Button
- 1 Pound Defrost Button
- Grill+Microwave Button
- PowerGrill Auto Button
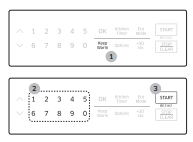
- Up & Down Buttons
- Numeric Buttons
- OK Button
- Keep Warm Button
- Kitchen Timer Button
- Options Button
- Eco Mode Button
- +30 sec Button
- Start Button
- Child Lock Button (Start Button for 3 sec)
- Stop/Clear Button
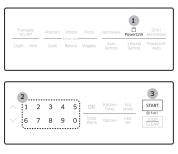
Setting the time
- Press the Options button.
- Press the 9 button.
- Press the OK button.
- Use the numeric buttons to enter the current time. You need to press at least three numbers to set the clock. For example, if the current time is 5:00, press 5, 0, 0. The display will show 5 : 00.
- Press the OK button.
Using my setting feature
- Press the Options button.
- Press one of the numeric buttons to select a function you want to customize.
- Press the OK button.
- Press one of the numeric buttons to select a setting.
- Press the OK button.
The functions, options, and corresponding numeric buttons are listed in the table below. No. F
1. Display Weight
- Weight options are pounds and kilograms.
2. 12 HR/24 HR
- The clock can display in either the 12 HR or 24 HR time mode.
3. Sound
- Sound can be turned On and Off.
4. Remind End Signal
- The Remind End Signal can be turned On and Off.
5. Daylight Savings Time Adjustment
- The time can be advanced one hour for DST without resetting the clock.
- ON (to advance one hour)
- OFF (to go back one hour)
6. Demo Mode
- The Demo Mode can be turned On and Off
7. Filter Remind
- The Filter Remind function can be turned On and Off
8. Word Scroll Speed
- There are three speeds, Slow, Normal, and Fast. The default is Normal speed.
- Slow speed
- Normal speed
- Fast speed
9. Clock
- The clock can be adjusted.
- Press the numeric buttons to enter the current time. (First 2 digits are for hours, last 2 digits are for minutes.)
Using your microwave oven
Using the stop/clear button
The STOP/CLEAR button allows you to clear instructions you have entered. It also allows you to pause the oven’s cooking cycle, so that you can check the food.
- To pause the oven during cooking, press the STOP/CLEAR button once. To restart, press the START button.
- To stop cooking, erase instructions, and return the oven display to the time of day, press the STOP/CLEAR button twice.
- To clear instructions you have just entered, press the STOP/CLEAR button once, and then re-enter the instructions.
- To cancel a timer setting, press the STOP/CLEAR button once.
Using the child lock
- The Child Lock function allows you to lock all buttons except Eco Mode so that the microwave oven cannot be operated by children accidentally. The oven can be locked at any time.
- Activating / Deactivating If you want to activate or deactivate the child lock function, press the START button for 3 seconds. The display will show ‘CHILD LOCK ON’ or ‘CHILD LOCK OFF’ when the oven is locked or unlocked, and then redisplay the time.
Using the kitchen timer
- Press the Kitchen Timer button.
- Use the numeric buttons to set the time you want the timer to run. (Max time 99 minutes, 99 seconds.)
- Press the OK button.
- The display counts down and beeps when the time has elapsed.
- To cancel the timer setting : Press the STOP/CLEAR button once.
Using the microwave +30 sec. feature
- Press the +30 sec button for each additional 30 seconds you want the food to be cooked for. (For example, press the button twice to cook for one minute.)
- Press the START button. NOTE When the oven is operating, if you press the +30 sec button, the cooking time will be increased by 30 seconds.
Using the more/less feature

Use the More or Less feature only after cooking has begun.
- To ADD more time to a cooking procedure, press the More button. Each time you press the More button, the cooking time will be increased by 10 seconSds.
- To REDUCE the time of a cooking procedure, press the Less button. Each time you press the Less button, the cooking time will be decreased by 10 seconds.
Using the eco mode
Eco Mode reduces standby power usage. When you press the Eco Mode button once, the display will go out and the microwave shifts to a mode which minimizes power usage. To cancel the Eco Mode, press the Eco Mode button once again, or press any other button.
Turntable on/off feature
- For best cooking results, leave the turntable 1 on. However, for large dishes it can be turned off.
- Press the Turntable On/Off button to turn the turntable on or off.
- You can use this feature in following modes.
- Microwave, PowerGrill, Grill+Microwave, and Keep Warm Mode
- If the turntable does not rotate for an extended period of time, food may burn.
- Consequently, we recommend that you keep the turntable on when using the PowerGrill or Grill+Microwave mode.
Turning on the light
Press the Light button to turn the cooktop lamp on or off. Press the button once for high, twice for low, and three times to turn the cooktop lamp off.
Turning on the vent

Press the Vent button once for boost fan 1 speed, twice for high fan speed, three times for medium fan speed, and four times for low fan speed. Press the Vent button 5 times to turn the fan off.
- The exhaust fan’s speed will decrease when the oven’s cooking function is activated.
- The Vent Fan protects the microwave from excess heat.
- It automatically turns on if it senses too much heat. If you have turned the fan on, you may find that you cannot turn it off. The fan will automatically turn off when the internal parts are cool. It may stay on for 30 minutes or more after the cooktop and microwave controls are turned off
Using the keep warm feature
- Press the Keep Warm button.
- Enter the warm hold time by pressing the numeric buttons. If you don`t set the time, your oven will maintain the Warm Hold function for 99 minutes.
- Press the START button.
- Keep Warm operates for up to 99 minutes and 99 seconds.
- Grill Heater Warnning – If the grill overheats, an alarm sounds when you open the door. – This alarm notification sounds automatically when the grill overheats. – The display will show : HEATER IS HOT
- The Vent Fan protects the microwave from excess heat. It automatically turns on if it senses the grill overheating. If you have turned the fan on, you may find that you cannot turn it off. The fan will automatically turn off when the internal parts are cool. It may stay on for about 3 minutes.
- Food that is cooked covered should also be covered during Keep Warm.
- Pastry items (pies, turnovers, etc.) should be uncovered during Keep Warm.
- Complete meals kept warm on a dinner plate can be covered during Keep Warm.
Below are the amounts of food we recommend you apply the Warm Hold function to by Food Type.

Using the auto defrost button
To thaw frozen foods, enter the weight of the food, and the microwave automatically sets the defrosting time, power level and standing time. Press the START button to start defrosting.
- Press the Auto Defrost button. The display shows: ENTER WEIGHT.
- Press the numeric buttons to directly enter the weight of the food. (0.1-6.0 lbs. See the table at the beginning of the next page.)
- Press the START button.
- The oven will beep and the display will read TURN THE FOOD OVER during the defrosting process. Open the oven door, and turn the food over.
Follow the instructions below when defrosting different types of food.
1. Roast Beef, Pork
- 2.5-6.0 lbs.
- Start with the food placed fat side down. After each stage, turn the food over and shield any warm portions with narrow strips of aluminum foil. Let stand, covered for 10-20 minutes.
2. Steaks, Chops, Fish
- 0.5-3.0 lbs.
- After each stage, rearrange the food. If there are any warm or thawed portions of food, shield them with narrow, flat pieces of aluminum foil. Remove any pieces of food that are nearly defrosted. Let stand, covered for 5-10 minutes.
3. Ground Meat
- 0.5-3.0 lbs.
- After each stage, remove any pieces of food that are nearly defrosted. Let stand, covered with foil for 5-10 minutes.
4. Whole Chicken
- 2.5-6.0 lbs.
- Remove giblets before freezing poultry. Start defrosting with the breast side down. After the first stage, turn the chicken over and shield any warm portions with narrow strips of aluminum foil. After the second stage, again shield any warm portions with narrow strips of aluminum foil. Let stand, covered for 30-60 minutes in the refrigerator.
5. Chicken Pieces
- 0.5-3.0 lbs.
- After each stage, rearrange or remove any pieces of food that are nearly defrosted. Let stand for 10-20 minutes.
Check the food when you hear the oven signal. After the final stage, small sections may still be icy; let them stand to continue the thawing process. The food is not defrosted until all ice crystals have thawed. Shielding roasts and pieces of steak using small pieces of foil prevents the edges from being cooked before the center of the food has defrosted. Use narrow, flat, smooth strips of aluminum foil to cover edges and thinner sections of the food.
Using the 1 pound defrost button
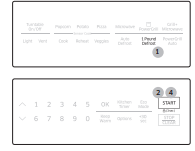
- Press the 1 Pound Defrost button. The display shows: 1.0 LB.
- Press the START button to start defrosting.
- The oven will beep and the display will read TURN THE FOOD OVER during the defrosting process. Open the oven door, and turn the food over.
- If you do not turn the food over when TURN THE FOOD OVER is displayed, the oven will pause until you press the START button.
Using the sensor cooking buttons
- Put the food on the tray.
- Press the category button that corresponds to the food you want to cook.
- Select the Cook Number designated for that food. To select, press the Up/Down buttons or the appropriate numeric button. For example, to reheat a casserole, after selecting Reheat, select 1. See the tables on this page and the following page for details.
- Press the START button. The microwave oven will automatically operate for the preprogrammed time.

Popcorn
Popcorn: 3.0~3.5 oz. 1 package
- Cook only one microwave popcorn bag at a time. Be careful when removing the heated bag from the oven and opening it. Let the oven cool for at least 5 minutes before using it again.
Potato
Potato: 1~6 potatoes.
- Pierce each potato several times with a fork. Place on the turntable in a spoke-like fashion. After cooking, let the potatoes stand for 3-5 minutes. Let the oven cool for at least 5 minutes before using it again.
Pizza
Pizza: 1~4 slices
- Place 1-4 pizza slices on a microwave-safe plate with the wide ends of the slices towards the outside edge of the plate. Do not let the slices overlap. Do not cover. Let the oven cool for at least 5 minutes before using it again.
Cook
1. Beverage: 8 oz.
- Use a measuring cup or mug and do not cover. Place the beverage in the oven. After heating, stir well. Let the oven cool for at least 5 minutes before using it again.
2. Chicken Breast: 8 ~24 oz.
- Place the chicken breasts on a microwave safe plate and cover with vented plastic wrap. Cook to an internal temperature of 170 °F. Let stand for 5 minutes.
3. Frozen Breakfast: 4 ~8 oz.
- Follow the package instructions for covering and letting stand. Use this button for frozen sandwiches, breakfast entrees, pancakes, waffles, etc. Let the oven cool for at least 5 minutes before using it again.
4. Frozen Dinner: 8 ~14 oz.
- Remove the food from its wrapping and follow the instructions on the box for covering and letting stand. Let the oven cool for at least 5 minutes before using it again.
Reheat
1. Casserole: 1 ~4 servings
- Cover the plate with a lid or vented plastic wrap. If the food is not as hot as you would like after using the “Sensor Cooking Reheat” function, continue heating using additional time and power. Stir the food once before serving. Contents: Casserole, refrigerated foods.
2. Dinner plate: 1 ~4 servings
- Use only precooked, refrigerated foods. Cover the plate with vented plastic wrap or waxed paper tucked under the plate. If the food is not as hot as you would like after using the “Sensor Cooking Reheat” function, continue heating using additional time and power. Contents: 3-4 oz. meat, poultry or fish (up to 6 oz. with bone) ½ cup starch (potatoes, pasta, rice, etc.) ½ cup vegetables (about 3 - 4 oz.)
3. Pasta 1 ~4 servings
- Cover the plate with a lid or vented plastic wrap. If the food is not as hot as you would like after using the “Sensor Cooking Reheat” function, continue heating using additional time and power. Stir the food once before serving. Contents: Pasta: canned spaghetti and ravioli.
Veggies
1. Fresh Vegetables (Fresh Veggies): 1~4 cups
- Place the fresh vegetables in a microwave-safe ceramic, glass, or plastic dish and add 2-4 tbs. of water. Cover with a lid or vented plastic wrap. Stir before letting stand. Let the oven cool for at least 5 minutes before using it again.
2. Frozen Vegetables (Frozen Veggies): 1~4 servings
- Place the frozen vegetables in a microwave-safe ceramic, glass, or plastic dish and add 2-4 tbs. of water. Cover with a lid or vented plastic wrap to cook. Stir before letting stand for 3-5 minutes. Let the oven cool for at least 5 minutes before using it again.
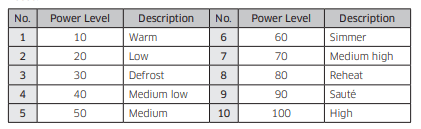
Using the microwave setting cooking times & power levels
Your oven allows you to set two different cooking stages, each with its own time length and power level. The power level lets you control the heating intensity from Warm (1) to High (10).
Power levels
The 10 power levels allow you to choose the optimal power level for your cooking needs.
One-stage cooking
For simple one-stage cooking, you only need to set the cooking time. The power level is automatically set to High. If you want to set the power level to any other level, press OK after entering the cooking time, and then use the numeric buttons to set the level.
1. Press the Microwave button. (You can skip this step and start at the next step.)
2. Use the numeric buttons to set a cooking time. You can enter a time from one second to 99 minutes and 99 seconds. To select a time greater than one minute, enter the seconds too. (For example, to set a cooking time of 20 minutes, enter 2, 0, 0, 0.) If you do not need to set the power level, just press the START button. The microwave will automatically operate at the High power level. If you want to change the power level, go to Step 3.
3. If you want to set the power level to a level other than High, press the OK button.
4. Press the Up/Down button or numeric buttons that correspond to the power level you want to use.
5. Press the START button. If you want to add to or reduce the cooking time, use the Up/Down button. You can adjust the cooking time while the microwave oven is operating.
Multi-stage cooking (maximum of 2 stages)
Your oven allows you to set two different cooking stages, each with its own time length and power level. The power level lets you control the heating intensity from Warm to High.
- Follow steps 1, 2, 3, and 4 from the “One-stage cooking” section.
- Press the OK button to move to the second stage.
- Follow steps 2, 3, 4, and 5 from the “One-stage cooking” section.
PowerGrill
Browning adds texture and taste to your food. When browning, use the rack accessory.
- Press the PowerGrill button. For instructions on using the rack, see the tables beginning on page 22 and page 24.
- Use the numeric buttons to set a cooking time. The maximum cooking time is 99 minutes and 99 seconds.
- Press the START button to begin Browning.
- The vent fan operates at low speed while the oven operates in Browning mode.
Grill Heater Warnning
- If the grill overheats, an alarm sounds when you open the door.
- This alarm notification sounds automatically when the grill overheats.
- The display will show : HEATER IS HOT
The Vent Fan protects the microwave from excess heat. It automatically turns on if it senses the grill overheating. If you have turned the fan on, you may find that you cannot turn it off. The fan will automatically turn off when the internal parts are cool. It may stay on for about 3 minutes. If the turntable does not rotate for an extended period of time, food may burn. Consequently, we recommend that you keep the turntable on when using the PowerGrill mode.
Manual guide for PowerGrill
Grilled Vegetables
- 9 oz
- PowerGrill
- 13-18
- Rinse the vegetables (asparagus, carrot, eggplant, etc.). Cut them into the even pieces. Brush them with oil and sprinkle with salt and pepper. Put veggies on the Hot Plate. Put the Hot Plate on the rack.
Homemade Lasagna
- 30 oz (12 oz of tomato sauce, 8 sheets of lasagna noodles, 7 oz of mozzarella cheese)
- 1st : Gill+MW
- 2nd : PowerGrill
- 1st : 13-16
- 2nd : 4-8
- Cook lasagna noodles according to the package directions. Layer the lasagna noodles, tomato sauce, and cheese into a gratin dish. Evenly sprinkle the remaining mozzarella cheese on the top layer of noodles. Put dish on the rack.
Frozen Potato Wedges
- 7 oz
- 1st : Gill+MW
- 1st : 6-10
- 2nd : PowerGrill
- 2nd : 5-9
- 14 oz
- 1st : Gill+MW
- 1st : 8-12
- 2nd : PowerGrill
- 2nd : 8-12
- Place frozen potato wedges on greased Hot Plate. Place the Hot Plate on the rack.
Frozen Mini Spring Rolls
- 4 ea (5.6 oz)
- 1st : Gill+MW
- 1st : 3-7
- 2nd : PowerGrill
- 2nd : 3-7
- 8 ea (11.3 oz)
- 1st : Gill+MW
- 1st : 6-9
- 2nd : PowerGrill
- 2nd : 5-9
- Place frozen spring rolls on the Hot Plate. Put the Hot Plate on the rack.
Frozen Prawn (Breaded)
- 5 ea (5.3 oz)
- 10 ea (10.6 oz)
- Place frozen prawns on the Hot Plate. Place the Hot Plate on the rack. When the oven beeps, turn prawns over, and then re-start the oven.
Grill+Microwave
The combination cooking feature allows you to cycle automatically between microwave and PowerGrill cooking. The food will be moist as well as brown. To use combination cooking:
1. Press the Grill+Microwave button.
- For instructions on using the rack and Hot Plate, see the tables beginning on page 22 and page 24.
2. Use the numeric buttons to set a cooking time.
- The maximum cooking time is 99 minutes and 99 seconds.
3. Press the START button. If you want to add or reduce the cooking time, use the Up & Down keys. You can adjust the cooking time while the microwave oven is operating.
- This mode combines microwave energy with grill heating. This combination reduces the cooking time while giving the food a brown surface. If the turntable does not rotate for an extended time, food may be burned. So it is not recommended to turn the turntable off with this mode. Use caution if turning the turntable off.
Grill Heater Warnning
- If the grill overheats, an alarm sounds when you open the door.
- This alarm notification sounds automatically when the grill overheats.
- The display will show : HEATER IS HOT
The Vent Fan protects the microwave from excess heat. It automatically turns on if it senses that the grill is overheating. If you have turned the fan on, you may find that you cannot turn it off. The fan will automatically turn off when the internal parts are cool. It may stay on for about 3 minutes.
Cookware for cooking with Grill+Microwave
Use only cookware that is specially manufactured for microwave ovens. Do not use metal cookware with this combination mode. Do not use any type of plastic cookware, as it can melt.
Food suitable for Grill+Microwave
Other food suitable for this combination mode cooking include all kinds of previously cooked food which needs reheating and browning (e.g. baked pasta), as well as food which requires a short cooking time to brown the top of the food. This mode can also be used for thick food portions that benefit from a browned and crispy top (e.g. chicken pieces, which you turn over half way through cooking). Other food suitable for this cooking mode include a variety of meats and poultry as well as frozen snacks and pizza.
PowerGrill Auto
The combination cooking feature allows you to cycle automatically between microwave and PowerGrill cooking. The food will be moist as well as brown.
- Put the food on the tray. For instructions on using the rack and Hot Plate, see the tables on the this page and the following page.
- Press the PowerGrill Auto button.
- To select the number that corresponds to the food, press the Up/Down button or the appropriate numeric buttons. For instructions, see the tables on this page and the following page.
- Press the OK button.
- To select the number that corresponds to the weight (if needed), press the Up/ Down button or one of the numeric buttons. For instructions, see the tables on this page and the following page.
- Press the START button. The microwave oven will automatically operate for the preprogrammed time.
PowerGrill Auto cooking guide
1. Hamburger
- 2 ea
- 4 ea
- Place hamburgers on the Hot Plate. Place the plate on the rack. When the oven beeps, turn over hamburgers and restart the oven.
- Rack + Hot Plate
2. Bacon
- 2 slices
- 4 slices
- 6 slices
- Place 2 paper towels on plate and arrange bacon on towels. Do not overlap. Cover with additional paper towel. Remove paper towel immediately after cooking.
- Rack + Hot Plate
3. Macaroni Gratin
- 1 serving (14 oz)
- 2 servings (28 oz)
- Cook macaroni according to package direction. Mix 9 oz (18 oz) macaroni, 0.3 oz (0.6 oz) melted butter, 2 oz (4 oz) milk, and 1 oz (2 oz) of beaten eggs. Pour mixture into an oven proof gratin bowl and sprinkle with 1.7 oz (2.4 oz) of Mozzarella cheese. Put gratin bowl containing mixture on the rack. * Numbers in parentheses show weights for 2 servings.
- Rack
4. Beef Steak
- 10 oz
- Season the beef with olive oil, rosemary, thyme and pepper. Put the beef on the Hot Plate. Put the Hot Plate on the rack. When the oven beeps, turn over steak and restart the oven.
- Rack + Hot Plate
5. Drumsticks
- 1 serving (3 ea)
- 2 servings (6 ea)
- Rinse drumsticks and place them directly on the rack. Place the rack on the Hot Plate. When the oven beeps, turn over drumsticks and restart the oven.
- Rack + Hot Plate
6. Boneless Pork Chops
- 1 serving (4 oz)
- 2 servings (8 oz)
- Place pork chops on the rack. Place the rack on the Hot Plate. When the oven beeps, turn over pork chops and restart the oven.
- Rack + Hot Plate
7. Sausage Links Fresh
- 1 serving (6 oz)
- 2 servings (11 oz)
- Place links on the Hot Plate. Place the plate on the rack. When the oven beeps, turn over sausages and restart the oven.
- Rack + Hot Plate
8. Salmon Steak
- 1 serving (5 oz)
- 2 servings (10 oz)
- Season the salmon with salt and pepper. Place skin side down on the Hot Plate. Put the Hot Plate on the rack. When the oven beeps, turn over steaks and restart the oven.
- Rack + Hot Plate
9. Shrimp Fresh
- 2 servings (4 oz)
- 4 servings (8 oz)
- Place shrimp on the Hot Plate. Place the plate on the rack. When the oven beeps, turn over shrimp and restart the oven.
- Rack + Hot Plate
10. Frozen Hash Browns
- 2 servings (2 ea)
- 4 servings (4 ea)
- Place frozen potato croquettes on greased Hot Plate. Place the plate on the rack. When the oven beeps, turn croquettes over, and then restart the oven.
- Rack + Hot Plate
11. Frozen Pizza
- 12 oz
- Place the pizza on the rack.
- Rack
12. Frozen Chicken Nuggets
- 1 serving (5 ea)
- 2 servings (10 ea)
- Place the chicken nuggets on the Hot Plate, then place the plate on the rack. When the oven beeps, turn over nuggets and restart the oven.
- Rack + Hot Plate
13. Frozen Cheese Sticks
- 2 servings (4 ea)
- 4 servings (8 ea)
- Place cheese sticks on the Hot Plate. Place the plate on the rack.
- Rack + Hot Plate
14. Frozen Waffles
- 2 servings (2 ea)
- 4 servings (4 ea)
- Place waffles on the rack. Place the rack on the Hot Plate. Turn over when the oven beeps, and restart the oven.
- Rack + Hot Plate
15. Cheese Toasts
- 2 servings (2 ea)
- 4 servings (4 ea)
- Place two pieces of toast on the Hot Plate. Put a slice of cheddar cheese and 2.5 oz (70 g) of grated mozzarella cheese on top of each piece of toast. Put the Hot Plate on the rack.
- Rack + Hot Plate
16. Nachos
- 5 oz
- Place tortilla chips on the plate without overlapping. Sprinkle evenly with cheese. Place the Hot Plate on the rack. Contents : - 2 cups tortilla chips - ⅓ cup grated cheese Rack + Hot Plate
17. Frozen Chicken Wings
- 1 serving (4 ea)
- 2 servings (8 ea)
- Place the chicken wings on the rack, then place the rack on the Hot Plate. When the oven beeps, turn over wings and restart the oven.
- Rack + Hot Plate
Cookware guide
Recommended cooking utensils
- Glass and glass-ceramic bowls and dishes — Use for heating or cooking.
- Microwavable plastic wrap — Use to cover. Leave a small opening for steam to escape and avoid placing it directly on the food.
- Wax paper — Use as a cover to prevent spattering.
- Paper towels and napkins — Use for short-term heating and covering. They absorb excess moisture and prevent spattering. Do not use recycled paper towels, which may contain metal and can catch fire.
- Paper plates and cups — Use for short-term heating at low temperatures. Do not use recycled paper, which may contain metal and can catch fire.
- Thermometers — Use only those labeled “Microwave Safe” and follow all directions. Check the food in several places. Conventional thermometers may be used once the food has been removed from the oven.
Limited use items
- Aluminum foil — Use narrow strips of foil to prevent overcooking of exposed areas. Using too much foil can damage your oven, so be careful.
- Ceramic, porcelain, and stoneware — Use these if they are labeled “Microwave Safe”. If they are not labeled, test them to make sure they can be used safely. Never use dishes with metallic trim.
- Plastic — Use only if labeled “Microwave Safe”. Other plastics can melt.
- Straw, wicker, and wood — Use only for short-term heating, as they are flammable.
Not recommended
- Glass jars and bottles — Regular glass is too thin to be used in a microwave and can shatter.
- Paper bags — These are a fire hazard, except for popcorn bags that are designed for microwave use.
- Styrofoam plates and cups — These can melt and leave an unhealthy residue on food.
- Plastic storage and food containers — Containers such as margarine tubs can melt in the microwave.
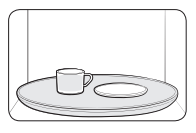
Testing utensils
If you are not sure whether a dish is microwave-safe or not, you can perform this test:
- Fill a 1 cup glass measuring cup with water and put it inside your oven, next to the dish you want to test.
- Set the microwave to 1 minute using the numeric buttons, and then press the START button. This will heat the glass and dish for one minute at High power. When the microwave stops, the water should be warm and the dish you are testing should be cool. If the dish is warm, then it is absorbing microwave energy and is not acceptable for use in the microwave.
Cooking techniques
Stirring
Stir foods such as casseroles and vegetables while cooking to distribute heat evenly. Food at the outside of the dish absorbs more energy and heats more quickly, so stir from the outside to the center. The oven will turn off when you open the door to stir your food.
Arrangement
Arrange unevenly shaped foods, such as chicken pieces or chops, with the thicker, meatier parts toward the outside of the turntable where they will receive more microwave energy. To prevent overcooking, place thin or delicate parts toward the center of the turntable.
Shielding
Shield food with narrow strips of aluminum foil to prevent overcooking. Areas that need shielding include poultry wing-tips, the ends of poultry legs, and the corners of square baking dishes. Use only small amounts of aluminum foil. Larger amounts can damage your oven.
Turning
Turn foods over midway through cooking to expose all parts to microwave energy. This is especially important with large items such as roasts.
Standing
Food cooked in the microwave builds up internal heat and continues to cook for a few minutes after the oven stops. Let food stand to complete cooking, especially food such as roasts and whole vegetables. Roasts need this time to complete cooking in the center without overcooking the outer areas. All liquids, such as soup or hot chocolate, should be shaken or stirred when cooking is complete. Let liquids stand a moment before serving. When heating baby food, stir well and test the temperature before serving.
Adding Moisture
Microwave energy is attracted to water molecules. Food that is uneven in moisture content should be covered or allowed to stand so that the heat disperses evenly. Add a small amount of water to dry food to help it cook.
Venting
After covering a dish with plastic wrap, vent the plastic wrap by turning back one corner so excess steam can escape.
General cooking recommendations
- Dense foods, such as potatoes, take longer to heat than lighter foods. Food with a delicate texture should be heated at a low power level to prevent it from becoming tough.
- Altitude and the type of cookware you are using can affect cooking time. When trying a new recipe, use the minimum cooking time and check the food occasionally to prevent overcooking.
- Food with a non-porous skin such as potatoes or hot dogs should be pierced to prevent bursting.
- Frying with oil or fat is not recommended. Fat and oil can suddenly boil over and cause severe burns.
- Some ingredients heat faster than others. For example, the jelly inside a jelly doughnut will be hotter than the dough. Keep this in mind to avoid burns.
- Home canning in the microwave oven is not recommended because all harmful bacteria may not be destroyed by the microwave heating process.
- Although microwaves do not heat the cookware, the heat from the food is often transferred to the cookware. Always use pot holders when removing food from the microwave and instruct children to do the same.
- Making candy in the microwave is not recommended as candy can heat to very high temperatures. Keep this in mind to avoid injury.
Guide for cooking eggs in your microwave
- Never cook eggs in the shell and never warm hard-cooked eggs in the shell. They can explode.
- Always pierce whole eggs to keep them from bursting.
- Cook eggs just until set. They become tough if overcooked.
Guide for cooking vegetables in your microwave
- Vegetables should be washed just before cooking. Often, no extra water is needed. If you are cooking dense vegetables such as cubed potatoes, carrots, or green beans, add about ¼ cup water.
- Small vegetables (sliced carrots, peas, lima beans, etc.) will cook faster than larger ones.
- Whole vegetables, such as potatoes, acorn squash, or corn on the cob, should be arranged in a circle on the turntable before cooking. They will cook more evenly if turned over after half the cooking time.
- Always place vegetables like asparagus and broccoli with the stem ends pointing towards the edge of the dish and the tips toward the center.
- When cooking cut vegetables, always cover the dish with a lid or vented microwavable plastic wrap.
- Whole, unpeeled vegetables such as potatoes, squash, eggplant, etc., should have their skin pricked in several spots before cooking to prevent them from bursting.
- For more even cooking, stir or rearrange whole vegetables halfway through the cooking time.
- Generally, the denser the food, the longer the standing time. (Standing time refers to the time necessary for dense, large foods and vegetables to finish cooking after they come out of the oven.) A baked potato can stand on the counter for five minutes before cooking is completed, while a dish of peas can be served immediately
Cleaning and maintaining your microwave oven
Cleaning the exterior
It’s best to clean spills on the outside of your microwave oven as they occur. Use a soft cloth and warm, soapy water. Rinse and dry.
Cleaning under your microwave oven
Regularly clean grease and dust from the bottom of your microwave using a solution of warm water and detergent.
Cleaning the control panel
Wipe with a damp cloth and dry thoroughly. Do not use cleaning sprays, large amounts of soap and water, abrasives, or sharp objects on the panel as it is easily damaged.
Cleaning the door and door seals
Always ensure that the door seals are clean and that the door closes properly. Take particular care when cleaning the door seals to ensure that no particles accumulate and prevent the door from closing correctly. Wash the glass door with very mild soap and water. Be sure to use a soft cloth to avoid scratching.
Cleaning the interior
To avoid injury, ensure that the microwave oven has cooled down before cleaning it.
Remove the glass tray from the oven when cleaning the oven or tray. To prevent the tray from breaking, handle it with care and do not put it in water immediately after cooking. Wash the tray carefully in warm sudsy water or in the dishwasher.
Cleaning the turntable and roller rings
Clean the roller rings periodically and wash the turntable as required. The turntable can be washed safely in your dishwasher.
Storing and repairing your microwave oven
If you need to store your microwave oven for a short or extended period of time, choose a dust-free, dry location. Dust and dampness may adversely affect the functionality of the microwave parts.
Do not repair, replace, or service any part of your microwave oven yourself. Allow only a qualified service technician to perform repairs. If the oven is faulty and needs servicing, or you are in doubt about its condition, unplug the oven from the power outlet and contact your nearest service center. Do not use the oven if the microwave oven is damaged, in particular, if the door or door seals are damaged or the door does not close properly. This can be caused by a broken hinge, a worn out seal or distorted/bent casing. Do not remove the oven from its casing. This microwave oven is for home use only and is not intended for commercial use.
Replacing the cooktop/night light
When replacing the cooktop/night light, make sure that you are wearing gloves to avoid injury from the heat of the lamp.
- Unplug the oven or turn off the power at the main power supply.
- Remove the screw from the light cover and lower the cover.
- Replace the lamp with a LED PBA.
- Replace the light cover and mounting screw.
- Turn the power back on at the main power supply.
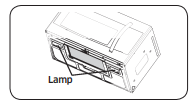
Replacing the oven light
When replacing the oven light, make sure that you are wearing gloves to avoid injury from the heat of the lamp.
- Unplug the oven or turn off the power at the main power supply.
- Open the door.
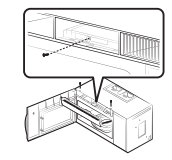
- Remove the vent cover mounting screws (2 middle screws).
- Slide the vent grille to the left, then pull it straight out.
- Remove the charcoal filter, if present.
- Remove the screw securing the lamp cover.
- Remove the lamp by pulling it out gently.
- Replace the lamp with a 50 watt halogen lamp.
- Replace the lamp holder.
- Replace the vent grille and re-insert the 2 screws.
- Plug the oven in or turn on the power at the main power supply. Reset the clock.
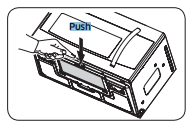
Cleaning the grease filter
Your microwave oven has reusable grease filter. The grease filters should be removed and cleaned at least once every four month, or as required. To order a new grease filter, contact the Parts Department at 1-800-627-4368 or your Samsung dealer. You can also order online at www.samsungparts.com
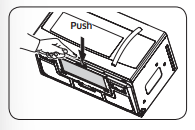
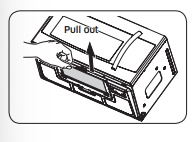
1. To remove the filter, push the front of the grease filter case. Pull out
2. Pull the filter case out of the microwave oven.
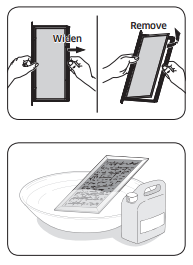
3. Remove the filter from the filter case by widening the case, as shown below. Then, soak the grease filter in hot water mixed with a mild detergent. Rinse well and shake to dry. If necessary, brush the filter lightly to remove embedded dirt. When the filter is dry, put it back in the filter case.
4. To re-install the filter, slide the filter case into the frame slot, and then push it inside.
Replacing the charcoal filter
- Unplug the oven or turn off the power at the main power supply.
- Open the door.
- Remove the vent grille mounting screws (2 middle screws).
- Slide the vent grille to the left, then pull it straight out.
- Push the hook and remove the old filter.
- Slide a new charcoal filter into place. The filter should rest at the angle shown.
- Replace the vent grille and 2 screws and close the door. Plug the oven in or turn on the power at the main power supply. Reset the clock.

Troubleshooting
Check points
General
1. The buttons cannot be pressed properly.
- Foreign matter may be caught between the buttons.
- Remove the foreign matter and try again.
- For touch models: Moisture is on the exterior.
- Wipe the moisture from the exterior.
- The Child Lock is activated.
- Deactivate the Child Lock.
2. The time is not displayed.
- Power is not supplied.
- Make sure power is supplied. Confirm the microwave is plugged in. Check your fuses or circuit breakers.
- The Eco (power-saving) function is set.
- Turn off the Eco function.
3. The oven does not work.
- Power is not supplied.
- Make sure power is supplied. Confirm the microwave is plugged in. Check your fuses or circuit breakers.
- The door is open.
- Close the door and try again.
- The door open safety mechanisms are covered by foreign matter.
- Remove the foreign matter and try again.
4. The oven stops while in operation.
- The user has opened the door to turn food over.
- After turning over the food, press the START button again to start operation.
5. The power turns off during operation.
- The oven has been cooking for an extended period of time.
- After the oven has cooked for an extended period of time, let the oven cool.
- The cooling fan is not working.
- Listen for the sound of the cooling fan.
- Trying to operate the oven without food inside.
- There is not enough ventilation space around the oven.
- There are intake/exhaust outlets on the front and rear of the oven for ventilation. Check the installation guide and make sure that the microwave is far enough away from walls and cabinets for proper ventilation.
- Several appliances or devices are plugged into the same outlet.
- Unplug all other appliances or devices from the outlet.
6. There is no power to the oven.
- Power is not supplied.
- Make sure power is supplied. Confirm the microwave is plugged in. Check your fuses or circuit breakers.
7. There is a popping sound during operation, and the oven doesn't work.
- Cooking food in a sealed container or using a container with a a tight lid.
- Do not cook food in sealed containers or in containers with tight lids. Expanding steam from the cooking food can cause the containers to burst or the lids to pop off.
8. The oven exterior gets too hot during operation.
- There is not enough ventilation space around the oven.
- There are intake/exhaust outlets on the front and rear of the oven for ventilation. Check the installation guide and make sure that the microwave is far enough away from walls and cabinets for proper ventilation.
- Objects are on top of the oven.
- Remove all objects on the top of the oven.
9. The door cannot be opened properly.
- Food residue is stuck between the door and oven interior.
10. The oven does not heat.
- The oven may not work if too much food is being cooked or improper cookware is being used.
- To test the oven, put one cup of water in a microwavesafe container, put the container in the oven, and then run the microwave for 1-2 minutes to check whether the water is heated. If the water is heated, reduce the amount of food and start the function again. Use a cooking container with a flat bottom.
11. Heating is weak or slow.
- The oven may not work if too much food is being cooked or improper cookware is being used.
- To test the oven, put one cup of water in a microwavesafe container, put the container in the oven, and then run the microwave for 1-2 minutes to check whether the water is heated. If the water is heated, reduce the amount of food and start the function again. Use a cooking container with a flat bottom.
12. The warm function does not work.
- The oven may not work if too much food is being warmed or improper cookware is being used.
- To test the oven, put one cup of water in a microwavesafe container, put the container in the oven, and then run the microwave for 1-2 minutes to check whether the water is heated. If the water is heated, reduce the amount of food and start the function again. Use a cooking container with a flat bottom.
13. The thaw function does not work.
- The oven may not work if too much food is being thawed or improper cookware is being used.
- To test the oven, put one cup of water in a microwavesafe container, put the container in the oven, and then run the microwave for 1-2 minutes to check whether the water is heated. If the water is heated, reduce the amount of food and start the function again. Use a cooking container with a flat bottom.
14. The interior light is dim or does not turn on.
- The door has been left open for a long time.
- The interior light may automatically turn off when the Eco function operates. Close and reopen the door or press the STOP/CLEAR button.
- The interior light is covered by foreign matter.
- Clean the inside of the oven and check again.
15. A beeping sound occurs during cooking.
- If the Auto Cook function is being used, this beeping sound means it's time to turn over the food.
- After turning over the food, press the START button again to restart operation.
16. The oven is not level.
- The oven is installed on an uneven surface.
- Make sure the oven is installed on flat, stable surface.
17. There are sparks during cooking.
- Metal containers are used during cooking or thawing.
- Do not use metal containers.
18. When power is connected, the oven immediately starts to work.
- The door is not properly closed.
- Close the door and check again.
19. There is electricity coming from the oven.
- The power source or power outlet is not properly grounded.
- Make sure the power source and power outlet are properly grounded.
20. There is water dripping.
- Water or steam may be generated by the cooking or defrosting process, depending on the food. This is not an oven malfunction.
- Let the oven cool and then wipe with a dry dish towel.
21. There is steam coming through a crack in the door.
- Water or steam may be generated by the cooking or defrosting process, depending on the food. This is not an oven malfunction.
- Let the oven cool and then wipe with a dry dish towel.
22. There is water left in the oven.
- Water or steam may be generated by the cooking or defrosting process, depending on the food. This is not an oven malfunction.
- Let the oven cool and then wipe with a dry dish towel.
23. The brightness inside the oven varies.
- Changes in brightness reflect changes in power output. Power output changes depending on the functions in use.
- Power output changes during cooking are not malfunctions.
24. Cooking is finished, but the cooling fan is still running.
- To ventilate the oven, the cooling fan continues to run for about 3 minutes after cooking is complete.
- This is not an oven malfunction.
25. Pressing the START button operates the oven.
- This happens when the oven is not operating.
- The microwave oven is designed to start operating when you press the START button if it was not operating.
Turntable
1. While turning, the turntable comes out of place or stops turning.
- There is no roller ring, or the roller ring is not properly in place.
- Install the roller ring properly and then try again.
2. The turn table drags while turning.
- The roller ring is not properly in place, there is too much food, or the container is too large and touches the inside of the microwave.
- Install the roller ring properly. Adjust the amount of food. Do not use containers that are too large.
3. The turn table rattles while turning and is noisy.
- Food residue is stuck to the bottom of the oven.
- Remove any food residue stuck to the bottom of the oven.
Grill
1. Smoke comes out during operation.
- During initial operation, smoke may come from the heating elements when you first start using the oven.
- This is not a malfunction. After you run the oven 2-3 times, it should stop.
- Food is on the heating elements.
- Let the oven cool and then remove the food from the heating elements.
- Food is too close to the grill.
- Put the food a suitable distance away from the grill while cooking.
- Food is not properly prepared and/or arranged.
- Make sure food is properly prepared and arranged.
Information Codes
C-10
- The GAS sensor is open.
- The GAS sensor is shorted.
- Unplug the power cord of the oven, and contact a local Samsung service center.
C-20
- The temperature sensor is open.
- The temperature sensor is shorted.
- Unplug the power cord of the oven, and contact a local Samsung service center.
C-F0
- The microwave has sensed an internal communications failure.
- Unplug the power cord of the oven, and contact a local Samsung service center.
C-F2
- A touch button has malfunctioned.
- Press Stop, and then try the button again.
Appendix
Specifications
- Oven Cavity: 2.1 cu ft
- Controls: 10 power levels, including Defrost
- Timer: 99 minutes, 99 seconds
- Power Source: 120 VAC, 60 Hz
- Power Consumption: 1700 Watt Microwave / 1700 Watt Heater
- Microwave Power Output: 1000 Watts Cook Top Light LED lamp (2 EA)
- Oven Light: 50 Watt halogen lamp
- Oven Cavity Dimensions (inches): 221/8”(W) x 1013/16”(H) x 1427/32”(D)
- Outside Dimensions (inches): 297/8” (W) x 1615/16” (H) x 1813/32”(D)
- Shipping Dimensions (inches): 3311/32”(W) x 2025/32” (H) x 193/8”(D)
- Net/Shipping Weight: 59.1 lbs. / 69.4 lbs. (26.8 kg / 31.5 kg)