When using electrical appliances, basic safety precautions should always be followed, including the following:
❑ Read all instructions.
❑ Do not touch hot surfaces. Use handles or knobs.
❑ To protect against a risk of electric shock, do not immerse cord, plug, or the electrical base of the grill/wafflebaker in water or other liquid.
❑ Close supervision is necessary when any appliance is used by or near children.
❑ Unplug from outlet when not in use and before cleaning. Allow to cool before cleaning.
❑ Do not operate any appliance with a damaged cord or plug or after the appliance malfunctions or is dropped or damaged in any manner.
Return the appliance to the nearest authorized service facility for examination, repair, or electrical or mechanical adjustment. Or, call the appropriate toll-free number listed on the cover of this manual.
❑ The use of accessory attachments not recommended by the appliance manufacturer may cause fire, electric shock or injury.
❑ Do not use outdoors.
❑ Do not allow cord to hang over the edge of table or counter or touch hot surfaces including the stove.
❑ Do not place on or near a hot gas or electric burner or in a heated oven.
❑ Use extreme caution when moving an appliance containing hot oil or other hot liquids.
❑ To use, plug cord into electrical outlet. To disconnect, grasp plug and remove from outlet. Do not yank on cord.
❑ Do not use appliance for other than intended use.
POLARIZED PLUG (120V Models Only)
This appliance has a polarized plug (one blade is wider than the other). To reduce the risk of electric shock, this plug is intended to fit into a polarized outlet only one way.
If the plug does not fit fully into the outlet, reverse the plug. If it still does not fit, contact a qualified electrician. Do not attempt to modify the plug in any way.
ELECTRIC CORD.
The cord of this appliance was selected to reduce the possibility of tangling in or tripping over a longer cord. If more length is needed, use an extension cord rated no less than 10 amperes. (For 220 volts rated products, use an extension cord rated no less than 6 amperes.) When using an extension cord, do not let it drape over the working area or dangle where someone could accidentally trip over it.
Handle cord carefully for longer life; avoid jerking or straining it at outlet and appliance connections.
Note: If the power supply cord is damaged, it should be replaced by qualified personnel or in Latin America by an authorized service center.
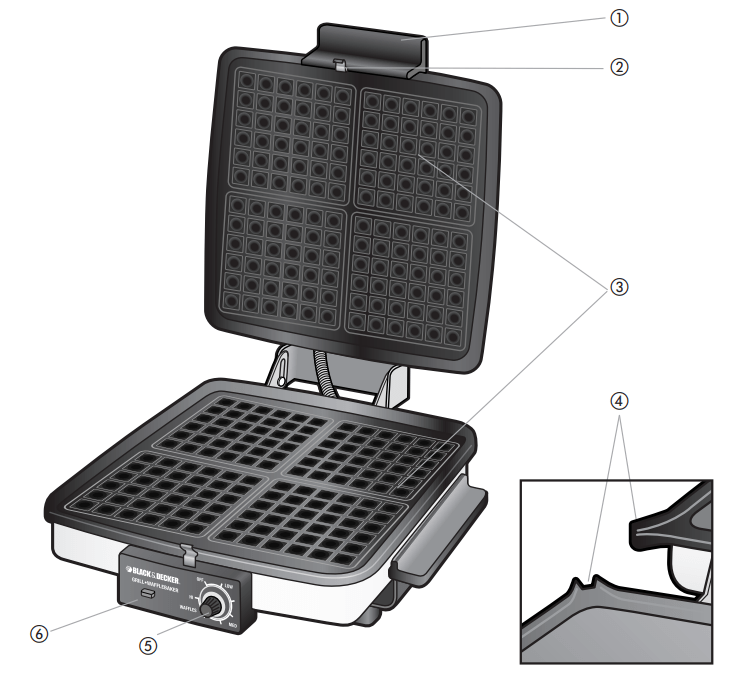
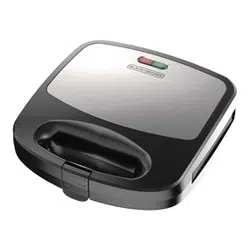
Overview
Product may vary slightly from what is illustrated.
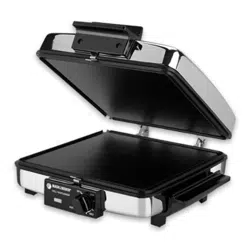
1. Handles 2. Grid clips 3. Non-stick cooking grids 4. Grease spouts 5. Control knob 6. Signal light
How to Use
This appliance is for household use only.
BEFORE FIRST USE
1. Remove the cooking grids by pressing down on the grid clips at the front of the unit and sliding the grids forward and out. Wash them in hot, sudsy water, rinse, dry thoroughly, and replace them in the unit. When replacing the grids, be sure the lip of each grid fits into the notch at the back of the unit and that each is securely clipped into place before plugging in and operating. Grids should have matching surfaces.
2. IMPORTANT: Condition the non-stick cooking surfaces with a light coating of cooking oil before first use. Do not use non-stick cooking spray to “condition.” Brush the oil onto the cooking surfaces or wipe on with a paper towel. Be sure to coat the cooking surfaces as this will reduce sticking. Wipe off excess oil with paper towels. The first waffle may absorb excess oil and appear greasy. If so, discard it.
BAKING WAFFLES
Be sure the Cooking Grids are securely attached with the waffle sides showing. Close the unit and plug the cord into a standard electrical outlet
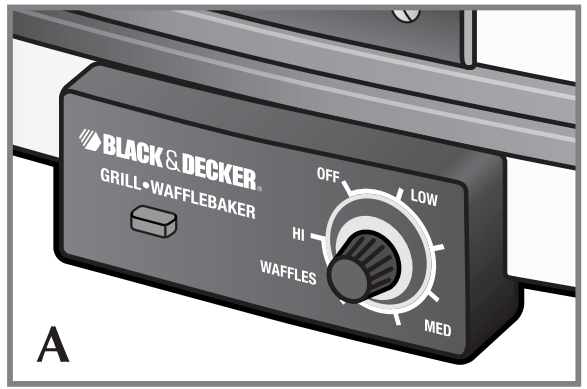
Turn the control knob to WAFFLES. The signal light (A) will come on to indicate the unit is heating. Use the pre-heat time to prepare your batter (see “Recipes”). When the signal light goes out (from 5-8 minutes), the unit is ready.
Open the unit and pour about 1 cup of batter onto the lower cooking surface. Spread the batter toward the edges using a rubber spatula for even waffles.
Carefully close the top. Keep hands away from the unit as steam may escape when baking begins. The signal light will come back on and may cycle on and off during baking. Cooking time is 3-5 minutes depending on the type of batter/ingredients you used. The hinge between the sections is designed to be loose. This allows the waffle to rise evenly and for steam to escape during baking. You may also notice steam moisture on the sides or near the handle. This is normal. Avoid opening the unit during baking cycle as it may cause the waffle to stick or bake poorly.
When waffles are done, the signal light will go out. Open the top and remove the waffle using a rubber or wooden spatula. Be careful not to scratch the non-stick finish. You may want to have a plate nearby when removing waffles in case they separate as this unit is designed to semi-cut waffles into 4 sections. If sticking occurs, lightly re-oil the cooking surfaces. You can make additional batches right away — no need to let the unit cool down. Keep the lid closed between cooking batches to preserve heat.
When all waffles are baked, turn the control knob to OFF, unplug the cord, open the unit, and allow it to cool.
GRILLING
This versatile unit is designed for open grilling to prepare griddle-style foods such as pancakes, eggs, or bacon strips, or closed grilling for hamburgers, hot dogs, or sandwiches such as grilled cheese. See the charts for preparation.
Be sure the cooking grids are securely attached with the flat grill sides showing. Close the unit and plug the cord into a standard electrical outlet.
Depending on the kind of food you’re grilling (such as bacon or chops), you may want to place a small can or container under the grease spouts at the corners to catch grease or drippings from the built-in grease channel.
For Closed Grilling: turn the control knob to high and preheat the unit closed for 8-10 minutes until the signal light goes out. Use the charts to help you determine the best setting, depending on the food. Open the unit, place the food on the lower Grid, and close the grill.
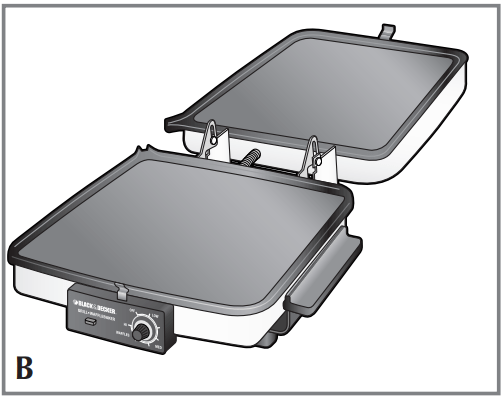
For Open Grilling: close the grill and turn the control knob to high to preheat for 8-10 minutes until the signal l goes out. Use the charts to help you determine food amounts and times. Open the grill and pull straight up on the top handle to release the top grid. Turn and slowly lower the top grid down so that it forms a flat griddle-like cooking surface across from the bottom grid (B). If cooking on only one side, place the food on the bottom grid. Watch and turn food as needed. To keep food warm while serving, turn the control knob to LOW.
When finished grilling, turn the control knob to OFF, unplug the cord, open the unit, and allow it to cool.
TIPS
To avoid damaging the non-stick surfaces, do not use sharp utensils or cut food on theGrid surfaces. Use rubber or wood utensils.
Baked waffles freeze well. Cook all the batter. Cool the waffles and place paper towelsbetween them. Wrap waffles in plastic wrap or freezer bags, and freeze.
To keep foods from sticking, you may want to re-oil cooking surfaces before each useor use a cooking spray.
GRILLING
Use the grill in the CLOSED position to press hamburgers or other meats (i.e. chops, Canadian bacon) or as a sandwich maker. Preparing meats in the CLOSED position will help cut down on spatter and speed up cooking times. NOTE that ALL the foods listed for CLOSED grilling can also be prepared in the OPEN (Griddle) position but will take 5 to 1 0 minutes longer than CLOSED and will require watching and turning for doneness.
Food
Amount
Suggestions/Timing
CLOSED
Bacon
1 to 4 slices
Place on grid & cook on HIGH for 9-12 minutes
Frankfurters
1 to 10 franks
Place on grid & cook on HIGH for 12-16 minutes
French Toast
1 to 4 slices
Preheat on HIGH. Lightly grease grids; cook for 2-3 minutes
Elam burgers
1 to 5 burgers ¾"/19 mm) thick
Preheat on HIGH. Lightly grease grids; cook for 3-6 minutes
CLOSED
Ham Slice (precooked)
½"/13mm thick (¾"/19 mm) thick
Preheat on HIGH. Lightly grease grids; cook for 3-5 minutes
Lamb Chops
1 to 6 chops (¾"/19 mm) thick
Preheat on HIGH. Lightly grease grids; cook for 3-6 minutes
Sandwiches
1 to 4
Preheat on HIGH. Lightly spread outer surfaces of bread with butter or margarine. Fill bread with favorite filling and cook 2 to 4 minutes
Sausage link
1 to 16 links (approx. 1 lb./454g)
Preheat on HIGH; cook 15 to 20 minutes
Sausage
Patties
1 to 8 patties (3/8"/10 mm) thick
Preheat on HIGH; cook 9 to 11 minutes
Food
Amount
Suggestions/Timing
Eggs
1 to 6
OPEN (Griddle)
Preheat on HIGH. Use 1 teaspoon butter/margarine per egg, watch & turn. Cook 2 to 3 minutes
Pancakes
1 to 8
Preheat on HIGH. Lightly grease grids and turn halfway through; cook 3-5 minutes
Care and Cleaning
This product contains no user serviceable parts. Refer service to qualified service personnel.
CLEANING
Unplug and allow the unit to COOL completely before cleaning. DO NOT IMMERSETHE UNIT nor run water directly onto the cooking surfaces.
Unclip the Grids and wash them in hot, soapy water. Rinse and dry thoroughly. DONOT PLACE THEM IN A DISHWASHER. Do not use steel wool pads or other abrasive cleaners on the cooking surfaces as they may damage the non-stick coating. To remove cooked-on food, use a plastic bristle brush or nylon mesh pad. Be sure to clean the handles after each use.
Clean the outside surfaces by wiping with a damp sponge or cloth. Dry thoroughly witha soft cloth. Do not use harsh or abrasive cleaners. Never spray or apply cleaners directly to the unit; instead, apply the cleaner to a cloth and rub on. Rubbing a soft dry cloth or paper towel over the chrome surface after cleaning will restore the shine. Cleaning the outside surfaces after each use will prevent grease from burning onto the chrome and discoloring it.
NEED HELP?
For service, repair or any questions regarding your appliance, call the appropriate "800" number on the cover of this book. Do not return the product to the place of purchase. Do not mail the product back to the manufacturer nor bring it to a service center. You may also want to consult the website listed on the cover of this manual.
What does it cover?
• Any defect in material or workmanship; provided; however, Applica’s liability will not exceed the purchase price of the product.
For how long?
• One year after the date of original purchase.
What will we do to help you?
• Provide you with a reasonably similar replacement product that is either new or factory refurbished.
How do you get service?
• Save your receipt as proof of the date of sale.
• Check our on-line service site at www.prodprotect.com/applica, or call our toll-free number, 1-800-231-9786, for general warranty service.
• If you need parts or accessories, please call 1-800-738-0245.
What does your warranty not cover?
• Damage from commercial use
• Damage from misuse, abuse or neglect
• Products that have been modified in any way
• Products used or serviced outside the country of purchase
• Glass parts and other accessory items that are packed with the unit
• Shipping and handling costs associated with the replacement of the unit
• Consequential or incidental damages (Please note, however, that some states do not allow the exclusion or limitation of consequential or incidental damages, so this limitation may not apply to you.)
How does state law relate to this warranty?
• This warranty gives you specific legal rights, and you may also have other rights that vary from state to state or province to province.