User Guide for Toaster Oven
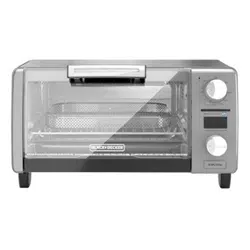
GETTING TO KNOW YOUR AIR FRY TOASTER OVEN
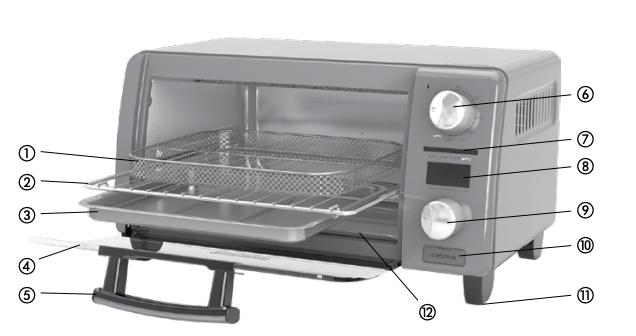
1. Air Fry mesh tray (Part# TOD1775-01)
2. Wire rack (Part# TO1745-06)
3. Baking pan (Part# TO1745-05)
4. Easy view glass door
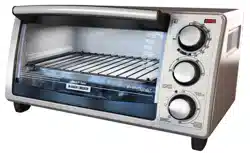
5. Door handle
6. Function/Temperature knob
7. Indicator Lights: Bake, Broil, Toast, Air Fry
8. Digital display
9. Time knob
10. Start/Stop button (Turns unit ON or OFF)
11. Rubber foot pads, 4pcs (Part # TOD1770-01)
12. Slide out crumb tray (Part# TO1745-04)
GETTING STARTED
This appliance is intended for household use only.
- Remove all packing material, any stickers, and the plastic band around the power plug.
- Remove and save literature.
- Please go to prodprotect/blackanddecker to register your warranty.
- Wash all removable parts as instructed in Care and Cleaning Section.
- Select a location where this unit is to be used, allowing enough space from the back of the unit and wall to allow heat to flow without damage to cabinets and walls.
- Ensure crumb tray is in place before use.
Important information about using your oven
- This oven gets hot. When in use, always use oven mitts or potholders when touching any outer or inner surface of the oven.
- When using the oven for the first time, you may notice smoke or a slight odor during the first few minutes. This is normal.
- Be sure food or baking pan does not come within 1 1/2 inches (3.8 cm) of the top heating elements.
- Food should not extend beyond the edges of the baking pan to avoid drippings from falling onto the heating elements.
- Many factors influence cook times such as altitude, humidity and variations in electrical grids. For best results, monitor the end of the cook cycle.
- Cooking Containers: Metal, ovenproof glass or ceramic bakeware can be used in your oven. Follow the manufacturer’s instructions. Be sure the top edge of the container is at least 1 1/2 inches (3.81cm) away from the upper heating elements.
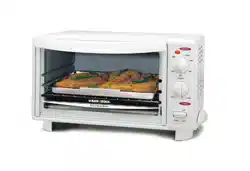
TOAST
It is not necessary to preheat the oven for toasting.
- Open oven door and insert wire rack.
- Place items to be toasted directly on wire rack and close the door.
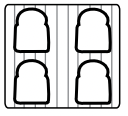
NOTE: for optimal toast, bread should be of uniform thickness and placed in one of the locations shown.
3. Set Function/Temperature selector knob to Toast position. The Toast indicator light and digital display will blink, indicating the oven is on standby.
4. Use the Time knob to select desired toast shade on digital display, with 1 being the lightest and 7 being the darkest.
5. Press the Start/Stop button to begin toasting. The light will turn solid while toasting.
6. There will be 2 audible beeps once the cooking cycle is complete. After 60 seconds the unit will turn off.
7. Open the oven door. Using oven mitts or pot holders, slide the rack out to remove the toast.
8. Unplug appliance when not in use.
STAY ON
The STAY ON function is available for BAKE, AIRFRY, BROIL, and KEEP WARM. To set the oven to STAY ON, turn the TIME knob counterclockwise past 01 (or clockwise past 60) until you see “on” in the display panel. Press the Start/Stop button. The oven will stay on until the Start/Stop knob is pressed again. To turn off, press the Start/Stop button; 00 will show in the display.
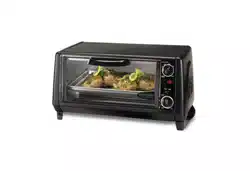
BAKE
Note: For best results, when baking or cooking, preheat the oven for at least minutes at the desired temperature setting.
Note: During Bake mode, the convection fan cycles on and off to circulate air and create optimal heat distribution.
Note: This oven has been designed to cook faster. Please inspect your items earlier than the prescribed cook time for a conventional oven to ensure that they do not get overcooked.
- Place items to be baked directly on wire rack or place pan on wire rack.
- Set Temp selector knob to desired temperature. The Bake indicator light and digital display will blink, indicating the oven is on stand by.
- Turn the Time knob to set cook time on digital display.
- Press the Start/Stop button to begin baking. The digital display will count down while cooking, showing the time remaining.
- There will be 2 audible beeps once the cooking cycle is complete. After 60 seconds the unit will turn off.
- Open the oven door. Using oven mitts or pot holders, slide the rack out to remove the food.
- Unplug appliance when not in use.
AIR FRY
Air Fry technology uses high intensity hot air to bake, brown, and crisp your favorite foods with little to no oil.
Air Fry mode operates the oven at 425°F. Use the cook times listed in the recipe book or follow the food package recommendations for baking. Adjust the cook time as needed to achieve your preferred crispiness.
NOTE: It is not necessary to preheat the oven for air frying.
NOTE: Arrange your food in a single layer on the mesh tray for optimal air frying results.
- Place food on Air Fry mesh tray
- Open oven door and insert tray on top of wire rack. Close door.
- Set Temp selector knob to Air Fry position. The Air Fry indicator light and digital display will blink, indicating the oven is on stand by.
- Turn the Time knob to set Air Fry time on digital display.
- Press the Start/Stop button to begin cooking. The digital display will count down while cooking, showing the time remaining.
- There will be 2 audible beeps once the cooking cycle is complete. The digital display will read “00” and the Air Fry indicator light will blink to indicate standby mode. After 60 seconds the unit will turn off.
- Open the oven door. Using oven mitts or pot holders, slide the tray out to remove the food.
- To turn off the oven during a cooking cycle, press the Start/Stop button. Note: Clean out the crumb tray frequently when using the air fry setting.
- Unplug the appliance when not in use.
BROIL
Note: It is not necessary to preheat the oven for broiling.
- If the items are going to be placed directly on the wire rack, slide the baking pan into the guide under the wire rack to catch drippings during broiling.
- Place items to be broiled directly on wire rack, or in the baking pan on top of the wire rack.
- Set Temp selector knob to Broil position. The Broil indicator light and digital display will blink, indicating the oven is on stand by.
- Turn the Time knob to set Broil time on digital display.
- Press the Start/Stop button to begin broiling. The digital display will count down while cooking, showing the time remaining.
Note: For best results when broiling meat, turn over the meat half-way through broiling.
6.There will be 2 audible beeps once the cooking cycle is complete. After 60 seconds the unit will turn off.
7.Open the oven door. Using oven mitts or pot holders, slide the rack out to remove the food.
8.Unplug the appliance when not in use.
WARM
- Set Temp selector knob to Warm position. The Bake indicator light and digital display will blink, indicating the oven is on stand by.
- Turn the Time knob to set cook time on digital display.
- Place food on rack or in pan. Press the Start/Stop button to begin cooking. The digital display will count down while cooking, showing the time remaining.
- There will be 2 audible beeps once the cooking cycle is complete. After 60 seconds the unit will turn off.
- Open the oven door. Using oven mitts or pot holders, slide the rack out to remove the food.
- Unplug appliance when not in use.
CARE AND CLEANING
This product contains no user serviceable parts. Refer to service qualified service personnel.
Cleaning
Important: Before cleaning any part, be sure the oven is off, unplugged, and cool.
Note: Do not allow food debris to accumulate in oven cavity. Do not use aerosol or spray oven cleaners.
- Clean the glass door with a sponge, soft cloth, or nylon pad and dish soap and warm water. Do not use a spray cleaner.
- Remove the wire rack, air fry mesh tray, and bake pan and wash them in hot water with dish soap. To remove stubborn spots, use a polyester or nylon pad.
- Pull out crumb tray and dispose of crumbs. Wipe tray with a damp cloth and dry thoroughly before placing back into the oven. Note: The rack and air fry mesh tray, are dishwasher safe. We recommend washing the bake pan and crumb tray by hand in hot water with dish soap.
- Wipe the outside of the oven with a damp cloth or sponge. Dry thoroughly.
- Do not attempt to clean the heating elements. Any food that comes into contact with the elements will burn off on its own.
FUNCTION CHART
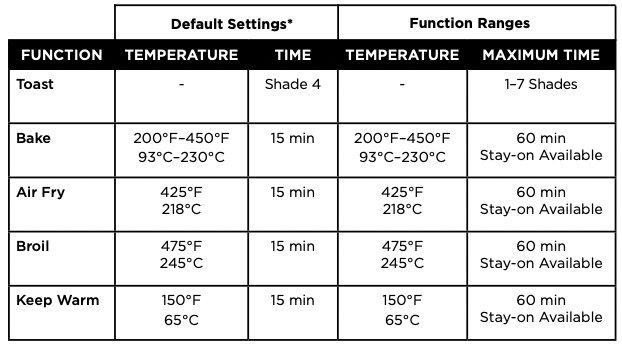
*Default settings apply only after the unit has been unplugged and plugged back in (Bake Function is Default). Once a setting has been used, the last function, time and temperature selections will be saved.