Use and care
GUIDE
THERMADOR.COM
MASTERPIECE
®
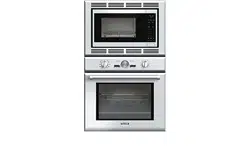
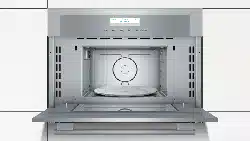
Series Built-in Microwave Oven MB30WS


Table of
CONTENTS
Table of Contents
Use and care manual
Safety Definitions ....................................................... 4
IMPORTANT SAFETY INSTRUCTIONS ........................ 5
9 PRECAUTIONS TO AVOID POSSIBLE EXPOSURE
TO EXCESSIVE MICROWAVE ENERGY .......................... 5
GROUNDING INSTRUCTIONS ....................................... 6
TV / Radio Interference ................................................... 6
Intended Use ................................................................... 6
Child Safety ..................................................................... 6
Cleaning Safety ............................................................... 6
Cooking Safety ................................................................ 7
In Case of Fire ................................................................. 7
Liquids ............................................................................. 7
Cooking Items ................................................................. 7
Cooking Utensils ............................................................. 8
Glass Tray / Turntable Ring ............................................. 8
Thermometers ................................................................. 8
Pacemakers ..................................................................... 9
Fan Motor Operation ...................................................... 9
State of California Proposition 65 Warnings: .................. 9
Causes of Damage .................................................... 10
Protecting the environment ..................................... 10
Tips for saving energy ................................................... 10
Getting to Know the Appliance ................................ 11
Parts .............................................................................. 11
Control Panel ................................................................ 12
Accessories ................................................................... 12
Before First Use ........................................................ 13
Before using the appliance for the first time ................ 13
Initial operation ............................................................. 13
Cleaning accessories .................................................... 13
Operating the appliance .......................................... 14
Setting the appliance .................................................... 14
Operating features ........................................................ 14
Microwave ................................................................ 15
Microwave utensil guide ............................................... 15
Microwave power levels ................................................ 15
Setting the microwave .................................................. 16
Suggestions for best results .......................................... 17
Microwave programs ............................................... 18
Information on the settings ........................................... 18
Setting a Microwave Program ....................................... 18
Beverage ....................................................................... 18
Popcorn ......................................................................... 19
Sensor Cook .................................................................. 19
Sensor Reheat ............................................................... 20
Auto Defrost ................................................................. 20
Keep Warm ................................................................... 21
Melt Butter .................................................................... 21
Melt Chocolate ............................................................. 21
Soften Ice Cream .......................................................... 22
Soften Cream Cheese ................................................... 22
Timer ....................................................................... 22
Kitchen Timer ................................................................ 22
Checking, changing or deleting settings ...................... 22
Childproof Lock ....................................................... 23
Activating and Deactivating .......................................... 23
Adjust Basic Settings ............................................... 23
Changing the Settings .................................................. 23
Available settings .......................................................... 23
Cleaning and Maintenance ...................................... 24
Cleaning Guide ............................................................. 24
Before Calling for Service ........................................ 25
THERMADOR® Support .......................................... 26
Before Calling Service ................................................... 26
Data Plate ...................................................................... 26
Service ........................................................................... 26
Parts and Accessories ................................................... 26
STATEMENT OF LIMITED PRODUCT WARRANTY ... 27
What this Warranty Covers & Who it Applies to .......... 27
How Long the Warranty Lasts ....................................... 27
Repair/Replace as Your Exclusive Remedy ................... 27
Out of Warranty Product ............................................... 27
Warranty Exclusions ...................................................... 27
4
.
Safety Definitions
Safety Defi nitions
9 WARNING
This indicates that death or serious injuries may
occur as a result of non-observance of this warning.
9 CAUTION
This indicates that minor or moderate injuries may
occur as a result of non-observance of this warning.
NOTICE: This indicates that damage to the appliance or
property may occur as a result of non-compliance with
this advisory.
Note: This alerts you to important information and/or
tips.

5
9 IMPORTANT SAFETY INSTRUCTIONS
READ ALL INSTRUCTIONS BEFORE USING THE APPLIANCE
IMPORTANT SAFET Y I NST RU CT I ONSRE AD AL L INSTRUCTIONS BEF ORE USI NG THE APP L I ANCE
9 PRECAUTIONS TO AVOID
POSSIBLE EXPOSURE TO
EXCESSIVE MICROWAVE
ENERGY
PRECAUTIONS TO AVOID POSSIBLE EXPOSURE TO
EXCESSIVE MICROWAVE ENERGY
(1) Do not attempt to operate this oven with the door
open, since open-door operation can result in harmful
exposure to microwave energy. It is important not to
defeat or tamper with the safety interlocks.
(2) Do not place any object between the oven front face
and the door or allow soil or cleaner residue to
accumulate on sealing surfaces.
(3) Do not operate the oven if it is damaged. It is
particularly important that the oven door close properly
and that there is no damage to the:
▯ door (bent)
▯ hinges and latches (broken or loosened)
▯ door seals and sealing surfaces.
(4) The oven should not be adjusted or repaired by
anyone except authorized service personnel. Improper
installation, service or maintenance can cause injury or
property damage. Refer to this manual for guidance.
Refer all servicing to a factory authorized servicer.
WARNING
To reduce the risk of burns, electric shock, fire, injury to
persons, or exposure to excessive microwave energy,
read all instructions before using the appliance.
WARNING
If the information in this manual is not followed exactly,
fire or shock may result causing property damage or
personal injury.
When using electrical appliances basic safety
precautions should be followed, including the
following:
Read and follow the specific “PRECAUTIONS TO AVOID
POSSIBLE EXPOSURE TO EXCESSIVE MICROWAVE
ENERGY” found in the Safety Instructions chapter.
This appliance must be grounded. Connect only to
properly grounded outlet (see GROUNDING
INSTRUCTIONS).
Install or locate this appliance only in accordance with
the provided installation instructions.
Some products such as whole eggs and sealed
containers – for example, closed glass jars – can
explode and should not be heated in this oven.
Use this appliance only for its intended use as described
in the manual. Do not use corrosive chemicals or vapors
in this appliance. This type of oven is specifically
designed to heat, cook, or dry food. It is not designed for
industrial or laboratory use.
As with any appliance, close supervision is necessary
when used by children (see CHILD SAFETY).
This appliance should be serviced only by authorized
service personnel. Contact nearest authorized service
facility for examination, repair, or adjustment.
Do not cover or block any vents or openings on the
appliance.
Do not store this appliance outdoors. Do not use this
product near water – for example, near a kitchen sink, in
a wet basement, near a swimming pool, or similar
locations.
Suitable for plug-connected only:
(1) Do not immerse cord or plug in water.
(2) Keep cord away from heated surfaces.
(3) Do not let cord hang over edge of table or counter.
(4) Do not operate this appliance if it has a damaged
cord or plug, if it is not working properly, or if it has
been damaged or dropped.
When cleaning surfaces of door and oven that come
together on closing the door, use only mild, nonabrasive
soaps, or detergents applied with a sponge or soft cloth.
See door surface cleaning instructions in chapter
“Cleaning and Maintenance”.
To reduce the risk of fire in the oven cavity:
▯ Do not overcook food. Carefully attend appliance
when paper, plastic, or other combustible materials
are placed inside the oven to facilitate cooking.
▯ Remove wire twist-ties from paper or plastic bags
before placing bag in oven.
▯ If materials inside the oven ignite, keep oven door
closed, turn oven off, and disconnect the power cord,
or shut off power at the fuse or circuit breaker panel.
▯ Do not use the cavity for storage purposes. Do not
leave paper products, cooking utensils, or food in the
cavity when not in use.

9 IMPORTANT SAFETY INSTRUCTIONS
READ ALL INSTRUCTIONS BEFORE USING THE APPLIANCE
6
GROUNDING INSTRUCTIONS
This appliance must be grounded. Grounding reduces
risk of electric shock by providing a safe pathway for
electric current in the event of a short circuit.
If this oven is equipped with a cord having a grounding
wire with a grounding plug, the plug must be plugged
into an outlet that is properly installed and grounded. See
INSTALLATION INSTRUCTIONS.
Consult a qualified electrician if grounding instructions
are not completely understood, or if doubt exists as to
whether the oven is properly grounded.
Do not use an extension cord. If the product power cord
is too short, have a qualified electrician install a three–
slot receptacle. This oven should be plugged into a
separate 60 Hertz circuit with the electrical rating as
shown in specifications table. When the oven is on a
circuit with other equipment, an increase in cooking
times may be required and fuses can be blown.
The model stated on the front cover is rated at 120V AC,
60 Hz and uses a NEMA 5-15 plug to connect to a
dedicated 120 V microwave circuit.
WARNING - Improper use of grounding can result in a
risk of electric shock.
TV / Radio Interference
This appliance generates and uses ISM frequency
energy. If not installed and used properly, in strict
accordance with the manufacturer’s instructions, it may
cause interference to radio and television reception. It
has been type tested and found to comply with limits for
ISM equipment pursuant to part 18 of FCC rules, which
are designed to provide reasonable protection against
such interference in a residential installation. However,
there is no guarantee that interference will not occur in a
particular installation. Turn the appliance on and off to
determine if it causes interference. Try the following to
correct the interference:
▯ Clean door and sealing surface of the oven.
▯ Reorient the receiving antenna of the radio or
television.
▯ Relocate the microwave oven with respect to the
receiver.
▯ Move the microwave oven away from the receiver.
▯ Plug the microwave into a different outlet so that the
oven and the receiver are on different branch circuits.
The manufacturer is not responsible for any radio or TV
interference caused by unauthorized modification to this
microwave oven. It is the responsibility of the user to
correct such interference.
Intended Use
This appliance is intended for normal family household
use only. It is not approved for outdoor use. See the
Statement of Limited Product Warranty. If you have any
questions, contact the manufacturer.
Do not use the cavity for storage purposes. Do not leave
paper products, cooking utensils, or food in the cavity
when not in use.
Do not operate oven when room humidity is excessive.
This oven is suitable for use above both conventional
built-in gas and electric ovens 36” (914 mm) or less
wide.
Child Safety
Do not allow children to use this appliance. Failure to do
so can result in burns or serious injury to children.
Children and pets should not be left alone or unattended
in the area where the appliance is in use. They should
never be allowed to play in its vicinity, whether or not the
appliance is in use.
When children become old enough to use the appliance,
it is the responsibility of the parents or legal guardians to
ensure that they are instructed in safe practices by
qualified persons.
Do not allow anyone to climb, stand, lean, sit, or hang on
any part of an appliance, especially a door, warming
drawer, or storage drawer. This can damage the
appliance, and the unit may tip over, potentially causing
severe injury.
Cleaning Safety
When cleaning surfaces of door and oven that come
together on closing the door, use only mild, nonabrasive
soaps, or detergents applied with a sponge or soft cloth.
See door surface cleaning instructions in chapter
“Cleaning and Maintenance”.
Clean turntable roller rest and oven bottom frequently to
prevent excessive noise.
Allow the glass tray to cool before cleaning or placing in
water.
WARNING
Be sure the entire appliance (including the light bulb) has
cooled and grease has solidified before attempting to
clean any part of the appliance.
7
9 IMPORTANT SAFETY INSTRUCTIONS
READ ALL INSTRUCTIONS BEFORE USING THE APPLIANCE
Cooking Safety
CAUTION
To avoid personal injury or property damage, observe
the following:
▯ Do not leave oven unattended while in use.
▯ Do not store flammable material next to or in the
oven.
▯ When flaming foods under the microwave, always
turn the fan on.
▯ Do not operate the oven while empty. This could
damage the oven and result in a risk of fire.
▯ Do not store or use corrosive chemicals, vapors,
flammables or nonfood products in or near this
appliance. It is specifically designed for use when
heating or cooking food. The use of corrosive
chemicals in heating or cleaning will damage the
appliance and could result in injury.
▯ Do not dry clothes, newspapers or other
materials in the oven. Do not use newspapers or
paper bags for cooking. Fire could result.
▯ Do not use recycled paper products unless
labeled safe for microwave use. They may
contain impurities which may cause sparks and
result in fires when used.
▯ Always use potholders when removing items from
the oven. The cooking container and the glass
tray can be hot even if the oven is cool.
▯ Whenever possible, do not operate the ventilation
system during a cooktop fire. However, do not
reach through fire to turn it off.
▯ Do not mount over sink.
▯ Do not store anything directly on top of the
appliance surface when the appliance is in
operation.
▯ Oversized food or oversized metal utensils
should not be inserted in a microwave oven as
they may create a fire or risk of electric shock.
▯ Do not clean with metal scouring pads. Pieces
can burn off the pad and touch electrical parts
involving a risk of electric shock.
▯ Do not store any materials, other than
manufacturer’s recommended accessories, in
this oven when not in use.
▯ Do not cover racks or any other part of the oven
with metal foil. This will cause overheating of the
oven.
In Case of Fire
If materials inside an oven should ignite:
1.
Keep door closed
2.
Turn appliance off
3.
Unplug the appliance or shut off at fuse or circuit
breaker
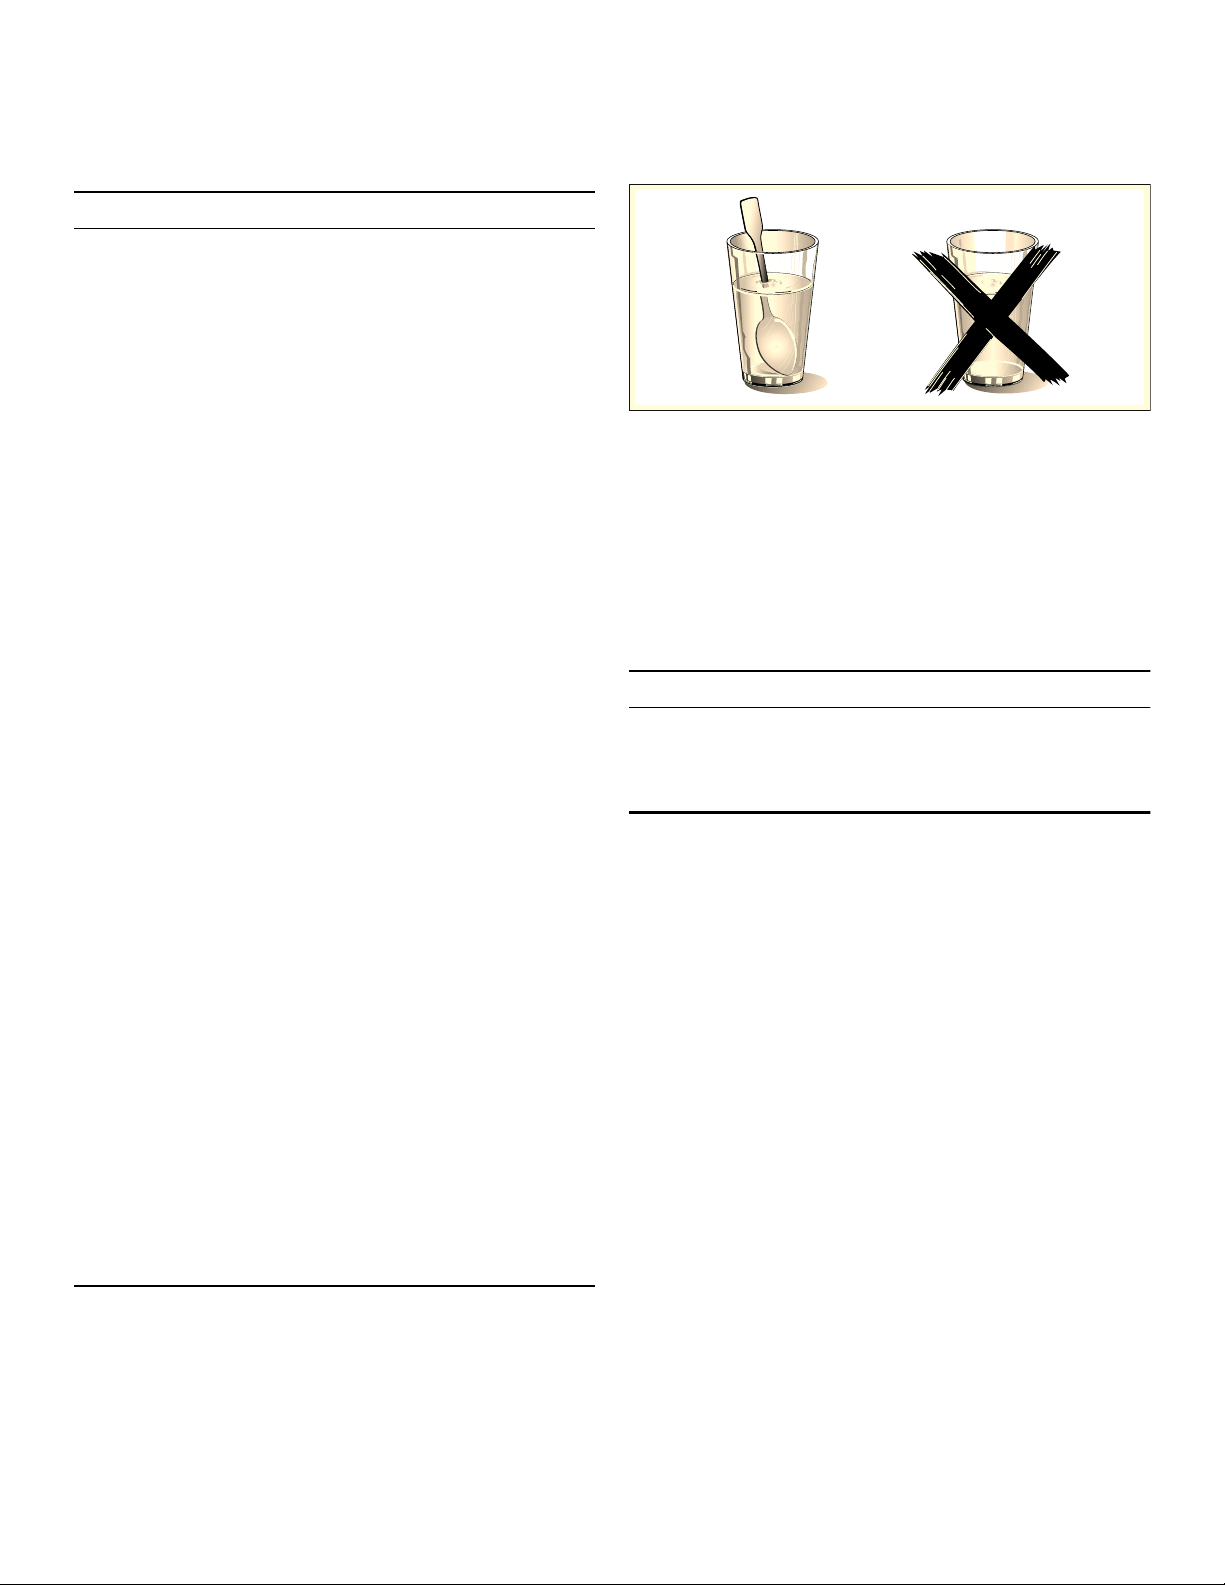
Liquids
Liquids, such as water, coffee, or tea could be
overheated. They can be heated beyond the boiling point
without appearing to boil. For example, visible bubbling
or boiling when the container is removed from the
microwave oven is not always present. THIS COULD
RESULT IN VERY HOT LIQUIDS SUDDENLY BOILING
OVER WHEN THE CONTAINER IS DISTURBED OR A
UTENSIL IS INSERTED INTO THE LIQUID.
When heating liquids, always place a glass rod/spoon in
the container. This will prevent delayed boiling.
CAUTION
Metal e.g. a spoon in a glass must be kept at least 1 inch
(25 mm) from the oven walls and the inside of the door.
Sparks could irreparably damage the glass on the inside
of the door.
▯ Take ready meals out of the packaging. They will heat
up more quickly and evenly in microwaveable
ovenware. The different components of the meal may
not require the same amount of time to heat up.
▯ Always cover the food. If you do not have a suitable
cover for your container, use a plate or special
microwave foil.
▯ Stir or turn the food several times during cooking.
Check the temperature.
▯ After heating, allow the food to stand for a further 2 to
5 minutes so that it can achieve an even temperature.
▯ Always use an oven cloth or oven gloves when
removing plates from the oven.
Cooking Items
Eggs: Do not cook or reheat whole eggs, with or without
shell. Steam buildup in whole eggs may cause them to
explode, and possibly damage the oven or cause injury.
Reheating sliced hard-boiled eggs and cooking
scrambled eggs is safe.
Popcorn: Use only popcorn in packages designed and
labeled for microwave use, or pop it in a microwave oven
corn popper. Follow popcorn manufacturers’ directions
and use a brand suitable for the wattage of your oven.
Do not continue to heat after popping has stopped.
Popcorn will scorch or burn. Do not leave oven
unattended.

9 IMPORTANT SAFETY INSTRUCTIONS
READ ALL INSTRUCTIONS BEFORE USING THE APPLIANCE
8
CAUTION
When using pre-packaged microwave popcorn, check
package weight before using the popcorn function. Set
the oven for the weight of the popcorn package. If these
instructions are not followed, popcorn may not pop
adequately or may ignite and cause fire.
Foods with nonporous skins: Potatoes, tomatoes, sweet
potatoes, apples, whole squash and sausages are
examples of foods with nonporous skins. These types of
foods must be pierced before cooking to prevent them
from exploding.
Baby food / Baby formula: Do not heat baby bottles or
food in microwave oven. The glass jar or the surface of
food may appear warm while the interior can burn the
infant’s mouth and esophagus.
Deep fat frying: Do not deep fat fry in oven. Oil can be
heated beyond ideal temperatures very quickly in a
microwave oven. Temperatures can climb high enough
for the cooking oils to reach their respective flash points
and burst into flames. The heated oil may bubble and
spatter causing possible damage to the oven and
perhaps result in burns. Additionally, microwave–safe
utensils may not be able to withstand the temperature of
the hot oil, and could result in the utensil shattering, if it
contains a slight imperfection, scratch or chip.
Home Canning / Drying foods / Small quantities of
foods: Do not use microwave oven for home canning or
heating of any closed jar. Pressure will build up and the
jar may explode. In addition, the oven cannot maintain
the food at the proper canning temperature. Improperly
canned food may spoil and be dangerous to consume.
Small quantities of food or foods with low moisture
content can dry out, burn or catch on fire.
Do not dry meats, herbs, fruits or vegetables in your
oven.
Proper cooking depends on time set and weight of food.
If you use a smaller portion than recommended and
cook at the time for the recommended portion, fire could
result.
Browning dishes: Microwave browning dishes or grills
are designed for microwave cooking only. Preheating
times vary depending on the size of the browning dish
and food being cooked. Always follow instructions
provided by the browning dish or grill manufacturer. Do
not preheat browning dishes more than 6 minutes.
Oven roasting bags: If an oven bag is used for
microwave cooking, prepare according to package
directions. Do not use wire twist–ties to close bags,
instead use nylon ties, cotton string or a strip cut from
the open end of the bag. Make six ½" (12.7 mm) slits by
closure. Place oven cooking bag in a dish slightly larger
than the food being cooked.
Cooking Utensils
See also Microwave Utensil Guide.
Cooking utensils, the glass tray and racks get hot during
microwaving. Always use potholders when removing
items from the oven. Allow the glass tray and the metal
racks (if used) to cool before handling.
Do not use metal utensils, or dishes with metallic trim in
the oven.
When using aluminum foil in the oven, allow at least
1 inch (25 mm) of space between foil and interior oven
walls or door.
The glass tray and the metal racks (if used) will get hot
during cooking. The cooking container and the glass tray
can be hot even if the oven is cool.
Never use paper, plastic, or other combustible materials
that are not intended for cooking.
When cooking with paper, plastic, or other combustible
materials, follow manufacturer’s recommendations on
product use. Do not use paper towels which contain
nylon or synthetic fibers. Heated synthetics could melt
and cause paper to ignite
Do not heat sealed containers or plastic bags in oven.
Food or liquid could expand quickly and cause container
or bag to break. Pierce or open container or bag before
cooking.
Glass Tray / Turntable Ring
Do not operate the oven without the turntable roller rest
and the glass tray in place.
Do not operate the oven without the glass tray in place.
Improper cooking or damage to the oven could result.
Verify that the glass tray is properly positioned and
turning when the oven is in use.
Note: The glass tray can turn in either direction.
Only use the glass tray designed for this oven. Do not
substitute any other tray.
Allow the glass tray to cool before cleaning or placing in
water.
Do not place food directly on the glass tray. Always place
food in a microwave safe dish.
Always replace the turntable ring and the glass tray in
their proper positions.
The turntable ring must always be used for cooking
along with the glass tray.
Thermometers
Do not use regular cooking thermometers in oven. Most
cooking thermometers contain mercury and may cause
electrical arc, malfunction, or damage to the oven.

9
9 IMPORTANT SAFETY INSTRUCTIONS
READ ALL INSTRUCTIONS BEFORE USING THE APPLIANCE
Pacemakers
CAUTION
To avoid pacemaker malfunction, consult physician or
pacemaker manufacturer about effects of microwave
energy on pacemaker.
Fan Motor Operation
After using the oven the fan motor can continue to run to
cool the electric components. This is perfectly normal,
and you can take out the food from the oven while the
fan operates.
State of California Proposition 65
Warnings:
WARNING
This product can expose you to chemicals including vinyl
chloride, which is known to the State of California to
cause cancer and birth defects or other reproductive
harm. For more information go to
www.P65Warnings.ca.gov.
SAVE THESE INSTRUCTIONS.

10
Causes of Damage
NOTICES:
▯ Metal e.g. a spoon in a glass must be kept at least
1 inch (25 mm) from the oven walls and the inside of
the door. Sparks could irreparably damage the glass
on the inside of the door.
▯ Water in the hot oven interior: Never pour water into
the hot oven interior. Steam is produced. Damage to
the enamel can arise due to the temperature change.
▯ Do not leave moist groceries in a closed oven for an
extended period of time. It can lead to corrosion inside
the oven.
▯ Fruit juice can leave stains in the oven. Always remove
fruit juice immediately when safe to touch, and wipe up
first with a damp and then a dry cloth.
▯ Cooling with the appliance door open: only allow the
oven cavity to cool when it is closed. Even if the
appliance door is only open a little, front panels of
adjacent units could be damaged over time.
▯ Highly soiled door seal: the appliance door will no
longer close properly during operation if the door seal
is highly soiled. Adjoining furniture fronts may be
damaged. Always keep the door seal clean.
▯ Appliance door as a seat or storage surface: do not
stand, sit or hang on the appliance door. Do not place
any cookware or accessories on the appliance door.
▯ Inserting accessories: depending on the appliance
type, accessories can scratch the door pane when
closing the appliance door. Always slide accessories
fully into the oven interior.
▯ Do not hold or carry the appliance by the door handle.
The door handle cannot carry the weight of the device
and could break off, or the hinges can be damaged.
▯ Operating the microwave without food in the oven
cavity may lead to overloading. Never run the
microwave unless there is food in the oven cavity. An
exception to this rule is a short ovenware test, see
section ~ "Microwave utensil guide"
▯ Always set the microwave power as recommended for
the food. High power settings can overheat foods very
quickly.
▯ The turntable may jump if overloaded.
Protecting the environment
Unpack the appliance and dispose of the packaging in
an environmentally friendly manner.
Tips for saving energy
▯ Open the appliance door as little as possible while
cooking, baking or roasting.
▯ It is best to bake several cakes in succession. The
oven is still warm. This shortens the baking time for the
second cake. You can also slide in two loaf tins next to
each other.

11
Getting to Know the Appliance
This section outlines and describes the features,
indicators and controls of the appliance. You will also
find information on the various functions of your
appliance.
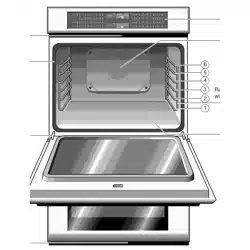
Parts
Oven Vents
The oven vents are located around the sides of the oven
cavity. Warm air may be released from the top and
bottom vents before, during and after cooking. It is
normal to see steam escaping from these vents, and
condensation may collect in this area. This area may be
warm when the oven is in use. Do not block any vents,
since they are important for air circulation.
Cooling Fan
The cooling fan runs during all cooking modes. The fan
can be heard when it is running, and warm air may be
felt as it is released from the oven vents. The fan may
also run after the oven is off.
0LFURZDYH
PLQV
1 Control panel and display
2 Oven vents
3 Door gasket
4 Door hinges
5 Glass turntable
6 Roller rest
12
Control Panel
You can set your appliance's various functions on the
control panel using the full touch color display. The full
touch color display shows you the current settings.
Operating Controls
Use the controls to set your appliance simply and
directly.
Touch buttons
There are sensors under the touch buttons. Press on the
words of the touch buttons to select a function. The
available functions are indicated by a light above the
respective touch button. Depending on the operation you
are running, the number of available functions can
change.
--------
Full touch color display
Use the full touch color display to navigate through the
lines on the display and select the settings.
In order to adjust a setting, touch the appropriate place
on the display with your finger. The area gets brighter. On
this area of the display, swipe your finger to the left or
right until the desired setting is displayed enlarged.
Accessories
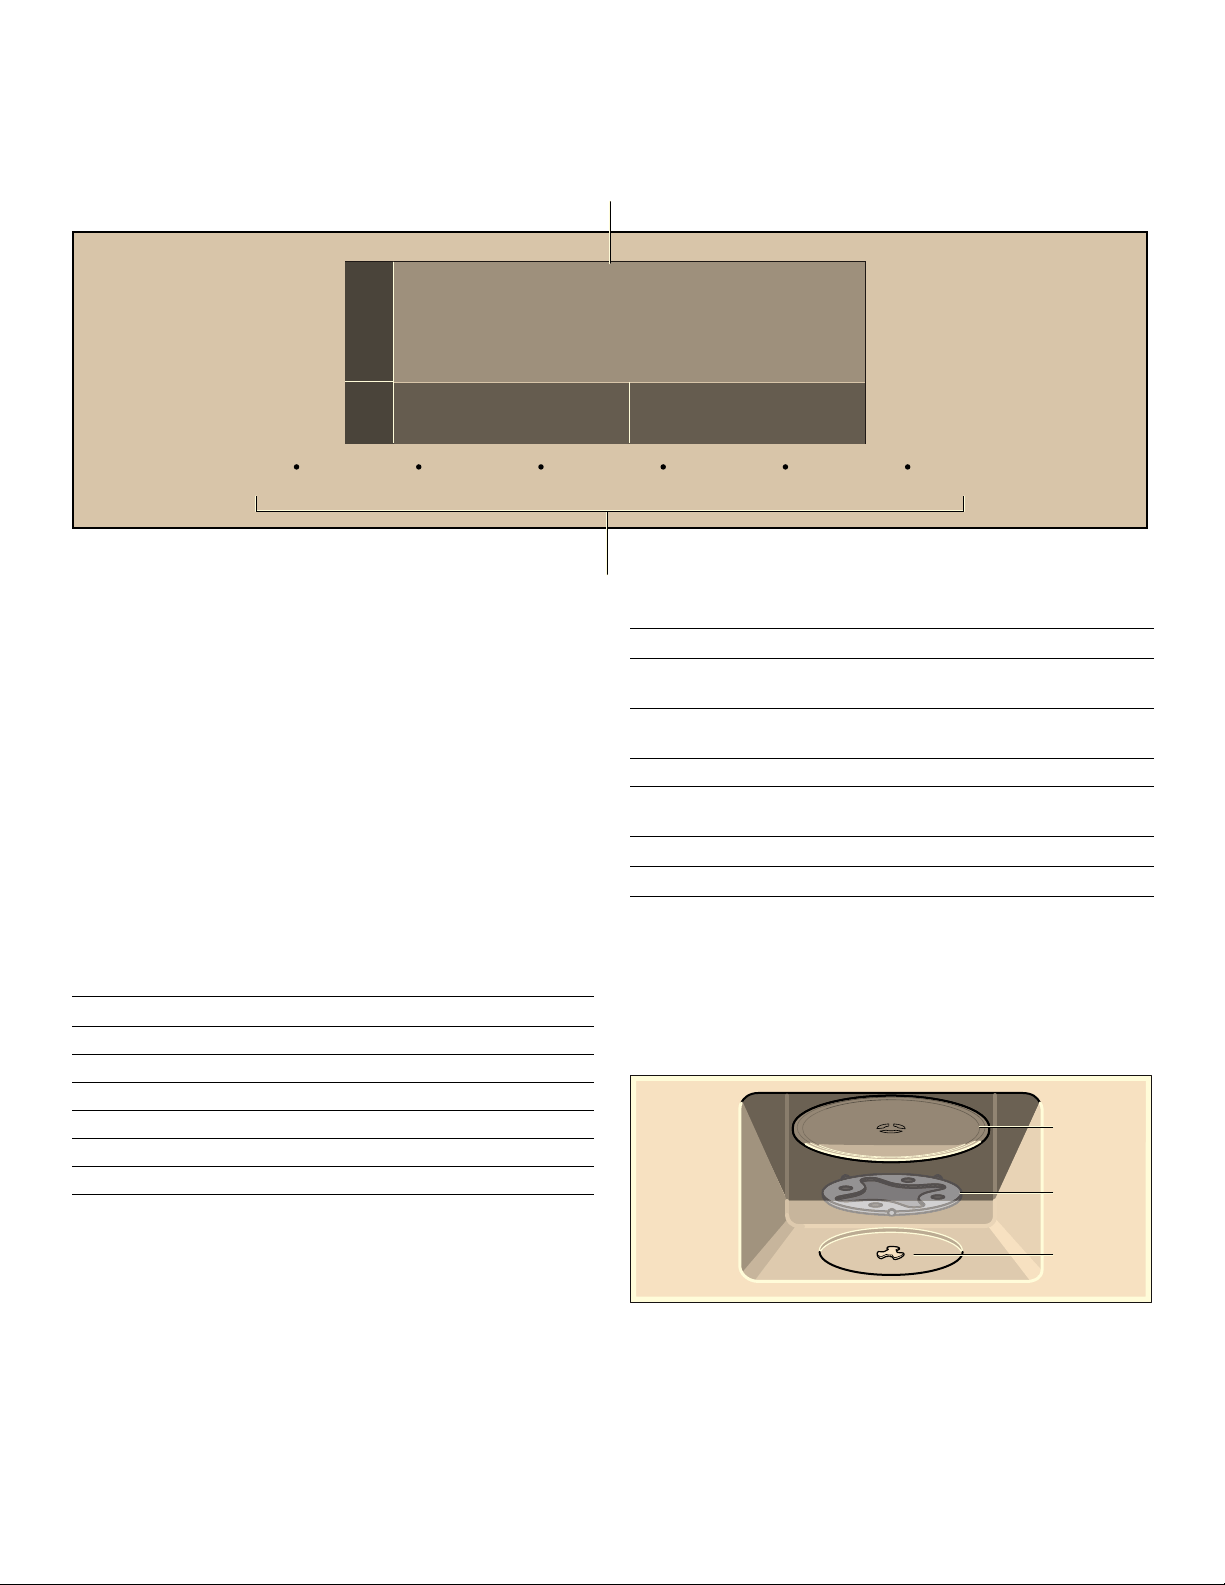
How to install the turntable
1.
Place the roller rest (a) in the recess in the oven cavity.
2.
Let the turntable (b) slot in place in the drive (c) in the
center of the floor of the oven cavity.
Note: Do not use the appliance if the turntable is not in
place. Confirm that all parts are properly seated and that
the turntable rotates freely when the microwave is
operated.
ON l OFF TIMERS INFOLOCK START l STOPSETTINGS
0LFURZDYH
PLQV
$GGVHF
(
Full touch color display
0
Touch buttons
Touch button Use
ON I OFF Switches the appliance on or off
TIMERS Sets the kitchen timer
SETTINGS Enters basic settings menu
LOCK Activates/Deactivates child lock
INFO Displays additional information
START I STOP Starts or pauses the operation
Direction Use
Navigate to the left Swipe to the right on the display
with your finger
Navigate to the right Swipe to the left on the display
with your finger
Navigate up Touch the top line of the display
Navigate down Touch the bottom line of
the display
;
Go to previous screen
8
Confirm setting
E
D
F

13
Before First Use
Before you can use your new appliance, you must enter
certain settings. You must also clean the oven cavity and
accessories.
Before using the appliance for the first
time
▯ Appliance must be properly installed by a qualified
technician before use.
▯ Remove all packing materials from inside and outside
the oven.
▯ While cool, wipe with a clean, damp cloth and dry.
▯ There may be a slight odor from your new appliance;
this is normal and will disappear after a short time.
▯ Optimum cooking results depend on proper cookware
being used.
▯ Read and understand all safety precautions and Use
and Care Guide information.
▯ Execute the following sections prior to operating.
Initial operation
As soon as the appliance is connected to the power
supply, the first setting "Time of Day" appears on the
display.
Setting the time of day
1.
Touch the bottom line.
The time setting options are displayed.
2.
Touch the “Hours” touch field and swipe to the left or
right to select the current hour.
3.
Touch the "Minutes" touch field and swipe to the left or
right to select the current minute.
4.
Touch the 8 symbol to apply the settings.
Setting the language
1.
Swipe to the left to get to the next setting.
2.
Touch the bottom line.
3.
Swipe to the left or right to select the required
language.
4.
Touch the top line.
Setting the time display
1.
Swipe to the left to get to the next setting.
2.
Touch the bottom line.
3.
Swipe to the left or right to select how the clock should
be displayed when the appliance is in stand-by mode.
4.
Press the SETTINGS touch button to complete initial
use.
5.
Touch the Save touch field.
“First start up finished” is displayed. The appliance
goes to stand-by mode.
Notes
▯ You can change these settings at any time in the basic
settings menu. ~ "Adjust Basic Settings" on page 23
▯ After connecting the appliance to the power or
following a power failure, the settings for initial use
may be shown in the display.
Cleaning accessories
Before using accessories for the first time, thoroughly
clean them with hot soapy water and a soft dish cloth.
7LPHRI'D\
/DQJXDJH
6HWFXUUHQWWLPHRIGD\
0LQXWHV
+RXUV
/DQJXDJH
7LPH'LVSOD\
(QJOLVK
6HWWKHODQJXDJH\RXUHTXLUH
7LPHRI'D\
7LPH'LVSOD\
$QDORJ
6HOHFWZKLFKFORFNGLVSOD\LVVKRZQ
/DQJXDJH
'LJLWDO 2II
ZKHQWKHDSSOLDQFHLVVZLWFKHGRII

14
Operating the appliance
You have already learned about the controls and how
they work. Now we will explain how to apply settings on
your appliance. You will learn about what happens when
you switch the appliance on and off, and how to select
the operating mode.
Setting the appliance
Switching the Appliance On and Off
Touch the ON l OFF touch button to switch the appliance
on or off.
The appliance will automatically go to the main menu.
Changing the settings of the current mode
You can change the settings during operation. Touch the
touch field of the value you want to change.
Pausing the operation
Touch the START l STOP touch button to pause the
operation. Press the START l STOP touch button again to
continue the operation.
Opening the appliance door interrupts the operation.
Touch the START l STOP touch button once the door has
been closed. The operation continues.
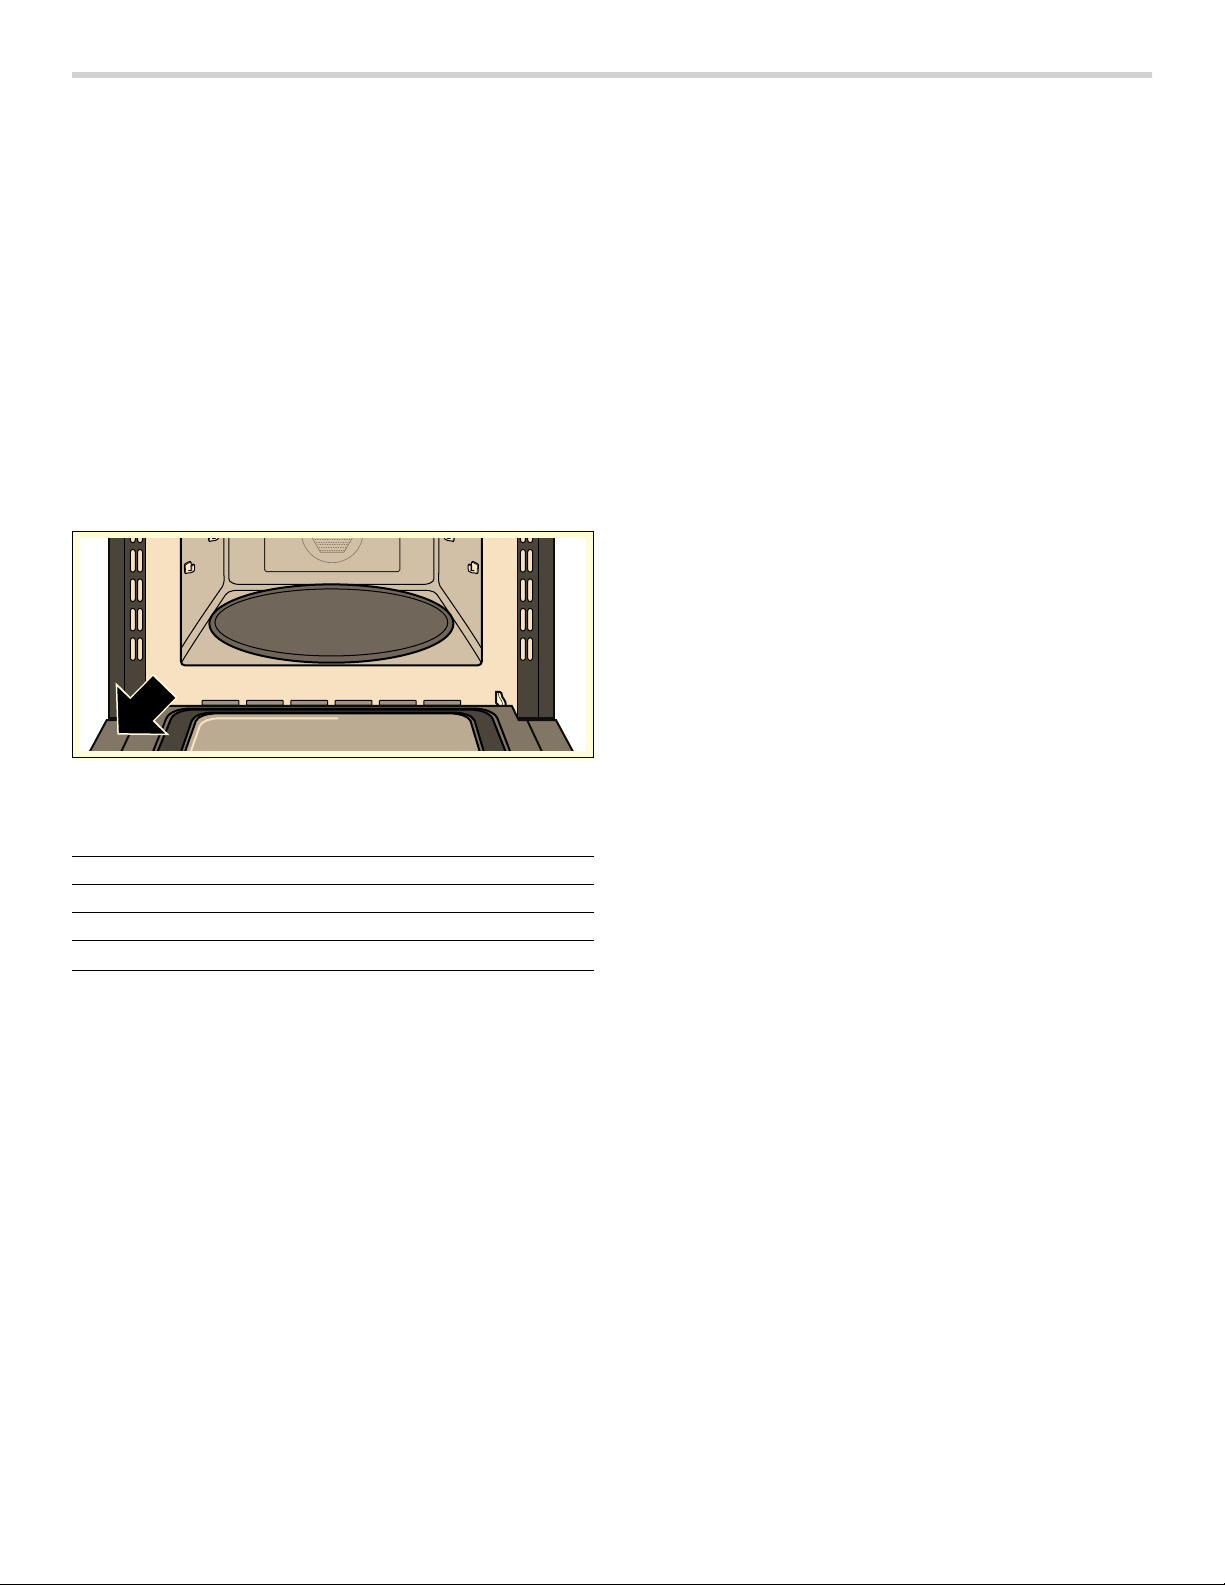
Opening the appliance door
If you open the appliance door during an operation, the
operation is paused. To continue operation, close the
door and touch the START l STOP touch button.
Note: For some types of heating, the operation
continues to run even when the appliance door is open.
Changing the operating mode
Touch the START l STOP touch button, then set a
different mode. Touch the ; symbol to navigate to the
main menu.
Switching the appliance off
Touch the ON l OFF touch button.
Operating features
Your appliance has several additional operating features
that help you to use the appliance correctly and
effectively.
Default values
The appliance suggests a setting for each operating
mode. You can accept this value or change it in the
appropriate area.
Status bar
The status bar fills in from left to right on the display. It
indicates a visual display of the set microwave duration.
INFO Touch Button
If the INFO touch button lights up, important information
regarding the mode you are using is available. This may
include for example recommendations on suitable
cookware or how to prepare food for a safe cooking
result. When you touch the INFO touch button, the
information is displayed for a few seconds.
Sounds
The appliance uses various sound signals during
operation. A sound signal can be heard whenever you
use a touch button or touch field, or when an operation is
started or finished. You can adjust these sounds in the
Settings menu. ~ "Adjust Basic Settings" on page 23
Notification display
Whenever an operation or timer is finished, a notification
appears on the display. Touch the display screen to
confirm and continue operation.

15
Microwave
You can use the microwave to cook, heat up or defrost
food quickly.
To ensure optimum use of the microwave, please
observe the notes on cookware and familiarize yourself
with the data in the cooking charts at the end of this Use
and Care Guide.
Microwave utensil guide
Suitable ovenware
▯ Heat-resistant glass, glass ceramic and
earthenware:
Utility dishes, loaf dishes, pie plates, cake plates, liquid
measuring cups, casseroles and bowls without
metallic trim (e.g. Pyrex
®
, Anchor Hocking™, Corning
Ware
®
, Emile Henry, etc.).
▯ China:
Bowls, cups, serving plates and platters without
metallic trim.
▯ Plastic films and wraps:
Plastic wrap (as a cover) - lay the plastic wrap loosely
over the dish and press it to the sides. Vent plastic
wrap by turning back one edge slightly to allow excess
steam to escape. The dish should be deep enough so
that the plastic wrap will not touch the food.
▯ Microwave-safe plastics:
Microwave-safe plastic dishes, cups, semi-rigid freezer
containers and plastic bags for short cooking times.
Use these with care because the plastic may soften
from the heat of the food.
▯ Paper products:
Paper towels, wax paper, parchment paper, paper
napkins and paper plates with no metallic trim or
design. Look for the manufacturers label for any
special instructions for use in the microwave oven.
Unsuitable ovenware
▯ Metal utensils and cookware:
Metal shields the food from microwave energy and
produces uneven cooking. Also, avoid metal skewers,
thermometers or foil trays. Metal utensils can cause
arcing, which can damage your microwave oven.
▯ Metal decoration:
Bowls, cups, serving plates and platters with metallic
trim.
▯ Aluminum foil:
Avoid large sheets of aluminum foil because they
hinder cooking and may cause harmful arcing. Use
small pieces of foil to shield poultry legs and wings.
Keep ALL aluminum foil at least 1 inch (25 mm) from
the side walls of the oven cavity and door of the
microwave.
▯ Wood:
Wooden bowls and boards will dry out and may split
or crack when you use them in the microwave oven.
Baskets made of wood will react in the same way.
▯ Tightly covered cookware:
Be sure to leave openings for steam to escape from
covered cookware. Pierce plastic pouches of
vegetables or other food items before cooking. Tightly
closed pouches may explode.
▯ Brown paper:
Avoid using brown paper bags. They absorb heat and
can burn.
▯ Flawed or chipped cooking utensils:
Any utensil that is cracked, flawed or chipped may
break in the oven.
▯ Metal twist ties:
Remove metal twist ties from plastic or paper bags.
They become hot and could cause a fire.
Ovenware test
Do not turn on the microwave unless there is food inside.
The following ovenware test is the only exception to this
rule.
Perform the following test if you are unsure whether your
ovenware is suitable for use in the microwave:
1.
Heat the empty ovenware at maximum power for ½ to
1 minute.
2.
Check the temperature occasionally during that time.
The ovenware should still be cold or warm to the touch.
The ovenware is unsuitable if it becomes hot or if sparks
are generated.
Microwave power levels
You can select from 10 different microwave power levels.
If you do not set a power level, the microwave will
automatically operate at the highest power level 100%.
The table below provides suggested power levels for
various types of food that can be prepared in the
microwave.
Microwave
output
Use for
100%
high
Boiling water
Cooking ground meat
Making candy
Cooking fresh fruit & vegetables
Cooking fish & poultry
Preheating browning dish
Reheating beverages
Cooking bacon slices
90% Reheating meat slices quickly
Saute onions, celery & green peppers
80% All reheating
Cooking scrambled eggs

16
Setting the microwave
The appliance must be turned off.
1.
Touch the ON l OFF touch button to switch on the
appliance.
You go directly to the main menu.
2.
Touch “Microwave”.
3.
A microwave power level in percent is suggested.
4.
Touch the power level field and swipe to the left or
right to select a different power level.
Confirm your setting by touching the 8 symbol.
Note: If you do not touch the 8 symbol the changes
will be taken over automatically after a few seconds.
5.
Touch the field that displays the default cooking time.
You can set hours, minutes and seconds.
Touch the required field and swipe to the left or right to
set the cooking time.
Confirm your setting by touching the 8 symbol.
Note: If you do not touch the 8 symbol the changes
will be taken over automatically after a few seconds.
6.
Touch the START l STOP touch button to start the
appliance operation.
The status bar begins to fill up. The cooking time
counts down on the display.
Changing the cooking time
You can change the cooking time at any time during
operation, by touching the time as it counts down. Touch
the 8 touch field to apply the settings.
The operation continues automatically with the new
settings.
Add 30 seconds cooking time
Touch the “Add 30 sec” field on the touch screen to
increase the cooking time in increments of 30 seconds.
You can also touch this field during microwave operation
to add 30 seconds to the remaining microwave time.
70% Cooking breads & cereal products
Cooking cheese dishes
Cooking muffins, brownies & cupcakes
Cooking whole poultry
60% Cooking pasta
50% Cooking meat
Cooking custard
Cooking spare ribs, rib roast & sirloin
roast
40% Cooking less tender cuts of meat
Reheating frozen packaged foods
30% Thawing meat, poultry & seafood
Cooking small quantities of food
Finish cooking casseroles, stew & some
sauces
Melting chocolate
20% Softening butter & cream cheese
10%
low
Softening ice cream
Raise yeast dough
Microwave
output
Use for
%HYHUDJH 0LFURZDYH 3RSFRUQ
FXSV R]
0LFURZDYH
PLQV
$GGVHF
0LFURZDYH
PLQV
0LQXWHV
+RXUV 6HFRQGV
0LFURZDYH
PLQV
$GGVHF

17
Changing the microwave power level
You can change the microwave power level at any time
during operation, by touching the power level field on the
display. Touch the 8 touch field to apply the settings.
The operation continues automatically with the new
settings.
The cooking time has elapsed
As soon as the set microwave time has been reached,
an audible signal sounds and the appliance ends the
microwave operation automatically.
“Microwave completed x” appears on the display.
Touch the display to stop the audible signal.
You can restart the microwave operation with the same
power level by setting a new time and touching the
START l STOP touch button.
Pausing the operation
Touch the START l STOP touch button to pause the
operation. Press the START l STOP touch button again to
continue the operation.
Opening the appliance door interrupts the operation.
Touch the START l STOP touch button once the door has
been closed. The operation continues.
Switching the appliance off
Touch the ON l OFF touch button.
Suggestions for best results
To help you achieve the best possible results from your
microwave oven, read the following suggestions below:
▯ Storage temperature
Foods taken from the freezer or refrigerator take
longer to cook.
▯ Size
Small pieces of food cook faster than large ones.
Pieces similar in size and shape will cook more evenly
when cooked together. For more even results, reduce
the power levels when cooking large pieces of food.
▯ Natural moisture
Very moist foods cook more evenly because
microwave energy heats water molecules very
efficiently.
▯ Stirring
Stir foods such as casseroles and vegetables from the
outside to the center to distribute the heat more
evenly. This will allow the food to cook faster.
(Constant stirring is not necessary.)
▯ Turning
Turn over foods such as pork chops, roasts or whole
cauliflower halfway through the cook time. This will
help to expose all sides equally to microwave energy.
▯ Placing food
Place delicate areas of food items, such as asparagus
tips, toward the center of the turntable tray.
▯ Arranging food
Arrange unevenly shaped foods, such as chicken
pieces or salmon, with the thicker or meatier parts
toward the outside of the turntable tray.
▯ Letting food stand
After removing the food from the microwave, cover the
food with foil or a casserole lid and let it stand to finish
cooking. This will help the food finish cooking in the
center and avoids overcooking the outer edges. The
length of stand time depends on the density and
surface area of the food items.
▯ Wrapping foods
Sandwiches and many other food types containing
pre-baked bread should be wrapped in paper towels
or wax paper prior to placing in the microwave to help
prevent the food items from drying out while heating.

18
Microwave programs
You can prepare food very easily using the various
programs. You select a program and enter the weight or
amount of your food. The program then applies the most
suitable settings.
Note: The display will give you useful instructions for
each of the microwave programs. Press the INFO button
whenever it lights up, and read and follow the displayed
instructions for best cooking results.
Information on the settings
▯ The cooking result depends on the quality of the food
and the type of cookware. For an optimal cooking
result, use food that is in good condition and chilled
meat only. For frozen food, use food straight out of the
freezer only.
▯ For some dishes, you will be required to enter the
weight or amount. The appliance will then apply the
time and temperature settings for you.
It is not possible to set weights or amounts outside of
the intended range.
▯ Information is provided, e.g. on cookware, shelf
position or the addition of liquid when cooking meat.
Some food requires turning or stirring, etc. during
cooking. This is shown in the display shortly after
operation starts. An audible signal will remind you at
the right time.
Setting a Microwave Program
Example: Setting Popcorn mode for 2.75 oz.
1.
Touch the ON l OFF touch button.
The main menu is displayed.
2.
Swipe to the right or left to select a Microwave
Program.
3.
Touch the Melt Butter program.
4.
Swipe to the left or right to select 1/4 cup.
5.
Touch “Continue”.
6.
Touch the START l STOP touch button.
The appliance starts operating and the cook time counts
down on the display.
Changing the operating mode
Touch the START l STOP touch button, then set a
different mode. Touch the
; symbol to navigate to the
main menu.
When the program is finished
The display shows “Program completed. Enjoy your
meal!”
Touch the display to turn off the notification. The
previously set program is displayed. You can continue
cooking or turn off the appliance.
Switching off the appliance
Touch the ON l OFF touch button to switch off the
appliance.
Beverage
The Beverage mode lets you heat 0.5 to 2 cups of a
beverage.
The following chart shows the available options and
settings ranges.
Setting
1.
Touch the ON l OFF touch button.
The main menu is displayed.
2.
Select “Beverage”.
3.
Swipe to the left or right to select the desired beverage
size.
4.
Touch “Continue”.
5.
Touch the START l STOP touch button.
The appliance starts operating and the cook time counts
down on the display.
3RSFRUQ 6HQVRU&RRN 6HQVRU5HKHDW
R] %DNHG3RWDWR
$XWR
0HOW%XWWHU
FXS
&RQWLQXH
FXSWEVS
Quantity (cups) Quantity (oz)
0.5 cups about 4 oz
1 cup about 8 oz
1.5 cups about 12 oz
2 cups about 16 oz

19
Popcorn
9 CAUTION
Do not leave the oven unattended while popping
corn. Popcorn may ignite and cause fire.
The popcorn mode lets you pop 5 different bag sizes of
commercially packaged microwave popcorn.
The following chart shows the available options and
settings ranges.
Setting
1.
Touch the ON l OFF touch button.
The main menu is displayed.
2.
Select “Popcorn”.
3.
Swipe to the left or right to select the desired amount.
4.
Touch “Continue”.
5.
Touch the START l STOP touch button.
The appliance starts operating and the cook time counts
down on the display.
Sensor Cook
The Sensor Cook mode allows you to cook many of your
favorite foods without selecting cooking times and power
levels. The microwave oven automatically determines the
required cooking time for each food item.
For best results for cooking by sensor, follow these
recommendations:
▯ Food cooked with the sensor system should start from
normal storage temperature.
▯ Turntable tray, ceramic tray and outside of container
should be dry.
▯ Foods should always be covered loosely with
microwavable plastic wrap, wax paper or lid.
▯ Foods should be cooked on a microwaveable dinner
plate.
▯ Touch the INFO button for information, e.g. on
cookware, rack position or the addition of liquid when
cooking meat.
▯ Do not open the door or touch the START l STOP
touch button during sensing time. When sensing time
is over, the remaining cooking time will appear in the
display. At this time you can open the door to stir, turn
or rearrange the food.
The following chart shows the amount of food you can
cook at any one time.
Notes
▯ Cover with vented plastic wrap or wax paper.
▯ Reheat food on a microwaveable dinner plate.
▯ Add water to dry rice (1 part rice/2 parts water).
▯ Pierce potatoes and vegetables with nonporous skins
with a fork. Do not cover.
Setting
1.
Touch the ON l OFF touch button.
The main menu is displayed.
2.
Select “Sensor Cook”.
3.
Swipe to the left or right to select the desired food.
4.
Touch the START l STOP touch button.
The appliance starts sensing.
5.
Once sensing is complete a notification is displayed.
Then the appliance starts cooking. The calculated
cook time counts down on the display.
Note: Do not open the door during the sensing
process, or the process will be cancelled. Once
sensing is completed, you can open the door to stir, turn
or rearrange the food. Touch the START l STOP touch
button to resume operation.
Quantity (oz) Quantity (g)
1.2 oz about 35 g
1.75 oz about 50 g
2.75 oz about 80 g
3.2 oz about 90 g
3.5 oz about 100 g
Sensor Cook program Quantity
Baked Potato 1 - 4 potatoes (8 - 32 oz)
Sweet Potato 1 - 4 potatoes (8 - 32 oz)
Fresh Vegetable 4 - 16 oz (0.25 - 1 lb)
Frozen Vegetable 6 - 16 oz (0.75 - 1 lb)
Ground Meat 8 - 24 oz (0.5 - 1.5 lb)
Fish / Seafood 8 - 20 oz (0.5 - 1.25 lb)
Brown Rice 0.5 - 2 cups (dry rice)
White Rice 0.5 - 2 cups (dry rice)
Frozen Entrées 10 - 20 oz
%DNHG3RWDWR 6ZHHW3RWDWR
SRWDWRHV
R]
SRWDWRHV
R]
)UR]HQ(QWU
R]

20
Sensor Reheat
The Sensor Reheat mode lets you reheat dinner plates or
casseroles (8-12 oz) for your cooking convenience.
For best results for cooking by sensor, follow these
recommendations:
▯ Food cooked with the sensor system should start from
normal storage temperature.
▯ Turntable tray, ceramic tray and outside of container
should be dry.
▯ Foods should always be covered loosely with
microwavable plastic wrap, wax paper or lid.
▯ Foods should be cooked on a microwaveable dinner
plate.
▯ Touch the INFO button for information, e.g. on
cookware, rack position or the addition of liquid when
cooking meat.
▯ Do not open the door or touch the START l STOP
touch button during sensing time. When sensing time
is over, the remaining cooking time will appear in the
display. At this time you can open the door to stir, turn
or rearrange the food.
The following chart shows the amount of food you can
cook at any one time.
Reheat cooking suggestions
Setting
1.
Touch the ON l OFF touch button.
The main menu is displayed.
2.
Select “Sensor Reheat”.
3.
Touch the START l STOP touch button.
The appliance starts sensing.
4.
Once sensing is complete a notification is displayed.
Then the appliance starts cooking. The calculated
cook time counts down on the display.
Note: Do not open the door during the sensing
process, or the process will be cancelled. Once
sensing is completed, you can open the door to stir, turn
or rearrange the food. Touch the START l STOP touch
button to resume operation.
Auto Defrost
With the Auto Defrost mode you can defrost three
different types of food by entering the weight. The ideal
defrost time will be calculated by the program.
The following chart shows the available options and
settings ranges.
Ovenware for defrosting
Place the food in a microwaveable shallow dish, such as
a glass casserole dish or glass plate, but do not cover.
Stand time
The defrosted food should be left to stand for an
additional 10 to 30 minutes until it reaches an even
temperature. Large pieces of meat require a longer
standing time than smaller pieces. Flat pieces of meat
and items made from ground meat should be separated
from each other before leaving to stand.
After this time, you can continue to prepare the food,
even though thick pieces of meat may still be frozen in
the middle.
Tips for defrosting
9 WARNING
HEALTH RISK
Liquid will be produced when defrosting meat or
poultry. Drain off this liquid when turning meat and
poultry, and under no circumstances, use it for other
purposes, or allow it to come into contact with other
foods.
▯ Always enter the weight in lb when using the defrost by
weight feature (see program table).
▯ Use the defrost mode for raw food items only.
▯ Defrosting gives best results when food to be thawed
is a minimum of 0° F (taken directly from a freezer). If
the food has been stored in a refrigerator-freezer that
Food/Quantity Directions
Dinner plate
1 serving
(1 plate)
Use only pre-cooked, refrigerated
foods. Cover plate with vented plastic
wrap or waxed paper, tucked under
plate. If food is not hot enough after
heating with the Reheat feature, con-
tinue heating using manual time and
power level setting.
Contents:
▯ 3-4 oz meat, poultry or fish
(up to 6 oz with bone)
▯ 1/2 cup starch
(potatoes, pasta, rice, etc.)
▯ 1/2 cup of vegetables
(about 3-4 oz)
Casserole, Pasta
1 to 4 servings
Cover plate with lid or vented plastic
wrap. If food is not hot enough after
heating with the Reheat feature, con-
tinue heating using manual time and
power level setting.
Stir foods once before serving.
Contents:
▯ Casserole: refrigerated foods
(such as beef stew or lasagna)
▯ Pasta: Canned spaghetti and ravi-
oli, refrigerated foods
Food type Quantity (lb)
Ground Meat 0.5 - 2 lb
Meat Pieces (Steaks/Chops) 0.5 - 3 lb
Poultry Pieces 0.5 - 3 lb

21
does not maintain a temperature of 5° F or below,
always program a lower food weight or lower cook
time to prevent cooking the food.
▯ If the frozen food is stored outside the freezer for up to
20 minutes, enter a reduced cook time or weight.
▯ The shape of the package will alter the defrosting time.
Shallow rectangular food packets defrost more quickly
than a deep frozen block of food.
▯ Separate pieces as they begin to defrost. Separated
frozen pieces of food defrost better.
▯ Shield warm areas of food with small pieces of
aluminum foil, if they start to heat up.
Use small pieces of aluminum foil to shield food items
like chicken wings, leg tips and fish tails.
Do not allow aluminum foil to touch the oven cavity
when defrosting.
Setting
1.
Touch the ON l OFF touch button.
The main menu is displayed.
2.
Select “Auto Defrost”.
3.
Touch the type of food you want to defrost.
4.
Swipe to the left or right to set the weight of the food.
5.
Touch “Continue”.
6.
Touch the START l STOP touch button.
The appliance starts operating and the cook time counts
down on the display.
Keep Warm
Use the Keep Warm mode to keep cooked foods hot and
ready to serve.
Notes
▯ Food cooked covered should remain covered during
Keep Warm.
▯ Pastry items (pies, turnovers, etc.) should be
uncovered.
▯ Complete meals kept warm on a dinner plate can be
covered during Keep Warm.
Setting
1.
Touch the ON l OFF touch button.
The main menu is displayed.
2.
Select “Keep Warm”.
3.
Touch the START l STOP touch button.
The status bar fills up quickly and the appliance starts
operating.
Melt Butter
The following chart shows the available options and
settings ranges.
Setting
1.
Touch the ON l OFF touch button.
The main menu is displayed.
2.
Select “Melt Butter”.
3.
Swipe to the left or right to select the desired amount.
4.
Touch “Continue”.
5.
Touch the START l STOP touch button.
The appliance starts operating and the cook time counts
down on the display.
Melt Chocolate
The following chart shows the available options and
settings ranges.
Setting
1.
Touch the ON l OFF touch button.
The main menu is displayed.
2.
Select “Melt Chocolate”.
3.
Swipe to the left or right to select the desired amount.
4.
Touch “Continue”.
5.
Touch the START l STOP touch button.
The appliance starts operating and the cook time counts
down on the display.
Note: After approximately half of the cook time has
elapsed, a beep sounds. You can open the door and stir
the food for more even heat distribution. Press the
START l STOP touch button to continue the operation.
Quantity in display
2 tbsp (tablespoons)
1/4 cup
1/2 cup
Quantity in display
1 cup
2 cups

22
Soften Ice Cream
The following chart shows the available options and
settings ranges.
Setting
1.
Touch the ON l OFF touch button.
The main menu is displayed.
2.
Select “Soften Ice Cream”.
3.
Swipe to the left or right to select the desired amount.
4.
Touch “Continue”.
5.
Touch the START l STOP touch button.
The appliance starts operating and the cook time counts
down on the display.
Soften Cream Cheese
The following chart shows the available options and
settings ranges.
Setting
1.
Touch the ON l OFF touch button.
The main menu is displayed.
2.
Select “Soften Cream Cheese”.
3.
Swipe to the left or right to select the desired amount.
4.
Touch “Continue”.
5.
Touch the START l STOP touch button.
The appliance starts operating and the cook time counts
down on the display.
Note: After approximately half of the cook time has
elapsed, a beep sounds. You can open the door and stir
the food for more even heat distribution. Press the
START l STOP touch button to continue the operation.
Timer
The Timer function works like a kitchen timer. The
appliance does not switch on and off automatically.
Kitchen Timer
The Kitchen Timer can be set when the appliance is
switched on or off.
1.
Touch the TIMERS touch button.
The kitchen timer function is shown in the display.
2.
Touch the required field and swipe to the left or right to
set the kitchen timer.
You can set hours, minutes and seconds.
3.
Touch the 8 symbol.
The kitchen timer begins to count down.
The . symbol and timer value are displayed in the top
left corner of the display.
Note: When the set time has elapsed, a short signal
sounds. “Kitchen Timer completed” is displayed. Touch
the notification to turn it off.
If you do not touch the notification it will turn itself off after
about one minute. The . symbol and 00 min 00 sec will
remain in the top left corner of the display. Touch the
display to cancel these indicators.
Checking, changing or deleting settings
1.
Touch the TIMERS touch button.
The time-setting options are shown in the display.
2.
Touch the required timer option.
3.
Swipe to the left or right on the touch display to
change the settings.
To delete a timer value, set “00:00“, or touch
“Cancel”.
4.
Touch the 8 symbol twice.
Quantity in display
8 oz
16 oz
32 oz
48 oz
Quantity in display
3 oz
6 oz
8 oz
PLQV
&DQFHO
.LWFKHQ7LPHU
0LQXWHV+RXUV 6HFRQGV

23
Childproof Lock
Your appliance is equipped with a childproof lock so that
children cannot switch it on accidentally or change any
settings.
Activating and Deactivating
The appliance has to be turned off.
1.
Touch and hold the LOCK touch button until "Panel
Lock activated" is displayed. The childproof lock is
activated. The
1 symbol is displayed in the top left
corner of the display.
2.
Touch and hold the LOCK touch button until "Panel
Lock deactivated" is displayed.
The childproof lock is deactivated.
Adjust Basic Settings
You can adjust various settings of your appliance, to
make using your appliance easy and convenient. If
necessary, you can change these settings in the menu
“Settings”.
Changing the Settings
The appliance has to be switched off.
1.
Touch the SETTINGS touch button.
2.
Swipe to the left or right to select the required setting.
3.
Touch the bottom line.
4.
Swipe to the left or right to select the required setting.
5.
If required touch the 8 symbol to apply the setting.
6.
Touch the top line.
7.
Touch the SETTINGS touch button.
8.
Touch "Save" to save the changes.
Available settings
Setting Options
Time of Day Set current time of day
Language english, français, español
Clock Format 12 hr, 24 hr
Time Display Digital, Analog, Off
Temperature Format Fahrenheit (°), Celsius (°C)
Signal Volume 1 - 5
Key Press Sound On, Off
Display Brightness 1 - 5
Demo Mode Yes, No
Factory Settings Reset

24
Cleaning and Maintenance
9 WARNING
Be sure the entire appliance has cooled and grease
has solidified before attempting to clean any part of
the appliance.
Cleaning Guide
▯ For best performance and for safety reasons, keep the
oven clean inside and outside. Take special care to
keep the inner door panel and oven front frame free of
food and grease build-up.
▯ Never use abrasive scouring powder or pads on the
microwave. Wipe the microwave oven inside and out
with a soft cloth and warm (not hot) mild detergent
solution. Rinse and wipe completely dry.
▯ Wipe spatters immediately with a wet paper towel,
especially after cooking greasy foods like chicken or
bacon.
▯ Clean your microwave oven weekly or more often, if
needed.
▯ Never operate the oven without food in the oven cavity;
this can damage the magnetron tube or glass tray.
You may wish to leave a cup of water standing inside
the oven when it is not in use to prevent damage if the
oven is accidentally turned on.
Part Recommendations
Oven cavity Keep inside (cavity) of the oven clean. Food particles and spilled liquids can stick to the
oven walls, causing the oven to work less efficiently.
Wipe up spills immediately. Use a damp, clean cloth and mild soap. DO NOT use harsh
detergents or abrasive cleaners.
To help loosen baked-on food particles or liquids, heat 2 cups of water (add the juice of
1 lemon if you desire to keep the oven fresh-smelling) in a 4 cup microwave-safe dish at
High power for 5 minutes or until boiling. Let stand in oven cavity for 1 or 2 minutes.
Glass turntable tray Remove glass turntable tray from the oven when cleaning the oven cavity and tray.
NOTICE: To prevent the glass turntable from breaking, handle with care and do not put it in
water immediately after cooking.
Wash the glass turntable tray in warm soapy water or in the dishwasher.
Turntable roller rest Clean with warm, soapy water. Rinse thoroughly and dry.
Door glass
Wash with soap and water or glass cleaner. Use Fantastik
®
or Formula 409
®
on a clean
sponge or paper towel and wipe clean. Avoid using abrasive cleaners, like powder cleaning
agents, steel wool pads and oven cleaners.
If steam accumulates inside or outside the oven door, wipe with a soft cloth. Steam can
accumulate when operating the oven in high humidity and in no way indicates microwave
leakage.
Painted surfaces
Clean with hot soapy water or apply Fantastik
®
or Formula 409
®
to a clean sponge or paper
towel and wipe clean. Avoid using abrasive cleaners, like powder cleaning agents, steel wool
pads and oven cleaners.
Stainless steel sur-
faces
Always wipe or rub in the direction of the grain. Clean with a soapy sponge, then rinse and
dry, or wipe with Fantastik
®
sprayed on a paper towel. Protect and polish with Stainless Steel
Magic
®
and a soft cloth. Remove water spots with a cloth dampened with white vinegar.
Do not use any cleanser that contains chlorine as these may rust the stainless steel
Plastic & Controls When cool, clean with soapy water, rinse and dry.
Printed areas
(words & numbers)
Do not use abrasive cleaners or petroleum-based solvents.

25
Before Calling for Service
Before calling customer service, consider the
suggestions and instructions below:
Problem Suggestion
Neither the display nor the oven
operates.
▯ Properly insert the plug into a grounded power outlet.
▯ Reset the household circuit breaker or replace any blown fuses.
The display works, but the oven
will not operate.
▯ Make sure the oven door is closed securely and completely.
▯ Check to see if packing material or other materials are stuck to the door seal.
▯ Check for damage to the oven door.
▯ Press and hold the START l STOP touch button and attempt to re–enter cooking
instructions.
The power goes off before the
cook time has elapsed.
▯ Reset the clock and any cooking instructions.
▯ Reset the household circuit breaker or replace any blown fuses.
▯ Press and hold the START l STOP touch button and attempt to re–enter cooking
instructions.
The microwave power level
switches from power level 100%
to power level 80%.
If the oven is set to cook for more than 30 minutes at 100% power level, it will
automatically reduce the power to a 80% power level after 30 minutes to avoid
overcooking.
You see sparks or arcing. Remove any metallic utensils, cookware or metal ties from the oven cavity. If using
aluminum foil, use only narrow strips and allow at least one inch between the foil
and the interior oven walls.
The turntable makes noises or
sticks.
▯ Clean the turntable, roller ring and oven cavity bottom.
▯ Make sure the turntable and roller ring are positioned correctly.
Using your microwave causes
TV or radio interference.
This is similar to the interference caused by other small appliances, such as hair
dryers. Move your microwave further away from other appliances, like your TV or
radio.
The display shows error mes-
sage E-xx and service hotline
A malfunction has occurred. Note any error codes that may appear on the display.
Disconnect the appliance from the power supply by switching off the fuse in the
fuse box and call an authorized servicer.
The display shows error mes-
sage E-11 and service hotline
The touch buttons do not operate properly. This may be due to condensation on
keypad. Clean the control panel with a dry cloth. Disconnect the appliance from
the power supply by switching off the fuse in the fuse box and switch it back on
after 10 seconds.
26
THERMADOR® Support
Before Calling Service
See the Use and Care Guide for troubleshooting
information. Refer to the “Statement of Limited Product
Warranty” in the Use and Care Guide.
To reach a service representative, see the contact
information at the front of the guide or in the following
section. Please be prepared with the information printed
on your product data plate prior to calling.
Data Plate
The data plate shows the model and serial number. Refer
to the data plate on the appliance when requesting
service.
The data plate can be found on the inside of the
appliance door.
To avoid having to search for each piece of information
when calling, you can enter the four items needed in the
spaces provided below.
Keep your invoice or escrow papers for warranty
validation if service is needed.
Service
We realize that you have made a considerable
investment in your kitchen. We are dedicated to
supporting you and your appliance so that you have
many years of creative cooking.
Please do not hesitate to contact our STAR® Customer
Support Department if you have any questions or in the
unlikely event that your THERMADOR® appliance needs
service. Our service team is ready to assist you.
USA
800-735-4328
www.thermador.com/support
Canada
800-735-4328
www.thermador.ca
Parts and Accessories
Parts, filters, descalers, stainless steel cleaners and more
can be purchased in the THERMADOR® eShop or by
phone.
USA
http://store.thermador.com/us
Canada
▯ If you live in any of the Atlantic provinces, Ontario, or
Québec contact:
Marcone
1.800.287.1627
▯ If you live in any of the Territories, Manitoba,
Saskatchewan, Alberta, or British Columbia contact:
Reliable Parts
1.800.663.6060
Model No.
FD-No.
Date of Purchase
Customer Service O

27
STATEMENT OF LIMITED PRODUCT WARRANTY
What this Warranty Covers &
Who it Applies to
The limited warranty provided by BSH Home Appliances
Corporation (“BSH“) in this Statement of Limited Product
Warranty applies only to the THERMADOR
®
appliance
(“Product“) sold to you, the first using purchaser,
provided that the Product was purchased:
▯ For your normal, household (non-commercial) use,
and has in fact at all times only been used for normal
household purposes.
▯ New at retail (not a display, "as is", or previously
returned model), and not for resale, or commercial
use.
▯ Within the United States or Canada, and has at all
times remained within the country of original purchase.
The warranties stated herein apply only to the first
purchaser of the Product and are not transferable.
Please make sure to return your registration card; while
not necessary to effectuate warranty coverage, it is the
best way for BSH to notify you in the unlikely event of a
safety notice or product recall.
How Long the Warranty Lasts
BSH warrants that the Product is free from defects in
materials and workmanship for a period of seven
hundred and thirty (730) days from the date of purchase.
The foregoing timeline begins to run upon the date of
purchase, and shall not be stalled, tolled, extended, or
suspended, for any reason whatsoever.
This Product is also warranted to be free from cosmetic
defects in material and workmanship (such as scratches
of stainless steel, paint/porcelain blemishes, chip, dents,
or other damage to the finish of the Product), for a period
of sixty (60) days from the date of purchase or closing
date for new construction. This cosmetic warranty
excludes slight color variations due to inherent
differences in painted and porcelain parts, as well as
differences caused by kitchen lighting, product location,
or other similar factors. This cosmetic warranty
specifically excludes any display, floor, “As Is”, or “B”
stock appliances.
Repair/Replace as Your Exclusive Remedy
During this warranty period, BSH or one of its authorized
service providers will repair your Product without charge
to you (subject to certain limitations stated herein) if your
Product proves to have been manufactured with a defect
in materials or workmanship. If reasonable attempts to
repair the Product have been made without success,
then BSH will replace your Product (upgraded models
may be available to you, in BSH’s sole discretion, for an
additional charge). All removed parts and components
shall become the property of BSH at its sole option. All
replaced and/or repaired parts shall assume the identity
of the original part for purposes of this warranty and this
warranty shall not be extended with respect to such
parts. BSH's sole liability and responsibility hereunder is
to repair manufacturer-defective Product only, using a
BSH-authorized service provider during normal business
hours. For safety and property damage concerns, BSH
highly recommends that you do not attempt to repair the
Product yourself, or use an un-authorized servicer; BSH
will have no responsibility or liability for repairs or work
performed by a non-authorized servicer. If you choose to
have someone other than an authorized service provider
work on your Product, THIS WARRANTY WILL
AUTOMATICALLY BECOME NULL AND VOID. Authorized
service providers are those persons or companies that
have been specially trained on BSH products, and who
possess, in BSH's opinion, a superior reputation for
customer service and technical ability (note that they are
independent entities and are not agents, partners,
affiliates or representatives of BSH). Notwithstanding the
foregoing, BSH will not incur any liability, or have
responsibility, for the Product if it is located in a remote
area (more than 100 miles from an authorized service
provider) or is reasonably inaccessible, hazardous,
threatening, or treacherous locale, surroundings, or
environment; in any such event, if you request, BSH
would still pay for labor and parts and ship the parts to
the nearest authorized service provider, but you would
still be fully liable and responsible for any travel time or
other special charges by the service company, assuming
they agree to make the service call.
Out of Warranty Product
BSH is under no obligation, at law or otherwise, to
provide you with any concessions, including repairs, pro-
rates, or Product replacement, once this warranty has
expired.
Warranty Exclusions
The warranty coverage described herein excludes all
defects or damage that are not the direct fault of BSH,
including without limitation, one or more of the following:
▯ Use of the Product in anything other than its normal,
customary and intended manner (including without
limitation, any form of commercial use, use or storage
of an indoor product outdoors, use of the Product in
conjunction with air or water-going vessels).
▯ Any party's willful misconduct, negligence, misuse,
abuse, accidents, neglect, improper operation, failure
to maintain, improper or negligent installation,
tampering, failure to follow operating instructions,
mishandling, unauthorized service (including self-
performed "fixing" or exploration of the appliance's
internal workings).
▯ Adjustment, alteration or modification of any kind.
▯ A failure to comply with any applicable state, local,
city, or county electrical, plumbing and/or building
codes, regulations, or laws, including failure to install
the product in strict conformity with local fire and
building codes and regulations.
▯ Ordinary wear and tear, spills of food, liquid, grease
accumulations, or other substances that accumulate
on, in, or around the Product.

28
▯ Any external, elemental and/or environmental forces
and factors, including without limitation, rain, wind,
sand, floods, fires, mud slides, freezing temperatures,
excessive moisture or extended exposure to humidity,
lightning, power surges, structural failures surrounding
the appliance, and acts of God.
In no event shall BSH have any liability or responsibility
whatsoever for damage to surrounding property,
including cabinetry, floors, ceilings, and other structures
or objects around the Product. Also excluded from this
warranty are Products on which the serial numbers have
been altered, defaced, or removed; service visits to teach
you how to use the Product, or visits where there is
nothing wrong with the Product; correction of installation
problems (you are solely responsible for any structure
and setting for the Product, including all electrical,
plumbing or other connecting facilities, for proper
foundation/flooring, and for any alterations including
without limitation cabinetry, walls, floors, shelving, etc.);
and resetting of breakers or fuses.
TO THE EXTENT ALLOWED BY LAW, THIS WARRANTY
SETS OUT YOUR EXCLUSIVE REMEDIES WITH
RESPECT TO PRODUCT, WHETHER THE CLAIM ARISES
IN CONTRACT OR TORT (INCLUDING STRICT LIABILITY,
OR NEGLIGENCE) OR OTHERWISE. THIS WARRANTY
IS IN LIEU OF ALL OTHER WARRANTIES, WHETHER
EXPRESS OR IMPLIED. ANY WARRANTY IMPLIED BY
LAW, WHETHER FOR MERCHANTABILITY OR FITNESS
FOR A PARTICULAR PURPOSE, OR OTHERWISE,
SHALL BE EFFECTIVE ONLY FOR THE PERIOD THAT
THIS EXPRESS LIMITED WARRANTY IS EFFECTIVE. IN
NO EVENT WILL THE MANUFACTURER BE LIABLE FOR
CONSEQUENTIAL, SPECIAL, INCIDENTAL, INDIRECT,
"BUSINESS LOSS", AND/OR PUNITIVE DAMAGES,
LOSSES, OR EXPENSES, INCLUDING WITHOUT
LIMITATION TIME AWAY FROM WORK, HOTELS AND/
OR RESTAURANT MEALS, REMODELLING EXPENSES
IN EXCESS OF DIRECT DAMAGES WHICH ARE
DEFINITIVELY CAUSED EXCLUSIVELY BY BSH, OR
OTHERWISE. SOME STATES DO NOT ALLOW THE
EXCLUSION OR LIMITATION OF INCIDENTAL OR
CONSEQUENTIAL DAMAGES, AND SOME STATES DO
NOT ALLOW LIMITATIONS ON HOW LONG AN IMPLIED
WARRANTY LASTS, SO THE ABOVE LIMITATIONS MAY
NOT APPLY TO YOU. THIS WARRANTY GIVES YOU
SPECIFIC LEGAL RIGHTS, AND YOU MAY ALSO HAVE
OTHER RIGHTS WHICH VARY FROM STATE TO STATE.
No attempt to alter, modify or amend this warranty shall
be effective unless authorized in writing by an officer of
BSH.

Table de
MATIÈRES
Table des Matières
Notice d’uti l i sati on
Définitions de sécurité ............................................. 30
CONSIGNES DE SÉCURITÉ IMPORTANTES .............. 31
9 MESURES DE PRÉCAUTION POUR ÉVITER
L’EXPOSITION EXCESSIVE À L’ÉNERGIE
MICRO-ONDE ............................................................... 31
INSTRUCTIONS DE MISE À LA TERRE ......................... 32
Interférences radio/télévision ....................................... 32
Utilisation prévue .......................................................... 32
Sécurité des enfants ...................................................... 32
Consignes en matière de nettoyage ............................. 33
Sécurité de cuisson ....................................................... 33
En cas d’incendie .......................................................... 33
Liquides ......................................................................... 33
Articles de cuisson ........................................................ 34
Utensiles de cuisson ...................................................... 35
Plateau en verre/Anneau du plateau tournant ............. 35
Thermomètres ............................................................... 35
Pacemakers ................................................................... 35
Fonctionnement du moteur du ventilateur ................... 35
Avertissement issue de la proposition 65
de l’État de la Californie : ............................................. 35
Causes des dommages ............................................. 36
Protection de l'environnement ................................. 36
Conseils d'économie d'énergie .................................... 36
Familiarisation avec l'appareil .................................. 37
Pièces ............................................................................ 37
Panneau de commande ................................................ 38
Accessoires ................................................................... 39
Avant la première utilisation .................................... 39
Avant d’utiliser l’appareil pour la première fois ............ 39
Fonctionnement initial .................................................. 39
Accessoires de nettoyage ............................................ 40
Utilisation de l’appareil ............................................ 40
Réglage de l’appareil .................................................... 40
Caractéristiques de fonctionnement ............................ 40
Micro-ondes ............................................................. 41
Guide des ustensiles pour micro-ondes ....................... 41
Niveaux de puissance du micro-ondes ......................... 42
Réglage du micro-ondes ............................................... 42
Suggestions pour les meilleurs résultats ....................... 43
Programmes du micro-ondes ................................... 44
Renseignements à propos des réglages ....................... 44
Réglage du programme de micro-ondes ...................... 44
Boisson .......................................................................... 45
Popcorn ......................................................................... 45
Capteur cuisson ............................................................ 45
Capteur Réchaud .......................................................... 46
Décongélation automatique ......................................... 47
Garder au Chaud ........................................................... 47
Fondre du beurre .......................................................... 48
Fondre du chocolat ....................................................... 48
Amollir de la crème glacée ........................................... 48
Amollir du fromage à la crème ..................................... 48
Minuterie ................................................................. 49
Minuterie de cuisine ...................................................... 49
Vérification, modification ou annulation des réglages .. 49
Verrou pour enfants ................................................. 49
Activation et désactivation ............................................ 49
Réglages de base .................................................... 50
Modification des réglages ............................................ 50
Réglages offerts ............................................................ 50
Nettoyage et entretien ............................................ 50
Guide de nettoyage ...................................................... 50
Dépannage .............................................................. 51
Soutien THERMADOR® ........................................... 52
Avant d’appeler le service de réparations .................... 52
Plaque signalétique ....................................................... 52
Dépannage .................................................................... 52
Pièces et accessoires ..................................................... 52
ÉNONCÉ DE LA GARANTIE LIMITÉE ....................... 53
Couverture de la garantie : ........................................... 53
Durée de la garantie ..................................................... 53
Réparation ou remplacement comme solution
exclusive ........................................................................ 53
Produit hors garantie .................................................... 53
Exclusions à la garantie ................................................. 53
30
.
Définitions de sécurité
Défi nitions de sécurité
9 AVERTISSEMENT
Ceci indique que le non-respect de cet
avertissement peut entraîner des blessures graves,
voire la mort.
9 ATTENTION
Ceci indique que le non-respect de cet
avertissement peut entraîner des blessures légères
ou de gravité moyenne.
AVIS : Ceci indique que la non-conformité à cet avis de
sécurité peut entraîner des dégâts matériels ou
endommager l'appareil.
Remarque : Ceci vous signale des informations et/ou
indications importantes.

31
9 CONSIGNES DE SÉCURITÉ IMPORTANTES
LISEZ TOUTES LES INSTRUCTIONS AVANT D'UTILISER L'APPAREIL
CONS I GNES DE SÉCURI TÉ IMPORTANTESLI SEZ TOUTES LES INSTRUCTIONS AVANT D' UT I L I S E R L' APPAREI L
9 MESURES DE
PRÉCAUTION POUR ÉVITER
L’EXPOSITION EXCESSIVE À
L’ÉNERGIE MICRO-ONDE
MESURES DE PRÉCAUTION POUR ÉVITER
L'EXPOSITION EXCESSIVE À L'ÉNERGIE MICRO-ONDE
(1) Lorsque vous faites fonctionner l'appareil, ne laissez
pas la porte du four ouverte car l'exposition à l'énergie
micro-onde peut être nocive. Il est important de ne pas
endommager les verrous de sécurité et de ne pas
essayer de les forcer.
(2) Aucun objet ne doit empêcher la porte du four de
bien se refermer et ne laissez pas les résidus d'aliments
ou de produit d'entretien s'accumuler sur les joints
d'étanchéité.
(3) Ne faites pas fonctionner le four s'il est endommagé.
Il est particulièrement important que la porte du four
puisse être refermée correctement, et donc que les
pièces suivantes ne soient pas endommagées:
▯ porte (bosselée)
▯ charnières et loquets (brisés ou desserrés)
▯ joints de porte et surfaces d'étanchéité.
(4) Confier toute réparation ou réglage uniquement à un
personnel autorisé par l’usine. Toute installation,
réparation ou maintenance inadéquate peut entraîner
des blessures ou des dommages matériels. Se reporter
à ce manuel pour obtenir des conseils sur la façon de
procéder. Toute réparation doit être confiée à un centre
de service agréé par l’usine.
AVERTISSEMENT
Pour réduire le risque de brûlures, de chocs
d’électrocution, de feu, de blessures ou d’exposition à
une énergie micro-ondes excessive, lisez toutes les
instructions avant d’utiliser l’appareil.
AVERTISSEMENT
Si les informations contenues dans ce manuel ne sont
pas suivies à la lettre, un incendie ou un choc électrique
peuvent se produire et entraîner des dommages
matériels ou des préjudices personnels.
Quand vous utilisez des appareils électriques,
observez les consignes de sécurité de base, y compris
ce qui suit :
Lisez et observez les précautions spécifiques «POUR
ÉVITER L’EXPOSITION POSSIBLE À UNE ÉNERGIE
MICRO-ONDES EXCESSIVE» que vous trouverez dans le
chapitre Consignes de sécurité.
Cet appareil doit être mis à la terre. Raccordez l’appareil
uniquement à une prise de courant correctement mise à
la terre (voyez INSTRUCTIONS DE MISE À LA TERRE).
Installez ou aménagez cet appareil uniquement en
conformité avec les instructions d’installation fournies.
Certains produits comme des œufs entiers et des
contenants scellés – par exemple, des pots en verre
scellés – peuvent éclater et ne doivent pas être chauffés
dans ce four.
Utilisez cet appareil uniquement dans le cadre de
l’utilisation prévue tel que décrit dans ce manuel.
N’utilisez pas de produits chimiques corrosifs ou des
vapeurs dans cet appareil. Ce type de four est conçu
spécifiquement pour chauffer, pour cuire ou pour sécher
les aliments. Il n’est pas conçu pour un usage industriel
ou en laboratoire.
Comme pour tout autre appareil électrique, l’utilisation
de cet appareil par les enfants doit se faire sous étroite
surveillance. (Voir SÉCURITÉ DES ENFANTS).
L’entretien de cet appareil doit être confié uniquement à
un personnel de service autorisé. Contactez le centre de
service autorisé le plus proche pour un examen, une
réparation ou un réglage.
Ne couvrez pas ou bloquez les évents ou ouvertures de
l’appareil.
Ne rangez pas cet appareil à l’extérieur.N’utilisez pas ce
produit à proximité de l’eau – par exemple, près d’un
évier de cuisine, dans un sous-sol humide, près d’une
piscine ou d’emplacements similaires.
Seulement approprié pour raccordement électrique avec
fiche :
(1) Ne plongez pas le cordon ou la fiche dans l’eau.
(2) Tenez le cordon à l’écart de surfaces chauffantes.
(3) Ne laissez pas le cordon suspendre par dessus le
bord d’une table ou d’un comptoir.
(4) N’utilisez pas cet appareil si le cordon ou la fiche
est endommagé, s’il ne fonctionne pas correctement ou
s’il a été endommagé ou a été échappé.
Lors du nettoyage des surfaces de la porte et du four qui
se joignent ensemble à la fermeture de la porte, utilisez
seulement des savons ou des détergents légers, non
abrasifs appliqués avec une éponge ou un chiffon doux.
Voyez les directives de nettoyage des surfaces de porte
dans le chapitre «Nettoyage et entretien».

9 CONSIGNES DE SÉCURITÉ IMPORTANTES
LISEZ TOUTES LES INSTRUCTIONS AVANT D'UTILISER L'APPAREIL
32
Pour réduire le risque de feu dans la cavité du four :
▯ Ne cuisez pas trop les aliments. Surveillez
attentivement l’appareil quand des matériaux en
papier, plastique et autres combustibles sont insérés à
l’intérieur du four pour faciliter la cuisson.
▯ Retirez les attaches métalliques des sacs de papier ou
de plastique avant de placer le sac dans le four.
▯ Si des matériaux à l’intérieur du four s’enflamment,
gardez la porte du four fermée, éteignez le four et
débranchez le cordon d’alimentation ou coupez
l’alimentation au panneau de fusibles ou de
disjoncteur.
▯ N’utilisez pas la cavité aux fins de rangement. Ne
laissez pas des produits de papier, des ustensiles de
cuisson ou des aliments dans la cavité lorsque celle-ci
ne sert pas.
INSTRUCTIONS DE MISE
À LA TERRE
Cet appareil doit être mis à la terre. En cas de court-
circuit électrique, la mise à la terre réduira le risque de
choc électrique en offrant au courant électrique un fil
d'évacuation.
Si ce four est équipé d’un cordon ayant un fil de mise à
la terre avec une prise de mise à la terre, la fiche doit
être branchée dans une prise qui a été installée et mise
à la terre de façon conforme. Voyez INSTRUCTIONS
D'INSTALLATION.
Consultez un électricien qualifié si vous ne comprenez
pas parfaitement les instructions de mise à la terre ou si
vous avez des doutes quant à la qualité de mise à la
terre.
N'utilisez pas de rallonge. Si le cordon d’alimentation du
produit est trop court, demandez à un électricien qualifié
d’installer une prise à trois fiches. Ce four devrait être
branché dans un circuit de 60 hertz séparé avec une
capacité électrique telle que montrée dans le tableau
des spécifications. Lorsque le four est branché sur un
circuit avec un autre équipement, une augmentation des
temps de cuisson pourrait être requise et les fusibles
pourraient griller.
Le modèle figurant sur la couverture avant est classé
120 V CA, 60 Hz et nécessite une fiche NEMA 5-15 pour
se raccorder à un circuit pour micro-ondes de 120 V
dédié.
ATTENTION - Si la mise à la terre n'est pas faite de
manière conforme, il existe un risque de choc électrique.
Interférences radio/télévision
Cet appareil génère et utilise de l’énergie à fréquence
ISM. S’il n’est pas installé et utilisé correctement, en
stricte conformité avec les directives du fabricant, il
pourrait perturber la réception des ondes radio et
télévision. Il a été testé et trouvé conforme avec les
limites régissant les équipements ISM conformément à la
partie 18 des règlements FCC, qui sont conçus pour
fournir une protection raisonnable contre une telle
interférence dans une installation résidentielle. Toutefois,
il n’y a aucune garantie qu’une interférence ne se
produira pas dans une installation particulière. Allumez et
éteignez l’appareil pour déterminer s’il est à l’origine de
l’interférence. Essayez les mesures suivantes pour
corriger l’interférence :
▯ Nettoyez la porte et la surface d’étanchéité du four.
▯ Réorientez l’antenne réceptrice de la radio ou de la
télévision.
▯ Relocalisez le four à micro-ondes par rapport au
récepteur.
▯ Éloignez le four à micro-ondes du récepteur.
▯ Branchez le micro-ondes dans une prise différente de
sorte que le four et le récepteur soient branchés sur
des circuits différents.
Le fabricant n’est pas responsable de toute interférence
radio ou télévision causée par une modification non
autorisée de ce four à micro-ondes. C’est à l’utilisateur
qu'il incombe de corriger une telle interférence.
Utilisation prévue
Cet appareil est destiné uniquement à une utilisation
domestique normale. Il n'est pas homologué pour un
usage en extérieur. Voyez la Ènoncé de la Garantie
Limitée. Si vous avez des questions, communiquez avec
le fabricant.
N’utilisez pas la cavité aux fins de rangement. Ne laissez
pas des produits de papier, des ustensiles de cuisson ou
des aliments dans la cavité lorsque celle-ci ne sert pas.
N’utilisez pas le four lorsque l’humidité de la pièce est
excessive.
Ce four peut être utilisé au-dessus des fours encastrés
conventionnels à gaz et électriques de 36 po (914 mm)
de largeur ou moins.
Sécurité des enfants
Ne pas permettre aux enfants d’utiliser cet appareil sauf
sous la surveillance attentive d’un adulte. Ne pas laisser
les enfants et les animaux seuls ou sans surveillance
lorsque l’appareil, que ce dernier soit en service ou non.
Lorsque les enfants sont assez âgés pour utiliser
l'appareil, il incombe aux parents ou tuteurs légaux de
veiller à ce qu'ils soient formés aux pratiques sécuritaires
par des personnes qualifiées.
Ne permettre à personne de grimper, rester debout,
s'appuyer, s'asseoir ou se pencher sur toute partie d'un
appareil, notamment une porte, un tiroir-réchaud ou un
tiroir de rangement. Ceci peut endommager l'appareil qui
risque de basculer et causer des blessures sérieuses.
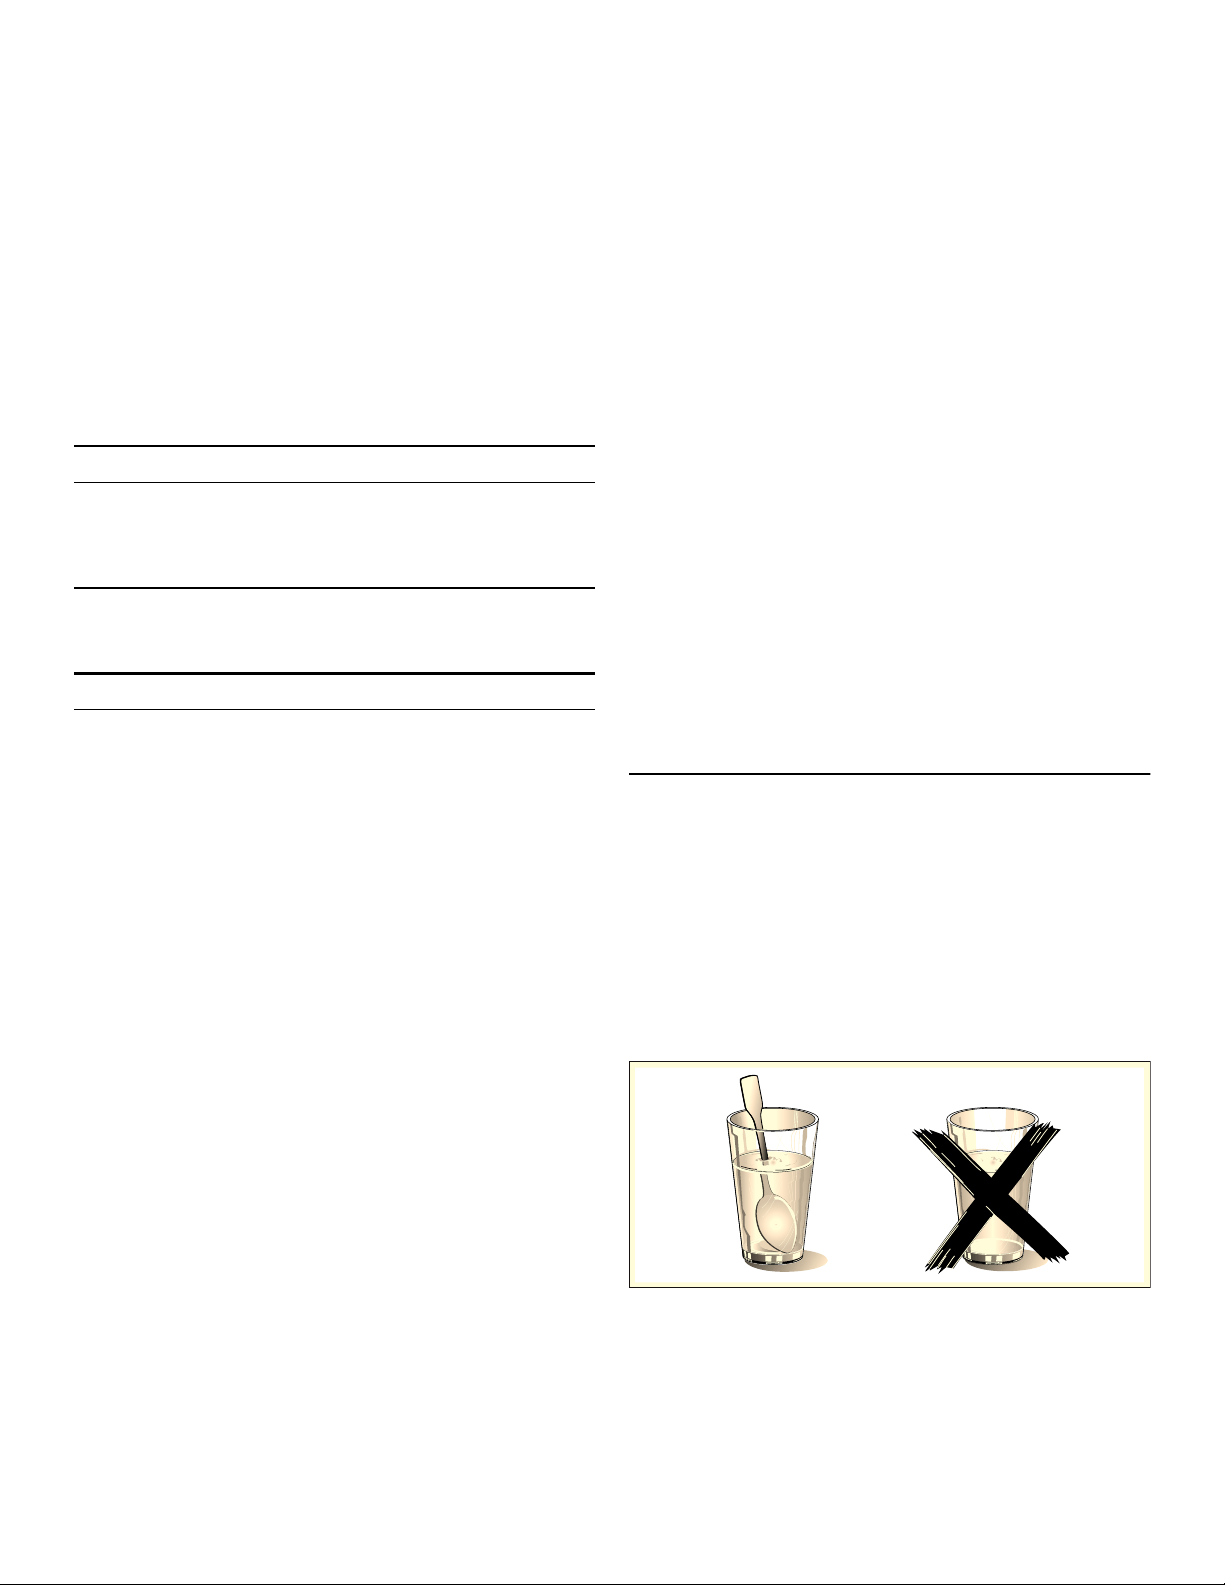
33
9 CONSIGNES DE SÉCURITÉ IMPORTANTES
LISEZ TOUTES LES INSTRUCTIONS AVANT D'UTILISER L'APPAREIL
Consignes en matière de nettoyage
Lors du nettoyage des surfaces de la porte et du four qui
se joignent ensemble à la fermeture de la porte, utilisez
seulement des savons ou des détergents légers, non
abrasifs appliqués avec une éponge ou un chiffon doux.
Voyez les directives de nettoyage des surfaces de porte
dans le chapitre «Nettoyage et entretien».
Nettoyez le repose-rouleau de la plaque tournante et le
plancher de four fréquemment pour empêcher un bruit
excessif.
Laissez le plat de verre se refroidir avant de le nettoyer
ou de le mettre dans l’eau.
AVERTISSEMENT
Assurez-vous que l’appareil tout entier (y compris
l'ampoule) s’est refroidi et que la graisse s’est solidifiée
avant de tenter de nettoyer une partie quelconque de
l’appareil.
Sécurité de cuisson
ATTENTION
Pour éviter les blessures corporelles ou les dégâts
matériels, veuillez suivre les consignes suivantes :
▯ Ne laissez pas le four sans surveillance pendant
qu’il est en marche.
▯ N'entreposez pas de matières inflammables près
ou dans le four.
▯ Lorsque vous flambez des aliments sous le
micro-ondes, allumez toujours le ventilateur.
▯ Ne faites pas fonctionner le four à vide. Cela
pourrait endommager le four et entraîner un
risque d’incendie.
▯ N'entreposez pas et n'utilisez pas des produits
chimiques corrosifs, des vapeurs, des matériaux
inflammables ou des produits non alimentaires
près ou dans cet appareil. Cet appareil est
spécialement conçu pour chauffer ou cuire la
nourriture. L'emploi de produits chimiques
corrosifs dans la cuisson ou le nettoyage
endommagera l'appareil et pourrait causer des
blessures.
▯ Ne séchez pas les vêtements, les journaux ou
autres matériaux dans le four. N’utilisez pas des
journaux ou des sacs de papier pour la cuisson.
Il pourrait en résulter un incendie.
▯ N’utilisez pas des produits fabriqués de papier
recyclé à moins que leur sécurité au micro-ondes
soit attestée. Ils pourraient contenir des
impuretés pouvant causer des étincelles et
provoquer un incendie.
▯ Utilisez des poignées pour retirer les éléments du
four. Le récipient de cuisson et le plateau de
verre peuvent être chauds même si le four est
froid.
▯ Dans la mesure du possible, ne mettez pas en
marche le système de ventilation pendant un feu
de table de cuisson. Toutefois, ne passez pas la
main à travers le feu pour l'éteindre.
▯ Ne montez pas l’appareil au-dessus d’un évier.
▯ Ne rangez aucun objet directement sur le dessus
de l’appareil lorsque l’appareil est en cours de
fonctionnement.
▯ La nourriture ou les ustensiles métalliques
surdimensionnés ne devraient pas être placés
dans le micro-ondes, car ils pourraient entraîner
des risques de décharge électrique ou
d'incendie.
▯ Ne nettoyez pas le four avec des éponges à
récurer métalliques. Des morceaux peuvent
brûler et se détacher des éponges et entrer en
contact avec des composantes électriques, ce
qui pourrait entraîner un risque de décharge
électrique.
▯ N'entreposez pas de matériaux dans ce four,
autres que les accessoires recommandés par le
fabricant, lorsqu'il n'est pas utilisé.
▯ Ne recouvrez pas les grilles ou toute autre partie
du four de feuilles métalliques. Cela causerait
une surchauffe du four.
En cas d’incendie
Si des matériaux à l'intérieur d'un four venaient à prendre
feu :
1.
Conserver la porte fermée
2.
Éteindre l'appareil
3.
Débrancher l’appareil ou sortir le fusible ou mettre le
disjoncteur à l’arrêt.
Liquides
Des liquides, comme de l’eau, du café ou du thé peuvent
surchauffer. Ils peuvent être chauffés au-delà du point
d’ébullition sans que cela ne paraisse. Par exemple, le
bouillonnement ou l’ébullition lorsque le contenant est
retiré du micro-ondes n’est pas toujours présent. CELA
POURRAIT RÉSULTER DANS DES LIQUIDES TRÈS
CHAUDS QUI BOUILLONNERONT SOUDAINEMENT
DÈS LORS QUE LE CONTENANT EST DÉRANGÉ OU
QU’UN USTENSILE EST INSÉRÉ DANS LE LIQUIDE.

9 CONSIGNES DE SÉCURITÉ IMPORTANTES
LISEZ TOUTES LES INSTRUCTIONS AVANT D'UTILISER L'APPAREIL
34
Lorsque vous faites chauffer des liquides, placez
toujours une baguette en verre ou une cuillère dans le
contenant. Vous pourrez ainsi éviter un retard d'ébullition.
ATTENTION
Du métal, par exemple, une cuillère dans un verre, doit
être conservé à au moins 1 pouce (25 mm) des parois
du four et de l’intérieur de la porte. Des étincelles
pourraient endommager irrévocablement le verre à
l’intérieur de la porte.
▯ Retirez les plats préparés de leur emballage. Ils
chaufferont plus rapidement et plus uniformément
dans des plats allant au micro-ondes. Les différents
composants du repas pourraient nécessiter des temps
de cuisson différents.
▯ Couvrez toujours la nourriture. Si vous ne possédez
pas un couvercle adéquat pour votre contenant,
utilisez une assiette ou un papier spécial conçu pour
le micro-ondes.
▯ Brassez ou retournez la nourriture plusieurs fois au
cours de la cuisson. Vérifiez la température.
▯ Après la cuisson, laissez la nourriture reposer de 2 à 5
minutes supplémentaires pour obtenir une
température uniforme.
▯ Utilisez toujours un linge ou des gants pour le four
lorsque vous retirez des assiettes du four.
Articles de cuisson
Oeufs: Ne faites pas cuire ou réchauffer des œufs
entiers, avec ou sans coquille. La vapeur s’accumule
dans les œufs, ce qui peut les amener à éclater, et
endommager potentiellement le four ou causer des
blessures. Le réchauffement d’œufs durs en tranches ou
la cuisson d’œufs brouillés ne pose aucun problème.
Popcorn: Utilisez uniquement du popcorn dans des
emballages conçus et étiquetés pour usage dans le
micro-ondes, ou faites-le éclater dans un éclateur de
popcorn pour four à micro-ondes. Suivez les instructions
du fabricant du popcorn et utilisez une marque qui
convient à l’intensité électrique de votre four. Ne
continuez pas de cuire après que le popcorn a cessé
d’éclater. Le popcorn risquerait alors de brûler. Ne
laissez pas le four sans surveillance.
ATTENTION
Lorsque vous utilisez du popcorn préemballé pour micro-
ondes, vérifiez le poids de l’emballage avant d’utiliser la
fonction de popcorn. Réglez le four selon le poids de
l’emballage du popcorn. Si vous ne suivez pas ces
instructions, il se peut que le popcorn ne s’éclate pas
correctement et pourrait s’enflammer et causer un
incendie.
Aliments avec peau non poreuse : Les pommes de
terre, les tomates, les patates douces, les pommes, les
courges entières et les saucissons sont des exemples
d’aliments avec des peaux non poreuses. Ces types
d’aliments doivent être percés avant la cuisson pour les
empêcher d’éclater.
Aliments pour nourrissons / lait maternisé: Ne chauffez
pas les biberons ou les aliments pour nourrissons dans
le four à micro-ondes. Le pot de verre ou la surface de
l’aliment pourrait sembler tiède alors que l’intérieur
pourrait brûler la bouche et l’œsophage du nourrisson.
Grande friture de gras : N’effectuez pas de grande
friture de gras dans le four. L’huile pourrait chauffée très
rapidement au-delà de sa température idéale dans un
four à micro-ondes. Les températures pourraient monter
à tel point que l’huile de cuisson arrivera au point
d’inflammabilité et s’enflammera. L’huile chauffée
pourrait bouillonner et être projetée causant des
dommages potentiels au four et même des blessures
aux personnes. Par ailleurs, les ustensiles micro-
ondables pourraient ne pas supporter la température de
l’huile chaude et pourraient occasionner le bris de
l’ustensile si celui-ci contient une imperfection, une
rayure ou une écaille.
Conserves maison / Séchage des aliments / Petites
quantités d’aliments : N’utilisez pas le four à micro-
ondes pour les conserves maison ou pour le chauffage
de tout pot fermé. La pression s’accumulera et le pot
pourrait éclater. Par ailleurs, le four ne peut maintenir
l’aliment à la bonne température de mise en conserve.
Les aliments mis en conserve incorrectement pourraient
rancir et être dangereux à consommer. De petites
quantités d’aliments ou des aliments à faible contenu
d’humidité peuvent s’assécher, brûler ou s’enflammer.
Ne séchez pas les viandes, herbes, fruits ou légumes
dans votre four.
La cuisson appropriée dépend du temps réglé et du
poids de l’aliment. Si vous utilisez une portion plus petite
que celle recommandée et faites cuire la portion au
temps recommandé, un incendie pourrait en résulter.
Plats de brunissement :.Les plats de brunissement ou
les grilles du micro-ondes sont conçus uniquement pour
la cuisson au micro-ondes. Les temps de préchauffage
varient selon la taille du plat de brunissement et de
l’aliment à cuire. Suivez toujours les instructions fournies
par le fabricant du plat de brunissement ou de la grille.
Ne préchauffez pas les plats de brunissement pendant
plus de 6 minutes.
Sacs de rôtisserie de four : Si un sac de four est utilisé
pour la cuisson au micro-ondes, préparez selon les
directions de l’emballage. N’utilisez pas des attaches
pour fermer les sacs, utilisez à la place des attaches de
nylon, du fil en coton ou d’une bande coupée de
l’extrémité ouverte du sac. Pratiquez 6 fentes de ½ po
(12,4 mm) après la fermeture du sac. Placez le sac de
cuisson dans un plat légèrement plus grand que
l’aliment à cuire.

35
9 CONSIGNES DE SÉCURITÉ IMPORTANTES
LISEZ TOUTES LES INSTRUCTIONS AVANT D'UTILISER L'APPAREIL
Utensiles de cuisson
Voyez aussi Guide des ustensiles micro-ondables.
Les ustensiles de cuisson, les plateaux de verre et les
grilles deviennent chauds pendant la cuisson au micro-
ondes. Utilisez des supports de casserole lorsque vous
retirez les éléments du four. Laissez le plateau de verre
et les grilles métalliques se refroidir (le cas échéant)
avant de les manipuler.
N’utilisez pas des ustensiles métalliques ou des plats
contenant une garniture métallique dans le four.
Lorsque vous utilisez de la feuille en aluminium dans le
four, prévoyez au moins un espace de 1 pouce (25 mm)
entre la feuille et les parois intérieures du four ou la
porte.
Le plateau de verre et les grilles métalliques (le cas
échéant) deviendront chauds pendant la cuisson.Le
récipient de cuisson et le plateau de verre peuvent être
chauds même si le four est froid.
N’utilisez jamais des matériaux en papier, plastique ou
autres matériaux combustibles non prévus pour la
cuisson.
Lorsque vous faites cuire avec des matériaux de papier,
de plastique ou autres matériaux combustibles, suivez
les recommandations du fabricant. N’utilisez pas des
serviettes de papier qui contiennent des fibres de nylon
ou des fibres synthétiques. Le chauffage de fibres
synthétiques pourrait fondre et amener le papier à
s’enflammer.
Ne pas chauffez des contenants scellés ou des sacs de
plastique dans le four. L’aliment ou le liquide pourrait se
dilater rapidement et causer le bris du contenant ou du
sac. Percez ou ouvrez le contenant ou le sac avant la
cuisson.
Plateau en verre/Anneau du plateau
tournant
N’utilisez pas le four sans repose-rouleau de plaque
tournante et la plaque tournante de verre en place.
Ne pas faire fonctionner le four sans avoir mis en place
le plateau en verre. Cela évitera tout dommage au four
ou de mauvais résultats à la cuisson. Vérifier que le
plateau en verre est bien en place et qu’il tourne lorsque
le four est en fonctionnement.
Remarque : Le plateau en verre peut tourner dans les
deux sens.
Utilisez uniquement la plaque tournante de verre conçue
pour ce four. Ne lui substituez aucun autre plat.
Laissez le plat de verre se refroidir avant de le nettoyer
ou de le mettre dans l’eau.
Ne placez pas les aliments directement sur le plat de
verre. Placez toujours l'aliment dans un plat micro-
ondable.
Toujours remettre en place l’anneau du plateau tournant
et le plateau en verre dans leur position initiale.
L’anneau du plateau tournant doit toujours être utilisé
pour la cuisson ainsi que le plateau en verre.
Thermomètres
N’utilisez pas des thermomètres de cuisson ordinaires
dans le four. La plupart des thermomètres de cuisson
contiennent du mercure et pourraient causer un arc
électrique, une anomalie ou des dommages au four.
Pacemakers
ATTENTION
Pour éviter la défaillance d’un stimulateur cardiaque,
consultez le médecin ou le fabricant du stimulateur
cardiaque à propos des effets de l’énergie micro-ondes
sur le stimulateur cardiaque.
Fonctionnement du moteur du ventilateur
Après l’utilisation du four, le moteur du ventilateur
continue de tourner afin de refroidir les composants
électriques. Cela est parfaitement normal et il est
possible de retirer la nourriture du four pendant que le
ventilateur est en marche.
Avertissement issue de la proposition 65
de l’État de la Californie :
AVERTISSEMENT
Ce produit peut vous exposer à des produits chimiques,
comme du chlorure de vinyle, reconnus par l’État de la
Californie comme causant le cancer, des malformations
congénitales ou d’autres effets nocifs sur la
reproduction. Pour de plus amples renseignements,
consultez www.P65Warnings.ca.gov.
CONSERVEZ CES
INSTRUCTIONS.

36
Causes des dommages
AVIS:
▯ Du métal, par exemple, une cuillère dans un verre, doit
être conservé à au moins 1 pouce (25 mm) des
parois du four et de l’intérieur de la porte. Des
étincelles pourraient endommager irrévocablement le
verre à l’intérieur de la porte.
▯ Eau dans le four chaud : ne jamais verser d'eau dans
le four chaud, car cela produit de la vapeur qui peut
endommager l'enceinte émaillée sous l'effet du
changement de température.
▯ Ne pas laisser pendant une période prolongée dans le
four fermé des produits alimentaires humides, car cela
peut favoriser l'apparition de corrosion dans le four.
▯ Le jus de fruit peut tacher l'enceinte du four. Toujours
enlever le jus de fruit sans attendre, quand il est sûre
de toucher, en utilisant d'abord un chiffon mouillé, puis
un chiffon sec.
▯ Refroidissement avec la porte ouverte : laisser le four
refroidir sans ouvrir la porte. Même si la porte n'est
que légèrement entrouverte, cela peut à la longue
endommager les façades des meubles voisins.
▯ Joint de porte très encrassé : lorsque le joint est très
sale, la porte ne se ferme plus correctement. Les
façades des meubles voisins risquent d'être
endommagées. Faire en sorte que le joint de la porte
soit toujours propre.
▯ Porte du four utilisée comme siège ou desserte : ne
pas monter sur la porte du four, ni s'asseoir dessus ou
s'y suspendre. Ne pas déposer sur la porte des
accessoires ou ustensiles de cuisson quelconques.
▯ Montage des accessoires : selon le type de four, les
accessoires peuvent rayer la porte lors de la fermeture
de cette dernière. Toujours mettre les accessoires
entièrement dans le four.
▯ Ne tenez pas et ne transportez pas l’appareil par la
poignée de porte. La poignée de porte ne peut
supporter le poids de l’appareil et pourrait se briser ou
les charnières pourraient être endommagées.
▯ Le fonctionnement du micro-ondes sans aliment dans
la cavité du four pourrait occasionner une surcharge.
Ne faites jamais fonctionner le micro-ondes à moins
que la cavité du four ne contienne des aliments. La
seule exception à cette consigne est un test de
matériel de cuisson, voyez la section ~ "Guide des
ustensiles pour micro-ondes"
▯ Réglez toujours la puissance du micro-ondes tel que
recommandé pour l’aliment. Des réglages à trop forte
puissance peuvent très rapidement surchauffer les
aliments.
▯ La plaque rotative pourrait sautiller si elle est
surchargée.
Protection de l'environnement
Déballez l'appareil et jetez l'emballage dans le respect
de l'environnement.
Conseils d'économie d'énergie
▯ Pendant la cuisson, ouvrez le moins possible la porte
du four.
▯ Si vous avez plusieurs gâteaux, faites-les cuire de
préférence l'un après l'autre. Le four est encore chaud
permet de réduire la durée de cuisson du gâteau
suivant. Vous pouvez aussi placer l'un à côté de l'autre
deux moules à cake.
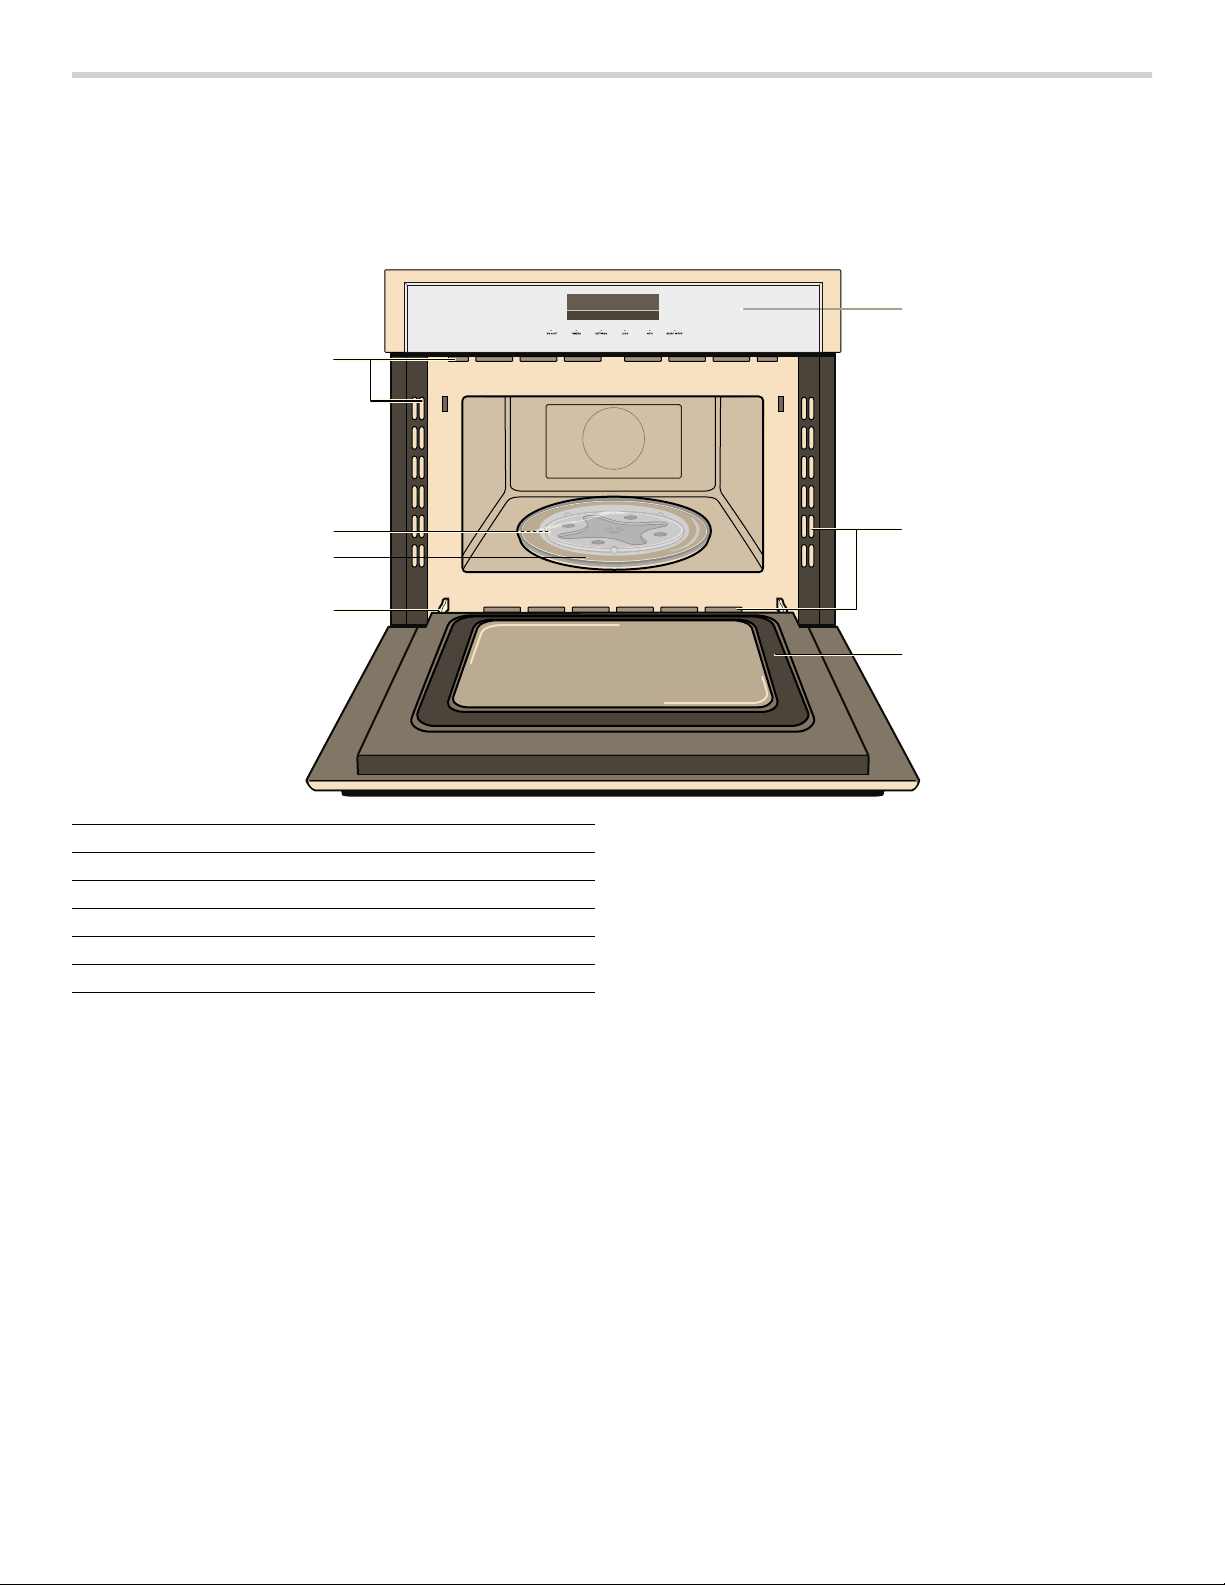
37
Familiarisation avec l'appareil
Dans cette section, vous trouverez les explications
concernant les témoins et les commandes. Vous y
trouverez également des renseignements concernant les
diverses fonctions de l’appareil.
Pièces
Évents de four
Les évents de four sont situés autour des côtés de la
cavité du four. De l’air chaud peut être évacué des
évents sur les côtés supérieure et inférieure cavité, avant,
pendant et après la cuisson. Il est normal de voir de la
vapeur s’échapper de ces évents, et de la condensation
pourrait s’accumuler dans cette zone. Cette zone peut
être chaude lorsque le four est en cours d’utilisation. Ne
bloquez pas les évents car ils sont importants pour la
circulation d’air.
Ventilateur de refroidissement
Le ventilateur de refroidissement est en marche dans
tous les modes de cuisson. Vous pourrez entendre le
ventilateur lorsqu’il est en marche, et vous pourriez
ressentir de l’air chaud émanant des évents du four. Il se
peut également que le ventilateur continue de tourner
après que le four a été éteint.
0LFURZDYH
PLQV
1 Panneau de commande et affichage
2 Évents de four
3 Joint d’étanchéité de porte
4 Charnières de porte
5 Plaque tournante de verre
6 Support de rouleau
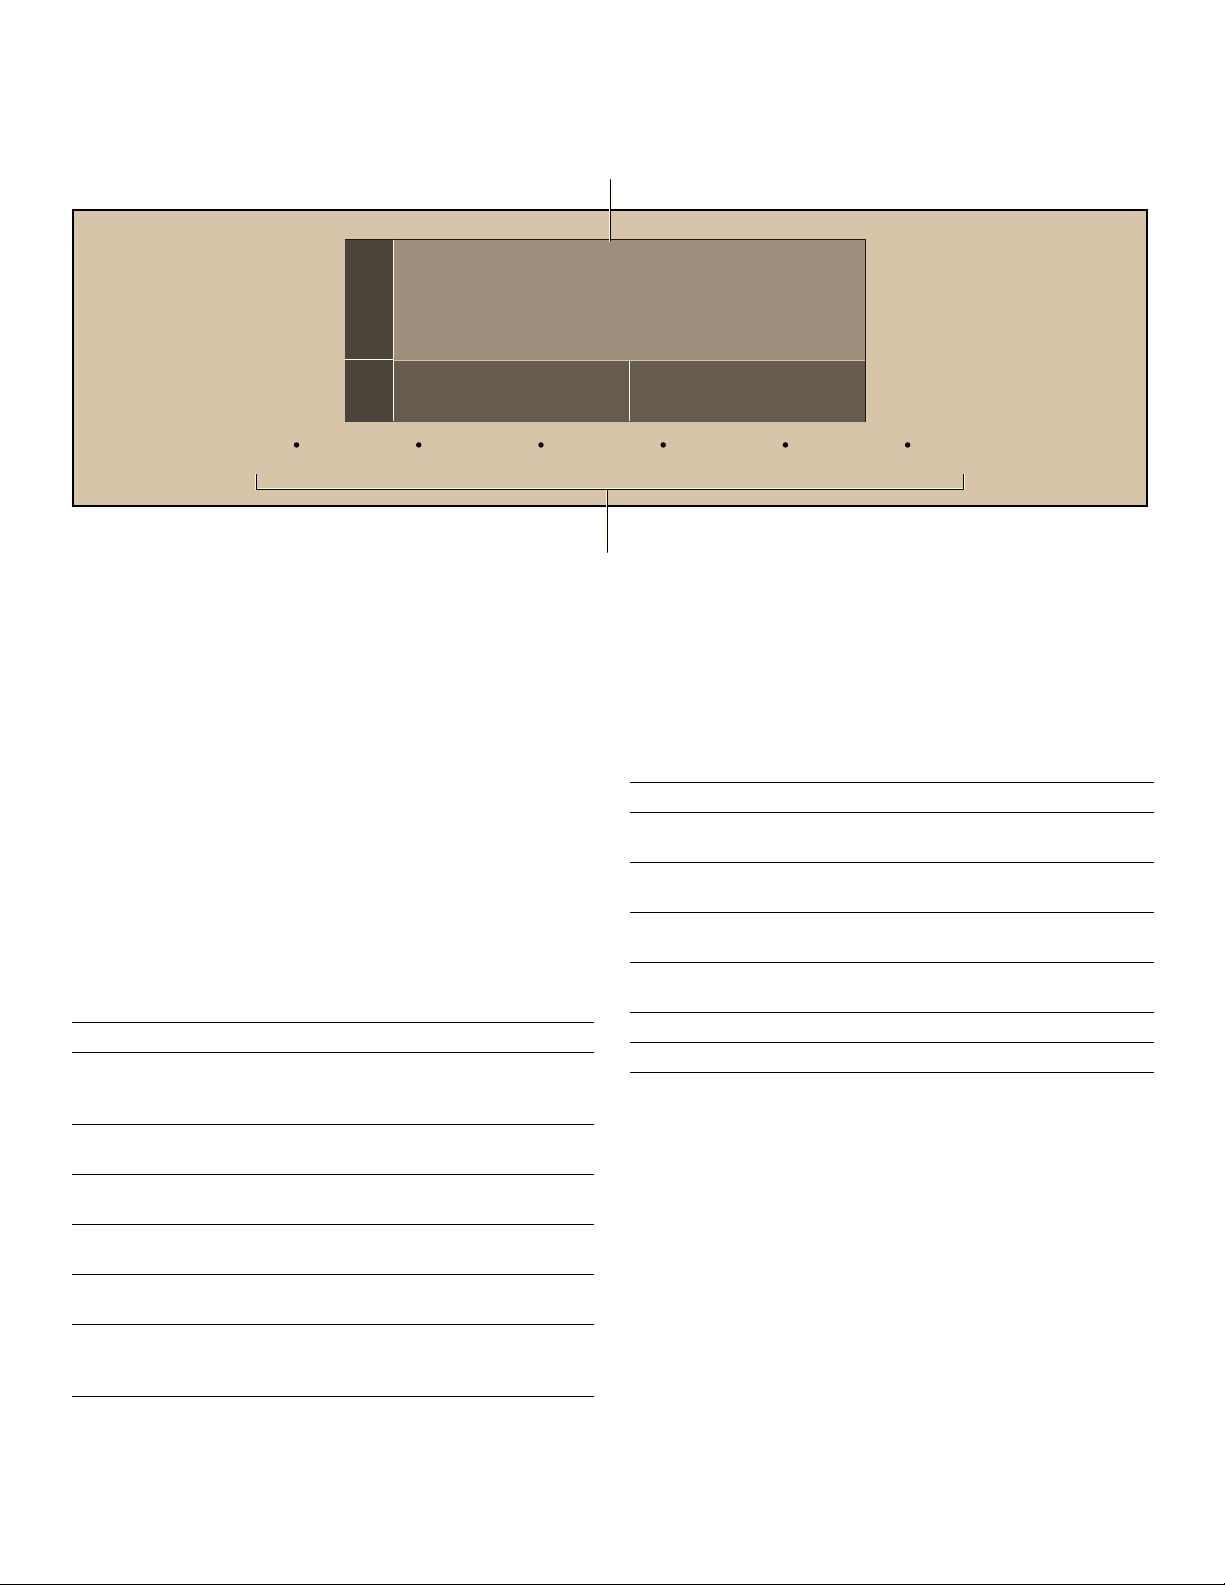
38
Panneau de commande
Vous pouvez régler les différentes fonctions de l’appareil
sur le panneau de commande au moyen de l’écran
tactile en couleur. L’écran tactile en couleur indique les
réglages actuels.
Commandes
Utilisez les commandes pour régler simplement et
directement l’appareil.
Touches tactiles
Les touches tactiles comportent des capteurs. Effleurez
le mot de la touche tactile correspondante pour
sélectionner une fonction. Les fonctions disponibles sont
indiquées par une lumière au-dessus du bouton tactile
respectif. Le nombre de fonctions disponibles dépend de
l'opération que vous utilisez.
Le témoin au-dessus de la touche tactile START l STOP
devient bleu lorsqu'un mode four est en marche.
--------
Écran tactile en couleur
Utilise l'écran tactile en couleur pour naviguer entre les
lignes de l’écran et sélectionner les réglages.
Pour ajuster réglages, effleurez avec un doigt l’endroit
approprié à l’écran. L'éclairage de la zone devient plus
intense. Dans cette zone de l’écran, glissez le doigt vers
la gauche ou la droite jusqu’à afficher le réglage voulu.
ON l OFF TIMERS INFOLOCK START l STOPSETTINGS
PLQV
0LFURRQGHV
$MRXWH]V
(
Écran tactile en couleur
0
Touches tactiles
Touche tactile Utilisation
ON l OFF
(MARCHE I
ARRÊT)
Met l’appareil en marche ou l’éteint
TIMERS
(MINUTERIES)
Règle la minuterie de cuisine
SETTINGS
(RÉGLAGES)
Vous amène au menu des réglages
de base
LOCK
(VERROUILLER)
Active ou désactive le verrou pour
enfants
INFO Affiche des renseignements
supplémentaires
START l STOP
(DÉMARRAGE I
ARRÊT)
Démarre ou interrompt l’opération
Directives Utilisation
Navigation vers la
gauche
Glissez le doigt sur l’écran vers
la droite
Navigation vers la
droite
Glissez le doigt sur l’écran vers
la gauche
Navigation vers le
haut
Effleurez la ligne supérieure de
l’écran
Navigation vers le bas Effleurez la ligne inférieure de
l’écran
;
Revenir à l’écran antérieur
8
Confirmation du réglage

39
Accessoires
Comment installer la plaque tournante
1.
Placez le support de rouleau (a) dans la niche de la
cavité du four.
2.
Laissez la plaque tournante (b) glisser en place dans
l'entraînement (c) au centre du fond de la cavité du
four.
Remarque : N'utilisez pas l'appareil si la plaque
tournante n'est pas en place. Assurez-vous que la plaque
est bien en place et qu'elle peut tourner sans entrave
lorsque le micro-ondes est utilisé.
Avant la première utilisation
Avant d'utiliser l’appareil neuf, vous devez procéder à
certains réglages. Vous devez également nettoyer le
compartiment de cuisson et les accessoires.
Avant d’utiliser l’appareil pour la première
fois
▯ Avant l’utilisation, l’appareil doit être correctement
installé par un technicien qualifié.
▯ Retirez tout matériau d’emballage à l’intérieur et à
l’extérieur du four.
▯ Essuyez le four pendant qu’il est froid à l’aide d’un
chiffon propre et humide et séchez.
▯ Il peut y avoir une légère odeur émanant de l'appareil
neuf. Ceci est normal et disparaîtra après quelque
temps.
▯ L’optimisation des résultats de cuisson dépend de la
sélection et de l’utilisation des bons ustensiles de
cuisson.
▯ Lisez et comprenez toutes les consignes de sécurité et
le Guide d’utilisation et d’entretien.
▯ Exécutez les sections suivantes avant l’utilisation.
Fonctionnement initial
Dès que l’appareil est raccordé à l’alimentation
électrique, le premier réglage « Heure du jour » apparaît
à l’écran.
Réglage de l’heure du jour
1.
Effleurez la ligne du bas.
Les options de réglage du temps sont affichées.
2.
Effleurez le champ tactile « Heure » et glissez vers la
gauche ou la droite pour sélectionner l’heure actuelle.
3.
Effleurez le champ tactile « Minute » et glissez vers la
gauche ou la droite pour sélectionner les minutes
actuelles.
4.
Effleurez le symbole 8 pour confirmer les réglages.
Réglage de la langue
1.
Glissez vers la gauche pour accéder au prochain
réglage.
2.
Effleurez la ligne du bas.
3.
Glissez vers la gauche ou la droite pour sélectionner
la langue requise.
4.
Effleurez la ligne du haut.
E
D
F
7LPHRI'D\
/DQJXDJH
6HWFXUUHQWWLPHRIGD\
0LQXWHV
+RXUV
/DQJXDJH
7LPH'LVSOD\
(QJOLVK
6HWWKHODQJXDJH\RXUHTXLUH
7LPHRI'D\

40
Réglages de l’heure à l’écran
1.
Glissez vers la gauche pour accéder au prochain
réglage.
2.
Effleurez la ligne du bas.
3.
Glissez vers la gauche ou la droite pour sélectionner
comment l’horloge sera affichée lorsque l’appareil
sera en mode veille.
4.
Effleurez la touch tactile SETTINGS pour terminer les
réglages initiaux.
5.
Effleurez le champ tactile Sauvegarder.
« Premier démarrage terminé » s’affiche. L’appareil
passe en mode veille.
Remarques
▯ Il est possible de modifier ces réglages à n'importe
quel moment dans le menu de réglages de base.
~ "Réglages de base" à la page 50
▯ Une fois l’appareil raccordé à l’alimentation ou après
une coupure de courant, les réglages initiaux utilisés
sont affichés à l’écran.
Accessoires de nettoyage
Avant d’utiliser les accessoires pour la première fois,
lavez les accessoires à fond avec de l’eau savonneuse
et un chiffon propre et doux.
Utilisation de l’appareil
Vous connaissez maintenant les commandes et
comment elles fonctionnent. Nous vous expliquons
maintenant comment configurer les réglages de
l'appareil. Vous découvrirez ce qui arrive lorsque vous
mettez l’appareil sous tension et hors tension et
comment sélectionner le mode de fonctionnement.
Réglage de l’appareil
Mise sous tension ou hors tension de l'appareil
Effleurez la touche tactile ON l OFF (MARCHE l ARRÊT)
pour mettre l’appareil sous ou hors tension.
L'appareil affiche automatiquement le menu principal.
Modification des réglages du mode actuel
Vous pouvez modifier les réglages en cours de
fonctionnement. Effleurez le champ tactile de la valeur à
modifier.
Mise en pause
Effleurez la touche tactile START l STOP
(DÉMARRAGE l ARRÊT) pour mettre la cuisson en
pause. Effleurez de nouveau la touche tactile
START l STOP (DÉMARRAGE l ARRÊT) pour reprendre
la cuisson.
L’ouverture de la porte de l’appareil interrompt la
cuisson. Effleurez la touche tactile START l STOP
(DÉMARRAGE l ARRÊT) à la fermeture de la porte. Le
micro-ondes redémarre.
Ouverture de la porte de l’appareil
Si vous ouvrez la porte de l’appareil en cours de
fonctionnement, il passe en mode Pause. Fermez la
porte et effleurez la touche tactile START l STOP
(DÉMARRAGE l ARRÊT) pour reprendre la cuisson.
Remarque : Pour certains modes de cuisson, le
fonctionnement se poursuit même lorsque la porte de
l’appareil est ouverte.
Changer le programme
Effleurez la touche tactile START l STOP et changez le
mode de cuisson. Touchez le symbole ; pour naviguer
vers le menu principal.
Mise hors tension de l'appareil
Effleurez la touche tactile ON I OFF (MARCHE I ARRÊT).
Caractéristiques de fonctionnement
L’appareil dispose de nombreuses caractéristiques de
fonctionnement qui vous aident à bien utiliser l’appareil
,et ce, de façon efficace.
Valeurs par défaut
L'appareil suggère un réglage pour chaque mode de
fonctionnement. Vous pouvez accepter cette valeur ou la
modifier dans la section appropriée.
Barre d'état
À l’écran, la barre d'état se remplir de la gauche vers la
droite. Il s'agit d'une aide visuelle de la durée de
fonctionnement réglée pour le micro-ondes.
Touche Tactile INFO
Si le touche tactile INFO s'allume, des informations
importantes concernant le mode que vous utilisez sont
disponibles. Cela peut inclure, par exemple, des
recommandations sur des ustensiles de cuisine
appropriés ou comment préparer des aliments pour un
résultat de cuisson sûr. Lorsque vous appuyez sur le
bouton INFO, les informations s'affichent pendant
quelques secondes.
7LPH'LVSOD\
$QDORJ
6HOHFWZKLFKFORFNGLVSOD\LVVKRZQ
/DQJXDJH
'LJLWDO 2II
ZKHQWKHDSSOLDQFHLVVZLWFKHGRII

41
Sons
L’appareil émet plusieurs sons en cours de
fonctionnement. Un signal sonore est mis à chaque fois
que vous effleurez une touche ou un champ tactile, ou à
l’amorce ou à la fin de la cuisson. Vous pouvez modifier
le niveau sonore dans le menu Réglages. ~ "Réglages
de base" à la page 50
Avis à l’écran
À la fin de la cuisson ou lorsque le temps est écoulé,
l'écran affiche un avis. Appuyer sur l'affichage à l'écran
pour confirmer et continuer l'opération.
Micro-ondes
Vous pouvez utiliser le micro-ondes pour cuire,
réchauffer ou décongeler rapidement des aliments.
Pour optimiser l'utilisation du micro-ondes, veuillez
respecter les remarques sur les ustensiles de cuisson et
vous familiariser avec les données des tableaux de
cuisson à la fin du présent guide d'utilisation et
d’entretien.
Guide des ustensiles pour micro-ondes
Plats de cuisson convenables
▯ Verre thermorésistant, verre-céramique et faïence :
Plats utilitaires, plats pour pain de viande, moules à
tarte, moules à gâteau, tasses à mesurer les liquides,
casseroles et bols sans garniture métallique (p. ex.,
Pyrex
MD
, Anchor HockingMC, Corning Ware
MD
,
Emile Henry, etc.).
▯ Porcelaine :
Bols, tasses, plats de service et plateaux sans
garniture métallique.
▯ Emballages et pellicules plastique :
Emballage plastique (comme couvercle) : Posez
l’emballage plastique de façon lâche sur le plat et
pressez-le sur les côtés. Aérez l’emballage plastique
en retroussant légèrement un bord pour permettre à la
vapeur excessive de s’échapper. Le plat devrait être
suffisamment profond de manière à ce que
l’emballage plastique ne touche pas l’aliment.
▯ Plastiques propres à la cuisson au micro-ondes :
Utilisez des plats, des tasses, des contenants de
congélation semi-rigides et des sacs de plastique
propres à une utilisation au micro-ondes pour de
courts temps de cuisson. Utilisez-les avec soin, car le
plastique pourrait se ramollir à cause de la chaleur
générée par l’aliment.
▯ Produits de papier :
Essuie-tout, papier ciré, papier parchemin, serviettes
de table et plats de papier sans garniture métallique
ou dessin. Lisez l’étiquette du fabricant pour des
instructions spéciales pour utilisation dans le four à
micro-ondes.
Plats de cuisson inappropriés
▯ Ustensiles et plats de cuisson métalliques :
Le métal protège l’aliment de l’énergie micro-ondes et
produit une cuisson inégale. Par ailleurs, évitez les
brochettes métalliques, les thermomètres ou les
plateaux en aluminium. Les ustensiles métalliques
peuvent provoquer la production d'arcs électriques
pouvant endommager le four à micro-ondes.
▯ Décoration métallique :
Bols, tasses, plats de service et plateaux avec
garniture métallique.
▯ Feuille d’aluminium :
Évitez les grandes feuilles d'aluminium car elles
nuisent à la cuisson et pourrait provoquer la
production dangereuse d'arcs électriques. Utilisez de
petits morceaux de feuille d’aluminium pour protéger
les ailes et les cuisses de poulet. Conservez TOUTE la
feuille d’aluminium à au moins 1 pouce (25 mm) des
parois de la cavité du four et de la porte du
micro-ondes.
▯ Bois :
Les bols et les plateaux de bois s’assècheront et
pourraient se fissurer ou se fendre si vous les utilisez
dans le four à micro-ondes. Les paniers fabriqués de
bois réagiront de la même manière.
▯ Plats de cuisson couverts de façon serrée :
Assurez-vous de laisser des ouvertures pour permettre
à la vapeur de s’échapper du plat de cuisson couvert.
Percez les pochettes de plastique de légumes ou
d’autres aliments avant leur cuisson. Les pochettes
trop serrées peuvent éclater.
▯ Papier gris d'emballage :
Évitez d’utiliser des sacs de papier gris d’emballage.
Ils absorbent la chaleur et peuvent brûler.
▯ Ustensiles de cuisson endommagés ou écaillés :
Tout ustensile qui est fissuré, endommagé ou écaillé
pourrait se briser dans le four.
▯ Attaches métalliques :
Retirez les attaches métalliques des sacs de papier ou
de plastique. Ils deviennent chauds et pourraient
s’enflammer.

42
Test de la vaisselle
Ne faites jamais fonctionner le micro-ondes sans
aliments. La seule exception à cette règle est le test de
vaisselle suivant.
Si vous n'êtes pas sûr que votre récipient est micro-
ondable, effectuez le test suivant :
1.
Placez le plat vide dans l'appareil pendant ½ à 1
minute à la puissance maximale.
2.
Vérifiez régulièrement la température.
Le récipient doit être froid ou tiède.
S'il est chaud ou si des étincelles se produisent, votre
récipient n'est pas approprié.
Niveaux de puissance du micro-ondes
Vous pouvez sélectionner parmi 10 différents niveaux de
puissance pour le micro-ondes. Si vous ne réglez pas un
niveau de puissance, le micro-onde fonctionnera
automatiquement au niveau de puissance maximum de
100 %.
Le tableau ci-dessous suggère des niveaux de puissance
pour différents types d’aliments pouvant être préparés au
micro-ondes.
Réglage du micro-ondes
L'appareil doit être hors tension.
1.
Effleurez la touche tactile ON l OFF pour mettre
l’appareil sous tension.
Vous serez amené directement au menu principal.
2.
Effleurez “Micro-ondes”.
3.
L'appareil suggère un niveau de puissance en
pourcentage.
4.
Effleurez le champ niveau de puissance et glissez vers
la gauche ou la droite pour sélectionner un niveau de
puissance différent.
Confirmez le réglage en effleurant le symbole 8.
Remarque : Si vous ne touchez pas le symbole 8,
les modifications seront automatiquement prises après
quelques secondes.
Puissance
du
micro-ondes
À utiliser pour
100 %
élevée
Bouillir de l’eau
Cuire de la viande hachée
Confectionner des friandises
Cuire des fruits et légumes frais
Cuire du poisson et de la volaille
Préchauffer un plat à dorer
Réchauffer des boissons
Cuire des tranches de bacon
90 % Réchauffer rapidement des tranches de
viande
Sauter des oignons, céleris et poivrons
verts
80 % Réchauffage général
Cuire des œufs brouillés
70 % Cuire des pains et des produits céréa-
liers
Cuire des plats de fromage
Cuire des muffins, des gâteaux au cho-
colat et des petits gâteaux
Cuire une volaille entière
60 % Cuire des pâtes
50 % Cuire de la viande
Cuire de la crème pâtissière
Cuire des côtes levées, du rôti de bœuf
et du rôti de surlonge
40 % Cuire des coupes de viande moins
tendres
Réchauffer des aliments préparés surge-
lés
30 % Décongeler de la viande, de la volaille et
des fruits de mer
Cuire de petites quantités d’aliments
Terminer la cuisson de casseroles, de
plats mijotés et de certaines sauces
Faire fondre du chocolat
20 % Ramollir du beurre et du fromage à la
crème
10 %
faible
Ramollir de la crème glacée
Faire lever de la pâte à levure
Puissance
du
micro-ondes
À utiliser pour
%RLVVRQ 0LFURRQGHV 3RSFRUQ
PO J
0LFURRQGHV
PLQV
$MRXWH]V
0LFURRQGHV
PLQV

43
5.
Effleurez le champ qui affiche le temps de cuisson par
défaut. Vous pouvez régler les heures, les minutes et
les secondes.
Effleurez le champ requis et glissez vers la gauche ou
la droite pour régler le temps de cuisson.
Confirmez le réglage en effleurant le symbole 8.
Remarque : Si vous ne touchez pas le symbole 8,
les modifications seront automatiquement prises après
quelques secondes.
6.
Effleurez la touche tactile START l STOP pour lancer la
cuisson.
La barre d’état commence à se remplir. Le décompte
s’affiche.
Modification du temps de cuisson
Vous pouvez modifier le temps de cuisson en tout temps
en cours de fonctionnement du micro-ondes en effleurant
le temps au cours du décompte. Effleurez le champ
tactile 8 pour confirmer les réglages.
La cuisson se poursuit automatiquement avec les
nouveaux réglages.
Ajout de 30 secondes au temps de cuisson
Effleurez le champ « Ajout 30 sec » à l’écran tactile pour
augmenter le temps de cuisson par incrément de
30 secondes.
Vous pouvez également effleurer ce champ au cours du
fonctionnement du micro-ondes pour ajouter
30 secondes au temps restant.
Modification du niveau de puissance du micro-ondes
Vous pouvez modifier le niveau de puissance du micro-
ondes en tout temps en cours de fonctionnement en
effleurant le champ de puissance à l’écran. Effleurez le
champ tactile 8 pour confirmer les réglages.
La cuisson se poursuit automatiquement avec les
nouveaux réglages.
Temps de cuisson écoulé
Dès que le temps de cuisson du micro-ondes est
terminé, un signal sonore retentit et le fonctionnement du
micro-ondes prend fin automatiquement.
« Micro-ondes terminée » x apparaît à l’écran.
Effleurez à l’écran pour interrompre le signal sonore.
Vous pouvez redémarrer le micro-ondes avec le même
niveau de puissance en réglant le temps de cuisson et
effleurant la touche tactile START l STOP.
Mise en pause
Effleurez la touche tactile START l STOP
(DÉMARRAGE l ARRÊT) pour mettre la cuisson en
pause. Effleurez de nouveau la touche tactile
START l STOP (DÉMARRAGE l ARRÊT) pour reprendre
la cuisson.
L’ouverture de la porte de l’appareil interrompt la
cuisson. Effleurez la touche tactile START l STOP
(DÉMARRAGE l ARRÊT) à la fermeture de la porte. Le
micro-ondes redémarre.
Mise hors tension de l'appareil
Effleurez la touche tactile ON I OFF (MARCHE I ARRÊT).
Suggestions pour les meilleurs résultats
Pour vous aider à obtenir les meilleurs résultats
possibles avec votre four à micro-ondes, lisez les
suggestions suivantes ci-dessous :
▯ Température de rangement
Les aliments sortis du congélateur ou du réfrigérateur
prennent plus de temps à cuire.
▯ Taille
Les petits morceaux cuisent plus rapidement que les
gros. Les morceaux de taille et de forme similaires
cuiront de façon plus uniforme lorsqu’ils sont cuits
ensemble. Pour des résultats plus uniformes, réduisez
le niveau de puissance lorsque vous faites cuire des
gros morceaux.
▯ Humidité naturelle
Les aliments très humides cuisent de façon plus
uniforme du fait que l’énergie du micro-ondes chauffe
les molécules d’eau de façon très efficace.
▯ Brassage
Brassez les aliments comme les casseroles et les
légumes de l’extérieur au centre pour distribuer la
chaleur de façon plus uniforme. Cela vous permettra
de cuire l’aliment plus rapidement. (Un brassage
constant n’est pas nécessaire.)
▯ Retournement des aliments
Retournez les aliments tels que les côtelettes de porc,
les rôtis ou le chou-fleur entier à mi-cuisson. Cela
aidera à exposer tous les côtés de façon uniforme à
l’énergie mico-ondes.
▯ Placement des aliments
Placez les parties délicates des aliments, comme les
pointes d’asperge, vers le centre de la plaque
tournante.
▯ Disposition des aliments
Disposez les aliments de forme uniforme, comme les
morceaux de poulet ou le saumon, avec les parties
plus épaisses, plus charnues vers l’extérieur de la
plaque tournante.
0LQXWHV
+HXUHV 6HF
0RFURRQGHV
PLQV
$MRXWH]V

44
▯ Laissez les aliments reposer
Après avoir retiré l’aliment du micro-ondes, couvrez
l’aliment de feuilles d’aluminium ou d’un couvercle de
casserole et laissez-le reposer pour terminer la
cuisson. Cela aidera à terminer la cuisson de l’aliment
au centre et évitera de trop cuire sur les bords
extérieurs. La durée du temps de repos dépend de la
densité et de la superficie des aliments.
▯ Enveloppement
Les sandwichs et de nombreux autres types
d’aliments contenant du pain précuit devraient être
enveloppés dans des serviettes de papier ou dans du
papier ciré avant de les placer dans le micro-ondes
pour aider à éviter d’assécher les aliments.
Programmes du micro-ondes
Il est très facile d’utiliser les différents programmes pour
préparer des aliments. Vous sélectionnez un programme
et saisissez le poids de l’aliment ou sa quantité. Le
programme utilise alors les réglages qui conviennent le
mieux.
Remarque : L’écran fournit des instructions utiles pour
chacun des programmes du micro-ondes. Appuyez sur
le bouton INFO chaque fois qu’il s’allume, et veuillez
conserver ses instructions pour optimiser les résultats de
cuisson.
Renseignements à propos des réglages
▯ Les résultats de cuisson dépendent de la qualité des
aliments et du type d’ustensiles de cuisson. Pour
optimiser les résultats de cuisson, utilisez uniquement
des aliments en bonne condition et de la viande froide.
Dans le cas des aliments congelés, utilisez
uniquement des aliments qui sortent directement du
congélateur.
▯ Pour certains plats, vous devrez saisir le poids ou la
quantité. L’appareil décide alors des réglages de
durée et de température pour vous.
Il est impossible de saisir un poids ou une quantité à
l’extérieur de la plage prévue.
▯ Des renseignements sont fournis à propos des
ustensiles ou de la position de la grille à utiliser, ou de
l’ajout de liquide lors de la cuisson de viande, entre
autres. Au cours de la cuisson, il faut retourner
certains aliments ou mélanger certains plats. Ces
instructions apparaissent à l’écran peu après le début
de la cuisson. Un signal sonore retentit pour vous
avertir au bon moment.
Réglage du programme de micro-ondes
Par exemple : Réglage du mode Popcorn à 78 gr
(2,75 oz).
1.
Effleurez la touche tactile ON I OFF.
Le menu principal est affiché.
2.
Glissez vers la droite ou la gauche pour sélectionner
un programme micro-ondes.
3.
Effleurez le programme Fondre du Beurre.
4.
Glissez vers la gauche ou la droite pour sélectionner
1/4 tasse.
5.
Effleurez « Continuer ».
6.
Effleurez la touche tactile START l STOP.
L’appareil commence la cuisson et le décompte est
affiché à l'écran.
Changer le programme
Effleurez la touche tactile START l STOP et changez le
mode de cuisson. Touchez le symbole ; pour naviguer
vers le menu principal.
À la fin du programme
L’écran affiche « Programme terminé. Bon appétit! »
Effleurez l’écran pour effacer l’avis. Le programme réglé
antérieurement s’affiche. Vous pouvez poursuivre la
cuisson ou éteindre l’appareil.
Mise hors tension de l'appareil
Effleurez la touche tactile ON l OFF (MARCHE l ARRÊT)
pour éteindre l’appareil.
3RSFRUQ &DSWHXU&XLVVRQ &DSWHXU5pFKDXG
J 3RPPHGHWHUUHDX
$XWR
)RQGUHGX%HXUUH
PO
&RQWLQXHU
POPO

45
Boisson
Le mode de boissons vous permet de réchauffer de 125
à 500 ml de liquide (1/2 à 2 tasses).
Le tableau suivant présente les options et les plages de
réglages offerts.
Réglage
1.
Effleurez la touche tactile ON I OFF.
Le menu principal est affiché.
2.
Sélectionnez « Boisson ».
3.
Glissez vers la gauche ou la droite pour sélectionner
le volume désirée de la boisson.
4.
Effleurez « Continuer ».
5.
Effleurez la touche tactile START l STOP.
L’appareil commence la cuisson et le décompte est
affiché à l'écran.
Popcorn
9 ATTENTION
Ne laissez pas le four sans surveillance lorsque
vous faites éclater le maïs. Le maïs pourrait
s’enflammer et provoquer un incendie.
Le mode Popcorn vous permet de faire éclater
5 différents sacs de maïs soufflé commercial convenant
au micro-ondes.
Le tableau suivant présente les options et les plages de
réglages offerts.
Réglage
1.
Effleurez la touche tactile ON I OFF.
Le menu principal est affiché.
2.
Séletionnez « Popcorn ».
3.
Glissez vers la gauche ou la droite pour sélectionner
la quantité désirée.
4.
Effleurez « Continuer ».
5.
Effleurez la touche tactile START l STOP.
L’appareil commence la cuisson et le décompte est
affiché à l'écran.
Capteur cuisson
Le mode Capteur cuisson vous permet de cuire bon
nombre de vos aliments préférés sans sélectionner les
temps de cuisson et les niveaux de puissance. Le four à
micro-ondes détermine automatiquement le temps de
cuisson requis pour chaque aliment.
Pour de meilleurs résultats au mode Capteur cuisson,
suivez ces recommandations :
▯ Les aliments cuits avec le système à capteurs
devraient être cuits à partir de leur température de
conservation normale.
▯ La plaque tournante, le plat céramique et l’extérieur du
contenant doivent être secs.
▯ Les aliments doivent toujours être couverts lâchement
avec de la pellicule en plastique, du papier ciré ou un
couvercle convenant aux micro-ondes.
▯ Les aliments devraient être cuits dans un plat de
service convenant au micro-ondes.
▯ Touchez le bouton INFO pour obtenir information à
propos des ustensiles ou de la position de la grille à
utiliser ou de l’ajout de liquide lors de la cuisson de
viande, entre autres.
▯ N’ouvrez pas la porte ou ne touchez pas la touche
ON l OFF pendant le temps de détection par le
capteur. Lorsque le temps de détection s'est écoulé, le
temps de cuisson restant apparaîtra à l’écran. Vous
pouvez alors ouvrir la porte pour mélanger, retourner
ou redisposer l’aliment.
Le tableau qui suit affiche la quantité d’aliments que vous
désirez cuire simultanément.
Remarques
▯ Couvrir avec une pellicule de plastique ou du papier
ciré aéré.
▯ Réchauffer l’aliment sur un plat de service convenant
au micro-ondes.
Quantité (tasse) Quantité (oz)
125 ml (1/2 t) environ 4 oz
250 ml (1 t) environ 8 oz
375 ml (1 1/2 t) environ 12 oz
500 ml (2 t) environ 16 oz
Quantité (oz) Quantité (gr)
1,2 oz près de 35 gr
1,75 oz près de 50 gr
2,75 oz près de 80 gr
3,2 oz près de 90 gr
3,5 oz près de 100 gr
Programme de Capteur
de Cuisson
Quantité
Pommes de terre au four 1 à 4 pommes de terre
(230 à 900 gr/8 à 32 oz)
Patates douces 1 à 4 patates douces
(230 à 900 gr/8 à 32 oz)
Légumes frais 115 à 450 gr
(4 à 16 oz/0,25 à 1 lb)
Légumes surgelés 340 à 450 gr
(6 à 16 oz/0,75 à 1 lb)
Viande hachée 230 à 680 gr
(8 à 24 oz/0,5 à 1,5 lb)
Poissons/fruits de mer 230 à 570 gr (8 à 20 oz/
0,5 à 1,25 lb)
Riz brun 125 à 500 ml
(1/2 à 2 t) (riz sec)
Riz blanc 125 à 500 ml
(1/2 à 2 t) (riz sec)
Plat principal surgelé de 280 à 570 gr
(10 à 20 oz)

46
▯ Ajouter de l'eau au riz sec (1 part de riz/2 parts
d’eau).
▯ Pommes de terre, patates douces et légumes avec
peau non poreuse doivent être percés avant la
cuisson.
Réglage
1.
Effleurez la touche tactile ON I OFF.
Le menu principal est affiché.
2.
Sélectionnez « Capteur cuisson ».
3.
Glissez vers la gauche ou la droite pour sélectionner
l’aliment désiré.
4.
Effleurez la touche tactile START l STOP
(DÉMARRAGE l ARRÊT).
L’appareil se met à détecter.
5.
Une fois la détection terminée, s’affiche un avis sur
l’écran. L’appareil amorce la cuisson. Le temps de
cuisson calculé s’écoule à l’écran.
Remarque : N’ouvrez pas la porte pendant le
processus de détection, sinon la détection sera
annulé. Une fois que la détection terminée, vous pouvez
ouvrir la porte pour brasser, retourner ou redisposer
l’aliment. Effleurez la touche tactile START l STOP pour
reprendre la cuisson.
Capteur Réchaud
Le mode Capteur réchaud vous permet de réchauffer les
plats de service ou les casseroles (8 à 12 oz) pour votre
commodité.
Pour de meilleurs résultats au mode Capteur cuisson,
suivez ces recommandations :
▯ Les aliments cuits avec le système à capteurs
devraient être cuits à partir de leur température de
conservation normale.
▯ La plaque tournante, le plat céramique et l’extérieur du
contenant doivent être secs.
▯ Les aliments doivent toujours être couverts lâchement
avec de la pellicule en plastique, du papier ciré ou un
couvercle convenant aux micro-ondes.
▯ Les aliments devraient être cuits dans un plat de
service convenant au micro-ondes.
▯ Touchez le bouton INFO pour obtenir information à
propos des ustensiles ou de la position de la grille à
utiliser ou de l’ajout de liquide lors de la cuisson de
viande, entre autres.
▯ N’ouvrez pas la porte ou ne touchez pas la touche
ON l OFF pendant le temps de détection par le
capteur. Lorsque le temps de détection s'est écoulé, le
temps de cuisson restant apparaîtra à l’écran. Vous
pouvez alors ouvrir la porte pour mélanger, retourner
ou redisposer l’aliment.
Le tableau qui suit affiche la quantité d’aliments que vous
désirez cuire simultanément.
Suggestions pour le réchauffage des aliments
Réglage
1.
Effleurez la touche tactile ON I OFF.
Le menu principal est affiché.
2.
Sélectionnez « Capteur réchaud ».
3.
Effleurez la touche tactile START l STOP
(DÉMARRAGE l ARRÊT).
L’appareil se met à détecter.
4.
Une fois la détection terminée, s’affiche un avis sur
l’écran. L’appareil amorce la cuisson. Le temps de
cuisson calculé s’écoule à l’écran.
Remarque : N’ouvrez pas la porte pendant le
processus de détection, sinon la détection sera
annulé. Une fois que la détection terminée, vous pouvez
ouvrir la porte pour brasser, retourner ou redisposer
l’aliment. Effleurez la touche tactile START l STOP pour
reprendre la cuisson.
3RPPH'H7HUUH 3DWDWH'RXFH
SRPPHVGHVWH
R]
SDWDWHV
R]
3ODWFRQJHOp
R]
$X)RXU
Aliment/Quan-
tité
Directions
Assiette plate
1 portion
(1 plat)
Utilisez uniquement des aliments réfri-
gérés précuits. Couvrez l’assiette avec
une pellicule de plastique ou du papier
ciré aéré, rangé sous l’assiette. Si l’ali-
ment n’est pas aussi chaud que vous
l’auriez souhaité après son réchauf-
fage avec la fonction de réchauffage,
continuez de chauffer en utilisant le
réglage manuel de temps et de niveau
de puissance.
Contenu:
▯ Viande, poulet ou poisson de 3-4 oz
(jusqu’à 6 oz avec os)
▯ une demi-tasse de féculent
(pommes de terre, pâtes, riz, etc.)
▯ 1/2 tasse de légumes
(environ 3-4 oz)
Casserole,
pâtes
1 à 4 portions
Plats à couvercle avec couvercle ou
pellicule en plastique aérée. Si l’ali-
ment n’est pas aussi chaud que vous
l’auriez souhaité après son réchauf-
fage avec la fonction de réchauffage,
continuez de chauffer en utilisant le
réglage manuel de temps et de niveau
de puissance.
Brassez les aliments une fois avant de
servir.
Contenu:
▯ Aliments réfrigérés dans une casse-
role (comme un ragoût de bœuf ou
une lasagne)
▯ Spaghetti et ravioli en boîte, ali-
ments réfrigérés

47
Décongélation automatique
Avec le mode Décongélation automatique (Auto Defrost),
vous pouvez décongeler trois différents types d’aliments
en saisissant leur poids. Le temps de décongélation
idéal sera calculé par le programme.
Le tableau suivant présente les options et les plages de
réglages offerts.
Plat de cuisson pour la décongélation
Placez l’aliment dans un plat peu profond allant au
micro-ondes comme une casserole en verre ou un plat
en verre, mais ne couvrez pas.
Temps de repos
L’aliment décongelé devrait être laissé au repos pendant
10 à 30 minutes additionnelles jusqu’à ce qu’il atteigne
une température uniforme. Il faut prévoir pour les gros
morceaux de viande un temps de repos plus long que
pour les morceaux plus petits. Les morceaux de viande
plats et les aliments composés de viande hachée
devraient être séparés les uns des autres avant de les
laisser au repos.
Après ce temps-là, vous pouvez continuer de préparer
l’aliment, même si des morceaux de viande épais sont
toujours congelés au centre.
Conseils pour la décongélation
9 AVERTISSEMENT
RISQUES À LA SANTÉ
Du liquide sera produit lors de la décongélation de
viande ou de volaille. Drainez ce liquide quand vous
retournez la viande ou la volaille et en aucune
circonstance devriez-vous l’utiliser à d’autres fins ou
lui permettre d’entrer en contact avec d’autres
aliments.
▯ Entrez toujours le poids en lb lorsque vous utilisez la
fonction de décongélation selon le poids (voyez le
tableau des programmes).
▯ Utilisez le mode de décongélation uniquement pour
les aliments crus.
▯ La décongélation donne les meilleurs résultats lorsque
l’aliment a décongelé et a un minimum de 0 °F (pris
directement du congélateur).Si l’aliment a été rangé
dans un réfrigérateur-congélateur qui ne maintient pas
une température de 5 °F ou moins, programmez
toujours un poids d’aliment inférieur ou un temps de
cuisson inférieur pour empêcher de cuire l’aliment.
▯ Si l’aliment congelé est rangé à l’extérieur du
congélateur pendant jusqu’à 20 minutes, entrez un
temps ou un poids de cuisson réduit.
▯ La forme de l’emballage modifiera le temps de
décongélation. Les paquets d’aliments rectangulaires
et minces se décongèlent plus rapidement qu’un bloc
d'aliments congelés épais.
▯ Séparez les morceaux à mesure qu’ils se décongèlent.
Les morceaux d’aliments congelés séparés se
décongèlent mieux.
▯ Protégez les zones chaudes de l’aliment avec de
petits morceaux de feuille en aluminium si elles
commencent à se chauffer.
Utilisez des petits morceaux de feuille en aluminium
pour protéger les aliments comme les ailes de poulet,
les extrémités des cuisses et les queues de poisson.
Ne laissez pas l’aluminium toucher la cavité du four
lors de la décongélation.
Réglage
1.
Effleurez la touche tactile ON I OFF.
Le menu principal est affiché.
2.
Sélectionnez « Décongélation Automatique ».
3.
Effleurez le type de l’aliment que vous souhaitez
décongléler.
4.
Glissez vers la gauche ou la droite pour régler le poids
de l’aliment.
5.
Effleurez « Continuer ».
6.
Effleurez la touche tactile START l STOP.
L’appareil commence la cuisson et le décompte est
affiché à l'écran.
Garder au Chaud
Utilisez le mode Garder au chaud pour conserver les
aliments cuits chauds et prêts à servir.
Remarques
▯ Les aliments couverts à la cuisson doivent rester
couverts au chaud.
▯ Les pâtisseries (tartes, chaussons, etc.) ne doivent
pas être couvertes.
▯ Les repas complets conservés à chaud sur un plat de
service peuvent être couverts pendant le mode Garder
au chaud.
Réglage
1.
Effleurez la touche tactile ON I OFF.
Le menu principal est affiché.
2.
Sélectionnez « Garder Au Chaud ».
3.
Effleurez la touche tactile START l STOP.
La barre d’état commence à se remplir rapidement.
L’appareil poursuit la cuisson.
Type d’aliment Quantité (lb)
Viande hachée de 227 à 907 gr
(0,5 à 2 lb)
Morceaux de viande (steak/côte-
lette)
de 227 gr à 1,4 kg
(0,5 à 3 lb)
Morceaux de volaille de 227 gr à 1,4 kg
(0,5 à 3 lb)

48
Fondre du beurre
Le tableau suivant présente les options et les plages de
réglages offerts.
Réglage
1.
Effleurez la touche tactile ON I OFF.
Le menu principal est affiché.
2.
Sélectionnez « Fondre du beurre ».
3.
Glissez vers la gauche ou la droite pour sélectionner
la quantité désirée.
4.
Effleurez « Continuer ».
5.
Effleurez la touche tactile START l STOP.
L’appareil commence la cuisson et le décompte est
affiché à l'écran.
Fondre du chocolat
Le tableau suivant présente les options et les plages de
réglages offerts.
Réglage
1.
Effleurez la touche tactile ON I OFF.
Le menu principal est affiché.
2.
Sélectionnez « Fondre du chocolat ».
3.
Glissez vers la gauche ou la droite pour sélectionner
la quantité désirée.
4.
Effleurez « Continuer ».
5.
Effleurez la touche tactile START l STOP.
L’appareil commence la cuisson et le décompte est
affiché à l'écran.
Remarque : Après environ la moitié du temps de
cuisson écoulé, un bip sonne. Vous pouvez ouvrir la
porte et remuer l’aliment pour une distribution de chaleur
plus uniforme. Appuyez sur le bouton START l STOP
pour continuer l'opération.
Amollir de la crème glacée
Le tableau suivant présente les options et les plages de
réglages offerts.
Réglage
1.
Effleurez la touche tactile ON I OFF.
Le menu principal est affiché.
2.
Sélectionnez « Amollir de la Crème Glacée ».
3.
Glissez vers la gauche ou la droite pour sélectionner
la quantité désirée.
4.
Effleurez « Continuer ».
5.
Effleurez la touche tactile START l STOP.
L’appareil commence la cuisson et le décompte est
affiché à l'écran.
Amollir du fromage à la crème
Le tableau suivant présente les options et les plages de
réglages offerts.
Réglage
1.
Effleurez la touche tactile ON I OFF.
Le menu principal est affiché.
2.
Sélectionnez « Amollir du Fromage à la Crème ».
3.
Glissez vers la gauche ou la droite pour sélectionner
la quantité désirée.
4.
Effleurez « Continuer ».
5.
Effleurez la touche tactile START l STOP.
L’appareil commence la cuisson et le décompte est
affiché à l'écran.
Remarque : Après environ la moitié du temps de
cuisson écoulé, un bip sonne. Vous pouvez ouvrir la
porte et remuer l’aliment pour une distribution de chaleur
plus uniforme. Appuyez sur le bouton START l STOP
pour continuer l'opération.
Quantité à l’écran
30 ml/2 c. à s. (cuillères
à soupe)
60 ml (1/4 t)
125 ml (1/2 t)
Quantité à l’écran
250 ml (1 t)
500 ml (2 t)
Quantité à l’écran
227 gr (8 oz)
454 gr (16 oz)
907 gr (32 oz)
1,4 kg (48 oz)
Quantité à l’écran
85 gr (3 oz)
170 gr (6 oz)
227 gr (8 oz)

49
Minuterie
La fonction minuterie s’utilise comme une minuterie de
cuisine. L'appareil ne s'allume pas et ne s'éteint pas
automatiquement.
Minuterie de cuisine
Vous pouvez régler la minuterie de cuisine lorsque
l’appareil est sous ou hors tension.
1.
Effleurez la touche tactile TIMERS.
La fonction de minuteries de cuisine s’affiche à l’écran.
2.
Effleurez le champ requis et glissez vers la gauche ou
la droite pour régler la minuterie de cuisine.
Vous pouvez régler les heures, les minutes et les
secondes.
3.
Effleurez le symbole 8.
La minuterie de cuisine lance le compte à rebours.
Le symbole
. et la valeur de la minuterie sont affichés
dans le coin supérieur gauche de l’écran.
Remarque : Un court signal sonore retentit à la fin du
temps écoulé. « Minuterie de cuisine terminée » s’affiche.
Touchez l’écran pour annuler la notification.
Si vous ne touchez pas l’écran, la notification s’éteindra
après environ une minute. Le symbole
. et 00 min
00 sec. sont affichés dans le coin supérieur gauche de
l’écran. Touchez l’écran pour annuler.
Vérification, modification ou annulation
des réglages
1.
Effleurez la touche tactile TIMERS (MINUTERIES).
Les options de réglage de temps s’affichent à l’écran.
2.
Effleurez l’option de minuterie requise.
3.
Glisser vers la gauche ou la droite sur l’écran tactile
pour modifier les réglages.
Pour supprimer une valeur de la minuterie, réglez
« 00:00 » ou effleurez « Réinitialiser ».
4.
Effleurez à deux reprises le symbole 8.
Verrou pour enfants
L’appareil est doté d’un verrou pour enfants de sorte que
les enfants ne peuvent démarrer accidentellement un
appareil ou en modifier un réglage.
Activation et désactivation
L'appareil doit être éteint.
1.
Effleurez la touche tactile LOCK et tenez-la enfoncée
jusqu’à ce que « Verrouillage du panneau activé »
s’affiche.
Le verrouillage de sécurité pour enfants est activé. Le
symbol 1 s’affiche dans l’écran.
2.
Effleurez la touche tactile LOCK et tenez-la enfoncée
jusqu’à ce que « Verrouillage du panneau activé »
s’affiche.
Le verrouillage de sécurité pour enfants est désactivé.
PLQV
5pLQLWLDOLVHU
0LQXWHULH
0LQXWHV+HXUHV 6HF

50
Réglages de base
Vous pouvez ajuster plusieurs réglages de l’appareil
pour faciliter son utilisation. Au besoin, vous pouvez
modifier ces réglages dans le menu « Réglages ».
Modification des réglages
L'appareil doit être éteint.
1.
Effleurez la touche tactile SETTINGS.
2.
Glissez vers la gauche ou la droite pour sélectionner
le réglage requis.
3.
Effleurez la ligne du bas.
4.
Glissez vers la gauche ou la droite pour sélectionner
le réglage requis.
5.
Au besoin, effleurez le symbole 8 pour confirmer le
réglage.
6.
Effleurez la ligne supérieure.
7.
Effleurez la touche tactile SETTINGS.
8.
Appuyez sur « Sauvegarder » pour conserver les
modifications.
Réglages offerts
Nettoyage et entretien
9 AVERTISSEMENT
Assurez-vous que l’appareil tout entier s’est refroidi
et que la graisse s’est solidifiée avant de tenter de
nettoyer une partie quelconque de l’appareil.
Guide de nettoyage
▯ Pour une meilleure performance et par souci de
sécurité, conservez le four propre à l’intérieur et à
l’extérieur.Prenez particulièrement soin de maintenir le
panneau de porte intérieur et le cadre avant du four
exempts d’aliments et d’accumulations de graisse.
▯ N’utilisez jamais des poudres ou des tampons à
récurer abrasifs sur le micro-ondes. Essuyez l’intérieur
et l’extérieur du four à micro-ondes avec un chiffon
doux et une solution tiède (pas chaud) de détergent
léger.Rincez et essuyez complètement à sec.
▯ Essuyez les éclaboussures immédiatement avec une
serviette de papier mouillée, surtout après la cuisson
d’aliments graisseux comme le poulet ou le bacon.
▯ Nettoyez votre micro-ondes une fois par semaine ou
plus, selon le besoin.
▯ N’utilisez jamais le four à micro-ondes sans aliment
dans la cavité du four, cela pourrait endommager le
tube magnétron ou le plat de verre. Vous pourriez
choisir de laisser une tasse d’eau à l’intérieur du four
lorsqu’il ne sert pas pour empêcher
l’endommagement du four en cas d’allumage
accidentel.
Réglage Options
Heure Réglez l’heure
Langue english, français, español
Format de l'heure 12 h, 24 h
Affichage heure Numérique, Analogue, Arrêt
Format température Fahrenheit (°), Celsius (°C)
Volume du signal 1 à 5
Touche son Marche (On), Arrêt (Off)
Luminosité affichage 1 à 5
Mode Démo Oui, Non
Réglages d'usine Réinitialiser
Pièce Recommandations
Cavité du four Conservez l’intérieur (la cavité) du four propre. Les particules alimentaires et les liquides
déversés peuvent adhérer aux parois du four, dégradant ainsi le rendement du four.
Essuyez immédiatement tous les déversements. Utilisez un chiffon humide et propre et un
savon léger. N'UTILISEZ PAS des détergents puissants ou des nettoyants abrasifs.
Pour aider à détacher les particules alimentaires ou les liquides collés, chauffez 2 tasses
d’eau (ajoutez le jus d’un citron, si vous souhaitez donner une odeur fraîche à votre four)
dans un bol à mesurer micro-ondable de 4 tasses à haute puissance pendant 5 minutes ou
jusqu’à ébullition. Laissez reposer dans la cavité du four pendant 1 ou 2 minutes.
Plaque tournante de
verre
Retirez la plaque tournante de verre du four lorsque vous nettoyez la cavité du four et le pla-
teau.
AVIS : : Pour empêcher la plaque tournante de verre de se briser, manipulez-la avec soin et
ne la plongez pas dans l'eau immédiatement après la cuisson.
Lavez la plaque tournante de verre dans de l’eau savonneuse chaude ou dans le lave-vais-
selle.
Repose-rouleau de
plaque tournante.
Nettoyez avec de l’eau tiède savonneuse. Rincez à fond et séchez.

51
Dépannage
Avant de contacter le service à la clientèle, veuillez
songer à suivre les suggestions et les instructions ci-
dessous :
Verre de porte Lavez avec du savon et de l’eau ou avec un nettoyant pour verre. Utilisez du produit Fantas-
tik® ou Formula 409® avec une éponge propre ou une serviette de papier et essuyez. Évi-
tez d’utiliser des nettoyants abrasifs, comme les agents de nettoyage en poudre, les
tampons en laine d’acier et les nettoyants pour four.
Si la vapeur s’accumule à l’intérieur ou à l’extérieur de la porte du four, essuyez avec un chif-
fon doux. La vapeur peut s’accumuler en cours de fonctionnement du four à forte humidité et
n’indique d’aucune manière une fuite du micro-ondes.
Surfaces peintes Nettoyez avec de l’eau chaude savonneuse ou appliquez du produit Fantastik® ou Formula
409® sur une éponge propre ou une serviette de papier et essuyez. Évitez d’utiliser des net-
toyants abrasifs, comme les agents de nettoyage en poudre, les tampons en laine d’acier et
les nettoyants pour four.
Surfaces en acier
inoxydable
Essuyez ou frottez toujours dans la direction du grain. Nettoyez avec une éponge
savonneuse, puis rincez et séchez ou essuyez avec du produit Fantastik® pulvérisé sur une
serviette de papier. Protégez et polissez avec le produit Stainless Steel Magic® et un chiffon
doux. Retirez les traces d’eau avec un chiffon humecté de vinaigre blanc. Ne pas utiliser
des nettoyants qui contient du chlore, ils peuvent rouiller l’acier inoxydable.
Plastique et com-
mandes
Lorsqu’ils sont froids, nettoyez avec de l’eau savonneuse, rincez et séchez.
Zones imprimées
(Mots et numéros)
N’utilisez pas des nettoyants abrasifs ou des solvants à base de pétrole.
Pièce Recommandations
Problème Suggestion
L’écran et le four ne fonc-
tionnent pas.
▯ Insérez correctement la fiche dans une prise de courant mise à la terre.
▯ Réenclenchez le disjoncteur du circuit résidentiel ou remplacez tout fusible
grillé.
L’écran fonctionne, mais non le
four.
▯ Assurez-vous que la porte du four est bien fermée.
▯ Vérifiez si du matériel d’emballage ou autres matériaux sont collés dans le joint
de porte.
▯ Examinez la porte du four pour voir si elle est endommagée.
▯ Appuyez et tenez la touche tactile START l STOP enfoncée et essayez de saisir
de nouveau les instructions de cuisson.
L’alimentation est coupée avant
que le temps de cuisson ne soit
écoulé.
▯ Réinitialisez l’horloge et toute instruction de cuisson.
▯ Réenclenchez le disjoncteur du circuit résidentiel ou remplacez tout fusible
grillé.
▯ Appuyez et tenez la touche tactile START l STOP enfoncée et essayez de saisir
de nouveau les instructions de cuisson.
Le niveau de puissance du four
à micro-ondes passe du niveau
de puissance 100 % au niveau
de puissance 80 %.
Si le four est réglé pour une cuisson de plus de 30 minutes à un niveau de puis-
sance de 100 %, il réduira automatiquement la puissance à un niveau de 80 %
après 30 minutes pour éviter de trop cuire les aliments.
Vous voyez des étincelles ou
une formation d’arcs.
Retirez tout ustensile, casserole ou attache métallique de la cavité du four. Si vous
utilisez une feuille en aluminium, utilisez seulement des bandes étroites et pré-
voyez un espace minimum de 1 po (2,5 cm) entre la feuille et les parois inté-
rieures du four.
La plaque tournante est
bruyante ou colle.
▯ Nettoyez la plaque tournante, l’anneau du rouleau et le fond de la cavité du four.
▯ Assurez-vous que la plaque tournante et l’anneau de rouleau sont positionnés
correctement.
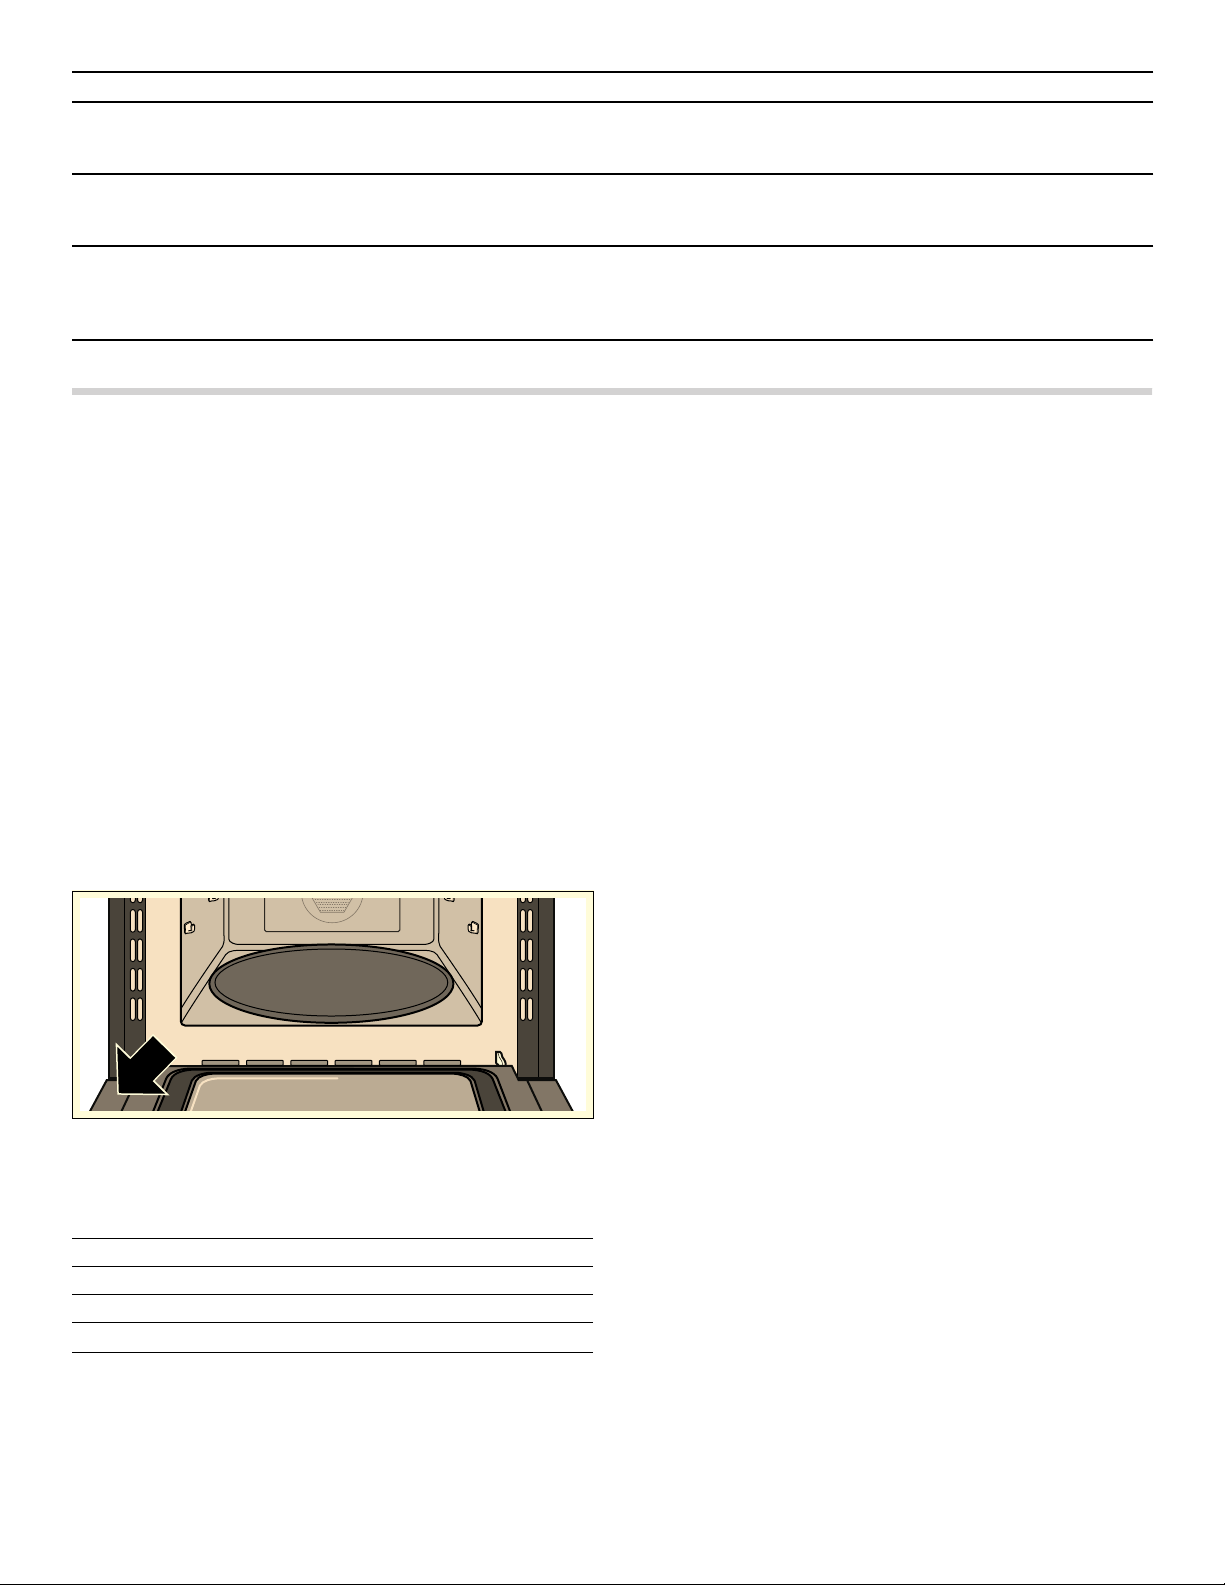
52
Soutien THERMADOR®
Avant d’appeler le service de réparations
Voyez le Guide d'utilisation et d'entretien pour les
renseignements de dépannage. Consultez l'énoncé de
garantie limitée du produit du Guide d'utilisation et
d'entretien.
Pour communiquer avec un représentant en réparations,
consultez les coordonnées au début du Guide ou dans la
section qui suit. Lorsque vous téléphonez, soyez prêt à
fournir les informations imprimées sur la plaque
signalétique du produit.
Plaque signalétique
La plaque signalétique affiche le modèle et le numéro de
série. Consultez la plaque signalétique de l’appareil
lorsque vous sollicitez un service.
La plaque signalétique se trouve à l’intérieur de la port
de l’appareil.
Pour ne pas avoir à chercher longtemps en cas de
besoin, vous pouvez inscrire ici les références de
l'appareil et le numéro de téléphone du service après-
vente
Conservez votre facture ou votre contrat aux fins de
validation de garantie si jamais vous avez besoin de
service.
Dépannage
Nous sommes conscients que vous avez investi des
sommes considérables dans votre cuisine. Nous nous
engageons à vous offrir, ainsi qu'à votre appareil, un
service de dépannage qui vous permettra de profiter de
votre cuisine pendant de nombreuses années.
N'hésitez pas à communiquer avec notre service à la
clientèle STAR® si vous avez des questions ou dans
l'éventualité peu probable où votre appareil
THERMADOR® nécessitait de l'entretien. Notre équipe
de dépannage se fera un plaisir de vous aider.
États-Unis
800-735-4328
www.thermador.com/support
Canada
800-735-4328
www.thermador.ca
Pièces et accessoires
Pour vous procurer des pièces, des filtres, du détartrant,
des produits nettoyants pour l'acier inoxydable et autres,
rendez-vous sur la boutique en ligne THERMADOR® ou
communiquez avec nous par téléphone.
États-Unis
http://store.thermador.com/us
Canada
▯ Si vous résidez dans les provinces de l'Atlantique, en
Ontario ou au Québec, communiquer avec :
Marcone
1.800-287-1627
▯ Si vous résidez dans un territoire, au Manitoba, en
Saskatchewan, en Alberta ou en Colombie-
Britannique, communiquer avec :
Reliable Parts
800-663-6060
L’utilisation du micro-ondes
perturbe la réception de la télé-
vision ou de la radio.
Cela est similaire à la perturbation causée par d’autres petits appareils, comme
des séchoirs à cheveux. Éloignez davantage le four à micro-ondes des autres
appareils comme le téléviseur ou la radio.
L’écran indique le message
d'erreur E-xx et le numéro
d'assistance technique
Présence d'une défaillance. Notez tout code d’erreur figurant sur l’écran. Débran-
chez l'appareil de l'alimentation électrique en désactivant le fusible dans le boîtier
à fusibles et joignez un centre de réparation autorisé.
L’écran indique le message
d'erreur E-11 et le numéro
d'assistance technique
Les touches tactiles ne fonctionnent pas correctement. Cela pourrait être causé
par de la condensation sur le clavier. Nettoyez le panneau de commande avec un
linge sec. Débranchez l'appareil de l'alimentation électrique en désactivant le
fusible dans le boîtier à fusibles et réactivez-le après 10 secondes.
Problème Suggestion
N° de modèle
N° FD
Date d’achat
Service après-vente O

53
ÉNONCÉ DE LA GARANTIE LIMITÉE
Couverture de la garantie :
La garantie limitée fournie par BSH Home Appliances
Ltd. (« BSH ») dans le présent énoncé de garantie limitée
s’applique seulement aux THERMADOR
®
appareil
(« Produit ») vendu au premier acheteur, en autant que le
produit ait été acheté :
▯ pour une utilisation normale résidentielle (non
commerciale), et qu’en fait en tout temps a été utilisé
pour un usage domestique normal ;
▯ nouveau au détail (non en montre, tel quel ou un
retour), qu’il n’est pas destiné à la revente ni à un
usage commercial et ;
▯ aux États-Unis ou au Canada et qu’il est demeuré en
tout temps dans le pays où l’appareil a été acheté.
Les garanties données ici s’appliquent seulement au
premier acheteur du produit et ne sont pas transférables.
S’assurer de retourner la carte d’enregistrement,
quoiqu’elle n’est pas nécessaire pour la garantie, c’est la
façon dont BSH peut vous aviser dans le cas d’un avis
de rappel ou de sécurité du produit.
Durée de la garantie
BSH garantit que le produit est exempt de défectuosités
autant dans les matériaux que dans la main-d’oeuvre
pour une période de sept cent trente (730) jours à partir
de la date d’achat. Cette période commence dès la date
de l’achat et ne peut pas être arrêtée, prolongée ou
suspendue pour quelque raison que ce soit.
Ce Produit est également garanti contre tout défaut de
matériau et de fabrication apparent (tels les éraflures sur
l'acier inoxydable, les défauts d'aspect de la peinture ou
de la porcelaine, les ébréchures, les bosselures, ou
autres dégâts au fini du Produit), pendant une période de
soixante (60) jours à compter de la date d'achat ou de la
date de clôture pour une nouvelle construction. Cette
garantie relative à l'apparence exclut les légères
variations de couleur découlant des différences
inhérentes aux pièces peintes et en porcelaine, ainsi que
découlant des différences causées par l'éclairage de
cuisine, l'emplacement du produit ou d'autres facteurs
similaires. Cette garantie relative à l'apparence exclut
plus particulièrement tout appareil électroménager en
exposition, de plancher, « En l'état » ou de stock « B ».
Réparation ou remplacement comme
solution exclusive
Pendant la période de garantie, BSH ou un de ses
centres de service autorisés réparera le produit sans
frais (sujet à certaines limitations indiquées dans le
présent document), si le produit présente un défaut de
fabrication ou de matériaux. Si des tentatives
raisonnables pour réparer le produit sont vaines, alors
BSH remplacera le produit (un modèle supérieur peut
être disponible, à la seule discrétion de BSH, moyennant
des frais additionnels). Toutes les pièces ou les
composants enlevés demeurent la seule propriété de
BSH. Toute pièce et tout composant réparés doit être
identique à la pièce d’origine à des fins de cette garantie
et la garantie ne sera pas prolongée en regard de telles
pièces. La seule responsabilité de BSH est de faire
réparer le produit défectueux par un centre de service
autorisé pendant les heures d’affaires normales. Pour la
sécurité et éviter des dommages à la propriété, BSH
recommande fortement de ne pas réparer le produit soi-
même, par une personne non qualifié ; BSH ne sera pas
tenu responsable des réparations ou du travail effectué
par une personne non autorisée. Si le consommateur
désire faire réparer par une personne autre qu’une
personne autorisée, CETTE GARANTIE EST
AUTOMATIQUEMENT NULLE ET NON AVENUE. Les
centres de service autorisés sont les personnes ou les
compagnies qui ont été spécialement formées sur les
produits BSH et qui possèdent, selon l’opinion de BSH,
une réputation supérieure pour le service à la clientèle et
la capacité technique (il est à noter qu’elles sont des
entités indépendantes et non des agents, partenaires,
affiliations ou représentants de BSH). Nonobstant ce qui
suit, BSH ne sera pas tenu responsable d’aucune façon
si le produit est situé dans une région éloignée
(supérieure à 100 miles d’un centre de service autorisé)
ou n’est pas accessible de façon raisonnable, dans un
environnement hasardeux, dangereux ; dans une telle
éventualité, à la demande du consommateur, BSH
pourrait payer les frais de main-d’oeuvre et de pièces et
expédier les pièces à un centre de service autorisé le
plus près, mais le consommateur serait entièrement
responsable pour toute durée de déplacement et autres
frais spéciaux encourus par le centre de service, en
autant qu’il accepte l’appel de service.
Produit hors garantie
BSH n’a aucun obligation, par loi ou autre, d’offrir toute
concession, incluant réparation, prorata ou
remplacement de produit une fois la garantie expirée.
Exclusions à la garantie
La couverture de garantie décrite aux présentes exclut
tout défaut ou dommage qui n'est pas une faute directe
de BSH, y compris sans limitation, un ou plusieurs des
cas suivants :
▯ utilisation du produit autre qu’un usage normal,
habituel et de la façon destinée (incluant sans
limitation toute forme d’utilisation commerciale,
d’utilisation ou de rangement d’un produit pour
l’intérieur à l’extérieur, utilisation du produit de concert
avec un transporteur aérien ou marin) ;
▯ mauvaise conduite, négligence, mauvaise utilisation,
abus, accidents, fonctionnement inadéquat, mauvais
entretien, installation inadéquate ou négligente,
altération, manquement d’observer les instructions de
fonctionnement, mauvaise manipulation, service non
autorisé (incluant réparation par le consommateur ou
exploration du fonctionnement interne du produit) ;
▯ ajustement, modification ou altération de toute sorte ;
▯ manquement à la conformité des normes applicables
fédérales, provinciales, municipales ou électrique du
pays, codes de plomberie et/ou de construction,

54
réglementation ou lois, incluant le manquement
d’installer le produit en stricte conformité avec les
codes et réglementations de construction et
d’incendie locaux ;
▯ usure ordinaire, déversements d’aliments, liquide,
accumulation de graisse ou autres substances
accumulées dans, sur ou autour du produit ;
▯ toute force ou tout facteur externe, élémentaire et/ou
environnemental, incluant sans limitation, pluie, vent,
sable, inondation, incendie, coulée de boue, gel,
humidité excessive et exposition prolongée à
l’humidité, foudre, surtension, problème de structure
autour de l’appareil et actes de Dieu.
En aucun cas, BSH ne sera tenu responsable des
dommages survenus à la propriété, incluant les
armoires, planchers, plafonds et autres objets ou
structures autour du produit. Également exclus de la
garantie sont des produit sur lequel le numéro de série a
été modifié, altéré, effacé, enlevé ; appel de service pour
enseigner le fonctionnement du produit ou les visites où
il n’y a aucun problème avec le produit ; correction de
problèmes d’installation (le consommateur est seul
responsable pour toute structure et tout réglage du
produit, incluant l’électricité, la plomberie et autres
connexions nécessaires, pour un plancher/fondation
appropriée, et pour toute modification incluant, sans
limitation, armoire, mur, plancher, tablette, etc.) et la
remise de coupe-circuit ou remplacement de fusible.
SELON LA PORTÉE PERMISE PAR LA LOI, CETTE
GARANTIE DONNE DES SOLUTIONS EXCLUSIVE
RELATIVEMENT AU PRODUIT, QUE LA RÉCLAMATION
SURVIENNE PAR CONTRAT OU TORT (INCLUANT
RESPONSABILITÉ STRICTE OU NÉGLIGENCE) OU
AUTRE. CETTE GARANTIE EST EN LIEU DE TOUTE
AUTRE GARANTIE, EXPRESSE OU IMPLICITE, TOUTE
GARANTIE PAR LOI, À DES FINS DE
COMMERCIALISATION OU À DES FINS
PARTICULIÈRES, OU AUTRE, SERA EN VIGUEUR
SEULEMENT POUR LA PÉRIODE EFFECTIVE DE LA
GARANTIE LIMITÉE EXPRESSE. EN AUCUN CAS, LE
FABRICANT NE PEUT ÊTRE TENU RESPONSABLE DES
DOMMAGES ACCESSOIRES, SPÉCIAUX, INDIRECTS,
PERTES D’AFFAIRES, ET/OU DOMMAGES PUNITIFS,
PERTES, FRAIS INCLUANT SANS LIMITATION LE
MANQUEMENT AU TRAVAIL, REPAS À L’HÔTEL ET/OU
AU RESTAURANT, FRAIS DE REMODELAGE
SURVENUS À CAUSE DE DOMMAGES DIRECTS
DÉFINITIVEMENT CAUSÉS EXCLUSIVEMENT PAR BSH
OU AUTRE. CERTAINS ÉTATS NE PERMETTENT PAS
L’EXCLUSION OU LA LIMITATION DES DOMMAGES
ACCESSOIRES OU INDIRECTS ET NE PERMETTENT
PAS LA LIMITATION SUR LA DURÉE D’UNE GARANTIE
IMPLICITE, PAR CONSÉQUENT LES LIMITATIONS
SUSMENTIONNÉES PEUVENT NE PAS S’APPLIQUER.
CETTE GARANTIE DONNE DES DROITS SPÉCIFIQUES
ET IL PEUT Y EN AVOIR D’AUTRES QUI VARIENT D’UN
ÉTAT À L’AUTRE.
Aucune tentative de modifier, changer ou amender cette
garantie ne peut être effective sansle consentement écrit
autorisé par un officier de BSH.


1901 MAIN STREET, SUITE 600 IRVINE, CA 92614 // 1-800-735-4328 // WWW.THERMADOR.COM
© 2017 BSH HOME APPLIANCES CORPORATION
9001260289 en-us, fr-ca 970901
*9001260289*