
Contents
2
En
Thank you for buying this Pioneer product.
Please read through these instructions so you will know how to operate your mod-
el properly.
After you have finished reading the instructions, keep this document in a
safe place for future reference.
01
Introduction
Manual overview ...........................................
4
How to use this manual ...............................
4
Conventions used in this manual .................
4
Terms used in this manual ...........................
4
iPhone/iPod compatibility ...........................
5
Android™ device compatibility ....................
5
Parking brake interlock ..................................
5
Protecting the LCD panel and screen ............
5
Notes on internal memory ............................
5
Before removing the vehicle battery ............
5
02
About AppRadio
Features .........................................................
6
Checking part names and functions ..............
6
Connecting and disconnecting
smartphones
...............................................
7
Connection states and usable functions ......
8
Disclaimer ....................................................
9
Demonstration images .................................
9
03
Basic operation
Home screen ...............................................
10
Reading the screen ....................................
10
Scrolling the Home screen .........................
10
Using the touch panel keys ........................
10
Touch panel keys common to
each function
..........................................
11
Setting the clock ..........................................
11
Audio source control ...................................
12
04
Using the radio
Starting procedure ......................................
13
Reading the screen ......................................
13
Using the touch panel keys .........................
13
Using the functions .....................................
14
Storing the strongest broadcast
frequencies
................................................
14
Recalling broadcast frequencies ................
14
Tuning in to strong signals .........................
14
₋
₋
₋
₋
₋
₋
₋
₋
₋
₋
₋
₋
₋
₋
₋
₋
05
Playing iPod music and video
Starting procedure ......................................
15
Reading the screen ......................................
15
Using the touch panel keys .........................
16
Using the functions ....................................
17
Narrowing down song (episode) or
video sources with the list
.........................
17
Repeating playback ....................................
17
Random play (shuffle) ................................
18
Changing the audiobook speed..................
18
Selecting song (episode) or video sources
from the playlist screen
.............................
18
Changing the wide screen mode ................
19
06
Using Pandora
®
internet radio
Starting procedure ......................................
20
Reading the screen ......................................
20
Using the touch panel keys .........................
21
Using the function ......................................
21
Selecting a Pandora station
from the list
...............................................
21
07
Registering and connecting
a Bluetooth device
Preparing communication devices ..............
22
Registering your Bluetooth devices .............
22
Searching for nearby Bluetooth devices .....
22
Pairing from your Bluetooth devices ..........
23
Searching for a specified Bluetooth
device
........................................................
24
Deleting a registered device ........................
24
Connecting a registered Bluetooth device
manually
..................................................
25
Setting the Bluetooth auto connect
function
...................................................
26
Disconnecting a Bluetooth device ..............
26
Switching product visibility..........................
27
Changing a PIN code ....................................
27
Displaying Bluetooth device address ...........
28
₋
₋
₋
₋
₋
₋
₋
₋
₋
₋

Contents
3
En
08
Using hands-free phoning
Starting procedure ......................................
29
Reading the screen ......................................
29
Using the touch panel keys .........................
29
Adjusting the phone volume .......................
30
Making a phone call ....................................
30
Direct dialing .............................................
30
Calling a number in the phone book ..........
30
Selecting a number using alphabet
search mode
..............................................
31
Dialing from the history .............................
31
Answering an incoming call .........................
32
Using advanced functions ...........................
32
Answering a call automatically ..................
32
Switching the ring tone ..............................
32
Storing a phone number ............................
32
Using the preset dial lists ...........................
33
Inverting the names ...................................
33
Setting the private mode ...........................
33
Adjusting the other party’s listening
volume
......................................................
33
Notes for hands-free phoning .....................
34
General notes ............................................
34
Registration and connection ......................
34
Making and receiving calls .........................
34
The received call history and the dialed
number history
..........................................
34
Phone book transfers .................................
34
09
Customizing preferences
Customizing the audio settings ...................
35
Using fader/balance adjustment ................
35
Using the equalizer ....................................
35
Adjusting loudness ....................................
37
Using the subwoofer output ......................
37
Enhancing bass (Bass Booster) ...................
37
Using the high pass filter ...........................
37
Adjusting source levels ..............................
38
Customizing the system settings .................
38
Setting the rear output ..............................
38
₋
₋
₋
₋
₋
₋
₋
₋
₋
₋
₋
₋
₋
₋
₋
₋
₋
₋
₋
₋
₋
₋
₋
₋
Setting the RCA output ..............................
39
Selecting the system language ...................
39
Setting the keyboard layout .......................
40
Switching the ever scroll function ..............
40
Clearing Bluetooth memory .......................
40
Updating Bluetooth connection
software
....................................................
41
Displaying the Bluetooth system
version
.......................................................
41
Setting the rear view camera .....................
41
Setting the video signal .............................
42
Adjusting the picture .................................
42
Adjusting the mix sound level ....................
43
Setting the clock mode ..............................
43
Selecting the background display...............
43
Restoring the default settings ....................
44
Checking the connections of leads .............
44
Customizing the favorites menu ..................
45
Registering menu items .............................
45
Removing menu items ...............................
45
Turning off the screen .................................
45
Appendix
Troubleshooting ..........................................
46
Positioning technology ................................
49
Positioning by GPS .....................................
49
Handling large errors ...................................
49
When positioning by GPS is impossible......
49
Conditions likely to cause noticeable
positioning errors
......................................
49
Setting list ....................................................
52
Audio settings ............................................
52
System settings ..........................................
52
Other settings ............................................
52
₋
₋
₋
₋
₋
₋
₋
₋
₋
₋
₋
₋
₋
₋
₋
₋
₋
₋
₋
₋
₋
₋
₋
Introduction
01
Chapter
4
En
Manual overview
How to use this manual
Finding the operation procedure for what
you want to do
When you have decided what you want to do,
you can find the page you need from the Con-
tents.
Finding customizable settings
If you want to look up the settings of this
product, refer to Setting list at the end of the
manual.
Conventions used in this manual
Before moving on, take a few minutes to read
the following information about the conven-
tions used in this manual. Familiarity with
these conventions will help you greatly as you
learn how to use your new equipment.
Buttons on this product are described in
bold lettering:
e.g.)
Press the Home button to display the
Home screen.
Menu items, screen titles, and functional
components are described in
bold with
double quotation marks “ ”:
e.g.)
Set “Dimmer” to “OFF”.
•
•
Touch panel keys that are available on the
screen are described in
bold in brackets [ ]:
e.g.)
Tap [Radio] on the Home screen.
Extra information, alternatives and other
notes are presented in the following format:
e.g.)
❐ If the home location has not been stored
yet, set the location first.
Functions of other keys on the same screen
are indicated with
❚
at the beginning of the
description:
e.g.)
■
If you touch [OK], the entry is deleted.
References are indicated like this:
e.g.)
➲ For details, refer to Answering a call
automatically on page 32.
Terms used in this manual
“Front display”
In this manual, the screen that is attached to
the body of this product is referred to as the
“Front display”.
“iPhone”
In this manual, iPod and iPhone are
referred to as iPhone.
“Android™ device”
In this manual, each Android smartphone is
referred to as Android device.
•
•
•
•
Before using this product, be sure to read
Important Information for the User
(a separate manual), which contains
warnings, cautions, and other important
information that you should note.
The screens shown in the examples may
differ from actual screens.
Actual screens may be changed without
notice for performance and function
improvements.
•
•

01
Introduction
Chapter
5
En
Introduction
iPhone/iPod compatibility
This product supports only the following
iPhone models and iPhone software versions.
Others may not work correctly.
Made for
iPod touch (4th generation): iOS 5.0
iPod touch (3rd generation): iOS 4.1
iPod touch (2nd generation): iOS 4.2.1
iPod classic 160GB (2009): Ver. 2.0.4
iPod classic 120GB: Ver. 2.0.1
iPod classic 80GB: Ver. 1.1.2
iPod classic 160GB (2007): Ver. 1.1.2
iPod nano (6th generation): Ver. 1.1
iPod nano (5th generation): Ver. 1.0.2
iPod nano (4th generation): Ver. 1.0.4
iPod nano (3rd generation): Ver. 1.1.3
iPhone 4S: iOS 5.0.1
iPhone 4: iOS 5.0.1
iPhone 3GS: iOS 4.3.3
❐ Operation methods may vary depending on
the iPhone models and the software ver-
sion of iPhone.
❐
Depending on the software version of the
iPhone, it may not be compatible with this
equipment.
For details about iPhone compatibility with
this product, refer to the information on
our website.
Android™ device compatibility
❐ Operation methods may vary depending on
the Android devices and the software ver-
sion of Android OS.
❐
Depending on the version of the Android
OS, it may not be compatible with this
equipment.
❐
Compatibility with all Android devices is not
guaranteed.
For details about Android device compatibil-
ity with this product, refer to the informa-
tion on our website.
•
•
•
•
•
•
•
•
•
•
•
•
•
•
Parking brake interlock
Certain functions (such as viewing of app based
visual content and certain touch panel key oper-
ations) offered by this product could be danger-
ous and/or unlawful if used while driving. To
prevent such functions from being used while
the vehicle is in motion, there is an interlock sys-
tem that senses when the parking brake is set. If
you attempt to use the functions described
above while driving, they will become disabled
until you stop the vehicle in a safe place, and (1)
apply the parking brake, (2) release the parking
brake, and then (3) apply the parking brake
again. Please keep the brake pedal pushed down
before releasing the parking brake.
Protecting the LCD panel and
screen
❐ Do not allow direct sunlight to fall on the
LCD screen when this product is not being
used. Extended exposure to direct sunlight
can result in LCD screen malfunction due to
the resulting high temperatures.
❐
When using a cellular phone, keep the an-
tenna of the cellular phone away from the
LCD screen to prevent disruption of the vid-
eo in the form of spots, colored stripes, etc.
❐
To protect the LCD screen from damage, be
sure to tap the touch panel keys with your
finger only and gently touch the screen.
Notes on internal memory
Before removing the vehicle battery
If the battery is disconnected or discharged, all
stored memory (except the registered
Bluetooth device list) will be erased and must
be reprogrammed.
About AppRadio
02
Chapter
6
En
Features
Listening to the radio
You can listen to the radio using this product.
Playing iPod music and video
You can play and operate audio sources and
video sources with the iPhone connected.
Advanced App Mode
With Advanced App Mode, you can display
the smartphone application screen on the
AppRadio display. You can also operate
AppRadio compatible smartphone applica-
tions (such as
AppRadio app) via the display
with multi-touch gestures like tapping, drag-
ging, scrolling, and flicking.
❐
For details of Advanced App Mode, refer
to the Operation Manual for
AppRadio
app
.
Hands-free phoning
You can control the Bluetooth connection of
the smartphone, and make a call using the in-
coming or outgoing call histories, transferred
phone book, or by dialing.
Displaying the rear view camera image
You can display what is behind the vehicle if a
rear view camera (e.g. ND-BC5) (sold separate-
ly) is connected to the system.
Mixing audio output
You can mix Apps audio output with the radio
audio output or the iPod audio output.
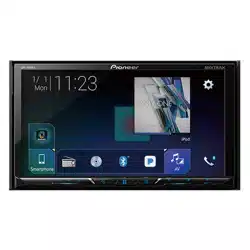
Checking part names and
functions
➀
➁ ➂ ➃ ➄
❐ Available buttons will light according to the
connected device.
Volume (+/–) button
Home button
Press the Home button to display the
Home screen.
In
Advanced App Mode, when you
press the
Home button, the AppRadio
app home screen is displayed. To display
the main Home screen, press the
Home
button again.
Press the
Home button twice, the audio
source control keys will be displayed on-
screen.
LCD screen
Menu button (for Android devices)
Press the Menu button to display the
menu screen. The
Menu button is avail-
able while running the AppRadio app or
other supported applications for Android
devices.
Back button (for Android devices)
Press the Back button to return the pre-
vious screen.
The Back button is avail-
able while running the AppRadio app or
other supported applications for Android
devices.
•
•
•
•
02
About AppRadio
Chapter
7
En
About AppRadio
Connecting and disconnecting
smartphones
WARNING
Certain uses of a smartphone may not be legal
while driving in your jurisdiction, so you must
be aware of and obey any such restrictions. If
in doubt as to a particular function, only per-
form it while the car is parked. No feature
should be used unless it is safe to do so under
the driving conditions you are experiencing.
CAUTION
To prevent data loss and damage to the
smartphone, never remove it from this
product while data is being transferred.
If data loss or corruption occurs on the
smartphone for any reason, it is usually not
possible to recover the data. Pioneer ac-
cepts no liability for damages, costs or ex-
penses arising from data loss or corruption.
For safety reasons, never operate this prod-
uct or smartphones while driving. To oper-
ate this product or smartphones, stop the
vehicle in a safe place, apply the parking
brake and operate them according to law.
•
•
•
Connect your iPhone
Using the supplied iPhone cable enables you to
connect your iPhone to this product.
❐
Connection via a USB hub is not possible.
Unlock your iPhone and then connect
the iPhone to this product.
iPhone
iPhone cable
To this product
The application startup message appears and
the
AppRadio app launches, then the Appli-
cation menu screen appears.
❐ The
AppRadio app may not launch de-
pending on the state of the connected
iPhone. In that case, launch the
AppRadio
app
according to the application startup
message.
❐ When you connect an iPhone with the applica-
tion corresponding to
Advanced App Mode
started, the application operation screen
appears on this product’s screen.
Disconnecting your iPhone
Pull out the iPhone cable after checking
that no data is being accessed.
About AppRadio
02
Chapter
8
En
Connect your Android device
1. Unlock your Android device.
2. Connect your Android device to this
product via the separately sold App
Connectivity Kit (CD-AH200C).
❐ The cable connection method varies depend-
ing on your device.
➲ For details, refer to the App Connectivity
Kit (CD-AH200C) manual.
3. Register your Android device and con-
nect it to this product via the Bluetooth
®
wireless technology.
When you use Advanced App Mode and
Pandora® internet radio, you must make the
Bluetooth connection with Serial Port Profile
(SPP) from this product.
➲
For detailed procedures, refer to Registering
your Bluetooth devices on page 22.
Android device
App Connectivity Kit
(sold separately)
To this product
Bluetooth
(To this product)
The application startup message appears and
the
AppRadio app launches, then the Appli-
cation menu screen appears.
Disconnecting your Android device
Pull out the cables after checking that no
data is being accessed.
Connection states and usable
functions
When a smartphone is connected, the follow-
ing functions are available.
No connection state
When this product is not connected to a
smartphone.
Tuner
iPod
Apps (iPhone)
Apps (Android)
Pandora® (iPhone)
Pandora® (Android)
Phone
*1
*1 “
Phone
” is available only when your
iPhone is connected this product with the
Bluetooth wireless technology.
Connect your iPhone
When your iPhone is connected to this prod-
uct.
Tuner
iPod
Apps (iPhone)
Apps (Android)
Pandora® (iPhone)
Pandora® (Android)
Phone
*1
*1 “
Phone
” is available only when your
iPhone is connected this product with the
Bluetooth wireless technology.
02
About AppRadio
Chapter
9
En
About AppRadio
Connect your Android device
When your Android device is connected to this
product via the separately sold App Connectiv-
ity Kit and the Bluetooth profile (SPP).
Tuner
iPod
*1
Apps (iPhone)
Apps (Android)
Pandora® (iPhone)
Pandora® (Android)
Phone
*2
*1 When your iPod is connected
to this prod-
uct, you can play and operate the audio
sources and video sources in your iPod.
*2 “
Phone
” is available only when your
iPhone is connected to this product with
Bluetooth wireless technology.
❐ When iPhone and Android devices are
connected simultaneously, the Apps of the
Android device take precedence.
Disclaimer
When you turn on this product, a disclaimer is
displayed on the screen.
Read the disclaimer carefully, checking its
details, and then touch [
OK] if you agree to
the conditions.
Demonstration images
If you do not operate this product for 30 sec-
onds while displaying the source off screen,
demonstration images are displayed.
When you turn the ignition switch off (ACC
OFF) and then turn it on again (ACC ON), the
demonstration images will not be displayed.
❐
If you reset the system, the demonstration
images will be displayed again.
Basic operation
03
Chapter
10
En
Home screen
The Home screen is the main screen that al-
lows access to your entertainment sources, ap-
ps, settings and more.
Reading the screen
Page one
Page two
Day of the week indicator
Current time
Scroll area
Current source indicator
The current source indicator appears under
the startup menu icon on the Home screen.
When mixing sources, the indicators appear
below both menu icons.
Scrolling the Home screen
Display the second page by flicking the
scroll area on the Home screen.
❐ When you scroll the Home screen, flick the
scroll area on the Home screen.
Using the touch panel keys
Page one
Radio
Displays the radio source screen.
➲ For details, refer to Chapter 4.
iPod
Displays the iPod source screen.
➲ For details, refer to Chapter 5.
Apps
Displays the Advanced App Mode.
The apps icon changes as follows:
: Appears when your iPhone is connected
via the supplied iPhone cable.
: Appears when your Android is
connected via the separately sold App
Connectivity Kit.
: Appears when your Android is connected
via the separately sold App Connectivity Kit
and processing the Bluetooth connection.
: Appears when your Android is
connected via the separately sold App
Connectivity Kit and Bluetooth wireless
technology (SPP).
➲
For details, refer to Advanced App Mode
on page 6.
Pandora
®
internet radio
Displays the Pandora application screen
when a smartphone with the Pandora
application installed is connected.
➲
For details, refer to Using Pandora®
internet radio on page 20.
Phone
Displays the phone menu screen.
➲
For details, refer to Chapter 8.
•
•
•
•
03
Basic operation
Chapter
11
En
Basic operation
Rear view camera
Switches to the rear view mode.the rear view mode.
➲
For details, refer to Setting the rear view
camera on page 41.
Clock adjustment
Adjusts the current date and time.
➲
For details, refer to Setting the clock on
this page.
Page two
Settings
Displays the settings menu screen.
➲
For details, refer to Chapter 9.
OFF
Turns the source off.
Display OFF
Turns the screen off.
➲
For details, refer to Turning off the screen
on page 45.
Touch panel keys common to
each function
The touch panel keys for operations common
to each function are described below.
e.g. “Special Device” screen
Returns to the previous screen.
Returns to the previous list/category (the
folder/category one level higher).
Returns to the top category menu screen.
Scrolls through the list and allows you to
view the remaining items.
❐ The selected item is highlighted.
Setting the clock
1 Tap the current time or week indicator
on the Home screen.
2 Tap the item to set.
3 Tap or to set the current date and
time.
❐ Initially, the clock is set to 12-hour format.
You can change the time format.
➲
For details, refer to Setting the clock
mode on page 43.
Basic operation
03
Chapter
12
En
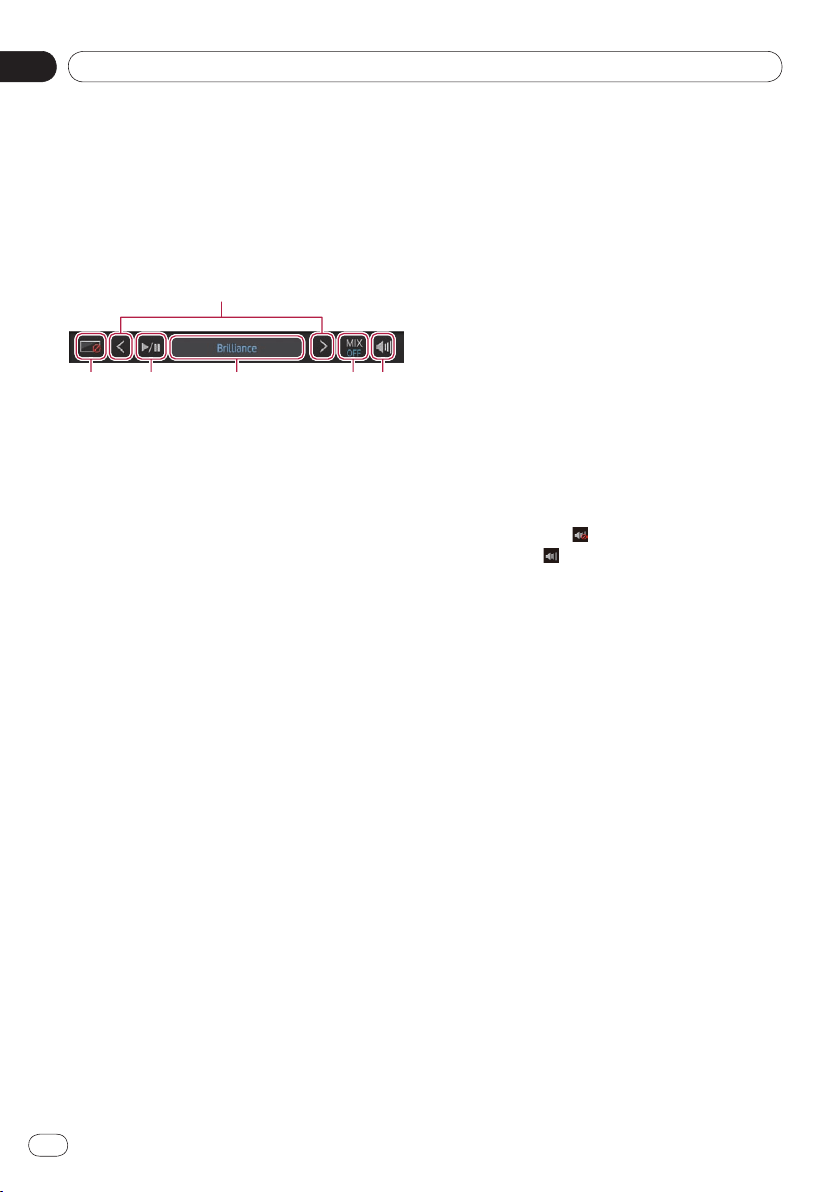
Audio source control
When you press the Home button twice, the
audio source control keys will be displayed on-
screen. Using these keys, you can operate the
audio source currently playing in the back-
ground without leaving the screen currently
displayed.
Turns the screen off. To turn it back on, tap
anywhere on the screen or press the
Home, Menu or Back buttons.
Moves to the next or previous song, file or
chapter when “
iPod” or “Apps” is selected
as the source.
Moves to the next or previous preset
channel when “
Radio” is selected as the
source.
Switches between playback and pause
when “
iPod” or “Apps” is selected as the
source.
Switches the frequency bands when
“
Radio” is selected as the source.
Displays information about the currently
playing source.
In Apps source:
Selects whether to mix Apps audio output
with the radio audio output or the iPod
audio output (only when an Android device
is connected via the
separately sold App
Connectivity Kit).
When the radio audio source is mixed,
“
MIX Radio” is displayed, and when the
iPod audio source is mixed, “
MIX iPod” is
displayed. When there is no mixable
source, “
MIX OFF” is displayed.
In radio source:
Selects whether to mix radio audio output
with the Apps audio output.
When the Apps audio source is mixed,
“
MIX ON” is displayed. When there is no
mixable source, “
MIX OFF” is displayed.
Switches between muted and unmuted
audio source.
When muted,
is displayed, and when
unmuted, is displayed.
❐ When you turn the ignition switch off (ACC
OFF) and then turn it on again (ACC ON),
these settings will be reset.
04
Using the radio
Chapter
13
En
Using the radio
Starting procedure
1 Press the Home button to display the
Home screen.
2 Tap [Radio] on the Home screen.
➲ For details, refer to Home screen on page 10.
3 Use the touch panel keys on the screen
to control the radio.
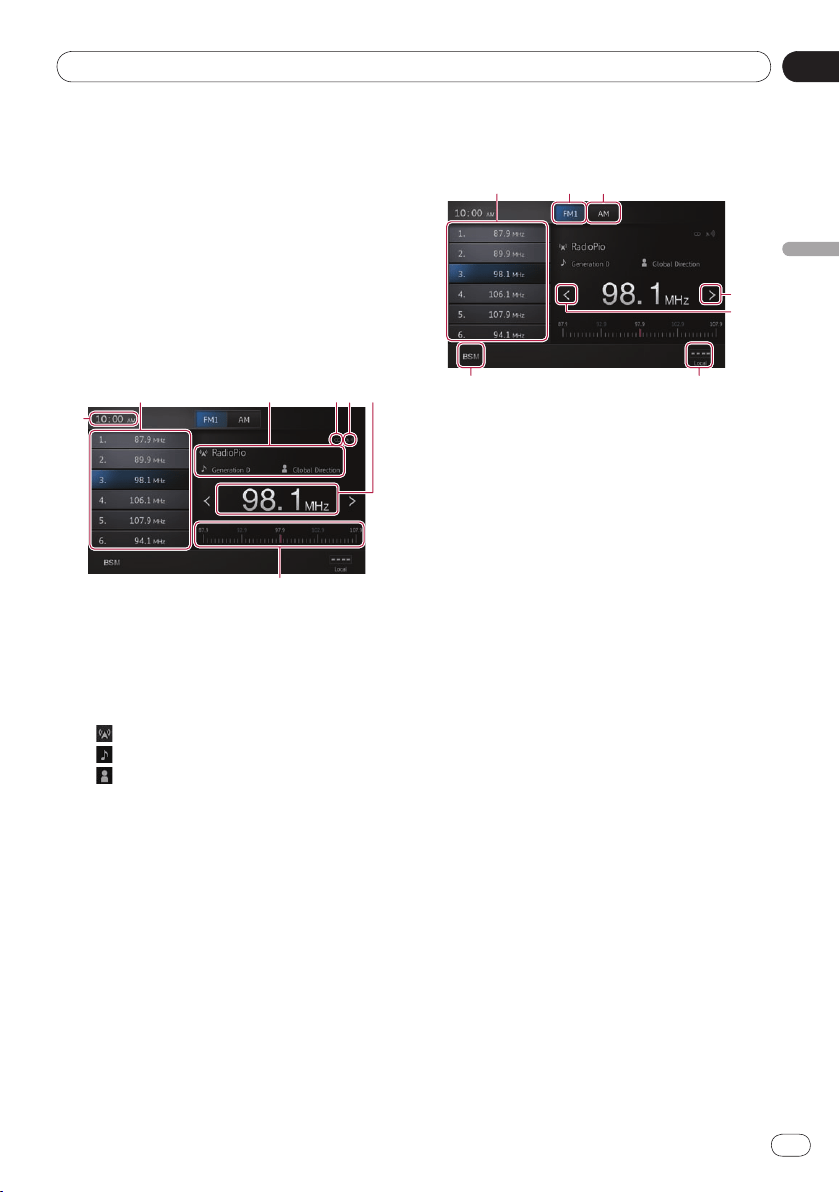
Reading the screen
Preset channel keys
➲ For details, refer to Storing the strongest
broadcast frequencies on the next page.
Current broadcast information
The following information is displayed:
: Program service (PS) name
: Song title
: Artist nameArtist name
STEREO indicator
Shows that the frequency selected is being
broadcast in stereo.
Signal level indicator
Shows the signal strength of the selected
frequency.
Frequency indicator
Frequency scale
Current time
•
•
•
Using the touch panel keys
Recalls the desired broadcast frequency.
Holding down the key stores the current
tuning frequency in memory.
➲
For details, refer to Recalling broadcast
frequencies on the next page.
Switches the band between FM1, FM2 and
FM3. Also switches to the FM band while
receiving the AM band.
Switches to the AM band while receiving
the FM band.
Raises frequencies in one-step increments.
Holds down the key and the tuner will scan
frequencies until a broadcast strong
enough for good reception is found.
Lowers frequencies in one-step increments.
Holds down the key and the tuner will scan
frequencies until a broadcast strong
enough for good reception is found.
Switches the reception level.
➲
For details, refer to Tuning in to strong
signals on the next page.
Stores the strongest broadcast frequencies.
➲
For details, refer to Storing the strongest
broadcast frequencies on the next page.
❐
If you touch and hold the , icons, pop-
up text explaining the function of the icon
is displayed.

Using the radio
04
Chapter
14
En
Using the functions
Storing the strongest broadcast
frequencies
This function automatically assigns frequen-
cies with good reception to the preset chan-
nels in the selected band.
You can update six channels in each band.
❐
Storing broadcast frequencies may replace
broadcast frequencies you have already
saved.
❐
The lowest frequency is registered for chan-
nels that could not be registered automati-
cally.
Tap .
Recalling broadcast frequencies
Tap any frequency on the preset chan-
nel keys.
Tuning in to strong signals
Local seek tuning lets you tune in to only
those radio stations with sufficiently strong
signals for good reception.
Tap or to switch the reception
level between the following levels:
FM: (OFF) → (LEVEL1) → (LEVEL2)
→
(LEVEL3) → (LEVEL4)
AM:
(OFF) → (LEVEL1) → (LEVEL2)
❐
The highest level setting allows reception
of only the strongest stations, while lower
levels allow the reception of weaker sta-
tions.
05
Playing iPod music and video
Chapter
15
En
Playing iPod music and video
Starting procedure
1 Connect your iPod.
➲ For details, refer to Connect your iPhone
on page 7.
2 Press the Home button to display the
Home screen.
3 Tap [iPod] on the Home screen.
➲ For details, refer to Home screen on page 10.
4 Select the song (episode) or video
source you want to play, and switch the
operation screen.
➲ For details, refer to Selecting song (epi-
sode) or video sources from the playlist
screen on page 18.
5 Use the touch panel keys on the screen
to control your iPod.
➲ For details, refer to Using the touch pan-
el keys on the next page.
❐ When playing music with an application in-
stalled to an iPhone, the playback informa-
tion may be displayed. You may be able to
operate the playback information with the
touch panel keys.
Reading the screen
Music
Current song (episode) information
: Song title (episode)
Shows the title of the current song.
When a podcast is played, the episode is
displayed (when available).
: Artist name (podcast title)
Shows the artist name currently playing.
When a podcast is played, the podcast ti-
tle is displayed (when available).
: Album title (release date)
Shows the title of the album for the
song. When a podcast is played, the re-
lease date is displayed (when available).
: Genre indicator
Shows the genre of the current song
(when available).
❐ If there is no corresponding information,
the following messages are displayed.
Artist name : No Name
Album title : No Title
Genre indicator : No Genre
Song number
Shows the song number and the total num-
ber of songs.
Album artwork
Album art work for the current song (epi-
sode) is displayed if it is available.
Play time
Shows the elapsed time, remaining time
and time bar of the current song (episode).
Pause indicator
Appears the pause indicator while pausing
playback.
Current time
•
•
•
•
•
•
•
Playing iPod music and video
05
Chapter
16
En
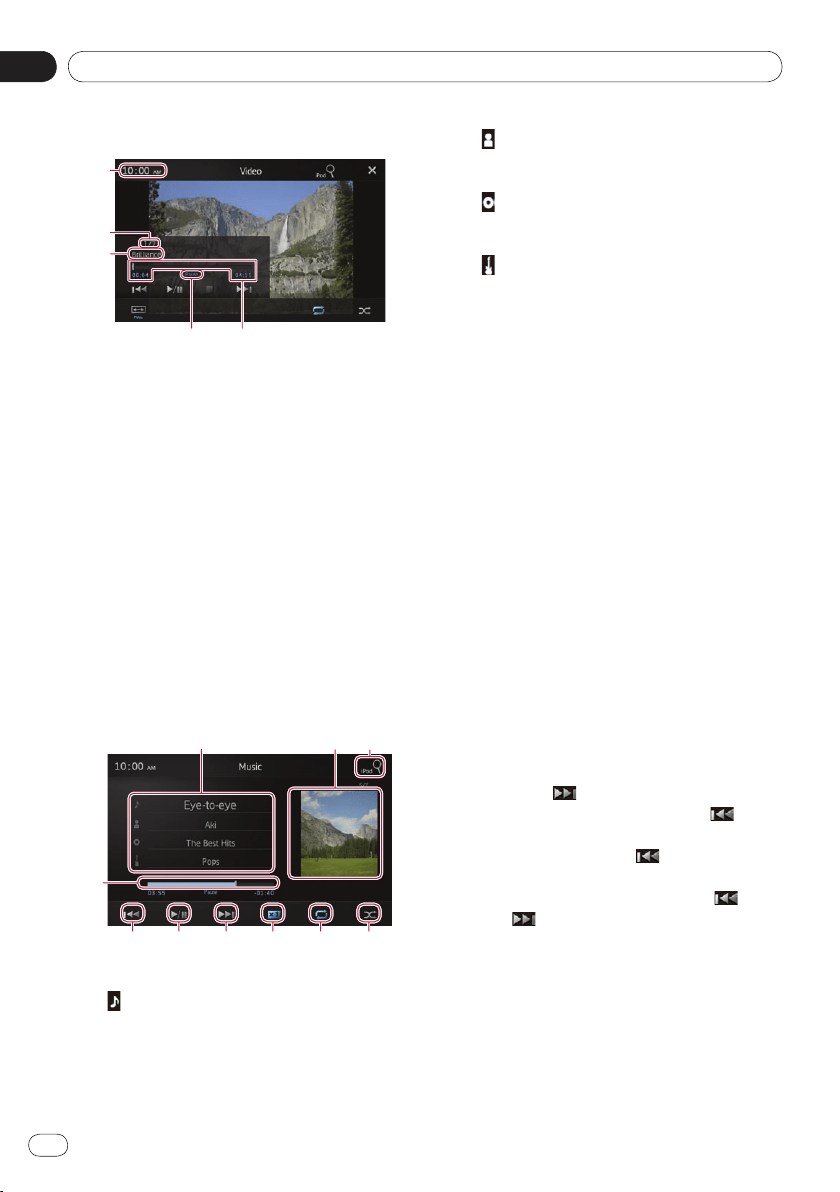
Video
Play time
Shows the elapsed time, remaining time
and time bar of the current video.
Pause indicator
Appears the pause indicator while pausing
playback.
Current video title
Shows the title of the current video.
❐ If there is no corresponding information,
“No Name” is displayed.
File number
Shows the file number and the total num-
ber of files.
Current time
Using the touch panel keys
Music
Displays the playlist screen.
: Song list
Displays the songs in the connected iPod
in alphabetical order.
•
: Artist list
Displays an album list for the artist
currently being played.
: Album list
Displays a song list for the album cur-
rently being played.
: Genre list
Displays an artist list for the genre
currently being played.
➲
For details, refer to Narrowing down
song (episode) or video sources with the
list on the next page.
Displays the album playlist.
➲
For details, refer to Narrowing down
song (episode) or video sources with the
list on the next page.
Displays the playlist screen that can be
used to search for song or video sources in
your iPod.
➲
For details, refer to Selecting song
(episode) or video sources from the
playlist screen on page 18.
Plays songs in random order.
➲
For details, refer to Random play (shuf-
fle) on page 18.
Selects the repeat range.
➲
For details, refer to Repeating playback
on the next page.
Changes the audiobook speed.
➲
For details, refer to Changing the audio-
book speed on page 18.
Tapping the key skips to the start of the
next song or chapter. Tapping the key
once skips to the start of the current song
or chapter. Tapping the
key twice
quickly will skip to the previous song or
chapter. Touching and holding the
key
or the key performs fast reverse or fast
forward.
Switches between playback and pause.
Performs fast reverse or fast forward by
dragging the playback point.
•
•
•
05
Playing iPod music and video
Chapter
17
En
Playing iPod music and video
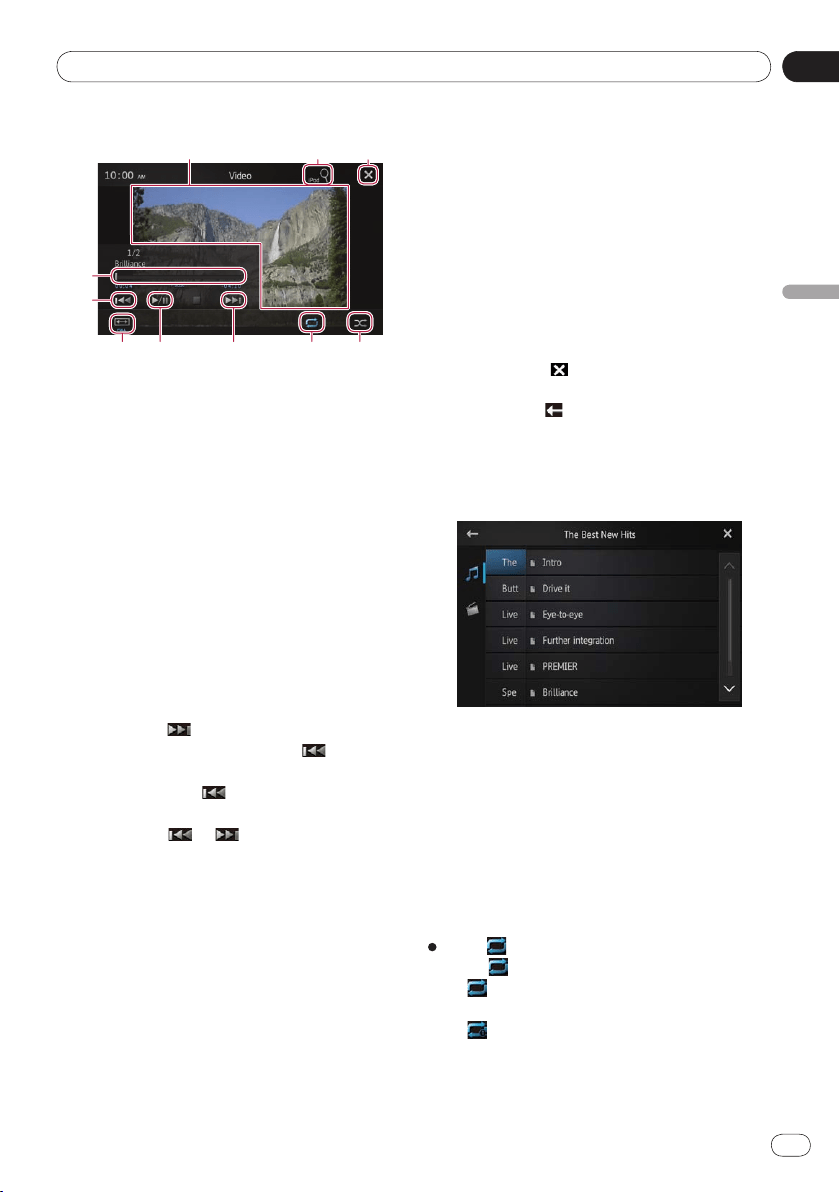
Video
Switches to full-screen mode.
Displays the playlist screen that can be used
to search for song or video sources in your
iPod.
➲
For details, refer to Selecting song
(episode) or video sources from the
playlist screen on the next page.
Hides the touch panel keys. If you want to
display the touch panel keys again, tap any-
where on the screen.
Plays videos in random order.
➲
For details, refer to Random play (shuffle)
on the next page.
Selects the repeat range.
➲
For details, refer to Repeating playback
on this page.
Tapping the key skips to the start of the
next video or chapter. Tapping once
skips to the start of the current video or
chapter. Tapping
twice quickly will skip
to the previous video or chapter. Touching
and holding
or performs fast reverse
or fast forward.
Switches between playback and pause.
Changes the screen mode.
➲
For details, refer to Changing the wide
screen mode on page 19.
Performs fast reverse or fast forward by
dragging the playback point.
Using the functions
Narrowing down song (episode) or
video sources with the list
Tapping an item on a list allows you to search
for a song (episode) or video sources and play
them in your iPod.
1 Tap the category list you want to search.
➲ For details, refer to Using the touch
panel keys on the previous page.
■
If you tap the key, return to the playback
screen.
■
If you tap the key in the playlist, the
previously selected menu screen is displayed.
■
If you tap a category list in the upper folder,
the playlist screen changes to the selected
category.
2 Search for the song (episode) you want
to play from the playlist.
➲ For details, refer to Step 3 in Selecting
song (episode) or video sources from the
playlist screen on the next page.
Repeating playback
There are two repeat play types for playback.
Tap .
Tapping changes the setting as follows:
(All): Repeats all songs or videos in the
selected list.
(One): Repeats just the current song or
video.
•
•
Playing iPod music and video
05
Chapter
18
En
Random play (shuffle)
This function shuffles songs, albums or videos
and plays them in random order.
Tap .
Tapping changes the setting as follows:
(Off): Does not shuffle.
(Songs): Plays back songs or videos in
random order within the selected list.
(Albums): Selects an album randomly,
and then plays back all songs in that al-
bum in order.
Changing the audiobook speed
The playback speed can be changed while
playing an audiobook.
Tap .
Tapping changes the setting as follows:
(Normal): Playback in normal speed.
(Faster): Playback faster than normal
speed.
(Slower): Playback slower than nor-
mal speed.
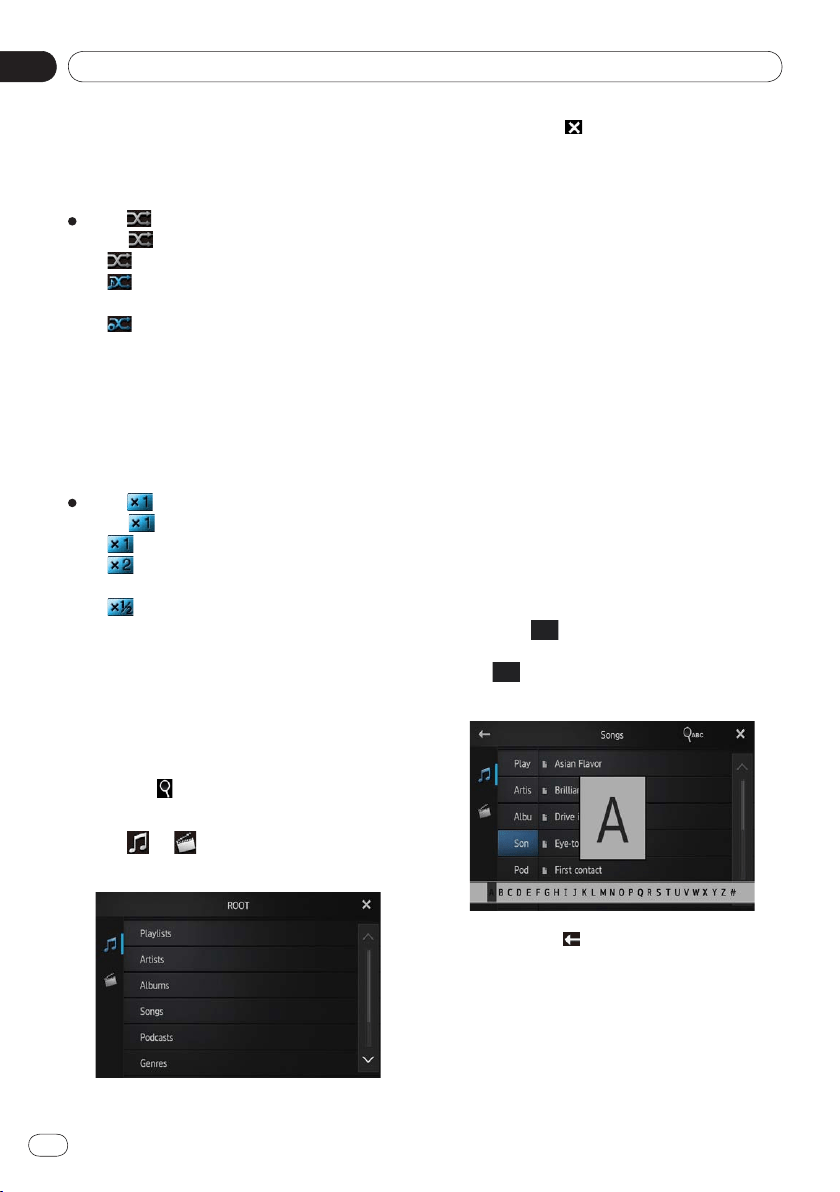
Selecting song (episode) or video
sources from the playlist screen
You can search for the song (episode) or video
you want to play from the playlist screen.
1 Tap the key to display the playlist
screen.
2 Tap or , then select the category
you want to search for.
•
•
•
•
•
•
■
If you tap the key, return to the playback
screen.
Category lists (for music):
Playlists
Artists
Albums
Songs
Podcasts
Genres
Composers
Audiobooks
Category lists (for video):
Video Playlists
Movies
Music Videos
TV Shows
Video Podcasts
Rented Movies
Video ITunesU
❐ Category item that do not correspond to the
connected iPod are not displayed.
3 Tap the key to display the alphabet
search screen.
❐ The key is not displayed in the top cate-
gory list or the song list.
■
If you tap the key in the playlist, the previ-
ously selected menu screen is displayed.
■
If you tap a category list in the upper folder,
the playlist screen changes to the selected cat-
egory.
•
•
•
•
•
•
•
•
•
•
•
•
•
•
•

05
Playing iPod music and video
Chapter
19
En
Playing iPod music and video
4 Tap the first letter of the title of the
song/video you are looking for.
While searching, touch panel key operation is
not available.
■
To refine the search with a different letter,
tap [Cancel].
5 Tap the title of the list that you want to
play.
Repeat this operation until you find the de-
sired song/video.
6 Start playback of the selected list.
Changing the wide screen mode
Tap .
Tapping to change the setting as follows:
Full (full screen): A 4:3 picture is en-
larged in the horizontal direction only,
enabling you to enjoy a 4:3 TV picture
(normal picture) without any omissions.
Zoom (zoom): A 4:3 picture is enlarged
in the same proportion both vertically
and horizontally; ideal for a cinema-sized
picture (wide screen picture).
Normal (normal): A 4:3 picture is dis-
played normally, giving you no sense of
disparity since its proportions are the
same as that of the normal picture.
❐ You cannot operate this function while driv-
ing.
❐ When a video is viewed in a wide screen
mode that does not match its original as-
pect ratio, it may appear different.
❐ Remember that using the wide mode fea-
ture of this system for commercial or public
viewing purposes may constitute an in-
fringement on the author’s rights protected
by Copyright Law.
❐ The video image will appear coarser when
viewed in “
Zoom” mode.
•
•
•
Using Pandora
®
internet radio
06
Chapter
20
En
CAUTION
For safety reasons, never operate this product
and smartphones while driving. To operate
this product and smartphones, stop the vehi-
cle in a safe place and apply the parking brake
and operate them according to law.
You can experience Pandora by connecting a
smartphone that has the Pandora application
installed.
❐ Before performing operations described in
this chapter, be sure to read Using
app-based connected content in Important
Information for the Users.
❐ Certain features of the Pandora service are
not available when accessing the service
through this product, including, but not
limited to, creating new stations, deleting
stations, emailing current stations, buying
songs from iTunes or Google Play, viewing
additional text information and adjusting
Cell Network Audio Quality.
❐ Pandora internet radio is a music service
not affiliated with Pioneer. More informa-
tion is available at
http://www.pandora.com
❐ Pandora is a registered trademark of
Pandora Media, Inc.
Starting procedure
1 Connect your smartphone.
➲ For details, refer to Connecting and dis-
connecting smartphones on page 7.
2 Press the Home button to display the
Home screen.
3 Tap [Pandora] on the Home screen.
➲ For details, refer to Home screen on page 10.
❐ When you use Pandora internet radio in
Android devices, you must make the
Bluetooth connection with Serial Port
Profile (SPP) from this product.
4 Start up the Pandora application in-
stalled on the smartphone.
The Pandora source screen appears.
❐ Before starting up, sign-in to Pandora
from your smartphone.
5 Use the touch panel keys on the screen
to control Pandora.
❐Pandora internet radio stops playing if
you switch to Advanced App Mode while
using Pandora internet radio.
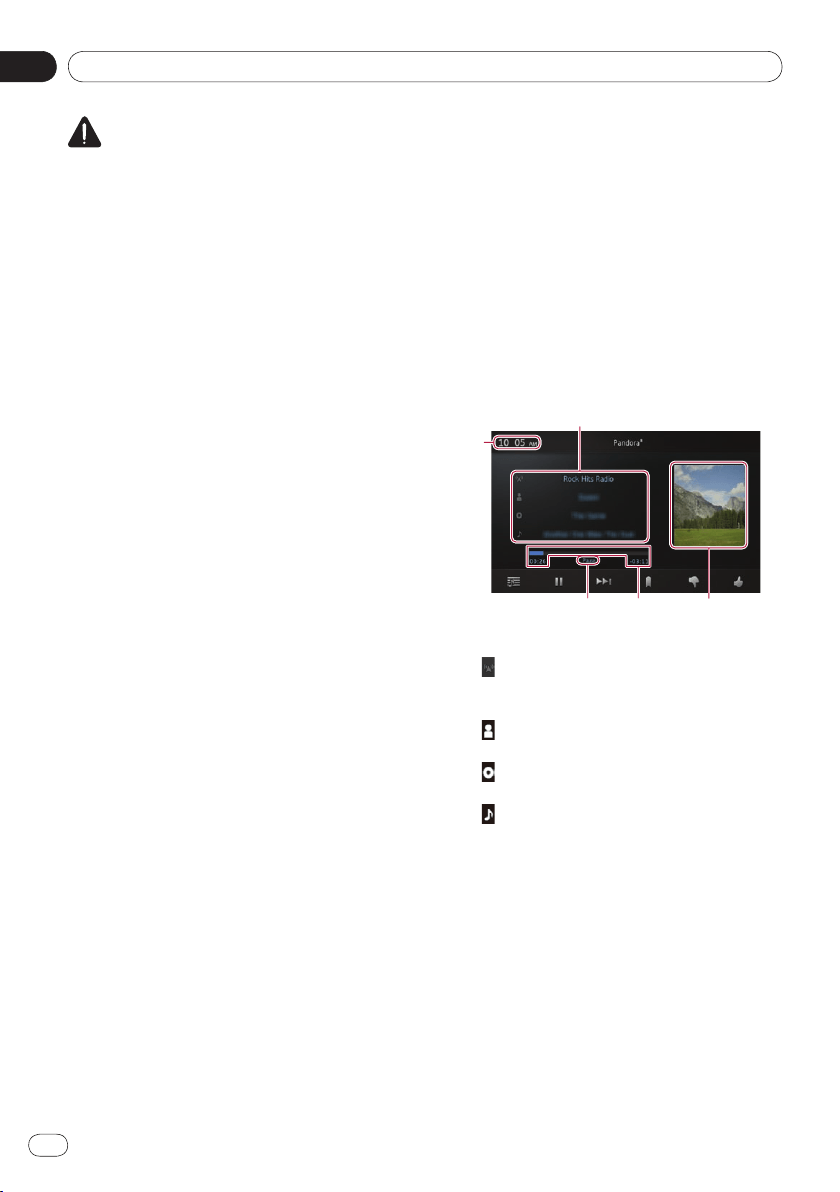
Reading the screen
Current track information
: Station name indicator
Shows the Pandora station name the tun-
er is currently tuned in to.
: Artist name
Shows the artist name currently playing.
: Album title
Shows the title of the album for the track.
: Track title
Shows the title of the current track.
❐ “-------” is displayed if there is no corre-
sponding information.
Album artwork
Album artwork for the current track is dis-
played if it is available.
Play time
Shows the elapsed time, remaining time
and time bar of the current track.
Pause indicator
Appears the pause indicator while pausing
playback.
Current time
•
•
•
•
06
Using Pandora
®
internet radio
Chapter
21
En
Using Pandora
®
internet radio
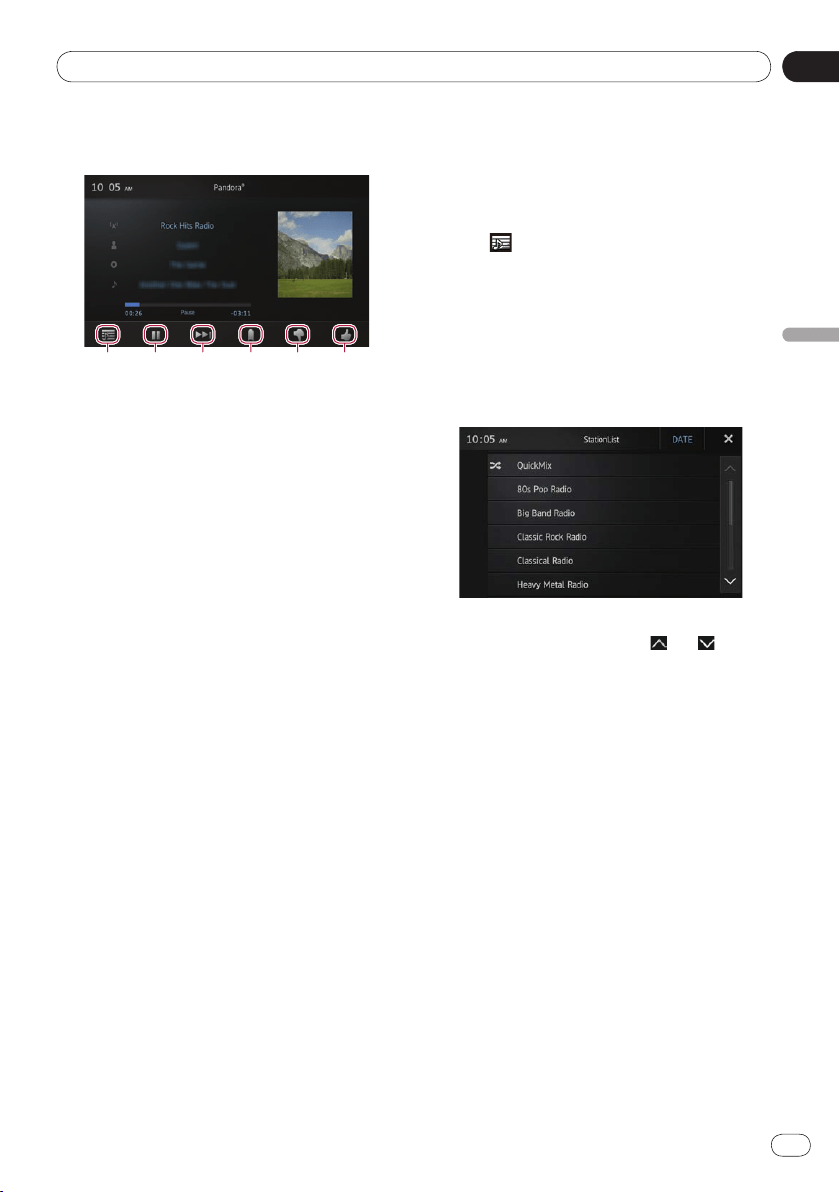
Using the touch panel keys
Gives a “Thumbs Up” to the track currently
playing.
Gives a “Thumbs Down” to the track
currently playing and skips to the next
track.
Adds information for the track currently
playing to bookmarks.
Skips to the start of the next track.
Switches between playback and pause.
Displays the list of your Pandora stations to
select one of them to play.
➲
For details, refer to Selecting a
Pandora station from the list on this
page.
Using the function
Selecting a Pandora station from
the list
1 Tap .
The station list screen appears.
2 Select the search mode.
■ If you tap [A-Z], the station list can be
sorted alphabetically.
■ If you tap [DATE], the station list can be
sorted in order of dates the items were
created.
3 Scroll the list by tapping or to dis-
play the item you want to select.
4 Tap the item.
❐ Tapping [QuickMix] plays only one track
based on particular musical characteris-
tics at a time from several shuffled
stations.
Using hands-free phoning
07
Chapter
22
En
Registering and connecting a Bluetooth device
07
Chapter
22
If your devices feature Bluetooth technology,
this product can be connected to your devices
wirelessly. This section describes how to set
up a Bluetooth connection.
For details about connectivity with devices fea-
turing Bluetooth wireless technology, refer to
the information on our website.
Preparing communication
devices
You can register and use devices that feature
Bluetooth profiles with this product.
❐ When you use
Advanced App Mode to
connect an Android device, the device
needs to support Serial Port Profile (SPP).
When connecting a device with SPP, you
must perform the pairing or connection
from this product.
❐ When this product is turn off, the Bluetooth
connection is also disconnected. When this
product restarts, the system automatically
attempts to reconnect the previously-con-
nected device.
❐ The Bluetooth connection menu cannot be
selected while driving.
Registering your Bluetooth
devices
You need to register your devices featuring
Bluetooth wireless technology when you con-
nect them for the first time. A total of three
devices can be registered. Three registration
methods are available:
Searching for nearby Bluetooth devices
Pairing from your Bluetooth devices
Searching for a specified Bluetooth device
•
•
•
❐ If you try to register more than three devic-
es, the system will ask you to select one of
the registered devices to delete.
➲
For details, refer to Deleting a regis-
tered device on page 24.
Searching for nearby Bluetooth
devices
The system searches for available Bluetooth
devices near this product, displays them in a
list, and registers them for connection.
1 Activate the Bluetooth wireless technol-
ogy on your devices.
For some Bluetooth devices, no specific action
is necessary to activate Bluetooth wireless
technology. For details, refer to the instruction
manual of your devices.
2 Tap [Phone] on the Home screen.
➲ For details, refer to Home screen on page 10.
The phone menu screen appears.
3 Tap on the phone menu.
The “Bluetooth Connection Menu” screen
appears.
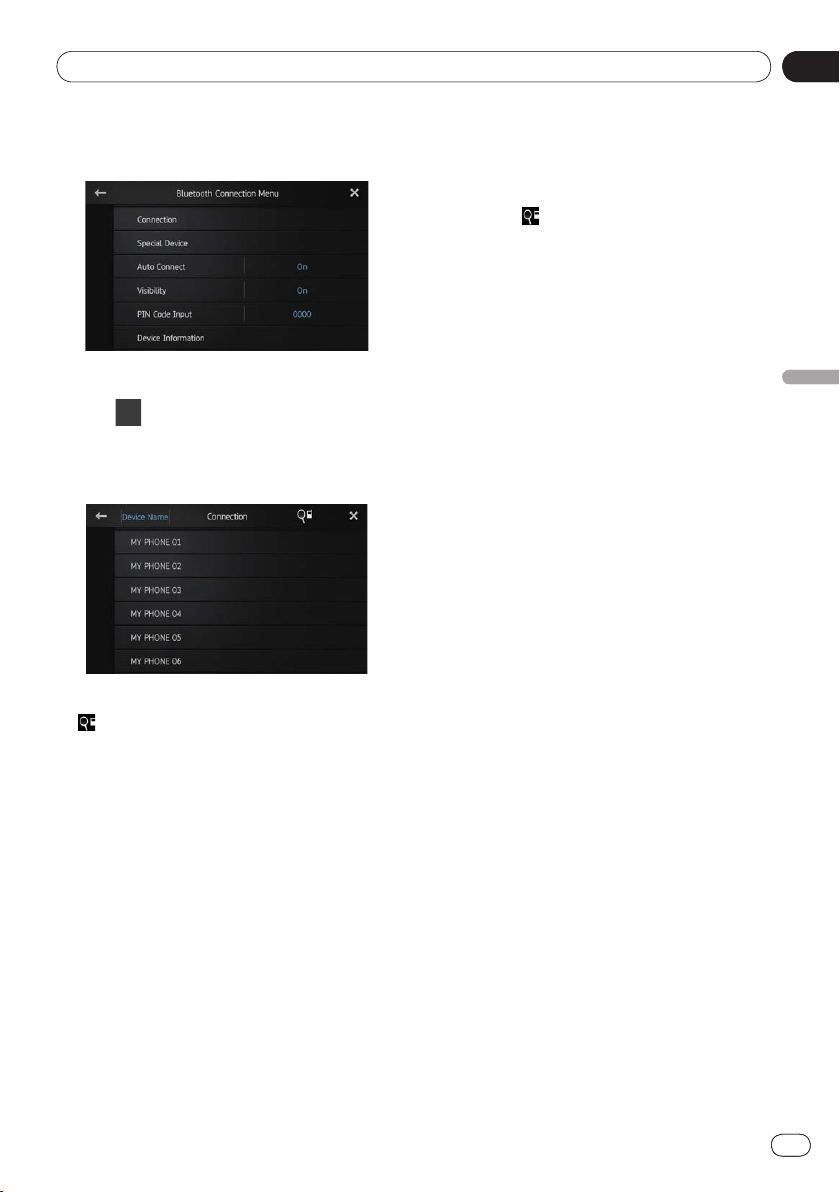
07
Using hands-free phoning
Chapter
23
En
07
Registering and connecting a Bluetooth device
Chapter
23
Registering and connecting a Bluetooth device
4 Tap [Connection] on the “Bluetooth
Connection Menu”.
The registered device list screen appears.
5 Tap on the registered device list.
The system searches for Bluetooth devices
waiting for a connection and displays them in
the list if a device is found.
❐ When the device is already connected,
becomes inactive.
❐ Up to 30 devices will be listed in the order
that the devices are found.
6 Wait until your Bluetooth device ap-
pears in the list.
■
If you want to switch between the device
names and Bluetooth device addresses, tap
[
Device Name].
❐ If you cannot find the Bluetooth device that
you want to connect, check that the device
is waiting for a Bluetooth wireless technolo-
gy connection.
7 Tap the Bluetooth device name you
want to register.
❐ If a PIN code input is required, enter a PIN
code. (The default PIN code is “
0000”.)
❐ If you tap
, the system starts searching for
Bluetooth devices waiting for connection,
and displays them in list format when any
devices are detected.
When the message “
Paired” appears, the de-
vice is registered in the system.
After the device is successfully registered, a
Bluetooth connection is established from the
system.
❐ After pairing, the phone book registered in
the device may be automatically transmit-
ted to this product.
Pairing from your Bluetooth devices
You can register a Bluetooth device by setting
this product to standby mode and requesting
connection from the Bluetooth device.
❐ Before registration, make sure that “
Visibil-
ity
” in the “Bluetooth Connection Menu”
is set to “
On”.
➲ For details, refer to Switching product vis-
ibility on page 27.
1 Activate the Bluetooth wireless technol-
ogy on your devices.
For some Bluetooth devices, no specific action
is necessary to activate Bluetooth wireless
technology. For details, refer to the instruction
manual of your devices.
2 Use the Bluetooth setting in the device
to pair this product with device.
❐ The device name is “AppRadio”.
❐ If a PIN code input is required, enter a PIN
code. (The default PIN code is “
0000”.)
When the device is successfully registered, the
connection settings are made from the device.
❐ If registration fails, repeat the procedure
from the beginning.
Using hands-free phoning
07
Chapter
24
En
Registering and connecting a Bluetooth device
07
Chapter
24
Searching for a specified
Bluetooth device
If you cannot connect your Bluetooth device
using the nearby device search and if your
Bluetooth device is found in the list, try the
following method.
1 Activate the Bluetooth wireless technol-
ogy on your devices.
For some Bluetooth devices, no specific action
is necessary to activate Bluetooth wireless
technology. For details, refer to the instruction
manual of your devices.
2 Tap [Phone] on the Home screen.
➲ For details, refer to Home screen on page 10.
The phone menu screen appears.
3 Tap on the phone menu.
The “Bluetooth Connection Menu” screen
appears.
4 Tap [Special Device] on the “Bluetooth
Connection Menu”.
The “Special Device” screen appears.
❐ If you cannot find the desired device name
on the list, tap [
Other phones] to search
the devices available nearby.
5 Tap the Bluetooth device name you
want to register.
A message prompting registration from the
device is displayed.
6 Use the Bluetooth setting in the device
to pair this product with the device.
When the message “Paired” appears, the de-
vice is registered in the system.
After the device is successfully registered, a
Bluetooth connection is established from the
system.
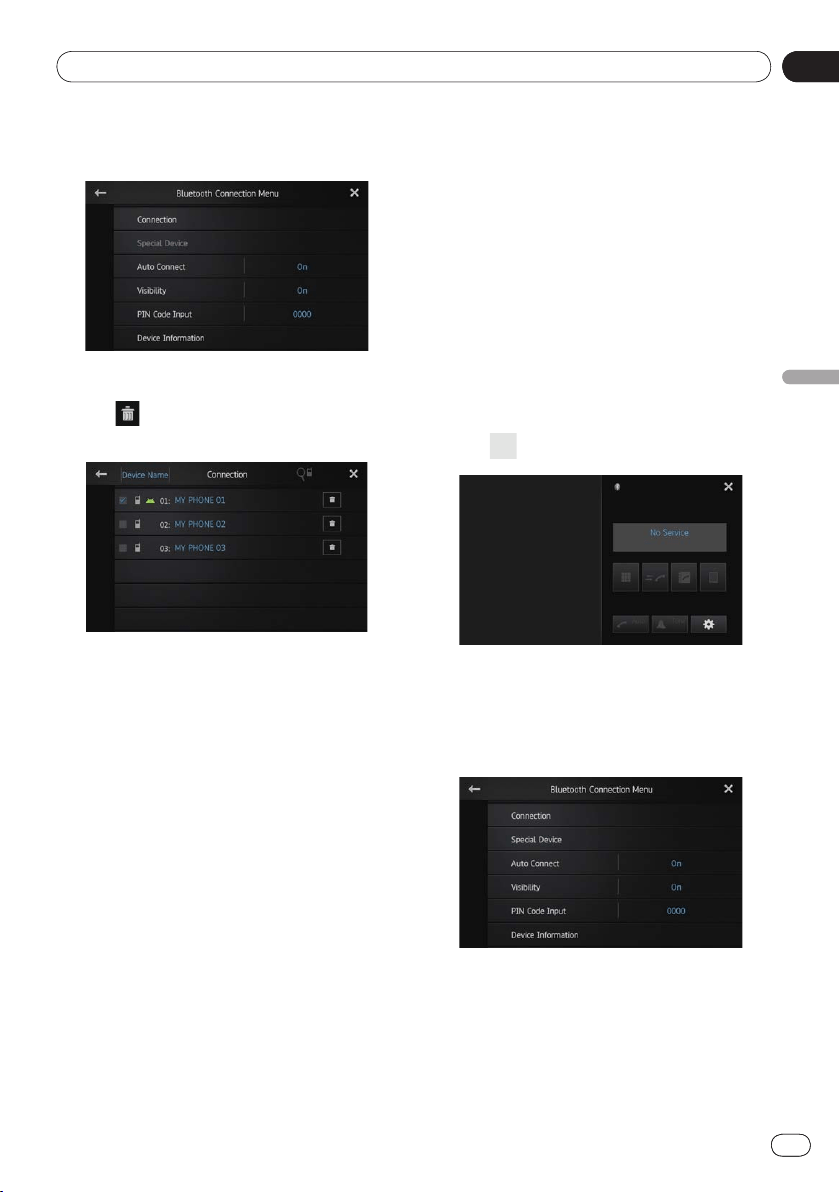
Deleting a registered device
When you have already registered three Blue-
tooth devices and you want to add another
one, you must first delete one of the regis-
tered devices.
❐ If a registered phone is deleted, all the
phone book entries and call history lists
that correspond to the phone will be also
cleared.
1 Tap [Phone] on the Home screen.
➲ For details, refer to Home screen on page 10.
The phone menu screen appears.
2 Tap on the phone menu.
The “Bluetooth Connection Menu” screen
appears.
07
Using hands-free phoning
Chapter
25
En
07
Registering and connecting a Bluetooth device
Chapter
25
Registering and connecting a Bluetooth device
3 Tap [Connection] on the “Bluetooth
Connection Menu”.
The registered device list screen appears.
4 Tap for the registered device you
want to delete.
The message “Delete OK?” appears.
5 Tap [Yes] to delete the device.
The message “Deleting” appears, and the de-
vice is deleted.
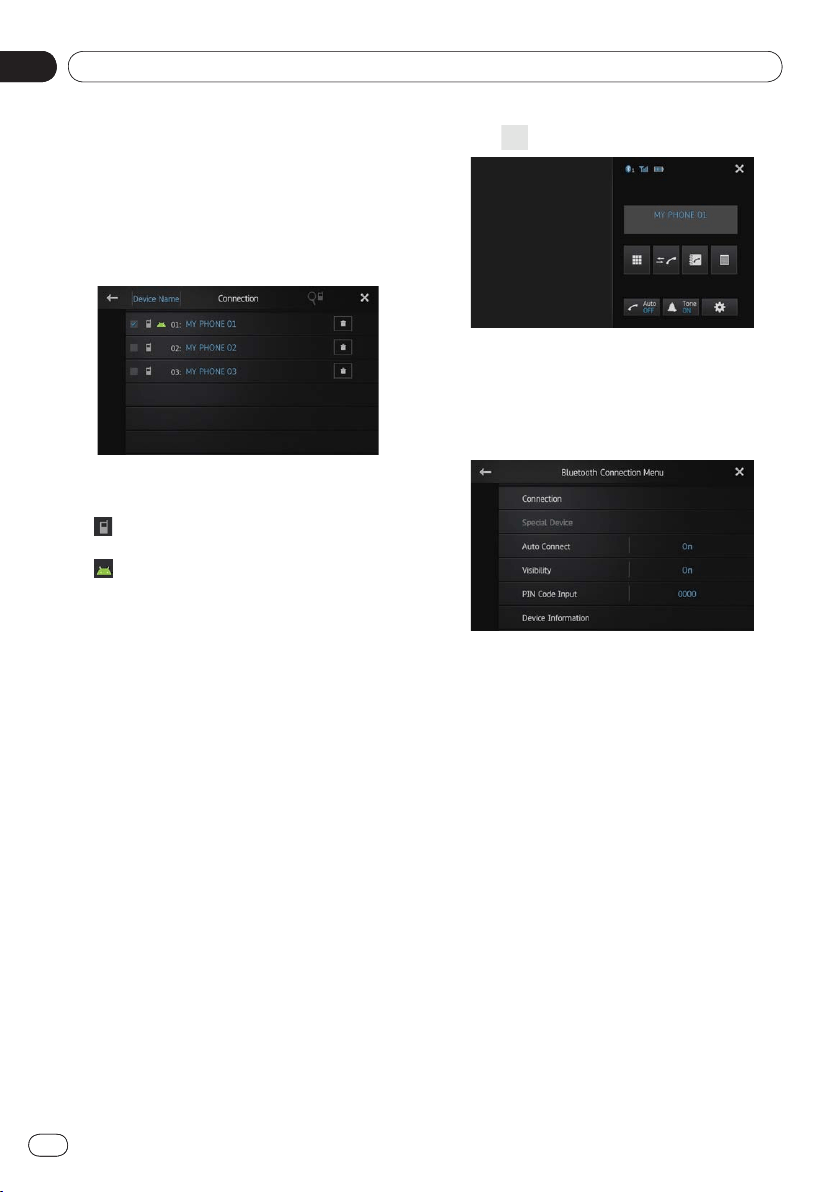
Connecting a registered
Bluetooth device manually
This product automatically connects the Blue-
tooth device selected as the target of connec-
tion. However, connect the Bluetooth device
manually in the following cases:
Two or more Bluetooth devices are regis-
tered, and you want to manually select the
device to be used.
You want to reconnect a disconnected
Bluetooth device.
Connection cannot be established automat-
ically for some reason.
•
•
•
If you start connection manually, carry out the
following procedure. You can also connect the
Bluetooth device by having this product detect
it automatically.
1 Activate the Bluetooth wireless technol-
ogy on your devices.
For some Bluetooth devices, no specific action
is necessary to activate Bluetooth wireless
technology. For details, refer to the instruction
manual of your devices.
2 Tap [Phone] on the Home screen.
➲ For details, refer to Home screen on page 10.
The phone menu screen appears.
3 Tap on the phone menu.
The “Bluetooth Connection Menu” screen
appears.
4 Tap [Connection] on the “Bluetooth
Connection Menu”.
The registered device list screen appears.
Using hands-free phoning
07
Chapter
26
En
Registering and connecting a Bluetooth device
07
Chapter
26
5 Tap the Bluetooth device name you
want to connect.
The Bluetooth connection progress is dis-
played.
When a connection is successfully established,
the checkbox next to the device name is
selected.
The available profile icons are displayed as fol-
lows:
: Appears when the HFP (Hands-Free
Profile) is available.
: Appears when the SPP (Serial Port
Profile) is available.
❐ If a device is already connected with the
same profile, that device is disconnected
and the new device will be connected.
Setting the Bluetooth auto
connect function
If this function is set on, a connection be-
tween your Bluetooth device and this product
will take place automatically as soon as the
two devices are less than a few meters apart.
Initially, this function is set to “
On”.
1 Tap [Phone] on the Home screen.
➲ For details, refer to Home screen on page 10.
The phone menu screen appears.
•
•
2 Tap on the phone menu.
The “Bluetooth Connection Menu” screen
appears.
3 Tap [Auto Connect] to turn automatic
connection off.
If you Bluetooth device is ready for a Bluetooth
wireless connection, a connection to this prod-
uct will automatically be established.
■
To turn automatic connection on, tap [Auto
Connect
] again.
Disconnecting a Bluetooth
device
1 Tap [Phone] on the Home screen.
➲ For details, refer to Home screen on page 10.
The phone menu screen appears.
07
Using hands-free phoning
Chapter
27
En
07
Registering and connecting a Bluetooth device
Chapter
27
Registering and connecting a Bluetooth device
2 Tap on the phone menu.
The “Bluetooth Connection Menu” screen
appears.
3 Tap [Connection] on the “Bluetooth
Connection Menu”.
The registered device list screen appears.
4 Tap the Bluetooth device name you
want to disconnect.
When the device is disconnected, the check-
box next to the device name is deselected.
■
To connect the device, tap the Bluetooth
device name again.
Switching product visibility
This function sets whether or not to make this
product visible to the other device. Initially,
this function is set to “
On”.
1 Tap [Phone] on the Home screen.
➲ For details, refer to Home screen on page 10.
The phone menu screen appears.
2 Tap on the phone menu.
The “Bluetooth Connection Menu” screen
appears.
3 Tap [Visibility] to turn visibility off.
■
To turn visibility on, tap [Visibility] again.
Changing a PIN code
When connecting your Bluetooth device to
this product via Bluetooth wireless technology,
you may be required to enter a PIN code on
your Bluetooth device. You can change the PIN
code.
❐ The default PIN code is “
0000”.
1 Tap [Phone] on the Home screen.
➲ For details, refer to Home screen on page 10.
The phone menu screen appears.

Using hands-free phoning
07
Chapter
28
En
Registering and connecting a Bluetooth device
07
Chapter
28
2 Tap on the phone menu.
The “Bluetooth Connection Menu” screen
appears.
3 Tap [PIN Code Input] on the “Bluetooth
Connection Menu”.
The “PIN Code” screen appears.
4 Enter an arbitrary PIN code (up to 8 dig-
its).
5 Tap to store the PIN code.
Displaying Bluetooth device
address
This product displays its Bluetooth device ad-
dress.
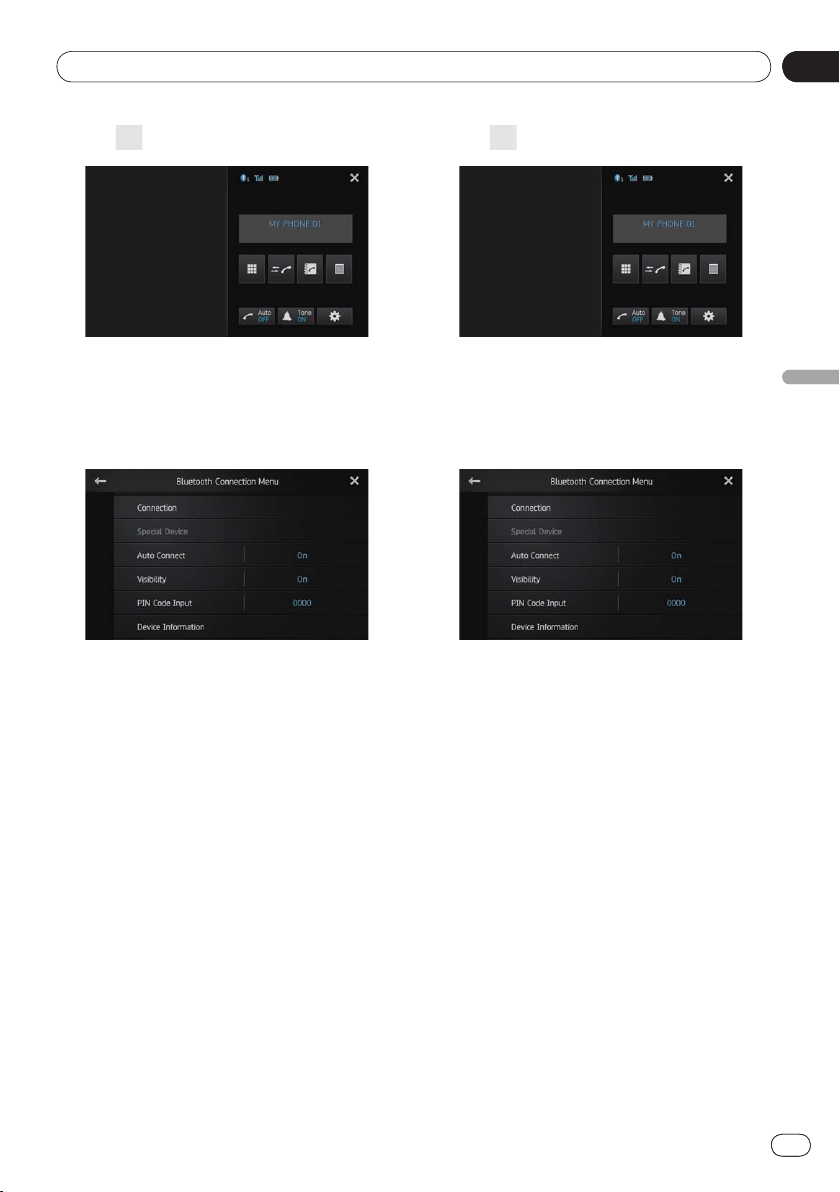
1 Tap [Phone] on the Home screen.
➲ For details, refer to Home screen on page 10.
The phone menu screen appears.
2 Tap on the phone menu.
The “Bluetooth Connection Menu” screen
appears.
3 Tap [Device Information] on the
“Bluetooth Connection Menu”.
The “Device Information” screen appears.
The “
Device Name” and “BD Address” are
displayed.
08
Using hands-free phoning
Chapter
29
En
Using hands-free phoning
CAUTION
For your safety, avoid talking on the phone as
much as possible while driving.
You can control the Bluetooth connection of
the smartphone, and make a call using the in-
coming or outgoing call histories, transferred
phone book, or by dialing.
To connect using the hands-free phoning func-
tion, you must first use the smartphone to pair
this product with the smartphone.
➲
For detailed procedures, refer to Registering
your Bluetooth devices on page 22.
For details about connectivity with devices fea-
turing Bluetooth wireless technology, refer to
the information on our website.
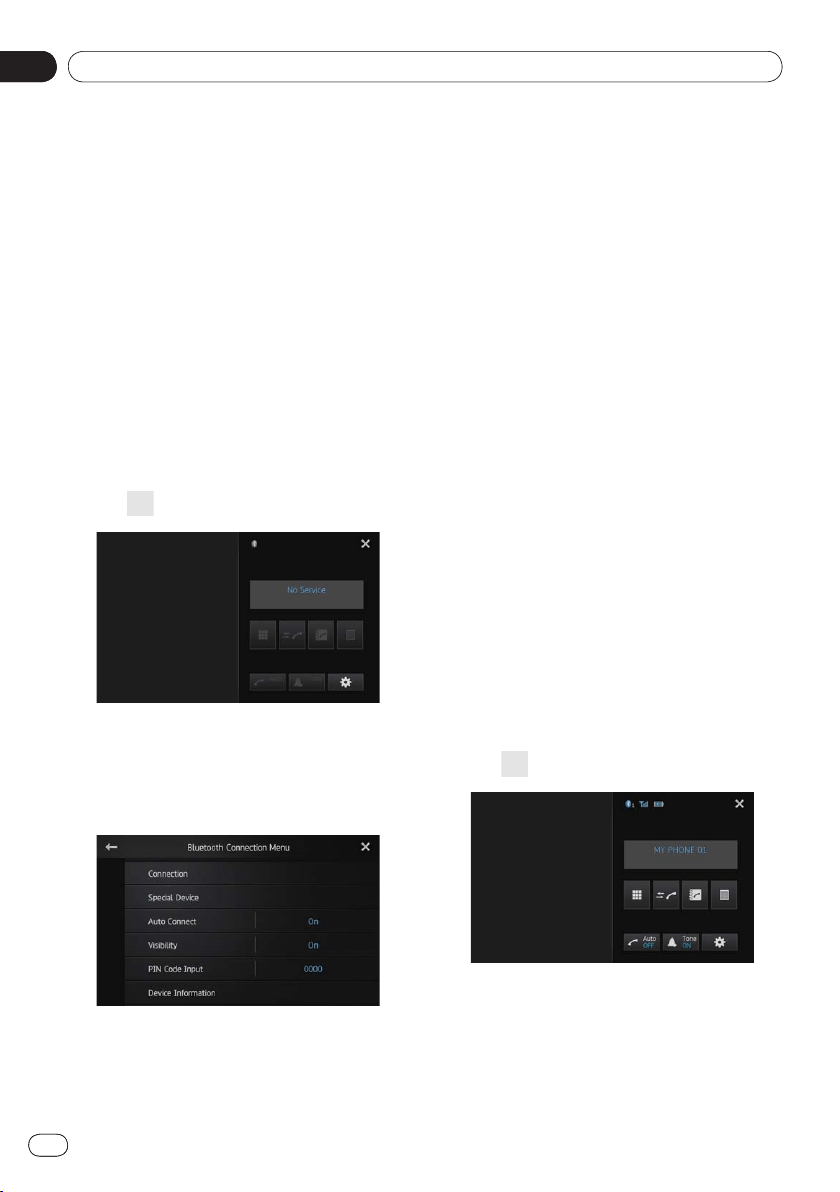
Starting procedure
1 Press the Home button to display the
Home screen.
2 Tap [Phone] on the Home screen.
➲ For details, refer to Home screen on page 10.
The phone menu screen appears.
Reading the screen
Number of the Bluetooth connectionNumber of the Bluetooth connection
device
Reception status of the smartphone
Battery status of the smartphone
Name of connected device
❐ Depending on the device, the phone menu
screen may be different from the actual
screen.
Using the touch panel keys
Switches to the mode for entering phone
numbers.
➲
For details, refer to Direct dialing on the
next page.
Switches to the call history list.
➲ For details, refer to Dialing from the
history on page 31.
Closes the phone menu screen and return
the previous menu screen.
Switches to the phone book mode.
➲
For details, refer to Calling a number in
the phone book on the next page.
➲
For details, refer to Selecting a number
using alphabet search mode on page 31.
Displays the preset dial screen.
➲
For details, refer to Using the preset dial
lists on page 33.
Displays the “Bluetooth Connection
Menu
”.
➲
For details, refer to Registering your
Bluetooth devices on page 22.
Turns the ring tone for incoming calls on or
off.
➲
For details, refer to Switching the ring
tone on page 32.
Turns automatic answering on or off.
➲
For details, refer to Answering a call
automatically on page 32.
Using hands-free phoning
08
Chapter
30
En
Adjusting the phone volume
During the hands-free phoning, you can adjust
the phone volume using the
Volume (+/–)
button when you are talking. The ring tone
volume also can be adjusted while the phone
rings.
Making a phone call
You can make a phone call in many different
ways.
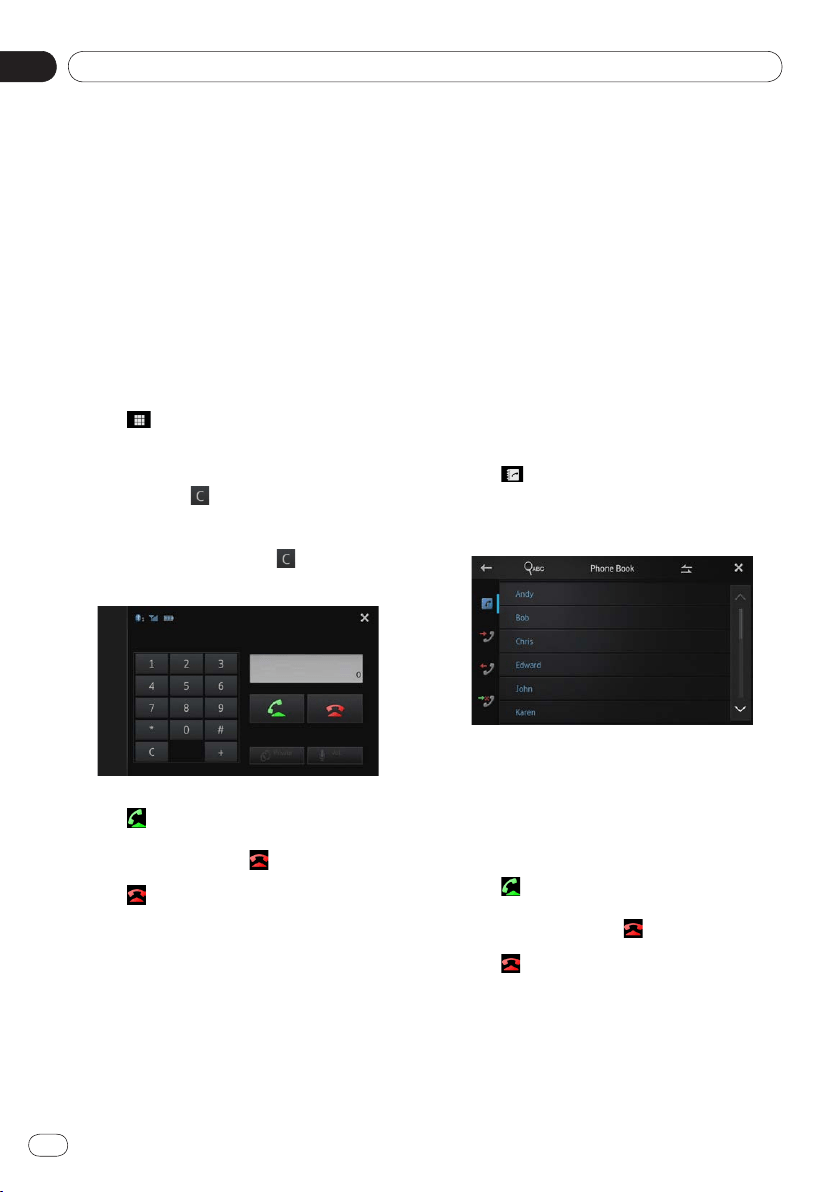
Direct dialing
1 Tap .
2 Tap the number keys to enter the phone
number.
■
If you tap the key, the entered number is
deleted one digit at a time from the end of
the number.
■
If you touch and hold the key, the en-
tered number is cleared.
3 Tap .
Dialing starts.
■
To cancel the call, tap .
4 Tap to end the call.
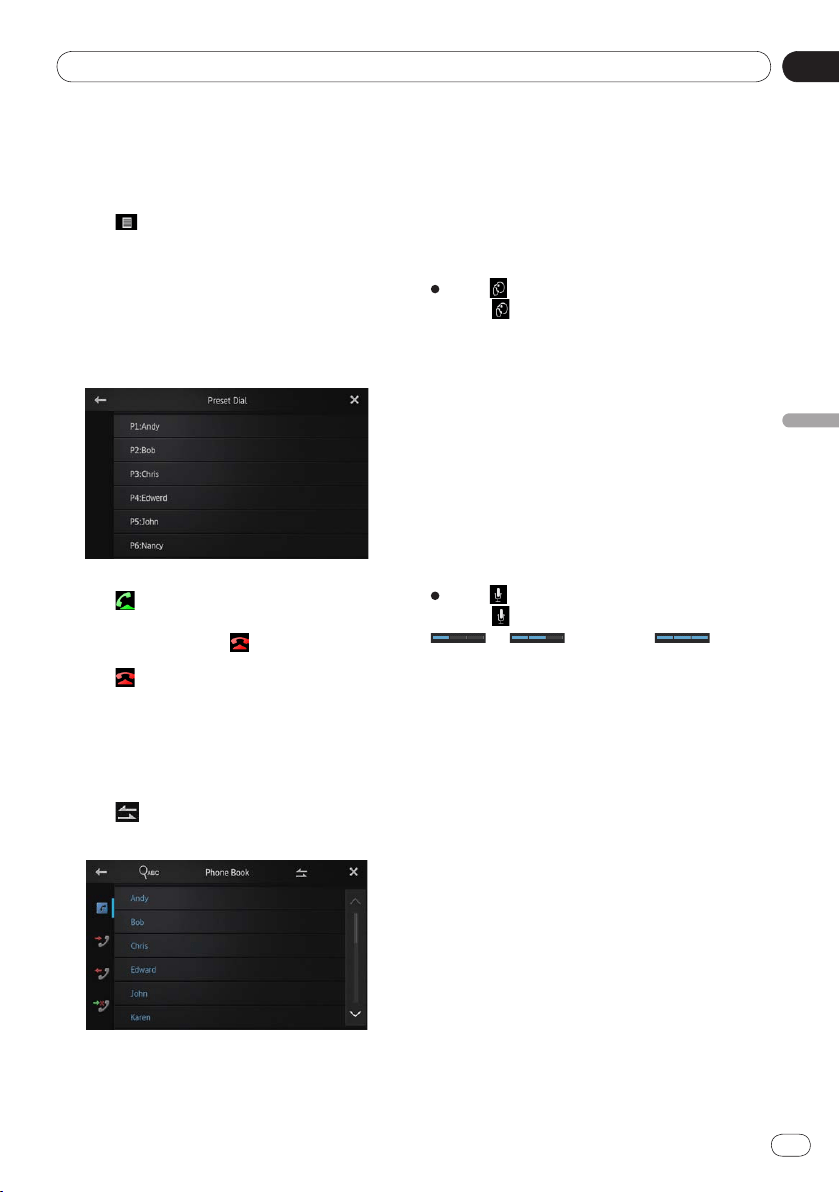
Calling a number in the phone book
You can select and call a contact from the
phone book entries transferred to this prod-
uct.
❐
Before using this function, you need to
transfer the phone book entries stored in
your smartphone to this product.
➲
For details, refer to Phone book transfers
on page 34.
❐
Depending on the settings of the connect-
ed smartphone, the phone book may not
be automatically transferred to this prod-
uct. When the phone book is not trans-
ferred, transfer the phone book from the
smartphone.
1 Tap .
The “Phone Book” screen appears.
2 Tap the desired name on the list.
The details screen of the phone book appears.
3 Tap the phone number you want to dial.
The dial confirm screen appears.
■
If several phone numbers are included in an
entry, select one by touching the list.
4 Tap .
Dialing starts.
■
To cancel the call, tap .
5 Tap to end the call.
08
Using hands-free phoning
Chapter
31
En
Using hands-free phoning
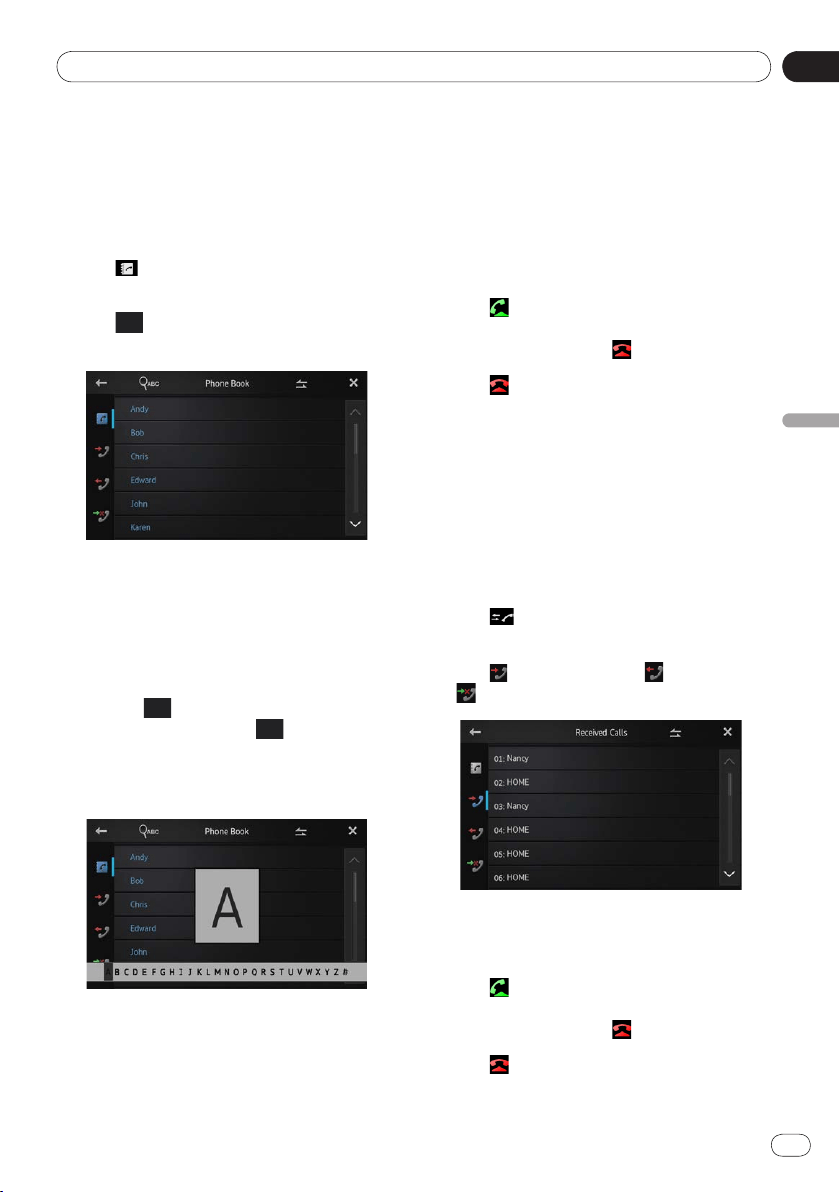
Selecting a number using alphabet
search mode
If a lot of numbers are registered in the phone
book, you can search for a phone number using
alphabet search mode.
1 Tap .
The “Phone Book” screen appears.
2 Tap to switch to the alphabet search
mode.
3 Tap the first letter of the entry you are
looking for.
The screen jumps to the top of the page dis-
playing the entries that start with the selected
letter.
■
If you want to change the character to Rus-
sian, tap
on the alphabet search mode.
To return to English, tap again.
■
The order of the first name and last name
may be different from that of the smart-
phone.
4 Tap the list to display the phone num-
ber list of the selected entry.
The details screen of the phone book appears.
5 Tap the phone number you want to dial.
The dial confirm screen appears.
■
If several phone numbers are included in an
entry, select one by touching the list.
6 Tap .
Dialing starts.
■
To cancel the call, tap .
7 Tap to end the call.
Dialing from the history
The most recent calls made dialed, received
and missed are stored in the call history list.
You can browse the call history list and call
numbers from it.
❐ Each call history saves 80 calls per registered
smartphone. If the number of calls exceeds
80, the oldest entry will be deleted.
1 Tap .
The latest updated call history list appears.
2 Tap (Received calls), (Dialed calls)
or (Missed calls).
3 Tap an entry on the list.
The dial confirm screen appears.
4 Tap .
Dialing starts.
■
To cancel the call, tap .
5 Tap to end the call.
Using hands-free phoning
08
Chapter
32
En
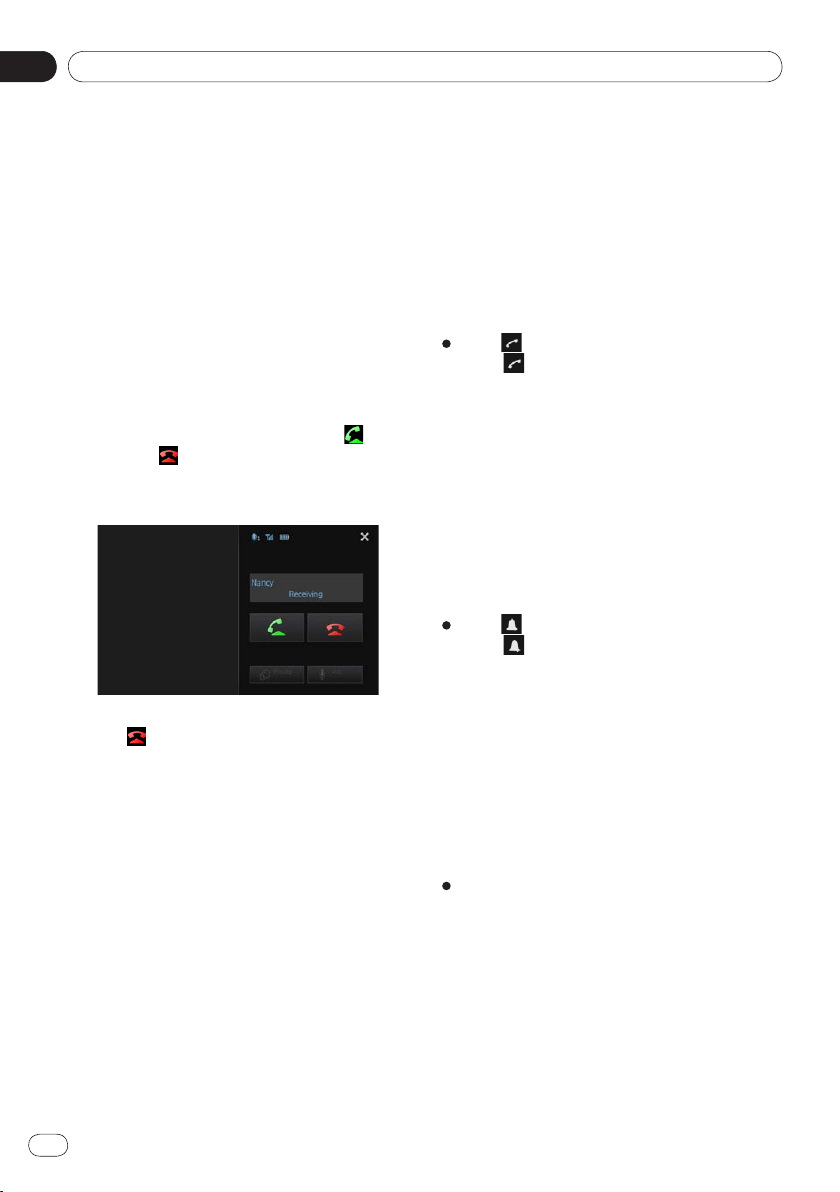
Answering an incoming call
This product informs you that it is receiving a
call by displaying a message and producing a
ring sound.
❐
You can set this product to automatically
answer incoming calls. If not set to auto-
matically answer incoming calls, you will
have to answer the calls manually.
➲ For details, refer to Answering a call
automatically on this page.
❐ The registered name appears if the phone
number of the received call is already regis-
tered in “
Phone book”.
1 To answer an incoming call, tap .
■
If you tap , an incoming call is rejected.
The rejected call is recorded in the missed call
history list.
2 Tap to end the call.
Using advanced functions
Answering a call automatically
You can enable or disable auto answer for
handling incoming calls.
This product automatically answers incoming
calls to the smartphone, so you can answer a
call while driving without taking your hands
off the steering wheel.
Tap .
Tapping changes the setting as follows:
OFF (default):
No automatic response. Respond manu-
ally.
ON:
Answers incoming calls automatically.
Switching the ring tone
You can select whether or not to use this prod-
uct’s ring tone. If this function is set to on, the
ring tone for this product will sound.
Tap .
Tapping changes the setting as follows:
ON (default):
The ring tone sounds.
OFF:
The ring tone is muted.
Storing a phone number
You can easily store up to 6 phone numbers as
presets from the phone book and the call histo-
ry list.
Touch and hold the desired phone
number in the phone book or the call
history list.
The phone number is registered on the
“
Preset Dial” list.
•
•
•
•
08
Using hands-free phoning
Chapter
33
En
Using hands-free phoning
Using the preset dial lists
You can easily store up to 6 phone numbers as
presets.
1 Tap .
The “Preset Dial” list appears.
2 Tap one of preset dial keys to select the
desired phone number.
The dial confirm screen appears.
■
If you want to delete a preset phone number,
touch and hold the preset phone number.
3 Tap .
Dialing starts.
■
To cancel the call, tap .
4 Tap to end the call.
Inverting the names
You can invert the order of first and last names
in
the phone book and the call history list.
1 Tap on the phone book or the call
history list.
The message “Would you like to invert all
names?
” appears.
2 Tap [Yes] to invert the names.
The order of all first and last names is inverted.
Setting the private mode
During a conversation, you can switch to pri-
vate mode (talk directly on your smartphone).
Tap .
Tapping changes the setting as follows:
OFF (default):
Hands-free phoning
ON:
Talk directly on your smartphone
Adjusting the other party’s listening
volume
To maintain good sound quality, this product
can adjust the other party’s listening volume.
If the volume is not loud enough for the other
party, use this function.
Tap .
Tapping switches between the three levels:
— (default) —
❐ This function is not available when the
private mode is set to “
ON”.
➲ For details, refer to Setting the private
mode on this page.
❐ This function can be performed even while
talking on the phone.
❐ Settings can be stored for each device.
•
•

Using hands-free phoning
08
Chapter
34
En
Notes for hands-free phoning
General notes
Connection to all smartphones featuring
Bluetooth wireless technology is not guaran-
teed.
The line-of-sight distance between this prod-
uct and your smartphone must be 10 meters
or less when sending and receiving voice and
data via Bluetooth technology. However, the
actual transmission distance may be shorter
than the estimated distance, depending on
the usage environment.
With some smartphones, the ring sound
may not be output from the speakers.
If private mode is selected on the smart-
phone, hands-free phoning may be disabled.
Registration and connection
Smartphone operations vary depending on
the type of smartphone. Refer to the in-
struction manual that came with your
smartphone for detailed instructions.
With some smartphones, phone book trans-
fer may not work even though your smart-
phone is paired with this product. In that
case, disconnect your smartphone, perform
pairing again from your smartphone to this
product, and then perform the phone book
transfer.
Making and receiving calls
You may hear a noise in the following situa-
tions:
-
When you answer the phone using the
button on the phone.
-
When the person on the other end of line
hangs up the phone.
If the person on the other end of the phone
call cannot hear the conversation due to an
echo, decrease the volume level for hands-
free phoning. This may reduce the echo.
With some smartphones, even if you press
the accept button on the smartphone when
a call comes in, hands-free phoning may not
be performed.
•
•
•
•
•
•
•
•
•
The registered name appears if the phone
number of the received call is already regis-
tered in the phone book. When one phone
number is registered under different names,
the name that comes first in the phone book
is displayed.
If the phone number of the received call is
not registered in the phone book, the phone
number of the received call appears.
The received call history and the
dialed number history
Calls made or editing performed only on
your smartphone will not be applied to the
dialed number history or phone book in this
product.
You cannot make a call to the entry of an
unknown user (no phone number) in the re-
ceived call history.
If calls are made by operating your
smartphone, no history data will be re-
corded in this product.
Phone book transfers
You can register up to five numbers per en-
try.
If there are more than 1 000 phone book
entries on your smartphone, all entries may
not be downloaded completely.
With some smartphones, it may not be pos-
sible to transfer all items in the phone book
at one time. In this case, transfer items one
by one from your smartphone.
Depending on the smartphone, this product
may not display the phone book correctly.
(Some characters may be garbled, or first
and last names may be reversed.)
If the phone book in the smartphone con-
tains image data, the phone book may not
be transferred correctly. (Image data cannot
be transferred from the smartphone.)
Depending on the smartphone, phone book
transfer may not be available.
•
•
•
•
•
•
•
•
•
•
•
09
Customizing preferences
Chapter
35
En
Customizing preferences
Customizing the audio
settings
❐ The audio settings cannot be set when the
source is set to “
OFF”.
1 Press the Home button to display the
Home screen.
2 Flick the scroll area on the Home screen.
➲ For details, refer to Home screen on page 10.
3 Tap [Settings] on the Home screen.
The menu top screen appears.
4 Tap .
The “Audio” screen appears.
5 Tap the item that you want to change
the settings for.
6 After changing the settings, tap to
return the Home screen.
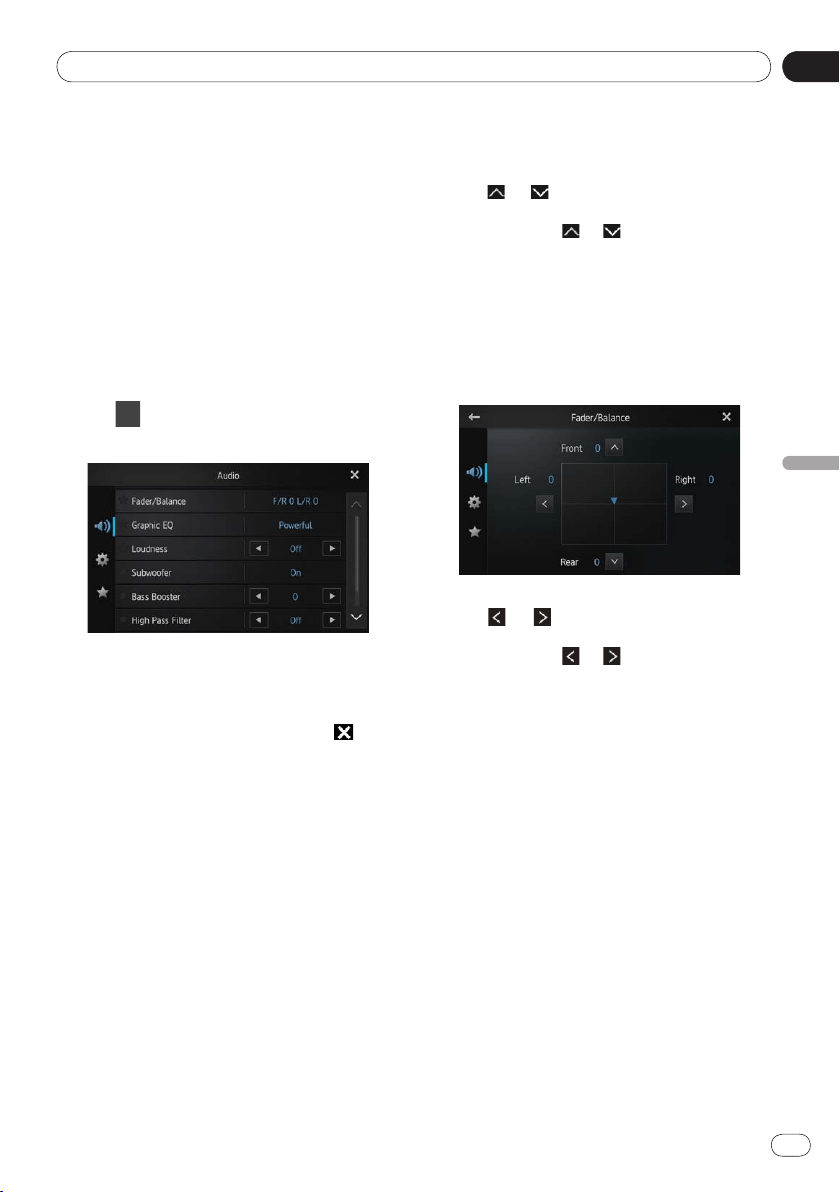
Using fader/balance adjustment
You can select a fader/balance setting that pro-
vides an ideal listening environment in all occu-
pied seats.
1 Display the “Audio” screen.
➲ For details, refer to Customizing the audio
settings on this page.
2 Tap [Fader/Balance].
When “Subwoofer” is selected in “Rear
Speaker
”, “Balance” will be displayed instead
of “
Fader/Balance” and front/rear speaker
balance cannot be adjusted.
➲
For details, refer to Setting the rear output
on page 38.
3 Tap or to adjust front/rear speaker
balance.
Each time you tap or , the front/rear
speaker balance moves towards the front or
the rear.
“
Front 15” to “Rear 15” is displayed as the
front/rear speaker balance moves from front
to rear.
Set “
Front” and “Rear” to “0” when using a
two-speaker system.
4 Tap or to adjust left/right speaker
balance.
Each time you tap or , the left/right
speaker balance moves towards the left or the
right.
“
Left 15” to “Right 15” is displayed as the
left/right speaker balance moves from left to
right.
Using the equalizer
The equalizer lets you adjust equalization to
match vehicle interior acoustic characteristics
as desired.
Recalling equalizer curves
There are seven stored equalizer curves that
you can easily recall at any time.
Here is a list of the equalizer curves:
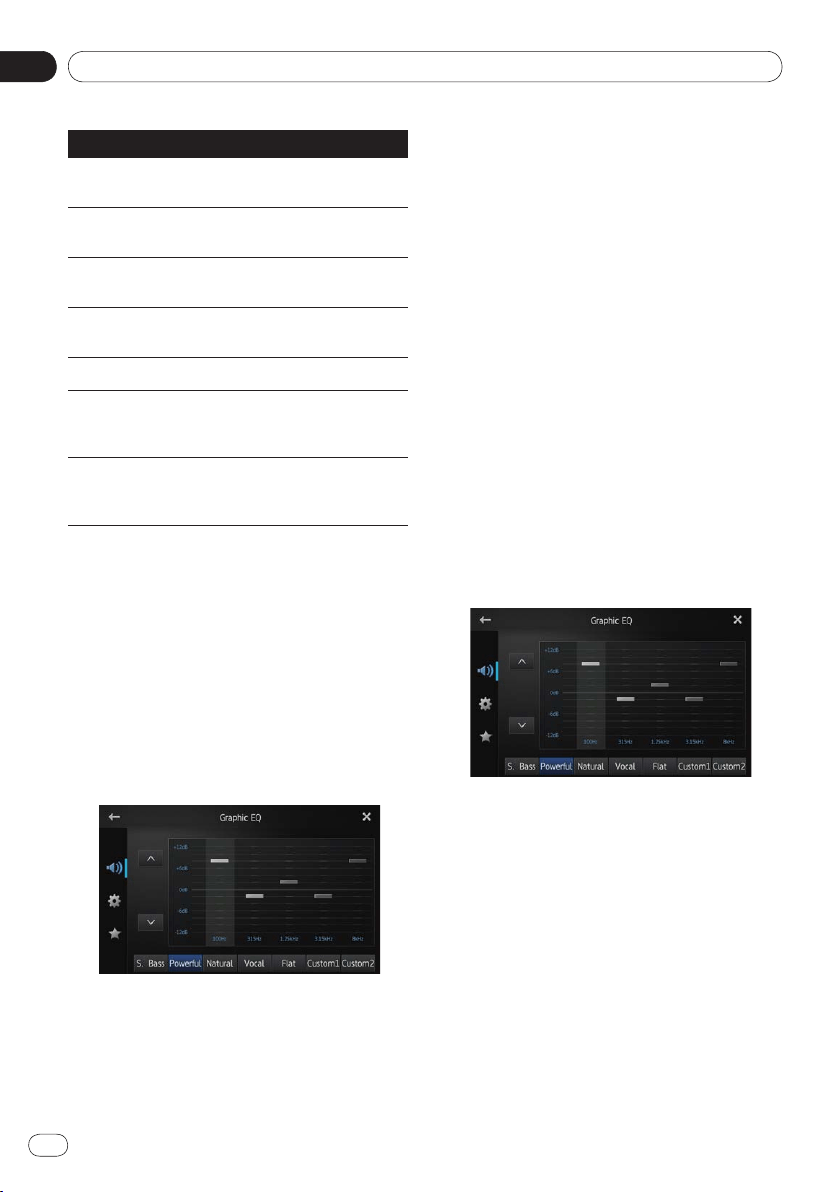
Customizing preferences
09
Chapter
36
En
Equalizer curve
S.Bass
(Super Bass) is a curve in which only low-
pitched sound is boosted.
Powerful is a curve in which low-pitched and high-
pitched sounds are boosted.
Natural is a curve in which low-pitched and high-
pitched sounds are slightly boosted.
Vocal is a curve in which the midrange, which is the
human vocal range, is boosted.
Flat is a flat curve in which nothing is boosted.
Custom1 is an adjusted equalizer curve that you cre-
ate. A separate custom curve can be created for each
source.
Custom2 is an adjusted equalizer curve that you cre-
ate. If you select this curve, the effect is applied to all
audio sources.
❐ When “Flat” is selected, no supplement or
correction is made to the sound. This is use-
ful to check the effect of the equalizer
curves by switching alternatively between
“
Flat” and a set equalizer curve.
1 Display the “Audio” screen.
➲ For details, refer to Customizing the audio
settings on the previous page.
2 Tap [Graphic EQ].
3 Tap the equalizer curve you want.
Adjusting the 5-band graphic equalizer
You can adjust the level of each band for the
equalizer curves.
❐
A separate “Custom1” curve can be creat-
ed for each source. If you make adjustments
when a curve other than “
Custom2” is se-
lected, the equalizer curve settings will be
recorded in “
Custom1”.
❐
A “Custom2” curve that is common for all
sources can be created. If you make adjust-
ments when the “
Custom2” curve is se-
lected, the “
Custom2” curve will be updat-
ed.
1 Display the “Audio” screen.
➲ For details, refer to Customizing the audio
settings on the previous page.
2 Tap [Graphic EQ].
3 Tap one of the keys to select a curve
that you want to use as the basis of cus-
tomizing.
4 Tap the frequency that you want to ad-
just the level for.
You can select the following frequencies:
100Hz — 315Hz — 1.25kHz — 3.15kHz — 8kHz
5 Tap the screen to adjust the level of the
equalizer band.
You can adjust the equalizer band level be-
tween “
+12dB” and “–12dB”.
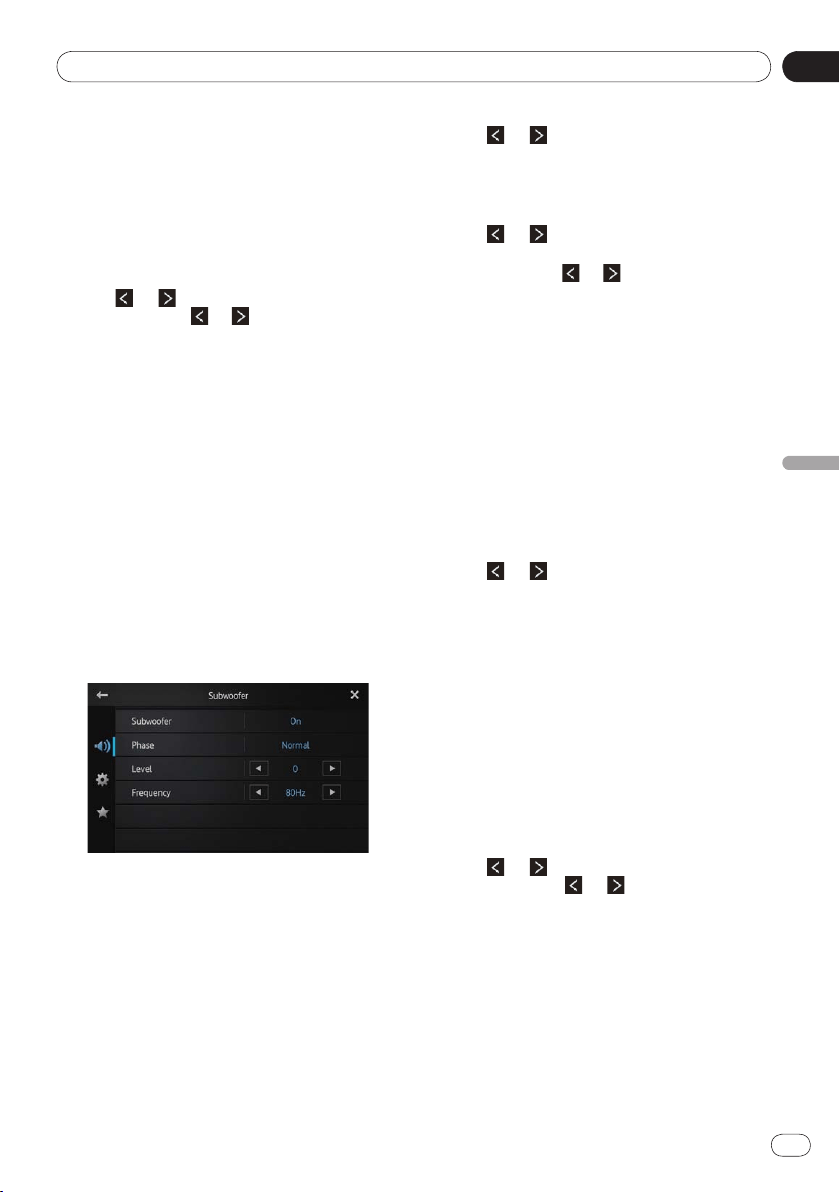
09
Customizing preferences
Chapter
37
En
Customizing preferences
Adjusting loudness
Loudness compensates for deficiencies in the
low- and high-sound ranges at low volume.
1 Display the “Audio” screen.
➲ For details, refer to Customizing the audio
settings on page 35.
2 Tap or next to “Loudness”.
Each time you tap or , the level is selected
in the following order:
Off (default) — Low — Mid — High
Using the subwoofer output
This product is equipped with a subwoofer
output that can be turned on or off.
❐
The cut-off frequency and output level can
be adjusted when the subwoofer output is
on.
1 Display the “Audio” screen.
➲ For details, refer to Customizing the audio
settings on page 35.
2 Tap [Subwoofer].
The “Subwoofer” screen appears.
3 Tap [Subwoofer] to set to “On”.
The subwoofer output is turned on.
■
If you select “Off”, the subwoofer output is
turned off.
4 Tap [Phase] to select “Normal” or
“Reverse” to set the phase of subwoofer
output.
5 Tap or next to “Level” to adjust
the output level.
“+6” to “–24” is displayed as the level is in-
creased or decreased.
6 Tap or next to “Frequency” to se-
lect cut-off frequency.
Each time you tap or , cut-off frequencies
are selected in the following order:
50Hz — 63Hz — 80Hz (default) — 100Hz — 125Hz
Only frequencies lower than those in the se-
lected range are output from the subwoofer.
Enhancing bass (Bass Booster)
You can enhance bass sounds that are often
muted by driving noise.
1 Display the “Audio” screen.
➲ For details, refer to Customizing the audio
settings on page 35.
2 Tap or next to “Bass Booster” to
adjust the range from 0 to +6.
Using the high pass filter
When you cut lower sounds from the subwoof-
er output frequency, activate “
High Pass Fil-
ter
”. Only frequencies higher than those in the
selected range are output from the front or
rear speakers.
1 Display the “Audio” screen.
➲ For details, refer to Customizing the audio
settings on page 35.
2 Tap or next to “High Pass Filter”.
Each time you tap or , cut-off frequencies
are selected in the following order:
Off (default) — 50Hz — 63Hz — 80Hz — 100Hz
—
125Hz
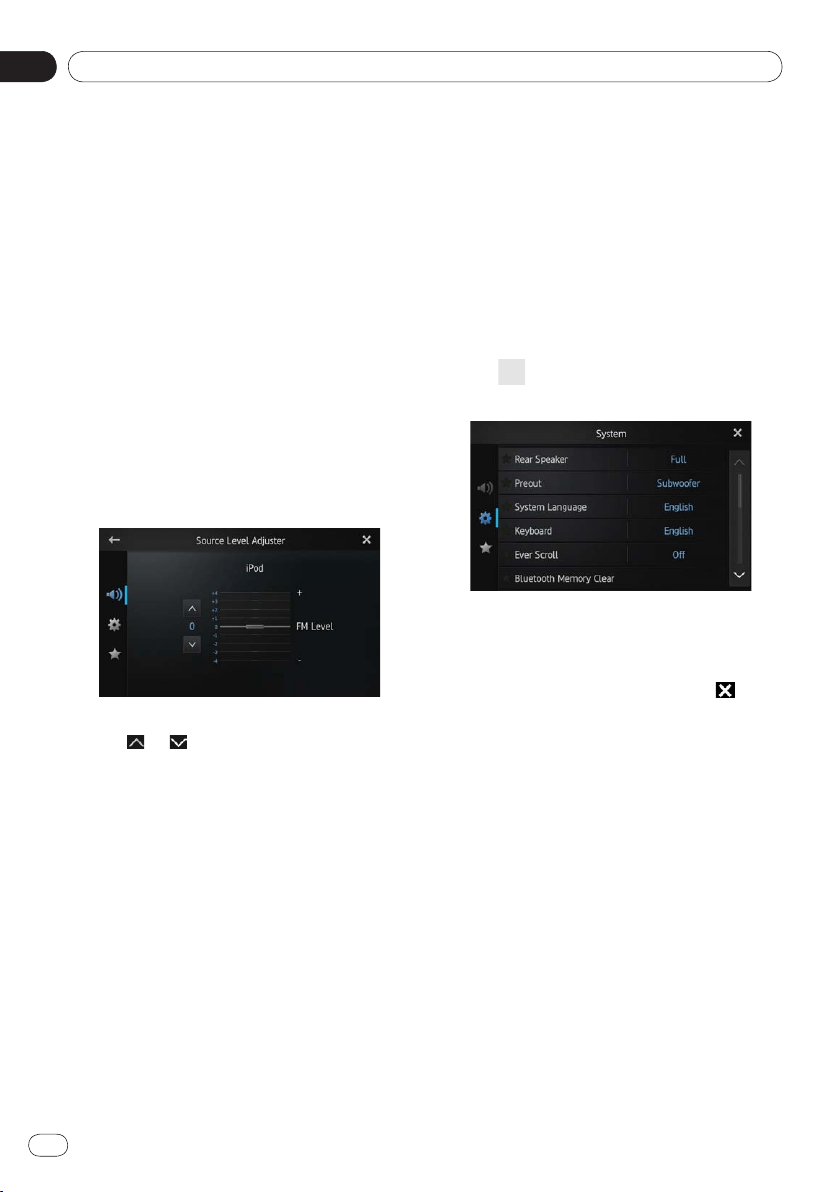
Customizing preferences
09
Chapter
38
En
Adjusting source levels
“Source Level Adjuster” lets you adjust the
volume level of each source to prevent radical
changes in volume when switching between
the sources.
❐
Settings are based on the FM volume level,
which remains unchanged.
1 Play the source you want to adjust the
volume level for.
The adjustable sources are “iPod”, “Apps”,
“
Pandora” and “AM” band.
2 Display the “Audio” screen.
➲ For details, refer to Customizing the audio
settings on page 35.
3 Tap [Source Level Adjuster].
The “Source Level Adjuster” screen appears.
4 Tap or to adjust the source vol-
ume.
“+4” to “–4” is displayed as the source volume
is increased or decreased.
Customizing the system
settings
1 Press the Home button to display the
Home screen.
2 Flick the scroll area on the Home screen.
➲ For details, refer to Home screen on page 10.
3 Tap [Settings] on the Home screen.
The menu top screen appears.
4 Tap .
The “System” screen appears.
5 Tap the item that you want to change the
settings for.
6 After changing the settings, tap to re-
turn the Home screen.
Setting the rear output
This product’s rear output (rear speaker leads
output) can be used for a full-range speaker
(
Full) or subwoofer (Subwoofer) connection.
If you switch the rear output setting to
“
Subwoofer”, you can connect a rear speaker
lead directly to a subwoofer without using an
auxiliary amp.
Initially, the product is set for a rear full-range
speaker connection (
Full).
❐
“Rear speaker” can be set only when the
source is set to “
OFF”.
1 Display the “System” screen.
➲ For details, refer to Customizing the system
settings on this page.
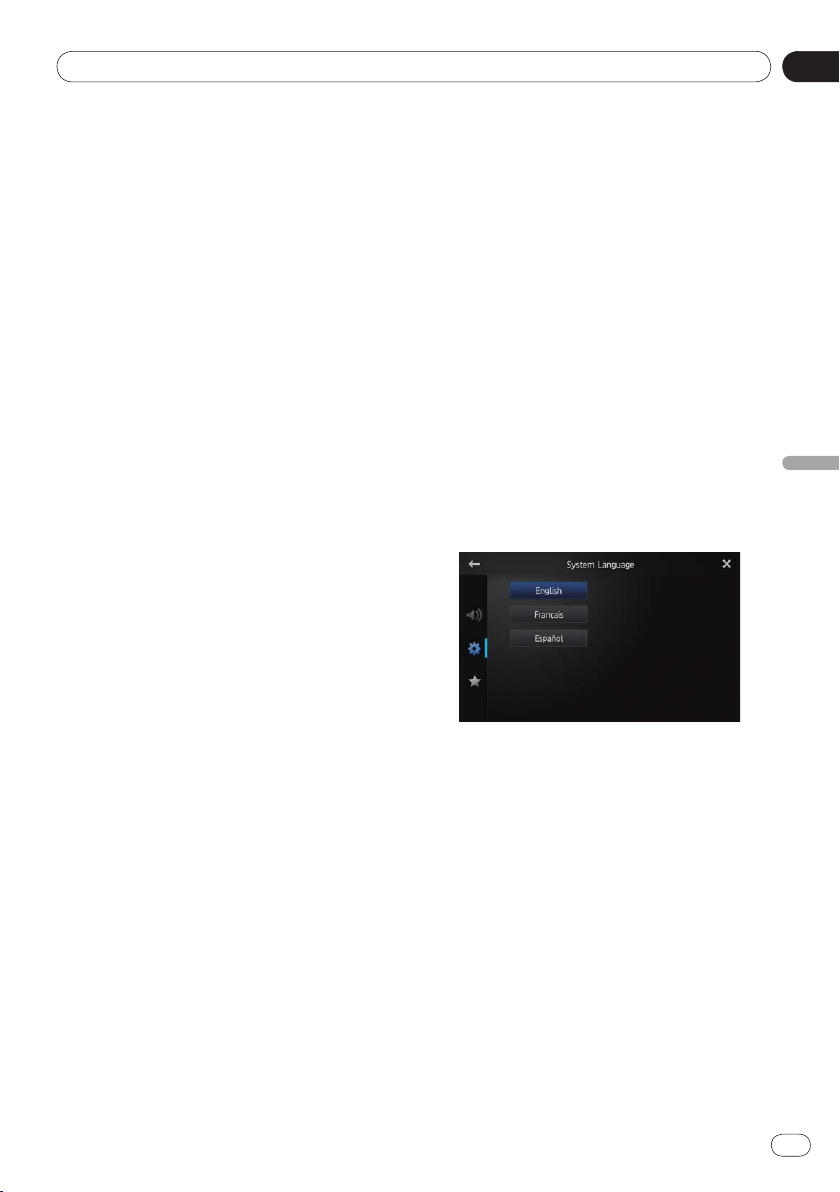
09
Customizing preferences
Chapter
39
En
Customizing preferences
2 Tap [Rear Speaker].
Tapping [Rear Speaker] changes the settings
as follows:
Full (default)
When no subwoofer is connected to the
rear output, select “Full”.
Subwoofer
When a subwoofer is connected to the
rear output, select “Subwoofer”.
❐ Even if you change this setting, there will be
no output unless you turn the subwoofer
output on.
➲
For details, refer to Using the subwoofer
output on page 37.
❐
If you change this setting, subwoofer
output in the audio menu will return to the
factory settings.
Setting the RCA output
This product’s preout (RCA rear output or
subwoofer output) can be used for a full-range
speaker (
Full) or subwoofer (Subwoofer)
connection.
Initially, the product is set for a rear full-range
speaker connection (
Full).
❐
“Preout” can be set only when the source is
set to “
OFF”.
1 Display the “System” screen.
➲ For details, refer to Customizing the system
settings on the previous page.
2 Tap [Preout].
Tapping [Preout] changes the settings as
follows:
Subwoofer (default)
When a subwoofer is connected to the
RCA rear output, select “Subwoofer”.
Full
When no subwoofer is connected to the
RCA rear output, select “Full”.
❐ Even if you change this setting, there will be
no output unless you turn the subwoofer
output on.
➲
For details, refer to Using the subwoofer
output on page 37.
•
•
•
•
❐ If you change this setting, subwoofer
output in the audio menu will return to the
factory settings.
Selecting the system language
The system language can be selected from
three languages.
❐
If the embedded language and the selected
language setting are not the same, text in-
formation may not display properly.
❐
Some characters may not be displayed
properly. Text that cannot be displayed is
displayed as “_” (underbar).
1 Display the “System” screen.
➲ For details, refer to Customizing the system
settings on the previous page.
2 Tap [System Language].
The “System Language” screen appears.
3 Tap the desired language.
English (default), Français, Español
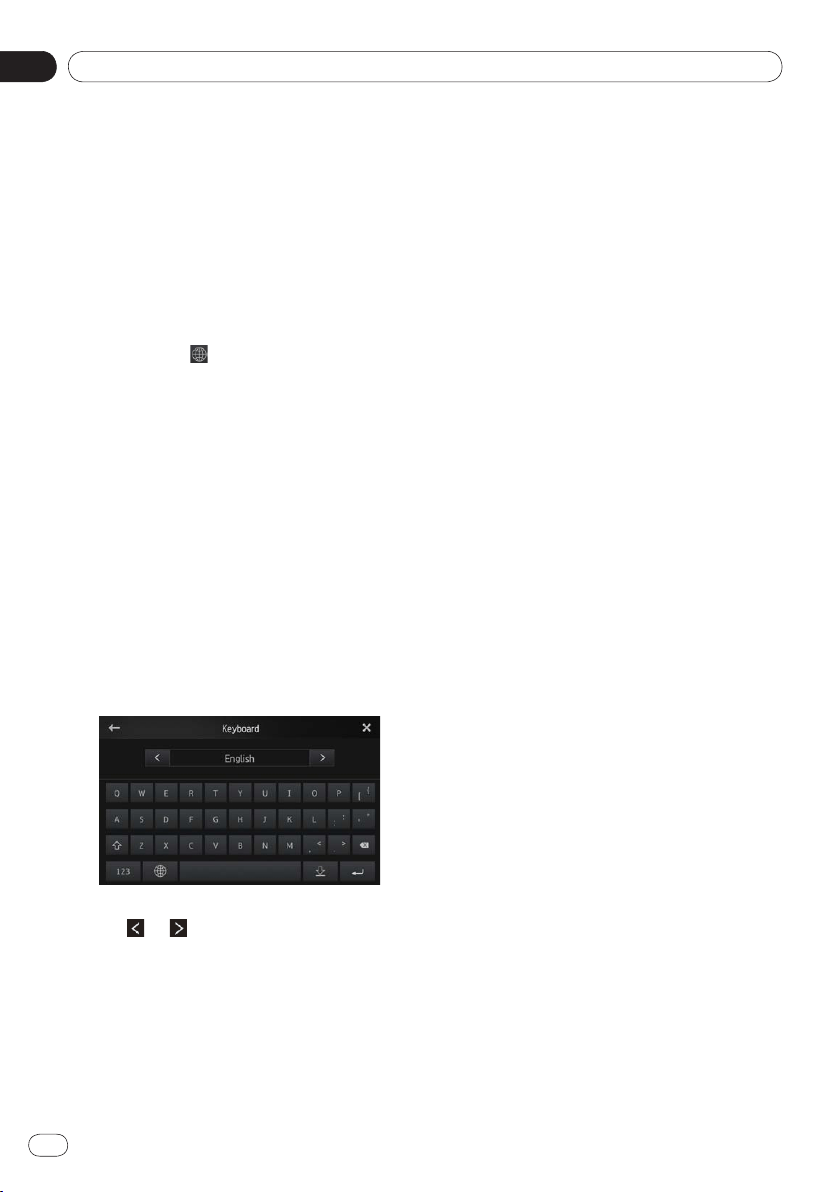
Customizing preferences
09
Chapter
40
En
Setting the keyboard layout
You can select the keyboard layout displayed
on this product for text input in
Advanced
App Mode
.
This setting is valid only when connecting an
iPhone with
Advanced App Mode installed.
❐ The keyboard layout depends on the system
language settings.
➲ For details, refer to Selecting the system
language on the previous page.
❐ When you tap on the virtual keyboard, the
language setting of iPhone is changed, but the
language on the virtual keyboard is not
changed. If you change the language setting of
the virtual keyboard, refer to the following
procedure.
❐ The iPhone keyboard layouts depends on
the Hardware Keyboard Layout setting of
your iPhone.
For details on iPhone operating procedures,
refer to your iPhone User Guide.
1 Display the “System” screen.
➲ For details, refer to Customizing the system
settings on page 38.
2 Tap [Keyboard].
The “Keyboard” screen appears.
3 Tap or to select the desired key-
board layout.
Switching the ever scroll function
If a character string is too long for the specified
frame, the string scrolls automatically to dis-
play the full text.
This function is used to set whether to repeat
the automatic scrolling of a string.
1 Display the “System” screen.
➲ For details, refer to Customizing the system
settings on page 38.
2 Tap [Ever Scroll].
Tapping [Ever Scroll] changes the settings as
follows:
Off (default):
Deactivates the Ever Scroll function.
On:
Activates the Ever Scroll function. Repeats
the automatic scrolling of a string.
Clearing Bluetooth memory
❐ Never turn this product off while the Blue-
tooth memory is being cleared.
❐
“Bluetooth Memory Clear” can be set
only when the source is set to “
OFF”.
1 Display the “System” screen.
➲ For details, refer to Customizing the system
settings on page 38.
2 Tap [Bluetooth Memory Clear].
The “Bluetooth Memory Clear” screen ap-
pears.
3 Tap [Clear].
After the confirmation display appears, tap
[
OK] to delete the memory.
■
If you do not want to clear the memory, tap
[
Cancel].
•
•
09
Customizing preferences
Chapter
41
En
Customizing preferences
Updating Bluetooth connection
software
This function is used to update this product
with the latest software. For information on
the software and updating, refer to our web-
site.
❐
“Bluetooth Software Update” can be set
only when the source is set to “
OFF”.
❐ Never turn this product off while the
Bluetooth memory is being cleared.
1 Display the “System” screen.
➲ For details, refer to Customizing the system
settings on page 38.
2 Tap [Bluetooth Software Update].
The “Bluetooth Software Update” screen ap-
pears.
3 Tap [Start] to display the data transfer
mode.
■
Follow the on-screen instructions to finish
updating the software.
Displaying the Bluetooth system
version
If this product fails to operate properly, you
may need to consult your dealer for repair. In
such cases, you may be asked to specify the
system version. Perform the following proce-
dure to check the version of this product.
❐
“Bluetooth Version Information” can be
set only when the source is set to “
OFF”.
1 Display the “System” screen.
➲ For details, refer to Customizing the system
settings on page 38.
2 Tap [Bluetooth Version Information] to
display to the version of the Bluetooth
module of this product.
Setting the rear view camera
The following two functions are available. The
rear view camera feature requires a separately
sold rear view camera (e.g. ND-BC5). (For de-
tails, consult your dealer.)
Rear view camera
This product features a function that automati-
cally switches to the full-screen image of the
rear view camera installed on your vehicle.
When the shift lever is in the REVERSE (R) posi-
tion, the screen automatically switches to a
full-screen rear view camera image.
Camera for Rear view mode
Rear view can be displayed at all times (e.g.
when monitoring an attached trailer, etc.).
Please be aware that with this setting, the
camera image is not resized to fit, and a por-
tion of what is seen by the camera is not view-
able.
To switch to the rear view mode, tap
on the
Home screen.
❐
In the rear view mode, on the screen
switches to .
❐ To cancel the rear view mode, tap on the
screen.
❐
Tapping the screen while displaying the rear
view screen returns to the current screen.
❐
In the rear view mode, if you do not touch
the screen for 7 seconds while displaying the
following screens, the screen switches to the
rear view screen automatically.
Radio, iPod and Pandora source screens
Advanced App Mode screen
CAUTION
Pioneer recommends the use of a camera
which outputs mirror-reversed images.
Otherwise, the screen image will appear re-
versed.
•
•
Customizing preferences
09
Chapter
42
En
❐ Immediately verify whether the display
changes to a rear view camera image when
the shift lever is moved to REVERSE (R) from
another position.
❐
When the screen changes to full-screen rear
view camera image during normal driving,
switch to the opposite setting in “
Camera
Polarity
”.
1 Display the “System” screen.
➲ For details, refer to Customizing the system
settings on page 38.
2 Tap [Camera Polarity].
You can select the following polarity:
Off (default): When the rear view camera
is not connected to this product.
Battery: When the polarity of the con-
nected lead is positive while the shift le-
ver is in the REVERSE (R) position.
Ground: When the polarity of the con-
nected lead is negative while the shift le-
ver is in the REVERSE (R) position.
Setting the video signal
You can select the suitable video signal setting
for your country.
❐
As this function is initially set to “Auto”, the
product will automatically adjust the video
signal setting.
However, the screen may turn black or im-
ages may not be displayed properly when
“
Auto” has been selected and the recep-
tion is weak. Normally, select the appropri-
ate TV signal.
❐
Regarding your country TV signal, consult
with your nearest Pioneer dealer.
❐
You can operate this function only for the
video signal input into the AV input.
1 Display the “System” screen.
➲ For details, refer to Customizing the system
settings on page 38.
•
•
•
2 Tap [Video Signal Setting].
The “Video Signal Setting” screen appears.
3 Tap or to select the desired video
signal.
Auto (default)
— PAL — NTSC — PAL-M —
PAL-N — SECAM
Adjusting the picture
You can adjust the brightness, contrast, color,
hue, dimmer and temperature for each source
and rear view camera.
1 Playback the source you want to adjust
the picture.
2 Display the “System” screen.
➲ For details, refer to Customizing the system
settings on page 38.
3 Tap [Picture Adjustment].
The picture adjustment screen appears.
4 If you are adjusting the picture adjust-
ment, select the unit.
Rear View
: Adjusts the picture for the
rear view camera.
Source: Adjusts the picture for the
source. The current source name is dis-
played on the picture adjustment screen.
5 Tap any of the following touch panel
keys to select the function to be adjusted.
Picture adjustment items are displayed.
Brightness: Adjusts the black intensity.
Contrast: Adjusts the contrast.
Color: Adjusts the color saturation.
Hue: Adjusts the tone of color (red or
green is emphasized).
•
•
•
•
•
•
09
Customizing preferences
Chapter
43
En
Customizing preferences
Dimmer: Adjusts the brightness of the
display.
Temperature: Adjusts the color tempera-
ture, resulting in a better white balance.
❐ You cannot adjust the picture adjustment
for rear view camera when “Camera
Polarity
” is set to “Off”.
➲
For details, refer to Setting the rear view
camera on page 41.
❐
You can adjust “Hue” only when the color
system is set to “
NTSC”.
❐
With some rear view cameras, picture ad-
justment may not be possible.
6 Tap or to adjust the selected item.
Each time you tap or , the level of the se-
lected item increases or decreases.
■
If you want to switch the adjustment item,
tap or .
❐ “Brightness”, “Contrast”, “Color”, “Hue”
can be adjusted from “
+24” to “–24”.
❐
“Dimmer” can be adjusted from “+1” to
“
+48”.
❐
“Temperature” can be adjusted from “+3”
to “
–3”.
❐
You cannot operate this function while driv-
ing.
❐
Different “Brightness”, “Contrast”,
“
Dimmer” settings can be set for when the
illumination switch is on and when it is off.
❐
The same specifications are applied to all
sources (Home screen, Settings screen,
Radio, iPod music, Pandora) other than the
video source.
❐
The “Dimmer” setting is set to a common
setting in all sources.
•
•
Adjusting the mix sound level
You can adjust the mixed sound volume in three
levels.
When the audio sources are mixed, the second
sound channel plays at this setting level.
1 Display the “System” screen.
➲ For details, refer to Customizing the system
settings on page 38.
2 Tap [Mixed Sound Level].
Tapping [Mixed Sound Level] switches be-
tween the three levels:
Low — Mid (default) — High
❐ Sound level “High” is the largest and “Low”
is the smallest.
Setting the clock mode
You can change the time format.
1 Display the “System” screen.
➲ For details, refer to Customizing the system
settings on page 38.
2 Tap [Clock Mode].
Tapping [Clock Mode] changes the settings as
follows:
12H (default):
Changes the display to 12-hour format.
24H:
Changes the display to 24-hour format.
Selecting the background display
You can change the audio source screen back-
ground and Home screen background.
1 Display the “System” screen.
➲ For details, refer to Customizing the system
settings on page 38.
2 Tap [Background].
The background screen appears.
3 Tap the desired background display.
•
•
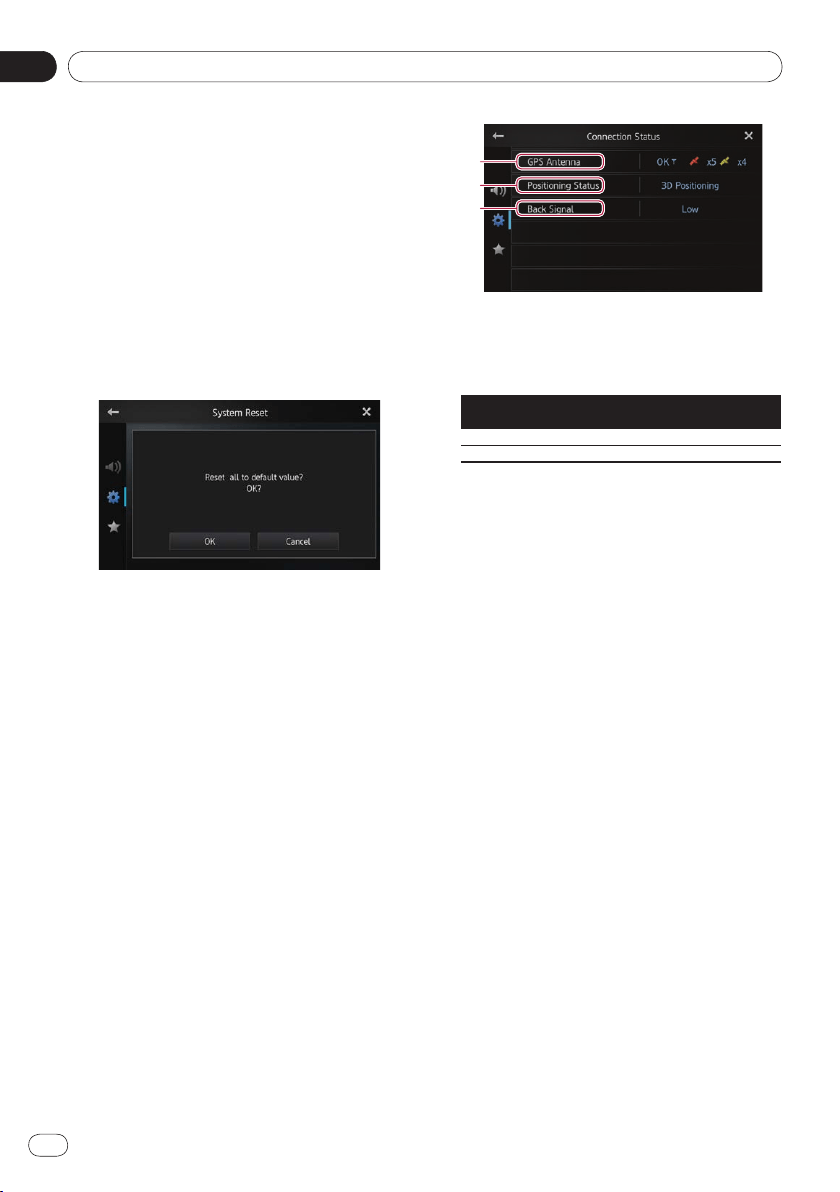
Customizing preferences
09
Chapter
44
En
Restoring the default settings
Resets various settings registered to this prod-
uct and restores them to the default settings.
❐
“System Reset” can be set only when the
source is set to “
OFF”.
1 Display the “System” screen.
➲ For details, refer to Customizing the system
settings on page 38.
2 Tap [System Reset].
A message confirming whether to restore the
settings appears.
3 Tap [OK].
■
If you do not want to restore the settings,
tap [
Cancel].
Checking the connections of leads
Check that leads are properly connected be-
tween this product and the vehicle. Please also
check whether they are connected in the cor-
rect positions.
1 Display the “System” screen.
➲ For details, refer to Customizing the system
settings on page 38.
2 Tap [Connection Status].
The “Connection Status” screen appears.
GPS Antenna
Indicates the connection status of the GPS
antenna, the reception sensitivity, and from
how many satellites the signal is received.
Color Signal
communication
Used in
positioning
Orange Yes Yes
Yellow Yes No
❐
When the GPS antenna is connected to
this product, “
OK” is displayed.
When the GPS antenna is not connected
to this product, “
Not OK” is displayed.
❐
If reception is poor, please change the in-
stallation position of the GPS antenna.
Positioning Status
Indicates the current GPS positioning sta-
tus.
2D Positioning:
The status when the signals from three
satellites are received.
3D Positioning:
The status when the signals from four or
more satellites are received.
Back Signal
When the shift lever is shifted to “R”, the
signal switches to “
High” or “Low”. (One of
these is displayed depending on the vehi-
cle.)
•
•
09
Customizing preferences
Chapter
45
En
Customizing preferences
Customizing the favorites
menu
You can register the desired menu items on
the “
Favorites” screen. Registering your fa-
vorite menu items allows you to quickly jump
to the registered menu screen by a simple
touch on the favorites menu.
❐
Up to 12 menu items can be registered on
the favorites menu list.
1 Press the Home button to display the
Home screen.
2 Flick the scroll area on the Home screen.
➲ For details, refer to Home screen on page 10.
3 Tap [Settings] on the Home screen.
The menu top screen appears.
4 Tap .
The “Favorites” screen appears.
5 Tap the item that you want to change the
settings for.
6 After changing the settings, tapchanging the settings, tap settings, tap to re-
turn the Home screen.
Registering menu items
1 Press the Home button to display the
Home screen.
2 Flick the scroll area on the Home screen.
➲ For details, refer to Home screen on page 10.
3 Tap [Settings] on the Home screen.
The menu top screen appears.
4 Touch the tab on the left edge and/or
scroll the bar on the right edge to display
the desired menu item.
5 Touch and hold the menu item you want
to register.
❐ A icon will appear next to the menu item
name.
6 The menu item is registered on the
“Favorites” screen.
Removing menu items
Touch and hold the menu item you want
to remove from the “Favorites” screen.
Turning off the screen
You can turn off the backlight of the LCD
screen.
1 Press the Home button to display the
Home screen.
2 Flick the scroll area on the Home screen.
➲ For details, refer to Home screen on page 10.
3 Tap [Display OFF] on the Home screen.
The screen is turned off.
❐
Tap anywhere on the screen to turn it back
on.
Appendix
Appendix
46
En
Troubleshooting
If you have problems operating this product, refer to this section. The most common problems are
listed below, along with likely causes and solutions. If a solution to your problem cannot be found
here, contact your dealer or the nearest authorized Pioneer service facility.
Problems with this product
Symptom Cause Action (Reference)
The power doesn’t turn on. This
product doesn’t operate.
Leads and connectors are incorrectly
connected.
Confirm once more that all connections
are correct.
The fuse is blown. Rectify the reason for the fuse blowing,
then replace the fuse. Be very sure to in-
stall a correct fuse with the same rating.
Noise and other factors are causing
the built-in microprocessor to oper-
ate incorrectly.
Park your vehicle in a safe place, and turn
off the engine. Turn the ignition key back
to off (ACC OFF). Then start the engine
again, and turn the power to this product
back on.
GPS signal can not be obtained. The GPS antenna is in an unsuitable
location.
The quality of signals from the GPS satel-
lites is poor, causing reduced positioning
accuracy. Check the GPS signal reception
and the position of the GPS antenna if
necessary.
Obstacles are blocking signals from
the satellites.
The quality of signals from the GPS satel-
lites is poor, causing reduced positioning
accuracy. Check the GPS signal reception
and the position of the GPS antenna if
necessary, or continue driving until recep-
tion improves. Keep the antenna clean.
The position of satellites relative to
your vehicle is inadequate.
The quality of signals from the GPS satel-
lites is poor, causing reduced positioning
accuracy. Continue driving until reception
improves.
Signals from the GPS satellites have
been modified to reduce accuracy.
(GPS satellites are operated by the US
Department of Defense, and the US
government reserves the right to dis-
tort positioning data for military rea-
sons. This may lead to greater posi-
tioning errors.)
The quality of signals from the GPS satel-
lites is poor, causing reduced positioning
accuracy. Wait until reception improves.
If a vehicle phone or cellular phone is
used near the GPS antenna, GPS re-
ception may be lost temporarily.
The quality of signals from the GPS satel-
lites is poor, causing reduced positioning
accuracy. When using a cellular phone,
keep the antenna of the cellular phone
away from the GPS antenna.
Something is covering the GPS anten-
na.
Do not cover the GPS antenna with spray
paint or vehicle wax, because this may
block the reception of GPS signals. Snow
buildup can also degrade the signals.
The screen is too bright. Picture quality adjustment of the dis-
play is not correct.
Adjust the picture quality. (Page 42)
Appendix
Appendix
47
En
Appendix
Symptom Cause Action (Reference)
The display is very dim. Picture quality adjustment of the dis-
play is not correct.
Adjust the picture quality. (Page 42)
No sounds are produced from an
audio source.
The volume level will not rise.
The volume level is low. Adjust the volume level.
The mute is on. Turn the mute off.
A speaker lead is disconnected. Check the connection.
The person on the other end of
the phone call cannot hear the
conversation due to an echo.
The voice from the person on the oth-
er end of the phone call is output
from the speakers and then picked up
by the microphone again, creating an
echo.
Use the following methods to reduce the
echo:
—Lower the volume on the receiver
—Have both parties pause slightly before
speaking
There is no picture. The parking brake cord is not con-
nected.
Connect the parking brake cord, and apply
the parking brake.
The parking brake is not applied. Connect the parking brake cord, and apply
the parking brake.
The backlight of the LCD panel is
turned off.
Turn on the backlight. (Page 45)
Nothing is displayed and the
touch panel keys cannot be
used.
The setting for the rear view camera
is incorrect.
Select the appropriate setting for the rear
view camera.
The shift lever was placed in [R] when
the rear view camera was not con-
nected.
Select the correct polarity setting for
“
Camera Polarity”.
(Page 41)
The smartphone was not
charged.
Charging stopped because the tem-
perature of the smartphone rose
due to prolonged use of the smart-
phone during charging.
Disconnect the smartphone from the ca-
ble, and wait until the smartphone cools
down.
More battery power was consumed
than was gained from charging.
This problem may be resolved by stop-
ping any unnecessary services on the
smartphone.
Problems in the audio screen
Symptom Cause Action (Reference)
iPod cannot be operated. The iPod is frozen. Reconnect the iPod with the suitable
cable.
An error has occurred. Reconnect the iPod with the suitable
cable.
No sounds are produced.
The volume level will not rise.
Cables are not connected correctly. Connect the cables correctly.
Music in an iPod cannot be
played.
An error has occurred. Select music using the search function.
Problems with the phone screen
Symptom Cause Action (Reference)
Dialing is not possible because
the touch panel keys for dialing
are inactive.
Your smartphone is out of range for
service.
Retry after re-entering the range for ser-
vice.
The connection between the smart-
phone and this product cannot be es-
tablished now.
Perform the connection process.
Appendix
Appendix
48
En
Problems with Advanced App Mode screen
Symptom Cause Action (Reference)
A black screen is displayed.
Tap [
Ignore] in an application startup
message.
Launch the AppRadio app according to
the message.
While operating an application, the ap-
plication was ended on the smart-
phone side.
Press the
Home button and display the
Home screen.
The smartphone OS may be waiting for
screen operation.
Stop the vehicle in a safe place and check
the screen on the smartphone.
A message prompting reconnec-
tion is displayed.
A smartphone with a security function
was connected to this product.
Unlock and reconnect the smartphone.
The OS version installed is old.
Upgrade the OS version.
An incompatible smartphone was
connected to this product.
Connect a compatible smartphone to
this product.
The screen is displayed, but op-
eration does not work at all.
An error has occurred.
When an iPhone is connected, turn the
ignition switch off (ACC OFF) and then
turn it on again (ACC ON).
When an Android device is connected,
disconnect the Bluetooth connection
from this product and then reconnect it.
The radio audio is not output. The radio audio mixing is turned off.
Turn on the radio audio mixing.
Problems with the Bluetooth connection
Symptom Cause Action (Reference)
An HFP connection can be
established, but an SPP connec-
tion cannot be established.
An error may have occurred in the
AppRadio app.
Turn the Bluetooth function of the
smartphone off and then turn it on
again.
Force-quit the AppRadio app on the
smartphone and start it again.
Turn the smartphone off and then turn it
on again.
An HFP connection cannot be
established.
An error may have occurred in this
product or the smartphone.
Cancel the device registration from this
product and perform the pairing again.
If the problem persists, turn the ignition
switch off and then turn it on again.
Pandora internet radio cannot
be connected.
An error may have occurred in the
Pandora application.
Display the setting of the Pandora
application on the smartphone, and turn
the setting for the Bluetooth connection
off and then turn it on again.
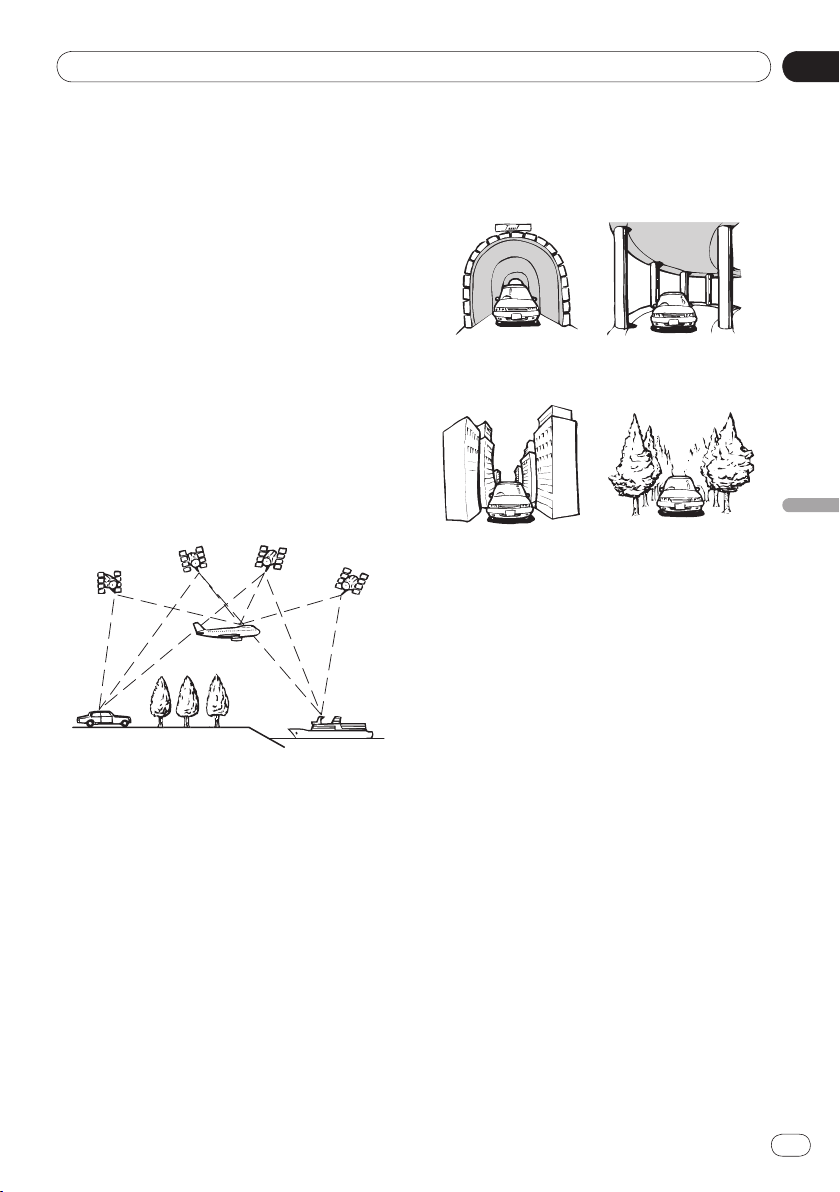
Appendix
Appendix
49
En
Appendix
Positioning technology
Positioning by GPS
The Global Positioning System (GPS) uses a
network of satellites orbiting the Earth. Each of
the satellites, which orbit at a height of
68 900 000 feet (21 000 km), continually
broadcasts radio signals giving time and posi-
tion information. This ensures that signals
from at least three can be picked up from any
open area on the ground’s surface.
The accuracy of the GPS information depends
on how good the reception is. When the sig-
nals are strong and reception is good, GPS can
determine latitude, longitude and altitude for
accurate positioning in three dimensions. But
if signal quality is poor, only two dimensions,
latitude and longitude, can be obtained and
positioning errors are somewhat greater.
Handling large errors
Positioning errors are kept to a minimum by
combining GPS, dead reckoning and map
matching. However, in some situations, these
functions may not work properly, and the error
may become larger.
When positioning by GPS is
impossible
GPS positioning is disabled if signals cannot
be received from more than two GPS satel-
lites.
•
In some driving conditions, signals from GPS
satellites may not reach your vehicle. In this
case, it is impossible for the system to use
GPS positioning.
In tunnels or en-
closed parking
garages
Under elevated
roads or similar
structures
When driving
among high
buildings
When driving
through a dense
forest or tall trees
If a car phone or cellular phone is used near
the GPS antenna, GPS reception may be lost
temporarily.
Do not cover the GPS antenna with spray
paint or car wax, because this may block the
reception of GPS signals. Snow buildup can
also degrade the signals, so keep the anten-
na clear.
❐ If a GPS signal has not been received for a
long time, your vehicle’s actual position and
the current position mark on the map may
diverge considerably or may not be updat-
ed. In such a case, once GPS reception is re-
stored, accuracy will recover.
Conditions likely to cause noticeable
positioning errors
For various reasons, such as the state of the
road you are traveling on and the reception
status of the GPS signal, the actual position of
your vehicle may differ from the position dis-
played on the map screen.
•
•
•
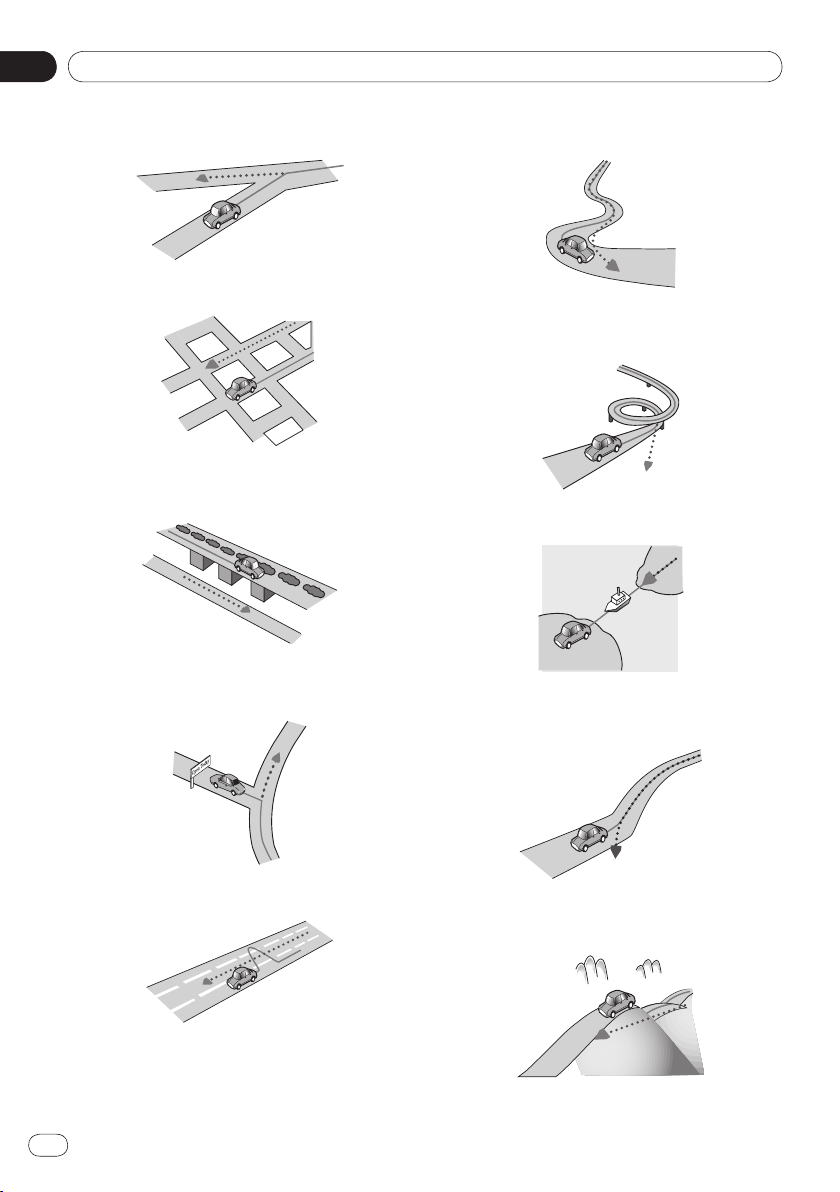
Appendix
Appendix
50
En
If you make a slight turn.
If there is a parallel road.
If there is another road very nearby, such as
in the case of an elevated freeway.
If you take a recently opened road that is
not on the map.
If you drive in zigzags.
•
•
•
•
•
If the road has a series of hairpin bends.
If there is a loop or similar road configura-
tion.
If you take a ferry.
If you are driving on a long, straight road or
a gently curving road.
If you are on a steep mountain road with
many height changes.
•
•
•
•
•
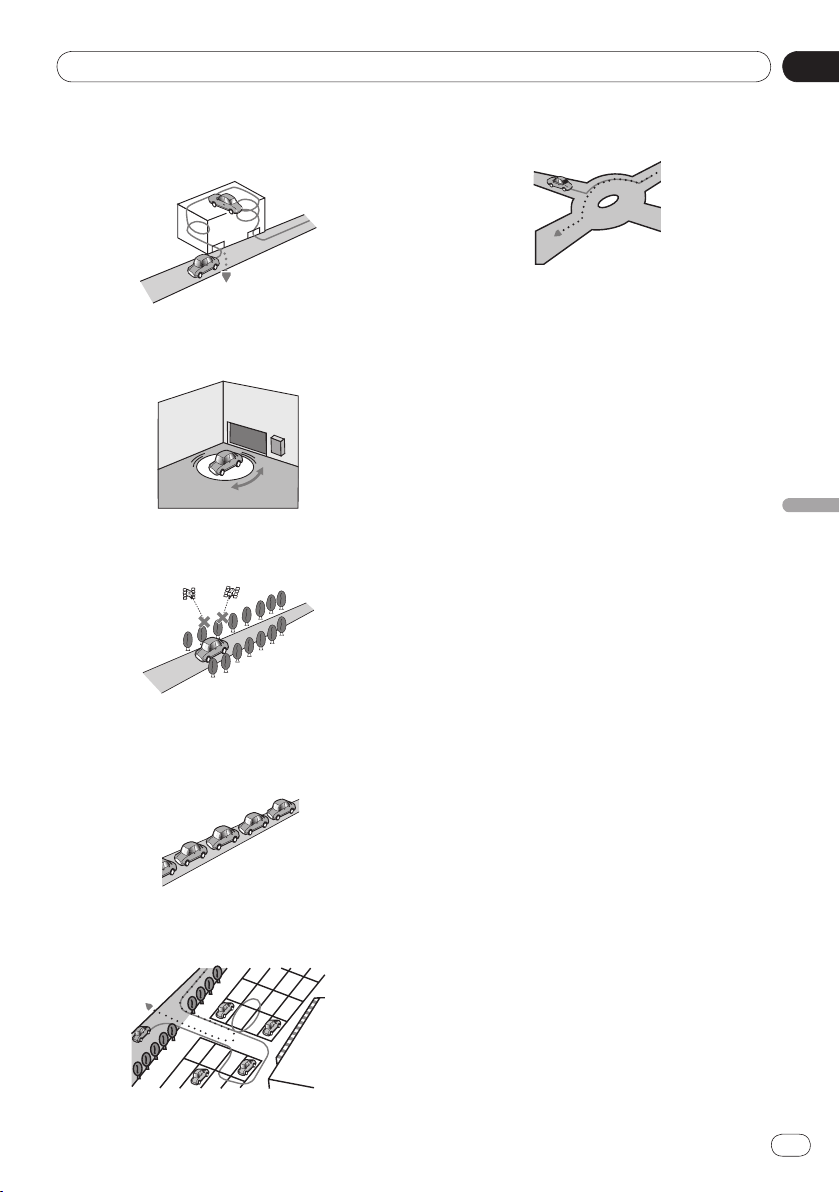
Appendix
Appendix
51
En
Appendix
If you enter or exit a multi-storey parking lot
or similar structure using a spiral ramp.
If your vehicle is turned on a turntable or
similar structure.
If trees or other obstacles block the GPS sig-
nals for a considerable period.
If you drive very slowly, or in a start-and-
stop manner, as in a traffic congestion.
If you join the road after driving around a
large parking lot.
•
•
•
•
•
When you drive around a traffic circle.
When starting driving immediately after
starting the engine.
•
•
Appendix
Appendix
52
En
Setting list
The customizable settings of this product are
listed below. For details about changing each
setting, refer to the page for that item.
Audio settings
Page
Fader/Balance 35
Graphic EQ 35
Loudness 37
Subwoofer 37
Bass Booster 37
High Pass Filter 37
Source Level Adjuster 38
System settings
Page
Rear Speaker 38
Preout 39
System Language 39
Keyboard 40
Ever Scroll 40
Bluetooth Memory Clear 40
Bluetooth Software Update 41
Bluetooth Version Information 41
Camera Polarity 41
Video Signal Setting 42
Picture Adjustment 42
Mixed Sound Level 43
Clock Mode 43
Background 43
System Reset 44
Connection Status 44
Other settings
Page
Favorites 45
Display OFF 45

Appendix
Appendix
53
En
Appendix

Appendix
Appendix
54
En

Appendix
Appendix
55
En
Appendix

© 2012 PIONEER CORPORATION.
All rights reserved.
<CXX4772-C>UC
PIONEER CORPORATION
1-1, Shin-ogura, Saiwai-ku, Kawasaki-shi,
Kanagawa 212-0031, JAPAN
PIONEER ELECTRONICS (USA) INC.
P.O. Box 1540, Long Beach, California 90801-1540, U.S.A.
TEL: (800) 421-1404
PIONEER EUROPE NV
Haven 1087, Keetberglaan 1, B-9120 Melsele, Belgium/Belgique
TEL: (0) 3/570.05.11
PIONEER ELECTRONICS ASIACENTRE PTE. LTD.
253 Alexandra Road, #04-01, Singapore 159936
TEL: 65-6472-7555
PIONEER ELECTRONICS AUSTRALIA PTY. LTD.
5 Arco Lane, Heatherton, Victoria, 3202, Australia
TEL: (03) 9586-6300
PIONEER ELECTRONICS OF CANADA, INC.
340 Ferrier Street, Unit 2, Markham, Ontario L3R 2Z5, Canada
TEL: 1-877-283-5901
TEL: 905-479-4411
PIONEER ELECTRONICS DE MEXICO, S.A. de C.V.
Blvd.Manuel Avila Camacho 138 10 piso
Col.Lomas de Chapultepec, Mexico, D.F. 11000
TEL: 55-9178-4270
先鋒股份有限公司
台北市內湖區瑞光路 407 號 8 樓
電話 :886-(0)2-2657-3588
先鋒電子(香港)有限公司
香港九龍長沙灣道 909 號 5 樓
電話 :852-2848-6488
<KMZAX> <12E00000>