Owners' Guide Scooter
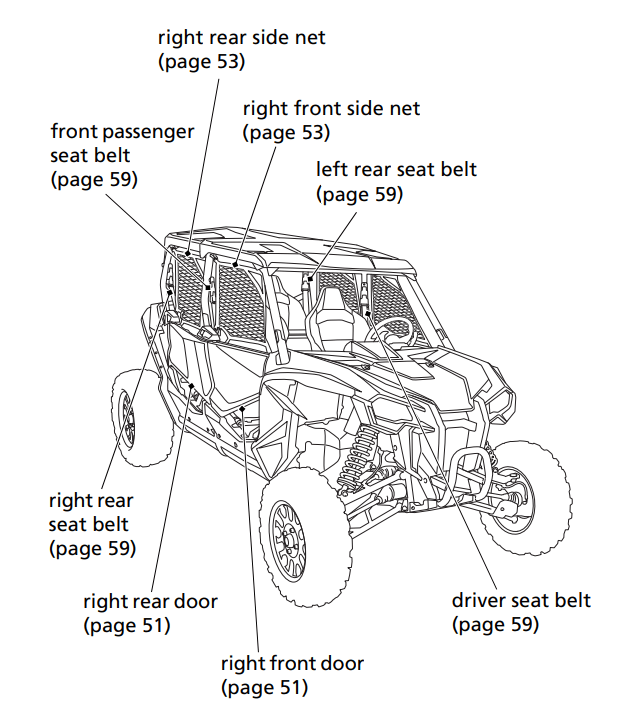
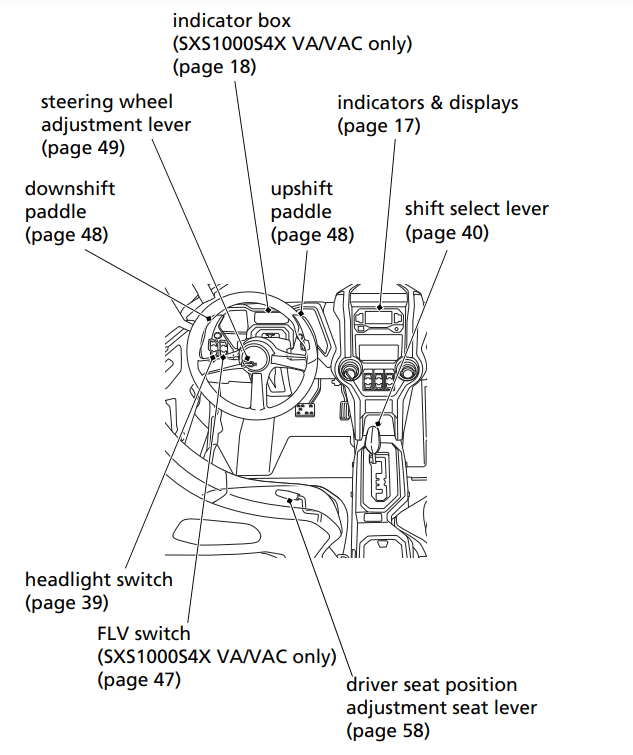
Operation Component Locations

Indicators & Displays
The indicators and displays on your Honda SXS keep you informed, alert you to possible problems, and make your driving safer and more enjoyable. Refer to the indicators frequently. Their functions are described on the following pages.
Lamp Check
The indicators come on and go off sequentially when you turn the ignition switch to the ON (I) position.
If one of these indicators does not come on when it should, have your dealer check for problems.
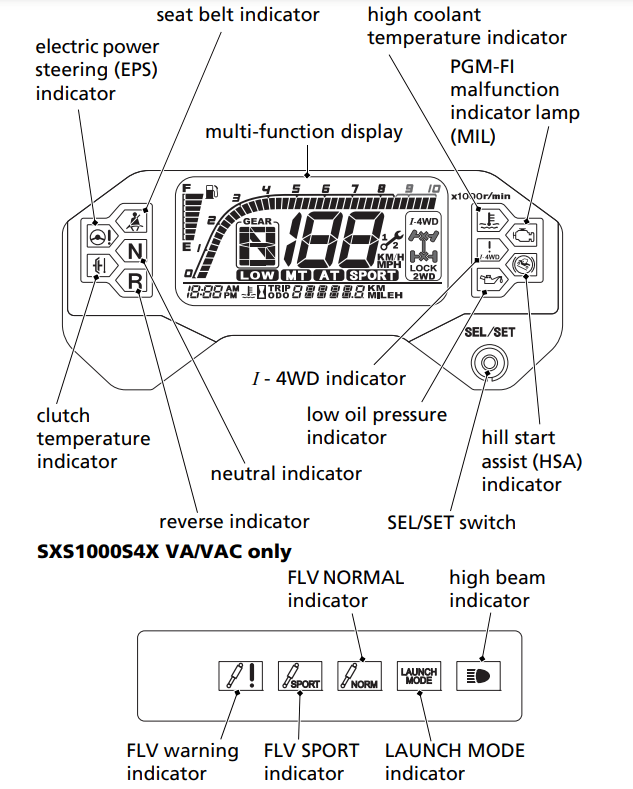
 Neutral Indicator
This indicator comes on and stays on when the transmission is in neutral.
 Reverse Indicator
This indicator comes on and stays on when the transmission is in reverse.
 Electric Power Steering (EPS) Indicator
This indicator comes on when the ignition switch is turned ON (q) and remains on until the engine is started.
This indicator comes on and stays on when there is abnormality in the electric power steering system.
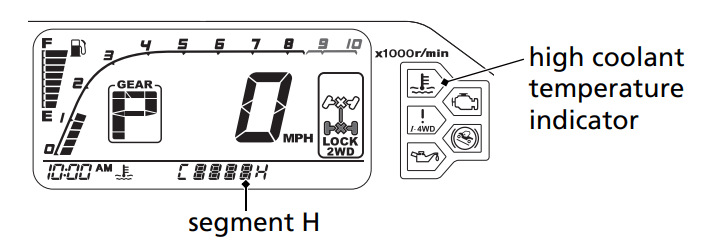
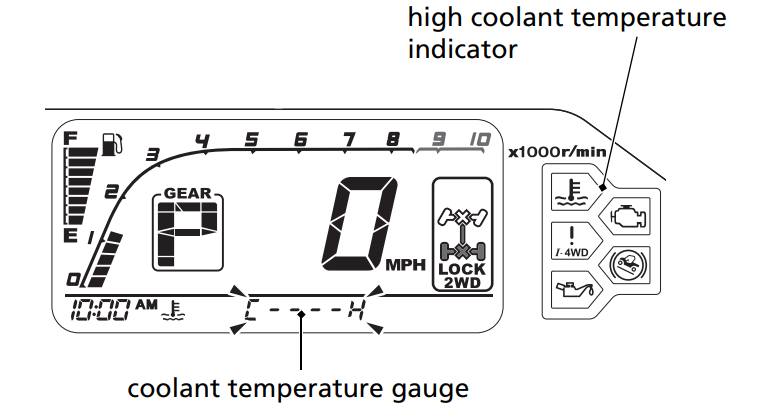
 High Coolant Temperature Indicator
This indicator comes on and stays on when the coolant temperature is high enough to adversely affect the service life of the engine. If this indicator comes on while you are driving, stop as soon as possible, turn the engine off, and let it cool.
 PGM-FI Malfunction Indicator Lamp (MIL)
This indicator comes on and stays on when there is a problem with your vehicle’s engine system. If this happens, reduce speed and take your vehicle to a dealer as soon as possible.
 Seat Belt Indicator
This indicator starts blinking if the driver's seat belt is not latched and remains blinking until the driver's seat belt is latched.
If the driver's seat belt is not latched properly, the maximum vehicle speed will be limited by the seat belt speed limiting system (page 60).
 Low Oil Pressure Indicator
This indicator comes on when the ignition switch is turned ON (q) and remains on until the engine is started.
This indicator comes on and stays on when the engine oil pressure is low enough to cause engine damage. If this indicator comes on while you are driving, stop as soon as possible, turn the engine off and check for oil leaks and oil level.
This indicator also comes on when the emergency valve is operated. (See more details about the emergency valve on page 231)
 Hill Start Assist (HSA) Indicator
This indicator comes on briefly when the ignition switch is turned ON (I).
This indicator comes on when HSA is being used (page 45).
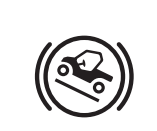
 I - 4WD Indicator
This indicator comes on briefly when the ignition switch is turned ON (I).
This indicator comes on and stays on when there is a problem with your vehicle’s HSA (Hill Start Assist), BTCS (Brake Traction Control System) and EBD (Electronic Brakeforce Distribution). If this happens, reduce speed and take your vehicle to a dealer as soon as possible.
 Clutch Temperature Indicator
This indicator comes on briefly when the ignition switch is turned ON (I).
If the indicator light does not go off after indicator lamp check, have your vehicle inspected by your dealer. This indicator flashes when the clutch temperature is unusually high. If the indicator flashes while driving, see page 238.
 FLV Warning Indicator (SXS1000S4X VA/VAC only)
This indicator comes on briefly when the ignition switch is turned ON (I).
This indicator comes on and stays on when there is a problem with your vehicle’s FOX® Live Valve (FLV) system. If this happens, reduce speed and take your vehicle to a dealer as soon as possible.
 FLV SPORT Indicator (SXS1000S4X VA/VAC only)
This indicator comes on briefly when the ignition switch is turned ON (I).
This indicator comes on when FLV is in the SPORT mode (page 181).
 FLV NORMAL Indicator (SXS1000S4X VA/VAC only)
This indicator comes on briefly when the ignition switch is turned ON (I).
This indicator comes on when FLV is in the NORMAL mode (page 181).
 LAUNCH MODE Indicator (SXS1000S4X VA/VAC only)
This indicator comes on briefly when the ignition switch is turned ON (I).
This indicator comes on when launch mode is activated (page 96). If this indicator flashes, launch mode is deactivated. Release the accelerator pedal and shift paddles and wait until the indicator goes off. Verify the preconditions are met and reactivate launch mode. (page 96).
 High Beam Indicator (SXS1000S4X VA/VAC only)
This indicator comes on when the high beams are on (page 39).
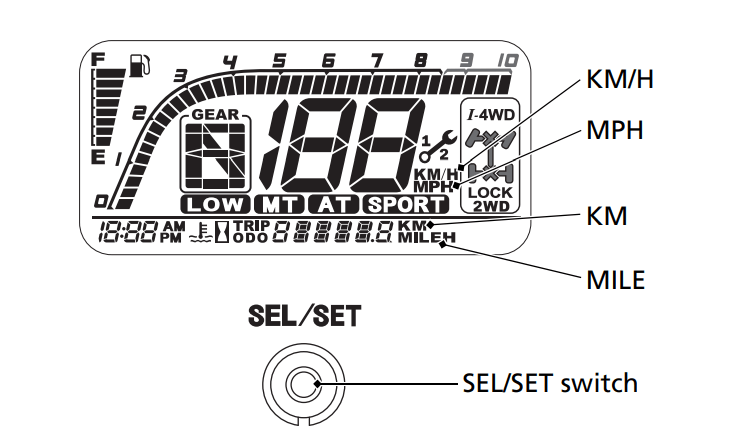
Display Check
When the ignition switch is turned ON (I), the multi-function display will temporarily show all the modes and digital segments and initial message. So, you can make sure the liquid crystal display is functioning properly.
If any part of this display does not come on during the key on check, have your dealer check for problems.
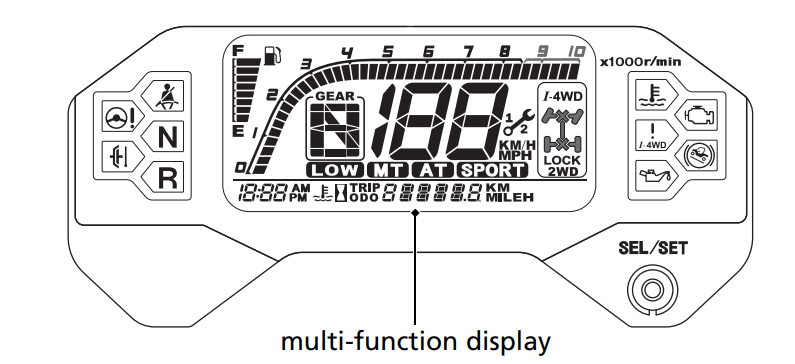
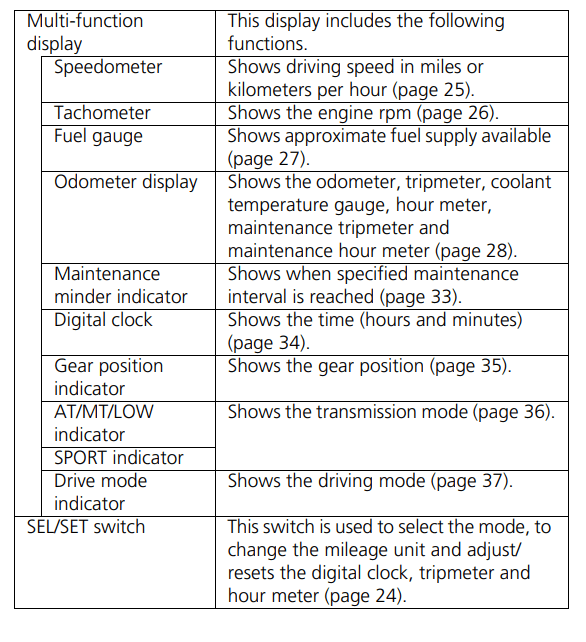
Multi-function Display
The multi-function display consists of the following function displays:
- Speedometer
- Tachometer
- Fuel gauge
- Odometer display
- Maintenance minder indicator
- Digital clock
- Gear position indicator
- AT indicator
- MT indicator
- LOW indicator
- SPORT indicator
- Drive mode indicator
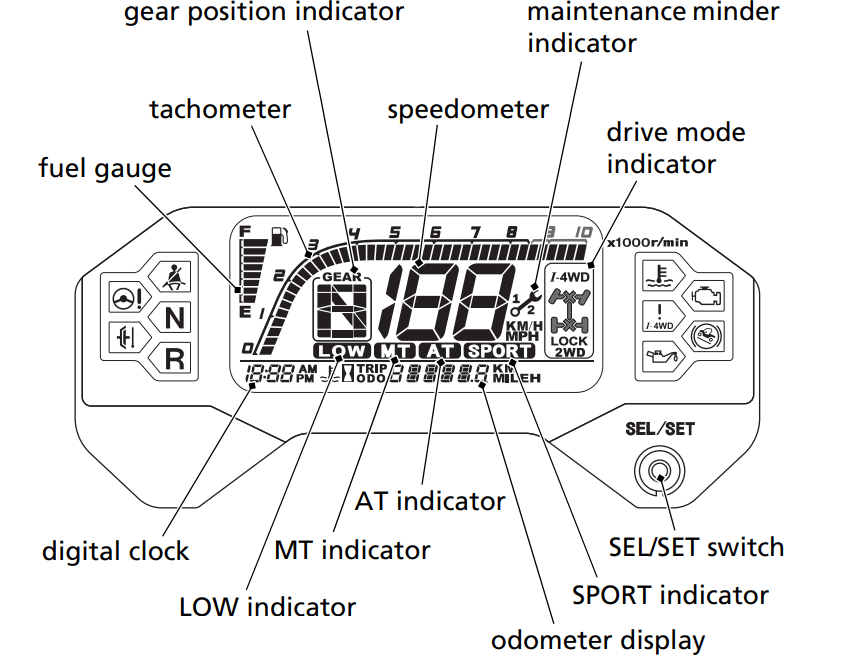
Speedometer
This display shows speed in miles or kilometers per hour.
Mileage Unit Change
The speedometer, odometer, tripmeter and maintenance tripmeter show in either “MPH” and “MILE” or “KM/H” and “KM”.
To change the mileage unit, press and hold the SEL/SET switch for more than 5 seconds in odometer mode (page 28) with the vehicle stopped.
Speedometer Blinking
If the speedometer digits and seat belt indicator blinks simultaneously, while you are driving, maximum vehicle speed will be limited to no more than 15 mph (24 km/h) by the seat belt speed limiting system (page 60).
Tachometer
This display shows the engine speed in revolutions per minute (rpm). Do not operate the engine in the tachometer red zone. Excessive engine speed can adversely affect engine life.
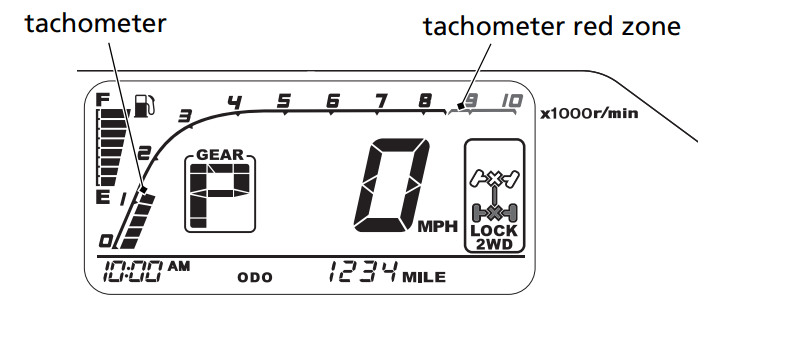
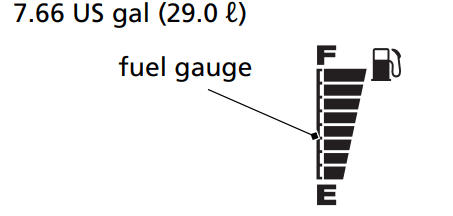
Fuel Gauge
The fuel gauge shows the approximate fuel supply available. The fuel tank capacity is:
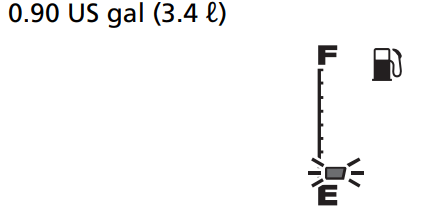
When the last segment blinks, you should refill the tank as soon as possible. The amount of fuel remaining when the blinking starts is approximately:
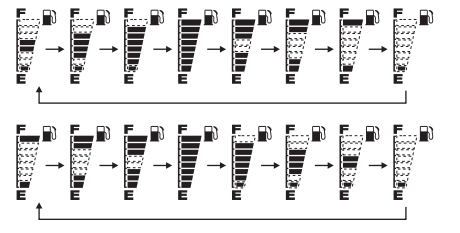
Fuel gauge failure: If the fuel system has an error, the fuel gauge indicators will be displayed as shown in the illustrations. If this occurs, see your dealer as soon as possible
Odometer Display
This display includes odometer, tripmeter, coolant temperature gauge, hour meter, maintenance tripmeter, and maintenance hour meter.
Each time you press the SEL/SET switch, mode will change as shown in the illustration.
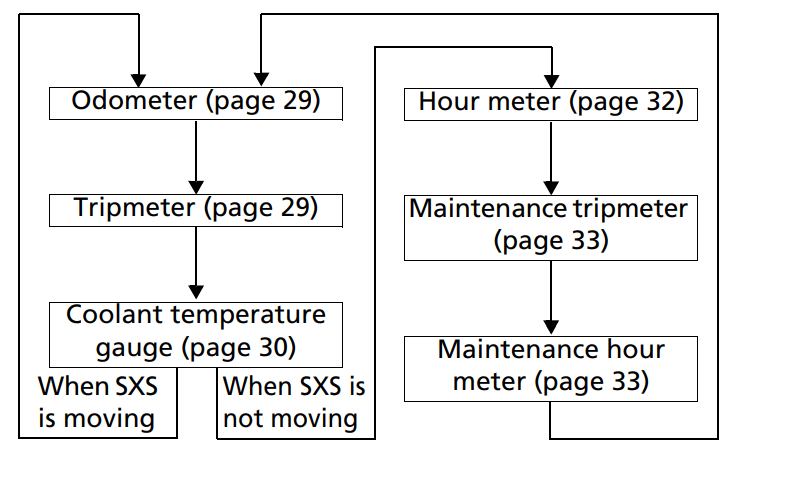
If there are unusual indications with your SXS, and SEL/SET switch is not pressed for 10 seconds, a message will automatically appear in the display
Odometer
The odometer shows the total miles or kilometers ridden with the ODO display. The odometer locks at 999,999 when the readout exceeds 999,999.

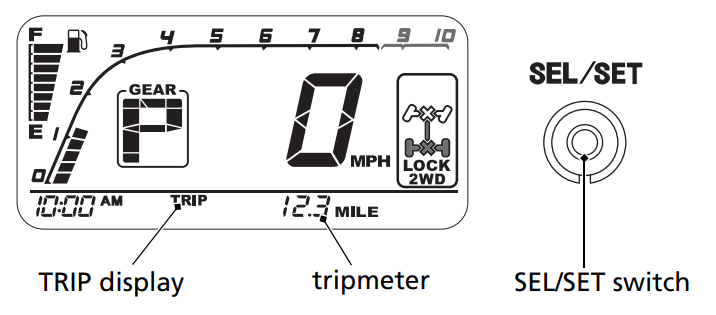
Tripmeter
The tripmeter shows the number of miles or kilometers ridden with the TRIP display, since you last reset the tripmeter. The tripmeter returns to 0.0 when the readout exceeds 999.9.
To reset the tripmeter, press and hold the SEL/SET switch with the display in the tripmeter mode.
Coolant temperature gauge
The coolant temperature gauge shows engine coolant temperature with the coolant temperature display. When the segment begins to move above the C (Cold) display, the engine is warm enough for the SXS to be ridden. When the coolant temperature is low, the coolant temperature gauge will display “Lo”. The normal operating temperature range is within the section between the H and C displays.
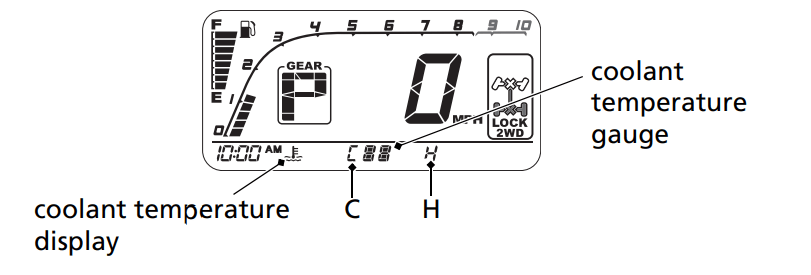
If all sections of the coolant temperature gauge, including segment H and high coolant temperature indicator are on (automatically appears in the display), stop the engine and check the reserve tank coolant level.
Read pages 236 – 237 and do not drive the SXS until the problem has been corrected.
NOTICE Continuing to ride with an overheated engine can cause serious engine damage.
Coolant temperature gauge failure: If the coolant temperature system has an error, the coolant temperature gauge will blink and appear in the display, and high coolant temperature indicator will turned on. If this occurs, see your dealer as soon as possible.
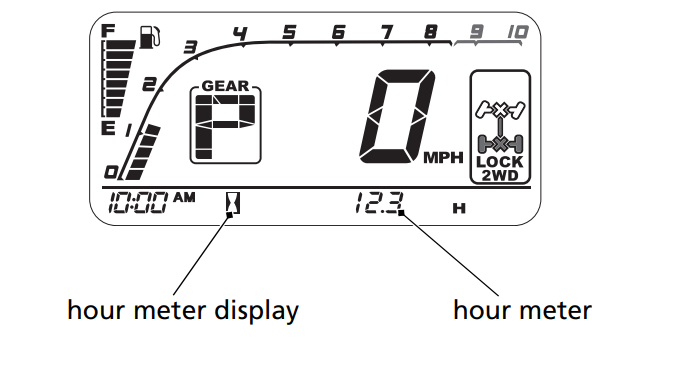
Hour meter
The hour meter display shows accumulated hours while the ignition is ON (q). The hour meter locks at 99,999.9 when the readout exceeds 99,999.9.
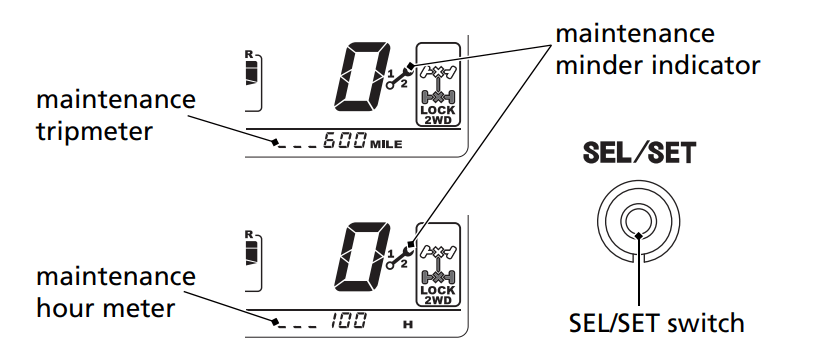
Maintenance Minder Indicator
The maintenance minder indicator appears in the display when the mileage or operating hours on your Honda SXS reaches the maintenance interval specified on the maintenance schedule (page 119).
Reset the indicator after each scheduled maintenance is performed. If the scheduled maintenance is performed before the maintenance minder indicator appears, be sure to reset the maintenance minder after performing the scheduled maintenance.
Resetting the indicator: To reset the indicator, press and continue to hold the SEL/SET switch and turn the ignition switch to ON (q). The indicator will light up, and after 2 seconds will blink twice, the maintenance minder indicator is reset.
Also the maintenance tripmeter and maintenance hour meter will reset.
See more details about maintenance minder indicator on page 117.
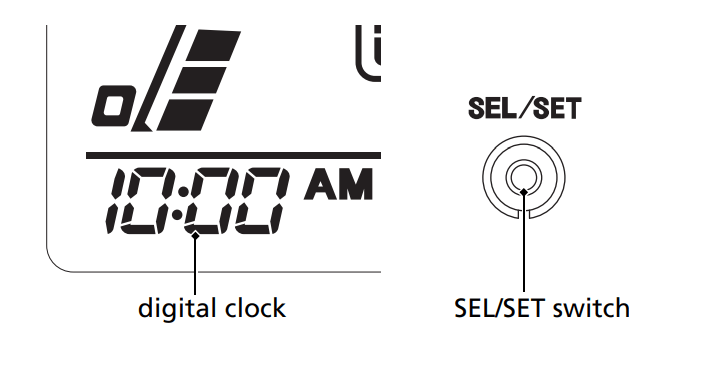
Digital Clock
The digital clock shows the hour and minutes with the 12-hour clock display.
To set the time:
- Turn the ignition switch to ON (I).
- Change to the hour meter display (page 28).
- Press and hold the SEL/SET switch. The clock will start blinking.
- Press and hold the SEL/SET switch until the desired time appears.
- To complete setting the clock, press the SEL/SET switch, or turn the ignition switch OFF (O).
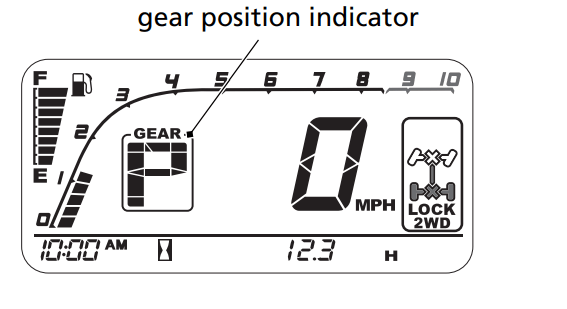
Gear Position Indicator
The gear position indicator shows the selected shift position by the shift select lever (page 40).
The indicator displays: P for park, N for neutral, R for reverse, H for high-range, L for low-range, and 1 – 6 for gear positions (shift paddles operation).
“–” will be displayed on the gear position indicator when the transmission is not shifted into gear properly. Before driving, check that the gear position is properly displayed on the gear position indicator.
If the gear position indicator blinks, see If the Transmission Is Not Functioning Properly, page 229.
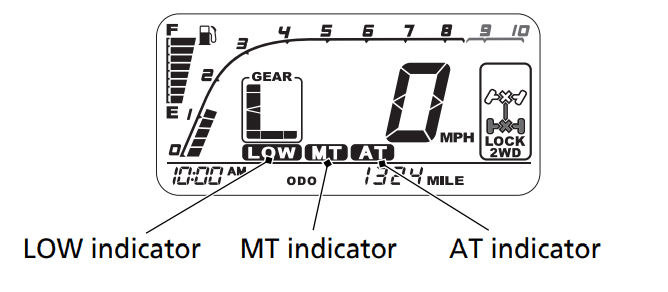
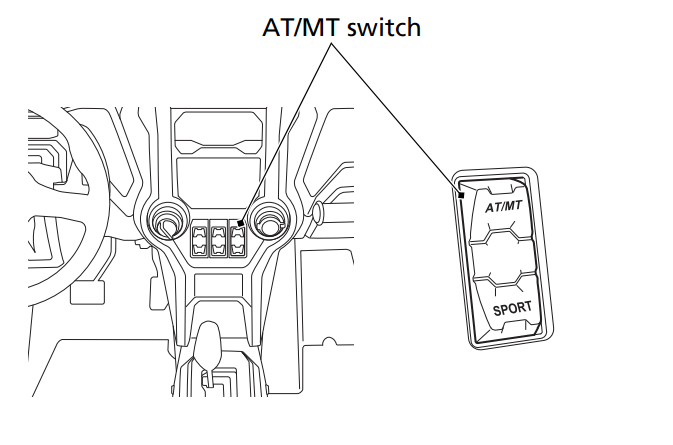
AT Indicator / MT Indicator / LOW Indicator
These indicators display the transmission mode of the SXS.
The indicators display: AT for automatic shift mode, MT for manual shift mode.
To switch between AT mode and MT mode, press the AT/MT switch (page 43). When MT mode is selected in low-range (L), the LOW indicator also comes on.
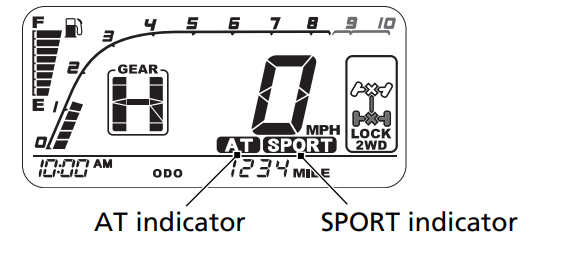
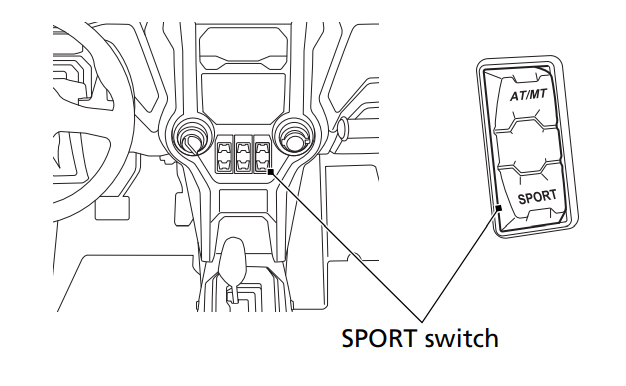
SPORT Indicator
When AT mode is selected, pressing the SPORT switch displays the SPORT indicator (page 44).
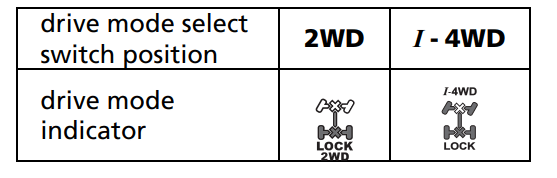
Drive Mode Indicator
The drive mode indicator shows the selected drive mode by pressing the drive mode select switch (page 41, 95).
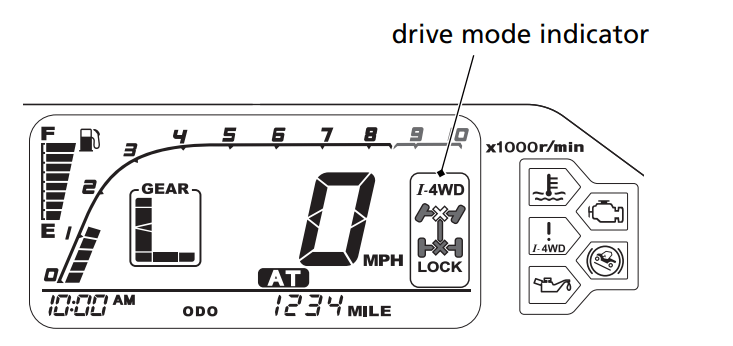
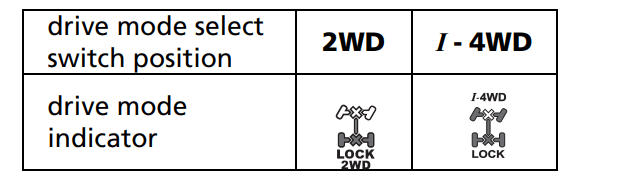
The drive mode indicator will flash between 2WD mode and I - 4WD mode for various conditions.
- The drive mode select switch is in I - 4WD mode while the engine is not running.
- A speed difference between front and rear tires is larger than allowed by the control program. (Release the accelerator pedal)
- The system detects a malfunction. (See your dealer)
Driver Controls
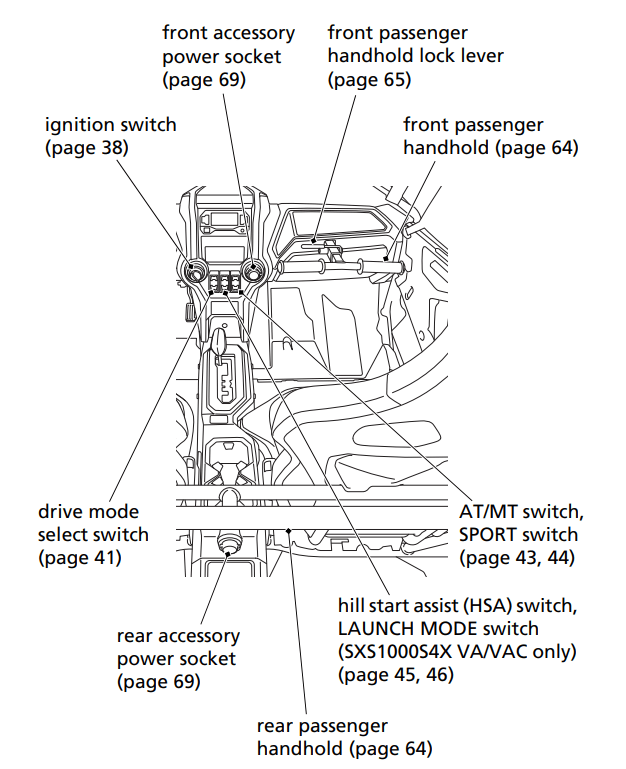
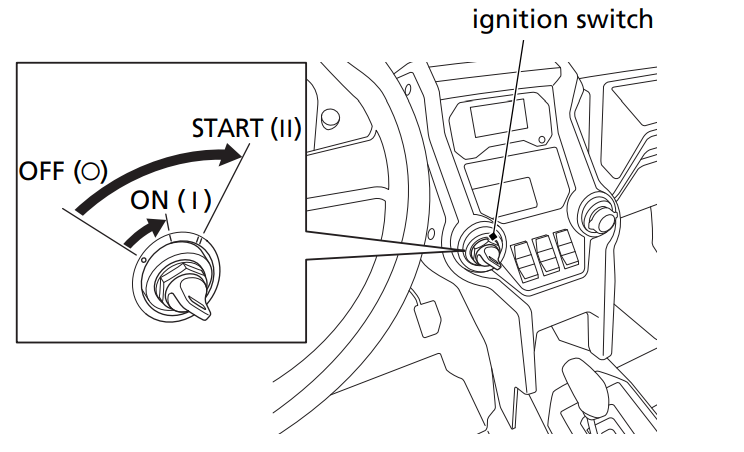
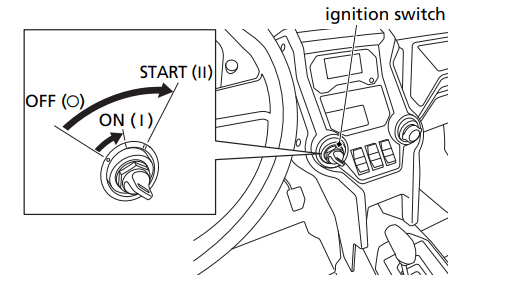
Ignition Switch
The ignition switch is a three-position, key-operated switch used to start and stop the engine.
OFF (O) — The engine and all electrical circuits are off. The key can be inserted and removed only when it is in this position.
ON (I) — The electrical circuits are on. You can use the accessory power socket in this position.
START (II) — This position is used only to start the engine. The key will automatically return to the ON (I) position when you let go of it.
Headlight Switch
The headlight switch is located on the left side of the steering wheel, has three positions: OFF, LO and HI. This switch turns the headlights and taillights on and off, and changes between low beam or high beam.
For example:
To change the headlight position from OFF to HI: press the HI side of headlight switch until you feel two clicks.
To change the headlight position from OFF to LO: press the HI side of headlight switch until you feel one click.
To change the headlight position from HI to LO: press the OFF side of headlight switch until you feel one click.
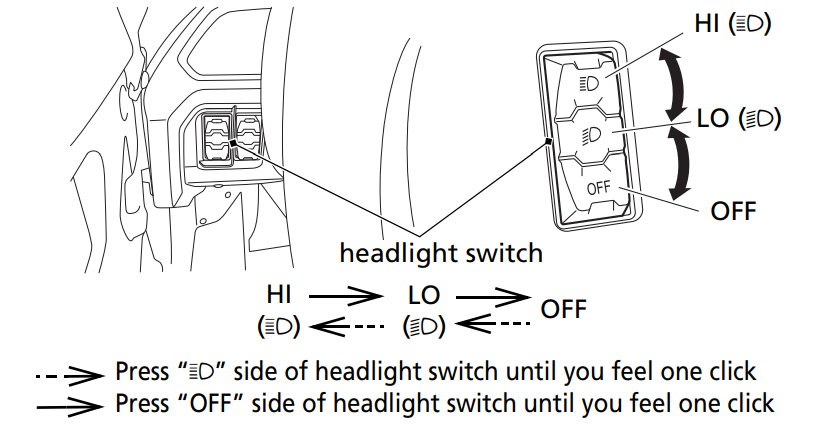
OFF — The headlights and taillights are off.
LO ( ) — The headlights and taillights are on. The headlights are low beam.
HI ( ) — The headlights and taillights are on. The headlights are high beam. The high beam indicator in the indicator box comes on (SXS1000S4X VA/VAC only).
Shift Select Lever
Your Honda SXS is equipped with an automatically controlled 6-speed transmission. The shift select lever, located in the center console, has five positions: park (P), reverse (R), neutral (N), high-range (H), and low-range (L).
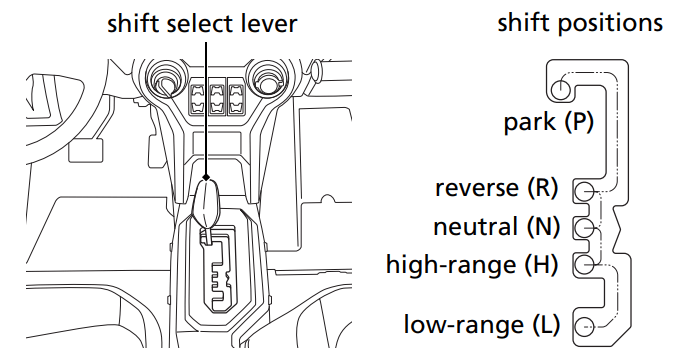
You should shift the shift select lever only when the vehicle is stopped with your foot on the brake pedal and with the engine idling. Use a firm motion to select the appropriate gear. Have your vehicle checked by a dealer if you experience any shifting problems.
NOTICE Do not attempt to shift the shift select lever with the engine speed above idle or while the vehicle is moving, as you may damage the transmission.
Drive Mode Select Switch
The drive mode select switch, located below the multi-function display, has two drive modes: 2WD and I - 4WD (page 95).
You can switch between 2WD mode and I - 4WD mode by pressing the drive mode select switch at any time the engine is running; you can also select I - 4WD mode while driving.
It is not recommended changing the drive mode under high throttle or excessive rear tire slippage.
When I - 4WD mode is selected and the ignition switch turned OFF (O) and then back to ON (I), the drive mode temporarily defaults to 2WD mode. Once the engine is re-started, I - 4WD mode will automatically resume.
- I - 4WD mode remains engaged until the 2WD mode is selected or the engine is stopped.
- I - 4WD mode will only engage while the engine is running.
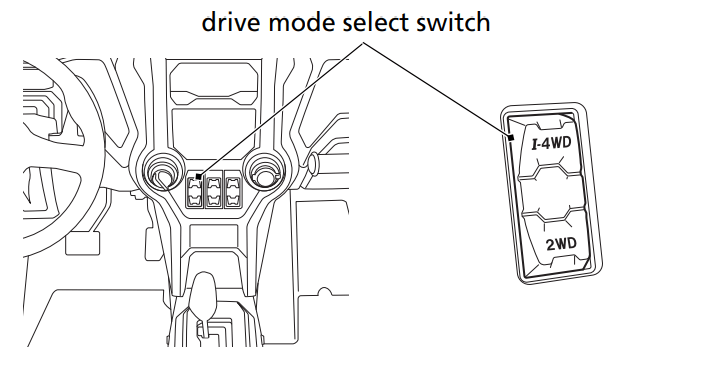
To check your present drive mode, look at the drive mode indicator.
The drive mode indicator will flash between 2WD mode and I - 4WD mode for various conditions.
- The drive mode select switch is in I - 4WD mode while the engine is not running.
- A speed difference between front and rear tires is larger than allowed by the control program. (Release the accelerator pedal)
- The system detects a malfunction. (See your dealer)
If the indicators do not go out or come on according to the drive mode, see your dealer.
AT/MT Switch
The AT/MT switch is located below the multi-function display. When the shift select lever is in high-range (H) or low-range (L) position, you can switch between AT mode and MT mode by pressing the AT/MT switch.
SPORT Switch
The SPORT switch is under the AT/MT switch.
When AT mode is selected and the shift select lever is in the highrange (H) position, you can switch between turning SPORT mode on and off by pressing the SPORT switch.
When the shift select lever is in the low-range (L) position, SPORT mode will not turn on even if the SPORT switch is pressed. When MT mode is selected, SPORT mode will not turn on even if the SPORT switch is pressed.
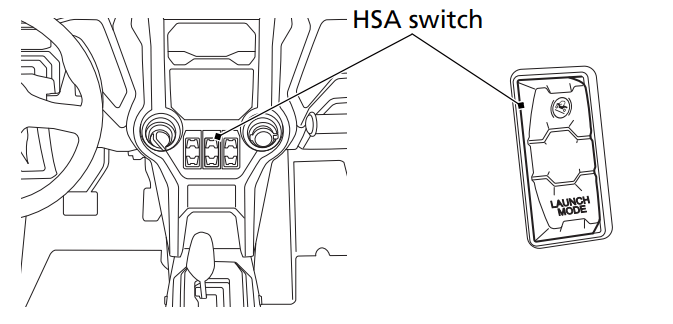
Hill Start Assist (HSA) Switch
The Hill Start Assist (HSA) switch is located below the multi-function display.
HSA keeps the brake pressure applied briefly to help prevent the vehicle from rolling on inclines as you move your foot from the brake pedal to the accelerator pedal.
To operate HSA:
- Press and hold the brake pedal to hold the vehicle.
- Make sure the shift select lever is in "H" or "L" when facing uphill, or "R" when facing downhill.
- Press and hold the HSA switch until the HSA indicator comes on on the display
- Release the pressure from the brake pedal and apply the accelerator.
– HSA is active for 1.5 seconds or until the accelerator is applied. HSA will self cancel if the accelerator is not applied within 1.5 seconds of pushing the HSA button.
– HSA is not a parking brake.
– HSA may not prevent the vehicle from rolling downhill if the vehicle is overloaded, on a steep hill, or sliding in slippery conditions.
NOTICE Avoid prolonged Hill Start Assist (HSA) use, as continuous operation may cause the system to overheat and fail.
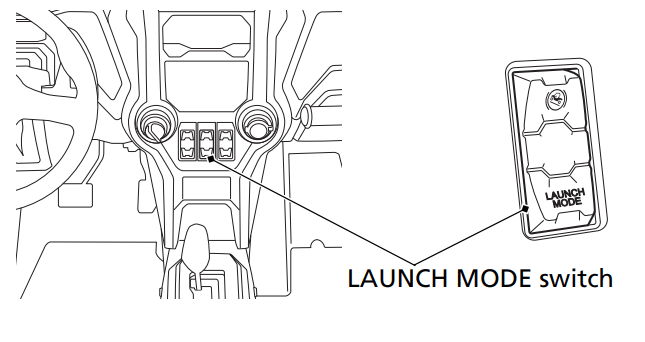
LAUNCH MODE Switch (SXS1000S4X VA/VAC only)
The LAUNCH MODE switch is under the HSA switch.
The LAUNCH MODE switch is used to operate the launch mode. For launch mode operation procedure, see page 96.
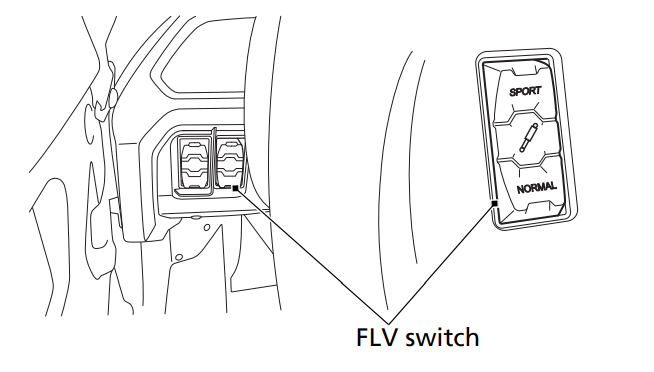
FOX® Live Valve (FLV) Switch (SXS1000S4X VA/VAC only)
The FLV switch is located on the left side of the steering wheel, and has two modes: NORMAL mode and SPORT mode.
The FLV switch is used to change between NORMAL mode and SPORT mode of FOX Live Valve (FLV) system.
For more information on FOX Live Valve (FLV) system, see page 181.
Shift Paddles
Your Honda SXS is equipped with a pair of shift paddles that are located behind the steering wheel.
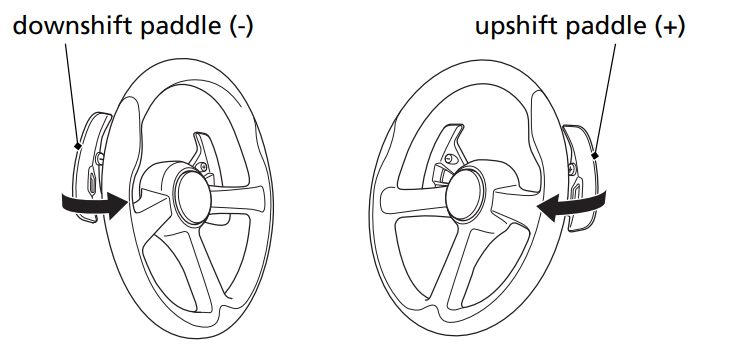
Pull the upshift paddle (+) to shift to a higher gear position and the downshift paddle (-) to shift to a lower gear position.
In MT mode, operate the shift paddles to drive the SXS. In AT mode, you can drive the SXS without operating the shift paddles. You can also operate the shift paddles to temporarily change the gear position. (See page 88 for more information)
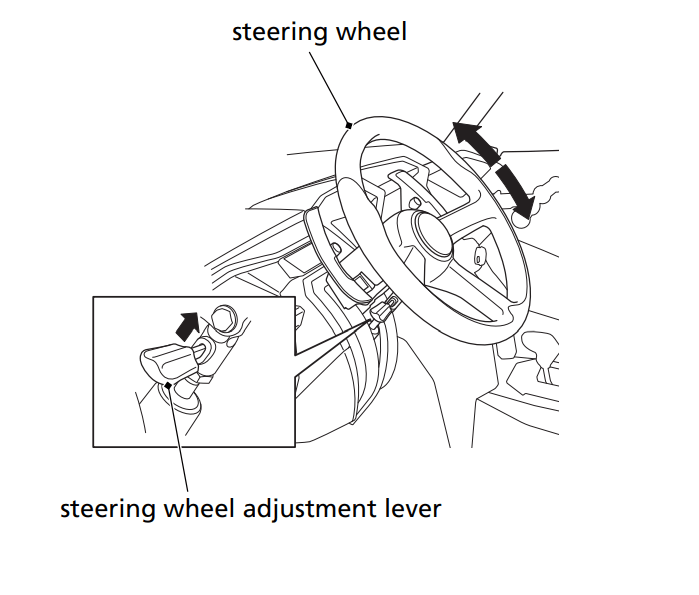
Steering Wheel Adjustment Lever
Your Honda SXS is equipped with a height-adjustable steering wheel. Adjust the steering wheel position so that you can comfortably grip the steering wheel in an appropriate driving posture.
WARNING Adjusting the steering wheel position while driving may cause you to lose control of the vehicle and be seriously injured in a crash. Adjust the steering wheel only when the vehicle is stopped.
NOTICE The steering wheel position damper unit contains high pressure nitrogen gas. Do not attempt to disassemble, service, or improperly dispose of the damper. See your dealer.
Adjustment
- Hold the steering wheel and pull the steering wheel adjustment lever up towards you.
- While pulling the steering wheel adjustment lever towards you, adjust the steering wheel position.
- Release the steering wheel adjustment lever.
- After adjusting the position, make sure you have securely locked the steering wheel in place by trying to move it up and down.
Doors
Your Honda SXS is equipped with doors to prevent branches, gravel, or other debris from getting inside the driver’s compartment, and to keep the driver’s and passenger’s legs and feet inside the vehicle if your vehicle ever tips or overturns. Be sure all doors are securely closed before driving your Honda SXS, and never remove a door.
If a door is damaged or does not close securely, see your dealer for repair or replacement. Do not drive the Honda SXS with the doors open or removed.
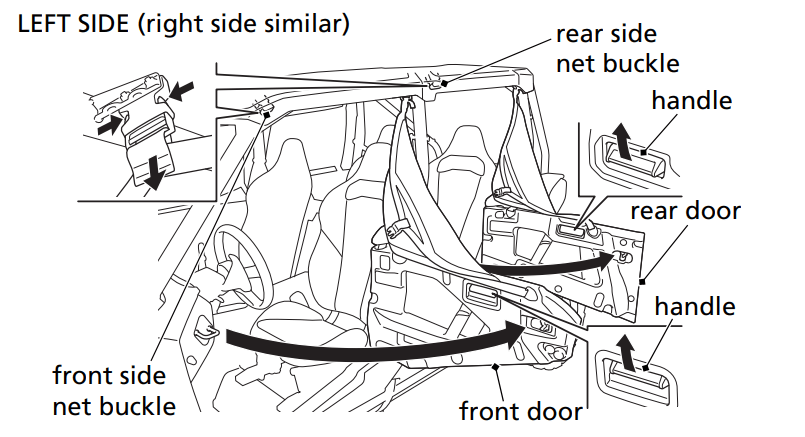
All doors can be opened and closed in the same manner.
Open
- Release the side net buckle.
- Pull up on the handle.
- Open the door.
Close
- Close the door securely until the second latch click is heard.
- Fasten the side net buckle.
- Make sure the door is closed securely.
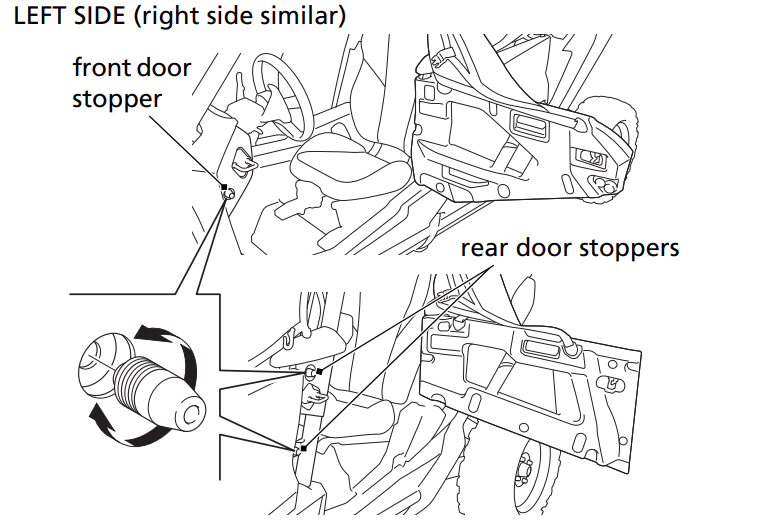
If the doors rattle when closed, turn the door stopper counterclockwise to adjust the doors. Each door has a double latching mechanism. Adjust the door stoppers so that it latches on the second click.
All doors can be adjusted in the same manner.
Adjustment
- Open the front door or rear door (page 51).
- front door: Turn the door stopper counterclockwise to extend it, and clockwise to retract it. rear door: Turn the door stoppers counterclockwise to extend them, and clockwise to retract them.
- Make sure the door is closed securely until the second latch click is heard.
Seat Belts
Your Honda SXS is equipped with lap/shoulder seat belts in each seating position. A seat belt keeps you connected to the vehicle so you won’t be thrown out during a crash or rollover. Together with a proper helmet, a seat belt is your best protection against serious injuries in any type of crash, so make sure you and your passengers always buckle up before driving.
WARNING
Not wearing a seat belt, or wearing one improperly, can result in serious injury or death in a crash or rollover.
Make sure the driver and any passengers always wear their seat belts properly
Of course, seat belts cannot completely protect you in every crash. But in most cases, seat belts can reduce your risk of serious injury
Seat Belt Speed Limiting System
When the driver's seat belt is not latched properly, the maximum vehicle speed will be limited by the seat belt speed limiting system.
When the driver's seat belt is not latched, the seat belt speed limiting system will:
- Limit the maximum vehicle speed to no more than 15 mph (24 km/h).
- Cause the seat belt indicator and speedometer to blink simultaneously.
To return the vehicle to normal operation the driver must:
- Properly deploy and latch their seat belt.
- Release the throttle for one second if the vehicle is moving.
The speed limitation will be removed and seat belt indicator and speedometer will stop blinking after the driver follows this procedure and correctly deploys and fastens their seat belt.
To avoid speed limitations altogether, the driver should always deploy and fasten their seat belt (and require all passengers to be securely belted) before driving the vehicle and keep their seat belt fastened while underway. If the driver unlatches their seat belt while the vehicle is travelling at speeds greater than 15 mph (24 km/h), the vehicle speed will be limited to 15 mph or less until the driver's seat belt is deployed and properly latched and throttle is released for one second.
How you wear a seat belt also matters. For the best protection:
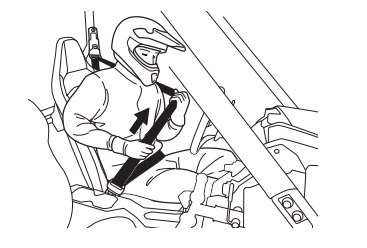
All seat belts can be secured in the same manner.
- Insert the latch plate into the buckle, then tug on the belt to make sure it is securely latched.
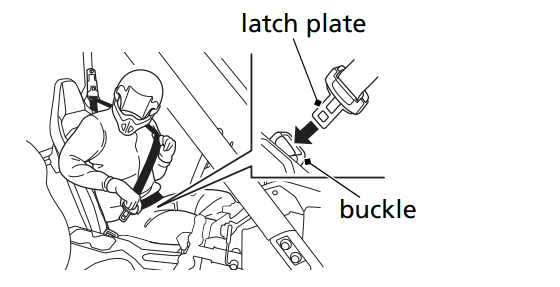
- Check that the belt is not twisted, because a twisted belt can cause injuries.
- Position the lap part of the belt as low as possible across your hips, then pull up on the shoulder part of the belt to make sure the lap part is snug. This keeps you connected to the vehicle and lets your strong pelvic bones take the force of a crash.
- Make sure the shoulder part of the belt goes over your shoulder and rests against your chest.
To unlatch a seat belt, press the red PUSH button on the buckle
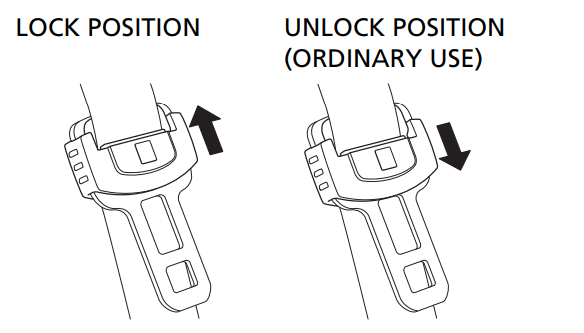
Seat Belt Locking Mechanism
The seat belts in your Honda SXS are equipped with a belt locking mechanism.
The belt locking mechanism is in the holder of the latch plate. When the seat belt is subjected to intense forces during a crash or rollover, part of the holder locks the belt.
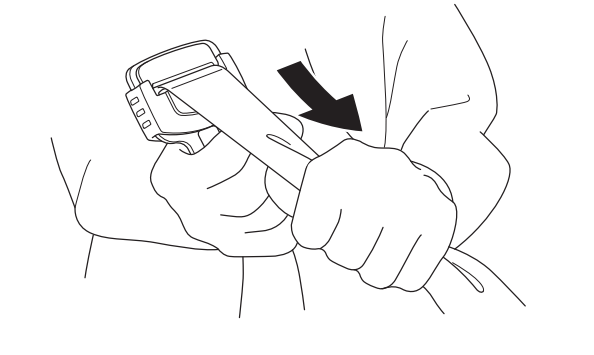
Unlock
- To unlatch a seat belt, press the red PUSH button on the buckles.
- Hold the latch plate and one side of the belt, and pull the other side of the belt. Doing so unlocks part of the holder.
If you have been driving in an extremely muddy or dusty area, be sure to inspect your belt and remove any dirt or debris before letting the belt retract into the retractor. Failure to do so could clog the retractor and make it inoperable.
Each seat belt has an emergency locking retractor. In normal driving conditions, the retractor lets you move freely in your seat while keeping some tension on the belt. During a crash or rollover, the retractor automatically locks the belt to help restrain your body.
Do not put any accessories on a seat belt, as that may reduce the effectiveness of the belt and increase the chance of injury in a crash.
If a seat belt is worn in a crash, the seat belt assembly must be replaced by your dealer. A belt that has been worn during a crash may not provide the same level of protection in a subsequent incident. The dealer should check the retractor and replace it if needed.
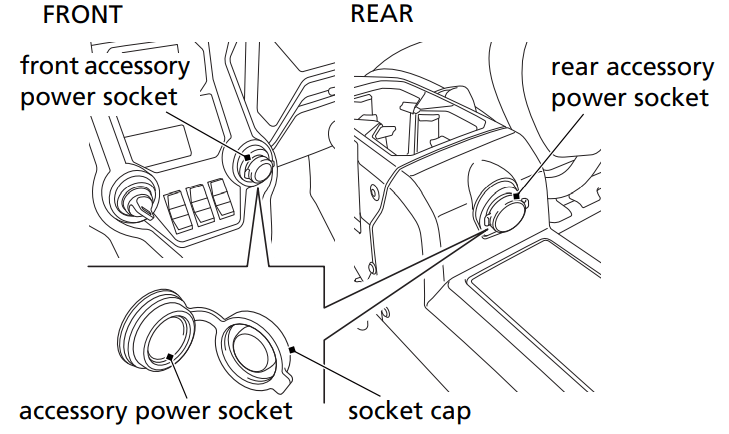
Accessory Power Socket
Your Honda SXS has two accessory power sockets. The front accessory power socket is located on the right side of ignition switch. The rear accessory power socket is located on the rear end of the center console. The sockets are intended for 12-volt DC accessories rated for 120 watts (10 amps) or less. Exceeding the limit can blow the accessory socket fuse (see page 239).
The sockets can be used to power such items as a trouble light, spotlight, CB radio, or cell phone, but not a heat-generating accessory, such as a car cigarette lighter.
To use an accessory power socket, the engine must be running.
NOTICE Using any heat-generating accessory or improperly rated accessory can damage the socket.
Remember to close the caps when you are finished using accessories, and keep water or other fluids away from the sockets.
Is Your Vehicle Ready to Drive?
Before driving your Honda SXS, it’s important to inspect the vehicle and correct any problem you find. A pre-drive inspection is a must, not only for safety, but because having a breakdown can be a major inconvenience.
If your vehicle has overturned or been involved in a crash, do not drive it until it has been inspected by your dealer. There may be damage or other problems you cannot see.
WARNING
Improperly maintaining this vehicle or failing to correct a problem before driving can cause a crash in which you or someone else can be seriously hurt or killed.
Always perform a pre-drive inspection and correct any problems before you operate the vehicle.
Pre-drive Inspection
Check the following items before driving your Honda SXS:
Oil Level
Check the engine and sub-transmission oil levels and add oil, if needed (pages 140, 150). Also check under the vehicle for leaks.
Coolant
Check the coolant level (page 160). If it is low, add a 50/50 mixture of silicate-free coolant and distilled water. Check for leaks.
Fuel Level
Check the fuel gauge (page 27) and add fuel, if needed (page 135). Make sure the fuel fill cap is secure. Also check for the smell of fuel or fumes - if you smell any fuel, turn the ignition switch to OFF (w) immediately, and see your dealer.
Brake Fluid
Check the level (page 187). If it is near MIN, check the brake pads for wear (page 189). If the brake pads are within the specification, check for leaks in the braking system (page 186).
Tires
Check the air pressure of all tires and inflate them to the proper pressure (page 193). Also inspect the tires for damage or excessive wear (page 195). If necessary see your dealer.
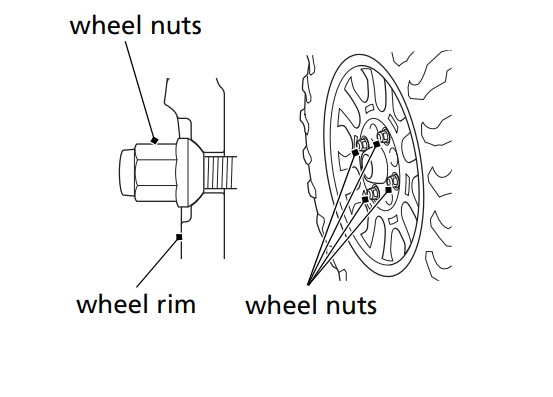
Wheels
Make sure the wheel nuts are properly tightened and the wheels are not cracked or deformed (page 200).
Driveshafts
Inspect the driveshafts and boots for damage, tears, or leaks and see your dealer if any are found.
Steering Gearbox and Boots
Check the steering to make sure it turns smoothly in both directions. Check that there is no binding or play in the steering. Check for any tears in the boots. If any tears are found, see your dealer.
Underbody
Check for and remove any debris stuck in the underbody; take extra care in your inspection if the vehicle was last driven in deep grass, brush, a wetland, or flooded area. Check for any visible dents or cracks. If any dents or cracks are found, see your dealer.
Air Cleaner
Inspect the air cleaner element. If necessary, replace the air cleaner element (page 165).
Air Cleaner Housing Drain
Tubes Check for deposits in the drain tubes. If necessary, clean the tubes (page 167) and check the air cleaner housing.
Suspension
Check the condition of all suspension components. Be sure to look for bends or oil leaks in the cushion damper. Check for tears in the boots of the front arm ball joints.
Lights
Make sure the headlights, taillights, and brake lights are working properly.
Controls
Check that all driving controls, including the accelerator pedal, brake pedal, drive mode select switch, shift select lever, and shift paddles are operating smoothly.
Tie-rod Ends
The wheels need to be lifted off the ground to correctly check the tie-rod ends, so it cannot be done in the pre-drive inspection. To have the tie-rod ends properly inspected, see your dealer.
Cargo
Be sure items in the cargo bed are within the cargo limit and are properly secured to prevent shifting (pages 82, 83).
Seat Position
Make sure the driver seat is secured in the proper seat position. If necessary, adjust the seat position (page 57).
Seat Belts
Make sure all seat belts are in good condition and operate properly. The seat belts must move smoothly when pulled out, and retract on their own when released. The latch plates should click securely into the buckles and release when the release buttons are pushed firmly.
Side Nets
Make sure all side nets and their mounting hardware are in good condition and that they latch and tighten securely.
Exhaust System
Make sure no materials or debris are sticking to, or accumulating around, the exhaust system. If any such debris is found, remove it so there's no chance for it to catch on fire. Start the engine and listen for any leaks.
CAUTION
Exhaust system operates at very high temperatures.
You can be burned if you touch the exhaust system.
Do not touch the exhaust system without letting the system cool down.
NOTICE
Exhaust system operates at very high temperatures.
Accumulated debris and vegetation that contact the exhaust can catch on fire.
Always conduct a pre-drive inspection and remove accumulated debris.
Remember to take care of any problem you find or have your dealer correct it before you drive your Honda SXS.
Basic Operation
Starting & Stopping the Engine
For safety, we recommend that you start the engine in a wellventilated area. If that is not practical, move the vehicle outdoors as soon as possible. The engine’s exhaust contains carbon monoxide, a colorless and odorless gas that can cause illness and even death.
WARNING
Running the engine of your vehicle while in an enclosed or even partially enclosed area can cause a rapid build-up of toxic carbon monoxide gas.
Breathing this colorless, odorless gas can quickly cause unconsciousness and lead to death.
Only run your vehicle's engine when it is located in a well ventilated area outdoors.
The starter motor will operate when the shift select lever is in the park (P) or neutral (N) position, or the brake pedal is pressed. You should do the following checks and adjustments before you drive your vehicle.
Before START:
- Check that any items you may be carrying are stored properly or fastened down securely.
- Make sure the doors, side nets and front hood are securely closed.
- Fasten your seat belt. Check that any passenger have fastened their seat belt as well.
- When you start the engine, check the indicators in the instrument panel.
Starting the engine:
- Shift the shift select lever into the park (P) position.
- Press on the brake pedal.
- Without touching the accelerator pedal, insert the key and turn the ignition switch to the START (II) position. Immediately after the engine starts, let go of the key. The switch returns to the ON (I) position. Do not hold the key in the START (II) position for more than 5 seconds at a time. If the engine does not start after 5 seconds, turn the key back to the OFF (O) position and wait about 10 seconds before turning it to START (II) again.
If the engine fails to start after repeated attempts, it may be flooded with excess fuel. To clear a flooded engine:
- Press the accelerator pedal all the way down. The engine will not start when the throttle is fully open because the electronic control unit shuts off the fuel supply.
- Turn the ignition switch to the START (II) position for 5 seconds to clear flooding.
- Follow the normal starting procedure.
- If the engine does not start, wait 10 seconds, then follow steps 1 – 3 again.
If the engine still won’t start, see If Your Engine Quits or Won’t Start, page 226.
To stop the engine, turn the ignition switch to the OFF (O) position. Remember to shift into the park (P) position and remove the key if you plan to leave the vehicle.
Taking Care of the Unexpected
With all the challenges you can encounter off-road, there’s a chance that sometime something may go wrong. This section gives practical advice to help you deal with a wide range of problems. Take time to read this section before you drive. Also review the tips in Preparing for a Drive (page 214).
General Guidelines
Keeping your Honda SXS well-maintained is the best way to reduce the possibility of having a problem while driving. However, problems can arise even with well-maintained machines.
Remember to take along your owner’s manual, the tool kit that came with your Honda SXS, and any other items (such as tire repair supplies and additional tools) that might help you solve a problem on your own.
If something goes wrong during a drive, the first thing to do is stop as soon as you safely can. Do not continue driving if you have a flat tire, or you hear an unusual noise, or your Honda SXS just doesn’t feel right. If you continue driving, you could cause more damage and endanger your own safety.
After stopping, take time to assess the situation. Carefully inspect your Honda SXS to identify the problem, then consider your options before you decide what to do. If a problem is relatively minor and you have the tools, supplies, and skills to make a permanent repair, you may be able to fix it on the trail and continue driving.
When a problem is more serious — or you don’t have the tools, supplies, experience, or time to deal with it — you need to choose the safest way to get yourself and your Honda SXS back home.
Should you ever have a problem while driving, please follow these guidelines:
- Always put personal safety first.
- Take time to assess the situation and your options before deciding what to do.
- If the problem is relatively minor and you have the tools, supplies, and skills to make a temporary repair, be sure to have permanent repairs made as soon as possible.
- Do not continue driving if you are hurt or your Honda SXS is not in safe driving condition.
Additional recommendations for specific problems follow
If Your Engine Quits or Won’t Start
Proper operation and maintenance can prevent starting and engine performance problems. In many cases, the cause of the problem may be a simple operational oversight.
If you have a problem starting the engine — or experience poor engine performance — the following information may help you. If you can’t correct the problem, see your dealer.
If your SXS won’t start, listen as you turn the ignition key to the START (II) position. If you don’t hear the starter motor turning, refer to the Starter motor doesn’t operate symptom. If you can hear the starter motor working normally, refer to the Starter motor works, but the engine won’t start symptom.
SYMPTOM: Starter motor doesn’t operate
| POSSIBLE CAUSE |
WHAT TO DO |
| transmission not in park (P) or neutral (N) position |
Shift into park (P) or neutral (N) position or press on the brake pedal. |
| blown fuse |
Replace with a new fuse of the same rating (page 239). |
| battery lead loose |
Tighten the battery lead. |
| low battery |
Charge the battery (page 206). If charging doesn’t help, see your dealer. |
| faulty starter motor |
If all possible causes are negative, the starter motor may be faulty. See your dealer. |
SYMPTOM: Starter motor works, but the engine won’t start.
| POSSIBLE CAUSE |
WHAT TO DO |
| out of fuel |
Fill the fuel tank. |
| flooded engine |
See starting the engine (page 87). |
| loose or unconnected spark plug caps |
Install the spark plug caps securely. If the engine still won’t start, see your dealer. |
| loose battery cables |
Tighten the battery terminal bolts. |
| weak battery |
Charge the battery (page 206). If charging doesn’t help, see your dealer. |
SYMPTOM: Engine starts, but runs poorly.
| POSSIBLE CAUSE |
WHAT TO DO |
| high coolant temperature |
Check the high coolant temperature indicator. Refer to If the High Coolant Temperature Indicator Lights, page 236. |
| runs erratically, misfires |
May damage catalytic converter. See your dealer. |
| blubbers (rich fuel mixture) |
See your dealer. |
| sooty exhaust (rich fuel mixture) |
See your dealer. |
| detonates or pings under load |
If applicable, switch to the recommended octane gasoline (page 134) or change your brand of gasoline. If the problem persists, see your dealer. |
| afterfires (backfires) |
May damage catalytic converter. See your dealer. |
| pre-ignition (runs on after ignition switched OFF) |
May damage catalytic converter. See your dealer. |
SYMPTOM: Engine starts, but runs poorly or dies when hot.
| POSSIBLE CAUSE |
WHAT TO DO |
| poor or inadequate fuel flow due to clogged fuel filter |
See your dealer. (ensure clean fuel supply)
|
If the Transmission Is Not Functioning Properly
If the gear position indicator is blinking, perform the following:
- If you are driving your Honda SXS, stop at a safe place.
- Shift the shift select lever to the park (P) position.
- Check the pattern displayed on the gear position indicator, and then perform the following.
“P”, “R”, “N”, “H” or “L” is blinking:
You can drive in either AT mode or MT mode. See your dealer as soon as possible.
“1”, “2”, “3”, “4”, “5” or “6” is blinking:
At high-range (H) or low-range (L), you can drive only in the gear position that is blinking. You can also drive in reverse (R). To avoid damaging the clutch, we recommend that you drive in lowrange (L). The engine brake may not work, so please drive slowly. See your dealer as soon as possible.
“–” is blinking:
Check for SXS failure again. Perform the following procedure.
- Check that the shift select lever is at the park (P) position.
- Turn the ignition switch to the OFF (O) position.
- Turn the ignition switch to the START (II) position and then start the engine.
- Check the gear position indicator display, and then perform the following.
If “-” continues to blink:
Change the gear position by using the gear change tool, and tighten the emergency valve. Perform the following procedure.
- Turn the ignition switch to the OFF (O) position to stop the engine.
- Turn the ignition switch to the ON (I) position. Do not turn it to the START (II) position.
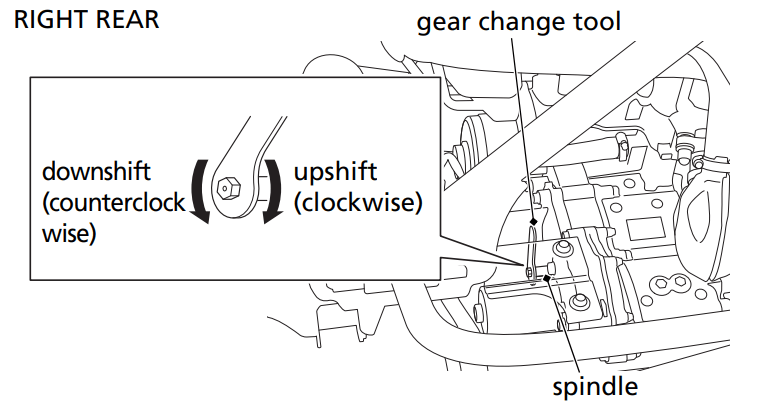
- Take out the gear change tool from the storage compartment (page 127).
- Put the gear change tool on the spindle which is located on the crankcase.
- To downshift, turn the gear change tool counterclockwise. To upshift, turn the gear change tool clockwise. When you upshift one position from the lowest downshift position, “E” blinks in the gear position indicator.
If you cannot shift properly, shift the shift select lever to the highrange (H) position, and while pushing the gear change tool in the direction you want to rotate, rock the vehicle back and forth. When the transmission shifts, return the shift select lever to the park (P) position.
- Return the gear change tool to the storage compartment.
- Check that “E” is blinking. Next, tighten the emergency valve. Proceed to “E” is blinking.
If “–” is not displayed in the gear position indicator and you change the gear position by using the gear change tool, the DCT system will automatically stop. To reactivate the system, turn the ignition switch to the OFF (w) position, and then turn it back to the ON (q) position.
“E” is blinking:
Tighten the emergency valve. Perform the following procedure.
- Turn the ignition switch to the OFF (O) position to stop the engine.
- Loosen the bolt and release the lock plate, and turn the emergency valve all the way in.
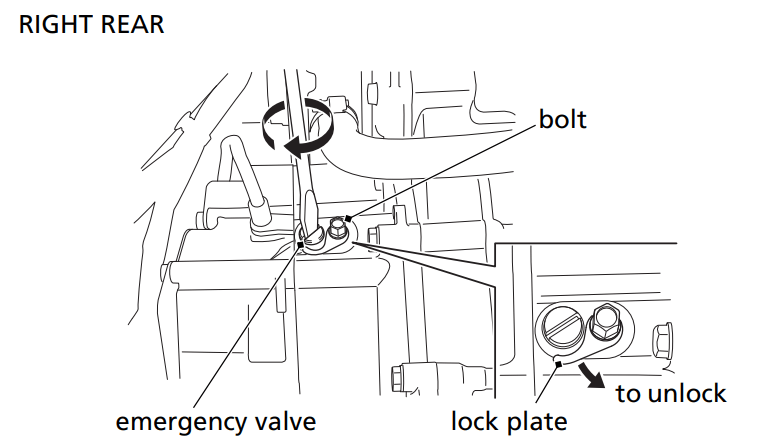
- Return the lock plate and tighten the bolt securely.
- Turn the ignition switch to the START ( ll ) position to start the engine.
- Check that the gear position (“1”, “2”, “3”, “4”, “5” or “6”) is blinking.
- At high-range (H) or low-range (L), you can drive only in the gear position that is blinking. You can also drive in reverse (R). To avoid damaging the clutch, we recommend that you drive in low-range (L). The engine brake may not work, so please drive slowly. See your dealer as soon as possible.
- When in the reverse (R), high-range (H), or low-range (L) position, low oil temperatures will cause the vehicle to move slowly. Shift into the park (P) position and warm up the engine.
- When restarting the engine, although ”E” stops blinking, the gear position (“1”, “2”, “3”, “4”, “5” or “6”) blinks, and the low oil pressure indicator comes on, you can drive the vehicle.
If You Have a Flat Tire
How you handle a flat tire on the trail depends on how serious the tire damage is, and what tools and supplies you have with you.
If you have a slow leak or a minor puncture, use the plug method to make a temporary repair. (The plug method is applied from the outside of the tire and is the same as that for conventional tubeless tires.)
A plug-type repair kit, available at most auto parts stores or service stations, provides a plug, an installation tool, tire cement, and an instruction sheet. Follow the instructions provided with the repair kit to make a temporary repair.
As soon as possible, have the tire permanently repaired by your dealer.
Any tire that cannot be repaired should be replaced.
Whenever the Honda SXS is to be operated far from service facilities or available transportation, we recommend that you carry a tire pump and a repair kit with the vehicle.
If the leak is more serious, or a temporary repair doesn't hold, the tire must be replaced. The tire will also need to be replaced if it is damaged (page 195). Replacing a tire involves removing and reinstalling the wheel (page 234).
If you are unable to repair a flat tire on the trail, you will need to send for help. We strongly recommend that you do not try to drive with a flat tire. The Honda SXS will be hard to handle, and if the tire comes off the rim, it may lock up the wheel and cause you to crash or overturn.
Emergency Wheel Removal/Installation
Refer to Safety Precautions on page 115.
Removal
- Park your Honda SXS on a firm, level surface.
- Loosen — but do not remove — the wheel nuts.
- Raise the front (or rear) wheels off the ground (page 133).
- Remove the wheel nuts.
- Remove the wheel.
•Avoid getting grease, oil, or dirt on the disc or pad surfaces when removing and installing each wheel. Any contamination can cause poor brake performance or rapid pad wear after reassembly
Installation
- Thoroughly clean hub and wheel.
- Position the wheel.
- Position the wheel nuts so that the tapered sides face the wheel rim.
- Hand-tighten the wheel nuts on the wheel, then lower the Honda SXS to the ground before tightening the nuts in a crisscross (rather than circular) pattern to the specified torque: 80 lbf·ft (108 N·m, 11 kgf·m)
If a torque wrench was not used for installation, see your dealer as soon as possible to verify proper assembly. Improper assembly may lead to loss of control and braking capability.
If the High Coolant Temperature Indicator Lights
Normally, the high coolant temperature indicator will only light momentarily when you turn the ignition ON (I). Occasionally, it may flicker at or near idling speed.
High coolant temperature may be caused by restriction of air flow to the radiator (such as mud caked on the radiator), extended idling, an oil leak, a coolant leak, a low oil level, a low coolant level, or extended operation under adverse conditions.
If all the sections of the coolant temperature gauge including segment H and high coolant temperature indicator are on while you’re driving, don’t ignore it. Pull safely to a stop. Stop the engine as soon as it’s safe to do so, and let it cool.
NOTICE Continuing to drive with high coolant temperature or an overheated engine can cause serious engine damage.
- A steaming engine indicates a coolant leak. Shut the engine off and wait until the steaming stops. Look for a leak, but don’t touch the engine or radiator system. Let everything cool off first.
- Check for any restriction of air flow to the radiator.
- If there’s no obvious problem, leave the engine on so the fan and coolant circulating system can continue working. Monitor the coolant temperature gauge and high coolant temperature indicator. The coolant temperature gauge and indicator may return to normal after a brief stop with no load on the engine.
- Check the radiator fan. If the fan is not working, turn the engine off. Remove the battery cover (page 204) and check the radiator fan fuse. If the fuse is blown, replace it with the proper (same rating) spare fuse. Start the engine. If all the sections of the coolant temperature gauge including segment H and high coolant temperature indicator stay on, turn the engine off. If the radiator fan is working, visually check the coolant level in the reserve tank, located under the front hood. It isn’t necessary to touch the radiator system.
- If the reserve tank is low or empty, don’t drive without adding coolant (page 160). After adding coolant, turn the engine on and check the coolant temperature gauge and high coolant temperature indicator. If the indicator doesn’t turn off, do not drive. The engine needs repair.
Transport your Honda SXS to a dealer (page 216). If the temperature drops to normal, check the coolant level. If it has gone down, add more coolant.
- Check for an oil leak.
- Check the oil level. If necessary, add the recommended oil (page 138) to the upper level mark. If you must leave your Honda SXS to get oil, secure it as much as possible.
- Start the engine, and check that the coolant temperature gauge and high coolant temperature indicator are normal.
If the coolant temperature gauge and indicator return to normal, resume driving. If there is a leak, do not drive the SXS until the leak is repaired by your dealer.
If there’s a mild coolant leak, you can drive for a while, carefully watching the coolant temperature gauge and indicator. Be prepared to stop and add more coolant or water. If the leak is bad, transport your Honda SXS to your dealer (page 216).
If the Clutch Temperature Indicator Flashes
The clutch temperature indicator flashes if the clutch temperature becomes unusually high. If the indicator flashes, release the accelerator pedal as soon as it is safe to and apply the brakes.
Shift the transmission to neutral (N) or park (P) and allow the engine to idle until the indicator stops flashing. Once the indicator stops flashing, the vehicle is safe to operate. If the clutch temperature indicator continues to flash, have your vehicle inspected by your dealer.
The clutch temperature indicator may flash under certain conditions, such as slow speed rock crawling, holding the vehicle stationary on an incline with the accelerator pedal, when the vehicle is stuck and the wheels are not turning, or attempting to pull an immovable object.
NOTICE Continuing to apply the accelerator pedal with the clutch temperature indicator flashing can damage the clutch.
If a Fuse Blows
All of the electrical circuits on your Honda SXS have fuses to protect them from damage caused by excess current flow (short circuit or overload).
If something electrical on your Honda SXS stops working, the first thing you should check for is a blown fuse.
Check all the fuses before looking elsewhere for another possible cause of the problem. Replace any blown fuses and check component operation.
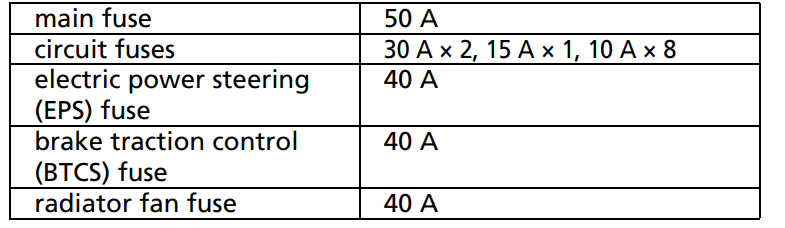
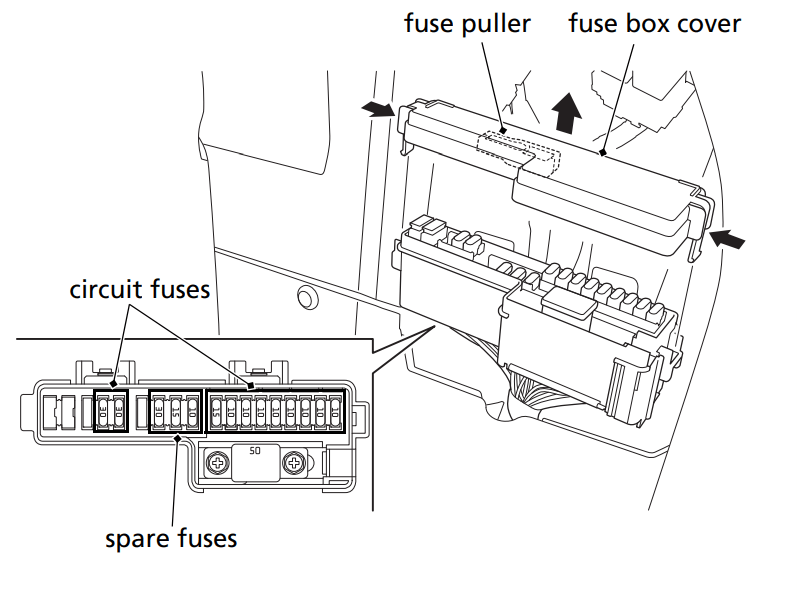
The main fuse and circuit fuses are located in the fuse box under the fuse box lid.
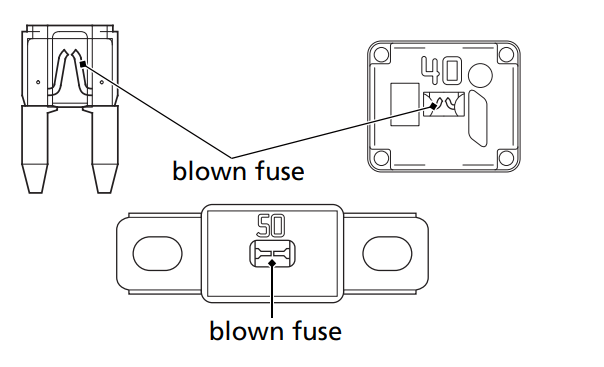
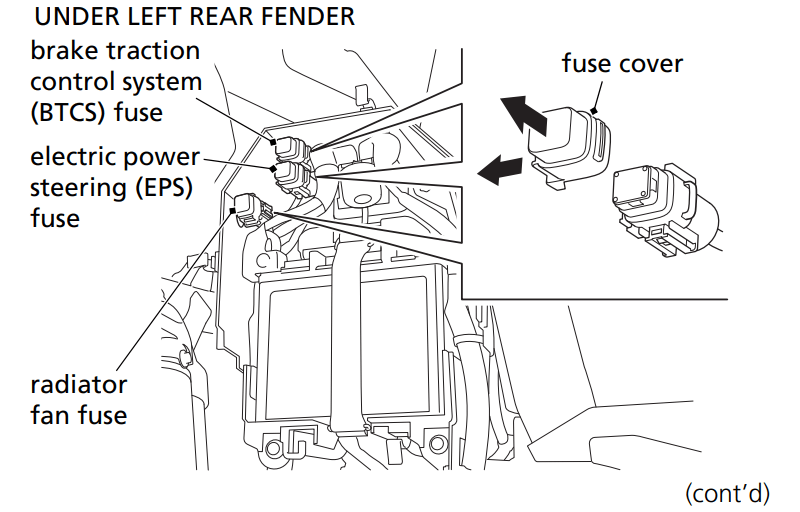
The electric power steering (EPS) fuse, brake traction control system (BTCS) fuse and radiator fan fuse are located in the battery cover.
Recommended Fuses
Main & Circuit Fuses
- To prevent an accidental short circuit, turn the ignition switch OFF (O) before checking or replacing fuses.
- Pull the top of fuse box lid out to release its prong from the grommet.
- Pivot the fuse box lid down. Be careful not to damage the rear passenger seat surfaces while removing the fuse box lid.
- Remove the fuse box lid by releasing its tabs from the slit.
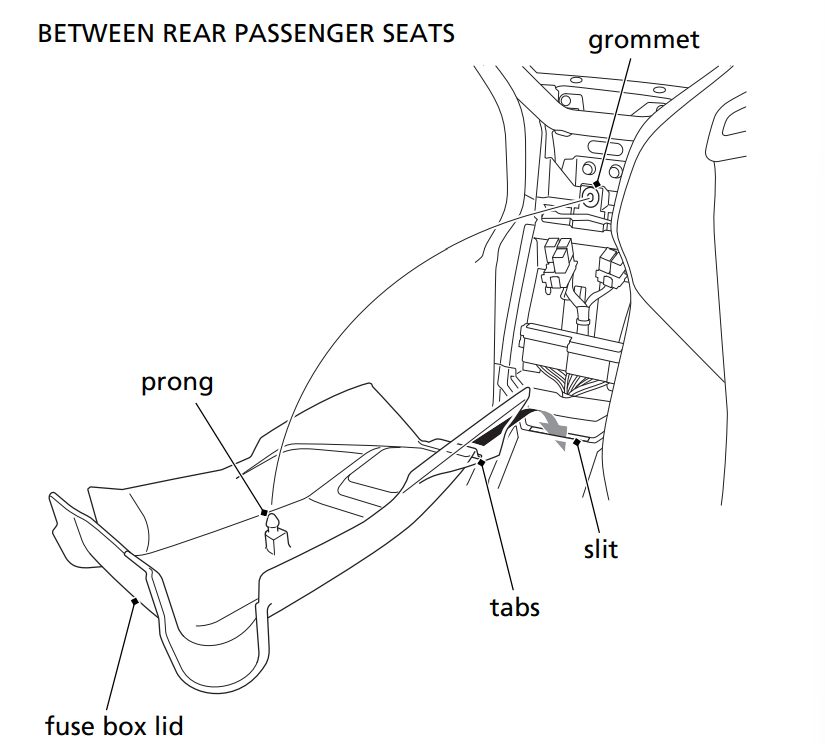
Main Fuse Access
- Remove the fuse box cover.
- To access the main fuse, remove the bolts, and then pull the main fuse out. If the main fuse is blown, see your dealer for this service.
Circuit Fuse Access
- To check or replace a circuit fuse, pull the fuses out one by one with the fuse puller located behind the fuse box cover. If the fuse is blown, replace it with a spare fuse of the same rating.
If you do not have a replacement fuse with the proper rating for the circuit, install one with a lower rating.
NOTICE Replacing a fuse with one that has a higher rating greatly increases the chance of damage to the electrical system.
- Install the removed parts in reverse order of removal.
Other Fuses
- Turn the ignition switch to OFF (w) before checking the fuse.
- Remove the battery cover (page 204).
Electric Power Steering (EPS) Fuse Access
- To access the EPS fuse, remove the fuse cover. If the EPS fuse is blown, see your dealer for this service.
Brake Traction Control System (BTCS) Fuse Access
- To access the BTCS fuse, remove the fuse cover. If the BTCS fuse is blown, see your dealer for this service.
Radiator Fan Fuse Access
- To access the radiator fan fuse, remove the fuse cover. If the radiator fan fuse is blown, see your dealer for this service.
- Install the fuse covers.
- Install the battery cover.
If you do not have a spare fuse and you cannot drive the Honda SXS without fixing the problem, take a fuse of the same rating or a lower rating from one of the other circuits that you can do without temporarily.
If you replace a blown fuse with a spare fuse that has a lower rating, replace the fuse with the correct rating as soon as you can. Also remember to replace any spare fuses that were installed.
If the replacement fuse of the same rating burns out in a short time, there is probably a serious electrical problem on your Honda SXS. Leave the blown fuse in that circuit and have your Honda SXS checked by your dealer.
If You Crash
Personal safety is your first priority after a crash. If you or anyone else has been injured, take time to assess the severity of the injuries and whether it is safe to continue driving. If you cannot drive safely, send someone for help. Do not drive if you will risk further injury.
If you decide that you are capable of driving your SXS safely, first evaluate the condition of your SXS. If the engine is still running, turn it off and look it over carefully; inspect it for fluid leaks, check the tightness of critical nuts and bolts securing such parts as the steering wheel, control levers, brakes, and wheels.
If there is minor damage, or you are unsure about possible damage but decide to try driving the Honda SXS back to your base, drive slowly and cautiously.
Sometimes, crash damage is hidden or not immediately apparent. When you get home, thoroughly check your Honda SXS and correct any problems you find. Also, be sure to have your dealer check the frame suspension, seat belts, and occupant protective structure after any serious crash.
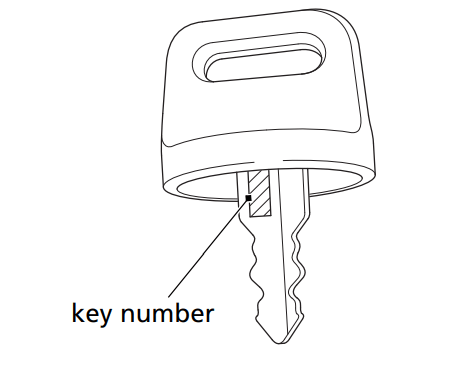
If You Lose Your Key
Be sure to record your key number. Store the spare key and recorded key number in a safe location. You’ll need this number to have a duplicate key made.
If you lose your key and aren’t carrying a duplicate, either get your spare or have one made. If you don’t know your key number, call the dealer where you purchased your Honda SXS. They may have it listed in their records. If they don’t, transport your Honda SXS to them or the nearest dealer. The dealer will probably have to remove the ignition switch assembly to find the key number so they can make a key for you.
If the Battery Is Low
If the battery is low, the starter motor doesn’t operate or works poorly, and you can’t start the engine. Jump starting your Honda SXS should be avoided. Instead, the battery should be removed and recharged (page 206). If you can’t charge the battery or it appears unable to hold a charge, contact your dealer.
WARNING
The battery gives off explosive hydrogen gas during normal operation.
A spark or flame can cause the battery to explode with enough force to kill or seriously hurt you.
Wear protective clothing and a face shield, or have a skilled mechanic do the battery maintenance.
WARNING: Battery posts, terminals and related accessories contain lead and lead compounds. Wash your hands after handling.
However, when there is no option other than jump starting, follow the instructions given below.
NOTICE If a battery sits in extreme cold, the electrolyte inside can freeze. Attempting to jump start with a frozen battery can cause it to rupture.
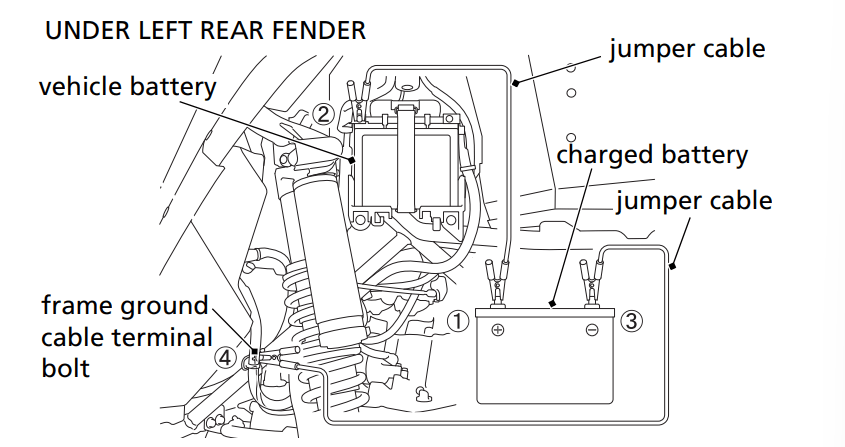
Use a battery that is the same as the one in the vehicle or an equivalent.
- To prevent an accidental short circuit, turn the ignition switch OFF
 .
.
- Remove the battery cover (page 204).
- Using a fully charged 12-volt battery, connect the positive (+) side of the jumper cable to the charged battery, and connect the positive (+) side on the other end of the jumper cable to the positive (+) terminal of vehicle battery.
- Connect the negative (-) side of the jumper cable to the charged battery, and connect the negative (-) side on the other end of the jumper cable to the frame ground cable terminal bolt.
- After starting the engine, remove the negative (-) sides of the jumper cable from the vehicle and the battery. Then remove the positive (+) sides of the jumper cable from the vehicle battery and the charged battery.
- Install the battery cover.
• Do not let the positive (+) side of the jumper cable touch on the negative (-) terminal.
• If the jumper cable is connected to the battery with the polarity reversed, the battery can explode or the electrical system will be seriously damaged.
If a Component Fails
The brake lines, control cables, and other components can be damaged as you drive in dense brush or over rocky terrain. Making a trailside repair depends on how serious the damage is and what tools and supplies you have with you.
- If any component in the brake system is damaged, you may have reduced or limited stopping power. If you decide to continue driving back to your base, do so cautiously and at a very low speed.
- If you damage the accelerator cable or other critical component, your Honda SXS may be unsafe to drive. Carefully assess the damage and make any repairs that you can. But if there is any doubt, it’s best to be conservative and safe.
If the Vehicle Speed Does Not Exceed 15 mph (24 km/h)
If the driver's side seat belt is not latched properly, the maximum vehicle speed will be limited to no more than 15 mph (24 km/h) by the seat belt speed limiting system (page 60). Also the seat belt indicator and speedometer digits blink.
Make sure that the driver's side seat belt is latched properly. If the problem persists, see your dealer.