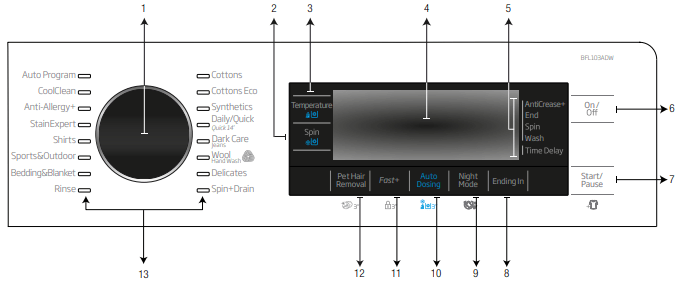
1. Programme Selection knob 2 - Spin Speed Adjustment button 3 - Temperature Adjustment button 4 - Display 5 - Programme Follow-up indicator 6 - On/Off button 7 - Start/Pause button 8 - End Time Adjustment button 9 - Auxiliary Function button 4 10 - Auxiliary Function button 3 11 - Auxiliary Function button 2 12 - Auxiliary Function button 1 13 - Programme Selection LEDs
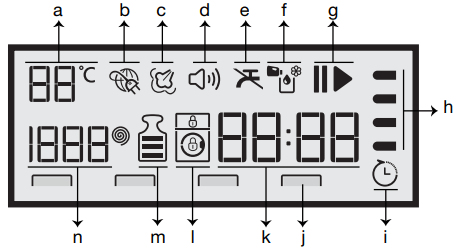
Display symbols
a- Temperature indicator b- internet Connection indicator c- Steam indicator d- Audio Warning indicator e- No Water indicator f- Dosing symbols g- Start/Pause indicator h- Programme Follow-up indicator i- Delayed Start Enabled indicator j- Auxiliary Function indicators k- Duration Information Line l- Lock Indicators m- Load indicator n- Speed indicator
The visuals used for machine description in this section are schematic and may not match exactly will the features of your machine.
Programme selection
1. Determine the programme suitable for the type, quantity and soiling level of the laundry in accordance with "Programme and consumption table".
Programmes are limited with the highest spin speed appropriate for that particular type of fabric.
When selecting a programme, always consider the type of fabric, colour, degree of soiling and permissible water temperature.
Always select the lowest appropriate temperature. Higher temperature means higher electricity consumption.
2. Select the desired programme with the Programme Selection knob.
Programmes
Cottons Eco
Use to wash your normally soiled, durable cotton and linen laundry. Although it washes longer than all other programmes, it provides high energy and water savings. Actual water temperature may be different from the stated wash temperature. When you load the machine with less laundry (e.g. ½ capacity or less), periods in programme stages may automatically get shorter. In this case, energy and water consumption will decrease more, providing a more economic wash.
Normally soiled laundry may be washed with reduced amount of detergent to save energy and protect the environment.
Cottons
You can wash your durable cotton laundry (sheets, bedlinen, towels, bathrobes, underwear etc.) in this programme. When the quick wash function button is pressed, programme duration becomes notably shorter but effective washing performance is ensured with intense washing movements. If the quick wash function is not selected, superior washing and rinsing performance is ensured for your heavily soiled laundry.
Synthetics
You can wash your laundry (such as shirts, blouses, synthetic/cotton blended fabrics etc.) in this programme. The programme duration gets notable shorter and washing with high performance is ensured. If the quick wash function is not selected, superior washing and rinsing performance is ensured for your heavily soiled laundry.
Wool / Hand Wash
Use to wash your woolen/delicate laundry. Select the appropriate temperature complying with the tag of your clothes. Your laundry will be washed with a very gentle washing action in order not to damage the clothes.
"Woolens programme of this machine is approved by “The Woolmark Company” for washing machine-washable woolen products provided that the products are washed in accordance with the instructions on the product tag and the instructions published by the manufacturer of this machine. M1422"
In UK, Ireland, Hong Kong and India, the Woolmark trademark is a Certification trademark.
Anti-Allergy+
Use this programme for your laundry (baby clothes, bed sheets, bedlinen, underwear, etc. cotton items) for which you require an anti-allergic and hygienic washing at high temperature with intensive and long washing cycle. The high level of hygiene is ensured thanks to long heating duration and additional rinsing step.
• Programme was tested by the “VDE” institute with the 20°C temperature option selected and it was certified in terms of its efficacy in eliminating bacteria and mould.
• Programme was tested by “The British Allergy Foundation” (Allergy UK) with the 60°C temperature option selected and it was certified in terms of its efficacy in eliminating allergens in addition to bacteria and mould.
Allergy UK, is the brand of the British Allergy Association. Seal of Approval is created to guide people that require recommendation about a product that the related product restricts / reduces / eliminates the allergens or reduces the allergen content significantly in the ambient where allergy patients exist. It aims to provide assurance that the products are tested scientifically or examined in a way to provide measurable results.
Bedding&Blanket
Use this programme to wash your fiber duvets that bear "machine washable" tag. Check that you have loaded the duvet correctly in order not to damage the machine and the duvet. Remove the duvet cover before loading the duvet into the machine. Fold the duvet into two and load it into the machine. Load the duvet into the machine paying attention to place it in a way that it will not contact the bellow or the glass. Besides, use this programme to wash your coats, vest, jackets etc. containing feathers with a "machinewashable" label on them.
Do not load more than 1 double fiber duvet (200 x 200 cm).
Do not wash your duvets, pillows and etc. that contain cotton in the machine.
CAUTION: Do not wash the items apart from duvets such as carpets, rugs and etc. in the machine. Otherwise, permanent damage will occur in the machine.
Spin+Drain
You can use this function to remove the water on the garment of drain the water in the machine.
Rinse
Use when you want to rinse or starch separately.
Shirts
This programme is used to wash the shirts made from cotton, synthetic and synthetic blended fabrics altogether. It reduces wrinkles. When the quick wash function is selected, the Pre-treatment algorithm is executed.
• Apply the pre-treatment chemical on your garments directly or add it together with the detergent when the machine starts to take water in the powder detergent compartment. Thus, you can obtain the same performance as you obtain with normal washing in a much shorter period of time. Usage life of your shirts increases.
Daily Quick / Quick 14’
Use this programme to wash your lightly soiled or unspotted cotton clothes in a short time. The programme duration can be reduced down to 14 minutes when the quick wash function is selected. When the quick wash function is selected, maximum 2 (two) kg of laundry must be washed.
Dark Care / Jeans
Use this programme to protect the colour of your dark-coloured garments or jeans. It performs high performance washing with special drum movement even if the temperature is low. It is recommended to use liquid detergent or woolen shampoo for dark coloured laundry. Do not wash your delicate clothes containing wool or etc.
Auto Program
Use to wash frequently washable cotton, synthetic or blended (cotton+synthetic) clothes. Programme detects the type and quantity of the laundry to automatically adjust water consumption and programme time.
CAUTION: Do not wash your woolen and delicate clothes in this programme. Select a suitable temperature if the temperature shown on the temperature display is not compatible with the warnings on the garment label.
The maximum washing temperature in Automatic programme depending on the soiling level and laundry type is 60ºC. Washing performance may not be at the desired level for heavily soiled whites and stubborn stains (collar, sock soil, perspiration stain, etc.). In this case, it is recommended to select Cottons programme with prewash and set the temperature to 50-60°C.
Many types of clothing are correctly detected and safely washed in Automatic programme.
Delicates
You can wash your delicate clothes such as cotton/synthetic blended knitwear or hosiery in this programme. It washes with more delicate washing action. Wash your clothes whose colour you want to preserve either at 20 degrees or by selecting the cold wash option.
CoolClean
Use to wash your moderately soiled and durable cotton/synthetic laundry. An effective washing is provided thanks to the intense washing action and double jet system.
Sports&Outdoor
You can use this programme to wash sports and outdoors garments that contain cotton/synthetics mix and water repellent covers such as gore-tex etc. It makes sure your garments are washed gently thanks to special rotating movements.
StainExpert
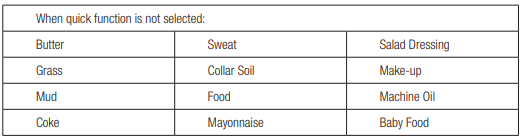
The machine has a special stain programme which enables the removal of different types of stains in the most effective way. Use this programme only for durable colourfast cotton laundry. Do not wash delicate and pigmenting clothes and laundry in this programme. Before washing, garment tags should be checked (recommended for cotton shirts, trousers, shorts, t-shirts, baby clothes, pyjamas, aprons, table clothes, bed sheets, duvet covers, pillowcases, bath-beach towels, towels, socks, cotton underwear that are suitable for washing at high temperature and long time). In the automatic stain programme, you can wash 24 types of stains divided into two different groups according to quick function selection. You can see stain groups based on the selection of the quick function.
You can find stain groups based on quick function below:
Select the stain programme.
Select the stain you want to clean by locating it in the groups above and selecting the related group with the quick auxiliary function button.
Read the garment tag carefully and ensure that correct temperature and spin speed are selected.
Temperature selection
Whenever a new programme is selected, the recommended temperature for the programme appears on the temperature indicator. It is possible that the recommended temperature value is not the maximum temperature that can be selected for the current programme.
Press the Temperature Adjustment button to change the temperature. Temperature will decrease by steps of 10 °C.
Finally, “-” symbol indicating the cold wash option appears on the display.
No change can be made in programmes where temperature adjustment is not allowed.
You can also change the temperature after the washing starts. This change can be made if the washing steps allow it. Changes cannot be made if the steps do not allow it.
If you scroll to cold wash option and press Temperature Adjustment button again, the recommended maximum temperature for the selected programme appears on the display. Press the Temperature Adjustment button again to decrease the temperature.
Spin speed selection
Whenever a new programme is selected, the recommended spin speed of the selected programme is displayed on the Spin Speed indicator
It is possible that the recommended spin speed value is not the maximum spin speed that can be selected for the current programme.
Press the Spin Speed Adjustment button to change the spin speed. Spin speed decreases gradually. Then, depending on the model of the product, "Rinse Hold" and "No Spin" options appear on the display.
Spin Speed Adjustment button only serves for decreasing the spin speed.
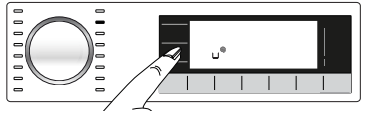
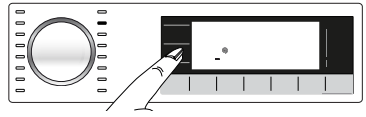
Rinse Hold option is indicated with “ı_ı” symbol and No Spin option is indicated with “_” symbol.
If you are not going to unload your laundry immediately after the programme completes, you can use Rinse Hold function in order to prevent them from getting wrinkled when there is no water in the machine.
This function holds the laundry in the final rinsing water.
If you want to spin your laundry after the Rinse Hold function:
Adjust the Spin Speed.
Press Start / Pause / Cancel button. The programme will resume. Machine drains the water and spins the laundry.
If you want to drain the water at the end of the programme without spinning, use No Spin function.
No change can be made in programmes where spin speed adjustment is not allowed.
You can change the spin speed after the washing starts if the washing steps allow it. Changes cannot be made if the steps do not allow it.
Rinse hold
If you are not going to unload your clothes immediately after the programme completes, you can use rinse hold function to keep your laundry in the final rinsing water in order to prevent them from getting wrinkled when there is no water in the machine. Press Start / Pause button after this process if you want to drain the water without spinning your laundry. Programme will resume and complete after draining the water.
If you want to spin the laundry held in water, adjust the Spin Speed and press Start / Pause button.
The programme will resume. Water is drained, laundry is spun and the programme is completed.
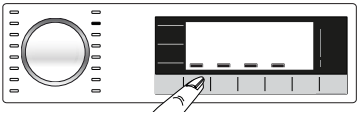
Auxiliary function selection
Select the desired auxiliary functions before starting the programme. Whenever a programme is selected, frames of the auxiliary function symbol that can be selected together with it illuminates. And when you select an auxiliary function, the interior area of the auxiliary function symbol also starts to illuminate.
Frame of the auxiliary function symbol that cannot be selected with the current programme does not illuminate.
Also the frames of the auxiliary function suitable for the current programme after the washing has started remains illuminated. You can select or cancel the auxiliary functions whose frames are illuminated. If the wash cycle has reached a point where you cannot select the auxiliary function, the function's frame turns off.
Some functions cannot be selected together. If a second auxiliary function conflicting with the first one is selected before starting the machine, the function selected first will be canceled and the second auxiliary function selection will remain active. For example, if you want to select Quick Wash after you have selected the Additional Water, Additional Water will be canceled and Quick Wash will remain active.
An auxiliary function that is not compatible with the programme cannot be selected. (See, "Programme and consumption table")
Some programmes have auxiliary functions that must be operated simultaneously. Those functions cannot be cancelled. The frame of the auxiliary function will not be illuminated, only inner area will be illuminated.
Auxiliary functions
Fast+
When this function is selected, the durations of the relevant programmes get shorter by 50%.
Thanks to the optimised washing steps, high mechanic activity and optimum water consumption, high washing performance is achieved in spite of the reduced duration.
When you select this function, load your machine with half of the maximum laundry specified in the programme table.
Night Mode
Use to wash the cottons with lesser energy consumption and silently. Spin steps are cancelled for a silent washing and the cycle ends with the Rinse Hold step. After completion of the programme, run Spin cycle to spin the laundry.
Pet Hair Removal
This function helps to remove pet hair that remain on your garments more effectively.
When you select this function, Prewash and Extra Rinse steps are added to the normal programme. Thus, washing is performed with more water and the pet hair is removed more effectively.
Auto Dosing
With this auxiliary function key, you can change your detergent and dose preferences. For detailed information, see 4.2.6.2 “Detergent and Softener Dose or Powder Detergent Selection“
Functions/Programmes Selected by Pressing the Function Keys for 3 Seconds
Drum Cleaning
Press and hold the auxiliary function button 1 for 3 seconds to select the programme.
Use regularly (once in every 1-2 months) to clean the drum and provide the required hygiene. Operate the programme while the machine is completely empty. To obtain better results, put powder lime-scale remover for washing machines when the powder detergent function is selected. When the programme is over, leave the loading door ajar so that the inside of the machine gets dry.
This is not a washing programme. It is a maintenance programme.
Do not run the programme when there is something in the machine. If you try to do so, the machine detects that there is load inside and aborts the programme.
Child lock
Use Child Lock function to prevent children from tampering with the machine. Thus you can avoid any changes in a running programme.
You can switch on and off the machine with On / Off button when the Child Lock is active. When you switch on the machine again, programme will resume from where it has stopped.
When the Child Lock is enabled, an audio warning will be given if the buttons are pressed. Audio warning will be canceled if the buttons are pressed five times consecutively.
To activate the Child Lock:
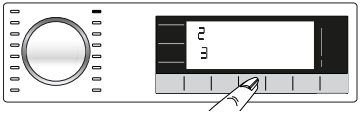
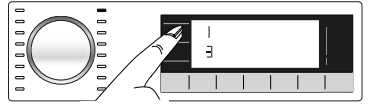
Press and hold Auxiliary Function button 2 for 3 seconds. After the countdown as “CL 3-2-1" on the display is over, "CL On" symbol appears on the display. Release Auxiliary Function button 2 when this warning is displayed.
To deactivate the Child Lock:
Press and hold Auxiliary Function button 2 for 3 seconds. After the countdown as “CL 3-2-1" on the display is over, "CL Off" symbol disappears.
AntiCrease+
This function is selected when the 4th auxiliary function is pressed and held for 3 seconds and the programme follow-up light for the relevant step turns on. When the function is selected, the drum rotates for up to 8 hours for preventing the laundry from creasing at the end of the programme. You can cancel the programme and take your laundry out at any time during the 8-hour duration. Press the function selection key or the machine on/off key to cancel the function. The programme follow-up light will remain on until the function is canceled or the step is complete. If the function is not cancelled, it will be active in the subsequent washing cycles as well.
Auto Dosing Setting
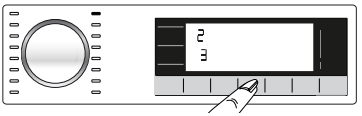
You can enable this function by pressing the auxiliary function key 3 for 3 seconds. With this function, the dosing amounts of the Liquid Detergent and Softener are changed.
Changing the dosing amounts of Liquid Detergent and Softener:
• Press and hold Auxiliary Function button 3 for 3 seconds.
• You can press the “Temperature” selection button() to change the liquid detergent dosing levels as below.
1: Low
2: Medium
3: High
• You can press the “Spin” selection button () to change the softener dosing levels as below.
1: Low
2: Medium
3: High
• After setting the dosing amounts, you can press the auto dosing key to return to the main menu. For all programmes, dosing will be performed based on the latest settings you have selected until you select a new setting.
End Time
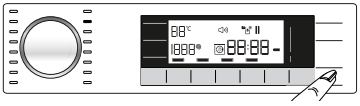
Ending In
Remaining time for the completion of the programme while it is running is displayed as “01:30” in hours and minutes format.
Programme time may differ from the values in section "Programme and consumption table" depending on the water pressure, water hardness and temperature, ambient temperature, amount and the type of laundry, auxiliary functions selected and the changes at the mains voltage.
With the End Time function, the startup of the programme may be delayed up to 24 hours. After pressing End Time button, the programme's estimated ending time is displayed. If the End Time is set, End Time indicator is illuminated.
In order for the End Time function is activated and the programme is completed at the end of the specified time, you must press Start/Pause button after adjusting the time.
If you want to cancel End Time function, press On/Off button to turn off and on the machine.
When you have activated the End Time function, do not add liquid detergent in the powder detergent compartment no 2. There is the risk of staining of the clothes.
Open the loading door, place the laundry and put detergent, etc.
Select the washing programme, temperature, spin speed and, if required, the auxiliary functions.
Set the end time of your choice by pressing the End Time button. End Time indicator illuminates.
Press Start/Pause button. Time countdown starts. “:” sign in the middle of the end time on the display starts flashing.
Additional laundry may be loaded during the End Time countdown period. At the end of the countdown, End Time indicator turns off, washing cycle starts and the time of the selected programme appears on the display.
When the End Time selection is completed, the time appears on the screen consists of end time plus the duration of the selected programme.
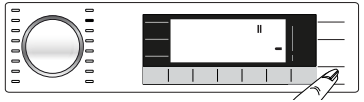
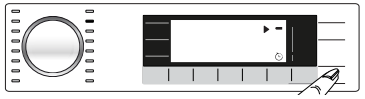
Starting the programme
1. Press Start/Pause button to start the programme.
2. The Start/Pause button's light which was off before starts to illuminate steadily now, indicating that the programme has started.
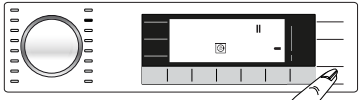
3. Loading door is locked. The door lock symbol appears on the display after the loading door is locked.
4. Programme follow-up indicator lights on the display will show the current programme step.
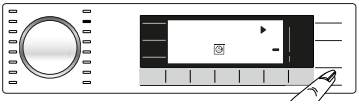
Loading door lock
There is a locking system on the loading door of the machine that prevents opening of the loading door in cases when the water level is unsuitable.
"Door Locked" symbol appears on the display when the loading door is locked.
Opening the loading door in case of power failure:
In case of power failure, you can use the loading door emergency handle under the pump filter cap to open the loading door manually.
CAUTION: To avoid any water overflow before opening the loading door, make sure there is no water left inside the machine.
• Open the pump filter cap.
• Release the loading door emergency handle located at the rear side of the filter cap.
• Pull down the loading door emergency handle once and open the loading door. After opening the loading door, re-insert the loading door emergency handle.
• If the loading door does not open, try again by pulling down the handle.
Changing the selections after programme has started
Adding laundry after the programme has started :
If the water level in the machine is suitable when you press Start/Pause button, the door lock will be deactivated and the door will open, allowing you to add garments. The door lock icon on the display goes off when the door lock is deactivated. After adding garments, close the door and press Start/Pause button once again to resume the washing cycle.
If the water level in the machine is not suitable when you press Start/Pause button, the door lock cannot be deactivated and the door lock icon on the display remains on.
If the temperature of the water inside the machine is above 50°C, you cannot deactivate the door lock for safety reasons, even if the water level is suitable.
Switching the machine to pause mode:
Press the Start/Pause button to switch the machine to pause mode. Pause symbol will flash on the display.
Changing the programme selection after programme has started:
The programme change is not allowed when the current programme is running.
You can select the new programme after switching the current programme to pause mode.
The selected program starts anew.
Changing the auxiliary function, speed and temperature
Depending on the step the programme has reached, you can cancel or activate the auxiliary functions. See, "Auxiliary function selection". Y
You can also change the speed and temperature settings. See, "Spin speed selection" and "Temperature selection".
The loading door will not open if the water temperature in the machine is high or the water level is above the loading door baseline.
Cancelling the programme
The programme is cancelled when the machine is turned off and on again. Press and hold On/Off button for 3 seconds. After the countdown as "3-2-1" on the display is over, the machine turns off.
If you press On/Off button when the Child Lock is enabled, the programme will not be cancelled. You should cancel the Child Lock first.
If you want to open the loading door after you have cancelled the programme but it is not possible to open the loading door since the water level in the machine is above the loading door baseline, then turn the Programme Selection knob to Pump+Spin programme and drain the water in the machine.
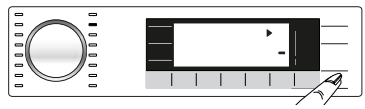
End of programme
End symbol appears on the display when the programme is completed.
If you do not press any button for 10 minutes, the machine will switch to OFF mode. Display and all indicators are turned off.
Completed programme steps will be displayed if you press On/Off button.
Adjusting the VOLUME level
Low volume and high volume
Press and hold 1st and 2nd auxiliary function buttons for 3 seconds to adjust the volume level. After the countdown as "3-2-1" on the display is over, the volume level symbol will appear and the new volume level will be displayed.
Drum Illumination
Drum illumination lamp of your machine will light up during programme selection. The light will turn off when you start the programme. If no programme is started or no key is pressed within 10 minutes during programme selection process, the drum illumination lamp will turn off.
Drum illumination lamp of your machine will light up after the programme is completed. It will go off when you press the On/Off button. The drum illumination lamp will turn off if you do not press any button within 10 minutes after the programme has ended.
Maintenance and cleaning
Service life of product extends and frequently experienced problems will be reduced if it is cleaned at regular intervals.
Cleaning the detergent drawer
When to clean
If you see hardened, viscous detergent or softener when you open the dosing container lid,
If you are not satisfied with the washing results (the detergent or softener may not be taken into the washing medium since it is hardened),
If the liquids in the compartment do not decrease for a long time even though you do not add detergent or softener and dosing is selected,
If you want to change the washing agents you have added to the compartment (for example, if you are not satisfied with the detergent and do not want to use it) or if you have made a mistake when adding the agents (for example, if you have added detergent to the softener compartment or softener to the detergent compartment),
If you are going to add a detergent or softener from a different brand than the one you normally use,
If you are adding a washing agent of a different nature (for example, if you are adding detergent for coloured laundry when there is detergent for white laundry in the compartment),
If you are adding a washing agent with a different concentration (To not waste the old detergent, you can add it to the powder detergent compartment in the next wash and select «powder detergent active» on the display.)
If the new softener to be added has the same characteristics but has a different scent (please keep in mind that if you add the new softener without cleaning the remnants of the previous one, this mixture will give a different smell),
If you are not going to use the product for a long time (for example, when going to the summer house and when returning - 3 months or more) (the washing agent may increasingly thicken and get hardened in the end, and thus the system may not perform dosing even if it shows that the compartments are full.)
Cleaning:
Before cleaning, press the On/Off button to switch of the product and unplug it.
It is recommended for you to wear a glove to avoid contacting the detergent you will take out of the detergent drawer and other washing agents.
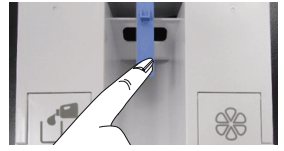
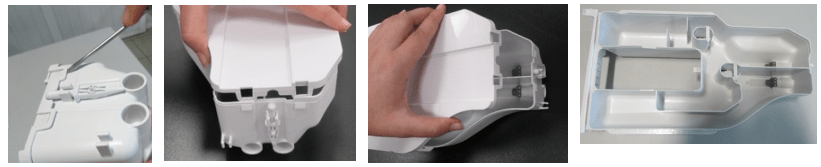
Press the blue part in the middle of the detergent drawer and then pull the drawer towards yourself to take it out.
Take out the discharge bar that is located at the back of the drawer.
The hole behind the detergent compartment that will be emptied is placed over a container.
Slightly push the discharge bar into the slot at the back of the detergent compartment.
The detergent starts to flow to the container.
Repeat the same process for softener.
Use a flat screwdriver to remove the tabs holding the upper cover of the detergent drawer (there are 6 tabs in total: two on the right side of the drawer, two on the left and two at the back) and wash the inside of the drawer.
After washing it, place the cover back to its location. Make sure that all tabs are fitted. If the tabs do not seat properly, liquids may leak or the detergent drawer may get stuck or difficultly move on the drawer slide. For this reason, please ensure that the tabs are fitted in place.
Fit the discharge bar to its slot at the back of the drawer.
Paying attention to its slot and slides, fit the drawer back in place and push it to close. After adding detergent and softener, it will be ready to be used in programmes with dosing function.
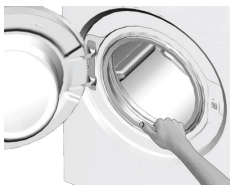
Cleaning the loading door and the drum
For products with drum cleaning programme, please see Operating the product - Programmes.
Select
Repeat Drum Cleaning process in every 2 months.
Use an anti-limescale suitable for the washing machines.
After every washing make sure that no foreign substance is left in the product.
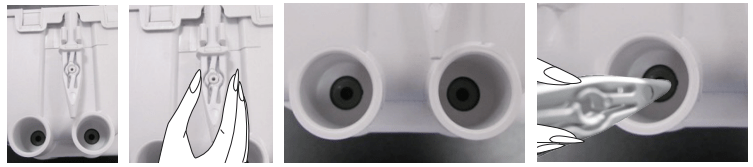
If the holes on the bellow shown in the figure is blocked, open the holes using a toothpick.
Foreign metal substances will cause rust stains in the drum. Clean the stains on the drum surface by using cleaning agents for stainless steel.
Never use steel wool or wire wool. These will damage the painted, chromated and plastic surfaces.
Cleaning the body and control panel
Wipe the body of the product with soapy water or non-corrosive mild gel detergents as necessary, and dry with a soft cloth.
Use only a soft and damp cloth to clean the control panel.
Cleaning the water intake filters
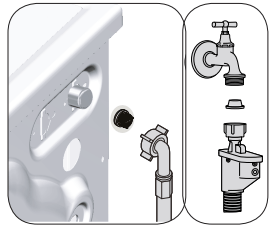
There is a filter at the end of each water intake valve at the rear of the product and also at the end of each water intake hose where they are connected to the tap. These filters prevent foreign substances and dirt in the water to enter the product. Filters should be cleaned if they are dirty.
Close the taps.
Remove the nuts of the water intake hoses to access the filters on the water intake valves. Clean them with an appropriate brush. If the filters are too dirty, remove them from their places with a pliers and clean in this way.
Take out the filters on the flat ends of the water intake hoses together with the gaskets and clean thoroughly under running water.
Replace the gaskets and filters carefully and tighten their nuts by hand.
Draining remaining water and cleaning the pump filter
The filter system in your product prevents solid items such as buttons, coins and fabric fibers clogging the pump impeller during draining of washing water. Thus, the water will be drained without any problem and the service life of the pump will extend.
If the product fails to drain water inside it, the pump filter is clogged. Filter must be cleaned whenever it is clogged or in every 3 months. Water must be drained off first to clean the pump filter.
In addition, prior to transporting the product (e.g., when moving to another house) water should be drained completely.
WARNING: Foreign substances left in the pump filter may damage your product or may cause noise problem.
WARNING: In regions where freezing is possible, the tap must be closed, system hose must be removed and the water inside the product must be drained when the product is not in use.
WARNING: After each use, turn off the tap to which the mains hose is connected.
In order to clean the dirty filter and drain the water:
1. Unplug the product to cut off the supply power.
WARNING: Temperature of the water inside the product may rise up to 90 ºC. To avoid the risk of scalding, clean the filter after the water inside the product is cooled down.
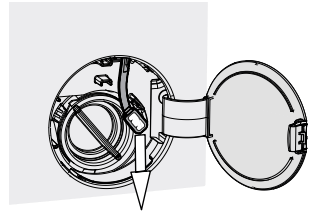
2. Open the filter cover.
3. Follow the below procedures in order to drain water.
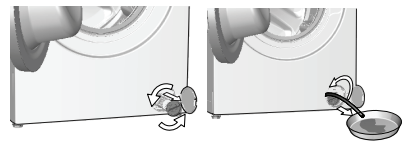
If the product has an emergency water draining hose, in order to drain the water:
a. Pull the emergency draining hose out from its seat.
b. Place a large container at the end of the hose. Drain the water into the container by pulling out the plug at the end of the hose. When the container is full, block the inlet of the hose by replacing the plug. After the container is emptied, repeat the above procedure to drain the water in the product completely.
c. When draining of water is finished, close the end by the plug again and fix the hose in its place.
d. Turn and remove the pump filter.
4. Clean any residues inside the filter as well as fibers, if any, around the pump impeller region.
5. Replace the filter.
6. If the filter cap is composed of two pieces, close the filter cap by pressing on the tab. If it is one piece, seat the tabs in the lower part into their places first, and then press the upper part to close.
Troubleshooting
Problem
Cause
Solution
Programs do not start after the loading door is closed.
Start / Pause / Cancel button is not pressed.
• *Press Start / Pause / Cancel button.
It may be difficult to close the loading door in case of excessive loading.
• Reduce the amount of laundry and make sure that the loading door is closed properly.
Programme cannot be started or selected.
The product has switched to self protection mode due to a supply problem (line voltage, water pressure, etc.).
• Press and hold On/Off button for 3 seconds to reset the product to factory settings. (See "Cancelling the programme")
Water inside the product.
Some water has remained in the product due to the quality control processes in the production.
• This is not a failure; water is not harmful to the product.
The product does not take water in.
Tap is turned off.
• Turn on the taps.
Water inlet hose is bent.
• Flatten the hose.
Water inlet filter is clogged.
• Clean the filter.
Loading door is not closed.
• Close the door.
The product does not drain water.
Water drain hose is clogged or twisted.
• Clean or flatten the hose.
Pump filter is clogged.
• Clean the pump filter.
Product vibrates or makes noise.
Product is standing unbalanced.
• Stable the product by adjusting the feet.
A hard substance has entered into the pump filter.
• Clean the pump filter.
Transportation safety bolts are not removed.
• Remove the transportation safety bolts.
Laundry quantity in the product is too little.
• Add more laundry to the product.
Excessive laundry is loaded in the product.
• Take out some of the laundry from the product or distribute the load by hand to balance it homogeneously in the product.
Product is leaning on a rigid item.
• Make sure that the product is not leaning on anything.
There is water leaking from the bottom of the product.
Water drain hose is clogged or twisted.
• Clean or flatten the hose.
Pump filter is clogged.
• Clean the pump filter.
Product stopped shortly after the programme started.
Machine has stopped temporarily due to low voltage.
• Product will resume running when the voltage restores to the normal level.
Product directly drains the water it takes in.
Draining hose is not at adequate height.
• Connect the water draining hose as described in the user manual.
No water can be seen in the product during washing.
Water is inside the invisible part of the product.
• This is not a failure.
Loading door cannot be opened.
Loading door lock is activated because of the water level in the product.
• Drain the water by running the Pump or Spin programme.
Product is heating up the water or it is at the spinning cycle.
• Wait until the programme completes.
Loading door may be stuck because of the pressure it is subjected to.
• Grab the handle and push and pull the loading door to release and open it.
If there is no power, loading door of the product will not open.
• To open the loading door, open the pump filter cap and pull down the emergency handle positioned at the rear side of the said cap. See "Loading door lock"
Washing takes longer than specified in the user manual.(*)
Water pressure is low.
• Product waits until taking in adequate amount of water to prevent poor washing quality due to the decreased amount of water. Therefore, the washing time extends.
Voltage is low.
• Washing time is prolonged to avoid poor washing results when the supply voltage is low.
Input temperature of water is low.
• Required time to heat up the water extends in cold seasons. Also, washing time can be lengthened to avoid poor washing results.
Number of rinses and/or amount of rinse water have increased.
• Product increases the amount of rinse water when good rinsing is needed and adds an extra rinsing step if necessary.
Excessive foam has occurred and automatic foam absorption system has been activated due to too much detergent usage.
• Use recommended amount of detergent.
Programme time does not countdown. (On models with display) (*)
Timer may stop during water intake.
• Timer indicator will not countdown until the product takes in adequate amount of water. The product will wait until there is sufficient amount of water to avoid poor washing results due to lack of water. Timer indicator will resume countdown after this.
Timer may stop during heating step.
• Timer indicator will not countdown until the product reaches the selected temperature.
Timer may stop during spinning step.
• Automatic unbalanced load detection system is activated due to the unbalanced distribution of the laundry in the product.
Programme time does not countdown. (*)
There is unbalanced load in the product.
• Automatic unbalanced load detection system is activated due to the unbalanced distribution of the laundry in the product.
Product does not switch to spinning step. (*)
There is unbalanced load in the product.
• Automatic unbalanced load detection system is activated due to the unbalanced distribution of the laundry in the product.
The product will not spin if water is not drained completely.
• Check the filter and the draining hose.
Excessive foam has occurred and automatic foam absorption system has been activated due to too much detergent usage.
• Use recommended amount of detergent.
Washing performance is poor: Laundry turns gray. (**)
Insufficient amount of detergent has been used over a long period of time.
• Use the recommended amount of detergent appropriate for water hardness and the laundry.
Washing has been made at low temperatures for a long time.
• Select the proper temperature for the laundry to be washed.
Insufficient amount of detergent is used with hard water.
• Using insufficient amount of detergent with hard water causes the soil to stick on the cloth and this turns the cloth into gray in time. It is difficult to eliminate graying once it happens. Use the recommended amount of detergent appropriate for water hardness and the laundry.
Excessive amount of detergent is used.
• Use the recommended amount of detergent appropriate for water hardness and the laundry.
Washing performance is poor: Stains persist or the laundry is not whitened. (**)
Insufficient amount of detergent is used.
• Use the recommended amount of detergent appropriate for water hardness and the laundry.
Excessive laundry is loaded in.
• Do not load the product in excess. Load with amounts recommended in the "4.3.3 Programme and consumption table".
Wrong programme and temperature were selected.
• Select the proper programme and temperature for the laundry to be washed.
Wrong type of detergent is used.
• Use original detergent appropriate for the product.
Excessive amount of detergent is used.
• Put the detergent in the correct compartment. Do not mix the bleaching agent and the detergent with each other.
Washing performance is poor: Oily stains appeared on the laundry.
(**)
Regular drum cleaning is not applied.
• Clean the drum regularly. For this procedure, please see "4.4.2 Cleaning the loading door and the drum".
Washing performance is poor: Clothes smell unpleasantly. (**)
Odours and bacteria layers are formed on the drum as a result of continuous washing at lower temperatures and/or in short programmes.
• Leave the detergent drawer as well as the loading door of the product ajar after each washing.
Thus, a humid environment favorable for bacteria cannot occur in the machine.
Colour of the clothes faded. (**)
Excessive laundry was loaded in.
• Do not load the product in excess.
Detergent in use is damp.
• Keep detergents closed in an environment free of humidity and do not expose them to excessive temperatures.
A higher temperature was selected.
• Select the proper programme and temperature according to the type and soiling degree of the laundry.
Washing machine does not rinse well.
The amount, brand and storage conditions of the detergent used are inappropriate.
• Use a detergent appropriate for the washing machine and your laundry. Keep detergents closed in an environment free of humidity and do not expose them to excessive temperatures.
Detergent was put in the wrong compartment.
• Add the detergent and the softener to the right compartment.
Pump filter is clogged.
• Check the filter.
Drain hose is folded.
• Check the drain hose.
Laundry became stiff after washing. (**)
Insufficient amount of detergent is used.
• Using insufficient amount of detergent for the water hardness can cause the laundry to become stiff in time. Use appropriate amount of detergent according to the water hardness.
Detergent was put in the wrong compartment.
• Add the detergent and the softener to the right compartment.
Detergent was mixed with the softener.
• Do not mix the softener with detergent. Wash and clean the drawer with hot water.
Laundry does not smell like the softener. (**)
Detergent was put in the wrong compartment.
• Add the detergent and the softener to the right compartment.
Detergent was mixed with the softener.
• Do not mix the softener with detergent. Wash and clean the drawer with hot water.
Softener dosing setting level is low.
• Increase the softener dosing amount by one level. See “Auto Dosing Setting”
Detergent residue in the detergent drawer. (**)
Detergent was put in wet drawer.
• Dry the detergent drawer before putting in detergent.
Detergent has gotten damp.
• Keep detergents closed in an environment free of humidity and do not expose them to excessive temperatures.
Water pressure is low.
• Check the water pressure.
The detergent in the main wash compartment got wet while taking in the prewash water. Holes of the detergent compartment are blocked.
• Check the holes and clean if they are clogged.
There is a problem with the detergent drawer valves.
• Call the Authorised Service Agent.
Detergent was mixed with the softener.
• Do not mix the softener with detergent. Wash and clean the drawer with hot water.
Regular drum cleaning is not applied.
• Clean the drum regularly. For this procedure, please see "4.4.2 Cleaning the loading door and the drum".
Too much foam forms inside the product. (**)
Improper detergents for the washing machine is used.
• Use detergents appropriate for the washing machine.
Excessive amount of detergent is used.
• Use only sufficient amount of detergent.
Detergent was stored under improper conditions.
• Store detergent in a closed and dry location. Do not store in excessively hot places.
Some meshed laundry such as tulle may foam too much because of their texture.
• Use smaller amounts of detergent for this type of item.
Detergent was put in the wrong compartment.
• Put the detergent in the correct compartment.
Foam is overflowing from the detergent drawer.
Too much detergent is used.
• Mix 1 tablespoonful softener and 14 l water and pour into the main wash compartment of the detergent drawer.
• Put detergent into the product suitable for the programmes and maximum loads indicated in the “4.3.3 Programme and consumption table”. When you use additional chemicals (stain removers, bleaches and etc), reduce the amount of detergent.
Laundry remains wet at the end of the programme. (*)
Excessive foam has occurred and automatic foam absorption system has been activated due to too much detergent usage.
• Use recommended amount of detergent.
(*) The product does not switch to spinning step when the laundry is not evenly distributed in the drum to prevent any damage to the product and to its surrounding environment. Laundry should be rearranged and re-spun.
(**) Regular drum cleaning is not applied. Clean the drum regularly. See 4.4.2
WARNING: If you cannot eliminate the problem although you follow the instructions in this section, consult your dealer or the Authorised Service Agent. Never try to repair a nonfunctional product yourself.
 The visuals used for machine description in this section are schematic and may not match exactly will the features of your machine.
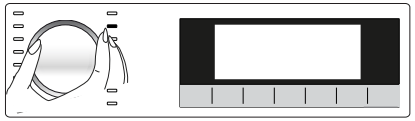


 CAUTION: Do not wash the items apart from duvets such as carpets, rugs and etc. in the machine. Otherwise, permanent damage will occur in the machine.
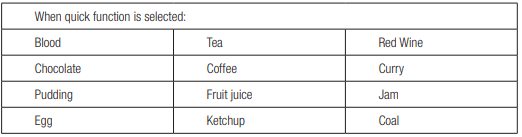


 ) to change the liquid detergent dosing levels as below.
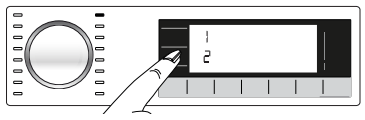
 ) to change the softener dosing levels as below.
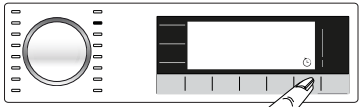

 CAUTION: To avoid any water overflow before opening the loading door, make sure there is no water left inside the machine.
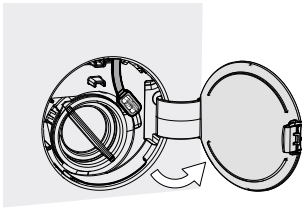
 :
: