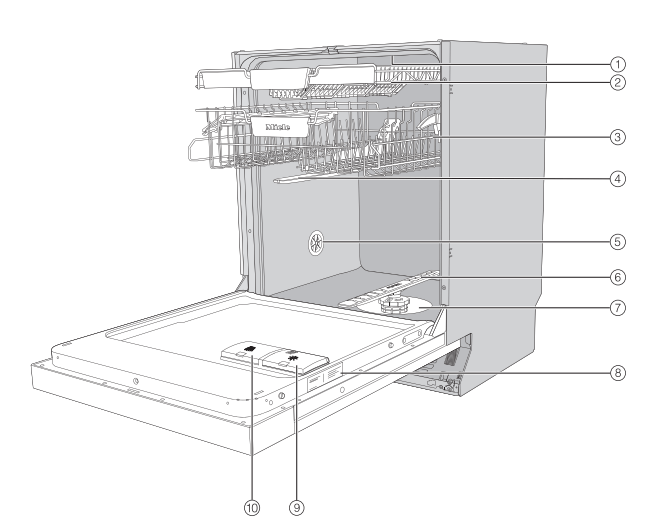
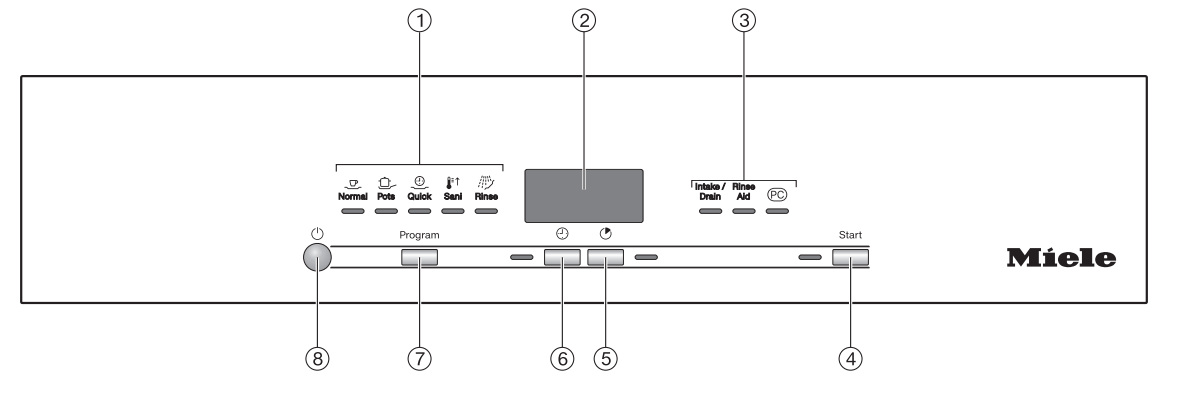
Program selection Normal = Normal Pots = Pots & Pans Quick = QuickIntenseWash Sani = SaniWash Rinse = Rinse & Hold
Time display
Indicator lights/refill reminders = Intake/Drainage = Rinse aid
Start button with indicator light For starting the selected program.
Express button For reducing the program cycle time.
Timer button For selecting a later program start.
Program program selection button For program selection.
On/Off button For turning the dishwasher on and off.
Before using for the first time
Every dishwasher is tested at the factory. There will be residual water in the machine from this test. It is not an indication that the dishwasher has been used previously.
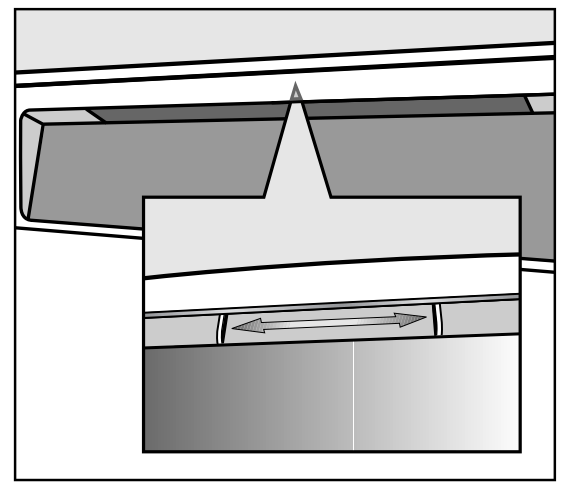
Opening the door
To open the door, reach under the recessed grip and pull the handle. If the door is opened during operation, all functions are automatically interrupted.
WARNING: Risk of scalding due to hot water. During operation, water in the dishwasher may be very hot. During operation, only open the door with extreme caution.
Closing the door
Insert the baskets.
Then lift the door upward and push until it clicks into position.
WARNING: Risk of crushing due to the door closing. When closing the door, you are at risk of shutting your fingers in it. Do not put your hand inside the door as it is closing.
Activating the safety lock
Use the safety lock to prevent children opening the dishwasher door. The door can then only be opened by using a lot of force.
To lock the door, push the slide underneath the recessed grip to the right.
To unlock the door, push the slide to the left.
Rinse aid
Rinse aid is necessary to ensure that water does not cling and leave marks on dishes during the drying phase, and helps dishes dry faster after they have been washed.
Rinse aid is poured into the reservoir and the amount set is dispensed automatically.
WARNING: Liquid dish soap or detergent can cause damage. Liquid dish soap and detergent can damage the rinse-aid reservoir. Only fill it with rinse aid formulated for domestic dishwashers.
Alternatively, you could use liquid citric acid at a concentration of up to 10%. The resulting rinsing and drying quality will not, however, be as good as when rinse aid is used.
WARNING: Risk of acid damage. The dishwasher can be damaged by high concentrations of acid. Under no circumstances should you use citric acid with a higher acid content.
If you only ever wish to use combination detergent products in your dishwasher, you do not need to add rinse aid. However, for optimum rinsing and drying results, use dishwasher detergent and add rinse aid separately.
Please make sure that if you stop using combination detergents, you refill the rinse aid. Turn the refill reminder back on if required.
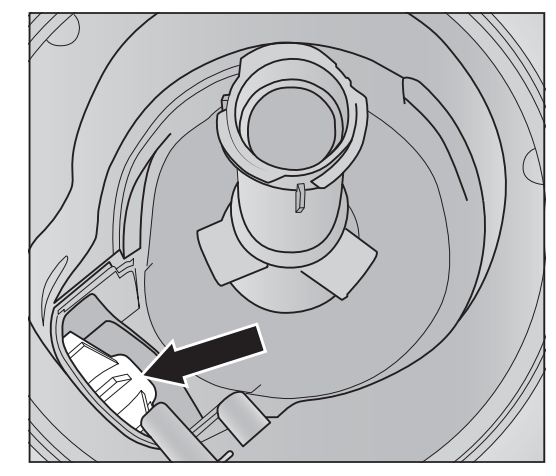
Adding rinse aid
Press the yellow button on the lid of the rinse-aid reservoir.
The lid will spring open.
Fill with rinse aid until the filling level indicator (arrow) changes to a dark color while the door is horizontally open.
The rinse-aid reservoir holds approximately 110 ml
Close the lid firmly until you hear it click into place. Otherwise, water can enter the rinse-aid reservoir during a program.
Wipe up any spilled rinse aid. This prevents excess foam developing during the next program.
Filling the rinse-aid reservoir
When the refill reminder Rinse aid appears in the display, the reservoir contains sufficient rinse aid for 2 to 3 programs only.
Add rinse aid in plenty of time.
The rinse-aid refill reminder will go out.
If you only ever use combination detergent products containing rinse aid in your dishwasher, you can turn off the refill reminder if you wish (see “Turning off the refill reminders” under “Options”).
Setting the rinse-aid dosage
You can adjust the rinse-aid dosage for best results. The rinse-aid dosage can be set from 0 to 6 ml. 3 ml is the factory default setting.
The rinse-aid dosage can turn out to be higher than the set value due to the automatic adjustment of the program.
If spots appear on dishes and glassware:
- Increase the rinse-aid dosage.
If clouding or smearing appears on dishes and glassware:
- Decrease the rinse-aid dosage.
Turn the dishwasher off with the button, if it is turned on.
Press the Start button in and, while holding it in, turn the dishwasher on using the button. Keep the Start button pressed in for at least 4 seconds until the Start indicator light comes on.
If this does not happen, start the procedure from the beginning again.
Press the Program button 3 times.
The left program indicator light will flash rapidly 3 times at intervals.
The set value will appear in the display after .
will start flashing in the time display. Setting 3 is set.
Use the Start button to select the required setting. The dosage amount increases each time you press the button. When the highest value is reached, the setting starts again from the beginning.
The setting is now saved.
Turn the dishwasher off with the button.
Operation
Turning on the dishwasher
Make sure the spray arms can rotate freely.
Close the door.
Turn on the water supply if it is turned off.
Press the button.
The Start indicator light flashes and the indicator light comes on next to the program selected.
Selecting a program
Choose your program according to the type of load and the degree of soiling.
The different programs and their uses are described under Program overview.
Use the Program button to select the program you want.
The indicator light next to the program selected will come on. The program duration will appear in hours and minutes in the display.
You can now select program options (see “Options”).
If any program options are selected, the appropriate indicator lights will also light up.
Display of program duration
The duration of the program selected appears in hours and minutes in the display before the program begins. During the program, the time left until the end of the program is displayed.
The displayed duration may vary for the same program. It is influenced by, for example, the temperature of the incoming water, the reactivation cycle of the water softener, the detergent type, the amount of dishware, and how soiled it is.
When a program is selected for the first time, the display will show the average program duration for a cold water connection.
The program durations shown under “Program overview” refer to standard test loads and temperatures.
Each time a program is run, the control module calculates the program duration required depending on the temperature of the water taken into the dishwasher and the amount of dishware.
Starting a program
The dishwasher can only be started if the door is closed.
Press the Start button. The program starts. The Start indicator light will come on.
WARNING: Risk of scalding due to hot water.
During operation, water in the dishwasher may be very hot.
During operation, only open the door with extreme caution.
End of program
The program has ended when shows in the display.
The dishwasher can now be opened and unloaded.
The drying fan may continue to run for a few minutes at the end of the program.
WARNING: Risk of damage due to steam. Steam from the dishwasher could damage the edges of delicate countertops when you open the door at the end of the program if the fan is no longer running.
At the end of a program, you can either open the door fully (do not leave it partially open) or leave it closed until you are ready to unload the dishes.
Energy management
To save energy, the dishwasher will switch off automatically 10 minutes after the last time a button is pressed or after the end of a program.
You can turn the dishwasher back on again with the button.
The dishwasher will not turn itself off while a program is running or if there is a fault.
Turning off the dishwasher
The dishwasher can be turned off at any time using the button.
Turning the dishwasher off during a program stops the program.
You can also do this to stop an ongoing timer.
WARNING: Risk of damage from leaking water. Leaking water can cause damage. If the dishwasher is not going to be used for a longer period of time, e.g., during vacations, the water supply should be turned off.
Unloading the dishwasher
Dishes tend to break and chip more easily when they are hot. Allow the dishes to cool until they are comfortable enough to handle before unloading them.
The dishes will cool much faster if you open the door when the program has ended.
First unload the lower basket, then the upper basket and finally the cutlery tray. This will prevent water drops from the upper basket and cutlery tray from falling onto the dishes in the lower basket.
Interrupting a program
A program will be interrupted as soon as the door is opened.
Close the door and press the Start button.
The program will continue from the point at which it was interrupted.
WARNING: Risk of scalding due to hot water. During operation, water in the dishwasher may be very hot. During operation, only open the door with extreme caution.
Canceling or changing a program
If a program is canceled, important program stages may be missed. A program should only be canceled in the first few minutes.
If a program has already started and you wish to cancel it, proceed as follows:
Turn the dishwasher off with the button.
If you would like to select another program:
Turn the dishwasher on again with the button.
If you have dispensed detergent manually, check whether the detergent compartment is still closed. If the lid is already open, fill it with detergent again and close the lid.
Select the program you want, and then start it.
Options
Timer
You can set the start time of a program. The program start time can be delayed for between 30 minutes and 24 hours. With start-time delays between 30 minutes and 3 hours, the delay can be set in 30 minute stages. It is set in hours for periods longer than this.
During manual detergent dispensing, the detergent will clump together if the detergent compartment is not dry, and this may mean it is not fully rinsed out.
When using the timer function, make sure that the detergent compartment is dry before adding detergent. Wipe dry with a cloth first, if necessary. Do not use any liquid detergents. These can leak out.
WARNING: Danger to health due to detergent. To prevent children coming into contact with dishwasher detergent: Do not fill the detergent dispenser until just before starting the program, i.e., before you activate the timer. Use the safety lock to secure the dishwasher door.
Activating the timer
Turn the dishwasher on with the button.
The Start indicator light will flash.
Select the program you want to use.
Press the timer button.
The most recently set time will be shown on the time display. The timer indicator light will light up.
Set the required time after which the program should start automatically using the button.
If the button is pressed and held, the time will increase automatically up to 24 hours. To start again with 0:30 hours, press the button twice.
Press the Start button.
The Start indicator light will come on
After you have activated the timer, all the displays will turn off after a few minutes to save energy.
Press the button to switch the time display back on again for a few minutes.
The time up until the program starts will count down in the display in hours for durations above 10 hours, and in minutes for durations below 10 hours.
At the end of the delay period, the program selected begins automatically. The time left will appear in the time display and the timer indicator light will go out.
Starting a program before the time for the timer has elapsed:
A program can be started before the time for the timer has elapsed. Proceed as follows:
Turn the dishwasher off with the button.
Turn the dishwasher on again with the button.
Select the program you want.
Press the Start button.
The program starts. The Start indicator light will come on.
Cleaning and care
Check the condition of your dishwasher regularly (approx. every 4– 6 months). This helps to avoid faults and problems.
WARNING: Damage due to unsuitable cleaning agents. All surfaces are susceptible to scratching. Contact with unsuitable cleaning agents can alter or discolor all surfaces. Only use cleaning agents formulated for use on the relevant surfaces.
Cleaning the wash cabinet
The wash cabinet is largely self-cleaning, provided that the correct amount of detergent is always used.
If, despite this, limescale or grease deposits build up in the cabinet, these can be removed with a proprietary dishwasher cleaner (available from the Miele Customer Service or Miele's online store). Follow the dosage recommended by the manufacturer on the packaging.
The frequent use of low-temperature wash programs increases the risk of contamination and odors inside the wash cabinet. Run the Pots & Pans program once per month to clean the wash cabinet and prevent odors from developing.
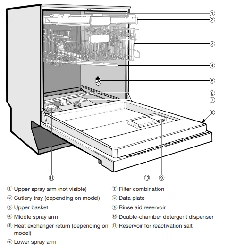
Clean the filters in the wash cabinet regularly
Cleaning the door and the door seal
The door seal and the sides of the dishwasher door are not accessed and cleaned by the spray arm jets. As a result, mold can develop here.
Wipe the door seals regularly with a damp cloth to remove food deposits.
Wipe off any food or drink residues which may have dripped onto the sides of the dishwasher door before closing it.
Cleaning the control panel
The control panel should only be wiped with a damp cloth.
Cleaning the front of the machine
WARNING: Damage due to soiling. Soiling that is left too long might become impossible to remove and could cause the external surfaces to alter or discolor. It is therefore best to remove any soiling immediately.
Clean the appliance front with a clean soft sponge and a solution of warm water and liquid dish soap. After cleaning, wipe the surfaces dry using a soft cloth. A clean, damp microfiber cloth without detergent can also be used.
To avoid damaging the external surfaces, do not use the following:
- cleaning agents containing soda, ammonia, acids, or chloride
- cleaning agents containing lime scale remover
- abrasive cleaning agents, such as scouring powder, scouring liquid, or pumice stones
- cleaning agents containing solvents
- stainless-steel cleaning agents
- dishwasher cleaner
- oven cleaner
- glass cleaner
- hard, abrasive brushes or sponges, e.g., pot scourers, brushes, or sponges which have been previously used with abrasive cleaning agents
- eraser sponges
- sharp metal scrapers
- steel wool
- steam cleaners
Cleaning the spray arms
Particles of food can get stuck in the spray-arm jets and bearings. The spray arms should therefore be inspected regularly (approx. every 2–4 months). Never run a wash program without using the spray arms.
WARNING: Damage due to soiling entering the circulation system. Without filters, soiling can enter the circulation system and cause a blockage. Do not run a wash program without the lower spray arm or without the filters. When cleaning the filters and spray arms, make sure that coarse soiling cannot get into the circulation system.
Turn off the dishwasher.
Removing the cutlery tray (if present)
In order to be able to remove the upper spray arm, you first have to remove the cutlery tray (if present).
Pull out the cutlery tray.
Press the rail safety clips on both sides of the cutlery tray together and remove the safety clips .
Take out the cutlery tray completely.
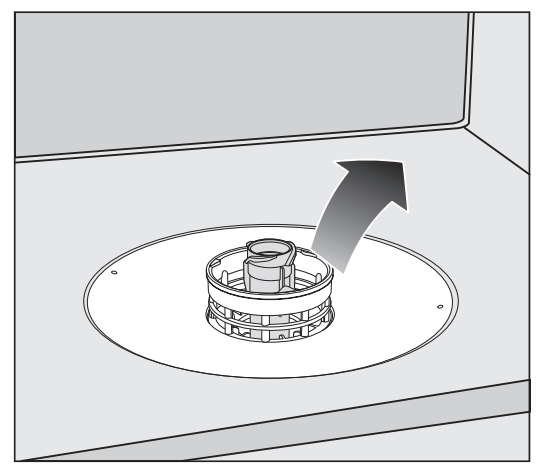
Removing the upper spray arm
Push the upper spray arm upward to engage the inner ratchet. Then unscrew the spray arm by rotating the screw thread counterclockwise .
Removing the middle spray arm
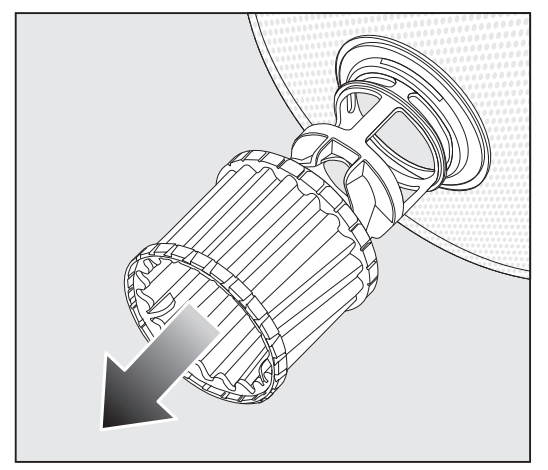
Rotate the screw thread of the middle spray arm clockwise and remove the spray arm .
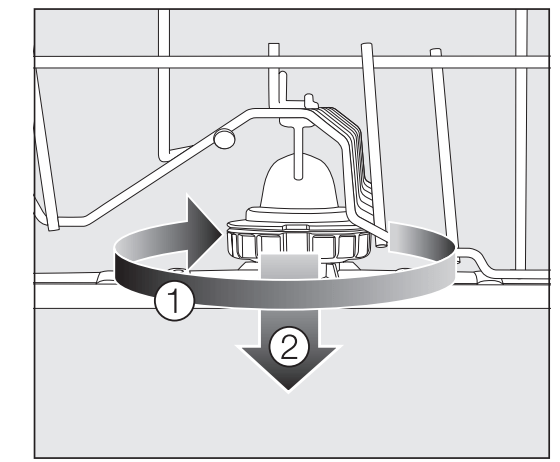
Removing the lower spray arm
Remove the lower basket.
Rotate the screw thread of the lower spray arm counterclockwise and pull the spray arm upward to remove .
Cleaning the spray arms
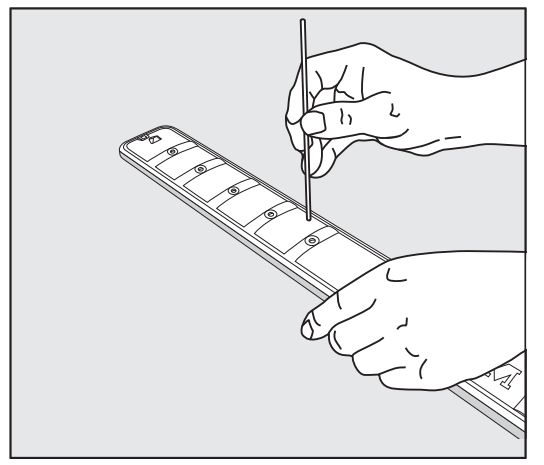
Use a pointed object to push food particles that are stuck in the sprayarm jets into the spray arm.
Rinse the spray arm thoroughly under running water
Reinstalling the spray arms
Reinstall the upper spray arm and tighten it by hand.
Reinstall the middle spray arm.
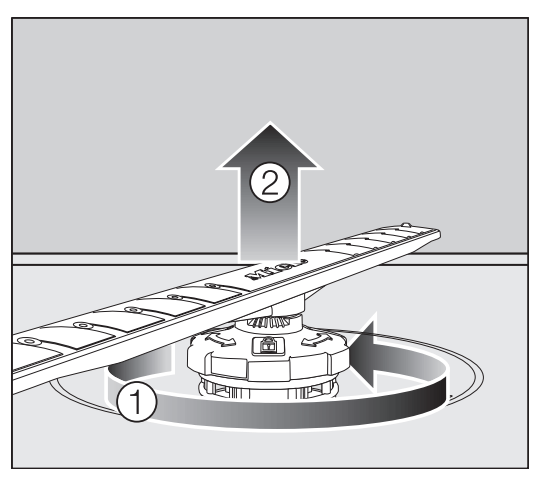
Reinstall the lower spray arm and ensure that the filter combination lies flat in the base of the wash cabinet.
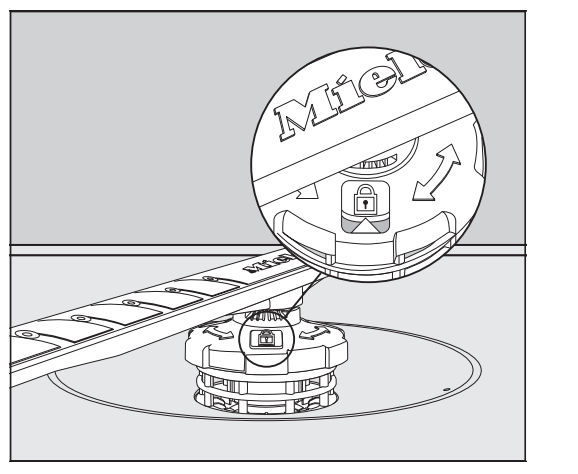
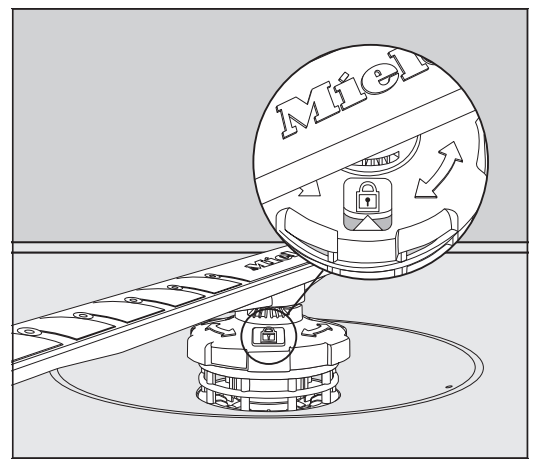
Rotate the screw thread of the lower spray arm clockwise until the arrow in the viewing window points to the lock symbol .
Make sure the spray arms can rotate freely.
WARNING: Damage due to soiling entering the circulation system. The lower spray arm is used to secure the filter combination. Without filters, coarse soiling can enter the circulation system and cause a blockage. Do not run a wash program without the lower spray arm or without the filters.
Inserting the cutlery tray (if present)
Slide the cutlery tray back onto the rails from the front.
Replace the safety clips in the rails on both sides of the cutlery tray.
Checking the filters in the wash cabinet
The filter combination in the base of the wash cabinet retains coarse soil from the suds solution. This prevents soiling getting into the circulation system and re-entering the wash cabinet through the spray arms.
WARNING: Damage due to soiling entering the circulation system. Without filters, soiling can enter the circulation system and cause a blockage. Do not run a wash program without the lower spray arm or without the filters. When cleaning the filters and spray arms, make sure that coarse soiling cannot get into the circulation system.
The filters can become blocked by soiling that collects over time. The level of soiling and time it takes before the filters need cleaning will vary depending on use.
Monitor the condition of the filter combination regularly and clean it if necessary.
Cleaning the filters
Turn off the dishwasher.
Remove the lower spray arm (see “Cleaning the spray arms” under “Cleaning and care”).
Before removing the filter combination, remove any coarse soiling to prevent it from entering the circulation system.
Remove the filter combination.
In order to clean the inside of the filter, pull the microfilter on the plastic ring downwards and away from the filter combination.
Rinse all of the filters under running water. If necessary, use a soft cleaning brush to remove soiling.
Insert the microfilter back into the filter combination.
Reinstall the filter combination so that it lies flat in the base of the wash cabinet.
Refit the lower spray arm to the filter combination using the screw thread.
Rotate the screw thread clockwise until the arrow in the viewing window points to the lock symbol .
WARNING: Damage due to soiling entering the circulation system. The lower spray arm is used to secure the filter combination. Without filters, coarse soiling can enter the circulation system and cause a blockage. Do not run a wash program without the lower spray arm or without the filters.
Cleaning the drain pump
If water remains in the wash cabinet after the end of a program, the water has not been pumped away. The drain pump may be blocked by foreign objects. These foreign objects are easy to remove.
Disconnect the dishwasher from the power supply. To do this, turn off at the electrical socket and withdraw the plug.
Take the filter combination out of the wash cabinet (see “Cleaning the filters” under “Cleaning and care”).
Scoop the water out of the wash cabinet using a suitable small container or utensil.
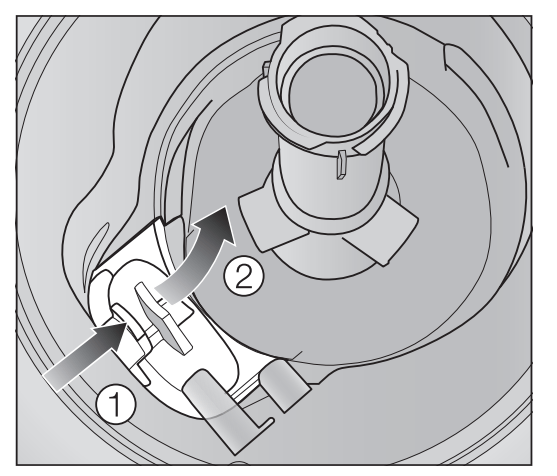
Press the catch of the drain pump cover inwards .
Tip the cover inwards until it is released .
Rinse the cover thoroughly under running water and remove all foreign objects.
The drain pump (see arrow) is underneath the cover.
WARNING: Risk of injury from glass splinters. It is especially difficult to see glass splinters in the drain pump. Take care when cleaning the drain pump.
Carefully remove all foreign objects from the drain pump. Check the drain pump impeller by manually turning it. You will feel a little resistance when you turn the impeller.
Refit the cover by placing it down vertically from above.
Ensure that the catch engages correctly.
WARNING: Damage due to incorrect cleaning. The components are delicate and can be damaged during cleaning. Take care when cleaning the drain pump.
Frequently Asked Questions
With the help of the following guide minor faults in the performance of the machine, some of which may result from incorrect operation, can be remedied without contacting the Service Department.
This guide may help you to find the reason for the fault, and how to correct it.
This section only lists faults that you can remedy yourself. All other faults are shown in Fault FXX.
Technical faults
Problem
Possible cause and solution
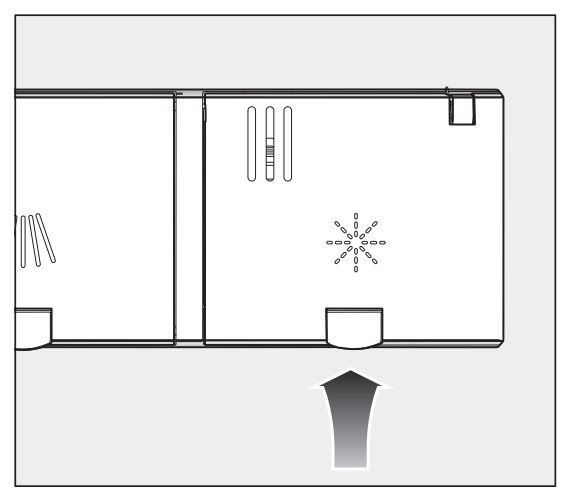
The control field re mains dark after the dishwasher has been turned on with the button.
The dishwasher is not plugged in.
Insert the plug.
The circuit breaker has tripped.
Reset the breaker (see data tag for the correct fuse rating).
If the breaker trips again, contact Miele Customer Service.
The dishwasher stops during a program.
The circuit breaker has tripped.
Reset the circuit breaker (see data plate for the correct fuse rating).
If the circuit breaker trips again, contact Miele Customer Service.
Fault messages
Problem
Possible cause and solution
The display shows a fault number that is not listed below.
There may be a technical fault.
Turn the dishwasher off with the button.
Turn the dishwasher back on after a few seconds.
Restart the desired program.
If the indicator lights flash again, there is a technical fault.
Turn off the dishwasher.
Turn off the water-supply faucet.
Contact Miele Customer Service.
Fault :
The drain pump may still be running, even with the door open.
The Waterproof system has reacted.
Turn off the dishwasher.
Turn off the water-supply faucet.
Contact Miele Customer Service.
All of the program se lection indicator lights are flashing.
Fault number appears in the time dis play.
Circulation-pump fault.
Turn off the dishwasher.
Turn the dishwasher back on.
Restart the desired program.
If the fault message appears again, there is a techni cal fault.
Turn off the dishwasher.
Turn off the water-supply faucet.
Contact Miele Customer Service.
Water intake fault
Problem
Possible cause and solution
The indicator light flashes on and off. and 173 appear alternately on the time display.
The water supply is turned off.
Open the watersupply faucet all the way.
The dishwasher stops during a program. The indicator light is flashing.
The fault number or appears in the display.
Before remedying the fault:
Turn the dishwasher off with the button.
Water-intake fault.
Open the water-supply faucet all the way and start the program again.
Clean the water-intake filter (see “Cleaning the water-intake filter” under “Cleaning and care”).
The water-connection pressure is lower than 7.25 psi (50 kPa).Seek professional advice.
The on-site connection for the water drainage may be too low and you will need to vent the water drainage (see “Water drainage” under “Installation”).
The dishwasher stops during a program.
Fault number appears in the time display.
A technical fault has occurred.
Turn off the dishwasher.
Turn off the water-supply faucet.
Contact Miele Customer Service.
Water drainage fault
Problem
Possible cause and solution
The dishwasher stops during a program. The indicator light is flashing.
Fault number appears in the time display.
Before remedying the fault:
Turn off the dishwasher.
Water-drainage fault.
There might be water in the wash cabinet.
Clean the filter combination (see “Cleaning the filters” under “Cleaning and care”).
Clean the drain pump (see “Cleaning the drain pump” under “Cleaning and care”).
Remove any kink or loop in the drain hose.
General dishwasher problems
Problem
Possible cause and solution
The indicator lights and time display are dark.
The dishwasher has turned off automatically to save energy.
Turn the dishwasher on again with the button.
Detergent residue is left in the detergent compartment at the end of a program.
The detergent compartment was still damp when detergent was added.
Only add the detergent when the detergent compartment is dry.
The detergent compartment lid cannot be closed.
Residual detergent is blocking the catch.
Remove the residual detergent.
At the end of a program there is a film of moisture on the inside of the door and possibly on the interior cabinet walls.
This is part of the normal function of the drying system. The moisture will dissipate after a short time.
Water remains in the wash cabinet at the end of a program.
Before remedying the fault:
Turn off the dishwasher.
The filter combination in the wash cabinet is clogged.
Clean the filter combination (see “Cleaning the filters” under “Cleaning and care”).
The drain pump is blocked.
Clean the drain pump (see “Cleaning the drain pump” under “Cleaning and care”).
The drain hose is kinked.
Remove any kinks from the drain hose.
Noises
Problem
Possible cause and solution
There is a knocking noise in the wash cabinet.
A spray arm is knocking against a wash item.
Carefully open the door and rearrange the wash items that are obstructing the spray arm.
There is a rattling noise in the wash cabinet.
Wash items are not secure in the wash cabinet.
Carefully open the door and rearrange the wash items so that they sit securely.
There is a foreign object (e.g., glass shard) in the drain pump.
Remove the foreign object from the drain pump (see “Cleaning the drain pump” under “Cleaning and care”).
Knocking noise in the water pipes
This may be caused by the on-site installation or them crosssection of the piping.
However, this will not affect the functioning of the dishwasher in any way. If in doubt, contact a suitably qualified plumber.
Poor cleaning results
Problem
Possible cause and solution
The dishes are not clean.
The dishes were not loaded correctly.
See notes under “Loading the dishwasher”.
The program was not powerful enough.
Select a more powerful program (see “Program overview”).
Activate the Extra clean function (see “Extra clean” under “Options”).
Not enough detergent was dispensed during manual detergent dispensing.
Use more detergent or change the brand you are using.
Items are blocking the path of the spray arms.
Carry out a rotation check and if needed rearrange the items so that the spray arms can rotate freely.
The filter combination in the wash cabinet is not clean or was incorrectly installed.
This may have caused the spray-arm jets to become blocked.
Clean and/or install the filter combination correctly.
Clean the spray-arm jets if necessary (see “Cleaning the spray arms” under “Cleaning and care”).
There are streaks on glassware and utensils. There is a bluish sheen on the surface ofglass-ware. The film can be wiped off.
The rinse-aid dosage is set too high.
Reduce the dosage (see “Rinse aid” under “Beforeusing for the first time”).
The dishware is not dry or utensils and glasses are flecked.
The rinse-aid dosage is set too low or the rinse-aid reservoir is empty.
Replenish the reservoir, increase the dosage, or change the brand of rinse aid (see “Rinse aid” under “Before using for the first time”).
The dishware was taken out of the wash cabinet too soon.
Leave the dishware in longer (see “Unloading the
dishwasher” under “Operation”).
The duration of the drying phase for the selected program is not sufficient for the dishware (particularly for plastic dishware).
Select the Extra Dry program option (see “Ex-
tra Dry” under “Options”).
You have used combination products that have insufficient drying performance.
Switch to another detergent or replenish the rinse aid (see “Rinse aid” under “Before using for the first time”).
Glassware has a brown or blue tinge. The film cannot be wiped off.
Ingredients from the detergent have formed a deposit.
Switch to another detergent straight away.
Glassware is dull and discolored. The film cannot be wiped off.
The glassware is not dishwasher-safe. The surface has altered.
No remedy. Purchase glassware which is dishwasher-safe.
Tea or lipstick stains have not been completely removed.
The wash temperature of the selected program was too low.
Select a program with a higher wash temperature.
The bleaching effect of the detergent is too low.
Switch to another detergent.
Plastic parts are discolored.
Natural dyes, e.g., from carrots, tomatoes, or ketchup may be the cause. The amount of detergent used or its bleaching effect was not sufficient to deal with natural dyes.
Use more detergent (see “Detergent”). Parts that are already discolored will not revert to their original color.
White residue is visible on the dishes. Clouding has occurred on glassware and utensils. The film can be wiped off.
The rinse-aid dosage is set too low.
Increase the dosage (see “Rinse aid” under “Before using for the first time”).
Unsuitable combination detergents were used.
Switch to another detergent. If using tabs or powder detergent, do not choose combination products and ensure you refill the rinse aid.
There are rust stains on the utensils.
The affected items are not corrosion resistant.
No remedy. Purchase utensils which are dishwasher-safe.
 Normal = Normal
 Pots = Pots & Pans
 Quick = QuickIntenseWash
 Sani = SaniWash
 Rinse = Rinse & Hold
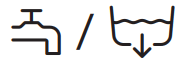 = Intake/Drainage
 = Rinse aid
 Express button
 Timer button
 On/Off button
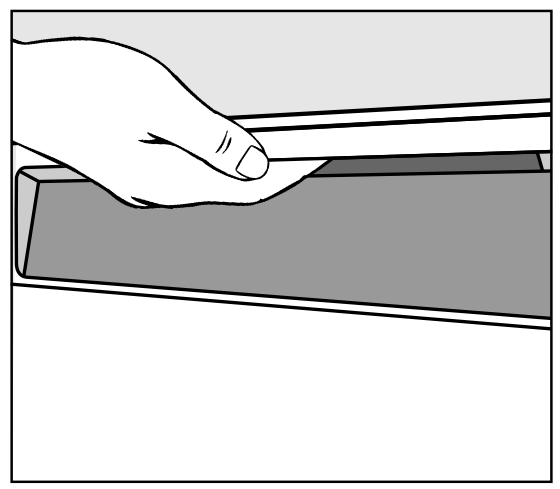
 on the lid of the rinse-aid reservoir.
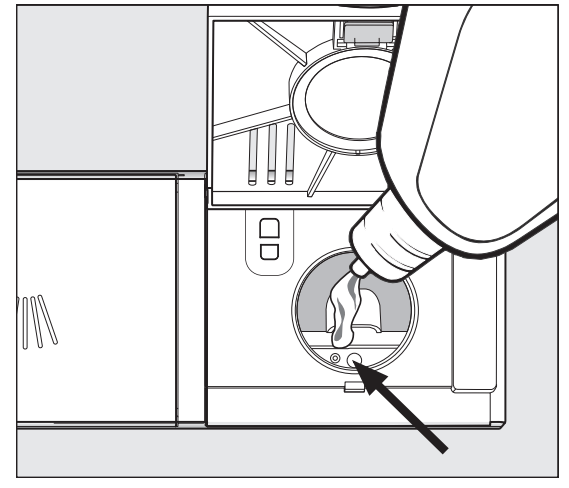
 Rinse aid appears in the display, the reservoir contains sufficient rinse aid for 2 to 3 programs only.
 button, if it is turned on.
 button. Keep the Start button pressed in for at least 4 seconds until the Start indicator light comes on.
 .
. will start flashing in the time display. Setting 3 is set.
 button.
 button.
 button.
 button.
 button.
 button.
 button.
 timer button.
 button.
 is pressed and held, the time will increase automatically up to 24 hours. To start again with 0:30 hours, press the
  button to switch the time display back on again for a few minutes.
 timer indicator light will go out.
 button.
 button.
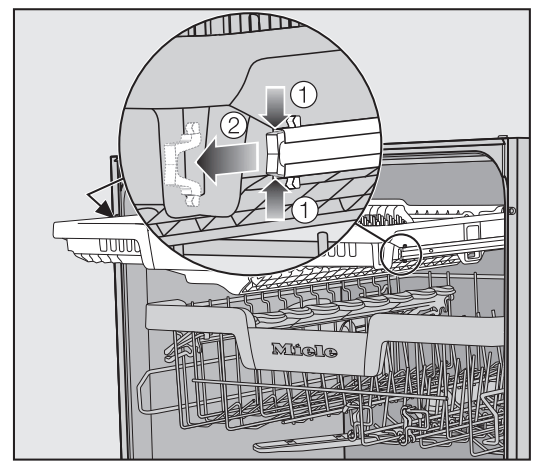
 and remove the safety clips
  .
.
 to engage the inner ratchet. Then unscrew the spray arm by rotating the screw thread counterclockwise
  .
.
 and remove the spray arm
  .
.
 and pull the spray arm upward to remove
  .
.
 .
.
 .
.
 .
. .
.
 button.
 button.
 :
: appears in the time dis play.
 indicator light flashes on and off.
  and 173 appear alternately on the time display.
 indicator light is flashing.
 or
or  appears in the display.
 button.
 appears in the time display.
 indicator light is flashing.
 appears in the time display.
 button.