Documents: Go to download!
User Manual
- User Manual - (English)
- Mounting Plan - (English)
- Warranty - (English)
- Product Sheet - (English)
- Energy Guide - (English)
- Guide to the dishwasher
- Before using for the first time
- Loading the dishwasher
- Operation
- Cleaning and care
- Troubleshooting
Table of contents
User Manual dishwasher
Guide to the dishwasher
Appliance overview
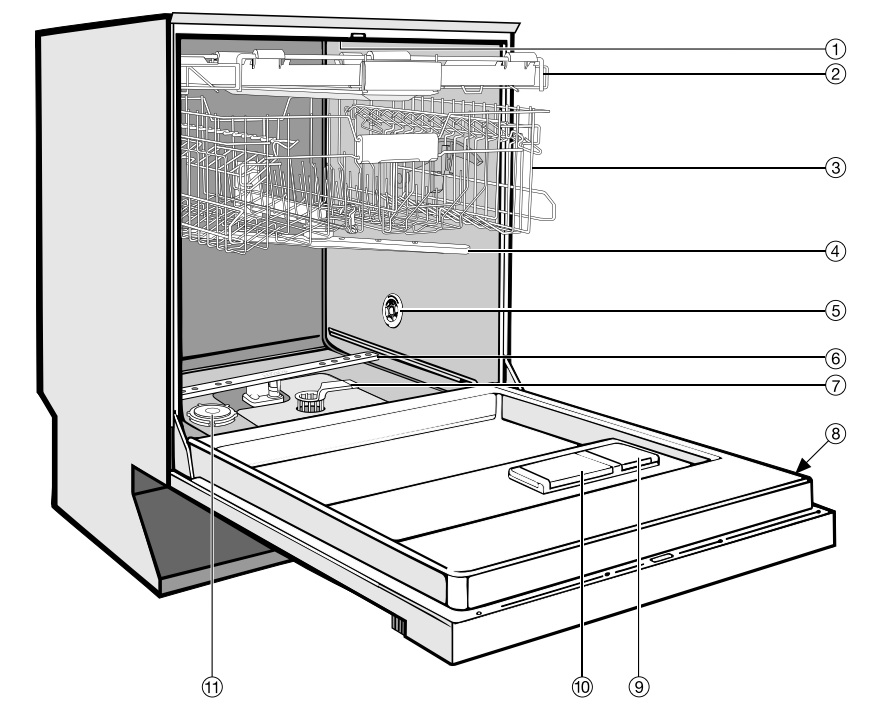
- Upper spray arm (not visible)
- Cutlery tray (depending on model)
- Upper basket
- Middle spray arm
- Air intake for drying (depending on model)
- Lower spray arm
- Filter system
- Data plate
- Rinse aid reservoir
- Dual compartment detergent dispenser
- Reservoir for dishwasher salt
Control panel
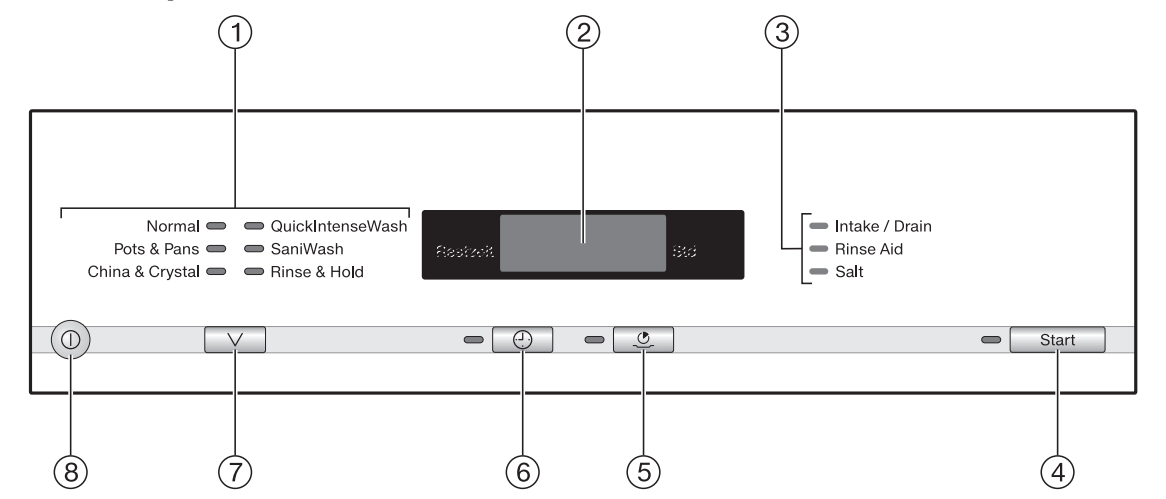
- Program selection
- Time display
- Check/Refill indicators
- Start button with indicator light
- Short button
 with indicator light
 - Delay Start button
 with indicator light
 - Program selection button

 (On/Off) button
Before using for the first time
Opening the door
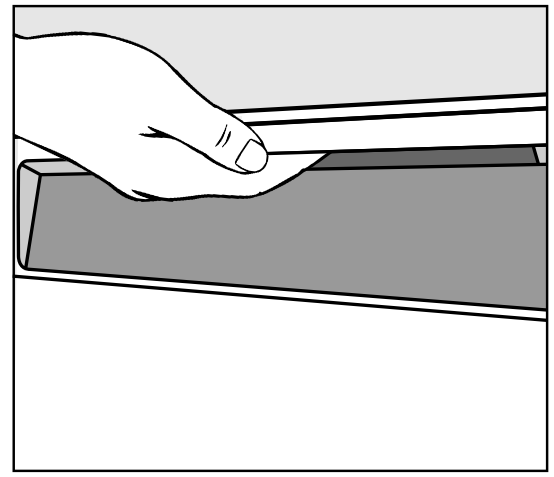
- To open the door, reach under the door grip and pull.
If the door is opened during operation, all functions are automatically interrupted.
Water in the dishwasher may be hot. Danger of scalding! Only open the door during operation if absolutely necessary and exercise extreme caution when doing so.
Closing the door
- Push the baskets in.
- Then lift the door upwards and push until it clicks into position.
Danger of crushing injuries! Do not put your hand inside the door as it is closing.
Child lock
The child lock can be used to prevent children opening the dishwasher. The door can then only be opened by using a lot of force.
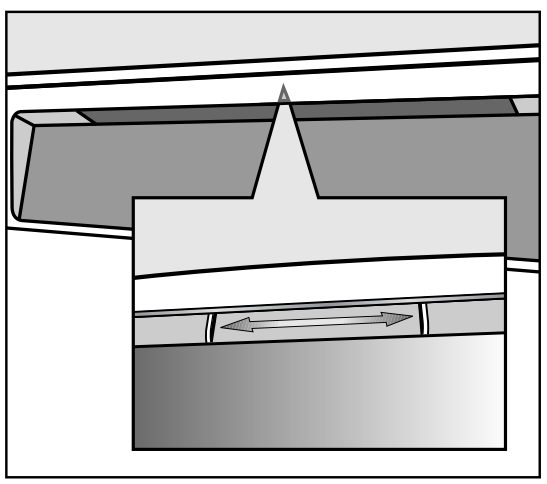
- To lock the door, push the slide underneath the recessed handle to the right.
- To unlock the door, push the slide to the left.
Water softener
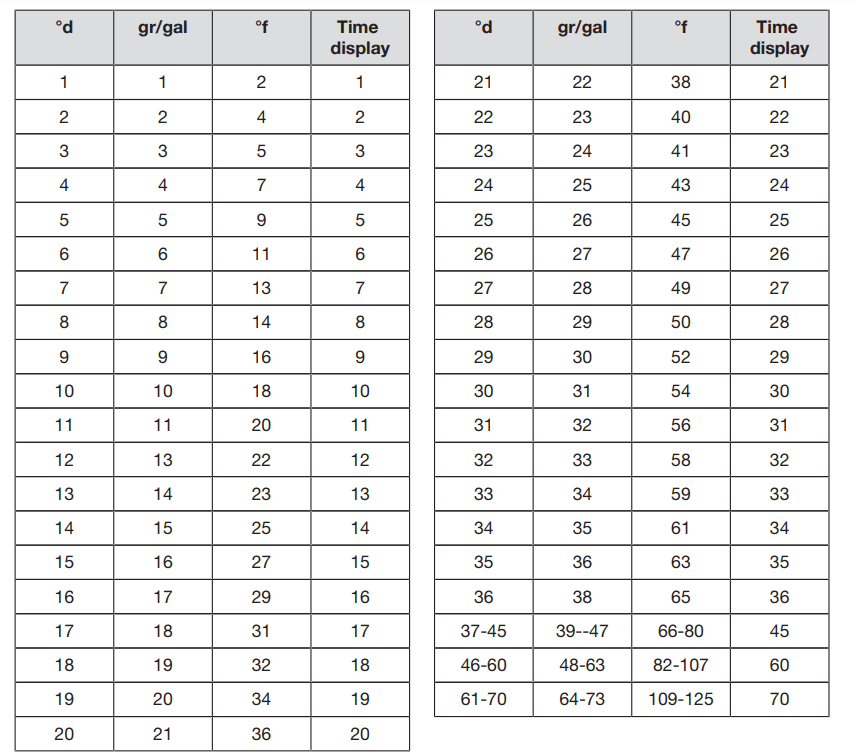
In order to achieve good cleaning results, the dishwasher needs to operate with soft water. Hard water results in a build-up of calcium deposits on dishware and in the dishwasher. Water supplies with a hardness level higher than 4 gr/gal (4 °d) needs to be softened. This takes place automatically in the integrated water softener. The water softener in the dishwasher is suitable for a water hardness level of up to 73 gr/gal (70 °d).
- The water softener requires dishwasher salt.
Depending on the water hardness level (< 22 gr/gal, or 21 °d), dishwasher salt is not required if combination tablets are being used (see “Operation - Detergent”).
- The dishwasher must be programmed for the water hardness in your area.
- Your local water supplier can tell you the water hardness level in your area.
- Where the water hardness fluctuates e.g. between 10 - 16 gr/gal (10 - 15 °d), always program the dishwasher to the higher value (16 gr/gal or 15 °d in this example).
It is useful to know your water hardness so that you can provide the service technician with this information in the event of any service calls.
Enter the water hardness below:
____________ gr/gal (°d)
The dishwasher is programmed at the factory for a water hardness level of 1 gr/gal (1 °d).
If this setting corresponds to the hardness of your water, you do not need to do anything more.
However, if you have a different water hardness, you must adjust the water softener to match your water hardness.
Displaying and setting the water hardness level
- Turn the dishwasher off with the
 button, if it is turned on.
 - Press the Start button and, simultaneously, switch the dishwasher on using the
 button. Keep the Start button pressed for at least four seconds until the Start indicator light comes on.
If this does not happen, start the procedure from the beginning again.
- Press the
 button twice.
The  indicator light will flash twice at short intervals.
The value which has been set for the water hardness appears as a figure in the time display (see table) according to 
 will start flashing in the time display. This is the factory default setting of 1°.
Use the Start button to select the value which equates to your water hardness level. Each press of the button moves you up a level. When the highest water hardness level is reached, the setting starts from the beginning again.
The setting is now stored in memory.
- Turn the dishwasher off with the
 button
Before using the appliance for the first time, you require:
- Approx. 1 liter (1 qt.) of water
- Approx. 2 lbs (1 kg) of dishwasher salt
- Domestic dishwasher detergent
- Rinse aid formulated for domestic dishwashers
Every dishwasher is tested at the factory. There will be residual water in the appliance from this test. It is not an indication that it has been used previously
Dishwasher salt
In order to achieve good cleaning results, the dishwasher needs to operate with soft water. Hard water results in a build-up of calcium deposits on dishes and in the dishwasher. Water supplies with a hardness level higher than 4 gr/gal (4 °d) needs to be softened. This takes place automatically in the integrated softener assembly. The softener assembly in the dishwasher is suitable for a water hardness level of up to 73 gr/gal (70 °d).
The softener assembly requires dishwasher salt. Depending on the water hardness level (< 22 gr/gal or 21 °d), dishwasher salt is not required if combination tablets are being used (see “Operation - Detergent”).
If the water in your area is very soft and consistently lower than 5 gr/gal (5 °d - German scale) you do not have to add dishwasher salt. The prompt to add salt will be switched off automatically if the softener assembly has been programmed for this to happen.
Dishwasher detergent will damage the softener assembly. Do not fill the salt container with dishwasher detergent (even liquid detergent).
Use only special, coarse-grained dishwasher salt or other pure kitchen salt.
Other types of salt may contain insoluble components which can damage the softener assembly
Filling the salt reservoir
Important! Before filling the salt reservoir with dishwasher salt for the first time, you must fill it with approx. 2 qt (2 l) of water to enable the salt to dissolve. Once the dishwasher has been used for the first time, there is always sufficient water in the reservoir.
- Remove the lower basket from the wash cabinet and unscrew the salt reservoir cap.
Water will run out of the reservoir when the cap is removed. It should therefore only be removed in order to refill the salt reservoir.
- Fill the reservoir with approx. 2 qt (2 l) of water (first use only).

- Place the funnel provided over the salt reservoir and carefully fill with salt until the reservoir is full. The salt reservoir holds approx. 4 lbs (2 kg) of salt depending on the brand used.
- Clean any excess salt from around the reservoir opening and then screw the cap on again firmly.
- Immediately after filling the salt reservoir, run the QuickIntenseWash program with the Short programming option selected and without any dishes in the dishwasher to remove any traces of salt from the wash cabinet.
Salt refill indicator
- Fill the salt reservoir with dishwasher salt when the Salt indicator light comes on. If it comes on during a program, wait until the end of the program.
Risk of corrosion! Immediately after filling the salt reservoir, run the QuickIntenseWash program with the Short programming option selected and without any dishware in the dishwasher to remove any traces of salt from the wash cabinet.
After the salt reservoir has been filled, the refill indicator may still be lit up if the salt concentration has not yet reached the correct level. It will go out when the correct concentration is reached.
The salt refill indicator will be turned off if you have programmed the dishwasher for a water hardness below 5 gr/gal (5 °d)
If you only ever use combination products in your dishwasher, you can switch both refill indicators for salt and rinse aid off if you wish (see “Options, Refill indicators”).
If you switch to using detergent that does not contain salt or rinse aid, it is important to remember to add dishwasher salt and rinse aid and to switch the indicators back on.
Rinse aid
Rinse aid is needed to prevent spotting on dishes and glassware. The rinse aid is filled in the reservoir and the set amount will be automatically dosed.
- Filling the rinse aid reservoir with detergent will damage the reservoir. Only pour rinse aid formulated for residential dishwashers into the reservoir.
When using “Tab” detergents rinse aid is not needed.
Adding rinse aid
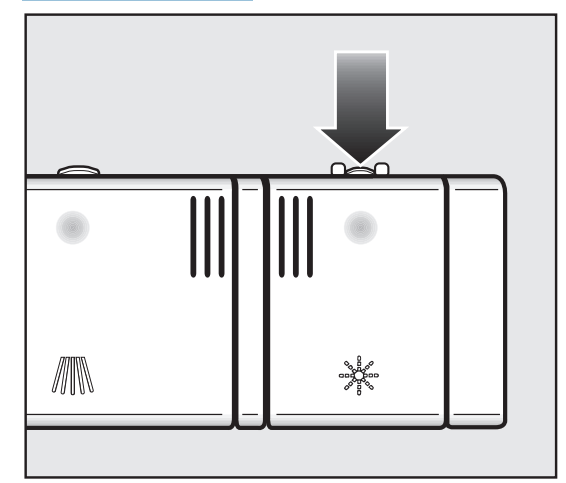
Press the button on the lid of the rinse aid reservoir in the direction of the arrow until the flap springs open.
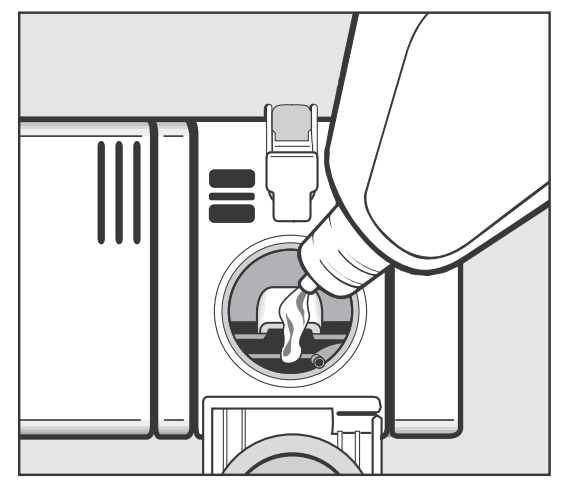
- Add rinse aid only until it is visible in the opening.
The rinse aid reservoir holds approx. 3.7 oz. (110 ml).
- Close the flap firmly so that it clicks into place. Otherwise water can enter the rinse aid reservoir during a program.
- Wipe up any spilled rinse aid. This prevents over-foaming occurring during the next program.
Rinse aid indicator
When the Rinse Aid indicator lights up, the rinse aid reservoir contains sufficient rinse aid for 2 - 3 programs only.
- Add rinse aid.
If you only ever use combination products in your dishwasher, you can switch both refill indicators for salt and rinse aid off if you wish (see “Options - Refill indicators”).
Loading the dishwasher
Tips
Remove coarse food residues from the dishes.
There is no need to rinse items under running water!
Do not wash items soiled with ash, sand, wax, grease, or paint in the dishwasher. These will damage the dishwasher.
Dishes can be loaded anywhere in the baskets, but the following notes should be observed:
- Do not place dishes or cutlery inside other pieces. They will cover each other.
- Load the dishes so that water can access all surfaces. This ensures that they get properly cleaned.
- Make sure that all items are securely positioned.
- Hollow items such as cups, glasses, pans, etc. must be inverted in the basket.
- Tall, narrow, hollow items, e.g., champagne glasses, should be placed in the center of the basket to ensure better water coverage.
- Concave items such as mugs or bowls should be placed at an angle so that the water can run off.
- The spray arms must not be blocked by items which are too tall or hang through the baskets. If in doubt, test for free movement by manually rotating the spray arms.
- Make sure that small items cannot fall through the holders in the baskets.
Small items, e.g., lids, should therefore be placed in the cutlery tray or cutlery basket (depending on model)
Some foods may contain natural dyes, e.g., carrots, tomatoes or tomato sauce. Plastic items in the dishwasher may discolor if large quantities of these foodstuffs find their way into the dishwasher on the dishes. The stability of plastic items is not affected by this discoloration. Cleaning silver cutlery in the dishwasher may also cause plastic items to discolor.
Items not recommended for dishwashing
- Wooden cutlery, cutting boards and dishes or items with wooden parts
- Craft items, antiques, valuable vases, and decorative glassware
- Plastic items which are not heat-resistant: the high temperatures in the dishwasher may cause them to melt or lose shape.
- Copper, brass, tin and aluminum items may discolor or become matt.
- Colors painted over a glaze may fade after a number of washes.
- Delicate glassware and glassware containing lead crystal: clouding may occur over time.
Loading examples
With models with cutlery tray, 10 standard place settings
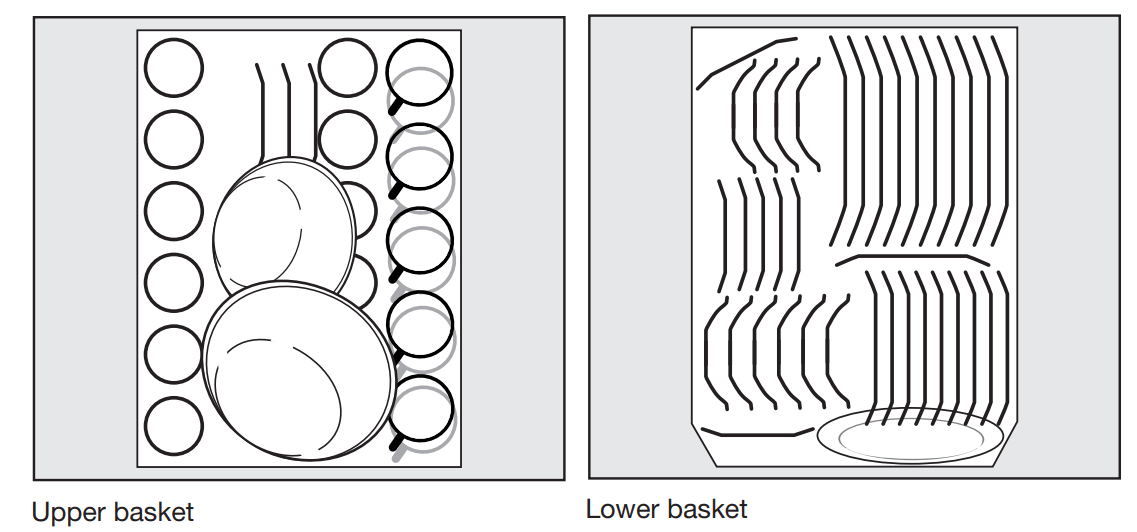
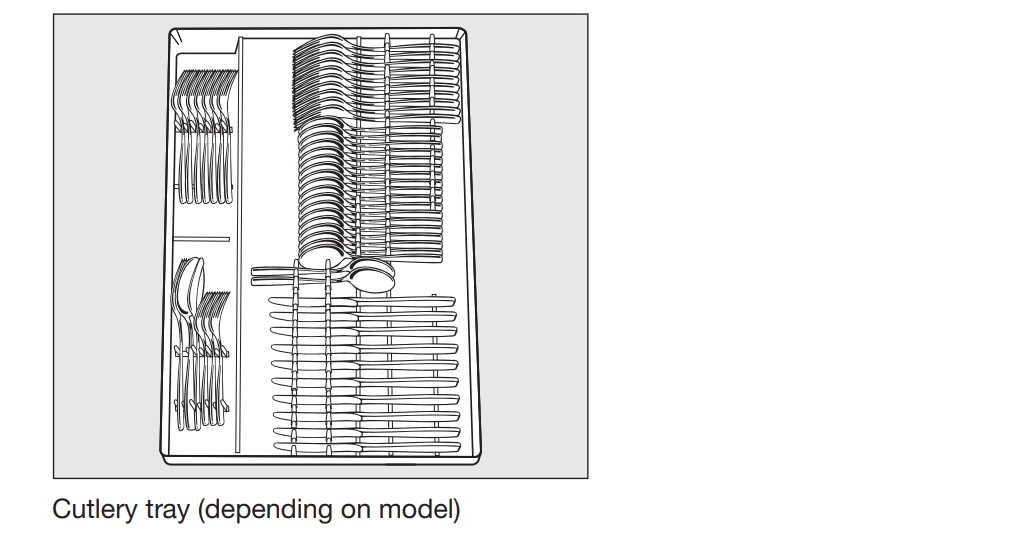
FlexAssist
The yellow FlexAssist components indicate which elements of the baskets for dishes and cutlery tray are moveable. They also act as grips and have symbols embossed on them to show what the moveable parts are used for.
Upper basket
For safety reasons, do not operate the dishwasher without the upper and lower baskets in place.
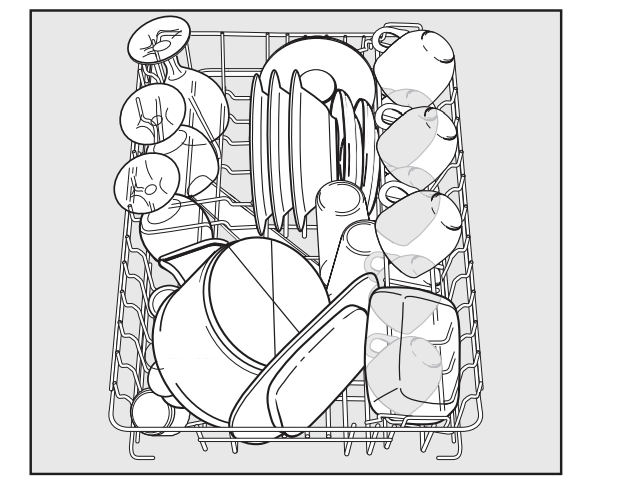
- Use the upper basket for small, lightweight and delicate items such as cups, saucers, glasses, dessert bowls, etc.
Shallow pans or casserole dishes can also be placed in the upper basket.
Cup rack
- Using the yellow lever
 , lift the cup rack upwards to make room for tall items.
Glasses can be arranged along the positioning rail of the cup rack to give them some support during the program.
- Lower the cup rack and lean the glasses against it or double stack smaller pieces.
Adjusting the upper basket
In order to gain more space for taller items the upper basket can be adjusted on three levels with 3/4" (2 cm) between each level.
The upper basket can also be set at an angle with one side high and the other side low. Make sure, however, that the basket can slide smoothly in and out of the cabinet.
- Pull the upper basket out.
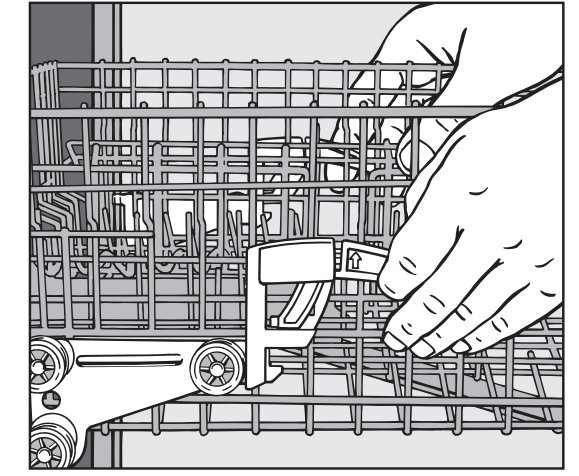
To raise the upper basket:
- Lift the basket until it clicks into place.
To lower the upper basket:
- Pull upwards on the levers at either side of the upper basket.
- Adjust the basket to the desired height and then push the levers securely back down into position.
Depending on the setting of the upper basket, the following plate dimensions can be accommodated.
Dishwashers with cutlery tray

Depending on the setting of the upper basket, a variety of plate dimensions can be accommodated.
Hinged spikes
Both rows of spikes at the front can be lowered to make more room for large items, e.g., pots, pans, and dishes.

- Press the yellow lever downwards 1, and then lower the spikes 2
Removable spiked insert
The comfort insert is used for plates, dishes, and pots.
The spiked insert at the back can be removed to make more room for larger items such as shallow pans and casserole dishes.
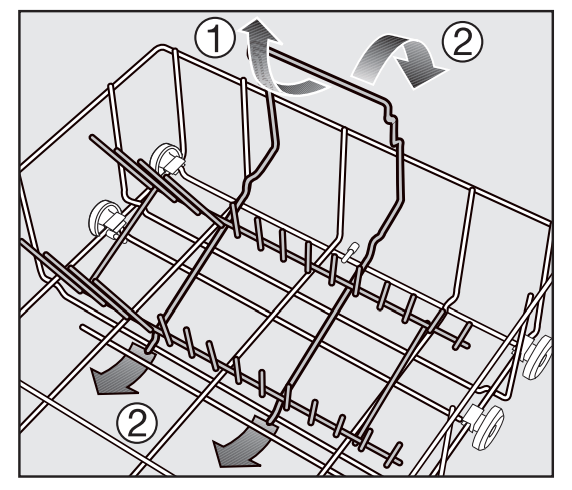
Removing the insert 1
- Pull it upwards by the handle as shown.
Refitting the insert 2
- Fit the insert into the lower basket with the hooks going under the long cross-piece as illustrated.
- Press down on the handle until the insert is held securely in position.
Bottle holder (depending on model)
The bottle holder can be used to wash narrow items, e.g., milk and baby bottles.

- Place the bottle holder in the position shown in the lower basket. If placed anywhere else, water will not be able to access the bottle properly, and cleaning results will be impaired.
Operation
Detergent
Only use detergents formulated for domestic dishwashers.
Active ingredients
Modern detergents contain various active ingredients, the most important of which are:
- Complexing agents to prevent calcification.
- Alkalis to aid the removal of dried-on soiling.
- Enzymes to break down starch and loosen protein.
- Oxygen-based bleaching agents to remove colored stains (e.g., tea, coffee, tomato sauce).
Most dishwasher detergents are mildly alkaline and contain enzymes and oxygen-based bleaching agents.
There are different types of detergent:
- Powder and liquid gel detergents. These detergents allow you to adjust the amount dispensed according to the amount of load and level of soiling.
- Tab detergents. These are suitable for most levels of soiling.
You can also buy Tab products (see “Options, DetergentAgent”, if applicable). In addition to detergent, these products contain rinse aid and salt substitutes.
They are available as “3 in 1” or when they also contain other components such as glass and stainless steel protective additives and enhanced cleaning power, as “5 in 1”, “7 in 1”, “All in 1” etc. Refer to the manufacturer's packaging as to whether Tab products are suitable for the water hardness level in your area.
Please note that the cleaning and drying results of Tab detergents can vary greatly.
For optimum cleaning and drying results, use Miele dishwasher detergent and add Miele salt and Miele rinse aid separately.
Detergent dosage
- Follow the dosage recommended by the manufacturer on the packaging.
- Unless directed otherwise, use one detergent tab or add 1 1/4 - 2 tablespoons (20 - 30 ml) detergent to compartment II, depending on the level of soiling. With very heavy soiling you can also add a small amount of detergent to compartment l.
- Tabs may not dissolve completely when the “QuickIntenseWash” program (if available) is used.
Use only the recommended amount of detergent. Continued use of too much detergent may cause machine damage.
Adding detergent
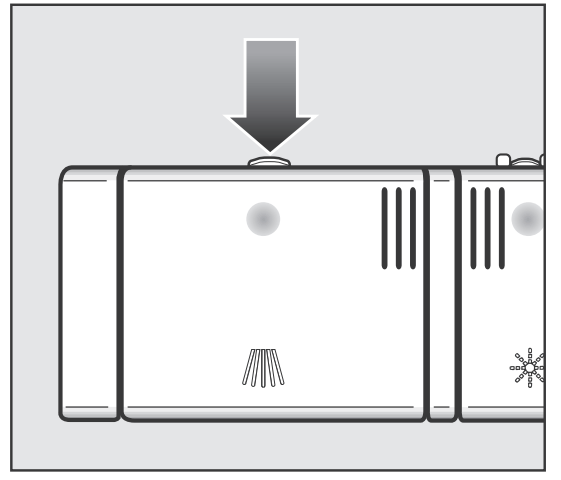
- Press the opening catch on the detergent dispenser.
The flap will spring open. The flap is always open at the end of a program.
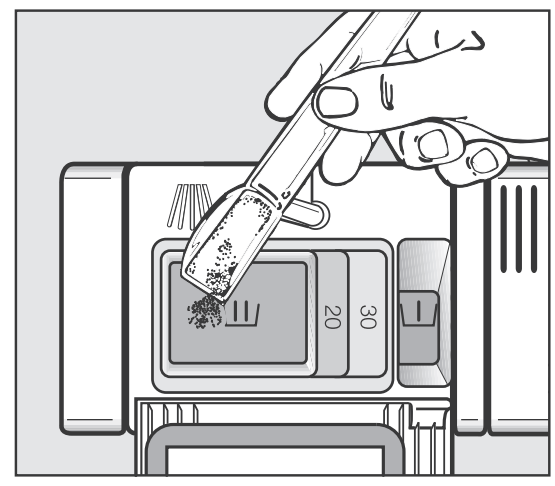
- Add the required amount of detergent and close the flap.
- Make sure that the detergent packaging is properly closed after use to avoid it getting damp and becoming lumpy
Dispensing aid
Compartment I holds a maximum of 2 teaspoons (10 ml), Compartment II holds a maximum of 3 ½ tablespoons (50 ml) of detergent. The marks in compartment II indicate the levels of approximately 1 ¼ and 2 tablespoons (20 and 30 ml) respectively.
The marks indicate the approximate fill level in ml when the door is open in a horizontal position.
Turning on
- Make sure the spray arms are not obstructed.
- Close the door.
- Turn on the water supply if it is turned off.
- Turn the dishwasher on with the
 button.
The Start indicator light flashes and the indicator light comes on next to the program selected.
Selecting a program
Choose your program according to the type of load and the degree of soiling. The different programs and their uses are described in the Program Overview chapter.
Use the program selection button  to select the program required. The indicator light for the program selected will light up.
The program duration will appear in hours and minutes in the display
If any program options are selected, the appropriate indicator lights will also light up.
Starting a program
The dishwasher can be started only if the door is closed.
- Press the Start button.
The program will begin.
The Start indicator light will come on.
A program should only be canceled in the first few minutes, if at all. Otherwise important program stages could be omitted.
Time display
The duration of the program selected appears in hours and minutes in the display before the program begins. During the program, the time left until the end of the program is displayed.
The program duration displayed may vary with the same program. It is influenced by, among other things, the water temperature at each intake, the reactivation process, the softener assembly, the type of detergent, the amount of dishes, and the amount of soiling.
When a program is selected for the first time, the display will show the average program duration for a cold water intake.
The times shown in the program overview refer to standard test loads and temperatures.
Each time a program is run, the electronic module calculates the program duration required depending on the temperature of the water taken into the dishwasher and the amount of dishes.
Energy management
To save energy, the dishwasher will switch off automatically 10 minutes after the last time a button has been pressed or 10 minutes after the end of the program (see “Options, Optimize Standby”).
- Press the
 button to switch the dishwasher back on.
The dishwasher will not turn off while a program is running, during the delay start period, or if there is a fault.
At the end of the program
The program has finished when  appears in the display.
The drying fan may continue to run for a few minutes at the end of the program.
- The dishwasher can now be opened and unloaded (see “Unloading the dishwasher”).
To prevent the risk of steam damage to the counter edging above the dishwasher, it is advisable to leave the door closed until you are ready to unload the dishware. Alternatively you can open the door fully until the dishware is cool enough to unload. Do not leave the door only partially open.
Turning off the dishwasher
At the end of a program:
- The dishwasher can be switched off at any time using the
 button.
Switching the dishwasher off during a program stops the program.
Turning the dishwasher off during the run-up to a delay start time (FlexiTimer) will also stop the process. I
f the dishwasher is not going to be used for a longer period of time, e.g., while on vacation, the water supply should be turned off.
Unloading the dishwasher
Dishes tend to break and chip more easily when they are hot. Allow the dishes to cool until they are comfortable enough to handle before unloading them.
The dishes will cool much faster if you open the door when the program has ended. First unload the lower basket, then the upper basket, and finally the cutlery tray (depending on model).
This will prevent water drops from the upper basket and cutlery tray from falling onto the dishes in the lower basket.
Changing a program
If the detergent dispenser flap has already opened, do not change the program.
If a program has already started and you wish to change it, proceed as follows:
- Turn the dishwasher off with the
 button.
 - Turn the dishwasher on again with the
 button.
 - Select the program you want, and then start it.
Cleaning and care
Check and clean your dishwasher regularly. This will help avoid problems and faults.
All surfaces are susceptible to scratching. Contact with unsuitable cleaning agents can alter or discolor all surfaces.
Cleaning the wash cabinet
Generally, the wash cabinet is self cleaning if the correct amount of detergent is used.
If, however, there are limescale or grease deposits in the wash cabinet, these can be removed with a special cleaning agent (available from Miele). Follow the instructions on the packaging.
If you mainly use low temperature programs (< 120°F/50 °C), there is a risk of bacteria and unpleasant odors building up in the wash cabinet.
To prevent this happening the dishwasher will automatically increase the temperature in the final rinse of the selected program after several programs using low temperatures have been run.
- Clean the filters in the wash cabinet regularly
Cleaning the door and the door seal
Bacteria could build up on the door seal and the sides of the dishwasher door as these surfaces are outside the wash cabinet and are not accessed and cleaned by the spray arm jets.
- Wipe the door seals regularly with a damp cloth to remove food deposits.
- Wipe off any food or drink residues which may have dripped onto the sides of the dishwasher door before closing it.
Cleaning the door front
If soiling remains longer, it may happen that the surfaces can become discolored or changed. Remove any soiling immediately
- Clean the front with a solution of warm water and a little dishwashing liquid applied with a soft sponge. Wipe the surfaces dry using a soft cloth.
Glass cleaners may be used to clean the exterior. However do not allow them to sit or “puddle”, this can cause damage to the surface. Remove the cleaner promptly
To better maintain your appliance avoid the following:
- Cleaning products containing soda, ammonia, acid, or chloride
- Descaling agents
- Abrasive cleaning products, such as scouring powder, scouring liquid, or pumice stones,
- Cleaners containing solvents
- Stainless steel cleaners
- Dishwasher cleaner
- Oven cleaners
- Glass cleaner
- Hard, abrasive brushes or sponges, e.g., pot scourers, brushes or sponges which have been previously used with abrasive cleaning agents
- Eraser sponges
- Sharp metal scrapers
- Steel wool
- Steam cleaning appliances
Filter system
The filter system in the base of the wash cabinet prevents food from being redeposited on dishes. It also protects the circulation pump from damage caused by foreign objects.
This dishwasher must not be used without all the filters in place!
Collection of coarse soil may cause the filters to clog. The level of soiling and time it takes before the filters need cleaning will vary depending on use.
- Check the condition of the filters regularly and clean them if necessary
- Turn the dishwasher off.
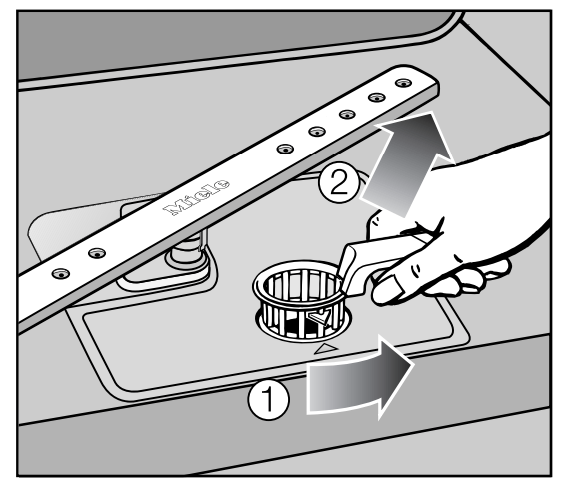
- Turn the handle counter-clockwise to release the filter system 1.
- Lift the filter system out of the dishwasher 2. Remove any coarse particles and rinse the filter well under running water. Use a nylon brush if necessary.
Ensure that coarse soil does not get into the circulation system and cause a blockage.
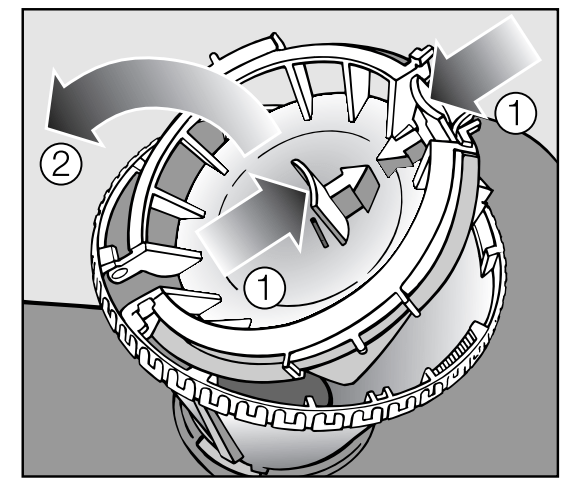
To clean the inside of the filter, the flap must be opened:
- Press catches 1 together in the direction of the arrows as shown, and open the filter 2.
- Rinse all the filters under running water.
- Then close the flap so that the catch engages.
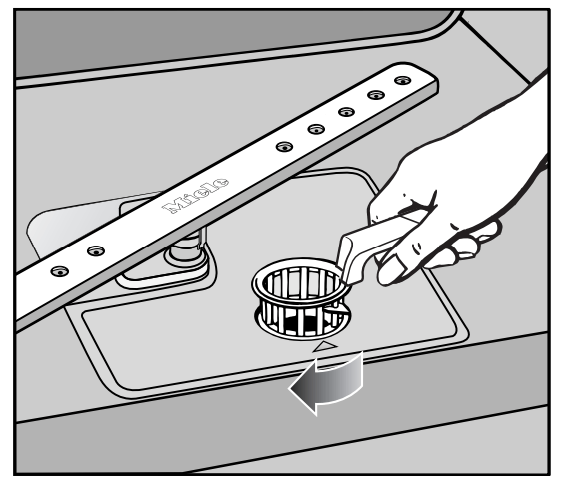
- Replace the filter system so that it lies flat in the base of the wash cabinet.
- Then turn the handle clockwise until both arrows point towards each other. This will lock the filter system in place.
Take care when you are fitting the filter system that it is secured in position correctly. Otherwise coarse soil could get into the circulation system and cause a blockage.
Cleaning the spray arms
- Particles of food can get stuck in the spray arm jets and bearings. The spray arms should therefore be inspected and cleaned regularly (approx. every 4 - 6 months). Turn the dishwasher off.
Remove the spray arms as follows:
- Take out the cutlery tray (if your dishwasher is fitted with one).
- Push the top spray arm upwards to engage the inner ratchet. Then unscrew the spray arm.
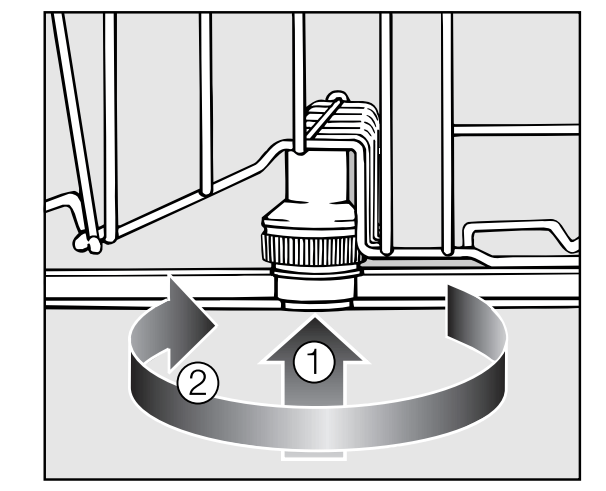
- Push the middle spray arm upwards 1 to engage the ratchet. Then unscrew the spray arm 2.
- Remove the lower basket.
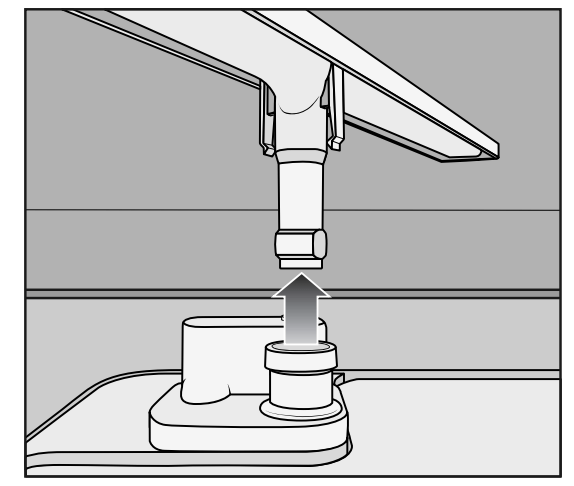
- Pull the lower spray arm firmly upwards to remove it.
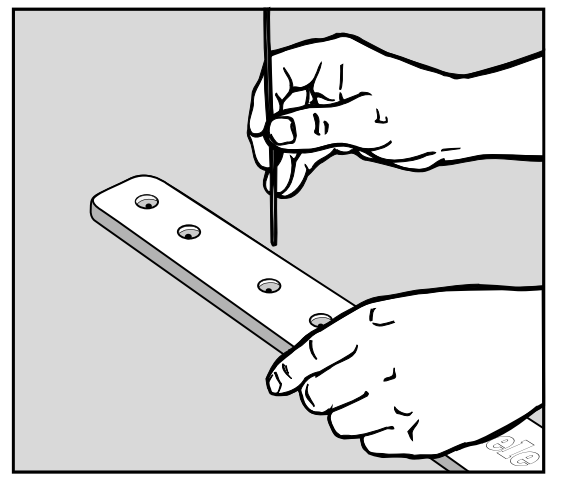
- Use a pointed object to push the food particles that are stuck in the spray arm jets into the spray arm.
- Rinse the spray arms thoroughly under running water.
- Replace the spray arms and check that they rotate freely.
Troubleshooting
Technical problems
Problem | Possible cause and solution |
After the dishwasher is turned on with the  button, the Start indicator light does not flash. button, the Start indicator light does not flash. | The dishwasher is not plugged in.
The circuit breaker has tripped.
|
| The dishwasher stops during a program. | The circuit breaker has tripped.
|
The Intake/Drain and Rinse Aid indicator lights are flashing at the same time. Fault number | There may be a technical fault.
If the indicator lights flash again, there is a technical fault.
|
Fault The drain pump is still running, even with the door open. | The WaterProof System has reacted.
|
Fault  : : | A fault has occurred in the circulation pump.
If the fault message appears again, there is a technical fault.
|
Water intake fault
Problem | Possible cause and solution |
| The Intake/Drain indicator flashes on and off. | Before fixing the fault:
|
The dishwasher stops during a program. The Intake/Drain indicator flashes. Fault code |
There is a problem with the water intake.
Contact a plumber. |
Water drainage fault
Problem | Possible cause and solution |
The dishwasher stops during a program. The Intake/Drain indicator flashes. Fault code | Before fixing the fault:
There is a problem with the water intake. There might be water in the wash cabinet.
|
General problems
Problem | Possible cause and solution |
| The indicator lights and time display are dark. | The dishwasher has switched off automatically to save energy.
|
| Detergent residue is left in the dispenser at the end of a program. | The dispenser was still damp when detergent was added.
|
| The dispenser cover cannot be closed. | Detergent residue is blocking the latch.
|
| The inside of the door and/or the interior walls are wet after a program has finished. | This is caused by the drying system and does not indicate a fault. The moisture will dissipate after a while. |
| Water remains in the wash cabinet at the end of a program. | Before fixing the fault:
The filter system in the wash cabinet is clogged.
The drain pump or non-return valve is blocked.
The drain hose is kinked.
|
Noises
Problem | Possible cause and solution |
| There is a knocking noise in the wash cabinet. | A spray arm is hitting the dishes.
|
| There is a rattling noise in the wash cabinet. | Dishes is moving around in the wash cabinet.
A foreign object (e.g., a cherry pit) has become lodged in the drain pump.
|
| There is a knocking noise from the water pipe | This may be caused by the installation or the diameter of the water pipe.
|
Poor cleaning results
Problem | Possible cause and solution |
| The dishes are not clean. | The dishes were not loaded correctly.
The program was not powerful enough.
Not enough detergent was dispensed.
Items are blocking the path of the spray arms.
The filter system in the base of the wash cabinet is not clean or is not correctly fitted. This may cause the spray arm jets to get blocked.
The non-return valve is open and blocked. Dirty water has flowed back into the wash cabinet.
|
| Smearing appears on glassware and cutlery. There is a bluish sheen on the surface of glassware; film can be wiped off. | The rinse aid dosage is set too high.
|
| Dishes is not dry or cutlery and glasses are spotty. | The rinse aid dosage is set too low or the rinse aid reservoir is empty.
Dishes was taken out of the cabinet too soon.
Combination tabs have been used which have impaired drying performance.
|
| Glasses have a brownish-blue discoloration; the deposit cannot be wiped off. | Detergent deposits.
|
| Glasses are dull and discolored; the deposit cannot be wiped off. | The glassware is not dishwasher-safe. The surfaces are affected.
|
| Tea or lipstick stains have not been completely removed. | The wash temperature of the selected program was too low.
The bleaching effect of the detergent is too low.
|
| Plastic parts are discolored. | Natural dyes, e.g., from carrots, tomatoes, or ketchup may be the cause. The amount of detergent used or its bleaching effect was not sufficient to deal with natural dyes.
|
| White residue is visible on dishes and cutlery, clouding occurs on glassware; this film can be wiped off. | The rinse aid dosage is too low.
The salt reservoir is empty.
The salt reservoir cap has not been screwed on correctly.
An unsuitable Tab detergent has been used.
The softener assembly is programmed too low for the water hardness level.
|
| There are rust stains on the cutlery | The affected items are not corrosion resistant.
A program was not run after dishwasher salt was added. Traces of salt have got into the wash cycle.
The salt reservoir cap has not been screwed on correctly.
|
Cleaning the water intake
A filter is incorporated in the screw connection of the water intake valve. The filter must be cleaned when dirty, otherwise insufficient water flows into the wash cabinet.
The plastic housing of the water connection contains an electrical component. The housing must not be dipped in water
Recommendation
If the water supply contains a large amount of insoluble substances, we recommend fitting a large-area filter in the connection between the faucet and the water intake hose threaded union. This filter is available from a Miele dealer or Miele Service.
To clean the filter:
- Disconnect the dishwasher from the electrical supply. Switch off at the mains socket and withdraw the plug.
- Turn off the water supply.
- Unscrew the water intake valve.
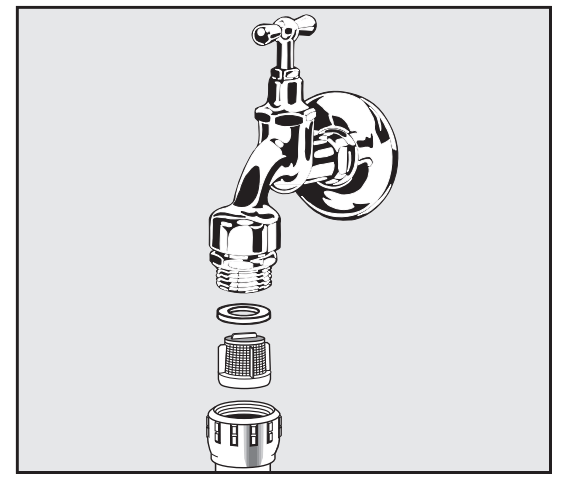
- Take the seal ring out of the screw connection.
- Withdraw the filter using pointed pliers and rinse clean under running water.
- Replace the filter and washer, making sure they are sitting correctly.
- Reconnect the water intake valve to the faucet, making sure it goes on correctly and is not cross-threaded.
- Turn on the water supply.
If water leaks out, the screw connection may not be connected securely or it may have been screwed on at an angle.
- Unscrew and reconnect the water intake valve correctly.
Cleaning the drain pump and non-return valve
If the water has not been pumped away at the end of a program, the drain pump or the non-return valve might be blocked. They are, however, easy to clean.
- Disconnect the dishwasher from the electrical supply. Turn off the dishwasher and withdraw the plug.
- Take the filter system out of the wash cabinet (see “Cleaning and care, Cleaning the filters”).
- Scoop the water out of the wash cabinet using a suitable container or utensil.
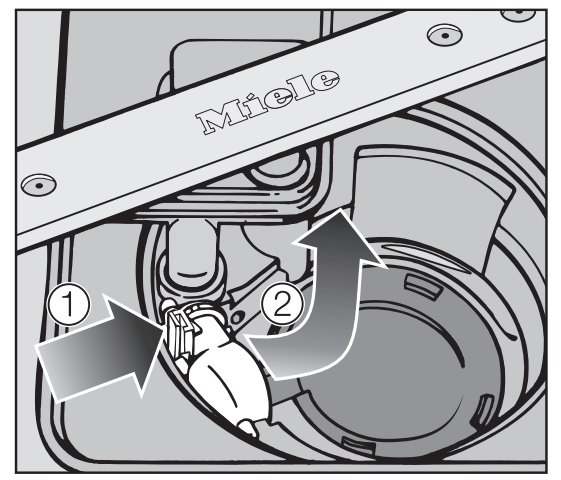
- Press the catch for the non-return valve inwards 1.
- Tilt the non-return valve inwards until it is released 2.
- Rinse it thoroughly under running water and remove any dirt from the nonreturn valve.
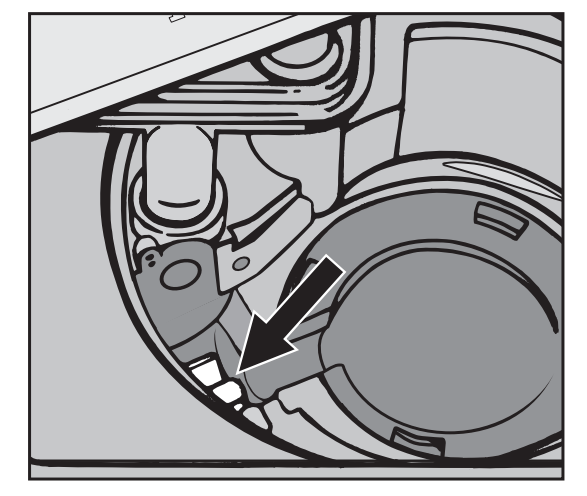
The drain pump is located underneath the non-return valve (see arrow).
- Remove all foreign objects from the drain pump (glass or bone splinters). Before returning the non-return valve, check that the drain pump is not blocked. Spin the impeller several times in both directions to check for obstructions.
- Carefully reinsert the non-return valve and secure it with the locking clamp.
Make sure the locking clamp clicks into place!
Be careful not to damage any delicate components when cleaning the drain pump and the non-return valve.
See other models: SF SF BM ESW 6214 SF
 appears in the display
 button.
  :
:  button.
  or
or  appears in the display.
 shows in the display