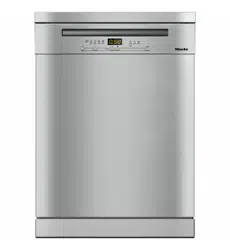
These operating instructions apply to several different dishwasher models of different heights. The different dishwasher models will be named as follows: normal = dishwasher measuring 80.5 cm high (built-in appliance) or 84.5 cm high (freestanding appliance) XXL = dishwasher measuring 84.5 cm high (built-in appliance).
Before using for the first time
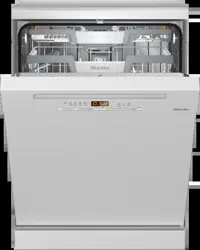
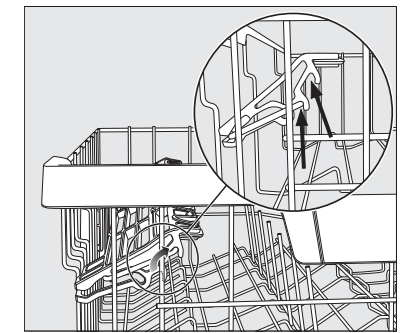
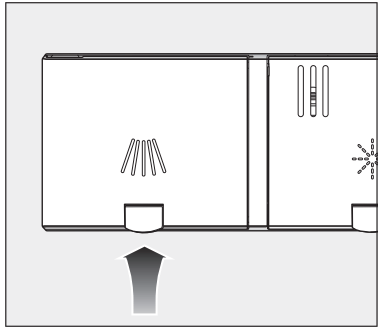
Opening the door
In some programmes, the door automatically opens slightly to assist the drying process. This function can be deactivated, if preferred (see “Programme options – AutoOpen”).
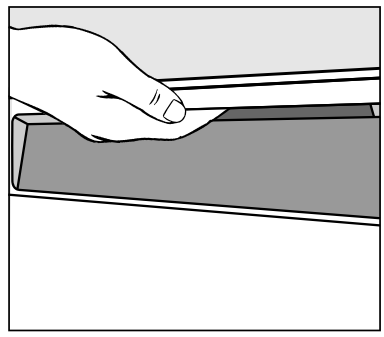
To open the door, reach under the recessed grip and pull the handle.
Open the door fully to disengage the locking mechanism.
At the end of the programme, if the AutoOpen function is on, the door locking pins automatically retract.
If the door is opened during operation all wash functions are automatically interrupted.
Closing the door
Push the baskets right in.
Raise the door upwards until the catch engages.
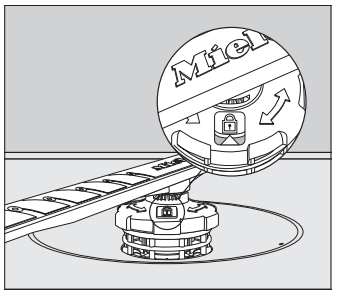
Activating the safety lock
Use the safety lock to prevent children opening the dishwasher door. The door can then only be opened by using a lot of force.
To lock the door, push the slide underneath the door grip to the right.
To unlock the door, push the slide to the left.
Water softener
In order to achieve good cleaning results, the dishwasher needs to operate with soft water. Hard water results in the build-up of calcium deposits on crockery and on the inner surfaces of the appliance.
Mains water with a water hardness level higher than 0.9 mmol/l (5 °dH – German scale) must be softened. This occurs automatically in the integrated water softener. The water softener is suitable for a water hardness level of up to 12.6 mmol/l (70 °dH – German scale).
In order to be reactivated, the water softener requires dishwasher salt. Depending on the water hardness level (< 3.8 mmol/l, or < 21 °dH – German scale), dishwasher salt is not required if combination detergents are being used (see “Detergent – Active ingredients”).
You should programme the dishwasher to the correct water hardness for your area.
Your local water authority will be able to advise you of the water hardness level in your area.
Where the water hardness fluctuates, e.g. between 1.8 and 2.7 mmol/l (10– 15 °dH – German scale), always programme the dishwasher to the higher value (2.7 mmol/l or 15 °dH in this example).
If the water hardness in your area is available in a unit other than °dH, you can convert the values as follows: 1 °dH = 0.18 mmol/l = 1.78 °fH The dishwasher is programmed at the factory for a water hardness level of 2.5 mmol/l (14 °dH – German scale).
If your water hardness level corresponds to this setting, you can skip to the next section. However, if you have a different water hardness level, you must adjust the water softener to match your water hardness.
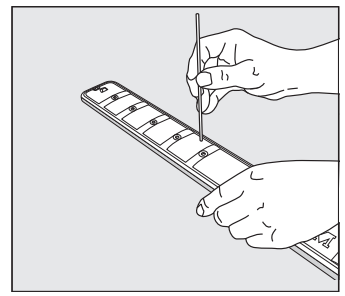
Displaying and setting the water hardness
Switch the dishwasher off with the button, if it is switched on.
Press the Start button in and, whilst holding it in, switch the dishwasher on using the button.
Keep the Start button pressed in for at least 4 seconds until the Start indicator light comes on.
If this does not happen, start the procedure from the beginning again.
Press the programme selection button 2 times.
The left indicator light will flash rapidly 2 times at intervals.
The value set for the water hardness is shown as a figure after in the time display.
will start flashing in the time display.
A water hardness of 14 °dH is set.
Use the Start button to set the water hardness value in your area.
The dosage amount increases each time you press the button. When the highest value is reached, the setting starts again from the beginning.
The setting is now saved.
Switch the dishwasher off with the button.
Filling the salt reservoir
Remove the lower basket from the wash cabinet and unscrew the salt reservoir cap.
Fill the salt reservoir with approx. 2 l of water (first use only).
Place the funnel provided over the salt reservoir and carefully fill with dishwasher salt until the reservoir is full. The salt reservoir holds up to kg of salt, depending on the type of salt used.
Clean off salt residues from around the salt reservoir opening. Next, screw the salt reservoir cap on again firmly.
Immediately after filling the salt reservoir and each time you remove the salt container cap, run the 65 °C QuickPowerWash programme with the Express programme option selected without a load in the dishwasher to dissolve and remove any traces of salt from the wash cabinet.
Refilling the salt
When the Salt indicator lights up, wait until the end of the programme and then refill the salt reservoir.
After the salt reservoir has been filled, the refill reminder may still appear in the display if the salt concentration has not yet reached the correct level. It will go out once the salt concentration has reached the correct level. The salt refill indicator will be switched off if you have programmed the dishwasher for a water hardness below 0.9 mmol/l (5 °dH – German scale).
Rinse aid
Rinse aid is necessary to ensure that water does not cling and leave marks on crockery during the drying phase, and helps crockery dry faster after it has been washed. Rinse aid is poured into the container and the amount set is dispensed automatically.
Alternatively, you could use liquid citric acid at a concentration of up to 10 %. The resulting rinsing and drying quality on the crockery will not, however, be as good as when rinse aid is used.
Adding rinse aid
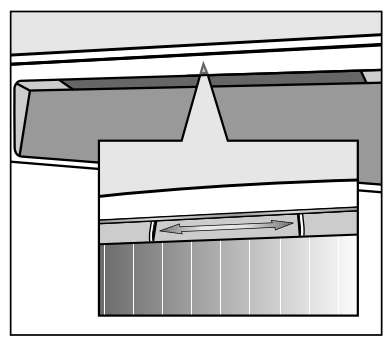
Press the yellow button on the lid of the rinse aid container. The lid will spring open.
Fill with rinse aid until the filling level indicator (arrow) changes to a dark colour while the door is horizontally open
Close the lid firmly until you hear it click into place. Otherwise, water can enter the rinse aid container during a programme.
Wipe up any spilled rinse aid. This prevents excess foam developing during the next programme.
Filling the rinse aid container
When the refill reminder Rinse aid appears in the display, the container contains sufficient rinse aid for 2 to 3 programmes only.
Refill with rinse aid in plenty of time. The rinse aid refill reminder will disappear.
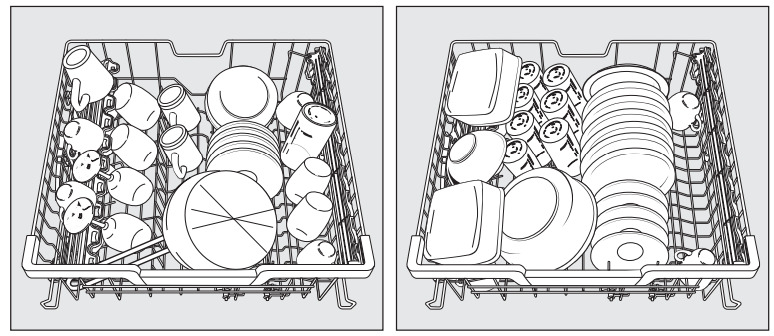
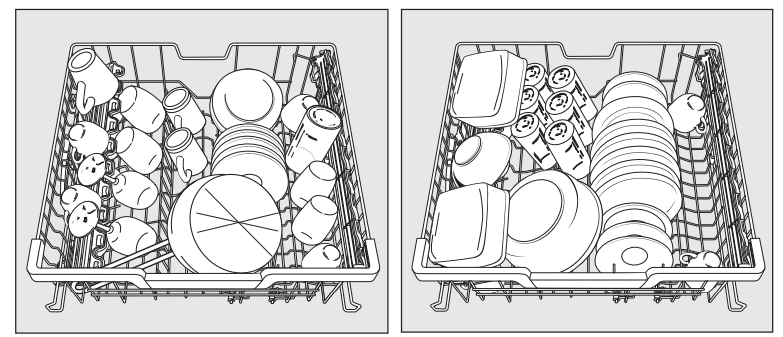
Loading the dishwasher
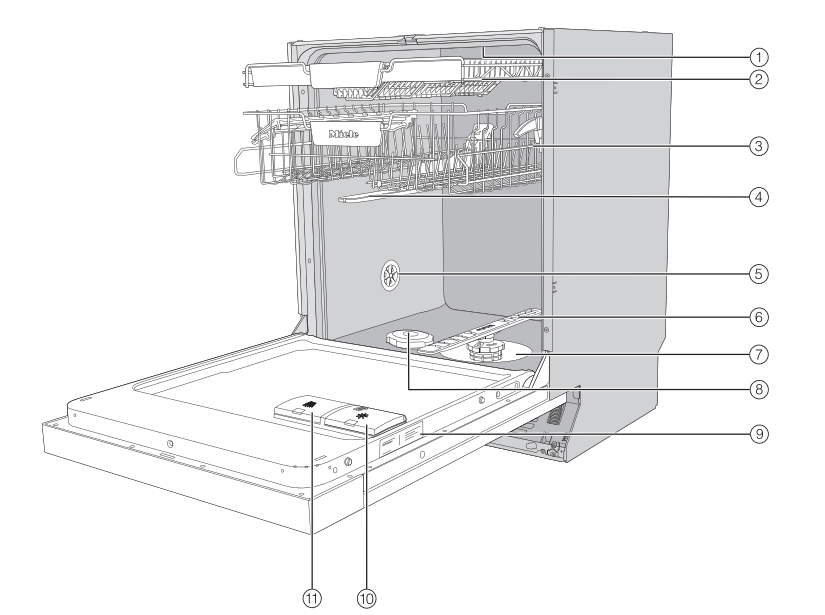
Upper basket
Loading the upper basket
Use the upper basket for small, lightweight and delicate items such as cups, saucers, glasses, dessert bowls etc. Shallow pans or casserole dishes can also be placed in the upper basket.
Long items such as soup ladles and mixing spoons should be placed lying down across the front of the upper basket.
Loading the FlexCare cup rack
You can put cups, small bowls and flat crockery on the FlexCare cup rack. Glasses can be arranged along the cup rack so they sit securely during the programme.
Lower the cup rack to do so.
Raise the cup rack upwards to make room for tall items.
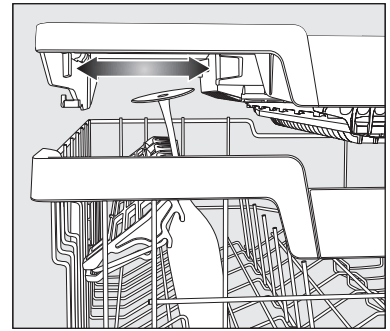
Adjusting the FlexCare cup rack
You can set the height and depth of the cup rack at two different levels. so that it can accommodate larger cups and so that taller crockery can be placed underneath it.
Pull the cup rack upwards and click it into the desired position (see arrow).
Loading the silicone elements of the FlexCare cup rack
The silicone elements in the cup rack are specially designed to hold tall glasses with long stems securely.
Lower the cup rack and lean the glasses against the openings.
If you wish you can adjust the left insert of the 3D MultiFlex tray to make space for taller glasses (see the “Cutlery” chapter, “3D MultiFlex tray” section).
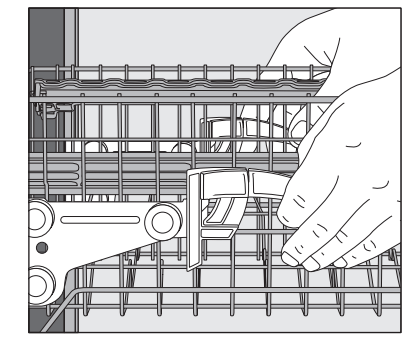
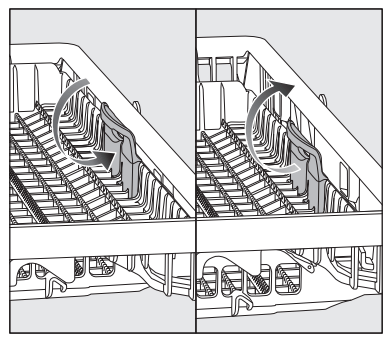
Lowering the spikes
On both front right-hand rows of spikes, you can lower every other spike to make it easier to arrange larger crockery, like cereal bowls.
Press the yellow lever downwards , and then lower the dark grey spikes .
Place the bowls vertically in the row of spikes.
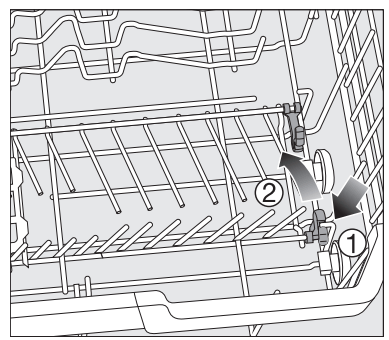
Adjust the upper basket
In order to gain more space for taller pieces of crockery in the lower or upper basket, the upper basket can be adjusted on three levels with 2 cm between each level.
The upper basket can also be set at an angle so that water can run off freely from recesses. Make sure, however, that the basket can slide smoothly in and out of the wash cabinet.
Pull out the upper basket.
To raise the upper basket:
Lift the basket up until it clicks into place.
To lower the upper basket:
Pull upwards on the levers at either side of the upper basket.
Adjust the basket to the desired height and then push the levers securely back down into position.
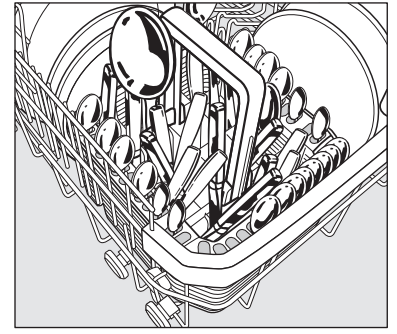
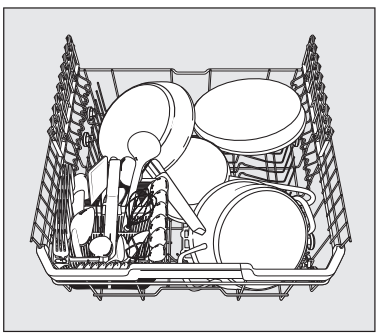
Lower basket
Loading the lower basket
Place larger and heavier items such as plates, serving platters, saucepans, bowls etc., in the lower basket. Glasses, cups and small plates and saucers can also be placed in the lower basket.
Loading the MultiComfort zone
The rear section of the lower basket is used for washing cups, glasses, plates and pots and pans.
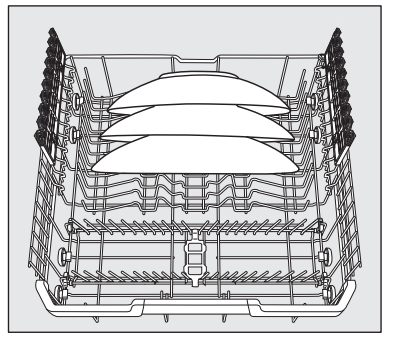
Place very large plates in the middle of the lower basket.
Tip: When tilted, plates up to 35 cm in diameter can be accommodated.
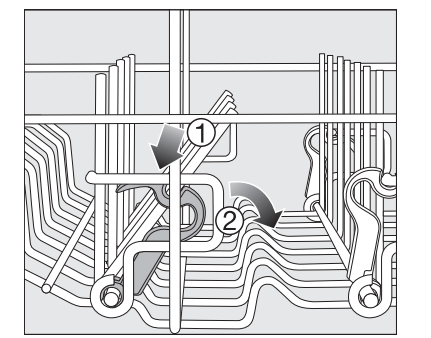
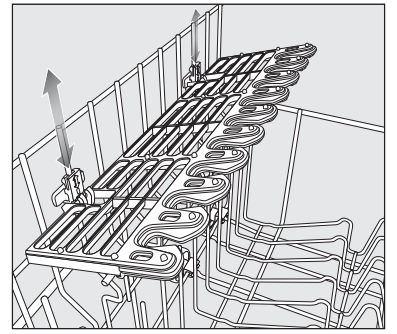
Lowering the spikes
The rows of spikes at the front are used for washing plates, soup bowls, platters, dessert bowls and saucers.
Both right-hand rows of spikes can be lowered to make more room for large items such as pots, pans and serving dishes.
Press the yellow lever downwards , and then lower the spikes .
Loading the FlexCare glass holder
The silicone elements in the glass holder provide a stable and secure hold for delicate stemware.
Stemware such as wine glasses, champagne flutes and beer glasses can be leaned against the glass rack or suspended from it.
The glass rack can be raised to make more room for tall items.
You can set the glass holder to two different heights
.
Slide the glass holder to the desired height until the catches click into place at the top or the bottom.
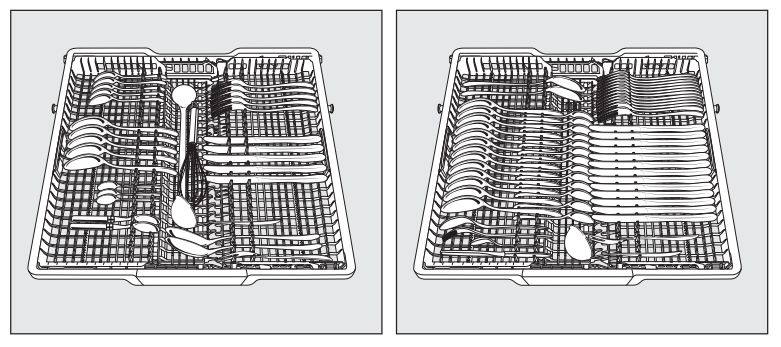
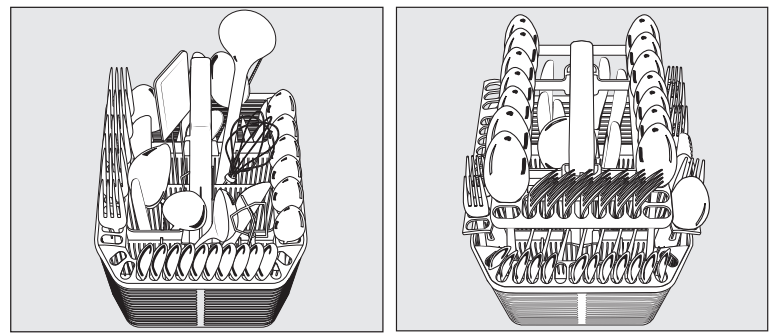
Cutlery tray/cutlery basket(depending on model)
Load the cutlery into the 3D MultiFlex tray or into the cutlery basket (depending on the model).
Loading the 3D MultiFlex tray
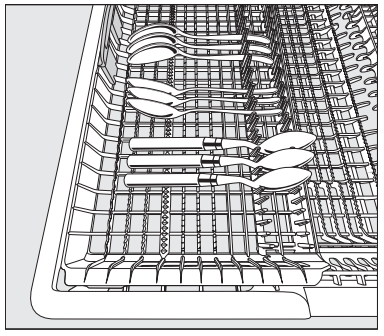
To make unloading easier, cutlery should be grouped in zones, one for knives, one for forks, one for spoons, etc.
Spoon heads should be placed in contact with at least one of the serrated retainers on the base of the tray to ensure that water runs off them freely.You can push the left insert to the middle in order to accommodate tall items of crockery and long stemmed glasses in the upper basket (see “Upper basket” – Loading the silicone elements of the FlexCare cup rack”).
If spoon handles do not fit between the holders, then lay them the other way round.
You can put large and long cutlery in the recessed centre part of the tray.
You can adjust the height of the righthand insert to create more space in the right-hand part of the tray for larger cutlery items or smaller pieces of crockery.
Pull the insert inwards by the yellow handle and click it into place in one of the two positions.
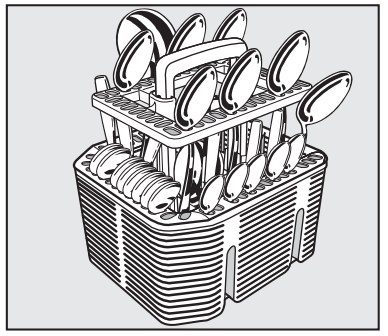
Loading the cutlery basket
The cutlery basket can be placed anywhere on the front rows of spikes in the left or right corner of the lower basket.
To avoid the risk of injury, knives and forks should be placed with the handles upwards in the cutlery basket. However, cutlery placed handle down in the cutlery basket will come out cleaner and drier.
Place small items of cutlery in the individual slots on three sides of the cutlery basket.
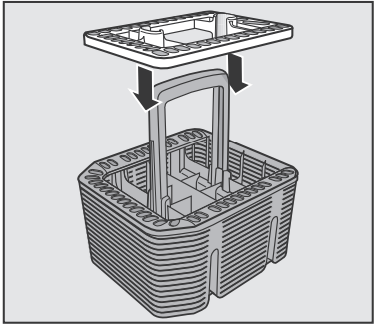
Loading the cutlery insert for the cutlery basket
Use the insert supplied for heavily soiled items of cutlery. As this insert separates the items, they do not overlap and can be more easily accessed by the water jets.
Fit the insert onto the cutlery basket if required.
Place cutlery into the insert with the handles facing downwards.
Arrange them evenly along the insert.
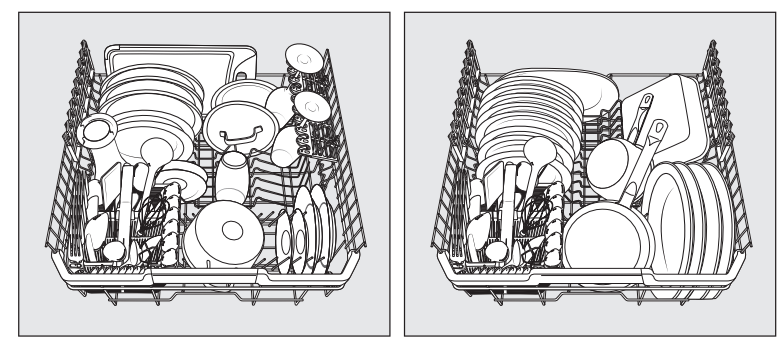
Loading examples
Dishwashers with cutlery tray
Upper basket
Lower basket
Cutlery tray
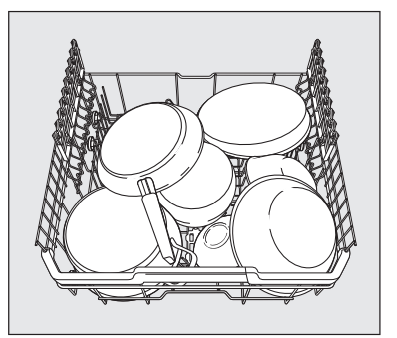
Heavily soiled items
Dishwashers with cutlery basket
Upper basket
Lower basket
Cutlery basket
Heavily soiled items
Detergent
Detergent dispensing
The detergent compartment holds a maximum of 50 ml.
There are marks in the detergent compartment to aid with dispensing: 20, 30, max. When the door is opened to a horizontal position, they show the approximate fill level in ml and the maximum fill height.
Follow the detergent dosage recommended by the manufacturer on the packaging.
Unless directed otherwise, use one detergent tab or add 20 to 30 ml of detergent to the detergent compartment, depending on the degree of soiling of the crockery.
Failure to dispense the recommended amount of detergent may impair cleaning results.
Some tabs may not dissolve completely when the programme QuickPowerWash is used.
Adding detergent
Press the yellow button on the lid of the detergent compartment.
The lid will spring open. The lid will also open at the end of a programme sequence.
Add the detergent to the detergent compartment.
Push the lid shut until you hear it click into place.
The detergent must not cause the detergent compartment lid to get stuck. This can prevent the lid from opening during the programme sequence. Do not overfill the detergent compartment.
Ensure that the detergent packaging is properly closed after use. This prevents the detergent from getting damp and clumping together.
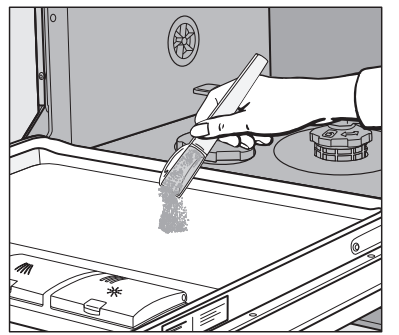
You can also apply a small amount of detergent to the inner panel of the door in programmes that have a prewash stage (see “Programme overview”).
Operation
Switching on the dishwasher
Make sure the spray arms can rotate freely.
Close the door.
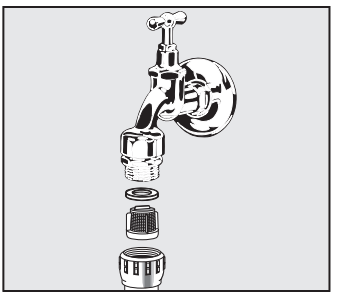
Open the stopcock, if it is closed.
Press the button.
The Start indicator light flashes and the indicator light comes on next to the programme selected.
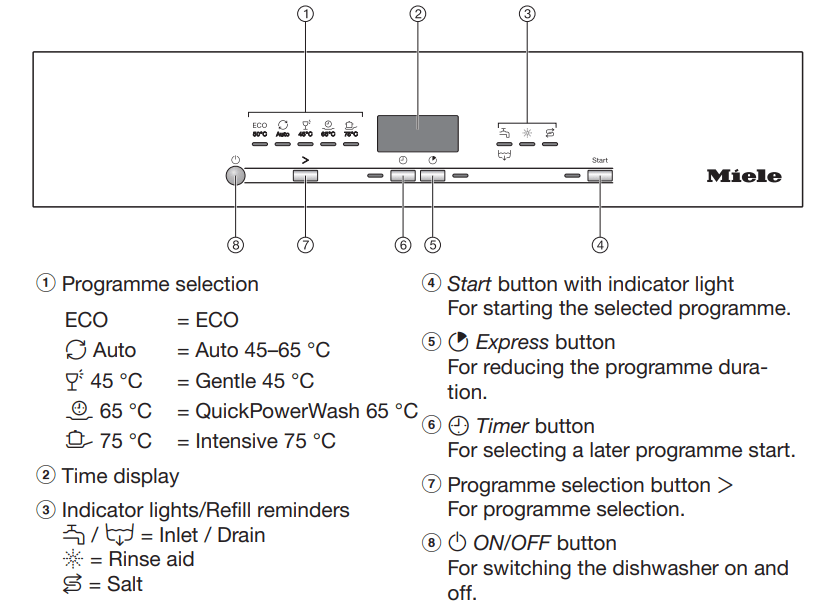
Selecting a programme
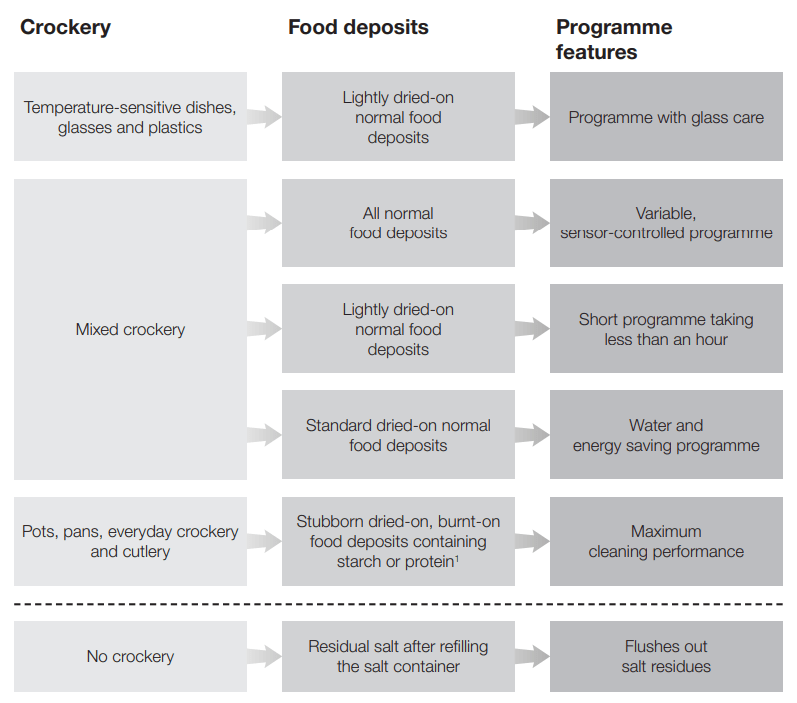
Choose your programme according to the type of crockery and the degree of soiling.
The different programmes and their uses are described under “Programme overview”.
Use the programme selection button to select the programme you want.
The indicator light for the programme selected will come on.
The programme duration will appear in hours and minutes in the display.
You can now select programme options see “Programme options”).
If any programme options are selected, the appropriate indicator lights will also light up.
Display of programme running time
The duration of the programme selected appears in hours and minutes in the display before the programme begins.
During the programme sequence, the time left until the end of the programme is displayed.
The displayed duration may vary for the same programme. It is influenced by, for example, the temperature of the incoming water, the reactivation cycle of the water softener, the detergent type and the amount of crockery and how soiled it is.
When a programme is selected for the first time, the display will show the average running time for a cold water connection.
The running times shown in the “Programme overview” chapter refer to standard test loads and temperatures.
For each programme sequence, the control module calculates the programme running time according to the temperature of the water taken into the dishwasher and the size of the load.
Starting the programme
Press the Start button. The programme starts. The Start indicator light will come on
End of programme
The programme has ended when shows in the display. In some programmes, if the AutoOpen function is activated, the door will automatically open slightly (see “Programme options – AutoOpen”). This improves the drying process
Energy management
To save energy, the dishwasher will switch off automatically 10 minutes after the last time a button is pressed or after the end of a programme. You can switch the dishwasher back on again with the button.
Switching off the dishwasher
The dishwasher can be switched off at any time using the button.
Switching the dishwasher off during a programme stops the programme.
You can also do this to stop an ongoing timer.
Risk of damage from leaking water. Water leakage can cause damage.
If the dishwasher is not going to be used for a longer period of time, e.g. whilst on holiday, the stopcock should be closed as a precaution.
Unloading the dishwasher
Dishes tend to break and chip more easily when they are hot. Allow the dishes to cool until they are comfortable enough to handle before unloading them.
If you open the door fully after switching off, the dishes will cool much faster.
First unload the lower basket, then the upper basket and finally the 3D MultiFlex tray (if present). This will prevent water drops from the upper basket and 3D MultiFlex tray from falling onto the dishes in the lower basket.
Interrupting a programme
A programme will be interrupted as soon as the door is opened.
If the door is closed again, the programme will continue from the point it was at before the door was opened.
Cancelling or changing a programme
If a programme has already started and you wish to cancel it, proceed as follows:
Switch the dishwasher off with the button.
If you would like to select another programme:
Switch the dishwasher on again with the button.
If you have dispensed detergent manually, check whether the detergent compartment is still closed. If the lid is already open, fill it with detergent again and close the lid.
Select the programme you want, and then start it.
Timer
You can set the start time of a programme. The programme start time can be delayed for between 30 minutes and 24 hours. With start time delays between 30 minutes and 9 hours 30 minutes, the delay can be set in 30 minute stages. It is set in hours for periods longer than this.
Activating the timer
Switch the dishwasher on with the button. The Start indicator light will flash.
Select the programme you want to use.
Press the Timer button
The most recently set time will be shown on the time display. The
Timer indicator light will light up.
Set the required time after which the programme should start automatically using the Timer button
If the Timer buttonis pressed and held, the time will increase automatically up to 24 hours. To start again with hours, press the Timer button twice.
Press the Start button.
The Start indicator light will come on.
The time up until the programme starts will show counting down in the display in hours for durations above 10 hours, and in minutes for durations below this.
At the end of the delay period, the programme selected begins automatically.
The time left will appear in the time display and the Timer indicator light will go out.
How the timer time is shown in the display:
Up to 59 minutes: e.g. 30 minutes =
1 hour up to 9 hours 30 minutes: e.g. 5 hours =
Over 10 hours: e.g. 15 hours =
Starting a programme before the time for the timer has elapsed:
A programme can be started before the time for the timer has elapsed.
Proceed as follows:
Switch the dishwasher off with the button.
Switch the dishwasher on again with the button.
Select the programme you want.
Press the Start button.
The programme starts. The Start indicator light will come on.
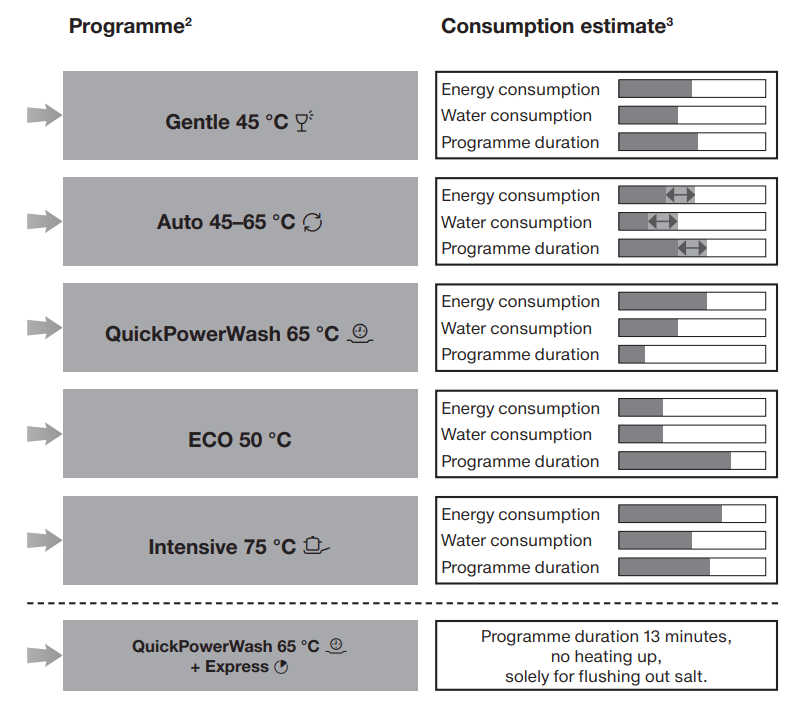
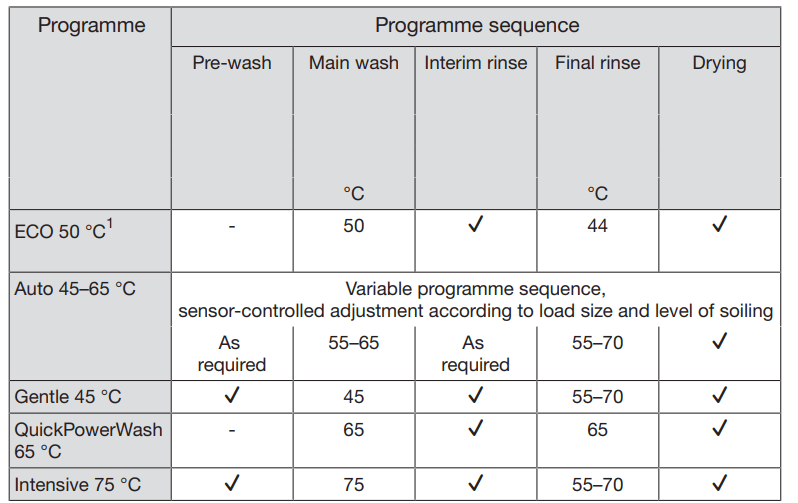
Programme overview
1 Food such as potatoes, pasta, rice or stews can leave starchy deposits. Deposits containing protein can be left by food such as fried meat or fish.
2All programmes can be combined with the “Express” or “IntenseZone” programme options.
3 The estimated values may change due to the selected settings or programme options, or the conditions in which the appliance is being used.
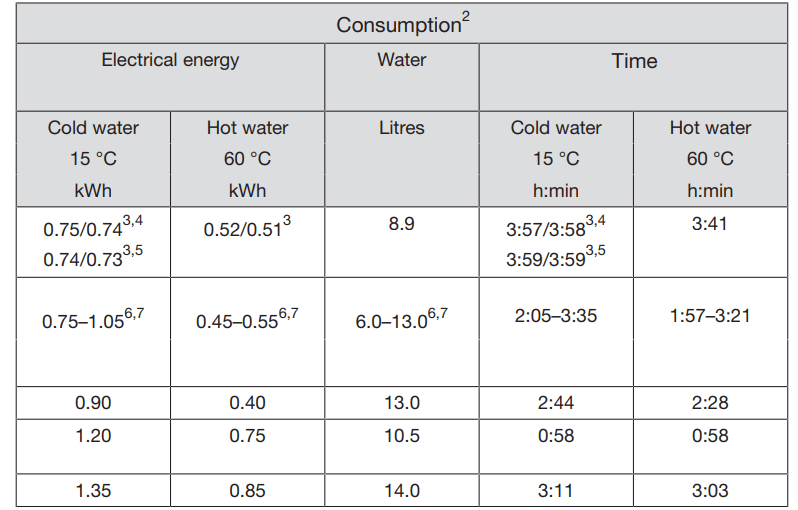
1 This programme is the most efficient in terms of its combined energy and water consumption for cleaning normally soiled crockery.
2 Values for the ECO programme were calculated under standardised testing conditions. Values for the remaining programmes were calculated under comparable testing conditions. In practice, the selected settings, programme options or use conditions may result in different values.
3 Dishwashers with cutlery tray/cutlery basket
4 Values according to EU 1059/2010
5 Values according to EU 2019/2017
6 Minimum value: half load with light soiling
7 Maximum value: full load with heavy soiling
Programme options
Express
The Express programme option reduces the programme running time.
In order to achieve optimum cleaning results, the temperature, and therefore the energy consumption, will increase with this option.
The time by which the programme running time is shortened varies according to the selected programme.
Selecting the Express programme option may take precedence over other selected options.
Switch the dishwasher on with the button.
The Start indicator light will flash.
Select a different programme if required.
Press the Express button.
The Express indicator light will come on if the programme option is available for the programme selected.
Press the Start button to start the programme.
The selected programme option will remain active for that particular programme until the setting is changed (except for the ECO programme).
AutoOpen
In some programmes, the door automatically opens slightly to assist the drying process.
This programme option can be deactivated if you wish.
Switch the dishwasher off with the button, if it is switched on.
Press the Start button in and, whilst holding it in, switch the dishwasher on using the button. Keep the Start button pressed in for at least 4 seconds until the Start indicator light comes on. If this does not happen, start the procedure from the beginning again.
Press the programme selection button 7 times.
The left indicator light will flash rapidly 7 times at intervals.
The flashing sequence in the display indicates whether the AutoOpen programme option is activated or not:
AutoOpen is activated
AutoOpen is deactivated
Press the Start button to change the setting.
The setting is now saved.
Switch the dishwasher off with thebutton.
Switching off the refill reminders
If you only ever use combination detergent products containing salt and rinse aid in your dishwasher, you can switch off both refill reminders if you wish.
Switch the dishwasher off with the button, if it is switched on.
Press the Start button in and, whilst holding it in, switch the dishwasher on using the button.
Keep the Start button pressed in for at least 4 seconds until the Start indicator light comes on.
If this does not happen, start the procedure from the beginning again.
Press the programme selection button 9 times.
The left programme indicator light will flash rapidly 9 times at intervals.
The flashing sequence in the display indicates whether the refill reminders have been activated or not:
Refill reminders activated
Refill reminders deactivated
Press the Start button to change the setting.
The setting is now saved.
Switch the dishwasher off with the button.
Extra clean
You can choose this programme option to increase the cleaning performance of the programmes.
If you activate this programme option, the programme running times and the main wash temperatures will increase.
The water and energy consumption may increase.
Switch the dishwasher off with the button, if it is switched on.
Press the Start button in and, whilst holding it in, switch the dishwasher on using the button.
Keep the Start button pressed in for at least 4 seconds until the Start indicator light comes on.
If this does not happen, start the procedure from the beginning again.
Press the programme selection button 10 times.
The left programme indicator light will emit 1 long flash at intervals.
The flashing sequence in the display indicates whether the Extra clean programme option is activated or not:
Extra clean is activated
Extra clean is deactivated
Press the Start button to change the setting.
The setting is now saved.
Switch the dishwasher off with the button.
Extra dry
You can select this programme option in order to increase the programme drying performance.
If you activate this programme option, the programme running times and final rinse temperatures will increase. The energy consumption may increase.
Switch the dishwasher off with the button, if it is switched on.
Press the Start button in and, whilst holding it in, switch the dishwasher on using the button.
Keep the Start button pressed in for at least 4 seconds until the Start indicator light comes on.
If this does not happen, start the procedure from the beginning again.
Press the programme selection button 11 times.
The left programme indicator light will emit 1 long flash and 1 short flash at intervals.
The flashing sequence in the display indicates whether the Extra dry programme option is activated or not:
Extra dry is activated
Extra dry is deactivated
Press the Start button to change the setting.
The setting is now saved.
Switch the dishwasher off with the button.
Factory defaults
If you have altered any settings, you can reset them back to the factory default settings.
Switch the dishwasher off with the button, if it is switched on.
Press the Start button in and, whilst holding it in, switch the dishwasher on using the button.
Keep the Start button pressed in for at least 4 seconds until the Start indicator light comes on.
If this does not happen, start the procedure from the beginning again.
Press the programme selection button 19 times.
The left programme indicator light will emit 1 long flash and 9 short flashes at intervals.
The flashing sequence in the display indicates whether the setting deviates from the factory default:
All values are factory default settings.
At least one setting has been changed.
To reset the dishwasher to the factory default settings, press the Start button.
The setting is now saved.
Switch the dishwasher off with the button.
Cleaning and care
Cleaning the wash cabinet
The wash cabinet is largely self-cleaning, provided that the correct amount of detergent is always used. If, despite this, limescale or grease deposits build up in the cabinet, these can be removed with a proprietary dishwasher cleaner (available from the Miele Customer Service Department or the Miele webshop). Follow the instructions on the product packaging. The frequent use of low-temperature wash programmes (< 50 °C) increases the risk of contamination and odours inside the wash cabinet. Run the Intensive 75 °C programme once per month to clean the wash cabinet and prevent odours from developing.
Clean the filters in the wash cabinet regularly.
Cleaning the door and the door seal
The door seal and the sides of the dishwasher door cannot be reached and cleaned by the spray arm jets. As a result, mould can develop here.
Wipe the door seals regularly with a damp cloth to remove food deposits.
Wipe off any food or drink residues that may have dripped onto the sides of dishwasher door.
Cleaning the control panel
The control panel should only be wiped with a damp cloth.
Cleaning the appliance front
Clean the appliance front with a clean soft sponge and a solution of warm water and washing-up liquid. After cleaning, wipe the surfaces dry using a soft cloth.
A clean, damp microfibre cloth without detergent can also be used.
To avoid damaging the external surfaces, do not use the following:
Detergents containing soda, ammonia, acids or chlorides
Detergents containing descaling agents
Abrasive detergents, e.g. scouring powder, scouring liquid, or pumice stones
Detergents containing solvents
Stainless steel cleaning agents
Dishwasher cleaner
Oven cleaner
Glass cleaning agents
Hard, abrasive brushes or sponges, e.g. pot scourers, brushes or sponges that have been previously used with abrasive cleaning agents
Eraser stain remover blocks
Sharp metal scrapers
Wire wool
Steam cleaners
Cleaning the spray arms
Particles of food can get stuck in the spray arm nozzles and bearings. The spray arms should therefore be inspected regularly (approx. every 2– 4 months).
Switch the dishwasher off.
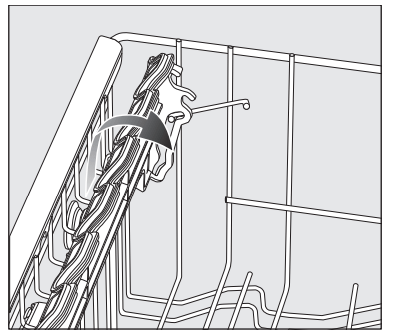
Removing the upper and middle spray arms
Take out the 3D MultiFlex tray (if your dishwasher is fitted with one).
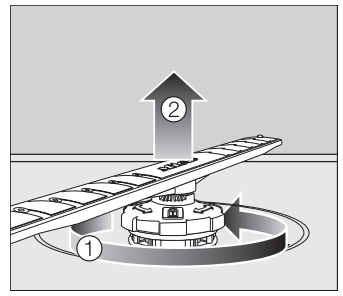
Push the upper spray arm upwards to engage the inner ratchet. Then unscrew the spray arm by rotating the screw thread anti-clockwise.
Rotate the screw thread of the middle spray arm clockwise (see diagram) and remove the spray arm
Removing the lower spray arm
Remove the lower basket.
Rotate the screw thread of the lower spray arm anti-clockwise and pull the spray arm upwards to remove
Cleaning the spray arms
Use a pointed object to push food particles in the nozzles into the spray arm.
Rinse the spray arm thoroughly under running water.
Refitting the spray arms
Refit the upper and middle spray arms.
Refit the lower spray arm and ensure that the filter combination lies flat in the base of the wash cabinet.
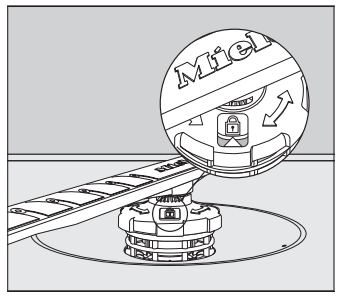
Rotate the screw thread of the lower spray arm clockwise until the arrow in the viewing window points to the lock symbol .
Make sure the spray arms can rotate freely.
Checking the filters in the wash cabinet
The filter combination in the base of the wash cabinet retains coarse soiling from the suds solution. This prevents soiling getting into the circulation system and re-entering the wash cabinet through the spray arms.
The filters can become blocked by soiling that collects over time. The level of soiling and time it takes before the filters need cleaning will vary depending on use.
Monitor the condition of the filter combination regularly and clean it if necessary.
Cleaning the filters
Switch the dishwasher off.
Remove the lower spray arm (see “Cleaning and care” chapter, “Cleaning the spray arms” section).
Before removing the filter combination, remove any coarse soiling to prevent it from entering the circulation system.
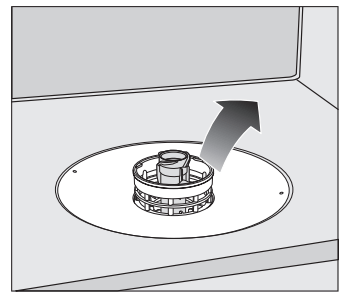
Remove the filter combination.
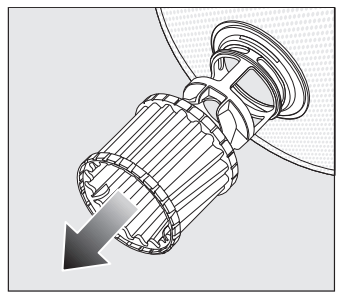
In order to clean the inside of the filter, pull the microfilter on the plastic ring downwards and away from the filter combination.
Rinse all the parts under running water. If necessary, use a soft cleaning brush to remove soiling.
Insert the microfilter back into the filter combination.
Refit the filter combination so that it lies flat in the base of the wash cabinet.
Refit the lower spray arm to the filter combination using the screw thread.
Rotate the screw thread clockwise until the arrow in the viewing window points to the lock symbol .
Cleaning the water inlet filter
A filter is incorporated in the screw thread to protect the water inlet valve. If the filter is soiled, insufficient water flows into the wash cabinet.
Disconnect the dishwasher from the mains. To do this, turn off the dishwasher, switch off at the socket and remove the plug.
Close the stopcock.
Unscrew the water inlet valve.
Remove the seal from the screw thread.
Using pointed pliers, take hold of the plastic filter slat and remove the filter.
Rinse the filter under running water.
Reassemble in reverse order.
Cleaning the drain pump
If water remains in the wash cabinet after the end of a programme, the water has not been pumped away. The drain pump may be blocked by foreign objects. These are easy to remove.
Disconnect the dishwasher from the mains. To do this, turn off the dishwasher, switch off at the socket and withdraw the plug.
Take the filter combination out of the wash cabinet (see “Cleaning and care” chapter, “Cleaning the filters”).
Scoop the water out of the cabinet using a suitable small container or utensil.
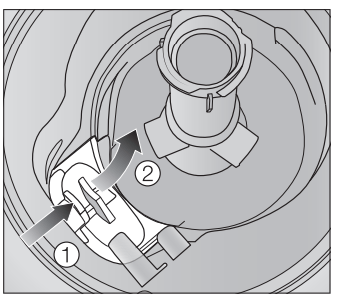
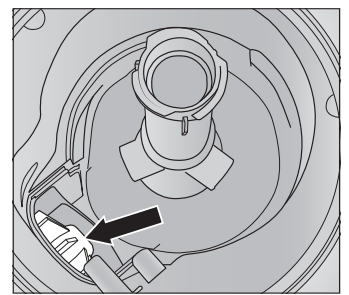
Press the catch of the drain pump cover inwards
Tip the cover inwards until it is released .
Rinse the cover thoroughly under running water and remove all foreign objects.
The drain pump (see arrow) is underneath the cover.
Carefully remove all foreign objects from the drain pump. Check the drain pump impeller by manually turning it. You will feel a little resistance when you turn the impeller.
Refit the cover by placing it down vertically from above.
Problem solving guide
Many malfunctions and faults that can occur in daily operation can be easily remedied. Time and money will be saved because a service call will not be needed. The following guide may help you to find the reason for a malfunction or a fault, and to correct it.
Technical problems
Problem
Cause and remedy
The control field remains dark after the dishwasher has been switched on with the button.
The dishwasher is not plugged in.
Insert the plug and switch on at the socket.
The mains fuse has tripped.
Reset the trip switch in the fuse box or replace the fuse in the plug (see data plate for minimum fuse rating).
If the mains fuse trips again, contact the Miele Customer Service Department.
The dishwasher stops during a programme.
The mains fuse has tripped.
Reset the trip switch in the fuse box or replace the fuse in the plug (see data plate for minimum fuse rating).
If the mains fuse trips again, contact Miele Service.
Fault messages
Problem
Cause and remedy
The display shows a fault number that is not listed below.
There may be a technical fault.
Switch the dishwasher off with the button.
Switch the dishwasher back on after a few seconds.
Restart the desired programme.
If the indicator lights flash again, there is a technical fault.
Switch the dishwasher off.
Close the stopcock.
Call the Miele Customer Service Department.
Fault The drain pump may still be running, even with the door open.
The Waterproof system has reacted.
Switch the dishwasher off.
Close the stopcock.
Call the Miele Customer Service Department.
All of the programme selection indicator lights are flashing. Fault number appears in the time display.
Circulation pump fault.
Switch the dishwasher off.
Switch the dishwasher back on.
Restart the desired programme.
If the fault message appears again, there is a technical fault.
Switch the dishwasher off.
Close the stopcock.
Call the Miele Customer Service Department.
Door release
Problem
Cause and remedy
Fault number appears in the time display.
The door does not open automatically.
There may be a technical fault.
Switch the dishwasher off.
Open the door manually (see “Before using for the first time – Opening the door”) and switch the dishwasher back on again.
If the same fault message appears again, call the Miele Customer Service Department.
The door locking pins do not retract after the door is opened.
There may be a technical fault.
Switch the dishwasher back on.
If the same fault message appears again, call the Miele Customer Service Department.
Water inlet fault
Problem
Cause and remedy
The dishwasher stops during a programme. The indicator light is flashing. Fault number appears in the time display
Before rectifying the problem:
Switch the dishwasher off.
Water drainage fault.
There might be water in the wash cabinet.
Clean the filter combination (see “Cleaning and care – Cleaning the filters”).
Clean the drain pump (see “Cleaning and care – Cleaning the drain pump”).
Remove any kinks or loops in the drain hose.
General problems with the dishwasher
Problem
Cause and remedy
The indicator lights and display are dark.
The dishwasher has switched off automatically to save energy.
Switch the dishwasher on again with the button.
Detergent residue is left in the detergent compartment at the end of a programme.
The detergent compartment was still damp when detergent was added.
Only add the detergent when the detergent compartment is dry.
The detergent compartment lid cannot be closed.
Residual detergent is blocking the catch.
Remove the residual detergent.
At the end of a programme there is a film of moisture on the inside of the door and possibly on the interior cabinet walls.
This is part of the normal function of the drying system. The moisture will dissipate after a short while.
Water remains in the wash cabinet at the end of a programme.
Before rectifying the problem:
Switch the dishwasher off.
The filter combination in the wash cabinet is clogged.
Clean the filter combination (see “Cleaning and care” chapter, “Cleaning the filters” section).
The drain pump is blocked.
Clean the drain pump (see “Cleaning and care” chapter, “Cleaning the drain pump” section).
The drain hose is kinked.
Remove any kinks from the drain hose.
Noises
Problem
Cause and remedy
Knocking noise in the wash cabinet
A spray arm is knocking against a wash item.
Carefully open the door and rearrange the wash items that are obstructing the spray arm.
Rattling noise in the wash cabinet
Wash items are insecure in the wash cabinet.
Carefully open the door and rearrange the wash items so that they sit securely.
There is a foreign object (e.g. glass shard) in the drain pump.
Remove the foreign object from the drain pump (see “Cleaning and care” chapter, “Cleaning the drain pump” section).
Knocking noise in the water pipes
This may be caused by the on-site installation or the cross-section of the piping.
However, this will not affect the functioning of the dishwasher in any way. If in doubt, contact a suitably qualified plumber.
Unsatisfactory washing result
Problem
Cause and remedy
The wash items are not clean.
The wash items were not loaded correctly.
See notes in the “Loading the dishwasher” chapter.
The programme was not powerful enough.
Select a more powerful programme (see “Programme overview” chapter).
Not enough detergent was dispensed during manual detergent dispensing.
Use more detergent or change the detergent you are using.
Items are blocking the path of the spray arms.
Carry out a rotation check and if needed rearrange the items so that the spray arms can rotate freely.
The filter combination in the wash cabinet is not clean or was incorrectly fitted. This may have caused the spray arm jets to become blocked.
Clean and/or fit the filter combination correctly.
Clean the spray arm jets if necessary (see “Cleaning and care” chapter, “Cleaning the spray arms” section).
There are smears on glassware and cutlery. There is a bluish sheen on the surface of glassware. The film can be wiped off.
The rinse aid dosage is set too high.
Reduce the dosage (see “Before using for the first time – Rinse aid”).
The crockery is not dry or cutlery and glasses are flecked.
The rinse aid dosage is too low or the rinse aid container is empty.
Replenish the rinse aid container, increase the dosage or change the brand of rinse aid (see “Before using for the first time – Rinse aid”).
The crockery was taken out of the wash cabinet too soon.
Leave the crockery in longer (see “Operation – Unloading the dishwasher”).
The duration of the drying phase for the selected programme is not sufficient for the crockery.
Select the Extra dry programme option if available (see “Programme options – Extra dry”).
You have used combination products that have insufficient drying performance.
Switch to another detergent, or replenish the rinse aid (see “Before using for the first time – Rinse aid”).
Glassware has a brown or blue tinge. The film cannot be wiped off.
Ingredients from the detergent have formed a deposit.
Switch to another detergent straight away
Glassware is dull and discoloured. The film cannot be wiped off.
The glassware is not dishwasher-proof. The surface has altered.
No remedy. Purchase glassware that is dishwasher-proof.
Tea or lipstick stains have not been completely removed.
The wash temperature of the selected programme was too low.
Select a programme with a higher main wash temperature.
The bleaching effect of the detergent used is too low.
Switch to another detergent.
Plastic items are discoloured.
Natural dyes, e.g. from carrots, tomatoes or ketchup may be the cause. The amount of detergent used or its bleaching effect was not sufficient to deal with natural dyes.
Use more detergent (see “Detergent”). Parts that are already discoloured will not revert to their original colour
White residue is visible on the crockery. Clouding has occurred on glassware and cutlery. The film can be wiped off.
The rinse aid dosage is set too low.
Increase the dosage (see “Before using for the first time – Rinse aid”).
There is no salt in the salt reservoir.
Fill the salt reservoir (see “Before using for the first time – Dishwasher salt”).
The salt reservoir cap has not been screwed on correctly.
Replace the cap, making sure that it screws back on correctly.
Unsuitable combination detergents were used.
Switch to another detergent. If using tabs or powder detergent, do not choose combination products and ensure you refill the dishwasher salt and rinse aid.
The water softener is programmed to too low a water hardness level.
Programme the water softener to a higher water hardness level (see “Before using for the first time – Water softener”).
There are rust stains on cutlery.
The affected items are not corrosion-resistant.
No remedy. Purchase cutlery that is dishwasher-safe.
A programme was not run after dishwasher salt was added. Traces of salt have got into the normal wash cycle.
Always run the 65 °C QuickPowerWash programme with the Express option selected and without any load items in the dishwasher immediately after adding dishwasher salt.
The salt reservoir cap has not been screwed on correctly.
Replace the cap, making sure that it screws back on correctly.
 button, if it is switched on.
 programme selection button 2 times.
 in the time display.
 will start flashing in the time display.
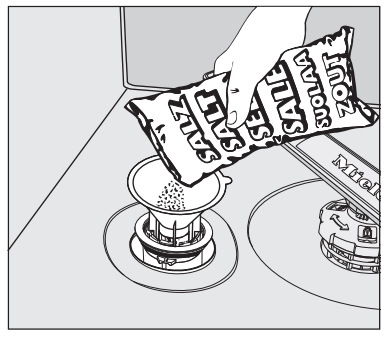
 65 °C QuickPowerWash programme with the
  Express programme option selected without a load in the dishwasher to dissolve and remove any traces of salt from the wash cabinet.
 indicator lights up, wait until the end of the programme and then refill the salt reservoir.
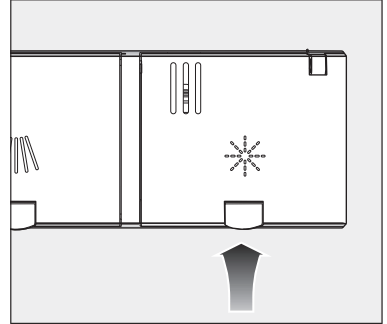
 on the lid of the rinse aid container. The lid will spring open.
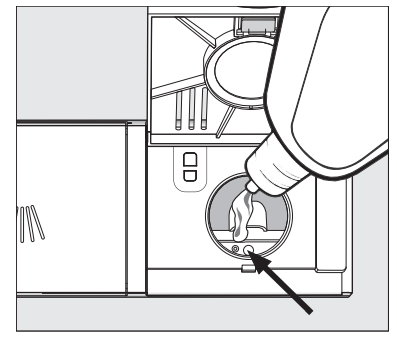
 , and then lower the dark grey spikes
  .
.
 .
.

 on the lid of the detergent compartment.
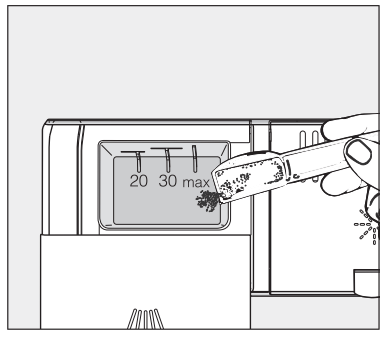
 button.
 to select the programme you want.
 shows in the display. In some programmes, if the AutoOpen function is activated, the door will automatically open slightly (see “Programme options – AutoOpen”). This improves the drying process
 Risk of damage from leaking water. Water leakage can cause damage.
 Timer button
 hours, press the


 Express programme option reduces the programme running time.
 programme selection button 7 times.
 AutoOpen is activated
 AutoOpen is deactivated
 programme selection button 9 times.
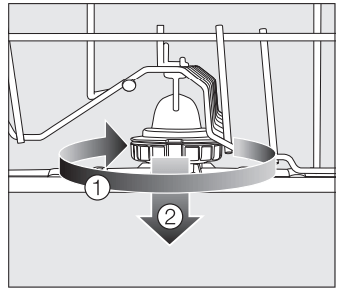
 (see diagram) and remove the spray arm
 .
.
 The drain pump may still be running, even with the door open.
 appears in the time display.
 appears in the time display.
 indicator light is flashing. Fault number
  appears in the time display
 65 °C QuickPowerWash programme with the
  Express option selected and without any load items in the dishwasher immediately after adding dishwasher salt.