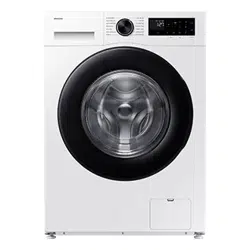
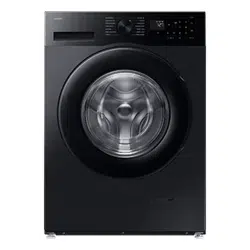
User manual Washing Machine
Installation
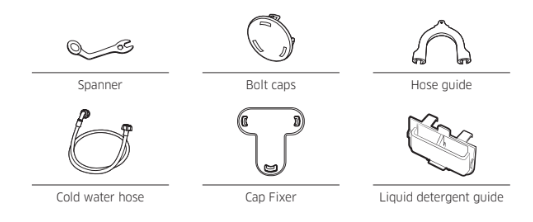
What’s included
Make sure all the parts are included in the product package. If you have a problem with the washing machine or the parts, contact a local Samsung customer centre or the retailer.
Step-by-step installation
STEP 1 Select a location
Location requirements:
- Solid, level surface without carpeting or flooring that may obstruct ventilation
- Away from direct sunlight
- Adequate room for ventilation and wiring
- The ambient temperature is always higher than the freezing point (0 ̊C)
- Away from a heat source
STEP 2 Remove the shipping bolts
Unpack the product package and remove all shipping bolts.
- Loosen all shipping bolts on the rear of the machine using the supplied spanner.

- Fill the holes with the supplied plastic bolt caps. Keep the shipping bolts for future use.
- Close all plastic bolt caps on the rear of the washing machine.
STEP 3 Adjust the levelling feet
- Gently slide the washing machine into position. Excessive force may damage the levelling feet.
- Level the washing machine by manually adjusting the levelling feet.
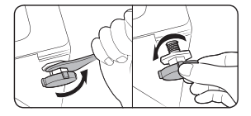
- When levelling is complete, tighten the nuts using the spanner.
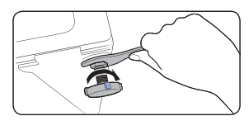
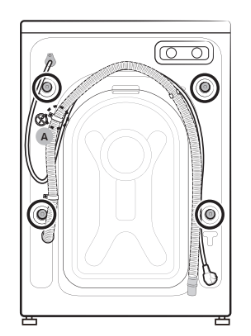
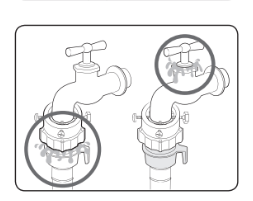
STEP 4 Connect the water hose
The provided hose adaptor may differ with the model. This step guides you through connecting the connector-type adaptor. If you are provided with the screw-type adaptor, go to 7.
Connect the water hose to the water tap.
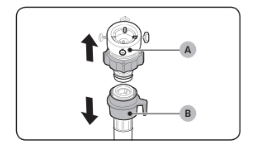
- Remove the adaptor (A) from the water hose (B).
- Use a Philips screwdriver to loosen four screws on the adaptor.
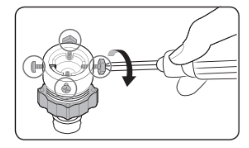
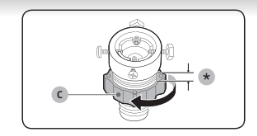
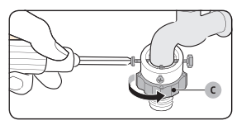
- Holde the adaptor and turn part (C) in the arrow direction to loosen it by 5 mm (*).
- Insert the adaptor into the water tap, and tighten the screws while lifting up the adaptor.
- Turn part (C) in the arrow direction to tighten it.
- While holding down part (E), connect the water hose to the adaptor. Then, release part (E). The hose fits into the adaptor with a clicking sound.
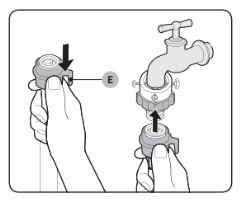
- If you are using a screw type of water tap, use the provided screw-type adaptor to connect to the water tap as shown.
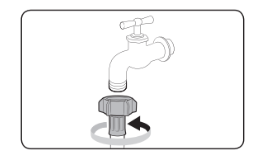
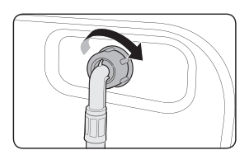
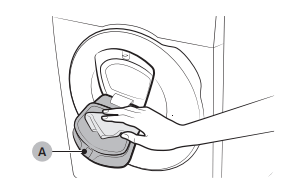
- Connect the other end of the water hose to the inlet valve on the back of the washing machine. Turn the hose clockwise to tighten.
- Open the water tap and check if there are any leaks around the connection areas. If there are water leaks, repeat the steps above.
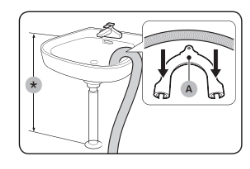
STEP 5 Position the drain hose
Over the edge of a wash basin
- The drain hose must be placed at a height of between 60 cm and 90 cm (*) from the floor. To keep the spout of the drain hose bent, use the supplied plastic hose guide (A). Secure the guide to the wall using a hook to ensure stable drainage.
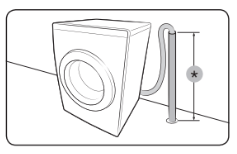
ln a drain pipe
The drain pipe should be between 60 cm and 90 cm high (*). It is advisable to use a 65 cm high vertical pipe. Make sure the drain hose is connected to the stand pipe at a slant.
Drain standpipe requirements:
- Minimum diameter of 5 cm
- Minimum carry-away capacity of 60 litres per minute
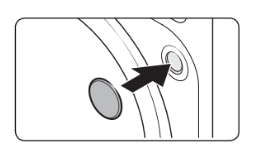
STEP 6 Power on
Plug the power cord into a wall socket featuring an AC 220-240 V / 50 Hz approved electrical outlet protected by a fuse or circuit breaker. Then, press Power to turn on the washing machine.
Before you start
Initial settings
Run Calibration (recommended): Calibration ensures accurate weight detection by the washing machine. Make sure the drum is empty before running Calibration.
- Power off, and then power on the washing machine.
- Hold down Temp. and Delay End (or Temp. and Delay End+) simultaneously for 3 seconds to enter Calibration mode. The “Cb” message appears. The buttons may differ with the models. Check your model.
- Press and hold Start/Pause (Hold to Start) to run the Calibration cycle. The drum will rotate clockwise and counter-clockwise for about 3 minutes.
- When the cycle is complete, “0” appears on the display and the washing machine will turn off automatically. The washing machine is now ready for use.
Laundry guidelines
STEP 1 Sort
Sort the laundry according to these criteria:
- Care Label: Sort the laundry into cottons, mixed fibres, synthetics, silks, wools, and rayon.
- Colour: Separate whites from colours.
- Size: Mixing different-sized items together in the drum improves the washing performance.
- Sensitivity: Wash delicate items separately for pure, new woollen items, curtains, and silk items. Check the labels on the items.
STEP 2 Empty pockets
Empty all the pockets of your laundry items
- Metal objects such as coins, pins, and buckles on clothing may damage other laundry items as well as the drum.
Turn clothing with buttons and embroideries inside out
- If pants or jacket zippers are open while washing, the drum may be damaged. Zippers should be closed and fixed with a string.
- Clothing with long strings may become entangled with other clothes. Make sure to tie the strings before starting the wash.
STEP 3 Use a laundry net
- Brassieres (water washable) must be placed in a laundry net. Metal parts of the brassieres may break through and tear other laundry items.
- Small, light clothing such as socks, gloves, stockings, and handkerchiefs may become caught around the door. Place them inside a fine laundry net.
- Do not wash the laundry net by itself without other laundry. This may cause abnormal vibrations that could move the washing machine and result in injury.
STEP 4 Prewash (if necessary)
- Select the Prewash option for the selected course if the laundry is heavily soiled. Do not use the Prewash option when detergent is manually added into the drum or if applying liquid detergent.
STEP 5 Determine the load capacity
- Do not overload the washing machine. Overloading may cause the washing machine to not wash properly. For the load capacity for the type of clothing, see page 35.
STEP 6 Apply a proper detergent type
- The type of detergent depends on the type of fabric (cotton, synthetic, delicate items, wool), colour, wash temperature, and degree of soiling. Always use “low suds” laundry detergent, which is designed for automatic washing machines.
Operations
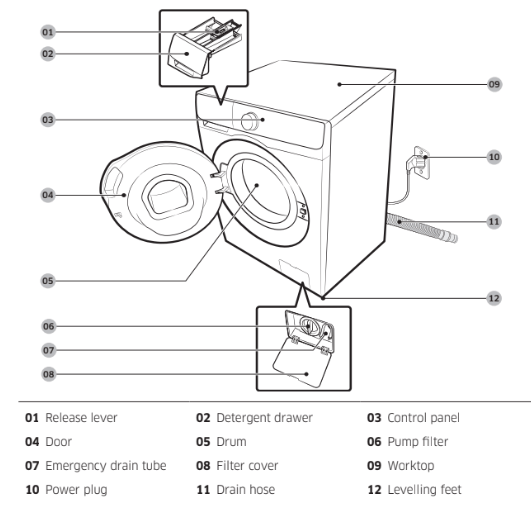
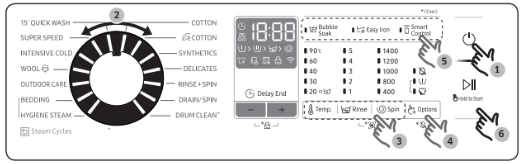
Control panel
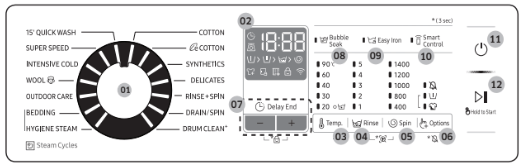
01 Cycle Selector
- Turn the dial to select a cycle.
02 Display
- The display shows current cycle information and estimated time remaining, or an information code when a problem occurs. For buttons and icons, refer to the corresponding page..
03 Temp.
- Press to change the water temperature for the current cycle.
- Press and hold for 3 seconds to turn on/off the Drum Light.
- The drum light turns off automatically after 2 minutes.
04 Rinse
- Press to change the rinse count for the current cycle. You can set the rinse count to a max of 5, depending on the cycle.
05 Spin
Press to change the spinning speed for the current cycle. The revolutions per minute (RPM) differs with the model.
- Rinse Hold(No indicator):
The final rinse process is suspended so that the laundry remains in the water. To unload the laundry, run a drain or spin process.
To use the Rinse Hold option, press Spin repeatedly until all rpm numeric indicators turn off. Not available for the DRAIN/ SPIN cycle.
To run the Spin Only cycle, press Spin for 3 seconds. When the cycle time and spinning speed appear, press Spin repeatedly until a desired spinning speed is selected. Then, press and hold Start/Pause (Hold to Start) to start the cycle. The spinning time depends on the selected cycle.
06 Options
Press to select an option from Intensive and Pre Wash. Press again to deselect.
07 Delay End
Delay End lets you set the end time of the current cycle. Based on your settings, the start time of the cycle will be determined by the machine’s internal logic. For example, this setting is useful for programming your machine to finish a wash at the time you normally return home from work.
- Press to choose a preset unit of hours.
08 Bubble Soak
Press to activate/deactivate the Bubble Soak function. This function helps remove a wide variety of stubborn stains.
- Bubble Soak helps remove a variety of stubborn stains.
- With Bubble Soak selected, laundry is thoroughly soaked in water bubbles for effective washing.
- Bubble Soak is available with and adds up to 30 minutes to these cycles: COTTON, SYNTHETICS, BEDDING, HYGIENE STEAM and SUPER SPEED.
09 Easy Iron
The spinning speed decreases to reduce wrinkles of the laundry. Set the spinning speed up to 800 rpm.
10 Smart Control
Press to activate/deactivate the Smart Control function. When the Smart Control function is activated, you can control your washing machine using your mobile device. For more information, see the SmartThings section on page .
11 Power
Press to turn on/off the washing machine.
12 Start/Pause (Hold to Start)
Press and hold to start an operation, or press to stop an operation temporarily
Simple steps to start
- Press Power to turn on the washing machine.
- Select a cycle in the cycle panel.
- Change the cycle settings (Temp., Rinse, and Spin) as necessary.
- To add an option, press Options. Use the button again to choose a preferred item.
- The machine provides three easy to access buttons for Bubble Soak, Easy Iron and Smart Control forfor easy access. To use an option item, press the corresponding button.
- Press and hold Start/Pause (Hold to Start).
To change the cycle during operation
- Press Start/Pause (Hold to Start) to stop operation.
- Select a different cycle.
- Press Start/Pause (Hold to Start) again to start the new cycle.
Cycle overview
Standard cycles
Delay End
You can set the washing machine to finish your wash automatically at a later time, choosing a delay of between 1(60minutes) to 24 hours (in 1 hour increments). The hour displayed indicates the time the wash will finish.
- Select a cycle. Then change the cycle settings if necessary.
- Press Delay End (or the +/- button) repeatedly until a desired end time is set.
- Press and hold Start/Pause (Hold to Start). The Delay End indicator blinks and the washing machine tumbles the drum to sense the weight of the load if load sensing is preset for the selected cycle. When complete, it displays your set time with the timer running.
- To cancel the Delay End, restart the washing machine by pressing Power.
Special features
AddWash
When the AddWash indicator turns on, you can stop operation of the machine and put additional laundry or softener into the drum. The Add Door opens by more than 130° for easy access.
|
|
|
1. Press Start/Pause (Hold to Start) to stop operation.
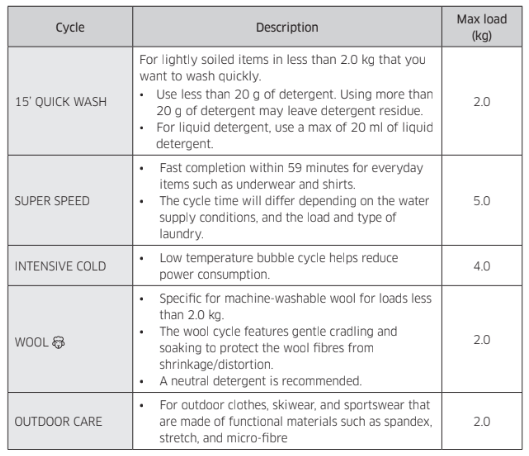
2. Press the upper area of the Add Door until you hear a clicking sound to unlock. Pull the handle of the Add Door to open.
|
 |
|
3. Open the Add Door and insert additional laundry or softener into the drum.
4. Push to lock the Add Door until you hear a clicking sound.
5. Press Start/Pause (Hold to Start) to resume operation.
|
- Open the Add Door and insert additional laundry or softener into the drum.
- Push to lock the Add Door until you hear a clicking sound.
- Press Start/Pause (Hold to Start) to resume operation.
CAUTION
- Do not open the Add Door if suds have formed inside the drum that rise above the level of the Add Door.
- Do not attempt to open the Add Door while the machine is operating without first pressing Start/Pause (Hold to Start). Please note that the Add Door can be opened unintentionally (without pressing Start/Pause (Hold to Start)) when the wash is complete.
- Do not add an excessive load through the Add Door. Performance may be degraded.
- Do not use the lower area of the Add Door as a handle. Your fingers may be caught.
- Make sure that no laundry is caught in the Add Door.
- Keep your pets out of the washing machine, especially the Add Door.
- When using for the wash, the Add Door seems to leak water after opening and closing the Add Door. This is normal, simply because steam emerging from the open Add Door has cooled and formed water drops on the surface.
- When the Add Door closes, the door seals up and no water can leak. However, you may encounter what appears to be water leak around the door - some residual water remaining around the Add Door may form water drops. This is normal.
- Neither the main door or the Add Door can opened when the water temperature is over 50 ̊C. If the water level inside the drum is over a certain point, the main door cannot be opened.
- If an information code of DDC appears on the display, see the “Information codes” section for further actions.
- Keep the Add door and its surroundings clean at all times. Debris or detergent on or around the seals of the Add door may cause a leak.
Settings
Child Lock
To prevent accidents by children, Child Lock locks all buttons except for Power.
To activate Child Lock
- On the manual dispenser models, press and hold - and + (of the Delay End option) simultaneously for 3 seconds. Then, press and hold Start/Pause (Hold to Start) to activate. The door locks and the Child Lock indicator turns on.
To deactivate Child Lock temporarily
- On the manual dispenser models, press and hold - and + (of the Delay End option) simultaneously for 3 seconds.
NOTE
- If you open the door 1 minute or more after deactivating Child Lock, an alarm sounds for up to 2 minutes.
- If you close the door within 2 minutes, the door locks and Child Lock is reactivated. If you do not close the door or the door is not properly closed, the alarm keeps sounding for 2 minutes.
- To add laundry after activating Child Lock, first deactivate Child Lock or restart the washing machine.
To cancel the Child Lock
- On the manual dispenser models, press and hold - and + (of the Delay End option) simultaneously for 3 seconds to deactivate, and then press and hold the buttons again for 3 seconds to cancel Child Lock. The door unlocks and the Child Lock indicator turns off.
Sound On/Off
You can turn on or off the sound from the washing machine. When this function is set to Off, the AddWash alarm, the melody of cycle completion, and the power-off beep will not sound. However, the other sounds stay active.
- To mute the sound, press and hold Options for 3 seconds.
- To unmute the sound, press and hold again for 3 seconds.
- Your setting will be kept even after restarting the machine.
Maintenance
DRUM CLEAN
Perform this cycle regularly to clean the drum and to remove bacteria from it. This cycle also removes accumulated dirt from the rubber door gasket.
- Press Power to turn on the washing machine.
- Turn the Cycle Selector to select DRUM CLEAN .
- Press and hold Start/Pause (Hold to Start).
DRUM CLEAN reminder
- The DRUM CLEAN reminder appears on the main screen once every 40 washes. It is advisable to perform the DRUM CLEAN regularly.
- When you first see this reminder, you can ignore the reminder for 6 consecutiv washes. From the 7th wash, the reminder no longer appears. However, it appears again on the second 40th wash.
Smart Check
To enable this function, you must first download the Samsung Smart Washer app at the Play Store or the Apple Store, and install it on a mobile device featuring a camera operation.
The Smart Check function has been optimized for Galaxy & iPhone series (applicable models only).
- When the washing machine detects an issue to check, an information code appears on the display. To enter Smart Check mode, press and hold Rinse and Spin simultaneously for 3 seconds.
- The washing machine starts the self-diagnosis procedure and display an information code if a problem is detected.
- Run the Samsung Smart Washer app on your mobile device, and tap Smart Check.
- Put the mobile device close to the washing machine’s display so that the mobile device and the washing machine face each other. Then, the information code will be recognized automatically by the app.
- When the information code is recognized correctly, the app provides detailed information about the problem with applicable counteractions.
NOTE
- The function name, Smart Check, may differ depending on the language.
- If there is strong reflected light on the washing machine display, the app may fail to recognize the information code.
- If the app fails to recognize the Smart Check code consecutively, enter the information code manually onto the app screen.
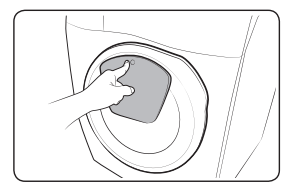
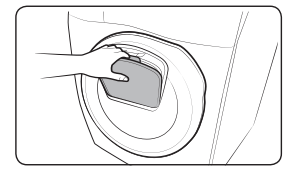
Cleaning
Add Door
|
|
- Open the Add Door.
- Use a wet cloth to clean the Add Door.
- Do not use cleaning agents. Discolouration may occur.
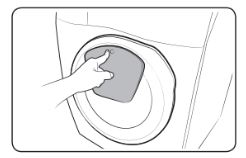
- Use caution when cleaning the rubber packing and the locking mechanism (A).
- Dust off the door area regularly.
- Wipe up and close the Add Door until you hear a clicking sound.
|
CAUTION
- Do not apply force on the Add Door. It may break.
- Do not leave the Add Door open while the machine is operating.
- Do not put heavy objects on the Add Door at any time.
- To prevent physical injury, do not touch the Add Door while the drum is rotating.
- Do not open the Add Door while the machine is operating. This may cause physical injury.
- Do not manipulate the feature panel while the Add Door is open. This may cause physical injury or system failure.
- Do not input objects other than laundry.
- Do not input bulky items to the drum through the Add Door.
- Do not pull out the rubber packing of the Add Door when cleaning. This may cause damage.
Mesh filter
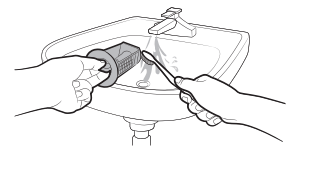
Clean the mesh filter of the water hose once or twice a year.
|
|
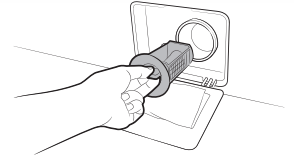
1. Turn off the washing machine, and unplug the power cord.
2. Close the water tap.
3. Loosen and disconnect the water hose from the back of the washing machine. Cover the hose with a cloth to prevent water from gushing out.
|
 |
|
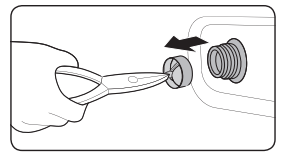
4. Use pliers to pull out the mesh filter from the inlet valve.
5. Submerge the mesh filter deeply in water so that the threaded connector is also submerged.
6. Dry the mesh filter completely in the shade.
7. Reinsert the mesh filter into the inlet valve, and reconnect the water hose to the inlet valve.
8. Open the water tap.
|
Pump filter
It is advisable to clean the pump filter 5 or 6 times a year to prevent its clogging. A clogged pump filter may reduce the bubble effect.
 |
|
1. Turn off the washing machine, and unplug the power cord.
2. Drain the remaining water inside the drum. See the Emergency drain section.
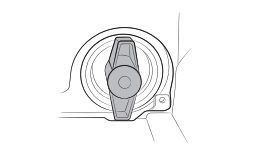
3. Gently press the top area of the filter cover to open.
4. Turn the pump filter knob to the left, and drain off the remaining water
|
 |
|
5. Clean the pump filter using soft brushes. Make sure the drain pump propeller inside the filter is unclogged.
6. Reinsert the pump filter, and turn the filter knob to the right.
|
 |
|
NOTE
- Some pump filters feature a safety knob that is designed to prevent accidents by children. To open the safety knob of the pump filter, push in and turn it anticlockwise. The spring mechanism of the safety knob helps open the filter.
- To close the safety knob of the pump filter, turn it clockwise. The spring makes a rattling sound, which is normal.
|
Troubleshooting
Does not start.
- Make sure the washing machine is plugged in.
- Make sure the door is properly closed.
- Make sure the water taps are open.
- Press and hold Start/Pause (Hold to Start) to start the washing machine.
- Make sure Child Lock is not activated.
- Before the washing machine starts to fill, it will make a series of clicking noises to check the door lock and does a quick drain.
- Check the fuse or reset the circuit breaker.
Water supply is insufficient, or no water is supplied.
- Fully open the water tap.
- Make sure the door is properly closed.
- Make sure the water supply hose is not frozen.
- Make sure the water supply hose is not kinked or clogged.
- Make sure there is sufficient water pressure.
After a cycle, detergent remains in the detergent drawer.
- Make sure the washing machine is running with sufficient water pressure.
- Make sure the detergent is added to the centre of the detergent drawer.
- Make sure the rinse cap is inserted properly.
- If using granular detergent, make sure the detergent selector is in the upper position.
- Remove the rinse cap and clean the detergent drawer.
Excessive vibrations or makes noise.
- Make sure the washing machine is installed on a level, solid floor that is not slippery. If the floor is not level, use the levelling feet to adjust the height of the washing machine.
- Make sure the shipping bolts are removed.
- Make sure the washing machine is not contacting any other object.
- Make sure the laundry load is balanced.
- The motor can cause noise during normal operation.
- Overalls or metal-decorated clothes can cause noise while being washed. This is normal.
- Metal objects such as coins can cause noise. After washing, remove these objects from the drum or filter case.
Does not drain and/ or spin.
- Make sure the drain hose is straightened all the way to the drain system. If you encounter a drain restriction, call for service.
- Make sure the debris filter is not clogged.
- Close the door and press and hold Start/Pause (Hold to Start). For your safety, the washing machine will not tumble or spin unless the door is closed.
- Make sure the drain hose is not frozen or clogged.
- Make sure the drain hose is connected to a drain system that is not clogged.
- If the washing machine is not supplied with sufficient power, the washing machine temporarily will not drain or spin. As soon as the washing machine regains sufficient power, it will operate normally.
The door does not open.
- Press Start/Pause (Hold to Start) to stop the washing machine.
- It may take a few moments for the door lock mechanism to disengage.
- The door will not open until 3 minutes after the washing machine has stopped or the power turned off.
- Make sure all the water in the drum is drained.
- The door may not open if water remains in the drum. Drain the drum and open the door manually.
- Make sure the door lock light is off. The door lock light turns off after the washing machine has drained.
Excessive suds.
- Make sure you use the recommended types of detergent as appropriate.
- Use high efficiency (HE) detergent to prevent oversudsing.
- Reduce the detergent amount for soft water, small loads, or lightly soiled loads.
- Non-HE detergent is not recommended.
Cannot apply additional detergent.
- Make sure the remaining amount of detergent and fabric softener is not over the limit.
Stops.
- Plug the power cord into a live electrical outlet.
- Check the fuse or reset the circuit breaker.
- Close the door and press and hold Start/Pause (Hold to Start) to start the washing machine. For your safety, the washing machine will not tumble or spin unless the door is closed.
- Before the washing machine starts to fill, it will make a series of clicking noises to check the door lock and does a quick drain.
- There may be a pause or soak period in the cycle. Wait briefly and the washing machine may start.
- Make sure the mesh filter of the water supply hose at the water taps is not clogged. Periodically clean the mesh filter.
- If the washing machine is not supplied with sufficient power, the washing machine temporarily will not drain or spin. As soon as the washing machine regains sufficient power, it will operate normally.
Fills with the wrong water temperature.
- Fully open both taps.
- Make sure the temperature selection is correct.
- Make sure the hoses are connected to the correct taps. Flush water lines.
- Disconnect the hoses and clean the mesh filter. The mesh filter may be clogged.
- While the washing machine fills, the water temperature may change as the automatic temperature control feature checks incoming water temperature. This is normal.
Load is wet at the end of a cycle.
- Use the High or Extra High spin speed.
- Use high efficiency (HE) detergent to reduce oversudsing.
- Load is too small. Small loads (one or two items) may become unbalanced and not spin completely.
- Make sure the drain hose is not kinked or clogged.
Leaks water.
- Make sure the door is properly closed.
- Make sure all hose connections are tight.
- Make sure the end of the drain hose is correctly inserted and secured to the drain system.
- Avoid overloading.
- Use high efficiency (HE) detergent to prevent oversudsing.
Has odours.
- Excessive suds collect in recesses and can cause foul odours.
- Run cleansing cycles to sanitise periodically.
- Clean the door seal (diaphragm).
- Dry the washing machine interior after a cycle has finished.
No bubbles are seen (Bubbleshot models only).
- Overloading may screen bubbles.
- Severely contaminated laundry may not generate bubbles.
Can I open the Add Door at any time?
- The Add Door can be opened only when the [image] indicator appears. However, it does not open in the following cases:
- When the boiling or drying process is running and the internal temperature becomes high
- If you set the Child Lock for safety reasons
- When the drum wash or drum drying cycle is running that does not involve additional laundry
The auto dispenser indicators blink. (applicable models only)
- Check if the detergent drawer is closed properly.
- Open the detergent drawer and close it again. Make sure it’s closed properly.
- This may happen if liquid detergent has hardened inside the detergent compartment.
- Clean and unclog the detergent compartment.
Information codes
If the washing machine fails to operate, you may see an information code on the screen. Check the table below and try the suggestions.
4C
Water is not supplied.
- Make sure the water taps are open.
- Make sure the water hoses are not clogged.
- Make sure the water taps are not frozen.
- Make sure the washing machine is operating with sufficient water pressure.
- Make sure that the cold water tap properly connected.
- Clean the mesh filter as it may be clogged.
NOTE When the washer displays the “4C” code, the washer do draining for 3 minutes. During this time, the Power button is inoperative.
4C2
Make sure the cold water supply hose is firmly connected to the cold water tap.
5C
Water is not draining.
- Make sure the drain hose is not frozen or clogged.
- Make sure the drain hose is positioned correctly, depending on the connection type.
- Clean the debris filter as it may be clogged.
- Make sure the drain hose is straightened all the way to the drain system.
- If the information code remains, contact a customer service centre.
dC
Operating the washer with the door open.
- Make sure the door is properly closed.
- Make sure laundry is not caught in the door.
DC1
The Main Door lock/unlock is not working properly.
- Turn the machine off, and restart the cycle.
- If the information code remains, contact a customer service centre.
DC3
The Add Door lock/unlock is not working properly.
- Turn the machine off, and restart the cycle.
- If the information code remains, contact a customer service centre.
OC
Water is overflowed.
- Restart after spinning.
- If the information code remains on the display, contact a local Samsung service centre.
LC, LC1
Check the drain hose.
- Make sure the end of the drain hose is placed on the floor.
- Make sure the drain hose is not clogged.
- If the information code remains, contact a customer service centre.
NOTE When the washer displays the “LC,LC1” code, the washer do draining for 3 minutes. During this time, the Power button is inoperative.
Ub
Spinning does not work.
- Make sure laundry is spread out evenly.
- Make sure the washing machine is on a flat, stable surface.
- Redistribute the load. If only one item of clothing needs washing, such as a bathrobe or pair of jeans, the final spin result might be unsatisfactory, and an “Ub” check message will be shown in the display.
3C
Check the motor for operation.
- Try restarting the cycle.
- If the information code remains, contact a customer service centre.
UC
The electronic control needs to be checked (Over Voltage Error).
- Check the PCB and wire harness.
- Check if power is supplied properly.
- If the information code remains, contact a customer service centre.
Low voltage detected
- Check if the power cord is plugged in.
- If the information code remains, contact a customer service centre.
HC
High temperature heating check
- If the information code remains, contact a customer service centre.
1C
The Water Level sensor is not working properly.
- Try power off and restarting the cycle.
- Check WaterLevel Sensor wire harness.
- If the information code remains, contact a customer service centre.
NOTE When the washer displays the “1C” code, the washer do draining for 3 minutes. During this time, the Power button is inoperative.
8C
The MEMS sensor is not working properly.
- Turn the machine off, and restart the cycle.
- If the information code remains, contact a customer service centre.
AC
Check communications between main and sub PBAs.
- Try power off and restarting the cycle.
- If the information code remains, contact a customer service centre.
AC6
Check communications between main and inverter PBAs.
- Depending on the state, the machine may automatically returns to normal operation.
- Turn the machine off, and restart the cycle.
- If the information code remains, contact a customer service centre.
ddC
This message appears when you open the Add Door without pressing Pause. If this happens, do one of the following:
- To add laundry, press the Add Door to close it properly. Then, press Start/Pause and try again.
- If you press the Add Door by mistake, press the Add Door again to close it properly. Then, press Start/Pause to resume operation.