Owners' Guide Washers and Dryers
PARTS AND FEATURES
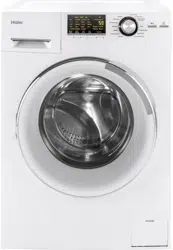
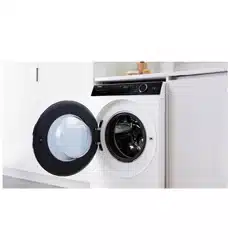
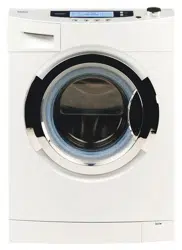
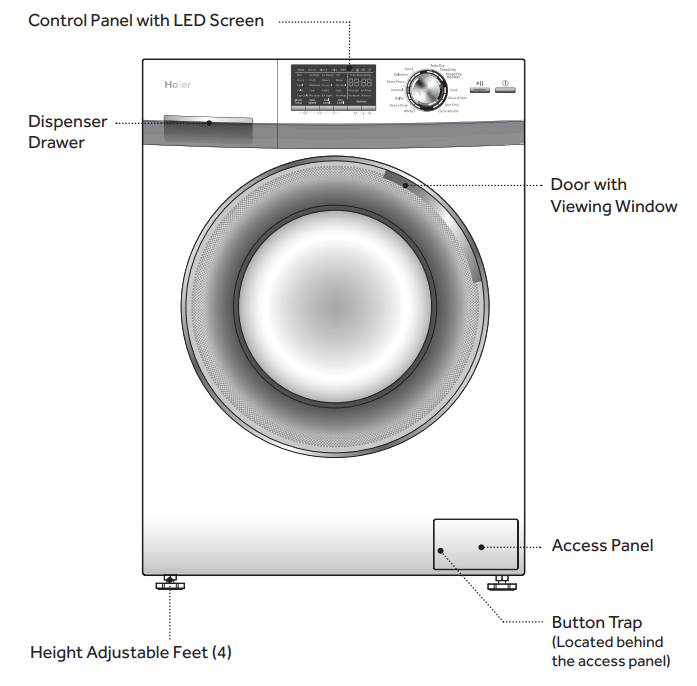
FRONT OF THE UNIT
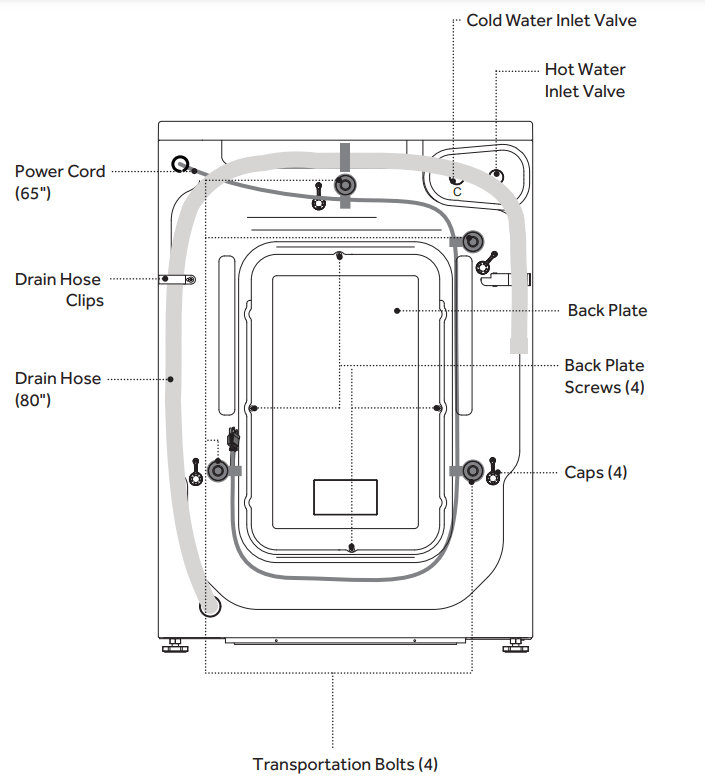
BACK OF THE UNIT
CONTROL PANEL AND FEATURES
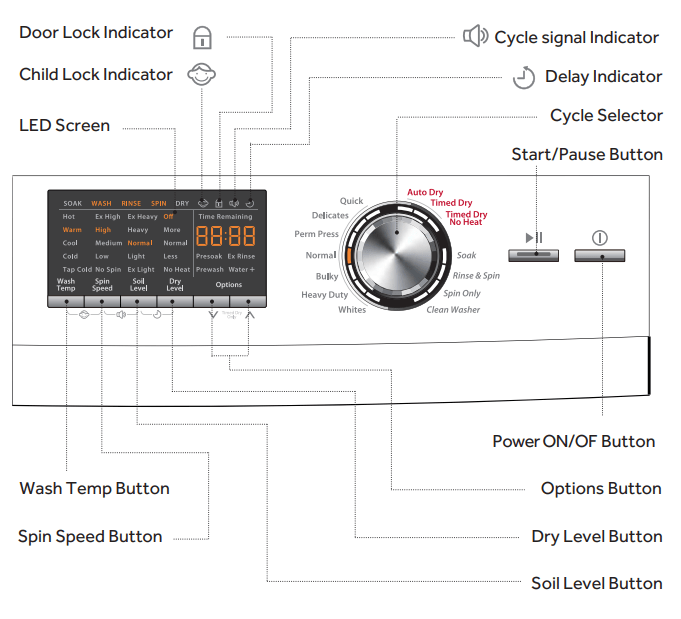
CONTROL PANEL
POWER ON/OFF BUTTON 
Press once to turn the washer / dryer ON. Press again to turn the washer / dryer OFF. If the washer / dryer is left on for more than 2 minutes without any buttons being touched, the power automatically turns off.
START/PAUSE BUTTON 
Press this button to start a cycle. Once started, only the selected cycle and settings will be displayed on the LED screen. Pressing the button a second time will pause the operating cycle and the time display will blink. During a pause, settings and options can be modified and selected, however the original cycle cannot be changed. If you don not press the Start/Pause button to start a cycle again, the operating cycle and the time display will blink all the time. Pressing the button again will resume the active cycle. If the “Drying Level” option has been selected, the washer will automatically begin drying after completing a wash cycle.
NOTE: An operating cycle can be cancelled at any time by pressing Power ON/OFF button.
CYCLE SELECTOR
The knob can be turned in either direction to choose a wash or dry cycle. The selected cycle will blink on the LED screen. Each cycle has preset water temperature,soil level,spin speed,dry level ,and options.In certain cycles the setting can be manually programmed to suit your needs.
WASH TEMP BUTTON
Use this button to select wash/rinse water temperatures. Available selections vary for each cycle. The desired setting will blink during the selection process.
SPIN SPEED BUTTON
Use this button to select a spin speed. Available selections vary for each cycle. The desired setting will blink during the selection process.
SOIL LEVEL BUTTON
Soil level (wash time) is preset for each cycle.As you press this button,the cycle time will increase or decrease in the Time Remaining display.
NOTE: Lower soil level settings will help reduce tangling and wrinkling.
DRY LEVEL BUTTON
Use this button to select a dry level. Available selections vary for each cycle. The desired setting will blink during the selection process.
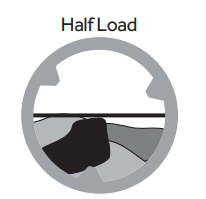
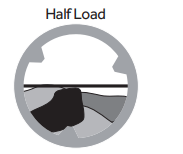
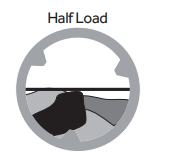
IMPORTANT: Do not attempt to dry a full wash load. A half load is the maximum for all dry cycles.
OPTIONS BUTTONS
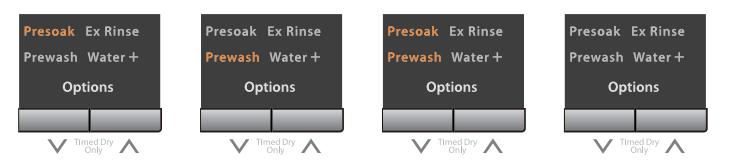
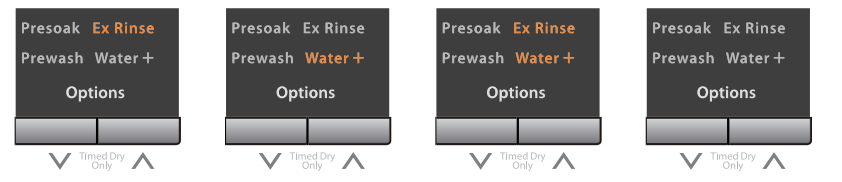
The options buttons allow you to select additonal cycle options and will blink when selected. Not all options are available with all cycles. Available options will grow orange, current selections will blink. You can decrease or increase the drying time for Timed Dry Only cycle by pressing options buttons. By pressing the “ ” button, you can select:
By pressing the “ ” button, you can select:
DELAY MODE 
Press and hold “Soil Level” and “Dry Level” button at the same time in order to get into “Delay” mode. The Delay icon will be turned on .The time can be adjusted by pressing “ ” and “
 ” up to “24 hr”. A press and hold of the “
 ” or “
 ” button will cause the display to count continuously between 1 hour and 24 hours (by one hour increments) and the OFF position. Another way to cancel the delay is to press and hold "Soil Level" and "Dry Level" button at the same time. After displaying “OFF”, display will quickly go back to the normal wash time. After selecting this option, you have to press the "Start/Pause" button to activate a delayed start. Once started, only the selected cycle and settings will be displayed in a steady state, the clock icon will blink, and the time display will count down in 1 minute increments. By pressing the “ ” button, you can select:
NOTE: An activated delay start can be cancelled at any time by pressing POWER ON/OFF button.
NOTE: Double check the Soil Level and Dry Level settings after activating or canceling the Delay Mode. The cycle settings could have changed by not pressing both buttons at the same time.
LED SCREEN
The LED screen displays available cycles, settings, estimated cycle time, icons for active options, lock indicators, and an operating status(SOAK, WASH, RINSE, SPIN,DRY).
Use the buttons along the bottom of the display to adjust settings. See “CYCLE GUIDE” for available settings on each cycle.Not all settings are available with all cycles.
DOOR LOCK INDICATOR 
The washer / dryer doorwill automatically lock during operation. A lock icon will appear on the LED screen when the door is locked.
NOTE: If a wash operation is paused, the door will unlock within 2 seconds. If a dry operation is paused, the door will unlock after the inside temperature cools to a safe temperature. The cooling time can take several minutes.
CHILD LOCK INDICATOR 
After starting the washer, press the "Wash Temp" and "Spin Speed" buttons at the same time for 2 seconds to activate the Child Lock feature. A child icon will appear on the LED screen. This feature is intended to prevent accidental changes to the operating machine. To cancel, press the "Wash Temp" and "Spin Speed" buttons again for 2 seconds. The child icon will disappear from the LED screen.
NOTE: This feature does notlock out the POWER ON/OFF button.
CYCLE SIGNAL INDICATOR 
This signal is helpful when you are removing items from hte washer as soon as it stops. press the Spin Speed and Soil Level buttons for 2 seconds to activate the cycle signal feature. A signal icon will appear on the LED screen. To cancel, press the Spin Speed and Soil Level buttons again at the same time. The signal icon will disappear from the LED screen.
POWER-OFF MEMORY
This machine has a power-off memory feature. In case of power failure or if the power is interrupted during an operating cycle, the settings will be saved, and operation will resume after pressing the POWER ON /OFF button when the power is restored.
CYCLE DESCRIPTIONS
Whites: This cycle is preset to use hot water to deep clean white garments.
Heavy Duty: This cycle is preset to use hot water to deep clean heavily soiled durable colorfast fabrics.
Bulky: Use this cycle to wash large items such as blankets and comforters.
Normal: This cycle is for normally soiled cottons, linens, and mixed garment loads.
Perm Press: This cycle is preset for a low spin speed to help maintain wrinkle-free clothing and reduce crease in synthetic fabrics.
Delicates: This cycle is intended to gently wash delicate garments and lingerie with sheer fabrics with lace trim.
Quick Wash: This cycle is intended for lightly soiled garments that are needed in a hurry.
Rinse & Spin: This cycle is useful for relaxing wrinkles, removing excess detergent, and refreshing clean garments.
Spin Only: This cycle is useful in extracting water from sink washed or clean wet garments.
Soak: Use the cycle to help remove small spots of set-in stains on fabrics.
Clean Washer: Use the cycle once a month to keep the inside of your washer clean.
NOTE: Do not place garments or other items in the washer during the Clean Washer cycle. Use this cycle with an empty wash drum.
Auto Dry: the drying time may vary depending on the weight, size of clothing, type of fabric, moisture, etc.
Timed Dry: Drying time is set to 30 minutes by default. press the “ ” and “
 ” button to decrease or increase the drying time in 10 minute increments. the cycle can last up to 120 minutes.
Timed Dry No Heat: Drying time is set to 30 minutes by default. press the “ ” and “
 ” button to decrease or increase the drying time in 1 minute increment within half an hour, and in 5 minute increments after half an hour.the cycle can last up to 60 minutes.
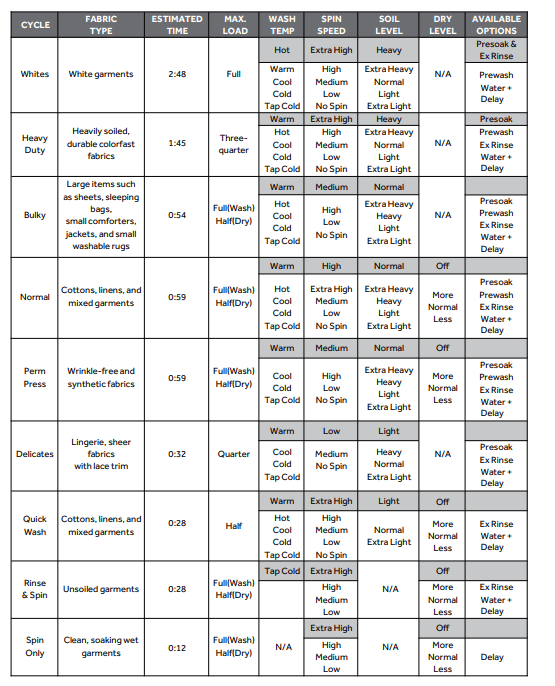
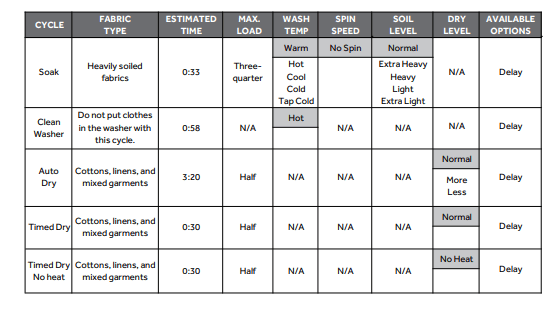
CYCLE GUIDE
NOTE: To protect your clothing, all options and settings are not available for all cycles. The shaded Speed and Temp. Settings are the default selections for the indicated cycle.
NOTE: It is important to check garment label wash instructions to select the proper wash settings. The wrong settings could damage and discolor clothing. Certain clothes should only be dry cleaned.
OPERATING INSTRUCTIONS
WARNING
To reduce the risk of fire, electric shock, or injury to persons, read the IMPORTANT SAFETY INSTRUCTIONS before operating this appliance.
GETTING STARTED
- Press once Power ON/OFF button and active the LED screen.
- turn the knob to select the desired wash cycle. The selected cycle will blink on the LED screen.
- Preset wash/rinse temperatures,spin speed and dry level will also blink on the LED screen. Press the Wash Temp, Spin Speed, Soil Level and Dry Level buttons to modify the settings.
- Select from the available options: Presoak, Prewash, Ex Rinse, Water +, and Delay.
- Press the “Start/Pause” button to confirm all selections and immediately begin the selected cycle or initiate a delay start countdown.
WASHING METHODS
SORTING AND PREPARATION
- Separate whites, darks, light colors and non-colorfast garments.
- Separate items that produce lint (flannel, fleece and towels) from items that collect lint (knits, corduroy and synthetic fabrics).
- Sort by fabric type (cottons, permanent press and delicate) and by the amountof soil.
- Close zippers, snaps and hooks.
- Empty pockets and turn them inside out.
- Remove pins or other sharp objects from clothes to prevent scratching interior parts.
- Repair loose seams and minor tears.
- Pre-treat spots, stains and heavily soiled areas.
LOADING
- Load each garment loosely; do not place folded items into the washer.
- Do not overload the washer.
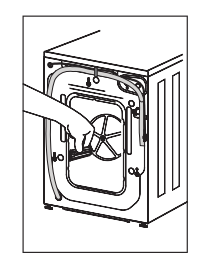
- Close the door properly after loading clothes. Take care to ensure that garments are not caught in the gasket.
IMPORTANT: If you intend to use the Drying option , load the washer only halffull with clothes. Do not completely fill the washer with a full load. Clothes must have room to tumble freely in the drum.
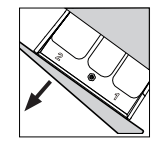
USING THE DISPENSER
The dispenser drawer is located in the upper left corner of the washer. Open the drawer by pulling it straight out. There are three separate compartments for loading detergent and fabric softener.

- PREWASH COMPARTMENT
If the "Prewash" option is selected, use only powdered HE detergent in both the prewash and main wash compartments. The compartment will be flushed with water during the prewash.
IMPORTANT: Liquid detergent poured into the main wash compartment will immediately flow into the wash drum and be used during the prewash.
- MAIN WASH COMPARTMENT
If the "Prewash" option is selected, use only powdered HE detergent, otherwise liquid HE detergent can be used. The compartment will be flushed with water during the wash cycle.
FABRIC SOFTENER COMPARTMENT
Use liquid fabric softener as recommended by the manufacturer. However, do not exceed the max fill mark shown in the compartment. This is necessary to ensure complete flushing during the final rinse and to avoid overflow in the dispenser drawer.
IMPORTANT: The dispenser is designed to work only with liquid fabric softener. Do not use powdered fabric softener; it will clog the dispenser by not completely dissolving.
DETERGENT
Use only High Efficiency detergent. HE detergents are specifically formulated with ingredients to avoid problems caused by too many soap suds. Excess suds will prevent the complete rinsing of detergent residue from clothes. Washer performance will be diminished by soap build up and damage can occur if soap suds get into areas of the machine like the condensing dryer compartment.

IMPORTANT: Use only powdered HE detergent when both the Prewash and Main Wash compartments are used. Liquid detergent immediately flows into the wash drum and both amounts would be used during the first wash program.
NOTE: The proper amount of detergent depends on the size of the load, the soil level of the clothes, and the softness of the water being supplied to the washer.
DRYING METHODS
SORTING AND LOADING CLOTHES
- Separate heavy fabrics from lightweight fabrics.
- Separate items that produce lint (flannel, fleece and towels) from items that collect lint (knits, corduroy and synthetic fabrics).
- Sort by fabric type (cottons, permanent press and delicates)
- Permanent press items should be dried together with enough space to tumble freely. Promptly remove garments from the dryer and fold or hang right away.
WARNING
Fire Hazard
To reduce the risk of fire, do not dry items containing foam rubber or similarly textured rubber-like materials.
IMPORTANT: Load the machine half-full with clothes. Do not completely fill the drum with a full load. Clothes must have room to tumble freely in the drum.
CARE AND CLEANING
WARNING
Electrical Shock Hazard
Risk of injury or death due to electric shock. Always unplug your appliance before cleaning.
CLEANING AND MAINTENANCE
- Before using cleaning products, always read and follow manufacturer’s instructions and warnings to avoid personal injury or product damage.
- Use a damp or sudsy cloth for cleaning control panel. To avoid any kind of damage to cabinet finish, wipe appliance cabinet as needed. If you spill liquid/powdered softener, bleach or detergent on the cabinet, wipe cabinet immediately because it can damage the finish.
- Do not use any abrasive, harsh chemicals, ammonia, chlorine bleach, concentrated detergent, solvents or metal scouring pads. Some of these chemicals may dissolve, damage and/or discolor your appliance.
- The Detergent Dispenser Compartment has a removable insert. Over time, this compartment may accumulate dried detergent, dirt and debris. You must remove the insert, then rinse in a sink or remove debris with a soft brush.
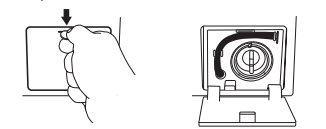
CLEANING THE BUTTON TRAP
The Button Trap is designed to capture small loose items such as buttons and coins, to keep them from damaging your machine.
- Using a coin or screwdriver, pull down on the catch of the access panel, and lower the panel door to open.
- Unclip the drain hose, pull it out and place the end of the drain hose in a pan or bucket to catch the water.
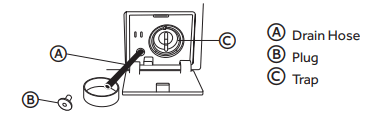
- Remove the plug from the drain hose and allow the water to drain completely.
- Turn the button trap counterclockwise to unlock and remove. Remove debris from the trap and rinse clean.
NOTE: A small amount of water will drain from the trap. Use a shallow pan or place a towel on the floor before removing the Button Trap.
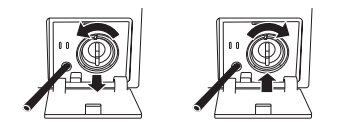
- Reinsert the trap and turn it clockwise to lock it into place.
- Replace the plug in the drain hose and clip it into place. Close the access panel.
IMPORTANT: Make sure the button trap and plug are firmly seated and locked into place to avoid leaks.
VACATIONING PRECAUTIONS
- Unplug the electrical cord from the wall outlet.
- Turn off the water supply faucets. This will eliminate the potential for water damage if the hoses accidentally rupture or become loose.
- Dry the wash drum and leave the door open so moisture can evaporate to help prevent the growth of mold and mildew.
MOVING OR STORAGE PRECAUTIONS
- Unplug the electrical cord from the wall outlet.
- Turn off the water supply faucets.
- Disconnect the water hoses and place them in the washtub.
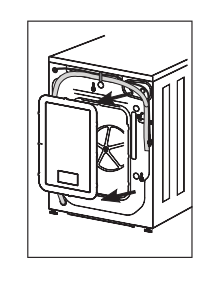
- Remove the drain hose from the drain and snap it back into the clips located on the back of the washer.
- Retract adjustable feet. Loosen locking nuts as far as possible and thread feet into the cabinet as far as possible.
- Reinstall the transportation hardware as shown below. Install the Transportation Bolts with the original four screws.
Remove the back plate by removing (4) screws
Position the (4) rubber grommets and plastic spacers
Insert the bolts and tighten with wrench
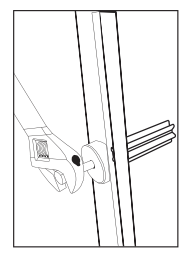
Replace the back plate and the (4) screws to hold it in place

TROUBLESHOOTING
NORMAL OPERATING SOUNDS
The following sounds are normally heard during the operation of the washer:
- Tumbling sounds: This is normal as the heavy wet clothes in the washer are continuously being tossed around.
- Air rushing noise: This happens when the washer tub spins at a very high RPM.
- Wash and rinse cycles going on and off will also make clicking sounds as well as spraying and water splashing sound.
- Drain pump operational sound, when dirty water is being drained
TROUBLESHOOTING
| TROUBLE |
POSSIBLE CAUSE |
POSSIBLE REMEDY |
| Washer/Dryer does not start |
The appliance is not properly plugged in. |
Insert the plug into the power socket securely |
| The wash/dry cycle does not start |
A. The door has not been closed properly.
B. The delay start has been selected.
|
A. Close the door and try it again.
B. Cancel the delay start
|
| The washer does not take in water |
A. The inlet hose is not connected to the tap.
B. The water tap has not been opened.
C. The faucet or valve may need to be open more fully.
D. There is no water supply in the house or the water pressure is too low.
|
A. See "installation" (p12-13)
B. Open the water tap.
C. Make sure water hoses are not kinked, twisted, or tangled.
D. Check another faucet in the house to make sure that household water pressure is adequate.
|
| There is water on the floor |
A. The water leakage could be caused by an improperly connected drain hose or water hose.
B. You may have a clogged or slow draining sink or standpipe.
C. You may have used incorrect or too much detergent
|
A. Check all connections.
B. Check plumbing or consult a professional plumber.
C. Make sure to use HE (High Efficiency) detergent only.
|
| The water will not drain from the washer |
A. This could be caused by your drain hose set up. The drain hose support bracket should be looped over a sink or into a standpipe that is between 2'6" and 3'3" high.
B. Button trap may be full
|
A. Make sure the end of the hose is not immersed in water.
B. Check to see that the button trap is clean and dust free.
|
| The washer/dryer is making noise |
A. The drum was not unlocked correctly during installation.
B. Coins, loose change, buttons or other heavy objects have been left in pockets.
C. The support feet have not been adjusted.
D. The washer load may need to be re-balanced, as the load may be uneven.
|
A. Remove shipping bolts [See "installation"] (p10)
B. Make sure to empty pockets before loading the washer.
C. Check the correct levelling of the appliance.
D. Evenly distribute clothing in the wash basket.
|
| Unsatisfactory washing results |
A. Clothes are too wrinkled. This is due to improper sorting, overloading, and washing in overly hot water repeatedly.
B. Soap Residue. Detergent may not be dissolving in water.
C. Spots or stains on your clothes. May be due to incorrect use of fabric softener.
D. Clothes are grayed or yellowed: This is due to not using enough detergent for large loads.
E. Clothes are ripped and have holes/excessive water & tear: This is due to sharp objects such as pins and belt buckles left in pockets.
F. Oversudsing or low cleaning performance.
|
A. Avoid overloading and resort your load. Do not mix heavy clothes such as work clothes with light clothes such as blouses, light shirts and delicate items. You may need to wash in warm or cold water.
B. Check water temperature. Use less detergent.
C. Read the instructions on the detergent container and follow proper directions for using the softener.
D. You may have to add more detergent to the load.
E. Remove small loose sharp objects prior to washing. Fasten belts, zippers, metal snaps etc.
F. Must use HE Detergent
|
| The dryer is working but not drying the clothes |
A. Unit may be over loaded.
B. Dryer load needs to be resorted.
C. Clothes dry unevenly.
D. Water supply is not properly connected (Typically when using Y-Adapter)
|
A. The dryer drum should only be half full during the dry cycle. This is to allow clothes to tumble
B. Heavy clothes may need to be separated from regular clothes.
C. Clothes in the dryer may need to be resorted.
D. Make sure that only cold water is turned on [see “water connection”] [ p13]
|
| Door will not open after completion of a dry cycle (Door lock is activated) |
The temperature inside has not cooled down to a safe temperature. |
Wait for the inside temperature to cool down. The cooling time can take several minutes. |
ERROR CODES
| ERROR CODE |
SYMPTOM |
ACTION TO TAKE |
SOLUTION |
| E1 |
The washer cannot drain the water within 4 minutes. |
Stop running |
Clear the pump.
Service Needed
|
| E2 |
Cannot lock the door after 20s. |
Stop running |
Service Needed. |
| E4 |
After 8 minutes, the selected water level has not been reached. |
Stop running |
Check plumbing and water hose connections.
Service Needed
|
| F7 |
Motor circuit error |
Stop running |
Service Needed |
| E8 |
The water is above the warning level. |
Stop running |
Service Needed |
| F9 |
Dryer sensor circuit problem. |
Stop running |
Service Needed |
| FA |
Water level sensor circuit problem |
Stop running |
Service Needed |
| FC |
No feedback signal from driver unit. |
Stop running |
Service Needed |
| Fd |
The dryer heating is abnormal. |
Stop running |
Service Needed |
| FE |
The dryer motor is abnormal. |
Stop running |
Service Needed |
| Unb |
Unbalanced load |
Spin low speed and cancel drying |
Evenly distribute clothing in the wash basket. |
BEFORE YOU CALL FOR SERVICE
IF NONE OF THE ABOVE SOLVES THE PROBLEM, CONTACT A QUALIFIED SERVICE TECHNICIAN. DO NOT TRY TO ADJUST OR REPAIR THE UNIT YOURSELF.
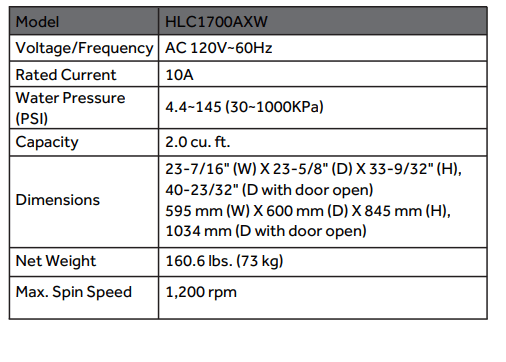
TECHNICAL SPECIFICATION