INSTRUCTION AND RECIPE BOOKLET
Cuisinart
®
AirFryer Toaster Oven
TOA-60

2
CONTENTS
Important Safeguards...........................................2
Special Cord Set Instructions ....................................3
Features .....................................................4
Before First Use ...............................................5
General Guidelines.............................................5
Oven Rack and Pan Position Diagrams.............................5
Operation ....................................................6
Cleaning and Maintenance ......................................7
Recipes......................................................9
Warranty ....................................................34
IMPORTANT SAFEGUARDS
When using an electrical appliance, especially when children are present, basic
safety precautions should always be taken, including the following:
1. Read all instructions.
2. UNPLUG FROM OUTLET WHEN NOT IN USE AND BEFORE CLEANING.
Allow to cool before cleaning or handling, putting on or taking off parts.
3. Do not touch hot surfaces. Use handles or knobs.
4. To protect against electric shock, do not place any part of the AirFryer Toaster
Oven in water or other liquids. See instructions for cleaning.
5. This appliance should not be used by or near children or individuals with
certain disabilities.
6. Do not operate any appliance with a damaged cord or plug, or after the
appliance has malfunctioned or has been dropped or damaged in any way, or
is not operating properly. Return the AirFryer Toaster Oven to the store
or retailer where purchased for examination or repair or adjustment.
7. The use of accessory attachments not recommended by Cuisinart may
cause injury.
8. Do not use outdoors.
9. Do not let cord hang over the edge of the table or countertop, where it could
be pulled on inadvertently by children or pets, or touch hot surfaces, which
could damage the cord.
10. Do not place AirFryer Toaster Oven on or near a hot gas or electric burner or
in a heated oven.
11. Do not use this AirFryer Toaster Oven for anything other than its
intended purpose.
12. Extreme caution should be exercised when using containers constructed of
materials other than metal or glass in the oven.
13. To avoid burns, use extreme caution when removing AirFryer Toaster Oven
accessories or disposing of hot grease.
14 When not in use, always unplug the unit. Do not store any materials other
than manufacturer’s recommended ovenproof accessories in this AirFryer
Toaster Oven.
15. Do not place any of the following materials in the AirFryer Toaster Oven:
paper, cardboard, plastic and similar products.
16. Do not cover Crumb Tray or any part of the oven with metal foil. This will
cause overheating of the oven.
17. Oversize foods, metal foil packages and utensils must not be inserted in the
AirFryer Toaster Oven, as they may involve a risk of fire or electric shock.
18. A fire may occur if the AirFryer Toaster Oven is covered or touching
flammable materials such as curtains, draperies or walls, when in operation.
Do not store any items on top of the appliance when in operation. Do not
operate under wall cabinets.
19. Do not clean with metal scouring pads. Pieces can break off the pad and
touch electrical parts, involving a risk of electric shock.
20. Do not attempt to dislodge food when the AirFryer Toaster Oven is plugged
into electrical outlet.
21. Warning: To avoid possibility of fire, NEVER leave AirFryer Toaster Oven
unattended during use.
22. Use recommended temperature settings for all cooking/baking,
roasting and AirFrying.
23. Do not rest cooking utensils or baking dishes on glass door.

3
24. Turn the ON/Oven Timer and the ON/Toaster Timer dials to the OFF position
to turn off the AirFryer Toaster Oven.
25. Do not operate your appliance in an appliance garage or under a wall cabinet.
When storing in an appliance garage, always unplug the unit from the electri-
cal outlet. Not doing so could create a risk of fire, especially if the appliance
touches the walls of the garage or the door touches the unit as it closes.
26. Extreme caution must be used when moving an appliance containing hot oil
or other hot liquids.
27. To disconnect, turn any control to "off", then remove plug from wall outlet.
SAVE THESE INSTRUCTIONS
Please read and keep these instructions handy. These instructions will help
you use your Cuisinart
®
AirFryer Toaster Oven to its fullest so that you will
achieve consistent, professional results.
SPECIAL CORD SET INSTRUCTIONS
A short power-supply cord is provided to reduce the risks resulting from becoming
entangled in or tripping over a longer cord.
Extension cords are available and may be used if care is exercised in their use.
If an extension cord is used, the marked electrical rating of the extension cord must
be at least as great as the electrical rating of the appliance, and the longer cord
should be arranged so that it will not drape over the countertop or tabletop, where it
can be tripped over unintentionally or pulled on by children.
NOTICE
This appliance has a polarized plug (one blade is wider than the other). As a safety
feature, this plug will fit in a polarized outlet only one way. If the plug does not fit
fully in the outlet, reverse the plug. If it still does not fit, contact a qualified electri-
cian. Do not attempt to defeat this safety feature.
FOR HOUSEHOLD USE ONLY
NOT INTENDED
FOR COMMERCIAL USE
4
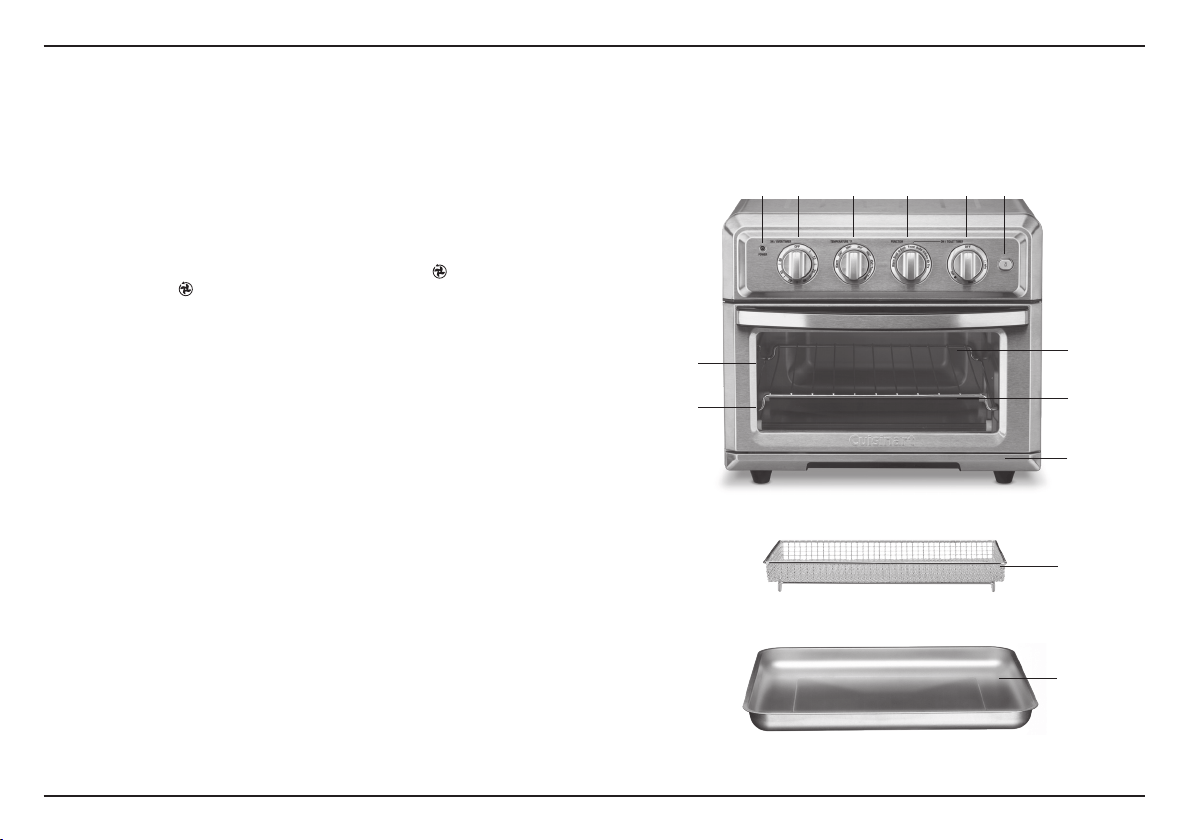
FEATURES
1. Power Light
Indicator light will turn on and remain lit when oven is in use.
2. ON/Oven Timer Dial
Use to set desired time for all functions except Toast. Setting the oven timer powers the
unit on and begins the cooking cycle. When the timer runs out, the unit will power off.
3. Oven Temperature Dial
Use to set desired temperature.
4. Function Dial
Use to select cooking method – Warm, Broil, Convection Broil , Toast, Bake,
Convection Bake , AirFry.
5. ON/Toast Timer Dial
Use to set desired toast shade from light to dark. Setting the toast timer powers the unit
on and begins the toasting cycle. When cycle is complete, the unit will power off.
6. Light Button
To turn on the interior oven light, press the Light Button while oven is in use and door is
closed. If door is opened while oven is on, the bulb-saver feature will turn the light off.
The light turns on again when door is closed and cooking resumes.
7. Easy Clean Interior
The sides of the oven are coated, providing an easy-to-clean surface.
8. Safety Auto Off Door Switch (not shown)
This oven comes equipped with a Safety Auto Off switch that cuts off power to the unit
when the oven door is opened. Please make sure to keep the oven door closed during
cooking/AirFrying.
9. Pull-Out Crumb Tray
The crumb tray comes already positioned in your oven. The crumb tray slides out from
the bottom front of the AirFryer Toaster Oven for easy cleaning.
10. AirFryer Basket
Use the AirFryer Basket in conjunction with the AirFry function to optimize your cooking
results. It is recommended the AirFryer Basket be nested in the baking pan.
11. Oven Rack
Can be used in two positions: Position 1 (bottom, pictured), Position 2 (top). Position 2
has a 50% stop feature so the rack stops halfway out of the oven. The oven rack can be
removed from Position 2 by lifting the front of the rack and sliding it out. See page 5 for
more details.
12. Baking Pan/Drip Tray
A Baking Pan/Drip Tray is included for your convenience. Use alone when baking or
roasting. Use Baking Pan with the AirFryer Basket when AirFrying.
13. Cord Storage (rear, not shown)
Takes up excess cord and keeps countertop neat.
1 2 3 4 5 6
7
11
Rack Position 2
Rack Position 1
9
12
10

5
BEFORE FIRST USE
Place your AirFryer Toaster Oven on a flat surface.
Before using, move oven 2 to 4 inches away from the wall or from any objects on
the countertop. Do not use on heat-sensitive surfaces.
OBJECTS SHOULD NOT BE STORED ON THE TOP OF THE OVEN. IF THEY
ARE, REMOVE ALL OBJECTS BEFORE YOU TURN ON YOUR OVEN. THE
EXTERIOR WALLS GET VERY HOT WHEN IN USE. KEEP OUT OF REACH
OF CHILDREN.
GENERAL GUIDELINES
AirFry: This function is used to AirFry meals as a healthy alternative to deep frying
in oil. The AirFry function uses a combination of hot air, high fan speed and 4 upper
heating elements to prepare a variety of meals that are both delicious and healthier
than traditional frying.
Use the provided Baking Pan and AirFryer Basket when using the AirFry function.
Place the AirFryer Basket onto the Baking Pan. Use Rack Position 2 for AirFrying.
Bake: Baking is recommended for a variety of foods you would normally prepare in
your conventional oven. Baked goods that require a more gentle cooking method
like cakes, muffins and pastry yield best results on Bake. Convection Bake uses a
fan to circulate heated air around food to cook faster and is ideal for even browning.
It is best used for heartier baked goods such as scones and bread and is also excel-
lent for roasts, poultry, pizza and vegetables.
Use the Baking Pan for fresh pizza (in Rack Position 1) and the rack alone if pizza is
frozen (in Rack Position 2). Or cook it on the pizza stone available for purchase on
the Cuisinart website.
Broiling: Broiling function can be used for beef, chicken, pork, fish and more. It also
can be used to top-brown casseroles and gratins. Convection Broil is best for meats
and fish, while traditional broil should be reserved for top browning.
Toasting: Always have the Oven Rack in Position 2, as indicated in the diagram at
right, for even toasting. Always position your item/items in the middle of the rack.
Caution: Aluminum foil is not recommended for covering the AirFryer Toaster Oven
accessories. If covered, the foil prevents the fat from dripping into the Drip Tray.
Grease will accumulate on the foil surface and may catch fire. If you choose to use
foil to cover the Baking Pan/Drip Tray, be sure foil is cut to neatly fit into the pan and
does not touch the wall or heating elements.
WARNING: Placing the Oven Rack in Position 1 or 2 with the rack upward
while toasting may result in a fire. Refer to rack position
diagram for proper use.
Turning off the AirFryer Toaster Oven: Turn BOTH the
ON/Oven Timer and the ON/Toast Timer dials to the OFF position. The power light
will turn off.
OVEN RACK AND PAN POSITION DIAGRAMS
Each recipe gives you step-by-step directions and will tell you where the Oven
Rack and tray should be positioned for best results. Please refer to the
diagrams below for Oven Rack positions.
POSITION 1 FOR BAKING
POSITION 2 FOR BAKING
NOTE: For chicken or other large
items, the pan or rack can be in
Position 1 as shown above.
POSITION 2 FOR BROILING
AND AIRFRYING
POSITION 2 FOR TOASTING
Oven Rack
Baking Pan/Drip Tray
AirFryer Basket
PARTS

6
OPERATION
Unwind the power cord. Check that the Crumb Tray is in place and that there is
nothing in the oven. Plug power cord into the wall outlet.
Broil or Convection Broil
Place the AirFryer Basket on top of the Baking Pan to use to Broil in
Rack Position 2.
Set the Function Dial to either Broil or Convection Broil. Set Temperature Dial to
Toast/Broil. Then turn the ON/Oven Timer dial to the desired cooking time to turn on
the oven and begin broiling. The power light will illuminate. The timer will ring once
when the cycle is complete and the oven will power off when
the time expires. To stop broiling, turn the ON/Oven Timer dial to the OFF position.
Broiling Tips:
For best results, use the provided AirFryer Basket fitted inside the Baking Pan
to broil.
Never use glass oven dishes to broil.
Be sure to keep an eye on food – items can get dark quickly while broiling.
Bake or Convection Bake
Fit the Baking Pan or Oven Rack into either rack position. (See Rack Positions,
page 5.)
Set the Function Dial to Bake or Convection Bake. Set the Temperature Dial to
desired temperature. Then turn the ON/Oven Timer dial to the recommended
cooking time to turn on the oven. It’s recommended to preheat oven for 5 minutes
prior to baking delicate items such as cakes and muffins. (Incorporate this time
into the total baking time.)
The power light will illuminate. The timer will ring once when time has expired and
cycle is complete; the oven will power off.
To stop baking mid-cycle, turn the ON/Oven Timer dial to the OFF position.
Baking Tips:
Select Bake for more delicate items like custards, cakes and eggs.
Most baked goods, as well as larger items like chicken, are baked in rack
Position 1.
Use Baking Pan in Position 1 for fresh pizza. Place frozen pizza directly on the
Rack in Position 2 to cook.
Convection Baking Tips:
Select Convection Bake for hearty baked goods that require even browning such
as scones and breads, as well as for roasts and poultry. Convection Bake is also
perfect for baking evenly browned and crispy homemade pizzas.
Most recipes recommend reducing heat or temperature by 25°F when
Convection Baking.
Always check for doneness 10 minutes before end of suggested
cooking time.
IMPORTANT
All of our recipes have been tested in our test kitchen and are specially developed to
work in the Cuisinart
®
AirFryer Toaster Oven.
Warm
Fit provided Baking Pan or Oven Rack into Rack Position 2.
Set the Temperature Dial to Warm. Set the Function Dial to Warm. Then turn the ON/
Oven Timer Dial to the desired warming time to start the oven and begin warming.
The power light will illuminate. The timer will ring once when the cycle is complete
and the oven will power off when the time expires.
To stop warming, turn the ON/Oven Timer dial to the OFF position.
Toast
Fit Oven Rack into Position 2. If toasting two items, center them in the middle of
the Oven Rack. Four items should be evenly spaced – two in front, two in back. Six
items should be evenly spaced – three in front, three in back.
Set the Function Dial to Toast. Set the Temperature Dial to Toast/Broil. Turn the ON/
Toast Timer Dial to desired shade setting from light to dark within the marked
settings to turn on the oven and begin toasting.
The oven power light will illuminate. When completed, the timer will ring and turn off.

7
To stop toasting, turn the ON/Toast Timer dial to the OFF position.
Important Notes on Toasting
The Oven Rack must be in Position 2 as indicated in the diagram on page 5.
AirFry
(Refer to Chart on page 8)
Place the AirFryer Basket onto the Baking Pan. AirFry in Rack Position 2.
Set the Function Dial to AirFry. Set Temperature Dial to desired temperature. Then
turn the ON/Oven Timer dial to the desired cooking time to turn on the oven and
begin AirFrying.
The oven power light will illuminate. The timer will ring once when the cycle is
complete, and the oven will power off when the time expires.
To stop AirFrying, turn the ON/Oven Timer dial to the OFF position.
AirFrying Tips:
AirFrying is a healthy alternative to frying. Many foods that can be fried, can be
AirFried without using excess amounts of oil. AirFried foods will taste lighter and less
greasy than deep-fried foods.
Most oils can be used for AirFrying. Olive oil is preferred for a richer flavor.
Vegetable, canola or grapeseed oil is recommended for a mild flavor.
Distribute oil evenly on food to achieve the crispiest and most golden results. Oil can
be sprayed or brushed onto foods for AirFrying. Alternatively, olive oil and non stick
cooking sprays can be used.
An assortment of coatings can be used on AirFry foods.
Some examples of different crumb mixtures include: breadcrumbs, seasoned
breadcrumbs, panko breadcrumbs, cornflakes, potato chip crumbs, graham
cracker crumbs, quinoa, various flours, etc.
Most foods do not need to be flipped during cooking, but larger items, like chicken
cutlets, should be flipped halfway during cooking to ensure quick, even cooking and
browning.
When AirFrying large quantities of food that crowd the pan, toss food halfway
through cooking to ensure even cooking and coloring.
Use higher temperatures for foods that cook quickly, like bacon and chips, and
lower temperatures for foods that take longer to cook like breaded chicken.
Foods will cook more evenly if they are cut to the same size.
Line the Baking Tray with aluminum foil for easy cleanup.
Please note that when most foods cook, they release water. When cooking large
quantities for an extended period of time, condensation may build up, which could
leave moisture on your countertop.
CLEANING AND MAINTENANCE
Always allow the oven to cool completely before cleaning.
Always unplug the oven from the electrical outlet.
Do not use abrasive cleaners, as they will damage the finish. Simply
wipe the exterior with a clean, damp cloth and dry thoroughly. Apply the
cleansing agent to a cloth, not directly onto the toaster oven, before cleaning.
To clean interior walls, use a damp cloth and a mild liquid soap solution
or a spray solution on a sponge. Never use harsh abrasives or corrosive
products. These could damage the oven surface. Never use steel wool pads, etc.,
on interior of oven.
Oven Rack, Baking Pan, AirFryer Basket and Crumb Tray should be
hand-washed in hot, sudsy water or use a nylon scouring pad or nylon brush.
They are NOT dishwasher safe.
After cooking greasy foods and after your oven has cooled, always clean top interior
of oven. If this is done on a regular basis, your oven will perform like new. Removing
the grease will help to keep toasting consistent, cycle after cycle.
To remove crumbs, slide out the Crumb Tray and discard crumbs. Wipe clean and
replace. To remove baked-on grease, soak the tray in hot, sudsy water or use
nonabrasive cleaners. Never operate the oven without the Crumb Tray in place.
Never wrap the cord around the outside of the oven. Use the cord storage cleats on
the back of the oven.
Any other servicing should be performed by an authorized service representative.

8
Food Recommended Amount Temperature Time
Bacon 8 slices 400ºF 8 to 10 minutes
Chicken Wings 3 pounds, about 20 wings 400ºF 20 to 25 minutes
Frozen Appetizers, (e.g., mozzarella
sticks, popcorn shrimp, etc.)
1½ pounds, about 28 frozen mozzarella sticks 400ºF 5 to 7 minutes
Frozen Chicken Nuggets 1 pound, about 34 frozen chicken nuggets 400ºF 10 minutes
Frozen Fish Sticks 12 ounces, about 20 frozen sh sticks 400ºF 8 minutes
Frozen Fries 1 to 2 pounds 450ºF 15 to 25 minutes
Frozen Steak Fries 1 to 2 pounds 450ºF 15 to 25 minutes
Hand-Cut Fries 2 pounds, about 3 medium potatoes, cut into ¼-inch thick
pieces, about 4 inches long
400ºF 15 to 20 minutes
Hand-Cut Steak Fries 2 pounds, about 3 medium-large potatoes, cut into eighths
lengthwise
400ºF 15 to 20 minutes
Shrimp 1 pound, about 16 extra-large shrimp 375ºF 8 to 10 minutes
Tortilla Chips 6, 5-inch tortillas cut into fourths 400ºF 5 to 6 minutes, toss
halfway through
AIRFRYER CHART
The chart below lists recommended cooking times, temperatures, and portions for various types of foods that can be Airfried in the Cuisinart
®
AirFryer Toaster Oven.
If portions exceed recommendations, you can toss occasionally while cooking to ensure the crispiest, most even results. Smaller amounts of food may require less time.
For best airfry results, use the oven light to periodically check on food.
Airfrying doesn’t require oil, but a light spray can enhance browning and crispness. Use an oil sprayer to keep it extra light, or pour a little oil into a bowl, add food,
and toss.

9
RECIPES
These mouthwatering recipes are just a sampling of what this appliance can do.
APPETIZERS AND SMALL BITES
Beet Chips with Fresh Dill ......................................10
Blooming Onion . . . . . . . . . . . . . . . . . . . . . . . . . . . . . . . . . . . . . . . . . . . . . . 10
Chicken Wings, Two Ways......................................11
Buffalo Sauce for Chicken Wings..............................11
Sesame Ginger Sauce for Chicken Wings .......................11
Crab Cakes .................................................12
Crispy Chickpeas .............................................13
Fried Pickles.................................................13
Italian Rice Balls..............................................13
Kale Chips ..................................................14
Nachos with Shredded Chicken and Homemade Tortilla Chips . . . . . . . . . 14
Pork and Ginger Wontons ......................................15
Potato Wedges with Crumbled Bacon and Blue Cheese ..............16
Shrimp Diablo................................................16
Spinach, Gruyère and Artichoke Dip . . . . . . . . . . . . . . . . . . . . . . . . . . . . . . 17
Spring Rolls with Sweet Chile Dipping Sauce .......................17
Veggie Sticks with Herbed Yogurt Dip.............................18
MAIN COURSES
Chicken Tenders..............................................19
Classic Roast Chicken .........................................20
Fish Tacos with Peach Salsa . . . . . . . . . . . . . . . . . . . . . . . . . . . . . . . . . . . . 20
Maple-Pecan BLT.............................................21
Meatball Grinder..............................................21
Pan-Roasted Salmon Dinner ....................................22
Pizza with Arugula, Prosciutto and Fig Jam ........................22
Pizza Margherita..............................................23
Roasted Chicken Thighs with Smoked Paprika and Lime .............23
Roasted Lamb Chops with Rosemary and Garlic ....................24
Sausage and Kale Quiche ......................................24
Simply Broiled Burgers.........................................25
SIDES
Brussels Sprouts with Pancetta..................................26
French Fries .................................................27
Roasted Acorn Squash ........................................27
Roasted Fennel, Carrots and Parsnips ............................27
Sweet Potato Fries with Chipotle Mayonnaise ......................28
SWEET TREATS
Baked Apples................................................28
Blueberry Muffins .............................................29
Cinnamon Sugar Doughnut Bites ................................29
Cherry-Ginger Scones . . . . . . . . . . . . . . . . . . . . . . . . . . . . . . . . . . . . . . . . . 30
Chocolate Layer Cake with Salted Caramel Frosting .................31
Crunchy Granola .............................................32
“Fried” Apples ...............................................32
Peanut Butter Swirl Brownies ...................................33

10
APPETIZERS AND SMALL BITES
Traditionally deep-fried favorites are transformed into lighter,
healthier versions in the Cuisinart
®
AirFryer Toaster Oven,
which requires only a few spritzes of oil to AirFry. Plus, we offer
many interchangeable dipping sauces that can be enjoyed with
more than just the recipes they accompany.
Beet Chips with Fresh Dill
Any root vegetable can be sliced thin and airfried for a healthier
alternative to packaged potato chips.
Makes about 1 to 2 servings
1 medium beet (about 5 ounces)
Olive oil, for spraying
¼ teaspoon kosher salt
1 tablespoon fresh dill, chopped
½ teaspoon white wine vinegar
1. Place the AirFryer Basket onto the Baking Pan. Reserve.
2. Slice beet into thin, even slices, about 1mm thick, or use the
3 millimeter setting on the slicing attachment of a Cuisinart
®
food
processor. Transfer to the reserved basket in a single layer. Spray
with oil, sprinkle with salt and toss. Spread into a single layer.
3. Put the assembled pan into Rack Position 2. Set to AirFry at 400°F
for 5 minutes, or until edges are browned and crispy.
4. When beet chips are ready, transfer to a serving bowl. Sprinkle with
chopped dill and vinegar and toss to combine.
Nutritional information per serving (based on 2 servings):
Calories 51 (41% from fat) • carb. 7g • pro. 1g • fat 2g • sat. fat 0g • chol. 0mg
sod. 322mg • calc. 12mg • fiber 2g
Blooming Onion
Who knew this popular restaurant appetizer was so easy to make?
Makes 1 blooming onion, about 2 to 3 servings
½ cup unbleached, all-purpose flour
2 large eggs, beaten well
1 tablespoon buttermilk
½ cup panko breadcrumbs
1½ teaspoons seafood seasoning
1 large Vidalia (or sweet) onion, peeled
Nonstick cooking spray
Olive oil, for spraying
1. Put the flour into a bowl large enough to dip the onion. Put the eggs and
buttermilk into another bowl, and the panko and seafood seasoning into a
third bowl. Reserve.
2. Trim top of onion to create a flat surface. Leave root end intact. Turn onion
over, so root end faces up, and rest it on its flat surface.
3. Without piercing the root, cut the onion into 4 wedges. Also without piercing
the root, cut each wedge in half; repeat until wedges are about ¼ inch thick.
4. Turn the cut onion over and carefully, without breaking the pieces off
the root, separate the layers; the separated onion will resemble a flower
with petals.
5. Dredge onion in flour, and shake off excess before dipping into the egg
mixture, and then, finally coat each layer evenly with the panko mixture.
6. Place the AirFryer Basket onto the Baking Pan. Spray the basket with the
nonstick cooking spray. Put the panko-crusted onion into the basket. Spray
with oil. Set to AirFry at 400°F for 10 minutes, or until golden and crispy.
Serve with the Chipotle Mayonnaise on page 28 or the Herbed Yogurt Dip on
page 18.
Nutritional information per serving (based on 3 servings):
Calories 177 (24% from fat) • carb. 26g • pro. 8g • fat 5g • sat. fat 1g • chol. 144mg
sod. 542mg • calc. 28mg • fiber 1g

11
Chicken Wings, Two Ways
For a healthier option than deep-frying, AirFry chicken wings. Here, we
give you two versions, plain and beer-battered for extra crispiness. Both
can be enjoyed right out of the AirFryer Toaster Oven, or tossed in your
favorite sauce.
Makes about 20 wing sections
Nonstick cooking spray
Beer-Battered Chicken Wings:
2 pounds chicken wings, tips removed, drumettes
and flats separated*
½ cup unbleached, all-purpose flour
½ cup light beer
¾ teaspoon kosher salt
Plain Chicken Wings:
2 pounds chicken wings, tips removed, drumettes
and flats separated
¾ teaspoon kosher salt
1. Place the AirFryer Basket onto the Baking Pan. Spray the basket with
the nonstick cooking spray. Reserve.
2. If beer battering the wings: In a large bowl combine the flour and
beer. Sprinkle wings with salt and put them into the bowl with the
batter. Coat wings in the batter and transfer to the basket.
3. If not beer-battering wings: Put the chicken wings into the basket.
Sprinkle with salt.
4. Put the assembled pan into Rack Position 2. Set to AirFry at 400°F
for 20 minutes. Cook until golden and crispy.
5. When chicken wings are done, toss immediately in sauce or add the
toppings of your choice, such as butter, garlic, fresh herbs or spices.
*Chicken wings may also be purchased already cut. They are often
referred to as “party wings” or “winglets.”
Nutritional information per wing section (plain):
Calories 94 (39% from fat) • carb. 0g • pro. 14g • fat 4g • sat. fat 1g • chol. 39mg
sod. 127mg • calc. 7mg • fiber 0g
Nutritional Information per wing section (beer-battered):
Calories 106 (36% from fat) • carb. 1g • pro. 14g • fat 4g • sat. fat 1g • chol. 39mg
sod. 127mg • calc. 7mg • fiber 0g
Buffalo Sauce for Chicken Wings
A classic sauce for wings, made with coconut oil instead of butter.
Makes about
1
/
3
cup sauce, enough to coat 20 wings
¼ cup hot sauce
1 tablespoon coconut oil
1. Put the hot sauce and coconut oil into a large bowl. Combine.
2. When chicken wings are ready, transfer wings to the large bowl and
toss evenly. Serve immediately.
Nutritional information per serving of Buffalo Sauce
(about 1 teaspoon, enough to cover 1 wing):
Calories 6 (100% from fat) • carb. 0g • pro. 0g • fat 1g • sat. fat 1g • chol. 0mg
sod. 28mg • calc. 0mg • fiber 0g
Sesame Ginger Sauce for
Chicken Wings
Add chili flakes to this sauce for a spicy kick.
Makes about
1
/
3
cup sauce, enough to coat 20 wings
¼ cup sesame oil
2 tablespoons soy sauce
2 tablespoons honey
1 2-inch piece ginger, peeled and grated
2 garlic cloves, grated
¼ cup toasted sesame seeds

12
6 green onions, thinly sliced
1. Put the sesame oil, soy sauce, honey, grated ginger and garlic into a
large bowl. Whisk together. Add the sesame seeds.
2. When chicken wings are ready, transfer them to the large bowl and
toss evenly. Sprinkle with the sliced green onions. Serve immediately.
Nutritional information per serving of Sesame Ginger Sauce
(about 1 teaspoon, enough to cover 1 wing):
Calories 39 (78% from fat) • carb. 2g • pro. 0g • fat 3g • sat. fat 0g • chol. 0mg
sod. 68mg • calc. 4mg • fiber 0g
Crab Cakes
With chunks of lump crabmeat, these crab cakes are sure to impress.
Makes about 16 crab cakes
16 ounces lump crab meat
1 teaspoon extra virgin olive oil
1 medium red bell pepper, finely chopped
1 jalapeño, seeded and finely chopped
3 green onions, sliced
1 garlic clove, finely chopped
¼ teaspoon kosher salt
2 large eggs, lightly beaten
1 cup panko breadcrumbs, plus about ½ cup extra for dredging
½ cup prepared mayonnaise
1 teaspoon Worcestershire sauce
1 teaspoon Dijon mustard
1½ teaspoons seafood seasoning
Hot sauce (optional)
Olive oil, for spraying
Lemon wedges, for serving
1. Pick through crabmeat to make sure there are no shells; reserve
in refrigerator.
2. Put a large skillet over medium heat and add the olive oil. Once the
pan is hot and the olive oil shimmers across the pan, add the pep-
pers, green onions and garlic. Sweat for at least 5 minutes, until the
vegetables soften slightly; stir in the salt.
3. Remove the vegetables from the heat and allow them to cool for a
few minutes. Once cool, add the vegetables to the crabmeat. Add
the eggs, panko, mayonnaise, Worcestershire, Dijon and seafood
seasoning and a dash or two of hot sauce if desired.
4. Gently mix all ingredients together. The best way to mix the crab
mixture is with clean hands; however, you can also mix with a spoon.
Mix carefully to keep the crabmeat intact.
5. Using a ¼ cup dry measuring cup, form the mixture into cakes and
place them on a clean plate, separating the layers of cakes with wax
paper if necessary. Cover with plastic wrap and refrigerate for 1 hour
before cooking.
6. Dredge the crab cakes in remaining panko crumbs. Place the AirFryer
Basket onto the Baking Pan. Put the cakes into the basket and spray
with olive oil.
7. Put the assembled pan into Rack Position 2. Set to AirFry at 400°F
for 10 minutes. Cook until evenly browned. Serve immediately, with
lemon wedges on the side.
Nutritional information per crab cake:
Calories 220 (41% from fat) • carb. 17g • pro. 15g • fat 10g • sat. fat 2g • chol. 90mg
sod. 500mg • calc. 106mg • fiber 1g

13
Crispy Chickpeas
Quickly transform a plain can of chickpeas into a crispy snack. Thanks
to the AirFry function of the Cuisinart
®
AirFryer Toaster Oven, you will
have a great new appetizer for guests.
1 can (15.5 ounces) chickpeas, drained and blotted dry, about
1½ cups
Olive oil, for spraying
¼ teaspoon kosher salt
¼ teaspoon ground cumin
Pinch freshly ground black pepper
1. Place the AirFryer Basket onto the Baking Pan. Put the chickpeas
into the basket and spray with oil. Sprinkle with the salt, pepper and
cumin.
2. Put the assembled pan into Rack Position 2. Set to AirFry at 350°F
for 15 minutes or until chickpeas are fragrant and lightly browned.
Serve immediately.
Nutritional information per serving (¼ cup):
Calories 75 (13% from fat) • carb. 14g • pro. 3g • fat 1g • sat. fat 0g • chol. 0mg
sod. 275mg • calc. 20mg • fiber 3g
Fried Pickles
Serve these as an appetizer with the Chipotle Mayonnaise on page 28.
Makes 5 to 6 servings
½ cup unbleached, all-purpose flour
2 large eggs, beaten well
½ cup finely ground cornmeal
1 teaspoon kosher salt
½ teaspoon cayenne pepper
Nonstick cooking spray
6 kosher dill pickles (about 10 ounces), cut into ¼-inch discs
Olive oil, for spraying
1. Put the flour into a gallon-size bag that seals. Put the beaten eggs
into a container large enough to dip the pickles. Put the cornmeal,
salt and cayenne pepper into another gallon-size bag that seals,
separate from the flour. Reserve.
2. Place the AirFryer Basket onto the Baking Pan. Spray the basket with
the nonstick cooking spray. Reserve.
3. Blot the cut pickles on a paper towel. Put the pickles into the bag
with the flour. Seal and shake to evenly coat each pickle slice.
Remove coated pickles from the bag, shaking off the excess flour.
Dip each pickle slice into the beaten eggs to evenly coat. Transfer to
the bag with the cornmeal mixture. Seal bag and shake to evenly
coat each pickle slice. Remove from the bag, shake off the excess
and transfer to the assembled basket in a single layer. Spray both
sides of each pickle slice with oil.
4. Put the assembled pan into Rack Position 2. Set to AirFry at 400°F
for 8 minutes. Cook until browned and crispy. Let cool slightly.
Nutritional information per serving (based on 6 servings):
Calories 109 (22% from fat) • carb. 17g • pro. 4g • fat 3g • sat. fat 1g • chol. 72mg
sod. 955mg • calc. 7mg • fiber 2g
Italian Rice Balls
For the perfect appetizer, serve these rice balls alongside prepared
marinara sauce.
Makes 8 rice balls
1 cup medium-grain white rice
2 cups water
¼ teaspoon kosher salt
1 large egg, beaten well
3 tablespoons grated Pecorino Romano cheese
¼ cup ricotta cheese
¼ cup basil leaves, thinly sliced
¼ teaspoon freshly ground black pepper

14
1 ounce mozzarella cheese, cut into 1-inch x ¼-inch pieces
¼ cup Italian-style breadcrumbs
Olive oil, for spraying
1 cup prepared marinara sauce*, for dipping, optional
1. Put the rice, water and salt into a medium saucepan. Bring to a boil,
stirring occasionally. Once rice comes to a boil, cover and reduce
heat to a simmer until all the water has been absorbed and the rice is
tender, about 10 minutes. Cool fully before adding the following egg
and cheese mixture; cooling the rice will help prevent the egg
from cooking.
2. In a small bowl, combine the egg, Pecorino, ricotta, basil and pepper.
While mixing and fluffing the rice with a spoon, mix in the egg and
cheese mixture. Spread the rice onto a parchment paper-lined baking
sheet. Refrigerate to chill, at least 30 minutes.
3. Once the rice has chilled, use slightly wet hands to scoop 3 table-
spoons of rice and form into a ball. Repeat with remaining rice. Stuff
each ball with one piece of the mozzarella and re-form if necessary.
4. Place the AirFryer Basket onto the Baking Pan. Put the breadcrumbs
into a small bowl. Gently toss each rice ball into the breadcrumbs
and transfer to the basket. Spray all sides with oil.
5. Put the assembled pan into Rack Position 2. Set to AirFry at 350ºF
for 20 minutes. Cook rice balls until evenly golden. Serve immediate-
ly, with marinara sauce* on the side if desired.
*Reduce the red pepper flakes in the Diablo Sauce recipe on page 16 to
about ¼ teaspoon for a delicious marinara sauce.
Nutritional information per rice ball:
Calories 149 (24% from fat) • carb. 22g • pro. 5g • fat 4g • sat. fat 2g • chol. 35mg
sod. 195mg • calc. 45mg • fiber 0g
Kale Chips
Kale chips make a light snack on their own, but they can also be
crumbled and used as a salad topper.
Makes 4 servings
4 stems curly kale, tough stems removed
Olive oil, for spraying
¼ teaspoon kosher salt
1. Place the AirFryer Basket onto the Baking Pan. Put the kale leaves
into the basket and spray with oil. Put the assembled pan into Rack
Position 2.
2. Set to AirFry at 350°F for 5 minutes. Cook until kale is bright and
crispy. NOTE: Keep an eye on the kale because it can crisp up very
quickly.
3. Once the kale is ready, remove from oven and sprinkle with salt.
Serve immediately.
Nutritional information per serving:
Calories 39 (27% from fat) • carb. 7g • pro. 2g • fat 1g • sat. fat 0g
chol. 0mg • sod. 171mg • calc. 58mg • fiber 1g
Nachos with Shredded Chicken and
Homemade Tortilla Chips
Store-bought tortilla chips can be used in place of the homemade chips
in this recipe for a quicker option.
Makes 6 to 8 servings
8 whole-wheat tortillas, quartered
Olive oil, for spraying
½ teaspoon kosher salt, divided
1 pound chicken thighs, shredded (see recipe on page 23)

15
1 can (15.5 ounces) black beans, drained and rinsed
2 plum tomatoes, chopped
1 can (7.25 ounces) pitted black olives, chopped
2 jalapeños, thinly sliced
4 ounces Monterey Jack cheese, shredded
2 green onions, thinly sliced
Salsa, for serving
1. Place the AirFryer Basket onto the Baking Pan. Put ½ of the cut
tortillas in the basket. Spray tortillas evenly with oil. Sprinkle with
¼ teaspoon salt. Toss.
2. Put the assembled pan into the oven in Rack Position 2. Set to
AirFry at 400°F for 4 to 5 minutes, or until tortillas are crispy and
browned on the edges. Remove and transfer to a bowl or plate to
reserve. Repeat with remaining tortillas.
3. When all of the tortillas are ready, remove the AirFryer Basket from
the Baking Pan. Line the bottom of the pan with aluminum foil. Put
half of the tortilla chips onto the foil. Spread into a single layer. Top
with half of the remaining ingredients, in the order listed, except for
the green onions. Top with the remaining tortilla chips and remaining
ingredients.
4. Put the pan with the nachos into Rack Position 2. Set to Broil for 5
minutes until cheese is melted
5. Remove from the oven and garnish with the sliced green onions.
Serve immediately with salsa.
Nutritional information per serving (based on 8 servings):
Calories 465 (49% from fat) • carb. 37g • pro. 26g • fat 26g • sat. fat 7g • chol. 65mg
sod. 1283mg • calc. 150mg • fiber 8g
Pork and Ginger Wontons
Ginger is the star in this dumpling. A fun hors-d’oeuvre served with
some soy dipping sauce.
Makes 48 dumplings
¾ pound ground pork
1 3-inch piece ginger, peeled and chopped
1 large green onion, chopped
1 tablespoon fresh cilantro leaves, chopped
1 tablespoon soy sauce, reduced sodium
2 teaspoons sesame oil
½ teaspoon rice vinegar
Water and cornstarch, for assembling dumplings
48 wonton wrappers
Vegetable oil, for spraying
1. In a medium mixing bowl, combine the pork, ginger, green onion,
cilantro, soy sauce, sesame oil and vinegar. Mix well with hands or
a spoon.
2. Prepare a large, clean and flat work surface equipped with two small
bowls, one with water and the other with cornstarch, plus a pastry
brush. Sprinkle the work surface with cornstarch and arrange wonton
wrappers in rows on the work surface (starting with two rows of 3).
3. Put 1 teaspoon of filling in the center of each wrapper. Brush the
edges of each wrapper with water and then fold the wrapper in half
to make a triangle, sealing in the filling and also sealing together the
damp edges.
4. Pull the edges on the long side of the triangle together and seal.
Continue with remaining filling and wrappers. Toss the wontons very
lightly with cornstarch once they are prepared.
5. Place the AirFryer Basket onto the Baking Pan and lightly spray. Put
one half of the wontons into the basket and spray with oil. Put the
assembled pan into Rack Position 2. Set to AirFry at 375°F for 10
minutes and cook until wontons are evenly browned. Remove and
repeat with the second batch of wontons.
6. Serve wontons with a soy dipping sauce.
Nutritional information per serving (3 wontons):
Calories 141 (35% from fat) • carb. 14g • pro. 8g • fat 6g • sat. fat 2g • chol. 33mg
sod. 189mg • calc. 17mg • fiber 0g

16
Potato Wedges with Crumbled Bacon
and Blue Cheese
Top these with a fried egg for the ultimate breakfast.
Makes 3 to 4 servings
5 slices bacon
1 pound russet potatoes, scrubbed
Olive oil, for spraying
½ teaspoon kosher salt
3 tablespoons crumbled blue cheese
1. Place the AirFryer Basket onto the Baking Pan. Put bacon slices into
the basket. Put the assembled pan into Rack Position 2. Set to
AirFry at 400°F for 10 minutes. Cook until bacon is browned and
crispy. Reserve.
2. While bacon is airfrying, slice potatoes into eighths. When bacon is
ready, transfer to a serving plate.
3. Put potato wedges into the basket. Spray evenly with oil. Sprinkle
with salt and toss. Spread into a single layer.
4. Put the assembled pan into Rack Position 2. Set to AirFry at 400°F
for 15 minutes, and cook until potatoes are golden and crispy. While
potatoes are airfrying, crumble bacon.
5. Once potatoes are done, sprinkle with bacon and crumbled blue
cheese. Bake at 400°F for 2 minutes, or until cheese is slightly
melted. Serve immediately.
Nutritional information per serving (based on 4 servings):
Calories 208 (45% from fat) • carb. 20g • pro. 9g • fat 1g • sat. fat 4g • chol. 23mg
sod. 764mg • calc. 42mg • fiber 1g
Shrimp Diablo
Adjust the spice in the sauce to taste by adjusting the amount of
crushed red pepper. Remember to start with less than you think – you
can always add more!
Makes 4 to 5 first-course servings
¼ cup extra virgin olive oil
2 garlic cloves, smashed
1½ to 2 teaspoons crushed red pepper
1 can (28 ounces) whole plum tomatoes, roughly chopped
2¼ teaspoons kosher salt, divided
1 pound large shrimp (about 16), peeled, cleaned and rinsed
¼ cup white rice flour
Olive oil for spraying
Crusty bread, for dipping
1. Put the olive oil, garlic and red pepper into a medium saucepan over
medium-low heat. Gently simmer until fragrant, about 5 to 10 min-
utes. Be careful not to have the heat too high or the garlic will burn.
2. Add the tomatoes and increase the heat so the mixture comes to a
rolling simmer. Simmer until sauce is reduced by half, about 30 min-
utes. Once reduced, stir in ¾ teaspoon of the salt. There should be
about 2½ cups of sauce.
3. Once the sauce is ready, dry the cleaned shrimp really well. Sprinkle
evenly with the remaining salt. Lightly coat the shrimp with rice flour.
4. Place the AirFryer Basket onto the Baking Pan. Put the floured
shrimp into the basket and spray with olive oil. Put the assembled
pan into Rack Position 2. Set oven to AirFry at 375°F
for 10 minutes. Cook until shrimp are evenly golden and crispy.
5. Serve shrimp with some crusty bread and the warm sauce for
dipping.
Nutritional information per serving (based on 5 servings):
Calories 283 (57% from fat) • carb. 14g • pro. 14g • fat 20g • sat. fat 3g
chol. 114mg • sod. 897mg • calc. 100mg • fiber 2g

17
Spinach, Gruyère and Artichoke Dip
A bit of a twist on the standard spinach artichoke dip, for the more
grown-up palate. The combination of Gruyère and Parmesan gives the
dip a pleasant nuttiness. No special pan required – we found that using
a pie plate was the best and quickest way to warm this dish.
Makes about 2 cups
Olive oil or nonstick cooking spray
12 ounces cream cheese, room temperature and cut into 1-inch
pieces (regular or reduced-fat style, such as Neufchâtel,
may be used)
2 ounces Gruyère cheese, finely grated
1 ounce Parmesan cheese, finely grated
1 garlic clove, finely chopped
½ small shallot, finely chopped
8 ounces frozen spinach, thawed and drained well
1 can (15 ounces) quartered artichoke hearts, drained
2 tablespoons heavy cream
½ teaspoon crushed red pepper
1. Fit the oven with the Rack in Position 1. Lightly coat a 9-inch pie or
cake pan with olive oil or nonstick cooking spray; reserve.
2. Put the cream cheese into a mixing bowl. Using a hand mixer, mix
until softened. Add remaining ingredients and mix on Low to fully
combine.
3. Transfer mixture to the prepared pie/cake pan and transfer to the
oven. Set to Bake at 350°F for 20 minutes, and then switch to Broil
for an additional 5 minutes, or until top is nicely browned.
4. Serve immediately with pita chips, crusty bread and crisp vegetables.
Nutritional information per serving (2 tablespoons):
Calories 99 (61% from fat) • carb. 5g • sugars 1g • pro. 5g • fat 7g • sat. fat 4g
chol. 23mg • sod. 169mg • calc. 93mg • fiber 3g
Spring Rolls with Sweet Chile
Dipping Sauce
Make a favorite takeout dish at home without deep-frying – these
appetizers are packed with fresh ingredients and great flavor.
Makes 1¼ cups dipping sauce and 28 spring rolls
Sweet Chile Dipping Sauce:
1 to 1½ red chiles, such as Fresno, cut into 1-inch slices
1 garlic clove, smashed
1 tablespoon unsweetened rice wine vinegar
1 cup water
1
/
3
cup granulated sugar
1 tablespoon plus 1 teaspoon cornstarch, dissolved in
1 tablespoon water
¼ teaspoon kosher salt
Spring Rolls:
6 green cabbage leaves (about 10 ounces), shredded or thinly
sliced
3 medium carrots (about 6 ounces), julienned
1 1-inch piece fresh ginger, peeled and julienned
3 green onions, thinly sliced
½ small green chile, like jalapeño or serrano, finely chopped
1
/
3
cup fresh basil leaves, thinly sliced
½ cup fresh cilantro leaves, chopped
2 tablespoons vegetable oil
1 tablespoon fish sauce
½ lime, juiced
½ teaspoon kosher salt
½ block extra-firm tofu, cut into 28 thick julienne strips
28 egg roll wrappers
1. Prepare the Sweet Chile Dipping Sauce: Put chile slices and garlic
into a small, heavy-bottomed pot. Heat on medium-high heat until
hot and fragrant. Remove from heat and add the vinegar. Return pot
to heat and cook until vinegar is mostly reduced.

18
2. Add water and sugar; stir. Bring mixture to a boil and cook until
sugar is dissolved. Add the cornstarch mixture to the pot and stir.
Boil while stirring, to thicken, at least 1 minute.
3. Remove pot from heat, add the salt and, with a hand blender or
blender, blend on High until chile slices and garlic are puréed and
mixture is homogeneous. Enjoy hot, or allow to cool to room
temperature. NOTE: Dip will become thicker and more gelatinous as
it cools.
4. Make the Spring Rolls: Put all of the filling ingredients, except the
tofu, into a mixing bowl. Combine and reserve. Put AirFryer Basket
onto the Baking Pan. Reserve.
5. Place one piece tofu in the center of one wrapper, and top with about
1 tablespoon of filling. Fold the bottom of the wrapper upward, over
the filling. Fold the right side over and then the left, and roll up to
secure the spring roll. Brush the edge with water to seal. Transfer to
assembled basket. Reserve and repeat with remaining wrappers.
Spray both sides of the spring roll with oil.
6. Put the assembled Baking Pan into rack Position 2. Set to AirFry at
400°F for 10 minutes. Cook until golden brown on all sides. Flip half-
way through cooking if necessary.
7. Serve immediately with the Sweet Chile Dipping Sauce.
Nutritional information per serving of Sweet Chile Dipping Sauce (1 tablespoon):
Calories 14 (1% from fat) • carb. 3g • pro. 0g • fat 0g • sat. fat 0g • chol. 0mg
sod. 29mg • calc. 1mg • fiber 0g
Nutritional information per Spring Roll:
Calories 53 (34% from fat) • carb. 7g • pro. 2g • fat 2g • sat. fat 0g • chol. 1mg
sod. 152mg • calc. 22mg • fiber 1g
Veggie Sticks with Herbed Yogurt Dip
The vegetables in this recipe can be substituted with any of
your favorites.
Makes 4 to 6 servings
Herbed Yogurt Dip:
1 garlic clove
1 tablespoon fresh mint leaves
7 ounces plain, non-fat Greek yogurt
1 teaspoon fresh lemon juice
¼ teaspoon kosher salt, divided
Veggie Sticks:
½ cup unbleached, all-purpose flour
3 large eggs, beaten well
1½ cups panko breadcrumbs
2 tablespoons grated Pecorino Romano cheese
1 teaspoon dried oregano
1 teaspoon dried parsley
½ teaspoon kosher salt
1 medium zucchini (about 6 ounces), cut into ¼-inch thick
pieces, about 3 inches long
10 string beans (about 2 ounces), trimmed
1 avocado, pitted and cut into 8 slices
Olive oil, for spraying
Lemon, for serving, optional
1. Prepare Herbed Yogurt Dip: Put garlic and mint into the work bowl of
a mini food processor. Pulse until roughly chopped. Scrape down
sides; add yogurt, lemon juice and salt. Process on High until com-
pletely puréed and homogeneous. Transfer to a serving bowl, cover,
and refrigerate until ready to use.
2. Make Veggie Sticks: Place the AirFryer Basket onto the Baking Pan.
Reserve. Put the flour and eggs into 2 separate, individual containers
large enough to dip the vegetables into. Combine the panko, cheese,

19
spices and salt into another container, also large enough to dip the
vegetables into.
3. Dredge each of the vegetables in the flour, and shake off the excess
before dipping into the eggs and then finally coating evenly with the
panko mixture. Once half are coated, transfer to the assembled pan
in a single layer. Spray both sides with oil.
4. Place the assembled pan into Rack Position 2. Set to AirFry at
375°F for 10 minutes. Cook until golden. While the first batch is
cooking, coat the remaining vegetables. Reserve until ready to AirFry.
When veggies sticks are ready, transfer to a serving plate. Taste and
adjust seasoning with more salt or a squeeze of lemon, if desired.
Serve immediately with the reserved Herbed Yogurt Dip.
Nutritional information per serving of Herbed Yogurt Dip (based on 1 tablespoon):
Calories 8 (1% from fat) • carb. 1g • pro. 1g • fat 0g • sat. fat 0g • chol. 0mg
sod. 48mg • calc. 20mg • fiber 0g
Nutritional information per serving of Veggie Sticks (based on 6 servings):
Calories 210 (37% from fat) • carb. 25g • pro. 8g • fat 9g • sat. fat 2g• chol. 95mg
sod. 282mg • calc. 42mg • fiber 5g
MAIN COURSES
The Cuisinart
®
AirFryer Toaster Oven, not only can AirFry, but it also
bakes and broils — with convection if you’d like — to put a full meal on
your table in record time!
Chicken Tenders
Kids of all ages will love this homemade version of the frozen standby.
Makes about 6 servings
1 cup unbleached, all-purpose flour
2 large eggs, lightly beaten
1 cup panko breadcrumbs
1 to 1½ pounds thinly sliced chicken breast
¾ teaspoon kosher salt
¾ teaspoon freshly ground black pepper
Olive oil, for spraying
1. Put the flour, eggs and panko into individual containers large enough
for dipping the chicken.
2. Sprinkle the chicken with the salt and pepper completely, on both
sides. Dredge each cutlet in flour and shake off the excess before
dipping into eggs, and then finally coating evenly with the panko
breadcrumbs.
3. Place the AirFryer Basket onto the Baking Pan. Put the prepared
cutlets in the basket and spray both sides with olive oil. Put the
assembled pan into Rack Position 2. Set to AirFry at 400°F for 15
minutes. Cook until chicken is evenly browned on both sides
(flipping halfway through) and the internal temperature registers
165°F.
4. Serve immediately.
Nutritional information per serving (based on 6 servings)
Calories 204 (30% from fat) • carb. 15g • pro. 20g • fat 7g • sat. fat 1g • chol. 110mg
sod. 393mg • calc. 14mg • fiber 1g

20
Classic Roast Chicken
Simple spices go a long way in this roast chicken recipe.
Makes 4 to 6 servings
1 Whole chicken (4 pounds)
1 teaspoon kosher salt
½ teaspoon freshly ground black pepper
1 lemon, halved
1 teaspoon extra virgin olive oil
2 teaspoons herbes de Provence or other dried herbs like
rosemary and thyme
3 garlic cloves, smashed
1. Line the Baking Pan with aluminum foil.
2. Pat the chicken dry and sprinkle with salt, pepper and lemon juice.
Put the lemon half into the chicken’s cavity. Put the chicken on the
prepared baking tray and drizzle with olive oil. Rub with herbs and
garlic cloves. Put the garlic cloves into the chicken’s cavity with the
lemon. Truss if desired.
3. Put the Baking Pan with the chicken into Rack Position 1. Set to
Convection Bake at 400°F for 25 minutes. When timer expires,
reduce temperature to 350°F and bake for an additional 20 minutes,
or until golden and crispy and chicken thighs register 165°F on an
instant-read thermometer.
4. Let chicken rest for 10 minutes; carve and serve.
Nutritional Information per serving (based on 6 servings):
Calories 707 (56% from fat) • carb. 4g • pro. 73g • fat 43g • sat. fat 12g • chol. 230mg
sod. 578mg • calc. 61mg • fiber 1g
Fish Tacos with Peach Salsa
Using just a few spritzes of olive oil, the AirFry feature takes the guilt
out of eating fried fish.
Makes 8 tacos
Peach Salsa:
2 large tomatoes, diced
1 medium peach, diced
½ small red onion, diced
½ jalapeño, seeded and finely chopped
1 small garlic clove, finely chopped
1
/
3
cup cilantro, roughly chopped
¾ teaspoon kosher salt
¼ teaspoon granulated sugar
¼ cup extra virgin olive oil
½ lime, juiced
Fish Tacos:
16 corn tortillas
1 cup unbleached, all-purpose flour
1 teaspoon kosher salt, plus more for serving if desired, divided
2 large eggs, beaten well
1 pound cod, cut into 1-ounce pieces
Olive oil, for spraying
Nonstick cooking spray
8 radishes, cut into matchsticks
Lime wedges, for garnish
1. Combine all of the salsa ingredients into a small bowl. Stir, and
reserve until ready to serve.
2. Place the AirFryer Basket onto the Baking Pan. Put 8 of the tortillas
into the basket. Put the assembled pan into Rack Position 2. Set to
AirFry at 400°F for 5 minutes, or until tortillas are warmed through.
Transfer warmed tortillas to a serving plate and cover with aluminum
foil. Repeat with remaining tortillas.

21
3. While tortillas are warming, put the flour with ½ teaspoon of salt, and
eggs into individual containers large enough to dip the fish pieces.
Evenly sprinkle the cod pieces with the remaining salt.
4. Dredge each piece of fish in flour and shake off the excess before
dipping into eggs, and then finally coating evenly with flour again.
5. Coat the AirFry basket with nonstick cooking spray. Put the floured
fish into the assembled basket. Spray each piece of cod with oil on
both the tops and bottoms. Put the assembled pan into Rack
Position 2. Set to AirFry at 400°F for 10 minutes. Cook until cod is
golden and crispy on all sides.
6. When cod is ready, transfer one piece of fish to one tortilla. Top with
a spoonful of salsa and radishes. Repeat with remaining tacos.
7. Serve immediately with lime wedges and an extra pinch of salt if
desired.
Nutritional information per taco:
Calories 128 (19% from fat) • carb. 18g • pro. 8g • fat 3g • sat. fat 1g • chol. 35mg
sod. 285mg • calc. 33mg • fiber 2g
Maple-Pecan BLT
This BLT is slightly sweeter than the bacon, lettuce and tomato sand-
wiches you’re used to.
Makes 2 sandwiches
4 slices soft white bread
3 slices bacon, halved
½ medium avocado
Pinch kosher salt
4 green leafy lettuce leaves
1 medium tomato, sliced
1 tablespoon pure maple syrup
2 tablespoons finely chopped pecans
1. Toast bread according to shade preference. Reserve. While bread is
toasting, place the AirFryer Basket onto the Baking Pan. Put bacon
slices into the basket. Once toast is finished, put the assembled pan
into Rack Position 2. Set to AirFry at 400°F for 10 minutes. Cook
bacon until browned and crispy.
2. While bacon is AirFrying, start assembling sandwiches by mashing
half of the avocado onto 2 of the toast slices. Sprinkle each with a
pinch of salt. Put 2 pieces of lettuce and several slices of tomato
onto the remaining 2 slices of toast.
3. When bacon is finished, remove assembled pan and transfer to a flat
surface. Brush the tops of the bacon with maple syrup, then sprinkle
with chopped pecans. Flip and repeat on other side.
4. Put the assembled pan, with the pecan-crusted bacon, back into
Rack Position 2. Set to AirFry at 400°F for an additional 2 to 3 min-
utes, or until pecans are golden.
5. When bacon is done, divide between the toast slices with the tomato
and lettuce. Top the bacon with one of the avocado toast slices to
form a sandwich.
Nutritional information per sandwich:
Calories 377 (46% from fat) • carb. 41g • pro. 12g • fat 20g • sat. fat 4g • chol. 23mg
sod. 885mg • calc. 323mg • fiber 3g
Meatball Grinder
A crowd-pleasing meal with simple ingredients and minimal effort.
Makes 4 servings
Meatballs:
1 pound ground beef
¾ teaspoon kosher salt
½ teaspoon freshly ground black pepper
½ teaspoon garlic powder

22
Meatball Grinders:
4 mini grinder rolls (about 5 inches long)
½ cup prepared marinara sauce*, plus extra for serving
6 ounces fresh mozzarella, thinly sliced
1. Make the Meatballs: Mix meat together well with spices and then
form into 8 equal balls.
2. Place on the Baking Pan and into Rack Position 2. Set to
Convection Bake at 400°F for 20 minutes. Cook until meatballs are
evenly browned on all sides.
3. Make the Meatball Grinders: Split rolls in half lengthwise and cut all
meatballs in half. Place 4 meatball halves on the bottom part of the
roll. Coat the meatballs with 2 tablespoons of marinara sauce and
then place mozzarella slices on top of the meat, as well on the top
half of the grinder roll.
4. Place open sandwich halves on clean Baking Pan into Rack Position
2. Set oven to Broil for about 8 to 10 minutes, cooking until cheese
is melted.
5. Assemble sandwiches, slice in half and serve.
* Reduce the red pepper flakes in the Diablo Sauce recipe on page 16 to
about ¼ teaspoon for a delicious marinara sauce.
Nutritional information per sandwich:
Calories 435 (55% from fat) • carb. 17g • pro. 33g • fat 27g • sat. fat 12g • chol. 106mg
sod. 713mg • calc. 70mg • fiber 1g
Pan-Roasted Salmon Dinner
This one-sheet dinner takes barely any time to prepare and cook.
Makes 2 servings
½ pound wild salmon
1 cup cherry tomatoes
½ bunch asparagus, trimmed
½ cup Kalamata olives, pitted and roughly chopped
1 garlic clove, sliced
1 to 2 tablespoons extra virgin olive oil
½ teaspoon kosher salt
¼ teaspoon freshly ground black pepper
1. Line Baking Pan with aluminum foil. Put salmon, tomatoes, aspara-
gus, olives and garlic onto the Baking Pan. Drizzle with olive oil and
sprinkle with salt and pepper.
2. Put the Baking Pan with the salmon into Rack Position 2. Set to
Convection Broil for 15 minutes and cook until salmon is opaque
and vegetables are browned. For medium-cooked salmon, check at
10 minutes; salmon should reach an internal temperature of 125°F.
Nutritional information per serving (based on 2 servings):
Calories 353 (56% from fat) • carb. 8g • pro. 31g • fat 22g • sat. fat 2g • chol. 81mg
sod. 891mg • calc. 47mg • fiber 3g
Pizza with Arugula, Prosciutto
and Fig Jam
Gourmet pizza that anyone can make.
Makes 1 pizza, 8 slices
Nonstick cooking spray or 1 tablespoon extra virgin olive oil
1 pound pizza dough, room temperature
¼ cup fig jam
¼ pound prosciutto, thinly sliced
3 ounces goat cheese
1 cup baby arugula
1. Set the oven to Convection Bake at 450ºF. Allow to preheat for 10
to 15 minutes.

23
2. Generously coat the Baking Tray with nonstick cooking spray or olive
oil. Put the pizza dough on the tray. Spread out the dough to evenly
cover the entirety of the tray. Spread the jam evenly on the dough,
leaving a 1-inch border for the crust (lightly coating the dough with
olive oil can help with spreading the jam evenly). Top with the pro-
sciutto and goat cheese.
3. Put the Baking Tray into Rack Position 1. Bake for 8 to 10 minutes
until cheese is melted and lightly brown and the bottom crust is
golden. It is recommended to turn the tray halfway through baking
time for best results.
4. Remove pizza and top with the arugula. Let arugula slightly wilt for 2
minutes before serving.
* Baking pizza on a baking/pizza stone gives you the crispiest crust;
similar to pizza prepared in a brick oven. Go to Cuisinart.com for
details on how to purchase.
Nutritional Information per slice:
Calories 255 (30% from fat) • carb. 37g • pro. 11g • fat 9g • sat. fat 3g • chol. 16mg
sod. 716mg • calc. 36mg • fiber 4g
Pizza Margherita
Simple and delicious—and quicker than takeout!
Makes 1 pizza, 8 slices
Nonstick cooking spray or 1 tablespoon extra virgin olive oil
1 pound pizza dough, room temperature
¾ cup pizza sauce
2 tablespoons grated Parmesan
3 ounces fresh mozzarella, thinly sliced
6 to 8 basil leaves, torn into pieces
1. Set oven to Convection Bake at 450ºF. Allow to preheat for 10 to
15 minutes.
2. While the oven is preheating, generously coat the Baking Tray with
nonstick cooking spray or the olive oil. Put the pizza dough on the
tray. Stretch dough in an even layer to cover the entirety of the tray.
Add the sauce into the center of the dough. Leaving a 1-inch border
for the crust, spread sauce into a thin, even layer. Sprinkle with the
Parmesan and top with the mozzarella.
3. Put the Baking Tray into Rack Position 1. Bake for 8 to 10 minutes
until cheese is melted and lightly brown and the bottom crust is
golden. It is recommended to turn the tray halfway through baking
time for best results.
4. Sprinkle with basil before serving.
* Baking pizza on a baking/pizza stone gives you the crispiest crust;
similar to pizza prepared in a brick oven. Go to Cuisinart.com for
details on how to purchase.
Nutritional Information per slice:
Calories 217 (29% from fat) • carb. 32g • pro. 15g • fat 8g • sat. fat 2g • chol. 7mg
sod. 402mg • calc. 46mg • fiber 5g
Roasted Chicken Thighs with
Smoked Paprika and Lime
A moist and flavorful main course, ready in 30 minutes.
Makes about 4 chicken thighs
1 pound chicken thighs, bone-in
1 tablespoon extra virgin olive oil
½ teaspoon kosher salt
½ teaspoon smoked Spanish paprika
¼ teaspoon freshly ground black pepper
¼ teaspoon ground cumin
½ lime, juiced

24
1. Line the Baking Pan with aluminum foil. Put the chicken thighs onto
the Baking Pan. Drizzle with olive oil and sprinkle evenly with the
salt, paprika, pepper, cumin and lime juice. Put the Baking Pan into
Rack Position 2.
2. Set to Convection Bake at 425°F for 25 minutes. Cook until skin is
crispy and the internal temperature reaches 165°F. Let rest for 10
minutes before serving.
Nutritional information per chicken thigh with skin:
Calories 313 (62% from fat) • carb. 1g • pro. 29g • fat 21g • sat. fat 5g • chol. 105mg
sod. 362mg • calc. 16mg • fiber 0g
Roasted Lamb Chops with
Rosemary and Garlic
This traditional lamb preparation can be enjoyed any night of the week.
Makes 4 servings
4 garlic cloves, crushed
1 tablespoon chopped fresh rosemary (leaves from about 3 to 4
rosemary sprigs)
¼ teaspoon freshly ground black pepper
2 tablespoons extra virgin olive oil
8 loin lamb chops, about 2 pounds
½ teaspoon kosher salt
1. Stir the garlic, rosemary, pepper and olive oil together in a stainless
steel bowl. Add the lamb chops and toss together to fully coat. Let
rest at room temperature for about 30 minutes. The lamb can also be
marinated overnight in the refrigerator at this point for
maximum flavor.
2. Once rested, line the Baking Pan with aluminum foil. Put the lamb
chops on the pan and sprinkle evenly with the salt.
3. Put the Baking Pan with the lamb into Rack Position 2. Set to
Convection Bake at 425°F for 15 minutes, cooking until the internal
temperature reads 130°F for medium rare. Let chops rest for about 5
minutes once removed from the oven before serving.
Nutritional information per serving (2 chops):
Calories 284 (46% from fat) • carb. 1g • pro. 36g • fat 14g • sat. fat 5g • chol. 109mg
sod. 395mg • calc. 33mg • fiber 0g
Sausage and Kale Quiche
Great for a Sunday brunch, this quiche will please any crowd.
The recipe for the crust, Pâté Brisée, makes enough for two quiches, so
freeze the other half to have on hand for next time.
Makes 8 to 10 servings
Pâté Brisée:
2 cups unbleached, all-purpose flour
1 teaspoon kosher salt
2 sticks (16 tablespoons) unsalted butter, cold, cut into
1-inch pieces
3 to 4 tablespoons ice water
Filling:
1½ teaspoons olive oil
1 garlic clove, finely chopped
1 small shallot, finely chopped
¼ teaspoon kosher salt, divided
Pinch freshly ground black pepper
4 large lacinato kale leaves, tough stems removed
and thinly sliced
¼ teaspoon fresh thyme leaves
1 hot Italian sausage link (about 3 ounces), chopped or
crumbled (if using fresh, remove casing)
½ cup whole milk
½ cup heavy cream
4 large eggs
1 ounce Gruyère or Swiss cheese, shredded

25
1. Prepare the Pâté Brisée: Put the flour and salt into a food processor
fitted with the chopping blade. Process to sift, about 10 seconds.
Add the butter and pulse until the mixture resembles coarse crumbs,
about 6 to 8 pulses. Pour in water 1 tablespoon at a time and pulse
until mixture starts to come together – you may not need all of the
water. (To test if the dough is hydrated well enough, remove cover
and pinch the mixture. If it holds, it is done.) Transfer to a lightly
floured surface and knead once or twice to bring together. Divide
dough equally into two pieces* and form each into a flat disk; wrap in
plastic wrap and refrigerate until ready to use, a minimum of
30 minutes.
2. On a lightly floured surface, roll out one of the pastry disks into an
11-inch circle that is about
1
/
8
inch thick. Reverse the dough onto the
rolling pin and unroll it evenly over a 9-inch tart pan. Press the dough
lightly into the pan, lifting the edges and working it gently down into
the bottom edge of the pan. Trim off excess dough by rolling the pin
over the top of the pan. With your thumbs, push the dough
1
/
8
inch
above the edge of the mold, to make an even, rounded rim of dough
around the inside circumference of the pan. Chill in refrigerator for
about 30 minutes.
3. Fit the oven with the rack in Position 1. Using a fork, prick the dough
evenly all over, but make sure not to go entirely through the dough.
Line the shell with parchment and weigh it down with dried beans or
rice. Set the oven to Bake at 350°F for 20 minutes. After 5 minutes,
put the tart shell in the oven and bake until the dough under the
parchment is no longer wet, about 12 to 15 minutes. Remove the
beans/rice and parchment and continue baking for another 2
minutes, until the shell is golden brown.
4. Prepare the filling: Put the oil into a medium skillet set over medium/
medium-low heat. Once oil is hot, add the garlic and shallot with a
pinch of the salt and the pepper. Sauté until softened and fragrant,
but has picked up no color. Add the kale, remaining salt and the
thyme. Sauté until the kale is bright and wilted. Remove and reserve.
5. Increase the heat to medium-high. Once hot, add the sausage,
breaking it up with a heatproof utensil/spatula while cooking. Sauté
until browned and fully cooked (no pink present if using fresh sau-
sage). Remove to cool. Evenly spread the cooled vegetables and
sausage over the baked tart shell.
6. Whisk the milk, cream and eggs together, then pour into the tart
shell. Top with the cheese.
7. With the rack still in Position 1, carefully transfer quiche to the oven.
Set to Bake at 300°F for 10 minutes, cooking until center is just set.
8. Remove and allow to cool for 5 to 10 minutes before slicing and
serving. Quiche is best served the same day, but can be stored in the
refrigerator for up to 5 days. Reheat for best results.
* Extra dough can be stored in the refrigerator for up to 1 week and in
the freezer for up to 2 months.
Nutritional information per serving (based on 10 servings):
Calories 269 (73% from fat) • carb. 11g • pro. 7g • fat 22g • sat. fat 12g • chol. 127mg
sod. 300mg • calc. 60mg • fiber 0g
Simply Broiled Burgers
These burgers are a perfect base for any of your favorite
burger toppings.
Makes four, 6-ounce burgers
24 ounces ground beef, 80% lean
1 tablespoon olive oil
1 teaspoon kosher salt
½ teaspoon freshly ground black pepper
½ teaspoon garlic powder
1. Form ground beef into 4 patties. Brush each with olive oil on both
sides and sprinkle with an even amount of salt, pepper
and garlic powder.
2. Place the AirFryer Basket onto the Baking Pan. Put burgers into the
basket and put assembled pan into Rack Position 2.

26
3. Set to Convection Broil for 15 minutes, stopping to flip burgers
halfway through cooking. Serve immediately.
Nutritional information per burger:
Calories 464 (74% from fat) • carb. 0g • pro. 29g • fat 38g • sat. fat 14g • chol. 121mg
sod. 704mg • calc. 32mg • fiber 0g
SIDES
Perfect accompaniments to main courses cooked quickly with minimal
ingredients and barely any cleanup.
Brussels Sprouts with Pancetta
A perfect side dish to any meal – the saltiness of the pancetta comple-
ments the earthiness of the sprouts, and a finish of red wine vinegar
provides an unexpected, but welcome tang.
Makes 4 servings
1 pound Brussels sprouts, trimmed and halved
1 shallot, thinly sliced
1 ounce pancetta, diced
1 tablespoon olive oil
1
/
8
teaspoon kosher salt
1
/
8
teaspoon freshly ground black pepper
2 teaspoons red wine vinegar
1. Line the Baking Pan with aluminum foil. Put all of the ingredients,
except for the vinegar, onto the Baking Pan. Toss to evenly coat.
Spread into a single layer.
2. Put the assembled pan into Rack Position 2. Set to Convection
Bake at 400°F for 15 minutes. Cook until sprouts are crispy and
tender.
3. Remove sprouts from the pan and put them into a serving bowl. Toss
with vinegar. Taste and adjust seasoning as desired.
Nutritional information per serving:
Calories 108 (46% from fat) • carb. 11g • pro. 5g • fat 6g • sat. fat 1g • chol. 6mg
sod. 230mg • calc. 50mg • fiber 4g

27
French Fries
These crispy fries can be served with any of your favorite
seasonings or sauces.
Makes 2 to 3 servings
1 pound (about 3 medium) russet potatoes
Olive oil, for spraying
1 teaspoon kosher or seasoned salt
1. Cut potatoes into ¼-inch thick pieces, about 4 inches long. Pat dry
completely.
2. Place the AirFryer Basket onto the Baking Pan. Put the dried pota-
toes into the pan. Spray with oil. Sprinkle with salt and toss. Spread
into a single layer.
3. Put the assembled pan into Rack Position 2. Set to AirFry at 400°F
for 15 minutes, cooking until desired crispiness is achieved.
4. When French fries are done, transfer to a serving bowl. Taste and
adjust seasoning as desired. Serve immediately.
Nutritional Information per serving (based on 3 servings):
Calories 138 (10% from fat) • carb. 27g • pro. 4g • fat 2g • sat. fat 0g • chol. 0mg
sod. 389mg • calc. 0mg • fiber 2g
Roasted Acorn Squash
Try this out as a simple side dish. It takes a minimal amount of time
from preparation to table; it is super tasty, with the bonus of being really
good for you!
Makes about 4 servings
1 teaspoon extra virgin olive oil
1 medium acorn squash, cut into about 12 wedges
½ teaspoon kosher salt
¼ teaspoon freshly ground black pepper
¼ teaspoon chili powder
1. Line the Baking Pan with aluminum foil and spread evenly with olive
oil. Add the squash wedges and then sprinkle evenly with salt,
pepper and chili powder.
2. Put the Baking Pan with the squash into Rack Position 2. Set to
Convection Bake at 400°F for 25 minutes. Squash is ready when
softened and evenly browned.
3. Serve immediately.
Nutritional information per serving:
Calories 104 (9% from fat) • carb. 24g • pro. 3g • fat 1g • sat. fat 0g • chol. 0mg
sod. 269mg • calc. 54mg • fiber 5g
Roasted Fennel, Carrots and Parsnips
Makes 4 servings
2 fennel bulbs, trimmed and quartered
3 medium carrots, cut into 1-inch pieces
1 large parsnip, cut into 1-inch pieces
1 garlic clove, smashed
3 tablespoons extra virgin olive oil
½ teaspoon kosher salt
¼ teaspoon freshly ground black pepper
Pinch ground cinnamon
1 teaspoon fresh thyme leaves
1. Line the Baking Pan with aluminum foil. Put all of the ingredients
onto the Baking Pan and toss. Spread into a single layer.
2. Transfer the Baking Pan with the vegetables into Rack Position 2.
Set to Convection Bake at 400°F for 20 minutes. Cook until vegeta-
bles are browned and tender.

28
Nutritional information per serving:
Calories 170 (54% from fat) • carb. 18g • pro. 2g • fat 11g • sat. fat 2g • chol. 0mg
sod. 360mg • calc. 85mg • fiber 6g
Sweet Potato Fries with Chipotle
Mayonnaise
A more nutritious alternative to regular French fries.
Makes 2 to 3 servings
Chipotle Mayonnaise:
½ cup mayonnaise
1 chipotle chile in adobo, finely chopped
¼ teaspoon fresh lemon juice
Sweet Potato Fries:
1 pound sweet potatoes (about 2 medium), cut into ¼-inch thick
pieces, about 4 inches long
Olive oil, for spraying
½ teaspoon kosher salt
1. Prepare Chipotle Mayonnaise: Put mayonnaise, chipotle and lemon
juice in the work bowl of a mini food processor. Process on High until
completely puréed and homogeneous. Transfer to a serving bowl,
cover, and refrigerate until ready to serve.
2. Make Sweet Potato Fries: Place the AirFryer Basket onto the Baking
Pan. Put the cut sweet potatoes into the basket. Spray with oil.
Sprinkle with salt and toss. Spread into a single layer.
3. Put the assembled pan into the oven in Rack Position 2. Set to
AirFry at 400°F for 15 minutes. Cook until golden brown and crispy.
4. When sweet potatoes are ready, transfer to a serving bowl. Serve
immediately with reserved Chipotle Mayonnaise on the side.
Nutritional information per serving of Chipotle Mayonnaise (based on 1 tablespoon):
Calories 101 (99% from fat) • carb. 0g • pro. 0g • fat 11g • sat. fat 2g • chol. 10mg
sod. 93mg • calc. 0mg • fiber 0g
Nutritional information per serving of Sweet Potato Fries (based on 3 servings):
Calories 149 (11% from fat) • carb. 31g • pro. 3g • fat 2g • sat. fat 0g • chol. 0mg
sod. 434mg • calc. 57mg • fiber 5g
SWEET TREATS
From Blueberry Muffins for breakfast to a rich Chocolate Cake with
salted Caramel Frosting for dessert, the Cuisinart
®
AirFryer Toaster Oven
can handle any baking task. Plus, the AirFrying feature makes making
fried treats, like doughnuts, possible with less calories and barely
any mess!
Baked Apples
Your kitchen will be filled with the smell of warm, fall spices while
these bake.
Makes 4 servings
4 firm apples, a sweet-tart variety works well, such as Pink Lady
¼ cup rolled oats (not quick cooking)
2 tablespoons chopped pecans
1 tablespoon unbleached, all-purpose flour
1 tablespoon light brown sugar
2 pinches ground cinnamon
Pinch kosher salt
Pinch ground nutmeg
2 tablespoons unsalted butter, cubed
1. Line the Baking Pan with aluminum foil or parchment paper; reserve.
Core the apples, but do not cut through the bottom; reserve.
2. Put the oats, pecans, flour, sugar, cinnamon, salt and nutmeg into a
small mixing bowl. Stir to combine. Add the butter and, using your
hands, mix together by pinching the mixture to form clumps. Make
sure the ingredients are evenly combined.
3. Divide the oat mixture among the apples. Press in to fill. Transfer to
the prepared Baking Pan and put into the oven in Rack Position 1.

29
4. Set to Bake at 350°F for 35 minutes. Cook until apples are tender
and tops are crispy and browned.
Nutritional information per apple:
Calories 243 (31% from fat) • carb. 42g • pro. 3g • fat 9g • sat. fat 4g • chol. 15mg
sod. 38mg • calc. 21mg • fiber 7g
Blueberry Muffins
A favorite muffin, these are quick to put together, and baking them in
the Cuisinart
®
AirFryer Toaster Oven brings them to the table quickly.
Makes 6 muffins
1 cup plus 1 tablespoon unbleached, all-purpose flour, divided
1½ teaspoons baking powder
¼ teaspoon kosher salt
Pinch ground cinnamon
4 tablespoons (½ stick) unsalted butter, room temperature
¾ cup granulated sugar
1 large egg
½ teaspoon pure vanilla extract
¼ cup whole milk
1 cup blueberries, fresh or frozen
Softened butter or nonstick cooking spray
1. Put 1 cup of the flour, baking powder, salt and cinnamon into a
mixing bowl. Whisk to combine; reserve.
2. Put the butter and sugar into a large mixing bowl. Using a hand
mixer, mix the two together until light and creamy. Gradually add the
egg and vanilla extract; mix on low to fully combine.
3. Alternating between the two, add the dry ingredients and the milk in
a few additions, starting and ending with the dry ingredients. Gently
mix to just combine.
4. Toss the blueberries with the tablespoon of flour and then add to the
batter. Gently fold to combine.
5. Fit the oven with the rack in Position 1. Lightly coat a 6-cup muffin
tin with the butter or cooking spray. Scoop the batter into the tin –
they may be very full. This is OK.
6. Set to Bake at 325°F for 25 minutes. After 5 minutes, place muffins
in preheated oven. Muffins are finished when lightly golden and
spring back to touch. Serve immediately, or store, covered, at room
temperature for up to 3 days.
Nutritional Information per muffin:
Calories 269 (41% from fat) • carb. 17g • pro. 15g • fat 10g • sat. fat 2g • chol. 90mg
sod. 500mg • calc 19mg • fiber 1g
Cinnamon Sugar Doughnut Bites
Not that they will likely hang around, but these doughnuts are best
eaten just after cooking.
Makes 16 doughnuts
¾ teaspoon active dry yeast
½ teaspoon plus 1½ teaspoons granulated sugar, divided
1 tablespoon warm whole milk (105°F to 110°F)
¾ cup bread flour, plus more for mixing (up to ¼ cup)
2 pinches kosher salt
2 pinches ground cinnamon
Pinch ground nutmeg
1 large egg, lightly beaten
2 tablespoons buttermilk
½ teaspoon pure vanilla extract
1 tablespoon unsalted butter, room temperature and cubed
Nonstick cooking spray
Melted butter for finishing (approximately 2 tablespoons)
Cinnamon sugar, for finishing (if preparing at home, combine
¼ cup granulated sugar with 1 tablespoon ground cinnamon)
1. In a small bowl, dissolve the yeast and ½ teaspoon sugar in the
warm milk. Let stand 5 to 10 minutes, or until mixture is foamy.

30
2. Put ¾ cup of the flour, the remaining sugar, salt, cinnamon and nut-
meg into a large mixing bowl. Whisk to combine. Once yeast has
proofed, add it to the flour/sugar. Using a wooden spoon, stir to
combine.
3. Whisk the egg, buttermilk and vanilla extract together and then slow-
ly mix into the flour mixture. Lightly dust a clean work surface with
flour and transfer dough to the surface, dusting lightly with flour.
Using your hands to knead, add additional flour as necessary, 1 tea-
spoon at a time, to keep dough from sticking to your hands. Add the
butter, 1 piece at a time, until all has been mixed into the dough.
Again, continue adding flour, 1 teaspoon at a time, to keep dough
from sticking to your hands. The dough should be tender and
smooth, and when pulled should not break apart.
4. Form dough into a ball and put in a clean mixing bowl, cover with
plastic wrap and allow to rest for 1 hour. After 1 hour, gently turn
dough over and press dough down (do not punch). Cover and allow
to rest for another hour.
5. Place the AirFryer Basket into the Baking Pan. Lightly coat with non-
stick cooking spray. Line a separate baking sheet with parchment
paper. Divide the dough into 16 pieces. Working with one piece at a
time (keeping the others covered loosely with plastic wrap), form into
a small ball and roll between hands to ensure that it is smooth. Put
round on the lined baking sheet and cover loosely with plastic wrap.
Repeat with the remaining pieces of dough.
6. Once 8 doughnuts have been formed, transfer them to the AirFryer
Basket and put into the oven in Rack Position 2. Set to AirFry at
350°F for 5 minutes. AirFry until doughnuts just get a bit of color at
the edges. Repeat with remaining doughnuts.
7. While doughnuts are AirFrying, melt additional butter in a small
saucepan set over low heat. Put cinnamon sugar in a shallow bowl.
Reserve.
8. Remove doughnuts from oven and immediately brush with butter on
all sides and then gently toss in cinnamon sugar. Serve immediately.
Nutritional information per doughnut:
Calories 66 (43% from fat) • carb. 8g • pro. 1g • fat 3g • sat. fat 2g • chol. 20mg
sod. 25mg • calc. 7mg • fiber 0g
Cherry-Ginger Scones
Scones call for a gentle hand, so be sure not to over-mix – the dough
will come together in its true form as you shape them.
Makes 8 scones
2 ½ cups unbleached, all-purpose flour
¼ cup granulated sugar
2 teaspoons baking powder
¼ teaspoon kosher salt
2 tablespoons finely chopped crystallized ginger
6 tablespoons unsalted butter, cold and cubed
2
/
3
cup buttermilk
1 large egg, lightly beaten
1 cup dried cherries
1 egg white, beaten, for brushing on glaze
1. Line the Baking Pan with parchment paper; reserve.
2. Put the flour, sugar, baking powder, salt and ginger into the work
bowl of a Cuisinart
®
Food Processor fitted with the chopping blade.
Process to combine, about 10 seconds. Add the butter and pulse
until the mixture resembles coarse crumbs.
3. In a liquid measuring cup, combine the buttermilk and egg. Add half
of the liquid mixture to the work bowl and pulse twice to mix. Add
remaining liquid and pulse again until just combined.
4. Remove the dough and place onto a clean counter/large cutting
board. Add the cherries and fold into dough until evenly combined.
5. Form the dough into a 10-inch-long cylinder. Using a sharp knife, cut
into 8 equal pieces and transfer to the prepared pan. Brush each
scone with the egg white.

31
6. Set to Convection Bake at 350°F for 30 minutes. After 5 minutes,
place the pan with the scones into the oven in Rack Position 1.
Bake until golden brown, about 20 to 25 minutes.
Nutritional information per scone:
Calories 304 (27% from fat) • carb. 48g • pro. 5g • fat 9g • sat. fat 6g • chol. 47mg
sod. 224mg • calc. 58mg • fiber 2g
Chocolate Layer Cake with Salted
Caramel Frosting
Chocolate, caramel and salt are an unstoppable combination. If looking
to save time, you can purchase caramel sauce to mix into the frosting.
Makes 1 cake, 12 servings
Chocolate Cake:
1 cup unbleached, all-purpose flour
1
/
3
cup cocoa powder, sifted
1 teaspoon espresso powder
½ teaspoon baking soda
¼ teaspoon baking powder
¼ teaspoon kosher salt
8 tablespoons (1 stick) unsalted butter, cubed and
room temperature
½ cup granulated sugar
¼ cup packed light brown sugar
1 large egg
1 large egg yolk
1 teaspoon pure vanilla extract
½ cup buttermilk
Frosting:
16 tablespoons (2 sticks) plus 2 tablespoons unsalted butter,
cubed and room temperature, divided
1½ cups confectioners’ sugar, sifted
¼ teaspoon kosher salt
½ teaspoon pure vanilla extract
4 tablespoons heavy cream, divided
¼ cup granulated sugar
Water
Flaked sea salt, for sprinkling (optional)
1. Prepare the cake: Fit the oven with the rack in Position 1. Coat a
9-inch round cake pan with softened butter or nonstick cooking
spray; reserve.
2. Put the flour, cocoa powder, espresso powder, baking soda, baking
powder and salt into a large mixing bowl. Whisk to combine; reserve.
3. Put butter and sugars into a large mixing bowl. Using a hand or
stand mixer, mix the butter and sugars together until light and
creamy. On a low speed, slowly add the egg, yolk and vanilla extract.
Scrape down as necessary.
4. Add
1
/
3
of the dry ingredients and, while mixing on low, add ½ of the
buttermilk. While still mixing on low, gradually add an additional
1
/
3
of
the dry ingredients and then the rest of the buttermilk. Finish with the
remaining dry ingredients and gently mix until combined.
5. Transfer the batter to the prepared cake pan.
6. Set to Bake at 350°F for about 20 minutes. After 5 minutes, transfer
the cake to the preheated oven. Bake until cake springs back to the
touch, about 15 minutes. Remove from oven and allow to fully cool.
Once room temperature, transfer to a refrigerator to chill.
7. Prepare the frosting: Using a hand or stand mixer, mix 2 sticks of the
butter, confectioners’ sugar and salt until light and creamy. Add the
vanilla extract and 2 tablespoons of the cream and continue to mix
until fluffy. Reserve.
8. Put the granulated sugar with enough water to just cover (should
resemble wet sand) in a heavy-bottomed medium saucepan. Set over
medium heat and allow to cook until sugar is the color of light maple
syrup. As soon as the sugar achieves that color, remove from heat

32
and very carefully whisk in the remaining 2 tablespoons of butter and
cream. Cool to room temperature.
9. Once cool, mix 3 tablespoons of the caramel sauce into the frosting;
reserve the remaining tablespoon for finishing the cake.
10. Once the cake is sufficiently cooled, remove from the refrigerator
and halve to make two even layers. Put one onto a cake stand or
plate and top with half of the frosting. Place the second layer on
top and finish with the remainder of the frosting. Decorate as desired
and drizzle with the reserved caramel sauce and a pinch of flaked
sea salt, if desired.
Nutritional information per serving:
Calories 399 (41% from fat) • carb. 41g • pro. 3g • fat 25g • sat. fat 15g • chol. 98mg
sod. 175mg • calc. 18mg • fiber 1g
Crunchy Granola
Granola is an easy and healthy alternative to packaged cereals.
Accompany this fragrant granola with a scoop of your favorite yogurt
or fruit.
Makes about 4 cups
1½ cups rolled oats (not quick cooking)
¾ cup raw nuts (pecans or pistachios work very well)
½ cup unsweetened coconut, shredded or flaked
¼ cup hulled sunflower seeds
¼ cup hulled pumpkin seeds (pepitas)
¼ cup coconut oil, melted
¼ cup pure maple syrup
½ teaspoon kosher salt
¼ teaspoon ground cinnamon
Pinch ground nutmeg
½ cup dried fruit (chopped if larger than berry-sized)
1. Line the Baking Pan with aluminum foil or parchment paper; reserve.
2. In a large mixing bowl, combine all ingredients except for the dried
fruit. Spread evenly on the prepared Baking Pan. Transfer the pan
with the granola to the oven in Rack Position 2. Set to Bake at
300°F for 20 minutes. Cook until nicely toasted, stirring halfway
through.
3. When the granola is ready, remove from oven, add the dried fruit and
stir to combine.
4. Cool completely on Baking Pan. Transfer to an airtight container to
store for up to 3 weeks.
Nutritional information per serving (½ cup):
Calories 290 (54% from fat) • carb. 29g • pro. 6g • fat 18g • sat. fat 5g • chol. 0mg
sod. 138mg • calc. 19mg • fiber 4g
“Fried” Apples
Crushed graham crackers provide a perfectly sweet crust for apple
slices. A healthy after-school snack for kids.
Makes 2 servings
½ apple, cored and sliced*
1 tablespoon unsalted butter, melted
1
/
3
cup graham cracker crumbs
1. Place the AirFryer Basket onto the Baking Pan; reserve.
2. Brush the apple slices with the butter, then coat with the graham
cracker crumbs.
3. Put the coated apples into the basket and put the assembled pan
into Rack Position 2.
4. Set to AirFry at 400°F for 10 minutes. Cook until apples are nicely
browned around the edges. Serve immediately.
* You can increase this recipe by using a whole apple and cooking in two
batches.

33
Nutritional information per serving:
Calories 126 (29% from fat) • carb. 22g • pro. 1g • fat 4g • sat. fat 2g • chol. 8mg
sod. 124mg • calc. 4mg • fiber 2g
Peanut Butter Swirl Brownies
Fudgy and rich, these brownies are just the thing when you need a
quick chocolate fix.
Makes 16 brownies
Nonstick cooking spray
1½ sticks (¾ cup) unsalted butter, cubed
4 ounces unsweetened chocolate, chopped
4 ounces bittersweet chocolate, chopped
2 tablespoons cocoa powder
2 teaspoons espresso powder
3 large eggs
1½ cups granulated sugar
2 teaspoons pure vanilla extract
½ cup unbleached, all-purpose flour
¾ teaspoon kosher salt
½ cup peanut butter
¼ cup confectioners’ sugar
2 tablespoons unsalted butter, melted and cooled
Pinch kosher salt
1. Fit the oven with the rack in Position 1. Lightly coat a 9-inch square
baking pan with nonstick cooking spray and line with parchment
paper. Reserve.
2 Put the butter and both chocolates into a heatproof bowl and place
over a pot of simmering water. Once the butter/chocolate mixture is
almost completely melted, stir in cocoa powder and espresso pow-
der. Set aside to cool to room temperature.
3. Using a hand mixer, beat the eggs to break them up, then gradually
add the sugar. Mix until light and thickened, about 1 to 2 minutes.
Add vanilla extract and beat until well combined.
4. Stir the flour and salt into the chocolate mixture until just incorporat-
ed. Fold the chocolate mixture into the egg mixture until the batter is
no longer streaky; reserve.
5. Prepare the peanut butter swirl by combining the peanut butter,
confectioners’ sugar and melted butter and stirring until combined.
6. Pour the batter into prepared pan. Dollop the peanut butter mixture
on top and, using a fork or knife, decoratively swirl into the batter.
7. Set to Bake at 350°F for 25 minutes. After 5 minutes, transfer the
pan to the preheated oven. Bake until edges are just dry, about 20
minutes. Cool completely and chill in the refrigerator overnight before
cutting and serving.
Nutritional information per brownie:
Calories 317 (57% from fat) • carb. 32g • pro. 5g • fat 21g • sat. fat 11g • chol. 61mg
sod. 107mg • calc. 17mg • fiber 2g

34
WARRANTY
LIMITED THREE-YEAR WARRANTY
(U.S. AND CANADA ONLY)
This warranty is available to consumers only. You are a consumer if you
own a Cuisinart
®
AirFryer Toaster Oven that was purchased at retail
for personal, family or household use. Except as otherwise required
under applicable law, this warranty is not available to retailers or other
commercial purchasers or owners. We warrant that your Cuisinart
®
AirFryer Toaster Oven will be free of defects in materials and workmanship
under normal home use for 3 years from the date of original purchase.
We recommend that you visit our website, www.cuisinart.com for a fast,
efcient way to complete your product registration. However, product
registration does not eliminate the need for the consumer to maintain the
original proof of purchase in order to obtain the warranty benets. In the
event that you do not have proof of purchase date, the purchase date for
purposes of this warranty will be the date of manufacture.
CALIFORNIA RESIDENTS ONLY
California law provides that for In-Warranty Service, California residents
have the option of returning a nonconforming product (A) to the store
where it was purchased or (B) to another retail store that sells Cuisinart
products of the same type. The retail store shall then, according to
its preference, either repair the product, refer the consumer to an
independent repair facility, replace the product, or refund the purchase
price less the amount directly attributable to the consumer’s prior usage of
the product. If neither of the above two options results in the appropriate
relief to the consumer, the consumer may then take the product to
an independent repair facility if service or repair can be economically
accomplished. Cuisinart and not the consumer will be responsible for
the reasonable cost of such service, repair, replacement, or refund of
nonconforming products under warranty. California residents may also,
according to their preference, return nonconforming products directly to
Cuisinart for repair or, if necessary, replacement by calling our Consumer
Service Center toll-free at 1-800-726-0190. Cuisinart will be responsible
for the cost of the repair, replacement, and shipping and handling of such
nonconforming products under warranty.
BEFORE RETURNING YOUR CUISINART PRODUCT
If your Cuisinart
®
AirFryer Toaster Oven should prove to be defective
within the warranty period, we will repair or, if we think necessary, replace
it. To obtain warranty service, please call our Consumer Service Center
toll-free at 1-800-726-0190 or write to: Cuisinart, 7475 North Glen Harbor
Blvd., Glendale, AZ 85307. To facilitate the speed and accuracy of your
return, enclose $10.00 for shipping and handling. (California residents
need only supply a proof of purchase and should call 1-800-726-0190
for shipping instructions.) Please be sure to include your return address,
phone number, description of the product’s defect, product serial number,
and any other information pertinent to the return. Please pay by check
or money order made payable to Cuisinart. NOTE: For added protection
and secure handling of any Cuisinart product that is being returned,
we recommend you use a traceable, insured delivery service. Cuisinart
cannot be held responsible for in-transit damage or for packages that are
not delivered to us. Lost and/or damaged products are not covered under
warranty.
Your Cuisinart
®
AirFryer Toaster Oven has been manufactured to
the strictest specications and has been designed for use only with
authorized accessories and replacement parts. This warranty expressly
excludes any defects or damages caused by accessories, replacement
parts or repair service other than those authorized by Cuisinart. This
warranty does not cover any damage caused by accident, misuse,
shipment or other than ordinary household use. This warranty excludes
all incidental or
consequential
damages. Some states do not allow the
exclusion or limitation of these damages, so these exclusions may not
apply to you. This warranty gives you specic legal rights, and you may
also have other rights, which vary from state to state.
Important: If the nonconforming product is to be serviced by someone
other than Cuisinart’s Authorized Service Center, please remind the
servicer to call our Consumer Service Center at 1-800-726-0190 to ensure
that the problem is properly diagnosed, the product is serviced with the
correct parts, and to ensure that the product is still under warranty.

35
NOTES:

36
©2019 Cuisinart
150 Milford Road
East Windsor, NJ 08520
Printed in China
19CE062758
IB-14326-ESP-B

MANUAL DE INSTRUCCIONES Y LIBRO DE RECETAS
Horno tostador/freidor Cuisinart
®
TOA-60

2
ÍNDICE
Medidas de seguridad importantes ................................2
Uso de extensiones ............................................3
Características . . . . . . . . . . . . . . . . . . . . . . . . . . . . . . . . . . . . . . . . . . . . . . . . 4
Antes del primer uso ...........................................5
Pautas generales ..............................................5
Posiciones de la bandeja/rejilla ................................... 6
Operación....................................................6
Limpieza y mantenimiento ....................................... 8
Recetas ....................................................10
Garantía ....................................................36
MEDIDAS DE SEGURIDAD
IMPORTANTES
Al usar aparatos eléctricos, especialmente en presencia de niños, siempre debe
tomar precauciones básicas de seguridad, incluso las siguientes:
1. Lea todas las instrucciones.
2. DESCONECTE EL APARATO CUANDO NO ESTÁ EN USO Y ANTES DE
LIMPIARLO. Permita que se enfríe antes de limpiarlo, manipularlo o
instalar/sacar piezas.
3. No toque las superficies calientes; utilice los mangos/asas y los botones/
perillas.
4. Para reducir el riesgo de descarga eléctrica, no sumerja ninguna parte
del aparato en agua ni en ningún otro líquido. Véase las instrucciones de
limpieza.
5. Este aparato no debe ser usado por o cerca de niños o personas con ciertas
discapacidades.
6. No utilice este aparato si el cable o el enchufe están dañados, después de
un mal funcionamiento, después de que se haya caído o si está dañado;
regréselo a un centro de servicio autorizado o al lugar donde lo compró para
su revisión, reparación o ajuste.
7. El uso de accesorios no recomendados por Cuisinart puede provocar heridas.
8. No lo utilice en exteriores.
9. No permita que el cable cuelgue del borde de la encimera o de la mesa,
donde niños o animales lo puedan jalar o tropezar, ni que tenga contacto con
superficies calientes.
10. No coloque el aparato sobre o cerca de un quemador a gas o de una hornilla
eléctrica caliente, ni en un horno caliente.
11. No utilice el aparato para ningún fin que no sea el indicado.
12. Tenga sumo cuidado al usar fuentes que no sean de metal o vidrio dentro del
horno.
13. Tenga sumo cuidado al sacar los accesorios del horno o tirar la grasa
caliente.
14 Siempre desenchufe el aparato cuando no lo está usando. Guarde
solamente los accesorios recomendados por el fabricante dentro del horno.
15. No ponga papel, cartón, plástico o materiales similares en el horno.
16. No cubra la bandeja recogemigas ni la rejilla del horno con papel de aluminio;
esto puede provocar un sobrecalentamiento.
17. No coloque alimentos muy grandes, envoltorios de aluminio o utensilios de
metal en el horno; esto puede provocar un incendio o una descarga eléctrica.
18. Puede ocurrir un incendio si el aparato está cubierto, toca, o se encuentra
cerca de materiales inflamables tales como cortinas, colgaduras o paredes.
No guarde ningún artículo sobre el aparato mientras está encendido o
caliente. No haga funcionar el aparato debajo de un armario/gabinete.
19. No use estropajos metálicos para limpiar el aparato; partículas de metal
podrían depositarse sobre sus componentes eléctricos, presentando un
riesgo de descarga eléctrica.
20. No intente desalojar alimentos atascados mientras el aparato está conectado.
21. Advertencia: para evitar los riesgos de incendio, NUNCA descuide/deje el
aparato sin vigilancia mientras está funcionando.
22. Siempre utilice las temperaturas recomendadas para cocinar/hornear, asar y
freír con aire.

3
23. No apoye utensilios de cocina o fuentes contra la puerta de vidrio.
24. Para apagar el aparato, ponga la perilla ON/OVEN TIMER y la perilla ON/
TOASTER TIMER en la posición “OFF”.
25. No haga funcionar el aparato debajo o dentro de un armario/gabinete.
Siempre desconecte el aparato antes de guardarlo en un armario/gabinete.
Dejar el aparato conectado presenta un riesgo de incendio, especialmente si
este toca las paredes o la puerta del armario/gabinete cuando cierra.
26. Tenga sumo cuidado al mover un aparato que contenga aceite u otro líquido
caliente.
27. Siempre apague el aparato, poniendo los controles en “OFF”, antes de
desenchufarlo.
GUARDE ESTAS INSTRUCCIONES
Por favor, lea y conserve estas instrucciones en un lugar seguro. Estas
instrucciones le ayudarán a sacar el máximo provecho de su horno tostador/
freidor Cuisinart
®
y siempre obtener resultados consistentes y profesionales.
USO DE EXTENSIONES
El cable provisto con este aparato es corto, para reducir el peligro de que alguien se
enganche o tropiece con un cable más largo.
Se podrá usar una extensión eléctrica, siempre que sea prudente.
La clasificación nominal de la extensión debe ser por lo menos igual a la del
aparato. El cable más largo o la extensión deben ser acomodados de tal manera
que no cuelguen de la encimera/mesa, donde pueden ser jalados por niños o
pueden causar tropiezos.
AVISO
El cable de este aparato está dotado de un enchufe polarizado (una pata es más
ancha que la otra). Como medida de seguridad, aquel enchufe se podrá enchufar de
una sola manera en las tomas de corriente polarizadas. Si el enchufe no entra en la
toma de corriente, inviértalo. Si aun así no entra completamente, comuníquese con
un electricista. No intente ir en contra de esta función de seguridad.
PARA USO DOMÉSTICO
SOLAMENTE
NO APROBADO PARA
USO COMERCIAL
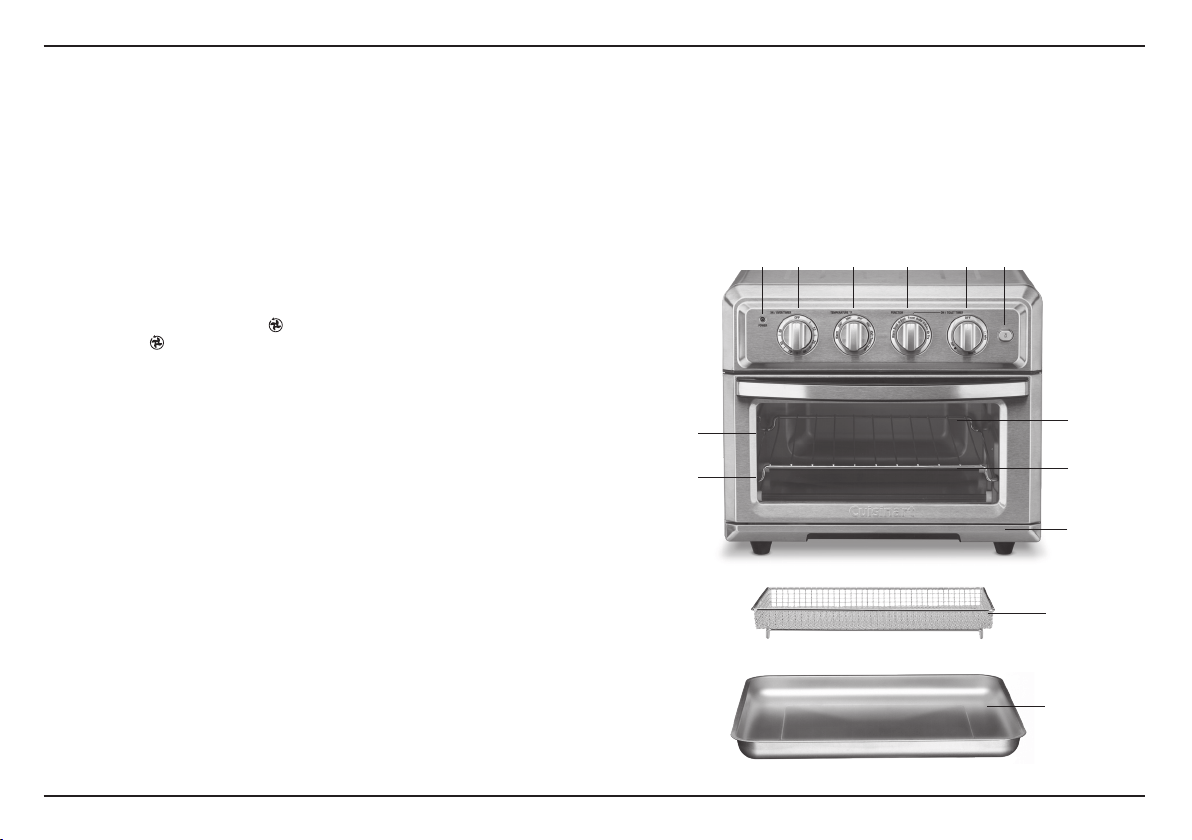
4
CARACTERÍSTICAS
1. Luz de encendido
La luz se enciende al encender el aparato y permanece encendida durante el
funcionamiento.
2. Perilla ON/OVEN TIMER (temporizador)
Permite fijar el tiempo de cocción deseado para todas las funciones excepto la función
de tostado. Fijar el tiempo de cocción enciende el horno y empieza el ciclo de cocción.
La unidad se apagará automáticamente al final del tiempo programado.
3. Perilla TEMPERATURE °F (control de temperatura)
Permite ajustar la temperatura al nivel deseado.
4. Perilla FUNCTION (selector de función)
Permite elegir la función deseada: mantener caliente (WARM), asado/gratinado (BROIL),
asado/gratinado por convección ( ), tostado (TOAST), horneado (BAKE), horneado por
convección ( ) o freír con aire (AIR FRY).
5. Perilla ON/TOAST TIMER (control de tostado)
Permite elegir entre varios niveles de tostado, desde ligeramente tostado hasta muy
tostado. Fijar el tiempo de tostado enciende el horno y empieza el ciclo de tostado. La
unidad se apagará automáticamente al final del ciclo.
6. Botón de luz
Presiónelo para encender la luz interior. Nota: la luz solamente se encenderá si el horno
está encendido y la puerta cerrada. Si abre la puerta mientras la luz está encendida,
la función de ahorro de energía la apagará. La luz se encenderá de nuevo al cerrar la
puerta.
7. Interior fácil de limpiar
Los paneles laterales del horno tienen un revestimiento especial que facilita la limpieza.
8. Apagado automático de seguridad en la puerta (no ilustrado)
Para su seguridad, el horno se apaga automáticamente al abrir la puerta. Cerciórese de
mantener la puerta cerrada durante la cocción.
9. Bandeja recogemigas
La bandeja recogemigas está integrada al horno. Se desliza hacia fuera, desde el frente
del horno, para una fácil limpieza.
10. Cesta para freír con aire
Utilice la cesta con la función AIR FRY (freír con aire) para conseguir resultados óptimos.
Se aconseja colocar la cesta para freír con aire adentro de la bandeja para freír.
11. Rejilla del horno
Puede usarse en dos posiciones: posición 1 (inferior, ilustrada) y posición 2 (superior). En
la posición 2, la rejilla se detendrá a la mitad al jalarse. Para deslizarla fuera del horno,
deberá alzar la parte delantera de la rejilla. (véase la página 5 para más detalles).
12. Bandeja/Bandeja de goteo
Para su comodidad, una bandeja/bandeja de goteo está incluida. Úsela por sí sola para
hornear o asar. Úsela con la cesta para freír con aire.
13. Espacio para guardar el cable (en la parte trasera, no ilustrado)
Mantiene la encimera ordenada.
1 2 3 4 5 6
7
11
Posición 2
Posición 1
9
12
10

5
ANTES DEL PRIMER USO
Coloque el horno sobre una superficie plana.
Deje un espacio libre de 2 a 4 pulgadas (5 cm a 10 cm) alrededor del aparato para
permitir que el aire circule libremente alrededor de este. No lo coloque sobre una
superficie sensible al calor.
NO GUARDE NINGÚN OBJETO ENCIMA DEL HORNO. SI LO HACE,
QUÍTELOS ANTES DE ENCENDER EL HORNO. EL EXTERIOR DEL APARATO
SE PONE MUY CALIENTE DURANTE EL USO. MANTÉNGALO FUERA DEL
ALCANCE DE LOS NIÑOS.
PAUTAS GENERALES
Función AIR FRY (freír con aire): Freír con aire proporciona una alternativa
saludable a freír con aceite. La función AIR FRY usa aire caliente, un ventilador
de alta velocidad y cuatro resistencias para cocinar una variedad de alimentos,
siempre consiguiendo resultados deliciosos y más saludables que con métodos
tradicionales.
Siempre utilice la cesta y la bandeja provistas para freír con aire
Coloque la cesta en la bandeja. Siempre coloque la bandeja en el horno en la
posición 2.
Función BAKE (horneado): La función de horneado es perfecta para cualquier
artículo que prepararía normalmente en su horno convencional. La función BAKE
es perfecta para los artículos tales como las pasteles y tortas, los “muffins” y los
artículos de panadería que requieran un método de cocción más suave. La función
de horneado por convección usa un ventilador para hacer circular el aire alrededor
de los alimentos, para una cocción rápida y un dorado uniforme. Es ideal para los
productos de panadería más sustanciosos tales como los bollos ingleses (“scones”)
y los panes, así como para la carne, el pollo, la pizza y los vegetales.
Para hacer pizza, utilice la bandeja y coloque la rejilla en la posición 1 si la pizza
está fresca o en la posición 2 si la pizza está congelada. Nota: también puede
hornear la pizza en la piedra de hornear disponible en www.cuisinart.com.
Función BROIL (asado/gratinado): La función de asado/gratinado puede usarse
para asar carne de res, pollo, cerdo, pescado y mucho más. También es perfecta
para dorar/gratinar cazuelas y platos gratinados. Utilice preferiblemente la función
de asado/gratinado por convección (CONV BROIL) para asar carne y pescado, y la
función de asado/gratinado convencional (BROIL) para dorar/gratinar.
Función TOAST (tostado) Para conseguir resultados uniformes, siempre ponga la
rejilla en la posición 2 para tostar (véase las posiciones de la rejilla a la derecha).
Siempre coloque los alimentos en el centro de la rejilla.
Precaución: no se aconseja cubrir ningún de los accesorios del horno con papel
de aluminio; esto impide que la grasa caiga en la bandeja de goteo, lo que puede
causar un incendio. Si desea cubrir la bandeja/bandeja de goteo con papel
de aluminio, asegúrese de que el papel no toque las paredes del horno, ni las
resistencias.
ADVERTENCIA: colocar la rejilla al revés, ya sea en la posición 1 o 2, puede
causar un incendio. Consulte el diagrama para colocar la rejilla debidamente.
Para apagar el horno: para apagar el aparato, ponga la perilla ON/OVEN TIMER
y la perilla ON/TOASTER TIMER en la posición “OFF”; la luz de encendido se
apagará.
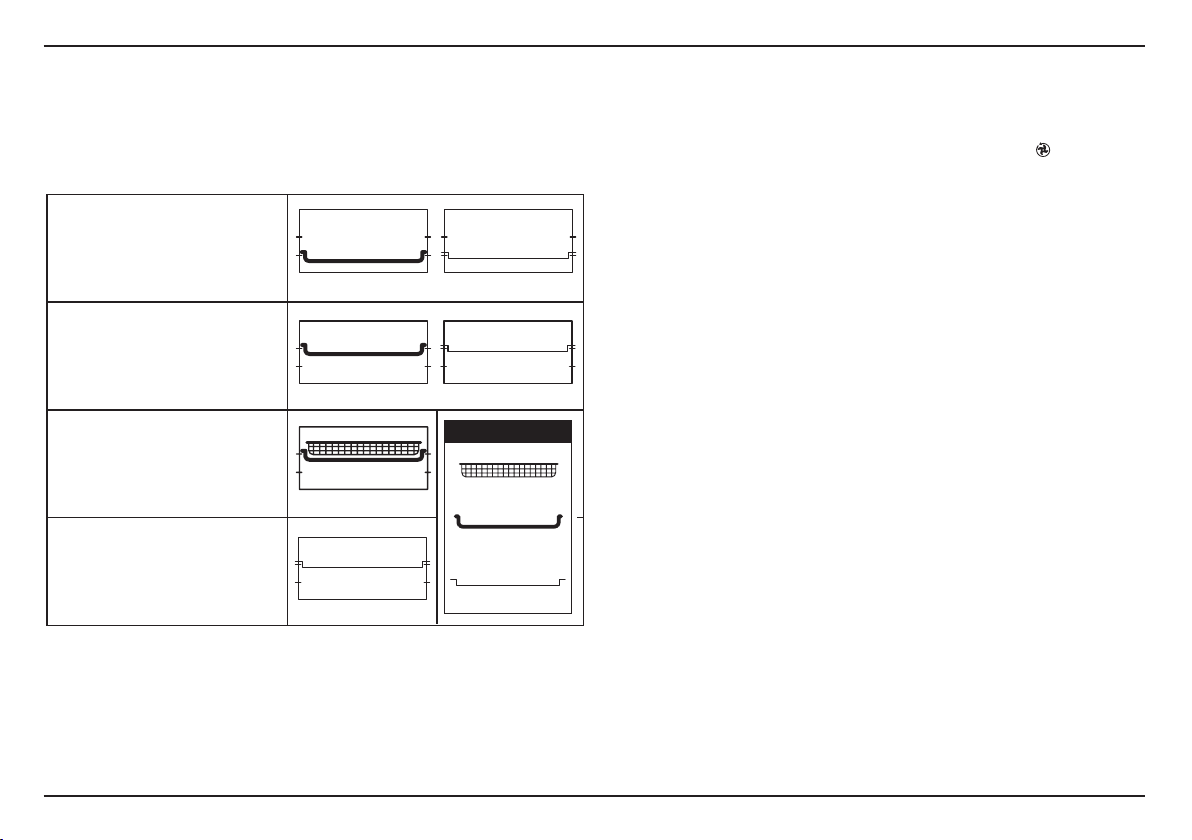
6
POSICIONES DE LA REJILLA Y DE LA BANDEJA
Cada receta provee instrucciones de preparación paso a paso e indica en qué
posición colocar la rejilla del horno o la bandeja para obtener resultados
óptimos. Los diagramas a continuación muestran las posiciones en que se
pueden colocar la rejilla y la bandeja.
POSICIÓN 1 PARA HORNEAR
POSICIÓN 2 PARA HORNEAR
NOTA: para hornear pollo o
artículos grandes, la bandeja puede
colocarse en la posición 1.
POSICIÓN 2 PARA ASAR/
GRATINAR Y FREÍR CON AIRE
POSICIÓN 2 PARA TOSTAR
OPERACIÓN
Desenrolle y enderece el cable. Asegúrese de que la bandeja recogemigas está
puesta y de que el horno está vacío. Conecte el cable a una toma de corriente.
Función BROIL (asado/gratinado) o CONV BROIL (asado/
gratinado por convección)
Coloque la cesta en la bandeja y coloque la bandeja en la posición 2.
Ponga el selector de función en “BROIL” (asado/gratinado) o “CONV BROIL” (asado/
gratinado por convección). Ajuste la temperatura a “TOAST/BROIL”. Fije el tiempo
de cocción deseado, usando la perilla ON/OVEN TIMER. La luz de encendido se
encenderá. Al final del tiempo, el horno sonará y se apagará automáticamente. Para
apagar el horno antes del fin del tiempo, ponga la perilla ON/OVEN TIMER en “OFF”.
Consejos para asar/gratinar:
para conseguir resultados óptimos, coloque la cesta en la bandeja.
Nunca utilice fuentes de cristal para asar/gratinar.
Vigile la cocción para asegurarse de que los alimentos no se quemen.
Función BAKE/CONV BAKE (horneado/horneado por
convección)
Ponga la rejilla del horno o la bandeja en la posición deseada (véase la sección
“Posiciones de la rejilla” a la izquierda).
Ponga el selector de función en “BAKE” o “CONV BAKE”. Elija la temperatura,
girando la perilla TEMPERATURE °F a la posición deseada. Fije el tiempo de
cocción deseado, usando la perilla ON/OVEN TIMER. Se aconseja precalentar el
horno por 5 minutos antes de hornear artículos delicados tales como pasteles/
tortas y “muffins”. Nota: incorpore el tiempo de precalentamiento en el tiempo de
cocción total.
La luz de encendido se encenderá. Al final del tiempo, el horno emitirá un pitido y
se apagará automáticamente.
Para apagar el horno antes del fin del tiempo, ponga la perilla ON/OVEN TIMER en
“OFF”.
Rejilla del horno
Bandeja/Bandeja de goteo
Cesta para freír
con aire
PIEZAS

7
Consejos para hornear:
Utilice la función “BAKE” para hornear artículos delicados tales como natillas,
pasteles/tortas y huevos.
Ponga la rejilla o la bandeja en la posición 1 para hornear la mayoría de los
artículos grandes.
Para hornear pizza fresca, coloque esta en la bandeja y coloque la rejilla en la
posición 1. Para hornear pizza congelada, coloque esta directamente en la rejilla y
coloque la rejilla en la posición 2.
Consejos para hornear por convección:
Utilice la función “CONV BAKE” para hornear alimentos que necesitan dorarse
uniformemente tales como “muffins”, bollos ingleses (“scones”), galletas, hojaldres
y panes, así como carne asada y pollo. La función “CONV BAKE” también es
perfecta para hornear pizzas caseras y siempre obtener resultados uniformemente
dorados y crujientes.
Por lo general, se debe reducir la temperatura en 25°F/15°C (en comparación
con la temperatura aconsejada para el horneado tradicional) con la función “CONV
BAKE”.
Siempre averigüe si los alimentos están listos unos 10 minutos antes del final
del tiempo de cocción sugerido.
IMPORTANTE
Todas nuestras recetas han sido probadas en nuestra cocina y han sido
especialmente desarrolladas para cocinarse en el horno tostador/freidor Cuisinart
®
.
Función WARM (mantener caliente)
Ponga la rejilla del horno o la bandeja en la posición 2.
Ponga el control de temperatura en “WARM”. Ponga el selector de función en
“WARM”. Ponga la perilla ON/OVEN TIMER sobre el tiempo deseado;
la luz de encendido se encenderá. Al final del tiempo, el horno sonará y se apagará
automáticamente.
Para apagar el horno antes del fin del tiempo, ponga la perilla ON/OVEN TIMER en
“OFF”.
Función TOAST (tostado)
Coloque la rejilla del horno en la posición 2. Ponga los alimentos en el centro de la
rejilla. Si tuesta más de dos artículos a la vez, espacie estos uniformemente sobre la
rejilla, por ejemplo dos en frente y dos atrás cuando tuesta cuatro artículos, o tres
en frente y tres atrás cuando tuesta seis.
Ponga el selector de función en “TOAST”. Ponga el control de temperatura sobre
“TOAST/BROIL”. Ponga el control de tostado (la perilla ON/OVEN TIMER) en
la posición deseada: LIGHT (ligeramente tostado), MED (tostado) o DARK (muy
tostado).
La luz de encendido se encenderá. Al final del ciclo, el horno emitirá un pitido y se
apagará.
Para apagar el horno antes del fin del tiempo, ponga la perilla ON/OVEN TIMER en
“OFF”.
IMPORTANTE
Antes de tostar, asegúrese de que la rejilla del horno está en la posición 2 (véase el
diagrama en la página 5).
Función AIR FRY (freir con aire)
(véase la tabla en la página 9)
Colocar la cesta para freír con aire en la bandeja. Coloque la bandeja en la posición
2.
Ponga el selector de función en “AIR FRY”. Elija la temperatura, girando la perilla
TEMPERATURE °F a la posición deseada. Fije el tiempo de cocción deseado,
usando la perilla ON/OVEN TIMER.
La luz de encendido se encenderá. Al final del tiempo, el horno sonará y se apagará
automáticamente.
Para apagar el horno antes del fin del tiempo, ponga la perilla ON/OVEN TIMER en
“OFF”.
Consejos para freír con aire:
Freír los alimentos con aire es más saludable que freírlos con aceite. Muchos
alimentos pueden ser fritos de esta manera, usando muy poco aceite. Los alimentos
fritos con aire son más livianos y menos aceitosos que los alimentos fritos en aceite.

8
La mayoría de los aceites pueden usarse para freír con aire. Sin embargo, el
aceite de oliva da un sabor más rico a los alimentos. Para un sabor más suave,
recomendamos usar aceite vegetal, aceite de colza o aceite de semilla de uva.
Rocíe los alimentos uniformemente con aceite para conseguir resultados dorados y
crujientes. Nota: puede rociar o cepillar el aceite. Puede sustituir el aceite con spray
vegetal.
Una variedad de coberturas pueden ser usadas para empanar los alimentos antes
de freírlos con aire, p. ej., pan rallado, pan rallado sazonado, pan rallado japonés
“panko”, hojuelas de maíz, chips de papa picadas, galletas Graham molidas, quinua,
varias harinas, etc.
La mayoría de los alimentos no requieren ser volteados durante la cocción, pero
sí se recomienda dar la vuelta a los alimentos grandes tales como las chuletas de
pollo a la mitad de la cocción para que se cocinen y se doren de manera uniforme.
También se recomienda revolver los alimentos a la mitad del tiempo de cocción
cuando se cocinan muchos alimentos a la vez.
Use temperaturas más altas para los alimentos que suelen cocinarse más rápido,
tales como el tocino y los chips de vegetales; use temperaturas más bajas para los
alimentos que requieren más tiempo tal como el pollo empanizado.
Los alimentos se cocinarán de manera más uniforme si son del mismo tamaño.
Para una fácil limpieza, forre la bandeja con papel de aluminio.
Nota: la mayoría de los alimentos pierden agua al cocinarse. Cuando cocina altas
cantidades de alimentos por un tiempo prolongado, puede que aquella agua
produzca condensación, la cual puede dejar la encimera húmeda.
LIMPIEZA Y MANTENIMIENTO
Permita que el aparato se enfríe completamente antes de limpiarlo.
Siempre desconecte el cable de la toma de corriente.
No utilice limpiadores abrasivos; esto podría dañar el acabado. Simplemente limpie
el cuerpo del aparato con un paño ligeramente humedecido y séquelo bien. Si desea
usar un limpiador, aplique este directamente sobre el paño, no sobre el horno.
Para limpiar el interior del horno, utilice una esponja ligeramente humedecida con
agua jabonosa. Nunca utilice productos químicos fuertes o abrasivos; esto podría
dañar la superficie del horno. Nunca use estropajos metálicos (p. ej., lana de acero)
para limpiar el horno.
Lave la rejilla del horno, la bandeja, la cesta para freír con aire y la bandeja
recogemigas en agua jabonosa caliente, usando un estropajo o un cepillo de
nailon. Estos accesorios NO son aptos para lavavajillas.
Después de cocinar alimentos grasos, siempre limpie la parte superior del interior
del horno, permitiendo que el horno se enfríe primero. Si lo hace con regularidad,
su horno rendirá como si estuviera nuevo. Limpiar la grasa asegurará un tostado
consistente, ciclo tras ciclo.
Para eliminar las migajas, deslice la bandeja recogemigas hacia fuera. Limpie la(s)
bandeja(s) y regrésela(s) en su puesto. Para eliminar grasa quemada de la bandeja,
remoje esta en agua jabonosa caliente o use un limpiador no abrasivo. Nunca utilice
el aparato sin la bandeja recogemigas.
Nunca enrolle el cable alrededor del aparato; más bien, enróllelo atrás del mismo.
Cualquier otro servicio
debe ser realizado por un técnico autorizado.

9
Alimento Cantidad recomendada Temperatura Tiempo
Tocino 8 lonchas 400 °F 8 a 10 minutos
Alitas de pollo 3 libras (910 g), aproximadamente 20 alitas 400 °F 20 a 25 minutos
Aperitivos congelados (p. ej., palitos
de Mozzarella, camarones rebozados,
etc.)
1½ libras (680 g), aproximadamente 28 piezas 400 °F 5 a 7 minutos
“Nuggets” de pollo congelados 1 libra (455 g), aproximadamente 34 piezas 400 °F 10 minutos
Palitos de pescado congelados 12 onzas (340 g), aproximadamente 20 piezas 400 °F 8 minutos
Papas fritas congeladas 1 a 2 libras (455 g a 910 g) 450 °F 15 a 25 minutos
Papas fritas gruesas congeladas 1 a 2 libras (455 g a 910 g) 450 °F 15 a 25 minutos
Papas fritas frescas 2 libras (910 g); 3 papas medianas cortadas en palitos
de 4 x ¼ pulgadas (10cm x 0.5 cm)
400 °F 15 a 20 minutos
Papas fritas gruesas frescas 2 libras (910 g); 3 papas medianas-grandes cortadas
en ocho pedazos
400 °F 15 a 20 minutos
Camarones 1 libra (455 g), aproximadamente 16 camarones
extragrandes
375 °F 8 a 10 minutos
Chips/Totopos de maíz 6 tortillas de 5 pulgadas (12.5 cm), cortadas en cuartos 400 °F 5 a 6 minutos (revolver a la
mitad del tiempo)
GUÍA PARA FREÍR CON AIRE
La tabla a continuación indica el tiempo, la temperatura de cocción y las porciones recomendados para varios tipos de alimentos que pueden freírse con aire en el horno
tostador/freidor Cuisinart
®
.
Si desea freír con aire más alimentos que lo recomendado en la tabla, revuelva ocasionalmente los alimentos para conseguir resultados uniformes y crujientes.
Cantidades más pequeñas de alimentos requerirán menos tiempo. Use la luz del horno para averiguar los resultados regularmente, hasta conseguir los resultados
deseados.
Freír con aire no requiere aceite, pero rociar los alimentos con un poco de aceite ayuda a que sean más dorados y crujientes. Utilice un rociador para mantenerlo
extraligero, o vierta un poquito de aceite en un tazón, agregue los alimentos y revuelva.

10
RECETAS
Estas recetas, que le harán agua la boca, son solo unos ejemplos de lo que este
aparato puede hacer.
APERITIVOS Y BOCADITOS
Chips de remolacha con eneldo fresco............................11
Flor de cebolla frita ...........................................11
Alitas de pollo, de dos maneras .................................12
Salsa picante para alitas de pollo ................................12
Salsa de jengibre-sésamo para alitas de pollo ......................13
Croquetas de cangrejo.........................................13
Garbanzos crujientes ..........................................14
Pepinillos “fritos” .............................................14
Bolas de arroz italianas ........................................15
Chips de col rizada ...........................................15
Nachos con pollo desmenuzado y chips/totopos de maíz caseros ......16
Wantanes de cerdo con jengibre.................................16
Papas con tocino y queso azul ..................................17
Camarones a la diabla .........................................18
Crema para mojar de espinaca, Gruyère y alcachofa .................18
Rollitos de primavera con salsa para mojar de chile dulce.............19
Palitos de vegetales con salsa para mojar de yogur con hierbas........20
PLATOS PRINCIPALES
Pollo asado clásico ...........................................21
Tacos de pescado con salsa de durazno ..........................21
Sándwiches BLT con salsa de jarabe de arce-pacanas ...............22
Sándwiches de albóndigas .....................................23
Salmón asado con vegetales....................................23
Pizza con rúcula, jamón de Parama y mermelada de higo .............24
Pizza Margarita...............................................24
Muslos de pollo asados con páprika ahumada y lima ................25
Chuletas de cordero asadas con romero y ajo ......................25
Quiche de salchicha y col rizada .................................26
Hamburguesas asadas ........................................27
ACOMPAÑAMIENTOS
Coles de Bruselas con “pancetta”................................27
Papas “fritas” ................................................28
Calabaza de bellota asada......................................28
Hinojo, zanahorias y chirivía asados ..............................28
Batatas “fritas” con mayonesa de chipotle .........................29
POSTRES
Manzanas al horno............................................29
“Muffins” de arándanos azules ..................................30
Mini rosquillas/buñuelos con azúcar y canela.......................30
Bollos ingleses (“scones”) con cerezas y jengibre ...................31
Torta de capas de chocolate con cobertura de caramelo salado........32
Muesli/Granola crujiente .......................................33
Manzanas “fritas”.............................................34
“Brownies” de mantequilla de maní...............................34

11
APERITIVOS Y BOCADITOS
Convierta favoritos fritos en recetas más ligeras y saludables que
requieren solo un rocío de aceite gracias al horno tostador/freidor
Cuisinart
®
. ¡Y disfrútelos con cualquiera de las numerosas salsas para
mojar intercambiables que los acompañan!
Chips de remolacha con eneldo fresco
Cualquier tubérculo cortado en rodajas y frito con aire proporciona una
alternativa más saludable a los chips de papa tradicionales.
Rinde 1 a 2 porciones
1 remolacha mediana
Aceite de oliva para rociar
¼ cucharadita de sal kosher
1 cucharada de eneldo fresco, picado
½ cucharadita de vinagre de vino blanco
1. Colocar la cesta para freír con aire en la bandeja. Reservar.
2. Cortar la remolacha en rodajas delgadas de aproximadamente 1 mm
(puede usar el disco rebanador ajustable de su procesadora de
alimentos Cuisinart
®
, ajustado a 3 mm). Disponer en una capa en la
cesta. Rociar con aceite, sazonar con sal y revolver. Extender en una
capa.
3. Colocar la bandeja en el horno, en la posición 2. Elegir la función AIR
FRY y ajustar la temperatura a 400 °F; hornear por 5 minutos, o hasta
que las orillas estén doradas y crujientes.
4. Cuando los chips estén listos, colocarlos en un bol para servir. Salpicar
con eneldo picado y vinagre; revolver.
Información nutricional por porción (basada en 2 porciones):
Calorías 51 (41 % de grasa) • Carbohidratos 7 g • Proteínas 1 g • Grasa 2 g • Grasa
saturada 0 g • Colesterol 0 mg • Sodio 322 mg • Calcio 12 mg • Fibra 2g
Flor de cebolla frita
¿Quién hubiera pensado que este popular aperitivo de restaurante fuese
tan fácil de preparar?
Rinde 2 a 3 porciones (1 flor de cebolla)
½ taza (60 g) de harina común
2 huevos grandes, bien batidos
1 cucharada (15 g) de suero de leche (“buttermilk”)
½ taza (60 g) de pan rallado japonés “panko”
1½ cucharaditas de salsa para mariscos
1 cebolla dulce (p. ej., Vidalia) grande, pelada
Spray vegetal
Aceite de oliva para rociar
1. Colocar la harina en un tazón grande en que quepa la cebolla. Colocar los
huevos y el suero de leche en otro tazón, y el pan rallado y las especias en un
tercer tazón. Reservar.
2. Cortar la extremidad superior de la cebolla de tal manera que forme una
superficie plana. Dejar la raíz intacta. Voltear la cebolla para que la raíz apunte
hacia arriba.
3. Sin cortar la raíz, cortar la cebolla en cuatro, y luego cortar cada pedazo a la
mitad; repetir hasta conseguir pedazos de ¼ de pulgada (0.5 cm) de grueso.
4. Voltear cuidadosamente la cebolla, teniendo cuidado de no separar los
pedazos de la raíz, y abrir/separar las capas de cebolla para que se parezca a
una flor.
5. Rebozar la cebolla en la harina y sacudir el exceso. Luego, meterla en la
mezcla de huevo, y cubrirla con pan rallado.
6. Colocar la cesta para freír con aire en la bandeja. Engrasar la cesta con spray
vegetal. Colocar la cebolla en la cesta. Rociar con aceite. Elegir la función AIR
FRY
y ajustar la temperatura a 400 °F; hornear por 10 minutos, o hasta que
esté dorada y crujiente. Servir con mayonesa de chipotle (página 28) o salsa
para mojar de yogur con hierbas (página 20).

12
Información nutricional por porción (basada en 3 porciones):
Calorías 177 (24 % de grasa) • Carbohidratos 26 g • Proteínas 8 g • Grasa 5 g • Grasa
saturada 1 g • Colesterol 144 mg • Sodio 542 mg • Calcio 28 mg • Fibra 1 g
Alitas de pollo, de dos maneras
Freír las alitas de pollo con aire es más saludable que freírlas en aceite.
Aquí le proponemos dos versiones, una simple y otra (más crujiente) en
rebozado de cerveza. Ambas son sabrosas así o con su salsa favorita.
Rinde aproximadamente 20 alitas
Spray vegetal
Alitas de pollo en rebozado de cerveza:
2 libras (910 g) de alas de pollo, las extremidades cortadas y
cortadas en dos al nivel de la articulación
½ taza (60 g) de harina común
½ taza (120 ml) de cerveza “light”
¾ cucharadita de sal kosher
Alitas de pollo simples:
2 libras (910 g) de alas de pollo, las extremidades cortadas y
cortadas en dos al nivel de la articulación
¾ cucharadita de sal kosher
1. Colocar la cesta para freír con aire en la bandeja. Engrasar la cesta con
spray vegetal. Reservar.
2. Para la versión en rebozado de cerveza: mezclar la harina y la cerveza
en un tazón grande. Sazonar las alitas con sal y colocarlas en la
mezcla. Revolver para cubrir y colocar las alitas en la cesta.
3. Para la versión simple: colocar las alitas en la cesta. Sazonar con sal.
4. Colocar la bandeja en el horno, en la posición 2.
Elegir la función
AIR
FRY y ajustar la temperatura a 400 °F; hornear por 20 minutos, hasta
que estén doradas y crujientes.
5. Cuando las alitas estén cocidas, revolverlas inmediatamente en salsa y
agregar la cobertura de su elección, p. ej., mantequilla, ajo, hierbas
frescas o especias.
*También puede comprar alitas de pollo cortadas.
Información nutricional por alita (simple):
Calorías 94 (39 % de grasa) • Carbohidratos 0 g • Proteínas 14 g • Grasa 4 g • Grasa
saturada 1 g • Colesterol 39 mg • Sodio 127 mg • Calcio 7 mg • Fibra 0g
Información nutricional por alita (en rebozado de cerveza):
Calorías 106 (36 % de grasa) • Carbohidratos 1 g • Proteínas 14g • Grasa 4g • Grasa
saturada 1 g • Colesterol 39 mg • Sodio 127mg • Calcio 7mg • Fibra 0g
Salsa picante para alitas de pollo
Una salsa clásica para alitas de pollo, hecha con aceite de coco en vez de
mantequilla.
Rinde aproximadamente
1
/
3
de taza (80 ml) de salsa, suficiente como para
cubrir 20 alitas.
¼ taza (60 ml) de salsa picante
1 cucharada (15 ml) de aceite de coco
1. Poner la salsa picante y el aceite de coco en un tazón grande. Revolver
para mezclar.
2. Cuando las alitas estén listas, colocarlas en el tazón y revolver para
cubrir uniformemente. Servir inmediatamente.
Información nutricional por porción de salsa
(aproximadamente 1 cucharadita, suficiente como para cubrir 1 alita):
Calorías 6 (100 % de grasa) • Carbohidratos 0 g • Proteínas 0 g • Grasa 1 g • Grasa
saturada 1 g • Colesterol 0 mg • Sodio 28 mg • Calcio 0 mg • Fibra 0 g

13
Salsa de jengibre-sésamo
para alitas de pollo
Si le gusta la salsa picante, añada hojuelas de chile a esta sabrosa salsa.
Rinde aproximadamente
1
/
3
de taza (80 ml) de salsa, suficiente como para
cubrir 20 alitas.
¼ taza (60 ml) de aceite de ajonjolí/sésamo
2 cucharadas (30 ml) de salsa de soya
2 cucharadas (30 g) de miel
1 trozo de 2 pulgadas (5 cm) de jengibre fresco, pelado y rallado
2 dientes de ajo, rallados
¼ taza (30 g) de semillas de sésamo/ajonjolí tostadas
6 cebolletas (“green onions”), finamente rebanadas
1. Colocar el aceite de ajonjolí/sésamo, la salsa de soya, la miel, el
jengibre rallado y el ajo en un tazón grande. Batir para revolver.
Agregar las semillas de sésamo/ajonjolí.
2. Cuando las alitas estén listas, colocarlas en el tazón y revolver para
cubrir uniformemente. Salpicar con las cebolletas rebanadas. Servir
inmediatamente.
Información nutricional por porción de salsa
(aproximadamente 1 cucharadita, suficiente como para cubrir 1 alita):
Calorías 39 (78 % de grasa) • Carbohidratos 2 g • Proteínas 0 g • Grasa 3 g • Grasa
saturada 0 g • Colesterol 0 mg • Sodio 68 mg • Calcio 4 mg • Fibra 0 g
Croquetas de cangrejo
Estas croquetas de cangrejo con pedazos grandes impresionarán a todos
sus invitados.
Rinde aproximadamente 16 croquetas
16 onzas (455 g) de cangrejo
1 cucharadita de aceite de oliva virgen extra
1 pimiento dulce rojo mediano, finamente picado
1 jalapeño, sin semillas, finamente picado
3 cebolletas (“green onions”), rebanadas
1 diente de ajo, finamente picado
¼ cucharadita de sal kosher
2 huevos grandes, ligeramente batidos
1 taza (120 g) de pan rallado japonés “panko”, + ½ taza (60 g)
para rebozar
½ taza (120 ml) de mayonesa
1 cucharadita de salsa Worcestershire
1 cucharadita de mostaza de Dijon
1½ cucharaditas de salsa para mariscos
Salsa picante (opcional)
Aceite de oliva para rociar
Pedazos de limón para servir
1. Quitar los posibles cartílagos del cangrejo y refrigerar hasta el
momento de usar.
2. Poner el aceite de oliva a calentar a fuego medio, en un sartén grande.
Una vez caliente, agregar el pimiento, el jalapeño, las cebolletas y el
ajo. Rehogar durante por lo menos 15 minutos, hasta que los vegetales
empiecen a suavizarse; sazonar con sal y revolver.
3. Retirar del fuego y dejar enfriar por unos minutos. Una vez tibios,
agregar los vegetales al cangrejo. Agregar los huevos, el pan rallado, la
mayonesa, la salsa Worcestershire, la mostaza de Dijon, la salsa para
mariscos y una pizca o dos de salsa picante si desea.

14
4. Mezclar los ingredientes con cuidado, a mano (la mejor forma para
hacer esto), o usando una cuchara. Tener cuidado de no romper la
carne de cangrejo.
5. Formar croquetas de ¼ de taza (60 ml) y colocarlas sobre un plato
limpio, usando hojas de papel encerado para separarlas si es
necesario. Cubrir con papel film/plástico y refrigerar por 1 hora antes
de cocinar.
6. Rebozar las croquetas en el pan rallado restante. Colocar la cesta para
freír con aire en la bandeja. Disponer las croquetas en la cesta y rociar
con aceite de oliva.
7. Colocar la bandeja en el horno, en la posición 2.
Elegir la función
AIR
FRY y ajustar la temperatura a 400 °F; hornear por 10 minutos, hasta
que estén doradas uniformemente. Servir inmediatamente, con
pedazos de limón.
Información nutricional por croqueta:
Calorías 220 (41 % de grasa) • Carbohidratos 17 g • Proteínas 15 g • Grasa 10 g • Grasa
saturada 2 g • Colesterol 90 mg • Sodio 500 mg • Calcio 106 mg • Fibra 1 g
Garbanzos crujientes
¡Convierta una lata de garbanzos en un sabroso tentempié crujiente
en minutos! Gracias a la función AIR FRY de su horno tostador/freidor
Cuisinart
®
, nunca le harán faltas las ideas para ofrecer nuevos aperitivos a
sus invitados.
1 lata de 15.5 onzas (440 g) de garbanzos, escurridos y secados
Aceite de oliva para rociar
¼ cucharadita de sal kosher
¼ cucharadita de comino en polvo
1 pizca de pimienta negra recién molida
1. Colocar la cesta para freír con aire en la bandeja. Colocar los
garbanzos en la cesta y rociar con aceite. Sazonar con sal, pimienta y
comino.
2. Colocar la bandeja en el horno, en la posición 2.
Elegir la función
AIR
FRY y ajustar la temperatura a 350 °F; hornear por 15 minutos, o hasta
que los garbanzos estén fragantes y ligeramente dorados. Servir
inmediatamente.
Información nutricional por porción de ¼ de taza (60 ml):
Calorías 75 (13 % de grasa) • Carbohidratos 14 g • Proteínas 3 g • Grasa 1 g • Grasa
saturada 0 g • Colesterol 0 mg • Sodio 275 mg • Calcio 20 mg • Fibra 3 g
Pepinillos fritos
Sírvalos como aperitivo, con mayonesa de chipotle (página 28).
Rinde 5 a 6 porciones
½ taza (60 g) de harina común
2 huevos grandes, bien batidos
½ taza (80 g) de harina de maíz finamente molida
1 cucharadita de sal kosher
½ cucharadita de pimienta de Cayena
Spray vegetal
6 pepinillos, en rodajas de ¼ de pulgada (5 mm)
Aceite de oliva para rociar
1. Colocar la harina en una bolsa de plástico hermética grande. Colocar
los huevos batidos en un tazón grande. Colocar la harina de maíz, la
sal y la pimienta de Cayena en otra bolsa de plástico hermética
grande. Reservar.
2. Colocar la cesta para freír con aire en la bandeja. Engrasar la cesta con
spray vegetal. Reservar.
3. Secar los pepinillos con papel absorbente. Colocar los pepinillos en la
bolsa de harina. Cerrar la bolsa y agitar para cubrir las rodajas en
forma uniforme. Retirar los pepinillos de la bolsa, sacudiendo el exceso
de harina. Mojar cada rodaja en el huevo batido para cubrirla. Colocar
las rodajas en la bolsa de harina de maíz. Cerrar la bolsa y agitar para
cubrir las rodajas en forma uniforme. Retirar de la bolsa, sacudiendo en
exceso y disponerlas en una capa en la cesta. Rociar cada lado con
aceite.

15
4. Colocar la bandeja en el horno, en la posición 2.
Elegir la función
AIR
FRY y ajustar la temperatura a 400 °F; hornear por 8 minutos, hasta
que estén dorados y crujientes. Dejar enfriar ligeramente.
Información nutricional por porción (basada en 6 porciones):
Calorías 109 (22 % de grasa) • Carbohidratos 17 g • Proteínas 4 g • Grasa 3 g • Grasa
saturada 1 g • Colesterol 72 mg • Sodio 955 mg • Calcio 7 mg • Fibra 2 g
Bolas de arroz italianas
Para el aperitivo perfecto, sirva estas bolas de arroz con salsa marinara.
Rinde 8 bolas de arroz
1 taza (185 g) de arroz blanco de grano medio
2 tazas (475 ml) de agua
¼ cucharadita de sal kosher
1 huevo grande, bien batido
3 cucharadas de queso Pecorino Romano rallado
¼ taza (60 g) de queso ricota/requesón
¼ taza (15 g) de hojas de albahaca fresca, finamente rebanadas
¼ cucharadita de pimienta negra recién molida
1 onza (30 g) de Mozzarella, en tiras de 1 x ¼ de pulgada
(2.5 cm x 0.5 cm)
¼ taza (30 g) de pan rallado con hierbas italianas
Aceite de oliva para rociar
1 taza (235 ml) de salsa marinara* para mojar (opcional)
1. Colocar el arroz, el agua y la sal en una cacerola mediana. Calentar,
revolviendo de vez en cuando. Cuando el agua empiece a hervir, cubrir
y reducir el fuego para que siga hirviendo a fuego lento. Cocinar por
aproximadamente 10 minutos, hasta que toda el agua se haya
evaporado. Dejar enfriar por completo antes de pasar a la etapa
siguiente.
2. Colocar el huevo, el queso Pecorino, el queso ricota/requesón, la
albahaca y la pimienta en un tazón pequeño; revolver. Agregar la
mezcla al arroz enfriado. Esparcir el arroz en el fondo de una placa
para horno cubierta con papel sulfurizado. Refrigerar la mezcla por un
mínimo 30 minutos o más antes de usar.
3. Cuando el arroz esté frío, mojarse ligeramente las manos, agarrar 3
cucharadas de arroz y formar una bola. Repetir con el resto del arroz.
Meter un pedazo de Mozzarella en el centro de cada bola, volviendo a
formar la bola si es necesario.
4. Colocar la cesta para freír con aire en la bandeja. Colocar el pan
rallado en un tazón pequeño. Rebozar suavemente cada bola de arroz
en pan rallado y colocarlas en la cesta. Rociar por todos lados con
aceite.
5. Colocar la bandeja en el horno, en la posición 2.
Elegir la función
AIR
FRY y ajustar la temperatura a 350 °F; hornear por 20 minutos, hasta
que las bolas de arroz estén doradas por todos lados. Servir
inmediatamente, con salsa marinara* al lado si desea.
*Para preparar salsa marinara, utilice la receta de la salsa a la diabla
(página 16), reduciendo la cantidad de hojuelas de pimiento rojo a ¼
cucharadita.
Información nutricional por bola de arroz:
Calorías 149 (24 % de grasa) • Carbohidratos 22 g • Proteínas 5 g • Grasa 4 g • Grasa
saturada 2 g • Colesterol 35 mg • Sodio 195 mg • Calcio 45 mg • Fibra 0 g
Chips de col rizada
Utilice estos chips de col rizada como tentempié ligero o desmenúcelos
para cubrir ensaladas.
Rinde 4 porciones
4 hojas de col rizada, sin los tallos duros
Aceite de oliva para rociar
¼ cucharadita de sal kosher
1. Colocar la cesta para freír con aire en la bandeja. Disponer las hojas de
col en la cesta y rociar con aceite. Colocar la bandeja en el horno, en
la posición 2.

16
2.
Elegir la función
AIR FRY y ajustar la temperatura a 350°F; hornear por 5
minutos, hasta que la col adquiera un color vivo y esté crujiente. NOTA:
vigilar la cocción ya que la col rizada suele ponerse crujiente muy
rápido.
3. Cuando la col esté lista, retirarla del horno y rociar con sal. Servir
inmediatamente.
Información nutricional por porción:
Calorías 39 (27 % de grasa) • Carbohidratos 7 g • Proteínas 2 g • Grasa 1 g • Grasa
saturada 0g• Colesterol 0 mg • Sodio 171 mg • Calcio 58 mg • Fibra 1 g
Nachos con pollo desmenuzado y
chips/totopos de maíz caseros
Para ahorrar tiempo, puede usar chips de maíz comprados.
Rinde 6 a 8 porciones
8 tortillas de trigo integral, cortadas en cuartos
Aceite de oliva, para servir
½ cucharadita de sal kosher
1 libra (455 g) de pollo desmenuzado
(ver la receta en la página 23)
1 lata de 15.5 onzas (440 g) de frijoles negros, escurridos y
enjuagados
2 tomates italianos, picados
1 lata de 7.25 onzas (200 g) de aceitunas negras deshuesadas,
picadas
2 jalapeños, finamente rebanados
4 onzas (115 g) de queso Monterrey Jack, rallado
2 cebolletas (“green onions”), finamente rebanadas
Salsa mexicana para servir
1. Colocar la cesta para freír con aire en la bandeja. Colocar la mitad de
los pedazos de tortilla en la cesta. Rociar uniformemente con aceite.
Sazonar con ¼ de cucharadita de sal. Revolver.
2. Colocar la bandeja en el horno, en la posición 2.
Elegir la función
AIR
FRY y ajustar la temperatura a 400 °F; hornear por 4 a 5 minutos, o
hasta que las orillas estén doradas y las tortillas crujientes. Sacar del
horno y colocar en un bol o un plato para servir. Repetir con el resto de
las tortillas.
3. Cuando todas las tortillas estén “fritas”, retirar la cesta de la bandeja.
Cubrir la bandeja con papel de aluminio. Colocar la mitad de los chips/
totopos de maíz en la bandeja. Extender en una capa. Cubrir con la
mitad de los ingredientes restantes (excepto las cebolletas), en orden.
Cubrir con el resto de los chips/totopos de maíz, y luego con los
ingredientes restantes.
4. Colocar la bandeja en el horno, en la posición 2. Elegir la función
BROIL y gratinar por 5 minutos, hasta que el queso esté derretido.
5. Retirar del horno y decorar con las cebolletas rebanadas. Servir
inmediatamente, con salsa.
Información nutricional por porción (basada en 8 porciones):
Calorías 465 (49 % de grasa) • Carbohidratos 37 g • Proteínas 26 g • Grasa 26 g • Grasa
saturada 7 g • Colesterol 65 mg • Sodio 1283 mg • Calcio 150 mg • Fibra 8 g
Wantanes de cerdo con jengibre
El jengibre es la estrella de estos ravioles chinos – un tentempié divertido
servido con salsa de soya.
Rinde 48 ravioles
¾ libra (340 g) de carne de cerdo molida
1 trozo de 3 pulgadas (7.5 cm) de jengibre fresco, pelado y
picado
1 cebolleta (“green onion”) grande, picada
1 cucharada de albahaca fresca picada
1 cucharada de salsa de soya baja en sodio
2 cucharaditas de aceite de sésamo/ajonjolí
½ taza (120 ml) de vinagre de arroz
Agua (para sellar los ravioles) y maicena

17
48 hojas para hacer ravioles chinos (wantanes)
Aceite vegetal para rociar
1. Colocar el cerdo, el jengibre, la cebolleta, el cilantro, la salsa de soya,
el aceite de sésamo/ajonjolí y el vinagre en un tazón mediano; revolver
con las manos o con una cuchara.
2. Preparar una superficie de trabajo amplia, plana y limpia, dos
pequeños boles (uno con agua y otro con maicena) y una brocha.
Enharinar la superficie de trabajo con maicena y disponer las hojas
para hacer ravioles chinos sobre ella, empezando con dos líneas de
tres hojas.
3. Colocar una cucharadita del relleno en centro de cada hoja. Cepillar las
orillas con agua y doblar la hoja a la mitad para formar un triángulo,
sellando el relleno y las orillas.
4. Juntar los lados largos del triángulo y presionar para sellar. Rellenar el
resto de las hojas de la misma manera. Cubrir levemente los ravioles
con maicena, revolviendo muy suavemente.
5. Colocar la cesta en la bandeja y rociar levemente con aceite. Disponer
la mitad de los wantanes en la cesta y rociar con aceite. Colocar la
bandeja en el horno, en la posición 2.
Elegir la función
AIR FRY y ajustar
la temperatura a 375 °F; hornear por 10 minutos, hasta que los
wantanes estén dorados por todos lados. Retirar del horno y repetir
con el resto de los wantanes.
6. Servir con salsa de soya.
Información nutricional por porción (3 wantanes):
Calorías 141 (35 % de grasa) • Carbohidratos 14 g • Proteínas 8 g • Grasa 6 g • Grasa
saturada 2 g • Colesterol 33 mg • Sodio 189 mg • Calcio 17 mg • Fibra 0 g
Papas con tocino y queso azul
Cubra estas papas con un huevo frito para el mejor desayuno.
Rinde 3 a 4 porciones
5 lonchas de tocino
1 libra (455 g) papas Russet, restregadas
Aceite de oliva para rociar
½ cucharadita de sal kosher
3 cucharadas de queso azul desmenuzado
1. Colocar la cesta para freír con aire en la bandeja. Disponer las lonchas
de tocino en la cesta. Colocar la bandeja en el horno, en la posición 2.
Elegir la función
AIR FRY y ajustar la temperatura a 400 °F; hornear por
10 minutos, hasta que el tocino esté dorado y crujiente. Reservar.
2. Mientras el tocino se está horneando, cortar cada papa en ocho
pedazos largos. Cuando el tocino esté listo, colocarlo sobre un plato
para servir.
3. Colocar las papas en la cesta. Rociar uniformemente con aceite.
Sazonar con sal y revolver. Extender en una capa.
4. Colocar la bandeja en el horno, en la posición 2.
Elegir la función
AIR
FRY y ajustar la temperatura a 400 °F; hornear por 15 minutos, hasta
que las papas estén doradas y crujientes. Mientras las papas se están
horneando, desmenuzar el tocino.
5. Cuando las papas estén listas, esparcir el tocino y el queso azul
desmenuzados encima. Hornear (usando la función BAKE) en 400°F
por 2 minutos, hasta que el queso esté ligeramente derretido. Servir
inmediatamente.
Información nutricional por porción (basada en 4 porciones):
Calorías 208 (45 % de grasa) • Carbohidratos 20 g • Proteínas 9 g • Grasa 1 g • Grasa
saturada 4 g • Colesterol 23 mg • Sodio 764 mg • Calcio 42 mg • Fibra 1 g

18
Camarones a la diabla
Ajuste la cantidad de hojuelas de pimiento rojo a su gusto. Recuerde
empezar con menos de lo que piensa. ¡Siempre puede añadir más!
Rinde 4 a 5 porciones como primer plato
¼ taza (60 ml) de aceite de oliva virgen extra
2 dientes de ajo, machacados
1½–2 cucharaditas de hojuelas de pimiento rojo
1 latas de 28 onzas (795 g) de tomates enteros, picados grueso
2¼ cucharaditas de sal kosher
1 libra (455g) de camarones grandes, limpios, pelados y
enjuagados
¼ taza (30 g) de harina de arroz
Aceite de oliva para rociar
Pan crujiente para mojar
1. Poner a calentar a fuego medio-lento el aceite de oliva, el ajo y las
hojuelas de pimiento rojo, en un sartén mediano. Cocinar suavemente
por 5 a 10 minutos, hasta que estén fragantes. Tener cuidado de no
dejar quemar el ajo.
2. Agregar los tomates y subir el fuego hasta que la mezcla hierva a fuego
lento. Cocinar a fuego lento por aproximadamente 30 minutos, hasta
reducir la salsa a la mitad. Una vez reducida, agregar ¾ de cucharadita
de la sal. Obtendrá aproximadamente 2½ tazas (590 ml) de salsa.
3. Cuando la salsa esté lista, secar los camarones con papel absorbente.
Sazonar por todos lados con la sal restante. Cubrir levemente con
harina de arroz.
4. Colocar la cesta para freír con aire en la bandeja. Disponer los
camarones rebozados en la cesta y rociar con aceite. Colocar la
bandeja en el horno, en la posición 2.
Elegir la función
AIR FRY, ajustar
la temperatura a 375 °F y hornear por 10 minutos, hasta que los
camarones estén dorados y crujientes.
5. Servir con pan crujiente y salsa tibia para mojar.
Información nutricional por porción (basada en 5 porciones):
Calorías 283 (57 % de grasa) • Carbohidratos 14 g • Proteínas 14 g • Grasa 20 g • Grasa
saturada 3 g • Colesterol 114 mg • Sodio 897 mg • Calcio 100 mg • Fibra 2 g
Crema para mojar de espinaca, Gruyère
y alcachofa
Crema para mojar tradicional, con un giro especial para el paladar de los
adultos. La combinación de Gruyère y Parmesano le da un agradable
sabor a nuez. No requiere ningún tipo de fuente especial; un molde de
tarta es el método más rápido para calentar este plato.
Rinde aproximadamente 2 tazas (475 ml)
Aceite de oliva o spray vegetal
12 onzas (340 g) de queso crema regular o bajo en grasa, a
temperatura ambiente, en pedazos
2 onzas (55 g) de Gruyère, finamente rallado
1 onza (30 g) de Gruyère, finamente rallado
1 diente de ajo, finamente picado
½ chalote grande pequeño, finamente picado
8 onzas (225 g) de espinaca congelada, descongelada, escurrida
y exprimida
1 lata de 15 onzas (425 g) de corazones de alcachofa,
escurridos
2 cucharadas de crema líquida para batir (“heavy cream”)
½ cucharadita de hojuelas de pimiento rojo
1. Colocar la rejilla del horno en la posición 1. Engrasar ligeramente un
molde redondo de 9 pulgadas (22 cm) con aceite de oliva o spray
vegetal; reservar.
2. Poner el queso crema en un tazón. Batir, usando una batidora de
mano, hasta que esté suave. Agregar el resto de los ingredientes;
seguir batiendo a velocidad baja para incorporar.
3. Colocar la mezcla en el molde preparado y colocar este en el horno.
Elegir la función BAKE, ajustar la temperatura a 350 °F y hornear por

19
20 minutos. Después de este tiempo, elegir la función BROIL y gratinar
por 5 minutos adicionales, hasta que esté bien dorado.
4. Servir inmediatamente con chips de pan pita, pan crujiente y vegetales
crudos.
Información nutricional por porción (2 cucharadas):
Calorías 99 (61 % de grasa) • Carbohidratos 5 g • Azúcar 1g • Proteínas 5 g • Grasa 7 g
Grasa saturada 4 g • Colesterol 23 mg • Sodio 169 mg • Calcio 93 mg • Fibra 3 g
Rollitos de primavera con salsa para
mojar de chile dulce
Puede preparar estos deliciosos aperitivos repletos de ingredientes
frescos y sabor en casa, sin tener que freírlos en aceite.
Rinde 28 rollitos de primavera y 1¼ tazas (295 ml) de salsa
Salsa de chile dulce para mojar:
1–1½ chiles rojos (p. ej., Fresno), en rodajas gruesas
1 diente de ajo, machacado
1 cucharada de vinagre de vino de arroz sin azúcar
1 taza (235 ml) de agua
1
/
3
taza (65 g) de azúcar granulada
1 cucharada + 1 cucharadita de maicena disuelta en
1 cucharada de agua
¼ cucharadita de sal kosher
Rollitos de primavera:
6 hojas de col verde, trituradas o finamente rebanadas
3 zanahorias medianas, en Juliana
1 trozo de 1 pulgada (2.5 cm) de jengibre fresco, pelado y
cortado en juliana
3 cebolletas (“green onions”), finamente rebanadas
½ chile verde pequeño, p. ej., jalapeño o serrano, finamente
picado
1
/
3
taza (20 g) de hojas de albahaca, finamente rebanadas
½ taza (30 g) de cilantro fresco, picado
2 cucharadas (60 ml) de aceite vegetal
1 cucharada de salsa de pescado
½ lima/limón verde
½ cucharadita de sal kosher
½ bloque de tofu extrafirme, cortado en 28 tiritas
28 hojas para rollitos de primavera
1. Preparar la salsa de chile dulce para mojar: colocar las rodajas de chile
y el ajo en una cacerola pequeña de fondo pesado. Calentar a fuego
medio-alto hasta que estén calientes y fragantes. Retirar del fuego y
agregar el vinagre. Regresar al fuego y cocinar hasta que el vinagre se
haya reducido casi por completo.
2. Agregar el agua y el azúcar; revolver. Poner a hervir y cocinar hasta
que el azúcar se haya disuelto. Agregar la mezcla de agua/maicena;
revolver. Seguir hirviendo, sin dejar de mezclar, durante por lo menos 1
minuto.
3. Retirar del fuego, agregar la sal y licuar a velocidad alta, usando una
licuadora de mano o una licuadora regular, hasta obtener una mezcla
suave y homogénea. Dejar enfriar a temperatura ambiente. NOTA: la
salsa se volverá más espesa y gelatinosa a medida que se enfríe.
4. Preparar los rollitos de primavera: colocar todos los ingredientes del
relleno, excepto el tofu, en un tazón mediano; revolver. Reservar.
Colocar la cesta en la bandeja. Reservar.
5. Colocar un pedazo de tofu en el centro de una hoja y agregar 1
cucharada del relleno. Doblar la parte inferior de la hoja por encima del
relleno. Doblar el lado derecho de la hoja por encima, y luego el lado
izquierdo para cerrar el rollito. Cepillar la orilla con agua para sellar.
Colocar el rollito en la cesta. Repetir con el resto de las hojas. Rociar
cada lado de los rollitos con aceite.
6. Colocar la bandeja en el horno, en la posición 2.
Elegir la función
AIR
FRY y ajustar la temperatura a 400°F; hornear por 10 minutos, hasta
que estén dorados por todos lados. Voltear a la mitad de la cocción si
es necesario.
7. Servir inmediatamente, con salsa para mojar de chile dulce.

20
Información nutricional por porción de salsa (1 cucharada):
Calorías 14 (1 % de grasa) • Carbohidratos 3 g • Proteínas 0 g • Grasa 0 g • Grasa
saturada 0 g • Colesterol 0 mg • Sodio 29 mg • Calcio 1 mg • Fibra 0 g
Información nutricional por rollito:
Calorías 53 (34 % de grasa) • Carbohidratos 7 g • Proteínas 2 g • Grasa 2 g • Grasa
saturada 0 g • Colesterol 1 mg • Sodio 152 mg • Calcio 22 mg • Fibra 1 g
Palitos de vegetales con salsa para
mojar de yogur con hierbas
Puede sustituir los vegetales en esta receta con cualquier vegetal de su
elección.
Rinde 4 a 6 porciones
Salsa para mojar de yogur con hierbas:
1 diente de ajo
1 cucharada de menta fresca
7 onzas (205 ml) de yogur griego natural sin grasa
1 cucharadita de jugo de limón fresco
¼ cucharadita de sal kosher
Palitos de vegetales:
½ taza (60 g) de harina común
3 huevos grandes, bien batidos
1½ tazas (180 g) de pan rallado japonés “panko”
2 cucharadas de queso Pecorino Romano rallado
1 cucharadita de orégano seco
1 cucharadita de perejil seco
½ cucharadita de sal kosher
1 calabacín/calabacita (“zucchini”) mediano, cortado en tiras de
3 pulgadas x ¼ de pulgada (7.5 cm x 0.5 cm)
10 judías verdes, limpias
1 aguacate, cortado en 8 rodajas
Aceite de oliva para rociar
Limón para servir (opcional)
1. Preparar la salsa para mojar de yogur con hierbas: colocar el ajo y la
menta en el bol de una mini-procesadora de alimentos. Pulsar para
picar grueso. Raspar el bol y agregar el yogur, el jugo de limón y la sal.
Procesar a velocidad alta hasta obtener una mezcla suave y
homogénea. Poner en un bol para servir, cubrir y refrigerar hasta el
momento de usar.
2. Preparar los palitos de vegetales: Colocar la cesta para freír con aire en
la bandeja. Reservar. Colocar la harina en un plato hondo y los huevos
en otro plato. Colocar el pan rallado, el queso, las especias y la sal en
un tercer plato.
3. Rebozar cada vegetal en la harina y sacudir el exceso. Luego, bañarlo
en la mezcla de huevo, y cubrirlo con pan rallado. Cuando la mitad de
los vegetales estén rebozados, disponerlos en una capa en la bandeja.
Rociar cada lado con aceite.
4. Colocar la bandeja en el horno, en la posición 2.
Elegir la función
AIR
FRY y ajustar la temperatura a 375°F; hornear por 10 minutos, hasta
que estén dorados. Mientras tanto, rebozar el resto de los vegetales.
Reservar hasta el momento de “freír”. Cuando los palitos de vegetales
estén listos, colocarlos sobre un plato para servir. Probar y ajustar la
sazón al gusto, o salpicar con jugo de limón si desea. Servir
inmediatamente, con la salsa de yogur con hierbas.
Información nutricional por porción de salsa (1 cucharada):
Calorías 8 (1 % de grasa) • Carbohidratos 1 g • Proteínas 1 g • Grasa 0 g • Grasa
saturada 0 g • Colesterol 0 mg • Sodio 48 mg • Calcio 20 mg • Fibra 0 g
Información nutricional por porción de palitos de vegetales (basada en 6 porciones):
Calorías 210 (37 % de grasa) • Carbohidratos 25 g • Proteínas 8 g • Grasa 9 g • Grasa
saturada 2g • Colesterol 95 mg • Sodio 282 mg • Calcio 42 mg • Fibra 5 g

21
Pollo asado clásico
Especias simples llenan este pollo clásico de sabor.
Rinde 4 a 6 porciones
1 pollo de 4 libras (1.8 kg)
1 cucharadita de sal kosher
½ cucharadita de pimienta negra recién molida
1 limón, cortado a la mitad
1 cucharadita de aceite de oliva virgen extra
2 cucharaditas de hierbas provenzales (Herbes de Provence) u
otras hierbas secas, p. ej., romero y tomillo
3 dientes de ajo, machacados
1. Forrar la bandeja con papel de aluminio.
2. Secar el pollo con papel absorbente, sazonar con sal y pimienta, y
rociar con jugo de limón. Meter la mitad de limón en la cavidad del
pollo. Colocar el pollo en la bandeja y rociar con aceite de oliva.
Restregar con las hierbas y el ajo. Meter los dientes de ajo en la
cavidad del pollo. Atar el pollo si desea.
3. Colocar la bandeja en el horno, en la posición 1.
Elegir la función
CONV
BAKE, fijar la temperatura a 400°F y hornear por 25 minutos. Al final
del tiempo, ajustar la temperatura a 350°F y hornear por 20 minutos
adicionales, hasta que el pollo esté dorado y crujiente, y que la
temperatura interna alcance 165°F (74°C).
4. Dejar enfriar por 10 minutos antes de cortar y servir.
Información nutricional por porción (basada en 6 porciones):
Calorías 707 (56 % de grasa) • Carbohidratos 4 g • Proteínas 73 g • Grasa 43 g • Grasa
saturada 12 g • Colesterol 230 mg • Sodio 578 mg • Calcio 61 mg • Fibra 1 g
Tacos de pescado con salsa
de durazno
Con solo un poco de aceite de oliva, la función AIR FRY le permite comer
pescado frito sin sentirse culpable.
Rinde 8 tacos
Salsa de durazno:
2 tomates grandes, picados
1 durazno mediano, picado
½ cebolla roja pequeña, picada
½ jalapeño, sin semillas, finamente picado
1 diente de ajo pequeño, finamente picado
1
/
3
taza (20 g) de cilantro fresco, picado grueso
¾ cucharadita de sal kosher
¼ cucharadita de azúcar granulada
¼ taza (60 ml) de aceite de oliva virgen extra
½ lima/limón verde
Tacos de pescado:
16 tortillas de maíz
1 taza (125 g) de harina común
1 cucharadita de sal kosher + un poco más para rociar
2 huevos grandes, bien batidos
1 libra (455 g) de bacalao, en cubos
Aceite de oliva para rociar
Spray vegetal
8 rábanos, cortados en palitos
Pedazos de lima/limón verde para decorar
1. Colocar los ingredientes de la salsa en un tazón pequeño. Revolver y
reservar hasta el momento de servir.
2. Colocar la cesta para freír con aire en la bandeja. Colocar la mitad de
las tortillas en la cesta. Colocar la bandeja en el horno, en la posición
2.
Elegir la función
AIR FRY y ajustar la temperatura a 400 °F; hornear
por 5 minutos, o hasta que las tortillas estén calientes. Colocar las

22
tortillas en un plato para servir y cubrir con papel de aluminio. Repetir
con el resto de las tortillas.
3. Colocar la harina y ½ cucharadita de la sal en un plato hondo, y los
huevos en otro plato. Sazonar los pedazos de pescado con la sal
remanente.
4. Rebozar cada pedazo de pescado en la harina y sacudir el exceso.
Bañar en el huevo, y luego rebozar en la harina otra vez.
5. Engrasar la cesta con spray vegetal. Disponer el pescado rebozado en
la cesta. Rociar cada lado del pescado con aceite. Colocar la bandeja
en el horno, en la posición 2.
Elegir la función
AIR FRY y ajustar la
temperatura a 400 °F; hornear por 10 minutos, hasta que el pescado
esté dorado y crujiente por todos lados.
6. Cuando el pescado esté listo, colocar un pedazo en el centro de una
tortilla. Cubrir con una cucharada de salsa y rábanos. Repetir con el
resto de las tortillas.
7. Servir inmediatamente, con pedazos de limón y una pizca más de sal si
desea.
Información nutricional por taco:
Calorías 128 (19 % de grasa) • Carbohidratos 18 g • Proteínas 8 g • Grasa 3 g • Grasa
saturada 1 g • Colesterol 35 mg • Sodio 285 mg • Calcio 33 mg • Fibra 2 g
Sándwiches BLT con salsa de jarabe de
arce-pacanas
Estos sándwiches BLT son un poco más dulces que los sándwiches de
tocino, lechuga y tomate tradicionales.
Rinde 2 sándwiches
4 rebanadas de pan blanco suave
3 lonchas de tocino, cortadas a la mitad
½ aguacate mediano
1 pizca de sal kosher
4 hojas de lechuga
1 tomate mediano, en rodajas
1 cucharada de jarabe de arce/maple puro
2 cucharadas de pacanas finamente picadas
1. Tostar el pan al gusto. Reservar. Mientras el pan se está tostando,
colocar la cesta en la bandeja. Disponer las lonchas de tocino en la
cesta. Después de retirar las tostadas del horno, colocar la bandeja en
el horno, en la posición 2.
Elegir la función
AIR FRY y ajustar la
temperatura a 400 °F; hornear por 10 minutos, hasta que el tocino esté
dorado y crujiente.
2. Mientras el tocino se está cocinando, empezar a armar los sándwiches,
aplastando la mitad del aguacate sobre dos de las tostadas. Rociar
con una pizca de sal. Colocar 2 pedazos de lechuga y varias rodajas
de tomate sobre las otras dos tostadas.
3. Cuando el tocino esté listo, colocarlo sobre una superficie plana.
Cepillar con jarabe de arce y esparcir las pacanas picadas encima.
Voltear y repetir en el otro lado.
4. Regresar las lonchas de tocino en la bandeja y colocar esta en el
horno, en la posición 2. Elegir la función AIR FRY, ajustar la
temperatura a 400 °F y hornear por 2 a 3 minutos, hasta que las
pacanas estén doradas.
5. Cuando el tocino esté listo, dividirlo entre los dos sándwiches,
colocándolo encima del tomate. Colocar las tostadas con aguacate
encima para cerrar los sándwiches.
Información nutricional por sándwich:
Calorías 377 (46 % de grasa) • Carbohidratos 41 g • Proteínas 12 g • Grasa 20 g • Grasa
saturada 4 g • Colesterol 23 mg • Sodio 885 mg • Calcio 323 mg • Fibra 3 g

23
Sándwiches de albóndigas
Estos sándwiches llevan ingredientes simples y requieren muy poco
trabajo, pero les encantarán a todos.
Rinde 4 porciones
Albóndigas:
1 libra (455 g) de carne de res molida
¾ cucharadita de sal kosher
½ cucharadita de pimienta negra recién molida
½ cucharadita de ajo en polvo
Sándwiches de albóndigas:
4 pancitos pequeños de aproximadamente 5 pulgadas (12.5 cm)
de largo
½ taza (120 ml) de salsa marinara casera* + un poco más para
servir
6 onzas (85 g) de Mozzarella fresca, rebanada
1. Preparar las albóndigas: revolver la carne con las especias y formar 8
bolas de tamaño uniforme.
2. Disponer las bolas en la bandeja y colocar esta en el horno, en la
posición 2.
Elegir la función
CONV BAKE, fijar la temperatura a 400°F y
hornear por 20 minutos, hasta que las albóndigas estén doradas por
todos lados.
3. Preparar los sándwiches: cortar los pancitos longitudinalmente a la
mitad y cortar las albóndigas a la mitad. Colocar 4 mitades de
albóndigas sobre la parte inferior de cada pancito. Cubrir con 2
cucharadas de salsa marinara y rebanadas de Mozzarella. Cubrir la
parte superior de cada pancito con Mozzarella también.
4. Colocar las mitades de sándwiches en la bandeja y colocar esta en el
horno, en la posición 2. Elegir la función BROIL y hornear por 8 a 10
minutos, hasta que el queso esté derretido.
5. Armar los sándwiches, cortarlos a la mitad y servir.
* Para preparar salsa marinara, utilice la receta de la salsa a la diabla
(página 16), reduciendo la cantidad de hojuelas de pimiento rojo a ¼ de
cucharadita.
Información nutricional por sándwich:
Calorías 435 (55 % de grasa) • Carbohidratos 17 g • Proteínas 33 g • Grasa 27 g • Grasa
saturada 12 g • Colesterol 106 mg • Sodio 713 mg • Calcio 70 mg • Fibra 1 g
Salmón asado con vegetales
Esta cena completa de un plato es muy rápida de preparar y de cocinar.
Rinde 2 porciones
½ libra (225 g) de salmón salvaje
1 taza (150 g) de tomates de pera
½ libra (225 g) de espárragos, limpios
½ taza (100 g) de aceitunas negras “Kalamata” deshuesadas,
picadas grueso
1 diente de ajo, rebanado
1–2 cucharadas de aceite de oliva virgen extra
½ cucharadita de sal kosher
¼ cucharadita de pimienta negra recién molida
1. Forrar la bandeja con papel de aluminio. Colocar el salmón, los
tomates, los espárragos, las aceitunas y el ajo en la bandeja. Rociar
con aceite de oliva y sazonar con sal y pimienta.
2. Colocar la bandeja en el horno, en la posición 2. Elegir la función
CONV BROIL y asar por 15 minutos, hasta que el salmón esté opaco y
que los vegetales estén bien dorados. Chequear el salón después de
10 minutos si no desea que esté muy cocido. La temperatura interna
del salmón debe alcanzar 125°F (52°C).
Información nutricional por porción (basada en 2 porciones):
Calorías 353 (56 % de grasa) • Carbohidratos 8 g • Proteínas 31 g • Grasa 22 g • Grasa
saturada 2 g • Colesterol 81 mg • Sodio 891 mg • Calcio 47 mg • Fibra 3 g

24
Pizza con rúcula, jamón de Parama
y mermelada de higo
Una pizza de alta cocina que todo el mundo puede preparar.
Rinde 8 porciones (una pizza)
Spray vegetal o 1 cucharada de aceite de oliva virgen extra
1 libra (455 g) de masa de pizza, a temperatura ambiente
¼ taza (60 ml) de mermelada de higo
¼ libra (115 g) de jamón de Parma (Prosciutto), finamente
rebanado
3 onzas (30 g) de queso de cabra
1 taza llena (30 g) de rúcula/rúgula/arúgula tierna
1. Elegir la función CONV BAKE y fijar la temperatura a 450°F. Dejar que
el horno se precaliente por 10 a 15 minutos.
2. Engrasar generosamente la bandeja con spray vegetal o aceite de
oliva. Colocar la masa de pizza en la bandeja. Estirar la masa de
manera que cubra el fondo de la bandeja. Esparcir la mermelada
uniformemente sobre toda la pizza, dejando una orilla de 1 pulgada
(2.5 cm). Nota: engrasar la masa ligeramente con aceite de oliva puede
ayudar a esparcir uniformemente la mermelada. Cubrir con jamón y
con queso de cabra.
3. Colocar la bandeja en el horno, en la posición 1. Hornear por 8 a 10
minutos adicionales, hasta que el queso esté derretido y ligeramente
dorado, y que la corteza esté dorada. Para mejores resultados, dar
vuelta a la bandeja a la mitad del tiempo.
4. Retirar la pizza del horno y cubrirla con rúcula. Esperar 2 minutos,
hasta que la rúcula se marchite, antes de servir.
* Hornear pizza sobre una piedra de hornear resulta en una corteza más
crujiente, igual que la que se consigue horneando la pizza en un horno de
ladrillo. Para comprar una piedra de hornear, visite www.cuisinart.com.
Información nutricional por porción:
Calorías 255 (30 % de grasa) • Carbohidratos 37 g • Proteínas 11 g • Grasa 9 g • Grasa
saturada 3 g • Colesterol 16 mg • Sodio 716 mg • Calcio 36 mg • Fibra 4 g
Pizza Margarita
¡Simple, deliciosa y más rápida que comida para llevar!
Rinde 8 porciones (una pizza)
Spray vegetal o 1 cucharada de aceite de oliva virgen extra
1 libra (455 g) de masa de pizza, a temperatura ambiente
¾ taza (175 ml) de salsa de pizza
2 cucharadas de queso Parmesano rallado
3 onzas (85 g) de Mozzarella fresca, rebanada
6–8 hojas grandes de albahaca, desmenuzadas
1. Elegir la función CONV BAKE y fijar la temperatura a 450°F. Dejar que
el horno se precaliente por 10 a 15 minutos.
2. Engrasar generosamente la bandeja con spray vegetal o aceite de
oliva. Colocar la masa de pizza en la bandeja. Estirar la masa de
manera que cubra el fondo de la bandeja. Colocar la salsa en el centro
de la masa. Esparcir la salsa uniformemente sobre toda la pizza,
dejando una orilla de 1 pulgada (2.5cm). Esparcir el queso Parmesano
encima y cubrir con Mozzarella.
3. Colocar la bandeja en el horno, en la posición 1. Hornear por 8 a 10
minutos adicionales, hasta que el queso esté derretido y ligeramente
dorado, y que la corteza esté dorada. Para mejores resultados, dar
vuelta a la bandeja a la mitad del tiempo.
4. Esparcir la albahaca rebanada sobre la pizza antes de servir.

25
* Hornear pizza sobre una piedra de hornear resulta en una corteza más
crujiente, igual que la que se consigue horneando la pizza en un horno de
ladrillo. Para comprar una piedra de hornear, visite www.cuisinart.com.
Información nutricional por porción:
Calorías 217 (29 % de grasa) • Carbohidratos 32 g • Proteínas 15 g • Grasa 8 g • Grasa
saturada 2 g • Colesterol 7 mg • Sodio 402 mg • Calcio 46 mg • Fibra 5 g
Muslos de pollo asados
con páprika ahumada y lima
Un plato principal jugoso y lleno de sabor, listo en solamente 30 minutos.
Rinde 4 porciones
1 libra (455 g) de muslos de pollo, con hueso/piel
1 cucharada (15 ml) de aceite de oliva virgen extra
½ cucharadita de sal kosher
½ cucharadita de páprika española ahumada
¼ cucharadita de pimienta negra recién molida
¼ cucharadita de comino en polvo
½ lima/limón verde
1. Forrar la bandeja con papel de aluminio. Colocar el pollo en la bandeja.
Salpicar con aceite de oliva y rociar uniformemente con sal, páprika,
pimienta, comino y jugo de limón. Colocar la bandeja en el horno, en la
posición 2.
2.
Elegir la función
CONV BAKE, fijar la temperatura a 425°F y hornear por
25 minutos, hasta que la piel esté crujiente y que la temperatura interna
alcance 165°F (74°C). Dejar reposar por 10 minutos antes de servir.
Información nutricional por porción (con piel):
Calorías 313 (62 % de grasa) • Carbohidratos 1 g • Proteínas 29 g • Grasa 21 g • Grasa
saturada 5 g • Colesterol 105 mg • Sodio 362 mg • Calcio 16 mg • Fibra 0 g
Chuletas de cordero asadas
con romero y ajo
Puede disfrutar esta receta tradicional en cualquier noche de la semana.
Rinde 4 porciones
4 dientes de ajo, machacados
1 cucharada de hojas de romero fresco, picadas
(aproximadamente 3 a 4 ramitas)
¼ cucharadita de pimienta negra recién molida
2 cucharadas (30 ml) de aceite de oliva virgen extra
8 chuletas de cordero (aproximadamente 2 libras/910 g)
½ cucharadita de sal kosher
1. Colocar el ajo, el romero, la pimienta y el aceite de oliva en un tazón de
acero inoxidable; revolver. Agregar las chuletas y revolver para cubrir.
Dejar marinar a temperatura ambiente por aproximadamente 30
minutos. Nota: puede dejar marinar las chuletas por una noche para
máximo sabor.
2. Forrar la bandeja con papel de aluminio. Disponer las chuletas en la
bandeja y sazonar uniformemente con sal.
3. Colocar la bandeja en el horno, en la posición 2. Elegir la función
CONV BAKE y fijar la temperatura a 425 °F; hornear por 15 minutos,
hasta que la temperatura interna alcance 130°F (54°C) para carne
poco hecha. Sacar del horno y dejar reposar por aproximadamente 5
minutos antes de servir.
Información nutricional por porción (2 chuletas):
Calorías 284 (46 % de grasa) • Carbohidratos 1 g • Proteínas 36 g • Grasa 14 g • Grasa
saturada 5 g • Colesterol 109 mg • Sodio 395 mg • Calcio 33 mg • Fibra 0 g

26
Quiche de salchicha y col rizada
Perfecta para el desayuno-almuerzo, esta “quiche” les encantará a todos
sus invitados.
Nuestra receta de masa quebrada rinde suficiente masa como para
preparar dos quiches. Si prepara solo una, congele la masa restante para
tenerla lista para la próxima vez.
Rinde 8 a 10 porciones
“Pâte brisée” (masa quebrada):
2 tazas (250 g) de harina común
1 cucharadita de sal kosher
16 cucharadas (225 g) de mantequilla sin sal fría, en pedazos
3–4 cucharadas (45 ml a 60 ml) de agua helada
Relleno:
1½ cucharaditas de aceite de oliva
1 diente de ajo, finamente picado
1 chalote pequeño, finamente picado
¼ cucharadita de sal kosher
1 pizca de pimienta negra recién molida
4 hojas grandes de col rizada “lacinato” (sin los tallos duros),
finamente rebanada
1 cucharadita de tomillo fresco
3 onzas (85 g) de salchicha italiana picante, picante o
desmenuzada (si usa salchicha fresca, sacar la tripa)
½ taza (120 ml) de leche entera
½ taza (120 ml) de crema líquida para batir (“heavy cream”)
4 huevos grandes
1 onza (30 g) de Gruyère o queso suizo, triturado
1. Preparar la masa quebrada: colocar la harina y la sal en el bol de una
procesadora de alimentos Cuisinart
®
equipada con cuchilla picadora.
Procesar por aproximadamente 10 segundos para tamizar. Agregar la
mantequilla y pulsar 6 a 8 veces hasta obtener una mezcla parecida a
migajas gruesas. Agregar agua, una cucharada a la vez, y seguir
pulsando justo hasta que los ingredientes lleguen a formar una bola de
masa (puede que no sea necesario utilizar toda el agua). Para averiguar
si la masa está lista, pellizcarla. Si no se deshace, está lista. Colocar la
masa sobre una superficie ligeramente enharinada y amasarla un par
de veces hasta que esté suave. Dividir la masa en dos porciones
iguales. Formar un disco plano con cada porción. Envolver los discos
en papel film/plástico y refrigerar por 30 minutos o más, hasta el
momento de usar.
2. Sobre una superficie ligeramente enharinada, estirar con un rodillo una
porción de masa hasta formar un disco de aproximadamente 11
pulgadas (28 cm) de diámetro y
1
⁄
8
de pulgada (3 mm) de espesor.
Colocar la masa en un molde de tartas de 9 pulgadas (22 cm de
diámetro). Presionar la masa suavemente en el fondo y las esquinas
del molde, alzando los bordes. Cortar el exceso de masa con el rodillo.
Presionar el borde de la masa con el pulgar para formar un borde
redondeado de aproximadamente
1
⁄
8
de pulgada (3 mm) todo alrededor
del molde. Refrigerar por aproximadamente 30 minutos.
3. Colocar la rejilla del horno en la posición 1. Pinchar el fondo de tarta
varias veces con los dientes de un tenedor, teniendo cuidado de no
perforar completamente la masa. Cubrir la masa con una hoja de papel
sulfurizado y llenar parcialmente con arroz crudo o frijoles secos. Elegir
la función BAKE y ajustar la temperatura a 350 °F (180 °C) y fijar el
tiempo en 20 minutos. Después de 5 minutos, colocar el fondo de tarta
en el horno y hornear por 12 a 15 minutos, hasta que la masa debajo
del papel sulfurizado esté seca. Retirar el arroz crudo/los frijoles secos
y el papel sulfurizado, y hornear el fondo de tarta por 2 minutos
adicionales, hasta dorarse.
4. Preparar el relleno: poner el aceite a calentar a fuego medio/medio-
lento, en un sartén mediano. Cuando esté caliente, agregar el ajo, el
chalote, una pizca de la sal y la pimienta. Saltear hasta que estén
suaves y fragantes, pero sin permitir que se doren. Agregar la col, la
sal restante y el tomillo. Saltear hasta que la col se marchite y adquiera
un color vivo. Reservar.
5. Ajustar el fuego a medio-alto. Una vez caliente, agregar la salchicha,
rompiendo la carne con un cucharón o una espátula resistente al calor.
Saltear hasta que la salchicha esté dorada y completamente cocinada
(si usa salchichas frescas, deben perder por completo su color rosado).
Retirar del fuego y dejar enfriar. Esparcir los vegetales y la salchicha
sobre el fondo de tarta.

27
6. Colocar la lecha, la crema y los huevos en un tazón; batir y verter en el
fondo de tarta. Cubrir con queso.
7. Colocar cuidadosamente la quiche en el horno (con la rejilla aún en la
posición 1). Elegir la función BAKE, ajustar la temperatura a 300°F y
hornear por 10 minutos, hasta que el centro empiece a cuajarse.
8. Retirar del horno y dejar enfriar por 5 a 10 minutos antes de cortar y
servir. La quiche es mejor fresca, pero se podrá conservar en el
refrigerador durante hasta 5 días. Recalentarla antes de servir.
* La masa cruda se podrá conservar en el refrigerador durante hasta una
semana, o en el congelador durante hasta 2 meses.
Información nutricional por porción (basada en 10 porciones):
Calorías 269 (73 % de grasa) • Carbohidratos 11 g • Proteínas 7 g • Grasa 22 g • Grasa
saturada 12 g • Colesterol 127 mg • Sodio 300 mg • Calcio 60 mg • Fibra 0 g
Hamburguesas asadas
Estas hamburguesas son la base perfecta para cualquiera de sus
acompañamientos favoritos.
Rinde 4 hamburguesas de 6 onzas (170 g)
24 onzas (680 g) de carne de res molida (80% magra)
1 cucharada de aceite de oliva
1 cucharadita de sal kosher
½ cucharadita de pimienta negra recién molida
½ cucharadita de ajo en polvo
1. Dividir la carne en 4 porciones y formar 4 hamburguesas. Cepillar cada
lado con aceite de oliva y sazonar con sal, pimienta y ajo.
2. Colocar la cesta para freír con aire en la bandeja. Colocar las
hamburguesas en la cesta y colocar la bandeja en el horno, en la
posición 2.
3. Elegir la función CONV BROIL y asar por 15 minutos, volteando las
hamburguesas a la mitad del tiempo. Servir inmediatamente.
Información nutricional por hamburguesa:
Calorías 464 (74 % de grasa) • Carbohidratos 0 g • Proteínas 29 g • Grasa 38 g • Grasa
saturada 14 g • Colesterol 121 mg • Sodio 704 mg • Calcio 32 mg • Fibra 0 g
ACOMPAÑAMIENTOS
Acompañamientos perfectos, cocinados rápidamente con un mínimo de
ingredientes y de limpieza.
Coles de Bruselas con “pancetta”
Plato de acompañamiento perfecto para cualquier plato de carne. El sabor
a sal de la “pancetta” complementa el sabor orgánico de las coles y un
rocío de vinagre de vino tinto proporciona un sabor inesperado, pero
bienvenido.
Rinde 4 porciones
1 libra (455 g) de coles de Bruselas, limpias y partidas a la mitad
1 chalote, en rodajas finas
1 onza (30 g) de “pancetta” (tocino italiano)
1 cucharada de aceite de oliva
1
⁄
8
cucharadita de sal kosher
1
⁄
8
cucharadita de pimienta negra recién molida
2 cucharaditas (20 ml) de vinagre de vino tinto
1. Forrar la bandeja con papel de aluminio. Colocar todos los ingredientes,
excepto el aceite, en la bandeja. Revolver para mezclar. Extender en
una capa.
2. Colocar la bandeja en el horno, en la posición 2.
Elegir la función
CONV
BAKE, fijar la temperatura a 400°F y hornear por 15 minutos, hasta que
las coles estén tiernas y crujientes.
3. Retirar las coles de la bandeja y colocarlas en un bol para servir.
Agregar el vinagre y revolver. Probar y ajustar la sazón al gusto.
Información nutricional por porción:
Calorías 108 (46 % de grasa) • Carbohidratos 11 g • Proteínas 5 g • Grasa 6 g • Grasa
saturada 1 g • Colesterol 6 mg • Sodio 230 mg • Calcio 50 mg • Fibra 4 g

28
Papas “fritas”
Puede servir estas papas “fritas” crujientes con cualquiera de sus salsas
favoritas.
Rinde 2 a 3 porciones
1 libra de papas “Russet”
Aceite de oliva para rociar
1 cucharadita de sal kosher o sal sazonada
1. Cortar las papas en pedazos largos de ¼ de pulgada (0.5 cm) de
grueso. Secar bien.
2. Colocar la cesta para freír con aire en la bandeja. Colocar las papas en
la cesta. Rociar con aceite. Sazonar con sal y revolver. Extender en
una capa.
3. Colocar la bandeja en el horno, en la posición 2. Elegir la función AIR
FRY y ajustar la temperatura a 400 °F; hornear por 15 minutos, hasta
que estén crujientes.
4. Una vez listas, colocar las papas “fritas” en un bol para servir. Probar y
ajustar la sazón al gusto. Servir inmediatamente.
Información nutricional por porción (basada en 3 porciones):
Calorías 138 (10 % de grasa) • Carbohidratos 27 g • Proteínas 4 g • Grasa 2 g • Grasa
saturada 0 g • Colesterol 0 mg • Sodio 389 mg • Calcio 0 mg • Fibra 2 g
Calabaza de bellota asada
Pruebe este plato de acompañamiento simple. ¡Es muy rápido de hacer,
súper sabroso, y muy bueno para usted!
Rinde aproximadamente 4 porciones
1 cucharadita de aceite de oliva virgen extra
1 calabaza de bellota (“acorn squash”) mediana, cortada en 8
pedazos
½ cucharadita de sal kosher
¼ cucharadita de pimienta negra recién molida
¼ cucharadita de chile en polvo
1. Forrar la bandeja con papel de aluminio y rociar uniformemente con
aceite de oliva. Disponer la calabaza en la bandeja y sazonar
uniformemente con sal, pimienta y chile en polvo.
2. Colocar la bandeja en el horno, en la posición 2. Elegir la función
CONV BAKE, fijar la temperatura a 400°F y hornear por 25 minutos,
hasta que la calabaza esté suave y dorada por todos lados.
3. Servir inmediatamente.
Información nutricional por porción:
Calorías 104 (9 % de grasa) • Carbohidratos 24 g • Proteínas 3 g • Grasa 1 g • Grasa
saturada 0 g • Colesterol 0 mg • Sodio 269 mg • Calcio 54 mg • Fibra 5 g
Hinojo, zanahorias y chirivía asados
Rinde 4 porciones
2 bulbos de hinojo, limpios y cortados en cuartos
3 zanahorias medianas, en trozos
1 chirivía grande, en trozos
1 diente de ajo, machacado
3 cucharadas (30 ml) de aceite de oliva virgen extra
½ cucharadita de sal kosher
¼ cucharadita de pimienta negra recién molida
1 pizca de canela en polvo
1 cucharadita de tomillo fresco
1. Forrar la bandeja con papel de aluminio. Colocar todos los ingredientes
en la bandeja y revolver suavemente. Extender en una capa.
2. Colocar la bandeja en el horno, en la posición 2. Elegir la función
CONV BAKE, fijar la temperatura a 400°F y hornear por 20 minutos,
hasta que los vegetales estén suaves y dorados.

29
Información nutricional por porción:
Calorías 170 (54 % de grasa) • Carbohidratos 18 g • Proteínas 2 g • Grasa 11 g • Grasa
saturada 2 g • Colesterol 0 mg • Sodio 360 mg • Calcio 85 mg • Fibra 6 g
Batatas “fritas” con mayonesa
de chipotle
Una nutritiva alternativa a las papas fritas tradicionales.
Rinde 2 a 3 porciones
Mayonesa de chipotle:
½ taza (120 ml) de mayonesa
1 chile chipotle en adobo, finamente picado
¼ cucharadita de jugo de limón fresco
Batatas “fritas”:
1 libra (455 g) de camote/batatas, en pedazos largos de ¼ de
pulgada (0.5 cm) de grueso
Aceite de oliva para rociar
½ cucharadita de sal kosher
1. Preparar la mayonesa de chipotle: colocar la mayonesa, el chipotle y el
limón en el bol de una mini-procesadora de alimentos. Procesar a
velocidad alta hasta obtener una mezcla suave y homogénea. Poner en
un bol para servir, cubrir y refrigerar hasta el momento de usar.
2. Preparar las batatas “fritas”: colocar la cesta para freír con aire en la
bandeja. Colocar las batatas en la cesta. Rociar con aceite. Sazonar
con sal y revolver. Extender en una capa.
3. Colocar la bandeja en el horno, en la posición 2.
Elegir la función
AIR
FRY y ajustar la temperatura a 400 °F; hornear por 15 minutos, hasta
que estén bien doradas y crujientes.
4. Una vez listas, colocar las batatas “fritas” en un bol para servir. Servir
inmediatamente, con mayonesa de chipotle al lado.
Información nutricional por porción de mayonesa de chipotle (1 cucharada):
Calorías 101 (99 % de grasa) • Carbohidratos 0 g • Proteínas 0 g • Grasa 11 g • Grasa
saturada 2 g • Colesterol 10 mg • Sodio 93 mg • Calcio 0 mg • Fibra 0 g
Información nutricional por porción de batatas “fritas” (basada en 3 porciones):
Calorías 149 (11 % de grasa) • Carbohidratos 31 g • Proteínas 3 g • Grasa 2 g • Grasa
saturada 0 g • Colesterol 0 mg • Sodio 434 mg • Calcio 57 mg • Fibra 5 g
POSTRES
Desde “muffins” de arándanos azules para el desayuno hasta torta de
chocolate con cobertura de caramelo salado para el postre, el horno
tostador/freidor Cuisinart
®
le permitirá preparar cualquier receta al horno.
¡Además, hace que sea posible hacer delicias fritas tales como rosquillas
con menos calorías y casi sin ensuciar!
Manzanas al horno
Esta receta llenará su cocina de un delicioso olor a especias de otoño.
Rinde 4 porciones
4 manzanas firmes de sabor dulce-agrio, tales como Pink Lady
¼ taza (20 g) de copos de avena (no utilice avena instantánea)
2 cucharadas de pacanas finamente picadas
1 cucharada de harina común
1 cucharada (10 g) de azúcar rubia (azúcar de caña integral)
2 pizcas de canela en polvo
1 pizca de sal kosher
1 pizca de nuez moscada rallada
2 cucharadas (30 g) de mantequilla sin sal, en pedacitos
1. Forrar la bandeja con papel de aluminio o papel sulfurizado; reservar.
Quitar el corazón de las manzanas, dejando el fondo de la manzana
intacto; reservar.
2. Colocar la avena, las pacanas, la harina, el azúcar, la canela, la sal y la
nuez moscada en un tazón pequeño. Revolver para mezclar. Agregar la
mantequilla y mezclar con las manos, pellizcando la mezcla para
formar grumos. Cerciorarse de que los ingredientes están bien
mezclados.

30
3. Dividir la mezcla entre las manzanas. Presionar en el centro para llenar.
Colocar las manzanas en la bandeja y colocar esta en el horno, en la
posición 1.
4. Elegir la función BAKE y ajustar la temperatura a 350°F; hornear por 35
minutos, hasta que las manzanas estén tiernas y que la parte superior
esté dorada y crujiente.
Información nutricional por manzana:
Calorías 243 (31 % de grasa) • Carbohidratos 42 g • Proteínas 3 g • Grasa 9 g • Grasa
saturada 4 g • Colesterol 15 mg • Sodio 38 mg • Calcio 21 mg • Fibra 7 g
“Muffins” de arándanos azules
Esta receta favorita es rápida de preparar y rápida de hornear gracias al
horno tostador/freidor Cuisinart
®
.
Rinde 6 “muffins”
1 taza (125 g) + 1 cucharada de harina común
1½ cucharaditas de polvo de hornear
¼ cucharadita de sal kosher
1 pizca de canela en polvo
4 cucharadas (55 g) de mantequilla sin sal, a temperatura
ambiente
¾ taza (150 g) de azúcar granulada
1 huevo grande
½ cucharadita de extracto natural de vainilla
¼ taza (60ml) de leche entera
1 taza (140 g) de arándanos azules frescos o congelados
Mantequilla a temperatura ambiente o spray vegetal para
engrasar el molde
1. Colocar 1 taza (125 g) de harina, el polvo de hornear, la sal y la canela
en un tazón mediano. Batir para mezclar; reservar.
2. Poner la mantequilla y el azúcar en un tazón grande. Batir, usando una
batidora de mano, hasta conseguir una mezcla ligera y cremosa.
Agregar el huevo y la vainilla poco a poco, batiendo a velocidad baja
para mezclar.
3. Agregar un tercio de la mezcla de ingredientes secos, y luego un tercio
de la leche. Repetir, un tercio a la vez, terminando con los ingredientes
secos. Mezclar suavemente para incorporar los ingredientes.
4. Revolver los arándanos azules con la cucharada de harina restante y
agregarlos a la mezcla. Revolver suavemente para mezclar.
5. Colocar la rejilla del horno en la posición 1. Engrasar ligeramente un
molde para “muffins” con mantequilla o spray vegetal. Verter la mezcla
en los moldes. Nota: puede que los moldes estén muy llenos; esto no
es un problema.
6. Elegir la función BAKE, ajustar la temperatura a 325°F y fijar el tiempo
en 25 minutos. Después de 5 minutos, colocar los “muffins” en el
horno. hasta que los “muffins” estén ligeramente dorados y que un
probador salga limpio. Servir inmediatamente o conservar a
temperatura ambiente, cubiertos, por hasta 3 días.
Información nutricional por “muffin”:
Calorías 269 (41 % de grasa) • Carbohidratos 17 g • Proteínas 15 g • Grasa 10 g • Grasa
saturada 2 g • Colesterol 90 mg • Sodio 500 mg • Calcio 19 mg • Fibra 1 g
Mini rosquillas/buñuelos (“donuts”)
con azúcar y canela
Aunque nunca durarán por mucho tiempo, estas rosquilla/buñuelos son
mejores frescas.
Rinde aproximadamente 16 rosquillas/buñuelos
¾ cucharadita de levadura seca activa
½ cucharadita + 1½ cucharaditas de azúcar granulada
1 cucharada de leche tibia
¾ taza (95 g) de harina para hacer pan + más (hasta ¾ taza/30 g)
para mezclar
2 pizcas de sal kosher

31
2 pizcas de canela en polvo
1 pizca de nuez moscada rallada
1 huevo grande, ligeramente batido
2 cucharadas (30 g) de suero de leche (“buttermilk”)
½ cucharadita de extracto natural de vainilla
1 cucharada (15 g) de mantequilla sin sal en pedazos, a
temperatura ambiente
Spray vegetal
Mantequilla derretida (aproximadamente 2 cucharadas) para
terminar
Azúcar con canela (¼ taza/50 g de azúcar + 1 cucharada de
canela) para terminar
1. Disolver la levadura y ½ cucharadita del azúcar en la leche tibia, en un
tazón pequeño. Dejar fermentar por 5 a 10 minutos, o hasta que la
mezcla se ponga espumosa.
2. Colocar ¾ de taza (95 g) de la harina, el azúcar remanente, la sal, la
canela y la nuez moscada en un tazón grande. Revolver, batiendo.
Agregar la levadura fermentada. Revolver, usando un cucharón de
madera, para mezclar.
3. Colocar el huevo, el suero de leche y la vainilla en un tazón; revolver,
batiendo. Agregar la mezcla a la mezcla de harina. Enharinar levemente
una superficie de trabajo limpia y colocar la masa encima,
espolvoreándola ligeramente con harina. Amasar a mano, agregando
harina una cucharadita a la vez si es necesario para que la masa no
pegue a sus manos. Agregar la mantequilla, un pedazo a la vez,
amasando después de cada adición. Seguir agregando harina, una
cucharadita a la vez, para evitar que la masa pegue a sus manos. La
masa debe estar tierna y suave, y no debe romperse al estirarse.
4. Formar una bola de masa y colocarla en un tazón limpio. Cubrir con
papel film/plástico y dejar reposar por 1 hora. Después de 1 hora,
voltear la masa y presionar ligeramente (no aplastar). Cubrir con papel
film/plástico y dejar reposar por una hora más.
5. Colocar la cesta en la bandeja. Engrasar ligeramente la cesta con spray
vegetal. Forrar una placa para horno con papel sulfurizado. Dividir la
masa en 16 porciones. Trabajar con una porción a la vez, manteniendo
las demás porciones cubiertas con papel film/plástico. Formar una
bola suave con cada porción. Colocar la rosquilla en la bandeja y
cubrir sin apretar con papel film/plástico. Repetir con el resto de la
masa.
6. Después de haber formado 8 rosquillas, colocar estas en la cesta y
colocar la bandeja en el horno, en la posición 2. Elegir la función AIR
FRY y ajustar la temperatura a 350°F; hornear por 5 minutos, hasta
que las orillas de las rosquillas estén ligeramente doradas. Repetir con
el resto de las rosquillas.
7. Mientras las rosquillas se están cocinando, colocar la mantequilla
restante en una cacerola pequeña y derretirla a fuego lento. Colocar el
azúcar con canela en un tazón poco profundo. Reservar.
8. Retirar las rosquillas del horno, cepillar inmediatamente con
mantequilla derretida y cubrir con azúcar con canela. Servir
inmediatamente.
Información nutricional por rosquilla:
Calorías 66 (43 % de grasa) • Carbohidratos 8 g • Proteínas 1 g • Grasa 3 g • Grasa
saturada 2 g • Colesterol 20 mg • Sodio 25 mg • Calcio 7 mg • Fibra 0 g
Bollos ingleses (“scones”)
con cerezas y jengibre
Cerciórese de no mezclar demasiado la masa. Se terminará de unir al
formar los “scones”.
Rinde 8 “scones”
2½ tazas (310 g) de harina común
¼ taza (50 g) de azúcar granulada
2 cucharaditas de polvo de hornear
¼ cucharadita de sal kosher
2 cucharadas de jengibre cristalizado finamente picado
6 cucharadas (85 g) de mantequilla sin sal, en pedacitos

32
2
⁄
3
taza (160 g) de suero de leche (“buttermilk”)*
1 huevo grande, ligeramente batido
1 taza (120 g) de cerezas secas
1 clara de huevo, batida
1. Forrar la bandeja con papel sulfurizado; reservar.
2. Colocar la harina, el azúcar, el polvo de hornear, la sal y el jengibre en
el bol de una procesadora de alimentos Cuisinart
®
equipada con
cuchilla de metal. Procesar por aproximadamente 10 segundos para
mezclar. Agregar la mantequilla y pulsar hasta obtener una mezcla
homogénea.
3. Colocar el suero de leche y el huevo en una taza de medir; revolver.
Agregar la mitad del líquido a la masa y pulsar 2 veces para mezclar.
Agregar el resto del líquido y pulsar otra vez para mezclar ligeramente.
4. Colocar la masa sobre una encimera limpia o una tabla de picar grande.
Agregar las cerezas y amasar suavemente para incorporarlas.
5. Formar un cilindro de 10 pulgadas (25 cm) de largo. Usando un cuchillo
afilado, cortar el rollo en 8 pedazos iguales y colocar estos en la
bandeja preparada. Cepillar cada bollo con la clara batida.
6. Elegir la función CONV BAKE, fijar la temperatura a 350°F y hornear
por 30 minutos, Después de 5 minutos, colocar la bandeja en el horno,
en la posición 1. Hornear por 20 a 25 minutos, hasta que estén bien
dorados.
Información nutricional por “scone”:
Calorías 304 (27 % de grasa) • Carbohidratos 48 g • Proteínas 5 g • Grasa 9 g • Grasa
saturada 6 g • Colesterol 47 mg • Sodio 224 mg • Calcio 58 mg • Fibra 2 g
Torta de capas de chocolate con
cobertura de caramelo salado
La combinación de chocolate, caramelo y sal es incomparable. Si quiere
ahorrar tiempo, puede usar salsa de caramelo lista para la cobertura.
Rinde 12 porciones (una torta)
Torta de chocolate:
1 taza (125 g) de harina común
1
⁄
3
taza (50 g) de cacao en polvo, tamizado
1 cucharadita de café expreso instantáneo
½ cucharadita de bicarbonato de sodio
¼ cucharadita de polvo de hornear
¼ cucharadita de sal kosher
8 cucharadas (115 g) de mantequilla sin a temperatura
ambiente, en pedacitos
½ taza (100 g) de azúcar granulada
¼ taza llena (50 g) de azúcar rubia (azúcar de caña integral)
1 huevo grande
1 yema de huevo grande
1 cucharadita de extracto natural de vainilla
½ taza (125 g) de suero de leche (“buttermilk”)
Cobertura:
16 cucharadas (225 g) + 2 cucharadas (30 g) de mantequilla sin a
temperatura ambiente, en pedacitos
1½ tazas (180 g) de azúcar glasé, tamizado
¼ cucharadita de sal kosher
½ cucharadita de extracto natural de vainilla
4 cucharadas (60 ml) de crema líquida para batir (“heavy
cream”)
¼ taza (50 g) de azúcar granulada
el agua
Copos de sal marina (opcional)

33
1. Preparar la torta: Colocar la rejilla del horno en la posición 1. Engrasar
ligeramente un molde redondo de 9 pulgadas (22 cm) con mantequilla
o spray vegetal; reservar.
2. Colocar la harina, el cacao en polvo, café expreso instantáneo, el
bicarbonato, el polvo de hornear y la sal en un tazón grande. Batir para
mezclar; reservar.
3. Poner la mantequilla y el azúcar en un tazón grande. Colocar la
mantequilla y el azúcar en un tazón grande. Batir, usando una batidora
de mano o una batidora de pie, hasta conseguir una mezcla ligera y
cremosa. Agregar lentamente el huevo, la yema y la vainilla, batiendo a
velocidad baja (raspar el tazón si es necesario).
4. Agregar
1
/
3
de los ingredientes secos (sin dejar de mezclar a velocidad
baja) y luego la mitad del suero de leche. Sin dejar de mezclar, agregar
otro
1
/
3
de los ingredientes secos y el resto del suero de leche. Agregar
los ingredientes secos restantes y revolver suavemente para mezclar.
5. Verter la mezcla en el molde preparado.
6. Elegir la función BAKE y ajustar la temperatura a 350°F y fijar el tiempo
en 20 minutos. Después de 5 minutos, colocar la torta en el horno
precalentado. Hornear por aproximadamente 15 minutos, hasta que un
probador salga limpio. Retirar del horno y dejar enfriar por completo.
Una vez a temperatura ambiente, refrigérelo.
7. Preparar la cobertura: colocar la mantequilla, el azúcar glasé y la sal en
un tazón grande. Batir, usando una batidora de mano o una batidora
de pie, hasta conseguir una mezcla ligera y cremosa. Agregar la vainilla
y 2 cucharadas (30 ml) de la crema líquida y seguir batiendo hasta
conseguir una mezcla esponjosa. Reservar.
8. Colocar el azúcar granulado en una cacerola mediana de fondo pesado
y cubrir con agua para que tenga la consistencia de la arena mojada.
Cocinar a fuego medio hasta que el azúcar esté dorado. Entonces,
retirar del fuego y agregar muy cuidadosamente las 2 cucharadas (30
ml) de crema líquida y las 2 cucharadas (30 g) de mantequilla
restantes. Dejar enfriar a temperatura ambiente.
9. Una vez la salsa de caramelo enfriada, agregar 3 cucharadas a la
cobertura; reservar el resto.
10. Cuando la torta esté fría, retirarla del refrigerador y cortarla
longitudinalmente a la mitad para conseguir dos capas de grosor
uniforme. Colocar una capa sobre un plato para torta o un plato
regular y cubrir con la mitad de la cobertura. Colocar la segunda capa
encima y cubrir con el resto de la cobertura. Decorar con la salsa de
caramelo reservada y copos de sal si desea.
Información nutricional por porción:
Calorías 399 (41 % de grasa) • Carbohidratos 41 g • Proteínas 3 g • Grasa 25 g • Grasa
saturada 15 g • Colesterol 98 mg • Sodio 175 mg • Calcio 18 mg • Fibra 1 g
Muesli/Granola crujiente
Una alternativa fácil y saludable a los cereales comerciales que
acompañará deliciosamente su yogur de fruta favorito.
Rinde aproximadamente 4 tazas (475 ml)
1½ tazas (120 g) de copos de avena (no utilice avena instantánea)
¾ taza (100 g) de nueces crudas (pacanas o pistachos son
perfectos para esta receta)
½ taza (80 g) de coco rallado sin azúcar
¼ taza (50 g) de semillas de girasol
¼ taza (50 g) de semillas de calabaza (pepitas)
¼ taza (60 ml) de aceite de coco, derretido
¼ taza (60 ml) de jarabe de arce/maple puro
½ cucharadita de sal kosher
¼ cucharadita de canela en polvo
1 pizca de nuez moscada rallada
½ taza (75 g) de frutas secas (picadas si son más grandes que
frutas del bosque)
1. Forrar la bandeja con papel de aluminio o papel sulfurizado; reservar.
2. Colocar todos los ingredientes, excepto las frutas secas, en un tazón
grande; revolver. Esparcir uniformemente en el fondo de la bandeja.

34
Colocar la bandeja en el horno, en la posición 2. Elegir la función
BAKE y ajustar la temperatura a 300°F; hornear por 20 minutos,
revolviendo a la mitad del tiempo, hasta que los ingredientes estén
bien tostados.
3. Retirar del horno y añadir las frutas secas; revolver para mezclar.
4. Dejar enfriar dentro de la bandeja. Colocar en un recipiente hermético.
Conservar durante hasta 3 semanas.
Información nutricional por porción de ½ taza:
Calorías 290 (54 % de grasa) • Carbohidratos 29 g • Proteínas 6 g • Grasa 18 g • Grasa
saturada 5 g • Colesterol 0 mg • Sodio 138 mg • Calcio 19 mg • Fibra 4 g
Manzanas “fritas”
Galletas Graham molidas proporcionan una corteza dulce perfecta para
las manzanas. Una merienda saludable para después de la escuela.
Rinde 2 porciones
½ manzana, en tajadas*
1 cucharada (15 g) de mantequilla sin sal, derretida
1
/
3
taza (15 g) de galletas “Graham” molidas
1. Colocar la cesta en la bandeja; reservar.
2. Cepillar las tajadas de manzana con mantequilla, y luego cubrirlas con
las galletas molidas.
3. Disponer las manzanas rebozadas en la cesta y colocar la bandeja en
el horno, en la posición 2.
4. Elegir la función AIR FRY y ajustar la temperatura a 400°F; hornear por
10 minutos, hasta que las orillas de las manzanas estén bien doradas.
Servir inmediatamente.
* Si desea duplicar la receta, hornear las tajadas de manzana en dos
veces.
Información nutricional por porción:
Calorías 126 (29 % de grasa) • Carbohidratos 22 g • Proteínas 1 g • Grasa 4 g • Grasa
saturada 2 g • Colesterol 8 mg • Sodio 124 mg • Calcio 4 mg • Fibra 2 g
“Brownies” de mantequilla de maní
Estos ricos “brownies” que se deshacen en la boca son perfectos para
satisfacer sus ganas de chocolate.
Rinde 16 “brownies”
Spray vegetal
¾ taza (190 g) de mantequilla sin sal, en cubitos
4 onzas (115 g) de chocolate amargo, picado
4 onzas (115 g) de chocolate semiamargo, picado
2 cucharadas de cacao en polvo
2 cucharaditas de café expreso instantáneo
3 huevos grandes
1½ tazas (300 g) de azúcar granulada
2 cucharaditas de extracto natural de vainilla
½ taza (60 g) de harina común
¾ cucharadita de sal kosher
½ taza (460 g) de mantequilla de maní
¼ taza (30 g) de azúcar glasé
2 cucharadas (30 g) de mantequilla sin sal, derretida y enfriada
1 pizca de sal kosher
1. Colocar la rejilla del horno en la posición 1. Engrasar ligeramente un
molde cuadrado de 9 x 9 pulgadas (22 cm x 22 cm) con spray vegetal
y forrarlo con papel sulfurizado. Reservar.
Derretir la mantequilla y el chocolate picado a baño María. Cuando el
chocolate esté casi derretido, agregar el cacao y el café expreso;
revolver. Dejar entibiar a temperatura ambiente.

35
3. Colocar los huevos en un tazón grande. Batir ligeramente, usando una
batidora de mano, y luego agregar poco a poco el azúcar. Mezclar por
1 a 2 minutos, hasta obtener una mezcla suave y espesa. Agregar la
vainilla y seguir batiendo para incorporar los ingredientes.
4. Agregar la harina y la sal a la mezcla de chocolate; revolver Incorporar
la mezcla de chocolate a la mezcla de huevo, revolviendo hasta
obtener una mezcla homogénea.
5. Colocar la mantequilla de maní, el azúcar glasé y la mantequilla
derretida en un tazón pequeño; revolver para mezclar.
6. Echar la mezcla de chocolate en el molde preparado. Agregar
cucharadas de la mezcla de mantequilla de maní y usar un tenedor o
un cuchillo para “cortarla”, logrando el efecto decorativo deseado.
7. Elegir la función BAKE, ajustar la temperatura a 350°F y fijar el tiempo
en 25 minutos. Después de 5 minutos, colocar el molde en el horno
precalentado. Hornear por aproximadamente 20 minutos, hasta que las
orillas estén ligeramente secas. Dejar enfriar por completo, y luego
refrigerar por una noche antes de cortar y servir.
Información nutricional por “brownie”:
Calorías 317 (57 % de grasa) • Carbohidratos 32 g • Proteínas 5 g • Grasa 21 g • Grasa
saturada 11 g • Colesterol 61 mg • Sodio 107 mg • Calcio 17 mg • Fibra 2 g

36
GARANTÍA
GARANTÍA LIMITADA DE TRES AÑOS
(VÁLIDA EN LOS EE.UU. Y EN CANADÁ
SOLAMENTE)
Esta garantía es para los consumidores solamente. Usted es un
consumidor si posee un aparato Cuisinart
®
que fue comprado en una
tienda para uso personal, familiar o casero. A excepción de los estados
donde la ley lo permita, esta garantía no es para los detallistas, los demás
comerciantes ni los dueños. Cuisinart garantiza este aparato contra todo
defecto de materiales o fabricación durante 3 años después de la fecha
de compra original, siempre que el aparato haya sido utilizado para uso
doméstico y según las instrucciones
Le aconsejamos que llene el formulario de registro disponible en
www.
cuisinart.com
a fin de facilitar la verificación de la fecha de compra
original. Sin embargo, no es necesario registrar el producto para recibir
servicio bajo esta garantía. En ausencia del recibo de compra, el período
de garantía será calculado a partir de la fecha de fabricación.
RESIDENTES DE CALIFORNIA SOLAMENTE
La ley del estado de California ofrece dos opciones bajo el período de
garantía. Los residentes del estado de California pueden (A) regresar el
producto defectuoso a la tienda donde lo compraron o (B) a otra tienda
que venda productos Cuisinart
®
de este tipo. La tienda, a su opción,
reparará el producto, referirá al consumidor a un centro de servicio
independiente, cambiará el producto o reembolsará al consumidor
el precio original del producto, menos la cantidad imputable al uso
del producto por el consumidor hasta que este se dañe. Si estas dos
opciones no satisfacen al consumidor, podrá llevar el aparato a un
centro de servicio independiente, siempre que se pueda ajustar o
reparar el aparato de manera económica. Cuisinart será responsable
por los gastos de servicio, reparación, reemplazo o reembolso de los
productos defectuosos durante el período de garantía. Los residentes de
California también pueden, si lo desean, mandar el producto defectuoso
directamente a Cuisinart para que lo reparen o lo cambien. Para esto, se
debe llamar a nuestro servicio posventa al 1-800-726-0190. Cuisinart será
responsable por los gastos de reparación, reemplazo, manejo y envío de
los productos defectuosos durante el período de garantía.
ANTES DE HACER REPARAR SU APARATO
Si este aparato presentara algún defecto de materiales o fabricación
durante el período de garantía, la reparemos o reemplazaremos (a nuestra
opción). Para obtener servicio bajo esta garantía, llame a nuestra línea
directa gratuita al 1-800-726-0190 o regrese el aparato defectuoso a:
Cuisinart, 7475 North Glen Harbor Blvd. Glendale, AZ 85307. Regrese
el producto defectuoso, junto con su recibo de compra y un cheque
o giro postal de US$10.00 para cubrir los gastos de manejo y envío.
Los residentes de California solo necesitan dar una prueba de compra
y deben llamar al 1-800-726-0190 para recibir instrucciones de envío.
Recuerde incluir su nombre, dirección y teléfono, la descripción del
problema, así como cualquier información pertinente. Por favor incluya
un cheque o giro postal a nombre de Cuisinart. NOTA: para mayor
seguridad, le aconsejamos que mande su paquete por un método de
entrega con seguro y seguimiento. Cuisinart no será responsable por los
daños ocurridos durante el transporte o por los paquetes mandados a
una dirección equivocada. Los productos perdidos o dañados durante el
envío no serán cubiertos bajo esta garantía.
Este aparato satisface las más altas exigencias de fabricación y ha sido
diseñado para uso con accesorios y piezas de repuesto autorizados
solamente. Esta garantía excluye expresamente los daños causados por
accesorios, piezas o reparaciones no autorizados por Cuisinart. Esta
garantía no cubre el uso institucional o comercial del producto, y no es
válida en caso de daños causados por mal uso, negligencia o accidente.
Esta garantía excluye expresamente todos los daños incidentales o
consecuentes. Algunos Estados no permiten la exclusión o limitación
de daños incidentales o consecuentes, de modo que las limitaciones
mencionadas pueden no regir para usted. Esta garantía le otorga
derechos legales específicos y usted puede tener otros derechos que
varían de un Estado a otro.
Importante: si debe llevar el producto defectuoso a un centro de servicio
no autorizado, por favor informe al personal del centro de servicio que
deberían llamar al servicio posventa de Cuisinart al 1-800-726-0190 a fin
de diagnosticar el problema correctamente, usar las piezas correctas para
repararlo y asegurarse de que el producto esté bajo garantía.

37
NOTAS:

38
©2019 Cuisinart
150 Milford Road
East Windsor, NJ 08520
Impreso en China
19CE062758
IB-14326-ESP-B