USER MANUAL Built-In Electric Single and Double Ovens
PARTS AND FEATURES
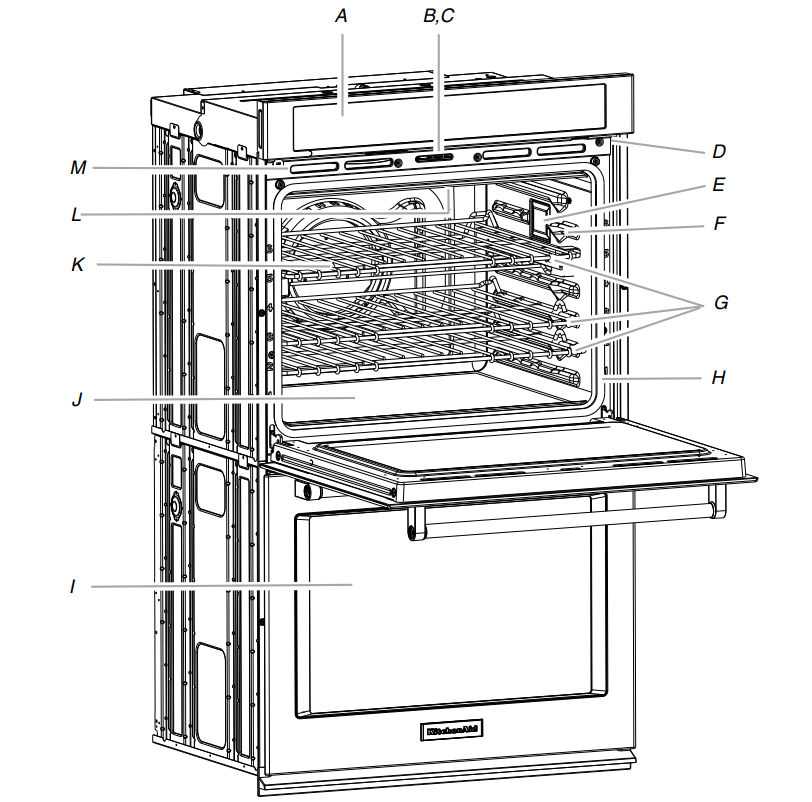
This manual covers different models. The oven you have purchased may have some or all of the items listed. The locations and appearances of the features shown here may not match those of your model.
A. Electronic oven control
B. Automatic oven light switch
C. Oven door lock latch
D. Model and serial number plate (on bottom edge of control panel, right hand side)
E. Oven lights
F. Temperature probe jack (oven with convection element and fan only)
G. Oven racks (roll-out racks available on select models only)
H. Gasket
I. Lower oven (on double oven models)
J. CleanBake™ bake element (hidden beneath floor panel)
K. Convection element and fan (in back panel)
L. Broil elements (not shown)
M. Oven vent
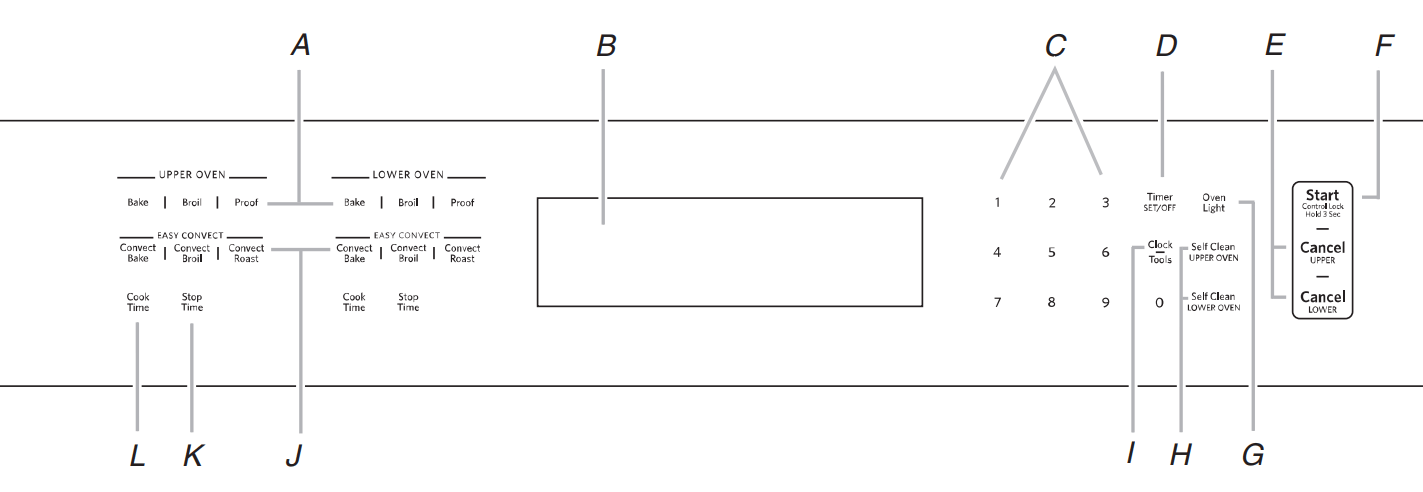
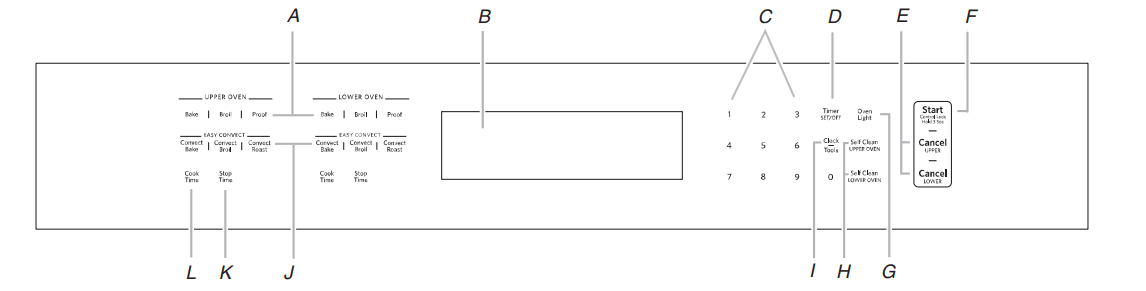
FEATURE GUIDE
A. Oven settings
B. Oven display
C. Number keys
D. Kitchen timer
E. Upper and lower oven cancel (double oven models) Cancel (single oven models)
F. Start/control lock
G. Oven light
H. Self clean
I. Clock/Tools
J. Convection cooking settings
K. Stop time
L. Cook time
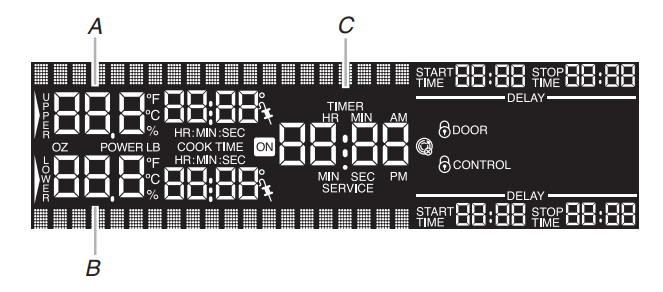
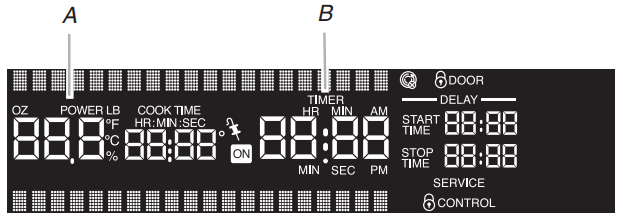
Double Oven Display
A. Upper oven cavity display
B. Lower oven cavity display
C. Time of day, timer display
Single Oven Display
A. Oven cavity display
B. Time of day, timer display
KEY
FEATURE
INSTRUCTIONS
CLOCK/TOOLS
Clock
The Clock uses a 12-hour cycle. See the “Electronic Oven Controls” section.
1. Touch CLOCK/TOOLS.
2. Touch the “1” key to select Clock. Then touch the number keys to set the time of day.
3. Touch START.
CLOCK/TOOLS
Settings
Enables you to personalize the audible tones and oven operation to suit your needs. See the “Electronic Oven Controls” section.
OVEN LIGHT
Oven cavity light
The oven light is controlled by a key on the oven control panel. While the oven door is closed, touch OVEN LIGHT to turn the light on and off. When the oven door is opened, the oven light will automatically come on.
TIMER
(SET/OFF)
Oven timer
The Timer can be set in hours or minutes up to 23 hours and 59 minutes.
1. Touch TIMER SET/OFF. Touch TIMER SET/OFF again to switch between MIN/SEC, HR/ MIN, and OFF. If no action is taken, the control will continue to wait for a length of time to be entered.
2. Touch the number keys to set the length of time.
3. Touch TIMER SET/OFF. If the key is not touched, the control will continue to wait for SET/ START to be touched. When the set time ends, 4 chimes will continuously repeat until the Timer Set/Off key is touched.
4. Touch TIMER SET/OFF anytime to cancel the Kitchen Timer or stop the reminder tones. If CANCEL is touched, the respective oven will turn off. However, the kitchen timer can be turned off only by using TIMER SET/OFF.
START
Cooking start
The Start key begins any oven function. If Start is not touched within 5 minutes after touching a key, the function is canceled and the time of day is displayed.
CANCEL UPPER CANCEL LOWER
Range function
The Cancel keys stop any function for the appropriate oven except the Clock and Timer.
BAKE
(Upper and Lower Oven)
Baking and roasting
1. Touch Upper Oven or Lower Oven BAKE. Touch the number keys to enter a temperature other than 350°F (177°C). The bake range can be set between 145°F and 550°F (63°C and 288°C).
2. Touch START. “Lo°” will appear on the oven display if the actual oven temperature is under 100°F (38°C), and “Preheating” will appear in the lower area of the display. When the actual oven temperature reaches 100°F (38°C), the oven display will begin displaying the temperature as it increases. When the set temperature is reached, if on, one tone will sound.
3. Touch CANCEL for the selected oven when finished cooking.
BROIL
Broiling
Close the door.
1. Touch Upper or Lower BROIL. Touch the number keys to enter a temperature other than 550°F (288°C). The broil range can be set between 450°F and 550°F (232°C and 288°C).
2. Touch START. A long chime will sound. The set oven temperature will appear on the oven display until the oven is turned off.
3. Touch CANCEL for the selected oven when finished cooking.
EASY CONVECT BAKE
Convect bake
Before convection baking, position racks according to the “Rack And Bakeware Positions” section.
1. Touch Upper or Lower CONVECT BAKE.
2. Touch the number keys to choose whether or not to convert the recipe.
3. If “1: Yes” has been selected, you will see a screen with “easy convect bake.” Then touch the number keys to enter a temperature. The convection bake range can be set between 170°F and 550°F (77°C and 288°C). The oven temperature will automatically be reduced by 25°F (14°C) for EasyConvect™ Bake, and the adjusted temperature will show on the display, but the cook time will not be adjusted. Then touch the number keys to enter a cook time.
NOTE: If a temperature between 170°F and 194°F (77°C and 90°C) is entered, the display will show only 170°F (77°C) and not the reduced temperature.
4. If “2: No” has been selected, Convect Bake will continue without conversion. Touch the “1 ” number key to use Rapid Preheat or “2” to continue without Rapid Preheat. Then touch the number keys to enter a temperature.
NOTE: Rapid Preheat Convect Bake should only be used for 1-rack baking.
5. Touch START. “Lo” will appear on the oven display if the actual oven temperature is under 100°F (38°C), and “Preheating” will appear in the lower area of the display. When the actual oven temperature reaches 100°F (38°C), the oven display will show the oven temperature increasing. When the set temperature is reached, if on, 1 chime will sound.
6.Touch CANCEL for the selected oven when finished cooking.
EASY CONVECT ROAST
Convect roast
1. Touch Upper or Lower CONVECT ROAST.
2. Touch the number keys to choose whether or not to convert the recipe.
3. If “1: Yes” has been selected, you will see a screen with “easy convect roast.” Touch the number keys to enter a temperature. The convection roast range can be set between 170°F and 550°F (77°C and 288°C). Touch the number keys to enter a cook time. The cook time will automatically be adjusted to 80% of the time entered, and the adjusted cook time will appear on the display, but temperature will not be adjusted.
4. If “2: No” has been selected, Convect Roast will continue without conversion. Touch the number keys to enter a temperature.
5. Touch START. A long chime will sound. The set oven temperature will appear on the oven display until the oven is turned off.
6. Touch CANCEL for the selected oven when finished cooking.
CONVECT MODE
Convect broil
Close the door.
1. Touch Upper or Lower CONVECT BROIL. Touch the number keys to enter a temperature other than 550°F (288°C). The convection broil range can be set between 450°F and 550°F (232°C and 288°C).
2. Touch START. The set oven temperature will appear on the oven display until oven is turned off.
3. Touch CANCEL for the selected oven when finished cooking
PROOF
Proofing bread
1. Touch Upper or Lower PROOF. Display will show 100°F (38°C).
2. Touch START. Let dough rise until nearly doubled in size, and then check at 20 to 25 minutes. Proofing time may vary depending on dough type and quantity.
3. Touch CANCEL for the selected oven when finished cooking.
Refer to the “Proofing Bread” section for more information.
STOP TIME
Delayed start
The Stop Time key is used to enter the starting time for an oven function with a delayed start. Stop Time should not be used for foods such as breads and cakes because they may not bake properly.
To set Cook Time or Stop Time, see the “Timed Cooking” section.
COOK TIME
Timed cooking
Cook Time allows the oven to cook for a set length of time, and/or shut off automatically.
To set Cook Time or Stop Time, see the “Timed Cooking” section.
Electronic Oven Controls
A. Oven settings
B. Oven display
C. Number keys
D. Kitchen timer
E. Upper and lower oven cancel (double oven models) Cancel (single oven models)
F. Start/control lock
G. Oven light
H. Self clean
I. Clock/Tools
J. Convection cooking settings
K. Stop time
L. Cook Time
OVEN USE
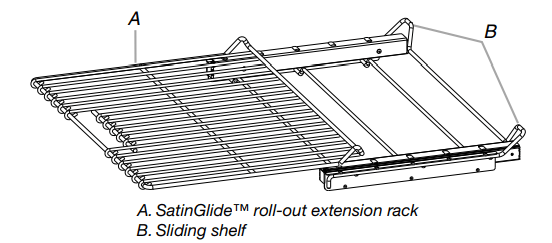
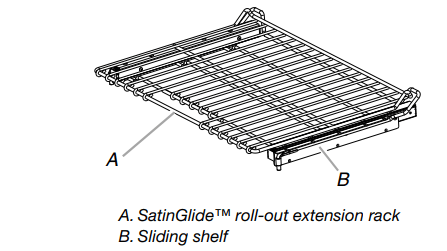
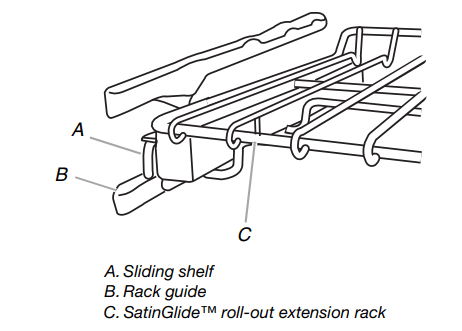
SatinGlide™ Roll-Out Extension Rack
The SatinGlide™ roll-out extension rack allows easy access to position and remove food in the oven. It can be used in rack positions 1 through 6.
Open Position
Closed and Engaged Position
To Remove SatinGlide™ Roll-Out Extension Rack:
1. Slide the rack in completely so that it is closed and engaged with the sliding shelf.
2. Using 2 hands, lift up on the front edge of the rack and push the sliding shelf to the back wall of the oven so that the front edge of the sliding shelf sits on the rack guides. The front edge of the rack and the sliding shelf should be higher than the back edge.
3. Pull the rack and the sliding shelf out.
To Replace SatinGlide™ Roll-out Extension Rack
1. Using 2 hands, grasp the front of the closed rack and the sliding shelf. Place the closed rack and the sliding shelf on the rack guide.
2. Using 2 hands, lift up on the front edge of the rack and the sliding shelf together.
3. Slowly push the rack and the sliding shelf to the back of the oven until the back edge of the rack pulls over the end of the rack guide.
To avoid damage to the sliding shelves, do not place more than 25 lbs (11.4 kg) on the rack.
Do not clean the SatinGlide™ roll-out extension rack in a dishwasher. It may remove the rack’s lubricant and affect its ability to slide.
See the “General Cleaning” section for more information.
Preheating and Oven Temperature
Preheating
When beginning a Bake or Convect Bake cycle, the oven begins preheating after Start is touched. The oven will take approximately 12 to 17 minutes to reach 350°F (177°C) with all of the oven racks provided with your oven inside the oven cavity. Higher temperatures will take longer to preheat. The preheat cycle rapidly increases the oven temperature. The actual oven temperature will go above your set temperature to offset the heat lost when your oven door is opened to insert food. This ensures that when you place your food in the oven, the oven will begin at the proper temperature. Insert your food when the preheat tone sounds. Do not open the door during preheat until the tone sounds.
Oven Temperature
While in use, the oven elements will cycle on and off as needed to maintain a consistent temperature. They may run slightly hot or cool at any point in time due to this cycling. Opening the oven door while in use will release the hot air and cool the oven which could impact the cooking time and performance. It is recommended to use the oven light to monitor cooking progress.
Baking and Roasting
IMPORTANT: The convection fan and convection element may operate during the Bake function to enhance performance and heat distribution.
The oven will take approximately 12 to 17 minutes to reach 350°F with all oven racks inside the oven cavity. The preheat cycle rapidly increases the temperature inside the oven cavity. Higher temperatures will take longer to preheat. Factors that impact preheat times include room temperature, oven temperature, and the number of racks. Unused oven racks can be removed prior to preheating your oven to help reduce preheat time. The actual oven temperature will go above the set temperature to offset the heat lost when the oven door is opened to insert food. This ensures that the oven will begin at the proper temperature when you place food in the oven. Insert food when the preheat tone sounds. Do not open the door during preheat until the tone sounds.
During baking or roasting, the bake and broil elements will cycle on and off in intervals to maintain the oven temperature.
Depending on the model, if the oven door is opened during baking or roasting, the heating elements (bake and broil) will turn off approximately 30 seconds after the door is opened. They will turn on again approximately 30 seconds after the door is closed.
Convection
In a convection oven, the fan-circulated hot air distributes heat more evenly. This movement of hot air helps maintain a consistent temperature throughout the oven, cooking foods more evenly, while sealing in moisture.
Most foods, using convect baking mode, can be cooked by lowering cooking temperatures 25°F (14°C). The cooking time, can be shortened significantly when using Convect Roast, especially for large turkeys and roasts.
■ It is important not to cover foods with lids or aluminum foil so that surface areas remain exposed to the circulating air, allowing browning and crisping.
■ Keep heat loss to a minimum by opening the oven door only when necessary. It is recommended to use the oven light to monitor progress.
■ Choose cookie sheets without sides and roasting pans with lower sides to allow air to move freely around the food.
■ Test baked goods for doneness a few minutes before the minimum cooking time using a method such as a toothpick.
■ Use a meat thermometer or the temperature probe to determine the doneness of meats and poultry. Check the temperature of pork and poultry in 2 or 3 places.
OVEN CARE
High Temp Self-Cleaning Cycle
IMPORTANT: The health of some birds is extremely sensitive to the fumes given off during the High Temp Self-Cleaning cycle. Exposure to the fumes may result in death to certain birds. Always move birds to another closed and well-ventilated room.
Self-clean the oven before it becomes heavily soiled. Heavy soil results in longer cleaning and more smoke.
Keep the kitchen well-ventilated during the High Temp SelfCleaning cycle to help get rid of heat, odors, and smoke.
Do not block the oven vent(s) during the High Temp Self-Cleaning cycle. Air must be able to move freely. Depending on your model, see “Oven Vent” or “Oven Vents” section.
Do not clean, rub, damage or move the oven door gasket. The door gasket is essential for a good seal.
Prepare Oven:
■ Remove the broiler pan, grid, cookware and bakeware and, on some models, the temperature probe from the oven.
■ Remove oven racks to keep them shiny and easy to slide. See “General Cleaning” section for more information.
■ Remove any foil from the oven because it may burn or melt, damaging the oven.
■ Hand clean inside door edge and the 1½" (3.8 cm) area around the inside oven cavity frame, being certain not to move or bend the gasket. This area does not get hot enough during high temp self-cleaning to remove soil. Do not let water, cleaner, etc., enter slots on door frame. Use a damp cloth to clean this area.
■ Wipe out any loose soil to reduce smoke and avoid damage. At high temperatures, foods react with porcelain. Staining, etching, pitting or faint white spots can result. This is normal and will not affect cooking performance
How the Cycle Works
IMPORTANT: The heating and cooling of porcelain on steel in the oven may result in discoloring, loss of gloss, hairline cracks and popping sounds.
The High Temp Self-Cleaning Cycle uses very high temperatures, burning soil to a powdery ash.
The oven is preset for a 4 hour 30 minute clean cycle; however, the time can be changed. Suggested clean times are 3 hours 30 minutes for light soil and between 4 hours 30 minutes and 5 hours 30 minutes for average to heavy soil.
Use the following chart as a guide to determine the desired cleaning level.
Once the oven has completely cooled, remove ash with a damp cloth. To avoid breaking the glass, do not apply a cool damp cloth to the inner door glass before it has completely cooled.
The oven lights will not work during the High Temp Self-Cleaning cycle.
On double oven models, only one oven can self-clean at a time. If one oven is high temp self-cleaning, the other oven cannot be set or turned on.
NOTE: The oven has a 2 speed cooling fan motor. During selfclean, the fan(s) will operate at its highest speed to increase airflow to better exhaust the hotter air through the oven vent(s). An increase in noise may be noticeable during and after the self-clean cycle until the oven cools.
To Start High-Temp Self-Cleaning
Before high temp self-cleaning, make sure the door is closed completely or it will not lock and the cycle will not begin.
1. Touch SELF CLEAN (Upper or Lower Oven). Touch SELF CLEAN repeatedly to set a clean time other than 4 hours and 30 minutes. The clean time can be set between 3 hours and 30 minutes and 5 hours and 30 minutes.
Number keys cannot be used to set a clean time.
2. Touch START.
The oven will start locking the door and display “Locking Door.” Opening the door at this point will cancel the self-clean cycle. “Door Locked” will display once the door is locked. Then, the start time and stop time will appear in the oven display.
When the cycle is complete and the oven is cool, “self clean complete” will appear on the oven display and “DOOR LOCKED” will disappear. The door will not unlock until the oven is cool.
If enabled, end-of-cycle tones will sound, then reminder tones will sound every minute.
3. Touch CANCEL for the selected oven, or open and close the oven door to clear the oven display and/or stop reminder tones.
To Delay the Start of High Temp Self-Cleaning
Before starting a delayed High Temp Self-Clean cycle, make sure the clock is set to the correct time of day. See “Clock” section. Also, make sure the door is closed completely or it will not lock and the cycle will not begin.
1. Touch SELF CLEAN (Upper or Lower Oven). Touch SELF CLEAN repeatedly to set a clean time other than 4 hours and 30 minutes. The clean time can be set between 3 hours and 30 minutes and 5 hours and 30 minutes.
Number keys cannot be used to set clean time.
2. Touch STOP TIME.
3. Touch the number keys to enter the time of day to stop.
4. Touch START
The start time and stop time is automatically calculated and displayed.
The door will not lock until the start time is reached.
When the start time is reached, the oven will automatically turn on. The oven will start locking the door and will display “Locking Door.” Opening the door at this point will cancel the self-clean cycle. “Door Locked” will display once the door is locked.
When the cycle is complete and the oven cools, “self clean complete” will appear on the oven display and “DOOR LOCKED” will disappear. The door will not unlock until the oven is cool.
5. Touch CANCEL for the selected oven, or open and close the oven door to clear the oven display.
To Stop High Temp Self-Cleaning anytime:
Touch Upper or Lower CANCEL. If the oven temperature is too high, the door will remain locked. It will not unlock until the oven cools.
General Cleaning
IMPORTANT: Before cleaning, make sure all controls are off and the oven is cool. Always follow label instructions on cleaning products.
Soap, water and a soft cloth or sponge are suggested first unless otherwise noted.
STAINLESS STEEL (on some models)
To avoid damage to stainless steel surfaces, do not use soap-filled scouring pads, abrasive cleaners, Cooktop Cleaner, steel-wool pads, gritty washcloths or abrasive paper towels.
Cleaning Method:
Rub in direction of grain to avoid damaging.
■ affresh® Stainless Steel Cleaner Part Number W10355016 (not included) or affresh® Stainless Steel Cleaning Wipes Part Number W10355049 (not included): See “Accessories” section to order.
OVEN DOOR EXTERIOR
Cleaning Method:
■ Glass cleaner and a soft cloth or sponge: Apply glass cleaner to soft cloth or sponge, not directly on panel.
■ affresh® Kitchen and Appliance Cleaner Part Number W10355010 (not included): See “Assistance or Service” section to order
OVEN DOOR INTERIOR
Cleaning Method:
■ Self-Cleaning cycle: For optimal door cleaning result, wipe away any deposits with a damp sponge before running cycle.
CONTROL PANEL
To avoid damage to the control panel, do not use abrasive cleaners, steel-wool pads, gritty washcloths or abrasive paper towels.
Cleaning Method:
■ Glass cleaner and soft cloth or sponge: Apply glass cleaner to soft cloth or sponge, not directly on panel.
■ affresh® Kitchen and Appliance Cleaner Part Number W10355010 (not included): See “Accessories” section to order.
OVEN CAVITY
Do not use oven cleaners.
Food spills should be cleaned when oven cools. At high temperatures, foods react with porcelain and staining, etching, pitting or faint white spots can result.
Cleaning Method:
■ Self-Cleaning cycle: See “High Temp Self-Cleaning Cycle” first.
OVEN RACKS
Cleaning Method:
■ Self-Cleaning cycle: See “High Temp Self-Cleaning Cycle” first. Remove racks or they will discolor and become harder to slide. If this happens, a light coating of vegetable oil applied to the rack guides will help them slide.
■ Steel-wool pad
Oven Lights
The oven lights are 120-volt, 40-watt maximum halogen bulbs. They will come on when the oven door is opened. On double oven models, both upper and lower lights will come on when either door is opened. The oven lights will not work during the Self-Cleaning cycle. When the oven door is closed, touch OVEN LIGHT to turn light on or off.
To Replace:
Before replacing the bulb, make sure the oven is off and cool.
1. Disconnect power.
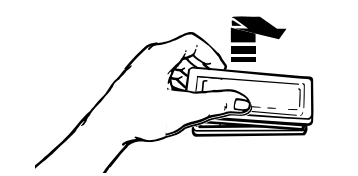
2. Remove glass light cover by grasping the front edge and pulling away from oven.
3. Remove bulb from socket.
4. Replace bulb, using tissue or wearing cotton gloves to handle bulb. To avoid damage to or decreasing the life of the new bulb, do not touch bulb with bare fingers.
5. Replace bulb cover by snapping back into wall.
6. Reconnect power.
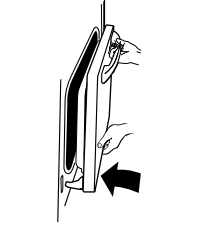
Oven Door
IMPORTANT: To avoid oven door glass breakage:
■ Do not close the oven door if the racks are not fully inserted into the oven cavity or when bakeware extends past the front edge of an oven rack.
■ Do not set objects on the glass surface of the oven door.
■ Do not hit glass surfaces with bakeware or other objects.
■ Do not wipe down glass surfaces until the oven has completely cooled.
For normal oven use, it is not suggested to remove the oven door. However, if removal is necessary, make sure the oven is off and cool. Then, follow these instructions. The oven door is heavy
To Remove:
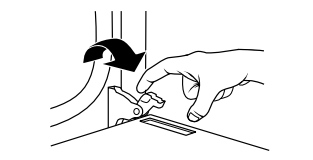
1. Open oven door all the way.
2. Flip up the hinge latch on each side.
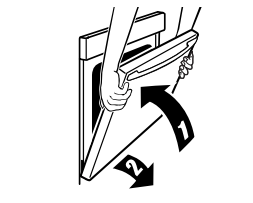
3. Close the oven door as far as it will shut.
4. Lift the oven door while holding both sides. Continue to push the oven door closed and pull it away from the oven door frame.
To Replace:
1. Insert both hanger arms into the door.
2. Open the oven door. You should hear a “click” as the door is set into place.
3. Move the hinge levers back to the locked position. Check that the door is free to open and close. If it is not, repeat the removal and installation procedures.
TROUBLESHOOTING
Try the solutions suggested here first in order to avoid the cost of an unnecessary service call.
Nothing will operate
■ Has a household fuse blown, or has a circuit breaker tripped?
Replace the fuse or reset the circuit breaker. If the problem continues, call an electrician.
■ Is the appliance wired properly?
See Installation Instructions.
Oven will not operate
■ Is the electronic oven control set correctly?
See “Electronic Oven Controsl” section.
■ Has a delay start been set?
See “Timed Cooking” section.
■ Is the Control Lock set?
See “Control Lock” section.
■ Is the Sabbath Mode set?
See “Sabbath Mode” section.
■ On double oven models, is one oven self-cleaning?
When one oven is self-cleaning, the other oven cannot be set or turned on.
Oven temperature too high or too low
■ Does the oven temperature calibration need adjustment?
See “Oven Temperature Control” section.
Warm air coming from oven vent
■ Warm air coming from the oven vent is normal. During a selfclean cycle, the air stream is increased.
■ The cooling fan may operate both during an oven's cycle and after the cycle has ended, causing warm air to exit from the oven vent.
Display shows messages
■ Is the display showing a letter followed by a number?
Clear the display. See “Display(s)” section. If a letter followed by a number reappears, call for service. See “Warranty” section.
Fan runs during Bake function
■ It is normal for the convection fan and element to operate during Bake mode to enhance performance and heat distribution.
Long preheat times
■ Not all cycles require preheating. See cycle instructions for preheat recommendations. Most cycles preheat to 350°F (177°C) in 12 to 17 minutes. Higher temperatures will take more time. Removing unused oven racks prior to preheating can help reduce preheat time.
Self-Cleaning cycle will not operate
■ Is the oven door open?
Close the oven door all the way.
■ Has the function been entered?
See “Self-Cleaning Cycle” section.
■ On some models, has a delay start Self-Clean cycle been set?
See “Self-Cleaning Cycle” section.
■ Has a delay start been set?
See “Timed Cooking” section.
■ On double oven models, is one oven self-cleaning?
When one oven is self-cleaning, the other oven cannot be set to self-clean.
Oven cooking results not what expected
■ Is the proper temperature set?
Double-check the recipe in a reliable cookbook.
■ Is the proper oven temperature calibration set?
See “Oven Temperature Control” section.
■ Was the oven preheated?
See “Baking and Roasting” section.
■ Is the proper bakeware being used?
See “Bakeware” section.
■ Are the racks positioned properly?
See “Rack and Bakeware Positions” section.
■ Is there proper air circulation around bakeware?
See “Rack and Bakeware Positions” section.
■ Is the batter evenly distributed in the pan?
Check that batter is level in the pan.
■ Is the proper length of time being used?
Adjust cooking time.
■ Has the oven door been opened while cooking?
Oven peeking releases oven heat and can result in longer cooking times.
■ Are baked items too brown on the bottom?
Move rack to higher position in the oven.
■ Are pie crust edges browning early?
Use aluminum foil to cover the edge of the crust and/or reduce baking temperature.
Uneven browning of baked items
■ See “Rack and Bakeware Positions” section.
■ Center the baking pan(s) on the rack and allow a minimum of 2" (5 cm) of clearance around all sides of the pan(s).
■ Allow a minimum of 2" (5 cm) of clearance between the oven door and the front edge of baking pans.