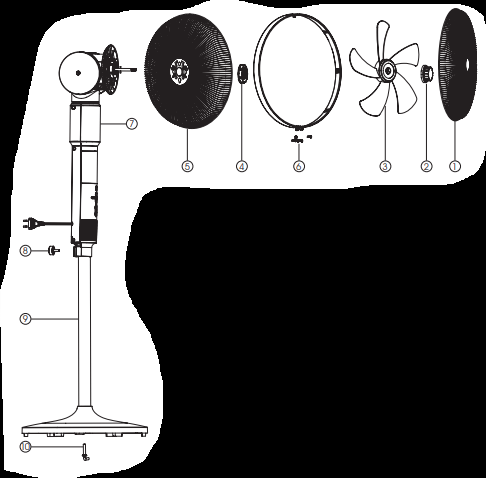
1. Front guard 2. Spinner 3. Fan blade 4. Rear guard nut 5. Rear guard 6. Screw for guards 7. Fan body 8. Stand fixing screw 9. Stand post 10. Base fixing screw
Installation & Operation Instruction
Installation
1. Take out parts for assembling: checking whether the manual, remote control, spare parts are all packed.
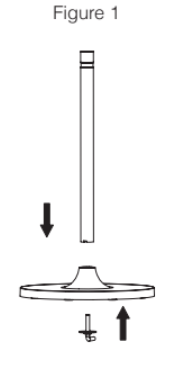
2. Assemble the fan as showing and indication below,
2.1. Put the column through the hole of base, and fix tightly by screw (Figure 1).
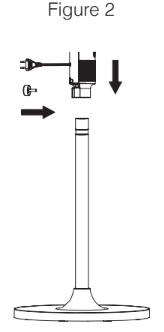
2.2 Put the fan body on the column, and fix by the nut (Figure 2).
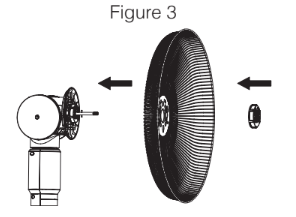
2.3. Put the rear grill on the rear cover of motor, ally at the hole on the grill, and fix by the grill nut. (Figure 3)
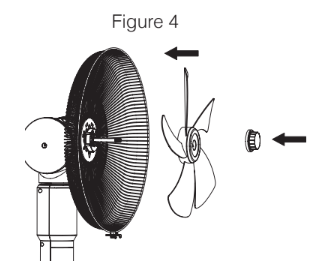
2.4. Fit the fan blade on the motor axes, tightly fixing by blade screw. (Figure 4)
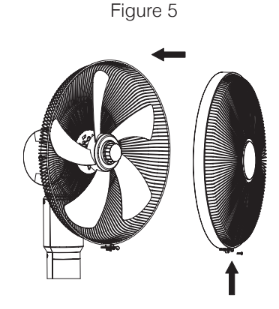
2.5. Assemble grill ring and front grill up together with the rear grill, and tight the grill ring with the lock on the bottom. (Figure 5)
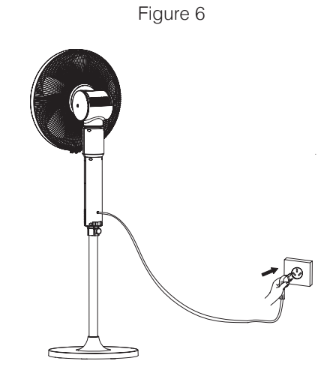
2.6. After assembled, plug in power and use it as the manual (Figure 6)
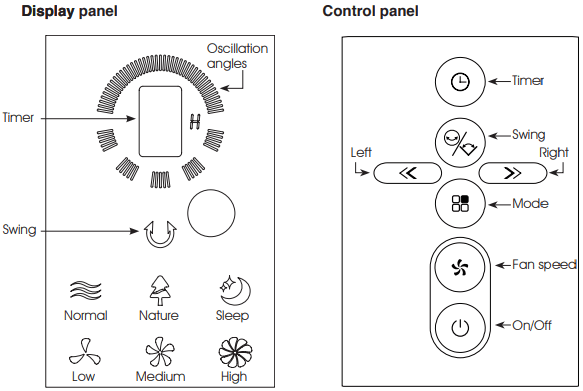
Operation Instruction
All functions can be operated by pressing the buttons on the control panel or using the remote control.
1. ON/ OFF
When first plug in, the fan will "beep" twice, then the fan is in standby mode. You may turn on the fan and start setting.
2. SPEED
Press "SPEED" button to set the fan speed and LED lights will change accordingly.
3. SWING
3.1. Manually Vertical oscillation: -10°, 0°, 10°, 20°, 30°, 40°, 50°, 60°, 70°, 80°, 90° can be adjusted by user.
3.2. Keep pressing the left button, the fan will turn counter clockwise; likewise keep pressing the right button, the fan will turn clockwise. When the fan reaches the desired direction, release the button and you may set the horizontal oscillation angles.
3.3. Horizontal oscillation angle can be set in 0°, 60°, 90°, 180°, 360° and LED light will change accordingly.
4. MODES
The fan is defaulted in normal mode, if you press the MODE button, it wil change from normal to nature to sleeping mode and LED light will change accordingly.
4.1. Normal mode: Choice of constant high, middle, and low fan speed.
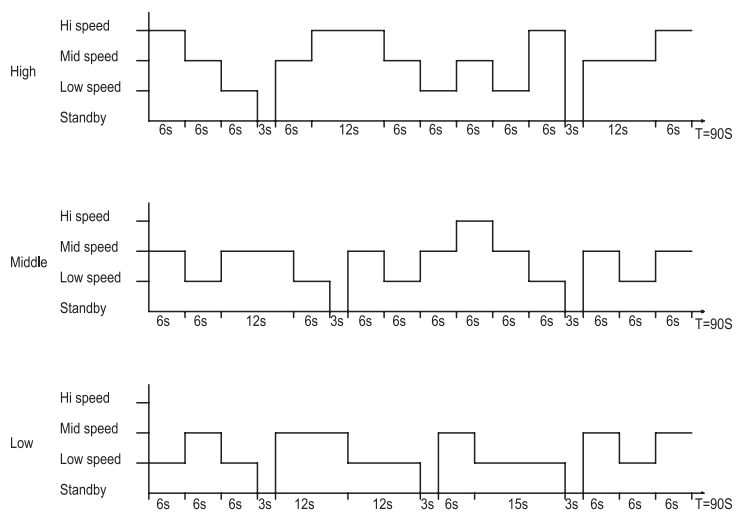
4.2. Nature mode: Choice of high, medium, and low mode in rhythm fan speed showed as following drawings.
4.3. Sleep mode: Choice of high and medium fan speed.
High: Start with 30 minutes "Nature" mode high waveform pattern, then 30 minutes "Nature" mode medium waveform pattern, then continue with "Nature" mode low waveform pattern. Medium: Start with 30 minutes "Nature" mode medium waveform pattern, and then continue with "Nature" mode low waveform pattern.
LOW: “Nature” mode low waveform pattern.
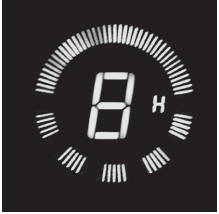
5. TIMER
By pressing the TIMER button, you may choose from 1H, 2H, 4H, and 8H timer. The fan will automatically turn off after the set time.
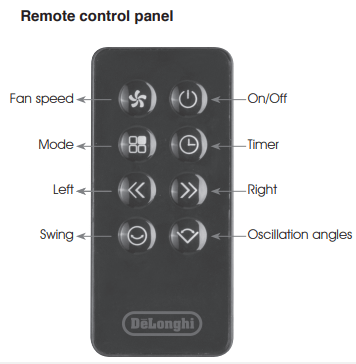
Usage for remote control
WARNING - KEEP BATTERIES OUT OF REACH OF CHILDREN
Swallowing may lead to serious injury in as little as 2 hours or death, due to chemical burns and potential perforation of the oesophagus.
Examine devices and make sure the battery compartment is correctly secured. Do not use if compartment is not secure.
Dispose of used button batteries immediately and safely. Flat batteries can still be dangerous.
This product requires button cell battery to operate and this is hazardous to young children.
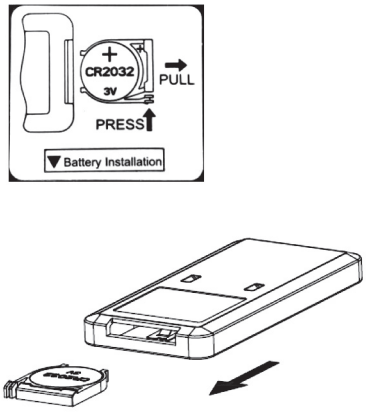
Remote control has a battery compartment that requires two or more independent and simultaneous actions to remove its cover; press and pull out the battery compartment on the back of remote control, install the button cell (CR2032 3V) according to the positive and negative sign and close the compartment. Align the remote control with the receiver on the fan to operate.
Clean & Maintenance
Clean
1. Suggested to clean the dust from the fan once a month.
2. Always unplug the fan before cleaning.
3. You may use dry cloth to wipe the outer parts with a soft cloth. Do not use corrosive detergent or solvent, gasoline, thinner, benzene on this fan.
Product Storage
1. Unplug and pack to prevent dust from entering the fan body if the fan will not be used for a long time.
2. Unplug and pack the fan in a cool dry place.
Safety Guidelines
Safety
• Read these instructions carefully and retain for future reference.
• Remove all packaging and any labels.
FUNDAMENTAL SAFETY WARNING
• The appliance is not intended for use by persons (including children) with reduced physical, sensory or mental capabilities, or lack of experience and knowledge, un less they have been given supervised or instruction concerning use of the appliance in a safe way and understand the hazards involve by a responsible person for their safety.
• Young children should be supervised to ensure that they do not play with the appliance.
• If the supply cord is damaged, it must be replaced by the manufacturer or its service agent or a similarly qualified person in order to avoid a hazard.
• Ensure that the fan is switched off from the supply mains before removing guard for cleaning.
• Misuse of your appliance can result in injury.
FOR EUROPEAN MARKET ONLY
• This appliance shall not be used by children. Keep the appliance and its cord out of reach of children less than 8 years.
• Children from 8 years and above can use, clean and perform user maintenance on this appliance in accordance with the User Instructions provided they are supervised by a person responsible for their safety and have been given instruction concerning the use of the appliance and are aware of the hazards.
• For indoor use only. Rain and water are dangerous in the presence of electricity.
• Use on stable horizontal surfaces only to avoid fan tipping over.
Before Plugging In
• Make sure your electricity supply is the same as the one shown on the rating label.
• Please ensure the socket’s power is over 10Amps / 240V and the voltage should meet the requirements on the rating label.
• Do not operate or plug in the fan with wet hands.
• Ensure the plug is plugged in the socket completely.
• If the fan does not rotate or with abnormal smell, immediately unplug the fan and contact service center for repair.
• Do not place heavy objects on the power cord, it will damage the cord.
• If the plug or the power cord is damaged, it will result in short circuit and may lead to electric shock or fire. Please unplug the fan and call service center for repair. These parts must be replaced by the manufacturer or its service agent or a similarly qualified person in order to avoid a hazard.
• Do not use pesticides and flammable sprays around the product, it may cause product damage.
• Do not put any foreign object in the fan.
• Do not spill liquid on the fan, it will lead to short circuit and damage the fan.
• Do not use the fan around a tub, sprinkler or pool, it will lead to short circuit and damage the fan.
• Do not leave the fan unattended. Please turn the fan off when you go out.
• Do not pull the power cord to unplug the fan, it will damage the cord.
Service and Customer Care
• If the cord is damaged it must, for safety reasons, be replaced by DeLonghi or an authorized DeLonghi repairer.
• If you experience any problems with the operation of your appliance, before requesting assistance, please visit www.delonghi.com
• Please note that your product is covered by a warranty, which complies with all legal provisions concerning any existing warranty and consumer rights in the country where the product was purchased.
• If your DeLonghi product malfunctions or you find any defects, please send it or bring it to an authorized DeLonghi Service Centre.


 the fan will turn counter clockwise; likewise keep pressing the right button,
  the fan will turn clockwise. When the fan reaches the desired direction, release the button and you may set the horizontal oscillation angles.
 0°, 60°, 90°, 180°, 360° and LED light will change accordingly.