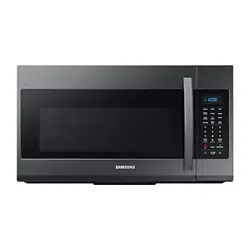
User Manual Microwave
setting up your microwave oven
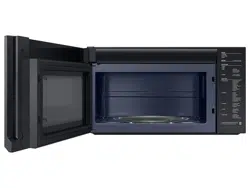
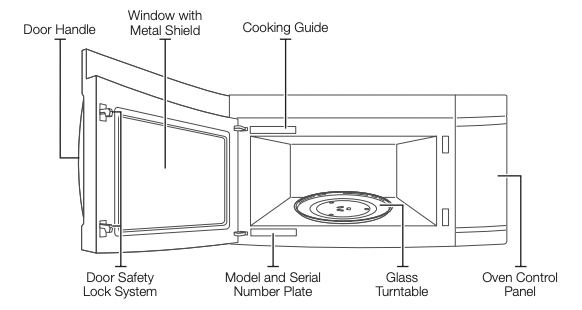
SETTING UP YOUR MICROWAVE OVEN
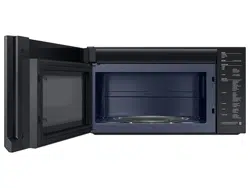
1. Open the door by pulling the handle on the right side of the door.
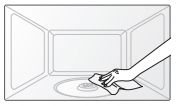
2. Wipe the inside of the oven with a damp cloth.
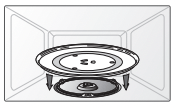
3. Install the pre-assembled ring into the indentation at the center of the microwave oven.
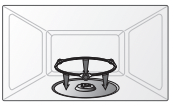
4. Place the glass tray securely in the center of the preassembled roller ring.
FEATURES
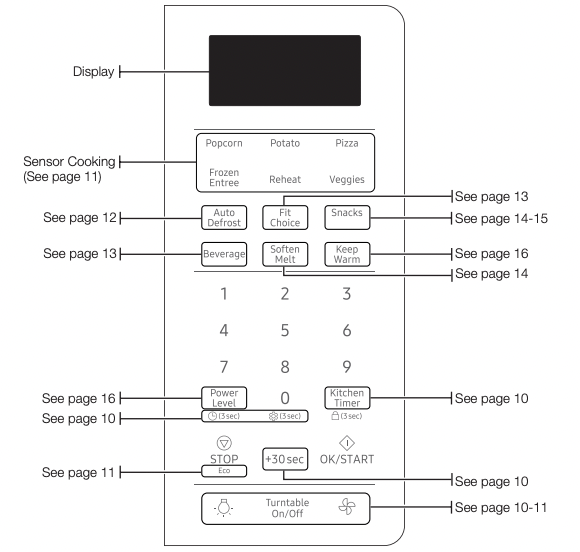
CHECKING THE CONTROL PANEL
SETTING THE TIME
Your microwave oven is equipped with a built-in clock. Set the clock when first installing your microwave oven and after a power failure. The time is displayed whenever the microwave oven is not being used.
- Press the Power Level button for 3 seconds.
- Use the number buttons to enter the current time. You need to press at least three numbers to set the clock. For example, if the current time is 5:00, press 5,0,0. The display will show: 500.
- Press the Power Level button.
- Use the Power Level button to select AM / PM.
- Press the OK/START button.
- A colon appears indicating that the time is set.
CHILD LOCK
The Child Lock function allows you to lock the buttons so that the microwave oven cannot be operated accidentally. The oven can be locked at any time.
Activating/Deactivating
If you want to activate or deactivate the child lock function, press the Kitchen Timer button for 3 seconds. The display will show ON when the oven is locked, and then re-displays the time.
OPTIONS
You can customize your new microwave oven to suit your preferences. To customize:
- Press the number 0 button for 3 seconds.
- Press the number button that corresponds to the function you want to customize.
- Press the number that corresponds to the option you want to set.
- Press the OK/START button to set the option.
The functions, options, and corresponding number buttons are listed in the table below.
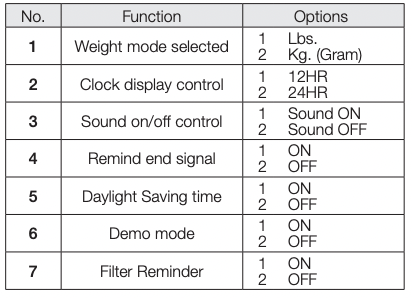
Filter Reminder
The filter should be cleaned or replaced once every four months. When it is time to clean or replace the filter, the microwave displays the “Filter” message to remind you to clean or replace the filter. To remove the message, touch the number 0 when the microwave is in standby mode, or access Options.
using your microwave oven
Cooking has never been easier than with your new Samsung microwave oven. The following section describes everything you need to know about using your microwave oven.
KITCHEN TIMER BUTTON
Use the Kitchen Timer for timing up to 99 minutes, seconds.
- Press the Kitchen Timer button.
- Use the number buttons to set the length of time you want the timer to run.
- Press the OK/START button.
- The display counts down and beeps when the time has elapsed.
- To cancel the timer setting: Press the STOP button once.
ADD 30 SEC BUTTON
This simplified control saves you time, letting you quickly start cooking at 100 % power.
- Press the Add 30 sec button for each 30 seconds you want food to cook. For example, press it twice to cook for one minute, and then press the OK/ START button to start cooking.
- Add 30 sec to a cooking program already in progress by pressing the Add 30 sec button for every additional 30 seconds you want to add.
VENT BUTTON (  )
)
The vent removes steam and other vapors from the cooking surface. You can manually select the vent setting.

 The exhaust fan’s speed will decrease when the oven’s cooking function is activated.
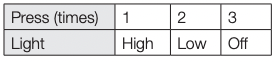
LIGHT HI/LO/OFF BUTTON (  )
)
The Light button allows you to select a light setting for your microwave.
TURNTABLE ON/OFF BUTTON
For best cooking results, leave the turntable on. However, for large dishes it can be turned off. Press the Turntable On/Off button to turn the turntable on or off.
 The turntable may become too hot to touch. Use pot holders to touch the turntable during and after cooking.
ECO MODE
Eco Mode reduces standby power usage. To start ECO Mode, press the STOP button once. The display will go out and the microwave shifts to the Eco mode which minimizes power usage. To cancel the Eco Mode, press the STOP button once again, or press any other button.
SENSOR COOKING BUTTONS
The Sensor Cooking buttons let you cook favorite foods using preset power levels and times at the touch of a button. If the food is not thoroughly cooked or reheated when you use the auto cook feature, complete the cooking process by selecting a power level and cooking the food for an additional amount of time.
Do not use the Sensor Cooking buttons continuously. The oven must cool for 5 minutes between uses or the food will overcook.
Sensor cooking utensils & covers
To obtain good cooking results using these functions, follow the directions for selecting the appropriate containers and covers in the Cookware section on page 16.
CAUTION
Always use microwave-safe containers and cover with a lid or plastic wrap. When using plastic wrap, turn back one corner to allow steam to escape.
CAUTION
Fill containers at least half full.
Foods that require stirring or rotating should be stirred or turned at the end of the Sensor Cook cycle, when the time has started to count down on the display.
Do not use the Auto Sensor cooking feature continuously. Wait 5 minutes before selecting another sensor cooking operation.
To avoid poor results, do not use the Auto Sensor when the room ambient temperature is too high or too low.
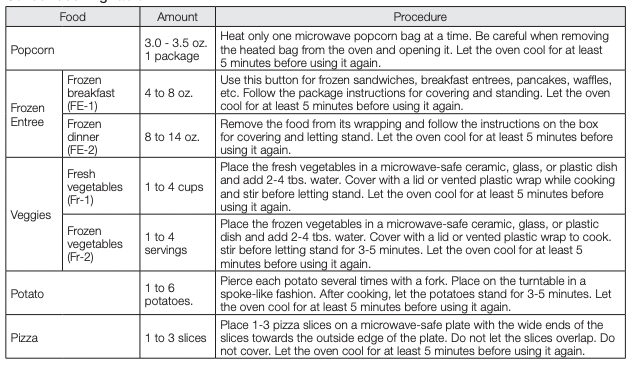
Sensor cooking table
REHEAT BUTTON
Heating leftovers and precooked foods is easy with your new microwave. By actually sensing the humidity that escapes as the food is heated, the oven’s heating time is automatically adjusted depending on the type and amount of precooked food.
All food must already be precooked. Plates of food and casseroles should be stored at refrigerator temperature. Press the Reheat button and OK/START button to begin reheating your precooked food.
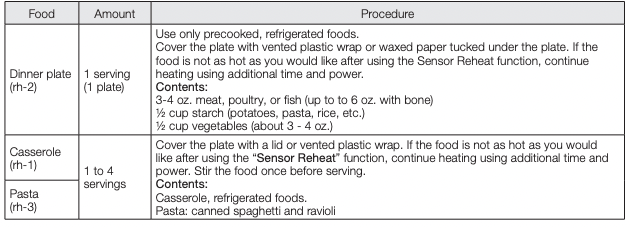
Reheating table
Follow the instructions below when reheating different types of food.
AUTO DEFROST BUTTON
To thaw frozen foods, enter the weight of the food, and the microwave automatically sets the defrosting time, power level, and standing time. Press the OK/START button to start defrosting.
- Press the Auto Defrost button.
- Press the number buttons to directly enter the weight of the food.
- Press the OK/START button.
- The oven will beep twice during the defrosting process. Open the oven door, and turn the food over.
Auto defrosting table
Follow the instructions below when defrosting different types of food
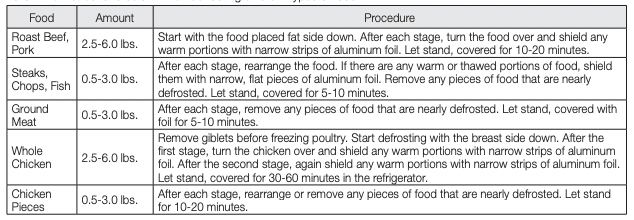
Check the food when you hear the oven signal. After the final stage, small sections may still be icy. Let the food stand to continue the thawing process. The food is not defrosted until all ice crystals have thawed. Shielding the edges of roasts and pieces of steak using small pieces of foil prevents the edges from being cooked before the center of the food has defrosted. Use narrow, flat, smooth strips of aluminum foil to cover edges and thinner sections of the food.
1 POUND DEFROST FUNCTION
To thaw 1 pound of frozen food, use the 1 Pound Defrost Function. The microwave will automatically set the defrosting time, power level and standing time.
1. Press the Auto Defrost button twice. The display shows: 1.0 LB.
2. Press the OK/START button to start defrosting.
3. The oven will beep and the display will read TURN THE FOOD OVER twice during the defrosting process. Open the oven door, and turn the food over.
4. If you do not turn the food over when TURN THE FOOD OVER is displayed, the oven will pause until you press the OK/ START button.
FIT CHOICE BUTTON
1. Press the Fit Choice button. Press the button repeatedly to cycle through the available items. (Refer to the Fit Choice table below for a list of the items.)
2. Press the 1, 2, 3, or 4 button to select the amount.
3. Press the OK/START button to begin cooking.
Fit Choice table

BEVERAGE BUTTON
1. Press the Beverage button.
2. Press the 1, 2, or 3 button to select the Amount.
3. Press the OK/START button.

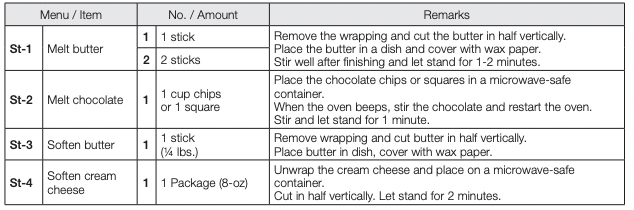
SOFTEN/MELT BUTTON
- Press the Soften/Melt button. Press the button repeatedly to cycle through the available items. (Refer to the Soften/Melt table below for a list of the items.)
- Press the number 1 or 2 button to select the amount. You can cook only 1 serving for the Melt Chocolate, Soften Butter, and Soften Cream Cheese options. (Refer to the Soften/Melt table for the serving size.)
- Press the OK/START button to begin cooking.
Soften / Melt table
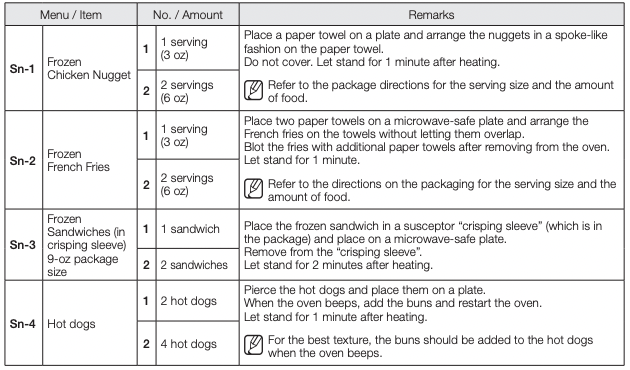
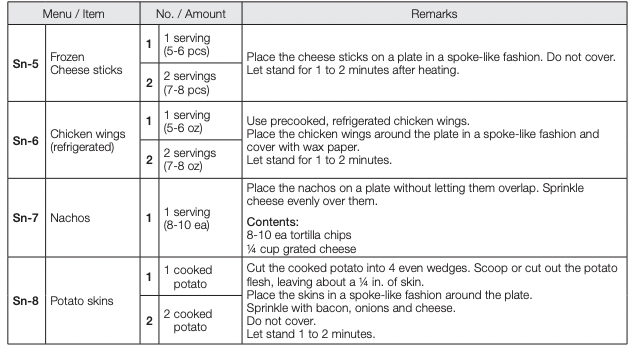
SNACKS BUTTON
- Press the Snacks button. Press the button repeatedly to cycle through the available items. (Refer to the Snack bar table below for a list of the items.)
- Press the number 1 or 2 button to select the serving size. You can cook only 1 serving for Nachos. (Refer to the Snack bar table for the serving size.)
- Press the OK/START button to begin cooking.
Snack bar table
MICROWAVE COOKING TIMES & POWER LEVELS
Your oven allows you to set two different cooking stages, each with its own time length and power level. The power level lets you control the heating intensity from Warm (1) to High (10).
One-stage cooking
For simple, one-stage cooking with the power level set to High (10), you only need to set the cooking time, and then press OK/START. The power level is automatically set to High. If you want to set the power level to any other level, use the Power Level button.
1. Use the number buttons to set a cooking time. You can enter a time from one second to 99 minutes and 99 seconds. To select a time greater than one minute, enter the seconds too. (For example, to set a cooking time of 20 minutes, enter 2, 0, 0, 0.)
2. If you want to set the power level to a level other than High, press the Power Level button, and then use the number buttons to enter the power level.
3. Press the OK/START button to begin cooking. If you want to change the power level, press the STOP button before you press the OK/START button, and then follow the instructions from Step 1 again.
Some recipes require different cooking stages at different temperatures. Your microwave allows you to set multiple cooking stages.
Multi-stage cooking
- Follow steps 1 and 2 from the “One-stage cooking” section.
- Use the number buttons to set a second cooking time.
- Press the Power Level button, and then use the number buttons to set the power level for the second cooking stage.
- Press the OK/START button to begin cooking.
When selecting more than one cooking stage, you must press the Power Level button before you can enter the second cooking stage time and power level.
Press the Power Level button twice to set the power level to High for a cooking stage.
Power Levels
The 10 power levels allow you to choose the optimal power level for your cooking needs.
1 Warm
2 Low
3 Defrost
4 Medium low
5 Medium
6 Simmer
7 Medium high
8 Reheat
9 Sauté
10 High
KEEP WARM
You can keep cooked food warm in your microwave oven for up to 99 minutes 99 seconds.
- Press the Keep Warm button.
- Enter the warming time.
- Press the OK/START button.
Keep Warm operates for up to 99 minutes 99 seconds.
Food that is cooked covered should also be covered during Keep Warm.
Pastry items (pies, turnovers, etc.) should be uncovered during Keep Warm.
Complete meals kept warm on a dinner plate can be covered during Keep Warm.
Below are the amounts of food we recommend you apply the Warm and Hold function to by Food Type.
Food type ---- Recommended Quantity
Liquid -------1-2 cups
Dry ----------5-10 oz.
cleaning and maintaining your microwave oven
Keeping your microwave oven clean improves its performance, wards off unnecessary repairs, and lengthens its life.
CLEANING THE EXTERIOR
It’s best to clean spills on the outside of your microwave oven as they occur. Use a soft cloth and warm, soapy water. Rinse and dry.
Do not get water into the vents. Never use abrasive products or chemical solvents such as ammonia or alcohol as they can damage the appearance of your microwave.
Cleaning under your microwave oven
Regularly clean grease and dust from the bottom of your microwave using a solution of warm water and detergent.
Cleaning the control panel
Wipe with a damp cloth and dry thoroughly. Do not use cleaning sprays, large amounts of soap and water, abrasives, or sharp objects on the panel as it is easily damaged.
Cleaning the door and door seals
Always ensure that the door seals are clean and that the door closes properly. Take particular care when cleaning the door seals to ensure that no particles accumulate and prevent the door from closing correctly. Wash the glass door with very mild soap and water. Be sure to use a soft cloth to avoid scratching.
If a thin film of water accumulates on the inside or outside of the oven door, wipe it off with a soft cloth. A thin water film can accumulate when you operate the oven when humidity is high and in no way indicates microwave leakage.
CLEANING THE INTERIOR
Ensure that the microwave oven has cooled down before cleaning it to avoid injury.
Remove the glass tray from the oven when cleaning the oven or tray. To prevent the tray from breaking, handle it with care and do not put it in water immediately after cooking. Wash the tray carefully in warm sudsy water or in the dishwasher.
Clean the interior surfaces (oven cavity) of your microwave oven periodically to remove any splashes or stains. To remove hardened food articles and remove smells, place 2 cups of water (add lemon juice for extra freshness) into a four-cup measuring glass. Run the microwave at High power for 5 minutes or until the water boils. Let the water stand in the oven for one or two minutes.
CLEANING THE TURNTABLE AND ROLLER RINGS
Clean the roller rings periodically and wash the turntable as required. You can wash the turntable safely in your dishwasher.
STORING AND REPAIRING YOUR MICROWAVE OVEN
If you need to store your microwave oven for a short or extended period of time, choose a dust-free, dry location.
Dust and dampness may adversely affect the ability of the microwave parts.

- Do not repair, replace, or service any part of your microwave oven yourself. Allow only a qualified service technician to perform repairs. If the oven is faulty and needs servicing, or you are in doubt about its condition, unplug the oven from the power outlet and contact your nearest Samsung service center.
- Do not use the oven if it is damaged, in particular, if the door or door seals are damaged. Door damage includes a broken hinge, a worn out seal, or a distorted/bent casing.
- Do not remove the oven from its casing.
- This microwave oven is for home use only and is not intended for commercial use.
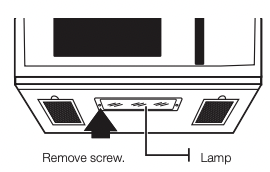
REPLACING THE COOKTOP/NIGHT LIGHT
When replacing the cooktop/night light, make sure that you are wearing gloves to avoid injury from the heat of the bulb.
- Unplug the oven or turn off the power at the main power supply.
- Remove the screw from the light cover and lower the cover.
- Replace the bulb with a 20 watt halogen lamp.
- Replace the light cover and mounting screw.
- Turn the power back on at the main power supply or plug the microwave in.
REPLACING THE OVEN LIGHT
When replacing the oven light, make sure that you are wearing gloves to avoid injury from the heat of the bulb.
- Unplug the oven or turn off the power at the main power supply.
- Open the door.
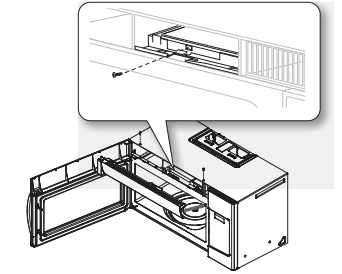
- Remove the vent cover mounting screws (2 middle screws).
- Slide the vent grille to the left, then pull it straight out.
- Remove the charcoal filter, if present.
- Remove the cover by pushing the hook and pulling up the lever.
- Remove the bulb by turning it gently.
- Replace the bulb with a 40 watt appliance bulb.
- Replace the bulb holder.
- Replace the vent grille and the 2 screws.
- Turn the power back or plug the microwave in.
CLEANING THE GREASE FILTER
Your microwave oven has reusable grease filter. The grease filters should be removed and cleaned at least once every four months or as required. To order a new grease filter, contact SamsungParts at 1-800-627-4368 or your Samsung dealer.
Your microwave oven has a filter reminder function. See page 10 for details.
To avoid risk of personal injury or property damage, do not operate the oven hood without the filters in place.
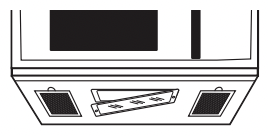
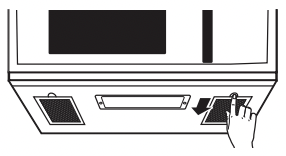
1. To remove the filter, slide them to the rear using the tabs, then pull down and out.
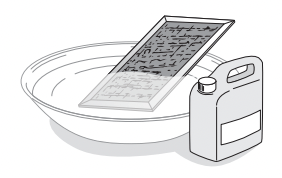
2. Soak the grease filter in hot water and a mild detergent. Rinse well and shake to dry. Brushing the filter lightly can remove embedded dirt.
Do not use ammonia or put the grease filter in the microwave oven cavity to dry. The aluminum will darken.
3. To re-install the filter, slide it into the frame slots on the back of each opening, and then press up and to the front to lock it.
REPLACING THE CHARCOAL FILTER
If your oven is vented to the inside, the charcoal filter should be replaced every 6 to 12 months and more often if necessary. The charcoal filter cannot be cleaned. To order a new charcoal filter, contact SamsungParts at 1-800-627-4368 or your Samsung dealer.
1. Unplug the oven or turn off the power at the main power supply.
2. Open the door.
3. Remove the vent grille mounting screws (2 middle screws).
4. Slide the vent grille to the left, then pull it straight out.
5. Push the hook, and then remove the old filter.
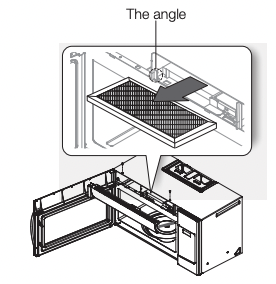
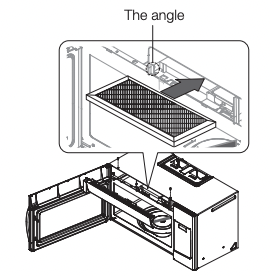
6. Slide a new charcoal filter into place. The filter should rest at the angle shown.
7. Replace the vent grille and 2 screws, and then close the door. Turn the power back on, and then set the clock.
troubleshooting
Check these solutions if you have a problem with your microwave:
The display and/or the oven is not working.
- Make sure the plug is properly connected to a grounded outlet. If the wall outlet is controlled by a wall switch, make sure the wall switch is turned on. Remove the plug from the outlet, wait ten seconds, and plug it in again. Reset the circuit breaker or replace any blown fuses.
- Plug a different appliance into the outlet. If the other appliance doesn’t work, call a qualified electrician to repair the wall outlet.
- Plug the oven into a different outlet.
The display is working, but the power won’t come on.
- Make sure the door is closed securely.
- Check if any packaging material or anything else is stuck in the door seal.
- Check if the door is damaged.
- Touch Cancel twice and enter all the cooking instructions again.
Is the power going off before the set time has elapsed?
- If there was a power outage, the time indicator will display: 88:88.
- If no power outage occurred, remove the plug from the outlet, wait ten seconds, and plug it in again.
- Reset the clock and any cooking instructions.
- Reset the circuit breaker or replace any blown fuses.
Cooks food too slowly.
- Make sure the oven has its own 15 to amp circuit line. Operating another appliance on the same circuit can cause a voltage drop. If necessary, move the oven to its own circuit.
Has sparks or arcing.
- Remove any metallic utensils, cookware, or metal ties. If using foil, use only narrow strips and allow at least one inch between the foil and the interior oven walls.
The turntable makes noise or becomes stuck.
- Clean the turntable, roller ring, and oven floor.
- Make sure the turntable and roller ring are positioned correctly.
Causes TV or radio interference.
- This is similar to interference caused by other small appliances, such as hair dryers. Move your microwave or appliance) away from the affected appliances, such as your TV or radio.
Vent Motor suction force is too weak.
- Set the vent mode to high.
- The Vent Fan will only operate in low speed mode while the microwave is working.
Operating noise is too loud.
- The microwave makes noise during operation. This is normal.
- If you hear an abnormal sound continuously, please contact the Samsung Call Center (1-800-726-7864).