Owner's Guide Televisions
Installing the TV
Assembling / Removing the pedestal
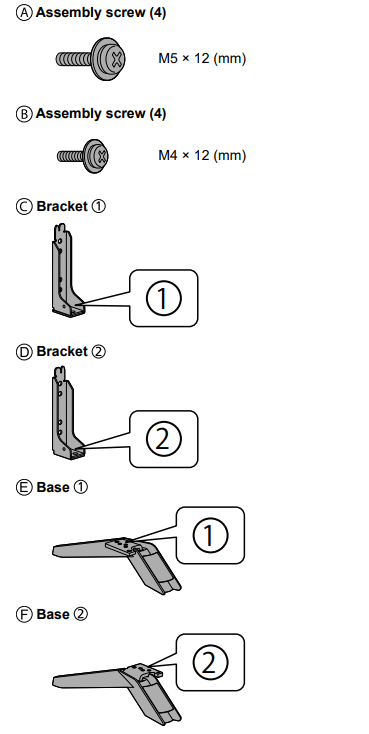
Preparations
Take out the pedestal and the TV from the packing case and put the TV onto a work table with the screen panel down on the clean and soft cloth (blanket, etc.)
- Use a flat and firm table bigger than the TV.
- Do not hold the screen panel part.
- Make sure not to scratch or break the TV.
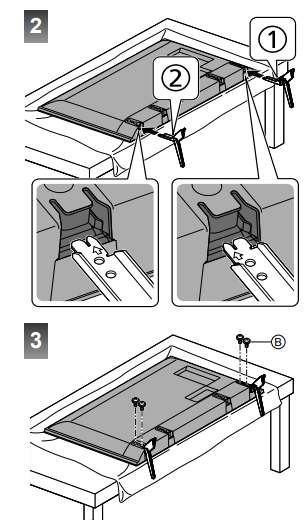
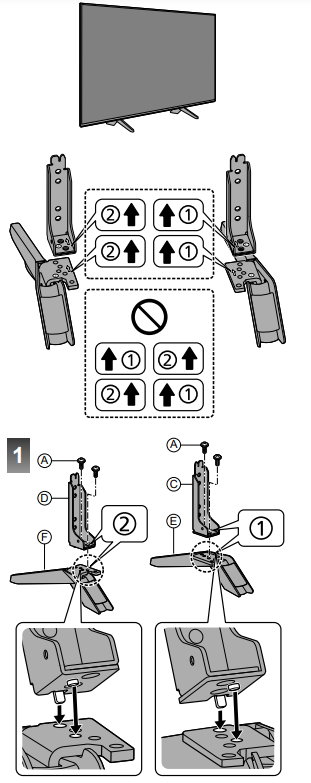
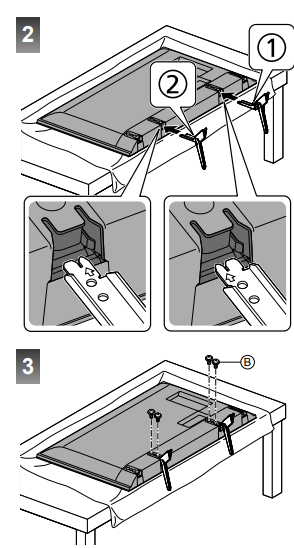
Assembling the pedestal
- Select a method to assemble the pedestal from the following styles.
- Do not assemble the pedestal by any method other than those specified below.
<Style 1>
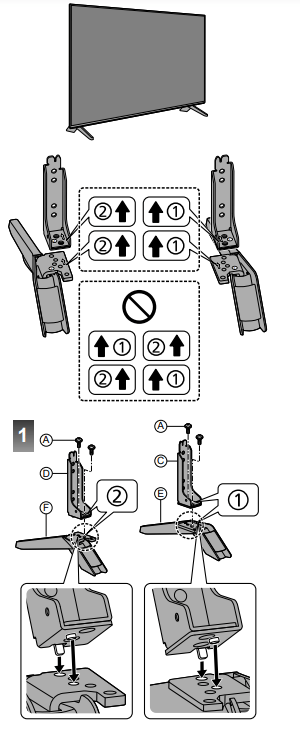
<Style 2>
Removing the pedestal from the TV
Be sure to remove the pedestal in the following way when using the wall-hanging bracket or repacking the TV.
- Put the TV onto a work table with the screen panel down on the clean and soft cloth.
- Pull out the covers.
- Remove the assembly screws
 from the TV.
- Pull out the pedestal from the TV.
- Remove the assembly screws
 from the bracket.
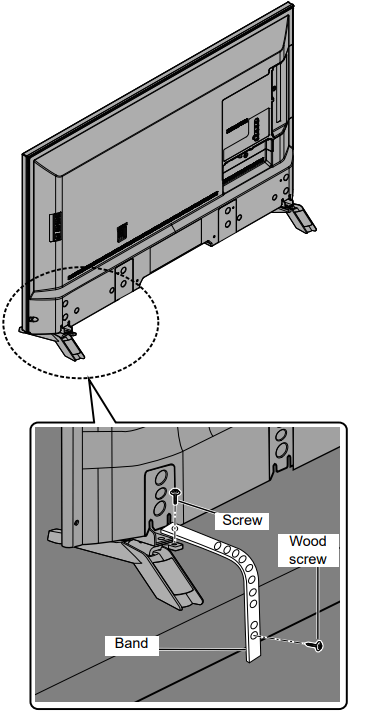
Preventing the TV from falling over
It is recommended to secure the pedestal to a furniture as shown to prevent the TV from falling over.
- This information is designed to reduce the risk of injuries caused by the TV falling over. However, no measure can guarantee protection in all cases.
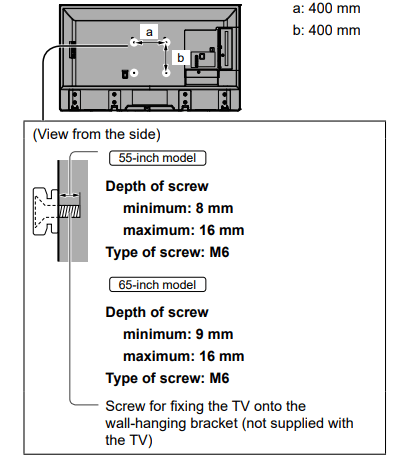
Installing the wallhanging bracket
Choosing to wall mount the TV shall be done at the owner’s risk. Always use a qualified installer to perform a TV wall bracket installation. Incorrect fitting may cause equipment to fall, resulting in injury and product damage. Any such damage will void your warranty
- Holes for wall-hanging bracket installation Rear of the TV
Warning
- When optional accessories such as wall brackets, etc. are used, always read and follow the manufactures installation and usage instructions.
- Do not mount the unit directly below ceiling lights (such as spotlights or halogen lights) which typically give off high heat. Doing so may warp or damage plastic cabinet parts.
- When installing wall brackets you must ensure the wall bracket is not electrically grounded to metal wall studs. Always ensure that there are no electrical cables, pipes, etc. in the wall before you begin the wall bracket installation.
- To prevent fall and injury, remove the TV from its fixed wall position when it is no longer in use.
Connections
- External equipment and cables shown are not supplied with this TV.
- Please ensure that the unit is disconnected from the mains socket before attaching or disconnecting any cables.
- Check the terminal type and cable plugs are correct for connection.
- Use a fully wired HDMI compliant cable. Please use a High Speed HDMI cable when connecting for high resolution pictures.
- Keep the TV away from electronic equipment (video equipment, etc.) or equipment with an infrared sensor, otherwise distortion of image / sound may occur or operation of other equipment may be affected.
- Please also read the manual of the equipment being connected.
Terminals
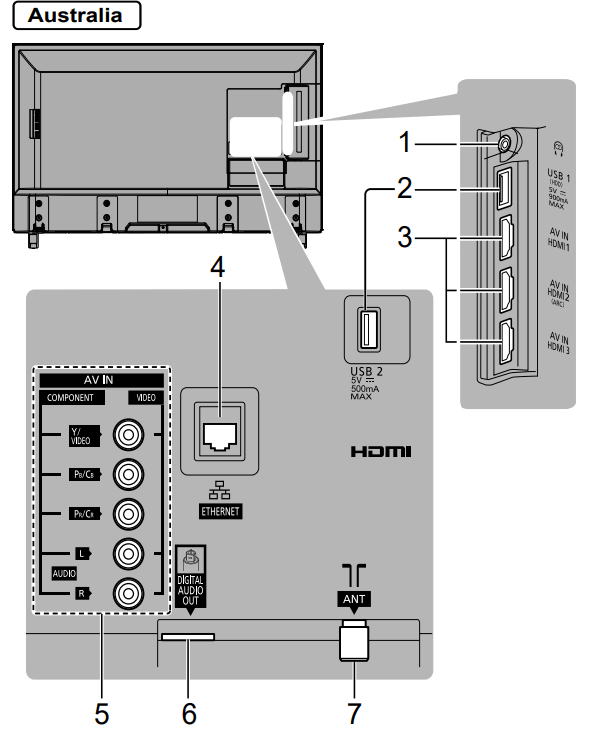
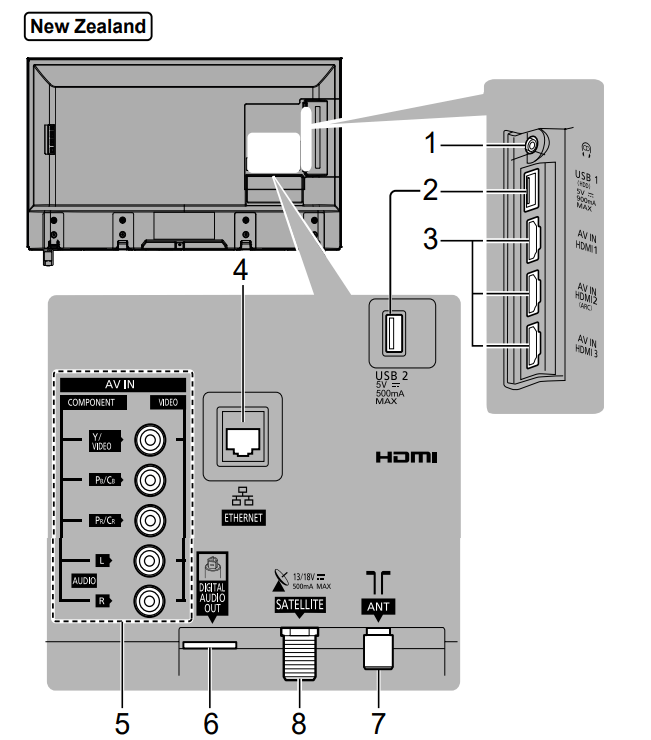
- Headphone jack (p. 13)
- USB 1 port
 This symbol indicates DC operation
- HDMI 1 - 3 (p. 12 - 13)
- ETHERNET terminal (p. 12)
- AV IN (COMPONENT / VIDEO) (p. 13)
- DIGITAL AUDIO OUT
- Aerial terminal (p. 11)
- Satellite terminal (p. 11) New Zealand
Basic connections
Mains lead
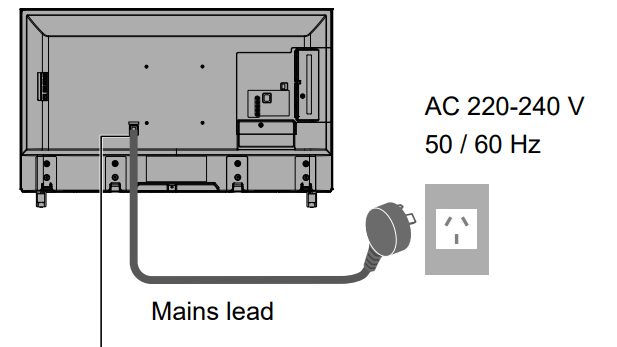
Insert the mains plug firmly into place. 55-inch model
- When disconnecting the mains lead, be absolutely sure to disconnect the mains plug from the mains socket first.
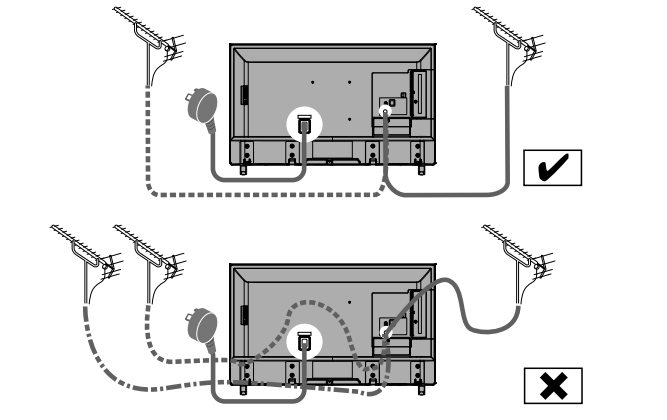
Aerial
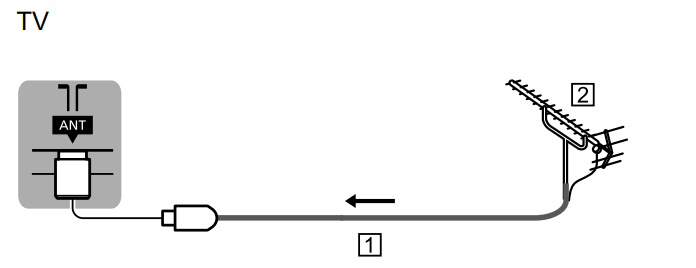
- RF cable
- Aerial
- For Digital TV, Analogue TV
- Keep RF (aerial) cable away from the mains lead to avoid and minimise mains interference pickup.
- Do not place the RF cable under the TV.
- An aerial, correct cable (75 Ω coaxial) and correct terminating plug are required to obtain optimum quality picture and sound.
- If a communal aerial system is used, you may require the correct connection cable and plug between the wall aerial socket and the TV.
- Your local Television Service Centre or dealer may be able to assist you in obtaining the correct aerial system for your particular area and the accessories required.
- Any matters regarding aerial installation, upgrading of existing systems or accessories required, and the costs incurred, are the responsibility of you, the customer.
- If the aerial is placed in the wrong location, interference might happen.
Satellite dish New Zealand
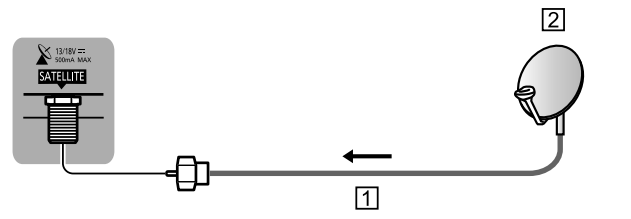
- Satellite cable
- Satellite dish
- For Satellite TV
- To ensure your satellite dish is correctly installed, please consult your local dealer. Also consult the received satellite broadcasting companies for details.
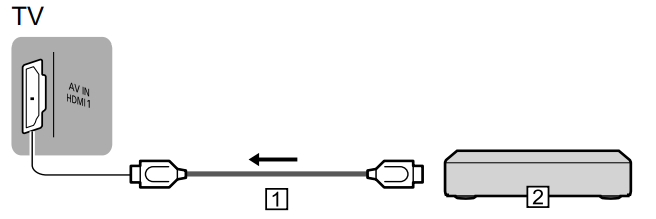
AV devices
DVD Recorder / VCR
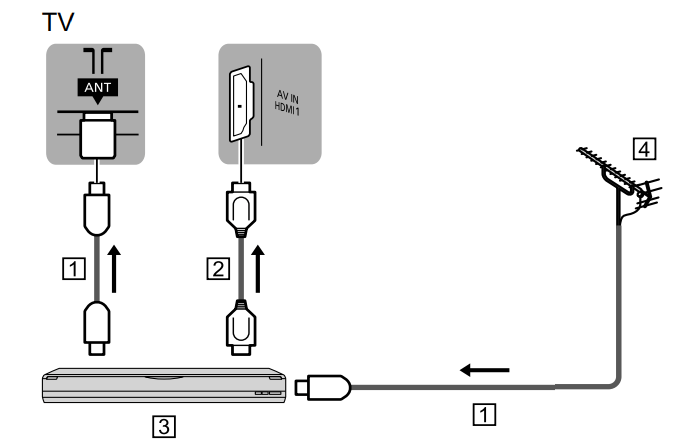
- RF cable
- HDMI cable
- DVD Recorder / VCR
- Aerial
Set top box
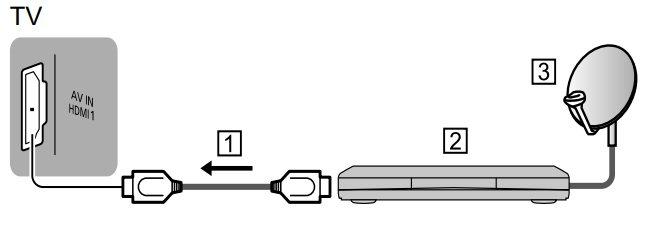
- HDMI cable
- Set top box
- Satellite dish
Network
A broadband network environment is required to be able to use internet services.
- If you do not have any broadband network services, please consult your retailer for assistance.
- Prepare the internet environment for wired connection or wireless connection.
Wired connection
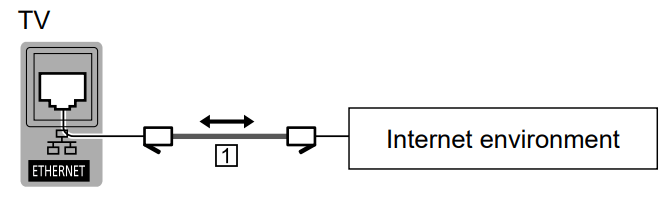
- LAN cable (Shielded)
- Use Shielded Twist Pair (STP) LAN cable
Wireless connection
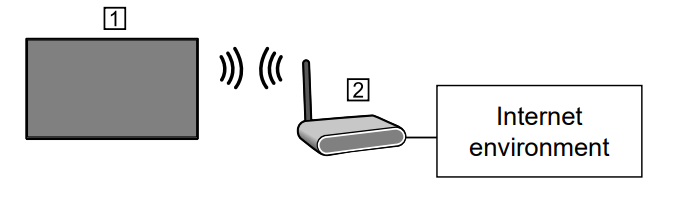
- Built-in wireless LAN (Rear of the TV)
- Access point
Note
Network reconnection may take a while after the TV set is turned on. If network features cannot be accessed, please wait and try again later.
Connections for 4K / HDR compatible equipment
- HDMI cable
- 4K / HDR compatible equipment
- To watch high-definition 4K more accurately or HDR content, connect the 4K / HDR compatible equipment to HDMI1 or 2 terminal.
- Connect the 4K compatible equipment to HDMI terminal using a 4K compatible cable and you can watch content in 4K format.
- Supporting HDR does not increase the peak brightness capabilities of the TV panel.
[HDMI 2.0 Setting] (Setup Menu)
Reproduces the image more precisely with the expanded colour gamut when connecting the 4K compatible equipment. Select the mode depending on the equipment.
[4K@60Hz 4:2:0]:
For better compatibility. Set to [4K@60Hz 4:2:0] when the image or sound in HDMI input is not played properly.
[4K@60Hz 4:4:4/4:2:0]:
For the 4K compatible equipment that has the function to output the image precisely with the expanded colour gamut.
- Select the HDMI input mode connected to the equipment.
- Display the menu and select [HDMI 2.0 Setting] (Setup Menu).
- For information about the valid format, refer to [eHELP] (Search by Purpose > Watching > 4K resolution > Valid 4K format).
Other connections
DVD Player
(COMPONENT equipment)
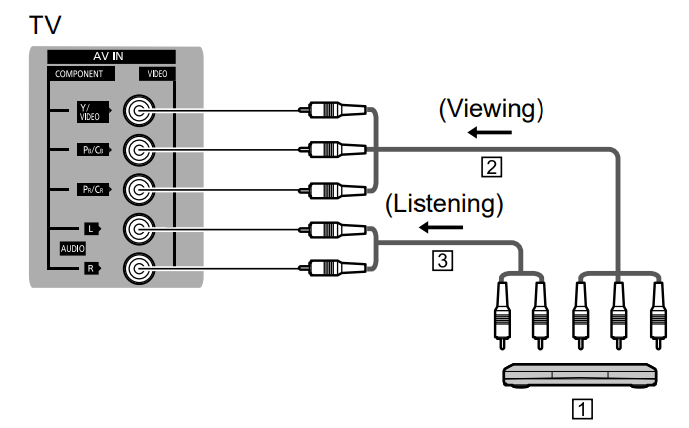
- DVD Player
- Component video cable (Shielded)
- Audio cable (Shielded)
Camcorder / Game equipment
(VIDEO equipment)
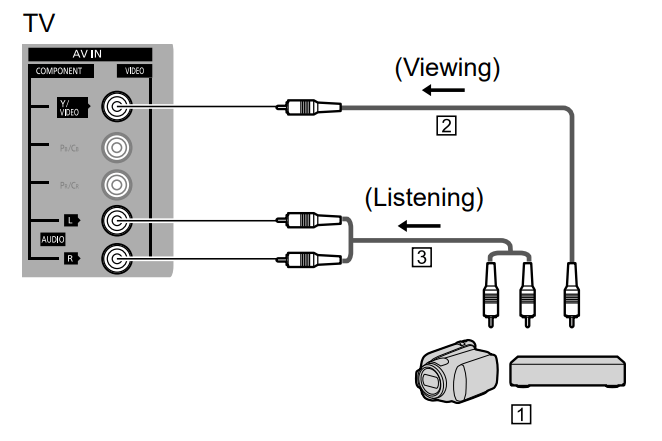
- Camcorder / Game equipment
- Composite video cable (Shielded)
- Audio cable (Shielded)
Amplifier (listening with external speakers)
- To enjoy multi-channel sound from external equipment (e.g. Dolby Digital 5.1ch), connect the equipment to the amplifier. For information about the connections, read the manuals of the equipment and amplifier.
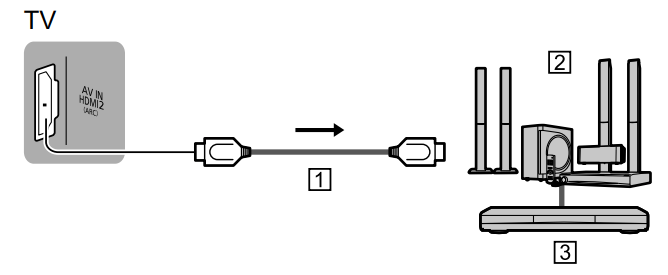
- HDMI cable
- Amplifier with speaker system
- External equipment (DVD Player, etc.)
- Use HDMI2 to connect the TV to an amplifier which has ARC (Audio Return Channel) function. If connecting to an amplifier without ARC function, use DIGITAL AUDIO OUT.

- Optical cable
- DIGITAL AUDIO IN
- e.g. Amplifier with speaker system
Note
- ARC function is not supported when performing mirroring on the TV set.
- To enable ARC function in CEC Menu
1 Display Home with [HOME].
2 Select ‘CEC’ and press [OK] to access.
3 Choose “Enable Audio System” under Audio System (*).
(*) Name will vary depending on external equipment and amplifier.
Headphones
- For information about the volume settings, refer to [eHELP] (Search by Purpose > Settings > Audio).

USB HDD (for recording)
- Use USB 1 port for connecting the USB HDD.
- For details, refer to [eHELP] (Search by Purpose > Recording).
Note
- The TV supports USB HDD capacity up to 2 TB.
HDMI CEC
- Use HDMI1 - 3 for HDMI CEC connection.
- For details, refer to [eHELP] (Search by Purpose > Functions > HDMI CEC).
Media Player
- Select “Filter” options to filter the files as per the content type (Photo / Video / Music)
1 Display the option menu with [OPTION].
2 Select “Filter” and press [OK] to access.
3 Select “Photo / Video / Music” and press [OK] to set.
Cable arrangement
Fixing the cables
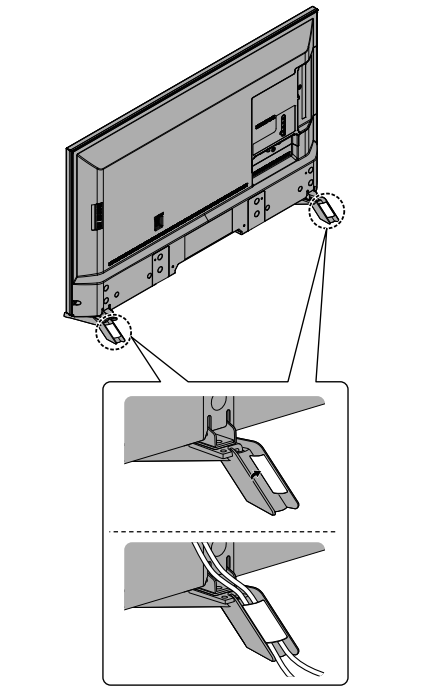
- Fix cables as necessary.
- When using the optional accessory, follow the option’s assembly manual to fix cables.
Identifying Controls
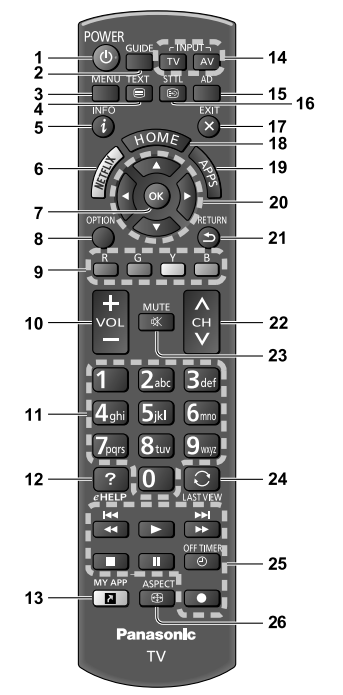
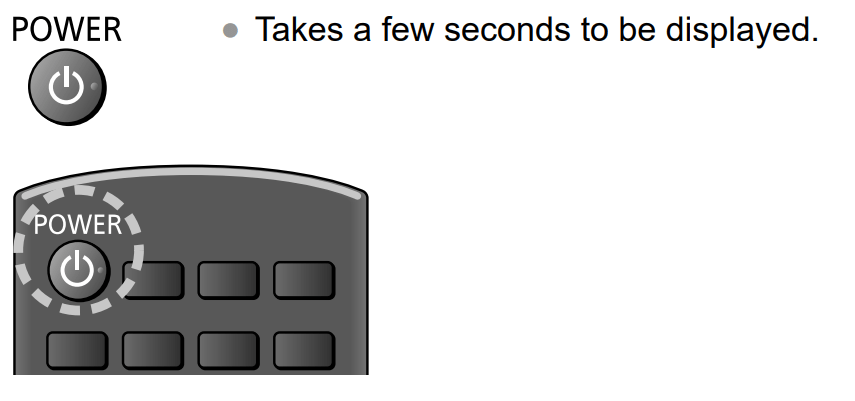
 Switches TV On or Off (Standby)
- TV Guide
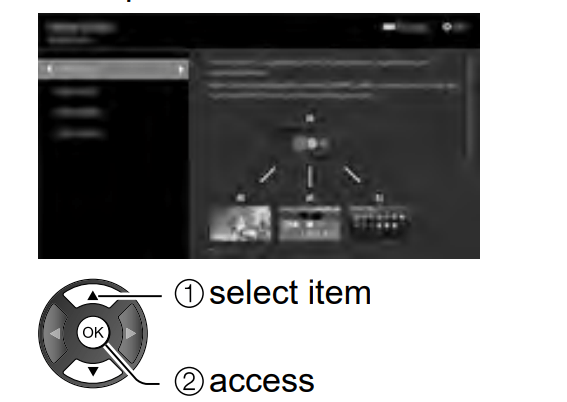
- [Main Menu]
● Press to access Video, Audio, TV, Setup and Parental Menus, etc.
- Teletext button
● This button is not used for this model. Australia
● Switches to teletext mode. New Zealand
- Information
● Displays channel and programme information.
- Netflix
● Accesses NETFLIX service directly.
● A broadband network environment is required in order to fully use this function.
● This service may be stopped or changed without notice.
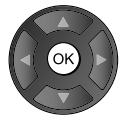
- OK
● Confirms selections and choices.
● Press after selecting channel positions to quickly change channel.
● Displays channel list.
- [Option Menu]
● Easy optional setting for viewing, sound, etc.
- Coloured buttons (red-green-yellow-blue)
● Used for the selection, navigation and operation of various functions.
- Volume Up / Down
- Numeric buttons
● Changes channel. Australia
● Changes channel and teletext pages. New Zealand
● Sets characters.
- [eHELP]
● Displays [eHELP] (Built-in Operating Instructions).
- [My App]
● Assigns a favourite application. After setting, starts the application easily by pressing this button.
● For details, refer to [eHELP] (Search by Purpose > Home > Apps)
- Input mode selection
● TV - switches to Digital TV / Analogue TV. Australia
● TV - switches to Satellite TV / Digital TV / Analogue TV. New Zealand
● AV - switches to AV input mode from Input Selection list.
- Audio Description
● Displays [Audio Description].
- Subtitles
● Displays [Subtitle Menu].
- Exit
● Returns to normal viewing screen.
- HOME ● Displays [Home].
● For details, refer to [eHELP] (Search by Purpose > Read first > Features).
- APPS
● Displays [Apps] (applications list).
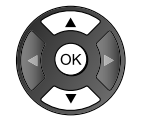
- Cursor buttons
● Makes selections and adjustments.
- Return
● Returns to the previous menu / page.
- Channel Up / Down
- Sound Mute On / Off
- Last view
● Switches to previously viewed channel or input mode.
- Operations for contents, connected equipment, etc.
- ASPECT
● Changes aspect ratio.
● Displays the [Aspect Selection] screen. [Auto] / [16:9] / [Just] / [4:3] / [Zoom]
■ [Auto] The best ratio is selected automatically.
■ [16:9]* Directly displays the image at 16:9 without distortion (anamorphic).
- For Digital Broadcast channels, image will be displayed based on broadcasted channel aspect ratio.
Note
● 16:9 Overscan Function only applies for 16:9 input source
■ [Just] Displays a 4:3 image full-screen. Stretching is only noticeable at the left and right edges.
■ [4:3] Displays the image at the standard 4:3 without distortion.
■ [Zoom] Displays a 16:9 letterbox or 4:3 image without distortion *
● Select [16:9 Overscan] in [Screen Settings] (Video Menu).
● Selects the screen area displaying the image for 16:9 aspect. [Off] / [On].
[On]: Enlarges the image to hide the edge of the image.
[Off]: Displays the image in the original size.
● Set to [On] if noise is generated on the edge of the screen.
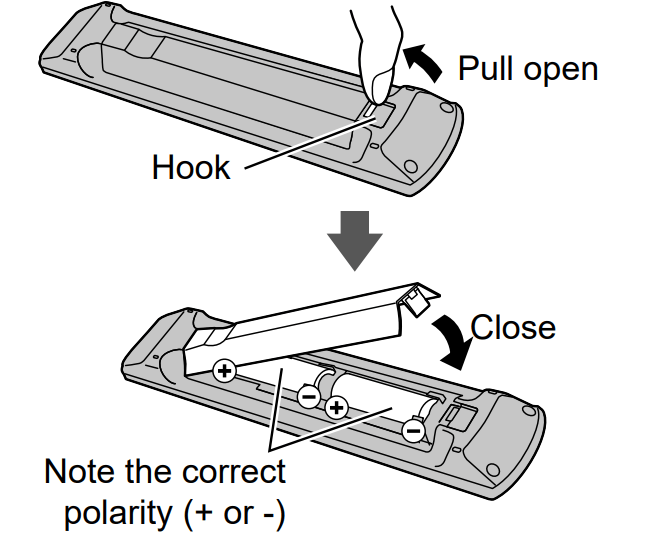
Installing / Removing batteries
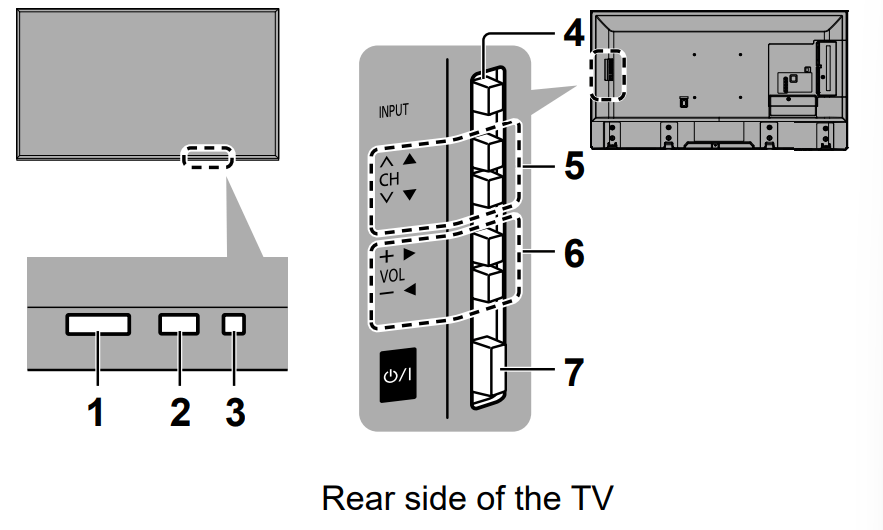
Indicator / Control panel
Note
- Location of indicators may vary depending on the models.
- Remote control signal receiver
● Do not place any objects between the TV remote control signal receiver and remote control.
- Ambient sensor
● Senses brightness to adjust picture quality when [Ambient Sensor] in the Video Menu is set to [On].
- Power LED
Red: Standby
Green: On
Orange: Standby with some functions (recording, etc.) active
● The LED blinks when the TV receives a command from the remote control.
- Input mode selection
● Press repeatedly until you reach the desired mode.
[Main Menu]
● Press and hold for about 3 seconds to display main menu. OK (when in the menu system)
- Channel Up / Down
Cursor Up / Down (when in the menu system)
- Volume Up / Down
Cursor Left / Right (when in the menu system)
- Mains power On / Off switch
● Use to switch the mains power.
● To turn Off the apparatus completely, you must pull the mains plug out of the mains socket.
●  : Standby / On
First time Auto Tuning
When the TV is turned on for the first time, it will automatically search for available TV channels and give options to set up the TV.
- These steps are not necessary if the setup has been completed by your local dealer.
- Please complete connections (p. 10 - 14) and settings (if necessary) of the connected equipment before starting Auto Tuning. For information about the settings for the connected equipment, read the manual of the equipment.
1.Plug the TV into a live mains socket and turn the power on
2.Select the following items
Set up each item by following the on-screen instructions.
How to use remote control
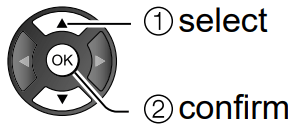
 Move the cursor
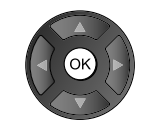 Access the item / store the setting
 Return to the previous item (if available)
Select your viewing environment
Connect to the Internet
Set up the network connection
Select your State/Territory Australia
3.Tuner Mode New Zealand
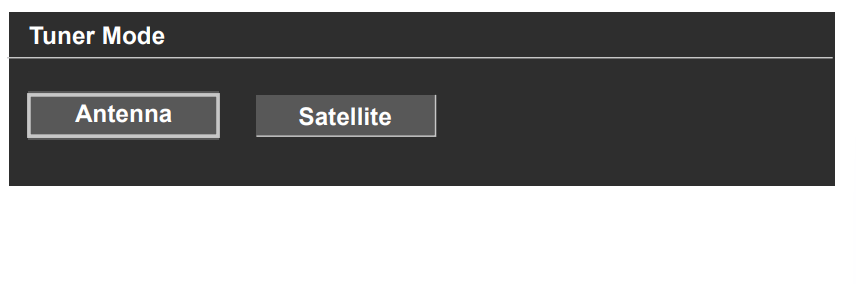
[Satellite]
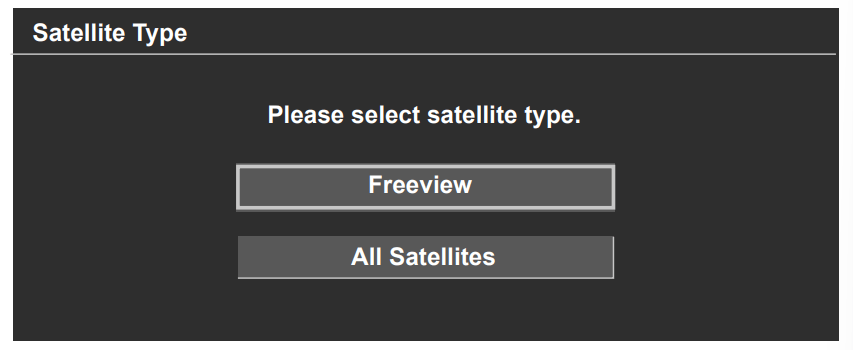
- Freeview > Operator type > Region > Antenna type > Satellite
- All Satellites > Antenna type > Satellite
[Antenna] [Satellite]
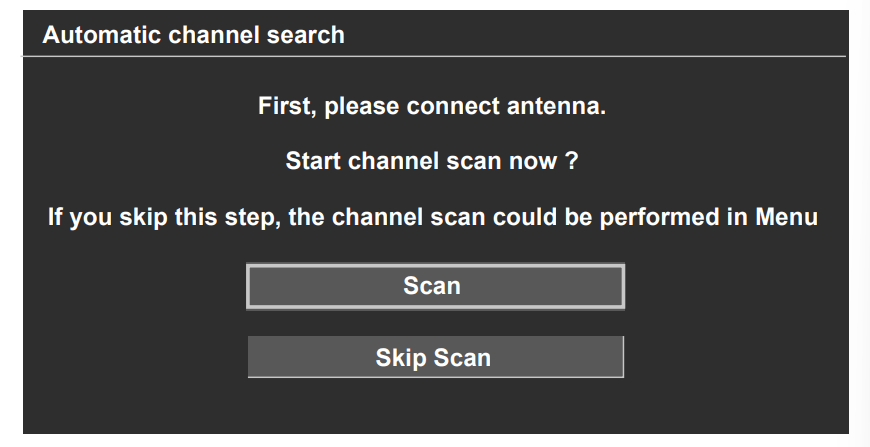
- To return to the previous screen / field

- To exit Channel Scan

- If some channels are not tuned correctly, you can try to tune them by [Channel Scan] in [Tuning Menu] (TV Menu).
- If Satellite were selected, please configure type of scan info New Zealand
Note
- The TV goes into Standby mode when no operation is performed. User can choose when the TV should go into standby mode by selecting available options in [Auto Sleep] in [Time Setup] (Setup) (Off / 4 / 6 / 8 hours).
- The TV goes into Standby mode when no signal is received and no operation is performed for 10 minutes if [No signal Power off] in the [Time Setup] (Setup) is set to [On].
- To retune all channels
[Channel Scan] in [Tuning Menu] (TV Menu)
[Satellite Re-scan] in [Tuning Menu] (TV Menu) New Zealand
- If no satellite channel is found, set
[LNB Frequency] to suit your environment. New Zealand [LNB Frequency] in [Tuning Menu] [Satellite Re-scan] [Antenna Setup] (Setup Menu)
- To add the available TV channels later
[Update Scan] in [Tuning Menu] (TV Menu)
[Satellite Add] in [Tuning Menu] (TV Menu) New Zealand
- To initialise all settings
[Shipping Condition] in (Setup Menu)
- In TV mode, Information banner will show the input source frequency (i.e 24Hz / 25Hz/etc..)
Watching TV
1.Turn power on

- Mains power On / Off switch should be on. (p. 16)
2.Select a channel
2.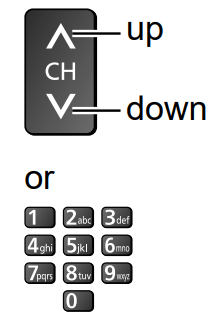
- To select a channel position with 2 or more-digit, e.g. 399

How to Use eHELP
[eHELP] is the detailed operating instructions built into the TV, and gives a more detailed explanation for a better understanding of the operation of each feature.
3.Display [eHELP]

4.Select the menu
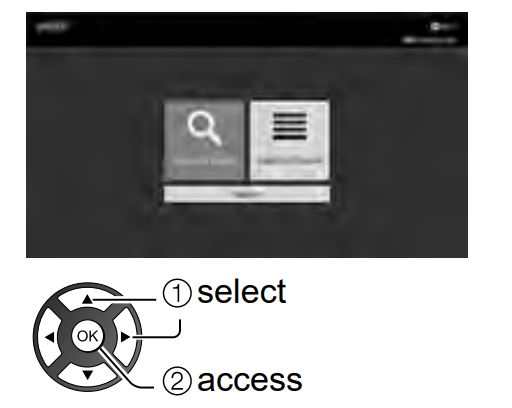
- To access [How to use]
[Keyword Search]: Search the content of eHELP in the keyword.
[Search by Purpose]: Search the content of eHELP for each item.
[Support]: Access the support information (FAQs, etc.).
5.Select the item
Example:
- To scroll the description (if more than 1 page) While the description is highlighted
- To open the reference screen

- To check the features of this TV
Search by Purpose > Read first > Features
FAQs
Before requesting service or assistance, please follow these simple guides to solve the problem.
- For details, refer to [eHELP] (Support > FAQs).
The TV does not switch on
- Check the mains lead is plugged into the TV and the mains socket.
The TV goes into Standby mode
- Auto Sleep function is activated.
The remote control does not work or is intermittent
- Are the batteries installed correctly? (p. 16)
- Has the TV been switched on?
- The batteries may be running low. Replace them with new ones.
- Point the remote control directly at the TV’s remote control signal receiver (within about 7 m and a 30 degree angle of the signal receiver).
- Situate the TV away from sunshine or other sources of bright light so they do not shine on the TV’s remote control signal receiver.
No image is displayed
- Check the TV is turned on.
- Check the mains lead is plugged into the TV and the mains socket.
- Check the correct input mode is selected.
- Check the selection of [Composite] / [Component] in [Input Selection] to match the signal being output by the external equipment.
- Is [Backlight], [Contrast], [Brightness] or [Colour] in the Video Menu set to the minimum?
- Check all required cables and connections are firmly in place.
An unusual image is displayed
- Turn the TV off with Mains power On / Off switch, then turn it on again.
- If the problem persists, initialise all settings. [Shipping Condition] in [Setup Menu]
The image or sound from external equipment are unusual when the equipment is connected via HDMI
- Set [HDMI 2.0 Setting] (Setup Menu) to [4K@60Hz 4:2:0] (p. 12)
Favourite List
Create favourite channels list from various broadcasters during watching.
[Main Menu] > TV > Tuning Menu > Favourite List
- Press remote OK to add or remove channels from list
Parts of the TV become hot
Parts of the TV may become hot. These temperature rises do not pose any problems in terms of performance or quality.
When pushed with a finger, the display panel moves slightly and makes a noise
- There is a little gap around the panel to prevent damage to the panel. This is not a malfunction.
About the inquiry
- Please contact your local Panasonic dealer for assistance.
If you make an inquiry from a place where this TV is not present, we cannot answer about contents that require visual confirmation for connection, phenomenon, etc. of this TV itself.
Moving image is not smooth
- Intelligent Frame Creation automatically compensates the picture frame rate and removes juddering movements to make the images smooth.
- However, smoothness of moving image is not guaranteed for certain input stream formats.
The LED indicator flashes red
- Please reset the TV by unplugging it from the electrical outlet if the LED flashes red.
- After a minute, plug the TV back in to the electrical outlet.
- If the flashing continues, contact your TV dealer or Panasonic service center.
Parental Password is forgotten.
- Initialise all settings.
[Shipping Condition] in [Setup Menu]
Maintenance
First, remove the mains plug from the mains socket.
Display panel, Cabinet, Pedestal
Regular care:
Gently wipe the surface of the display panel, cabinet, or pedestal by using a soft cloth to remove dirt or fingerprints.
For stubborn dirt:
(1) First clean the dust from the surface.
(2) Dampen a soft cloth with clean water or diluted neutral detergent (1 part detergent to 100 parts water).
(3) Wring out the cloth firmly. (Please note, do not let liquid enter the TV inside as it may lead to product failure.)
(4) Carefully wipe moisten and wipe away the stubborn dirt.
(5) Finally, wipe away all the moisture.
Caution
- Do not use a hard cloth or rub the surface too hard, otherwise this may cause scratches on the surface.
- Take care not to subject the surfaces to insect repellent, solvent, thinner or other volatile substances. This may degrade surface quality or cause peeling of the paint.
- The surface of the display panel is specially treated and may be easily damaged. Take care not to tap or scratch the surface with your fingernail or other hard objects.
- Do not allow the cabinet and pedestal to make contact with a rubber or PVC substance for a long time. This may degrade surface quality.
Mains plug
Wipe the mains plug with a dry cloth at regular intervals. Moisture and dust may cause fire or electrical shock.