When using an electrical appliance, basic precautions should always be observed,
including the following; read all instructions before using this appliance.
DANGER
To reduce the risk of electric shock:
■ Do not use while bathing or in the shower.
■ Do not place or store appliance where it can fall or be pulled into a tub or sink.
Do not place in or drop into water or other liquid.
■ Do not reach for an appliance that has fallen into water. Unplug it immediately.
Some electrical parts inside the clipper are electrically live, even when the switch
is off.
■ Always unplug the clipper from the electrical outlet immediately after using.
■ Unplug this appliance from the electrical outlet before cleaning
WARNING
To reduce the risk of burns, fire, electric shock or injury to persons:
■ An appliance should never be left unattended while plugged in. Do not pull, wrap
or twist cord around appliance.
■ Close supervision is necessary when this appliance is used by, on, or near
children or persons with special needs.
■ Use this appliance only for its intended use as described in this manual. Do not
use attachments not recommended or authorized by Spectrum Brands, Inc.
■ Never operate this appliance if it has a damaged cord or plug. If it is not working
properly, or if it has been dropped, damaged, or dropped into water, return it to
Spectrum Brands, Inc. for repair or replacement.
■ Keep cord away from heated surfaces where oxygen is being administered
■ Never drop or insert any object into any opening on this appliance.
■ Do not place appliance on any surface while it is operating.
■ Do not use this appliance with a damaged or broken cutting unit, as injury may
occur. Always make certain blades are aligned properly.
IMPORTANT SAFETY
INSTRUCTIONS
SAvE ThESE INSTRUCTIONS
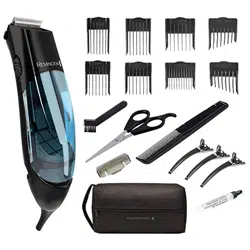
Product Features
Register Your New Product Today!
By registering your new Remington
®
product, you will receive these important benefits:
Proof of Ownership • Product Protection • Product Registration • Special Offers
Register online at: www.RemingtonProducts.com
■ Always slide power switch to the “off” position when plugging or unplugging
from an electric outlet.
■ Always store your clipper in a moisture-free environment. Do not store trimmer in
temperatures exceeding 140°F (60°C).
■ Always slide power switch to the “off” position before removing hair chamber as
rotating fan blades are accessible and could pose a hazard.
■ This clipper is designed for use with 110-120 Volts AC, 60 HZ electrical outlets.
Do not connect the clipper to a higher voltage than indicated, as it may result in
personal injury and/or damage to the clipper.
■ This appliance does not contain any user-serviceable parts.
■ This appliance is for household use only.
■ This appliance is not intended for use on pets.
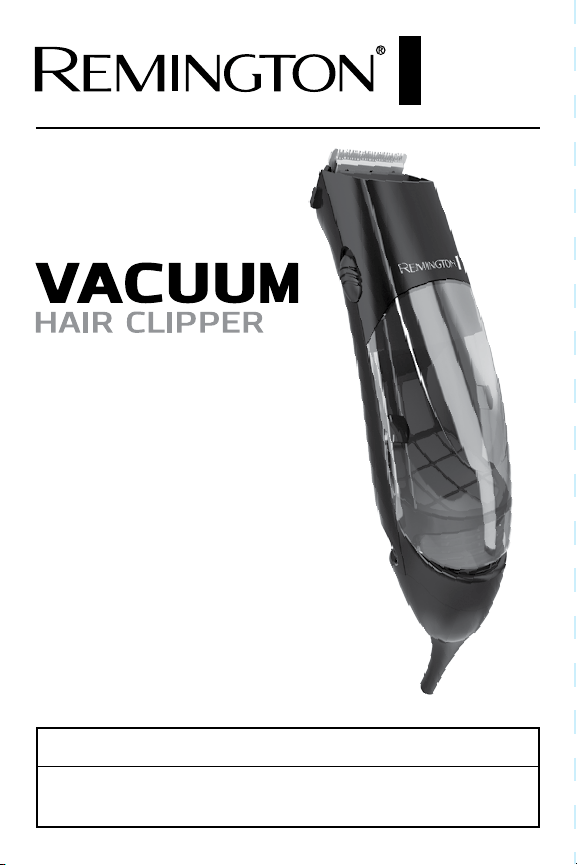
Groomer Parts
A. Hair clipper
B. Grips on chamber
(do not squeeze)
C. On/Off switch
D. Hair inlet
E. Fan chamber
F. Hair chamber
G. 1” guide comb
H. 3/4” guide comb
I. 1/2” guide comb
J. 3/8” guide comb
K. 1/4” guide comb
L. 1/8” guide comb
M. Left ear guide comb
N. Right ear guide comb
O. Blade cover
P. Scissors
Q. Sectioning clips
R. Styling comb
S. Cleaning brush
T. Storage pouch
U. Oil bottle
A.
B. C. D.
E.
F.
G. H. I.
J. K. L.
M. N.
P.
Q.
R.
S.
O.
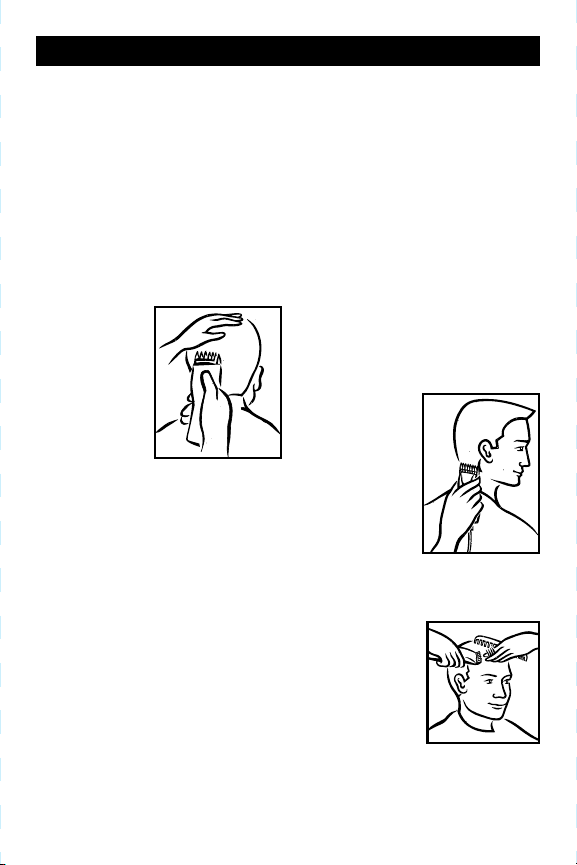
How to Use
Before Cutting Hair
1. Make sure your hair clipper is
operating correctly.
2. The vacuum feature will not function
properly if the hair chamber is
removed.
3. The person should be seated so that
the top of his head is at your eye level.
4. Comb the hair as it is normally styled.
5. Comb out all knots and tangles.
6. Ensure the hair
is dry. Hair
clippers perform
best with dry
hair, making it
easier to see
how much hair
is being cut.
7. Hold the hair
clipper in the
palm of one hand with your thumb
resting firmly on the top of the hair
clipper. This grip provides comfortable
cutting control.
To Attach Trimming Guides
1. Select the trimming guide that
matches the length you want the
hair to be after the cut. The trimming
guides are numbered and marked
with 1/8” (3mm), 1/4” (6mm), 3/8”
(9mm), 1/2” (12mm), 3/4”(18mm), and
1”(25mm).
2. Hold the trimming guide with the teeth
up. Slide the trimming guide onto the
blades until it locks into place.
Giving A Comfortable,
Even Cut
■ Allow the clipper to cut through the
hair without moving it too quickly.
Moving the clipper too quickly may
create a pulling sensation. As the
clipper cuts the hair, the vacuum
sucks the clippings through the
inlet into the hair chamber.
■ Use short strokes when cutting, and
initially use the longest trimming
guide. You can always use a closer
trimming guide later if you want a
closer cut.
How to Give a
Haircut
1. Start at the
back of the
head. Holding
the clipper as
shown, lightly
stroke upwards
making sure
you are taking
off the desired amount of hair. Work
your way up to the crown of the
head in layers. When completed,
comb the area
to remove any
loose hair and to
determine if you
need any further
cutting.
2. Repeat the same
procedure for each side of the
head. Make sure the length of the
hair is trimmed to the same length
on both sides of the head.
T. U.
3. To trim around
the ears,
remove the
trimming guide
and replace
with either the
left or right
ear guide. The
shorter guide
teeth are designed to be toward the
ear. Move the clipper from the front
of the head to the back. This creates
a tapered effect around the ear and
back of the neck.
4. The final trim can be made with the
hair clipper or the included scissors.
Make sure to check over the entire
head for any uneven areas. For styled
hair or giving quick trims, you may
prefer using your hair clipper without
the trimming guide.
Very Short Styles
1. Using the
1/2” (12mm)
trimming guide,
hold the comb
flat against the
head and move
the hair clipper
from the back
of the neck to the crown of the head.
2. Cut in a similar manner from the side
to the top of the head. Then cut from
the front to the crown of the head.
3. If a “Flat Top” style is desired, then
remove the trimming guide and use
the barber’s comb. Trim a little at a
time until the “flat look” is achieved.
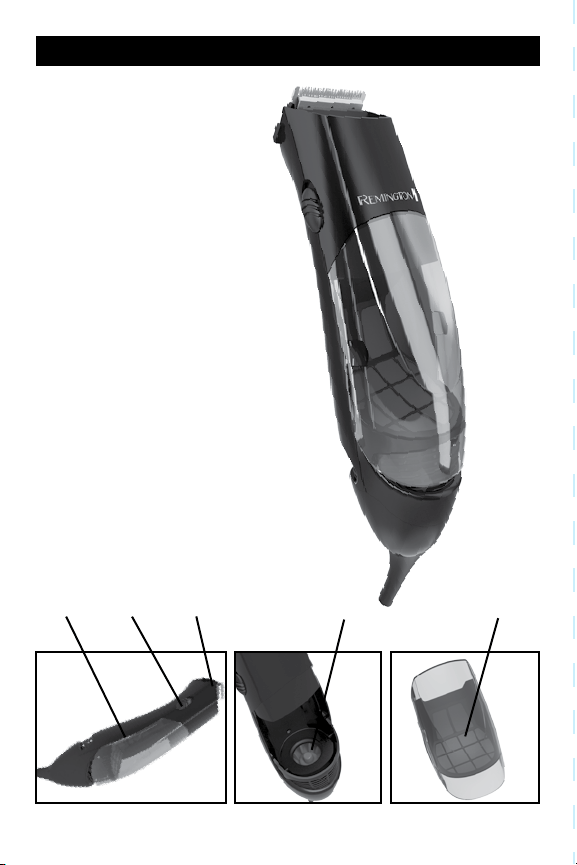
Emptying Hair Chamber:
1. Turn off the unit.
2. Hold the underside of the unit with
one hand.
3. Locate the grips on the side of
the chamber (fig. 1). Using your
thumb and
forefinger, lift
both sides of
the chamber
at the same
time.
4. Empty the
contents
into a waste
container.
(fig. 2)
5. You may have
to vigorously shake the chamber or
scoop out some of the compacted
hair clippings.
6. Be careful not to puncture the
screens on the hair chamber while
emptying the unit.
7. Once finished emptying, place the
chamber back onto the unit and
push gently until the chamber
clicks into place.
Line Cord Safety Tips
1. To insert plug, grasp it firmly and
guide it into outlet.
2. To disconnect the appliance, grasp
the plug and remove it from outlet.
Do not pull or yank on the cord or
appliance. Do not wrap the cord
around the appliance.
fig. 1
fig. 2
Cleaning & Maintenance
Cleaning and Maintaining Your Clipper
Your clipper is fitted with high-quality blades. Cleaning should only be done with a
soft brush, such as the brush supplied with the unit. Clean your clipper regularly
to ensure that the units operating life is not prematurely shortened.
■ Unplug adapter from wall outlet
■ Do not apply pressure or hard objects to the cutters.
■ Do not use liquid cleaners on the cutters or harsh or corrosive chemicals on the
units main body.
Weekly (or as needed)
Clipper should always be shut off. Remove clipper guard attachment from clipper.
Shake or blow out any accumulated hairs.
Main clipper
1. Remove the blades by pushing upward on the cutter teeth. The (hairpocket)
underside of the cutter assembly will be exposed.
2. Blow out any loose hair that has accumulated. Brush out any remaining hair from
the cutter teeth and hair pocket with the brush provided. Do not rinse the cutter
assembly under water or use cleaning fluids. Apply 2-3 drops of supplied oil to
blades after each cleaning.
Troubleshooting
Clipper cutters do not move:
■ The cutting unit may be dirty and clogged. Clean the unit as directed in Cleaning
& Maintenance section. Vacuum not functioning properly:
■ Ensure that the chamber has been emptied and placed back into the unit
properly.
■ Check for obstructions in the inlet and air flow path. Fan chamber clogged up:
■ Remove the hair chamber.
■ Using the cleaning brush that has been provided, gently brush between the
protective exhaust vents. If necessary, blow into the fan chamber. Hair clippings
should become loose and fall out.
Limited Two-Year Warranty
Spectrum Brands, Inc. warrants this product against any defects that are due to faulty
material or workmanship for a two-year period from the original date of consumer
purchase. This warranty does not include damage to the product resulting from
accident or misuse. If the product should become defective within the warranty
period, we will replace it free of charge. Return your product and sales receipt with
your name, address and day time phone number to: Remington Returns Center, 507
Stokely Dr., P.O. Box 1, Deforest, WI 53532
. For more information call 800-736-4648
in the US or 800-268-0425 in Canada.
Warranty excludes: Storage pouch
KEEP ORIGINAL SALES RECEIPT AS PROOF OF PURCHASE FOR WARRANTY
PURPOSES.
This warranty does not cover products damaged by the following:
■ Accident, misuse, abuse or alteration of the product
■ Servicing by unauthorized persons
■ Use with unauthorized accessories
■ Connecting it to incorrect current and voltage
■ Wrapping cord around appliance causing premature wear & breakage
■ Any other conditions beyond our control
No responsibility, obligation, or liability is assumed for the installation or mainte-
nance of this product.
Warranty
Performance Guarantee
SPECTRUM BRANDS, INC. SHALL NOT BE RESPONSIBLE FOR ANY
INCIDENTAL, SPECIAL OR CONSEQUENTIAL DAMAGES RESULTING FROM THE
USE OF THIS PRODUCT. ALL IMPLIED WARRANTIES, INCLUDING BUT NOT
LIMITED TO IM PLIED WARRANTIES OF FITNESS AND MERCHANTABILITY, ARE
LIMITED IN DURATION TO TWO YEARS FROM DATE OF ORIGINAL PURCHASE.
This warranty gives you specific legal rights and you may also have other rights
which vary from state to state or province to province. Some states do not allow
the exclusion or limitation of incidental, special or consequential damages.
Spectrum Brands, Inc. Money-back Offer
If within 30 days after you have purchased your Remington
®
branded product,
you are not satisfied and would like a refund, return it with the sales slip indicat-
ing purchase price and date of purchase to the retailer from whom it was pur-
chased. Spectrum Brands, Inc. will reimburse all retailers who accept the product
within 30 days from the date of purchase. If you have any questions concerning
the money-back guarantee, please call 800-736-4648 in the US or 800-268-0425
in Canada.
Remington Guarantees Satisfaction After 30 Days!
Remington
® Men’s Shave and Groom 60-Day Money Back Guarantee*
If within 60 days after purchasing any Remington
® branded Men’s Shave and
Groom product, you are not completely satisfied and would like a refund, return
it with the original dated sales receipt directly to Remington and receive a full
refund.** For questions concerning the money-back guarantee, please call 800-
736-4648 in the US or 800-268-0425 in Canada.
**Terms and conditions apply.
Terms and Conditions
1. Refund will be in the form of a check issued in US Dollars and will be provided
only if all Terms and Conditions are met.
2. The following items must be returned to Remington and postmarked no later
than 60 days after purchase of the Remington
® branded Men’s Shave and
Groom product:
a. The Remington product;
b. The original sales receipt indicating price and date purchased; and
c. The completed 60-day money back guarantee form located at
RemingtonProducts.com/60day.
3. In addition, Remington, in its discretion, must determine that the returned product
was used in accordance with the instruction booklet (included with the product
at the time of purchase).
4. Returns should be mailed prepaid (no collect returns accepted) to:
Remington 60-Day MBG
507 Stokely Drive, Box 1
DeForest, WI 53532
5. Refund does not include postage costs for the return of the product, but will
include applicable taxes paid by customer, if any.
6. No responsibility will be accepted for late, lost, stolen, misdirected or damaged
product.
7. Please allow 4-6 weeks to receive your refund by check.
*Applies to US and Canadian customers’ returns only.
120 VAC, 50-60 Hz
Questions or comments: Call 800-736-4648 in the US or 800-268-0425 in
Canada
or visit RemingtonProducts.com.
Dist. by:
Spectrum Brands, Inc. Middleton, WI 53562
Dist. by:
Spectrum Brands Canada, Inc.
131 Saramia Crescent, Vaughan, ON L4K 4P7
® Registered trademark of Spectrum Brands, Inc. (SBI)
© 2014 SBI
6/14 10321-00
Made in China
T22-0002466
Use and Care Guide
HKVAC2000

When using an electrical appliance, basic precautions should always be observed,
including the following; read all instructions before using this appliance.
DANGER
To reduce the risk of electric shock:
■ Do not use while bathing or in the shower.
■ Do not place or store appliance where it can fall or be pulled into a tub or sink.
Do not place in or drop into water or other liquid.
■ Do not reach for an appliance that has fallen into water. Unplug it immediately.
Some electrical parts inside the clipper are electrically live, even when the switch
is off.
■ Always unplug the clipper from the electrical outlet immediately after using.
■ Unplug this appliance from the electrical outlet before cleaning
WARNING
To reduce the risk of burns, fire, electric shock or injury to persons:
■ An appliance should never be left unattended while plugged in. Do not pull, wrap
or twist cord around appliance.
■ Close supervision is necessary when this appliance is used by, on, or near
children or persons with special needs.
■ Use this appliance only for its intended use as described in this manual. Do not
use attachments not recommended or authorized by Spectrum Brands, Inc.
■ Never operate this appliance if it has a damaged cord or plug. If it is not working
properly, or if it has been dropped, damaged, or dropped into water, return it to
Spectrum Brands, Inc. for repair or replacement.
■ Keep cord away from heated surfaces where oxygen is being administered
■ Never drop or insert any object into any opening on this appliance.
■ Do not place appliance on any surface while it is operating.
■ Do not use this appliance with a damaged or broken cutting unit, as injury may
occur. Always make certain blades are aligned properly.
IMPORTANT SAFETY
INSTRUCTIONS
SAvE ThESE INSTRUCTIONS
Product Features
Register Your New Product Today!
By registering your new Remington
®
product, you will receive these important benefits:
Proof of Ownership • Product Protection • Product Registration • Special Offers
Register online at: www.RemingtonProducts.com
■ Always slide power switch to the “off” position when plugging or unplugging
from an electric outlet.
■ Always store your clipper in a moisture-free environment. Do not store trimmer in
temperatures exceeding 140°F (60°C).
■ Always slide power switch to the “off” position before removing hair chamber as
rotating fan blades are accessible and could pose a hazard.
■ This clipper is designed for use with 110-120 Volts AC, 60 HZ electrical outlets.
Do not connect the clipper to a higher voltage than indicated, as it may result in
personal injury and/or damage to the clipper.
■ This appliance does not contain any user-serviceable parts.
■ This appliance is for household use only.
■ This appliance is not intended for use on pets.
Groomer Parts
A. Hair clipper
B. Grips on chamber
(do not squeeze)
C. On/Off switch
D. Hair inlet
E. Fan chamber
F. Hair chamber
G. 1” guide comb
H. 3/4” guide comb
I. 1/2” guide comb
J. 3/8” guide comb
K. 1/4” guide comb
L. 1/8” guide comb
M. Left ear guide comb
N. Right ear guide comb
O. Blade cover
P. Scissors
Q. Sectioning clips
R. Styling comb
S. Cleaning brush
T. Storage pouch
U. Oil bottle
A.
B. C. D.
E.
F.
G. H. I.
J. K. L.
M. N.
P.
Q.
R.
S.
O.
How to Use
Before Cutting Hair
1. Make sure your hair clipper is
operating correctly.
2. The vacuum feature will not function
properly if the hair chamber is
removed.
3. The person should be seated so that
the top of his head is at your eye level.
4. Comb the hair as it is normally styled.
5. Comb out all knots and tangles.
6. Ensure the hair
is dry. Hair
clippers perform
best with dry
hair, making it
easier to see
how much hair
is being cut.
7. Hold the hair
clipper in the
palm of one hand with your thumb
resting firmly on the top of the hair
clipper. This grip provides comfortable
cutting control.
To Attach Trimming Guides
1. Select the trimming guide that
matches the length you want the
hair to be after the cut. The trimming
guides are numbered and marked
with 1/8” (3mm), 1/4” (6mm), 3/8”
(9mm), 1/2” (12mm), 3/4”(18mm), and
1”(25mm).
2. Hold the trimming guide with the teeth
up. Slide the trimming guide onto the
blades until it locks into place.
Giving A Comfortable,
Even Cut
■ Allow the clipper to cut through the
hair without moving it too quickly.
Moving the clipper too quickly may
create a pulling sensation. As the
clipper cuts the hair, the vacuum
sucks the clippings through the
inlet into the hair chamber.
■ Use short strokes when cutting, and
initially use the longest trimming
guide. You can always use a closer
trimming guide later if you want a
closer cut.
How to Give a
Haircut
1. Start at the
back of the
head. Holding
the clipper as
shown, lightly
stroke upwards
making sure
you are taking
off the desired amount of hair. Work
your way up to the crown of the
head in layers. When completed,
comb the area
to remove any
loose hair and to
determine if you
need any further
cutting.
2. Repeat the same
procedure for each side of the
head. Make sure the length of the
hair is trimmed to the same length
on both sides of the head.
T. U.
3. To trim around
the ears,
remove the
trimming guide
and replace
with either the
left or right
ear guide. The
shorter guide
teeth are designed to be toward the
ear. Move the clipper from the front
of the head to the back. This creates
a tapered effect around the ear and
back of the neck.
4. The final trim can be made with the
hair clipper or the included scissors.
Make sure to check over the entire
head for any uneven areas. For styled
hair or giving quick trims, you may
prefer using your hair clipper without
the trimming guide.
Very Short Styles
1. Using the
1/2” (12mm)
trimming guide,
hold the comb
flat against the
head and move
the hair clipper
from the back
of the neck to the crown of the head.
2. Cut in a similar manner from the side
to the top of the head. Then cut from
the front to the crown of the head.
3. If a “Flat Top” style is desired, then
remove the trimming guide and use
the barber’s comb. Trim a little at a
time until the “flat look” is achieved.
Emptying Hair Chamber:
1. Turn off the unit.
2. Hold the underside of the unit with
one hand.
3. Locate the grips on the side of
the chamber (fig. 1). Using your
thumb and
forefinger, lift
both sides of
the chamber
at the same
time.
4. Empty the
contents
into a waste
container.
(fig. 2)
5. You may have
to vigorously shake the chamber or
scoop out some of the compacted
hair clippings.
6. Be careful not to puncture the
screens on the hair chamber while
emptying the unit.
7. Once finished emptying, place the
chamber back onto the unit and
push gently until the chamber
clicks into place.
Line Cord Safety Tips
1. To insert plug, grasp it firmly and
guide it into outlet.
2. To disconnect the appliance, grasp
the plug and remove it from outlet.
Do not pull or yank on the cord or
appliance. Do not wrap the cord
around the appliance.
fig. 1
fig. 2
Cleaning & Maintenance
Cleaning and Maintaining Your Clipper
Your clipper is fitted with high-quality blades. Cleaning should only be done with a
soft brush, such as the brush supplied with the unit. Clean your clipper regularly
to ensure that the units operating life is not prematurely shortened.
■ Unplug adapter from wall outlet
■ Do not apply pressure or hard objects to the cutters.
■ Do not use liquid cleaners on the cutters or harsh or corrosive chemicals on the
units main body.
Weekly (or as needed)
Clipper should always be shut off. Remove clipper guard attachment from clipper.
Shake or blow out any accumulated hairs.
Main clipper
1. Remove the blades by pushing upward on the cutter teeth. The (hairpocket)
underside of the cutter assembly will be exposed.
2. Blow out any loose hair that has accumulated. Brush out any remaining hair from
the cutter teeth and hair pocket with the brush provided. Do not rinse the cutter
assembly under water or use cleaning fluids. Apply 2-3 drops of supplied oil to
blades after each cleaning.
Troubleshooting
Clipper cutters do not move:
■ The cutting unit may be dirty and clogged. Clean the unit as directed in Cleaning
& Maintenance section. Vacuum not functioning properly:
■ Ensure that the chamber has been emptied and placed back into the unit
properly.
■ Check for obstructions in the inlet and air flow path. Fan chamber clogged up:
■ Remove the hair chamber.
■ Using the cleaning brush that has been provided, gently brush between the
protective exhaust vents. If necessary, blow into the fan chamber. Hair clippings
should become loose and fall out.
Limited Two-Year Warranty
Spectrum Brands, Inc. warrants this product against any defects that are due to faulty
material or workmanship for a two-year period from the original date of consumer
purchase. This warranty does not include damage to the product resulting from
accident or misuse. If the product should become defective within the warranty
period, we will replace it free of charge. Return your product and sales receipt with
your name, address and day time phone number to: Remington Returns Center, 507
Stokely Dr., P.O. Box 1, Deforest, WI 53532
. For more information call 800-736-4648
in the US or 800-268-0425 in Canada.
Warranty excludes: Storage pouch
KEEP ORIGINAL SALES RECEIPT AS PROOF OF PURCHASE FOR WARRANTY
PURPOSES.
This warranty does not cover products damaged by the following:
■ Accident, misuse, abuse or alteration of the product
■ Servicing by unauthorized persons
■ Use with unauthorized accessories
■ Connecting it to incorrect current and voltage
■ Wrapping cord around appliance causing premature wear & breakage
■ Any other conditions beyond our control
No responsibility, obligation, or liability is assumed for the installation or mainte-
nance of this product.
Warranty
Performance Guarantee
SPECTRUM BRANDS, INC. SHALL NOT BE RESPONSIBLE FOR ANY
INCIDENTAL, SPECIAL OR CONSEQUENTIAL DAMAGES RESULTING FROM THE
USE OF THIS PRODUCT. ALL IMPLIED WARRANTIES, INCLUDING BUT NOT
LIMITED TO IM PLIED WARRANTIES OF FITNESS AND MERCHANTABILITY, ARE
LIMITED IN DURATION TO TWO YEARS FROM DATE OF ORIGINAL PURCHASE.
This warranty gives you specific legal rights and you may also have other rights
which vary from state to state or province to province. Some states do not allow
the exclusion or limitation of incidental, special or consequential damages.
Spectrum Brands, Inc. Money-back Offer
If within 30 days after you have purchased your Remington
®
branded product,
you are not satisfied and would like a refund, return it with the sales slip indicat-
ing purchase price and date of purchase to the retailer from whom it was pur-
chased. Spectrum Brands, Inc. will reimburse all retailers who accept the product
within 30 days from the date of purchase. If you have any questions concerning
the money-back guarantee, please call 800-736-4648 in the US or 800-268-0425
in Canada.
Remington Guarantees Satisfaction After 30 Days!
Remington
® Men’s Shave and Groom 60-Day Money Back Guarantee*
If within 60 days after purchasing any Remington
® branded Men’s Shave and
Groom product, you are not completely satisfied and would like a refund, return
it with the original dated sales receipt directly to Remington and receive a full
refund.** For questions concerning the money-back guarantee, please call 800-
736-4648 in the US or 800-268-0425 in Canada.
**Terms and conditions apply.
Terms and Conditions
1. Refund will be in the form of a check issued in US Dollars and will be provided
only if all Terms and Conditions are met.
2. The following items must be returned to Remington and postmarked no later
than 60 days after purchase of the Remington
® branded Men’s Shave and
Groom product:
a. The Remington product;
b. The original sales receipt indicating price and date purchased; and
c. The completed 60-day money back guarantee form located at
RemingtonProducts.com/60day.
3. In addition, Remington, in its discretion, must determine that the returned product
was used in accordance with the instruction booklet (included with the product
at the time of purchase).
4. Returns should be mailed prepaid (no collect returns accepted) to:
Remington 60-Day MBG
507 Stokely Drive, Box 1
DeForest, WI 53532
5. Refund does not include postage costs for the return of the product, but will
include applicable taxes paid by customer, if any.
6. No responsibility will be accepted for late, lost, stolen, misdirected or damaged
product.
7. Please allow 4-6 weeks to receive your refund by check.
*Applies to US and Canadian customers’ returns only.
120 VAC, 50-60 Hz
Questions or comments: Call 800-736-4648 in the US or 800-268-0425 in
Canada
or visit RemingtonProducts.com.
Dist. by:
Spectrum Brands, Inc. Middleton, WI 53562
Dist. by:
Spectrum Brands Canada, Inc.
131 Saramia Crescent, Vaughan, ON L4K 4P7
® Registered trademark of Spectrum Brands, Inc. (SBI)
© 2014 SBI
6/14 10321-00
Made in China
T22-0002466
Use and Care Guide
HKVAC2000
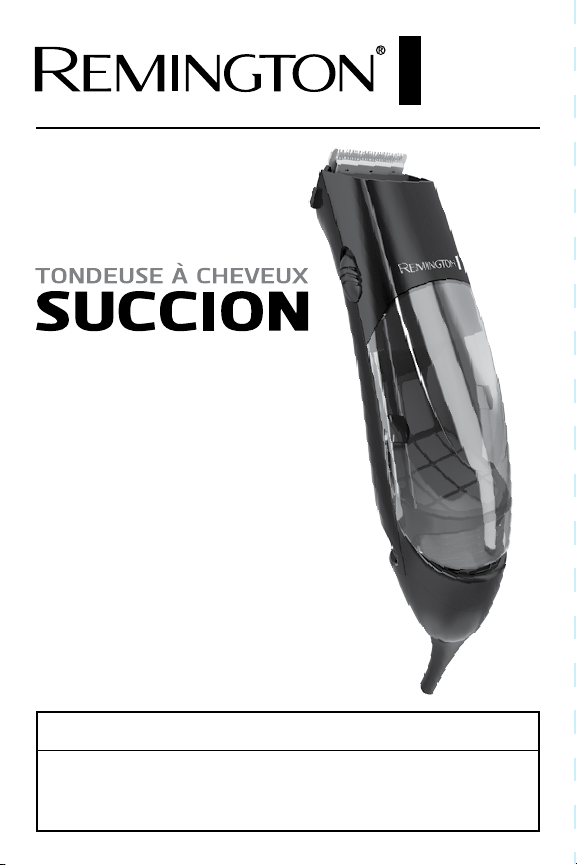
Des mesures de sécurité élémentaires, dont les suivantes, s’imposent lors de
l’utilisation d’un appareil électrique; lisez toutes les directives avant d’utiliser cet
appareil.
DANGER
Afin de réduire le risque de choc électrique:
■ Ne pas utiliser pendant le bain ou sous la douche.
■ Ne pas placer ni ranger l’appareil où il peut tomber ou être tiré dans une
baignoire ou un lavabo. Ne pas placer ou laisser tomber dans l’eau ou tout autre
liquide.
■ Ne touchez pas un appareil qui est tombé dans l’eau. Débranchez-le
immédiatement. Certains composants électriques internes de la tondeuse sont
sous tension même lorsque l’interrupteur est éteint.
■ Toujours débrancher la tondeuse de la prise électrique immédiatement après
utilisation.
■ Débranchez l’appareil de la prise électrique avant de le nettoyer
AvERTISSEMENT
Afin de réduire le risque de brûlure, d’incendie, de choc électrique ou de
blessure
■ Un appareil ne doit jamais être laissé branché po Ne tirez pas, envelopper ou
torsion cordon autour de l’appareil.
■ Surveillez étroitement les enfants ou les personnes ayant des besoins spéciaux qui
sont à proximité de l’appareil, qui s’en servent ou sur qui l’on s’en sert.
■ Utiliser cet appareil uniquement pour son usage prévu comme décrit dans
ce manuel. Ne pas utiliser d’accessoires non recommandés ou autorisés par
Spectrum Brands, Inc.
■ Ne jamais utiliser cet appareil si le cordon ou la fiche est endommagé. Si elle
ne fonctionne pas correctement, ou si elle a été échappé, endommagé ou s’il
est tombé dans l’eau, le retourner à Spectrum Brands, Inc. pour réparation ou
remplacement.
MESURES DE SÉCURITÉ
IMPORTANTES
CONSERvEZ CES DIRECTIvES
Caractéristiques du produit
■ Éloignez le cordon de l’oxygène de surfaces.where chauffée est administré
■ Ne jamais laisser tomber ou insérer un objet dans les ouvertures de cet appareil.
■ Ne pas placer l’appareil sur une surface lorsqu’il est en marche.
■ Ne pas utiliser cet appareil avec une unité de coupe endommagée ou brisée, que
les blessures peuvent se produire. Assurez-vous toujours certaines lames sont
alignées correctement.
■ Glissez toujours interrupteur d’alimentation sur la position “off” au moment de
brancher ou de le débrancher électrique.
■ Rangez toujours votre tondeuse dans un environnement exempt d’humidité. Ne
pas stocker tondeuse à une température supérieure à 140 ° F (60 ° C).
■ Glissez toujours interrupteur d’alimentation sur la position “off” avant de retirer
la chambre de cheveux comme les pales en mouvement sont accessibles et
peuvent présenter un danger.
■ Cette tondeuse est conçue pour une utilisation avec 110-120 Volts AC, 60 Hz
prises électriques. Ne branchez pas la tondeuse à une tension supérieure à
celle indiquée, car elle peut entraîner des blessures et / ou des dommages à la
tondeuse personnelle.
■ Cet appareil ne contient aucune pièce réparable par l’utilisateur.
■ Cet appareil est à usage domestique uniquement.
■ Cet appareil n’est pas conçu pour être utilisé sur les animaux domestiques.
Pièces de la tondeuse
A.
Tondeuse à cheveux
B. Agripper (ne serrez pas)
C. Interrupteur marche/arrêt
D. Orifice d’aspiration des cheveux
E. Compartiment de l’aspirateur
F. Panier à cheveux
G. Peigne de guidage de 1 po
H. Peigne de guidage de 3/4 po
I. Peigne de guidage de 1/2 po
J. Peigne de guidage de 3/8 po
K. Peigne de guidage de 1/4 po
L. Peigne de guidage de 1/8 po
M. Peigne de guidage pour oreille gauche
N. Peigne de guidage pour oreille droite
O. Protège-lames
P. Ciseaux
Q. Pinces
R. Peigne de coiffeur
S. Brosse de nettoyage
T. Étui de rangement
U. Bouteille d’huile
A.
B. C. D.
E.
F.
G. H. I.
J. K. L.
M. N.
P.
Q.
R.
S.
O.
Mode d’emploi
Avant de coupe de cheveux
1. Assurez-vous que votre tondeuse
fonctionne correctement.
2. L’option de vide ne fonctionnera pas
correctement si la chambre de poil
est enlevé.
3. La personne doit être assis de sorte
que le sommet de sa tête est au
niveau de vos yeux.
4. Peignez les cheveux comme il est
normalement de style.
5. Peigner tous les
nœuds et les
écheveaux.
6. Vérifiez les
cheveux sont
secs. Tondeuse
à cheveux
fonctionnent
mieux avec
les cheveux secs, ce qui rend plus
facile de voir combien de cheveux est
coupée.
7. Tenez la tondeuse dans la paume
d’une main avec le pouce reposant
fermement sur le dessus de la
tondeuse. Cette poignée permet un
contrôle de coupe confortable.
Pour fixer les guides de règlage
1. Sélectionnez le guide de coupe qui
correspond à la longueur que vous
voulez que les cheveux d’être après
la coupe. Les guides de rognage sont
numérotés et marqués avec 1/8 “(3
mm), 1/4” (6mm), 3/8 “(9mm), 1/2”
(12mm), 3/4 “(18 mm), et 1 “(25mm).
2. Tenez le guide de coupe avec les
dents en place. Faites glisser le
guide de coupe sur les lames
jusqu’à ce qu’il se verrouille en
place.
Donner un cadre confortable,
même Couper
■ Laissez la tondeuse pour couper à
travers les cheveux sans bouger
trop vite. Le déplacement de la
tondeuse trop rapidement peut
créer une sensation de tiraillement.
Comme la tondeuse coupe les
cheveux, le vide aspire l’herbe
coupée à travers l’entrée dans la
chambre de
cheveux.
■ Utilisez des
traits courts
lors de la
coupe, et
d’abord utiliser
le guide de
coupe plus
longue. Vous
pouvez toujours utiliser un guide
de coupe de plus près plus tard si
vous voulez une
coupe plus près.
Comment donner
une coupe de
cheveux
1. Commencez à
l’arrière de la tête. Tenir la tondeuse
comme indiqué, frottez légèrement
vers le haut en s’assurant que
vous prenez au large de la quantité
T. U.
désirée de
cheveux.
Hissez-vous
au sommet
de la tête en
couches. Une
fois terminé,
peigner la zone
toremove les
cheveux en vrac et pour déterminer
si vous avez besoin d’une coupe.
2. Répétez la même procédure pour
chaque côté de la tête. Assurez-vous
que la longueur du poil est coupé à
la même longueur des deux côtés
de la tête.
3. Pour découper autour des oreilles,
retirer le guide de coupe et la
remplacer par la gauche ou guide de
l’oreille droite. Les dents de guidage
plus courtes sont conçus pour être
orienté vers l’oreille. Déplacez la
tondeuse à l’avant de la tête vers
l’arrière. Cela
crée un effet
conique autour
de l’oreille et à
l’arrière du cou.
4. L’assiette finale
peut être
faite avec la
tondeuse ou
des ciseaux inclus. Assurez-vous
de vérifier sur toute la tête pour
toutes les zones irrégulières. Pour les
cheveux de style ou de donner des
garnitures rapides, vous préférerez
peut-être utiliser votre tondeuse sans
le guide de coupe.
Styles très courts
1. Utilisation de la 1/2 “(12mm) guide
de coupe, maintenez le plat de
peigne sur la tête et passer la
tondeuse à l’arrière de la nuque à
la couronne de la tête.
2. Couper d’une
manière
similaire à
partir du côté
de la partie
supérieure
de la tête.
Ensuite,
couper de
l’avant vers
le sommet de
la tête.
3. Si un style
“Flat Top» est souhaitée, puis
retirez le guide de coupe et
d’utiliser le peigne du coiffeur.
Coupez un peu à un moment
jusqu’à ce que le “look plat” est
atteint.
Vidange chambre des
cheveux:
1. Eteignez l’appareil.
2. Tenez le dessous de l’appareil avec
une seule main.
3. Repérez les poignées sur le côté de
la chambre (fig. 1). Avec le pouce et
l’index, soulevez les deux côtés de
la chambre en même temps.
4. Vider le contenu dans un conteneur
à déchets. (fig. 2)
fig. 1
fig. 2
Nettoyage et entretien
Nettoyage et entretien de votre tondeuse
Votre tondeuse est munie de lames de haute qualité. Le nettoyage ne doit être
effectué avec une brosse douce, tels que le pinceau fourni avec l’appareil.
Nettoyez votre tondeuse régulièrement pour s’assurer que les unités durée de vie
n’est pas prématurément écourtée.
■ Débranchez l’adaptateur de la prise murale
■ Ne pas appliquer de pression ou des objets durs pour les couteaux.
■ Ne pas utiliser de nettoyants liquides sur les fraises ou de produits chimiques
agressifs ou corrosifs sur le corps principal unités.
Hebdomadaire (ou au besoin)
Clipper doit toujours être coupée. Retirer fixation d’un capot de tondeuse ton-
deuse. Agiter ou souffler les poils accumulés.
Écrêteur principal
1. Retirez les lames en poussant à la hausse sur les dents de la fraise. Le
(hairpocket) inférieure de l’assemblage de coupe soit exposée.
2. Souffler les cheveux en vrac qui s’est accumulée. Brossez les cheveux restant
des dents de coupe et poche de cheveux avec la brosse fournie. Ne pas rincer
l’ensemble de coupe sous l’eau. Appliquez 2 à 3 gouttes de l’huile fournie sur les
lames après chaque nettoyage.
Garantie limitée de deux ans
Spectrum Brands, Inc. garantit ce produit contre toute défectuosité due à des vices
matériels et de fabrication pour une période de deux ans à compter de la date d’achat
initiale. La garantie ne couvre toutefois pas les dommages résultant d’un accident ou
d’un mauvais usage. Si ce produit devait faire défaut au cours de la période de garantie,
nous le remplacerons sans frais. Retournez votre produit accompagné du reçu de caisse
avec vos nom, adresse et numéro de téléphone de jour à: Remington Returns Center,
507 Stokely Dr., P.O. Box 1, Deforest, WI 53532. Pour de plus amples renseignements,
composez le 800-736-4648 aux É.-U. ou le 800-268-0425 au Canada.
Pièces exclues de la garantie: Étui de rangement
GARDER REÇU DE CAISSE ORIGINAL COMME PREUVE D’ACHAT DES FINS DE
GARANTIE.
Cette garantie ne couvre pas les produits endommagés par le texte suivant:
■ Accident, mauvaise utilisation, abus ou altération du produit
■ Entretien par des personnes non autorisées
■ Utilisation avec des accessoires non autorisés
■ Raccordement à courant incorrects et tension
■ Emballage cordon autour de l’appareil et provoquer une usure prématurée
rupture
■ Toutes les autres conditions hors de notre contrôle
Aucune responsabilité, obligation ou responsabilité n’est assumée pour
l’installation ou l’entretien de ce produit.
Garantie
Garantie de rendement
SPECTRUM BRANDS, INC. DÉCLINE TOUTE RESPONSABILITÉ POUR LES DOMMAGES
INDIRECTS, PARTICULIERS OU CONSÉCUTIFS RÉSULTANT DE L’UTILISATION DE CE
PRODUIT. TOUTES LES GARANTIES IMPLICITES, Y COMPRIS SANS TOUTEFOIS S’Y
LIMITER LES GARANTIES DE QUALITÉ MARCHANDE ET D’ADÉQUATION À UN USAGE
PARTICULIER, SONT LIMITÉES À UNE PÉRIODE DE DEUX ANS À COMPTER DE LA
DATE D’ACHAT INITIALE.
La présente garantie vous confère des droits spécifiques, cependant vous pouvez
avoir d’autres droits qui varient d’un État ou d’une province à l’autre. Par exemple,
certains États n’autorisent pas l’exclusion ni la limite des dommages indirects, par-
ticuliers et consécutifs.
Garantie de remboursement de Spectrum Brands, Inc.
Si vous n’êtes pas satisfait et désirez obtenir un remboursement au cours des 30
jours qui suivent l’achat de ce produit de marque Remington®, retournez le produit
avec son reçu de caisse indiquant le prix et la date d’achat au détaillant où vous
l’avez acheté. Spectrum Brands, Inc. remboursera tous les détaillants qui accept-
ent le produit dans les 30 jours suivant la date d’achat. Si vous avez des questions
concernant la présente garantie de remboursement, veuillez composer le 800-736-
4648 aux É.-U. ou le 800-268-0425 au Canada.
Remington garantit votre satisfaction après 30 jours!
Garantie de remboursement de 60 jours sur les rasoirs et les tondeuses
pour homme de Remington
®*.
Si au cours des 60 jours qui suivent l’achat de n’importe quel rasoir ou tondeuse
pour homme de marque Remington
® vous n’êtes pas totalement satisfait de
votre achat et désirez un remboursement, retournez le produit avec son reçu de
caisse original indiquant la date d’achat directement à Remington et vous serez
remboursé en entier.** Si vous avez des questions concernant la garantie de
remboursement, veuillez téléphoner au 800-736-4648 aux É.-U. ou au 800-268-
0425 au Canada.
**Des conditions s’appliquent.
Modalités et conditions
1. Le remboursement se fera sous forme de chèque émis en dollars US et ne sera
accordé que si toutes les conditions sont remplies.
2. Les articles suivants doivent être retournés à Remington et le colis doit être daté
d’au plus 60 jours après la date de l’achat du rasoir ou de la tondeuse pour
homme de marque Remington
®, le cachet de la poste faisant foi :
a. le produit Remington;
b. le reçu de caisse original indiquant le prix et la date d’achat; et
c. le formulaire de garantie de remboursement de 60 jours dûment
rempli que vous trouverez sur notre site à l’adresse
RemingtonProducts.com/60day.
3. De plus, Remington, à son entière discrétion, doit déterminer que le produit
retourné a été utilisé conformément au guide d’utilisation (compris avec le
produit au moment de l’achat).
4. Les retours doivent être postés port payé (aucun retour port dû ne sera accepté)
à l’adresse suivante :
Remington 60-Day MBG
507 Stokely Drive, Box 1
DeForest, WI 53532
5. Le remboursement ne couvre pas les frais de port pour le retour du produit mais
comprendra les taxes applicables payées par le consommateur, le cas échéant.
6. Aucune responsabilité ne sera assumée pour les produits en retard, perdus,
volés, postés à la mauvaise adresse ou endommagés.
7. Veuillez prévoir de 4 à 6 semaines avant de recevoir votre chèque de
remboursement.
*S’applique aux retours des clients aux É.-U. et au Canada seulement.
120 VAC, 50-60 Hz
Questions ou commentaires: Composez le 800-736-4648 aux É.-U. ou le 800-
268-0425 au Canada. Ou visitez RemingtonProducts.com
Dist. par: Spectrum Brands, Inc., Middleton, WI 53562
Dist. par: Spectrum Brands Canada, Inc.,
131 Saramia Crescent, Vaughan, ON L4K 4P7
® Marque déposée de Spectrum Brands, Inc. (SBI)
© 2014 SBI 6/14 10321-00
Fabriqué en Chine
T22-0002466
HKVAC2000
Guide d’utilisation
et d’entretien
Enregistrez votre nouveau produit dès aujourd’hui!
En enregistrant votre nouveau produit Remington
®
vous profiterez des avantages
importants que voici : Preuve de propriété • Protection du produit •
Enregistrement du produit • Offres spéciales • Enregistrez votre produit
en ligne à l’adresse www.RemingtonProducts.com
5. Vous pourriez avoir à secouer vigoureusement la chambre ou ramasser quelques-
uns des coupures de cheveux compactés.
6. Faites attention à ne pas percer les écrans sur la chambre de cheveux tout en
vidant l’unité.
7. Une fois terminé la vidange, placer la chambre sur l’unité et poussez doucement
jusqu’à ce que la chambre s’enclenche.
Conseils cordon secteur de sécurité
1. Pour insérer la fiche: Attraper fermement et guider dans la prise.
2. Pour débrancher l’appareil, saisir la fiche et la retirer de la prise. Ne tirez pas sur
le cordon ou de l’appareil. Ne pas enrouler le cordon autour de l’appareil.
Dépannage
Coupeurs de Clipper ne bougent pas:
■ L’unité de coupe peut être sale et bouché. Nettoyez l’appareil comme indiqué à la
section Nettoyage et Entretien. Vide ne fonctionne pas correctement:
■ Assurez-vous que la chambre a été vidée et placé dans l’unité correctement.
■ Vérifiez les obstructions dans la voie d’entrée et de circulation de l’air. Chambre
Fan bouché:
■ Retirez le compartiment à poils.
■ Utilisation de la brosse de nettoyage qui a été fourni, brosser doucement entre
les sorties d’air de protection. Si nécessaire, souffler dans la chambre de
ventilateur. Coupures de cheveux devraient se détacher et tomber.
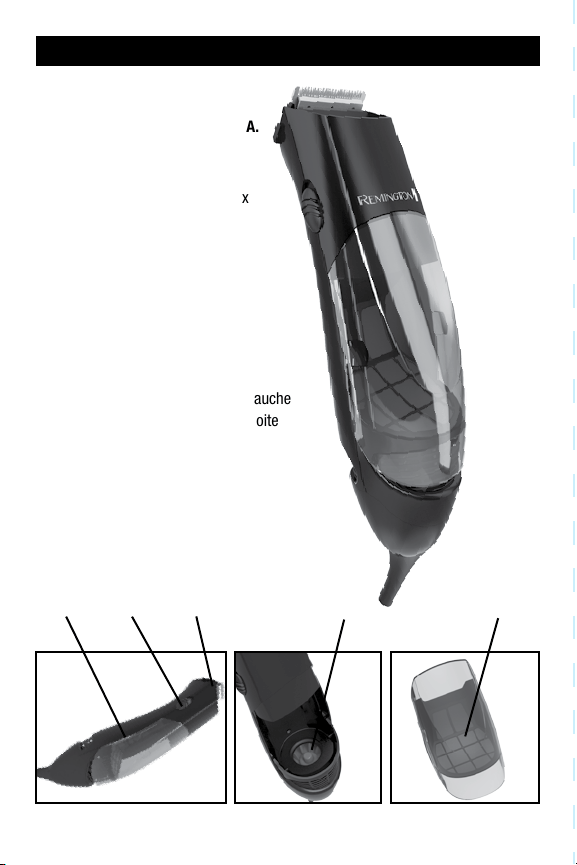
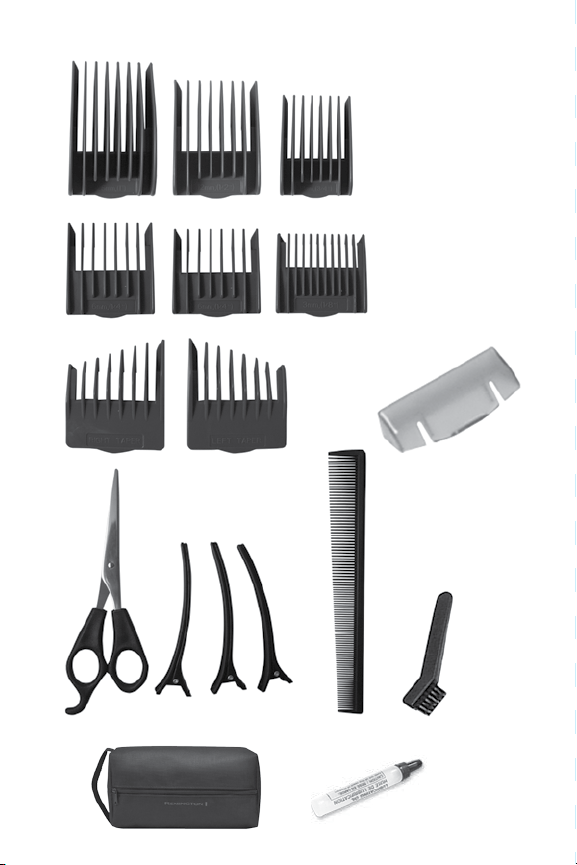
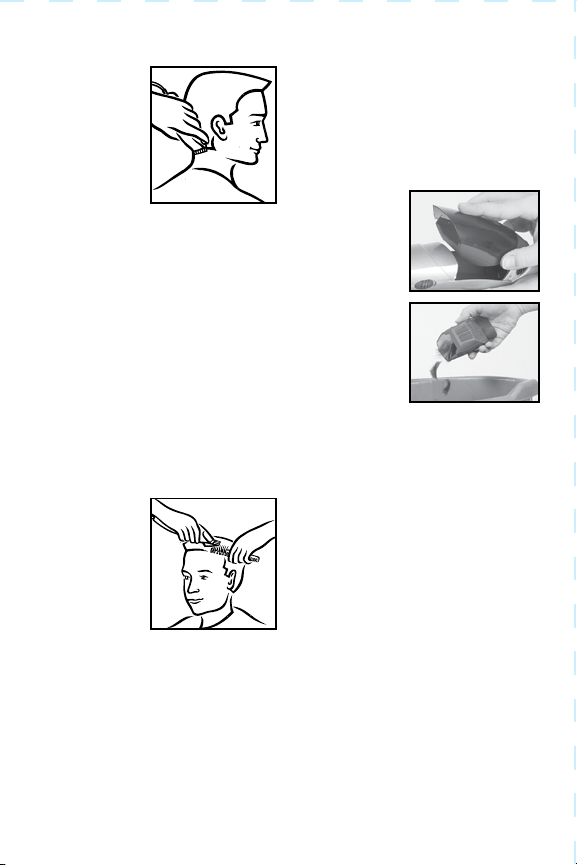