Loading ...
Loading ...
Loading ...
24
25
CONVERSION TO OPERATE ON ULPG
This must be done by a licensed Gas Fitter. COMPULSORY
Included with the cooker is a conversion kit for converting the cooker to operate on
ULPG (LPG in Aust.). The kit consists of replacement injectors for all burners,
including oven burner for gas models. The kit also includes a test point for
checking gas pressure and a replacement label identifying the type of gas the
cooker is connected to.
There is no gas regulator requirement for ULPG installations as the gas pressure of
2.75 Kpa is regulated at the bottle.
A 7mm socket is needed to remove and replace the injectors. The data plate in this
instruction manual (page 32) identifies the injector size for each burner.
Each burner must be run on the minimum flame setting and adjusted accordingly
to ensure that the minimum flame is not extinguished by air dra
fts.
REMEMBER TO CHANGE THE OVEN INJECTOR ON GAS OVEN COOKERS.
If the flame is yellow and leaves black marks on pots and in the oven then the
conversion has not been done correctly. THIS WILL VOID THE WARRANTY.
ALL CONVERSIONS TO ULPG MUST BE CARRIED OUT BY A LICENSED GAS
FITTER. GLEM GAS WARRANTY SERVICE WILL NOT BE MADE ON
INCORRECTLY CONVERTED APPLIANCES.
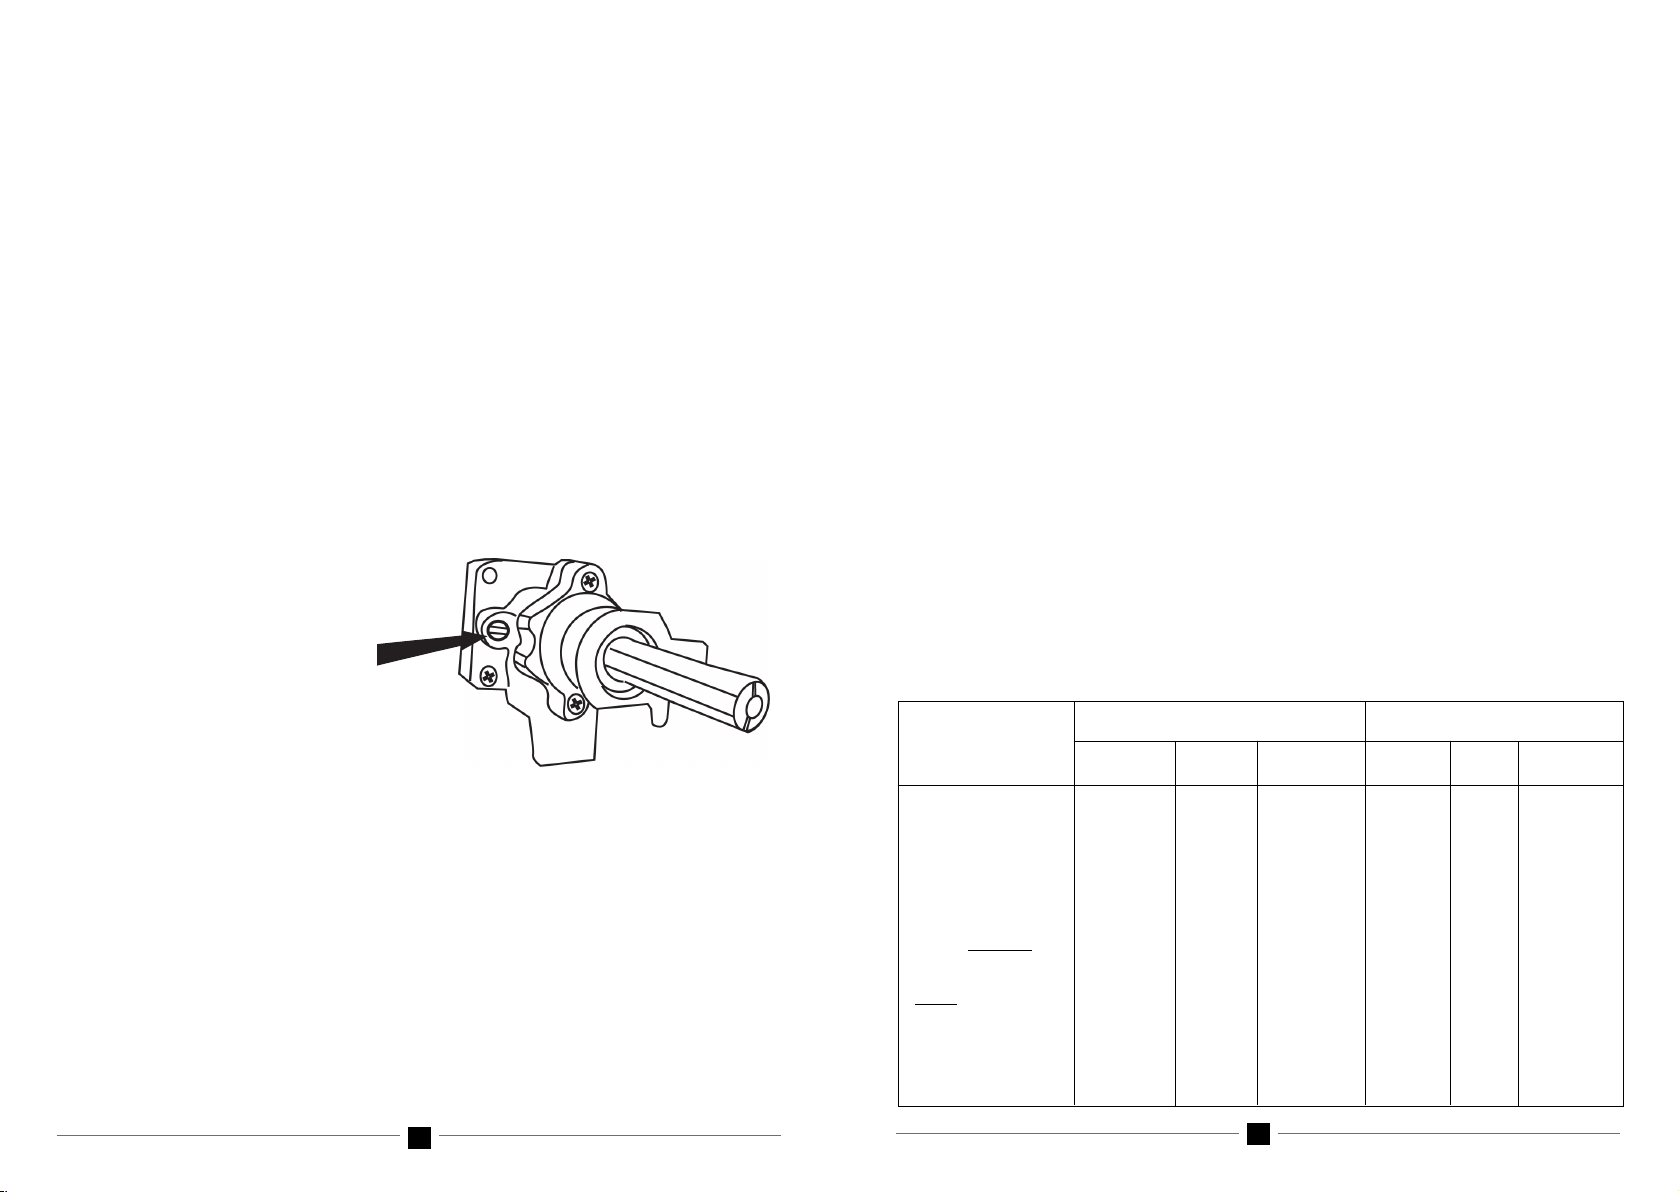
When completing the LPG
conversion the bypass screw
on the oven thermostat needs
to be screwed all the way clockwise.
Use a small flat blade screwdriver.
NOTE!
THIS COOKER MUST BE INSTALLED BY A LICENSED GAS FITTER.
WRITTEN PROOF IS REQUIRED FOR WARRANTY SERVICE. STANDARD
PLUMBERS TEFLON TAPE SHOULD NOT BE USED TO SEAL JOINTS. AN
APPROPRIATE GAS SEALING TAPE MUST BE USED.
GAS CHECKS AND ADJUSTMENTS - LOW FLAME SETTING
Check the low flame setting for each hob burner and the oven burner with the control
engaged in the minimum position.
Hob Burner
Turn the control until it engages in the minimum position and remove the control knob.
Insert a screwdriver in the adjusting screw (located to the side of the gascock shaft). To
increase the flame, turn the adjusting screw anticlockwise. To decrease the flame, turn
the adjusting screw clockwise. Adjust for a minimum, stable and clear flame. ENSURE
THE MINIMUM FLAME WILL NOT BE EXTINGUISHED BY AIR DRAUGHTS.
Oven Burner -
Light the oven burner and operate at maximum for 15 minutes. Turn the control until it
engages in the minimum position and remove the control knob. Insert a screwdriver in
the adjusting screw (located to the left side of the thermostat shaft). To increase the
flame, turn the adjusting screw anticlockwise. To decrease the flame, turn the adjusting
screw clockwise. Adjust for a minimum, stable and clear flame.
Ensure the minimum flame will not be extinguished when the oven door is closed
GAS INJECTOR SELECTION TABLE
1.70
14.5
1.0
0.96 12.0
2.75
1.55
11.5 1.0
0.88 10.0 2.75
1.55
11.5 1.0
0.88 10.0 2.75
1.18
7.0 1.0
0.68 6.0 2.75
0.90
4.0 1.0
0.52 3.5 2.75
1.41 9.0 1.0 0.79 8.5 2.75
Large Wok Bnr
Wok Burner
Fish Burner
Large Burner
Medium Burner
Small Burner
Oven Burners
53/70/60cm
80cm/90cm DI,ML
90cm UN,GL,MA
1.75 14.5 1.0
0.96
12.5 2.75
NATURAL ULPG
Inj Diam MJ/H Gas Press Inj Diam MJ/H Gas Press
BURNER TYPE
1.75
14.6
1.0
0.98
13.8
2.75
1.
8
5
1
5
.5
1.0
1.00
1
3.0
2.75
Control knob shaft
Loading ...
Loading ...
Loading ...