Being aware of the temperature inside of your grill allows you to adjust the heat when needed.
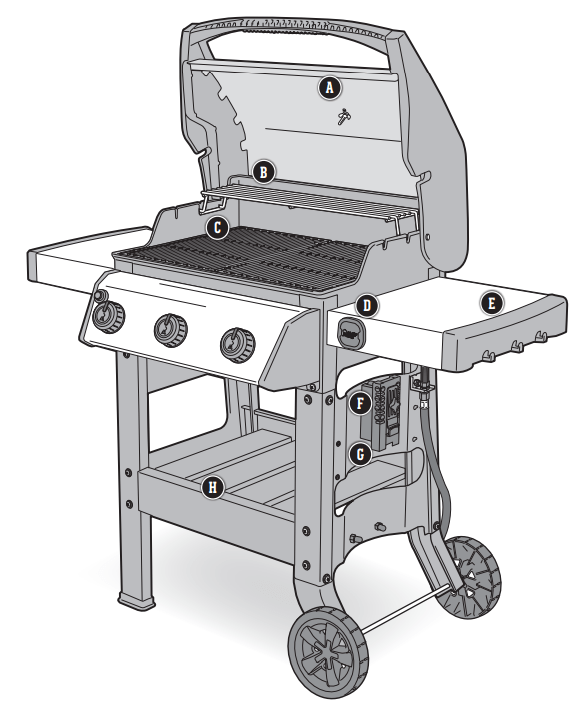
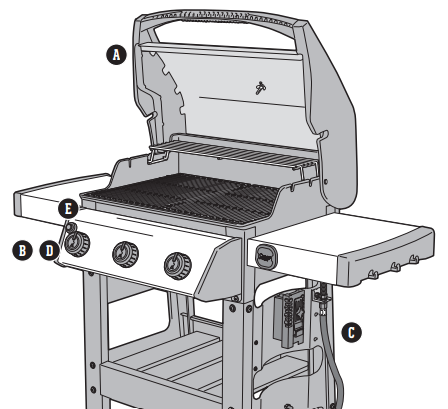
B. Warming Rack
The warming rack keeps food warm or toasts burger buns, as the main meal grills below.
C. Porcelain-Enameled, Cast Iron Cooking Grates
The reversible cooking grates empower you to be even more creative with your dish. The thin side of the cooking grate is ideal for delicate food such as fish and shrimp, while the wider side creates a thick sear mark enhancing the flavor of your food.
D. iGRILL 3 Ready
The iGrill 3 app-connected thermometer monitors food from beginning to end, displaying the real-time core food temperature on your mobile device. Once you’ve downloaded the Weber iGrill app, connect your devices to Bluetooth, and run up to four thermometer probes from your grill to the food. (Sold separately.)
E. Side Tables with Integrated Tool Hooks
Use the side tables to keep platters, seasonings, and tools within arm’s reach. Hang your essential grilling tools on the hooks for easy access and organization of your backyard workspace. The left side table folds down to fit in smaller spaces.
F. Fuel Gauge
Always know where you stand. The easy-to-read fuel gauge located next to the gas tank lets you see how much fuel is left in your tank at all times. Rest assured knowing that you will not run out of gas halfway through your next grilling experience.
G. Easy Access Gas Tank Storage
Mounting the gas tank to the outside of the grill makes the tank easy to access and remove; while also increasing storage space in the cart.
H. Open Cart Design
The sleek open-cart design provides additional room and accessibility of your grilling tools.
Operation
The Very First Time You Grill
Perform an Initial Burn-Off
Heat the grill on the highest setting, with the lid closed, for at least 20 minutes prior to grilling for the first time.
Every Time You Grill
Meal-to-Meal Maintenance
The Meal-To-Meal Maintenance plan includes the following simple, yet important, steps that should always be performed prior to grilling.
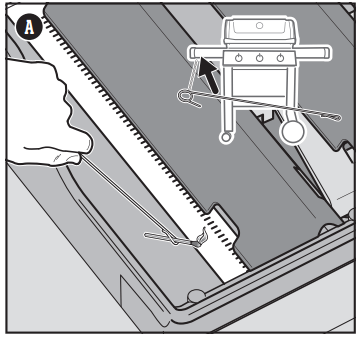
Check for Grease
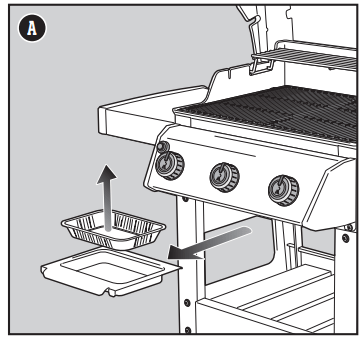
Your grill was built with a grease management system that funnels grease away from food and into a disposable container. As you cook, grease is channeled down to the slide-out catch pan and into a disposable drip tray that lines the slide-out catch pan. This system should be cleaned each and every time you grill to prevent fires.
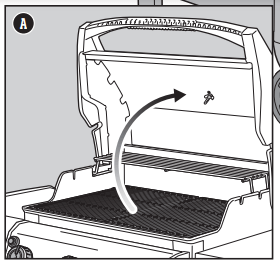
1) Confirm that the grill is off and cool.
2) Remove the slide-out catch pan by pulling it forward (A).
3) Check for excessive amounts of grease in the disposable drip tray that lines the slide-out catch pan. Discard disposable drip tray when necessary and replace with a new one.
4) Reinstall all components.
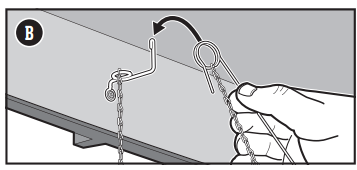
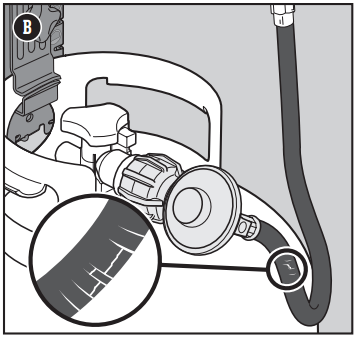
Inspect the Hose
Routine inspection of the hose is necessary.
1) Confirm that the grill is off and cool.
2) Check hose for any signs of cracking, abrasions, or cuts (B). If the hose is found to be damaged in any way, do not use the grill.
Preheat the Grill
Preheating the grill is critical to successful grilling. Preheating helps to prevent food from sticking to the grate and gets the grate hot enough to sear properly. It also burns off residue of a previously cooked meal.
1) Open the grill lid.
2) Ignite your grill according to the ignition instructions in this Owner's Manual.
3) Close lid.
4) Preheat the grill with all burners on the start/ high position for 10 to 15 minutes or until thermometer registers 500° F (260° C) (C).
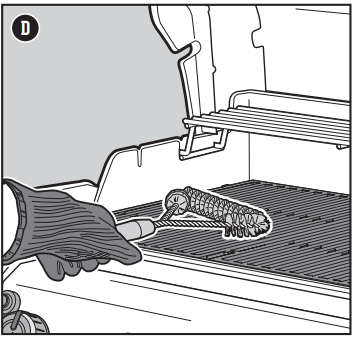
Clean the Cooking Grate
After preheating, any bits of food or debris left over from previous use will be easier to remove. Cleaned grates will also prevent your next meal from sticking.
1) Brush the grates with a stainless steel bristle grill brush immediately after preheating (D).
Igniting the Grill
Using the Crossover Ignition System to Ignite the Grill
The crossover ignition system ignites burner 1 furthest to the left with a spark from the igniter electrode. You generate the energy for the spark by pushing the igniter button. You will hear the igniter clicking. Burner(s) 2 (and 3) can be lit after burner 1 is lit. All burners should be lit for preheating, however, all burners do not have to be lit while grilling.
1) Open the grill lid (A).
2) Check that all burner control knobs are in the off position. Check by pushing in and turning knobs clockwise (B).
Note: It is important that all burner control knobs are in the off position before turning on the LP tank. If they are not, the flow limiting device built into the regulator will activate, limiting the flow of gas from the LP tank.
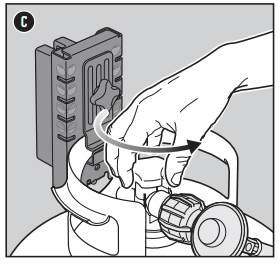
3) Turn the LP tank on by slowly turning the tank valve counterclockwise; wait 60 seconds (C).
Note: It is important that the LP tank is turned on slowly. If it is opened too quickly, the flow limiting device built into the regulator will activate, limiting the flow of gas from the LP tank.
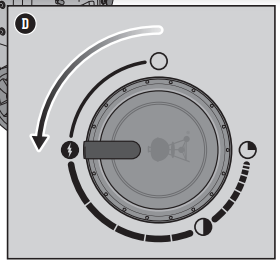
4) Begin with burner 1 furthest to the left. Push the burner control knob in and turn it counterclockwise to the start/high position (D).
IMPORTANT: Always ignite burner 1 first. The other burner(s) ignite from burner 1.
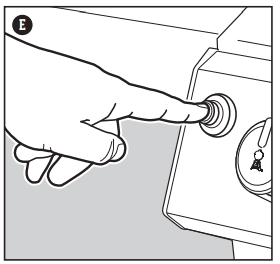
5) Push and hold the electronic ignition button (E). You will hear it ticking.
6) Check that burner 1 is lit by looking through the cooking grates and through the cutout in the FLAVORIZER BARS.
7) If the burner does not ignite, turn burner control knob to the off position and wait five minutes to allow the gas to clear before attempting to light the burner again.
8) When burner 1 ignites, you can turn on burner 2 (and burner 3).
Should the burners fail to ignite using the electronic ignition, refer to the TROUBLESHOOTING section. There you will find instructions on igniting the grill with a match to help determine the exact problem.
To Extinguish Burners
1) Push each burner control knob in and then turn clockwise all the way to the off position.
2) Turn gas supply off at the LP tank.
WARNING: Open lid during ignition.
WARNING: Do not lean over open grill while igniting or cooking.
WARNING: If ignition does not occur within four seconds of attempting to light the first burner, turn the burner control knob to the off position. Wait five minutes to allow accumulated gas to dissipate, and then repeat the lighting procedure.
Cleaning and Maintenance
Cleaning the Inside of the Grill
Over time, the performance of your grill can diminish if it has not been maintained properly. Low temperatures, uneven heat, and food sticking to cooking grates are all signs that cleaning and maintenance are overdue. When your grill is off and cool, start by cleaning the inside, from the top down. A thorough cleaning is recommended at least twice a year. Consistent use may require quarterly cleanings.
Cleaning the Lid
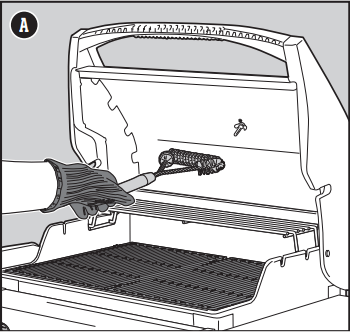
From time to time you may notice “paint-like” flakes on the inside of the lid. During use, grease and smoke vapors slowly change into carbon and deposit on the inside of your lid. These deposits will eventually peel, and looks very similar to paint. These deposits are non-toxic, but the flakes could fall onto your food if you do not clean the lid regularly.
1) Brush the carbonized grease from the inside of the lid with a stainless steel bristle grill brush (A). To minimize further build-up, the inside of the lid can be wiped with a paper towel after grilling while the grill is still warm (not hot).
Cleaning the Cooking Grates
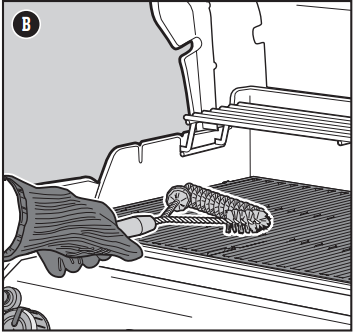
If you have been cleaning your cooking grates as recommended, the debris on your grates should be minimal.
1) With grates installed, brush the debris off your cooking grate with a stainless steel bristle grill brush (B).
2) Take the grates out and set aside.
Cleaning the FLAVORIZER BARS
FLAVORIZER BARS catch drippings that smoke and sizzle, adding flavor to your food. Any drippings that are not vaporized by the FLAVORIZER BARS are funneled away from the burners. This helps prevent flare-ups inside of your grill, and protects the burners from getting clogged.
1) Scrape the FLAVORIZER BARS with a plastic scraper (C) .
2) If necessary, brush the FLAVORIZER BARS with a stainless steel bristle grill brush.
3) Remove FLAVORIZER BARS and set aside.
Cleaning the Burners
Two areas on the burners that are key to optimum performance are the ports (small openings running along the length of the burners) and the spider/insect screens on the ends of the burner. Keeping these areas clean is essential for safe operation.
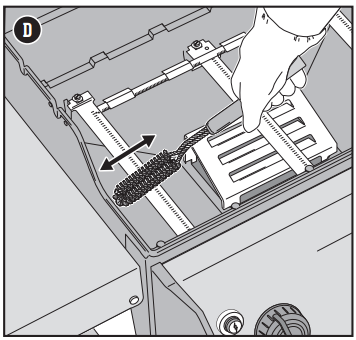
Cleaning the Burner Ports
1) Use a clean stainless steel bristle grill brush to clean the outside of the burners by brushing across the top of the burner ports (D). Do not brush lengthwise.along the tube, as this will only brush debris from one port to another.
2) When cleaning burner 1, avoid damaging the ignition electrode by carefully brushing around it (E) .
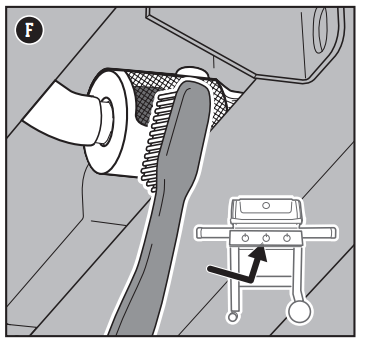
Cleaning the Spider Screens
1) Locate the ends of the burners on the underside of the control panel where they meet the valves.
2) Clean the spider/insect screens on each of the burners using a soft bristle brush (F).
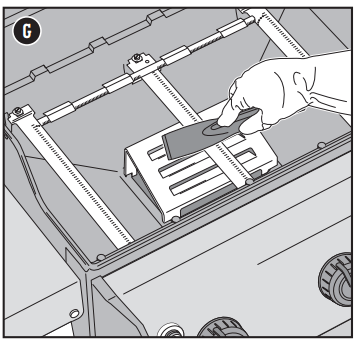
Cleaning the Heat Deflector
Located under the burners, the heat deflector distributes heat evenly throughout the cookbox while cooking. Keeping the heat deflector clean will enhance the cooking performance of your grill.
1) Scrape the heat deflector with a plastic scraper (G).
2) If necessary, brush the heat deflector with a stainless steel bristle grill brush.
3) Remove heat deflector and set aside.
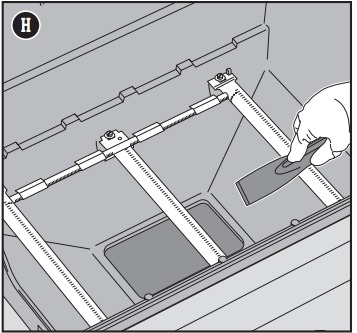
Cleaning the Cookbox
Look inside the cookbox for any grease accumulation or leftover food particles. Excessive accumulation can cause a fire.
1) Use a plastic scraper to scrape debris off the sides and bottom of the grill into the opening in bottom of the cookbox (H). This opening leads debris into the slide-out catch pan.
Cleaning the Grease Management System
The grease management system consists of a slide-out catch pan and disposable drip tray. These components were designed to be easily removed, cleaned, and replaced; an essential step every time you prepare to grill. Instructions on inspecting the grease management system can be found in MEAL-TOMEAL MAINTENANCE.
Cleaning the Outside of the Grill
The outside of your grill may include stainless steel, porcelain-enameled, and plastic surfaces. Weber recommends the following methods based on the surface type
Cleaning Stainless Steel Surfaces
Clean stainless steel using a non-toxic, non-abrasive stainless steel cleaner or polish designed for use on outdoor products and grills. Use a microfiber cloth to clean in the direction of the grain of the stainless steel. Do not use paper towels.
Note: Do not risk scratching your stainless steel with abrasive pastes. Pastes do not clean or polish. They will change the color of the metal by removing the top chromium oxide film coating.
Cleaning Painted, Porcelain-Enameled Surfaces and Plastic Components
Clean painted, porcelain-enameled and plastic components with warm soapy water, and paper towels or cloth. After wiping down the surfaces, rinse and dry thoroughly.
Cleaning the Outside of Grills that are in Unique Environments
If your grill is subject to a particularly harsh environment, you will want to clean the outside more often. Acid rain, pool chemicals, and salt water can cause surface rusting to appear. Wipe down the outside of your grill with warm soapy water. Follow up with a rinse and thorough drying. Additionally, you may want to apply a stainless steel cleaner weekly to prevent surface rust.
Troubleshooting
GRILL WILL NOT IGNITE
SYMPTOM
• Burner does not ignite when following the electronic ignition instructions in the “Operation” section of this Owner's Manual.
CAUSE
SOLUTION
There is a problem with gas flow.
If the grill will not ignite, the first step is to determine if there is gas flowing to the burners. To check this, follow the instructions below for “Using a Match to Determine if there is Gas Flow to the Burners.”
If match lighting IS NOT successful, follow the gas flow troubleshooting suggestions on the next page.
There is a problem with the electronic ignition system.
If the grill will not ignite, the first step is to determine if there is gas flowing to the burners. To check this, follow the instructions below for “Using a Match to Determine if there is Gas Flow to the Burners.”
If match lighting IS successful, follow the instructions below for “Checking the Components of the Electronic Ignition System.”
Using a Match to Determine if there is Gas Flow to the Burners
1) Open the grill lid.
2) Check that all burner control knobs are in the off position. Check by pushing in and turning knobs clockwise.
Note: It is important that all burner control knobs be in the off position before you turn on the LP tank. If they are not, the flow limiting device built into the regulator will activate, limiting the flow of gas from the LP tank.
3) Turn the LP tank on by slowly turning the tank valve counterclockwise; wait 60 seconds.
Note: It is important that the LP tank is turned on slowly. If it is opened too quickly, the flow limiting device built into the regulator will activate, limiting the flow of gas from the LP tank.
4) Begin with burner 1, furthest to the left. Put match in the matchstick holder and strike match. (Matchstick holder is located under left side table.) Insert lit match down through the cooking grates, past the FLAVORIZER BARS and next to the burner (A).
5) Push the burner control knob in and turn it counterclockwise to the start/high position.
6) Check that the burner is lit by looking through the cooking grates and through the cutout in the FLAVORIZER BARS.
7) If the burner does not ignite within 4 seconds, turn burner control knob to the off position and wait five minutes to allow the gas to clear before attempting to light the burner again. If repeated attempts fail, follow the gas flow troubleshooting instructions on the next page.
8) If the burner ignites, the problem lies in the ignition system. Follow the instructions for “Checking the Components of the Electronic Ignition System.”
9) After burner 1 ignites, you can turn on burner 2 (and burner 3). 10)Replace the matchstick holder by hanging underneath left side table (B).
Checking the Components of the Electronic Ignition System
When pressing the ignition button you should hear a ticking sound. If you cannot hear the ticking sound, check the battery, then check the wires.
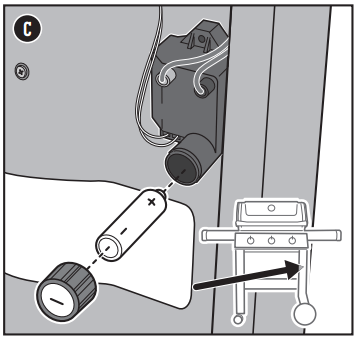
Checking the Battery
There are three potential issues with the battery that supplies the power to your ignition module that need to be checked:
1) Some batteries have a plastic protective wrap around them. (Do not confuse this plastic with the battery label.) Check that this plastic wrap is removed.
2) Confirm that the battery is installed correctly (C).
3) If the battery is old, replace it with a new battery
Checking the Wires
There are two potential trouble spots that need to be checked:
1) Check that the ignition wires are connected securely to the terminals on the ignition button under the control panel.
2) Make sure the ignition wires are properly attached to the ignition module. The wire terminals are color coded to correspond with the terminals on the ignition module. The number of wires will vary per model.
GAS FLOW
SYMPTOM
• Grill does not reach desired temperature or heats unevenly.
• One or more of the burners fail to ignite.
• Flame is low when burner is on high position.
• Flames do not run the whole length of the burner.
• Burner flame pattern is erratic.
CAUSE
SOLUTION
The “flow limiting device” has been activated. This safety feature built into the regulator restricts the gas flow in the event of a gas leak. You can inadvertently activate this safety feature without having a gas leak. This typically occurs when you turn on the gas at the LP tank and one or more of the control knobs are not in the off position. It may also occur if you turn on the LP tank too quickly.
Reset the “flow limiting device” by closing the LP tank valve and turning all the burner control knobs to the off position. Wait five minutes to allow accumulated gas to dissipate, then ignite the grill again following the instructions in the “Operation” section.
The LP tank is low or empty.
Refill LP tank.
Fuel hose is bent or kinked.
Straighten fuel hose.
Burner ports are dirty.
Clean burner ports. Refer to “Cleaning the Burner Ports.”
SYMPTOM
• Gas is smelled in conjunction with burner flames that appear yellow and lazy.
CAUSE
SOLUTION
Spider screens on the burners are obstructed.
Clean spider screens. Refer to “Cleaning the Spider Screens” in the Product Care section. Also refer to the illustrations and information in this section about proper flame pattern and spider screens.
SYMPTOM
• The smell of gas and/or a light hissing sound.
CAUSE
SOLUTION
The internal rubber seal in the LP tank valve could be damaged.
Inspect the rubber seal for damage. If damaged, return tank to local retailer.
GREASY GRILL (Peeling Paint & Flare-Ups)
SYMPTOM
• Inside of lid appears to have the appearance of peeling paint.
CAUSE
SOLUTION
The flakes you see are accumulated cooking vapors that have turned into carbon.
This happens over time after repeated use of your grill. This is not a defect. Clean the lid. Refer to the “Product Care” section.
SYMPTOM
• Experiencing flare-ups when grilling or preheating.
CAUSE
SOLUTION
There is leftover food from the previous meal.
Always preheat the grill on the highest setting for 10 to 15 minutes.
The inside of the grill needs to be cleaned thoroughly.
Follow the steps in the "Cleaning and Maintenance" section to clean the grill inside from the top down.
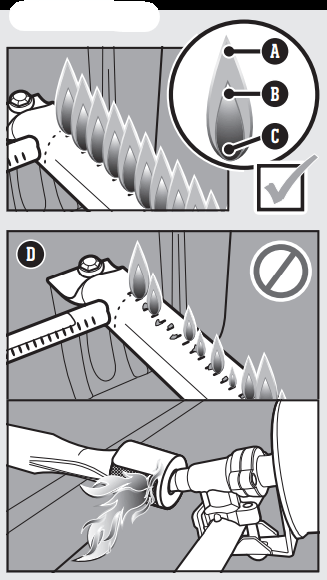
Proper Burner Flame Pattern
The burners in your grill were factory set for the correct air and gas mixture. When the burners are performing correctly, you will see a specific flame pattern. The tips may occasionally flicker yellow (A), with a descending light blue (B) to dark blue flame (C).
WARNING: Blocked and dirty ports can restrict full gas flow, resulting in a fire (D) in and around the gas valves, causing serious damage to your grill.
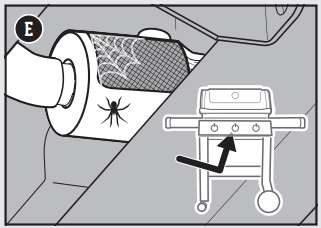
Spider Screens
The combustion air openings of the burners (E) are fitted with stainless steel screens to prevent spiders and other insects from spinning webs and building nests inside the burners. Additionally, dust and debris can accumulate on the outside of the spider/insect screen and obstruct the oxygen flow to the burners.
 position for 10 to 15 minutes or until thermometer registers 500° F (260° C) (C).
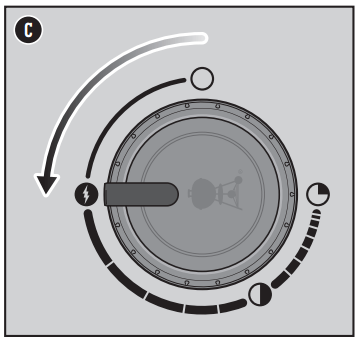
 position. Check by pushing in and turning knobs clockwise (B).
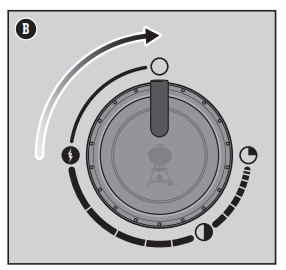


 position.