User manual
Installation
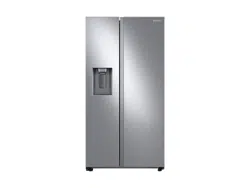
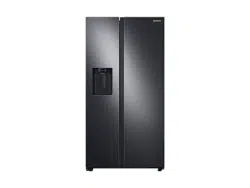
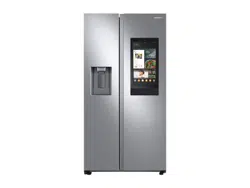
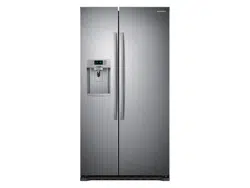
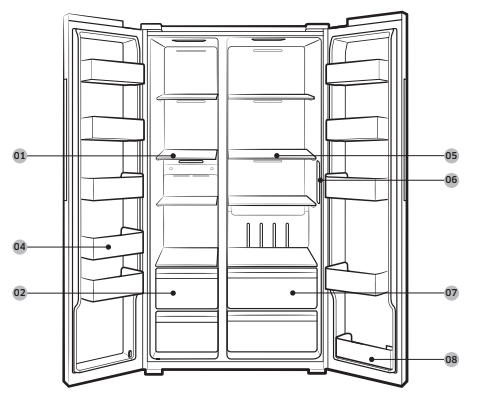
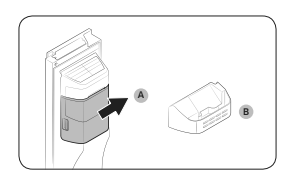
Refrigerator at a glance
The actual appearance of your refrigerator may differ, depending on the model and the country.
Type A
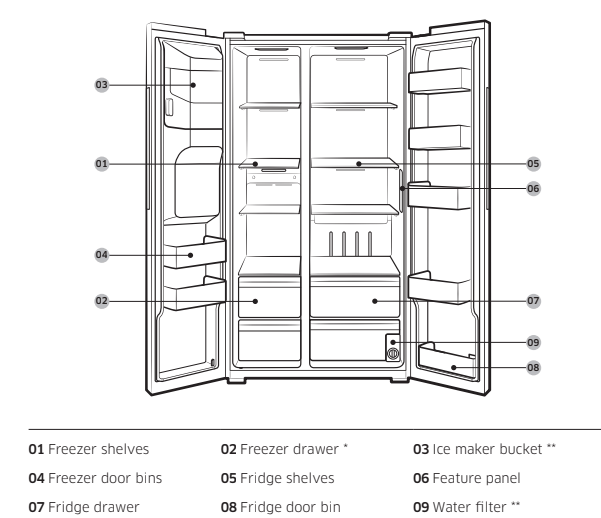
Type B
Step-by-step installation
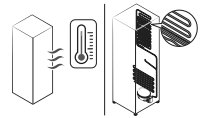
STEP 1 Select a site
Site requirements:
• Solid, level surface without carpeting or flooring that may obstruct ventilation
• Away from direct sunlight
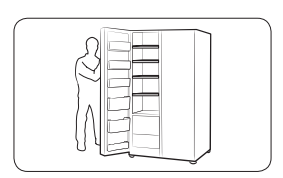
• Adequate room for opening and closing the door
• Away from a heat source
• Room for maintenance and servicing
• Temperature range: between 50 °F (10 °C) and 109 °F (43 °C)
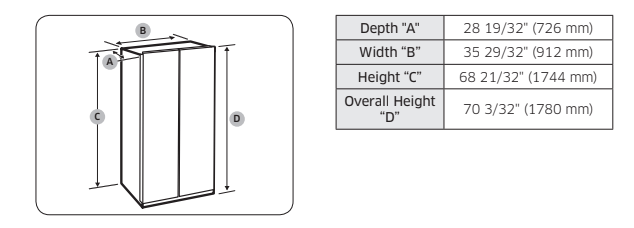
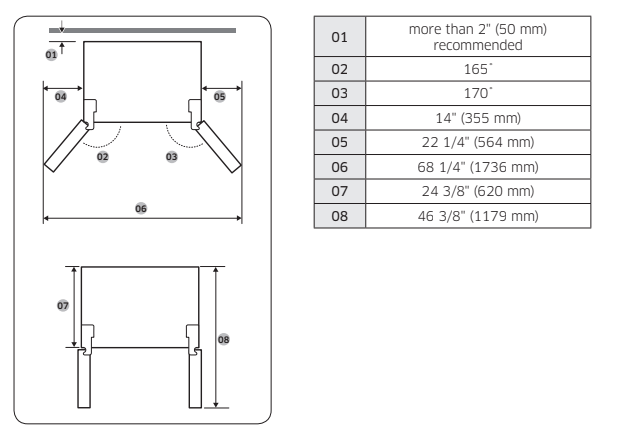
Clearance
See the pictures and table below for space requirements for installation.
STEP 2 Flooring
• The surface to install the refrigerator must support a fully loaded refrigerator.
• To protect the floor, put a large piece of cardboard on each leg of the refrigerator when you move it for installation.
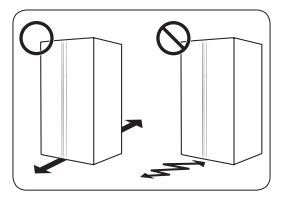
• Once the refrigerator is in its final position, do not move it unless necessary to protect the floor. If you have to, use a thick paper or cloth such as old carpets along the movement path.
STEP 3 Door removal for entrance
If the refrigerator cannot pass through the entrance due to its size, follow these
instructions:
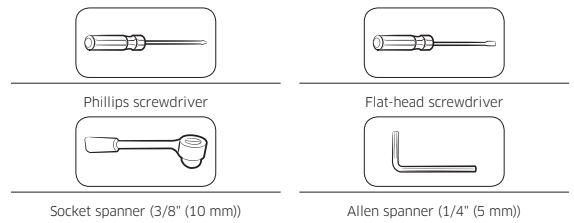
Tools required (not provided)
These tools are used for removing the doors.
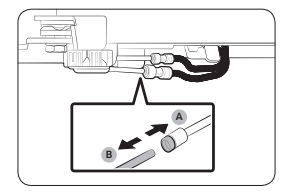
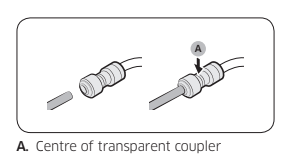
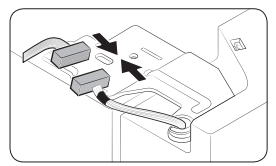
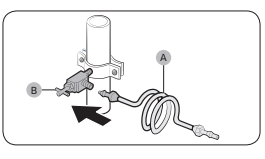
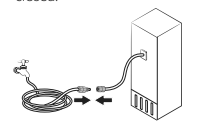
Disconnect the water line (Dispenser models only)
1. From the bottom rear side of the refrigerator, pull out the water line to the front.
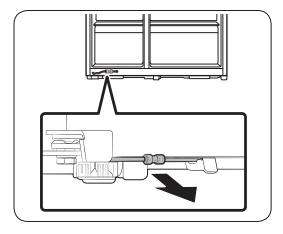
2. To disconnect the hoses, press and hold the transparent coupler (A) and detach the water hose (B).
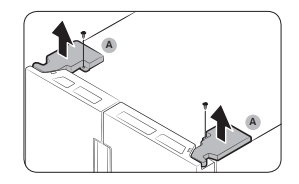
Detach the doors
1. Use a Phillips screwdriver to unscrew the hinge covers (A) on the top of each door.
2. Open the doors to loosen the hinges and remove the hinge covers. Once the covers are removed, close the doors.
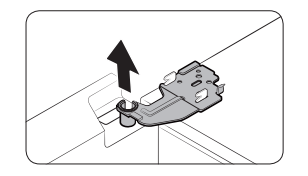
3. Disconnect the electrical harness.

4. Gently lift the clamp.
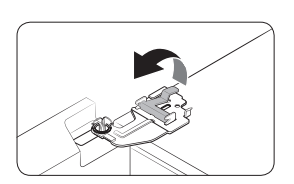
5. Pull the clamp to remove.
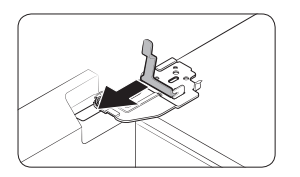
6. Open the door by 90 degrees. While holding the door, remove the hinge.
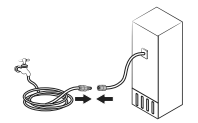
Reconnect the water hoses (Dispenser models only)
Once the refrigerator has passed through the entrance, reconnect the water hoses.
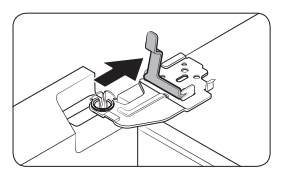
Reattach the doors
1. Hold the freezer door and hook to the hinge at the bottom of the refrigerator.
2. Put the hinge into its position, and then insert it into the hole on the door.
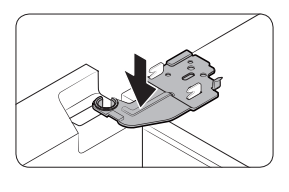
3. Insert the clamp in the arrow direction.
4. Press the clamp as shown.
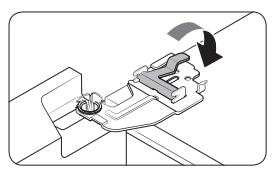
5. Connect the electrical harness.
6. Insert the hinge covers with the front sides first, and then tighten the screws. Use a Phillips screwdriver for this step.

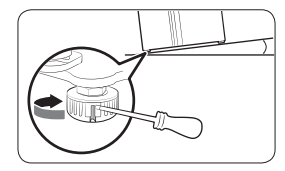
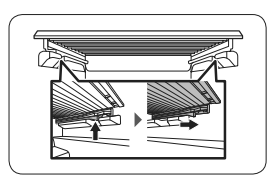
STEP 4 Adjust the leveling feet
The refrigerator can be leveled using the front legs that have a special screw (leveler) for
leveling purposes. Use a flat-head screwdriver for leveling.
To adjust the height of the freezer side: Insert a flat-head screwdriver into the leveler of the freezer-side front leg. Turn the leveler clockwise to raise, or turn it counter clockwise to lower.SS
To adjust the height of the fridge side: Insert a flat-head screwdriver into the leveler of the fridge-side front leg. Turn the leveler clockwise to raise, or turn it counter clockwise to lower.

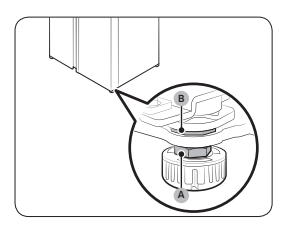
STEP 5 Adjust the door height
The height of a door can be adjusted using the clamp nut and the height nut on the front
bottom of each door.
1. Open the door to adjust, and locate the two nuts (A) and (B) on the front bottom of the door.
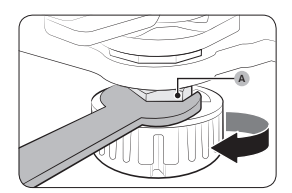
2. With a 19 mm spanner (not provided), turn the clamp nut (A) clockwise to loosen. Then, open the door, and do the following inside the door.
- To raise the door, turn the height nut (B) counter clockwise.
- To lower the door, turn the height nut (B) clockwise.
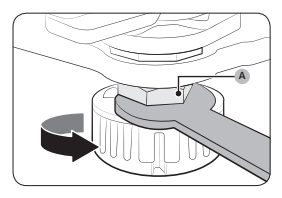
3. When complete, tighten the clamp nut (A) by turning it counter clockwise.
STEP 6 Connect the water dispenser line
A water dispenser with a filter is one of the helpful features on your new refrigerator. To help promote better health, the water filter removes unwanted particles from your water. However, it does not sterilize or destroy microorganisms. You may need to purchase a water purifying system to do that.
The water line also connects to the ice maker. For the ice maker to operate properly, water pressure of 30 to 120 psi (206 to 827 kPa) is required. If the refrigerator is installed in an area with low water pressure (below 30 psi / 206 kPa), you can install a booster pump to compensate for the low pressure.
After you have connected the water line, make sure the water storage tank inside the refrigerator is properly filled. To do this, press the water dispenser lever until water runs from the water outlet.
NOTE
• Water line installation kits are available at extra cost from your retailer. We recommend
using a water line installation kit that contains copper tubing and a 1/4" (6 mm)
compression nut.
1. Shut off the main water source.
2. Insert the pipe clamp (B) and the shutoff valve (C) into the cold water line (A).
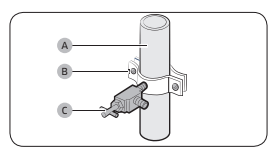
3. Connect the water line installation kit (A) to the shutoff valve (B).
Connect the water supply line to the refrigerator
There are several items you must purchase to complete this connection. You may find these items sold as a kit at your local hardware store.
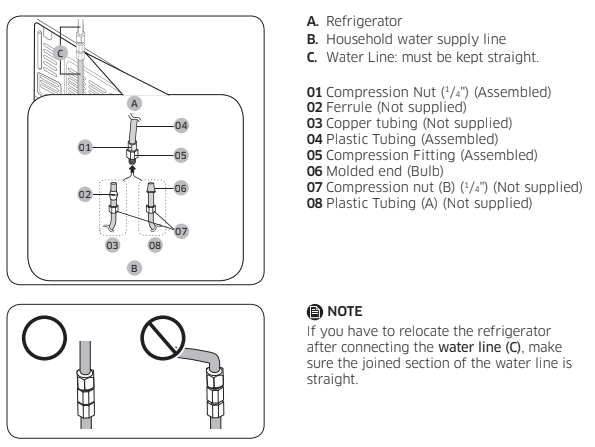
1. Connect the household water line to the assembled compression fitting.
- If you are using copper tubing, slip the compression nut (B) (not supplied) and ferrule
(not supplied) on the copper tubing (not supplied) as shown.
- If you are using plastic tubing (A), insert the molded end (Bulb) of the plastic tubing
(A) into the compression fitting.
2. Tighten the compression nut (B) onto the compression fitting. Do not over-tighten the
compression nut (B).
3. Turn the water on and check for any leakage. If you find water drops or leakage in
the connection areas, turn off the main water supply. Check the connections and, if
necessary, tighten.
4. Flush 1 gallon of water through the filter before drinking or using the water from the
refrigerator. (Flush approximately 6 minutes.) To flush, press a large glass or cup against
the water dispenser lever. Fill the glass, empty it, and then repeat.
5. After you turn on the refrigerator, let the ice maker make ice for 1 to 2 days. Over that
period of time, throw out the first 1 or 2 buckets of ice the ice maker makes to ensure
all impurities have been removed from the water line.
STEP 7 Initial settings
By completing the following steps, the refrigerator should be fully functioning.
1. Plug the power cord into the wall socket to turn the refrigerator on.
2. Open the door, and check if the interior light lights up.
3. Set the temperature to the coldest, and wait for about an hour. Then, the freezer will be slightly chilled, and the motor will run smoothly.
4. Wait until the refrigerator reaches the set temperature. Now the refrigerator is ready
for use.
STEP 8 Final check
When installation is complete, confirm that:
• The refrigerator is plugged into an electrical outlet and grounded properly.
• The refrigerator is installed on a flat, level surface with a reasonable clearance from the
wall or the cabinet.
• The refrigerator is level and is sitting firmly on the floor.
• The door opens and closes freely, and the interior light turns on automatically when you
open the door.
Operations
Feature panel
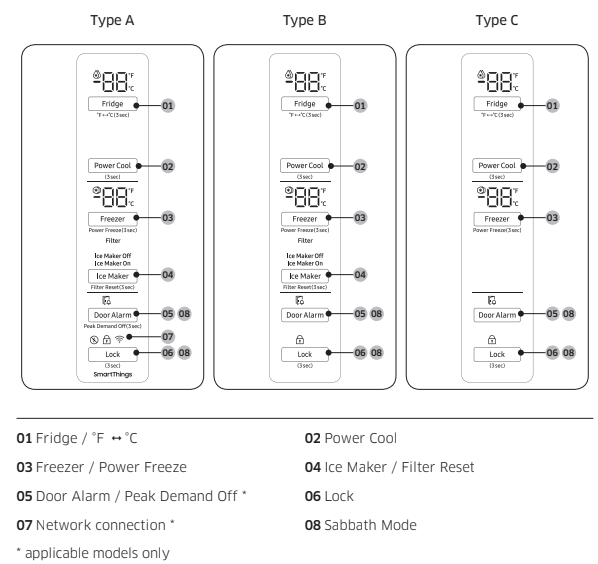
01 Fridge / °F  °C (3 sec)
- Fridge
- You can use the Fridge button to set the fridge temperature.
• Press Fridge repeatedly to select a desired temperature between 34 °F (1 °C) and 44 °F (7 °C).
- The temperature indicator displays the currently set or selected temperature.
- °F
 °C
°C
- You can also use the Fridge button to switch the temperature scale between Celsius and Fahrenheit.
- To switch the temperature scale, press and hold Fridge for 3 seconds to change the current temperature scale.
02 Power Cool (3 sec)
- Power Cool speeds up the cooling process at maximum fan speed.
- This is useful to quickly cool food that spoils quickly, or after the door is left open for some time. The fridge keeps running at full speed for several hours and then returns to the previous temperature. Press and hold Power Cool for 3 seconds.
03 Freezer / Power Freeze (3 sec)
- Freezer
- You can use the Freezer button to set the freezer temperature.
• Press Freezer repeatedly to select a desired temperature
between 5 °F (-15 °C) and -8 °F (-23 °C).
- The temperature indicator displays the currently set or
selected temperature.
- Power Freeze
- Power Freeze speeds up the freezing process at maximum fan speed. The freezer keeps running at full speed for 50 hours and then returns to the previous temperature.
• To activate Power Freeze, press and hold Freezer for 3 seconds. The corresponding indicator  lights up, and the refrigerator will speed up the freezing process for you.
• To deactivate, press and hold Freezer for 3 seconds again. The freezer returns to the previous temperature setting.
• To freeze large amounts of food, activate Power Freeze for at least 20 hours before putting food in the freezer.
04 Ice Maker / Filter Reset (3 sec)
- Ice Maker
- Press Ice Maker to turn the ice maker on or off.
- The ice maker has 2 indicators ( Ice Maker On / Ice Maker Off) to indicate its operating status.
• When the ice maker operates, the corresponding indicator ( Ice Maker On) turns on.
• When the ice maker is turned off, the corresponding indicator (Ice Maker Off ) turns on. In this case, ice making is disabled even if you press the Cubed Ice or Crushed Ice buttons on the dispenser panel. To enable ice making, you must turn the ice maker on.
- Filter Reset
- After about 6 months (and typically, about 300 gallons (1200 L) of water), the Filter indicator blinks red for several seconds when you open the door, reminding you that the filter needs to be replaced.
- When this happens, replace the filter, and then press and hold Filter Reset for 3 seconds.The filter lifecycle will be reset and the Filter indicator turns off. 05 Door Alarm / Peak Demand Off (3 sec)
05 Door Alarm / Peak Demand Off (3 sec)
- Door Alarm
- If the door is left open for more than 2 minutes, an alarm will sound and the alarm indicator will blink. You can toggle the alarm on and off by pressing Door Alarm. The alarm is enabled by factory default.
- If the door is left open for 5 minutes, internal light (in the fridge, freezer) will blink for 5 minutes and turn off. This is for alerting the hearing-impaired person, and it is normal.
- Peak Demand Off
- The Peak Demand Off function activates/deactivates Smart Grid.
- Press Door Alarm for 3 seconds to set/clear the Peak Demand Off function.
06 Lock (3 sec)
- To prevent accidental setting changes, press and hold Lock for 3 seconds. The main panel will be disabled and the Lock indicator ( ) will turn on.
- When Lock is on, the indicator blinks if any button on the main panel is pressed. If you press and hold the button again for more than 3 seconds, Lock will be deactivated. However, Lock will be reactivated if no button is pressed within 1 minute.
07 Network connection
You can control and monitor your refrigerator on the SmartThings app. For more
information, see the SmartThings (applicable models only) section.
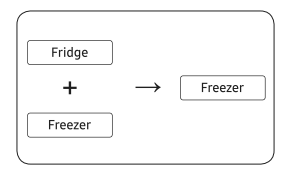
08 Sabbath Mode
- The Sabbath mode stays active for 85 hours once it is activated. After that, it will be deactivated automatically.
- To activate, press and hold Door Alarm and Lock simultaneously for 5 seconds to enter Sabbath mode. Then the refrigerator operates in Sabbath mode where the buttons, the display, and the room lamps are all under control.
- To deactivate, press and hold the buttons again for 5 seconds to exit Sabbath mode.
09 Cooling Off
- Cooling Off mode (also called Shop mode) is designed for use by retailers when they are displaying refrigerators on a retail floor.
- In Cooling Off mode, the refrigerator’s fan motor and lights operate normally, but the compressors do not run so that neither the refrigerator nor the freezer run the cooling process.
- To enter or exit the Cooling Off mode, press and hold Fridge and Power Cool simultaneously for 6 seconds. Then, when the display blinks, press Lock.
- When the Cooling Off mode is on, the refrigerator chime sounds, and the refrigerator shows “0” on the fridge temperature display and “FF” on the freezer temperature display.
SmartThings (applicable models only)
Visit the Google Play Store, Galaxy Apps, or Apple App Store and search for “SmartThings”. Download and install the SmartThings app provided by Samsung Electronics to your smart device.
You are required to register your Samsung account to use the app. If you don’t have a
Samsung account, follow the app’s onscreen instructions to create a free Samsung account.
Turn on the device you want to connect, open the SmartThings app on your phone, and
then follow the instructions below.
If a pop-up appears saying that a new device has been found, tap ADD NOW.
If a pop-up doesn't appear, tap the + button, and then select the device you want to
connect from the list of available devices.
If your device isn't in the list of available devices, tap Supported Devices, select the device
type (Refrigerator), and then select the specific device model.
Follow the instructions in the app to set up your device. Once setup is complete, your
refrigerator will appear as a "card" on your Devices screen.
Integrated control
You can monitor and control your refrigerator at home and on the go.
• Tap the refrigerator icon on the SmartThings Dashboard or tap the Devices icon at the bottom of the Dashboard, and then tap the refrigerator "card" to open the Refrigerator page.
• Check the operation status or notifications related to your refrigerator, and then change options or settings if necessary.
Refrigerator settings
- Monitoring
- Fridge temperature. Displays the desired temperature setting of the fridge.
- Freezer temperature. Displays the current temperature of the freezer.
- Diagnosis .Detects abnormal operations of the refrigerator.
- Energy monitoring .Checks the accumulated power consumption of the refrigerator for the last 180 days.
- Functions
- You can turn the ice making function on or off, and check the current settings of the function.
- You can also check the status and progress of ice making.
- Power Cool .You can turn Power Cool on or off, and check the current settings.
- Power Freeze .You can turn Power Freeze on or off, and check the current settings.
- Fridge temperature . You can set the desired temperature of the fridge.
- Freezer temperature .You can set the desired temperature of the freezer.
- Sabbath Mode .You can activate and deactivate the Sabbath mode.
- Alarms
- Abnormally high temperature . This alarm is triggered when the fridge or the freezer has abnormally high temperatures.
- Door opening This alarm is triggered if the fridge door or the freezer drawer is open for a specific time.
- Water filter replacement .This alarm reminds you that the water filter must be replaced.
SMART GRID Function (Demand Response) (applicable models only)
When the refrigerator operates in SMART GRID (Demand Response) mode, the Energy
Management Refrigerator function can control energy usage or delay the operation of
some functions to save money when energy prices or demand are the highest.
Using the SMART GRID (Demand Response) Function
- This feature monitors energy prices and demand information from your utility company and sends notifications to the refrigerator to run high energy consuming tasks during off- peak times when electricity costs and demand are lower.
- If the refrigerator receives a control signal from the utility company, the refrigerator will display the DAL (L3) ~ TALR (L4) levels on the refrigerator display and control the power consumption according to the level.
- [Exception condition] The DAL and TALR control signals from a utility company work as long as product performance is maintained.
- If the refrigerator receives the SMART GRID (Demand Response) signal (DAL or TALR), the refrigerator will operate in Delay Appliance Load (Display:L3) or Temporary Appliance Load Reduction (Display:L4) mode.
• Delay Appliance Load (L3): The refrigerator responds to a DAL signal by providing a moderate load reduction for the duration of the delay period. This function controls functions that consume a lot of energy such as adjusting the Cooling system, running the defrost cycle, and making ice.
- When the refrigerator operates in DAL (L3) mode, “L3” is displayed on the refrigerator display.
- DAL mode is automatically deactivated after it lasts for the amount of time stipulated by the DAL signal (max. 4.5 hours) or when the Peak Demand Off key is pressed.
• Temporary Appliance Load Reduction (L4): The refrigerator responds to a TALR signal by aggressively reducing the load for a short time period. This function reduces energy consumption by stopping the compressor and controlling the functions that consume a lot of energy such as the defrost cycle and making ice.
- When the refrigerator operates in TALR (L4) mode, “L4” is displayed on the refrigerator display.
- TALR (L4) mode is automatically deactivated after it lasts for the received duration (max. 15 minutes), or when the Peak Demand Off key is pressed. The mode is immediately deactivated and the refrigerator returns to the normal state when the door is opened or closed, or the dispenser is used.
To check the MAC address
1. In this mode, the MAC address appears on the temperature panel (on both the
freezer and the fridge sections of the panel) sequentially for 1 minute. Press and hold both Freezer and Fridge for 6 seconds. The temperature panel blinks. Then, press Freezer again to display the MAC address. The fridge beeps.
2. For example, if the MAC address is "11- 22-33-44-55-66", the temperature panel
displays the address for 1 minute in this sequence: "-- / --" → "11 / 22" → "33 / 44" → "55 / 66" → "-- / --". After the 1 minute, the MAC address disappears and the temperature panel
returns to the normal state.
Peak Demand Off (Override mode)
- When you want the refrigerator to ignore the SMART GRID (Demand Response) signal from the utility company, you can activate Peak Demand Off (Override mode).
- When you activate Peak Demand Off (Override mode), the refrigerator ignores the SMART GRID (Demand Response) signal and is not controlled by the utility company.
Activating and deactivating Peak Demand Off (Override mode)
1. Press and hold Door Alarm for 3 seconds.
2. A buzzer sounds and ‘Or’ and ‘on’ is displayed in the freezer and fridge temperature
displays for 5 seconds. Then the Peak Demand Off (Override mode) icon  turns on.
3. If the refrigerator receives a SMART GRID (Demand Response) signal from the utility
company, ’Or’ is displayed in the freezer temperature display.
4. To deactivate Peak Demand Off (Override mode), press and hold Door Alarm for 3
seconds.
5. A buzzer sounds and ‘Or’ and ‘oF’ is displayed in the freezer and fridge temperature
displays for 5 seconds. Then the Peak Demand Off (Override mode) icon  turns off.
Using the Energy Management Function
The Energy Management function enables you to control and monitor your Energy
Management refrigerator using the SmartThings app for your convenience.
To change the time setting for the Delay Defrost Capability
You can change the time setting for the Delay Defrost Capability on the app.
Provision for Open Access to the Connected Product Requirements
1. SGIP Open Standards (Smart Energy Profile 2.0 - http://www.csep.org/)
- Energy Consumption Reporting
- Demand Response
2. Samsung OPEN API
- Operational Status, User Settings & Messages
- ICE Maker Status: GET /icemaker/status/vs/0
- Door Open Alarm: GET /doors/vs/0
- DR Status: GET /drlc/vs/0
- Delay Defrost Capability
- Set Schedule of the Defrost Delay: POST /defrost/reservation/vs/0?op=add
- Get Schedule of the Defrost Delay : GET /defrost/reservation/vs/0
- Delete Schedule of the Defrost Delay: POST /defrost/reservation/vs/0?op=remove
- Defrost Delay On/OFF: POST /defrost/delay/vs/0
Dispenser panel (applicable models only)
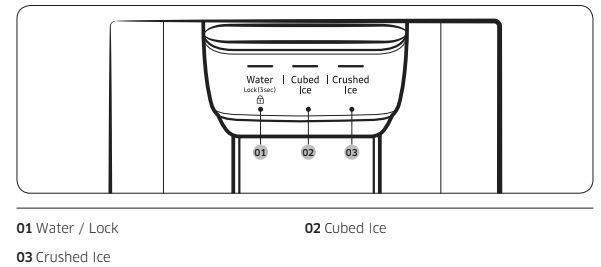
01 Water / Lock (3 sec)
- Water .To dispense chilled water, press Water. The corresponding indicator turns on.
- Lock (Dispenser panel / Dispenser lever).
- To prevent the use of the dispenser panel buttons and the dispenser lever, press and hold Water for more than 3 seconds.
- If you press and hold the button again for more than 3 seconds, the dispenser lock will be deactivated.
- When dispenser lock is on, the indicator blinks if any button on the dispenser panel is pressed or the dispenser lever is pressed.
02 Cubed Ice
- Cubed Ice .Press Cubed Ice to dispense cubed ice. The corresponding indicator turns on.
03 Crushed Ice
- Crushed Ice .Press Crushed Ice to dispense crushed ice. The corresponding indicator turns on.
Special features
Water/Ice dispenser (applicable models only)
- Using the dispenser, you can dispense water with or without ice.
- The water dispenser offers 3 options: chilled water, cubed ice, and crushed ice. To dispense chilled water, press Water on the dispenser panel. Put a water glass under the dispenser, and then push the dispenser lever.
To dispense water with ice
1. With the Ice Maker enabled, press Cubed Ice or Crushed Ice to select the ice type.
2. Put a water glass under the dispenser, and then push the dispenser lever with
the glass. Ice will be dispensed from the dispenser.
3. Press Water to select water.
4. Push the dispenser lever with the glass. Water will be dispensed from the dispenser.
Auto ice maker (applicable models only)
The refrigerator has a built-in ice maker that automatically dispenses ice so that you can
enjoy filtered water with cubed or crushed ice.
Ice making
After you have installed your refrigerator and plugged it in, follow these instructions to
ensure proper ice making and to keep the ice bucket full of ice:
1. Let the refrigerator operate for at least 24 hours to ensure optimal performance.
2. Dispense the first 4 to 6 ice cubes into a glass.
3. Wait another 8 hours and dispense another 4 to 6 ice cubes.
4. Then, wait another 16 hours and dispense the first glass-full of ice.
Water clouding
Water supplied to the refrigerator flows through a core alkaline filter. During this filtering
process, the water pressure of the water increases and the water becomes saturated with
oxygen and nitrogen. This causes the water to look misty or cloudy temporarily when
dispensed. This is normal and the water will look clear after a few seconds.
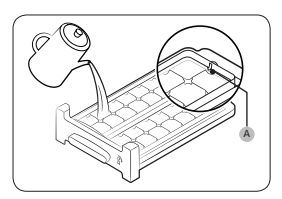
Twist ice maker (applicable models only)
1. Open the freezer door, and slide open the ice tray.
2. Fill the tray with water up to the maximum level (A) marked on the inner rear of the tray.
3. Slide the tray back into position.
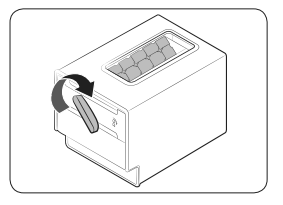
NOTE
• Make sure the ice cube storage bin is in place under the ice tray.
• To dispense the ice cubes, turn the handle of the bin to the right to empty half of the ice cubes into the bin. Then, turn it to the left to empty the other half.
• Take out the bin by slightly twisting and pulling to the front.
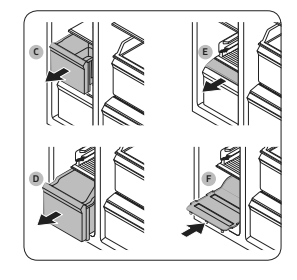
To secure more storage space (applicable models only)
If you do not use the ice maker and need more storage space, remove the icemaker
bucket (A). Then, insert the Freezer guide (Optional) (B) into the icemaker bucket’s
place.
To secure more space, remove the upper drawer (C), lower drawer (D), and lower drawer cover (E). Then, insert the provided bottom shelf (F).
Maintenance
Handle and care
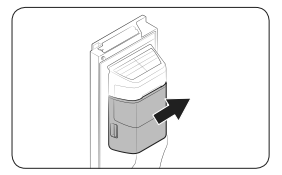
Icemaker bucket (applicable models only)
If you do not dispense ice for an extended period, ice may form clumps inside the
bucket. If this happens, remove and empty the icemaker bucket.
1. To remove the icemaker bucket, gently lift it up and pull out slowly while holding the handgrips with both hands.
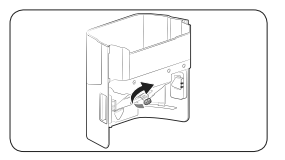
2. Remove and empty the icemaker bucket.
3. When done, turn the gear handle on the rear of the bucket by 90°, and then put
the bucket back into position. Make sure the bucket is inserted properly until you
hear a clicking sound.
4. Press and hold Ice Maker for 3 seconds to reset the ice maker.
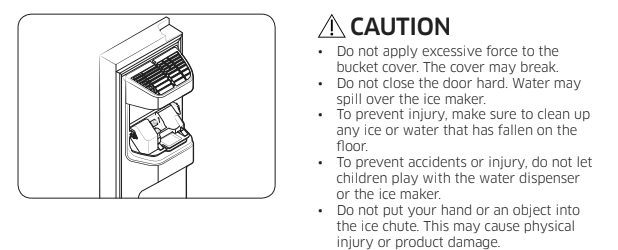
Shelves (fridge/freezer)
Pull the shelf out as far as it goes. Then lift it up and remove it.
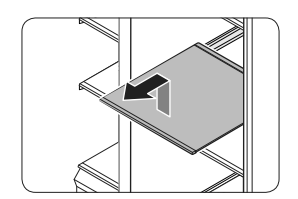
Door bins
To remove a door bins, hold the front sides of the bin and gently lift up to remove.
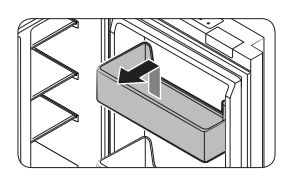
Drawers
To remove, pull the drawers out as far as they go, and then lift up slightly and pull.
Drawer cover
While pushing the left and right hooks underneath the drawer cover, pull the drawer cover to remove.
Cleaning
Interior and exterior
- Regularly use a dry cloth to remove all foreign substances such as dust or water from the power plug terminals and contact points.
1. Unplug the power cord.
2. Use a moistened, soft, lint-free cloth or paper towel to clean the refrigerator’s interior
and exterior.
3. When done, use a dry cloth or paper towel to dry well.
4. Plug in the power cord.
Ice / Water dispenser (applicable models only)
If the rubber seals of a door become dirty, the door may not close properly and reducing
refrigerator performance and efficiency. Use a mild detergent and damp cloth to clean the
rubber seals. Then, dry well with a cloth.
To keep cords and exposed parts of the rear panel free of dirt, vacuum the panel
once or twice a year.
Replacement
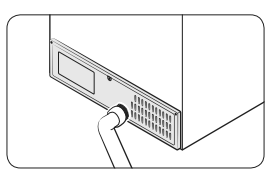
Water filter (applicable models only)
- The Filter Reset indicator ( Filter) turns red to let you know it is time to replace the water filter. Before replacing the filter, make sure the water supply line is shut off.
1. Shut off the water supply line.
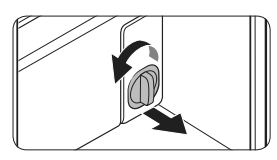
2. Turn the knob of the filter cartridge 90 degrees counterclockwise (1/4 turn). The filter cartridge unlocks.
3. Pull out to remove the cartridge.
- If the water filter is severely contaminated, the cartridge may not be easy to remove. If that is the case, use force to remove the cartridge.
- To prevent water leaks from the filter opening, pull the cartridge straight out while removing it.
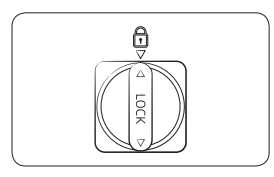
4. Insert a new filter cartridge. Use only Samsung-provided or approved filters.
5. Turn the cartridge knob clockwise to
lock into place.
6. Press and hold Ice Maker on the main panel for 3 seconds to reset the life
cycle detector. The Filter Reset indicator ( Filter) turns off.
7. When you are done replacing the filter, open the water valve and run water
through the dispenser for about 7 minutes. This is to remove impurities and air from the water line.
Reverse osmosis water filtration system
- The water pressure of the water supply system to a reverse osmosis water filtration system must be between 30 to 120 psi (206 to 827 kPa).
- The water pressure of the reverse osmosis water filtration system to the refrigerator’s cold water line must be at least 40 psi (276 kPa). If the water pressure is below these specifications:
• Check if the sediment filter in the reverse osmosis system is blocked. Replace the filter if necessary.
• Refill the water tank in the reverse osmosis system with water.
• If your refrigerator has a water filter, it may further reduce the water pressure when used in conjunction with a reverse osmosis system. Remove the water filter.
- For more information or servicing, contact a licensed plumbing professional.
Ordering a new filter
To purchase a new water filter, contact a local Samsung service center.
LED Lamps
To replace the lamps of the refrigerator, contact a local Samsung service center.
Troubleshooting
General
Temperature
Fridge/freezer does not operate. Fridge/freezer temperature is warm.
- Power cord is not plugged in properly.
- Properly plug in the power cord.
- Temperature control is not set correctly.
- Set the temperature lower.
- Refrigerator is located near a heat source or direct sunlight.
- Keep the refrigerator away from direct sunlight or a heat source.
- Not enough clearance between refrigerator and nearby walls or cabinets.
- We recommend that the gap between the refrigerator and nearby walls (or cabinets) is more than 2" (50 mm).
- The refrigerator isoverloaded. Food is blocking the refrigerator vents.
- Do not overload the refrigerator. Do not allow food to block vents.
Fridge/freezer is over-cooling.
- Temperature control is not set correctly.
- Set the temperature higher.
Interior wall is hot.
- Refrigerator has heat-proof piping in the interior wall.
- To prevent condensation from forming, the refrigerator has heat-proof piping in the front corners. If the ambient temperature rises, this equipment may not work effectively. This is not a system failure.
Odour
Refrigerator has odours.
- Spoiled food.
- Clean the refrigerator and remove any spoiled food.
- Food with strong odours.
- Make sure strong smelling food is wrapped airtight.
Frost
Frost around the vents.
- Food is blocking the vents.
- Make sure no food blocks the refrigerator vents.
Frost on interior walls
- Door is not closed properly.
- Make sure food does not block the door. Clean the door gasket.
Condensation
Condensation forms on the interior walls.
- If door is left open, moisture enters the refrigerator.
- Remove the moisture and do not leave a door open for extended periods of time.
- Food with high moisture content.
- Make sure food is wrapped airtight.
Water/ice (dispenser models only)
Water flow is weaker than normal.
- Water pressure is too low.
- Make sure the water pressure is between 20 to 120 psi.
Ice maker makes a buzzing sound.
- The ice maker function is activated, but the water supply to the refrigerator has not been connected.
- Activate the Ice Maker off.
Ice maker does not make ice.
- Ice maker has just been installed.
- You must wait for 12 hours for the refrigerator to make ice.
- Freezer temperature is too high.
- Set the freezer temperature below 0 °F (-18 °C) or -4 °F (-20 °C) in warm ambient air.
- Dispenser Lock is activated.
- Deactivate dispenser Lock.
- Ice maker is off.
Ice does not dispense.
- Ice may jam if the ice dispenser is not used for a long time (approx. 3 weeks).
- If you won't be using the refrigerator for a long time, empty the ice bucket and turn off the ice maker.
- Ice bucket is not properly inserted.
- Make sure the ice bucket is properly inserted.
- Water line is not connected properly or water supply is not on.
- Check if the water line is installed correctly. Check if the water line stop cock is closed.
Water does not dispense.
- Water line is not connected properly or water supply is not on.
- Check if the water line is installed correctly. Check if the water line stop cock is closed.
- Dispenser Lock is activated.
- Deactivate dispenser Lock.
- A third-party water filter was installed.
- Use only Samsung-provided or approved filters.
- Unapproved filters may leak and damage the refrigerator.
- Water filter indicator turns on or blinks.
- Replace the water filter. After replacing, reset the filter indicator sensor.
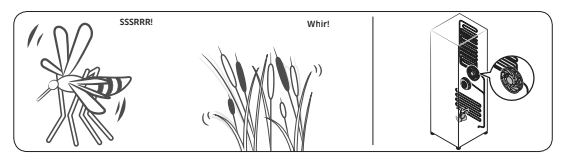
Do you hear abnormal sounds from the refrigerator?
Before calling for service, review the checkpoints below. Any service calls related to
normal sounds will be charged to the user.
These sounds are normal.
• When starting or ending an operation, the refrigerator may make sounds similar to a
car engine igniting. As the operation stabilizes, the sounds will decrease.
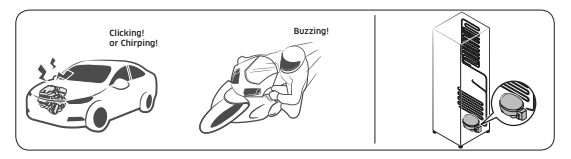
• While the fan is operating, these sounds may occur. When the refrigerator reaches the
set temperature, no fan sound will occur.
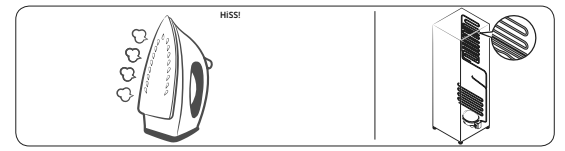
• During a defrost cycle, water may drip on the defrost heater, causing sizzling sounds.
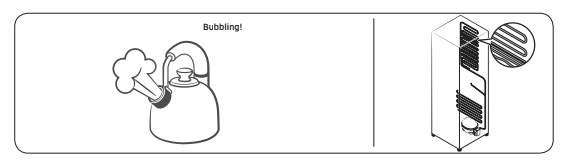
• As the refrigerator cools or freezes, refrigerant gas moves through sealed pipes, causing
bubbling sounds.
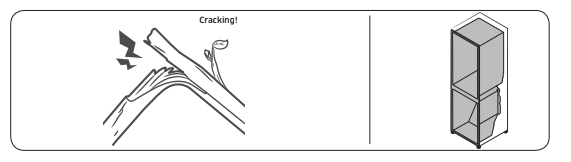
• As the refrigerator temperature increases or decreases, plastic parts contract and
expand, creating knocking noises. These noises occur during the defrosting cycle or
when electronic parts are working.
• For ice maker models: When the water valve opens to fill the ice maker, buzzing sounds
may occur.
• Due to pressure equalizing when opening and closing the refrigerator door, whooshing
sounds may occur.
SmartThings (applicable models only)
- Could not find “SmartThings” in the app market.
• The SmartThings app is not available for some tablet and iPad and some smartphone.
- support that [Android] OS 6.0 or higher(minimum 2GB RAM Size)
- support that [iOS]10.0 or higher/iPhone6 or higher. The SmartThings app fails to operate.
- The SmartThings app fails to operate.
• The SmartThings app is available for applicable models only.
• The old Samsung Smart Refrigerator app cannot connect with Samsung Smart Home models.
- The SmartThings app is installed but is not connected to my refrigerator.
• You must log into your Samsung account to use the app.
• Make sure that your router is operating normally.
• If you have not connected your refrigerator to the SmartThings App after the app was installed, you must make the connection using the device registration function of the app.
- Could not log into the app.
• You must log into your Samsung account to use the app.
• If you don’t have a Samsung account, follow the app’s onscreen
instructions to create one.
- An error message appears when I try to register my refrigerator.
• Easy Connection may fail due to the distance from your access
point (AP) or electrical interference from the surrounding environment. Wait a moment and try again.
- The SmartThings app is successfully connected to my refrigerator but does not run.
• Exit and restart the SmartThings app or disconnect and reconnect the router.
• Unplug the power cord of the refrigerator, and then plug it in again after 1 minute.
Smart Grid (applicable models only)
- What Do I Need to use the Energy Management and Smart Grid functions?
To use the Smart Grid (Demand Response) and Energy Management functions on your refrigerator, you need the following:
• A wireless access point (router)
• A Samsung Energy Management-supported refrigerator
• A smartphone
• Connect your refrigerator to your home Wi-Fi network.
• Register for the EMS service with your electric company. Your electric company must have an EMS (Energy Management System) supporting SEP (Smart Energy profile).
• Download the SmartThings app from the Google Play Store, Apple App Store, or Samsung Galaxy Apps.
• Install and run the SmartThings app on your smartphone.
- Why isn’t the Energy Management function working normally?
• Make sure that your home router is operating normally with proper Internet service and connection.
• Make sure that the refrigerator is connected to the AP (router). Checkpoints
• Connect your smartphone to the router (AP, Access Point), and
then check if you can browse the Internet on the smartphone.
- Why isn’t the Delay Defrost Capability working normally?
• Make sure that your home router is operating normally with proper Internet service and connection.