BMW X2 2020 Car
Product's Documents
Below are documents related to this product, you can read online or download:
- Owner's manual - (English) Read Online | Download pdf
Vehicle features and options
This chapter describes all standard, country-spe‐ cific and optional features offered with the series. It also describes features that are not necessarily available in your vehicle, for instance, due to the selected options or country versions. This also applies to safety-related functions and systems. When using these functions and systems, the applicable laws and regulations must be ob‐ served.
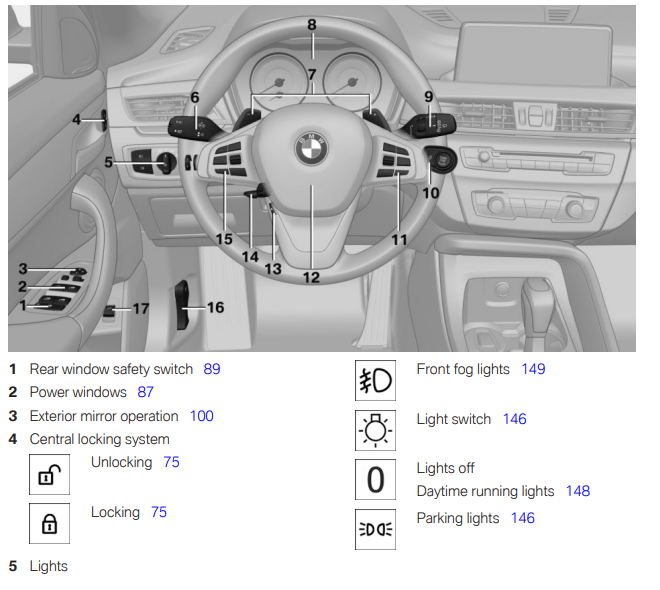
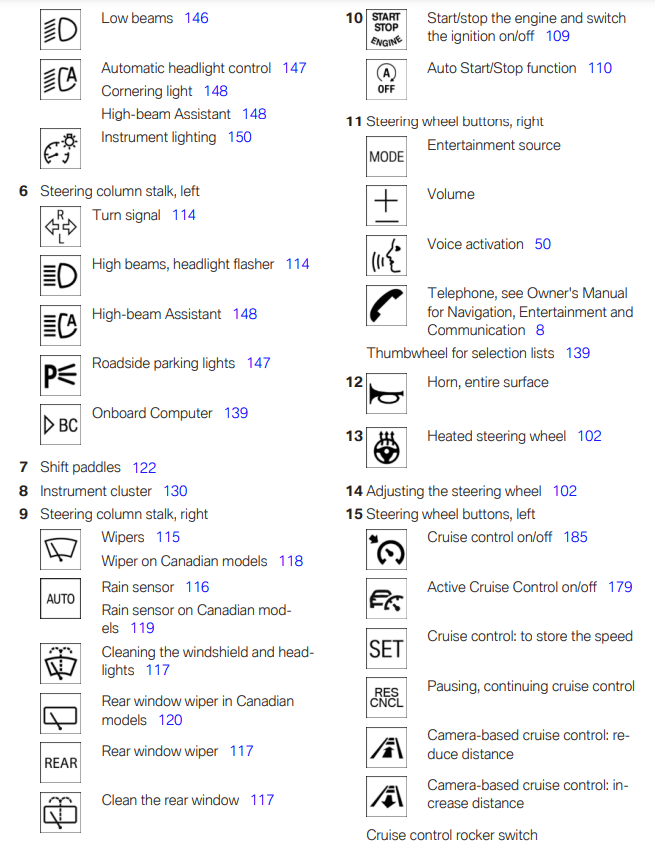
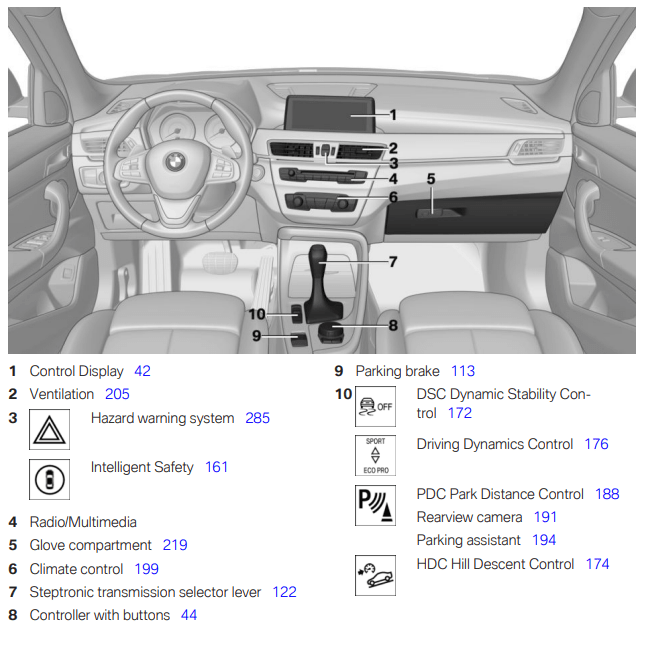
In the vicinity of the steering wheel

In the vicinity of the center console
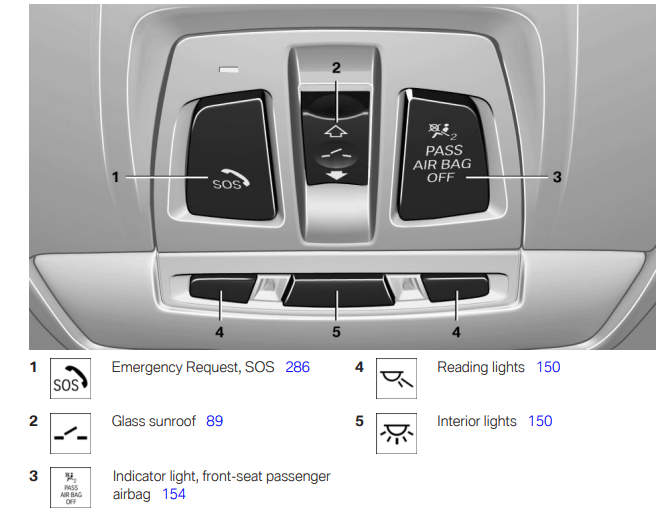
In the vicinity of the roofliner
Vehicle features and options
This chapter describes all standard, country-spe‐ cific and optional features offered with the series. It also describes features that are not necessarily available in your vehicle, for instance, due to the selected options or country versions. This also applies to safety-related functions and systems. When using these functions and systems, the applicable laws and regulations must be ob‐ served.
Concept
The iDrive combines the functions of many switches. These functions can be operated via the Controller and, depending on the equipment version, the touchscreen.
Safety information
Warning
Operating the integrated information systems and communication devices while driving can distract from traffic. It is possible to lose control of the vehicle. There is a risk of accident. Only use the systems or devices when the traffic situation allows. As warranted, stop and use the systems and devices while the vehicle is stationary
Input and display
Letters and numbers
Depending on the menu, you can switch be‐ tween entering upper and lower case letters, numbers and characters.
Entry comparison
When entering names and addresses, the choice is narrowed down with every letter entered and letters may be added automatically.
Entries are continuously compared with data stored in the vehicle.
Activating/deactivating the functions
Several menu items are preceded by a check‐ box. The checkbox indicates whether the func‐ tion is activated or deactivated. Selecting the menu item activates or deactivates the function.
 Function is activated.
 Function is deactivated.
Status information
General information
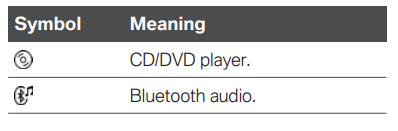
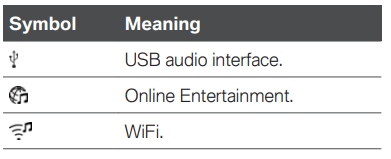
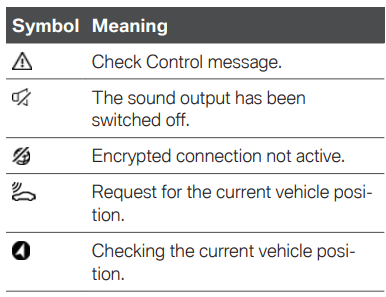
The status field can be found in the upper area of the Control Display. Status information is dis‐ played in the form of symbols.
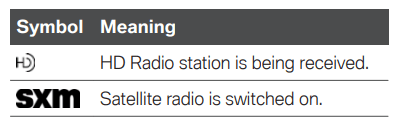
Radio symbols
Telephone symbols
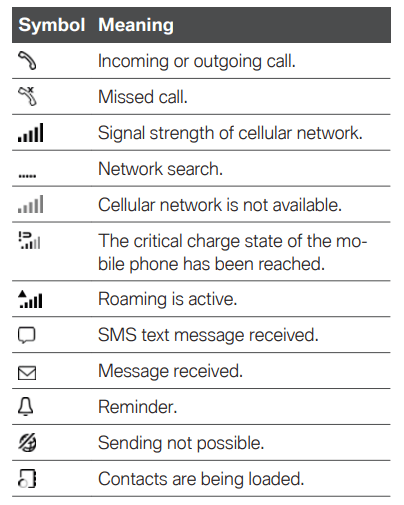
Entertainment symbols
Other symbols
Split screen, split screen display
General information
Additional information, for instance information from the Onboard Computer can be displayed in several menus on the right side of the split screen display, referred to as the split screen.
The additional information remains visible even when switching to another menu on the split screen.
Switching on/off
 Press the button.
Selecting the display
The display can be selected in menus which support the split screen function.
Specifying the number of displays
It is possible to specify the number of displays.
Control elements
Overview
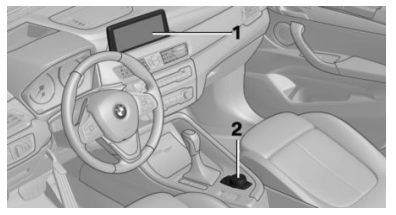
Control Display
General information
To clean the Control Display, follow the care in‐ structions, refer to page 295.
In the case of very high temperatures on the
Control Display, for instance due to intense solar radiation, the brightness may be reduced down to complete deactivation. Once the temperature is reduced, for instance through shade or air con‐ ditioning, the normal functions are restored.
Safety information
NOTICE
Objects in the area in the front of the Control Display can shift and damage the Control Dis‐ play. There is a risk of damage to property. Do not place objects in the area in front of the Control Display.
Switching on/off automatically
The Control Display is switched on automatically after unlocking.
In certain situations, the Control Display is switched off automatically, for instance if no op‐ eration is performed on the vehicle for several minutes.
Switching on/off manually
The Control Display can also be switched off manually.
Press the button.Press the Controller or any button on the Con‐ troller to switch it back on again.
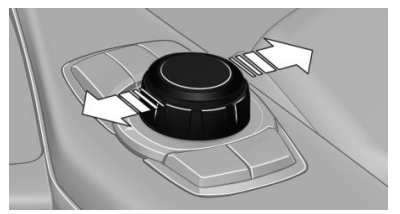
Controller with navigation system
General information
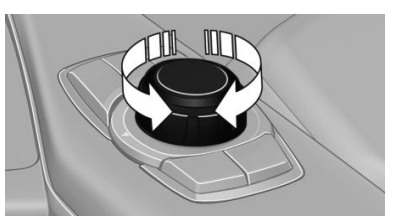
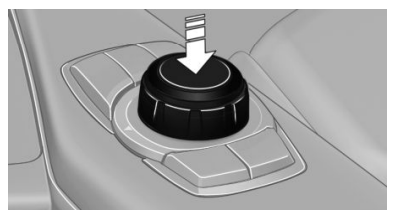
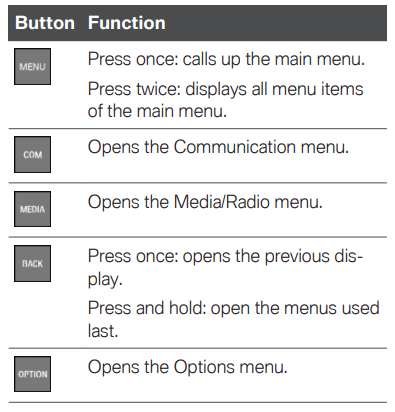
The buttons can be used to open the menus di‐ rectly. The Controller can be used to select menu items and enter the settings.
Operation
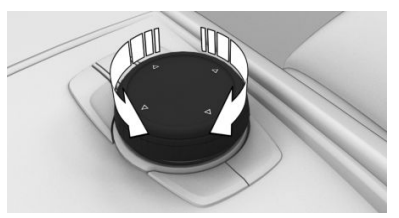
Buttons on the Controller
Controller without navigation system
General information
The buttons can be used to open the menus di‐ rectly. The Controller can be used to select menu items and enter the settings.
Operation
Buttons on the Controller
Operating via the Controller
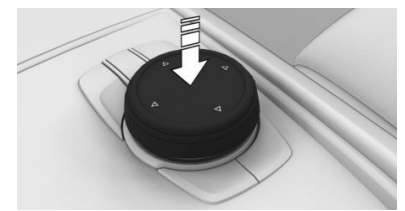
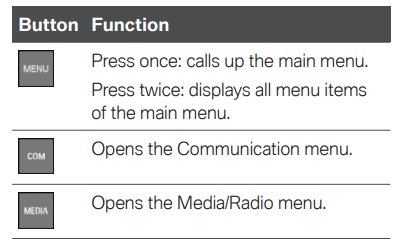
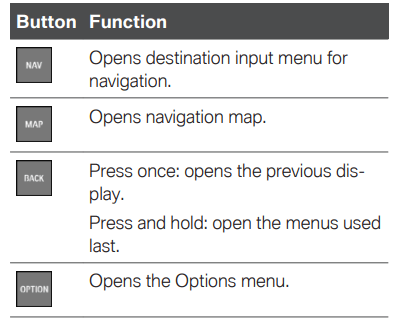
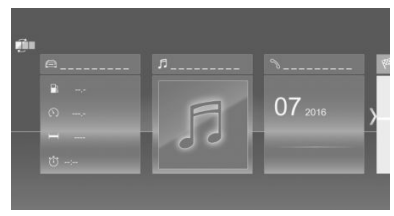
Opening the main menu
 Press the button.
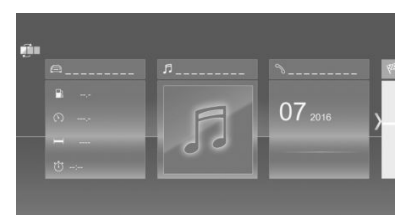
The main menu is displayed.
All iDrive functions can be called up via the main menu.
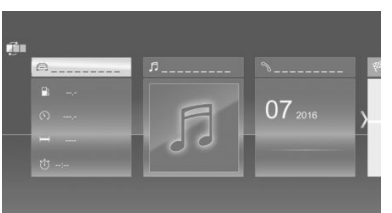
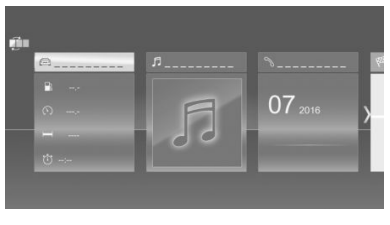
Adjusting the main menu
Press the button twice. All menu items of the main menu are dis‐ played.Selecting menu items
Highlighted menu items can be selected.
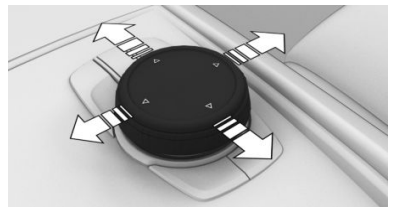
Changing between displays
After a menu item is selected, for instance "iDrive settings", a new display appears.
 Press the button. The previous display re-opens.
An arrow indicates that additional displays can be opened.
Opening recently used menus
The recently used menus can be displayed.
Press and hold this button.
The recently used menus are displayed.
Opening the Options menu
 Press the button.
The "Options" menu is displayed.
The menu consists of various areas:
Changing settings
Settings, such as brightness, can be entered.
Via iDrive:
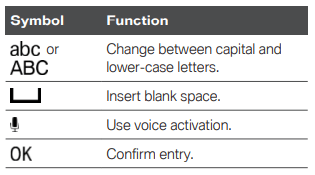
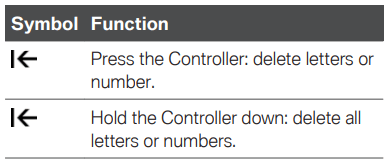
Entering letters and numbers
Input
 confirm entry.
Deleting
Using alphabetical lists
For alphabetical lists with more than 30 entries, the letters for which there is an entry are dis‐ played at the left edge.
Operation via touchscreen
General information
The Control Display is equipped with a touch‐ screen.
Touch the screen with your fingers. Do not use any objects.
Opening the main menu
 Tap on the symbol.
The main menu is displayed.
All iDrive functions can be called up via the main menu.
Adjusting the main menu
 Tap on the symbol. All menu items of the main menu are dis‐ played.
Selecting menu items
Tap the desired menu item.
Dynamic contents
You can display dynamic contents within the menu items. The contents of the menu items update automatically, e.g., the active destination guidance in the navigation. To access the dy‐ namic content directly, tap on the lower section of the menu item.
Via iDrive:
Changing between displays
After a menu item is selected, a new display opens.
An arrow indicates that additional displays can be opened.
The new display opens.
Changing settings
Settings such as brightness can be changed via the touchscreen.
Via iDrive:
 Tap on the symbol.
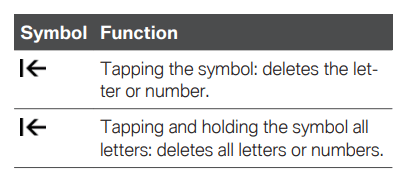
Entering letters and numbers
Input
 Tap the symbol on the touchscreen. A keyboard appears in the Control Display.
Deleting
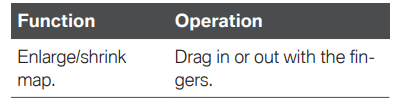
Operating navigation map
The navigation map can be moved using the touchscreen.
Programmable memory buttons
General information
The iDrive functions can be stored on the pro‐ grammable memory buttons and called up di‐ rectly, for instance radio stations, navigation des‐ tinations, phone numbers and menu entries.
Settings are stored for the driver profile currently used.
Storing a function
 Press and hold the desired button until a signal sounds.
Executing a function
Press the button.
The function will work immediately. This means, for instance that the number is dialed when a phone number is selected.
Displaying the key assignment
Touch buttons with finger. Do not wear gloves or use objects.
The button assignment is displayed at the top edge of screen.
Deleting the button assignments
Vehicle features and options
This chapter describes all standard, country-spe‐ cific and optional features offered with the series.
It also describes features that are not necessarily available in your vehicle, for instance, due to the selected options or country versions. This also applies to safety-related functions and systems.
When using these functions and systems, the applicable laws and regulations must be ob‐ served.
Concept
Most functions displayed on the Control Display can be operated by voice commands via the voice activation system. The system supports you with announcements during input.
General information
Functional requirements
Via the Control Display, set a language that is also supported by the voice activation system so that the spoken commands can be identified.
To set the language, refer to page 54.
Using the voice activation system
Activating the voice activation system
 Press the button on the steering wheel.
 The symbol on the Control Display indi‐ cates that the voice activation system is active.
No other commands may be available. In this case, operate the function via iDrive.
Terminating the voice activation system
Press the button on the steering wheel or ›Cancel‹.
Using the voice activation system of the smartphone
A smartphone connected to the vehicle can be used via voice activation.
Activate voice command response on the smart‐ phone for this purpose.
Press and hold the button on the steering wheel for approx. 3 seconds. Voice command response is activated on the smartphone.Release the button. If activation is successful, a confirmation ap‐ pears on the Control Display.If it was not possible to activate voice command response, the list of Bluetooth devices appears on the Control Display.
Possible commands
General information
Most menu items on the Control Display can be spoken as commands.
Commands from other menus can also be spo‐ ken.
You can also select list entries such as phone list entries via voice activation. Read these list en‐ tries out loud exactly as they are shown in the re‐ spective list.
Displaying possible commands
The following is displayed in the top area of the Control Display:
 Encrypted connection is not available.
Help on the voice activation system
Example: opening the tone settings
The commands of the menu items are spoken just as they are selected via the Controller.
Press the button on the steering wheel.Adjusting
Setting the voice dialog
You can set the system to use standard dialog or a short version.
The short version of the voice dialog plays back short messages in abbreviated form.
Via iDrive:
Activating voice recognition via the server
The voice recognition feature via the server pro‐ vides a dictation function and a natural method of entering destinations while improving the quality of voice recognition. To use the functions, data is transmitted to a service provider and stored lo‐ cally there.
Via iDrive:
Setting the language
The language to be used for voice activation and system announcements can be set.
Via iDrive:
Adjusting the volume
Turn the volume button during the spoken in‐ structions until the desired volume is set.
Information for Emergency Requests
Do not use the voice activation system to initiate an Emergency Request. In stressful situations, the voice and vocal pitch can change. This can unnecessarily delay the establishment of a phone connection.
Instead, use the SOS button, refer to page 286, close to the interior mirror.
System limits
Amazon Alexa Car Integration
Concept
Alexa is a digital assistant by Amazon. With Ama‐ zon Alexa Car Integration, Alexa can be used in the vehicle.
General information
Some of the Alexa functions are limited in the ve‐ hicle to prevent any impairment of safety while driving.
Functional requirement
Activation in the BMW Connected app
The Amazon Alexa Car Integration is activated in the BMW Connected app.
Follow the instructions in the app.
Activation in the vehicle
An authorization for the use of Amazon Alexa Car
Integration is required every time before starting a trip.
 Press the button on the steering wheel.
Malfunction
In case of a malfunction, switch off the vehicle and start the engine again.
Vehicle features and options
This chapter describes all standard, country-spe‐ cific and optional features offered with the series.
It also describes features that are not necessarily available in your vehicle, for instance, due to the selected options or country versions. This also applies to safety-related functions and systems.
When using these functions and systems, the applicable laws and regulations must be ob‐ served.
Language
Setting the language
Via iDrive:
The setting is stored for the driver profile cur‐ rently used.
Setting the voice dialog
For voice dialog for the voice activation system, refer to page 51.
Time
Setting the time zone
Via iDrive:
The setting is stored for the driver profile cur‐ rently used.
Setting the time
Via iDrive:
Setting the time format
Via iDrive:
The setting is stored for the driver profile cur‐ rently used.
Automatic time setting
Depending on your vehicle's optional features, the time, date and, if needed, the time zone are updated automatically
Via iDrive:
The setting is stored for the driver profile cur‐ rently used.
Date
Setting the date
Via iDrive:
Setting the date format
Via iDrive:
The setting is stored for the driver profile cur‐ rently used.
Setting the units of measurement
You can set the units of measurement for some values, for example, consumption, distances and temperature.
Via iDrive:
The setting is stored for the driver profile cur‐ rently used.
Activating/deactivating the display of the current vehicle position
Concept
If vehicle tracking has been activated, the current vehicle position can be displayed in the BMW Connected app or in the ConnectedDrive cus‐ tomer portal.
Activating/deactivating
Via iDrive:
Activating/deactivating popup windows
For some functions, popup windows are dis‐ played automatically on the Control Display.
Some of these popup windows can be activated or deactivated.
Via iDrive:
The setting is stored for the driver profile cur‐ rently used.
Control Display
Brightness
Via iDrive:
The setting is stored for the driver profile cur‐ rently used.
Depending on the light conditions, the bright‐ ness settings may not be clearly visible.
Screensaver
If no settings are made via iDrive, a screensaver will be displayed after an adjustable time.
Via iDrive:
The setting is stored for the driver profile currently used.
Selecting the contents of the main menu
You can select the displayed contents for some menu items in the main menu.
 Press the button.
The setting is stored for the driver profile cur‐ rently used.
Messages
Concept
The menu centrally displays all messages arriv‐ ing in the vehicle in list form.
General information
The following messages can be displayed:
Messages are additionally displayed in the status field.
Retrieving messages
Via iDrive:
The respective menu is opened, where the mes‐ sage is displayed.
Deleting messages
All messages, except Check Control messages or messages from the vehicle manufacturer, can be deleted from the list.
Check Control messages or messages from the vehicle manufacturer are displayed as long as they are relevant.
Via iDrive:
 Press the button.
Adjusting
The following settings can be adjusted:
Via iDrive:
Data protection
Data transfer
Concept
The vehicle offers different functions, whose use requires a data transfer to BMW or a service pro‐ vider. The data transfer can be deactivated for some functions.
General information
With data transfer deactivated, the respective function cannot be used.
Only make these settings while stationary.
Activating/deactivating
Follow the instructions on the Control Display.
Via iDrive:
Deleting personal data in the vehicle
Concept
Depending on the usage, the vehicle stores per‐ sonal data, such as stored radio stations. This personal data can be permanently deleted using iDrive.
General information
Depending on the equipment package, the fol‐ lowing data can be deleted:
Altogether, the deletion of the data can take up to 15 minutes.
Functional requirement
Data can only be deleted while stationary.
Deleting data
Note and follow the instructions on the Control
Display.
Via iDrive:
The deletion process takes 15 minutes to com‐ plete.
If not all data was deleted, repeat the deletion.
Canceling deletion
Start the engine to cancel deletion of the data.
Connections
Concept
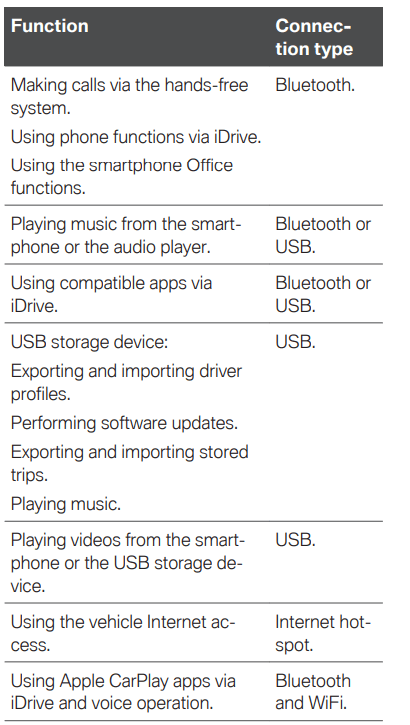
Various connection types are available for using mobile devices in the vehicle. The connection type to select depends on the mobile device and the desired function.
General information
The following overview shows possible functions and the suitable connection types for them. The scope of functions depends on the mobile de‐ vice.
The following connection types require one-time pairing with the vehicle:
Paired devices are automatically recognized later on and connected to the vehicle.
Safety information
Warning
Operating the integrated information systems and communication devices while driving can distract from traffic. It is possible to lose control of the vehicle. There is a risk of accident. Only use the systems or devices when the traffic sit‐ uation allows. As warranted, stop and use the systems and devices while the vehicle is sta‐ tionary.
Compatible devices
General information
Malfunctions may occur with devices not listed or deviating software versions.
Displaying the vehicle identification number and software part number
When looking for compatible devices, you may have to state the vehicle identification number and the software part number. These numbers can be displayed in the vehicle.
Via iDrive:
A software update, refer to page 65, can be performed, if needed.
Bluetooth connection
Functional requirements
Switching on Bluetooth
Via iDrive:
Activating/deactivating telephone functions
To use all supported functions of a mobile phone, the following functions must be activated prior to pairing.
Via iDrive:
Pairing the mobile device with the vehicle
Via iDrive:
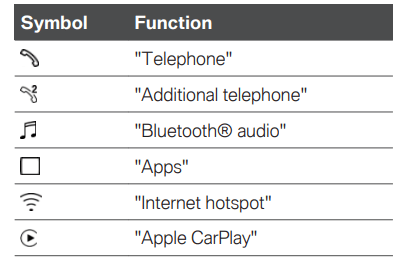
 "Telephone"
 "Bluetooth® audio"
 "Apps"
 “Apple CarPlay”
The device is connected and displayed in the device list, refer to page 64.
If connection was not successful: Frequently Asked Questions, refer to page 60.
Frequently Asked Questions
All requirements are met and all required steps were completed in the specified order. Despite that, the mobile device does not function as ex‐ pected.
In this case, the following explanations can help:
Why could the mobile phone not be paired or connected?
In the vehicle, delete Bluetooth connections with other devices.
Delete all known Bluetooth connections from the device list on the mobile phone and start a new device search.
Charge the mobile phone.
Why does the mobile phone no longer react?
Switch the mobile phone off and on again.
Do not subject the mobile phone to extreme ambient temperatures.
Why can phone functions not be used via iDrive?
Connect the mobile phone with the tele‐ phone or additional phone function.
Why are no or not all phone book entries dis‐ played or why are they incomplete?
How can the phone connection quality be im‐ proved?
If all points in this list have been checked and the required function is still not available, contact the hotline, a dealer’s service center or another quali‐ fied service center or repair shop.
USB connection
General information
Mobile devices with a USB port are connected to the USB interface.
The snap-in adapter features a separate USB port that is automatically connected when a compatible mobile phone is inserted.
Common file systems are supported. FAT32 and exFAT are the recommended formats.
A connected USB storage device will be sup‐ plied with charge current via the USB interface if the device supports this. Follow the maximum charge current of the USB interface.
The following uses are possible on USB interfa‐ ces with data transfer:
Follow the following when connecting:
Not compatible USB media:
Functional requirement
Compatible device, refer to page 59, with USB interface.
Connecting the device
Connect the USB storage device using a suitable adapter cable to a USB interface, refer to page 213.
The USB storage device is displayed in the de‐ vice list, refer to page 64.
Internet connection
General information
Up to 8 devices can be connected with the Inter‐ net hotspot.
Functional requirements
Activating the Internet hotspot
Via iDrive:
Connecting a device to the Internet hotspot
Via iDrive:
 “Internet hotspot”
You will need to purchase data volume from a service provider when you first connect to the Internet via the Internet hotspot.
All devices connected via the Internet hotspot use this data volume.
If necessary, data volume can be purchased from the ConnectedDrive Store.
Adjusting
The network name and hotspot code can be changed. In addition, the network name can be hidden so that it cannot be found by other devices.
Via iDrive:
 Press the button.
 “Change hotspot key”“Change hotspot name”“Hide hotspot”
 Select the symbol.
Apple CarPlay preparation
Concept
CarPlay allows certain functions of a compatible Apple iPhone to be used via Siri voice operation and iDrive.
Functional requirements
Switching on Bluetooth and CarPlay
Via iDrive:
Pairing the iPhone with CarPlay
Pair the iPhone with the vehicle via Bluetooth, re‐ fer to page 60.
Select CarPlay as the function:
 "Apple CarPlay"
The iPhone is connected to the vehicle and dis‐ played in the device list, refer to page 64.
Operation
For more information, refer to the Integrated Owner's Manual or the Owner's Manual for Navi‐ gation, Entertainment, Communication.
Frequently Asked Questions
All requirements are met and all required steps were completed in the specified order. Despite that, the mobile device does not function as ex‐ pected.
In this case, the following explanations can help:
The iPhone has already been paired with Apple CarPlay. When a new connection is established, CarPlay can no longer be selected.
If the steps listed have been carried out and the required function is still not available: contact the hotline, a dealer's service center or another quali‐ fied service center or repair shop.
Managing mobile devices
General information
Displaying the device list
All devices paired or connected with the vehicle are displayed in the device list.
Via iDrive:
A symbol indicates, for which function a device is used.
Configuring the device
Functions can be activated or deactivated for paired and connected devices.
Via iDrive:
If a function is assigned to a device, the function will be deactivated where appropriate for a de‐ vice that is already connected and the device will be disconnected.
Disconnecting the device
The device's connection to the vehicle is discon‐ nected.
The device remains paired and can be con‐ nected again, refer to page 64.
Via iDrive:
Connecting the device
A disconnected device can be reconnected.
Via iDrive:
The functions that were assigned to the device before disconnecting are assigned to the device when it is reconnected. The functions may be deactivated on a device already connected.
Deleting the device
Via iDrive:
The device is disconnected and removed from the device list.
Swapping the telephone and additional phone
If two mobile phones are connected to the vehi‐ cle, the functions of the phone and additional phone can be switched.
Via iDrive:
Software update
General information
The vehicle supports a large number of mobile devices, for example mobile phones and MP3 players. Software updates are available for many of the supported devices. The vehicle is kept upto-date via regular vehicle software updates.
Displaying the version of the installed software
The software version installed in the vehicle is displayed.
Via iDrive:
If an update has been carried out before, select the desired version to display additional informa‐ tion.
Updating software via USB
The software may only be updated when the ve‐ hicle is stationary.
Via iDrive:
Restoring the software version
You can restore the software to the version prior to the last update or to its factory settings.
The software may only be restored when the ve‐ hicle is stationary.
Via iDrive:
 “Previous version”“Default software settings”
Vehicle features and options
This chapter describes all standard, country-spe‐ cific and optional features offered with the series.
It also describes features that are not necessarily available in your vehicle, for instance, due to the selected options or country versions. This also applies to safety-related functions and systems.
When using these functions and systems, the applicable laws and regulations must be ob‐ served.
General information
You can use the following media formats to call up the content in the Owner's Manual:
Printed Owner's Manual
Concept
The printed Owner's Manual describes all stand‐ ard, country-specific, and optional features of‐ fered with the series.
General information
The Owner's Manual for Navigation, Entertain‐ ment, and Communication can be obtained as a printed book from the service center.
Supplementary Owner's Manuals
Also follow the Supplementary Owner's Manuals, which are included in addition to the onboard lit‐ erature.
Integrated Owner's Manual in the vehicle
Concept
The Integrated Owner's Manual specifically de‐ scribes features and functions found in the vehi‐ cle. The Integrated Owner's Manual can be dis‐ played on the Control Display.
Selecting the Owner's Manual
 Press the button.
Scrolling through the Owner's Manual
Turn the Controller, until the next or previous contents are displayed.
Context help
General information
The section of the Owner's Manual relating to the function that is currently selected can be dis‐ played directly.
Opening via iDrive
Change directly to the Options menu from the function on the Control Display:
 Press the button.
Opening when a Check Control message is displayed
Directly from the Check Control message on the
Control Display:
 "Owner's Manual"
Changing between a function and the Owner's Manual
To switch from a function, for instance radio, to the Owner's Manual on the Control Display and to alternate between the two displays:
Press the button.Press the button again to return to the last displayed function. Press the button to return to the page of the Owner's Manual displayed last.
To alternate continuously between the last dis‐ played function and the last displayed page of the Owner's Manual, repeat steps 4 & 5. Opens a new display every time.
Programmable memory buttons
General information
The entry points into the Owner's Manual can be stored on the programmable memory buttons, refer to page 49, and called up directly.
Storing
 Press the desired programmable memory button and hold for more than 2 sec‐ onds.
Executing
Press the corresponding button.
The owner's manual is directly dis‐ played at the selected entry point.
The vehicle is supplied with two vehicle keys with integrated key.
Each vehicle key contains a replaceable battery, refer to page 73.
Depending on the equipment and country ver‐ sion, various settings, refer to page 84, can be configured for the button functions.
A personal driver profile, refer to page 82, for each vehicle key is stored in the vehicle.
To provide information on maintenance require‐ ments, the service data is stored in the vehicle key, refer to page 274.
To prevent possible locking in of the vehicle key, take the vehicle key with you when exiting the vehicle
Overview
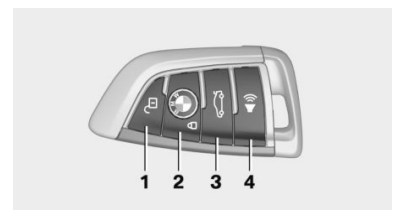
Unlocking
 Press the button on the vehicle key.
Depending on the settings, refer to page 84, the following access points are unlocked:
The light functions may depend on the ambient brightness.
Convenient opening
Press and hold the button on the vehi‐ cle key after unlocking.
The windows and the glass sunroof are opened, as long as the button on the vehicle key is pressed.
Locking
 Press the button on the vehicle key. The following functions are executed:
If the engine or ignition is still switched on when you lock the vehicle, the vehicle horn honks twice. In this case, the engine or ignition must be switched off by means of the Start/Stop button.
With Comfort Access: convenient closing
Safety information
Warning
With convenient closing, body parts can be jammed. There is a risk of injury. Make sure that the area of movement of the doors is clear during convenient closing.
Closing
Press and hold the button on the vehicle key in the area close to the vehicle.
The windows and the glass sunroof are closed, as long as the button on the vehicle key is pressed.
The exterior mirrors are folded in.
The exterior mirrors are not folded in when the hazard warning flashers are switched on.
Switching on interior lights and courtesy light
Press the button on the vehicle key with the vehicle locked.
This function is not available, if the interior lights were switched off manually.
The light functions may depend on the ambient brightness.
After locking, wait 10 seconds before pressing the button again.
Panic mode
You can trigger the alarm system if you find your‐ self in a dangerous situation.

To switch off the alarm: press any button.
Tailgate
General information
To avoid locking the vehicle key in the vehicle, do not place the vehicle key in the cargo area.
Depending on the vehicle equipment and coun‐ try version, it is possible to specify whether the tailgate can be unlocked with the vehicle key and how the vehicle doors will respond to this. To perform settings, refer to page 84.
Safety information
Warning
Body parts can be jammed when operating the tailgate. There is a risk of injury. Make sure that the area of movement of the tailgate is clear during opening and closing.
Warning
The tailgate pivots out when it opens. There is a risk of injury or risk of damage to property.
Make sure that the area of movement of the tailgate is clear during opening and closing.
NOTICE
Sharp-edged or pointed objects can hit the windows and heat conductors while driving.
There is a risk of damage to property. Cover the edges and ensure that pointed objects do not hit the windows.
 Press the button on the vehicle key for approx. 1 second.
Without automatic tailgate operation:
The tailgate is unlocked and can be swung up‐ ward.
With automatic tailgate operation:
The tailgate opens automatically.
Replacing the battery
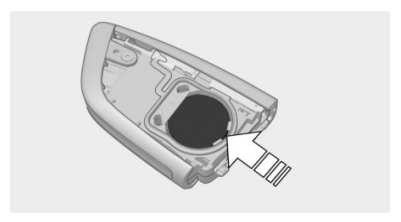
 Have old batteries disposed of by a deal‐ er’s service center or another qualified service center or repair shop or take them to a collection point.
Additional vehicle keys
Additional vehicle keys are available from a serv‐ ice center or another qualified service center or repair shop.
Loss of vehicle keys
A lost vehicle key can be blocked and replaced by a dealer’s service center or another qualified service center or repair shop.
Malfunction
General information
A Check Control message is displayed. Vehicle key recognition by the vehicle may mal‐ function under the following circumstances:
In the case of interference, the vehicle can be unlocked and locked from the outside with the integrated key, refer to page 74.
Starting the engine via emergency detection of the Vehicle key
It is not possible to start the engine if the vehicle key has not been detected.
Proceed as follows in this case:
If the vehicle key is not recognized, slightly change the position of the vehicle key and repeat the procedure.
Frequently Asked Questions
What precautions can be taken to be able to open a vehicle with an accidentally locked in vehicle key?
This requires an active BMW Connected‐
Drive contract and the BMW Connected app must be installed on a smartphone.
An active BMW ConnectedDrive contract is required.
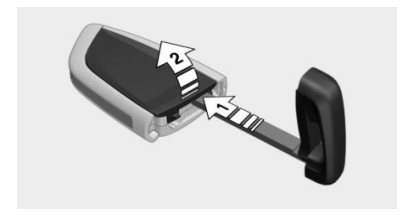
Integrated key
General information
The driver's door can be locked and unlocked without the vehicle key using the integrated key.
Safety information
Warning
Unlocking from the inside is only possible with special knowledge.
Persons who spend a lengthy time in the vehi‐ cle while being exposed to extreme tempera‐ tures are at risk of injury or death. Do not lock the vehicle from the outside when there are people in it.
NOTICE
The door lock is permanently joined with the door. The door handle can be moved. When pulling the door handle with the integrated key inserted, paint or the integrated key can be damaged. There is a risk of damage to prop‐ erty. Remove the integrated key before pulling the outside door handle.
Removing
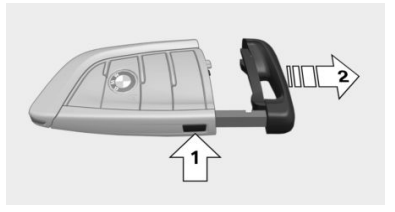
Press the button, arrow 1, and pull out the integrated key, arrow 2.
Vehicle features and options
This chapter describes all standard, country-spe‐ cific and optional features offered with the series.
It also describes features that are not necessarily available in your vehicle, for instance, due to the selected options or country versions. This also applies to safety-related functions and systems.
When using these functions and systems, the applicable laws and regulations must be ob‐ served.
Interior air quality
The air quality in the vehicle is improved by the following components:
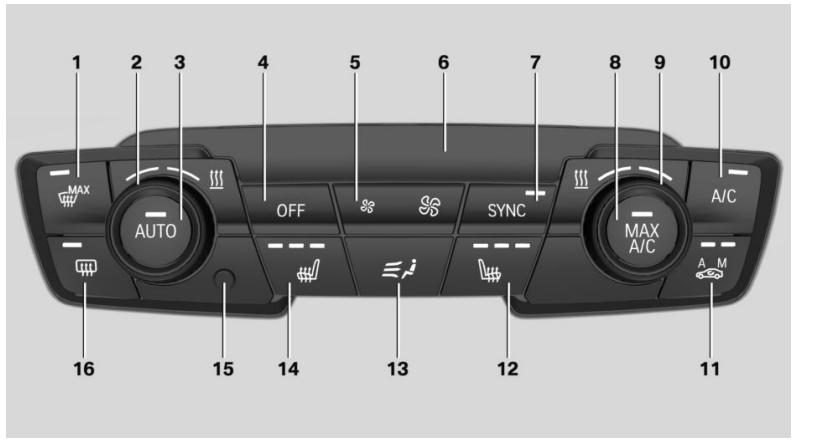
Air conditioner
Climate control functions in detail
Switching the system on/off
Switching on
Press any button except for the following:
Switching off
 Press and hold the left button until the control switches off.
Temperature
Concept
The system heats or cools, depending on the set temperature.
Adjusting
 Turn the wheel to set the desired temperature.
Do not rapidly switch between different tempera‐ ture settings. Otherwise, the automatic climate control will not have sufficient time to adjust the set temperature.
Air conditioning
Concept
The air in the car's interior will be cooled and de‐ humidified and, depending on the temperature setting, warmed again.
The car's interior can only be cooled with the en‐ gine running.
Switching on/off
 Press the button.
The LED is illuminated with air condi‐ tioning switched on.
Depending on the weather, the windshield and side windows may fog up briefly when the en‐ gine is started.
The air conditioner produces condensation wa‐ ter, refer to page 229, that will exit from below the vehicle.
Recirculated-air mode
Concept
You may react to unpleasant odors or pollutants in the immediate environment by temporarily suspending the supply of outside air. The system then recirculates the air flow within the vehicle.
Operation
 Press button repeatedly to select an op‐ erating mode:
To prevent window fogging, recirculated-air mode switches off automatically after a certain amount of time, depending on the environmental conditions.
With constant recirculated-air mode, the air qual‐ ity in the car's interior deteriorates and window fogging increases.
If the windows fog over, switch off recirculatedair mode and increase the air flow, if needed.
Adjusting the air flow manually
Concept
The air flow for climate control can be adjusted manually.
Operation
 Press the left or right side of the button: to decrease or increase air flow.
The intensity is indicated by LEDs. The highest level is active when seven LEDs are lit.
The air flow from the air conditioner may be re‐ duced automatically to save battery power.
Adjusting the air distribution manually
Concept
The air distribution for climate control can be ad‐ justed manually.
Operation
 Turn the wheel to select the de‐ sired program or the desired in‐ termediate setting.
 Windows.
 Upper body region.
 Floor area.
 Windows, upper body region, and floor area.
To defrost windows and remove condensation
Make the following settings to defrost the win‐ dows and remove condensation:
Rear window defroster
 Press the button. The LED lights up.
The rear window defroster switches off automatically after a certain period of time.
For permanent activation, press the button for longer than 3 seconds. To deactivate, press the button again.
The rear window defroster can only be activated continuously at an external temperature below approx. 23 ℉/–5 ℃.
Microfilter
In external and recirculated-air mode, the micro‐ filter filters dust and pollen from the air.
Have this filter changed during vehicle mainte‐ nance, refer to page 274.
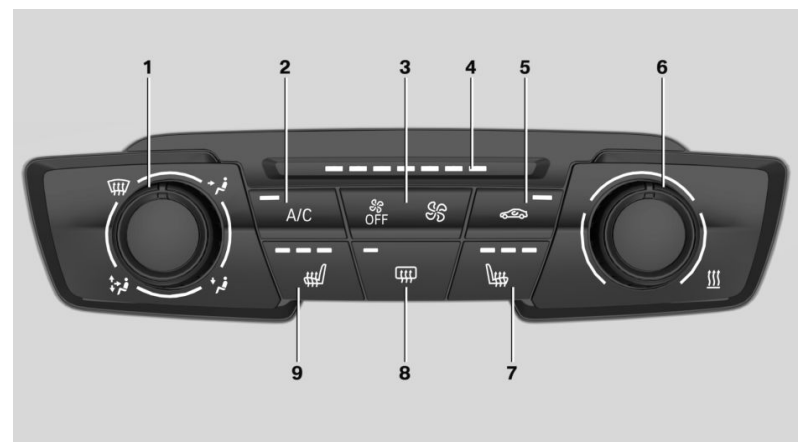
Automatic climate control
Climate control functions in detail
Switching the system on/off
Switching on
Press any button except for the following:
Switching off
 Press the button
Temperature
Concept
The automatic climate control achieves the set temperature as quickly as possible, if necessary by using the maximum cooling or heating power, and then keeps it constant.
Adjusting
 Turn the wheel to set the desired temperature.
The selected temperature is shown on the dis‐ play of the automatic climate control.
The automatic climate control reaches this tem‐ perature as quickly as possible, if needed, by in‐ creasing the cooling or heating output, and then keeps it constant.
Do not rapidly switch between different tempera‐ ture settings. Otherwise, the automatic climate control will not have sufficient time to adjust the set temperature.
Air conditioning
Concept
The air in the car's interior will be cooled and de‐ humidified and, depending on the temperature setting, warmed again.
The car's interior can only be cooled with the en‐ gine running.
Switching on/off
 Press the button.
The LED is illuminated with air condi‐ tioning switched on.
Depending on the weather, the windshield and side windows may fog up briefly when the en‐ gine is started.
The cooling function is switched on automati‐ cally with the AUTO program.
When using the automatic climate control, con‐ densation water develops and collects under‐ neath the vehicle.
Maximum cooling
Concept
The system is set to the lowest temperature, op‐ timum air flow and recirculated-air mode.
General information
The function is available above an external tem‐ perature of approx. 32 ℉/0 ℃ And with the en‐ gine running.
Switching on/off
 Press the button.
The LED is illuminated with the system switched on.
Air flows out of the vents to the upper body re‐ gion. The vents need to be open for this.
The air flow can be adjusted with the program active.
AUTO program
Concept
The AUTO program cools, ventilates or heats the car's interior automatically.
The air distribution and temperature are control‐ led automatically depending on the temperature in the car's interior and the desired temperature setting including the selected intensity of the air flow.
Switching on/off
 Press the button.
The LED is illuminated with the AUTO program switched on.
Depending on the selected temperature, the in‐ tensity of the AUTO program, and outside influ‐ ences, the air is directed to the windshield, side windows, upper body, and into the floor area.
The air conditioning, refer to page 203, is switched on automatically with the AUTO pro‐ gram.
Point the side vents toward the side windows.
At the same time, a condensation sensor con‐ trols the program so as to prevent window con‐ densation as much as possible.
Intensity
 With the AUTO program switched on, the inten‐ sity can be adjusted. This changes the automatic control for the air flow and air distribution.
Press the left or right side of the button: to decrease or increase intensity.
The selected intensity is shown on the display of the automatic climate control.
Automatic recirculated-air control/ recirculated-air mode
Concept
The automatic recirculated-air control AUC rec‐ ognizes odors or pollutants in the outside air.
The outside air supply is shut off and the interior air is recirculated.
General information
If the system is activated, a sensor detects pollu‐ tants in the outside air and controls the shut-off automatically.
If the system is deactivated, outside air continu‐ ously flows into the car's interior.
With constant recirculated-air mode, the air qual‐ ity in the car's interior deteriorates and window fogging increases.
Switching on/off
 Press button repeatedly to select an op‐ erating mode:
Recirculated-air mode switches off automatically at low external temperatures after a certain amount of time in order to avoid window fogging.
If the windows are fogged over, switch off the re‐ circulated-air mode and press the AUTO button to utilize the condensation sensor. Make sure that air can flow to the windshield.
Adjusting the air flow manually
Concept
The air flow for climate control can be adjusted manually.
General information
To adjust the air flow manually switch off AUTO program first.
Operation
 Press the left or right side of the button: to decrease or increase air flow.
The selected air flow is shown on the display of the automatic climate control.
The air flow of the automatic climate control may be reduced automatically to save battery power.
Adjusting the air distribution manually
Concept
The air distribution for climate control can be ad‐ justed manually.
Operation
 Press the button repeatedly to select a program:
If the windows are fogged over, press the AUTO button to utilize the condensation sensor.
SYNC program
Concept
The system allows the transfer of the current setting of the temperature on the driver's side to the front passenger side.
Switching on/off
Press the button.
 The current setting of the temperature on the driver's side is transferred to the front passenger side.
The program is switched off if the setting on the front passenger side is changed.
To defrost windows and remove condensation
Concept
Ice and condensation are quickly removed from the windshield and the front side windows.
Switching on/off
 Press the button.
The LED is illuminated with the system switched on.
The air flow can be adjusted with the program active.
If the windows are fogged over, you can also switch on the air conditioning or press the AUTO button to utilize the condensation sensor.
Rear window defroster
 Press the button. The LED lights up.
The rear window defroster switches off automatically after a certain period of time.
For permanent activation, press the button for longer than 3 seconds. To deactivate, press the button again.
The rear window defroster can only be activated continuously at an external temperature below approx. 23 ℉/–5 ℃.
Microfilter/activated-charcoal filter
In external and recirculated-air mode, the micro‐ filter/activated charcoal filter filters dust, pollen, and gaseous pollutants out of the air.
Have this filter changed during vehicle mainte‐ nance, refer to page 274.
Ventilation
Front ventilation
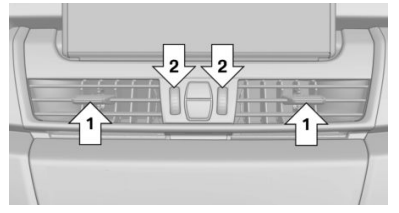
Adjusting
Ventilation in the rear

Parked-car ventilation
Concept
The parked-car ventilation ventilates the car's in‐ terior and lowers its temperature, if needed.
General information
The parked-car ventilation can be switched on and off directly or by using two preset activation times. The system remains switched on for minutes.
The parked-car ventilation system is operated via iDrive.
Functional requirements
Switching on/off directly
Via iDrive:
 The symbol on the automatic climate control flashes if the system is switched on.
Preselecting the activation time
Via iDrive:
Activating the activation time
Via iDrive:
Activate the desired activation time.
The symbol on the automatic climate control lights up when the activation time is activated.
The symbol on the automatic climate control flashes when the system has been switched on.
The system will only be switched on within the next 24 hours. After that, it needs to be reacti‐ vated.
This chapter describes all standard, country-spe‐ cific and optional features offered with the series.
It also describes features that are not necessarily available in your vehicle, for instance, due to the selected options or country versions. This also applies to safety-related functions and systems.
When using these functions and systems, the applicable laws and regulations must be ob‐ served.
General information
Regularly remove foreign objects such as leaves in the area below the windshield when the hood is raised.
Wash your vehicle frequently, particularly in win‐ ter. Intense soiling and road salt can damage the vehicle.
Safety information
NOTICE
When cleaning with high-pressure washers, components can be damaged due to the pres‐ sure or temperatures being too high. There is a risk of damage to property. Maintain sufficient distance and do not spray too long continu‐ ously. Follow the operating instructions for the high-pressure washer.
Distances and temperature
Maximum temperature: 140 ℉/60 ℃.
Minimum distance from sensors, cameras, seals: 12 inches/30 cm.
Minimum distance from glass sunroof: 31.5in/80 cm.
Automatic vehicle washes
Safety information
NOTICE
Improper use of automatic vehicle washes can cause damage to the vehicle. There is a risk of damage to property. Follow the following in‐ structions:
Driving into a vehicle wash with a Steptronic transmission
General information
In a vehicle wash, the vehicle must be able to roll freely.
To roll or push the vehicle, refer to page 125.
Some vehicle washes do not permit persons in the vehicle. The vehicle cannot be locked from the outside when in selector lever position N. A signal sounds when an attempt is made to lock the vehicle.
Driving out of a vehicle wash
Ensure that the vehicle key is in the car.
Start the engine. Starting the engine, refer to page 109.
Headlights
Do not rub wet headlights dry and do not use abrasive or acidic cleaning agents.
Soak areas that have been dirtied, for instance from insects, with shampoo and wash off with water.
Thaw ice with de-icing spray; do not use an ice scraper.
After washing the vehicle
After washing the vehicle, apply the brakes briefly to dry them; otherwise, braking action can be reduced. The heat generated during braking dries brake discs and brake pads and protects them against corrosion.
Completely remove all residues on the windows, to minimize loss of visibility due to smearing and to reduce wiper noises and wiper blade wear.
Vehicle care products
General information
BMW recommends using vehicle care and cleaning products from BMW. Suitable care products are available from a dealer’s service center or another qualified service center or repair shop.
Safety information
Warning
Cleansers can contain substances that are dan‐ gerous and harmful to your health. There is a risk of injury. When cleaning the interior, open the doors or windows. Only use products in‐ tended for cleaning vehicles. Follow the in‐ structions on the container.
Vehicle paint
General information
Regular care contributes to driving safety and value retention. Environmental influences in areas with elevated air pollution or natural con‐ taminants, such as tree resin or pollen can affect the vehicle's paintwork. Tailor the frequency and extent of your vehicle care to these influences.
Aggressive substances such as spilled fuel, oil, grease or bird droppings, must be removed im‐ mediately to prevent the finish from being altered or discolored.
Matte finish
Only use cleaning and care products suitable for vehicles with matte finish.
Leather care
Remove dust from the leather regularly, using a cloth or vacuum cleaner.
Otherwise, particles of dust and road grime chafe in pores and folds, and lead to increased wear and premature degradation of the leather sur‐ face.
To guard against discoloration, such as from clothing, clean leather and provide leather care roughly every two months.
Clean light-colored leather more frequently be‐ cause soiling on such surfaces is substantially more visible.
Use leather care products; otherwise, dirt and grease will gradually break down the protective layer of the leather surface.
Upholstery material care
General information
Vacuum the upholstery regularly with a vacuum cleaner.
If upholstery is very dirty, for instance with bever‐ age stains, use a soft sponge or microfiber cloth with a suitable interior cleaner.
Clean the upholstery down to the seams using large sweeping motions. Avoid rubbing the material vigorously.
Safety information
NOTICE
Open Velcro® fasteners on articles of clothing can damage the seat covers. There is a risk of damage to property. Ensure that any Velcro® fasteners are closed.
Caring for special components
Light-alloy wheels
When cleaning the vehicle, use only neutral wheel cleaners having a pH value from 5 to 9. Do not use abrasive cleaning agents or steam jets above 140 ℉/60 ℃. Follow the manufacturer's instructions.
Aggressive, acidic or alkaline cleaning agents can destroy the protective layer of adjacent compo‐ nents, such as the brake disc.
After cleaning, apply the brakes briefly to dry them. The heat generated during braking dries brake discs and brake pads and protects them against corrosion.
Chrome surfaces
Carefully clean components such as the radiator grille or door handles with plenty of water, possibly with shampoo added, particularly when they have been exposed to road salt.
Rubber components
Environmental influences can cause surface soil‐ ing of rubber parts and a loss of gloss. Use only water and suitable cleaning agents for cleaning.
Treat especially worn rubber parts with rubber care agents at regular intervals. When cleaning rubber seals, do not use any silicon-containing vehicle care products in order to avoid damage or noises.
Fine wood parts
Clean fine wood facing and fine wood compo‐ nents only with a moist rag. Then dry with a soft cloth.
Plastic components
NOTICE
Cleansers that contain alcohol or solvents, such as lacquer thinners, heavy-duty grease remov‐ ers, fuel, or such, can damage plastic parts.
There is a risk of damage to property. Clean with a microfiber cloth. Dampen the cloth lightly with water, if needed.
Clean with a microfiber cloth.
Dampen the cloth lightly with water, if needed.
Do not soak the roofliner.
Safety belts
Warning
Chemical cleansers can destroy the safety belt webbing. Missing protective effect of the safety belts. There is a risk of injuries or danger to life.
Use only a mild soapy solution for cleaning the safety belts.
Dirty belt straps impede the reeling action and thus have a negative impact on safety.
Use only a mild soapy solution, with the safety belts clipped into their buckles.
Safety belts should only be allowed to retract if they are dry.
Carpets and floor mats
Warning
Objects in the driver's floor area can limit the pedal distance or block a depressed pedal.
There is a risk of accident. Stow objects in the vehicle such that they are secured and cannot enter into the driver's floor area. Use floor mats that are suitable for the vehicle and can be safely attached to the floor. Do not use loose floor mats and do not layer several floor mats.
Make sure that there is sufficient clearance for the pedals. Ensure that the floor mats are se‐ curely fastened again after they were removed, for instance for cleaning.
Floor mats can be removed from the car's inte‐ rior for cleaning.
If the floor carpets are very dirty, clean with a mi‐ crofiber cloth and water or a textile cleaner. To prevent matting of the carpet, rub back and forth in the direction of travel only.
Sensor/camera lenses
To clean sensors and camera lenses, use a cloth moistened with a small amount of glass deter‐ gent.
Displays/Screens/protective glass of the Head-up Display
NOTICE
Chemical cleansers, moisture or fluids of any kind can damage the surface of displays and screens. There is a risk of damage to property.
Clean with a clean, antistatic microfiber cloth.
NOTICE
The surface of displays can be damaged with improper cleaning. There is a risk of damage to property. Avoid pressure that is too high and do not use any scratching materials.
Clean with a clean, antistatic microfiber cloth.
Clean the protective glass of the Head-up Dis‐ play using a microfiber cloth and commercially available dish-washing soap.
Long-term vehicle storage
When the vehicle is shut down for longer than three months, special measures must be taken.
Further information is available from a dealer's service center or another qualified service center or repair shop