BMW X3 2020 Car
Product's Documents
Below are documents related to this product, you can read online or download:
- Owner's manual - (English) Read Online | Download pdf
User manual Car
This chapter describes all standard, countryspecific and optional features offered with the series. It also describes features that are not necessarily available in your car, e. g., due to the selected options or country versions. This also applies to safety-related functions and systems. The respectively applicable country provisions must be observed when using the respective features and systems.
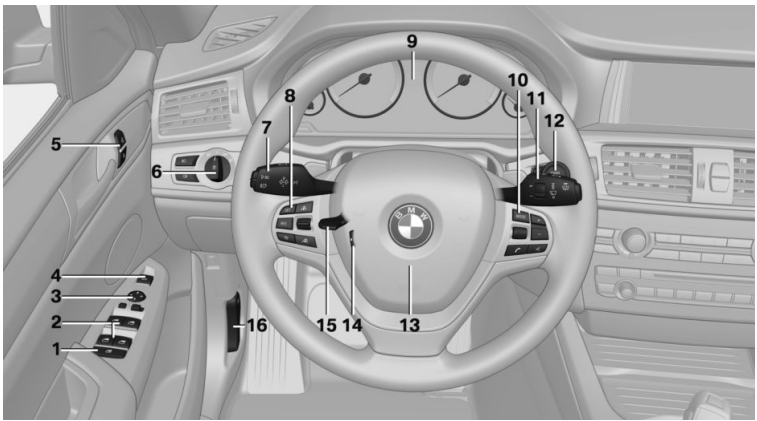
The iDrive combines the functions of many switches. Thus, these functions can be oper‐ ated from a central location.
 Using the iDrive during a trip To avoid becoming distracted and pos‐ ing an unnecessary hazard to your vehicle's occupants and to other traffic, never attempt to use the controls or enter information unless traffic and road conditions allow it.◀
Control elements
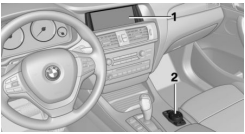
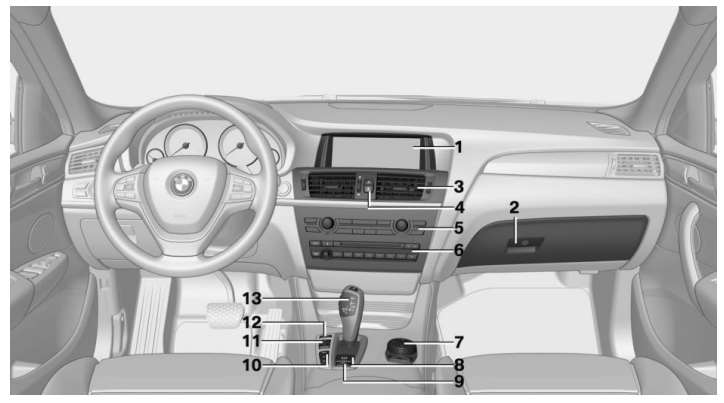
1 Control Display
2 Controller with buttons and, depending on the equipment version, with touchpad
Control Display
Hints
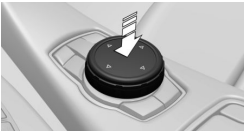
Switching on
1. Switch on the ignition.
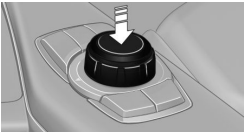
2. Press the controller.
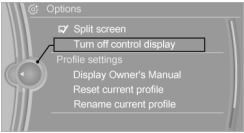
Switch off
1.  Press button.
2. "Turn off control display"
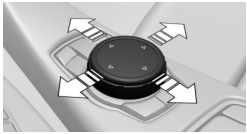
Controller with navigation system
The buttons can be used to open the menus directly. The controller can be used to select menu items and enter the settings.
Some iDrive functions can be operated using the touchpad on the controller.
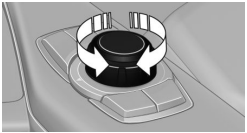
1. Turn.
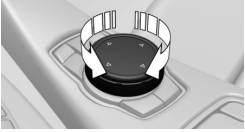
2. Press.
3. Move in four directions.
Buttons on controller
| Press button | Function |
| MENU | Open the main menu. |
| RADIO | Opens the Radio menu. |
| MEDIA | Opens the Multimedia menu. |
| NAV | Opens the Navigation menu. |
| TEL | Opens the phone menu. |
| BACK | Displays the previous panel. |
| OPTION | Opens the Options menu. |
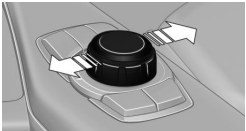
Controller without navigation system
The buttons can be used to open the menus directly. The controller can be used to select menu items and enter the settings.
1. Turn.
2. Press
3. Move in two directions.
Buttons on controller
| Press button | Function |
| MENU | Open the main menu. |
| Audio | Open audio menu last listened to, switch between audio me‐ nus. |
| TEL | Opens the phone menu. |
| BACK | Open previous panel. |
| OPTION | Opens the Options menu. |
Opening the main menu
 Press button.
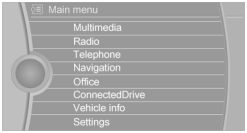
The main menu is displayed.
All iDrive functions can be called up via the main menu.
Vehicle features and options
This chapter describes all standard, countryspecific and optional features offered with the series. It also describes features that are not necessarily available in your car, e. g., due to the selected options or country versions. This also applies to safety-related functions and systems. The respectively applicable country provisions must be observed when using the respective features and systems.
Via the Control Display, set a language that is also supported by the voice activation system so that the spoken commands can be identi‐ fied.
Set the language, refer to page 93.
Activating the voice activation system
1.  Press button on the steering wheel.
2. Wait for the signal.
3. Say the command. A command that is recognized by the voice activation system is announced and dis‐ played in the instrument cluster
 This symbol in the instrument cluster indi‐ cates that the voice activation system is active.
If no other commands are available, use func‐ tion via iDrive.
Terminating the voice activation system
Briefly press the button on the steer‐ ing wheel or ›Cancel‹.
Via the main menu
The commands of the menu items are spoken just as they are selected via the controller.
1. Turn on the Entertainment sound output if needed.
2. Press button on the steering wheel.
3. ›Radio‹
4. ›Tone‹
Via short command
The desired tone settings can also be started via a short command.
1. Turn on the Entertainment sound output if needed.
2. Press button on the steering wheel.
3. ›Tone‹
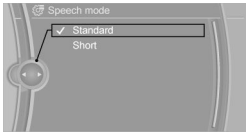
Set system to standard dialog or use a short version.
The short version of the voice dialog plays back short messages in abbreviated form.
1. "Settings"
2. "Language/Units"
3. "Speech type:"
4. Select setting.
Turn the volume button while giving an in‐ struction until the desired volume is set.
This chapter describes all standard, countryspecific and optional features offered with the series. It also describes features that are not necessarily available in your car, e. g., due to the selected options or country versions. This also applies to safety-related functions and systems. The respectively applicable country provisions must be observed when using the respective features and systems.
The Integrated Owner's Manual can be dis‐ played on the Control Display. It specifically describes features and functions found in the vehicle.
Components of the Integrated Owner's Manual
The Integrated Owner's Manual consists of three parts, which offer various levels of infor‐ mation or possible access.
Quick Reference Guide
The Quick Reference Guide provides informa‐ tion how to operate the car, how to use basic vehicle functions or what to do in case of a breakdown. This information can also be dis‐ played while driving.
Search by images
Image search provides information and de‐ scriptions. This is helpful when the terminol‐ ogy for a feature is not at hand.
Owner's Manual
Search for information and descriptions by en‐ tering terms selected from the index.
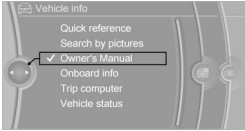
Select components
1. Press button.
2. Turn the controller: open "Vehicle info".
3. Press the controller.
4. Selecting desired range:
▷ "Quick reference"
▷ "Search by pictures"
▷ "Owner's Manual"
Leafing through the Owner's Manual
Page by page with link access
Turn the controller until the next or previous page is displayed.
Page by page without link access
Scroll through the pages directly while skip‐ ping the links.
Highlight the symbol once. Now simply press the controller to browse from page to page.
 Scroll back.
 Scroll forward.
Context help - Owner's Manual to the temporarily selected function
You may open the relevant information di‐ rectly.
Opening via the iDrive
To move directly from the application on the Control Display to the Options menu:
1. Press button or move the controller to the right repeatedly until the "Options" menu is displayed.
2. "Display Owner's Manual"
Opening when a Check Control message is displayed
Directly from the Check Control message on the Control Display: "Display Owner's Manual"
Changing between a function and the Owner's Manual
To reel from a function, e. g., radio, to the Owner's Manual on the Control Display and to alternate between the two displays:
1. Press button or move the controller to the right repeatedly until the "Options" menu is displayed.
2. "Display Owner's Manual"
3. Select the desired page in the Owner's Manual.
4. Press button again to return to last displayed function.
5.  Press button to return to the page of the Owner's Manual displayed last.
To alternate permanently between the last dis‐ played function and the Owner's Manual re‐ peat steps 4 & 5. Opens a new display every time.
Programmable memory buttons
General information
The Owner's Manual can be stored on the pro‐ grammable memory buttons and called up di‐ rectly.
Storing
1. "Owner's Manual" Select via the iDrive.
2.  Press selected button for more than 2 seconds.
Executing
Press button. The Owner's Manual is displayed im‐ mediately.
This chapter describes all standard, countryspecific and optional features offered with the series. It also describes features that are not necessarily available in your car, e. g., due to the selected options or country versions. This also applies to safety-related functions and systems. The respectively applicable country provisions must be observed when using the respective features and systems.
General information
The vehicle is supplied with two remote con‐ trols with integrated key.
Every remote control holds a replaceable bat‐ tery.
You may set the key functions depending on the optional features and country-specific ver‐ sion. For Settings, refer to page 45.
The vehicle stores personal settings for every remote control. Personal Profile, refer to page 35.
The remote controls hold information on re‐ quired maintenance. Service data in the re‐ mote control, refer to page 215
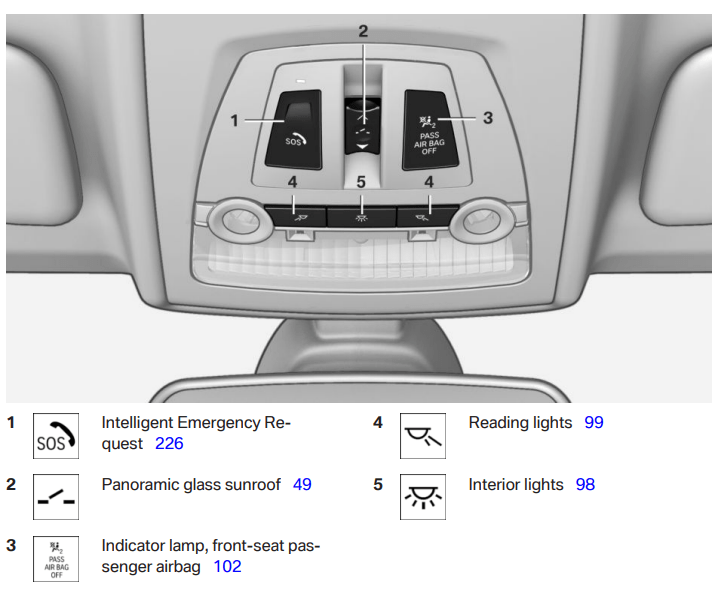
Overview
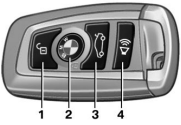
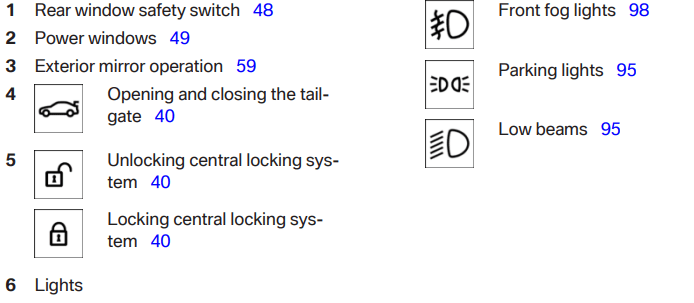
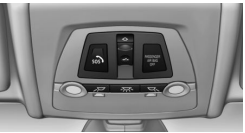
1 Unlocking
2 Locking
3 Unlock the tailgate
4 Press briefly: headlight courtesy delay fea‐ ture
Press and hold: Panic mode
Integrated key
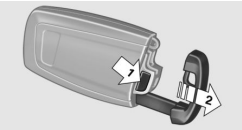
Press button, arrow 1, and remove the key, ar‐ row 2.
The integrated key fits the following locks:
Replacing the battery
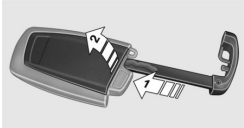
1. Remove integrated key from remote con‐ trol.
2. Push in the catch with the key, arrow 1.
3. Remove the cover of the battery compart‐ ment, arrow 2.
4. Insert a battery of the same type with the positive side facing up.
5. Press the cover closed.
 Take the used battery to a recycling center or to your service center.
New remote controls
New remote controls are available from the service center.
Loss of the remote controls
Lost remote controls can be disabled by your service center.
Emergency detection of remote control
It is possible to switch on the ignition or start the engine in situations such as the following:
A Check Control message is displayed if an at‐ tempt is made to switch on the ignition or start the engine.
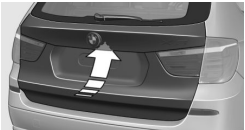
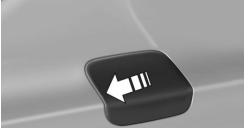
Starting the engine with emergency detection of the remote control

Steptronic transmission: if a corresponding Check Control message appears, hold the re‐ mote control, as shown, against the marked area on the steering column and press the Start/Stop button within 10 seconds while pressing the brake.
If the remote control is not recognized: slightly change the height position of the remote con‐ trol and repeat the procedure.
Opening
The tailgate swings back and up when it opens.
Ensure that adequate clearance is available before opening.
Opening from the outside
 Press button next to the tailgate.
As the case may be, the doors are also un‐ locked. Unlocking with the remote control, refer to page 38.
The tailgate is unlocked and can be swung up‐ ward.
Closing
Hints
 Keep the closing path clear
Make sure that the closing path of the tailgate is clear; otherwise, injuries may re‐ sult.◀
Do not place the remote control in the cargo area
Take the remote control with you and do not leave it in the cargo area; otherwise, the re‐ mote control is locked inside the vehicle when the tailgate is closed.◀
Provide edge protection
Sharp objects or those with edges can hit the rear window while driving and damage the heat conductors of the rear window. Pro‐ vide edge protection.◀
The concept
The vehicle can be accessed without activat‐ ing the remote control.
All you need to do is to have the remote con‐ trol with you, such as in your pants pocket.
The vehicle automatically detects the remote control when it is in close proximity or in the car's interior.
Comfort Access supports the following func‐ tions:
Functional requirements
Unlocking
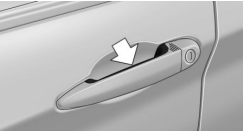
Grasp the door handle on the driver's or front passenger door completely, arrow. This corresponds with pressing the button on the remote control. 
Locking
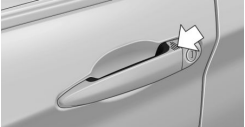
Touch the surface on the door handle of the driver's or front passenger door, arrow, with your finger for approx. 1 second without grasp‐ ing the door handle.
This corresponds with pressing the button on the remote control. 
To save battery power, ensure that the ignition and all electronic systems and/or power con‐ sumers are turned off before locking the vehi‐ cle.
Convenient closing
Monitor closing
Monitor closing to ensure that no one becomes trapped.◀
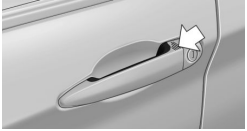
Touch the surface on the door handle of the driver's or front passenger door, arrow, with your finger and hold it there without grasping the door handle.
This corresponds to pressing and holding the remote control button.
In addition to locking, the windows and the glass sunroof close and the exterior mirrors fold in.
Unlocking the tailgate separately
Press button on tailgate's exterior
This corresponds with pressing the button on the remote control. 
The situation of the doors does not change.
Note the opening height of the tailgate
The tailgate swings back and up when it opens. Ensure that there is sufficient clearance when the tailgate opens; otherwise, damage may result.◀
Do not place the remote control in the cargo area
Take the remote control with you and do not leave it in the cargo area; otherwise, the re‐ mote control is locked inside the vehicle when the tailgate is closed.◀
Opening and closing the tailgate with no-touch activation
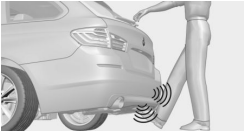
The tailgate can be opened with no-touch acti‐ vation using the remote control you are carry‐ ing. With automatic tailgate operation, it can also be closed with no-touch activation. Two sensors detect a forward-directed foot motion in the center of the area at the rear of the car and the trunk lid opens and/or closes.
Foot movement to be carried out
Do not touch vehicle
With the foot motion, make sure there is steady stance and do not touch the vehicle; otherwise, there is a danger of injury, e. g. from hot exhaust system parts.◀
1. Place in the center behind the vehicle, about an arm's length from the vehicle rear.
2. Move a foot in the direction of travel as far under the vehicle as possible and immedi‐ ately pull it back. With this movement, the leg must pass through the ranges of both sensors.
Opening
Perform the foot movement described earlier.
The tailgate opens, regardless of whether it was previously locked or unlocked.
The tailgate swings back and up when it opens. Ensure that adequate clearance is available before opening.
Before the opening, the hazard warning sys‐ tem flashes.
Preventing inadvertent opening
In situations where the tailgate should not be opened with no-touch activation, en‐ sure that the remote control is located beyond the range of the sensor, at least 5 ft/1.50 m from the rear of the car.
Otherwise, the tailgate may be opened inad‐ vertently, for example by an unintentional
Indicator lamp on the interior rearview mirror

The system is armed.
The doors, hood or tailgate is not closed properly, but the rest of the vehicle is se‐ cured.
After 10 seconds, the indicator lamp flashes continuously. Interior motion sen‐ sor and tilt alarm sensor are not active.
When the still open access is closed, inte‐ rior motion sensor and tilt alarm sensor will be switched on.
Tilt alarm sensor
The tilt of the vehicle is monitored.
The alarm system responds in situations such as attempts to steal a wheel or when the car is towed.
Interior motion sensor
The windows and glass sunroof must be closed for the system to function properly.
Avoiding unintentional alarms
The tilt alarm sensor and interior motion sen‐ sor can be switched off together, such as in the following situations:
Switching off the tilt alarm sensor and interior motion sensor
 Press the remote control button again within 10 seconds as soon as the vehicle is locked.
The indicator lamp lights up for approx. 2 sec‐ onds and then continues to flash.
The tilt alarm sensor and interior motion sen‐ sor are turned off, until the vehicle is locked again.
Switching off the alarm
Roller sunblinds for the rear side windows
Pull out the roller sunblind at the loop and hook it onto the bracket.
Do not open the window while the roller sunblind is tilted
Do not open the window while the roller sun‐ blind is tilted; otherwise, there is a risk of dam‐ age at high speeds that may result in personal injury.◀
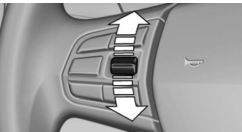
Panoramic glass sunroof
General information
The glass sunroof and the sliding visor can be operated together or separately, using the same switch.
The glass sunroof is operational when the igni‐ tion is switched on.
Keep the closing path clear
Monitor closing and make sure that the closing path of the glass sunroof is clear; oth‐ erwise, injuries may result.◀
Take the remote control with you
Take the remote control with you when leaving the vehicle so that children, e.g., can‐ not operate the glass sunroof and injure them‐ selves.◀
Tilting the glass sunroof

Push switch briefly upward.
Opening/closing the glass sunroof and sliding visor separately

The sliding visor opens, as long as the reel is held down. If the sliding visor is already fully open, the glass sunroof opens.
The glass sunroof closes as long as the reel is held down. If the glass sunroof is already closed or in the tilted position, the sliding visor closes.
The sliding visor opens automatically. If the sliding visor is already fully open, the glass sunroof opens automatically.
The glass sunroof closes automatically. If the glass sunroof is already closed or in the tilted position, the sliding visor closes au‐ tomatically.
Pressing the reel upward stops the motion.
Opening/closing the glass sunroof and sliding visor together

Briefly press the reel twice in succession in the desired direc‐ tion past the resistance point.
The glass sunroof and sliding vi‐ sor move together. Pressing the reel upward stops the motion.
Comfort position
If the glass sunroof is not automatically com‐ pletely opened, the comfort position has been attained. In this position the wind noises in the interior are the least.
If desired, continue the movement by pressing the reel.
Pinch protection system
If the closing force when closing the glass sun‐ roof exceeds a certain value, the closing move‐ ment is stopped, beginning at approximately the middle of the opening in the roof, or from the tilted position during closing.
The glass sunroof reopens slightly.
Danger of jamming even with pinch pro‐ tection
Despite the pinch protection system, check that the glass sunroof's closing path is clear; otherwise, the closing action may not be inter‐ rupted in certain extreme situations, such as when thin objects are present.◀
Closing from the open position without pinch protection
E. g. if there is an external danger, proceed as follows:
1. Press the reel forward beyond the resist‐ ance point and hold.
The pinch protection is limited and the glass sunroof reopens slightly if the closing force exceeds a certain margin.
2. Press the reel forward again beyond the re‐ sistance point and hold until the glass sun‐ roof closes without jam protection. Make sure that the closing area is clear.
Closing from the raised position without pinch protection
If there is an external danger, push the reel for‐ ward past the resistance point and hold it.
The glass sunroof closes without jam protec‐ tion.
Initializing after a power failure
After a power failure during the opening or closing process, the glass sunroof can only be operated to a limited extent.
Initializing the system
The system can be initialized when the vehicle is stationary and the engine is running.
During the initialization, the glass sunroof closes without jam protection.
Keep the closing path clear
Monitor closing and make sure that the closing path of the glass sunroof is clear; oth‐ erwise, injuries may result.◀

Press the reel up and hold it until the initialization is complete:
This chapter describes all standard, countryspecific and optional features offered with the series. It also describes features that are not necessarily available in your car, e. g., due to the selected options or country versions. This also applies to safety-related functions and systems. The respectively applicable country provisions must be observed when using the respective features and systems.
The ideal seating position can make a vital contribution to relaxed, fatigue-free driving.
The seating position plays an important role in an accident in combination with:
Hints
Do not adjust the seat while driving
Do not adjust the driver's seat while driv‐ ing, or the seat could respond with unexpected movement and the ensuing loss of vehicle control could lead to an accident.◀
Do not incline the backrest too far to the rear
Do not incline the backrest too far to the rear while driving, or there is a risk of slipping under the safety belt in the event of an accident. This would eliminate the protection normally pro‐ vided by the belt.◀
Keep the movement area unobstructed
When changing the seat position, keep the seat's area of movement unobstructed; otherwise, people might get injured or objects damaged.◀
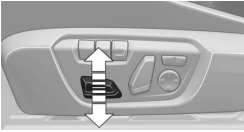
Manually adjustable seats
At a glance
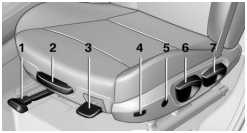
1 Forward/backward
2 Thigh support
3 Seat tilt
4 Backrest width
5 Lumbar support
6 Height
7 Backrest tilt
Forward/backward
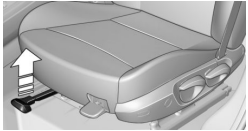
Pull the lever and slide the seat in the desired direction.
After releasing the lever, move the seat for‐ ward or back slightly making sure it engages properly.
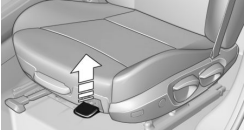
Height
Pull the lever and apply your weight to the seat or lift it off, as necessary.
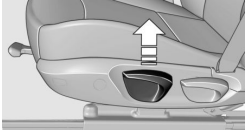
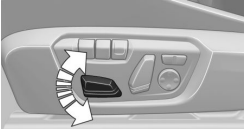
Backrest tilt
Pull the lever and apply your weight to the backrest or lift it off, as necessary.
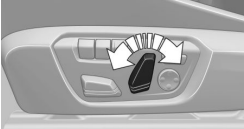
Seat tilt
Pull the lever and move the seat to the desired tilt. After releasing the lever, apply your weight to the seat or lift it off to make sure the seat engages properly.
Electrically adjustable seats
At a glance
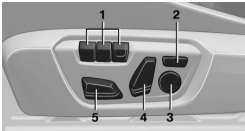
1 Seat and mirror memory
2 Backrest width
3 Lumbar support
4 Backrest tilt
5 Forward/backward, height, seat tilt
General information
The seat setting for the driver's seat is stored for the profile currently in use. When the vehi‐ cle is unlocked via the remote control, the po‐ sition is automatically retrieved if the Function, refer to page 46, is activated for this purpose.
Adjustments in detail
1. Forward/back.
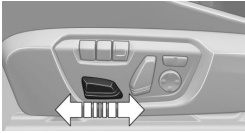
2. Height.
3. Seat tilt.
4. Backrest tilt.
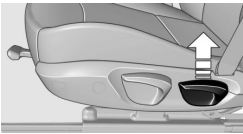
Thigh support
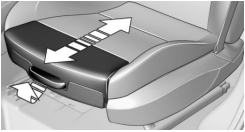
Pull the lever at the front of the seat and adjust the thigh support.
Lumbar support
The curvature of the seat backrest can be ad‐ justed in a way that it supports the lumbar re‐ gion of the spine. The lower back and the spine are supported for upright posture.

The curvature is increased/ decreased.
The curvature is shifted up/ down.
Backrest width

Change the width of the back‐ rest using the side wings to ad‐ just the lateral support.
Front seat heating
Switching on
 Press button once for each tempera‐ ture level.
The maximum temperature is reached when three LEDs are lit.
If the journey is continued within approx. 15 minutes, the seat heating is activated automat‐ ically with the temperature selected last.
When ECO PRO, refer to page 182, is acti‐ vated, the heater output is reduced.
Switch off
Press button longer.
The LEDs go out.
Rear seat heating
Switching on
Press button once for each tempera‐ ture level.
The maximum temperature is reached when three LEDs are lit.
If the journey is continued within approx. 15 minutes, the seat heating is activated automat‐ ically with the temperature selected last.
When ECO PRO, refer to page 182, is acti‐ vated, the heater output is reduced.
Switch off
Press button longer.
The LEDs go out.
This chapter describes all standard, countryspecific and optional features offered with the series. It also describes features that are not necessarily available in your car, e. g., due to the selected options or country versions. This also applies to safety-related functions and systems. The respectively applicable country provisions must be observed when using the respective features and systems.
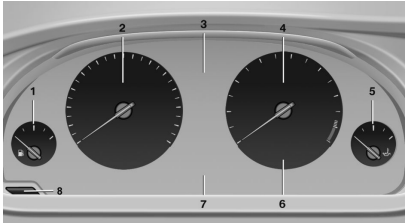
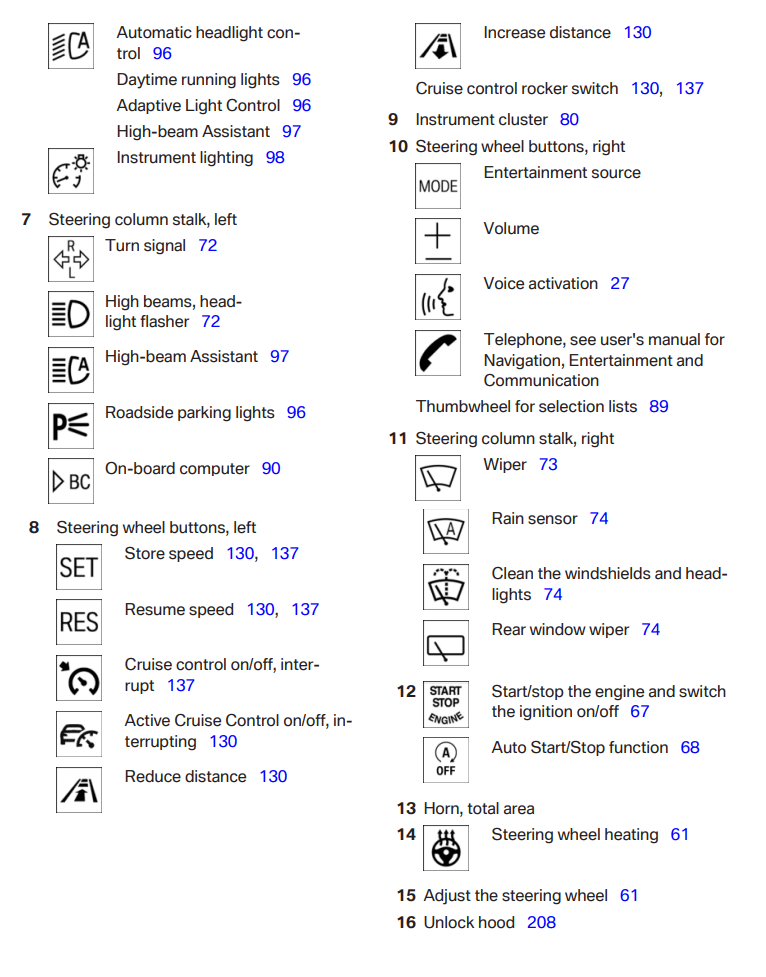
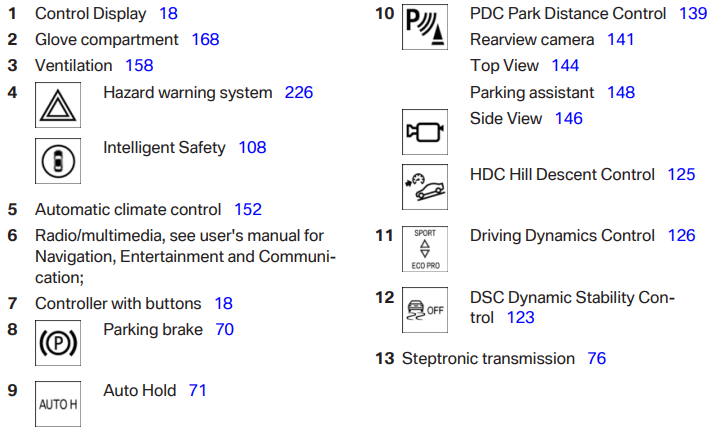
1 Fuel gauge 84
2 Speedometer
3 Messages, e.g. Check Control
4 Tachometer 84
5 Engine oil temperature 85
6 Current fuel consumption
7 Electronic displays 80
8 Reset miles 85
Electronic displays
▷ Selection lists, refer to page 89.
▷ External temperature, refer to page 85.
▷ On-board computer, refer to page 90.
▷ Date, refer to page 85.
▷ Energy recovery, refer to page 86.
▷ Transmission display, refer to page 78.
▷ Miles/trip miles, refer to page 85.
▷ Messages, e.g. Check Control, refer to page 81.
▷ Navigation display, see User's manual for Navigation, Entertainment and Communi‐ cation.
▷ Range, refer to page 85.
▷ Status, Driving Dynamics Control, refer to page 126.
▷ Service requirements, refer to page 86.
▷ Speed limit detection, refer to page 88.
▷ Time, refer to page 85.
The concept
The Check Control system monitors functions in the vehicle and notifies you of malfunctions in the monitored systems.
A Check Control message is displayed as a combination of indicator or warning lights and text messages in the instrument cluster and in the Head-up Display.
In addition, an acoustic signal may sound and a text message may appear on the Control Dis‐ play.
Indicator/warning lights
General information
The indicator and warning lights in the instru‐ ment cluster can light up in a variety of combi‐ nations and colors.
Several of the lights are checked for proper functioning and light up temporarily when the engine is started or the ignition is switched on.
Red lights
Safety belt reminder

Flashing or illuminated: safety belt on the driver or passenger side is not buckled. The safety belt reminder can also be activated if objects are placed on the front passenger seat. Make sure that the safety belts are positioned correctly.
Airbag system

Airbag system and belt tensioner are defective.
Have the vehicle checked by the serv‐ ice center immediately.
Parking brake

The parking brake is set.
For additional information, refer to Release parking brake, refer to page 70.
Brake system
 Continue to drive moderately.
 Have the vehicle checked by the serv‐ ice center immediately.
Front-end collision warning

Illuminated: advance warning is issued, e.g., when there is the impending dan‐ ger of a collision or the distance to the vehicle ahead is too small.
Increase distance.
Flashing: acute warning of the imminent dan‐ ger of a collision when the vehicle approaches another vehicle at a relatively high differential speed.
Intervention by braking or make an evasive ma‐ neuver.
Pedestrian warning

Symbol in the instrument cluster
If a collision with a person detected in this way is imminent, the symbol lights up and a signal sounds.
Orange lights
Active Cruise Control

The number bars shows the selected distance from the vehicle driving ahead.
For additional information, refer to Active Cruise Control with Stop & Go function, ACC, refer to page 130.
Vehicle detection, Active Cruise Control

Illuminated: vehicle driving ahead de‐ tected.
Flashing: the conditions are not ade‐ quate for operating the system.
The system was deactivated but applies the brakes until you actively resume control by pressing on the brake pedal or accelerator pedal.
Yellow lights
Anti-lock Braking System ABS

Avoid abrupt braking if possible. Brak‐ ing force boost in some cases defec‐ tive. Stop carefully. Take into account longer brake travel. Have this checked by the service center immediately.
DSC Dynamic Stability Control

Flashing: DSC controls the drive and braking forces. The vehicle is stabi‐ lized. Reduce speed and adapt driving profile to the driving circumstances.
Illuminated: DSC failed. Have the system checked by the service center.
For additional information, refer to Dynamic Stability Control DSC, refer to page 123.
DSC Dynamic Stability Control is deactivated or DTC Dynamic Traction Control is activated

Dynamic Stability Control DSC is switched off or Dynamic Traction Con‐ trol DTC is switched on.
For additional information, refer to Dynamic Stability Control, refer to page 123, and Dy‐ namic Traction Control, refer to page 124.
Flat Tire Monitor FTM

The Flat Tire Monitor signals a loss of tire inflation pressure in a tire.
Reduce your speed and stop cau‐ tiously. Avoid sudden braking and steering ma‐ neuvers.
For more information, see Flat Tire Monitor, re‐ fer to page 106.
Tire Pressure Monitor TPM
Illuminated: the Tire Pressure Monitor signals a loss of tire inflation pressure in a tire.
Reduce your speed and stop cautiously. Avoid sudden braking and steering maneuvers.
Flashing and then continuously illuminated: no flat tire or loss of tire inflation pressure can be detected.
For more information, see Tire Pressure Moni‐ tor, refer to page 103.
Steering system

Steering system in some cases defec‐ tive.
Have the steering system checked by the service center.
Engine functions

Have the vehicle checked by the serv‐ ice center.
For additional information, refer to Onboard Diagnostics socket, refer to page 216.
Lane departure warning

System is switched on and under cer‐ tain circumstances warns if a detected lane is left without flashing beforehand. For additional information, refer to Lane depar‐ ture warning, refer to page 118.
Green lights
Turn signal

Turn signal on.
Unusually rapid flashing of the indicator lamp indicates that a turn signal bulb has failed.
For additional information, refer to Turn signal, refer to page 72.
Parking lights, headlight control

Parking lights or headlights are acti‐ vated.
For additional information, refer to Parking lights/low beams, headlight control, re‐ fer to page 95.
Front fog lights

Front fog lights are activated.
High-beam Assistant

High-beam Assistant is switched on.
High beams are activated and off auto‐ matically as a function of the traffic sit‐ uation.
For additional information, refer to High-beam Assistant, refer to page 97.
Cruise control

The system is switched on. It maintains the speed that was set using the con‐ trol elements on the steering wheel.
Automatic Hold

The vehicle is automatically held in place when it is stationary.
On inclines, the system prevents the vehicle from rolling backward when driving off.
For more information, see Automatic Hold, re‐ fer to page 71.
Blue lights
High beams

High beams are activated.
For additional information, refer to High beams, refer to page 73.
General lamps
Check Control
At least one Check Control message is displayed or is stored. The symbol is shown in the display of the instrument cluster.
This chapter describes all standard, countryspecific and optional features offered with the series. It also describes features that are not necessarily available in your car, e. g., due to the selected options or country versions. This also applies to safety-related functions and systems. The respectively applicable country provisions must be observed when using the respective features and systems.
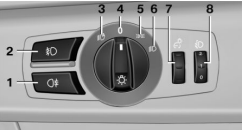
1 Rear fog lights
2 Front fog lights
3 Depending on the equipment: automatic headlight control, Adaptive Light Control, High-beam Assistant, Welcome lights, Daytime running lights
4 Lights off, daytime running lights
5 Parking lights, daytime running lights
6 Depending on the equipment: low beams, welcome lights, High-beam Assistant
7 Instrument lighting
8 Headlight range control
General information
Position of switch: 
If the driver door is opened with the ignition switched off, the exterior lighting is automati‐ cally switched off at these switch settings.
Parking lights
Position of switch  the vehicle's lights light up on all sides, e.g., for parking.
Do not use the parking lights for extended pe‐ riods; otherwise, they might drain the battery and it would then be impossible to start the en‐ gine.
When parking, it is preferable to switch on the one-sided roadside parking lights, refer to page 96.
Low beams
Position of switch  with the ignition switched on: the low beams light up.
Welcome lights
When the vehicle is parked, leave the switch in position or  parking and interior lights come on briefly when the vehicle is unlocked depending on the ambient brightness.
Activating/deactivating
1. "Settings"
2. "Lighting"
3. "Welcome lights"
Settings are stored for the profile currently in use.
This chapter describes all standard, countryspecific and optional features offered with the series. It also describes features that are not necessarily available in your car, e. g., due to the selected options or country versions. This also applies to safety-related functions and systems. The respectively applicable country provisions must be observed when using the respective features and systems.
ABS prevents locking of the wheels during braking.
The vehicle contains its steering power even during full brake applications, thus increasing active safety.
ABS is operational every time you start the en‐ gine.
When you apply the brakes rapidly, this system automatically produces the greatest possible braking force boost. It reduces the braking dis‐ tance to a minimum during emergency stop. This system utilizes all of the benefits provided by ABS.
Do not reduce the pressure on the brake pedal for the duration of the emergency stop.
The concept
HDC is a downhill driving assistant that auto‐ matically controls vehicle speed on steep downhill gradients. Without applying the brakes, the vehicle moves at slightly more than walking speed.
Hill Descent Control can be activated at speeds below approx. 22 mph/35 km/h. When driving downhill, the vehicle reduces its speed to approx. walking speed and then keeps its speed constant.
As long as there is active braking, the system is on standby. The system does not brake the vehicle during this time.
Only use HDC in low gears or in selector lever position D or R.
Increasing or decreasing vehicle speed
Specify desired speed in the range from ap‐ prox. 4 mph/6 km/h to approx. 15 mph/25 km/h using the rocker switch of the cruise control on the steering wheel. Vehicle speed can be changed by lightly accelerating.
This chapter describes all standard, countryspecific and optional features offered with the series. It also describes features that are not necessarily available in your car, e. g., due to the selected options or country versions. This also applies to safety-related functions and systems. The respectively applicable country provisions must be observed when using the respective features and systems.
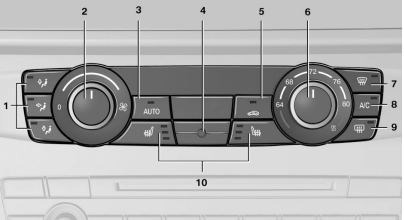
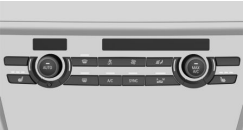
1 Vent settings
2 Air flow
3 AUTO program
4 Interior temperature sensor — always keep clear
5 Recirculated-air mode
6 Temperature
7 Defrosts windows and removes condensation
8 Cooling function
9 Rear window defroster
10 Seat heating 55
Hints
Sufficient ventilation
When remaining in the vehicle for an ex‐ tended period of time, ensure sufficient exter‐ nal ventilation. Do not continuously use recir‐ culated-air mode; otherwise the air quality in the interior continuously deteriorates and win‐ dow condensation increases.◀
Climate control functions in detail
Manual air distribution
Press buttons repeatedly to select a program:
 Windows
 Upper body region.
 Footwell.
You may combine these programs as needed.
Air flow, manual

Turn the ring to set the desired air volume.
The higher the rate, the more ef‐ fective the heating or cooling will be.
The air flow of the automatic climate control may be reduced automatically to save battery power.
AUTO program
 Press button.
Air flow, air distribution and tempera‐ ture are controlled automatically.
Depending on the selected temperature and outside influences, the air is directed to the windshield, side windows, upper body, and into the footwell.
The cooling function, refer to page 154, is switched on automatically with the AUTO pro‐ gram.
Recirculated-air mode
You may respond to unpleasant odors or pollu‐ tants in the immediate environment by tempo‐ rarily suspending the supply of outside air. The system then recirculates the air currently within the vehicle.
 Press button repeatedly to select an operating mode:
Recirculated air mode switches off automati‐ cally at low external temperatures after a cer‐ tain amount of time in order to avoid window fogging.
If the windows fog over, switch off recircu‐ lated-air mode and increase the air flow, if needed.
Sufficient ventilation
When remaining in the vehicle for an ex‐ tended period of time, ensure sufficient exter‐ nal ventilation. Do not continuously use recir‐ culated-air mode; otherwise the air quality in the interior continuously deteriorates and win‐ dow condensation increases.◀
Temperature
 Turn the ring to set the desired temperature.
The automatic climate control reaches this temperature as quickly as possible, if needed by increasing the cooling or heating output, and then keeps it constant.
Do not rapidly switch between different tem‐ perature settings. Otherwise, the automatic cli‐ mate control will not have sufficient time to ad‐ just the set temperature.
Defrosts windows and removes condensation
 Press button.
Ice and condensation are quickly re‐ moved from the windshield and the front side windows.
Adjust air flow with the program active.
If the windows are fogged over, you can also switch on the cooling function to dehumidify the air.
Cooling function
The car's interior can only be cooled with the engine running.
 Press button.
The air will be cooled and dehumidi‐ fied and, depending on the temperature set‐ ting, warmed again.
Depending on the weather, the windshield and side windows may fog up briefly when the en‐ gine is started.
The cooling function is switched on automati‐ cally with the AUTO program.
When using the automatic climate control, condensation water, refer to page 177, devel‐ ops that exits underneath the vehicle.
Rear window defroster
 Press button.
The rear window defroster switches off automatically after a certain period of time.
Switching the system on/off
Switch off
Turn the rotary switch for the air volume, refer to page 153, to 0. The blower and automatic climate control are turned off entirely.
Switching on
Set any air volume.
The AUTO program can also be switched on directly via the AUTO button.
Microfilter
The microfilter removes dust and pollen from the incoming air.
This filter should be replaced during scheduled maintenance, refer to page 215, of your vehi‐ cle.
This chapter describes all standard, countryspecific and optional features offered with the series. It also describes features that are not necessarily available in your car, e. g., due to the selected options or country versions. This also applies to safety-related functions and systems. The respectively applicable country provisions must be observed when using the respective features and systems.
Observe the fuel recommendation, refer to page 192, prior to refueling.
Refuel promptly
Refuel no later than at a range of 30 miles/50 km or engine operation might fail and damage might occur.◀
Diesel engines
The filler neck is designed for refueling at die‐ sel fuel pumps.
Opening
1. Briefly press the rear edge of the fuel filler flap.
2. Turn the tank lid counterclockwise.
3. Place the tank lid in the bracket attached to the fuel filler flap.
Closing
1. Fit the lid and turn it clockwise until you clearly hear a click.
2. Close the fuel filler flap.
Do not pinch the retaining strap
Do not pinch the retaining strap attached to the lid; otherwise, the lid cannot be closed properly and fuel vapors can escape.◀
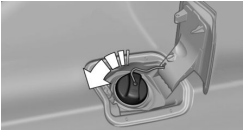
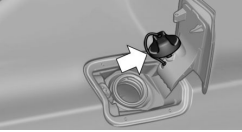
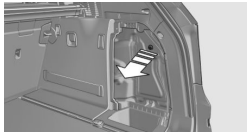
Manually unlocking fuel filler flap
In the event of an electrical malfunction, e.g.
The release is located in the trunk.
1. Open the cover on the right side trim.
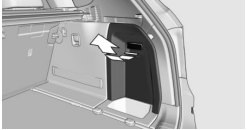
2. Pull the green knob with the fuel pump symbol. This releases the fuel filler flap.
Observe the following when refueling
The fuel tank is full when the filler nozzle clicks off the first time.
Do not overfill the fuel tank
Do not overfill the fuel tank; otherwise fuel may eslide, causing harm to the environ‐ ment and damaging the vehicle.◀
Handling fuels
Observe safety regulations posted at the gas station.◀
This chapter describes all standard, countryspecific and optional features offered with the series. It also describes features that are not necessarily available in your car, e. g., due to the selected options or country versions. This also applies to safety-related functions and systems. The respectively applicable country provisions must be observed when using the respective features and systems.
The maintenance system indicates required maintenance measures, and thereby provides support in maintaining road safety and the op‐ erational reliability of the vehicle.
In some cases scopes and intervals may vary according to the country-specific version. Re‐ placement work, spare parts, fuels and lubri‐ cants and wear materials are calculated sepa‐ rately. Additional information is available from the service center.
Sensors and special algorithms take into ac‐ count the driving conditions of your vehicle. Based on this, Condition Based Service recog‐ nizes the maintenance requirements.
The system makes it possible to adapt the amount of maintenance corresponding to your user profile.
Detailed information on service requirements, refer to page 86, can be displayed on the Con‐ trol Display.
Service data in the remote control
Information on the required maintenance is continuously stored in the remote control. Your service center will read out this data and suggest the right array of service procedures for your vehicle.
Therefore, hand your service specialist the re‐ mote control with which the vehicle was driven most recently.
Storage periods
Storage periods during which the vehicle bat‐ tery was disconnected are not taken into ac‐ count.
If this occurs, have a service center update the time-dependent maintenance procedures, such as checking brake fluid and, if needed, changing the engine oil and the microfilter/ activated-charcoal filter.
Service and Warranty Information Booklet for US models and Warranty and Service Guide Booklet for Canadian models
Please consult your Service and Warranty In‐ formation Booklet for US models and Warranty and Service Guide Booklet for Canadian mod‐ els for additional information on service re‐ quirements.
Maintenance and repair should be performed by your service center. Make sure to have reg‐ ular maintenance procedures recorded in the vehicle's Service and Warranty Information Booklet for US models, and in the Warranty and Service Guide Booklet for Canadian mod‐ els. These entries are proof of regular mainte‐ nance.