Please read these instructions carefully
and retain for future reference.
Sunbeam Pedestal Fan
with Remote Control
Instruction Booklet
FA8900 40cm Pedestal Fan

Contents
Important instructions – retain for
future use.
Sunbeams Safety Precautions 1
Safety Precautions For Your Pedestal Fan 2
Locating Your Pedestal Fan 3
Features of Your Pedestal Fan 4
Parts Identification 5
Assembling Your Pedestal Fan 6
Remote Control 8
Using Your Pedestal Fan 9
Care And Cleaning 12

Sunbeam is very safety conscious when
designing and manufacturing consumer products,
but it is essential that the product user also
exercise care when using an electrical appliance.
Listed below are important precautions for the
safe use of an electrical appliance.
• Readcarefullyandsavealltheinstructions
providedwithanappliance.
• Alwaysturnthepoweroffatthepoweroutlet
beforeyouinsertorremoveaplug.Remove
bygraspingtheplug-donotpullonthecord.
• Turnthepoweroffandremovetheplug
whentheapplianceisnotinuseandbefore
cleaning.
• Donotuseyourappliancewithanextension
cordunlessthiscordhasbeenchecked
andtestedbyaqualifiedtechnicianor
serviceperson.
• Alwaysuseyourappliancefromapower
outletofthevoltage(A.C.only)marked
ontheappliance.
• Thisapplianceisnotintendedforuseby
persons(includingchildren)withreduced
physical,sensoryormentalcapabilities,or
lackofexperienceandknowledge,unlessthey
havebeengivensupervisionorinstruction
concerninguseoftheappliancebyaperson
responsiblefortheirsafety.
• Childrenshouldbesupervisedtoensurethat
theydonotplaywiththeappliance.
• Thetemperatureofaccessiblesurfacesmaybe
highwhentheapplianceisoperating.
• Neverleaveanapplianceunattendedwhile
inuse.
• Donotuseanapplianceforanypurpose
otherthanitsintendeduse.
• Donotplaceanapplianceonornearahotgas
flame,electricelementoronaheatedoven.
• Donotplaceontopofanyotherappliance.
• Donotletthepowercordofanappliancehang
overtheedgeofatableorbenchtoportouch
anyhotsurface.
• Donotoperateanyelectricalappliancewith
adamagedcordoraftertheappliancehas
beendamagedinanymanner.Ifdamageis
suspected,returntheappliancetothenearest
SunbeamAppointedServiceCentre
forexamination,repairoradjustment.
• Foradditionalprotection,Sunbeam
recommendtheuseofaresidualcurrent
device(RCD)withatrippingcurrentnot
exceeding30mAintheelectricalcircuit
supplyingpowertoyourappliances.
• Donotimmersetheapplianceinwater
oranyotherliquidunlessrecommended.
•Appliancesarenotintendedtobeoperated
bymeansofanexternaltimerorseparate
remotecontrolsystem.
•Thisapplianceisintendedtobeusedin
householdandsimilarapplicationssuch
as:staffkitchenareasinshops,officesand
otherworkingenvironments;farmhouses;by
clientsinhotels,motelsandotherresidential
typeenvironments;bedandbreakfasttype
environments.
Sunbeam’s Safety Precautions
1
Ifyouhaveanyconcernsregardingtheperformanceanduseofyourappliance,
pleasevisitwww.sunbeam.com.auorcontacttheSunbeamConsumerServiceLine.
Ensuretheabovesafetyprecautionsareunderstood.

•Donotuseoutdoors.
• Donotrunthecordofthefanunder
carpeting.Donotcoverthecordwiththrow
rugs,runnersorotherfloorcoverings.
Arrangethecordawayfromtrafficareasso
thatitwillnotbetrippedover.
• Donotusethisfanintheimmediate
surroundsofabath,shower,laundryarea
orswimmingpool.
• Besurethefanisplacedonadry,even
surface.Donotuseonsoftsurfaces,such
asbeds,whereopeningmaybecome
blocked.
• Whenoperatingwiththeoscillation
function,donotplacethefaninaposition
thatmayrestrictorimpedeitsmovement.
• Keepyourfanawayfromheatsources,
corrosivegasesandavoiddirectsunlight.
• Thisfanisonlytobeusedwiththebase
fittedandingoodcondition.
• Disconnectthepowerplugbefore
dismantling,assemblingorbeforecleaning.
• Alwaysunplugthefanwhennotinuse.
• Thefanmustnotbeusediftheguardsare
damagedinanyway.
• Donotinsertorallowforeignobjectsto
enteranyventilationorexhaustopenings
asthismaycauseelectricshockorfire,or
damagetothefan.
• Neverinsertfingersoranyotherobjects
throughtheguardswheneverthepower
plugisconnected,especiallywhile
running.
• Avoidtouchingmobilepartsofthefan.
• Donotattempttomoveyourfanwhilst
itisoperating.Ifyourfanneedstobe
moved,pleaseensurethatitisturnedoff
andyouusethecarryhandleontopofthe
pedestal.
• Whendisposingofthefanattheendofits
usefullife,followlocalregulations.
• Donotcoilthepowercordtootightly
aroundtheaircooler,asthismaydamage
thecord.
Safety Precautions For
Your Pedestal Fan
2

1.Alwayslocateyourfanonalevelsurface.
2.Yourpedestalfanshouldbelocatedina
dry,cool,wellventilatedlocation.Keep
yourfanawayfromheatsources,corrosive
gasesandavoiddirectsunlight.
3.Donotattempttomoveyourpedestalfan
whilstitisoperating.Ifyourfanneedsto
bemoved,pleaseensurethatitisturned
offandyouusethecarryhandleontopof
thefan.
Locating Your Pedestal Fan
3
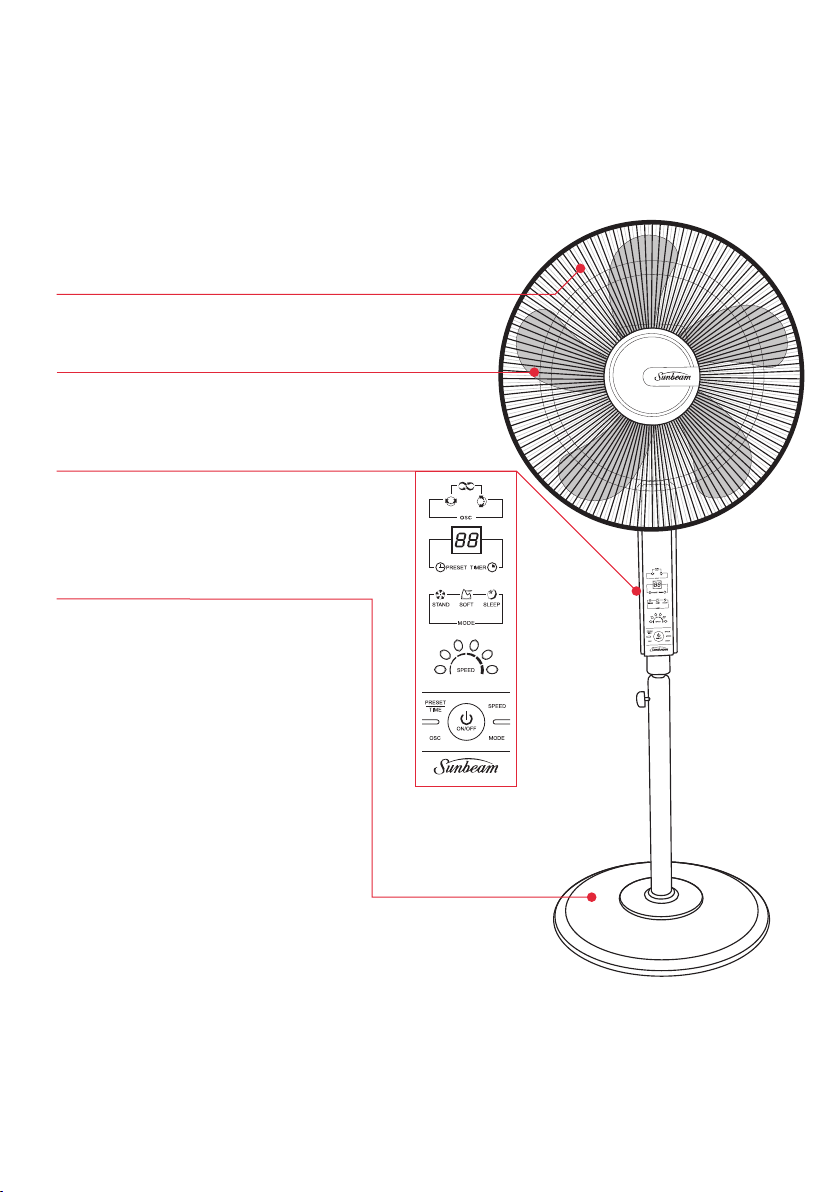
Features Of Your Sunbeam
Pedestal Fan
Metal Grille
Easilyassembled,50cmsecuregrille.
Plastic Fan Blades
5bladestoeffectivelymovetheairabout
yourroom.
Control Panel
Simplypresstheon/offbuttontoturnthe
uniton.Usetheotherbuttonstoselectwind
mode,timer,speedandoscillationfunctions.
Solid Base
Makesyourpedestalfansecure.
4
5
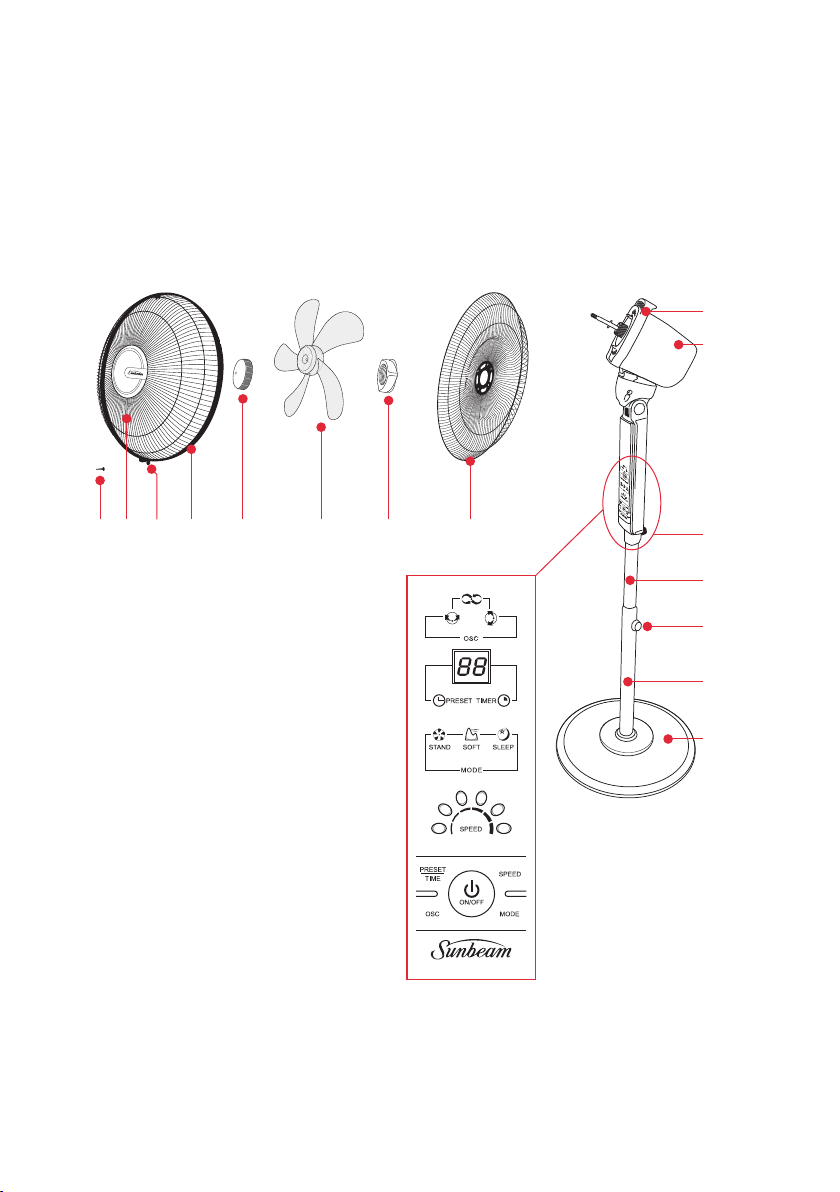
Parts Identification
1. LockingScrew
2. FrontGuard
3. GuardClip
4. GuardRing
5. BladeKnob
6. FanBlade
7. GuardInterlockingNut
8. RearGuard
9. FrontMotorCover
10. RearMotorCover
11. Screw
12. ExtensionTube
13. HeightAdjustmentKnob
14. Stand
15. Base
16. ControlPanel
1 2 3 4 5 6 7 8
9
10
11
12
13
14
15
16
6
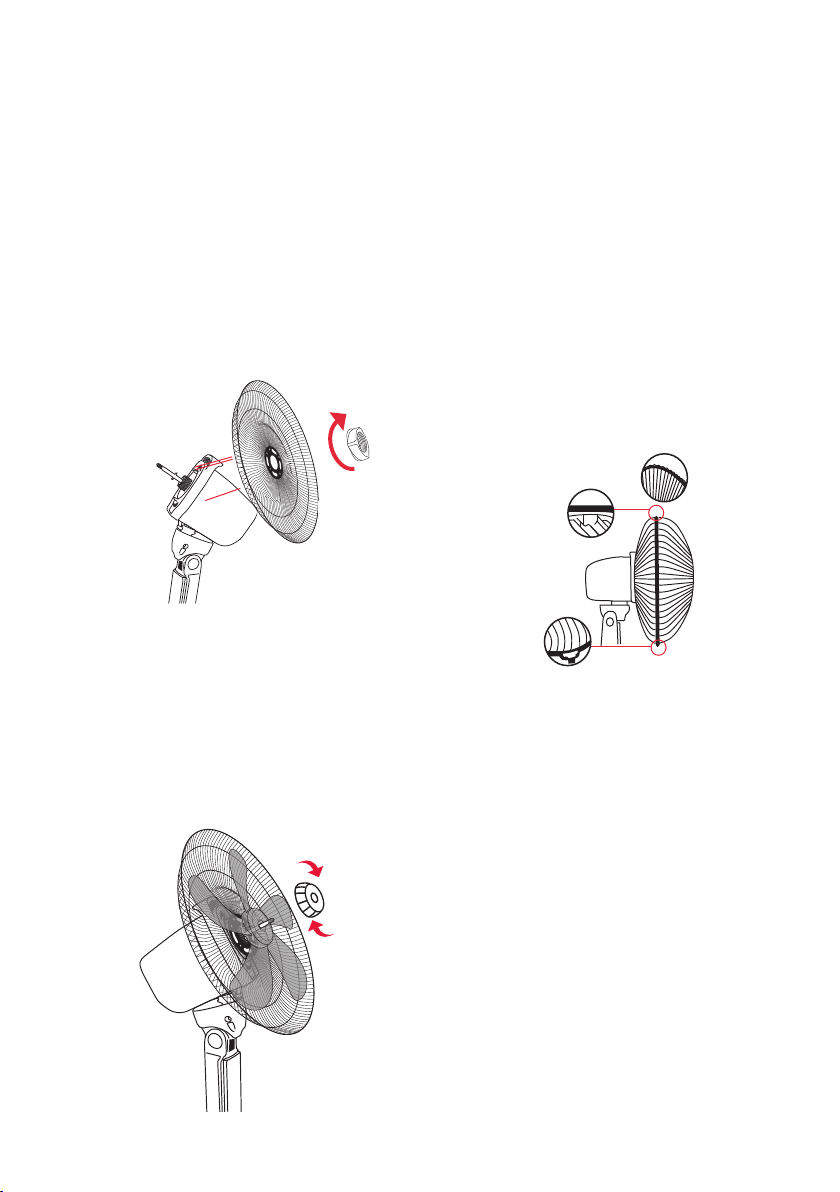
1.Unpackallthecomponentsfromthebox.
2.Unfastentheinterlockingnutandblade
knobfromthefrontofthemotor
(SeeFigure2)andplacetooneside.
3.Attachtherearfanbladegrillandensureit
isinthecorrectorientationwiththe“UP”
andthetwoholesalignedatthetop
(SeeFigure1).Firmlyscrewonthe
interlockingnut.
4.Mountthefanbladeontothemotorshaft;
andfastenthebladeknobfirmlybyturning
inananti-clockwisedirection.
SeeFigure2.
5.Openthefrontguardclipandattachthe
fanbladegrillwiththe“UP”word(which
appearsontheinsideofthegrill),the
Sunbeamlogoshouldbestraight.Pushthe
roundedgesofthegrillfirmlytogetherwith
thebackgrillandlocktheclip.Usinga
Phillipsheadscrewdriver,tightenthescrew
provided.SeeFigure3.
Assembling Your Pedestal Fan
Figure1
Figure2
Figure3
7
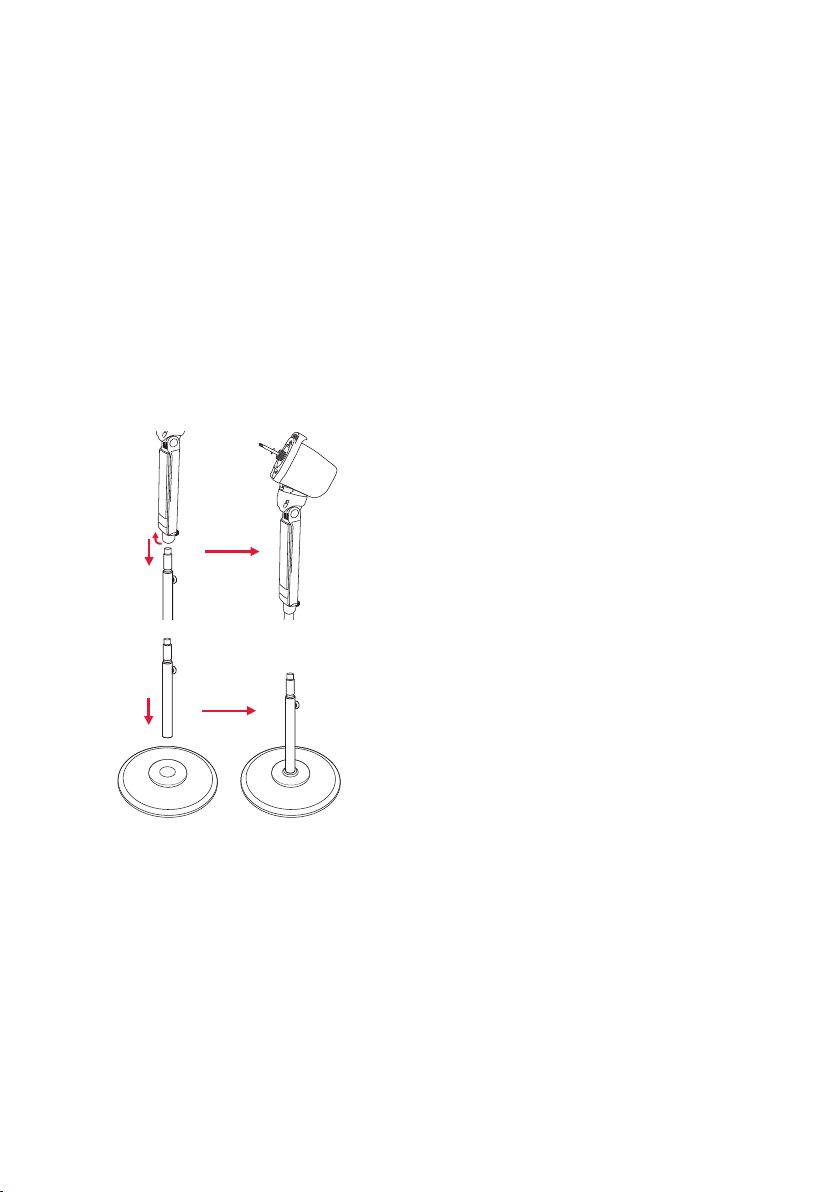
Assembling Your Pedestal Fan (continued)
Connecting The Base
1.Locatethemouldedsecuringknob.
2.Insertthelowerextensionshaftfirmlyinto
thebaseandattachthemouldedsecuring
knobtotheundersideofthebaseand
tighten.(ReferFigure1).
Attaching the body and base
1.Removethescrewfromtheupperfan
shaft.Placetooneside.
2.Inserttheupperfanshaftontothelower
extensionshaftandinsertthescrewand
firmlytighten.Ensurethestandbodyis
completelyinterlockedwiththebase.
(ReferFigure2).
Figure1
Figure2
8
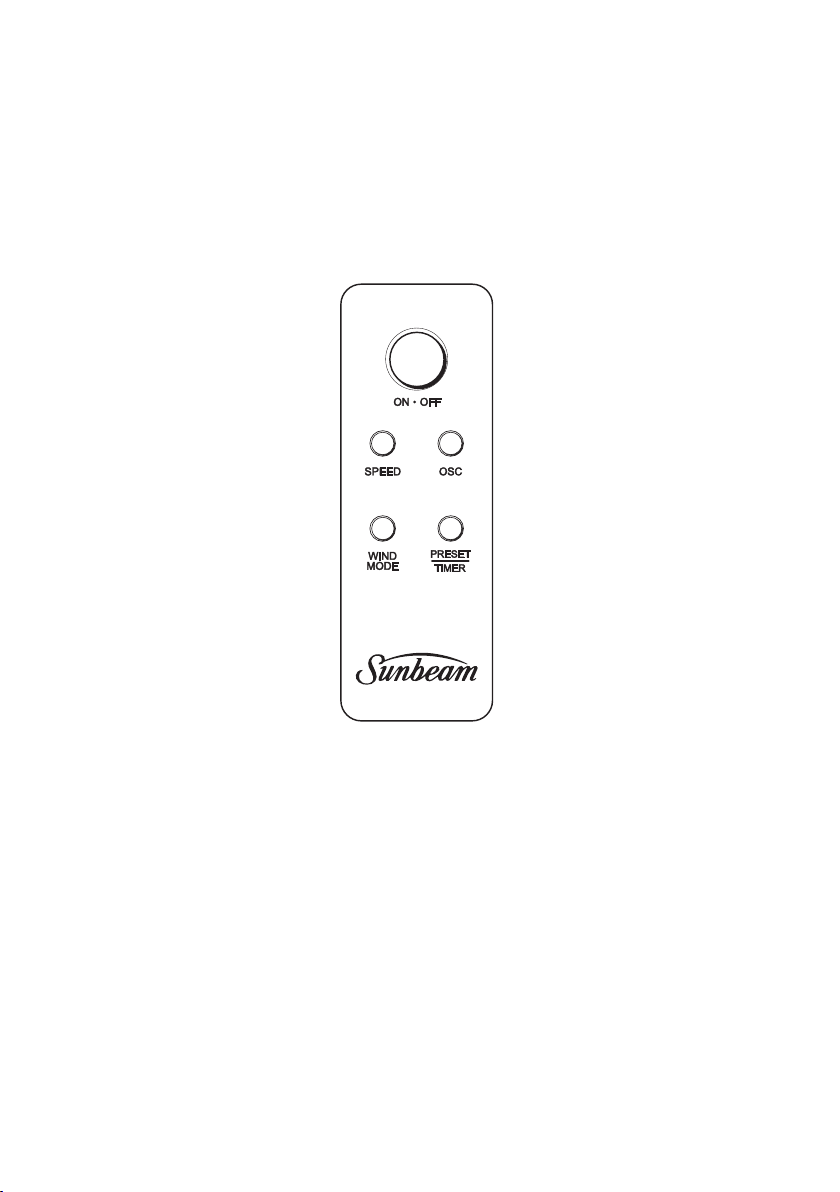
Remote Control
Remote control
Operateswithin8metresofthe
PedestalFan.
Fan speed button
Choosefrom3speedsettings,
lowmediumorhigh.
Wind Mode
Youhaveachoiceof2Natureor
Sleepairflowtypes.
Whenusedinnaturemode,the
fanspeedisrandomlyadjusted,
givingthefeelingofanatural
breeze.
WhensettoSleepModethe
fanspeeddecreasesafter30
minutesfromhightomedium,
thenmediumtolow.Whenused
withthetimer,willultimately
switchtheunitoff.
Oscillation
Yourpedestalfanoscillates70°,
distributingcoolairthroughout
theroom.
Preset/Timer
Thepresettimerallowsyouto
setyourpedestalfantoturn
on/offafter1,2,4or8hours.
Using the remote control
1. Point the remote towards the control panel
on the front of the pedestal to operate.
Inserting or changing the batteries
1. Slide the rear cover off the remote control
unit.
2. Insert the 2 AAA batteries provided with your
pedestal fan.
3. Replace the rear cover.
9
1. Place the pedestal fan on a flat level surface
2. Adjust the height by turning the height
adjustment knob, located on the lower
extension shaft.
Note: Ensure the knob is tightened firmly at all
times. Insert the plug into a 230/240 V power
outlet and turn the power on.
3. Press the on/off button on the fan or the
remote control. The fan will start at ‘medium’
speed for 3 seconds then automatically
change to ‘low’ speed.
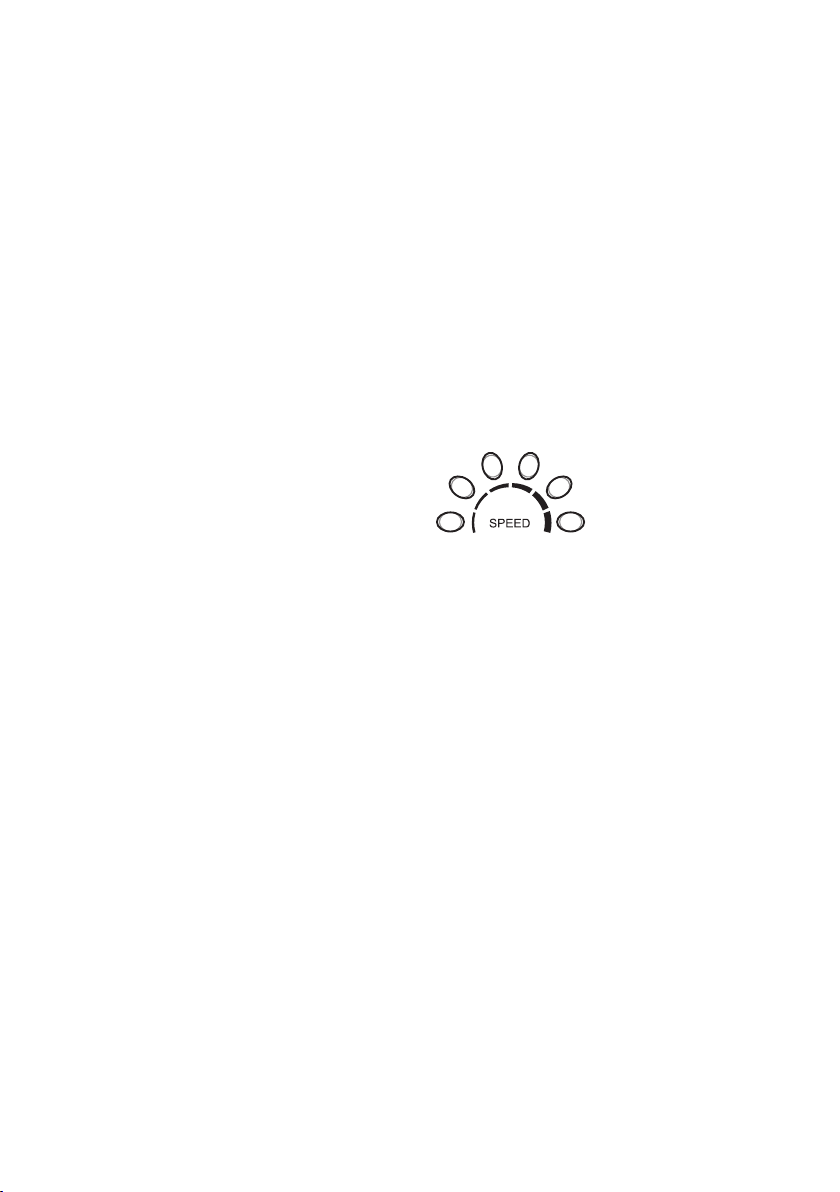
Selecting a fan speed
1. To select a fan speed simply press the
‘speed’ button, on either the fan or remote
control, repeatedly to select the desired
speed from the 6 settings available.
The LED lights indicate the graduated speed
on the dial below.
• If you will not be using the fan for a length of
time, it is advisable to turn the power off at
the wall socket and unplug the power cord.
Using Your Pedestal Fan
10
Using Your Pedestal Fan (continued)
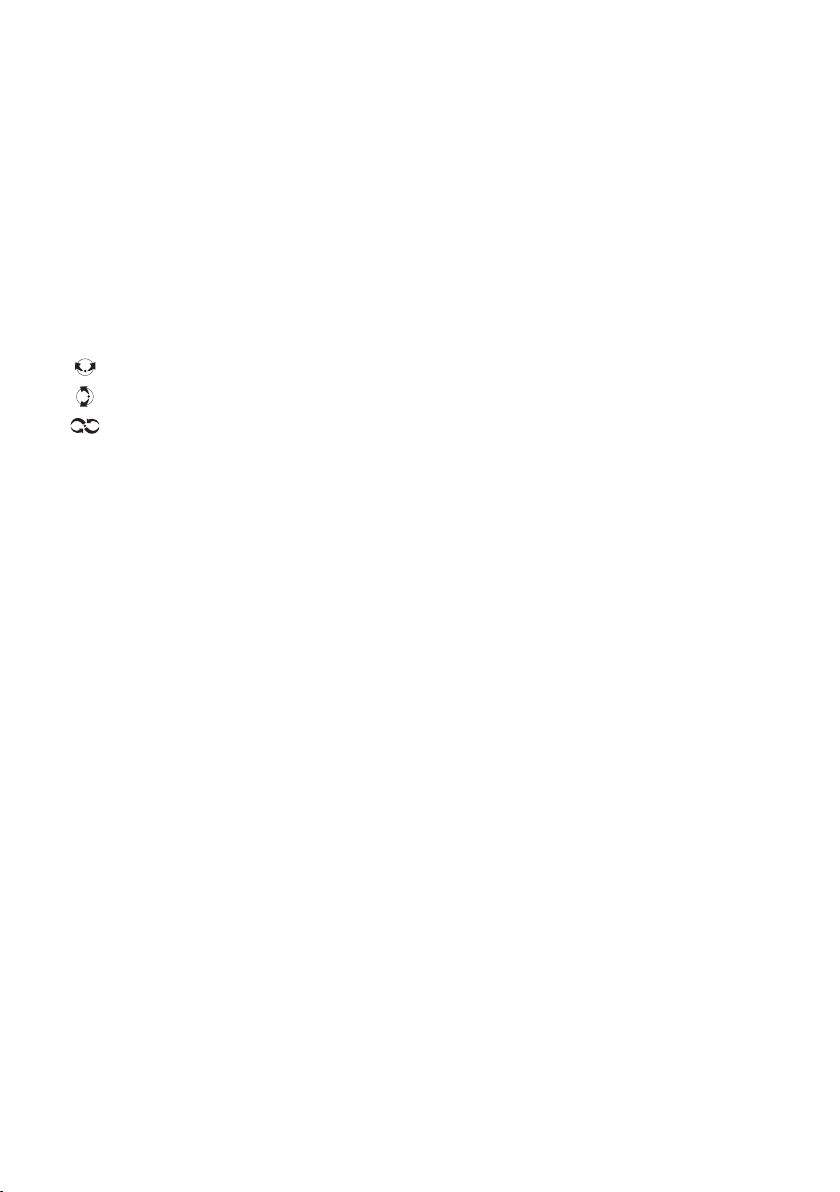
Oscillation
Press the oscillation button to choose from
three options of wind direction:
horizontal direction
vertical direction
wave or figure 8 direction
To turn oscillation off, press the oscillation
button again.
Timer
Pre-set to turn on
To pre-set the timer to turn the fan on, place
the fan in “standby” mode (on at the power
outlet but off on the fan) press the preset/timer
button and select the required time (in half
hour increments up to 2 hours, then hourly up
to 10 hours). When the preset time is reached,
the fan will switch ON automatically.
Note: The time must be set when the preset
indicator blinks 3 times. The selected time is
set once the blinking has ceased.
Pre-set to turn off
To pre-set the time to turn the fan off, press
the preset/timer button to switch to timer
mode. Press the timer button once to set the
desired time for the fan to cease operating.
When this set time is reached, the fan will
switch OFF automatically. The timing intervals
are the same as to turn the fan on. Press timer
button again to switch back to preset mode.
Note: You may also pre-set your fan to turn off
whilst in stand by mode.
Using Your Pedestal Fan (continued)
WIND MODES
Pressthemodebuttontoselectthedesired
airflowtypeinsequence:
Stand mode
The Fan will operate at the selected speed.
Soft mode
The fan will gradually change the speed for a
more natural airflow. This speed provides an
extra level of comfort by simulating the natural
rise and fall of the wind over time and can be
used on any speed setting.
Sleep mode
Is identical to Soft mode with the advantage
that the set fan speed gradually decreases
every 30 minutes.
11

Care and Cleaning
• Ensure that your pedestal fan is switched
off and disconnected from the power outlet
before cleaning.
• Carefully wipe your fan using a clean
soft cloth. Do not use abrasive cleaners
or brushes to clean the fan as these will
scratch and damage the surface
• Take care that excessive dust does not build
up in or around the motor body. Use a dry
soft brush or vacuum cleaner to remove it.
• Do not allow the motor or other electrical
components to be exposed to water.
• Always store your fan in a cool dry place
when not in use, preferably in the original
box.
12

Shouldyouexperienceanydifficultieswith
yourappliance,pleasephoneourcustomer
servicelineforadviceon1300881861in
Australia,or0800786232inNewZealand.
Alternatively,youcansendawrittenclaim
toSunbeamattheaddresslistedbelow.
Onreceiptofyourclaim,Sunbeamwill
seektoresolveyourdifficultiesor,ifthe
applianceisdefective,adviseyouonhow
toobtainareplacementorrefund.
YourSunbeam2YearReplacement
Guaranteenaturallydoesnotcovermisuse
ornegligenthandlingandnormalwearand
tear.
Similarlyyour2YearReplacementGuarantee
doesnotcoverfreightoranyothercosts
incurredinmakingaclaim.Pleaseretain
yourreceiptasproofofpurchase.
Thebenefitsgiventoyoubythisguarantee
areinadditiontoyourotherrightsand
remediesunderanylawswhichrelatetothe
appliance.
Ourgoodscomewithguaranteesthatcannot
beexcludedundertheAustralianConsumer
LawandundertheNewZealandConsumer
GuaranteesAct.
InAustraliayouareentitledtoa
replacementorrefundforamajorfailureand
forcompensationforanyotherreasonably
foreseeablelossordamage.Youarealso
entitledtohavethegoodsrepairedor
replacedifthegoodsfailtobeofacceptable
qualityandthefailuredoesnotamountto
amajorfailure.
Shouldyourappliancerequirerepairor
serviceaftertheguaranteeperiod,contact
yournearestSunbeamservicecentre.
ForacompletelistofSunbeam’sauthorised
servicecentresvisitourwebsiteorcall:
Australia
www.sunbeam.com.au
1300881861
Units5&6,13LordStreet
BotanyNSW2019Australia
New Zealand
www.sunbeam.co.nz
0800786232
26VesteyDrive,MtWellington
Auckland,NewZealand
In the unlikely event that this appliance develops any malfunction
within 2 years of purchase (3 months commercial use) due to
faulty materials or manufacture, we will replace it for you
free of charge.
2 Year Replacement Guarantee

is a registered trademark.
Need help with your appliance?
Contactourcustomerserviceteamorvisit
ourwebsiteforinformationandtipson
gettingthemostfromyourappliance.
In Australia
Visit www.sunbeam.com.au
Or call 1300 881 861
In New Zealand
Visit www.sunbeam.co.nz
Or call 0800 786 232
Made in China.
Due to minor changes in design or otherwise,
the product may differ from the one shown in this leaflet.
© Copyright.
Sunbeam Corporation Limited 2012.
ABN 45 000 006 771
Units 5 & 6, 13 Lord Street
Botany NSW 2019 Australia
Unit 3, Building D
26 Vestey Drive
Mt Wellington Auckland
New Zealand
Sunbeam Corporation is a division of GUD Holdings Ltd.
6/12