USER MANUAL Microwave
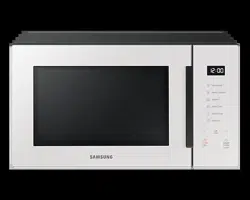
OVEN FEATURES
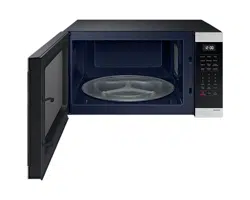
OVEN
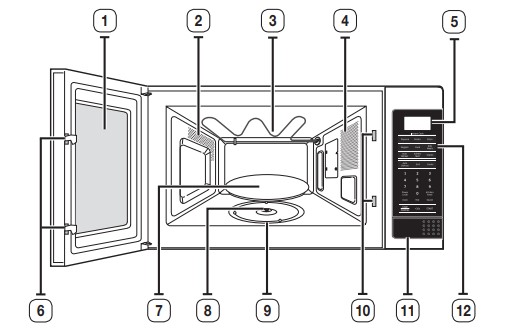
- DOOR
- VENTILATION HOLES
- GRILL
- LIGHT
- DISPLAY
- DOOR LATCHES
- TURNTABLE
- COUPLER
- ROLLER RING
- SAFETY INTERLOCK HOLES
- OPEN DOOR PUSH BUTTON
- CONTROL PANEL
CONTROL PANEL
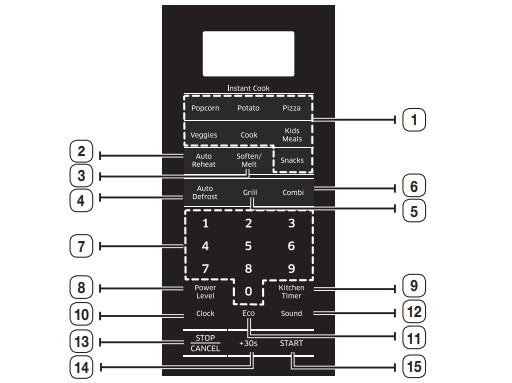
- INSTANT COOK BUTTONS
- AUTO REHEAT BUTTON
- SOFTEN/MELT BUTTON
- AUTO DEFROST BUTTON
- GRILL BUTTON
- COMBI BUTTON
- NUMBER BUTTONS
- MWO POWER LEVEL BUTTON
- KITCHEN TIMER BUTTON
- CLOCK BUTTON
- ECO BUTTON
- SOUND BUTTON
- STOP/CANCEL BUTTON
- +30s BUTTON
- START BUTTON
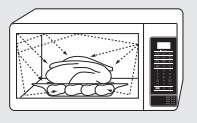
OVEN USE
HOW A MICROWAVE OVEN WORKS
Microwaves are high-frequency electromagnetic waves. The microwaves cause molecules in the food to vibrate more quickly, releasing heat. This heat disperses through the food, cooking it, reheating it, or defrosting it. You can use your microwave oven to:
- Defrost (manual & auto)
- Cook
- Reheat
Cooking Principle.
- The microwaves generated by the magnetron are distributed uniformly as the food rotates on the turntable. The food is thus cooked evenly.
- The microwaves are absorbed by the food up to a depth of about 1 inch (2.5 cm). Cooking then continues as the heat is dissipated within the food.
- Cooking times vary according power level setting you use and the properties of the food:
- Quantity and density
- Water content
- Initial temperature (refrigerated or not)
CHECKING IF YOUR OVEN IS OPERATING CORRECTLY
The following simple procedure enables you to confirm your oven is working correctly at all times.
Open the oven door by pushing the push button on the bottom side of the control panel. Place a glass of water on the turntable. Then, close the door.
 |
1. Press the Number buttons to enter an operating time of 4 to 5 minutes. |
 |
2. Press the Start button
Result: The oven heats the water for 4 or 5 minutes. The water should then be boiling.
1) When cooking has finished the oven beeps 4 times.
2) The end reminder signal will beep 1 time (once every minute).
3) The current time is displayed again.
|
SETTING THE TIME
Your microwave oven has an inbuilt clock. When power is supplied, “:0”, “88:88” or “12:00” is automatically displayed on the display. You must set the clock:
- When you first install your microwave oven
- After a power failure
 |
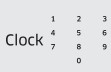
1. To set the time.
Press the Clock button once.
|
 |
2. Use the Number buttons to enter the current time. You must press at least three numbers to set the clock. If the current time is 5:00 enter, 5, 0, 0. |
|
3. Press the Start button again. A colon will blink, indicating that the time is set. |
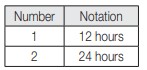
SWITCHING THE TIME NOTATION
You can change the time notation (12H/24H). 12H is the default.
 |
1. Press the hidden button (Clock + the Number “0” button). Then, press the Number button corresponding to your choice
|
|
2. Press the Start button. |
SETTING POWER LEVELS
 |
Your microwave allows you to set up to two different stages of cooking, each with its own time length and power level. The MWO Power level button lets you control the heating intensity from Warm (1) to High (10). |
ONE-STAGE COOKING
For simple one-stage cooking, you only need to set a cooking time. The power level is automatically set to High. If you want to set the power to any other level, you must set it using the MWO Power level button.
 |
1. Use the Number buttons to set a cooking time. You can set a time from one second to 99 minutes, 99 seconds. To set a time over one minute, enter the seconds too. For example, to set 20 minutes, enter 2, 0, 0, 0. |
 |
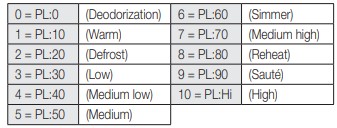
2. If you want to set the power level to something other than High, press the MWO Power level button, then use the Number buttons to enter a power level.
Power Levels
|
|
3. Press the Start button to begin cooking. If you want to change the power level, press the Stop/Cancel button before you press the Start button, and repeat Steps 1 and 2 above. |
Some recipes require different stages of cooking at different temperatures. You can set multiple stages of cooking with your microwave.
USING THE GRILL COOK BUTTON
For more time savings plus the benefits of grilling, use the Grill mode directly after microwave cooking.
This feature allows you to grill some of your favorite foods using the radiant heat from the grilling element.
TROUBLESHOOTING AND ERROR CODE
TROUBLESHOOTING
Check these solutions if you have a problem with your microwave:
The display and/or the oven is not working.
- Make sure the plug is properly connected to a grounded outlet. If the wall outlet is controlled by a wall switch, make sure the wall switch is turned on.
- Remove the plug from the outlet, wait ten seconds, and plug it in again.
- Reset the circuit breaker or replace any blown fuses.
- Plug a different appliance into the outlet. If the other appliance doesn’t work, call a qualified electrician to repair the wall outlet. Plug the oven into a different outlet.
The display is working, but the power won’t come on
- Make sure the door is closed securely.
- Check if any packaging material or anything else is stuck in the door seal.
- Check if the door is damaged.
- Touch Cancel twice, and enter all the cooking instructions again.
The microwave turned off before the set time elapsed.
- If there was a power outage, the time indicator will display: 88:88.
- If no power outage occurred, remove the plug from the outlet, wait ten seconds, and plug it in again. Reset the clock and any cooking instructions.
- Reset the circuit breaker or replace any blown fuses.
Cooks food too slowly.
- Make sure the oven has its own 20 amp circuit line. Operating another appliance on the same circuit can cause a voltage drop. If necessary, move the oven to its own circuit
Has sparks or arcing.
- Remove any metallic utensils, cookware, or metal ties. If using foil, use only narrow strips and allow at least one inch between the foil and the interior oven walls.
The turntable makes noise or becomes stuck.
- Clean the turntable, roller ring, and oven floor.
- Make sure the turntable and roller ring are positioned correctly.
Causes TV or radio interference.
- This is similar to interference caused by other small appliances, such as hair dryers. Move your microwave (or appliance) away from appliances, such as your TV or radio.
Operating noise is too loud.
- The MWO makes noise during operation. This is normal.
- If you hear an abnormal sound continuously, please contact the Samsung Call Center (1-800-SAMSUNG (726-7864)).
Difficult to replace Charcoal Filter.
- Please refer to the instructions for replacing the charcoal filter in the user’s manual.
Turntable rotates improperly.
- Make sure you have not put too much food on the turntable.
- If the food is too large or too heavy, the turntable may operate improperly
Smoke and bad smell when initial operating.
- This is a temporary condition caused by a new component heating for the first time. The smoke and smell will disappear completely after 10 minutes of operation. To remove the smell more quickly, put a Pyrex measuring cup with a half cup of water mixed with 2 tablespoons of lemon juice into the microwave oven, and then run the microwave on high for 1½ to 2 minutes.
ERROR CODE
The SE Error Message
- The “SE” message indicates a “Key Short” error. Check if one or more buttons is stuck in the “pressed” or “On” position. If that is not the case, turn off the microwave oven and try setting it again. If the SE error recurs, call your local SAMSUNG Customer Care Center.
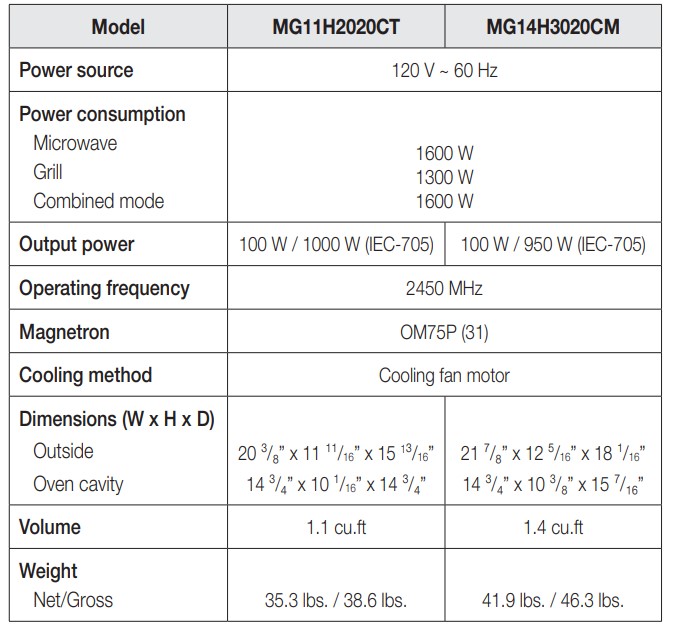
TECHNICAL SPECIFICATIONS
SAMSUNG strives to improve its products at all times. Both the design specifications and these user instructions are thus subject to change without notice.