Operating Instructions
Manuel d’utilisation
Manual De Operación
(Household)
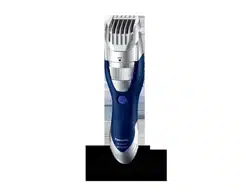
Rechargeable Beard/Hair Trimmer
(Utilisation domestique)
Tondeuse à barbe/cheveux rechargeable
(Uso doméstico)
Recortadora de cabello/barba recargable
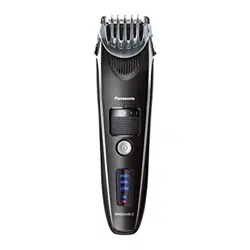
Model No. ER‑GB40
N° de modèle ER‑GB40
Modelo No. ER‑GB40
English 2
Français 11
Español 21
Before operating this unit, please read these instructions completely and save them for future use.
Avant d’utiliser ce produit, veuillez lire attentivement les instructions et conserver ce manuel pour un usage futur.
Antes de utilizar este producto, lea las instrucciones detenidamente y guarde este manual para uso futuro.

2
English
IMPORTANT SAFETY INSTRUCTIONS
When using an electrical appliance, basic
precautions should always be followed, including
the following:
Read all instructions before using this appliance.
DANGER
To reduce the risk of electric
shock:
1. Do not reach for an appliance that has fallen
into water. Unplug immediately.
2. Charger unit is not for immersion or for use in
shower.
3. Do not place or store appliance where it can fall
or be pulled into a tub or sink. Do not place in
or drop into water or other liquid.
4. Except when charging, always unplug this
appliance from the electrical outlet immediately
after using.
5. Unplug this appliance before cleaning.
6. Do not use an extension cord with this
appliance.
WARNING
To reduce the risk of burns, fire,
electric shock, or injury to persons:
1. Close supervision is necessary when this
appliance is used by, on, or near children or
invalids.
2. Use this appliance only for its intended use as
described in this manual. Do not use
attachments not recommended by the
manufacturer.
3. Never operate this appliance if it has a
damaged cord or plug, if it is not working
properly, if it has been dropped or damaged, or
dropped into water. Return the appliance to a
service center for examination and repair.
4. Keep the cord away from heated surfaces.
5. Never drop or insert any object into any
opening.
6. Do not use outdoors or operate where aerosol
(spray) products are being used or where
oxygen is being administered.
7. Do not use this appliance with a damaged or
broken comb, as it has the potential to result in
facial injury.
8. Always attach plug to appliance first, then to
outlet. To disconnect, turn all controls to “off”
then remove plug from outlet.
SAVE THESE INSTRUCTIONS
3
English
Thank you for choosing a Panasonic trimmer. Please read
all instructions before use.
Important
This trimmer has a built‑in rechargeable battery. Do not throw into
fire, apply heat, or charge, use, or leave in a high temperature
environment.
►Before use
This WET/DRY trimmer can be used for wet trimming or for dry
trimming. You can use this watertight trimmer in the shower and
clean with water. The following symbol means suitable for use in
a bath or shower.
►Using the trimmer
•Check that the blades are not damaged or deformed before
use.
•Terminate usage when there is an abnormality or failure.
•Turn off the appliance before changing the trimming length or
removing the comb attachment.
•Before and after each use, apply oil at the places marked with
arrows. (See page 9.)
•The appliance should not be used on animals.
•Do not press the blade against the skin.
•Do not use the trimmer for any purpose other than trimming.
•This appliance is not intended for use by persons (including
children) with reduced physical, sensory or mental capabilities,
or lack of experience and knowledge, unless they have been
given supervision or instruction concerning use of the
appliance by a person responsible for their safety. Children
should be supervised to ensure that they do not play with the
appliance.
►Charging the trimmer
•Never use the AC adaptor in the bathroom or shower room.
•Use the dedicated AC adaptor (RE7‑70) only. Do not use the
dedicated AC adaptor to charge other appliances.
•Charge the appliance in a location where it will not be exposed
to direct sunlight or other heat sources, at temperatures of
0 °C (32 °F) to 35 °C (95 °F).
•Plug in the AC adaptor into a household outlet where there is
no moisture and handle it with dry hands.
•The trimmer may become warm during use and charging.
However, this is not a malfunction.
•Hold the plug when disconnecting it from the household outlet.
If you tug on the power cord, you may damage it.
•Do not use the trimmer if the power cord or the AC adaptor is
worn, or if the plug does not fit snugly in the outlet.
•Do not damage or deform the power cord. Do not place heavy
objects on the power cord or trap it between objects.
•The supply cord cannot be replaced. If the cord is damaged,
the AC adaptor should be scrapped.
►Cleaning the trimmer
Warning
Disconnect the AC adaptor from the household outlet
before cleaning to prevent electric shock.
•The trimmer housing should not be taken apart as this can
affect the watertight construction of the appliance.
•If you clean the trimmer with water, do not use salt water or
hot water. Do not soak the trimmer in water for a long period of
time.
4
English
•Clean the housing only with a soft cloth slightly dampened
with tap water or soapy tap water. Do not use thinner, benzine,
alcohol or other chemicals.
•Do not wash the AC adaptor with water.
•Clean the power plug regularly to remove any dust or dirt.
►Storing the trimmer
•Store the trimmer in a place with low humidity after use.
•Do not store the trimmer where it will be exposed to direct
sunlight or other heat sources.
•Remove the trimmer from the AC adaptor when storing it.
•Do not bend the power cord or wrap it around the AC adaptor.
•Store the AC adaptor in a dry area where it is protected from
damage.
•Keep the oil away from children.
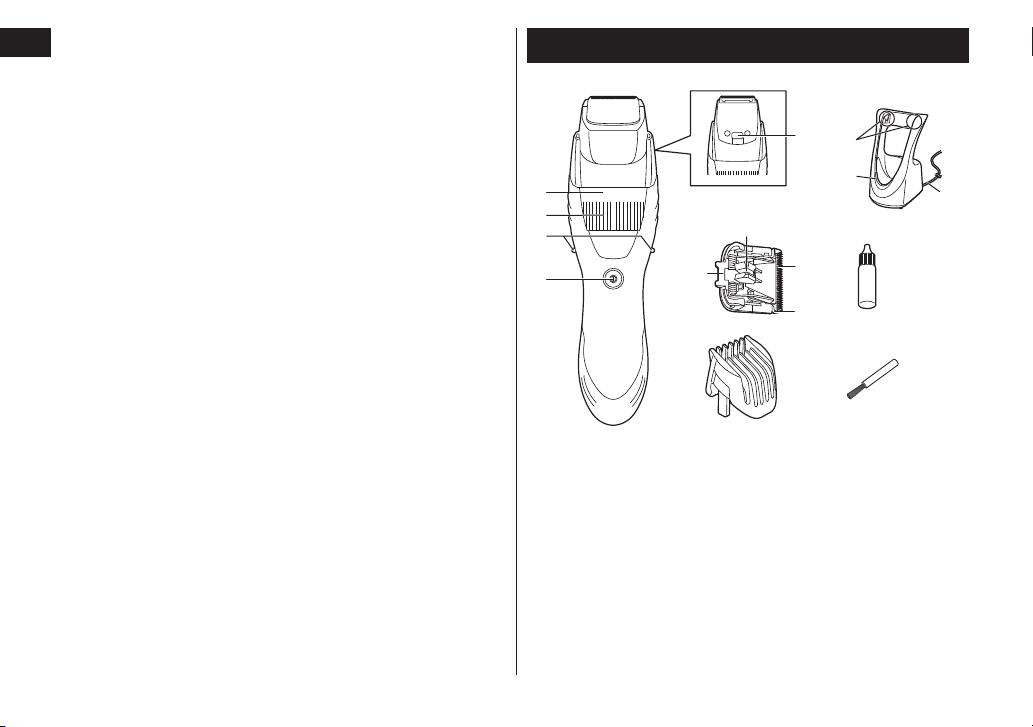
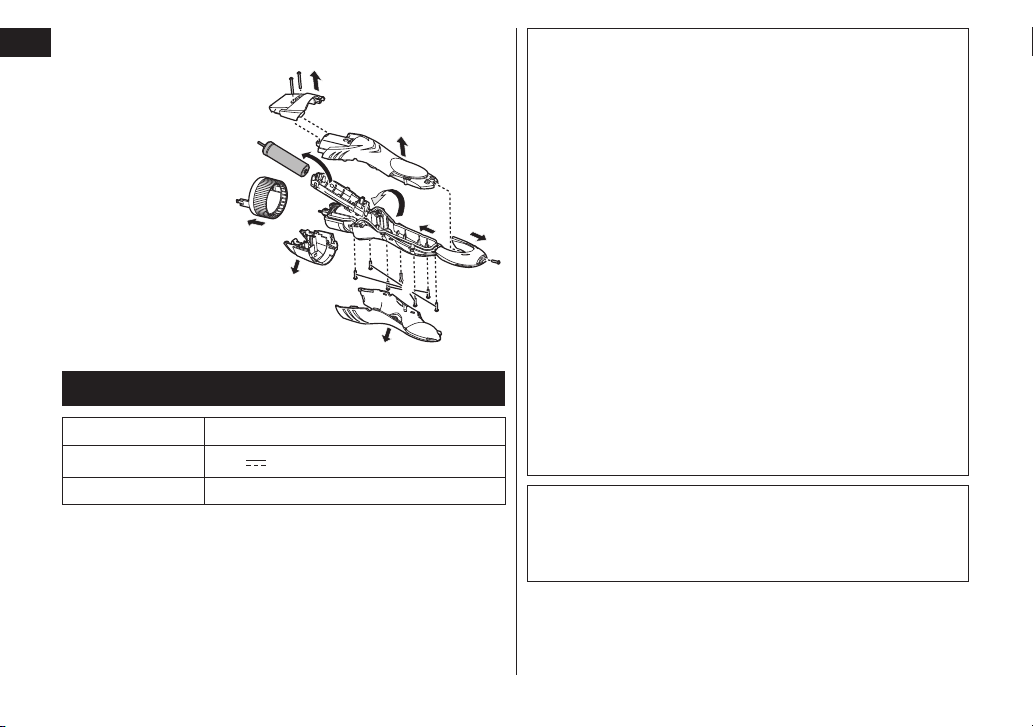
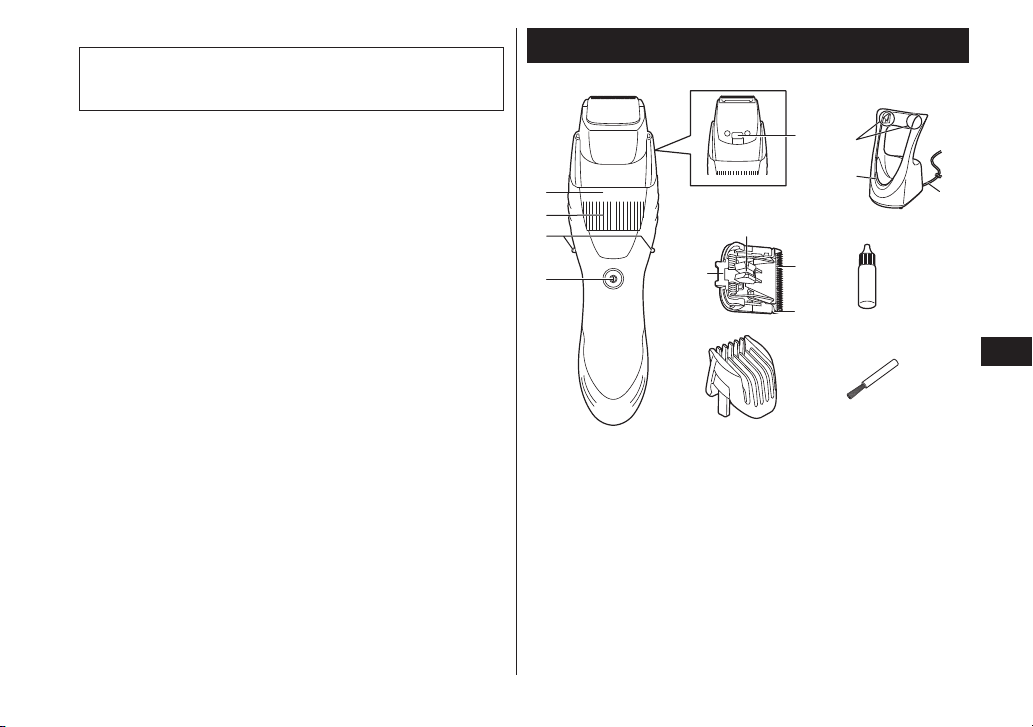
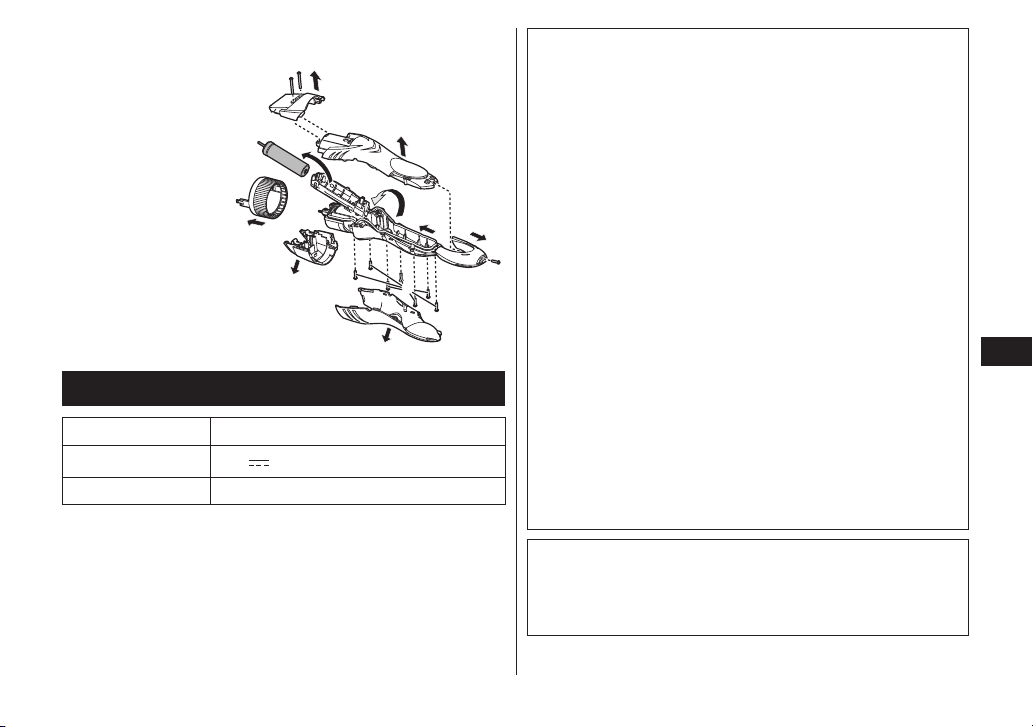
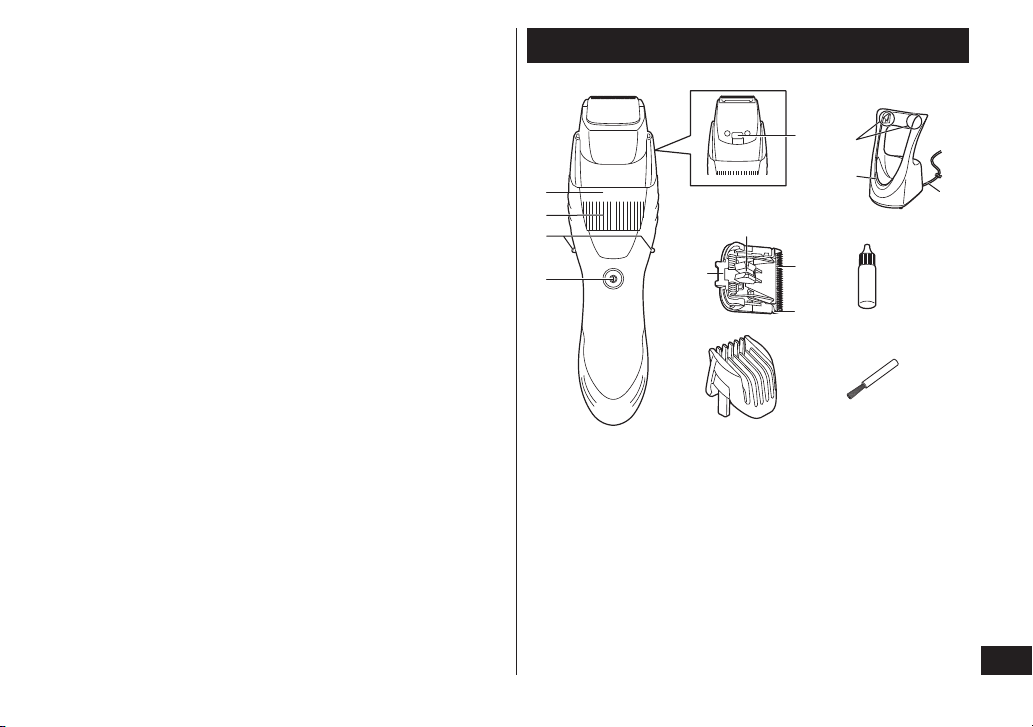
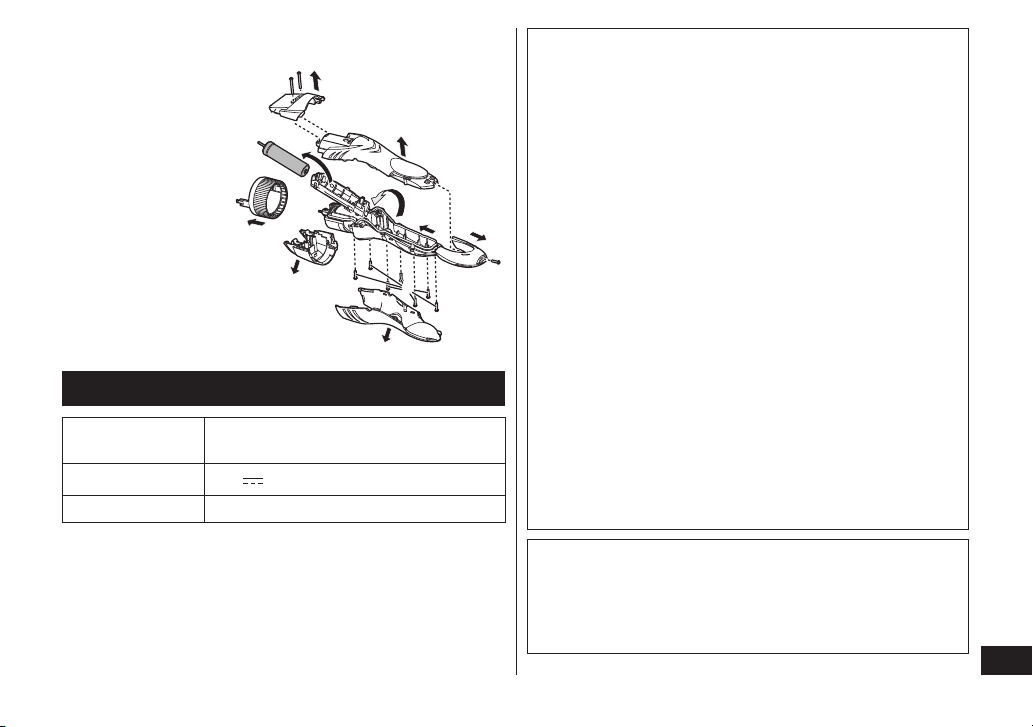
Parts identification
A Main body
1 Trimming height indicator
2 Dial (Height adjustment
control)
3 Side terminals
4 Power switch
5 Water inlet
B Blade assembly
6 Cleaning lever
7 Moving blade
8 Stationary blade
9 Mounting hook
C Comb attachment
(1 mm (1/32˝) to 10 mm (13/32˝))
D AC adaptor (RE7‑70)
Charging terminals
Charge indicator lamp
Power cord
E Oil
F Cleaning brush
5
English
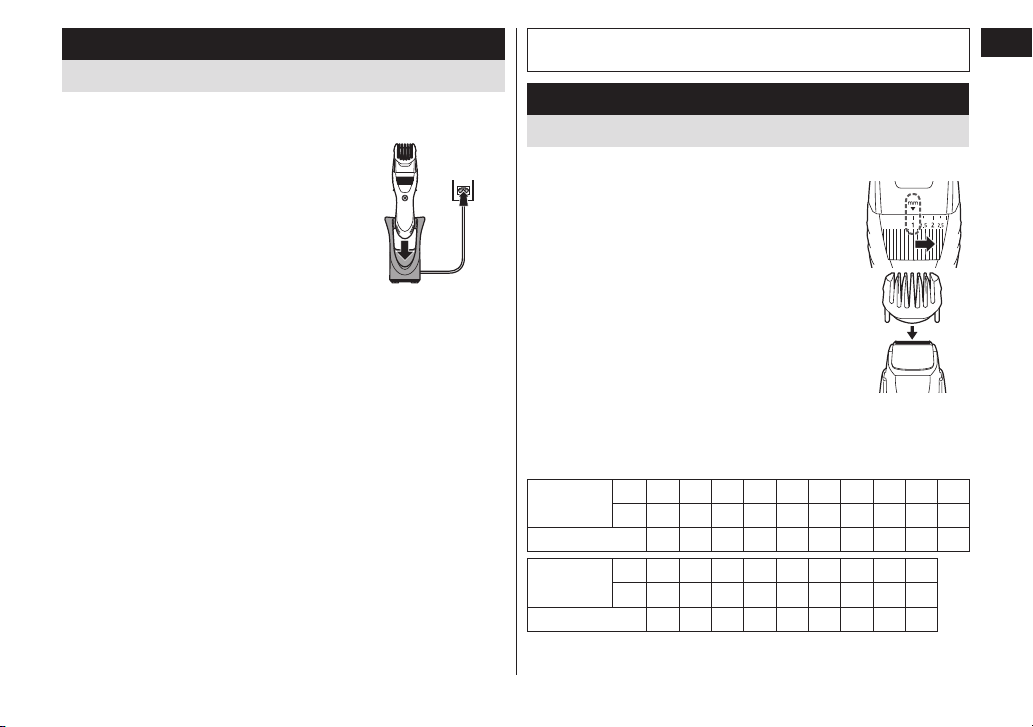
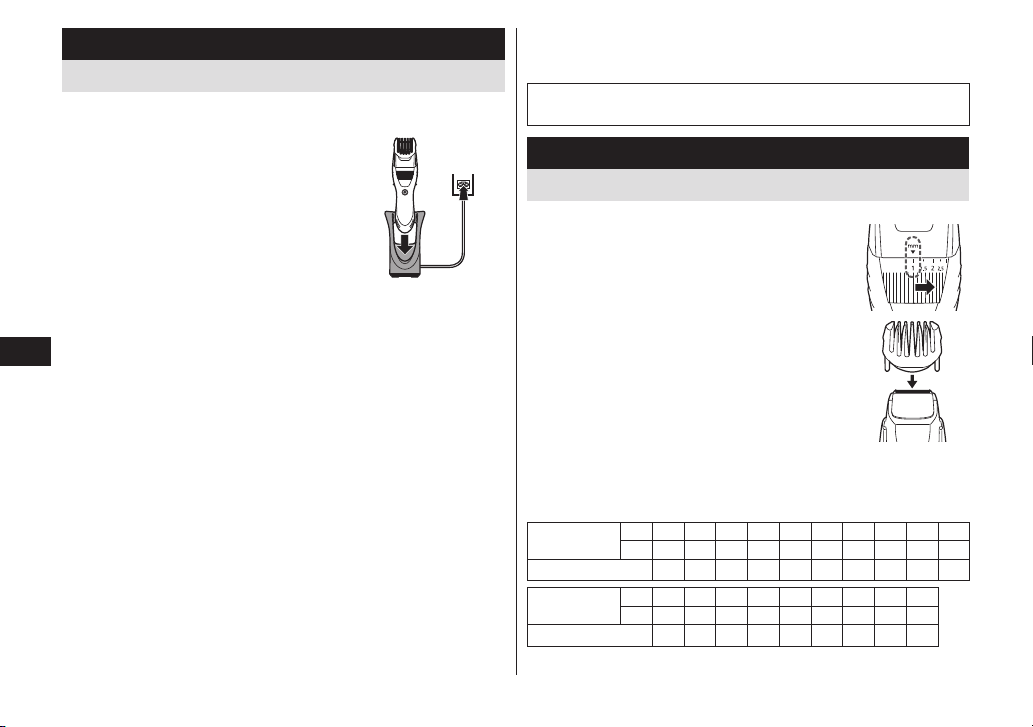
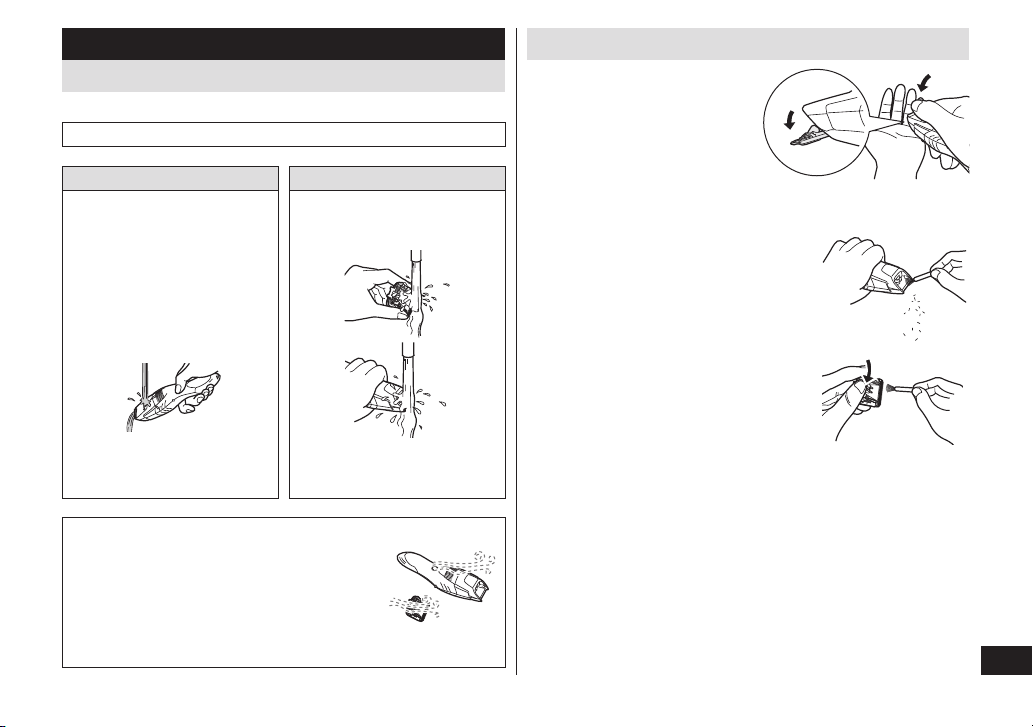
Charge
Charging the trimmer
Perform the following steps to charge the trimmer if it seems to
lose speed.
1
1
Turn off the trimmer and insert
it in the AC adaptor until it
clicks as illustrated.
•The trimmer will not charge unless the
side terminals are in contact with the
charging terminals.
•Wipe off any water droplets on the side
terminals.
•If you charge the trimmer with power
switch turned on, it will start working when
you remove from the AC adaptor.
2
1
2
2
Put the plug into a household outlet.
The charge indicator lamp glows red.
•Charging is completed after approx. 15 hours.
•When charging the trimmer for the first time or when it has not
been in use for more than 6 months, the charge indicator lamp
may not glow for a few minutes, or the operating time may
shorten. Please charge it for more than 23 hours in such cases.
3
3
Disconnect the plug after charging is
completed.
•To keep charging the battery will not affect battery performance.
•Recommended ambient temperature for charging is 0 ‑ 35 °C
(32 ‑ 95 °F). The battery may not charge properly or not at all
under extreme low or high temperatures.
•The charge indicator lamp glows and stays on until the plug is
disconnected from a household outlet.
•
A full charge supplies enough power for approximately 50 minutes of use.
Note:
You cannot operate the trimmer while charging.
Use
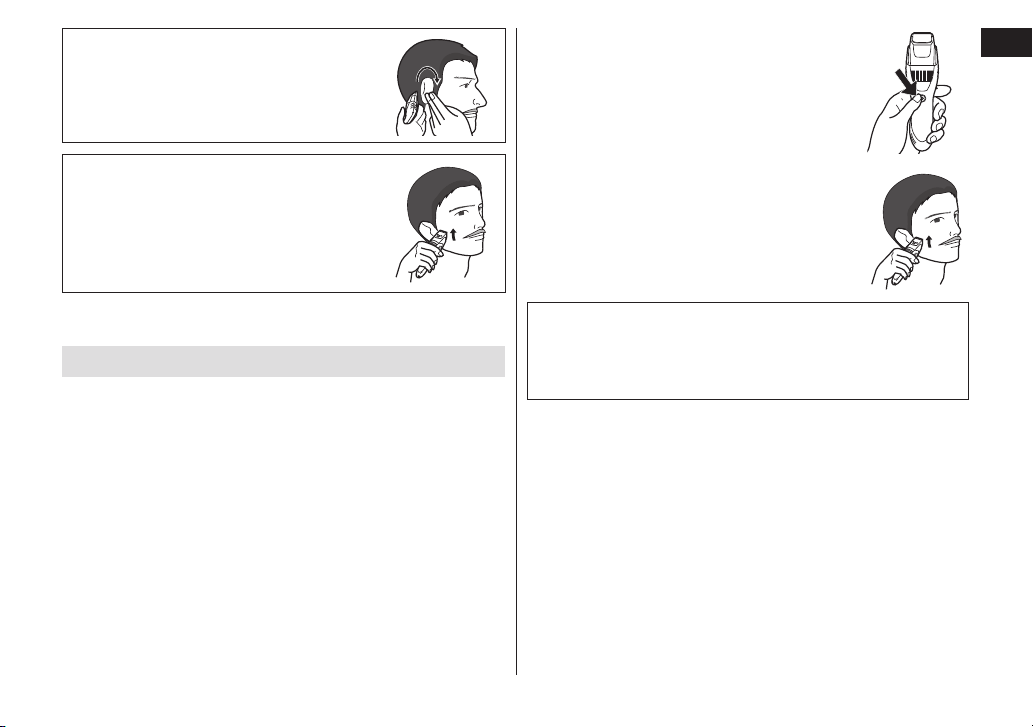
Using the comb attachment
Make sure that the trimmer is turned off.
1
1
Turn the dial to the “1” position.
2
2
Mount the comb attachment to the
main body until it clicks.
3
3
Turn the dial to move the comb attachment to
the desired trimming length
(between 1 mm (1/32˝ ) to 10 mm (13/32˝ )).
Trimming length
(estimate)
mm
1 1.5 2 2.5 3 3.5 4 4.5 5 5.5
inch
1/32 1/16 5/64 3/32 1/8 9/64 5/32
11/64
3/16 7/32
Indicator
1 1.5 2 2.5 3 3.5 4 4.5 5 5.5
Trimming length
(estimate)
mm
6 6.5 7 7.5 8 8.5 9 9.5 10
inch
15/64
1/4 9/32
19/64
5/16
11/32 23/64
3/8
13/32
Indicator
6 6.5 7 7.5 8 8.5 9 9.5 10
•Actual hair length will be a little longer than the height you set.

6
English
Use
Using the trimmer
Make sure there is no damage to the blade.
We recommend using the trimmer in an ambient temperature
range of 0 ‑ 35 °C (32 ‑ 95 °F). If used outside this range, the
appliance may stop operating.
Dry trimming
►Trimming with the comb attachment
Do not use with shaving creams applied or when the beard is wet.
1
1
Press the power switch to turn off the trimmer.
2
2
Mount the attachment and adjust the dial.
(See page 5.)
3
3
Press the power switch to turn on
the trimmer.
4
4
Hold the trimmer with the power
switch facing downward, and cut
the beard by moving the trimmer
back against the flow of the beard.
•Hair trimmings may collect inside the
attachment when a large volume of beard
is cut, so discard hair trimmings after each
use.
►Trimming without the comb attachment
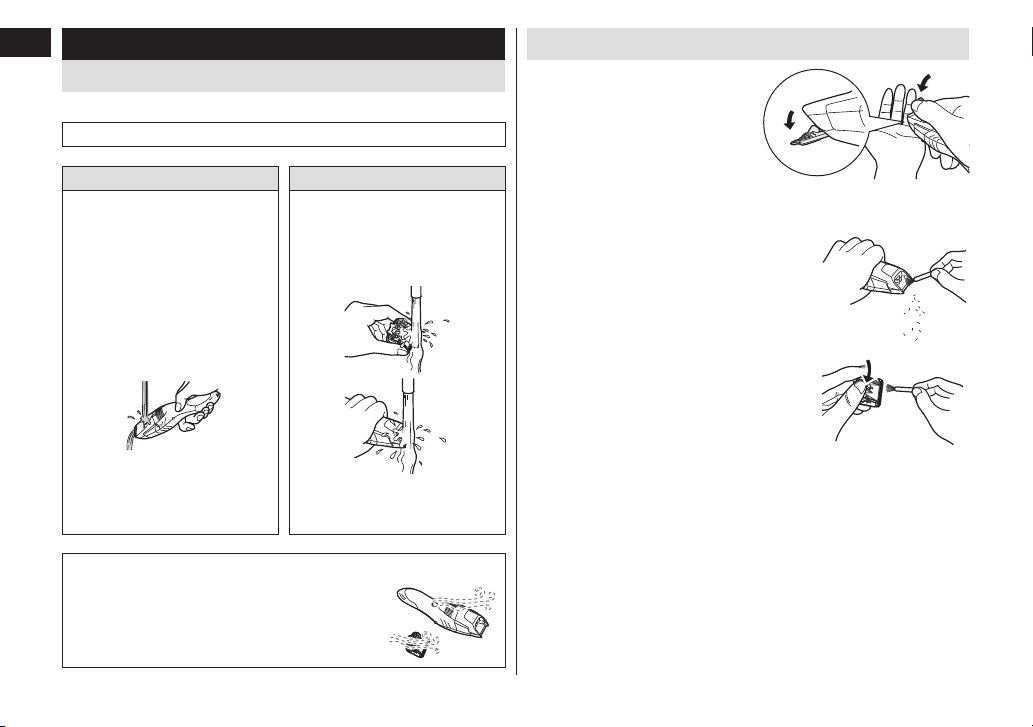
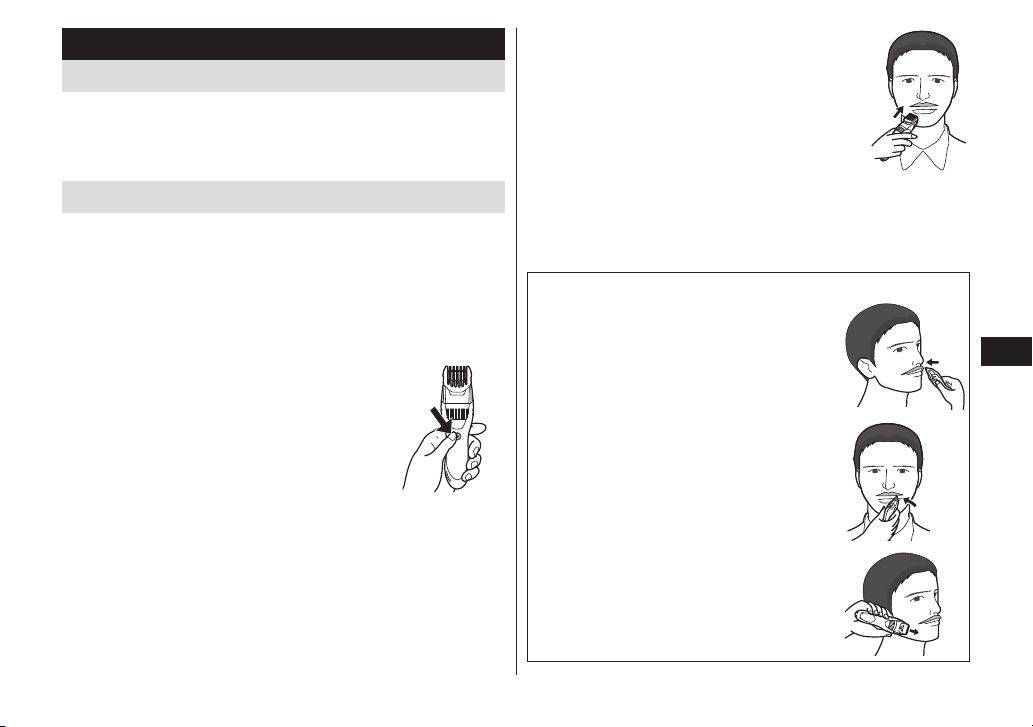
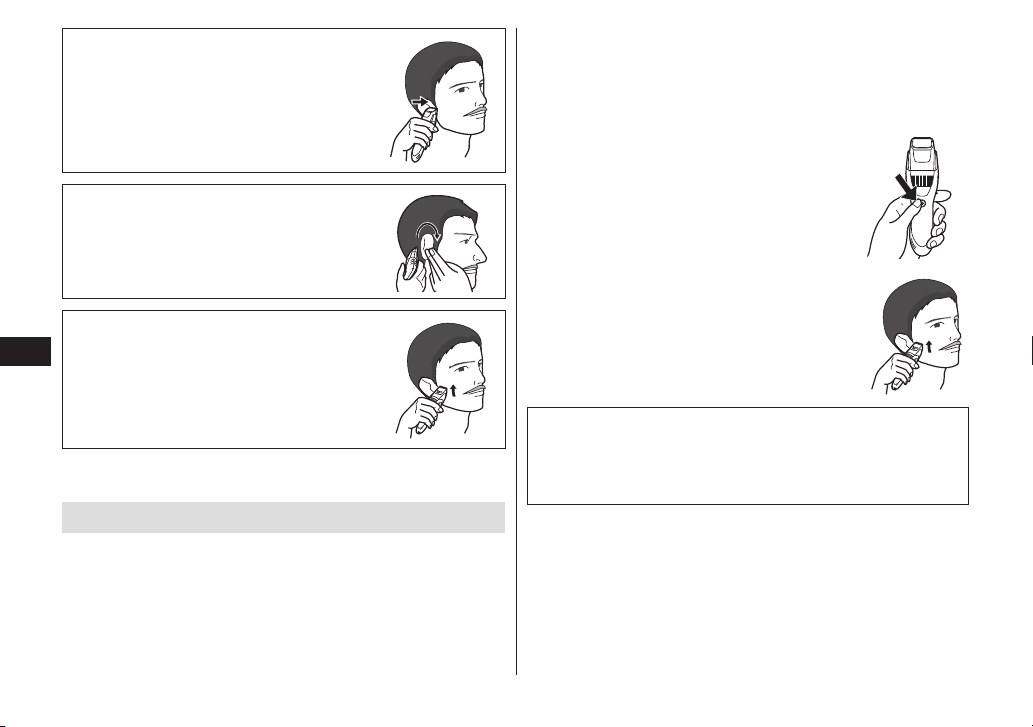
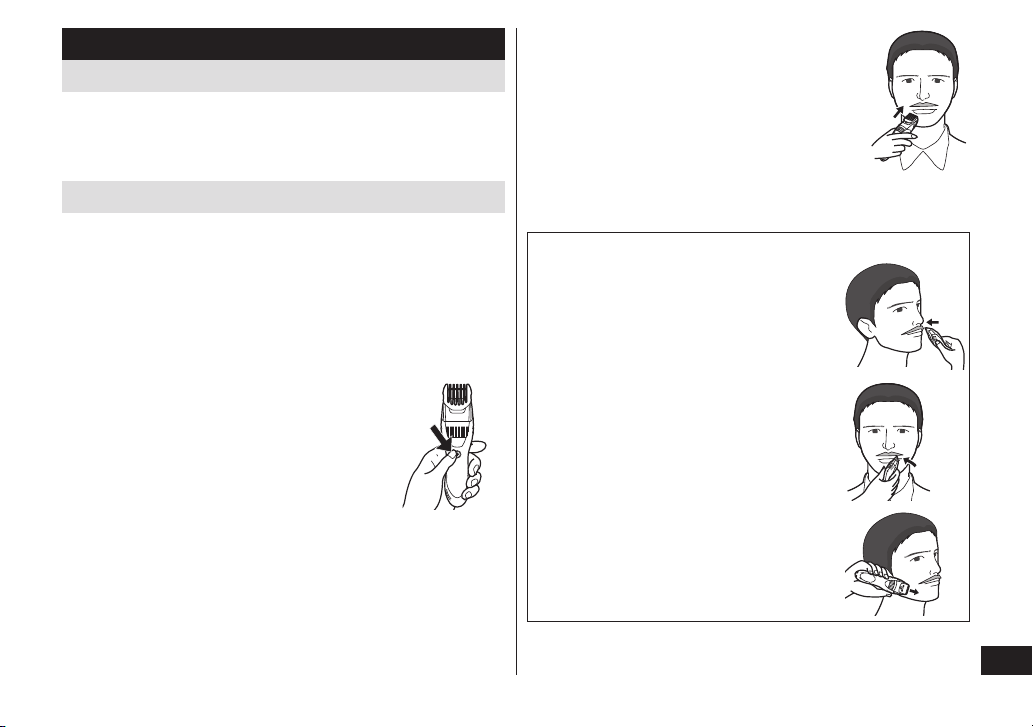
Shaping your moustache
■ Above the lips
Place the trimmer at a right angle to your
skin with the power switch facing upwards
and trim around your moustache.
To round out the shape, trim around your
moustache by holding the main body
sideways.
■ Trimming the edge of beard
Cut your beard gradually with the power
switch facing your skin, taking care not to
cut too much.
Shaping your sideburns
Place the trimmer at a right angle to your skin
and cut your sideburns.
7
English
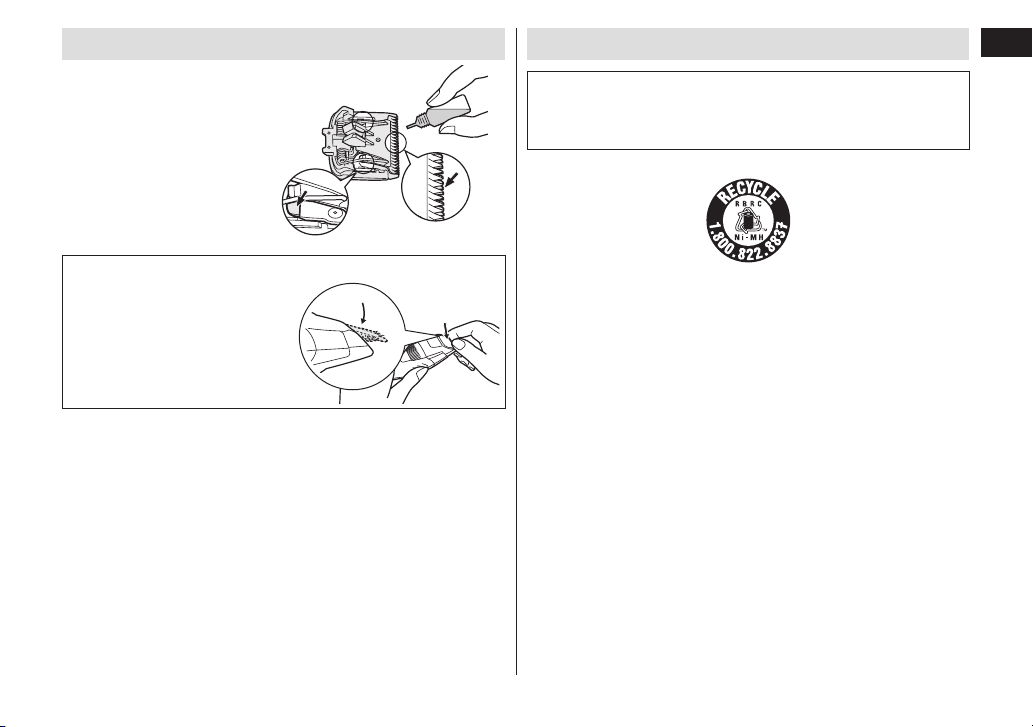
3
3
Press the power switch to turn on
the trimmer.
4
4
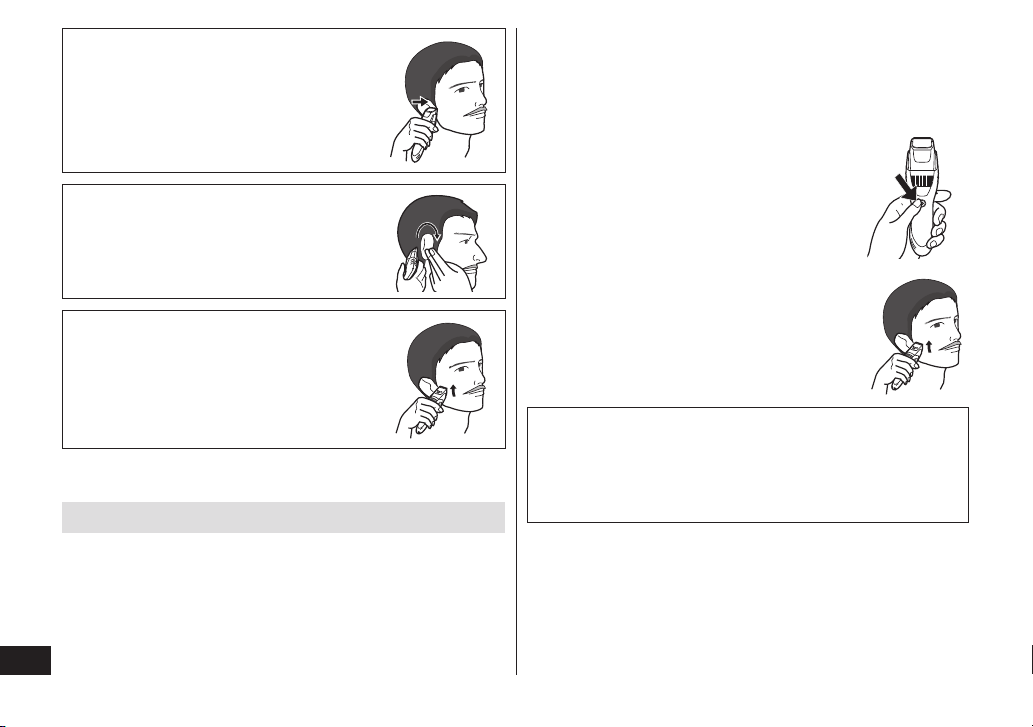
Cut your beard slowly, moving
upward from the bottom with the
power switch facing your skin.
Notes
•Do not use any shaving creams as these may cause a
decrease in cutting performance due to scoring of the blades.
•Make sure to rinse the main body with water and apply the oil
to the blades after wet trimming.
Shaping the hair around your ears
Trim the hair around your ears by holding the
main body sideways.
Cutting your vellus hair
Cut your vellus hair slowly, moving upward
from the bottom with the power switch facing
your skin.
•Trimming your beard or moustache without an attachment will
trim hair length to approx. 0.5 mm (1/64˝).
Wet trimming
►Trimming without the comb attachment
Cut your beard or vellus hair with water or face‑wash cleanser on
your face.
Wet trimming will decrease the friction, allowing a smooth touch.
Wet trimming is recommended to trim a fuller beard to a length of
0.5 mm (1/64˝) without an attachment.
1
1
Remove the comb attachment.
2
2
Apply water, soap, etc., to your face.
8
English
Clean
Cleaning the trimmer
It is recommended to clean at every use.
1. Remove the trimmer from the AC adaptor.
▼ ▼
To remove light dirt To remove heavy dirt
2. Remove the comb
attachment and turn the
trimmer on.
3. Run water down the water
inlet at the back of the main
body, rinse thoroughly for
approximately 20 seconds,
and then turn the trimmer
off.
•Rinse with water and
shake up and down
several times to remove
the water.
2.
Remove the comb attachment
and blade assembly.
3. Clean the trimmer and the
blade assembly with
running water.
•
Rinse with water and
shake up and down several
times to remove the water.
▼ ▼
4. Wipe off the water with a towel and let it
dry naturally.
•It will dry faster with the blade removed.
5. Apply the oil to the blade after drying.
6. Attach the comb attachment and blade
assembly to the trimmer.
4
Cleaning with the brush
1. Remove the trimmer from the
AC adaptor.
•Make sure that the trimmer is
turned off.
2. Remove the comb attachment.
3. Hold the main body, place your
thumb against the blade
assembly and then push it
away from the main body.
4. Brush off any hair trimmings from the
main body and from around the blade
assembly.
5. Brush any hair trimmings out from
between the stationary blade and the
moving blade while pressing down the
cleaning lever to raise the moving blade.
6. Apply the oil to the blade.
7. Attach the comb attachment and blade assembly to the trimmer.
9
English
Lubrication
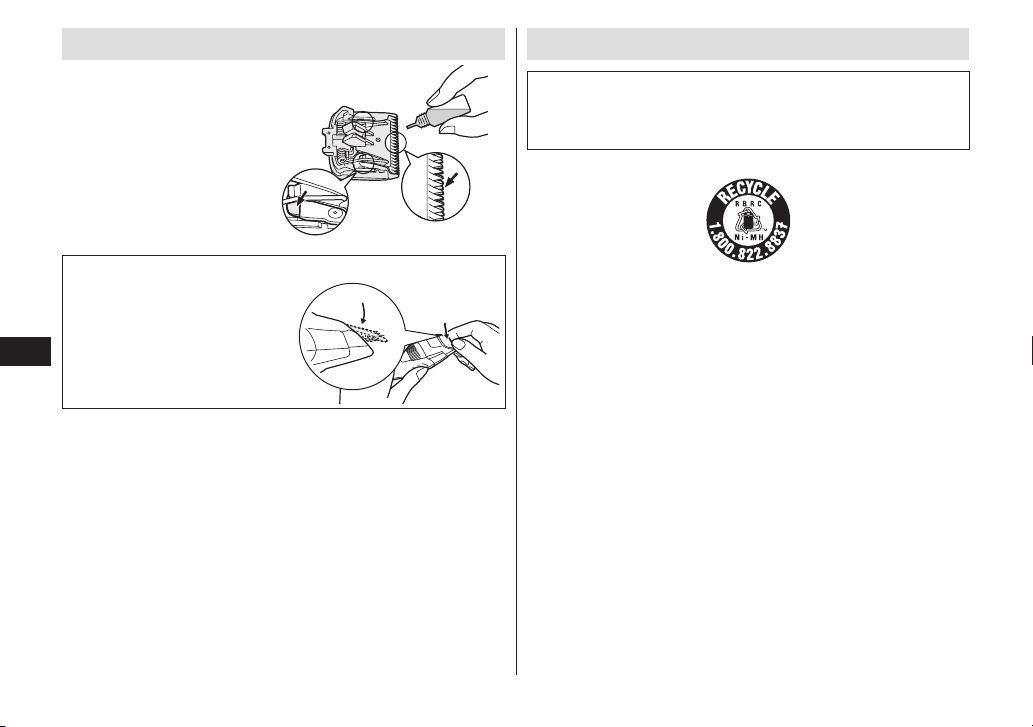
Apply the oil to the blade
assembly before and after each
use.
Apply a drop of the oil to the
points indicated by the arrows.
Remounting the blade assembly
Fit the mounting hook into the
blade mounting on the trimmer
and then push in until you hear
a click.
►Blade life
Blade life varies according to the frequency and length of use of
the trimmer.
For example, the blade life is approximately 3 years when using
the trimmer for 5 minutes 10 times a month. Replace the blade
assembly if cutting efficiency reduces substantially despite proper
maintenance.
►Battery life
Battery life will vary according to the frequency and length of use.
If the battery is charged once every 2 weeks, the service life will
be approximately 3 years.
•It is recommended that the trimmer be recharged at least every 6
months even when not in regular use because the charge will
drain from the battery and its service life may be shortened.
Removing the built-in rechargeable battery
ATTENTION:
A nickel metal hydride battery that is recyclable powers the
product you have purchased. Please call 1‑800‑8‑BATTERY for
information on how to recycle this battery.
Remove the built‑in rechargeable battery before disposing of the
trimmer. Do not dismantle or replace the battery so that you can
use the trimmer again. This could cause fire or an electric shock.
Please contact an authorised service center.
The battery replacing service is available only in the United States
of America.
•
Remove the trimmer from the AC adaptor when removing the battery.
10
English
•Perform steps 1 to and lift the battery, and then remove it.
•Please take care not to short‑circuit the battery.
Specifications
Power source See the name plate on the AC adaptor.
Motor voltage
1.2 V
Charging time Approx. 15 hours
This product is intended for household use only.
Federal Communication Commission Interference Statement
This equipment has been tested and found to comply with the
limits for a Class B digital device, pursuant to Part 15 of the FCC
Rules. These limits are designed to provide reasonable
protection against harmful interference in a residential
installation. This equipment generates, uses and can radiate
radio frequency energy and, if not installed and used in
accordance with the instructions, may cause harmful
interference to radio communications. However, there is no
guarantee that interference will not occur in a particular
installation. If this equipment does cause harmful interference to
radio or television reception, which can be determined by turning
the equipment off and on, the user is encouraged to try to
correct the interference by one of the following measures:
• Reorient or relocate the receiving antenna.
• Increase the separation between the equipment and receiver.
• Connect the equipment into an outlet on a circuit different from
that to which the receiver is connected.
• Consult the dealer or an experienced radio/TV technician for help.
FCC Caution: To assure continued compliance, install and use in
accordance with provided instructions. Any changes or
modifications not expressly approved by the party responsible
for compliance could void the user’s authority to operate this
equipment.
This device complies with part 15 of the FCC Rules. Operation is
subject to the following two conditions: (1) This device may not
cause harmful interference, and (2) this device must accept any
interference received, including interference that may cause
undesired operation.
FOR YOUR CONVENIENCE, WE HAVE ESTABLISHED A
TOLL-FREE (IN USA ONLY) NATIONAL ACCESSORY
PURCHASE HOT LINE AT 1-800-332-5368.
IN CANADA, CONTACT PANASONIC CANADA INC. AT THE
ADDRESS OR TELEPHONE NUMBER ON THE BACK PAGE.

11
Français
CONSIGNESDESÉCURITÉIMPORTANTES
Lorsdel’utilisationd’unappareilélectrique,ilfaut
toujoursprendredesprécautionsdebase,ycompris
lessuivantes:
Liseztouteslesinstructionsavantd’utilisercetappareil.
DANGER
Anderéduiretoutrisque
d’électrocution:
1.Netouchezpasunappareilquiesttombédans
l’eau.Débranchez-leimmédiatement.
2.N’immergeznin’utilisezlechargeurdansladouche.
3.Neplacezninerangezl’appareillàoùilpeuttomber
ouêtreprécipitédansunebaignoireouunévier.Ne
déposezoun’échappezpasdansl’eauoudansun
autreliquide.
4.Débrancheztoujourscetappareildelaprise
électriqueimmédiatementaprèsusage,excepté
pendantlacharge.
5.Débranchezcetappareilavantdelenettoyer.
6.N’employezpasderallongeaveccetappareil.
MISESENGARDE
Anderéduirelerisquedebrûlures,d’incendie,
d’électrocutionoudeblessurescorporelles:
1.Unegrandevigilanceestnécessairelorsquecet
appareilestutilisépardesenfantsoudespersonnes
handicapées,sureuxouenleurprésence.
2.Utilisezcetappareiluniquementpoursonusage
prévu,commeledécritleprésentmanuel.N’utilisez
pasd’accessoiresquinesontpasrecommandéspar
lefabricant.
3.N’utilisezjamaiscetappareilsilecordonoulache
estendommagé,s’ilnefonctionnepascorrectement,
s’ilesttombé,endommagéoutombédansl’eau.
Retournezl’appareilàuncentrederéparationpour
lefaireinspecteretréparer.
4.Gardezlecordonàdistancedessurfaceschauffées.
5.Nefaitesjamaistomberoun’insérezpasunobjet
danslesouverturesdel’appareil.
6.N’utilisezpasàl’extérieur,dansdesendroitsoùdes
aérosols(pulvérisateurs)sontutilisésoulàoùde
l’oxygèneestadministré.
7.N’utilisezpascerasoiravecunpeigneendommagé
oucassé,carilpourraitprovoquerdesblessuresau
visage.
8.Brancheztoujourslacheàl’appareilenpremier,
puispourdébrancher,commuteztoutesles
commandessur“arrêt”.
CONSERVEZLESPRÉSENTESINSTRUCTIONS

12
Français
Mercid’avoirchoisiunetondeusePanasonic.Veuillezliretoutes
lesinstructionsavantdel’utiliser.
Important
Cettetondeuseestéquipéed’unebatterierechargeableintégrée.Nepas
jeteraufeu,chauffer,oucharger,utiliser,oulaisserdansunendroitoùla
températureambianteestélevée.
►
Avantl’utilisation
CettetondeuseHUMIDE/ÀSECpeutêtreutiliséepourunecoupe
humideouàsec.Vouspouvezutilisercettetondeuseétanchesousla
doucheetlarincersousl’eau.Lesymbolesuivantindiquequ’ellepeut
êtreutiliséesousladoucheoudanslebain.
►
Utilisationdelatondeuse
•
Vériezquelalamen’estpasendommagéenidéforméeavant
utilisation.
•
Cessezl’utilisations’ilyauneanomalieouunepanne.
•
Éteignezl’appareilavantdechangerlalongueurdecoupeoupour
retirerlaxationdupeigne.
•
Avantetaprèschaqueutilisation,appliquezdel’huileauxendroits
indiquéspardesèches.(Voirpage18.)
•
L’appareilnedoitpasêtreutilisésurdesanimaux.
•
N’appuyezpaslalamecontrelapeau.
•
Neutilisezpaslatondeusedansunbutautrequepourlacoupe.
•
Cetappareiln’apasétéconçupourêtreutilisépardespersonnes
(enfantsycompris)souffrantd’unhandicapphysique,sensorielou
mental,ounedisposantpasdel’expérienceetdesconnaissances
nécessairesàuneutilisationsûre,àmoinsqu’ellesaientreçutoutes
lesconsignesrequisesparlapersonneresponsabledeleursécurité
quantàl’utilisationdel’appareil.Nepaslaisserunenfantjoueravec
latondeuse.
►
Rechargedelatondeuse
•
N’utilisezjamaisl’adaptateurCAdanslasalledebainousousla
douche.
•
Utilisezuniquementl’adaptateurCAdédié(RE7-70).N’utilisezpas
l’adaptateurCAdédiépourchargerd’autresappareils.
•
Nechargezpasl’appareildansunendroitexposéàlalumièredirecte
dusoleiloud’unesourcedechaleur,àdestempératurescomprises
entre0°C(32°F)et35°C(95°F).
•
Branchezl’adaptateurCAsuruneprisesecteurneprésentantpas
d’humiditéetmanipulez-leavecdesmainssèches.
•
Latondeusepeutchaufferencoursdefonctionnementetde
chargement.Ilnes’agittoutefoispasd’uneanomalie.
•
Tenezlachelorsquevousladébranchezdelaprisesecteur.Si
voustirezsurlecordond’alimentation,vousrisquezde
l’endommager.
•
N’utilisezpaslatondeusesilecordond’alimentationoul’adaptateur
CAestuséousilachenes’adaptepasparfaitementdanslaprise.
•
N’endommagezpasnidéformerlecordond’alimentation.Nepas
placerd’objetslourdssurlecordond’alimentationnilecoincerentre
desobjets.
•
Lecordond’alimentationnepeutpasêtreremplacé.S’ilest
endommagé,l’adaptateurCAdoitêtremisaurebut.
13
Français
►
Nettoyagedelatondeuse
Attention
Débranchezlachedelaprisesecteuravantlenettoyagepour
évitertoutchocélectrique.
•
L’appareilnedoitjamaisêtredémontécarcelaaffecteraitl’étanchéité
delaconstructiondel’appareil.
•
Encasdenettoyageàl’eau,nepasutiliserd’eausaléeoud’eau
chaude.Nepasimmergerlatondeusependantunepériode
prolongée.
•
Nettoyezleboîtieruniquementavecuntissuimbibéd’eaucourante
oud’eaucourantesavonneuse.Nepasutiliserdesolvant,d’essence,
d’alcooloud’autresproduitschimiques.
•
N’utilisezpasd’eaupourlaverl’adaptateurCA.
•
Nettoyezrégulièrementlaprisedecourantpourretirerlapoussière
oulasaleté.
►
Rangementdelatondeuse
•
Aprèsutilisation,rangezlatondeusedansunendroitsec.
•
Nerangezpasl’appareildansunendroitexposéàlalumièredirecte
dusoleilouprèsd’autressourcesdechaleur.
•
Enlevezlatondeusedel’adaptateurCAlorsdurangement.
•
Nepliezpaslecordond’alimentationetnel’enroulezpasautourde
l’adaptateurCA.
•
Rangezl’adaptateursecteurdansunendroitsecoùilestprotégéde
toutdommage.
•
Tenezl’huilehorsdeportéedesenfants.
Identicationdespièces
A
Boîtier
1
Indicateurdelahauteurde
coupe
2
Molettederéglagedela
hauteurdecoupe
3
Pointsdecontactlatéraux
4
Boutondemiseenmarche
5
Entréed’eau
B
Lame
6
Levierdenettoyage
7
Lameamovible
8
Lamexe
9
Crochetdemontage
C
Peigne
(1mm(1/32po)à10mm(13/32po))
D
AdaptateurCA(RE7-70)
Bornesdechargement
Témoindecharge
Cordond’alimentation
E
Huile
F
Brossedenettoyage
14
Français
Chargement
Rechargedelatondeuse
Suivezlesétapessuivantespourchargerlatondeusesiellesemble
perdredelavitesse.
1
1
Mettezlatondeusehorsmarche
etplacez-lasurl’adaptateurCA
delafaçonindiquéeetjusqu’àce
qu’unclicsefasseentendre.
•
Latondeusenesechargerapasavantqueles
pointsdecontactlatérauxsoientencontact
aveclesbornesdechargement.
•
Essuyez,sinécessaire,toutesgouttesd’eau
situéessurlespointsdecontactlatéraux.
•
Sivousrechargezlatondeuseaveclebouton
demiseenmarchepositionnésurON,celle-ci
vafonctionnerdenouveaudèsquevousla
débrancherezdel’adaptateurCA.
2
1
2
2
Insérezlachedansuneprisesecteur.
Letémoinlumineuxdecharges’allumeenrouge.
•
Larechargeestterminéeaprèsenviron15heures.
•
Lorsquevouschargezlatondeusepourlapremièrefoisousiellen’apasété
utiliséependantplusde6mois,letémoindechargerisquedenepass’allumer
pendantquelquesminutes,etladuréedefonctionnementpourraitêtreréduite.
Veuillezchargerlatondeusependantplusde23heuresdansuntelcas.
3
3
Débranchezlacheunefoislarechargeterminée.
•
Laisserchargerlabatterieau-delàdutempsdechargeindicatif
n’affecterapaslesperformancesdecelle-ci.
•
Latempératureambianterecommandéepourlachargeestde0–35°C
(32-95°F).Lesperformancesdelabatteriepeuventsedégraderoula
batterierisquedenepassechargerencasdetempératures
extrêmementbassesouélevées.
•
Letémoinlumineuxdecharges’allumeetrestealluméjusqu’àcequela
chesoitretiréedelaprisesecteur.
•
Unerechargecomplètefournitassezd’énergiepourenviron50minutesutilisation.
Nota:
Vousnepouvezpasutiliserlatondeuselorsqu’elleestencoursdechargement.
Utilisation
Utilisationdupeigne
Vériezquelatondeuseesthorsmarche.
1
1
Tournezlamolettederéglagesurla
position«1».
2
2
Montezlepeignesurleboîtierde
l’appareiljusqu’àcequ’unclicse
fasseentendre.
3
3
Tournezlamolettepourdéplacerlepeignejusqu’àla
longueurdecoupesouhaitée(entre1mm(1/32po)
et10mm(13/32po)).
Longueurdetaille
(estimation)
mm
1 1,5 2 2,5 3 3,5 4 4,5 5 5,5
po
1/32 1/16 5/64 3/32 1/8 9/64 5/32
11/64
3/16 7/32
Indicateur
1 1.5 2 2.5 3 3.5 4 4.5 5 5.5
Longueurdetaille
(estimation)
mm
6 6,5 7 7,5 8 8,5 9 9,5 10
po
15/64
1/4 9/32
19/64
5/16
11/32
23/64
3/8
13/32
Indicateur
6 6.5 7 7.5 8 8.5 9 9.5 10
•
Lalongueurducheveuseraunpeupluslonguequelahauteursélectionnée.
15
Français
Utilisation
Utilisationdelatondeuse
S’assurerquelalamen’estpasendommagée.
Nousconseillonsd’utiliserlatondeuseàunetempératureambiante
compriseentre0°C(32°F)et35°C(95°F).Endehorsdecetteplage,
ellerisquedeneplusfonctionner.
Coupeàsec
►
Pourtailleràl’aidedupeigne
Nepasutiliseravecdelamousseàraseroulorsquelabarbeesthumide.
1
1
Appuyezsurleboutondemiseenmarchepour
mettrelatondeusehorsmarche.
2
2
Montezl’accessoireetajusterlamolettederéglage.
(Voirpage14.)
3
3
Appuyezsurleboutondemiseen
marchepourmettrelatondeuseen
marche.
4
4
Maintenezlatondeuseaveclebouton
demiseenmarchefaceverslebas,et
coupezlabarbeendéplaçantla
tondeuseàcontresensdupoildela
barbe.
•
Despoilsdebarbepeuvents’accumulerà
l’intérieurdupeignelorsquequ’unebarbe
volumineuseestcoupée.Éliminezdonctousles
poilsdebarbedupeigneaprèschaque
utilisation.
►
Pourtaillersanslepeigne
Pourmodelervotremoustache
■
Audessusdeslèvres
Placezlatondeuseperpendiculairementà
votrepeauavecleboutondemiseenmarche
faceverslehautettaillezautourdevotre
moustache.
Pourarrondirlaforme,taillezautourdevotre
moustacheenmaintenantperpendiculairement
leboîtierdel’appareil.
■
Pourtaillerlesbordsdelabarbe
Taillezgraduellementvotrebarbeavecle
boutondemiseenmarchefaceàvotrepeau,
enprenantgardedenepastropraser.
16
Français
1
1
Retirezlepeigneduboîtierdelatondeuse.
2
2
Appliquezdel’eau,dusavon,etc.survotrevisage.
3
3
Appuyezsurleboutondemiseen
marchepourmettrelatondeuseen
marche.
4
4
Taillezlentementvotrebarbe,en
déplaçantl’appareildebasenhaut,
avecleboutondemiseenmarcheface
àvotrepeau.
Remarques
•
N’utilisezpasdelamousseàraser,carcecipourraitdiminuerles
performancesdecoupe.
•
Veillezàrinceravecdel’eauleboîtierdel’appareiletàappliquerde
l’huilesurlalameaprèsunrasageavecdel’eau.
Pourmodelervosfavoris
Placezlatondeuseperpendiculairementàvotre
peauettaillezvosfavoris.
Pourmodelerlespoilsautourdesoreilles
Taillezlespoilsautourdevosoreillesenmaintenant
perpendiculairementleboîtierdel’appareil.
Pourtaillerlespoilsns
Taillezlentementlespoilsns,endéplaçant
l’appareildebasenhaut,avecleboutondemise
enmarchefaceàvotrepeau.
•
Taillervotrebarbeouvotremoustachesansaccessoirepermettrade
couperlepoilàunelongueurd’environ0,5mm(1/64po).
Rasageavecdel’eau
►
Pourtaillersanslepeigne
Taillezvotrebarbeoulespoilsnssurpeaumouilléeouavecunproduit
nettoyantsurvotrevisage.
Lerasageavecdel’eauréduitlesfrottementspourunecoupeendouceur.
Lerasageavecdel’eauestrecommandépourcouperunebarbe
complèteàunelongueurde0,5mm(1/64po)sansaccessoire.
17
Français
Entretien
Nettoyagedelatondeuse
Unnettoyageestrecommandéaprèschaqueutilisationdel’appareil.
1. Retirezlatondeusedel’adaptateurCA.
▼ ▼
Pourenleverlespetitessaletés Pourlesgrossessaletés
2. Retirezlepeigneetmettezla
tondeuseenmarche.
3. Faitescoulerdel’eaupar
l’entréed’eausituéeàl’arrière
duboîtierdel’appareil,rincez
soigneusementpendant
environ20secondes,puis
mettezlatondeusehors
marche.
•
Rincezavecdel’eauet
secouezplusieursfoispour
enleverl’eau.
2. Retirezlepeigneetlalame.
3. Nettoyezlatondeuseetla
lameàl’eaucourante.
•
Rincezavecdel’eauet
secouezplusieursfoispour
enleverl’eau.
▼ ▼
4. Essuyezl’eauàl’aided’uneserviette,puis
laissezséchernaturellement.
•
L’appareilvasécherplusvitesilalameest
enlevée.
5. Appliquezquelquesgouttesd’huilesurla
lameunefoissèche.
6. Fixezlepeigneetlalameàlatondeuse.
4
Nettoyageaveclabrosse
1. Enlevezlatondeusede
l’adaptateurCA.
•
Vériezquelatondeuseesthors
marche.
2. Retirezlaxationdupeigne.
3. Tenezleboîtier,placezvotre
poucecontrelalameetpoussez-la
versl’extérieurparrapportau
boîtier.
4. Brossezpourenlevertouslespoilsduboîtier
etdesalentoursdelalame.
5. Brossezpourenlevertouslespoilsquiont
ététaillésentrelalamexeetlalamemobile
toutenpressantsurlelevierdenettoyage
pourreleverlalamemobile.
6. Appliquezquelquesgouttesd’huilesurlalame.
7. Fixezlepeigneetlalamesurlatondeuse.
18
Français
Lubrication
Appliquezquelquesgouttesd’huile
surlatondeuseavantetaprès
chaqueutilisation.
Appliquezunegoutted’huilesur
lespointsindiquésparlesèches.
Pourremonterlalame
Fixezlecrochetdemontagedans
lemontantdelamesurlatondeuse
etpoussez-lejusqu’àcequ’il
s’enclenche.
►
Duréedeviedelalame
Laduréedeviedelalamevarieselonlafréquenceetladurée
d’utilisationdelatondeuse.
Parexemple,laduréedelalameestapproximativementde3anslorsque
latondeuseestutiliséependant5minutes,10foisparmois.Mêmeavec
unentretienapproprié,remplacezlalamesil’efcacitédelacoupeest
réduitedefaçonconsidérable.
►
Duréedeviedelabatterie
Laduréedeviedelabatterievarieenfonctiondelafréquenceetdela
duréed’utilisation.Silabatterieestrechargéeunefoistoutesles2
semaines,laduréedevieserad’environ3ans.
•
Ilestrecommandéderechargerlatondeuseaumoinstousles6mois
mêmelorsqu’ellen’estpasutiliséecarellesedéchargeraetsadurée
devierisquedesetrouverréduite.
Retraitdelabatterierechargeableintégrée
ATTENTION:
L’appareilquevousvousêtesprocuréestalimentéparunepileau
nickel-métal-hydrure(NiMH).Pourdesrenseignementssurlerecyclage
delapile,veuillezcomposerle1-800-8-BATTERY.
Retirezlabatterierechargeableintégréeavantdejeterlatondeuse.Ne
pasdémonterniremplacerlabatterieandepouvoirréutiliserla
tondeuse.Vousrisqueriezdeprovoquerunincendieoudevous
électrocuter.
Veuillezcontacteruncentredeserviceaprès-venteagrée.
Leservicederemplacementdebatterien’estdisponiblequ’aux
États-Unis.
•
Enlevezlatondeusedel’adaptateurCAlorsduretraitdelabatterie.
19
Français
•
Effectuezlesétapesde
1
à
,surélevezlabatterie,etretirez-la.
•
Faitestrèsattentionànepascourt-circuiterlabatterie.
Caractéristiques
Sourced’alimentation Voirlaplaquesignalétiquesurl’adaptateurCA.
Tensiondumoteur
1,2V
Tempsdechargement Env.15heures
Ceproduitestdestinéuniquementàl’usagedomestique.
DéclarationsurlebrouillageradioélectriquedelaCommissionfédérale
descommunications
Leprésentéquipementafaitl’objetd’essaisetaétéjugéconformeaux
limitespourundispositifnumériquedeclasseB,envertuduChapitre
15desrèglementsdelaFCC.Ceslimitessontconçuespourfournir
uneprotectionraisonnablecontrelesinterférencesnuisibleslorsque
l’appareilfonctionnedansuneinstallationrésidentielle.Leprésent
équipementgénère,utiliseetpeutémettredel’énergieRFs’iln’estpas
installéetutiliséconformémentaumoded’emploi,cequipeut
provoquerdesinterférencesnuisiblesauxcommunicationsradio.
Cependant,iln’yaaucunegarantiequelesinterférencesne
surviendrontpasdansuneinstallationparticulière.Sicetéquipement
émetdesinterférencesnuisiblesàlaréceptiondelaradiooudela
télévision,cequipeutêtredéterminélorsdelamiseenmarchepuis
horsmarchedel’équipement,l’utilisateurdoitcorrigercesinterférences
enprenantl’unedesmesuressuivantes:
•
Réorienteroudéplacerl’antenneréceptrice.
•
Augmenterladistanceentrel’équipementetlerécepteur.
•
Connecterl’équipementàlaprised’uncircuitdifférentdeceluisur
lequellerécepteurestconnecté.
•
Consulterledétaillantouuntechnicienspécialiséenradio/TVpour
obtenirdel’aide.
AvertissementdelaFCC:Pourassureruneconformitécontinue,
installeretutiliserconformémentauxconsignesfournies.Quelque
changementoumodicationnonexpressémentapprouvé(e)parla
partieresponsabledelaconformitépourraitannulerl’autoritéde
l’utilisateuràfairefonctionnerleprésentéquipement.
Cetappareilestconformeàlapartie15desrèglementsdelaFCC.
L’utilisationestsoumiseauxdeuxconditionssuivantes:(1)Cetappareil
nedoitpasprovoquerd’interférencesnuisibleset(2),cetappareildoit
supportertouteinterférencereçue,ycomprislesinterférencespouvant
provoquerunfonctionnementindésirable.

20
Français
POURPLUSDERENSEIGNEMENTS,COMMUNIQUEZAVEC
PANASONICCANADAINC.ÀL’ADRESSEOUAUNUMÉRODE
TÉLÉPHONEINDIQUÉSÀL’ENDOSDUMANUEL.
POURLECANADA,CONTACTERL’UNEDESSUCCURSALESDE
VENTEINDIQUÉESAUDOS.

21
Español
INSTRUCCIONESDESEGURIDADIMPORTANTES
Alutilizarundispositivoeléctrico,debenseguirse
siempreunasprecaucionesbásicasqueincluyenlas
siguientes:
Leatodaslasinstruccionesantesdeutilizarestedispositivo.
PELIGRO
Parareducirelriesgode
descargaseléctricas:
1.Nointentealcanzarundispositivoquesehayacaído
alagua.Desenchúfeloinmediatamente.
2.Elcargadornodebesumergirseniutilizarseenla
ducha.
3.Nocoloqueniguardeeldispositivodondepueda
caerseenunabañera.Nolocoloquenilodejecaer
enaguaoalgúnotrolíquido.
4.Exceptocuandoloestécargando,desenchufe
siempreesteaparatodelatomaeléctricatras
utilizarlo.
5.Desenchufeestedispositivoantesdelimpiarlo.
6.Noutiliceunalargadorconestedispositivo.
ADVERTENCIA
Parareducirelriesgodequemaduras,fuego,
descargaseléctricasodañospersonales:
1.Esnecesariaunasupervisióncercanacuandoel
dispositivoseautilizadoporocercadeniñoso
minusválidos.
2.Utiliceestedispositivosolamenteparaelusoparael
quesehadiseñadocomosedescribeeneste
manual.Noutiliceningúnaccesoriono
recomendadoporelfabricante.
3.Nuncautiliceeldispositivositieneelcordónoel
enchufedañado,sinofuncionacorrectamente,osi
sehacaído,dañadoomojado.Devuelvael
dispositivoauncentrodeservicioparaexaminarloy
repararlo.
4.
Mantengaelcablealejadodelassuperciescalientes.
5.Nuncadejecaerniintroduzcaningúnobjetopor
cualquierabertura.
6.Noutilicelaafeitadoraenexterioresodondese
esténutilizandoaerosoles(spray)odondeseesté
administrandooxígeno.
7.Noutiliceestedispositivosielpeineestádañadoo
roto,yaquepodríacausarleheridasenlacara.
8.Conectesiempreelenchufealdispositivoy,a
continuación,alatomadecorriente.Para
desconectarlo,coloquetodosloscontrolesenla
posición“apagado”y,acontinuación,retireel
enchufedelatomadecorriente.
GUARDEESTASINSTRUCCIONES
22
Español
GraciasporelegirunrecortadorPanasonic.Leacompletamente
lasinstruccionesantesdeutilizarlo.
Importante
Esterecortadortieneunabateríarecargableincorporada.Nolaarrojeal
fuegoniapliquecalor.Tampocolautilice,cargueodejeenunentornode
altatemperatura.
►
Antesdeluso
EsterecortadorWET/DRYsepuedeutilizarpararecortarelpeloen
mojadooenseco.Puedeutilizaresterecortadorestandoenladucha
ylimpiarloconagua.Elsímbolosiguientesignicaqueesadecuado
paraelusoenunabañeraoducha.
►
Utilizacióndelrecortador
•
Antesdeutilizarelaparato,compruebequelascuchillasnoesténni
dañadasnideformadas.
•
Sifuncionaincorrectamenteofalla,dejedeutilizarla.
•
Apagueelaparatoantesdecambiarlalongituddecorteoquitarel
accesoriodepeinado.
•
Antesydespuésdecadauso,apliqueaceiteentodaslaspartes
marcadasconechas.(consultelapágina28.)
•
Elaparatonosedebeutilizarenanimales.
•
Noempujelacuchillacontralapiel.
•
Noutiliceelrecortadorparaotronquenoseaelcortedepelos.
•
Esteaparatonodebeserutilizadoporpersonas(incluyendoniños)
concapacidadesfísicas,sensorialesomentalesreducidas,ocon
faltadeconocimientoyexperiencia,amenosqueseencuentrenbajo
supervisiónobajoinstruccionessobreelusodelaparatodeuna
personaresponsabledelaseguridad.Sedebesupervisaralosniños
paraasegurarsedequenojueguenconelaparato.
►
Cargadeelrecortador
•
NuncautiliceeladaptadordeCAenelcuartodebaño.
•
UtiliceúnicamenteeladaptadordeCA(RE7-70).Noutiliceeste
adaptadordeCAparacargarotroselectrodomésticos.
•
Cargueelaparatoenunlugarenelquenoestéexpuestoalaluz
solardirectaniaotrasfuentesdecalor,atemperaturasentre0°C
(32°F)y35°C(95°F).
•
EnchufeeladaptadordeCAenunatomadecorrientedoméstica
dondenohayahumedadymanéjeloconlasmanossecas.
•
Elrecortadorpuedecalentarseduranteelusoylacarga.Nosetrata
deunfallo.
•
Sujeteelenchufecuandolodesconectedelatomadecorriente
doméstica.Sitiradelcabledealimentación,puededañarlo.
•
Noutiliceelrecortadorsielcabledealimentaciónoeladaptadorde
CAestándesgastados,osielenchufenoencajabienenlatomade
corriente.
•
Nodañenideformeelcabledealimentación.Nocoloqueobjetos
pesadosenelcabledealimentaciónnilocoloqueentreobjetos.
•
Elcabledealimentaciónnopuedesustituirse.Sielcablede
alimentaciónpresentadaños,debedesecharseeladaptadordeCA.
►
Limpiezadelrecortador
Advertencia
Paraevitarunadescargaeléctrica,desconecteelenchufedela
tomadecorrienteantesdelimpiarelaparato.
•
Nosedebeabrirlacarcasayaquesepodríaafectarlaconstrucción
estancaalaguadelaparato.
•
Silimpiaelrecortadorconagua,noutiliceaguasaladaniagua
caliente.Nosumerjaelrecortadorenaguaduranteunperíodode
tiempoprolongado.
•
Limpielacarcasasóloconunpañosuaveligeramentehumedecido
conaguacorrienteoconaguacorrienteyjabón.Noutilice
disolvente,bencina,alcoholniotrosproductosquímicos.
•
NolaveeladaptadordeCAconagua.
•
Limpieelenchufedeformaregularparaquitarelpolvoylasuciedad.
23
Español
►
Almacenamientodelrecortador
•
Guardeelrecortadorenunlugarpocohúmedodespuésdeutilizarlo.
•
Noguardeelrecortadorenunlugarenelqueestéexpuestoalaluz
solardirectaoaotrasfuentesdecalor.
•
RetireelrecortadordeladaptadordeCAcuandologuarde.
•
Nodobleelcabledealimentaciónniloenrollealrededordel
adaptadordeCA.
•
AlmaceneeladaptadordeCAenunáreasecadondenopuedaser
dañado.
•
Mantengaelaceitefueradelalcancedelosniños.
Identicacióndelaspartes
A
Cuerpoprincipal
1
Indicadordealturadecorte
2
Discoselector(Controlde
ajustedealtura)
3
Terminaleslaterales
4
Interruptordeencendido
5
Entradadeagua
B
Bloqueodecuchilla
6
Palancadelimpieza
7
Cuchillamovible
8
Cuchillaestacionaria
9
Ganchodemontaje
C
Peine
(de1mm(1/32˝)a10mm(13/32˝))
D
AdaptadordeCA(RE7-70)
Terminalesdecarga
Lámparaindicadoradecarga
Cabledealimentación
E
Aceite
F
Cepillodelimpieza

24
Español
Carga
Cargadeelrecortador
Sigalossiguientespasosparacargarelrecortadorsipareceperderla
velocidad.
1
1
Apagueelrecortadoreinsértelo
eneladaptadordeCAhastaque
seoigaunclic,segúnsemuestra
enlailustración.
•
Elrecortadornosecargaráamenosquelos
terminaleslateralesesténencontactoconlos
terminalesdecarga.
•
Limpieconunpañolasgotasdeaguadelos
terminaleslaterales.
•
Sicargaelrecortadorconelinterruptorde
encendidoactivado,esteempezaráafuncionar
cuandoloretiredeladaptadordeCA.
2
1
2
2
Inserteelenchufeenlatomadecorriente.
Laluzindicadoradecargaseiluminaráenrojo.
•
Lacargaestarácompletatrasaproximadamente15horas.
•
Cuandocargueelrecortadorporprimeravezocuandonolohaya
utilizadodurantemásde6meses,lalámparaindicadoradecargapodría
noiluminarseduranteunosminutosoeltiempodefuncionamiento
podríaacortarse.Cárguelodurantemásde23horasenesoscasos.
3
3
Desconecteelenchufeunavezsehayacompletado
lacarga.
•
Cuandolacargaestácompleta,seguircargandolabateríanoafectará
alrendimientodelamisma.
•
Latemperaturaambienterecomendadaparalacargaesde0–35°C
(32-95°F).Elrendimientodelabateríapodríaverseafectadoola
bateríapodríanocargarsebajocondicionesdetemperatura
extremadamentebajaoalta.
•
Laluzindicadoradecargaseiluminaypermaneceasíhastaqueel
enchufeseretiradelatomadecorriente.
•
Unacargacompletasuministrasucientepotenciapara
aproximadamente50minutosdeuso.
Nota:
Nopuedehacerfuncionarelrecortadormientrasseestácargando.
Uso
Usodelpeine
Asegúresedequeelrecortadorestéapagado.
1
1
Muevaeldiscoselectoralaposición
“1”.
2
2
Coloqueelpeineenelcuerpo
principalhastaqueseoigaunclic.
3
3
Muevaeldiscoselectorparamoverelpeinealadistancia
decortedeseada(entre1mm(1/32˝ )y10mm(13/32˝ )).
Longituddecorte
(estimación)
mm
1 1,5 2 2,5 3 3,5 4 4,5 5 5,5
pulgada
1/32 1/16 5/64 3/32 1/8 9/64 5/32
11/64
3/16 7/32
Indicador
1 1.5 2 2.5 3 3.5 4 4.5 5 5.5
Longituddecorte
(estimación)
mm
6 6,5 7 7,5 8 8,5 9 9,5 10
pulgada
15/64
1/4 9/32
19/64
5/16
11/32
23/64
3/8
13/32
Indicador
6 6.5 7 7.5 8 8.5 9 9.5 10
•
Lalongitudrealdelpeloseráunpocosuperioralaalturaquedena.
25
Español
Uso
Utilizacióndelrecortador
Asegúresedequelacuchillanoestédañada.
Recomendamosqueseuseelrecortadorenunrangodetemperatura
ambientede0°C(32°F)a35°C(95°F).Siseutilizafueradeeste
rango,elaparatopuededejardefuncionar.
Recorteenseco
►
Recorteconelpeine
Noloutilicecuandoapliquecremasdeafeitarocuandolabarbaesté
mojada.
1
1
Pulseelinterruptordeencendidoparaapagarel
recortador.
2
2
Monteelaccesorioyajusteeldiscoselector.
(consultelapágina24.)
3
3
Pulseelinterruptordeencendidopara
encenderelrecortador.
4
4
Sujeteelrecortadorconelinterruptor
deencendidomirandohaciaabajo,y
cortelabarbamoviendoelrecortador
encontradeladireccióndelpelo.
•
Puedenacumularserestosdepelodentrodel
peinecuandosecortaunagrancantidadde
barba,porloquedebenretirarselosrestosde
pelodespuésdecadauso.
►
Cortesinelpeine
Darleformaalbigote
■
Porencimadeloslabios
Coloqueelrecortadorenángulorectorespecto
alapielconelinterruptordeencendido
mirandohaciaarribayrecortealrededordel
bigote.
Pararedondearlaforma,recortealrededordel
bigotesujetandoelcuerpoprincipal
lateralmente.
■
Cortedelbordedelabarba
Cortelabarbagradualmenteconelinterruptor
deencendidomirandohacialapiel,teniendo
cuidadodenocortardemasiado.
26
Español
1
1
Quiteelaccesoriodepeinado.
2
2
Apliqueagua,jabón,etc.alacara.
3
3
Pulseelinterruptordeencendidopara
encenderelrecortador.
4
4
Cortelabarbalentamente,moviendo
desdeabajohaciaarribaconel
interruptordeencendidomirando
hacialapiel.
Notas
•
Nousecremasdeafeitadoyaqueestaspuedencausaruna
reduccióndelrendimientodecortedebidoaldeteriorodelas
cuchillas.
•
Asegúresedelavarelcuerpoprincipalconaguayaplicaraceitealas
cuchillasdespuésderecortarenmojado.
Darleformaalaspatillas
Coloqueelrecortadorenángulorectoconsupiely
cortelaspatillas.
Perladodelpeloalrededordelasorejas
Recorteelpeloalrededordelasorejassujetandoel
cuerpoprincipallateralmente.
Cortedelvello
Corteelvellolentamente,moviendodesdeabajo
haciaarribaconelinterruptordeencendido
mirandohacialapiel.
•
Alrecortarlabarbaoelbigotesinunaccesorio,elpelosecortaráauna
longitudde0,5mm(1/64˝)aproximadamente.
Corteenmojado
►
Cortesinelpeine
Cortelabarbaoelvellodespuésdeaplicaraguaounalechelimpiadora
facialalacara.
Elcorteenmojadoreducelafricción,permitiendountactosuave.
Elcorteenmojadoserecomiendaparacortarunabarbacompletaauna
longitudde0,5mm(1/64˝)sinunaccesorio.
27
Español
Limpieza
Limpiezadelrecortador
Serecomiendalimpiardespuésdecadauso.
1. RetireelrecortadordeladaptadordeCA.
▼ ▼
Paraeliminarpequeñasmanchas Paraliminarmanchasdifíciles
2. Retireelpeineyenciendael
recortador.
3. Dejecorrerelaguaporla
entradadeaguaenlaparte
posteriordelcuerpoprincipal,
laveduranteaproximadamente
20segundosyluegoapague
elrecortador.
•
Enjuagueconaguayagite
variasvecesparaeliminarel
agua.
2. Retireelpeineylacuchilla.
3. Limpieelrecortadoryla
cuchillaconaguacorriente.
•
Enjuagueconaguayagite
variasvecesparaeliminarel
agua.
▼ ▼
4. Limpieelaguaconunatoallaydejeque
sequedeformanatural.
•
Sesecarámásrápidosiseretirala
cuchilla.
5. Apliqueelaceitealacuchilladespuésde
queseseque.
6. Coloqueelpeineylacuchillaenel
recortador.
4
Limpiezaconlaescobilla
1. Retireelrecortadordeladaptador
deCA.
•
Asegúresedequeelrecortador
estéapagado.
2. Quiteelaccesoriodepeinado.
3. Sostengaelcuerpoprincipal,
coloquesusdedoscontralas
cuchillasyenseguidaapártelosdel
cuerpoprincipal.
4. Cepilleyquitecualquiercabellodelcuerpo
principalyalrededordelacuchilla.
5. Cepilleyquitecualquiercabelloentrela
cuchillaestacionariaylamóvilpresionando
haciaabajolapalancadelimpiezapara
alcanzarlacuchillamóvil.
6. Apliqueelaceitealacuchilla.
7. Coloqueelpeineylacuchillaenelrecortador.

28
Español
Lubricación
Apliqueelaceiteenelrecortador
antesydespuésdecadauso.
Apliqueunagotadeaceitealas
puntascomoindicanlasechas.
Reinstalacióndelacuchilla
Coloqueelganchodemontajeen
lamonturadelacuchilladel
recortadory,acontinuación,
empujehaciadentrohastaqueoiga
unclic.
►
Duracióndelacuchilla
Laduracióndelacuchillavaríadeacuerdoconlafrecuenciadeusodel
recortador.
Porejemplo,laduracióndelacuchillaesaproximadamentede3años
cuandoutilizaelrecortadorpor5minutos10vecesalmes.Sustituyalas
cuchillassilaecienciadecortesereduceapesardeunmantenimiento
adecuado.
►
Vidadelabatería
Lavidadelabateríavariarásegúnlafrecuenciayladuracióndeluso.Si
labateríasecargaunavezcada2semanas,suvidaútilseráde
aproximadamente3años.
•
Serecomiendarecargarelrecortadoralmenoscada6mesesaunque
noseutiliceregularmente,yaquelabateríasedescargaráyesto
puedereducirsuvidaútil.
Extraccióndelabateríarecargableinterna
ATENCIÓN:
Elproductoquehacompradosealimentaconunabateríadehidruros
demetalníquel(Ni-MH)reciclable.
Llamealteléfono1-800-8-BATTERYparaobtenerinformaciónacerca
decómoreciclarestabatería.
Extraigalabateríarecargableincorporadaantesdedesecharel
recortador.Nodesmontenicambielabateríaparapoderutilizardenuevo
elrecortador.Estopodríacausarunincendioounadescargaeléctrica.
Póngaseencontactoconuncentrodeservicioautorizado.
Elserviciodereemplazodebateríaestádisponiblesolamenteenlos
EstadosUnidosdeAmérica.
•
RetireelrecortadordeladaptadordeCAcuandoextraigalabatería.
29
Español
•
Lleveacabolospasos
1
a
ylevantelabatería,despuésretírela.
•
Tengacuidadodenocausaruncortocircuitoenlabatería.
Especicaciones
Fuentedeenergía
Anoteelnúmerodeplacaqueseencuentraen
eladaptadordeCA.
Voltajedelmotor
1,2V
Tiempodecarga Aproximadamente15horas
Esteproductoestádestinadosolamenteparasuusodoméstico.
DeclaracióndeInterferenciadelaComisiónFederalde
Comunicaciones
Esteequipohasidoprobadoyseencuentraenconformidadconlos
límitesestablecidosparadispositivosdigitalesdelaClaseB,en
aplicacióndelodispuestoenlaSección15deloslineamientosdela
CFC.Estoslímiteshansidodiseñadosparaproporcionarprotección
razonablecontralainterferenciaperjudicialenunainstalación
residencial.Esteequipogenera,usaypuedeirradiarenergíaderadio
frecuenciay,sinoseinstalayseusaenconformidadconlas
instruccionesproporcionadas,podríaocasionarinterferenciaperjudicial
alasradiocomunicaciones.Sinembargo,noestágarantizadoqueno
sepresentaráningunainterferenciaenunainstalaciónenparticular.Si
esteequipoocasionainterferenciasperjudicialesenlarecepciónde
radioodetelevisión,locualsepuededeterminarapagandoy
encendiendoelequipo,selepidealusuariotratardecorregirla
interferenciamediantelarealizacióndeunadelassiguientesmedidas:
•
Cambiedeorientaciónodelugarlaantenaderecepción.
•
Incrementelaseparaciónentreelequipoyelreceptor.
•
Conecteelequipoenunatomadecorrientequeseadeuncircuito
diferenteaaquelenelqueestáconectadoelreceptor.
•
Póngaseencontactoconeldistribuidoroconuntécnico
experimentadoenradio/TVparasolicitarayuda.
PrecaucionesdelaCFC:Paragarantizarlaconformidaddeforma
continua,instaleyuseelaparatodeacuerdoalasinstrucciones
proporcionadas.Cualquiercambioomodicaciónqueserealicequeno
estéaprobadoporlaparteresponsabledelaconformidadpodría
invalidarlaautoridaddelusuarioparausaresteequipo.
Estedispositivoestáenconformidadconlaparte15delanormativade
laFCC.Elfuncionamientoestásujetoalassiguientesdoscondiciones:
(1)Estedispositivonopuedecausarinterferenciasperjudiciales,y(2)
estedispositivodebeaceptarcualquierinterferenciarecibida,
incluyendointerferenciasquepodríanproducirunfuncionamientono
deseado.

30
Español
PARASUCONVENIENCIA,AHORADISPONEMOSDEUNALÍNEA
NACIONALDELLAMADAGRATISPARALACOMPRADE
ACCESORIOS(SOLAMENTEENUSA);LLAMEAL1-800-332-5368.
PARACANADÁ,CONTACTEANUESTRASSUCURSALESDEVENTA
QUESEMENCIONANENLACONTRATAPA.

31
MEMO

Printed in China
Imprimé en Chine
Impreso en China
0000000000 X0000‑0
IN USA CONTACT:
Panasonic Corporation of North America
One Panasonic Way, Secaucus, NJ 07094
IN CANADA CONTACT:
AU CANADA, COMMUNIQUEZ AVEC:
Panasonic Canada Inc.
5770 Ambler Drive, Mississauga, Ontario L4W 2T3
(905) 624‑5010
EN MEXICO CONTACTE CON:
Panasonic de México S.A. de C.V.
Félix Cuevas No. 6 Piso 2 y 3
Col. Tlacoquemecatl Del Valle
Del. Benito Juárez
México, D.F. C.P.03200
01 (55) 5488‑1000
EN PANAMA CONTACTE CON:
Panasonic Latin America. S.A.
P.O. Box 0816‑03164
Panama, Republic of Panama
(507) 229‑2955
Service • Assistance • Accessories
Dépannage • Assistance • Accessoires
Call 1-800-338-0552 (In USA)
http://www.panasonic.com/shavers/
http://www.panasonic.com/consumersupport/
Call 1-800-561-5505 (In Canada)
Composer le 1-800-561-5505 (Au Canada)
http://www.panasonic.ca/
F EN, CA, ES