Operating Instructions
(Household)
AC/Rechargeable Beard/Hair Trimmer
Model No.
ER‑GB80/ER‑GB60
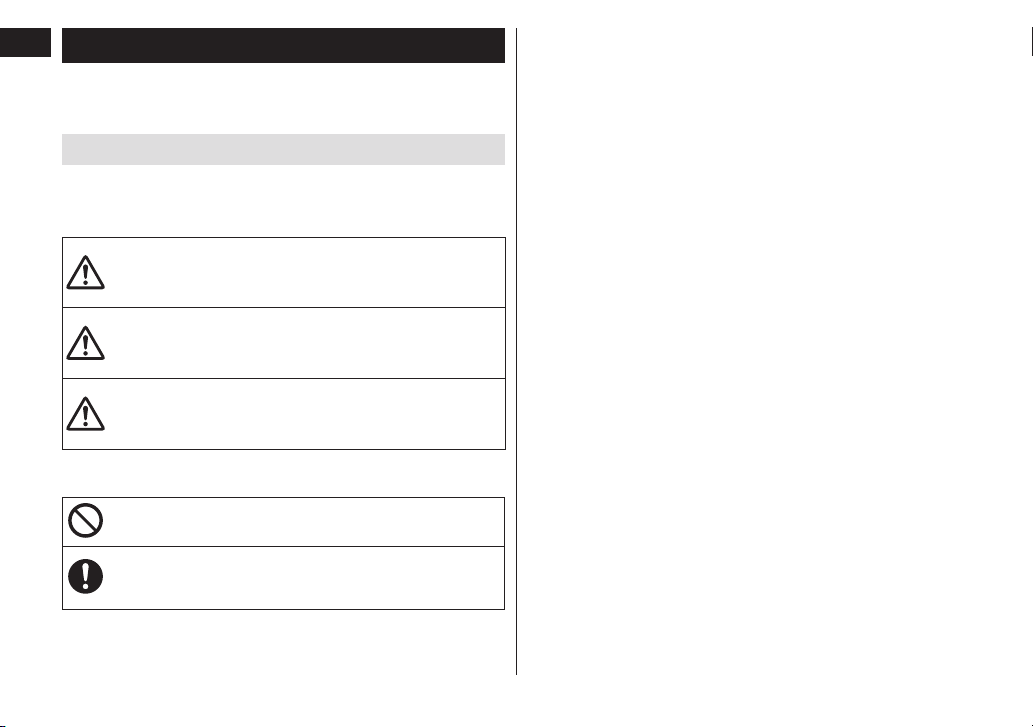
The illustrations in these operating instructions are of the ER‑GB80 model.
English��������������������������������������������� 3
Français����������������������������������������� 19
Español������������������������������������������ 35
BC

2

3
English
Operating Instructions
(Household)
AC/Rechargeable Beard/Hair Trimmer
Model No.
ER‑GB80/ER‑GB60
Thank you for purchasing this Panasonic product.
Before operating this unit, please read these instructions completely and save them for future use.
Safety precautions..................... 4
Intendeduse����������������������������������������8
Partsidentication������������������������������8
Chargingthetrimmer��������������������������9
Usingthetrimmer��������������������������������9
Usingthecombattachment�������������10
Trimmingbeard����������������������������������11
Trimminghair�������������������������������������13
Trimmingbodyhair���������������������������14
Cleaningthetrimmer�������������������������14
Troubleshooting��������������������������������16
Frequentlyaskedquestions�������������16
Bladelife���������������������������������������������17
Batterylife������������������������������������������17
Removingthebuilt-inrechargeable
battery�������������������������������������������������17
Specications������������������������������������17
Contents
4
English
Safety precautions
To reduce the risk of injury, loss of life, electric shock, fire, and
damage to property, always observe the following safety
precautions.
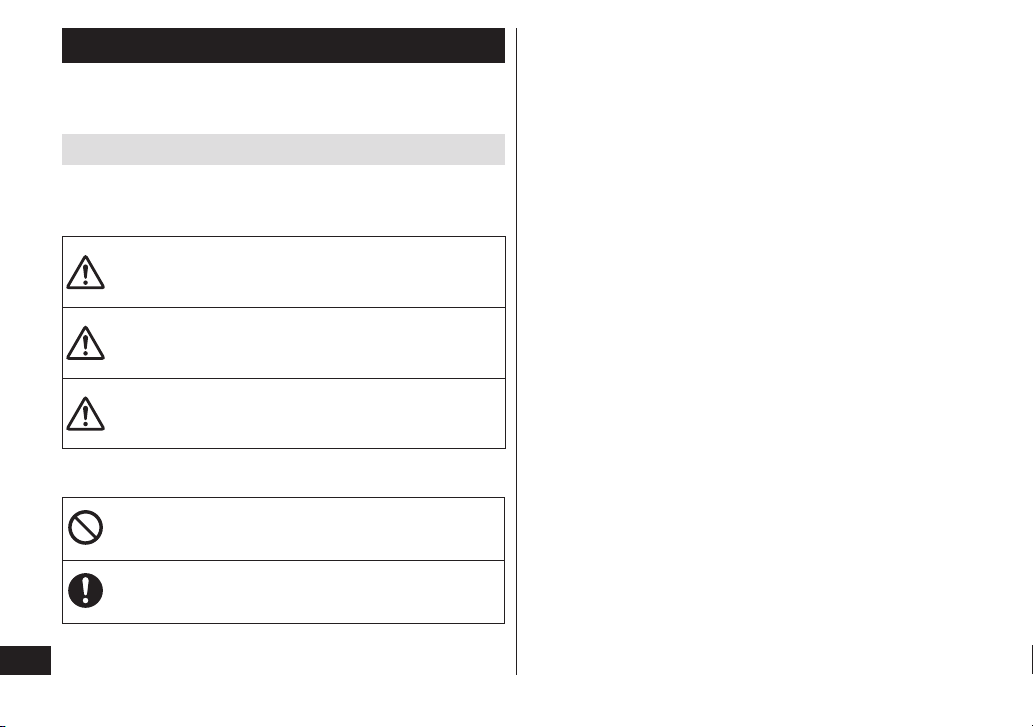
Explanation of symbols
The following symbols are used to classify and describe the level
of hazard, injury, and property damage caused when the
denotation is disregarded and improper use is performed.
DANGER
Denotes a potential
hazard that will result in
serious injury or death.
WARNING
Denotes a potential
hazard that could result
in serious injury or death.
CAUTION
Denotes a hazard that
could result in minor
injury.
The following symbols are used to classify and describe the type
of instructions to be observed.
This symbol is used to alert users to a specific operating
procedure that must not be performed.
This symbol is used to alert users to a specific operating
procedure that must be followed in order to operate the
unit safely.
IMPORTANT SAFETY INSTRUCTIONS
When using an electrical appliance, basic
precautions should always be followed, including
the following:
Read all instructions before using this appliance.
DANGER
To reduce the risk of electric
shock:
1. Do not reach for an appliance that has fallen
into water. Unplug immediately.
2. Charger unit is not for immersion or for use in
shower.
3. Do not place or store appliance where it can fall
or be pulled into a tub or sink. Do not place in
or drop into water or other liquid.
4. Except when charging, always unplug this
appliance from the electrical outlet immediately
after using.
5. Unplug this appliance before cleaning.
6. Do not use an extension cord with this
appliance.
WARNING
To reduce the risk of burns, fire,
electric shock, or injury to persons:
1. Close supervision is necessary when this
appliance is used by, on, or near children or
invalids.
5
English
2. Use this appliance only for its intended use as
described in this manual. Do not use
attachments not recommended by the
manufacturer.
3. Never operate this appliance if it has a
damaged cord or plug, if it is not working
properly, if it has been dropped or damaged, or
dropped into water. Return the appliance to a
service center for examination and repair.
4. Keep the cord away from heated surfaces.
5. Never drop or insert any object into any
opening.
6. Do not use outdoors or operate where aerosol
(spray) products are being used or where
oxygen is being administered.
7. Do not use this appliance with a damaged or
broken comb, as it has the potential to result in
facial injury.
8. Always attach plug to appliance first, then to
outlet. To disconnect, turn all controls to “off”
then remove plug from outlet.
SAVE THESE INSTRUCTIONS
WARNING
Do not connect or disconnect the adaptor to a
household outlet with a wet hand.
-Doing so may cause electric shock or injury.
Never use the appliance if the AC adaptor is
damaged or if the power plug fits loosely in a
household outlet.
Do not damage or modify, or forcefully bend, pull, or
twist the cord.
Also, do not place anything heavy on or pinch the
power cord.
-Doing so may cause electric shock or fire due to a short
circuit.
Do not use in a way exceeding the rating of the
household outlet or the wiring.
-Exceeding the rating by connecting too many plugs to one
household outlet may cause fire due to overheating.
This product has a built-in rechargeable battery. Do
not throw into flame or heat.
-Doing so may cause fluid leak, overheating, or explosion.
Do not modify or repair.
-Doing so may cause fire, electric shock, or injury.
Contact an authorized service center for repair (battery
change, etc.).
Never disassemble except when disposing of the
product.
-Doing so may cause fire, electric shock, or injury.
6
English
WARNING
Do not clean with water when the AC adaptor is
attached.
-Doing so may cause electric shock or fire due to a short
circuit.
Do not use anything other than the supplied AC
adaptor. Also, do not charge any other product with
the supplied AC adaptor.
-Doing so may cause burn or fire due to short circuit.
Do not store within the reach of children or infants.
Do not let them use it.
-Putting the blade, the cleaning brush and/or oil container
in the mouth may cause accidents and injury.
Always ensure the appliance is operated on an
electric power source matched to the rated voltage
indicated on the AC adaptor.
Fully insert the adaptor.
-Failure to do so may cause fire or electric shock.
Immediately stop using and remove the adaptor if
there is an abnormality or malfunction.
-Failure to do so may cause fire, electric shock, or injury.
<Abnormality or malfunction cases>
• The main unit or AC adaptor is deformed or
abnormally hot.
• The main unit or AC adaptor smells of burning.
• There is abnormal sound during use or charging of
the main unit or AC adaptor.
-Immediately request inspection or repair at an authorized
service center.
Regularly clean the power plug and the appliance
plug to prevent dust from accumulating.
-Failure to do so may cause fire due to insulation failure
caused by humidity.
Disconnect the adaptor and wipe with a dry cloth.
If the oil is consumed accidentally, do not induce
vomiting, drink a large amount of water, and contact
a physician.
If the oil comes into contact with eyes, immediately
wash thoroughly with running water, and contact a
physician.
-Failure to do so may result in physical problems.
This appliance is not intended for use by persons
(including children) with reduced physical, sensory
or mental capabilities, or lack of experience and
knowledge, unless they have been given
supervision or instruction concerning use of the
appliance by a person responsible for their safety.
Children should be supervised to ensure that they
do not play with the appliance.
-Failure to do so may cause an accident or injury.
The supply cord cannot be replaced. If the cord is
damaged, the AC adaptor should be scrapped.
-Failure to do so may cause an accident or injury.
7
English
CAUTION
Do not press the blade against the skin.
Do not use this product for any purpose other than
trimming beard, hair and body hair.
Do not directly apply the blades on ears or rough
skin (such as swellings, injuries or blemishes).
-Doing so may cause skin injury.
Do not allow pins or trash to adhere to the power
plug or the appliance plug.
-
Doing so may cause electric shock or fire due to a short circuit.
Do not drop or subject to shock.
-Doing so may cause injury.
Do not wrap the cord around the adaptor when storing.
-Doing so may cause the wire in the cord to break with the
load, and may cause fire due to short circuit.
Check that the blades are not damaged or deformed
before use.
-Failure to do so may cause skin injury.
Disconnect the adaptor or the appliance plug by
holding onto the adaptor or the appliance plug
instead of the cord.
-Failure to do so may cause electric shock or injury.
►Disposing of the rechargeable battery
DANGER
The rechargeable battery is exclusively for use with
this trimmer. Do not use the battery with other
products.
Do not charge the battery after it has been removed
from the product.
• Do not throw into fire or apply heat.
• Do not solder, disassemble, or modify the battery.
• Do not let the positive and negative terminals of
the battery get in contact with each other through
metallic objects.
• Do not carry or store the battery together with
metallic jewellery such as necklaces and hairpins.
• Never peel off the tube.
-Doing so may cause fluid leak, overheating, or explosion.
WARNING
After removing the rechargeable battery, do not
keep it within reach of children and infants.
-The battery will harm the body if accidentally swallowed.
If this happens, consult a physician immediately.
8
English
WARNING
If the battery fluid leaks out, take the following
procedures. Do not touch the battery with your bare
hands.
-The battery fluid may cause blindness if it comes in
contact with your eyes.
Do not rub your eyes. Wash immediately with clean water
and consult a physician.
-The battery fluid may cause inflammation or injury if it
comes in contact with the skin or clothes.
Wash it off thoroughly with clean water and consult a
physician.
Intended use
•Before and after each use, apply oil at the places marked with
arrows. (See page 15.)
•The trimmer may become warm during operation and/or
charging. This is normal.
•Clean the housing only with a soft cloth slightly dampened with
tap water or soapy tap water. Do not use thinner, benzine,
alcohol or other chemicals.
•Before using an attachment, check that it has been installed
correctly. Failure to do so may cause hair to be cut too short.
•Store the trimmer in a place with low humidity after use.
•The appliance should not be used on animals.
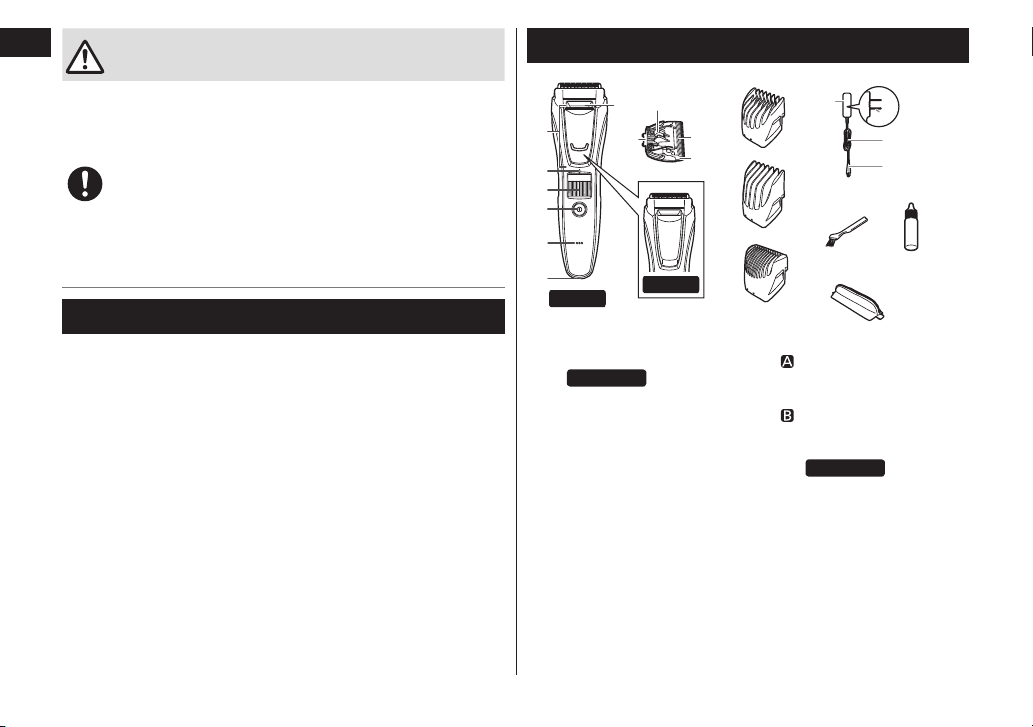
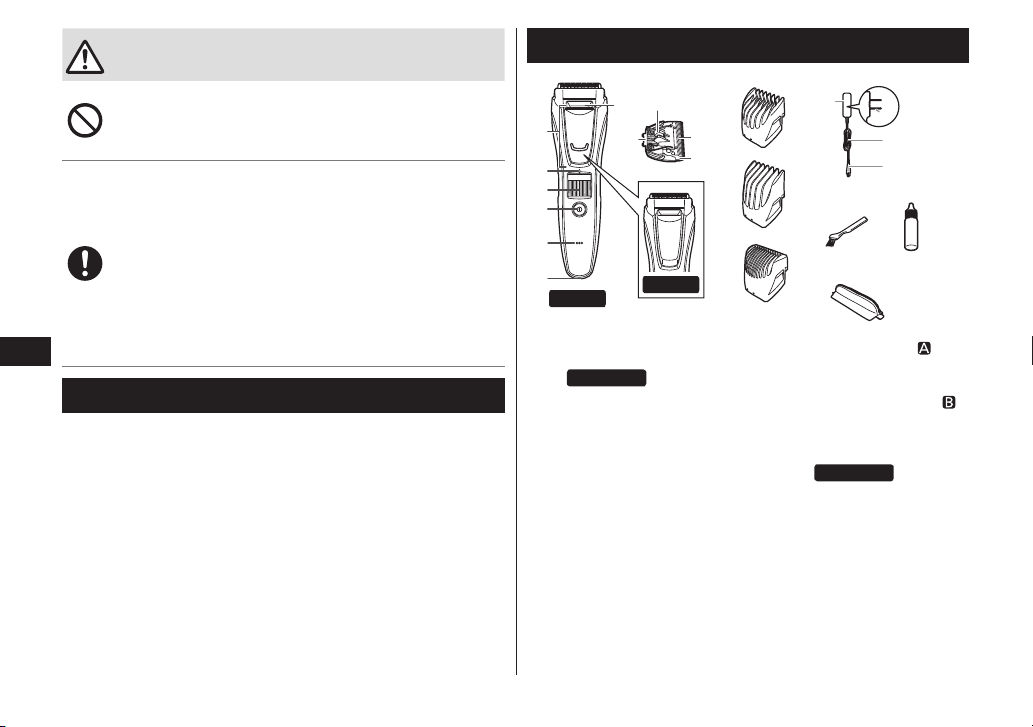
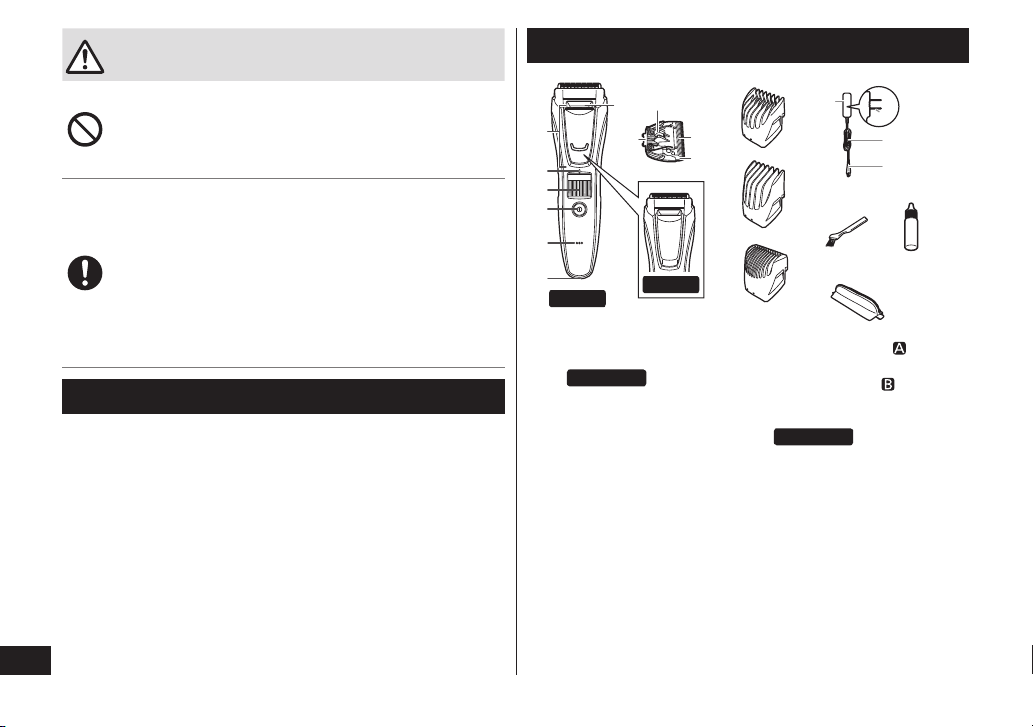
Parts identification
ER-GB80
ER-GB60
A Main body
Precision trimmer
ER-GB80
2 Trimming height indication
mark
3 Dial (Height adjustment
control)
4 Power switch
5 Charge status lamp
6 Appliance socket
7 Water inlet
B Blade
8 Cleaning lever
9 Moving blade
Stationary blade
Mounting hook
C Comb attachment for beard
[ ] (1 mm (1/32˝) to 10 mm
(13/32˝))
D Comb attachment for hair
[ ] (11 mm (7/16˝) to
20 mm (51/64˝))
E Comb attachment for body
hair ER-GB80
F AC adaptor (RE9-70)
Adaptor
Power plug
Cord
Appliance plug
Accessories
G Cleaning brush
H Oil
I Pouch
9
English
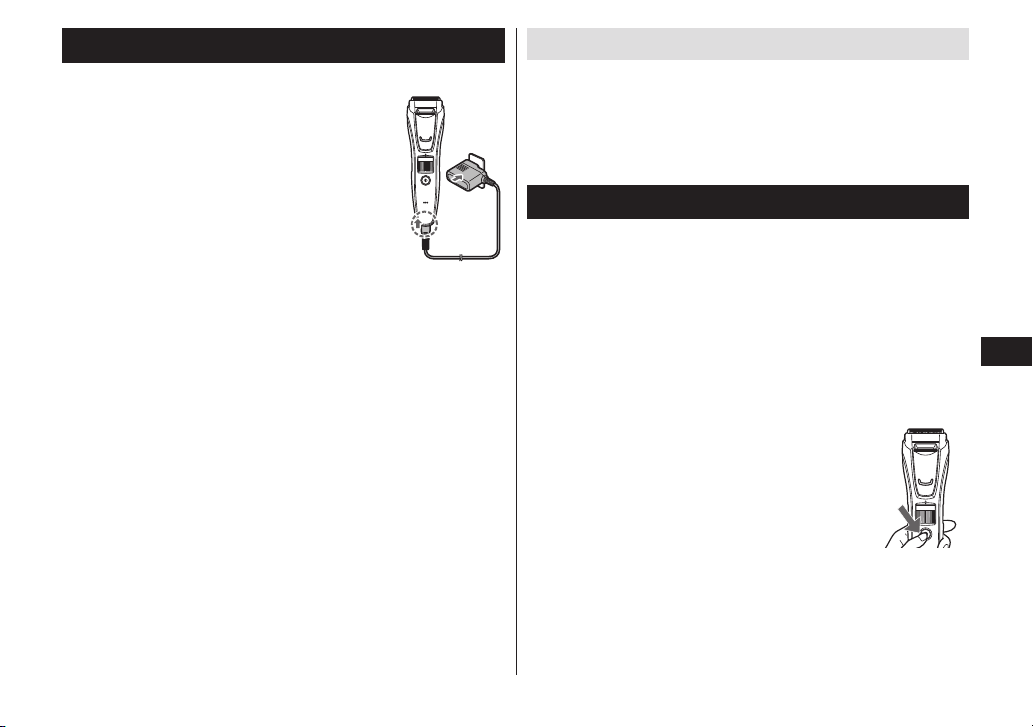
Charging the trimmer
•Make sure that the trimmer is turned off.
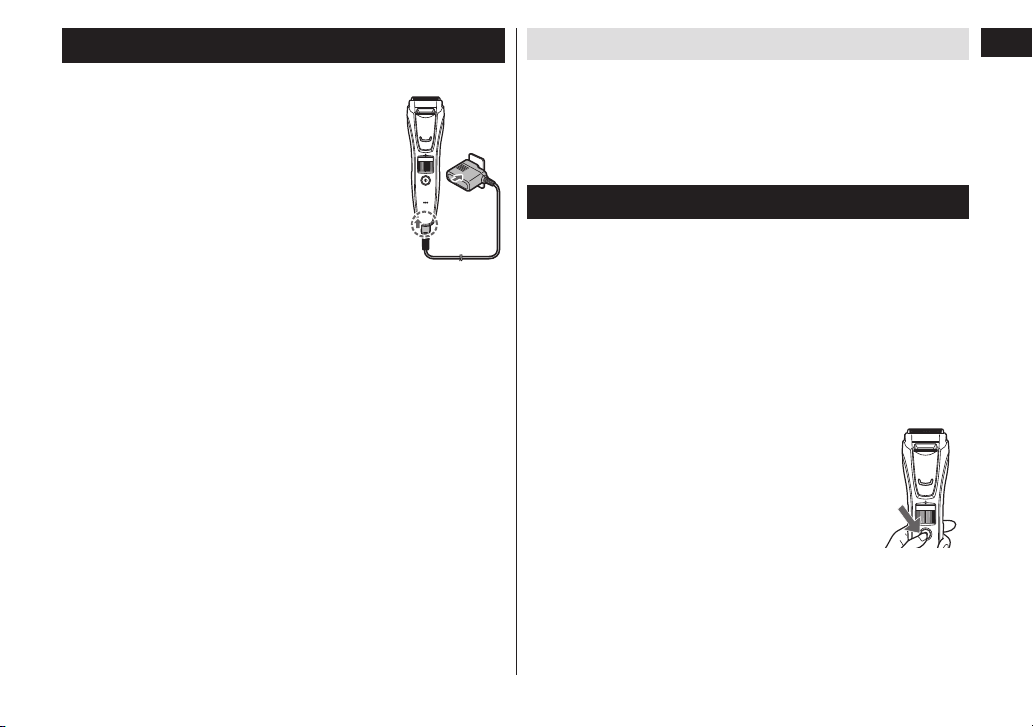
1
1
Connect the appliance plug to
the appliance socket.
2
2
Plug in the adaptor into a
household outlet.
• Check that the charge status lamp glows.
• Charging is completed after approx.
1 hour.
1
2
3
3
Disconnect the adaptor when the charge status
lamp stops glowing.
• Recommended ambient temperature for charging is
0 – 35 °C (32 – 95 °F). Battery performance may decrease
under extremely low or high temperatures, and the battery
may not be charged properly.
• A full charge supplies enough power for approximately
50 minutes of use.
The operating time may differ depending on the frequency
of use, the operating method and the ambient temperature.
• When charging the trimmer for the first time or when it has
not been in use for more than 6 months, the lamp on the
main body may not glow for a few minutes, or the operating
time may shorten. Please charge it for more than 8 hours in
such cases.
• If the shape of the plug does not fit the power outlet, use an
attachment plug adaptor of the proper configuration.
AC operation
If you connect the AC adaptor to the trimmer in the same way as
for charging, and turn on the power, you can use it.
•If the remaining battery is too low, the blades may move slowly or
stop, even with the AC operation. In this case, charge the battery
for 1 minute or more.
•The battery will be discharged, even with the AC operation.
Using the trimmer
•Make sure that the trimmer is turned off.
•We recommend using the trimmer in an ambient temperature
range of 0 – 35 °C (32 – 95 °F). If used outside this range, the
appliance may stop operating.
1
1
Mount the desired comb attachment and adjust
the trimming height as needed. (See page 10.)
• It can also be used without the comb attachment.
(Trimming height: approx. 0.5 mm (1/64˝))
• Actual hair length will be a little longer than the height you
set.
2
2
Press the power switch to turn on
the power.
10
English
Using the comb attachment
•Be careful not to cut your hand with the blade when attaching or
removing the comb attachment.
•Make sure that the trimmer is turned off.
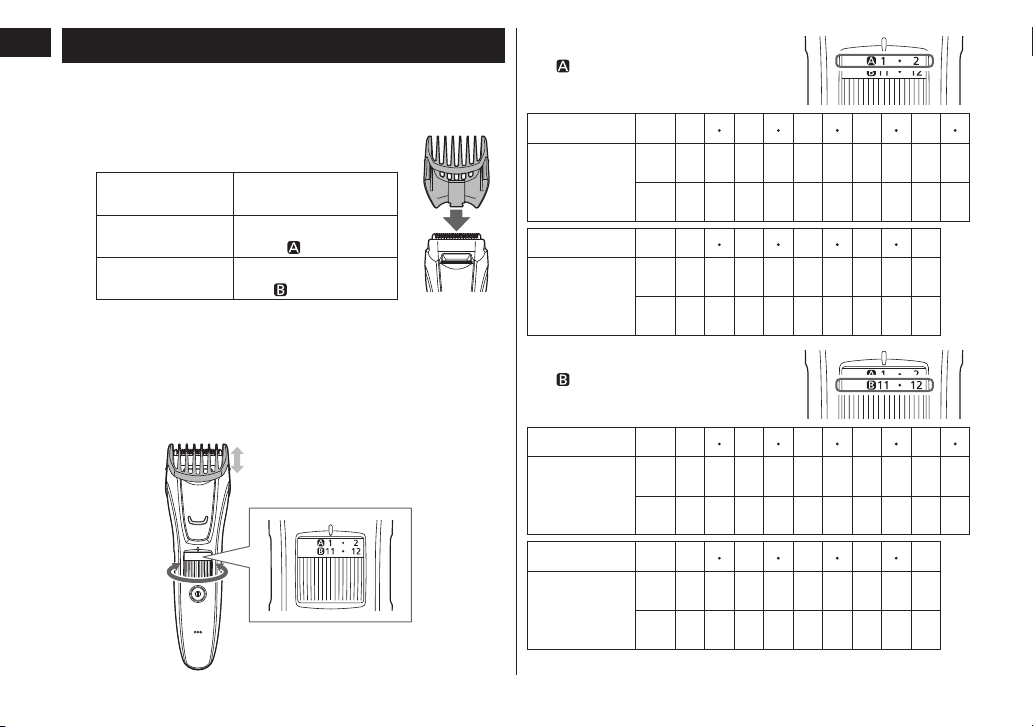
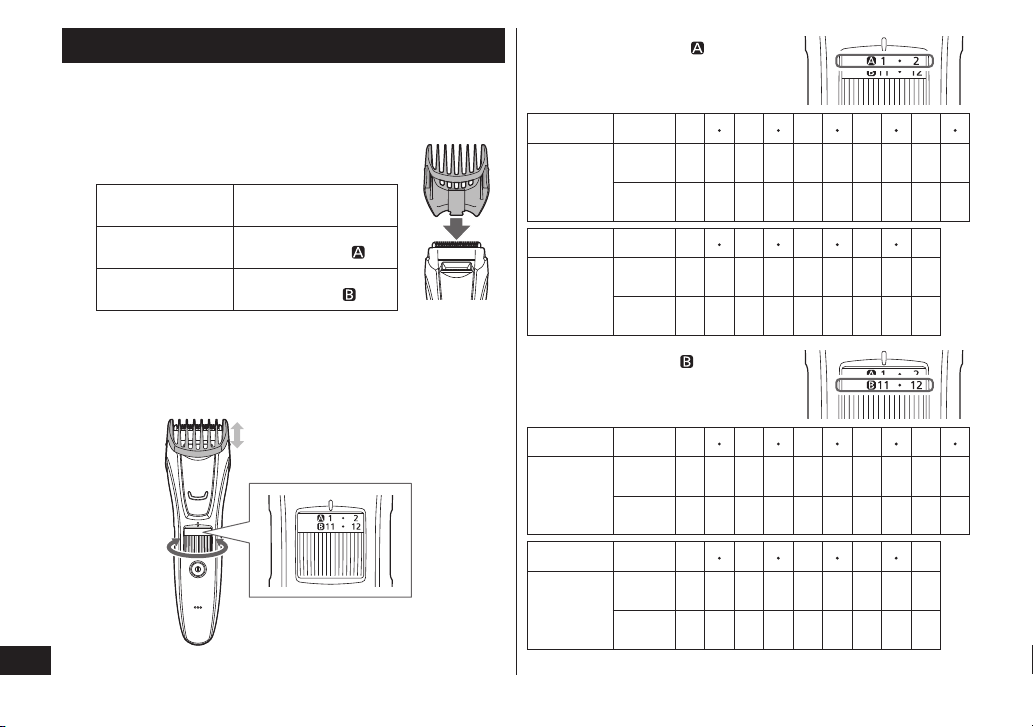
1
1
Mount the comb attachment to the
main body until it clicks.
Trimming height
(estimate)
Comb attachment
1 mm (1/32˝) to
10 mm (13/32˝)
Comb attachment for
beard [
]
11 mm (7/16˝) to
20 mm (51/64˝)
Comb attachment for
hair [
]
• Setting of 10.5 mm (0.41˝) is unavailable.
• The trimming height of the comb attachment for body hair
cannot be adjusted.
This comb attachment trims to a length of approximately
1.5 mm (1/16˝).
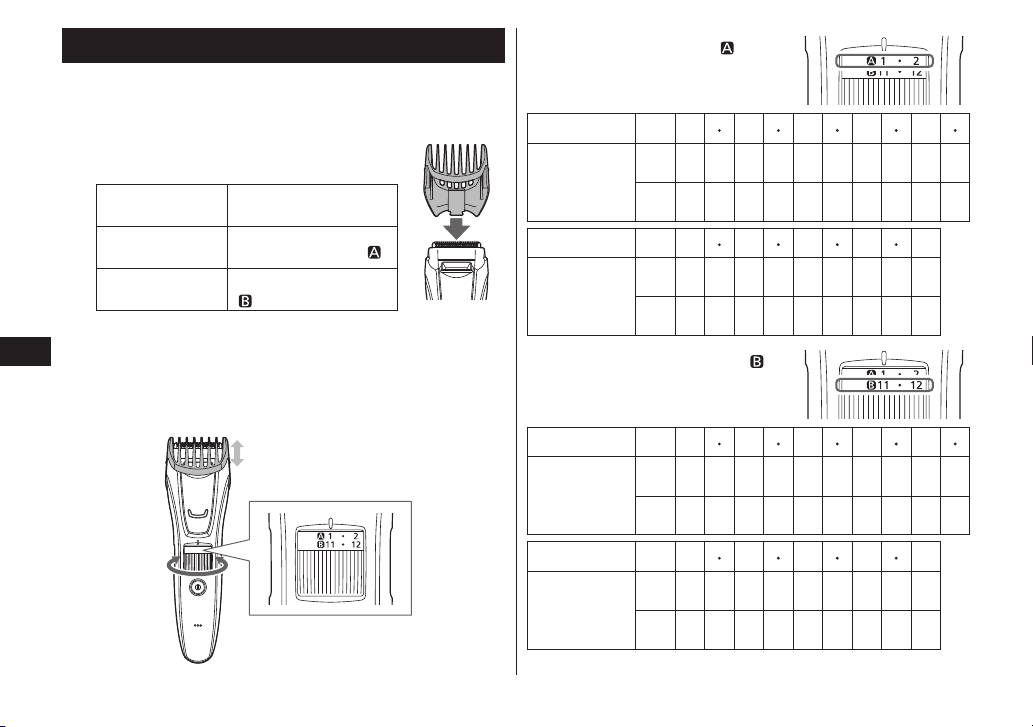
2
2
Turn the dial and adjust the trimming height
indication mark to the desired height.
►Comb attachment for beard
[ ]
Indicator
1
2 3 4 5
Trimming
height
(estimate)
mm 1 1.5 2 2.5 3 3.5 4 4.5 5 5.5
inch
1/32
1/16
5/64
3/32
1/8
9/64
5/32
11/64
3/16
7/32
Indicator
6
7 8 9 10
Trimming
height
(estimate)
mm 6 6.5 7 7.5 8 8.5 9 9.5 10
inch
15/64
1/4 9/32
19/64
5/16
11/32 23/64
3/8
13/32
►Comb attachment for hair
[ ]
Indicator
11
12 13 14 15
Trimming
height
(estimate)
mm 11
11.5
12
12.5
13
13.5
14
14.5
15
15.5
inch
7/16
29/64 15/32
1/2
33/64 17/32
9/16
37/64 19/32 39/64
Indicator
16
17 18 19 20
Trimming
height
(estimate)
mm 16
16.5
17
17.5
18
18.5
19
19.5
20
inch
5/8
21/32 43/64 11/16 23/32 47/64
3/4
49/64 51/64
11
English
Removing the comb attachment
Remove the comb attachment from the main body.
Trimming beard
•Do not use with shaving foam applied or when the beard is wet.
A wet beard may stick to the skin or bunch up, making it difficult
to trim.
Adjusting the beard length
•Make sure that the trimmer is turned off.
1
1
Attach the comb
attachment for beard to the
main body. (See page 10.)
2
2
Set the trimming height.
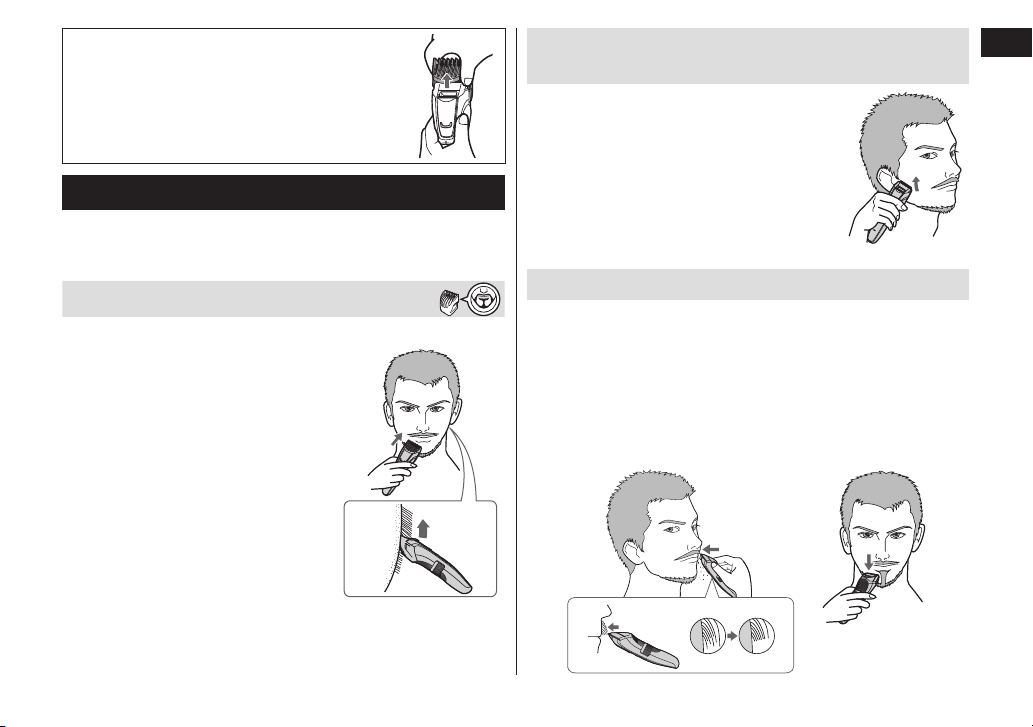
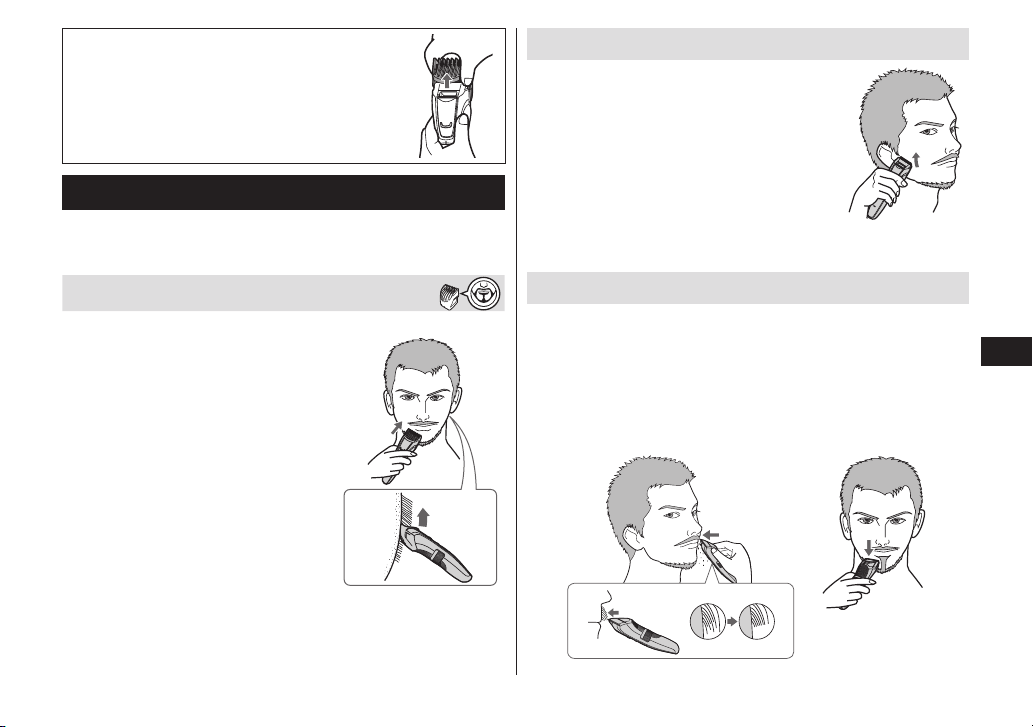
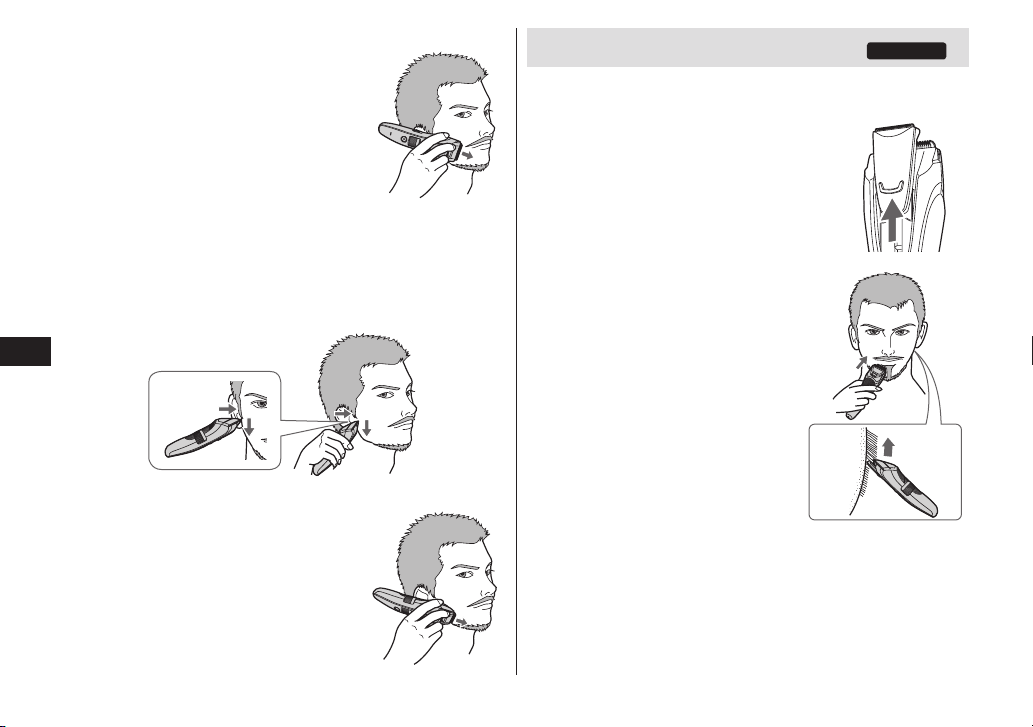
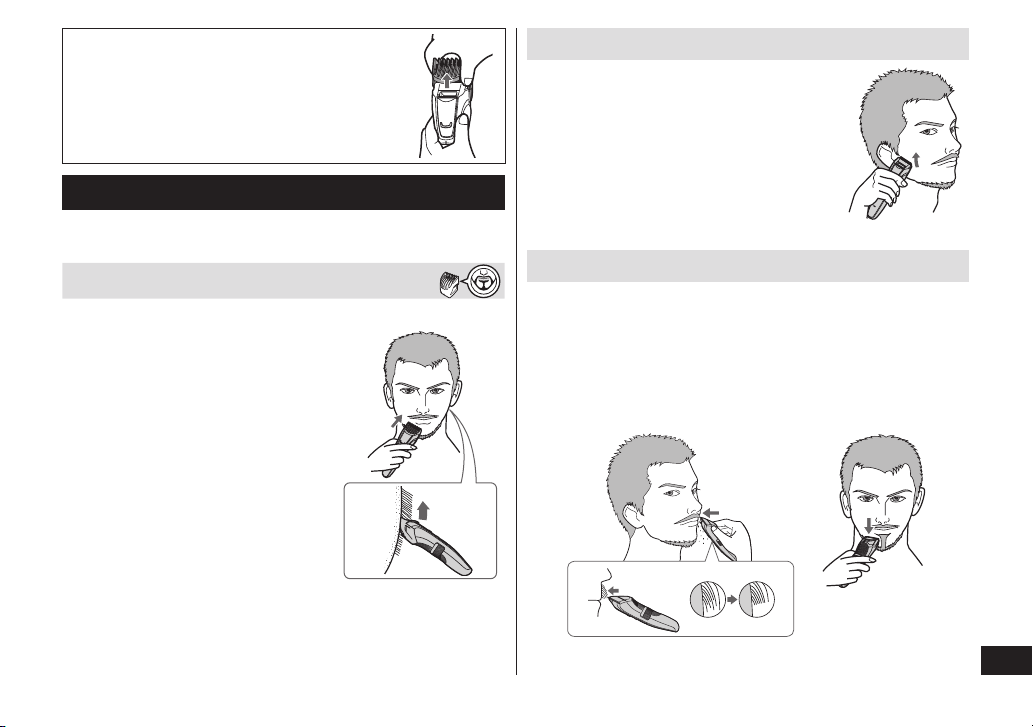
3
3
Holding the trimmer with the
power switch facing upward,
trim by bringing the blade in
contact with the skin and
moving the trimmer against
the flow of the beard.
• Hair trimmings may collect inside
the attachment when a large
volume of beard is cut, so discard
hair trimmings after each use.
Trimming without the comb attachment/
trimming the downy hair
1
1
Remove the comb attachment.
2
2
Holding the trimmer with the
power switch facing outwards,
trim by bringing the blade in
contact with the skin.
• The trimmer cannot trim hair to lengths
less than 0.5 mm (1/64˝).
Beard shaping
Use the trimmer without any comb attachments to properly shape
your beard.
•Use the precision trimmer for trimming narrow areas and for
detailed trimming. (See page 12.)
►Above and below lips
Holding the trimmer with the power switch at the
bottom, cut across a line with the blade at a 90°
angle to the skin.
12
English
►Ends of moustache
Holding the trimmer with the power
switch facing outward, trim
gradually from the ends by bringing
the blade in contact with the skin.
►Sideburns
Holding the trimmer with the power switch at the
bottom, trim by moving the trimmer downward with
the blade at a 90° angle to the sideburns.
►Beard
Holding the trimmer with the
power switch facing outward, trim
by bringing the blade in contact
with the skin and cutting along a
line while moving the trimmer
forward.
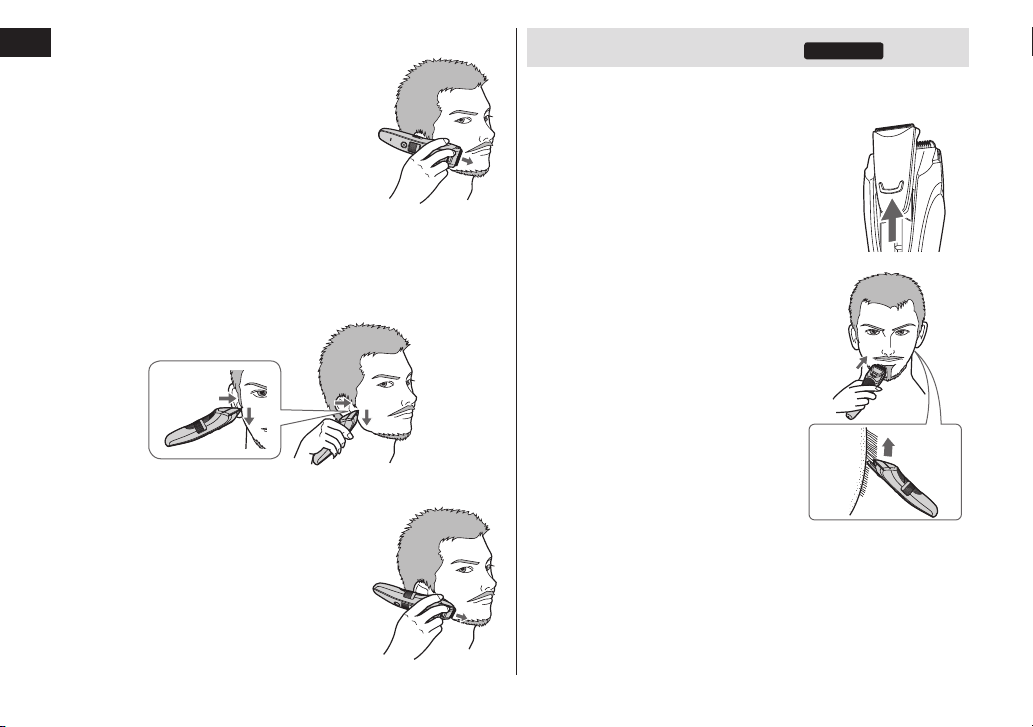
Using the precision trimmer
ER-GB80
Use the precision trimmer for trimming narrow areas and for
detailed trimming.
1
1
Remove the comb attachment.
2
2
Slide the precision trimmer up
to its maximum height.
3
3
Holding the trimmer with
the power switch facing the
skin, trim by bringing the
blade in contact with the
skin.
13
English
Trimming hair
•Make sure that the trimmer is turned off.
•To maintain sharpness, remove hair trimmings between usages.
Trimming to an even length
1
1
Attach the comb attachment for hair to the
main body. (See page 10.)
2
2
Set the trimming height.
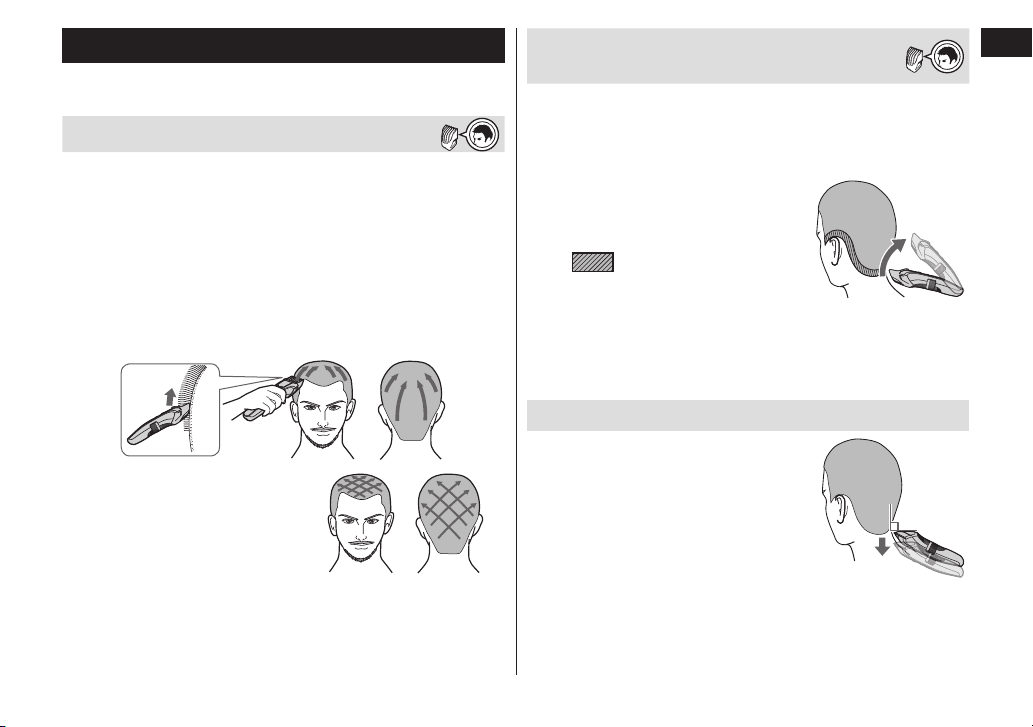
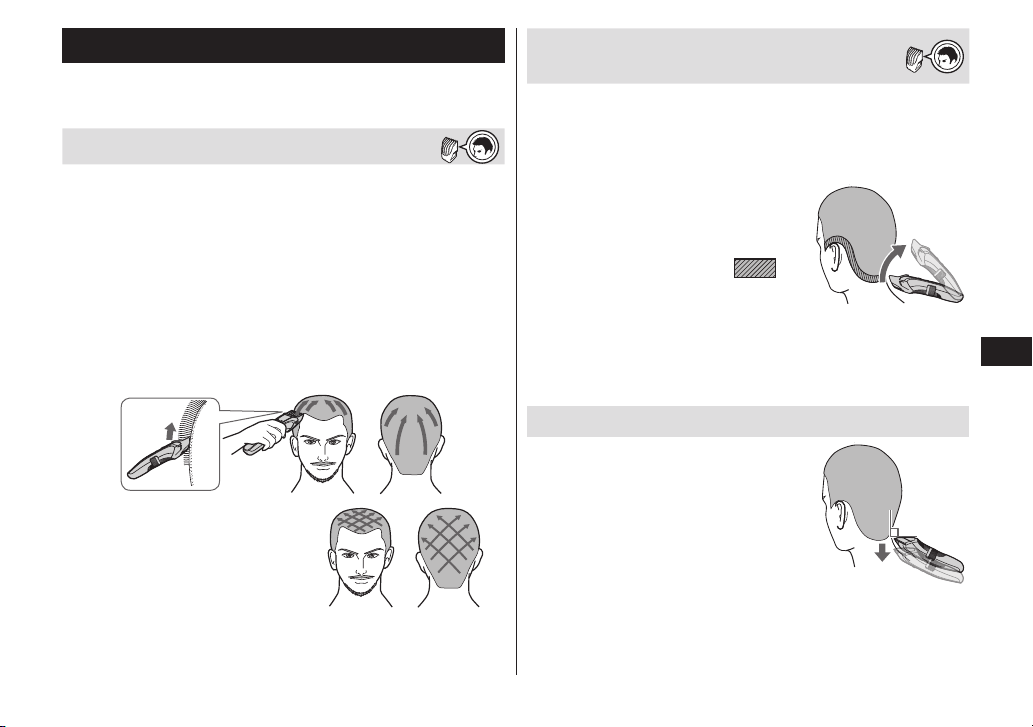
3
3
Holding the trimmer with the power switch
upward, trim by moving the trimmer slowly
against the flow of hair and toward the crown of
your head.
4
4
Trim slowly while
crisscrossing from
various directions to
avoid missing any spots.
Adjusting the length around the ears
and neckline
1
1
Attach the comb attachment for hair to the
main body. (See page 10.)
2
2
Set the trimming height.
3
3
Holding the trimmer with the
power switch upward, trim
around the ears and neckline
(
) by lifting the tip of
the comb attachment little by
little from the hairline.
• When trimming the entire area to 12 mm (15/32˝), use 9 mm
(23/64˝) as a rough standard trimming height for the neckline.
• When trimming the entire area to 9 mm (23/64˝), use 6 mm
(15/64˝) as a rough standard trimming height for the neckline.
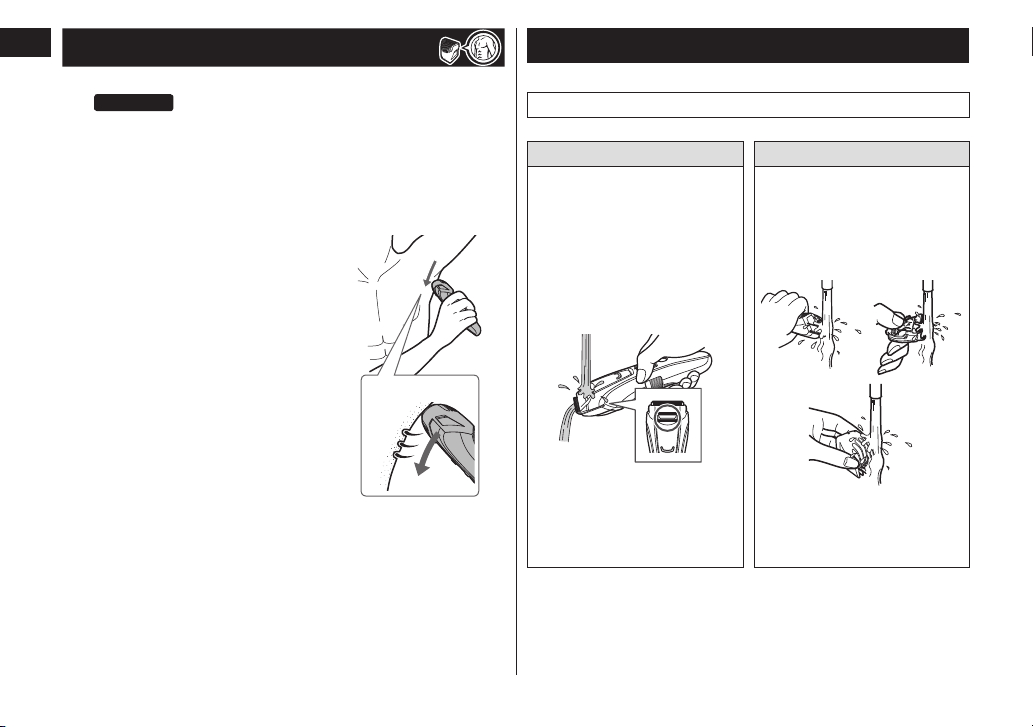
Trimming the downy hair around the neckline
1
1
Remove the comb attachment.
2
2
Holding the trimmer with the
power switch at the bottom,
touching the blade
perpendicular to the area of
downy hair, and move the
trimmer downward along the
skin.
90°
•It is recommended to ask someone else to trim around your own
ears and neckline.
14
English
Trimming body hair
Trim armpits and bikini lines with the comb attachment for body
hair. ER-GB80
•The trimming height is approximately 1.5 mm (1/16˝).
•Do not use when body hair is wet.
Wet body hair may stick to the skin or bunch up, making it difficult
to trim.
1
1
Attach the comb attachment for body hair to
the main body. (See page 10.)
2
2
Holding the trimmer with the
power switch at the bottom,
trim by bringing the blade in
contact with the skin and
slowly moving the trimmer in
the direction as illustrated.
•The desired results may not be achieved if hair is too long. In this
case, trim the hair to a length of about 10 mm (13/32˝) before
using the trimmer.
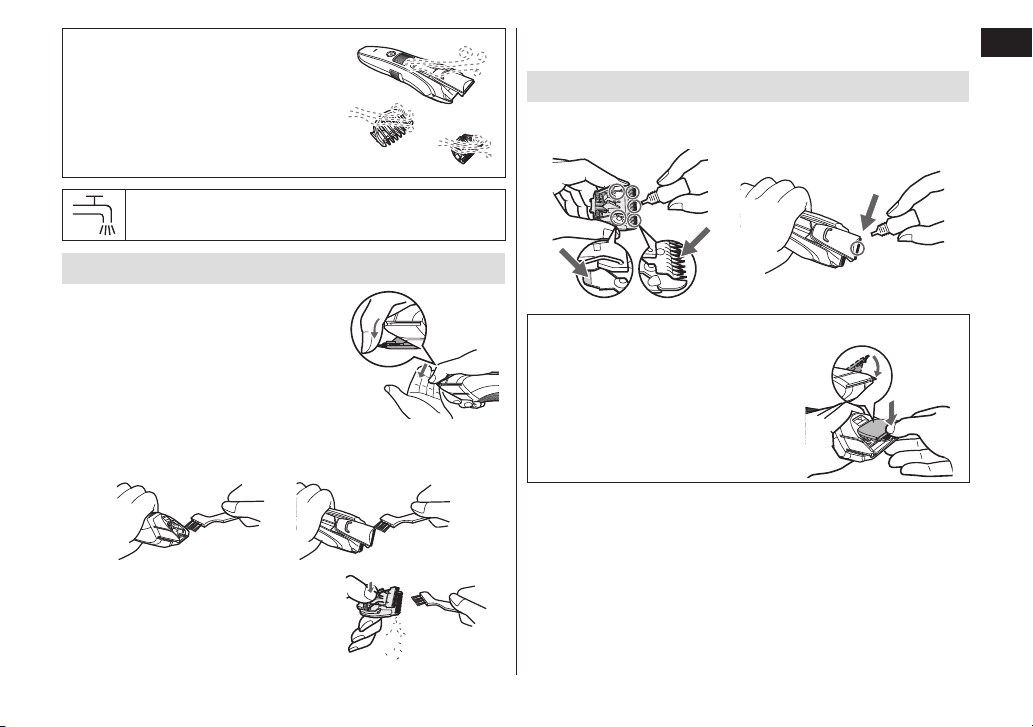
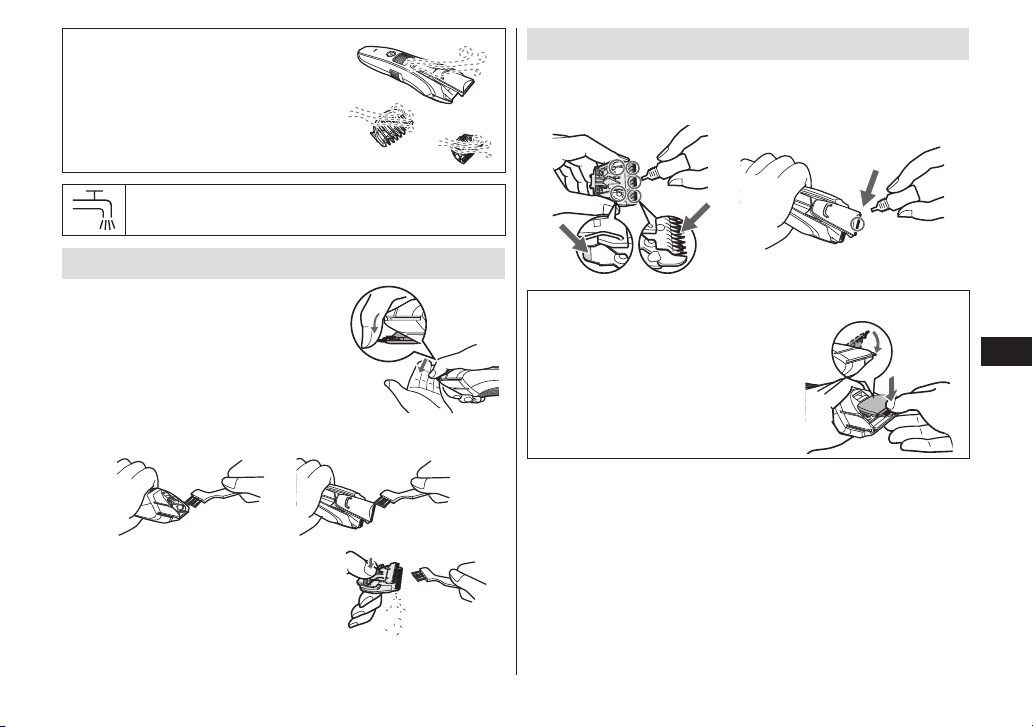
Cleaning the trimmer
• It is recommended to clean after every use.
1. Remove the trimmer from the AC adaptor.
▼ ▼
To remove light dirt To remove heavy dirt
2. Remove the comb
attachment and turn the
trimmer on.
3. Run water down the water
inlet at the front of the main
body, rinse thoroughly for
approximately 20 seconds,
and then turn the trimmer
off.
•Rinse with water and
shake up and down
several times to remove
the water.
2. Remove the comb
attachment and blade.
3. Clean the trimmer, the
blade and the comb
attachments with running
water.
•Rinse with water and
shake up and down
several times to remove
the water.
▼ ▼
15
English
4. Wipe off the water with a towel and
let it dry naturally.
•It will dry faster with the blade
removed.
5. Apply the oil to the blade after drying.
6. Attach the comb attachment and
blade to the trimmer.
The mark on the left means suitable for cleaning
under an open water tap.
Cleaning with the brush
1. Remove the trimmer from the AC
adaptor.
•Make sure that the trimmer is turned
off.
2. Remove the comb attachment.
3. Hold the main body, place your thumb
against the blades and then push them
away from the main body.
4. Brush off any hair trimmings from the main body and from
around the blade.
5. Brush any hair trimmings out from
between the stationary blade and the
moving blade while pressing down the
cleaning lever to raise the moving
blade.
6. Apply the oil to the blade.
7. Attach the comb attachment and blade to the trimmer.
Lubrication
Apply the oil to the trimmer before and after each use.
Apply a drop of the oil to the points indicated by the arrows.
Remounting the blade
Fit the mounting hook into the blade
mounting on the trimmer and then push
in until you hear a click.

16
English
Troubleshooting
Problem Action
The trimmer has become
blunt.
Charge the trimmer.
(See page 9.)
Clean the blade and apply oil.
(See pages 14 and 15.)
Replace the blade.
(See page 15.)
Trimmer stopped
functioning.
Charge the trimmer.
Or use with the AC operation.
(See page 9.)
Charge the battery for
approximately 8 hours
continuously to rejuvenate it.
If few uses remain even after
charging, the battery has reached
the end of its life. (Fluid may be
leaking due to degradation at the
end of battery life.)
Contact an authorized service
center for repair.
The trimmer cannot be
charged.
Push the appliance plug into the
main body all the way and make
sure the charge status lamp glows.
Charge within the recommended
charging temperature of 0 °C
(32 °F) to 35 °C (95 °F).
Trimmer can be used for
only about 10 minutes
even after charging.
Have the battery replaced by an
authorized service center.
Problem Action
The trimmer cannot be
properly cleaned even
after water is poured from
the water inlet.
When the trimmer is very dirty,
remove the blade and wash with
water. (See page 14.)
Makes a loud sound.
Confirm that the blade is properly
attached.
If the problems still cannot be solved, contact the store where you
purchased the unit or a service center authorized by Panasonic for
repair.
Frequently asked questions
Question Answer
Will the battery be
exhausted after a long
period of disuse?
When the appliance is not used
for 6 months or more, the
battery will weaken (leak battery
fluid, etc.). Fully charge the
battery once every 6 months.
Can the battery be charged
before every use?
Yes, but it is recommended that
you charge the battery when it
is empty. The life of the battery
will vary depending upon usage
and storage conditions.
17
English
Blade life
Blade life varies according to the frequency and period of use of
the trimmer.
For example, the blade life is approximately 3 years when using the
trimmer for 5 minutes 10 times a month. Replace the blades if
cutting efficiency reduces substantially despite proper maintenance.
Battery life
Battery life will vary according to the frequency and length of use.
If the battery is charged once a month, the service life will be
approximately 3 years.
If the operating time is significantly shorter even after a full charge,
the battery has reached the end of its life.
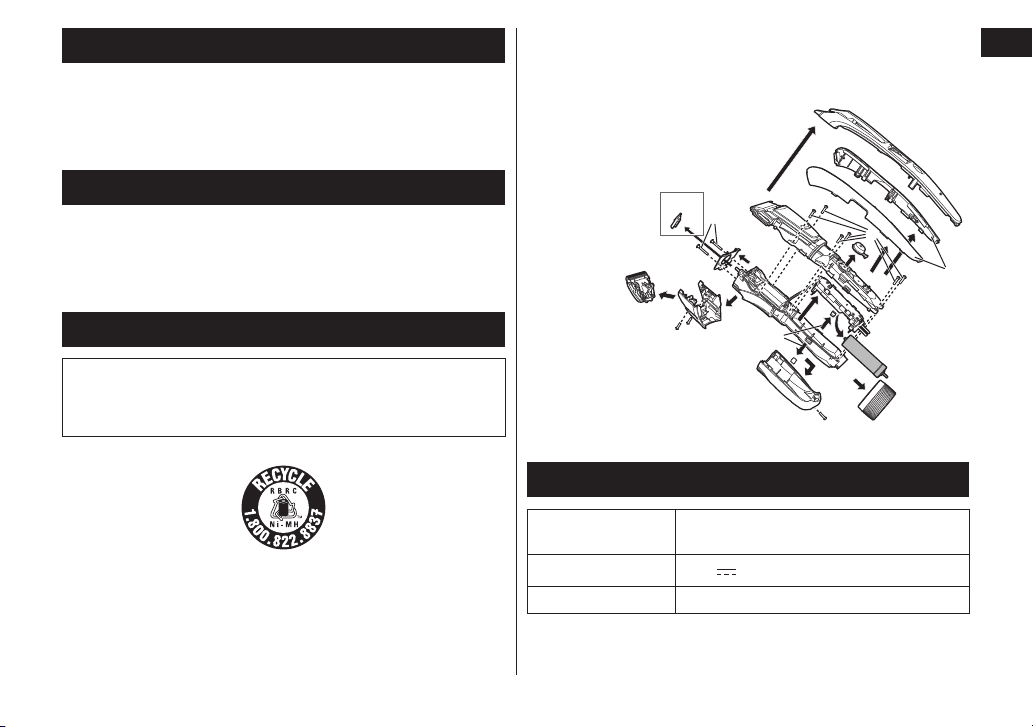
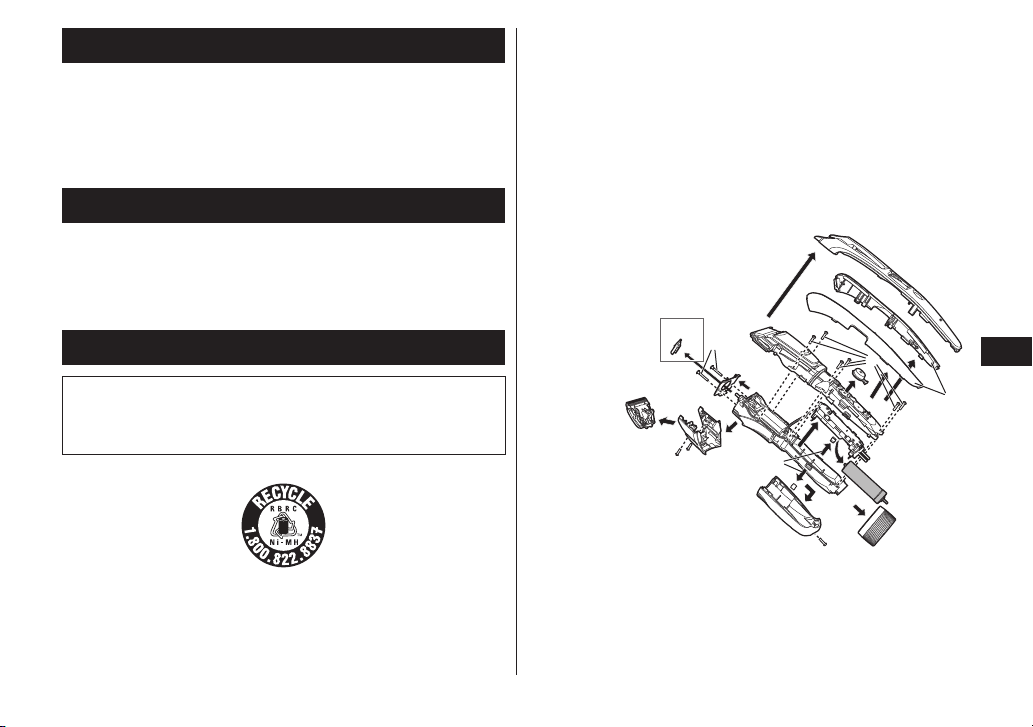
Removing the built-in rechargeable battery
ATTENTION:
A nickel metal hydride battery that is recyclable powers the
product you have purchased. Please call 1‑800‑8‑BATTERY for
information on how to recycle this battery.
Remove the built-in rechargeable battery before disposing of
the trimmer.
This figure must only be used when disposing of the trimmer, and
must not be used to repair it. If you dismantle the trimmer yourself,
it will no longer be waterproof, which may cause it to malfunction.
•Remove the trimmer from the AC adaptor.
•Press the power switch to turn on the power and then keep the
power on until the battery is completely discharged.
•Perform steps to and lift the battery, and then remove it.
•Please take care not to short‑circuit the battery.
*
*for ER‑GB80 only
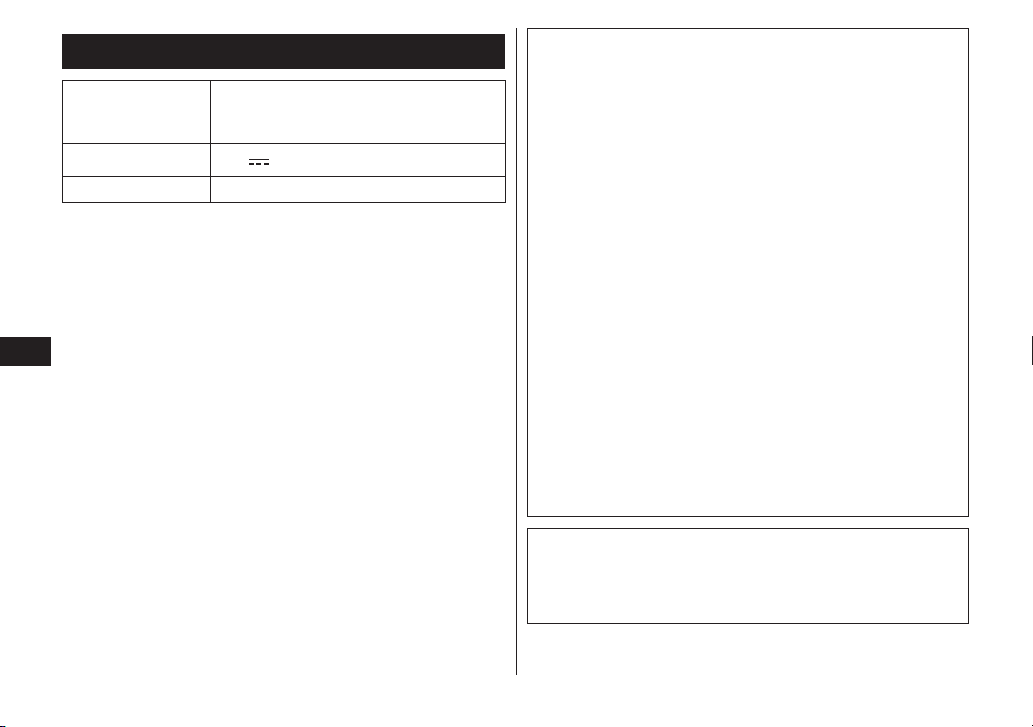
Specifications
Power source
See the name plate on the AC adaptor.
(Automatic voltage conversion)
Motor voltage
1.2 V
Charging time Approx. 1 hour
This product is intended for household use only.

18
English
Federal Communication Commission Interference Statement
This equipment has been tested and found to comply with the
limits for a Class B digital device, pursuant to Part 15 of the FCC
Rules. These limits are designed to provide reasonable
protection against harmful interference in a residential
installation. This equipment generates, uses and can radiate
radio frequency energy and, if not installed and used in
accordance with the instructions, may cause harmful
interference to radio communications. However, there is no
guarantee that interference will not occur in a particular
installation. If this equipment does cause harmful interference to
radio or television reception, which can be determined by turning
the equipment off and on, the user is encouraged to try to
correct the interference by one of the following measures:
• Reorient or relocate the receiving antenna.
• Increase the separation between the equipment and receiver.
• Connect the equipment into an outlet on a circuit different from
that to which the receiver is connected.
• Consult the dealer or an experienced radio/TV technician for help.
FCC Caution: To assure continued compliance, install and use in
accordance with provided instructions. Any changes or
modifications not expressly approved by the party responsible
for compliance could void the user’s authority to operate this
equipment.
This device complies with part 15 of the FCC Rules. Operation is
subject to the following two conditions: (1) This device may not
cause harmful interference, and (2) this device must accept any
interference received, including interference that may cause
undesired operation.
Personal Care & Beauty Care Products
FOR USA AND PUERTO RICO ONLY
30-Day Quality
Satisfaction Guarantee
If you are dissatisfied with any Panasonic Personal Care &
Beauty Care Products for any reason, simply return it to the
place of purchase with a dated proof of purchase, in the original
packaging, with all accessories, parts and instructions, within
30 days of the date of purchase, for a full refund, or call
Panasonic at 1‑800‑338‑0552.
Abuse or misapplication of this product voids the guarantee.
FOR YOUR CONVENIENCE, WE HAVE ESTABLISHED A
TOLL-FREE (IN USA ONLY) NATIONAL ACCESSORY
PURCHASE HOT LINE AT 1-800-332-5368.

19
Français
Moded’emploi
Tondeuseàbarbe/Cheveuxrechargeable/CA
(àusagedomestique)
Modèle
ER-GB80/ER-GB60
Mercid’avoirchoisiceproduitPanasonic.
Avantdefairefonctionnercetappareil,veuillezliretouteslesinstructionsetlesconserverpouruneutilisationultérieure�
Consignes de sécurité ................... 20
Usageprévu���������������������������������������������� 24
Identicationdescomposants���������������� 24
Rechargedelatondeuse������������������������� 25
Utilisationdelatondeuse������������������������ 25
Utilisationdupeigne�������������������������������� 26
Tailledelabarbe��������������������������������������� 27
Coupedescheveux���������������������������������� 29
Tailledespoilsducorps��������������������������30
Nettoyagedelatondeuse������������������������ 30
Dépannage������������������������������������������������ 32
Questions-Réponses������������������������������ 32
Duréedeviedelalame���������������������������� 33
Duréedeviedelapile������������������������������ 33
Retraitdelapilerechargeableintégrée���
33
Caractéristiques���������������������������������������34
Tabledesmatières
20
Français
Consignesdesécurité
Anderéduirelerisquedeblessure,dedécès,dechocélectrique,
d’incendieoudedommagesàlapropriété,respecteztoujoursles
consignesdesécuritésuivantes.
Explicationdessymboles
Lessymbolessuivantssontutiliséspourrépertorieretdécrireleniveau
derisque,deblessuresetdedommagesàlapropriétépouvantêtre
causéslorsquelesconsignessontignoréesetquel’appareiln’estpas
utilisédemanièreconforme.
DANGER
Signaleundangerpotentiel
pouvantentraînerdes
blessuresgravesoulamort.
AVERTISSEMENT
Signaleundangerpotentiel
quipeutentraînerdes
blessuresgravesoulamort.
ATTENTION
Signaleundanger
susceptibled’entraînerdes
blessuresmineures.
Lessymbolessuivantssontutiliséspourrépertorieretdécrireletypede
consignesàobserver.
Cesymboleestutilisépouravertirlesutilisateursqu’ils’agit
d’uneprocéduredefonctionnementspéciquequinedoitpas
êtreeffectuée.
Cesymboleestutilisépouravertirlesutilisateursqu’ils’agit
d’uneprocéduredefonctionnementspéciquequidoitêtre
suivieandepouvoirutiliserl’appareilentoutesécurité.
CONSIGNESDESÉCURITÉIMPORTANTES
Lorsdel’utilisationd’unappareilélectrique,ilfaut
toujoursprendredesprécautionsdebase,ycompris
lessuivantes:
Liseztouteslesinstructionsavantd’utilisercetappareil.
DANGER
Anderéduiretoutrisquede
chocélectrique:
1.Netouchezpasunappareilquiesttombédans
l’eau.Débranchez-leimmédiatement.
2.N’immergeznin’utilisezlechargeurdansladouche.
3.Neplacezninerangezl’appareillàoùilpeuttomber
ouêtreprécipitédansunebaignoireouunévier.Ne
déposezoun’échappezpasdansl’eauoudansun
autreliquide.
4.Débrancheztoujourscetappareildelaprise
électriqueimmédiatementaprèsusage,excepté
pendantlacharge.
5.Débranchezcetappareilavantdelenettoyer.
6.N’employezpasderallongeaveccetappareil.
AVERTISSEMENT
Anderéduirelerisquedebrûlures,d’incendie,
dechocélectriqueoudeblessurescorporelles:
1.Unegrandevigilanceestnécessairelorsquecet
appareilestutilisépardesenfantsoudespersonnes
handicapées,sureuxouenleurprésence.
21
Français
2.Utilisezcetappareiluniquementpoursonusage
prévu,commeledécritleprésentmanuel.N’utilisez
pasd’accessoiresquinesontpasrecommandéspar
lefabricant.
3.N’utilisezjamaiscetappareilsilecordonoulache
estendommagé,s’ilnefonctionnepascorrectement,
s’ilesttombé,endommagéoutombédansl’eau.
Retournezl’appareilàuncentrederéparationpour
lefaireinspecteretréparer.
4.Gardezlecordonàdistancedessurfaceschauffées.
5.Nefaitesjamaistomberoun’insérezpasunobjet
danslesouverturesdel’appareil.
6.N’utilisezpasàl’extérieur,dansdesendroitsoùdes
aérosols(pulvérisateurs)sontutilisésoulàoùde
l’oxygèneestadministré.
7.N’utilisezpascerasoiravecunpeigneendommagé
oucassé,carilpourraitprovoquerdesblessuresau
visage.
8.Brancheztoujourslacheàl’appareilenpremier,
puispourdébrancher,commuteztoutesles
commandessur“arrêt”avantdedébrancher.
CONSERVEZLESPRÉSENTESINSTRUCTIONS
AVERTISSEMENT
Nepasbrancherl’adaptateuràuneprisesecteuroula
débrancheraveclesmainshumides�
-
Cecipourraitentraînerunchocélectriqueoudesblessures.
Nejamaisutiliserl’appareilsil’adaptateursecteurest
endommagéousilached’alimentationn’estpas
correctementinséréedansuneprisesecteur�
Nepasendommagernimodier,niplierexcessivement,
nitirer,nitordrelecordon�
Etnepasplacerd’objetlourdsurlecordon
d’alimentation,nilepincer�
-
Cecipourraitprovoquerunchocélectriqueouunincendiedûà
uncourt-circuit.
Nepasutiliserunetensionnominalesupérieureàcellede
lapriseouducâblesecteur�
-
Undépassementdetensionnominaleenconnectantune
quantitétropimportantedechesdansuneprisesecteurpeut
entraînerunincendiedûàunesurchauffe.
Ceproduitdisposed’unepilerechargeableintégrée�Ne
paslajeterdanslefeunil’exposeràlachaleur�
-
Toutmanquementàcequiprécèdepeutentraînerune
surchauffe,uneinammationouuneexplosiondel’appareil.
Nepasmodier,niréparerl’appareil�
-
Cecipourraitprovoquerunincendie,unchocélectriqueoudes
blessures.
Contacteruncentredeserviceagréépourlesréparations
(remplacementdelapile,etc.).
Nejamaisdémonterl’appareil,sauflorsdesamiseau
rebut�
-
Cecipourraitprovoquerunincendie,unchocélectriqueoudes
blessures.
22
Français
AVERTISSEMENT
Nepasnettoyeravecdel’eauquandl’adaptateursecteur
estxé�
-
Cecipourraitprovoquerunchocélectriqueouunincendiedûà
uncourt-circuit.
Nepasutiliserunautreadaptateurquel’adaptateur
secteurfourni�Etnepaschargerunautreproduitàl’aide
del’adaptateursecteurfourni�
-
Cecipourraitentraînerdesbrûluresouunincendieduesàun
court-circuit.
Nepasrangerl’appareildansunendroitàportéedes
enfants�Nepasleslaisserl’utiliser�
-
Mettrelalame,labrossedenettoyageet/oulerécipientd’huile
danslabouchepeutcauserdesaccidentsetdesblessures.
S’assurerdetoujoursfairefonctionnerl’appareilparle
biaisd’unesourced’alimentationélectriquedontla
tensioncorrespondàlatensionnominaleindiquéesur
l’adaptateursecteur�
Insérercomplètementl’adaptateur�
-
Sinon,cecipourraitprovoquerunincendieouchocélectrique.
Cesserimmédiatementd’utiliserl’appareiletdébrancher
l’adaptateurencasd’anomalieoudedysfonctionnement�
-
Sinon,cecipourraitprovoquerunincendie,unchocélectrique
oudesblessures.
<Encasd’anomalieoudedéfaillance>
• L’appareilprincipaloul’adaptateursecteurestdéformé
ouanormalementchaud�
• L’appareilprincipaloul’adaptateursecteursentlebrûlé�
• Unbruitanormalestconstatéaucoursdel’utilisation
ouduchargementdel’appareilprincipaloude
l’adaptateursecteur�
-
Faireimmédiatementvérierouréparerl’appareildansuncentre
deserviceagréé.
Nettoyerrégulièrementlached’alimentationetlache
del’appareilpouréviterl’accumulationdepoussière�
-
Sinon,cecipourraitprovoquerunincendiedûàundéfaut
d’isolementprovoquéparl’humidité.
Débrancherl’adaptateuretl’essuyeravecunchiffonsec.
Sil’huileestingéréeaccidentellement,neprovoquerpas
levomissement,boireunegrandequantitéd’eauet
contacterunmédecin�
Sil’huileentreencontactaveclesyeux,lesrincer
immédiatementàl’eaucouranteetconsulterunmédecin�
-
Danslecascontraire,vouspourriezrencontrerdes
complicationsphysiques.
23
Français
AVERTISSEMENT
Cetappareiln’apasétéconçupourêtreutilisépardes
personnes(enfantsycompris)souffrantd’unhandicap
physique,sensorieloumental,ounedisposantpasde
l’expérienceetdesconnaissancesnécessairesàune
utilisationsûre,àmoinsqu’ellesaientreçutoutesles
consignesrequisesparlapersonneresponsabledeleur
sécuritéquantàl’utilisationdel’appareil�Nepaslaisser
unenfantjoueraveclatondeuse�
-
Sinon,cecipourraitprovoquerunaccidentoudesblessures.
Lecordond’alimentationnepeutpasêtreremplacé�Sile
cordonestendommagé,l’adaptateursecteurdoitêtremis
aurebut�
-
Sinon,cecipourraitprovoquerunaccidentoudesblessures.
ATTENTION
Nepasappuyerlalamecontrelapeau�
Nepasutiliserceproduitdansunquelconqueautrebut
quelatailledelabarbe,descheveuxetdespoilsdu
corps�
Nepasappliquerleslamesdirectementsurlesoreillesou
unepeauirritée(gonements,blessuresoutâches)�
-
Cecipourraitendommagervotrepeau.
Éviterquedesbrochesoudesdéchetsadhèrentàla
ched’alimentationouàlachedel’appareil�
-
Cecipourraitprovoquerunchocélectriqueouunincendiedûà
uncourt-circuit.
Nepaslaisserl’appareiltomberoulesoumettreàunchoc�
-
Cecipourraitprovoquerdesblessures.
Nepasserrerlecordonenl’enroulantautourde
l’adaptateuravantdeleranger�
-
Cecirisquederomprelelducordonaveclacharge,etcauser
unincendiedûàuncourt-circuit.
Vérierqueleslamesnesontpasendommagéesni
déforméesavantutilisation�
-
Sinon,cecipourraitblesserlapeau.
Débrancherl’adaptateuroulachedel’appareilenles
maintenantplutôtqu’entirantsurlecordon�
-
Sinon,cecipourraitprovoquerunchocélectriqueoudes
blessures.
► Miseaurebutdelapilerechargeable
DANGER
Cettepilerechargeables’utiliseuniquementaveccette
tondeuse�Nepasutiliserlapileavecunquelconqueautre
appareil�
Nepasrechargerlapileunefoisqu’elleaétéretiréede
l’appareil�
• Nepaslajeteraufeuoulasoumettreàunesourcede
chaleur�
• Nepassouder,démonter,oumodierlapile�
• Nepaslaisserlesbornespositivesetnégativesdela
pileentrerencontactl’uneavecl’autreviadesobjetsen
métal�
• Nepasrangeroutransporterlapileavecdesbijoux
métalliques,commedescolliersoudesépinglesà
cheveux�
• Nejamaisdécollerlerevêtementdelapile�
-
Toutmanquementàcequiprécèdepeutentraînerune
surchauffe,uneinammationouuneexplosiondel’appareil.
24
Français
AVERTISSEMENT
Unefoislapilerechargeableretirée,nepaslalaisserà
portéedesenfantsoudesnourrissons�
-
Encasd’absorptionaccidentelle,lapileestnocivepourlecorps.
Enpareilcas,consulterunmédecinimmédiatement.
Siduliquideenprovenancedelapilefuit,prendreles
mesuressuivantes�Nepastoucherlapileàmainsnues�
-
Leliquideenprovenancedelapilepeutrendreaveugleencas
decontactaveclesyeux.
Nepassefrotterlesyeux.Laverimmédiatementavecdel’eau
propreetconsulterunmédecin.
-
Leliquideenprovenancedelapilepeutcauserune
inammationoudesblessuresencasdecontactaveclapeau
oudesvêtements.
Lerincercomplètementavecdel’eaupropreetconsulterun
médecin.
Usageprévu
•
Avantetaprèschaqueutilisation,appliquezdel’huileauxendroits
indiquéspardesèches.(Voirpage31.)
•
Latondeusepeutchaufferdurantlefonctionnementet/oule
chargement.Ceciestnormal.
•
Nettoyezleboîtieruniquementavecuntissuimbibéd’eaucouranteou
d’eaucourantesavonneuse.N’utilisezpasdesolvant,d’essence,
d’alcooloud’autresproduitschimiques.
•
Avantd’utiliserunaccessoire,vériezqu’ilaétéinstallécorrectement.
Sinoncecipourraitcoupertropcourtlescheveux.
•
Aprèsutilisation,rangezlatondeusedansunendroitsec.
•
L’appareilnedoitpasêtreutilisésurdesanimaux.
Identicationdescomposants
ER-GB80
ER-GB60
A
Boîtier
Tondeusedeprécision
ER-GB80
2
Repèred’indicationde
hauteurdecoupe
3
Molette(Commandede
réglagedehauteur)
4
Boutondemiseenmarche
5
Témoind’étatdecharge
6
Prise
7
Entréed’eau
B
Lame
8
Levierdenettoyage
9
Lamemobile
Lamexe
Crochetdemontage
C
Peignepourlabarbe[ ]
(1mm(1/32po)à10mm
(13/32po))
D
Peignepourlescheveux[ ]
(11mm(7/16po)à20mm
(51/64po))
E
Peignepourlespoilsdu
corps ER-GB80
F
Adaptateursecteur(RE9-70)
Adaptateur
Fiched’alimentation
Cordon
Ficheducordon
d’alimentation
Accessoires
G
Brossedenettoyage
H
Huile
I
Pochettederangement
25
Français
Rechargedelatondeuse
•
Vériezquelatondeuseesthorsmarche.
1
1
Raccordezlacheducordon
d’alimentationàlaprise�
2
2
Branchezl’adaptateursuruneprise
dusecteur�
• Vériezqueletémoind’étatdechargeest
allumé.
• Larecharges’achèveauboutde1heure
environ.
1
2
3
3
Débranchezl’adaptateurlorsqueletémoind’étatde
chargecessedebriller�
• Latempératureambianterecommandéepourlachargeestde
0–35°C(32–95°F).Lesperformancesdelapilepeuventse
dégraderencasdetempératuresextrêmementbassesouélevées
etlapilerisquedenepassechargercorrectement.
• Unerechargecomplètefournitassezd’énergiepourenviron
50minutesutilisation.
Laduréedefonctionnementpeutvarierselonlafréquence
d’utilisation,lemodeopératoireetlatempératureambiante.
• Lorsquevouschargezlatondeusepourlapremièrefoisousielle
n’apasétéutiliséependantplusde6mois,letémoinsurleboîtier
risquedenepass’allumerpendantquelquesminutes,etladurée
defonctionnementpourraitêtreréduite.Veuillezchargerla
tondeusependantplusde8heuresdanscecas.
• Silaformedelachenecorrespondpasàlaprisedecourant,
utilisezunadaptateurdeprisedelamêmeconguration.
FonctionnementsurcourantCAdusecteur
Ilestpossibled’utiliserlatondeuseenbranchantl’adaptateursecteur
commepourunerechargeclassique.
•
Silapileesttropfaible,leslamespeuventsedéplacerlentementou
s’arrêter,mêmebranchésursecteur.Danscecas,rechargezlapile
pendantaumoins1minute.
•
Lapileseradéchargée,mêmebranchéesursecteur.
Utilisationdelatondeuse
•
Vériezquelatondeuseesthorsmarche.
•
Nousconseillonsd’utiliserlatondeuseàunetempératureambiante
compriseentre0et35°C(32–95°F).Endehorsdecetteplage,elle
risquedeneplusfonctionner.
1
1
Installezlepeignesouhaitéetréglezlahauteurde
coupeaubesoin�(Voirpage26�)
• Vouspouvezégalementl’utilisersanslepeigne.
(Hauteurdecoupe:environ0,5mm(1/64po))
• Lalongueurdescheveuxseraàpeinepluslonguequelahauteur
sélectionnée.
2
2
Appuyezsurleboutondemiseen
marchepourmettrel’appareilsous
tension�
26
Français
Utilisationdupeigne
•
Faitesattentionànepasvouscouperlamainaveclalamelorsde
l’installationetduretraitdupeigne.
•
Vériezquelatondeuseesthorsmarche.
1
1
Montezlepeignesurleboîtierde
l’appareiljusqu’àcequ’ils’encliquète�
Hauteurdecoupe
(estimation)
Peigne
1mm(1/32po)à
10mm(13/32po)
Peignepourlabarbe[
]
11mm(7/16po)à
20mm(51/64po)
Peignepourlescheveux
[
]
• Leréglagesur10,5mm(0,41po)n’estpasdisponible.
• Iln’estpaspossibled’ajusterlahauteurdecoupedupeignepour
lespoilsducorps.
Cepeignecoupeàunelongueurd’environ1,5mm(1/16po).
2
2
Tournezlamoletteetajustezlerepèred’indication
dehauteurdecoupeàlahauteursouhaitée�
► Peignepourlabarbe[ ]
Indicateur
1 2 3 4 5
Hauteurde
coupe
(estimation)
mm 1 1,5 2 2,5 3 3,5 4 4,5 5 5,5
po 1/32
1/16
5/64
3/32
1/8
9/64
5/32
11/64
3/16
7/32
Indicateur
6 7 8 9 10
Hauteurde
coupe
(estimation)
mm 6 6,5 7 7,5 8 8,5 9 9,5 10
po
15/64
1/4 9/32
19/64
5/16
11/32 23/64
3/8
13/32
► Peignepourlescheveux[ ]
Indicateur
11
12 13 14 15
Hauteurde
coupe
(estimation)
mm 11
11,5
12
12,5
13
13,5
14
14,5
15
15,5
po 7/16
29/64 15/32
1/2
33/64 17/32
9/16
37/64 19/32 39/64
Indicateur
16
17 18 19 20
Hauteurde
coupe
(estimation)
mm 16
16,5
17
17,5
18
18,5
19
19,5
20
po 5/8
21/32 43/64 11/16 23/32 47/64
3/4
49/64 51/64
27
Français
Retraitdupeigne
Retirezlepeigneduboîtierdel’appareil.
Tailledelabarbe
•
Nepasutiliseravecdelamousseàraseroulorsquelabarbeesthumide.
Unebarbehumiderisquedecolleràlapeauoudefairedestouffes,la
rendantdifcileàcouper.
Réglagedelalongueurdebarbe
•
Vériezquelatondeuseesthorsmarche.
1
1
Fixezlepeignepourlabarbe
auboîtier�(Voirpage26�)
2
2
Réglezlahauteurdecoupe�
3
3
Toutenmaintenantla
tondeuseavecleboutonde
miseenmarchefaceversle
haut,taillezlabarbeen
mettantlalameaucontactde
lapeauetendéplaçantla
tondeuseàcontresensdupoil
delabarbe�
• Despoilsdebarbepeuvents’accumuleràl’intérieurdupeigne
lorsqu’unebarbevolumineuseestcoupée.Éliminezdonctousles
poilsdebarbedupeigneaprèschaqueutilisation.
Taillersanslepeigne/taillerleduvet
1
1
Retirezlepeigneduboîtierdela
tondeuse�
2
2
Toutenmaintenantlatondeuse
avecleboutondemiseenmarche
faceversl’extérieur,taillezlabarbe
enmettantlalameaucontactdela
peau�
• Latondeusenepeutpascouperlespoilsà
deslongueursinférieuresà0,5mm(1/64po).
Miseenformedelabarbe
Utilisezlatondeusesanspeignepourdonnerdebellesformesàvotrebarbe.
•
Utilisezlatondeusedeprécisionpourtaillerleszonesétroitesetpour
unetailledétaillée.(Voirpage28.)
► Au-dessuseten-dessousdeslèvres
Toutenmaintenantlatondeuseavecleboutondemise
enmarchefaceverslebas,coupezlelongd’uneligne
aveclalameperpendiculaireàlapeau�
28
Français
► Extrémitésdelamoustache
Toutenmaintenantlatondeuseavecle
boutondemiseenmarchefacevers
l’extérieur,taillezgraduellementdepuis
lesextrémitésenmettantlalameau
contactdelapeau�
► Pattes
Toutenmaintenantlatondeuseavecleboutondemise
enmarchefaceverslebas,taillezlabarbeendéplaçant
latondeuseverslebasaveclalameperpendiculaireaux
pattes�
► Barbe
Toutenmaintenantlatondeuseavec
leboutondemiseenmarchefacevers
l’extérieur,taillezlabarbeenmettant
lalameaucontactdelapeaueten
coupantlelongd’unelignetouten
déplaçantlatondeuseversl’avant�
Utilisationdelatondeusedeprécision
ER-GB80
Utilisezlatondeusedeprécisionpourtaillerleszonesétroitesetpourune
tailledétaillée.
1
1
Retirezlepeigneduboîtierdela
tondeuse�
2
2
Faitesglisserlatondeusede
précisionjusqu’àsahauteur
maximale�
3
3
Toutenmaintenantla
tondeuseavecleboutonde
miseenmarchefaceàlapeau,
taillezlabarbeenmettantla
lameaucontactdelapeau�
29
Français
Coupedescheveux
•
Vériezquelatondeuseesthorsmarche.
•
Pouruntravaildeprécision,retirerlesdépôtsdecheveuxentreles
utilisations.
Coupeàunelongueurégale
1
1
Fixezlepeignepourcheveuxauboîtier�
(Voirpage26�)
2
2
Réglezlahauteurdecoupe�
3
3
Toutenmaintenantleboutondemiseenmarchede
latondeuseverslehaut,coupezlescheveuxen
déplaçantlentementlatondeusedanslesens
inversedelapoussedescheveuxetenvous
dirigeantverslecentredevotretête�
4
4
Coupezenentrecroisant
doucementdansplusieurs
directionsandenepas
oublierdezone�
Réglagedelalongueurautourdesoreilles
etdelanuque
1
1
Fixezlepeignepourcheveuxauboîtier�
(Voirpage26�)
2
2
Réglezlahauteurdecoupe�
3
3
Toutenmaintenantleboutonde
miseenmarchedelatondeuse
verslehaut,coupezautourdes
oreillesetdelanuque(
)en
soulevantpetitàpetitl’extrémité
dupeignedelalignedescheveux�
• Pourcoupertoutelazoneà12mm(15/32po),utilisez9mm(23/64po)
commehauteurdecoupesommairestandardpourlanuque.
• Pourcoupertoutelazoneà9mm(23/64po),utilisez6mm(15/64po)
commehauteurdecoupesommairestandardpourlanuque.
Coupeduduvetautourdelanuque
1
1
Retirezlepeigneduboîtierde
latondeuse�
2
2
Maintenezleboutondemiseen
marchedelatondeuseversle
bas,enpositionnantlalame
perpendiculairementàlazone
deduvetetdéplacezlatondeuse
verslebas,lelongdelapeau�
90°
•
Ilestconseillédedemanderàuneautrepersonnepourlacoupeautour
devosoreillesetdelanuque.

30
Français
Tailledespoilsducorps
Taillezlesaissellesetlalignedubikiniaveclepeignepourpoilsducorps.
ER-GB80
•
Lahauteurdecoupeestd’environ1,5mm(1/16po).
•
Nepasutiliserlorsquelespoilsducorpssonthumides.
Lespoilshumidesducorpsrisquentdecolleràlapeauoudefairedes
touffes,lesrendantdifcileàcouper.
1
1
Fixezlepeignepourlespoilsducorpsauboîtier�
(Voirpage26�)
2
2
Toutenmaintenantleboutonde
miseenmarchedelatondeuse
verslebas,taillezlespoilsen
mettantlalameaucontactdela
peauetendéplaçantlatondeuse
danslesensindiquédans
l’illustration�
•
Lesrésultatsescomptésrisquentdenepasêtreatteintssilespoilssont
troplongs.Danscecas,coupezlespoilsàunelongueurd’environ
10mm(13/32po)avantd’utiliserlatondeuse.
Nettoyagedelatondeuse
• Unnettoyageestrecommandéaprèschaqueutilisationdel’appareil.
1. Débranchezlatondeusedel’adaptateursecteur.
▼ ▼
Pourenleverlespetitesimpuretés
Pourenleverlesgrossesimpuretés
2. Retirezlepeigneetmettezla
tondeuseenmarche.
3. Faitescoulerdel’eaudans
l’entréed’eausituéeàl’avant
duboîtierdel’appareil,rincez
soigneusementpendant
environ20secondes,puis
mettezlatondeusehors
marche.
•
Rincezavecdel’eauet
secouezplusieursfoispour
enleverl’eau.
2. Retirezlepeigneetlalame.
3. Nettoyezlatondeuse,lalame
etlespeignesàl’eaucourante.
•
Rincezavecdel’eauet
secouezplusieursfoispour
enleverl’eau.
▼ ▼
31
Français
4.
Essuyezlatondeuseàl’aided’une
serviette,puislaissezséchernaturellement.
•
Lalamesécheraplusrapidementsielle
estretirée.
5. Appliquezquelquesgouttesd’huilesurla
lameunefoissèche.
6. Fixezlepeigneetlalameàlatondeuse.
Lamarquesurlagauchesigniequ’ilestpossiblede
nettoyerl’appareilsousunrobinetd’eaucourante�
Nettoyageaveclabrosse
1. Débranchezlatondeusedel’adaptateur
secteur.
•
Vériezquelatondeuseesthorsmarche.
2. Retirezlepeigneduboîtierdelatondeuse.
3. Tenezleboîtier,placezvotrepoucecontre
leslamesetpoussez-lesversl’extérieur
parrapportauboîtier.
4. Brossezpourenlevertouslespoilsduboîtieretdesalentoursdela
lame.
5. Brossezpourenlevertouslespoilsquiont
ététaillésentrelalamexeetlalame
mobiletoutenpressantsurlelevierde
nettoyagepourreleverlalamemobile.
6. Appliquezquelquesgouttesd’huilesurlalame.
7. Fixezlepeigneetlalamesurlatondeuse.
Lubrication
Appliquezquelquesgouttesd’huilesurlatondeuseavantetaprèschaque
utilisation.
Appliquezunegoutted’huilesurlespointsindiquésparlesèches.
Réinstallationdelalame
Fixezlecrochetdemontagedansle
montantdelamesurlatondeuseet
poussez-lejusqu’àcequ’ils’enclenche.

32
Français
Dépannage
Problème Action
Latondeusen’estplusaussi
aiguisée.
Chargezlatondeuse.
(Voirpage25.)
Nettoyezlalameethuilez-la.
(Voirlespages30et31.)
Remplacezlalame.
(Voirpage31.)
Latondeuseacesséde
fonctionner.
Chargezlatondeuse.
Oubienutilisezl’adaptateursecteur.
(Voirpage25.)
Chargezlapilependantenviron
8heuresencontinupourlarecharger
complètement.
S’ilnerestequequelquesutilisations
mêmeaprèslechargement,lapile
estenndevie.(Unefuitedeliquide
engendréparladégradationdela
pileenndevieestpossible.)
Veuillezcontacterunservice
après-venteagréépourréparation.
Impossibledechargerlapile.
Poussezentièrementlachedu
cordond’alimentationdansle
boîtieretveillezàcequeletémoin
d’étatdechargementsoitallumé.
Chargezàlatempératurede
chargementrecommandéede0°C
(32°F)à35°C(95°F).
Problème Action
Latondeusepeutêtre
utiliséependantseulement
environ10minutes,même
aprèschargement.
Faitesremplacerlapileparuncentre
deserviceagréé.
Latondeusenepeutpasêtre
nettoyéecorrectementmême
aprèsavoirfaitcoulerde
l’eaudepuisl’entréed’eau.
Lorsquelatondeuseesttrèssale,
retirezlalameetlavezl’appareilà
l’eau.(Voirpage30.)
Émetunbruitfort.
Vériezquelalameestbienxée.
Sivousneparveneztoujourspasàrésoudrelesproblèmes,contactezle
magasinoùvousavezachetél’unitéouuncentredeserviceautorisépar
Panasonicpourlaréparation.
Questions-Réponses
Question Réponse
Lapilesera-t-elleépuisée
aprèsunelonguepériodesans
utilisation?
Lorsquel’appareiln’estpasutilisé
pendant6moisouplus,lapile
s’affaiblit(fuiteduliquidedepile,
etc.).Rechargezentièrementlapile
unefoistousles6mois.
Lapilepeut-elleêtrechargée
avantchaqueutilisation?
Oui,maisilestrecommandéque
vousrechargiezlapilelorsqu’elle
estvide.Laduréedeviedelapile
varieselonlesconditions
d’utilisationetdestockage.
33
Français
Duréedeviedelalame
Laduréedeviedelalamevarieselonlafréquenceetladurée
d’utilisationdelatondeuse.
Parexemple,laduréedelalameestapproximativementde3ans
lorsquelatondeuseestutiliséependant5minutes,10foispar
mois.Mêmeavecunentretienapproprié,remplacezleslamessi
l’efcacitédelacoupeestréduitedefaçonconsidérable.
Duréedeviedelapile
Laduréedeviedelapilevarieenfonctiondelafréquenceetdeladurée
d’utilisation.Silapileestrechargéeunefoisparmois,laduréedevie
serad’environ3ans.
Siledélaidefonctionnementestsensiblementpluscourtmêmeaprès
unerechargecomplète,celasigniequelapileaatteintlandesavie.
Retraitdelapilerechargeableintégrée
ATTENTION:
L’appareilquevousvousêtesprocuréestalimentéparunepileau
nickel-métal-hydrure(NiMH).Pourdesrenseignementssurlerecyclage
delapile,veuillezcomposerle1-800-8-BATTERY.
Retirerlapilerechargeableintégréeavantdejeterlatondeuse�
Cetteillustrationpeutuniquementêtreutiliséelorsdelamiseaurebutde
latondeuse,etnedoitpasêtreutiliséepoursaréparation.Sivous
démontezvous-mêmelatondeuse,elleneseraplusétanche,cequi
pourraitengendrersondysfonctionnement.
•
Débranchezlatondeusedel’adaptateursecteur.
•
Appuyezsurlecommutateurd’alimentationpourmettrel’appareilsous
tension,puislaissez-lesoustensionjusqu’àcequelapilesoit
entièrementdéchargée.
•
Effectuezlesétapes
à
etsoulevezlapile,puisretirez-la.
•
Faitestrèsattentionànepascourt-circuiterlapile.
*
*ER-GB80uniquement
34
Français
Caractéristiques
Sourced’alimentation
Voirlaplaquesignalétiquesurl’adaptateur
secteur.
(Conversiondetensionautomatique)
Tensiondumoteur
1,2V
Tempsdechargement Env.1heure
Ceproduitestdestinéuniquementàl’usagedomestique.
DéclarationsurlebrouillageradioélectriquedelaCommissionfédérale
descommunications
Leprésentéquipementafaitl’objetd’essaisetaétéjugéconformeaux
limitespourundispositifnumériquedeclasseB,envertuduChapitre
15desrèglementsdelaFCC.Ceslimitessontconçuespourfournir
uneprotectionraisonnablecontrelesinterférencesnuisibleslorsque
l’appareilfonctionnedansuneinstallationrésidentielle.Leprésent
équipementgénère,utiliseetpeutémettredel’énergieRFs’iln’estpas
installéetutiliséconformémentaumoded’emploi,cequipeut
provoquerdesinterférencesnuisiblesauxcommunicationsradio.
Cependant,iln’yaaucunegarantiequelesinterférencesne
surviendrontpasdansuneinstallationparticulière.Sicetéquipement
émetdesinterférencesnuisiblesàlaréceptiondelaradiooudela
télévision,cequipeutêtredéterminélorsdelamiseenmarchepuis
horsmarchedel’équipement,l’utilisateurdoitcorrigercesinterférences
enprenantl’unedesmesuressuivantes:
• Réorienteroudéplacerl’antenneréceptrice.
• Augmenterladistanceentrel’équipementetlerécepteur.
• Connecterl’équipementàlaprised’uncircuitdifférentdeceluisur
lequellerécepteurestconnecté.
• Consulterledétaillantouuntechnicienspécialiséenradio/TVpour
obtenirdel’aide.
AvertissementdelaFCC:Pourassureruneconformitécontinue,
installeretutiliserconformémentauxconsignesfournies.Quelque
changementoumodicationnonexpressémentapprouvé(e)parla
partieresponsabledelaconformitépourraitannulerl’autoritéde
l’utilisateuràfairefonctionnerleprésentéquipement.
Cetappareilestconformeàlapartie15desrèglementsdelaFCC.
L’utilisationestsoumiseauxdeuxconditionssuivantes:(1)Cetappareil
nedoitpasprovoquerd’interférencesnuisibleset(2),cetappareildoit
supportertouteinterférencereçue,ycomprislesinterférencespouvant
provoquerunfonctionnementindésirable.

35
Español
Instruccionesdefuncionamiento
(Electrodoméstico)
RecortadoraRecargabledeCabello/Barba
Modelon.ºER-GB80/ER-GB60
GraciasporcompraresteproductoPanasonic.
Antesdeponerestaunidadenfuncionamiento,lealasinstruccionesensutotalidadyguárdelasparasuusoenelfuturo�
Precauciones de seguridad ........... 36
Usoprevisto���������������������������������������������� 40
Identicacióndelaspiezas��������������������� 40
Cargadeelrecortador����������������������������� 41
Utilizacióndelrecortador������������������������41
Usodelpeine�������������������������������������������� 42
Recortedelabarba���������������������������������� 43
Cortedepelo���������������������������������������������45
Recortarelvellocorporal������������������������ 46
Limpiezadelrecortador��������������������������� 46
Solucióndeproblemas���������������������������� 48
Preguntasmásfrecuentes����������������������� 48
Duracióndelacuchilla����������������������������49
Vidadelabatería�������������������������������������� 49
Extraccióndelabateríarecargable
interna�������������������������������������������������������� 49
Especicaciones��������������������������������������49
Contenido
36
Español
Precaucionesdeseguridad
Parareducirelriesgodesufrirlesiones,descargaseléctricas,oinclusoel
fallecimiento,ydeprovocarunincendioodañosenlapropiedad,cumpla
siemprelasprecaucionesdeseguridadqueguranacontinuación.
Explicacióndelossímbolos
Lossiguientessímbolosseusanparaclasicarydescribirelnivelde
peligro,lesiónydañoalapropiedadquepuedenprovocarsedebidoal
incumplimientodelasinstruccionesyalusoindebido.
PELIGRO
Denotaunpeligropotencial
queresultaráenunalesión
graveolamuerte.
ADVERTENCIA
Denotaunpeligropotencial
quepodríaresultarenuna
lesióngraveolamuerte.
PRECAUCIÓN
Denotaunpeligroque
podríaresultarenuna
lesiónleve.
Lossiguientessímbolosseusanparaclasicarydescribireltipode
instruccionesquedebencumplirse.
Estesímboloseutilizaparaadvertiralosusuariosdeun
procedimientoespecícodefuncionamientoquenodebe
realizarse.
Estesímboloseutilizaparaadvertiralosusuariosdeun
procedimientoespecícodefuncionamientoquedebeseguirse
parahacerfuncionarlaunidaddeformasegura.
INSTRUCCIONESDESEGURIDADIMPORTANTES
Alutilizarundispositivoeléctrico,debenseguirsesiempre
unasprecaucionesbásicasqueincluyenlassiguientes:
Leatodaslasinstruccionesantesdeutilizareste
dispositivo.
PELIGRO
Parareducirelriesgode
descargaseléctricas:
1.Nointentealcanzarundispositivoquesehayacaído
alagua.Desenchúfeloinmediatamente.
2.Elcargadornodebesumergirseniutilizarseenla
ducha.
3.Nocoloqueniguardeeldispositivodondepueda
caerseenunabañera.Nolocoloquenilodejecaer
enaguaoalgúnotrolíquido.
4.
Exceptocuandoloestécargando,desenchufesiempre
esteaparatodelatomaeléctricatrasutilizarlo.
5.Desenchufeestedispositivoantesdelimpiarlo.
6.Noutiliceunalargadorconestedispositivo.
ADVERTENCIA
Parareducirelriesgodequemaduras,fuego,
descargaseléctricasodañospersonales:
1.Esnecesariaunasupervisióncercanacuandoel
dispositivoseautilizadoporocercadeniñoso
minusválidos.
2.Utiliceestedispositivosolamenteparaelusoparael
quesehadiseñadocomosedescribeeneste
manual.Noutiliceningúnaccesoriono
recomendadoporelfabricante.
37
Español
3.
Nuncautiliceeldispositivositieneelcordónoel
enchufedañado,sinofuncionacorrectamente,osise
hacaído,dañadoomojado.Devuelvaeldispositivoa
uncentrodeservicioparaexaminarloyrepararlo.
4.
Mantengaelcablealejadodelassuperciescalientes.
5.Nuncadejecaerniintroduzcaningúnobjetopor
cualquierabertura.
6.Noutilicelaafeitadoraenexterioresodondese
esténutilizandoaerosoles(spray)odondeseesté
administrandooxígeno.
7.Noutiliceestedispositivosielpeineestádañadoo
roto,yaquepodríacausarleheridasenlacara.
8.Conectesiempreelenchufealdispositivoy,a
continuación,alatomadecorriente.Para
desconectarlo,coloquetodosloscontrolesenla
posición“apagado”y,acontinuación,retireel
enchufedelatomadecorriente.
GUARDEESTASINSTRUCCIONES
ADVERTENCIA
Noconectenidesconecteeladaptadoraunatomade
corrientesitienelasmanosmojadas�
-
Delocontrario,podríasufrirdescargaseléctricasolesiones.
NoutiliceelaparatosieladaptadordeCAestádañadoo
silaclavijadealimentaciónquedaojaalconectarlaen
unatomadecorriente�
Nodañenimodique,dobleenérgicamente,tireo
retuerzaelcable�
Además,nocoloqueobjetospesadossobreelmismoni
lopellizque�
-
Delocontrario,podríaprovocarunadescargaeléctricaoun
incendiodebidoauncortocircuito.
Noloutilicedemaneraquesuperelacapacidadnominal
delatomadecorrienteodelcableado�
-
Superarelvalornominalalconectardemasiadosenchufesa
unatomadecorrientepuedecausarunincendiodebidoal
sobrecalentamiento.
Esteproductotieneunabateríarecargableintegrada�No
loarrojealfuegooaunallama�
-
Delocontrario,podríaprovocarunsobrecalentamiento,un
incendioounaexplosión.
Nolomodiquenilorepare�
-
Delocontrario,podríaprovocarunincendio,unadescarga
eléctricaosufrirlesiones.
Póngaseencontactoconuncentrodeservicioautorizadopara
sureparación(cambiodebatería,etc.).
Nuncalodesmonte,exceptocuandosedeshagadel
producto�
-
Delocontrario,podríaprovocarunincendio,unadescarga
eléctricaosufrirlesiones.
38
Español
ADVERTENCIA
NolimpieelaparatoconaguasieladaptadordeCAestá
acoplado�
-
Delocontrario,podríaprovocarunadescargaeléctricaoun
incendiodebidoauncortocircuito.
NoutiliceotroadaptadordistintoaladaptadordeCA
suministrado�Asimismo,nocargueotroproductoconel
adaptadordeCAsuministrado�
-
Delocontrario,podríasufrirquemadurasoprovocarunincendio
debidoauncortocircuito.
Guárdelofueradelalcancedelosniñosobebés�Noles
permitautilizarlo�
-
Ponerselacuchilla,elcepillodelimpiezay/oelrecipientedel
aceiteenlabocapuedeprovocaraccidentesylesiones.
Asegúresesiempredequeelaparatoestéoperando
desdeunafuentedeenergíaeléctricaacordeconla
tensiónnominalindicadaeneladaptadordeCA�
Introduzcacompletamenteeladaptador�
-
Delocontrario,podríaprovocarunincendioosufriruna
descargaeléctrica.
Suspendainmediatamenteelusoyretireeladaptadorsi
hayunaanomalíaounfuncionamientoincorrecto�
-
Delocontrario,podríaprovocarunincendio,sufrirunadescarga
eléctricaolesiones.
<Casosdeanomalíaoavería>
• LaunidadprincipaloeladaptadordeCAestán
deformadosoanormalmentecalientes�
• LaunidadprincipaloeladaptadordeCAhuelena
quemado�
• Seescuchaunruidoextrañoduranteelusoolacarga
procedentedelaunidadprincipalodeladaptadordeCA�
-
Soliciteinmediatamenteunarevisiónoreparaciónenuncentro
deservicioautorizado.
Limpieregularmentelaclavijadelcabledealimentacióny
delaparatoparaevitarlaacumulacióndepolvo�
-
Delocontrario,podríaprovocarunincendiodebidoaunfallodel
aislamientoprovocadoporlahumedad.
Desconecteeladaptadorylímpieloconunpañoseco.
Siseingiereaccidentalmenteelaceite,noinduzcael
vómito�Bebaunagrancantidaddeaguaypóngaseen
contactoconunmédico�
Sielaceiteentraencontactoconlosojos,enjuáguelos
inmediatamenteconabundanteaguaypóngaseen
contactoconunmédico�
-
Delocontrario,podríasufrirproblemasfísicos.
39
Español
ADVERTENCIA
Esteaparatonodebeserutilizadoporpersonas
(incluyendoniños)concapacidadesfísicas,sensorialeso
mentalesreducidas,oconfaltadeconocimientoy
experiencia,amenosqueseencuentrenbajosupervisión
obajoinstruccionessobreelusodelaparatodeuna
personaresponsabledelaseguridad�Sedebesupervisar
alosniñosparaasegurarsedequenojueguenconel
aparato�
-
Delocontrario,podríasufrirunaccidenteounalesión.
Elcabledealimentaciónnosepuedesustituir�Sisedaña
elcable,eladaptadordeCAdebedesecharse�
-
Delocontrario,podríasufrirunaccidenteounalesión.
PRECAUCIÓN
Noempujelacuchillacontralapiel�
Noutiliceesteproductoconningúnndistintode
recortarbarba,peloyvellocorporal�
Noapliquelascuchillasdirectamentesobrelasorejaso
lapieláspera(como,porejemplo,inamaciones,heridas
omanchas)�
-
Delocontrario,puedesufrirlesionescutáneas.
Nopermitaquealleresoporqueríasepeguenala
clavijadelcabledealimentaciónodelaparato�
-
Delocontrario,podríaprovocarunadescargaeléctricaoun
incendiodebidoauncortocircuito.
Nopermitaqueelaparatosufracaídaseimpactos�
-
Delocontrario,puedeprovocarlesiones.
Noenrolleelcablealrededordeladaptadorcuando
guardeelaparato�
-
Delocontrario,puedecausarqueelalambredelcablede
alimentaciónserompayprovocarunincendiodebidoaun
cortocircuito.
Antesdeutilizarelaparato,compruebequelascuchillas
noesténnidañadasnideformadas�
-
Delocontrario,podríasufrirlesionescutáneas.
Desconecteeladaptadorolaclavijadelaparato
sujetándolos,evitandotirardselcable�
-
Delocontrario,podridasufrirunadescargaeléctricaolesiones.
► Eliminacióndelabateríarecargable
PELIGRO
Labateríarecargabledebeutilizarseexclusivamentecon
esterecortador�Noutilicelabateríaconotrosproductos�
Nocarguelabateríaunavezretiradadelproducto�
• Nolaarrojealfuegonileapliquecalor�
• Nosuelde,desmontenimodiquelabatería�
• Nopermitaquelosterminalespositivoynegativodela
bateríaentrenencontactoentreellosatravésde
objetosmetálicos�
• Notransportenialmacenelabateríajuntoconjoyas
metálicascomoporejemplocollaresuhorquillasparael
pelo�
• Nopeleeltubo�
-
Delocontrario,podríaprovocarunsobrecalentamiento,un
incendioounaexplosión.
40
Español
ADVERTENCIA
Trasretirarlabateríarecargable,manténgalafueradel
alcancedelosbebésylosniños�
-
Labateríaproduciríalesionescorporalessiseingiriera
accidentalmente.
Siestosucediera,consulteconunmédicoinmediatamente.
Siellíquidodelabateríaseltrahaciafuera,sigalos
procedimientosqueseindicanacontinuación�Notoque
labateríaconlasmanosdesnudas�
-
Ellíquidodelabateríapuedeproducirceguerasientraen
contactoconlosojos.
Nosefrotelosojos.Lávelosinmediatamenteconagualimpiay
consulteconunmédico.
-
Ellíquidodelabateríapuedeproducirinamaciónoheridassi
entraencontactoconlapielolaropa.
Laveinmediatamenteconagualimpiayconsulteconunmédico.
Usoprevisto
•
Antesydespuésdecadauso,apliqueaceiteentodaslaspartes
marcadasconechas.(consultelapágina47.)
•
Elrecortadorpuedecalentarseduranteelusoy/olacarga.Setratade
algonormal.
•
Limpielacarcasasóloconunpañosuaveligeramentehumedecidocon
aguacorrienteoconaguacorrienteyjabón.Noutilicedisolvente,
bencina,alcoholniotrosproductosquímicos.
•
Antesdeutilizarunaccesorio,compruebequelohainstalado
correctamente.Delocontrario,podríarecortarelpelodemasiadocorto.
•
Guardeelrecortadorenunlugarpocohúmedodespuésdeutilizarlo.
•
Elaparatonosedebeutilizarenanimales.
Identicacióndelaspiezas
ER-GB80
ER-GB60
A
Cuerpoprincipal
Recortadordeprecisión
ER-GB80
2
Marcaindicativadelongitud
decorte
3
Dial(Controldeajustede
altura)
4
Interruptordeencendido
5
Pilotoindicadordeestadode
carga
6
Receptáculodeclavija
7
Entradadeagua
B
Cuchilla
8
Palancadelimpieza
9
Cuchillademovimiento
Cuchillaestacionaria
Ganchodemontaje
C
Peineparabarba[ ](de
1mm(1/32˝)a10mm(13/32˝))
D
Peineparapelo[ ](de11mm
(7/16˝)a20mm(51/64˝))
E
Peineparavellocorporal
ER-GB80
F
AdaptadordeCA(RE9-70)
Adaptador
Clavijadelcablede
alimentación
Cable
Clavijadelaparato
Accesorios
G
Cepillodelimpieza
H
Aceite
I
Estuche

41
Español
Cargadeelrecortador
•
Asegúresedequeelrecortadorestéapagado.
1
1
Conectelaclavijadelaparatoenel
receptáculodeclavija�
2
2
Conecteeladaptadorenlatomade
corriente�
• Compruebequeelpilotoindicadordeestado
decargaseilumine.
• Lacargasecompletatras1hora
aproximadamente.
1
2
3
3
Desconecteeladaptadorcuandoelpilotoindicador
deestadodecargaseapague�
• Latemperaturaambienterecomendadaparalacargaesde0–
35°C(32–95°F).Elrendimientodelabateríapodríadisminuir
bajocondicionesdetemperaturaextremadamentebajaoaltayla
bateríapodríanocargarsecorrectamente.
• Unacargacompletasuministrasucientepotenciapara
aproximadamente50minutosdeuso.
Eltiempodefuncionamientopuedevariarenfuncióndela
frecuenciadeuso,elmétododefuncionamientoylatemperatura
ambiente.
• Cuandocargueelrecortadorporprimeravezocuandonolohaya
utilizadodurantemásde6meses,elpilotoindicadordelcuerpo
principalpodríanoiluminarseduranteunosminutosoeltiempo
defuncionamientopodríaacortarse.Entalescasos,cárguelo
durantemásde8horas.
• Sieltipodeenchufenoencajaconeltomacorriente,utiliceun
adaptadordeenchufeconlaconguraciónadecuada.
FuncionamientoconCA
SiconectaeladaptadordeCAenelrecortadordelmismomodoquepara
cargar,yenciendelaalimentación,puedeutilizarlo.
•
Sielniveldecargadelabateríaesdemasiadobajo,lascuchillas
puedenmoverselentamenteodetenerse,inclusoconlafuentede
alimentacióndeCA.Enestecaso,carguelabateríaduranteunmínimo
de1minuto.
•
Labateríasedescargará,inclusoconlafuentedealimentacióndeCA.
Utilizacióndelrecortador
•
Asegúresedequeelrecortadorestéapagado.
•
Recomendamosqueseuseelrecortadorenunrangodetemperatura
ambientede0a35°C(32–95°F).Siseutilizafueradeesterango,el
aparatopuededejardefuncionar.
1
1
Coloqueelpeinedeseadoyajustelalongitudde
corte�(consultelapágina42�)
• Tambiénsepuedeutilizarsinelpeine.
(Longituddecorte:aprox.0,5mm(1/64˝))
• Lalongitudrealdelpeloseráunpocosuperioralaalturaque
dena.
2
2
Pulseelinterruptordeencendidopara
encenderelaparato�
42
Español
Usodelpeine
•
Tengacuidadodenoproducirsecortesenlasmanosconlacuchilla
cuandocoloqueoretireelpeine.
•
Asegúresedequeelrecortadorestéapagado.
1
1
Coloqueelpeineenelcuerpoprincipal
hastaqueseoigaunclic�
Longituddecorte
(estimación)
Peine
de1mm(1/32˝)a
10mm(13/32˝)
Peineparabarba[
]
de11mm(7/16˝)a
20mm(51/64˝)
Peineparapelo[
]
• Nivelde10,5mm
(0,41˝)
nodisponible.
• Lalongituddecortedelpeineparaelvellocorporalnopuedeajustarse.
Estepeinecortaaunalongituddeaproximadamente1,5mm(1/16˝).
2
2
Gireeldialyajustelamarcaindicativadelongitud
decorteenlaposicióndeseada�
► Peineparabarba[ ]
Indicador
1 2 3 4 5
Longitudde
corte
(estimación)
mm 1 1,5 2 2,5 3 3,5 4 4,5 5 5,5
pulgada 1/32
1/16
5/64
3/32
1/8
9/64
5/32
11/64
3/16
7/32
Indicador
6 7 8 9 10
Longitudde
corte
(estimación)
mm 6 6,5 7 7,5 8 8,5 9 9,5 10
pulgada
15/64
1/4 9/32
19/64
5/16
11/32 23/64
3/8
13/32
► Peineparapelo[ ]
Indicador
11
12 13 14 15
Longitudde
corte
(estimación)
mm 11
11,5
12
12,5
13
13,5
14
14,5
15
15,5
pulgada 7/16
29/64 15/32
1/2
33/64 17/32
9/16
37/64 19/32 39/64
Indicador
16
17 18 19 20
Longitudde
corte
(estimación)
mm 16
16,5
17
17,5
18
18,5
19
19,5
20
pulgada 5/8
21/32 43/64 11/16 23/32 47/64
3/4
49/64 51/64
43
Español
Retirarelpeine
Retireelpeinedelcuerpoprincipal.
Recortedelabarba
•
Noloutilicecuandoapliqueespumadeafeitarocuandolabarbaestémojada.
Labarbamojadapuedepegarsealapieloamontonarse,dicultandoelcorte.
Ajustedelalongituddelabarba
•
Asegúresedequeelrecortadorestéapagado.
1
1
Coloqueelpeineparabarba
enelcuerpoprincipal�
(consultelapágina42�)
2
2
Ajustelaalturaderecorte�
3
3
Sujeteelrecortadorconel
interruptordeencendido
mirandohaciaarribayrecorte
labarbatocandolapielconla
cuchillaymoviendoel
recortadorencontradela
direccióndelpelo�
• Puedenacumularserestosdepelodentrodelpeinecuandose
cortaunagrancantidaddebarba,porloquedebenretirarselos
restosdepelodespuésdecadauso.
Cortesinpeine/cortedelvello
1
1
Quiteelaccesoriodepeinado�
2
2
Sujeteelrecortadorconel
interruptordeencendidomirando
haciafueraytoquelapielconla
cuchillapararecortar�
• Elrecortadornopuedecortarpeloconuna
longitudinferioralos0,5mm(1/64˝).
Darformaalabarba
Utiliceelrecortadorsinelpeineparadarformaalabarba.
•
Utiliceelrecortadordeprecisiónpararecortarzonasestrechasypara
unrecorteminucioso.(consultelapágina44.)
► Porencimaypordebajodeloslabios
Sujeteelrecortadorconelinterruptordeencendidoenla
parteinferior,cortealolargodeunalínea,conla
cuchillaenunángulode90ºconrespectoalapiel�
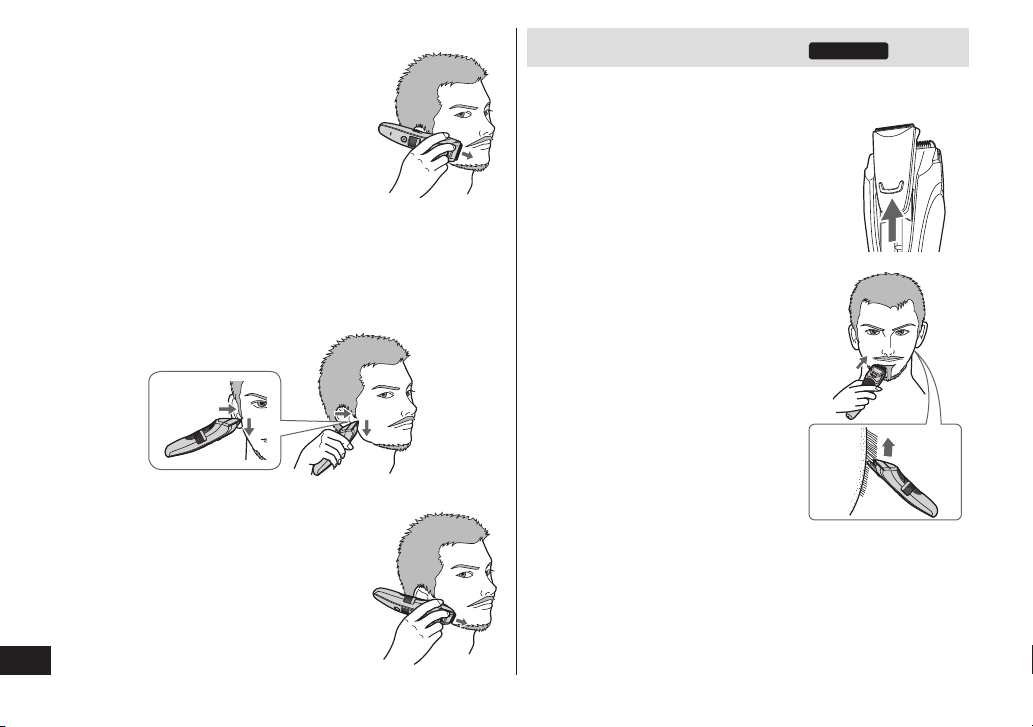
44
Español
► Extremosdelbigote
Sujeteelrecortadorconelinterruptor
deencendidomirandohaciafueray
recortegradualmentedesdelos
extremostocandolapielconla
cuchilla�
► Patillas
Sujeteelrecortadorconelinterruptordeencendidoenla
parteinferioryrecortedesplazandoelrecortadoren
direccióndescendente,conlacuchillaenunángulode
90ºconrespectoalaspatillas�
► Barba
Sujeteelrecortadorconelinterruptor
deencendidomirandohaciafueray
recortetocandolapielconlacuchilla,
alolargodeunalíneamientrasmueve
elrecortadorhaciadelante�
Usodelrecortadordeprecisión
ER-GB80
Utiliceelrecortadordeprecisiónpararecortarzonasestrechasyparaun
recorteminucioso.
1
1
Quiteelaccesoriodepeinado�
2
2
Desliceelrecortadordeprecisión
hastasumáximaaltura�
3
3
Sujeteelrecortadorconel
interruptordeencendido
mirandohacialapielyrecorte
tocandolapielconlacuchilla�
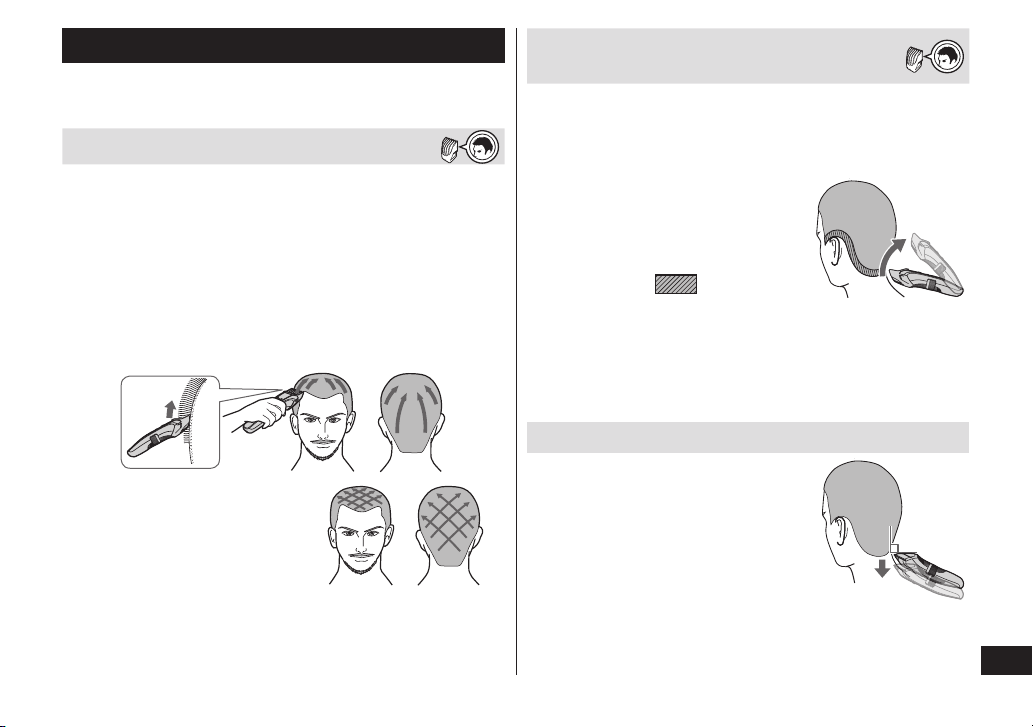
45
Español
Cortedepelo
•
Asegúresedequeelrecortadorestéapagado.
•
Paramantenerlaprecisión,retirelosrecortesdepelodespuésdecada
uso.
Cortedepeloaunalongituduniforme
1
1
Coloqueelpeineparapeloenelcuerpoprincipal�
(consultelapágina42�)
2
2
Ajustelaalturaderecorte�
3
3
Sujeteelrecortadorconelinterruptordeencendido
mirandohaciaarribayrecortedesplazandoel
recortadorlentamentecontraladireccióndelpeloy
hacialacoronilla�
4
4
Cortelentamentemientras
desplazaelcortadordesde
distintasdirecciones,para
evitarcualquierparteque
nosehayacortado�
Ajustedelalongitudalrededordelas
orejasylalíneadelanuca
1
1
Coloqueelpeineparapeloenelcuerpoprincipal�
(consultelapágina42�)
2
2
Ajustelaalturaderecorte�
3
3
Sujeteelrecortadorconel
interruptordeencendido
mirandohaciaarribaycorte
alrededordelasorejasylalínea
delanuca(
)levantando
lapuntadelpeinedelalíneadel
pelogradualmente�
• Cuandocorteunazonaenteraa12mm(15/32˝),utilicelos9mm(23/64˝)
comolongituddecorteestándaraproximadaparalalíneadelanuca.
• Cuandocorteunazonaenteraa9mm(23/64˝),utilicelos6mm(15/64˝)
comolongituddecorteestándaraproximadaparalalíneadelanuca.
Cortarelvelloalrededordelalíneadelanuca
1
1
Quiteelaccesoriodepeinado�
2
2
Sujeteelrecortadorconelinterruptor
deencendidoenlaparteinferior,
apliquelacuchillaendirección
perpendicularalazonadelvelloy
muevaelrecortadorendirección
descendentealolargodelapiel�
90°
•
Serecomiendaqueotrapersonaseocupedecortarelpeloalrededor
delasorejasylalíneadelanuca.
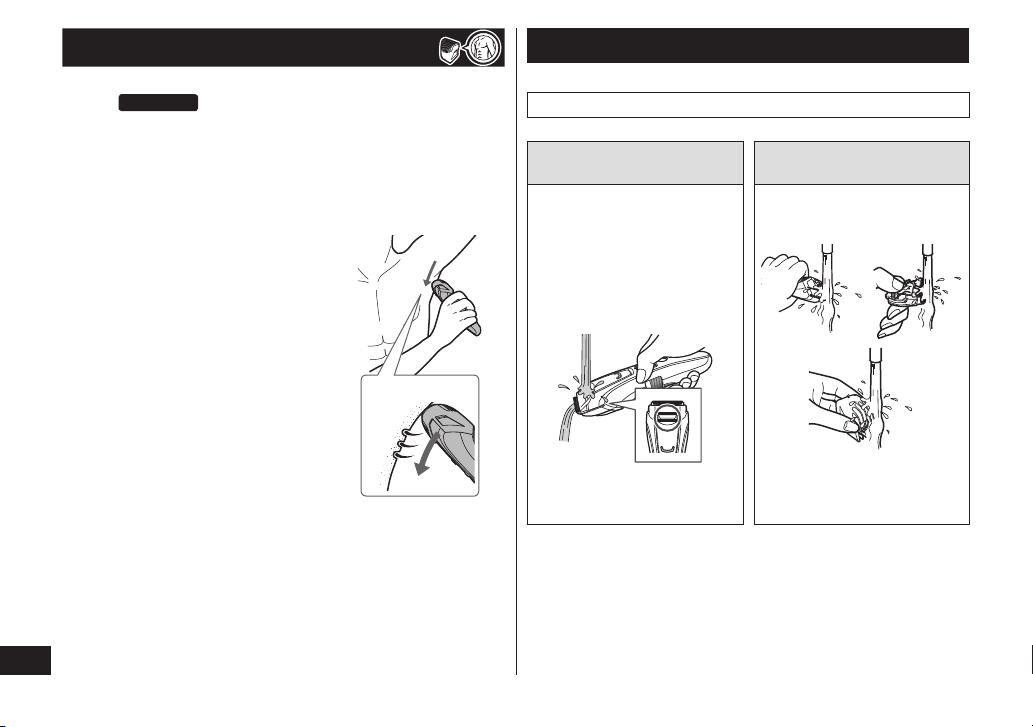
46
Español
Recortarelvellocorporal
Recorteelvellodelasaxilasylalíneadelbikiniconelpeineparavello
corporal. ER-GB80
•
Lalongitudderecorteesdeaproximadamente1,5mm(1/16˝).
•
Noutiliceelrecortadorcuandoelvellocorporalestémojado.
Elvellocorporalmojadopuedepegarsealapieloamontonarse,
dicultandoelcorte.
1
1
Coloqueelpeineparavellocorporalenelcuerpo
principal�(consultelapágina42�)
2
2
Sujeteelrecortadorconel
interruptordeencendidoenla
parteinferioryrecortetocando
lapielconlacuchillay
desplazandolentamenteel
recortadorenladirecciónquese
indicaenlailustración�
•
Esposiblequenoseobtenganlosresultadosdeseadossielpeloes
demasiadolargo.Entalcaso,corteelpelohastaunalongitudde
10mm(13/32˝)antesdeutilizarelrecortador.
Limpiezadelrecortador
• Serecomiendalimpiardespuésdecadauso.
1. RetireelrecortadordeladaptadordeCA.
▼ ▼
Paraeliminarpequeñasmanchas Paraeliminarunagrancantidad
desuciedad
2. Retireelpeineyenciendael
recortador.
3. Dejecorrerelaguaporla
entradadeaguaenlaparte
frontaldelcuerpoprincipal,
laveduranteaproximadamente
20segundos,yacontinuación,
apagueelrecortador.
•
Enjuagueconaguayagite
variasvecesparaeliminarel
agua.
2. Retireelpeineylacuchilla.
3. Laveelrecortador,lacuchillay
lospeinesconaguacorriente.
•
Enjuagueconaguayagite
variasvecesparaeliminarel
agua.
▼ ▼
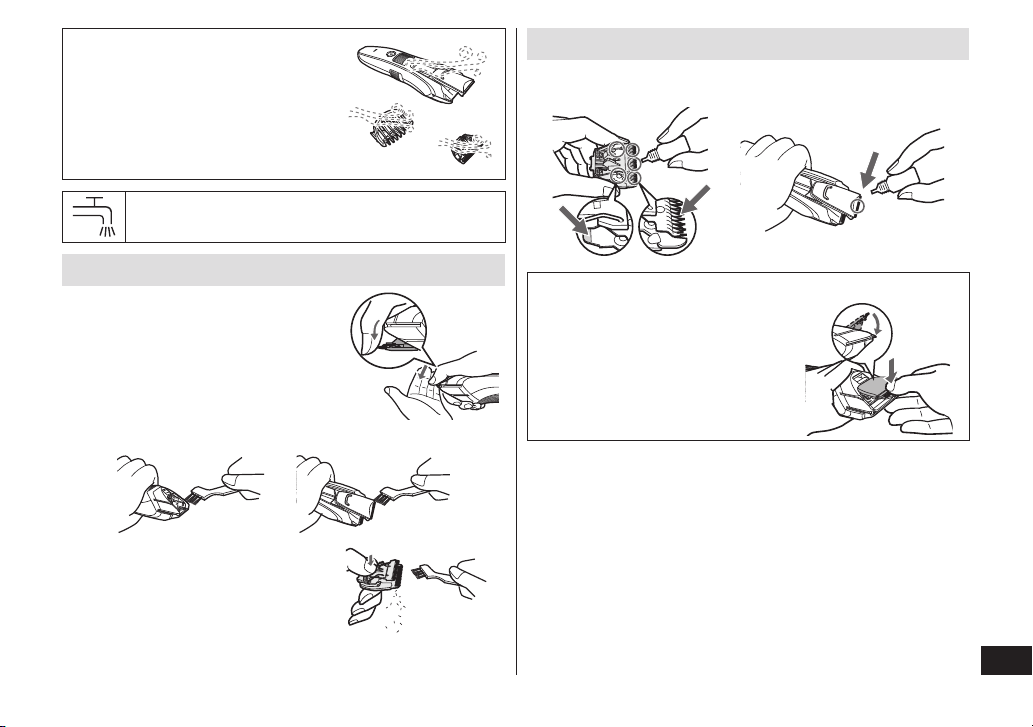
47
Español
4. Limpieelaguaconunatoallaydejeque
sequedeformanatural.
•
Sesecarámásrápidosiseretirala
cuchilla.
5. Apliqueelaceitealacuchilladespuésde
queseseque.
6. Coloqueelpeineylacuchillaenel
recortador.
Lamarcadelaizquierdasignicaquesepuedelimpiar
bajoungrifodeaguacorriente�
Limpiezaconlaescobilla
1. RetireelrecortadordeladaptadordeCA.
•
Asegúresedequeelrecortadoresté
apagado.
2. Quiteelaccesoriodepeinado.
3. Sostengaelcuerpoprincipal,coloquesus
dedoscontralascuchillasyenseguida
apártelosdelcuerpoprincipal.
4.
Cepilleyquitecualquiercabellodelcuerpoprincipalyalrededordelacuchilla.
5. Cepilleyquitecualquiercabelloentrela
cuchillaestacionariaylamóvilpresionando
haciaabajolapalancadelimpiezapara
alcanzarlacuchillamóvil.
6. Apliqueelaceitealacuchilla.
7. Coloqueelpeineylacuchillaenelrecortador.
Lubricación
Apliqueelaceiteenelrecortadorantesydespuésdecadauso.
Apliqueunagotadeaceitealaspuntascomoindicanlasechas.
Reinstalacióndelacuchilla
Coloqueelganchodemontajeenla
monturadelacuchilladelrecortadory,a
continuación,empujehaciadentrohasta
queoigaunclic.

48
Español
Solucióndeproblemas
Problema Acción
Elrecortadorhaperdido
ecaciadecorte.
Cargueelrecortador.
(consultelapágina41.)
Limpielacuchillayapliqueaceite.
(Consultelaspáginas46y47.)
Sustituyalacuchilla.
(consultelapágina47.)
Elrecortadorhadejadode
funcionar.
Cargueelrecortador.
OutilíceloconeladaptadordeCA.
(consultelapágina41.)
Carguelabateríadurante8horas
aproximadamentedeformacontinua
paraoptimizarsuestado.
Siquedanpocosusos,inclusotras
haberefectuadolacarga,labatería
hallegadoalnaldesuvidaútil.(Es
posiblequehayafugasdelíquido
debidoaladegradaciónalnaldela
vidaútildelabatería).
Póngaseencontactoconunservicio
autorizadoparasureparación.
Elrecortadornocarga.
Introduzcacompletamentela
clavijadelaparatoenelcuerpo
principalyasegúresedequeel
pilotoindicadordeestadode
cargaseilumine.
Cargueenunentornoconla
temperaturadecargarecomendada
deentre0°C(32°F)y35°C(95°F).
Problema Acción
Elrecortadorpuedeutilizarse
únicamente10minutos,
inclusodespuésdehaberlo
cargado.
Soliciteaunserviciotécnico
autorizadoquesustituyanlabatería.
Elrecortadornopuede
limpiarsecorrectamente,
inclusodespuésdeverter
aguadesdelaentradade
agua.
Cuandoelrecortadorestémuysucio,
retirelacuchillaylávelaconagua.
(consultelapágina46.)
Emiteunsonidoagudo.
Conrmequelacuchillaestán
correctamentecolocadas.
Silosproblemaspersisten,póngaseencontactoconelestablecimiento
enelqueadquiriólaunidadoconunserviciotécnicoautorizadopor
Panasonicparasureparación.
Preguntasmásfrecuentes
Pregunta Respuesta
¿Labateríaseagotarátrasun
periododetiempoprolongado
sinutilizarelaparato?
Cuandoelaparatonoseutilice
durante6mesesounperiodode
tiemposuperior,labateríase
debilitará(fugasdelíquidodela
batería,etc.).Carguelabateríapor
completounavezcada6meses.
¿Labateríapuedecargarse
antesdecadauso?
Sí,peroserecomiendacargarla
bateríacuandoestécompletamente
descargada.Lavidadelabatería
variaráenfuncióndelas
condicionesdeusoy
almacenamiento.
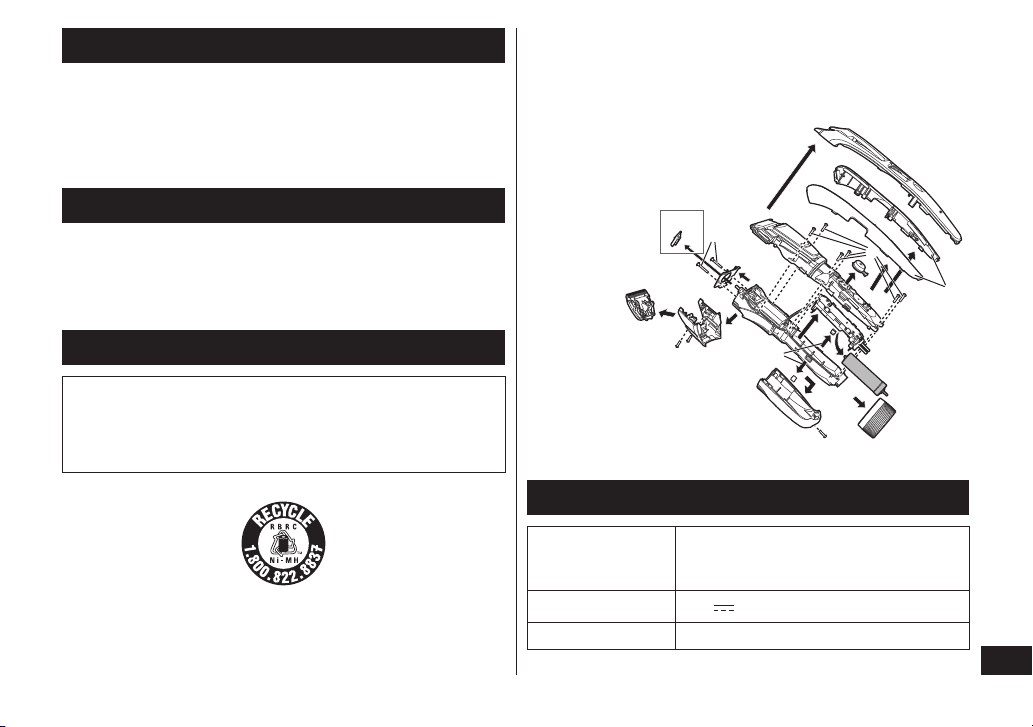
49
Español
Duracióndelacuchilla
Laduracióndelacuchillavaríadeacuerdoconlafrecuenciadeusodel
recortador.
Porejemplo,laduracióndelacuchillaesaproximadamentede3
añoscuandoutilizaelrecortadorpor5minutos10vecesalmes.
Sustituyalascuchillassilaecienciadecortesereduceapesarde
unmantenimientoadecuado.
Vidadelabatería
Lavidadelabateríavariarásegúnlafrecuenciayladuracióndeluso.Sila
bateríasecargaunavezalmes,suvidaútilserádeaproximadamente3años.
Sieltiempodefuncionamientoessignicativamentemáscorto,incluso
despuésdeunacargacompleta,estoindicaquelabateríahaalcanzadoel
naldesuvida.
Extraccióndelabateríarecargableinterna
ATENCIÓN:
Elproductoquehacompradosealimentaconunabateríadehidruros
demetalníquel(Ni-MH)reciclable.
Llamealteléfono1-800-8-BATTERYparaobtenerinformaciónacerca
decómoreciclarestabatería.
Extraigalabateríarecargableincorporadaantesdedesecharelrecortador�
Estagurasolodebeutilizarseenelmomentodedesecharelrecortador;no
debeutilizarsepararepararlo.Sidesmontaustedmismoelrecortador,este
dejarádeserhermético,loquepuedeprovocarunfuncionamientoincorrecto.
•
RetireelrecortadordeladaptadordeCA.
•
Pulseelinterruptordeencendidoparaencenderelaparatoydéjelo
encendidohastaquelabateríaestecompletamentedescargada.
•
Sigalospasos
a
,levantelabatería,yacontinuaciónextráigala.
•
Tengacuidadodenocausaruncortocircuitoenlabatería.
*
*sóloparaER-GB80
Especicaciones
Fuentedeenergía
Anoteelnúmerodeplacaqueseencuentraen
eladaptadordeCA.
(Conversióndevoltajeautomática)
Voltajedelmotor
1,2V
Tiempodecarga Aprox.1hora
Esteproductoestádestinadosolamenteparasuusodoméstico.
50
Español
DeclaracióndeInterferenciadelaComisiónFederalde
Comunicaciones
Esteequipohasidoprobadoyseencuentraenconformidadconlos
límitesestablecidosparadispositivosdigitalesdelaClaseB,en
aplicacióndelodispuestoenlaSección15deloslineamientosdela
CFC.Estoslímiteshansidodiseñadosparaproporcionarprotección
razonablecontralainterferenciaperjudicialenunainstalación
residencial.Esteequipogenera,usaypuedeirradiarenergíaderadio
frecuenciay,sinoseinstalayseusaenconformidadconlas
instruccionesproporcionadas,podríaocasionarinterferenciaperjudicial
alasradiocomunicaciones.Sinembargo,noestágarantizadoqueno
sepresentaráningunainterferenciaenunainstalaciónenparticular.Si
esteequipoocasionainterferenciasperjudicialesenlarecepciónde
radioodetelevisión,locualsepuededeterminarapagandoy
encendiendoelequipo,selepidealusuariotratardecorregirla
interferenciamediantelarealizacióndeunadelassiguientesmedidas:
• Cambiedeorientaciónodelugarlaantenaderecepción.
• Incrementelaseparaciónentreelequipoyelreceptor.
• Conecteelequipoenunatomadecorrientequeseadeuncircuito
diferenteaaquelenelqueestáconectadoelreceptor.
• Póngaseencontactoconeldistribuidoroconuntécnico
experimentadoenradio/TVparasolicitarayuda.
PrecaucionesdelaCFC:Paragarantizarlaconformidaddeforma
continua,instaleyuseelaparatodeacuerdoalasinstrucciones
proporcionadas.Cualquiercambioomodicaciónqueserealicequeno
estéaprobadoporlaparteresponsabledelaconformidadpodría
invalidarlaautoridaddelusuarioparausaresteequipo.
Estedispositivoestáenconformidadconlaparte15delanormativade
laFCC.Elfuncionamientoestásujetoalassiguientesdoscondiciones:
(1)Estedispositivonopuedecausarinterferenciasperjudiciales,y(2)
estedispositivodebeaceptarcualquierinterferenciarecibida,incluyendo
interferenciasquepodríanproducirunfuncionamientonodeseado.
PARASUCONVENIENCIA,AHORADISPONEMOSDEUNALÍNEA
NACIONALDELLAMADAGRATISPARALACOMPRADE
ACCESORIOS(SOLAMENTEENUSA);LLAMEAL1-800-332-5368�

51
MEMO

F
EN, CA, ES
Printed in China
Imprimé en Chine
Impreso en China
0000000000 X0000‑0
IN USA CONTACT:
Panasonic Corporation of North America
Two Riverfront Plaza, Newark, NJ 07102‑5490
IN CANADA CONTACT:
AU CANADA, COMMUNIQUEZ AVEC:
Panasonic Canada Inc.
5770 Ambler Drive, Mississauga, Ontario L4W 2T3
www.panasonic.com
EN MEXICO CONTACTE CON:
Panasonic de México S.A. de C.V.
Félix Cuevas No. 6 Piso 2 y 3
Col. Tlacoquemecatl Del Valle
Del. Benito Juárez
México, D.F. C.P.03200
01 (55) 5488‑1000
EN PANAMA CONTACTE CON:
Panasonic Latin America. S.A.
P.O. Box 0816‑03164
Panama, Republic of Panama
(507) 229‑2955
Service • Assistance • Accessories
Dépannage • Assistance • Accessoires
Call 1-800-338-0552 (In USA)
http://www.panasonic.com/personalcare
http://www.us.panasonic.com/consumersupport
www.panasonic.ca/english/support (In Canada)
www.panasonic.ca/french/support (Au Canada)
http://www.panasonic.com