Owner Manual Gas Cooktop
Getting Started
Before Using the Appliance for the First Time
- Remove all packing materials and literature from the cooktop surface.
- Wipe with a clean, damp sponge and dry.
- There may be a slight odor during the first several uses. This is normal and will disappear.
- Optimum cooking results depend on the proper cookware being selected and used. See “Choosing Cookware - Cookware Recommendations”.
- Read all safety precautions and Use and Care Manual information prior to operating.
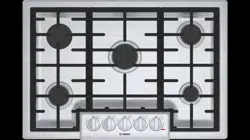
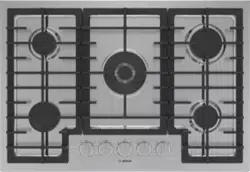
Parts and Accessories
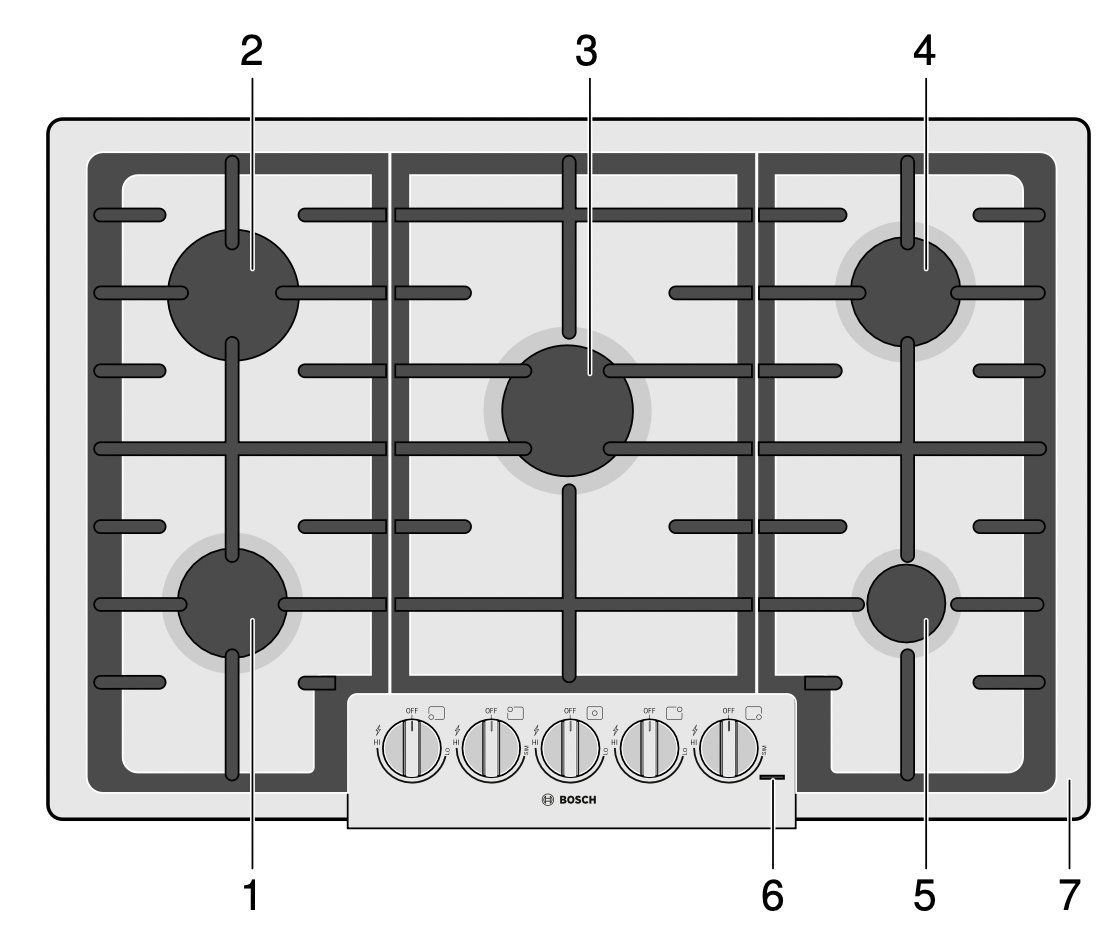
- Left front burner (10,000 BTU/ 2.93 kW)
- Left rear burner (5,500 BTU/ 1.61 kW) OPTISIM™ feature
- Center burner (19,000 BTU/ 5.56kW)
- Right rear burner (10,000 BTU/ 2.93kW)
- Right front burner (5,500 BTU/ 1.61kW)
- Burner “On” indicator light
- Serial Number/Data Plate location (right front underneath)
Sealed burners
Your new cooktop has sealed gas burners. There are no burner parts under the cooktop to clean, disassemble or adjust. Your cooktop has three different burner sizes: small, medium, and large.
Burner Cap and Burner Base Placement
WARNING: To prevent flare-ups, do not use the cooktop without all burner caps and all burner grates properly positioned.
WARNING: To prevent burns, do not touch burner caps or grates while hot. Turn the cooktop off and allow the burners to cool.
The burner caps must be properly placed for the cooktop to function properly. If the burner cap is not properly placed, one or more of the following problems may occur:
- Burner flames are too high.
- Flames shoot out of burners.
- Stainless steel discolors.
- Burners do not ignite.
- Burner flames light unevenly.
- Burner emits gas odor.
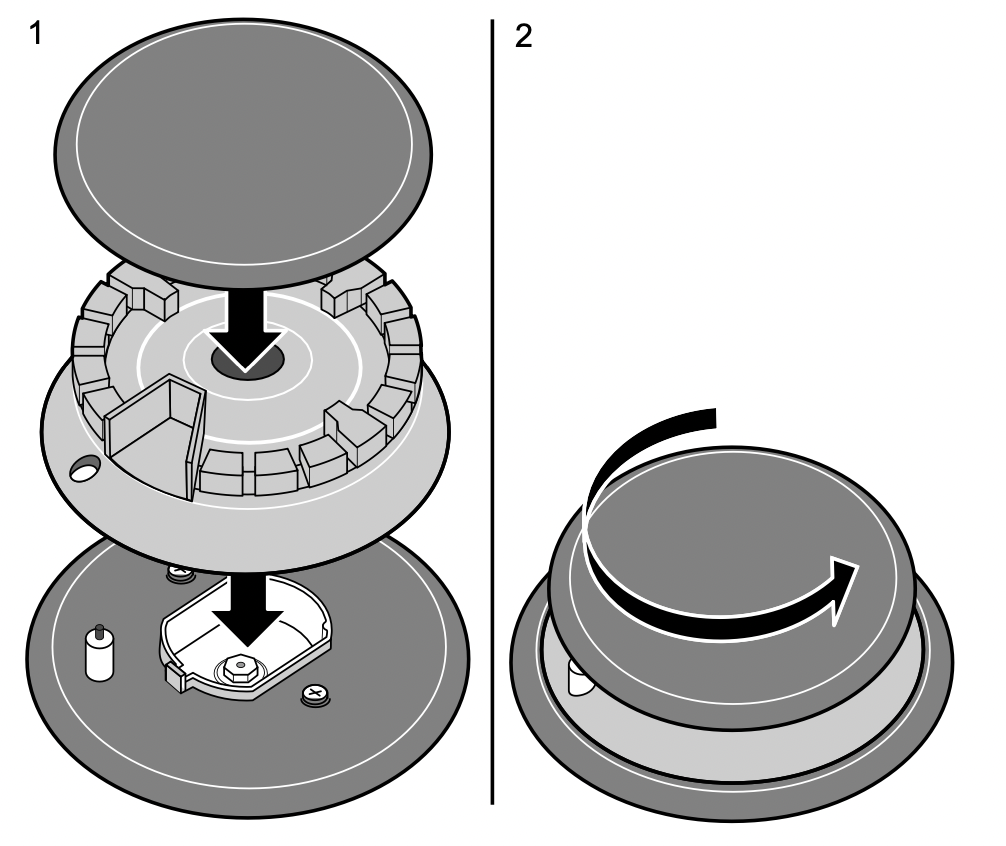
Burner Cap and Burner Base Placement
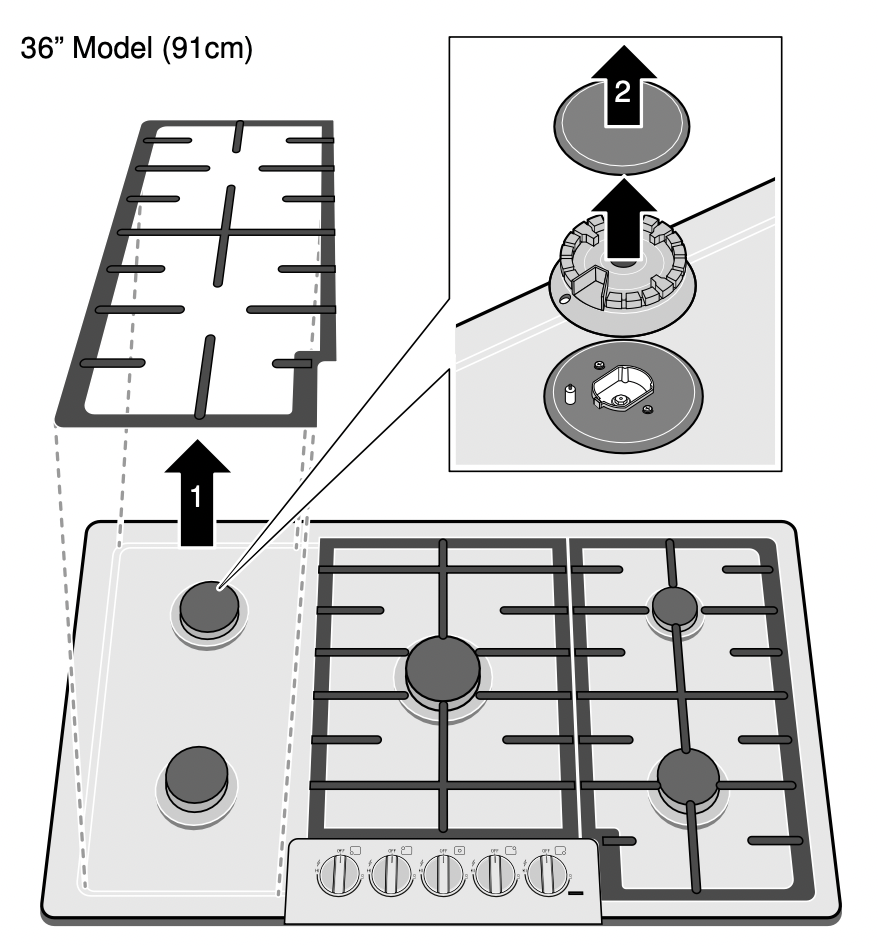
- After electrical connection is complete, place each burner base on the corresponding location on the cooktop. One of the three bars on the burner base should line up with the notch and prevent the base from rotating. The small hole or cutout near the edge should also line up with the igniter. Pay special attention to avoid damaging the igniter during installation of the base. See Illustration below.
- Once each base is located and resting evenly, place each burner cap on its correct burner base. See Illustration.
- Place burner cap gently on top of base so that the prongs of the burner base fit snugly into the groove of the burner cap.
- If the maintop is removed by a certified installer (for example to check electrical or piping connection) the panhead screws that were removed must be reinstalled to ensure proper functionality of burners.
Placing Burner Caps and Bases
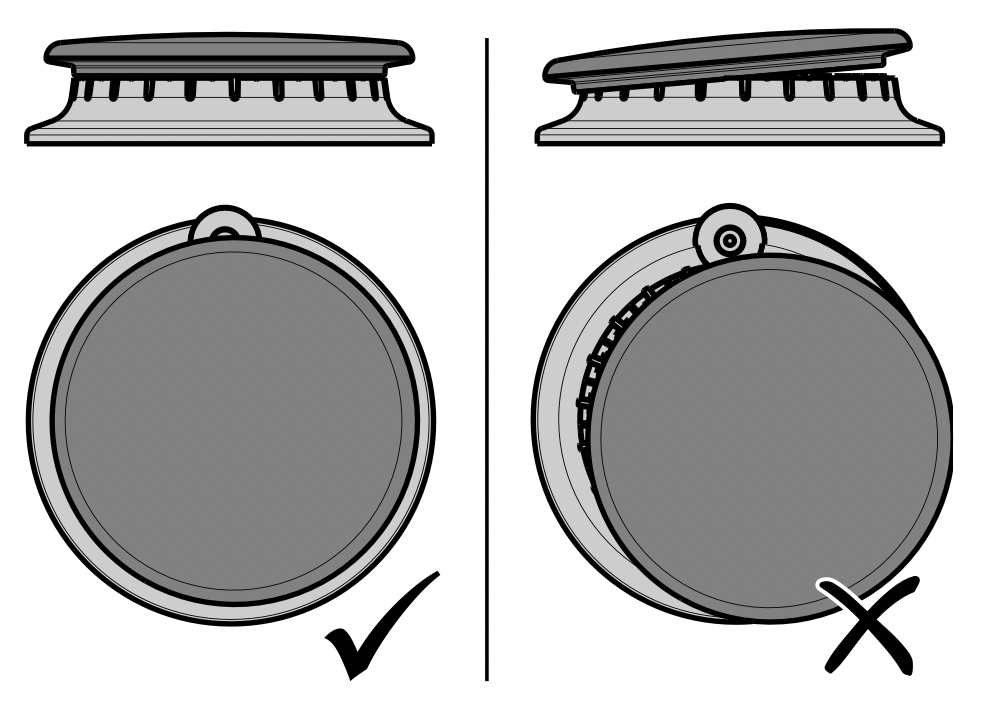
Checking Burner Cap Placement
- Check to make sure that there is no gap between the burner cap and burner base. See illustration below for correct and incorrect placements of the burner cap.
- You may gently try to move the burner cap from side to side to check if it is properly placed. If properly placed, the cap will click from side to side as the prongs hit the groove ridge.
Checking Burner Cap Placement
Burner “ON” light
An “On” light is located on the cooktop. When illuminated, it indicates at least one burner is in use (no light on the 500 Series).
Install Burner Grates
Properly position and install each burner grate as shown in the illustration below.
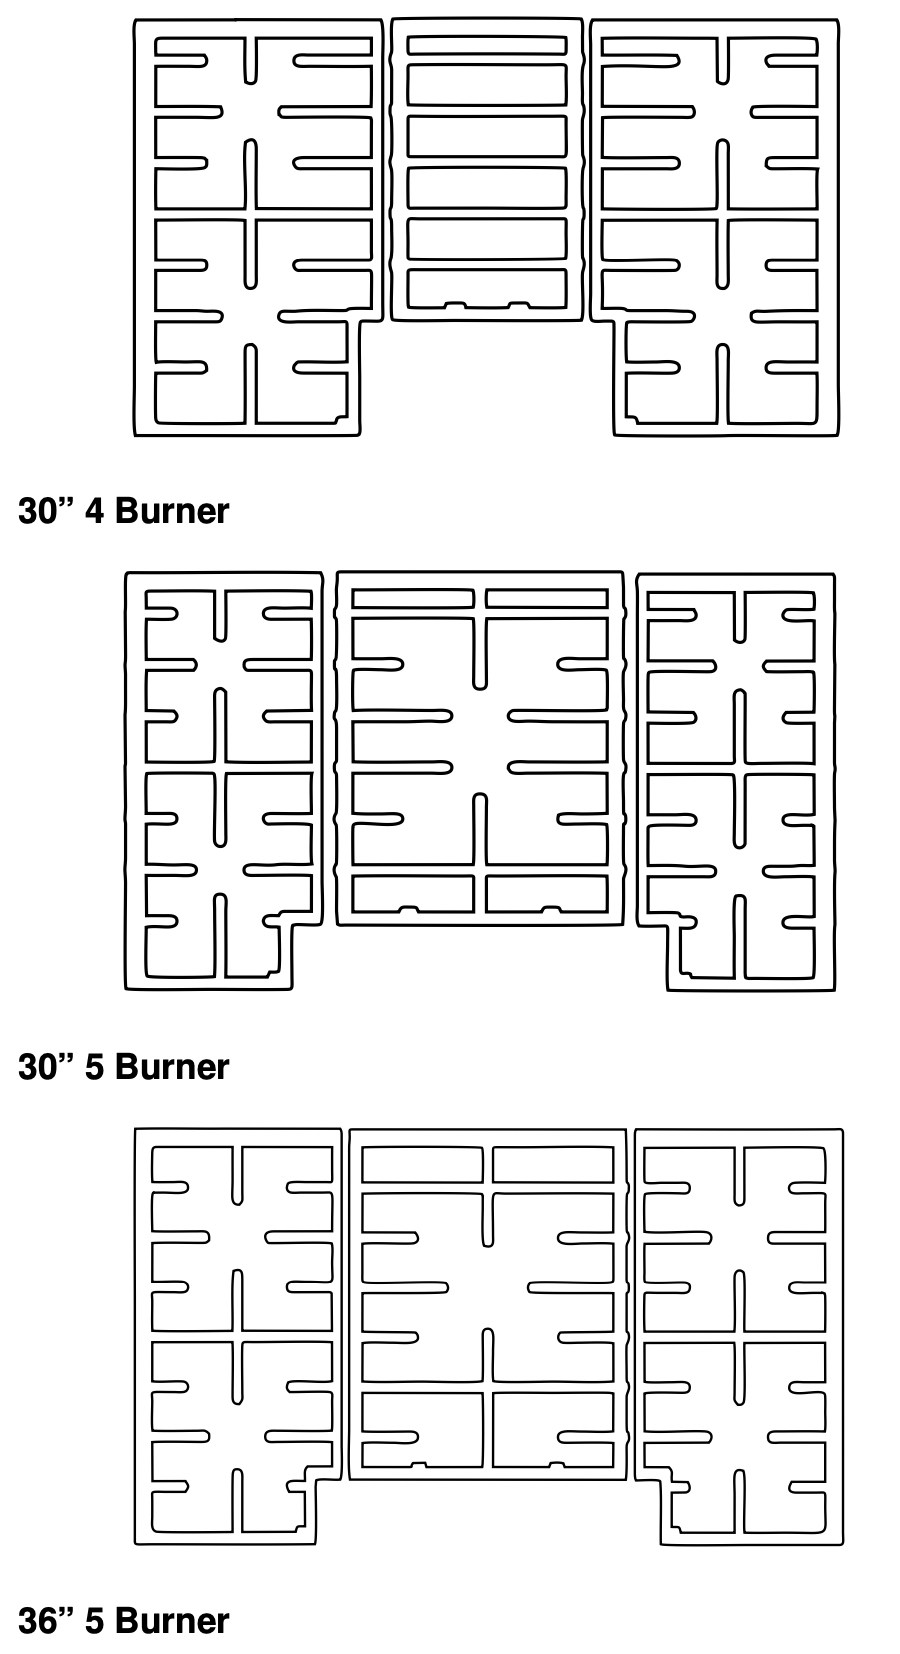
WARNING: To prevent flare-ups, properly support pots and avoid spills, all grates must be properly positioned on the cooktop whenever the cooktop is in use. Each of the four feet must be placed into the corresponding dimples in the cooktop. Do not use a grate if the rubber feet are missing or damaged.
Control Knobs
The cooktop has one control knob for each burner. Push down and turn to the left to light and set the desired heat setting.
WARNING: Failure to operate knobs properly may result in personal injury and damage to the appliance.
The cooktop has standard burner controls and rubber grommets.
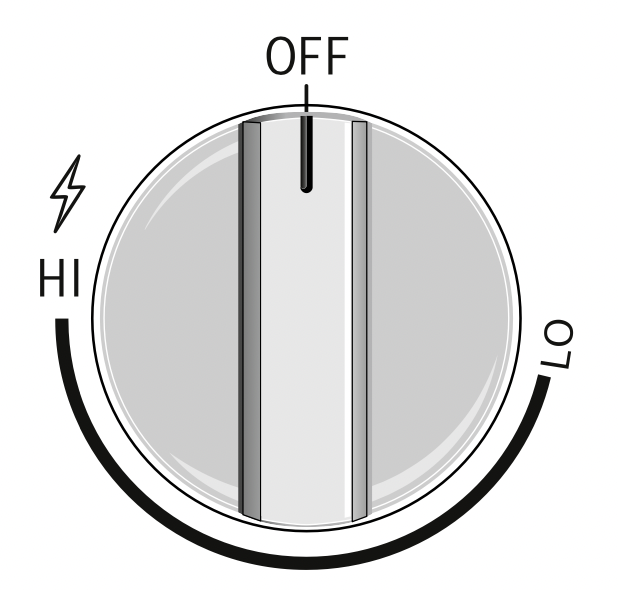
The standard burner controls have an infinite number of heat settings.
To operate: Select the appropriate control knob, push down and turn counterclockwise to the desired flame size. Turn off by turning the control knob clockwise to OFF.
Control Knob Removal
To remove knob: With control knob in the OFF position, gently lift knob up and off.
WARNING: To avoid possible electric shock, do not reach through control opening into rough-in box.
WARNING: Do not use the appliance without the knobs in place.
To replace knob: Replace control knob by placing indicator line at the OFF position. Press down firmly.
Operation
About the Appliance
Use the cooktop for surface cooking applications such as boiling, frying, simmering, steaming and sautéing.
WARNING: The burning of gas cooking fuel can create small amounts of carbon monoxide, benzene, formaldehyde and soot. To minimize exposure to these substances, the burners should be adjusted by a certified installer or authorized servicer to ensure proper combustion. Ensure proper ventilation with an open window or use a ventilation fan or hood when cooking with Gas. Always operate the unit according to the instructions in this manual.
Normal Operation - Electronic Ignition/Reignition
The cooktop uses electronic igniters to light the burners. There is no pilot light. Each burner has its own igniter. If a burner flame blows out during use, the burner will automatically reignite.
CAUTION: To avoid possible injury or damage to the appliance, ensure grates are installed exactly per installation instructions and not backwards or upside down.
The igniter should be clean and dry for proper operation.
- Avoid getting water or food on the igniter.
- If the igniter is wet or soiled, it may spark without igniting the burner, or even spark continuously when a flame is present.
Note: If the burner does not light within 4 seconds, turn the burner off. Check to see that the burner cap is positioned correctly on the burner base and the igniter is clean and dry. If a burner still fails to ignite, see “Before Calling for Service”.
When a flame is present and a Low setting is used, the igniter may occasionally spark. This is normal.
CAUTION: To avoid possible injury or damage to the appliance, ensure grates are installed exactly per installation instructions and not backwards or upside down.
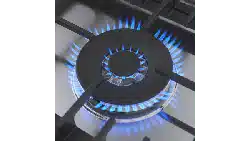
Typical Flame Characteristics
The burner flame should be blue in color and stable with no yellow tips, excessive noise or fluttering. It should burn completely around the burner cap.
Checking Flame Characteristics:
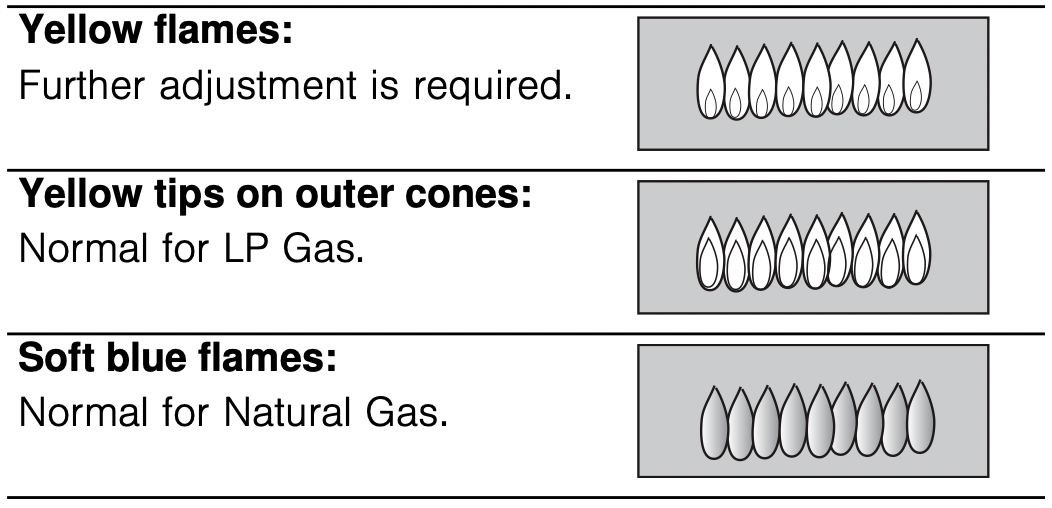
- If the flame is completely or mostly yellow, verify that the regulator is set for the correct fuel. After adjustment, retest.
- Some yellow streaking is normal during the initial startup. Allow unit to operate 4 to 5 minutes and reevaluate before making adjustments.
- Foreign particles in the gas line may cause an orange flame during initial use. This should disappear with use. Check burner to make sure port holes are not obstructed. If the ports are clogged. "Before Calling for Service" on page 19
Note: An audible “pop” may be heard when the burner is turned off manually. The “popping” may be louder with LP gas than with natural gas. This is normal.
Getting the most out of your appliance
Cooking suggestions for best results
- Boil water in covered pot on High using largest burner for best results. If water boils over, turn to a lower setting.
- When melting chocolate or butter, use smallest burner with OPTISIM™ feature for best results.
- When simmering, bring food to a boil first. Stir well to be sure all the food is boiling, then cover and reduce the flame to the desired setting to simmer.
- There should be steam and slight quivering of the liquid’s surface while simmering.
- Use a lid to keep a more constant cooking temperature and heat food faster.
- Check the food occasionally to see if the control knob should be turned to a lower or higher setting.
- It is normal to stir food occasionally.
- Center the pan over the burner before turning the burner on.
- Use proper cookware. "Proper Cookware" on page 15
- Refer to the settings recommendations in the following chart for suggested settings.
Settings recommendations
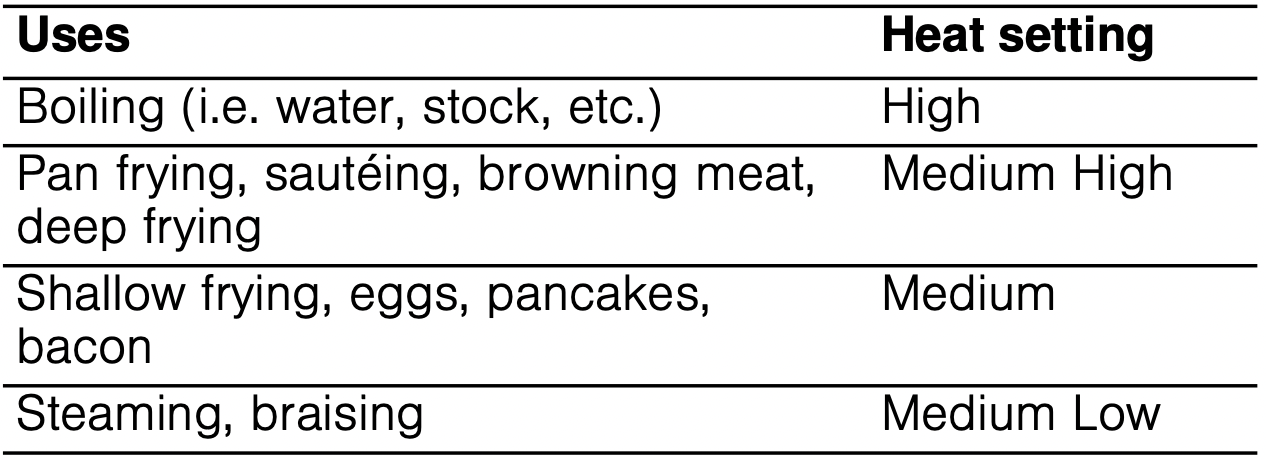
Melting chocolate, melting butter, sim- Low mering sauces, soups and stews (i.e. tomato sauce, alfredo sauce, beef stew, etc.)
Note: When melting chocolate or butter, use smallest burner with OPTISIM™ feature for best results.
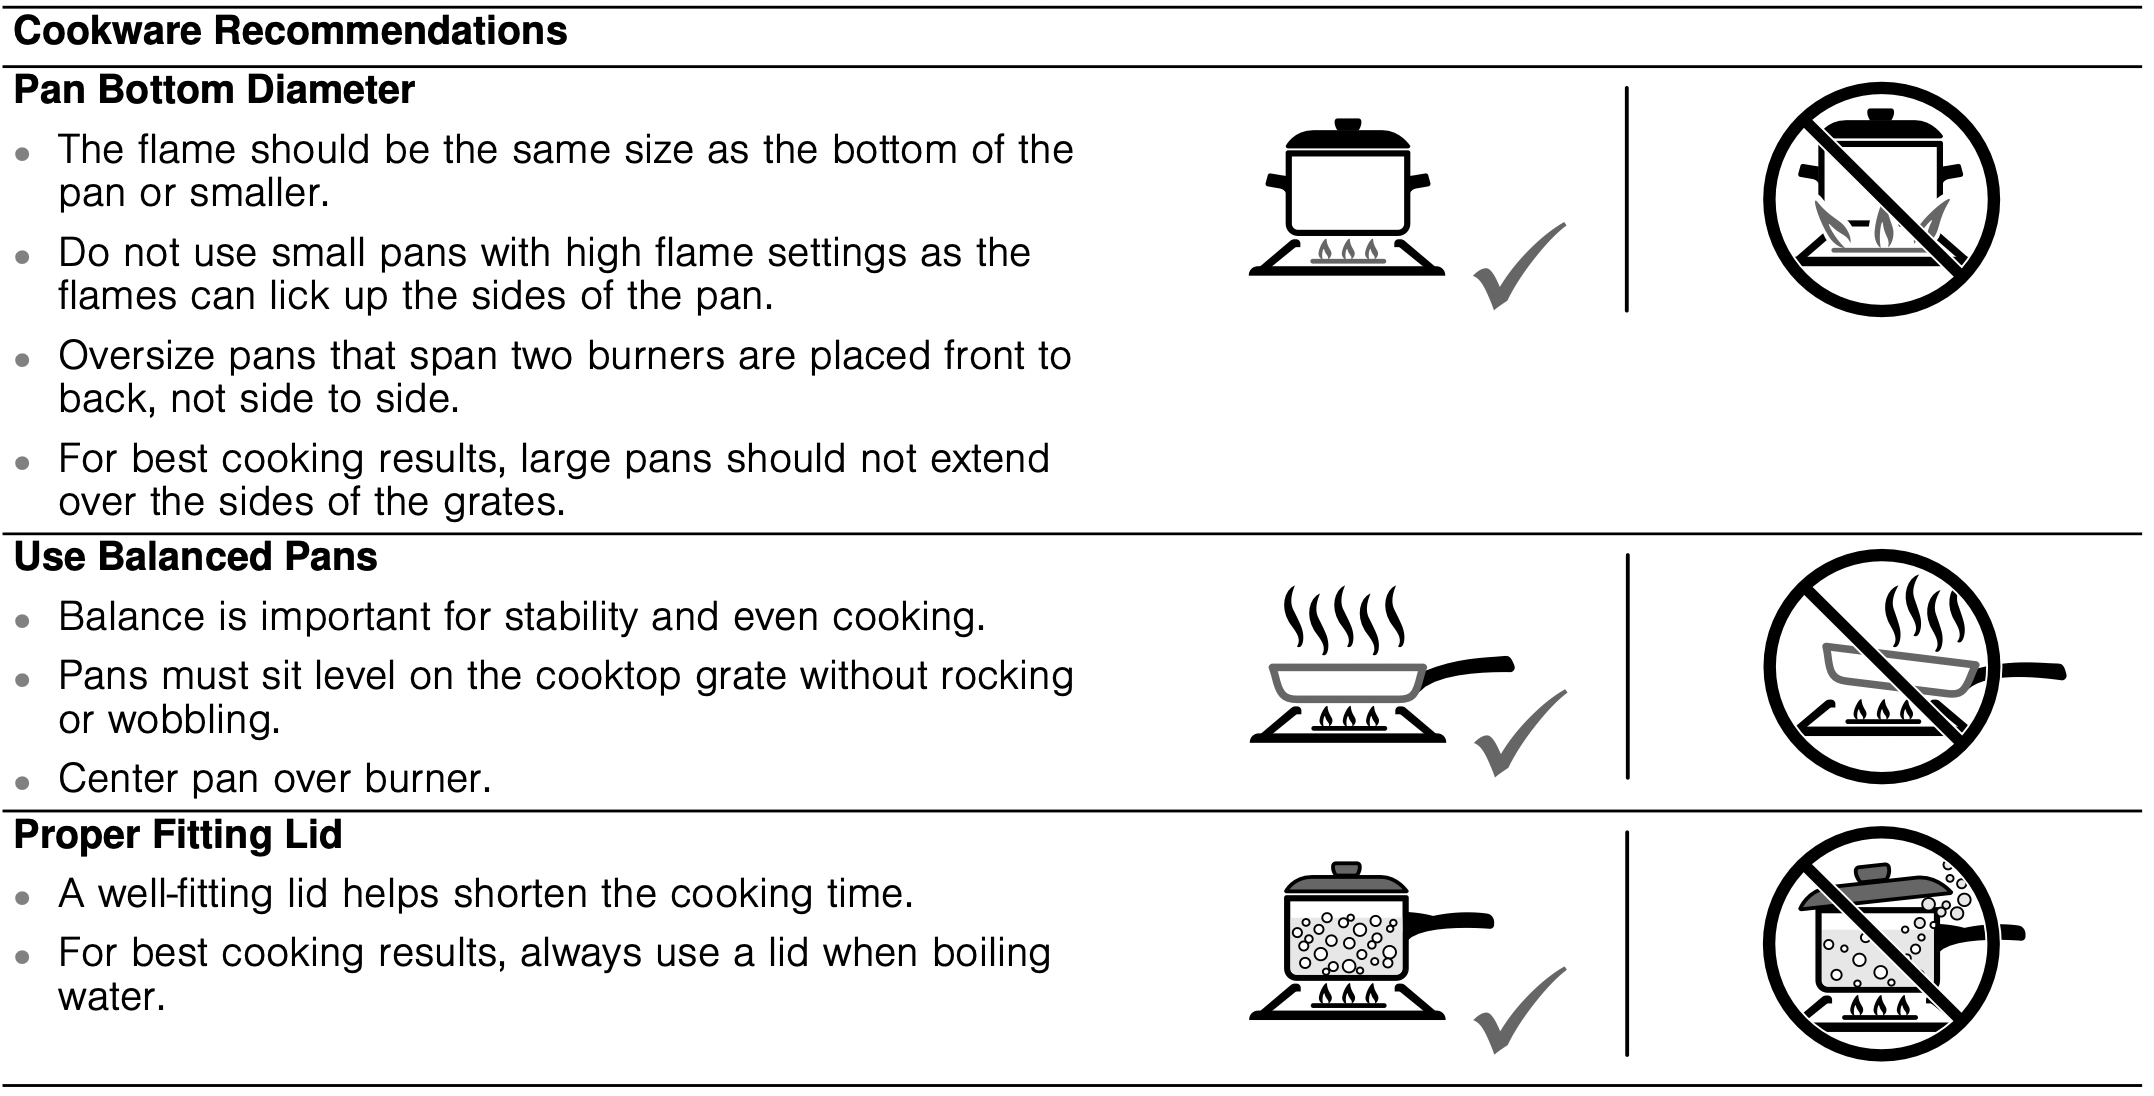
Proper Cookware
- Aluminum or copper bottomed pans conduct heat evenly.
- Steel pans, if not combined with other metals, may cook unevenly.
- Cast-iron cookware absorbs heat slowly and cooks more evenly at low-to-medium settings.
- Flat heavy bottom pans provide even heat and stability.
- DO NOT USE pans that are thin, warped, dented or ridged as they heat unevenly.
Choosing Suitable Cookware
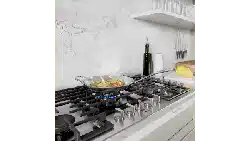
Specialty cookware
- Pans that span 2 burners, i.e. griddles, roasters and fish poachers, may be used when placed front to back. Adjust flame equally to cook evenly.
- Use a Wok with a flat bottom.
- Canners and pressure cookers must meet the same requirements as described above. After bringing contents to a boil, use lowest heat setting possible to maintain a boil or pressure (for pressure canners/ cookers).
Cleaning and Maintenance
Cleaning
The entire cooktop can be safely cleaned by wiping with a soapy sponge, then rinsing and drying. If stubborn soil remains, follow the recommended cleaning methods below.
Cleaning recommendations:
- Always use the mildest cleaner that will do the job. Use clean, soft cloths, sponges or paper towels.
- Rub stainless steel finishes in the direction of the grain. Wipe area dry to avoid water marks.
- Before cleaning, be certain the burners are turned off and the grates and burners are cool.
- Do not clean removable cooktop parts in any self cleaning oven or dishwasher.
- After cleaning, place all parts in their proper positions before using cooktop.
- For proper burner performance, keep igniters clean and dry.
- Keep the igniter ports clean for proper lighting performance of the burners. It is necessary to clean these when there is a boilover or when the burner does not light even though the electronic igniters click.
- Do not use flammable cleansers such as lighter fluid.
CAUTION: All igniters spark when any single burner is turned on. Do not touch any of the burners when the cooktop is in use.
Cleaning Guidelines
The cleaners recommended below and on the following page indicate a type and do not constitute an endorsement of a particular brand. Use all products according to package directions.
| Cooktop part / material |
Suggested cleaners |
Important reminders
|
| Burner base / aluminum alloy |
- Detergent and hot water; rinse and dry.
- Stiff nylon bristle tooth brush to clean port openings.
- Abrasive cleansers: Brillo ® or S.O.S. ® pads. Rinse and dry.
|
- Do not scratch or gouge the port openings.
- Clean ports with a wire or straightened paper clip.
- Do not use a toothpick that may break off.
- Do not soak burner bases.
|
| Burner cap / porcelain enamel |
- Hot sudsy water; rinse and dry thoroughly.
- Nonabrasive Cleansers: Ammonia, Fantastic ® , Formula 409 ® .
- Mild Abrasive Cleansers: Bon Ami ® , Ajax ® , Comet ® .
- Liquid cleaners: Kleen King ® , Soft Scrub ® .
- For food stains, use an abrasive cleanser such as, Zud ® or Bar Keepers Friend ® .
- Reassemble. Make sure that the cap is seated on the base.
|
- Acidic and sugar-laden spills deteriorate the porcelain enamel.
- Remove soil immediately after unit has cooled enough to touch.
- Do not use wet sponge or towel on hot porcelain.
- Do not soak burner caps.
- Always apply minimal pressure with abrasive cleaners.
- Dry thoroughly after cleaning.
|
| Control knobs and grommets |
- Hot sudsy water; rinse and dry immediately.
- To remove grommets, see “Burner Control Knob Removal”.
- To remove knobs, lift straight up.
|
- Do not soak knobs or grommets.
- Do not use abrasive scrubbers or cleansers, such as Bon Ami®, Ajax®, or Comet®. They may permanently damage the finish or remove graphics.
- Do not pull on grommet when removing or replacing.
|
| Exterior finish / stainless steel |
- Nonabrasive Cleaners: Hot water and detergent, Fantastic ® , Formula 409 ® . Rinse and dry immediately.
- Cleaner Polish: Stainless Steel Magic ® to protect the finish from staining and pitting; enhances appearance.
- Hard water spots: Household white vinegar.
- Mild Abrasive Cleaners: Kleen King Stainless Steel liquid cleaner, Bon Ami ® .
- Heat discoloration: Bar Keepers Friend ®
|
- Do not use steel wool pads. They will scratch the surface.
- Stainless steel resists most food stains and pit marks providing the surface is kept clean and protected.
- Never allow food stains or salt to remain on stainless steel for any length of time.
- Rub lightly in the direction of the grain.
- Chlorine or chlorine compounds in some cleaners are corrosive to stainless steel. Check ingredients on label before using.
|
| Grates and grate bridge / porcelain enamel on cast iron |
- Nonabrasive cleaners: Hot water and detergent, Fantastic ® , Formula 409 ® . Rinse and dry immediately.
- Mild abrasive cleaners: Bon Ami ® and Soft Scrub®.
- Abrasive cleaners for stubborn stains: soap-filled steel wool pad.
|
- The grates are heavy; use care when lifting. Place on a protected surface for cleaning.
- Blisters/ crazing/ chips are common due to the extreme temperatures on grate fingers and rapid temperature changes.
- Acidic and sugar-laden spills deteriorate the enamel. Remove soil immediately after unit has cooled enough to touch.
- Abrasive cleaners, used too vigorously or too often can eventually mar the enamel.
- Do not clean in a self-clean oven.
|
| Igniters / ceramic |
- Carefully wipe with a cotton swab dampened with water, ammonia or Formula 409 ® .
- Gently scrape soil off with a toothpick.
|
- Avoid excess water on the igniter. A damp igniter will prevent burner from lighting.
- Remove any lint that may remain after cleaning.
|
Maintenance
The appliance requires only regular cleaning for proper operation. No other maintenance is required.
For detailed instructions see ~ "Cleaning and Maintenance" on page 16
Troubleshooting
Before Calling for Service
Before calling customer service, consider the suggestions and instructions below:
CAUTION
- Repairs should only be done by an authorized servicer.
- Improper repair of your appliance may result in risk of severe physical injury or death.
| Problem |
Suggestion |
| Burner(s) do not light / igniters do not spark |
- Make sure that the gas shut off valve is in the “ON” position and the gas supply to the house is not shut off.
- Make sure the burner caps and burner bases and the burner ports are not clogged. Clear ports with a wire or straightened paper clip if clogged.
- Make sure the igniters are clean and dry.
- Check the power supply. It should be properly grounded with the correct polarity. Make sure the unit is fully plugged in to the outlet and the circuit breaker is not tripped.
|
|
Burner flame goes out unexpectedly
|
Make sure that there is not draft in the room.
|
| Igniters spark even though knobs are in the off position |
When the electrical power connection has been activated at the first power up or reconnected after an outage, the igniters may spark once or twice, even though all burner knobs are in the “OFF” position.
|
| Cooking results are not what was expected |
- The cooktop is not level.
- Cooking pan does not fit the surface being used. "Proper Cookware" on page 15
- Cookware is not the type or size recommended. "Proper Cookware" on page 15
|
Product Rating Label
The rating label shows the model number and the FD number (production number/product’s unique identifier) of your cooktop. It is located on the underside of the cooktop.
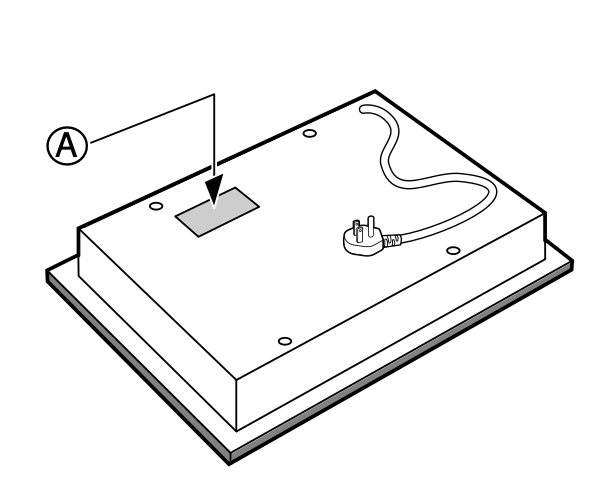
Rating Label Location
A Rating Label