User Manual
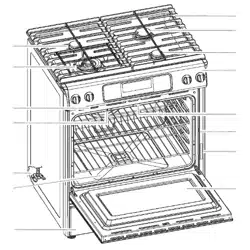
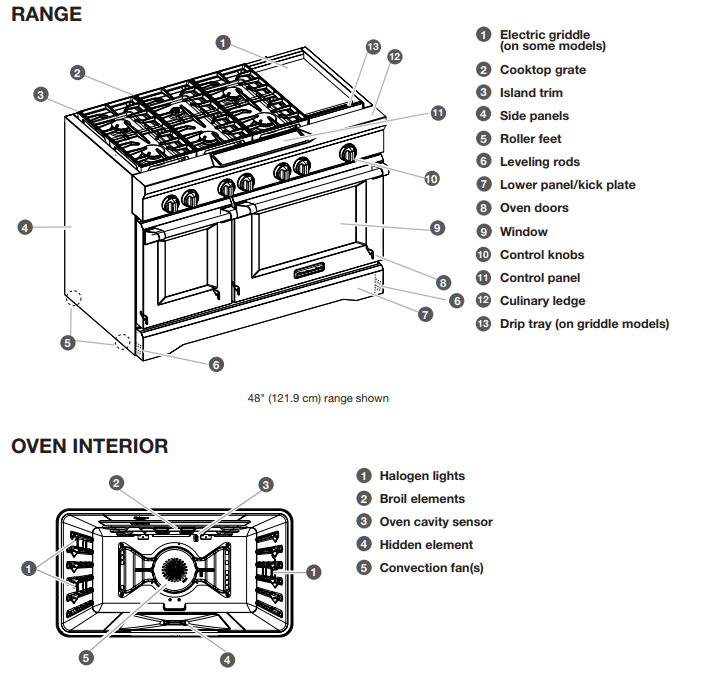
PARTS AND FEATURES
USING YOUR OVEN
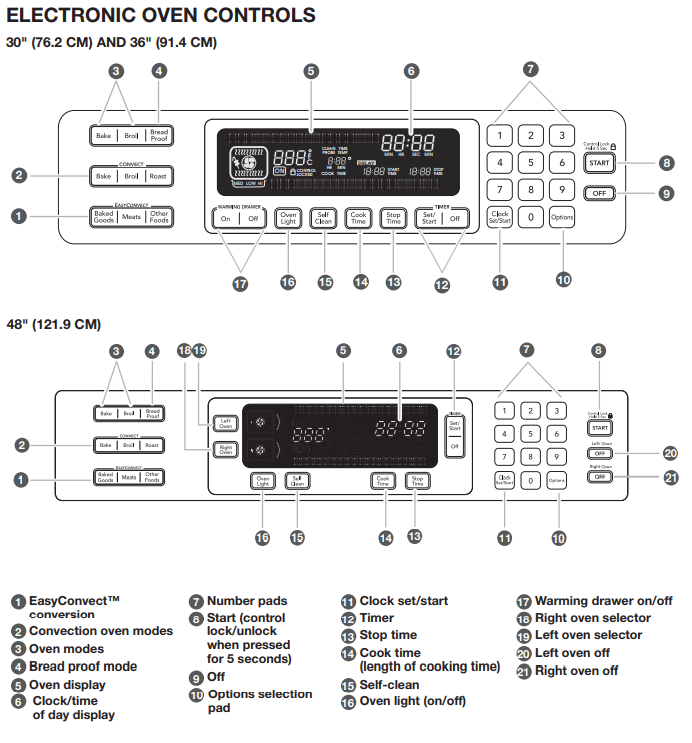
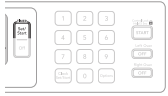
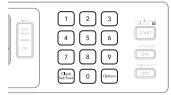
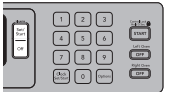
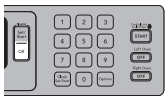
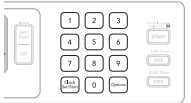
CONTROL PANEL
When pressing any control pad function on the Electronic Oven Control, use the pad of your finger to press the desired function. Hold down the pad a few seconds, or until the desired function appears in the display.
When entering multiple functions within one setting, pause briefly between each control pad command. If a command pad is pressed several times repeatedly, the pad may briefly stop working. Wait a few seconds, and the pad should function again as normal.
OVEN DISPLAY
- When the oven is in use, this display shows the oven temperature, heat source(s) and start time.
- During Timed Cooking, this display also shows a timed countdown and the stop time (if entered).
- If “Err” appears on the display, an invalid pad was pressed. Press OFF and retry your entry.
- When the oven is not in use this display is blank, except for the clock display.
FUNCTIONS
Control Panel
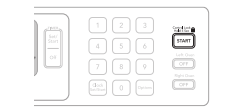
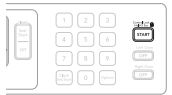
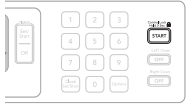
Using the Start Pad
The START pad begins any oven function except the Timer, Control Lock and Sabbath Mode. If not pressed within 5 seconds after pressing a pad, “START?” will appear on the oven display as a reminder. If not pressed within 5 minutes after pressing a pad, the oven display will return to inactive mode (blank) and the programmed function will be canceled.
If a function has been started and a different function is selected, “START?” will appear in the display after 5 seconds. If the START pad is not pressed within 5 seconds, the oven display will return to the active/already started function.
Using the Off Pad
The OFF pad stops any oven function except for the Clock, Timer, and Control Lock.
Using Control Lock
The Control Lock shuts down the control panel pads to avoid unintended use of the oven(s).
The Control Lock feature may be used either when the range is in use or turned off (for example, during cleaning).
The Control Lock is preset unlocked, but can be locked.
When the control is locked, only the TIMER SET/START, TIMER OFF and OVEN LIGHT pads will function.
To Lock or Unlock Control:
Before locking, make sure the oven, the Timer and Timed Cooking are off
Press and hold START for 5 seconds until “CONTROL LOCKED” appears on the display. Repeat to unlock and remove “CONTROL LOCKED” from the display.
Clock
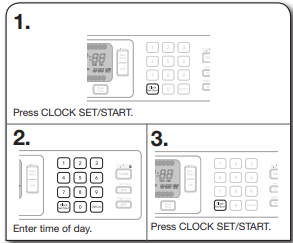
Setting the Clock
This is a 12-hour clock
TIMER
Setting the Timer
The Timer can be set in minutes and seconds or hours and minutes and counts down the set time. The time can be reset during the countdown by repeating the steps below. NOTE: The Timer does not start or stop the oven
1. Press TIMER SET/START. Press again to switch from MIN/SEC and HR/MIN.
2. Enter desired time.
3. Press TIMER SET/START. When time reaches 0:00, 4 chimes will sound until TIMER OFF is pressed.
4. Press TIMER OFF at any time to cancel Timer or stop reminder tones.
OPTIONS
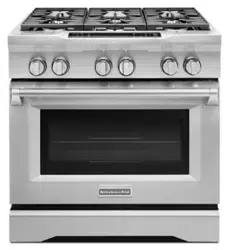
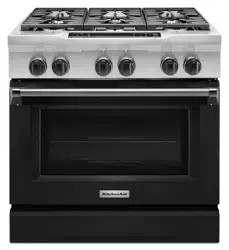
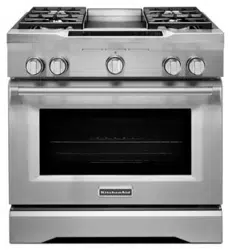
These instructions cover different models. The oven you have purchased may have some or all of the items listed. The locations and appearances of the items shown here may not match those of your model.
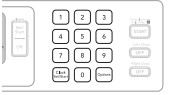
Options Selection Pad
The OPTIONS selection pad allows you to access special functions within the Electronic Oven Control that allow you to customize the product to your needs. These special functions allow you to change the oven temperature between Fahrenheit and Celsius, turn the audible signals and prompts on and off, and adjust the oven calibration. The Dehydrate and Sabbath Mode are also set using the OPTIONS selection pad.
NOTE: The Sabbath mode can only be set using the Options selection pad after the mode is enabled (See “Sabbath Mode – Option 7” section.)
To Use:
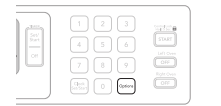
Press OPTIONS. The oven display will scroll through the 6 options, or you can press a number pad to quickly enter the desired hidden function. Each time an option is selected, the oven will toggle to the setting displayed.
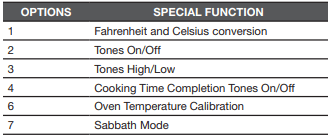
Fahrenheit and Celsius – Option 1
Fahrenheit is the default setting, but setting may be changed to Celsius.
Tones – Options 2, 3, 4
Tones are audible signals, indicating the following:
One beep
- Function has been entered
Three beeps
Preheat Completion Tone
- One chime indicates a preheat cycle has been completed.
Timer Completion Tones
- Four chimes sound twice when the timer reaches zero. This can occur when using the timer for functions other than cooking.
Cooking Time Completion Tones
- Three beeps indicate the end of a cooking cycle.
All Tones ON/OFF
All tones are preset to ON, but can be turned OFF.
Tone Volume High/Low
The volume is preset to HIGH but can be changed to LOW.
Cooking Time Completion Tones ON/OFF
All tones are preset to ON but can be turned OFF
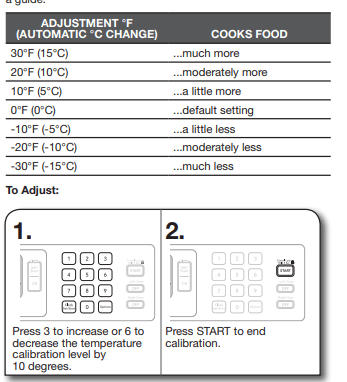
Oven Temperature Calibration – Option 6
IMPORTANT: Do not use a thermometer to measure oven temperature because opening the oven door during cycling may give incorrect readings.
The oven provides accurate temperatures; however, it may cook faster or slower than your previous oven, so the temperature calibration can be adjusted. It can be changed in Fahrenheit or Celsius.
A minus sign means the oven will be cooler by the displayed amount. The absence of a minus sign means the oven will be warmer by the displayed amount. Use the following chart as a guide.
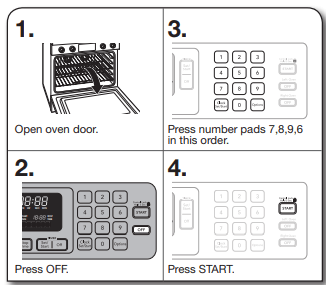
Sabbath Mode
- The Sabbath Mode sets the oven(s) to remain ON in a bake setting until turned off.
- A timed Sabbath Mode can also be set to keep the oven on for only part of the Sabbath.
- When the Sabbath Mode is set, only the number and start keys will function.
- No tones will sound, and the display will not show messages or temperatures changes.
- The heat source icons will appear lit on the oven display throughout the Sabbath Mode
- When the oven door is opened or closed, the oven light will not turn on or off and the heating elements will not turn on or off immediately.
- If a power failure occurs when the Sabbath Mode is set, the oven will remain in Sabbath Mode but will no longer be actively cooking. The “ON” indicator will no longer be illuminated. Press OFF to return to normal operating mode (non-Sabbath Mode compliant, not cooking).
To Enable: IMPORTANT: Before the Sabbath Mode can be regularly set,
To Disable: The Sabbath Mode setting capability can be disabled by repeating the previous steps. The Sabbath Mode cannot be regularly set until re-enabled.
To Set Regularly Untimed:
To Set Regularly Timed:
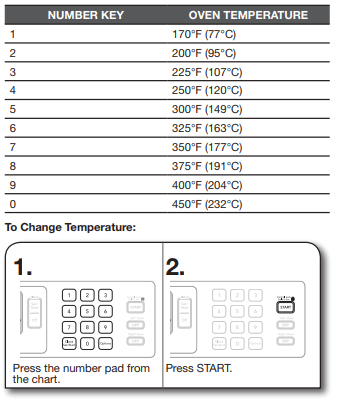
Temperature Change
The oven temperature can be changed when the oven(s) are in the Sabbath Mode. No tones will sound, and the display will not change. The heating elements will not turn on or off for a random time, anywhere from 16 to 24 seconds. It may take up to 30 minutes for the oven to change temperature. Number pads 1 through 0 represent temperatures. Use the following chart as a guide
KNOW YOUR OVEN
- Odors and smoke are normal when the oven is used the first few times, or when it is heavily soiled.
IMPORTANT: The health of some birds is extremely sensitive to the fumes given off. Exposure to the fumes may result in death to certain birds. Always move birds to another closed and well-ventilated room.
IMPORTANT: This oven automatically adjusts for 208V operation without affecting cooking performance. Preheat times may be longer.
Aluminum Foil
IMPORTANT: To avoid permanent damage to the oven bottom finish, do not line the oven bottom with any type of foil or liner.
- On models with bottom oven vents, do not block or cover the vents.
- For best cooking results, do not cover rack with foil because air must be able to move freely.
Positioning Rack and Bakeware
IMPORTANT: To avoid permanent damage to the porcelain finish, do not place food or bakeware directly on the oven door or bottom.
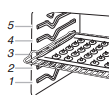
Racks
- Position racks before turning on the oven.
- Do not position racks with bakeware on them.
- Make sure racks are level.
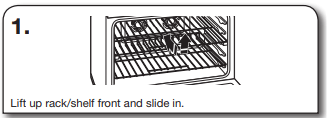
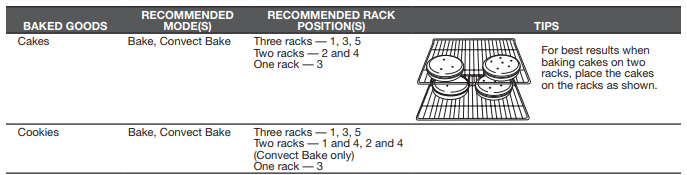
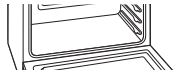
To move a rack, pull it out to the stop position, raise the front edge, then lift out. Use the following illustration and charts as a guide.
Bakeware
To cook food evenly, hot air must be able to circulate. Allow 2" (5.0 cm) of space around bakeware and oven walls. For convection cooking, allow 1" (2.5 cm) of space around bakeware and oven walls.
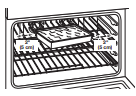
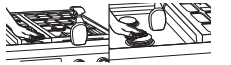
Roll-Out Extension Rack
The roll-out extension rack allows easy access to position and remove food in the oven. It can be used in rack positions 1 through 4. The roll-out extension rack will not fit in position 5.
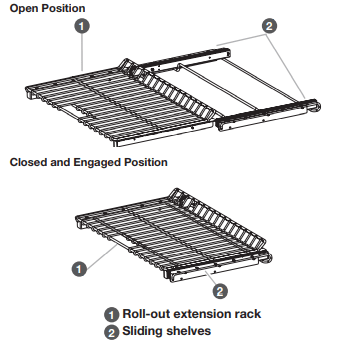
To Remove the Roll-Out Extension Rack:
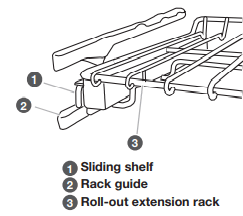
Rack must be closed and engaged with sliding shelf. Using 2 hands, lift up on front edge of rack and sliding shelf together. Slowly push both to back wall of oven. The front edge of the sliding shelf should sit on the rack guide located on the sides of the oven. The front edge of the rack and the sliding shelf should be higher than the back edge.
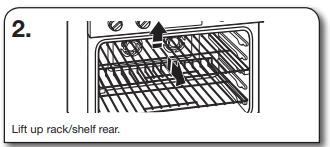
Using 2 hands, lift up back of rack and sliding shelf so that back and front are level on rack guide. Pull out.
To Replace the Roll-Out Extension Rack:
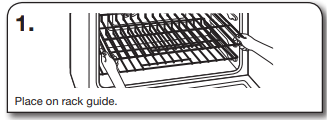
Using 2 hands, grasp front of the closed rack and sliding shelf. Place the closed rack and sliding shelf on the rack guide.
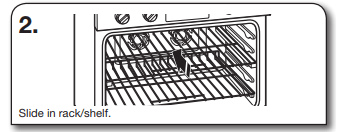
Slowly push the rack and sliding shelf to the back of oven until the back edge of the sliding shelf drops
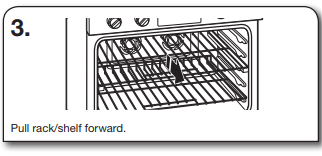
Pull the rack and sliding shelf slightly forward until the front edge drops and the sliding shelf is on the rack guide.
Know Your Racks
- To avoid damage to the sliding shelves, do not place more than 25 lbs (11.4 kg) on the rack.
- Do not clean the roll-out extension rack in a dishwasher. It may remove the rack’s lubricant and affect its ability to slide.
- See the “Care and Cleaning” section for more information.
Meat Thermometer
When not using the supplied temperature probe, use a meat thermometer to determine whether meat, poultry, and fish are cooked to the desired degree of doneness. The internal temperature, not appearance, should be used to determine doneness. A meat thermometer is not supplied with this appliance. Follow manufacturer’s directions for using a meat thermometer.
Oven Vent
The oven vent should not be blocked or covered since it allows the release of hot air and moisture from the oven. Blocking or covering the vent will cause poor air circulation, affecting cooking and cleaning results. Do not put plastics, paper, or other items that could melt near the oven vent.

SPECIAL MODES
Proofing Bread Proofing bread prepares dough for baking by activating the yeast. Follow recipe direction as a guide. To Proof:
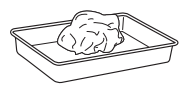
1. Before first proofing, place dough in a lightly greased bowl and cover loosely with wax paper coated with shortening. Close door.
2. Press START.
3. Press BREAD PROOF.
NOTE: The Proof cycle will start even if the oven temperature is over 300°F (149°C). You cannot change the temperature under Bread Proofing.
Before second proofing, shape dough, place in baking pan(s) and cover loosely with plastic wrap coated with cooking spray. Follow same placement and control steps above. Before baking, remove plastic wrap.
Temperature Probe
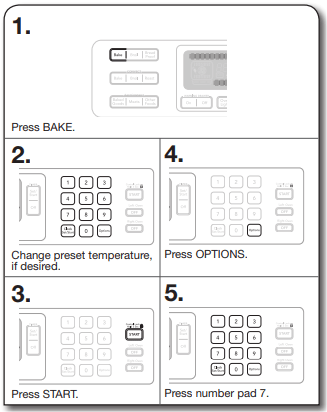
The temperature probe accurately measures the internal temperature of meat, poultry and casseroles and should be used in determining the doneness of food. It is available on most cycles including: Bake, Convection Bake, Convection Roast, and EasyConvect™ Conversion.
Know Your Temperature Probe
- Always unplug and remove the temperature probe from the oven when removing food.
- When using the probe, the Cook Time function may not be used
To Use Temperature Probe:
Enter desired probe temperature before selecting a cooking mode. The probe temperature is the desired temperature of the food when it is done.
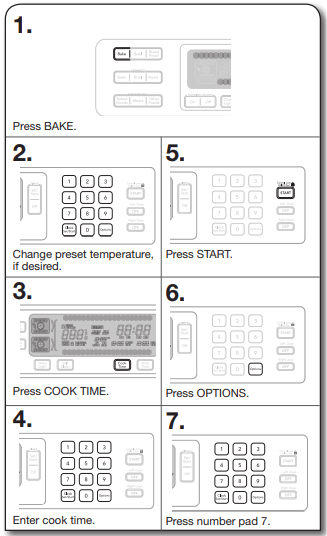
Timed/Delay Cooking
Timed Cooking allows the oven(s) to cook for a set length of time. Delay Cooking allows the oven(s) to be set to turn on at a certain time of day. Delay start should not be used for food such as breads and cakes because they may not bake properly. Timed Cooking is available on most cycles including: Bake, Convect Bake, Convect Roast, EasyConvect™ Conversion, Bread Proof, and Keep Warm. Delay Cooking is available on the Bake, Convect Bake, and Convect Roast cycles.
NOTE: For best cooking results, when the temperature probe is being used, the Cook Time function cannot be used.
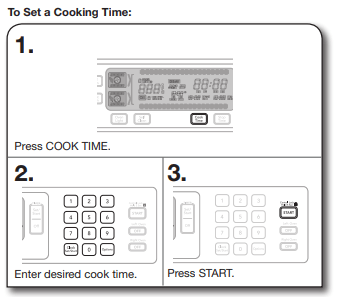
To Set a Delay Cooking Time: Before setting, make sure the clock is set to the correct time of day. See “Clock” section.
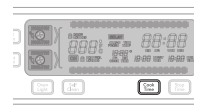
1.Press COOK TIME.
2.Enter desired cook time.

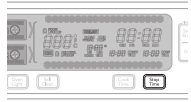
3.Press STOP TIME.
4.Enter desired stop time. The start time is automatically calculated. When the start time is reached, the oven will automatically turn on. When the stop time is reached, the oven will shut off automatically.
5.Press START.
COOKTOP SURFACE
After Each Use
To preserve the finish, clean food spills containing acids, such as vinegar and tomato, as soon as the entire appliance is cool.
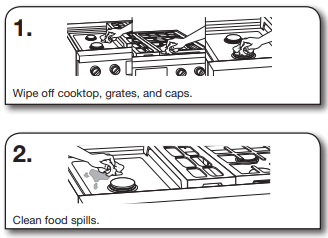
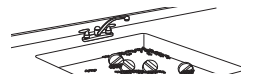
SEALED SURFACE BURNERS
1. Remove burner cap and base

2. Wipe off cooktop, grates, and caps.

3. Clean clogged burner ports.
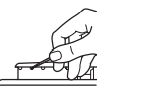
Use a straight pin. Do not enlarge or distort the port. Do not use a wooden toothpick. If the burner needs to be adjusted, contact a trained repair specialist.
4. Replace burner cap.
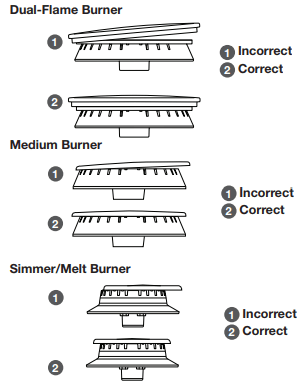
Make sure alignment pins are properly aligned with burner cap.
5. Turn ON burner.

If the burner does not light, check cap alignment. If the burner still does not light, do not service the sealed burner yourself. Contact a trained repair specialist.
CARE AND CLEANING
PORCELAIN-COATED GRATES AND CAPS
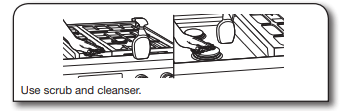
Clean with a nonabrasive nylon scrub pad and mildly abrasive cleanser.
Know Your Grates and Caps
- Food spills containing acids, such as vinegar and tomato, should be cleaned as soon as the cooktop, grates, and caps are cool. These spills may affect the finish.
- To avoid chipping, do not bang grates and caps against each other or hard surfaces such as cast iron cookware.
- Do not reassemble caps on burners while wet.
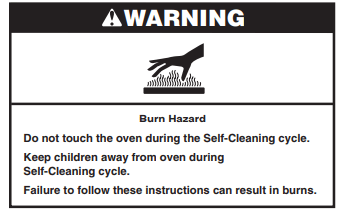
- Do not clean in the Self-Cleaning cycle.
- Do not clean in dishwasher.
GRILL
To Remove:
Before removing or replacing grill, make sure the control knobs are turned to OFF. Allow the grill to cool completely before handling.
1. Remove grill grate and wave tray
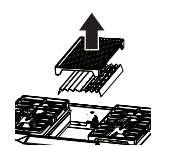
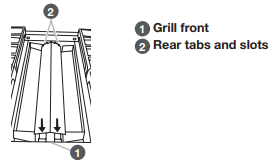
2. Remove flame spreader. Pull forward slightly on the flame spreader to release the tabs from the rear slots and lift out.
3. Remove burner assembly. Lift up and out.
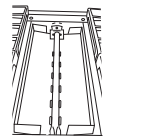
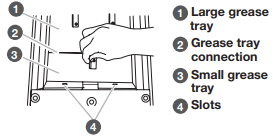
4. Remove small grease tray. Unhook tabs from slots and lift slightly to disengage from the large grease tray.
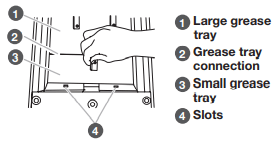
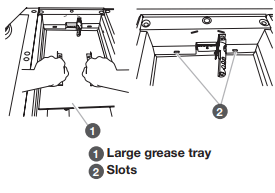
5. Remove large grease tray. Unhook slots and lift out.
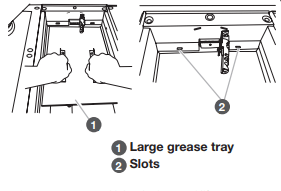
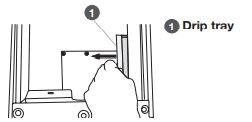
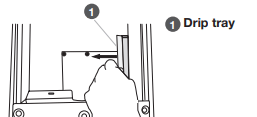
6. Remove and clean drip tray.
To Clean: Do not use oven cleaners, metal brushes, abrasive scouring pads or other scrubbers made to clean outdoor grills.
Grate:
- Do not clean grill grate in dishwasher.
- Do not clean in a self-cleaning oven.
1. Scrub with brush while grate is still warm. Use a soft-bristle brush. Oven mitts may be worn while cleaning.
2. Soak in warm, soapy water for 30 minutes. After soaking, scrub with nonabrasive pad.
Wave Tray and Wave Plate:
1. Soak in warm, soapy water to loosen soil. After soaking, scrub with non-abrasive pad. Oven cleaner may be used.
Burner Assembly:
1. Wipe with warm, soapy water or non-abrasive cleanser. Use damp cloth or non-abrasive pad.
Grease Trays and Drip Tray:
- Allow cooktop to cool before cleaning.
1. Wipe with warm, soapy water or non-abrasive cleanser. Use damp cloth or non-abrasive pad.
Module Basine:
1. Wipe with warm, soapy water or non-abrasive cleanser. Use damp cloth or non-abrasive pad.
2. For heavy soil, soak with paper towels. Soak paper towels in household cleanser and lay them on the soil for at least 30 minutes. After soaking, scrub with a nonabrasive pad.
To Replace
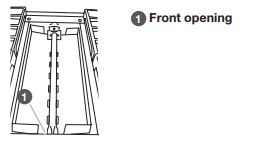
1. Replace drip tray. Slide drip tray into opening on the right front side of the grill basin. Follow the guides to ensure correct placement.
2. Replace large grease tray. Insert the large grease tray all the way under the back edge of the grill basin and hook it into the slots.
3. Replace small grease tray. Insert the small grease tray all the way under the front of the grill basin and hook it into the slots. When the 2 grease trays are installed properly, the small grease tray will hook over the large grease tray.
4. Replace burner assembly. Insert the orifice tube on the front of the burner assembly into the opening at the front of the grill basin and set into place.
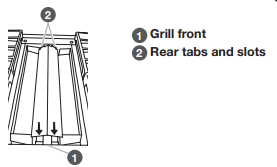
5. Replace flame spreader. Insert front tabs of the flame spreader into slots at the front of the grill basin; then insert rear tabs into the rear slots.
6. Place wave tray on top of flame spreader.
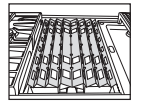
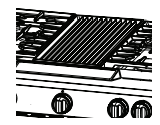
7. Place grill grate into position.
GRIDDLE
Tips:
- Prior to cleaning the griddle make sure that all cooktop burners have been turned off and the oven controls have been locked.
- For best results, clean the griddle shortly after removing the food.
Do Not Use:
- Soap
- Abrasive materials
- Cleaning materials, including stainless steel cleaner
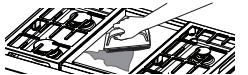
After Each Use:
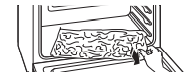
1. Heat for 10 to 15 minutes at 300°F (149°C).
2. Pour water on soiled area.
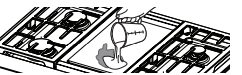
Using a measuring cup, pour up to 1 cup (236.6 mL) tap water over the soiled area starting at the back allowing the water to run toward the drip tray in the front. Allow the water to bubble on the griddle for 3–4 seconds. Use a pad holder or wooden spoon with non-scratch pad. Use pressure on soiled areas. Repeat if needed for heavy soils
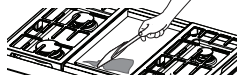
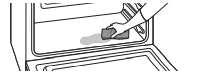
3. Scrape residue into drip tray.
Use a pad holder or wooden spoon with non-scratch pad. Use pressure on soiled areas. Repeat if needed for heavy soils.
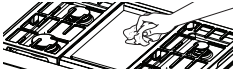
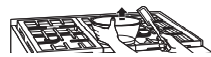
4. Remove remaining residue.
Fold a damp towel and with the pad holder or wooden spoon, go over the griddle to remove remaining residue.
5. Turn off griddle and let cool.
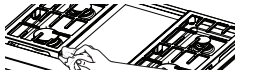
6. Wipe off griddle.
Once cool, wipe the griddle with a clean, damp terry cloth towel. Then buff with a microfiber cloth. If streaking, rainbowing, or ghosting occur use a mixture of 1 part white vinegar to 2 parts water on a towel to wipe the griddle.
7. Remove, empty, and clean drip tray
Clean the drip tray with warm soapy water. Wipe the area under the drip tray clean. Once dry, put the drip tray back in position.
COOKTOP CONTROLS
1. Remove knobs
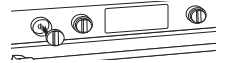
Pull the knobs straight away from the control panel to remove.
2. Clean with warm, soapy water
Know Your Cooktop Controls
- To avoid damage to the cooktop controls, do not use steel wool, abrasive cleansers or oven cleaner.
- To avoid damage, do not soak knobs.
- When replacing knobs, make sure knobs are in the Off position.
- Do not remove seals under knobs.
- When replacing knobs after cleaning either the surface burner controls or the griddle module control, make sure the knobs are replaced to the correct location. The power burner knobs have power settings and the griddle knob has temperature settings. All other knobs have Hi, Med, Lo settings only.
STAINLESS STEEL
Use affresh® Stainless Steel Cleaner or affresh® Stainless Steel Cleaning Wipes (not included). Rub in direction of grain to avoid possible damage to the steel surface.
SELF-CLEANING THE OVEN
Prepare Oven:
1. Empty out oven and remove racks.
Remove broiler pan, grid, cookware and bakeware and, on some models, the temperature probe from the oven.
IMPORTANT: Remove racks before the Self-Cleaning cycle to avoid discoloring and difficulty sliding
2. Remove any foil from oven
Foil may burn or melt, damaging the oven
3. Hand clean.

With a damp cloth, hand clean the inside door edge and 1½" (3.8 cm) of the area around the inside oven cavity frame. Be certain not to move or bend the gasket. This area does not get hot enough during self-cleaning to remove soil. Do not let water, cleaner, etc., enter slots on doorframe.
4. Wipe out loose soil.
Wiping out soil reduces smoke and avoids damage. At high temperatures, foods react with porcelain. Staining, etching, pitting, or faint white spots can result. This will not affect cooking performance.
Prepare Cooktop: Remove plastic items
Plastic items may melt.
How the Cycle Works
IMPORTANT:
- The heating and cooling of porcelain on steel in the oven may result in discoloring, loss of gloss, hairline cracks, and popping sounds.
- The Self-Cleaning cycle uses very high temperatures, burning soil to a powdery ash.
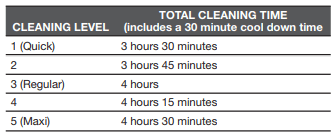
- The oven is preset for a 5 hour clean cycle; however, the time can be changed.
Use the following chart as a guide to determine the desired cleaning level:
TROUBLESHOOTING
Nothing will operate
- A household fuse has blown or a circuit breaker has tripped.
- Replace the fuse or reset the circuit breaker. If the problem continues, call an electrician.
Surface burners will not operate
- This is the first time the surface burners have been used.
- Turn on any one of the surface burner knobs to release air from the gas lines.
- The control knob is not set correctly.
- Push in knob before turning to a setting.
- The burner ports are clogged.
- Clean clogged burner ports with a straight pin.
Surface burner flames are uneven, yellow, and/or noisy
- The burner ports are clogged.
- Clean clogged burner ports with a straight pin.
- On models with caps, the burner caps are not positioned properly.
- Make sure alignment pins are properly aligned with the burner cap.
- Propane gas is being used.
- The range may have been converted improperly. Contact a trained repair specialist.
Surface burner makes popping noises
Burner sparks but does not light
- There is continuous sparking, but the burner does not light.
- Discontinue use of the surface burner and contact a service technician.
Excessive heat around cookware on cooktop
- The cookware is not the proper size.
- Use cookware about the same size as the surface cooking area, element, or surface burner. Cookware should not extend more than 1/2" (1.3 cm) outside the cooking area.
Cooktop cooking results not what expected
- The proper cookware is not being used.
- Use medium-to-heavy cookware made of the material that cooks food the way you want. The best cookware should have a flat bottom, straight sides, and a well-fitting lid.
- The control knob is not set to the proper heat level.
- Set the Cooktop Control to HI, MED, or LO, depending upon the type of cooking you want to do.
- The range is not level.
- The range must be level for the griddle to operate properly. See the Installation Instructions for leveling instructions.
Oven will not operate
- This is the first time the oven has been used.
- Turn on any one of the surface burner knobs to release air from the gas lines.
- The electronic oven control is not set correctly.
- Make sure you have followed the instructions for the function you want to perform.
- A delay start has been set.
- This will cause the oven to start at a later time.
- The Control Lock is set.
- All the buttons will be locked. Slide the bar up on the main screen to unlock the button/screen.
- The Sabbath Mode is set.
- This mode allows oven operation in keeping with the Jewish Sabbath. When set, only the number and start keys will function.
Oven temperature too high or too low
- The oven temperature calibration needs adjustment.
- Select the temperature offset up to +35°F.
Display shows messages
- The display is showing a letter followed by a number.
- Clear the display. If a letter followed by a number reappears, call for service.
Self-Cleaning cycle will not operate
- The oven door is open.
- Close the oven door all the way.
- The function has not been entered.
- Make sure you have properly followed the Self-Cleaning Cycle instructions.
- On some models, a delay start Self Clean cycle has been set.
- This will cause the oven to start the Self-Clean cycle at a later time.
- A delay start has been set.
- This will prevent the oven from starting any function until the delay start time is reached or has been canceled.
- On 48" (121.9 cm) ranges, one oven is self-cleaning.
- When one oven is self-cleaning, the other oven cannot be set to self-clean.
Oven cooking results not what expected
- The proper temperature is not set.
- Double-check the recipe in a reliable cookbook.
- The proper oven temperature calibration is not set.
- Select the temperature offset up to +35°F to increase or decrease the temperature as desired.
- The oven was not preheated.
- If the proper steps are followed when setting the desired function, the oven will preheat before cooking.
- The proper bakeware is not being used.
- Make sure the bakeware used is appropriate for the food being cooked.
- The racks are not positioned properly.
- Place racks so there is adequate space above each food item.
- There is not proper air circulation around bakeware.
- Allow 2" (5.0 cm) of space around bakeware and oven walls.
- The batter is not evenly distributed in the pan.
- Check that batter is level in the pan.
- The proper length of time is not being used.
- The oven door has been opened while cooking.
- Oven peeking releases oven heat and can result in longer cooking times.
- Baked items are too brown on the bottom.
- Move rack to higher position in the oven.
- Pie crust edges are browning early.
- Use aluminum foil to cover the edge of the crust and/or reduce baking temperature