Roborock S6 Robotic Vacuum Cleaner
Product's Documents
Below are documents related to this product, you can read online or download:
- User Manual - (English) Read Online | Download pdf
User manual
Changes or modifications not expressly approved by the party responsible for compliance could void the user's authority to operate the equipment.
This equipment has been tested and found to comply with the limits for a Class B digital device, pursuant part 15 of the FCC Rules. These limits are designed to provide reasonable protection against harmful interference in a residential installation.
This equipment generates uses and can radiate radio frequency energy and, if not installed and used in accordance with the instructions, may cause harmful interference to radio communications. However, there is no guarantee that inter- ference will not occur in a particular installation. If this equipment does cause harmful interference to radio or television reception, which can be determined by turning the equipment off and on, the user is encouraged to try to correct the interference by one or more of the following measures:
Reorient or relocate the receiving antenna.
Increase the separation between the equipment and receiver.
Connect the equipment into an outlet on a circuit different from that to which the receiver is connected.
Consult the dealer or an experienced radio/TV technician for help.
To satisfy FCC/IC RF exposure requirements, a separation distance of 20 cm or more should be maintained between the antenna of this device and persons during device operation. To ensure compliance, operations at closer than this distance is not recommended
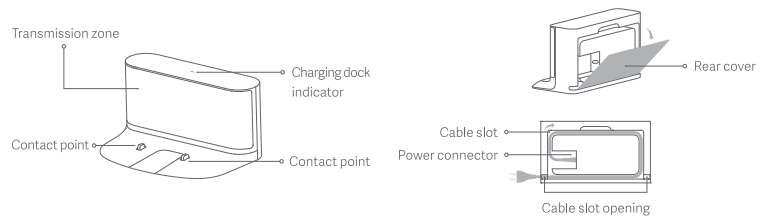
1. Clip the damp-proof mat onto the charging dock using the guiding grooves.
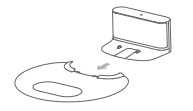
2. Place the charging dock against a wall on a level floor and plug it in. Hide any excess cable in the cable slot.
3. Power on and charge.
Press and hold the  button to power on, wait until the ring light turns on, and then place the main unit onto the charging dock to charge. The high-performance lithium-ion rechargeable battery pack inside must be charged regularly to maintain optimum battery performance.

4. Connect to the Mi Home app. (Optional)
This product is compatible with the Mi Home smarthome platform and can be controlled using the Mi Home app. It also supports the MIUI ecosystem and can be connected to other Mi Home smarthome products.
Quick Setup
1. Download Mi Home app
In the app store/Google play, search "Mi Home" or scan the QR code below to download and install the Mi Home app.

2. Add Device
Open the "My Device" page of the Mi Home app, tap "+" on the upper right corner of the page to add a device. You can find this newly added device in the "My Device" list.
3. Reset WIFI
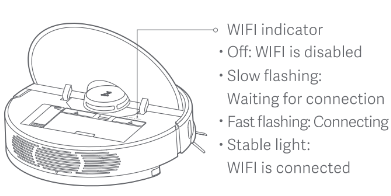
If you experience any WIFI problems, reset the WIFI to defaults. Open the top cover to expose the WIFI indicator then press and hold the  button and the
  button until you hear the "Reset WIFI" voice prompt. Reset is complete when the WIFI indicator flashes slowly. The product will then wait for a connection.
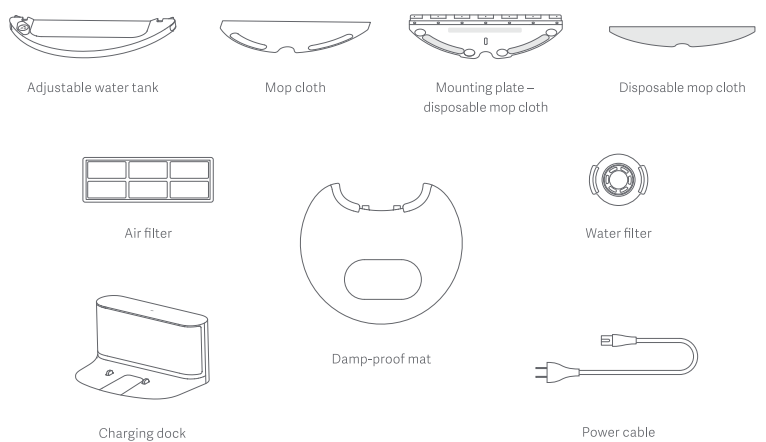
5. Install the mopping module.
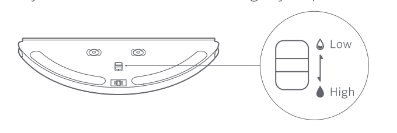
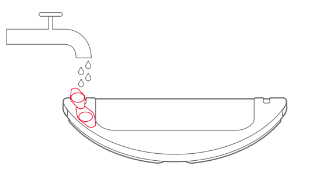
1. Adjusting the water flow rate
Adjust the water flow rate according to your preferences.
2. Install the mop cloth
a. Installing a reusable mopping cloth
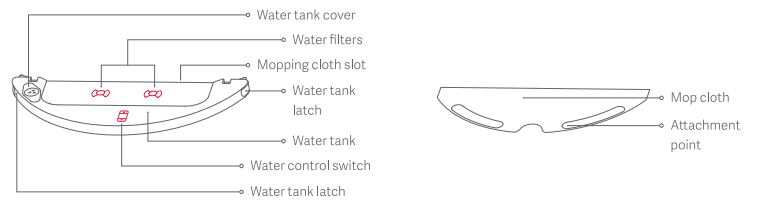
Dampen the mop cloth and squeeze it dry. Slot it into the mounting point and slide it along the groove on the water tank then press it firmly in place.
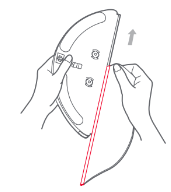
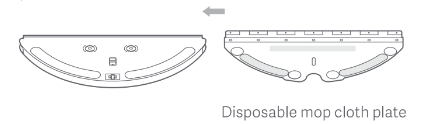
b. Installing a disposable mop cloth
b1. Installing the disposable mop cloth plate
Insert the disposable mop cloth plate from right to left along the slot on the water tank as shown then press it firmly in place.
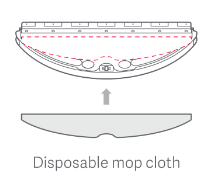
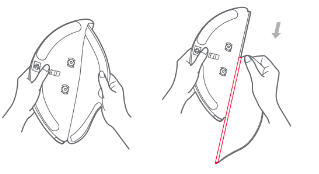
b2. Securing a disposable mop cloth
Place the water tank on a flat surface with the disposable mopping cloth fabric facing up. Align the cloth with the mop cloth plate and press it down firmly. Press down on the various locking points to secure the cloth onto the mop cloth plate.
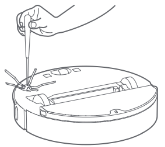
3. Refill the water tank
Open the water tank, fill the tank with water, then reseal it carefully.
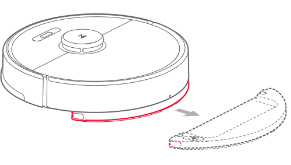
4. Install the mopping module
Line the mopping module up with the alignment indicators on the rear of the Main Unit then slot it in until you hear a click.
6. Start cleaning
When the power light changes from a slow white flash to a steady light, charging is complete. Press the button or use the Mi Home app to start cleaning.
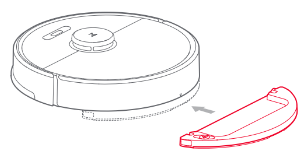
7. Remove the mopping module
When a cleaning cycle is complete and the main unit has returned to the charging dock, press the latches on either side of the mopping module and pull backwards to remove it.
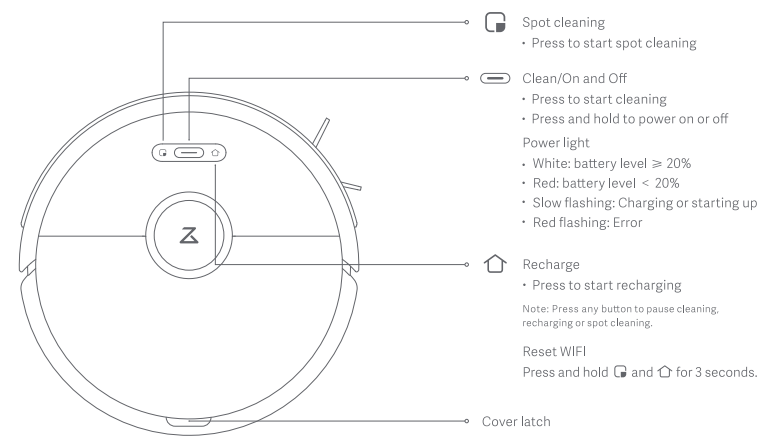
Press and hold the button to power on the main unit.
The power light will turn on and the main unit will enter standby mode. When the main unit is idle, press and hold the button to power off and end the current cleaning cycle.
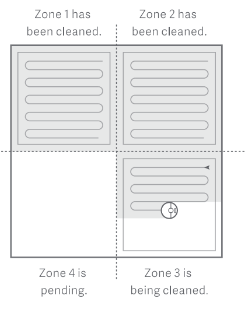
Press the button to start cleaning. When cleaning, the product will plan an appropriate cleaning path based on the generated map of the scanned area. It will clean along the edges of a zone first and then plan a Z-shaped cleaning route to cover the whole zone efficiently and quickly without missing a spot.
When the product is running, press any button to pause it. Press the button to restart cleaning or the button to end the cleaning cycle and send the product back to the charging dock.
If inactive for more than 10 minutes, the product will enter sleep mode and its indicator light will flash slowly. Press any button to wake the product.
Auto mode: After cleaning, the main unit will automatically return to the charging dock for charging.
Manual mode: In pause mode, press the button to start recharging.The power light flashes slowly when the robot is being charged.
If an error occurs, the power light will flash red quickly and a voice prompt will sound. Refer to "Troubleshooting" for solutions.
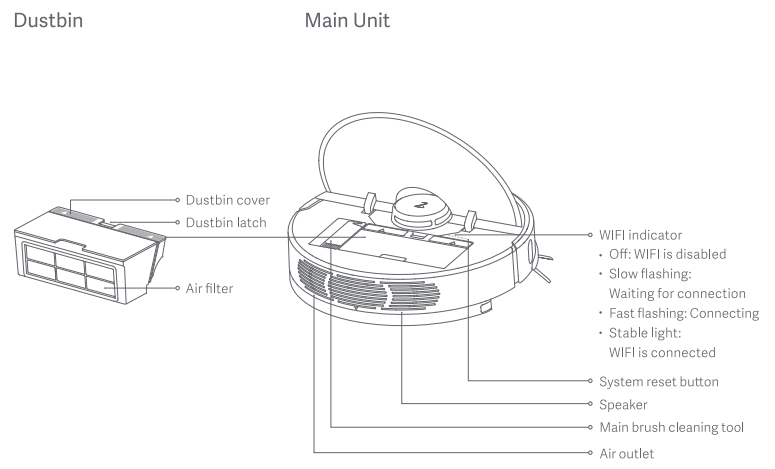
If your smartphone cannot connect to the product for any reason, open the dustbin cover to view the WIFI indicator then press and hold the button and the button until you hear the "Reset WIFI voice prompt. Reset is complete when the WIFI indicator flashes slowly.
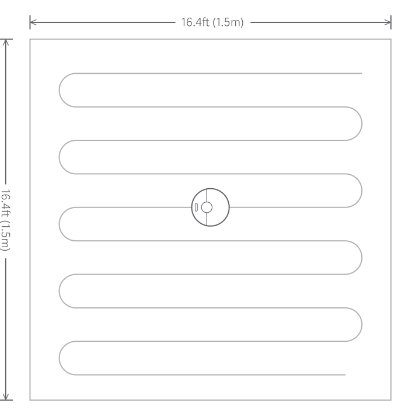
In standby or pause mode, press the Spot Cleaning button to start spot cleaning. This mode cleans a 16.4ft (1.5m) square area centered on the product. After cleaning, it will return to its starting point.
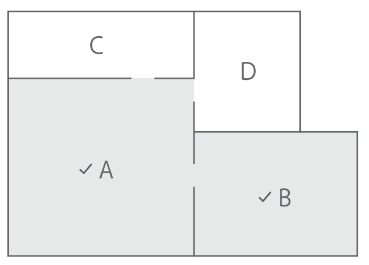
Send the product to clean specific rooms of your home.
Schedule when you want the product to start cleaning. After cleaning, it will return to its charging dock.
Draw a cleaning zone and send the product to clean that specific area.
Mark specific points on a map for cleaning and the product will navigate to them automatically.
Select Quiet, Balanced, Turbo or MAX mode. It is Balanced mode by default.
Any active cleaning cycle will stop, voice messages will not play, and the ring light drops to low brightness. This mode is enabled by default from 22:00-08:00 and can be disabled or adjusted.
Set virtual no-go zones and barrier lines to prevent the product entering defied areas.

If refilling the water tank or cleaning the mop cloth during a clean, press any button to pause the cleaning cycle and remove the mop module. Refill the water tank or clean the mopping cloth and reinstall the mopping module then press the button to continue the cleaning cycle.
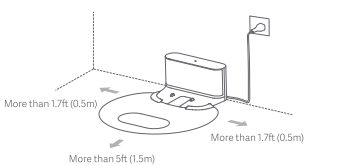
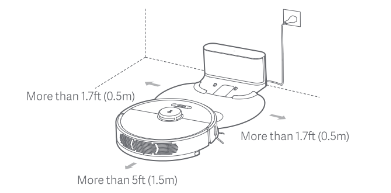
Place the charging dock on a level floor and keep at least 1.7ft (0.5m) on either side and at least 5ft (1.5m) in front of it and plug it in. For a better experience with the Mi Home app, place the charging dock in rage of WIFI.
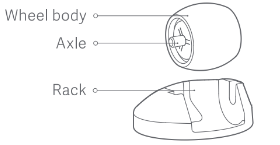
Main brush * Clean weekly
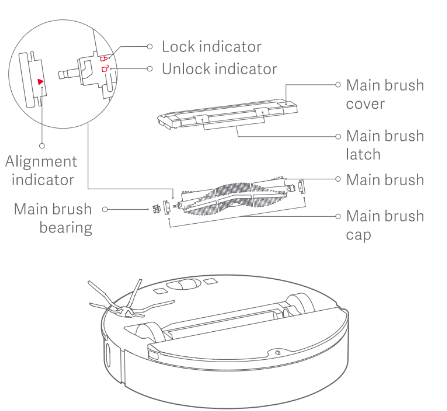
Using the main brush cleaning tool

Dustbin and filter * Clean weekly
1. Open the top cover of the main unit and press the dustbinblatch to release and remove the dustbin.
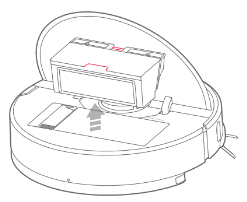
2. Open the dustbin cover as indicated by arrow and pour out the contents.
Clean the filter * Clean bi-weekly
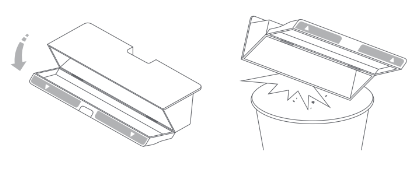
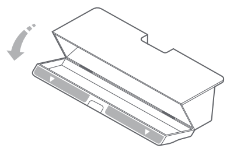
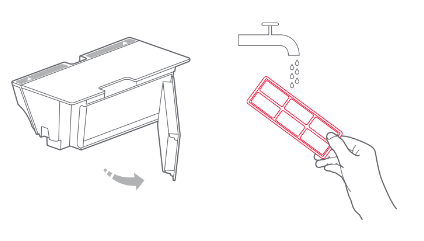
1. Open the dust bin cover as indicated by the arrow.
2. Fill the dustbin with clean water and close the cover. Shake the dustbin and pour out the dirty water
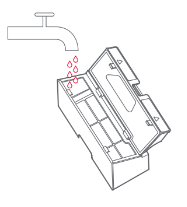
3. Remove the filter and rinse with water.
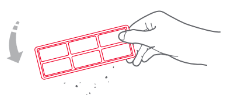
4. Rinse repeatedly and lightly tap the filter frame against a hard surface to shake loose any dirt. Continue until clean.
5. Dry the filter thoroughly and reinstall.
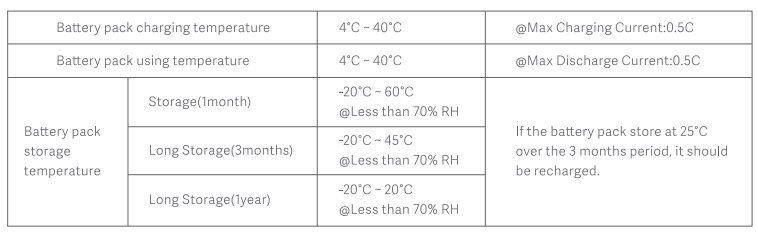
The product is equipped with a high-performance lithium-ion rechargeable battery. To maintain optimum battery perfor- mance, keep the main unit charged.
Use a soft dry cloth to clean the charging contacts on the charging dock.
1. Remove the mop cloth from the mopping module.
2. Clean the mopping cloth and dry it.
Remove and discard used mop cloth, and replace it with a new one when required.

If buttons are unresponsive or the main unit cannot be shut down, reset the system by pressing the Reset button (refer to page 7). The main unit will restart after reset.
If a problem persists after a system reset, power on the main unit then press and hold the button. At the same time, press the Reset button. Keep holding the button until you hear the "Start restoring initial version" voice prompt. The product will then restore all factory defaults.
When the cleaner is on the charging dock, hold and press "Re- charge" for 10 seconds until you hear a "Ding-dong" sound, and Holiday mode will be activated.
In this mode, the LED indicator will dim, functions that has nothing to do with charging such as cleaning, recharging and remote control via WIFI will be disabled, and the cleaner will enter low power consumption mode to maintain optimal battery performance.
After Holiday mode is activated, you can disable it by holding and pressing "Recharge" for 10 seconds until the LED indicator brightens.
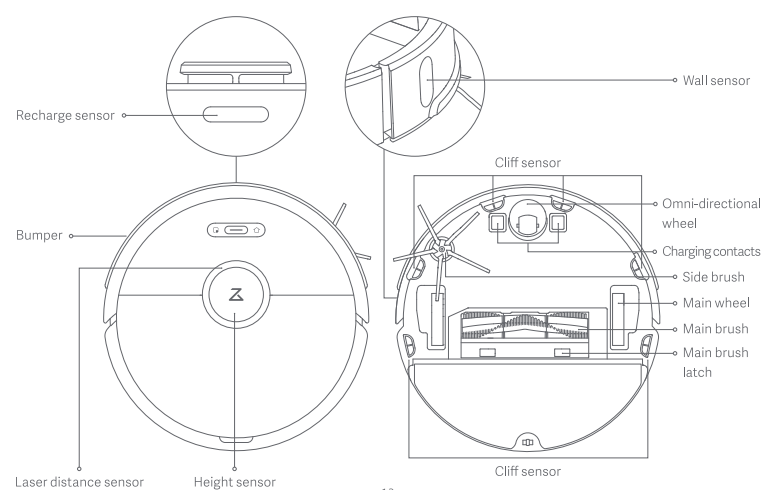
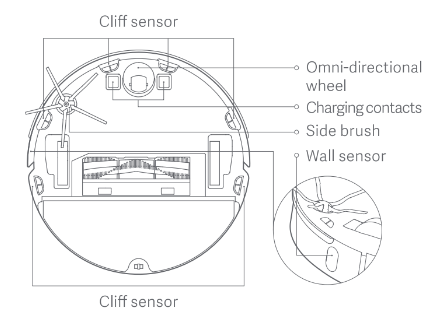
Use a soft dry cloth to wipe and clean all sensors, including:
Use the Mi Home app to update the firmware. Connect the main unit to the charging dock and ensure that the battery charge is at more than 20% before updating
When a runtime error occurs, the power light flashes red quickly and a voice prompt is given. Please use the table below to solve the problem.