ERG500 ROWER
OWNER’S MANUAL
PLEASE CAREFULLY READ THIS ENTIRE MANUAL BEFORE OPERATING YOUR NEW ROWER
FITNESS

Table Of Contents
1
2
4
13
14
18
Product Registration
Important Safety Instructions
ERG500 Assembly Instructions
Battery Replacement
Console Operation
Manufacturer’s Limited Warranty
Thank you for your purchase of this quality rower from XTERRA Fitness. Your new
rower has been manufactured by one of the leading tness manufacturers in the world.
XTERRA Fitness will do all we can to make your ownership experience as pleasant as
possible for many years to come. If you have questions, or if parts are missing or damaged,
or you require customer service, call (870) 333-5500. Please have your model number and
serial number handy when you call.
Please take a moment to record where you purchased your machine, as well as the date of
purchase for future reference. We appreciate your condence in XTERRA Fitness and we
will always remember that you are the reason that we are in business. Please complete and
mail your registration card today and enjoy your new rower.
Yours in Health,
XTERRA Fitness
Congratulations On Your New Rower and Welcome to the XTERRA Fitness Family!
ERG500_VER5_20180821

ERG500 Rower
1
ATTENTION
THIS ROWER IS INTENDED FOR RESIDENTIAL USE ONLY AND IS WARRANTED FOR THE
APPLICATION. ANY OTHER APPLICATION VOIDS THIS WARRANTY IN ITS ENTIRETY.
Record Your Serial Number
Please record the Serial Number of this tness product
in the space provided below.
Serial Number
Register Your Purchase
The self-addressed product registration card must be completed in full and returned to
XTERRA Fitness. You can also go to www.xterratness.com/warrantyreg.html
to register online.
Product Registration
Purchase Location
Purchase Date

2
ERG500 Rower
• Do not operate equipment on deeply padded, plush or shag carpet. Damage to both carpet and
equipment may result.
• Before beginning this or any exercise program, consult a physician. This is especially important for
persons over the age of 35 or persons with pre-existing health conditions.
• Keep hands away from all moving parts.
• Do not attempt to use your equipment for any purpose other than for the purpose it is intended.
• Wear proper shoes. High heels, dress shoes, sandals or bare feet are not suitable for use on your
equipment. Quality athletic shoes are recommended to avoid leg fatigue.
• Wear proper clothing for exercising, loose clothing could become caught in the machine.
• Only one person at a time should use the machine.
• If the user experiences dizziness, nausea, chest pain, or any other abnormal symptoms, STOP the workout
at once. CONSULT A PHYSICIAN IMMEDIATELY.
• Do not place any sharp object around the machine.
Important Safety Instructions
When using an appliance, basic precautions should always be followed, including the following:
Read all instructions before using this appliance.
WARNING - To reduce the risk of burns, re electric shock, or injury to persons:
1. Do not operate under blanket or pillow. Excessive heating can occur and cause re, electric shock, or injury
to persons.
2. This exercise equipment is not intended for use by persons with reduced physical, sensory or mental capa-
bilities, or lack of experience and knowledge.
3. Keep children and pets away from the machine at all times. DO NOT leave children unattended in the same
room with the machine.
4. Use this appliance only for its intended use as described in this manual. Do not use attachments not
recommended by the manufacturer.
5. Never operate this appliance is not working properly, if it has been dropped or damaged, or dropped into
water. Return the appliance to a service center for examination and repair.
6. Keep the appliance away from heated surfaces.
7. Never operate the appliance with the air openings blocked. Keep the air openings free of lint, hair, and the
like.
8. Never drop or insert any object into any opening.
9. Do not use outdoors.
10. Do not operate where aerosol (spray) products are being use or where oxygen is being administered.
11. The appliance is intended for household use.
SAVE THESE INSTRUCTIONS - THINK SAFETY!
Fitness Equipment Safety Instructions
CAUTION!! Please be careful when unpacking the carton.
Failure to follow all guidelines may compromise the effectiveness of the exercise experience, expose
yourself (and possibly others) to injury, and reduce the longevity of the equipment.
WARNING: This product can expose you to chemicals including Toluene and Acrylamide which are
known to the State of California to cause cancer and birth defects or other reproductive harm.
For more information go to www.P65Warnings.ca.gov
ERG500 Rower
3
Before you begin
Thank you for selecting our revolutionary XTERRA ERG500 Fitness Rower. A rower is an effective exercise
for increasing cardiovascular tness, building endurance, and toning the body. Our tness rower provides an
impressive selection of features designed to make your workouts at home more effective and enjoyable.
For your benet, read this manual carefully before you use the ERG500 Fitness Rower. To help us assist
you, note the product model number and serial number before contacting us. Before reading further, please
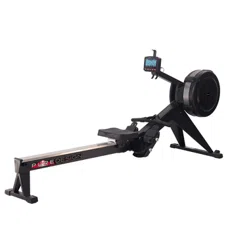
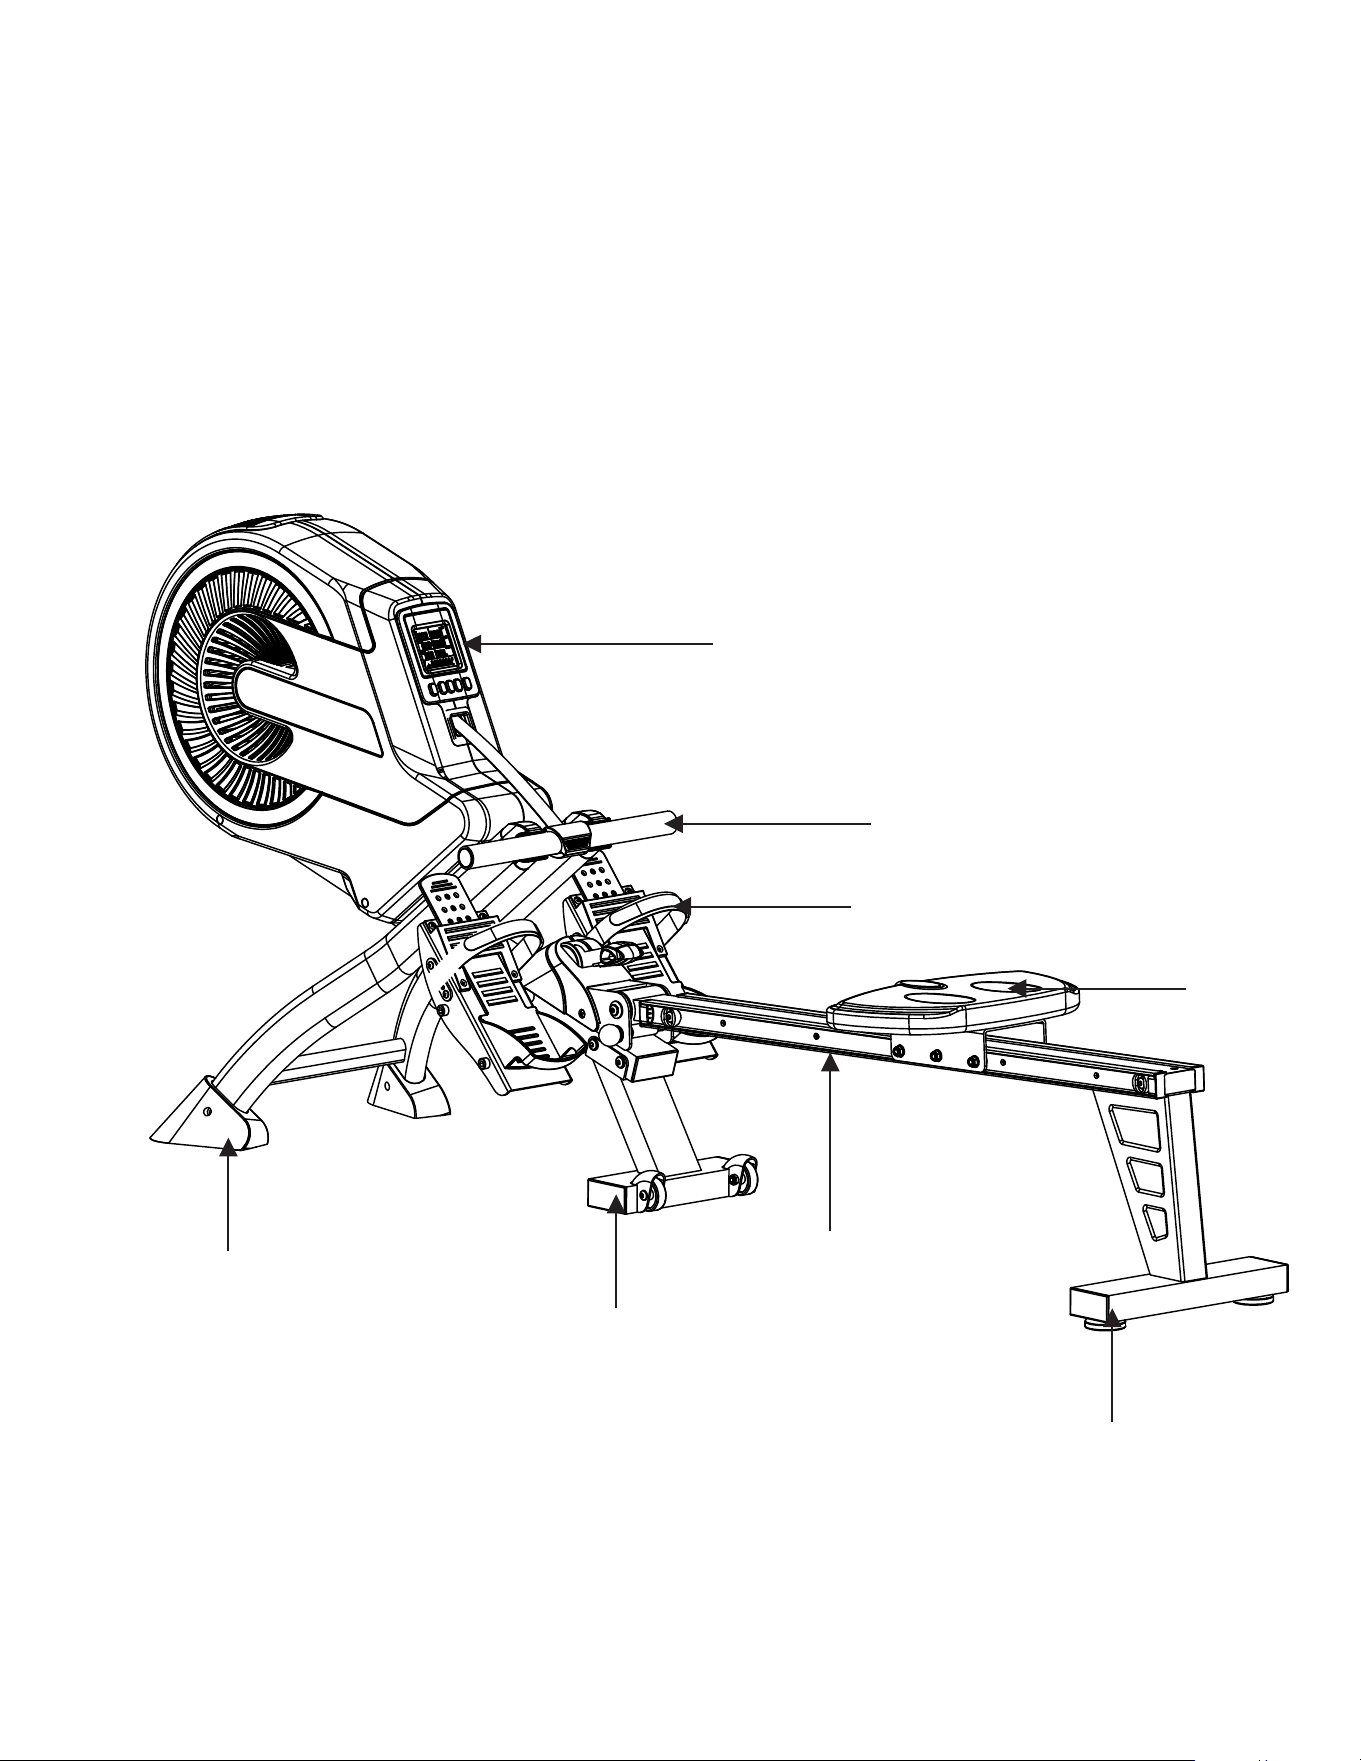
familiarize yourself with the parts that are labeled in the drawing below.
Console
Handle Bar
Pedals
Seat
Rear Stabilizer
Sliding Rail
Mid-Stabilizer
Front Stabilizer
4
ERG500 Rower
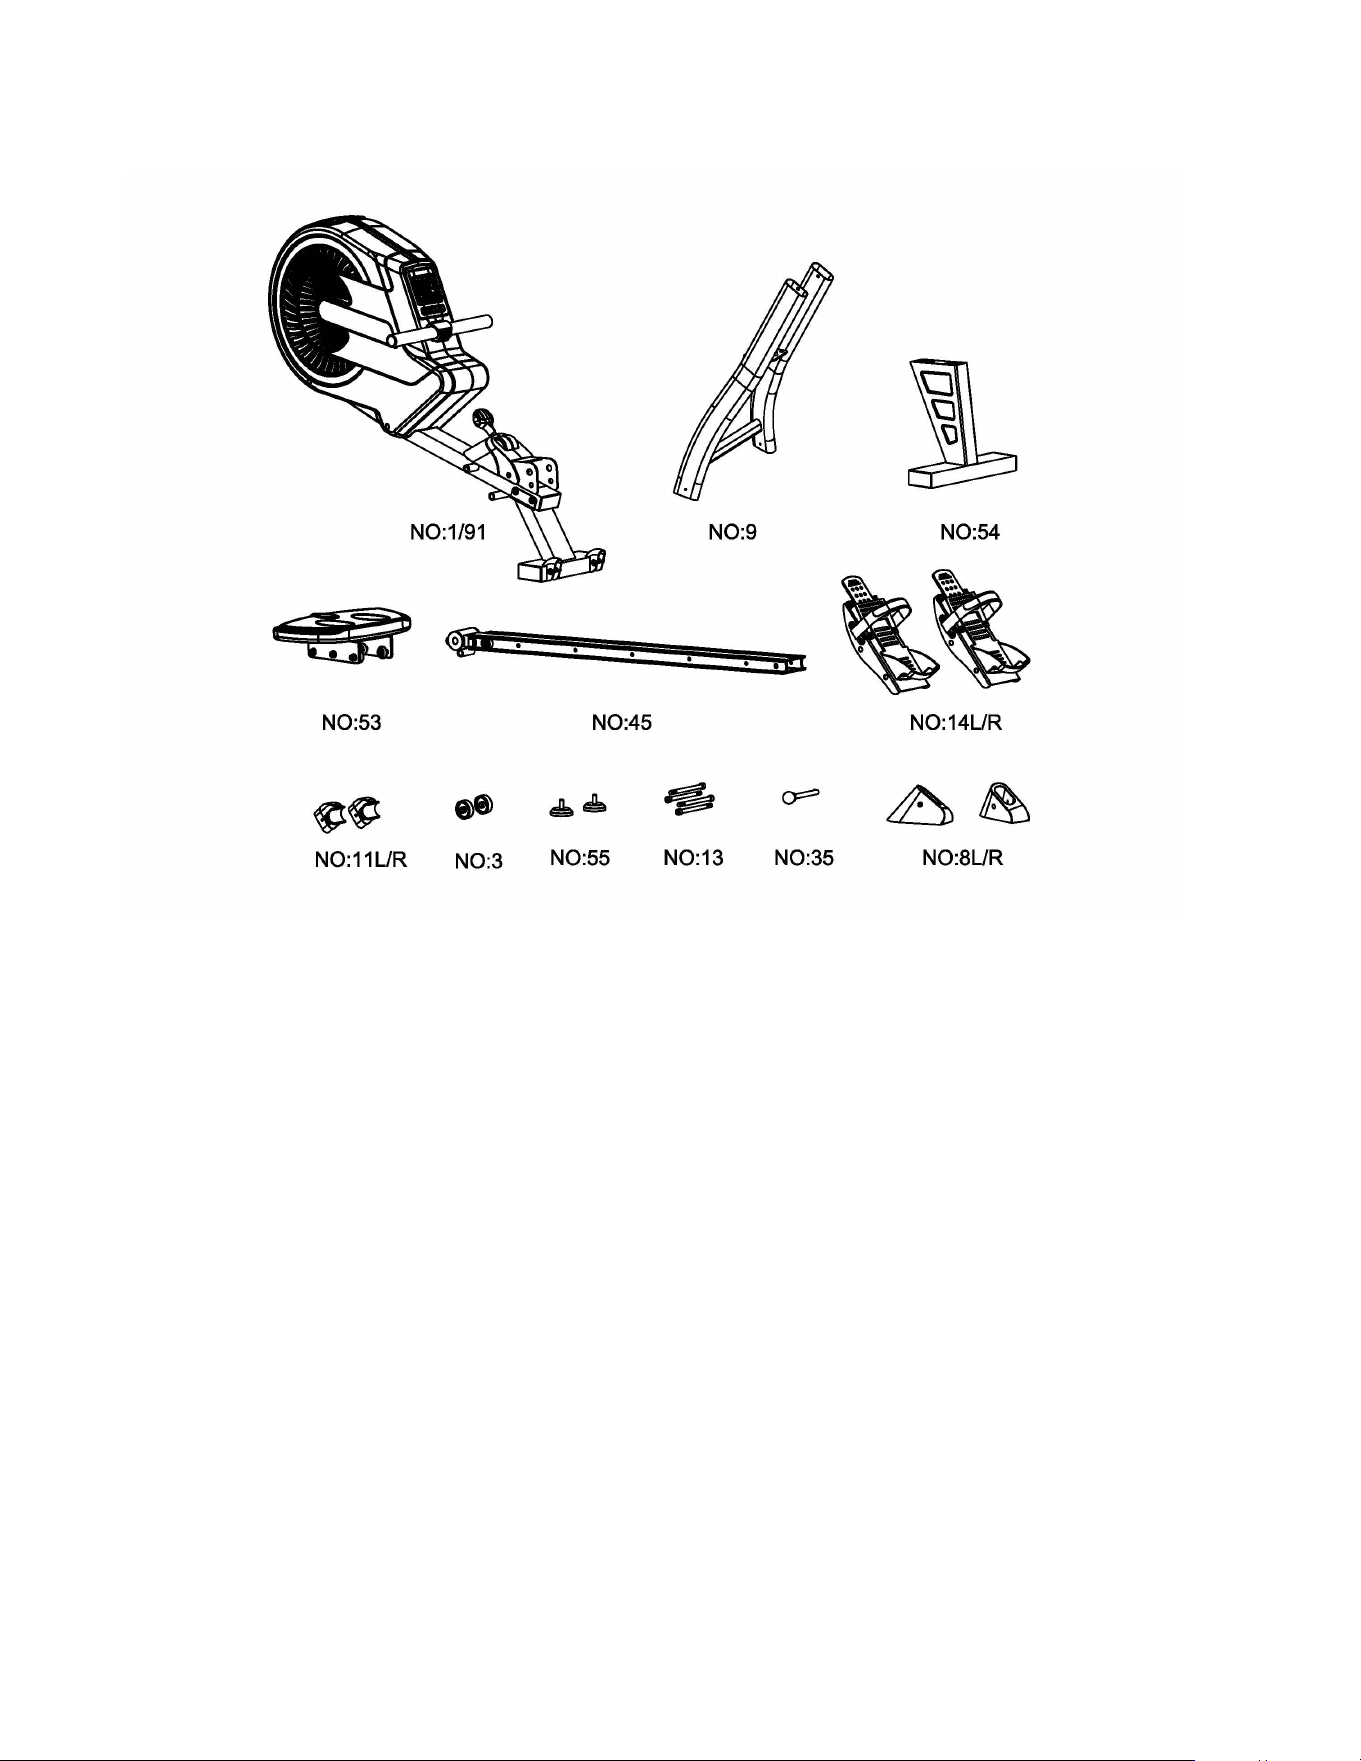
ERG500 Assembly Part Checklist
1/91 Main Frame/middle stabilizer 1
9 Front Support Tube 1
54 Rear Support Tube 1
53 Seat 1
45 Slide Rail 1
14L/R Pedal 1/1
11L/R Fixed Bracket for Handlebar 1/1
3 Roller 2
55 Foot Mat 2
13 Allen Bolt for Pedal 4
35 Ball Pin 1
8L/R End Cap 1/1
User Manual 1
Hardware Pack 2
Part No. Description Q’TY

ERG500 Rower
5
ERG500 Assembly Pack Checklist
Part No Description Q’ty
19 Allen Bolt 5
34 Allen Bolt 4
36 Cushioned Rubber 2
37 Spring Washer 2
38 Flat Washer 2
40L End Cap for Side Rail (L) 1
40R End Cap for Side Rail (R) 1
41 Axle for Slide Rail 1
42 Allen Bolt 2
43 Flat Washer 3
92 Allen Key (6mm) 2
93 Wrench (13mm) 1
Note: Above parts are all needed to assemble this machine. Before you start to assemble, please check
the hardware packing to make sure they are included.
6
ERG500 Rower
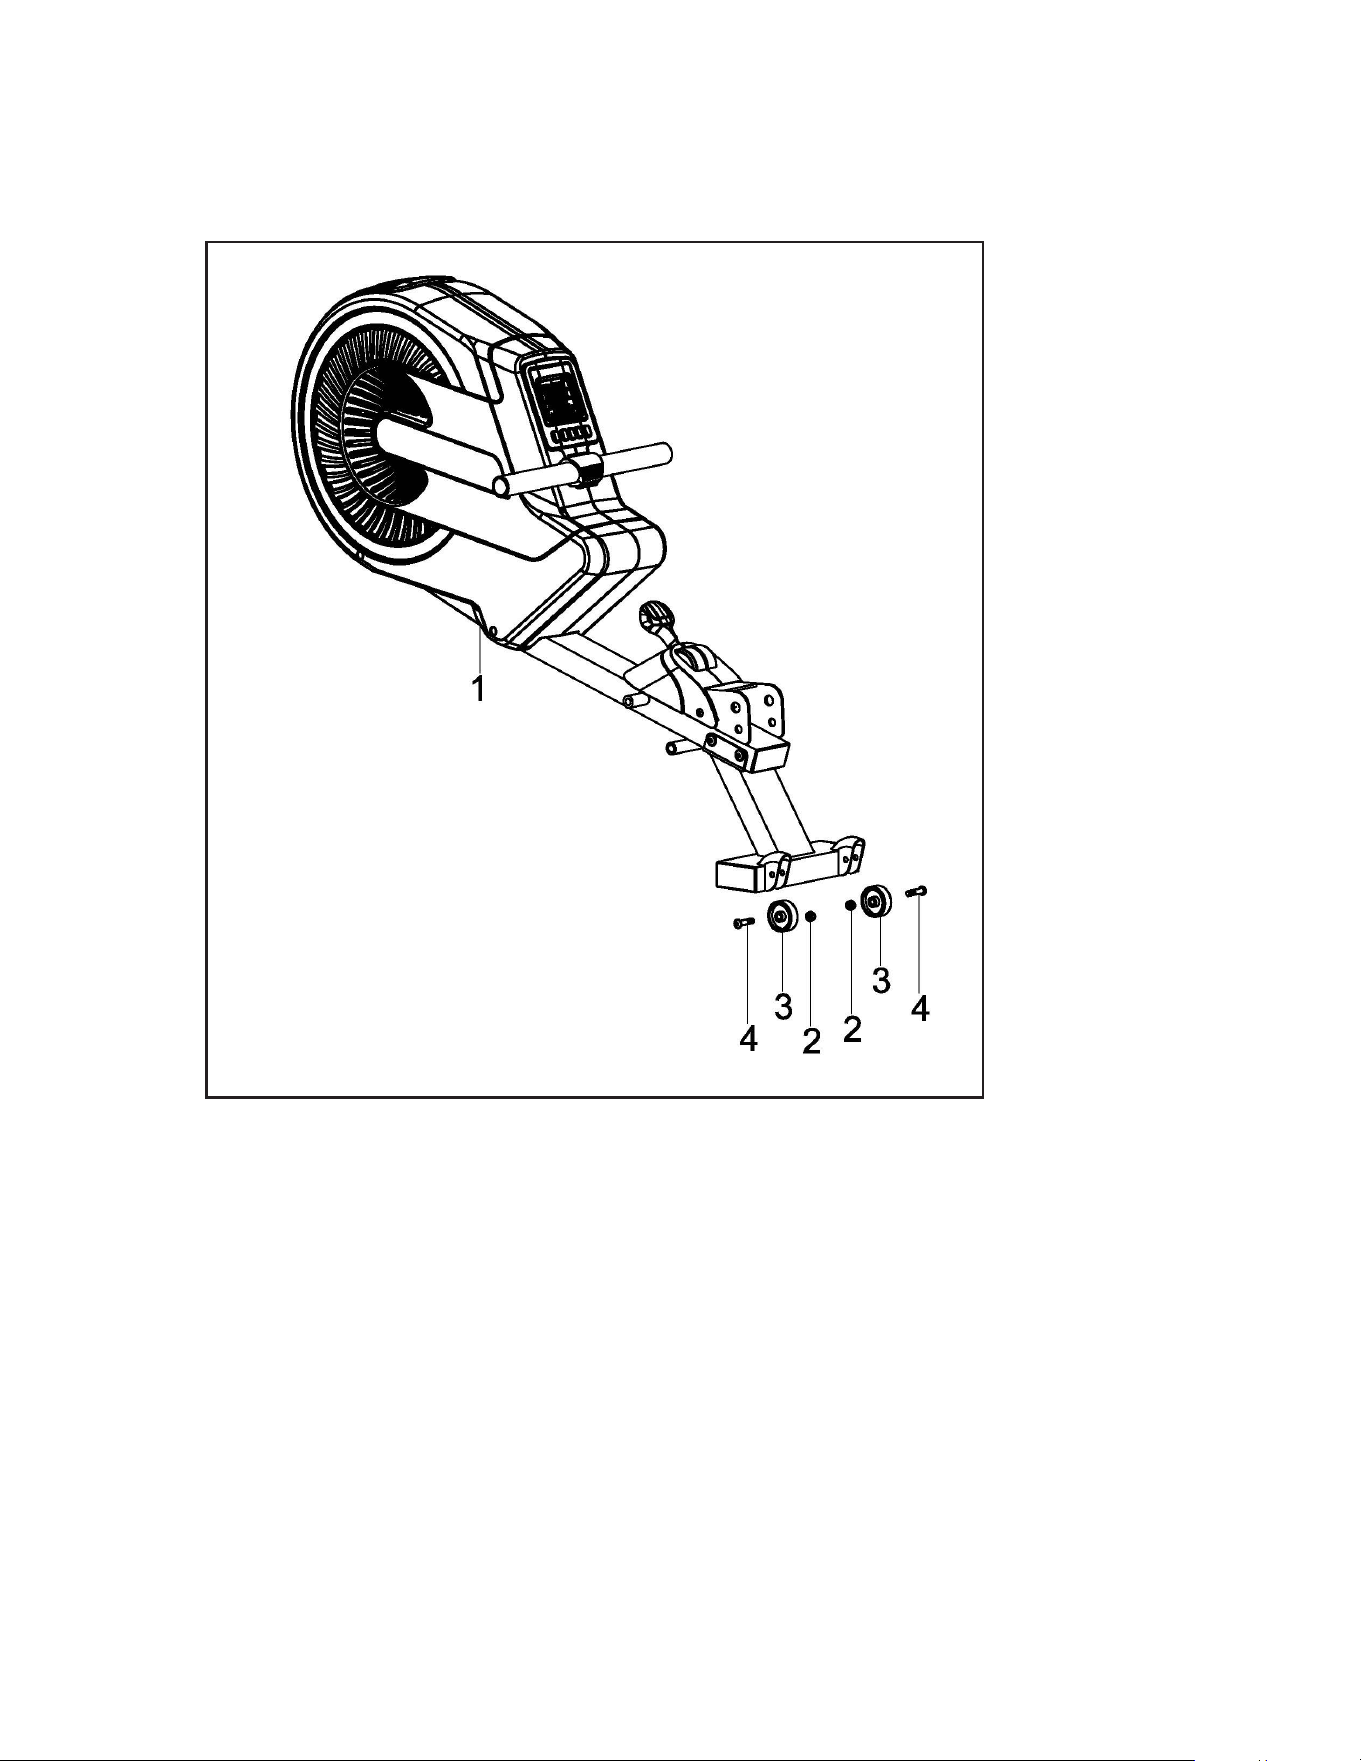
1. Attach the rollers (3) onto middle stabilizer, fasten with
two sets of allen bolt (4) and nylon nut (2) which are pre-
assembled on the middle stabilizer.
ERG500 Assembly Instructions
Middle Stabilizer Rollers
1
ERG500 Rower
7
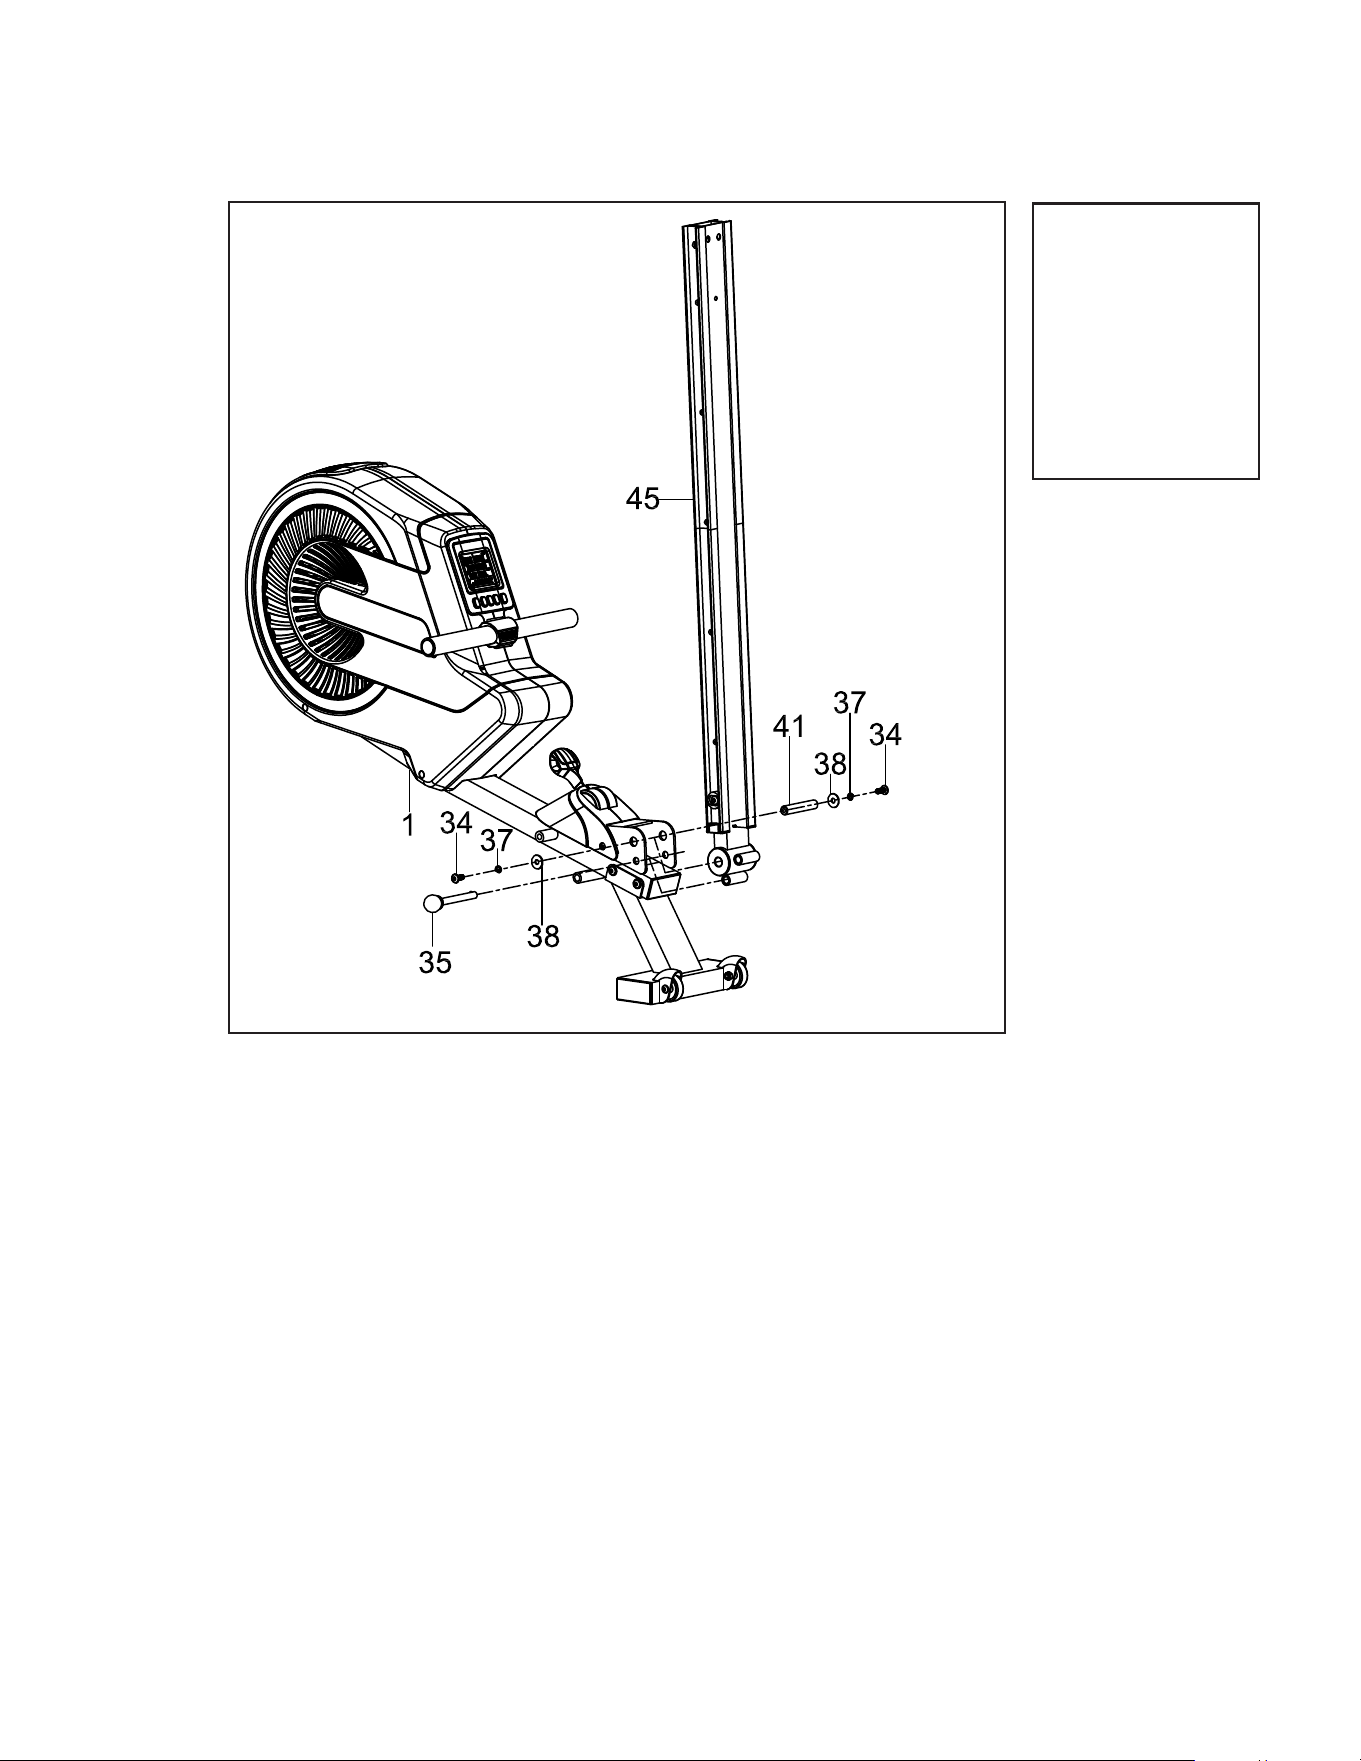
2 Allen Bolts (#34)
2 Spring Washers
(#37)
2 Flat Washers (#38)
1 Axle (#41)
Attaching the Slide Rail
2
Hardware Step 2
1. Pull out the ball pin (35) from the main frame (1).
2. Place the slide rail (45) onto the U shaped connection tube of the
main frame (1), fasten with one axle for slide rail (41), two sets of
allen bolts (34), spring washers (37) and at washers (38).
3. Then insert the ball pin (35).
8
ERG500 Rower
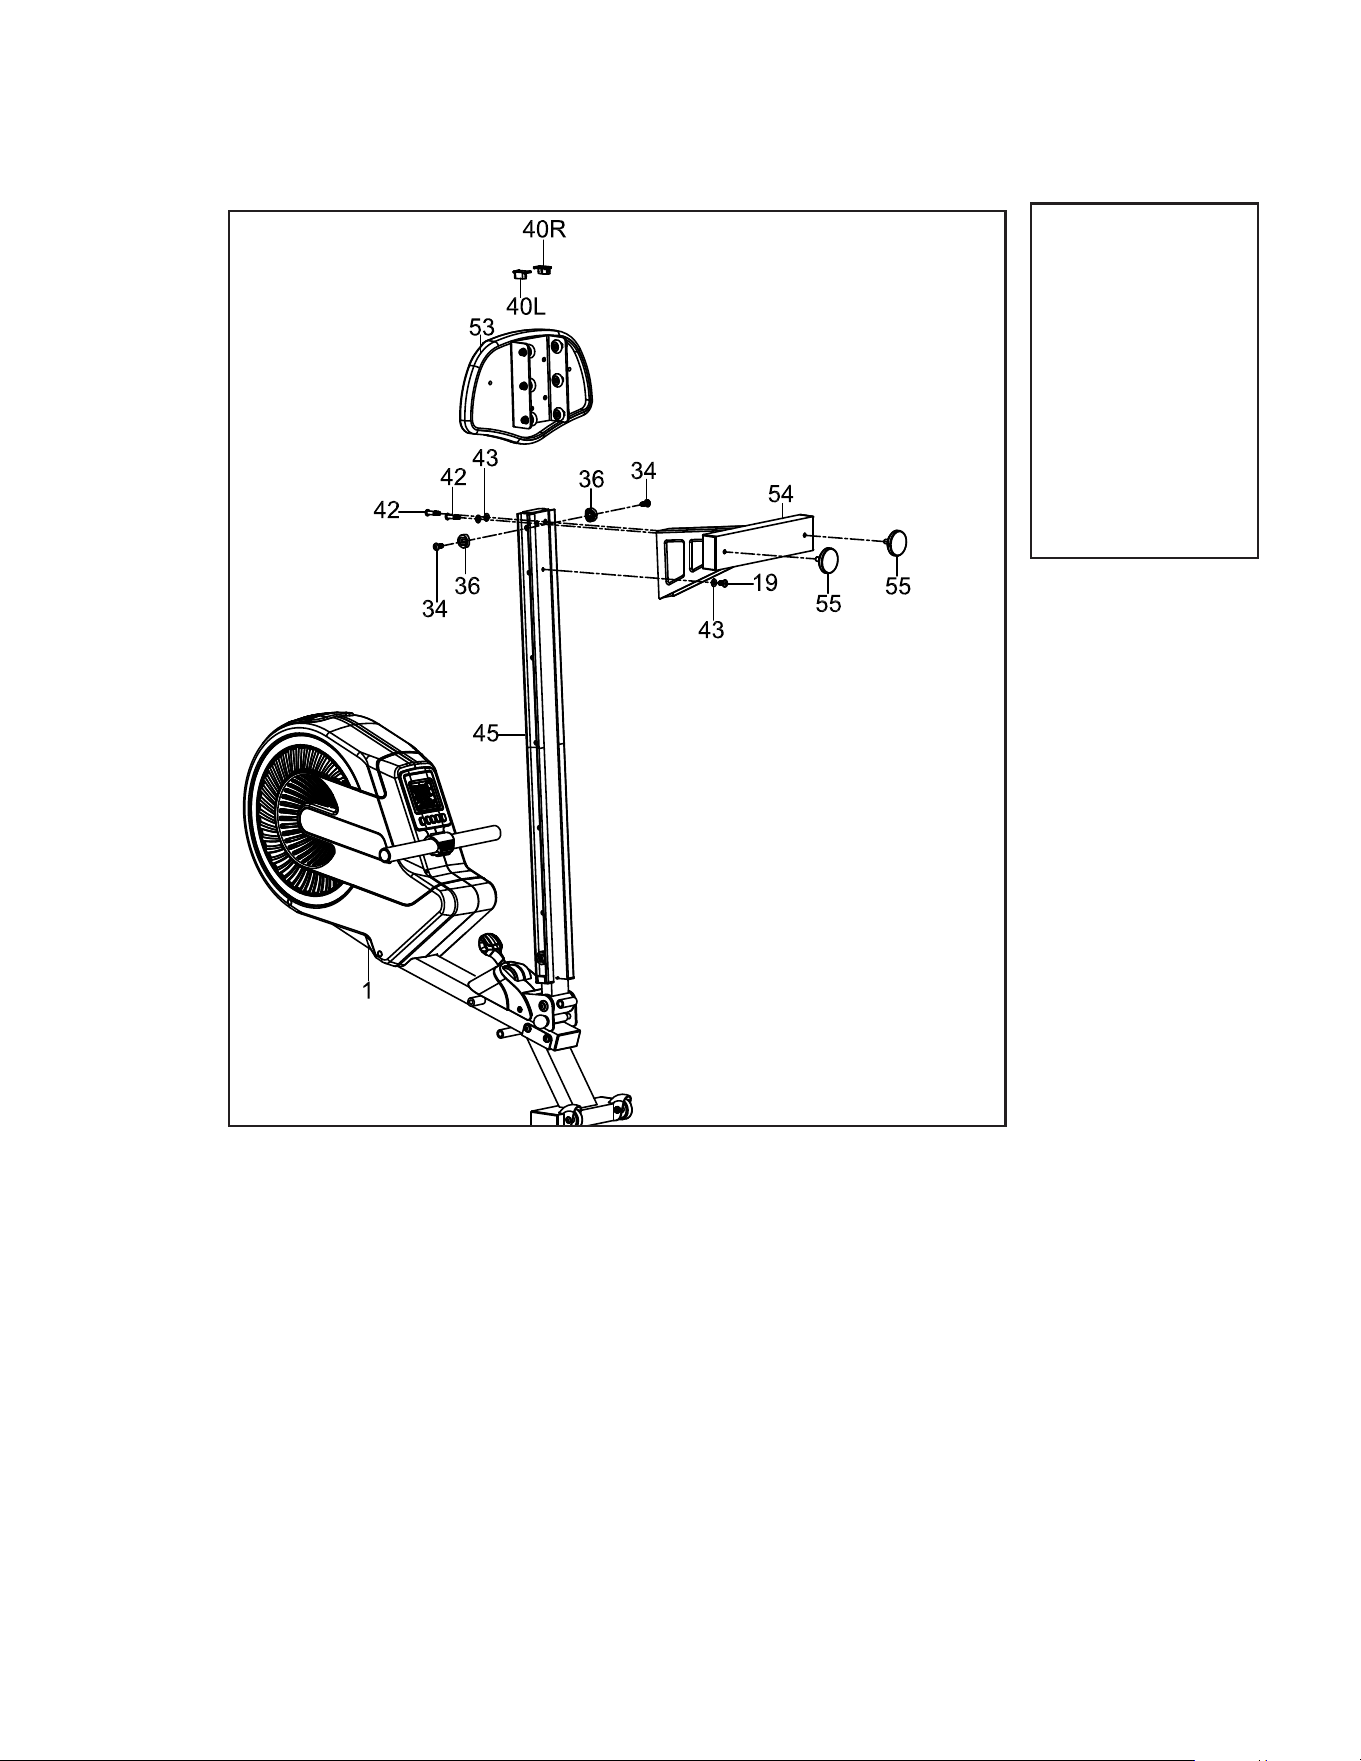
1. Insert the seat (53) to the slide rail (45).
2. Insert two cushion rubbers (36) to the slide rail (45), slightly
fasten with two allen bolts (34).
3. Fasten two foot mats (55) on the rear support tube (54).
4. Attach the rear support tube (54) to the slide rail (45), fasten
with one allen bolt (19), three at washers (43) and two allen
bolts (42).
5. Then insert two end caps for side rail (40L/R) to the end of
slide rail (45).
2 Cushioned Rubbers
(#36)
2 Allen Bolts (#34)
1 Allen Bolt ((#19)
3 Flat Washers (#43)
2 Allen Bolts (#42)
2 End Caps (#40)
Attaching the Seat and Rear Stabilizer
3
Hardware Step 3
ERG500 Rower
9
4 Allen Bolts (#19)
Attaching the Front Stabilizer
4
Hardware Step 4
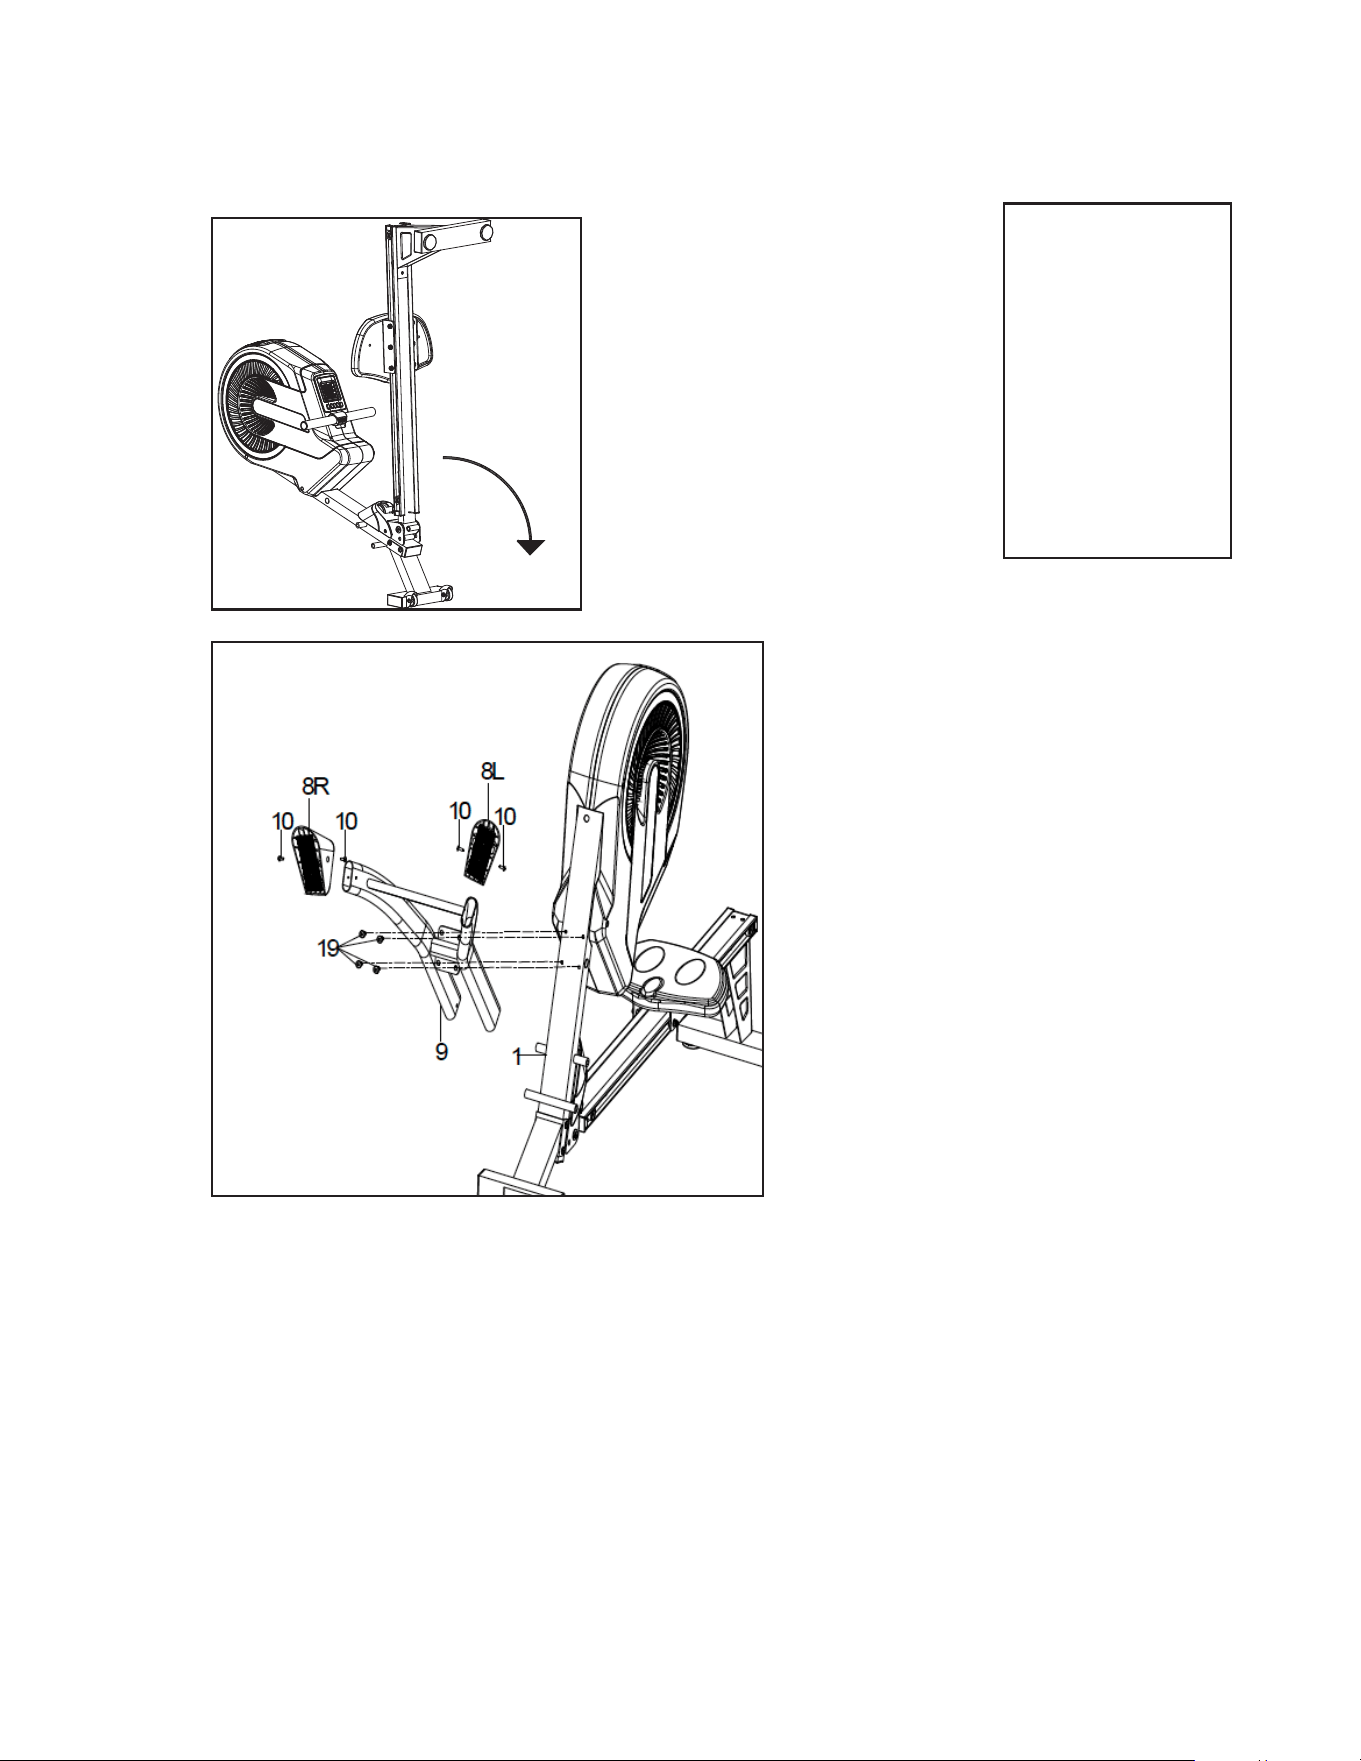
1. Turn over the main frame and place the rear support tube on
the oor.
2. Take off four self-tapping screws (10) from the end caps for
front stabilizer tube (8L/R) which are pre-assembled on the
end caps, then attach the end caps to the front support tube
(9) by four self-tapping screws (10).
3. Attach the front support tube (9) to the main frame (1),
fasten with four allen bolts (19).
10
ERG500 Rower
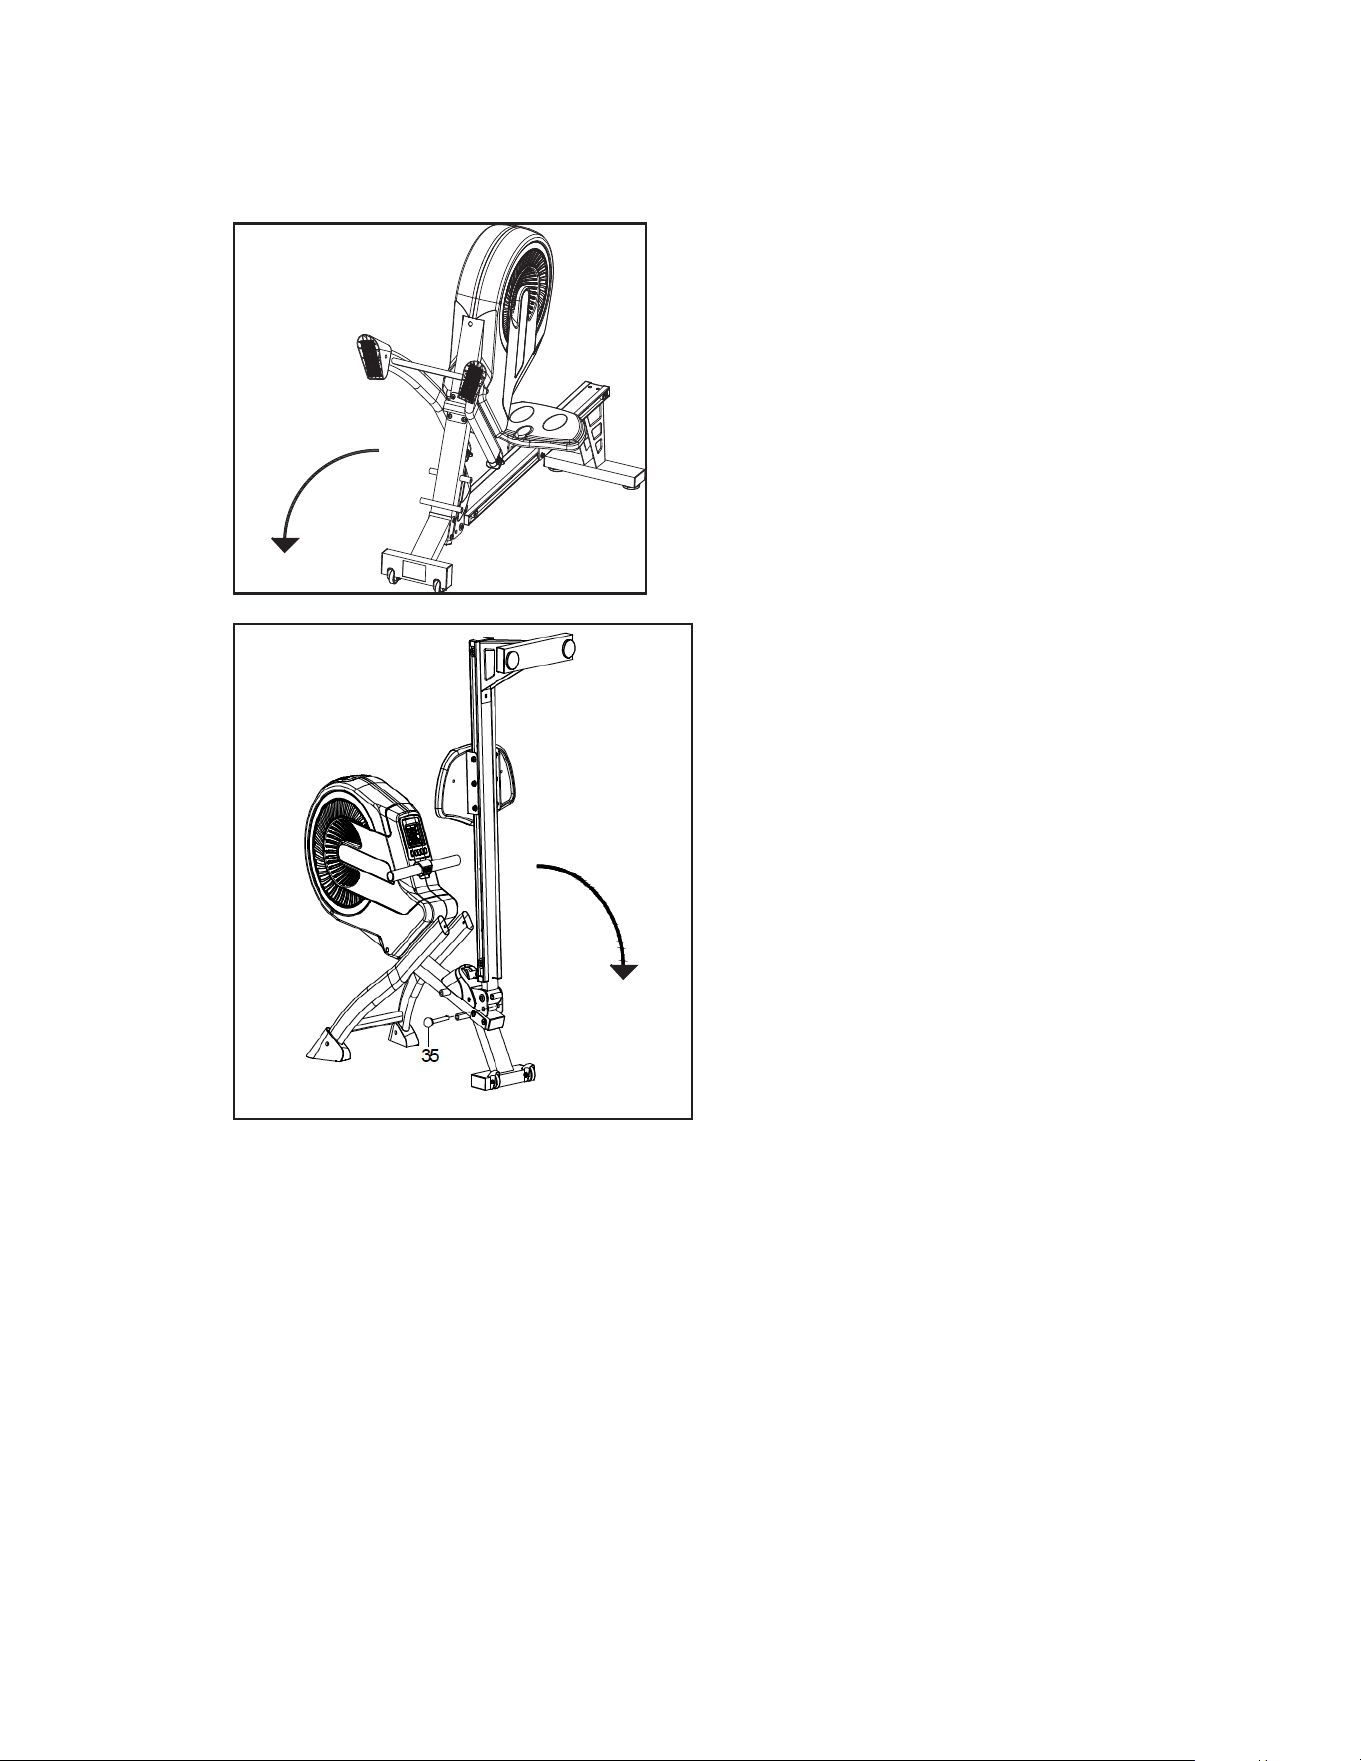
1. Turn over the main frame and place the front support tube
on the oor.
2. Pull out the ball pin (35) from the main frame and unfold the
main frame. Then insert the ball pin (35) to the main frame
again for xation.
Note: Before insert ball pin (35).
1. Slightly lift up the main frame.
2. Make sure the ball pin holes are lined up.
3. Insert ball pin (35) into holes.
Using the Lock Ball Pin
5
ERG500 Rower
11
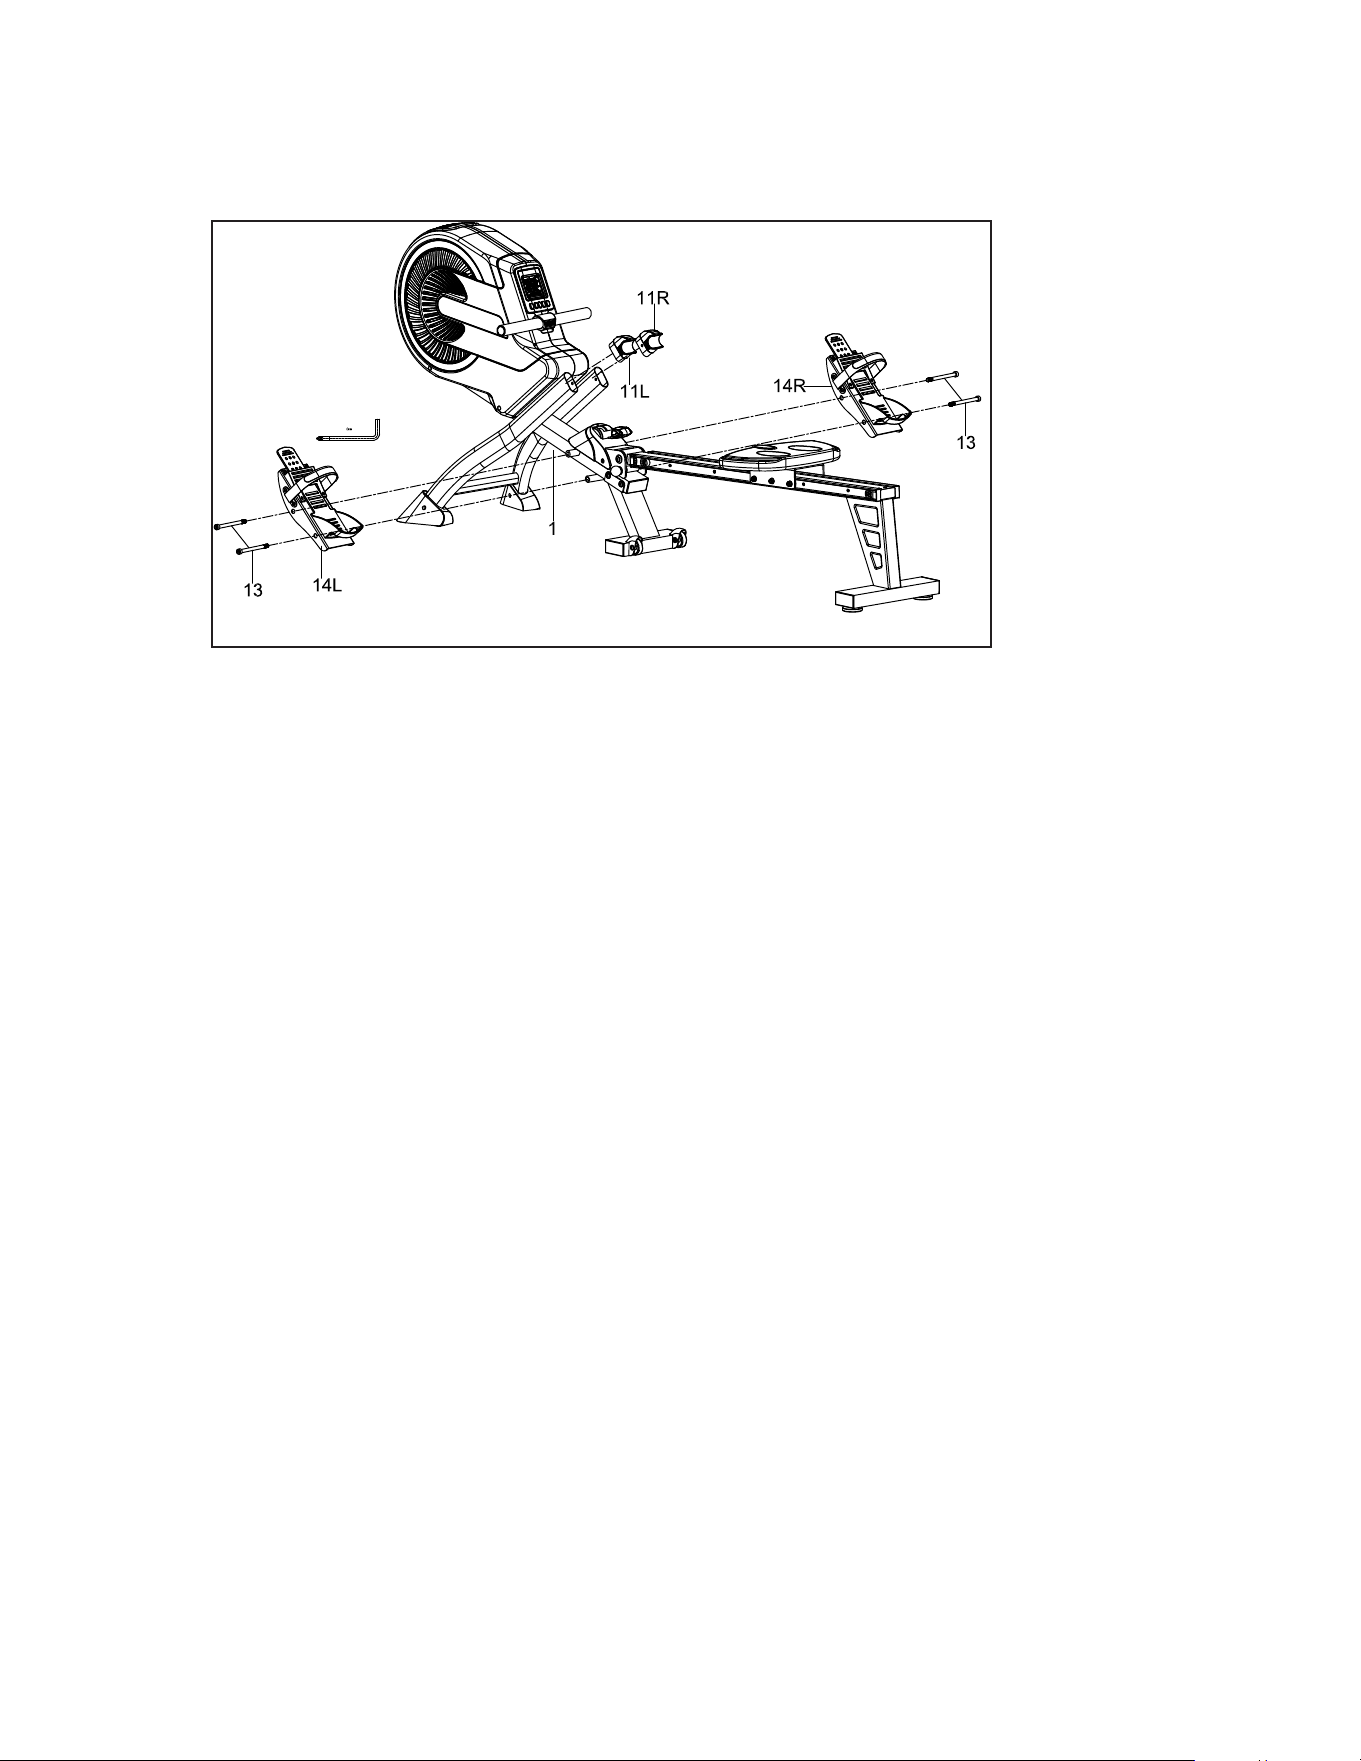
Attaching the Pedals
6
1. Insert two xed brackets for handlebar (11L/R) into the holes
on the front support tube of main frame (1).
2. Attach the left pedal (14L) to the left side of main frame (1),
fasten with two allen bolts (13).
3. Repeat for the right pedal (14R) to the right side of main
frame (1).
12
ERG500 Rower
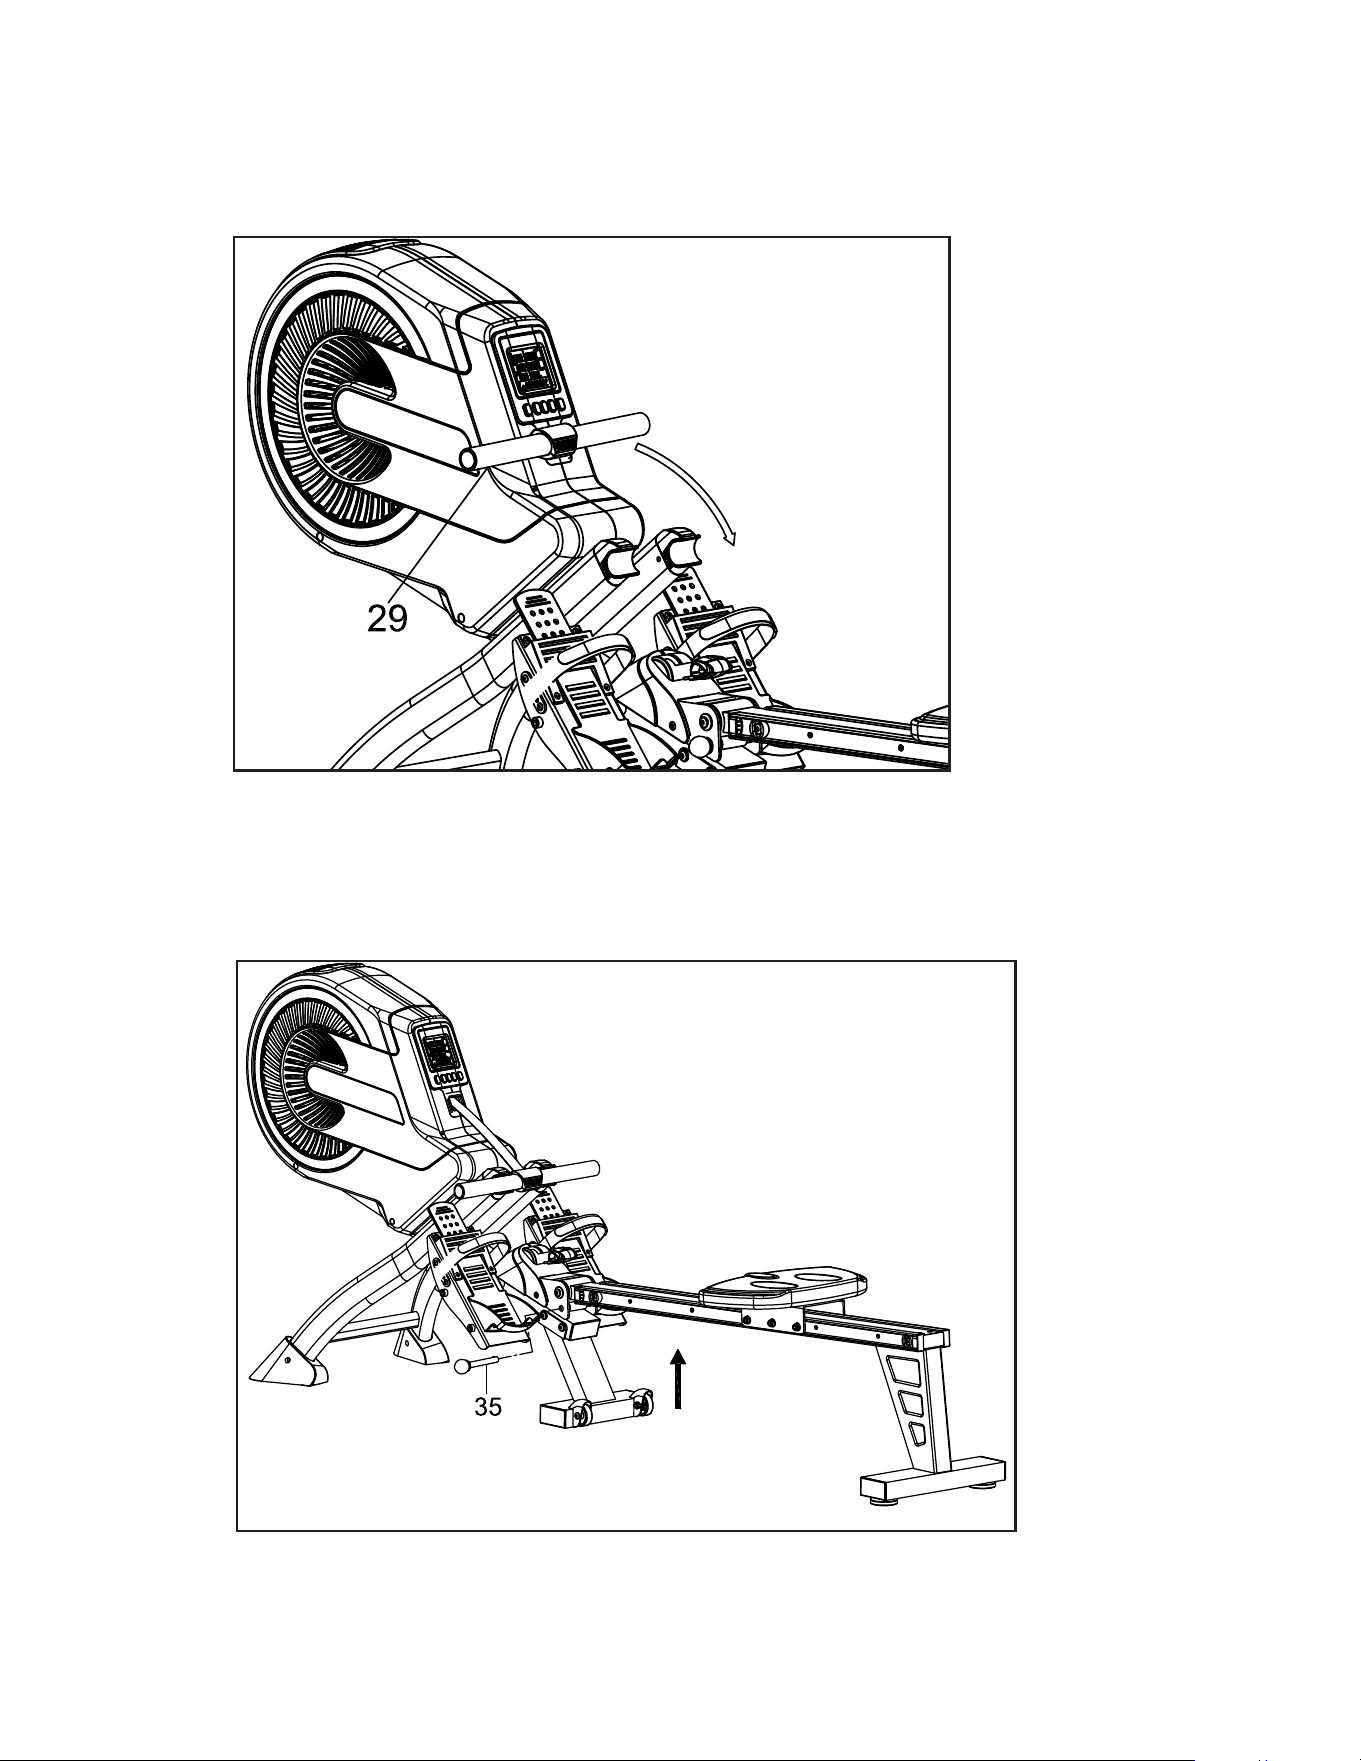
1. The handlebar (29) also can be placed into the handlebar
holder.
Attaching the Handlebar
7
Folding the Rower
8
1. To fold the machine for storage, the ball pin can be removed and
the slide rail can be lifted up. Remember to replace the pin.
ERG500 Rower
13
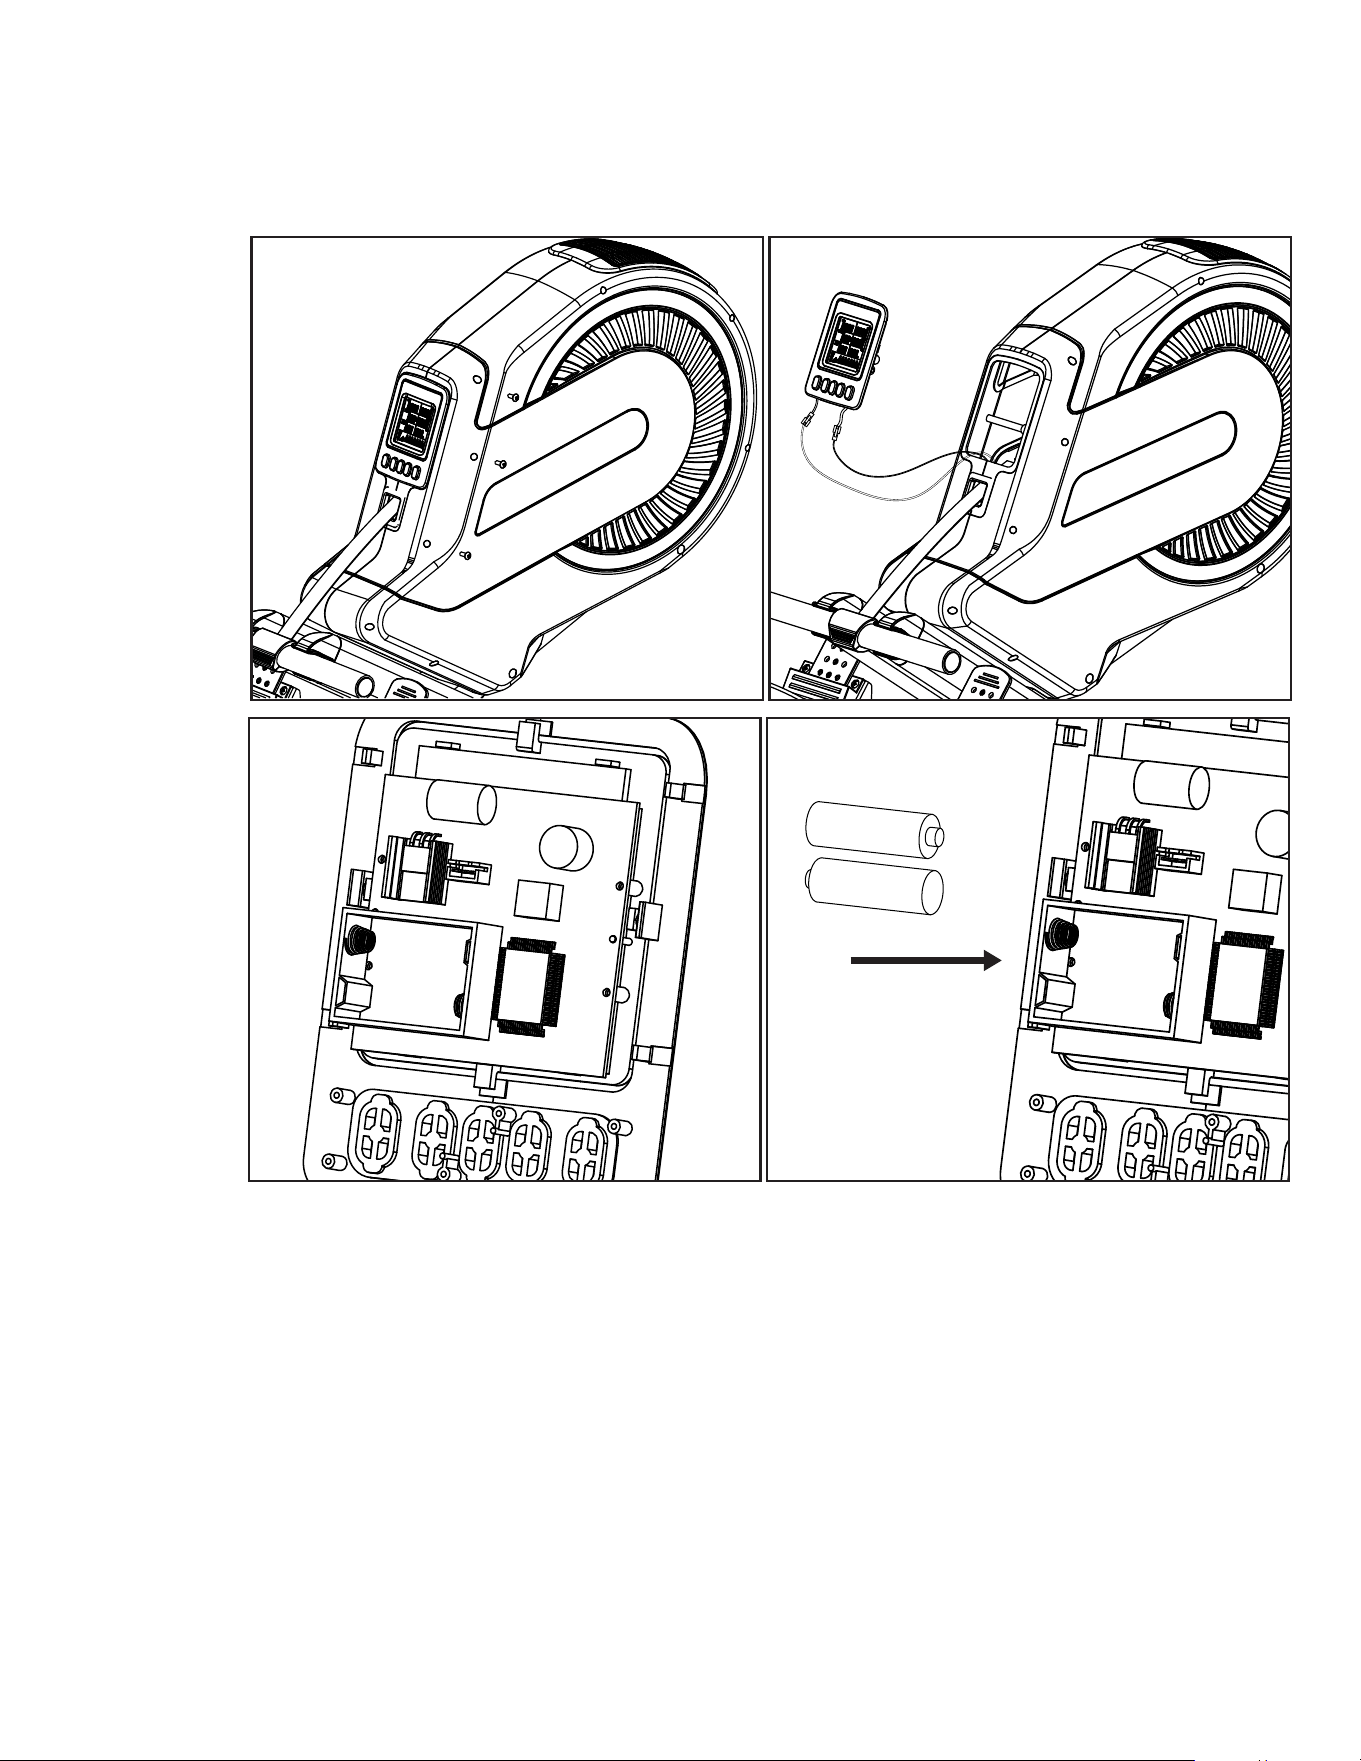
1. Loosen the 3 screws on the right side fo the console. Gently ease the
console panel out of the shroud.
2. On the back panel, replace batteries. Make sure they t tightly in the correct
postions.
3. Place console back into shroud and retighten the 3 screws.
Battery Replacement
9
14
ERG500 Rower
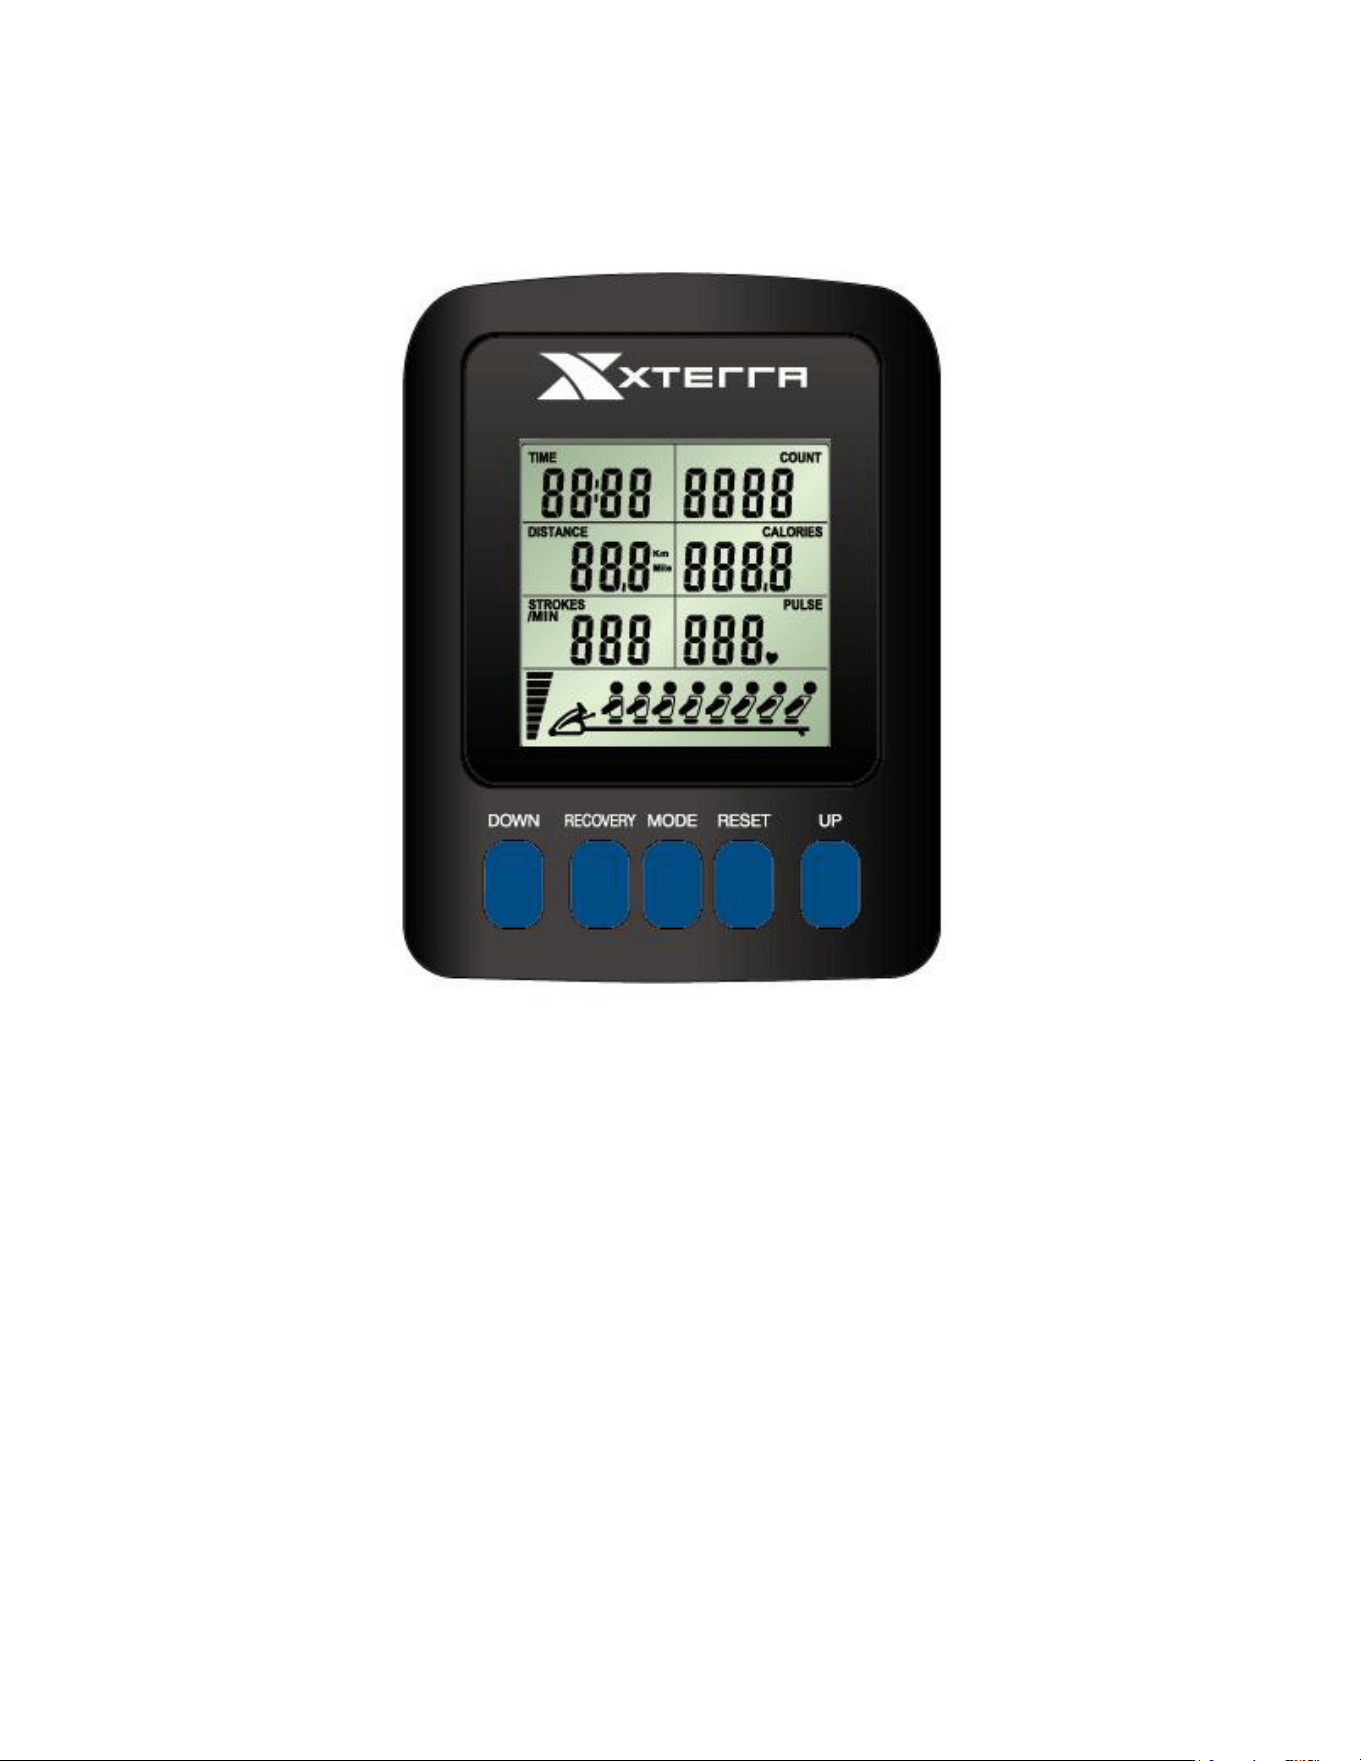
Operation of Your Console
ERG500 Console
BUTTONS:
MODE: Select to change between the presets TIME, COUNT, DISTANCE, CALORIES, and
PULSE.
PULSE RECOVERY:
** It is functional only when used with the wireless chest belt (not included) **
The console has a Recovery Mode. This lets you monitor how quickly you recover from exercising.
After your exercise session press the Recovery button, the LCD console will then count down from
60 seconds to zero. After this, a tness score F1 to F6 will be displayed on console.
F1.0 = Excellent F2.0 = Good F3.0 = Fair F4.0 = below average
F5.0 = No Good F6.0 = Poor
Key Functions

ERG500 Rower
15
Functions
TIME: Accumulates total work out time from 00:00 up to 99:59. You may also select a target
time before training by pressing “UP” and “DOWN” buttons. Each setting is 1:00 minute.
As soon as the target time is achieved, time will start counting up immediately and sound an 3
second alarm.
DISTANCE: Accumulates training distance from 0.0 up to 99.9 M (MILE). You may also preset
the target distance before training by pressing “UP” and “DOWN” buttons. Each setting is 0.1
M (MILE).
As soon as the target distance is achieved, distance will start counting up immediately and
sound an 3 second alarm.
COUNT: Accumulates total count from 0 up to 9999. You may also preset the target count
before training by pressing “UP” and “DOWN” buttons. Each setting is 10 count.
As soon as the target count is achieved, count will start up immediately and sound an 3
second alarm.
CALORIE: Accumulates calories consumption during training from 0 up to 9999 kcal with
each increment 0.1kcal. You may also preset the target calorie before training by pressing
“UP” and “DOWN” buttons. Each setting is 1 kcal increment.
As soon as the target calorie is achieved, the calorie value will start up immediately and
sound an 3 second alarm.
(This data is a rough guide for comparison between different exercise sessions and should
not be used as a medical standard.)
RESET: Press and hold this button for 2 seconds to reset all of the value to Zero.
UP:Increase the setting value of the following functions.
TIME, COUNT, DISTANCE, CALORIES, and PULSE.
DOWN: Decrease the setting value of the following functions.
TIME, COUNT, DISTANCE, CALORIES, and PULSE.

16
ERG500 Rower
BATTERY REPLACEMENT:
Quick release the lock on the bottom of the console, slide cover out carefully. Install two
AAA batteries in the battery case inside the console.
Ensure that the batteries are correctly tted. Battery must be correctly positioned and make
sure the battery spring has proper contact with batteries.
IF the displays appear blank or display only partial segments, remove the batteries and wait
15 seconds then restore them.
Whenever you remove the batteries, all the functional values will be reset to zero.
PULSE: Your current pulse rate from 40 to 220bpm will be displayed on the LCD console
whenever you wear the wireless chest belt (optional item, not included).
If no heart rate signals are detected for 3 seconds, the console will show “P“.
You can set a target heart rate before training by pressing “UP” and “DOWN” buttons within
the rate zone 90 to 220. Each increment is 1 heart beat.
If you go above your target heart rate, the LCD Pulse value will ash and ask you reduce the
intensity of your exercise.
NOTE: If no signal has been transmitted into console for 4 minutes, the LCD display will shut
off automatically and all function data will reset to Zero. You may press any button or start
training to have the console power on again.
TRAVEL DISTANCE: Displays your stroke travel distance visually on the LCD.

ERG500 Rower
17
Trouble Shooting
Problem Cause Solution
Monitor does not display
Batteries not Installed Install Batteries
Computer Wires not
connected
Ensure the computer wires
are connected properly at
the upright and computer
No count or distance
displays on the monitor
Sensor wire not connected
Ensure the computer wires
are connected properly at
the upright and the computer
Sensor wire not working
properly
Replace sensor wire
Monitor not working properly Replace monitor
No Tension
Air Damper needs
Adjustment
Adjust tension lever
accordingly
Squealing Belt slipping Adjust Belt

18
ERG500 Rower
Manufacturer’s Limited Warranty
Effective August 21, 2018 - ROWER LIMITED WARRANTY
Home Use Limited Warranty
Frame
5 Years
Parts
2 Years
XTERRA Fitness Inc. warrants all its home use Rower parts for a period of time listed below, from the date of retail sale, as determined by a
sales receipt or in the absence of a sales receipt, eighteen (18) months from the original factory shipping date. XTERRA Fitness’
responsibilities include providing new or remanufactured parts, at XTERRA Fitness’ option, and technical support to our independent dealers
and servicing organizations. In the absence of a dealer or service organization, these warranties will be administered by XTERRA Fitness
directly to a consumer. The warranty period applies to the following components:
NORMAL RESPONSIBILITIES OF THE CONSUMER
This warranty applies only to products in ordinary household use. The consumer is responsible for the items listed below:
1. The warranty registration card must be completed and returned to the address listed on the card within 10 days of the original purchase
to validate the manufacturer’s limited warranty or register online at the XTERRA Fitness website.
2. Proper use of the Rower in accordance with the instructions provided in this manual, including maintenance.
3. Proper connection to a power supply of sufcient voltage, replacement of blown fuses, repair of loose connections or defects in house/
facility wiring.
4. Expenses for making the Rower accessible for servicing, including any item that was not part of the Rower at the time it was shipped
from the factory.
5. Damages to the Rower nish during shipping, installation or following installation.
EXCLUSIONS
This warranty does not cover the following:
1. CONSEQUENTIAL, COLLATERAL, OR INCIDENTAL DAMAGES SUCH AS PROPERTY DAMAGE AND INCIDENTAL
EXPENSESRESULTING FROM ANY BREACH OF THIS WRITTEN OR ANY IMPLIED WARRANTY. Note: Some states do not allow
the exclusion or limitation of incidental or consequential damages, so this limitation or exclusion may not apply to you.
2. Service call reimbursement to the consumer. Service call reimbursement to the dealer that does not involve malfunction or defects in
workmanship or material, for units that are beyond the warranty period, for units that are beyond the service call reimbursement period,
for Rowers not requiring component replacement, or Rowers not in ordinary household use.
3. Damages caused by services performed by persons other than authorized XTERRA Fitness service companies, use of parts other than
original XTERRA Fitness parts, or external causes such as alterations, modications, abuse, misuse, accident, improper maintenance,
inadequate power supply, or acts of God.
4. Products with original serial numbers that have been removed or altered.
5. Products that have been; sold, transferred, bartered, or given to a third party.
6. Products that are used as store display models.
7. Products that do not have a warranty registration on le at XTERRA Fitness Inc. XTERRA Fitness reserves the right to request proof of
purchase if no warranty record exists for the product.
8. Product use in any environment other than a residential setting.
9. THIS WARRANTY IS EXPRESSLY IN LIEU OF ALL OTHER WARRANTIES EXPRESSED OR IMPLIED, INCLUDING THE
WARRANTIES OF MERCHANTABILITY AND/OR FITNESS FOR A PARTICULAR PURPOSE.
SERVICE
Keep your bill of sale. Twelve (12) months from the date on the bill of sale or eighteen (18) months from the date of factory shipping as
determined by the serial number establishes the warranty period should service be required. If service is performed, it is in your best interest
to obtain and keep all receipts. This written warranty gives you specic legal rights. You may also have other rights that vary from state to
state. Service under this warranty must be obtained by following these steps, in order:
1. Contact your selling authorized XTERRA Fitness dealer. OR
2. Contact your local authorized XTERRA Fitness service organization.
3. If there is a question as to where to obtain service, contact our service department at (870)333-5500
4. XTERRA Fitness’ obligation under this warranty is limited to repairing or replacing, at XTERRA Fitness’ option, the product through one
of our authorized service centers. All repairs must be preauthorized by XTERRA Fitness. If the product is shipped to a service center
freight charges to and from the service center will be the customer’s responsibility. For replacement parts shipped while the product is
under warranty, the customer will be responsible for shipping and handling charges. For in-home service, the customer will be respon-
sible for a trip charge. There will be an additional trip charge if the customer is located over 100 miles from the nearest service center.
5. The owner is responsible for adequate packaging upon return to XTERRA Fitness. XTERRA Fitness is not responsible for damages in
shipping. Make all freight damage claims with the appropriate freight carrier. DO NOT SHIP ANY UNIT TO OUR FACTORY WITHOUT
A RETURN AUTHORIZATION NUMBER. All units arriving without a return authorization number will be refused.
6. For any further information, or to contact our service department by mail, send your correspondence to:
Product features or specications as described or illustrated are subject to change without notice. All warranties are made by
XTERRA Fitness, Inc. This warranty applies only in the 48 contiguous United States. NOTE: This does not include Alaska or Hawaii.
XTERRA Fitness, Inc.
P.O. Box 2037
Jonesboro, AR 72402-2037
Labor
90 Days

ERG500 Rower
19
www.xterrafitness.com
©2018 All RIghts Reserved. ERG500 Owner’s Manual
3000 Nestle Road Jonesboro, AR 72401 - Phone:870-333-5500 - Fax:870-935-7611