®

“IMPORTANT SAFETY INSTRUCTIONS”
When using this machine, basic safety precautions should always be taken,
including the following:
“Read all instructions before using.”
DANGER – To reduce the risk of electric shock.
1. The machine should never be left unattended while plugged in. Always unplug the machine from the
electrical outlet immediately after using and before cleaning.
2. Always unplug before changing the light bulb. Replace bulb with same type rated 12V 5 watts.
WARNING – To reduce the risk of burns, fire, electric shock, or injury to persons.
1. Do not allow this machine to be used as a toy. Close attention is necessary when the machine is used
by or near children.
2. Use this machine only for its intended use as described in this manual. Use only accessories
recommended by the manufacturer as contained in this manual.
3. Never operate this machine if it has a damaged cord or plug, if it is not working properly, if it has been
dropped or damaged, or dropped into water. Return the machine to the nearest authorized dealer or
service center for examination, repair, electrical or mechanical adjustment.
4. Never operate the machine with any air openings blocked. Keep ventilation openings of the machine
and foot control free from the accumulation of lint, dust, and loose cloth.
5. Never drop or insert any object into any opening.
6. Do not use outdoors.
7. Do not operate where aerosol (spray) products are being used or where oxygen is being administered.
8. To disconnect, turn the main switch to the symbol “O” position which represents off, then remove plug
from outlet.
9. Do not unplug by pulling on cord. To unplug, grasp the plug, not the cord.
10.Keep fingers away from all moving parts. Special care is required around the machine needle.
11.Always use the proper needle plate. The wrong plate can cause the needle to break.
12.Do not use bent needles.
13.Do not pull or push fabric while stitching. It may deflect the needle causing it to break.
14.Switch the machine to the symbol “O” position when making any adjustments in the needle area, such
as threading needle, changing needle, threading bobbin, or changing presser foot, and the like.
15.Always unplug the machine from the electrical outlet when removing covers, lubricating, or when
making any other user servicing adjustments mentioned in the instruction manual.
16.This sewing machine is not intended for use by young children or infirm persons without supervision.
17.Young children should be supervised to ensure that they do not play with this machine.
“SAVE THESE INSTRUCTIONS”
“This machine is intended for household use.”

FOR USERS IN THE UK, EIRE, MALTA
AND CYPRUS ONLY.
If this machine is fitted with a three-pin non-rewireable BS plug then please read the following.
IMPORTANT
If the available socket outlet is not suitable for the plug supplied with this equipment, it should be cut off
and an appropriate three-pin plug fitted. With alternative plugs an approved fuse must be fitted in the plug.
NOTE
The plug served from the main lead must be destroyed as a plug with bared flexible cords is hazardous if
engaged in a live socket outlet. In the event of replacing the plug fuse, use a fuse approved by ASTA to BS
1362, i.e. carrying the mark, rating as marked on plug.
Always replace the fuse cover, never use plugs with the fuse cover omitted.
WARNING
DO NOT CONNECT EITHER WIRE TO THE EARTH TERMINAL WHICH IS MARKED WITH
THE LETTER ‘E’, BY THE EARTH SYMBOL OR COLOURED GREEN OR YELLOW.
The wires in this main lead are coloured in accordance with the following code:
Blue Neutral
Brown Live
As the colours of the wiring in the main lead of this appliance may not correspond with the coloured
markings identifying the terminals in your plug, proceed as follows.
The wire which is coloured blue must be connected to the terminal which is marked with the letter ‘N’ or
coloured black or blue.
The wire which is coloured brown must be connected to the terminal which is marked with the letter ‘L’ or
coloured red or brown.

1
CONGRATULATIONS ON CHOOSING
OUR MACHINE
Your machine is the most advanced computerized home use this machine available.
To fully enjoy all the features incorporated we suggest that you study this booklet.
PLEASE READ BEFORE USING THIS MACHINE
For safe operation
1. Be sure to keep your eye on the needle while sewing. Do not touch the pulley, thread take-up, needle,
or other moving parts.
2. Remember to turn off the power switch and unplug the cord when:
● Operation is completed
● Replacing or removing the needle or any other parts
● A power failure occurs during use
● Maintaining the machine
● Leaving the machine unattended.
3. Do not store anything on the foot controller.
4. Plug the machine directly into the wall. Do not use extension cords.
For a longer service life
1. When storing this machine, avoid direct sunlight and high humidity locations. Do not store the machine
beside a space heater, iron, or other hot objects.
2. Use only neutral soaps or detergents to clean the case. Benzene, thinner, and scouring powders can
damage the case and machine, and should never be used.
3. Do not drop or hit the machine.
4. Always consult the operation manual when replacing or installing any assemblies, the presser feet,
needle, or other parts to assure correct installation.
For repair or adjustment
In the event a malfunction occurs or adjustment is required, first follow the troubleshooting table in the
back of the operation manual to inspect and adjust the machine yourself. If the problem persists, please
consult your nearest authorized Brother service center.

AUTOMATIC REINFORCEMENT STITCHING _38
Cancelling automatic reinforcement
stitching_____________________________38
AUTOMATIC THREAD CUTTING ___________39
Cancelling programmed automatic thread
cutting______________________________39
UTILITY STITCH SELECTION ______________40
USEFUL SKILLS_________________________42
The “ ” key______________________42
Sewing corners_______________________43
Sewing thick seams ___________________43
Sewing curves _______________________43
Sewing thick fabric ____________________44
Sewing thin fabric _____________________44
__________________________5
PRINCIPAL PARTS _______________________5
OTHER INCLUDED ACCESSORIES__________7
OPTIONS _______________________________8
POWER SUPPLY _________________________9
SELECTION KEYS_______________________10
Screen messages guide you through each
operation____________________________10
OPERATION BUTTONS___________________11
Using the operation buttons _____________11
USING THE SCREEN KEYS _______________12
Examples of the keys on LCD ___________12
About the screen______________________12
If the LCD is hard to see when the power is
turned on____________________________13
Adjusting the brightness of the LCD_______13
HOW TO USE THE LANGUAGE SELECTION
KEY___________________________________14
How to clear the language selection_______15
BOBBIN WINDING / BOBBIN THREAD
SETTING ______________________________16
Winding the bobbin and setting the bobbin
thread ______________________________16
Setting the bobbin_____________________18
UPPER THREADING _____________________19
Thread according to number and arrow
marks on machine ____________________19
Auto-threading device__________________20
Using the extra spool pin and the net______21
START/STOP ___________________________22
“START/STOP” button _________________22
Foot controller________________________22
Mounting and Using the Knee Lifter _______23
STITCH WIDTH AND STITCH LENGTH ______24
Stitch width __________________________24
Stitch length _________________________25
Quick adjustment reference chart for stitch
width and stitch length _________________27
THREAD TENSION ______________________29
Correct tension _______________________29
Loosen tension by touching “ ” (Weak)___29
Tighten tension by touching “ ” (Strong)__30
Except “UTILITY STITCH” ______________30
CHANGING THE PRESSER FOOT __________31
Change the presser foot according to
the LCD message_____________________31
Installing embroidery foot “Q” ____________31
Changing the embroidery foot ___________32
Feed dog adjustment __________________33
CHANGING THE NEEDLE_________________34
Setting the needle securely _____________34
Checking needle______________________34
MACHINE OPERATION KEYS______________35
Utility
Stitches
Characters
and
Decorative
Stitches
Embroidering
Editing
Embroidery
Patterns
Retrieving
My
Custom
Stitch
TM
Maintenance
Error
Messages
Trouble
shooting
Sewing
Chart
Patterns
(Programmed
in Machine)
Patterns
(Memory
Card)
Sewing
Setting Up
2
CONTENTS
CHAPTER 1
CHAPTER 2
SETTING UP
1. SEWING
_________________________36
TRIAL SEWING _________________________36
Sewing by using “UTILITY STITCH”_______36
2. UTILITY STITCHES
_________________________45
STRAIGHT STITCHES____________________45
For reinforcement stretching on stretch
fabric_______________________________46
Changing the stitch length ______________46
Changing the needle position____________46
ADAPTER FOR LOW SHANK ATTACHMENTS 47
Included accessories __________________47
Installation of walking foot_______________47
ZIGZAG STITCHES ______________________48
Overcasting (using a zigzag stitch)________48
Applique (using a zigzag stitch) __________48
Patchwork (for crazy quilt) ______________48
OVERCASTING _________________________49
When using , or stitches________49
When using , or stitches________49
OVERCASTING (When using the side cutter) __50
BLIND HEM STITCHES ___________________52
Adjusting the needle drop position ________53
BUTTONHOLE STITCHES_________________54
Order of one cycle ____________________56
Sewing stretch fabrics__________________56
Buttons that do not fit into the guide plate
(Odd-shaped buttons)__________________57
Changing the stitch length ______________57
Changing the stitch width _______________57
BAR TACKING __________________________58
Thick fabrics _________________________59
Changing the bar tack stitch length _______59
Changing the bar tack stitch width ________59
DARNING ______________________________60
Changing the length of the darning stitch___61
Changing the bar tack stitch width ________61
Darning stitch cycle____________________61
TAPE ATTACHING_______________________62
EYELET STITCH ________________________63
Size of eyelet (Actual size) ______________63
BUTTON SEWING _______________________64
Attaching buttons with four holes _________65
Attaching a shank to the button __________65
BASTING ______________________________66
ZIPPER INSERTION (CENTERED
AND SIDE APPLICATION)_________________67
Centered application___________________67
Side application ______________________68
DART SEAM____________________________70
GATHERING____________________________71
Pulling out the bobbin thread ____________72
PINTUCK ______________________________73
_________________________88
CHARACTER SEWING ___________________88
Combinations of characters _____________89
DECORATIVE STITCHES _________________90
DECORATIVE STITCHES (7 mm) ___________91
SATIN STITCHES________________________92
CROSS STITCHING______________________93
CHARACTER AND
DECORATIVE STITCH ADJUSTMENT _______94
Changing the pattern size (Actual size) ____94
Single/repeat sewing __________________94
Elongation___________________________95
Changing the stitch length and
the stitch width _______________________96
Customize patterns by combining satin
stitches using the “ ” and “ ” keys ____97
Changing Mirror Image [Left and Right (the
“ ” key), and Top and Bottom (the “ ”
key)] _______________________________99
Confirming entry of combined
stitch patterns _______________________100
Saving combined stitch patterns_________100
SEWING ______________________________102
Sewing attractive finishes______________102
Using a pattern sheet _________________102
Sewing ____________________________103
ADJUSTING STITCH PATTERNS __________105
3
Utility
Stitches
Characters
and
Decorative
Stitches
Embroidering
Editing
Embroidery
Patterns
Retrieving
My
Custom
Stitch
TM
Maintenance
Error
Messages
Trouble
shooting
Sewing
Chart
Patterns
(Programmed
in Machine)
Patterns
(Memory
Card)
Sewing
Setting Up
FLAT FELL SEAM _______________________75
Finished flat fell seam__________________76
APPLIQUES ____________________________77
Sewing the applique around corners ______77
APPLIQUE QUILTS ______________________78
SCALLOP STITCH _______________________79
SMOCKING STITCH______________________80
PATCHWORK STITCH____________________81
FAGOTING _____________________________82
DECORATIVE STITCHING ________________83
Decorative stitching ___________________83
Shell tacking _________________________83
HEM-STITCH (HEIRLOOM STITCH) _________84
“ ” hem-stitching ____________________84
“ ” hem-stitching ____________________85
LATERAL SEWING (STRAIGHT/ZIGZAG)_____86
3.
CHARACTERS AND DECORATIVE STITCHES
4. EMBROIDERING
________________________106
PREPARATION BEFORE SEWING_________106
Attaching embroidery foot “Q”___________106
Fitting embroidery unit ________________107
Removing the embroidery unit __________108
Placing the embroidery unit into its case __108
Initializing the embroidery unit __________109
SELECTING AND SEWING PATTERNS _____110
Selecting alphabetical characters________110
Selecting one-point patterns____________111
Selecting frame patterns_______________112
Selecting floral alphabets ______________113
Selecting patterns from a memory card ___114
MEMORY _____________________________116
Saving a pattern combination in memory __116
EMBROIDERING _______________________117
Embroidering attractive finishes _________117
Setting the fabric into the embroidery
frame______________________________117
Fitting the embroidery frame to
the embroidery unit___________________119
Embroidering _______________________120
Embroidering a single color pattern
when “MULTI COLOR” is displayed ______122
Changing the stitch density for characters
and some frame patterns ______________122
MOVING THE LOCATION (LAYOUT) _______123
Moving the embroidery location _________124
Checking the embroidering area_________124
Embroidering from a specific starting point_125
Changing the pattern direction __________125
Reversing patterns ___________________126
Using the “IMAGE” key________________126
Changing the size of characters, frame
patterns and pattern __________________127
ADJUSTMENTS DURING THE EMBROIDERY
PROCESS ____________________________129
If the thread breaks during embroidering __129
Continuing a pattern after the power
has been momentarily turned off ________129
When sewing again from the beginning.......130
EMBROIDERY APPLICATIONS____________131
Linking characters____________________131
Embroidering appliques
(using a frame pattern) ________________132
Embroidering onto small pieces
of fabric or onto corners _______________134
5. EDITING EMBROIDERY PATTERNS
________________________135
EMBROIDERY EDITING CAPABILITIES_____135
Explanation of the Editing Functions _____135
HOW TO EDIT _________________________136
Character Editing ____________________137
One-point Editing ____________________143
Border Pattern Editing ________________145
Editing Patterns on Embroidery Cards
(sold separately)_____________________146
Editing Combinations _________________147
SAVING A PATTERN COMBINATION TO
MEMORY _____________________________151
Let's Sew __________________________153
CORRECTING EDITED PATTERNS ________154
Correcting another stitch pattern during
editing_____________________________154
Correcting stitch patterns after editing ____155
6. RETRIEVING
________________________156
RETRIEVING CHARACTERS AND
PATTERNS____________________________156
RETRIEVING AN EMBROIDERY PATTERN__157
RETRIEVING AN EDITED PATTERN _______158
DELETING A STORED PATTERN__________159
4
Utility
Stitches
Characters
and
Decorative
Stitches
Embroidering
Editing
Embroidery
Patterns
Retrieving
My
Custom
Stitch
TM
Maintenance
Error
Messages
Trouble
shooting
Sewing
Chart
Patterns
(Programmed
in Machine)
Patterns
(Memory
Card)
Sewing
Setting Up
7. MY CUSTOM STITCH
TM
(Function for making own stitch Designs)
________________________160
MAKING THE ILLUSTRATION_____________160
GENERATING THE DATA ________________162
EDITING AN EXISTING “ ” ________164
Moving a point ______________________164
Moving part or all of a pattern___________165
Inserting new points __________________165
Once you have finished editing__________166
STORING THE “ ” WHICH YOU HAVE
ENTERED_____________________________167
RETRIEVING A “ ” ______________168
MAINTENANCE
________________________169
CLEANING ____________________________169
Cleaning the screen __________________169
Cleaning the machine surface __________169
Cleaning the shuttle __________________169
CHANGING THE LIGHT BULB_____________171
RELATED CHART OF SEWING FABRICS,
THREAD AND NEEDLE __________________172
ERROR MESSAGES
________________________173
Warning messages___________________173
Instruction messages _________________178
Alarms_____________________________179
TROUBLESHOOTING
________________________180
USING THE “OPERATION GUIDE” KEY _____180
Trouble with threads and stitches________181
Mechanical trouble ___________________182
PATTERNS (MEMORY CARD)
________________________191
One point mark embroidery pattern ______191
PATTERNS
(PROGRAMMED IN MACHINE)
________________________186
Utility stitches _______________________186
Character sewing ____________________186
Character embroidering chart___________190
Frame pattern embroidering chart _______190
SEWING CHART
________________________183
*MY CUSTOM STITCHTM is under application for a registered trademark in the United States of America.
SETTING UP CHAPTER 1
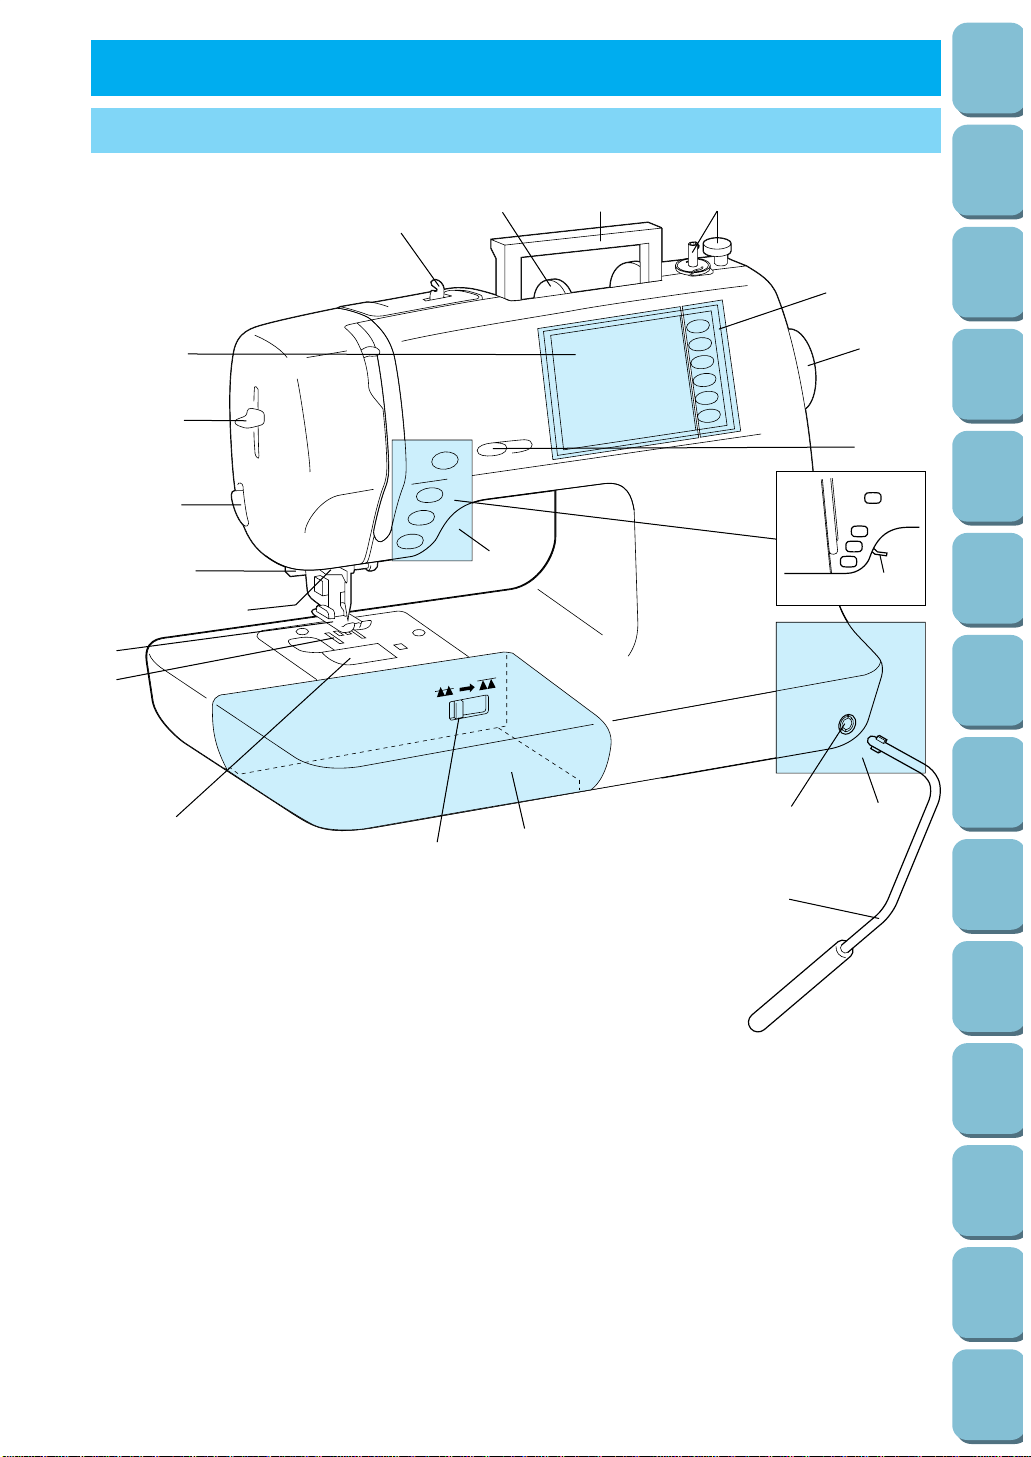
PRINCIPAL PARTS
3
2
1
12
C
13
14
B
A
E
11
16
17
10
9
8
6
7
5
4
D
15
1– Handle
2– Spool cap
3– Thread guide for bobbin winding
4– Needle threader lever
5– Thread cutter
6– Buttonhole lever
7– Needle threader
8– Presser foot
9– Feed dog
10– Bobbin cover
11– Feed dog adjustment lever
12– Bobbin winder device
13– Balance wheel
14– Speed range control lever
15– Presser foot lever
16– Knee Lifter Mounting Slot
17– Knee Lifter
A–Main power switch and connectors
B–Accessory compartment
C–Selection keys (Refer to page 10)
D–L.C.D. (Liquid Crystal Display)
E–Operation buttons (Refer to page 11)
5
Utility
Stitches
Characters
and
Decorative
Stitches
Embroidering
Editing
Embroidery
Patterns
Retrieving
My
Custom
Stitch
TM
Maintenance
Error
Messages
Trouble
shooting
Sewing
Chart
Patterns
(Programmed
in Machine)
Patterns
(Memory
Card)
Sewing
Setting Up
Utility
Stitches
Characters
and
Decorative
Stitches
Embroidering
Editing
Embroidery
Patterns
Retrieving
My
Custom
Stitch
TM
Maintenance
Error
Messages
Trouble
shooting
Sewing
Chart
Patterns
(Programmed
in Machine)
Patterns
(Memory
Card)
Sewing
Setting Up
6
2
1
3
4
2A 1
0
9
876
5
4
3
2
1
1
J
III
III
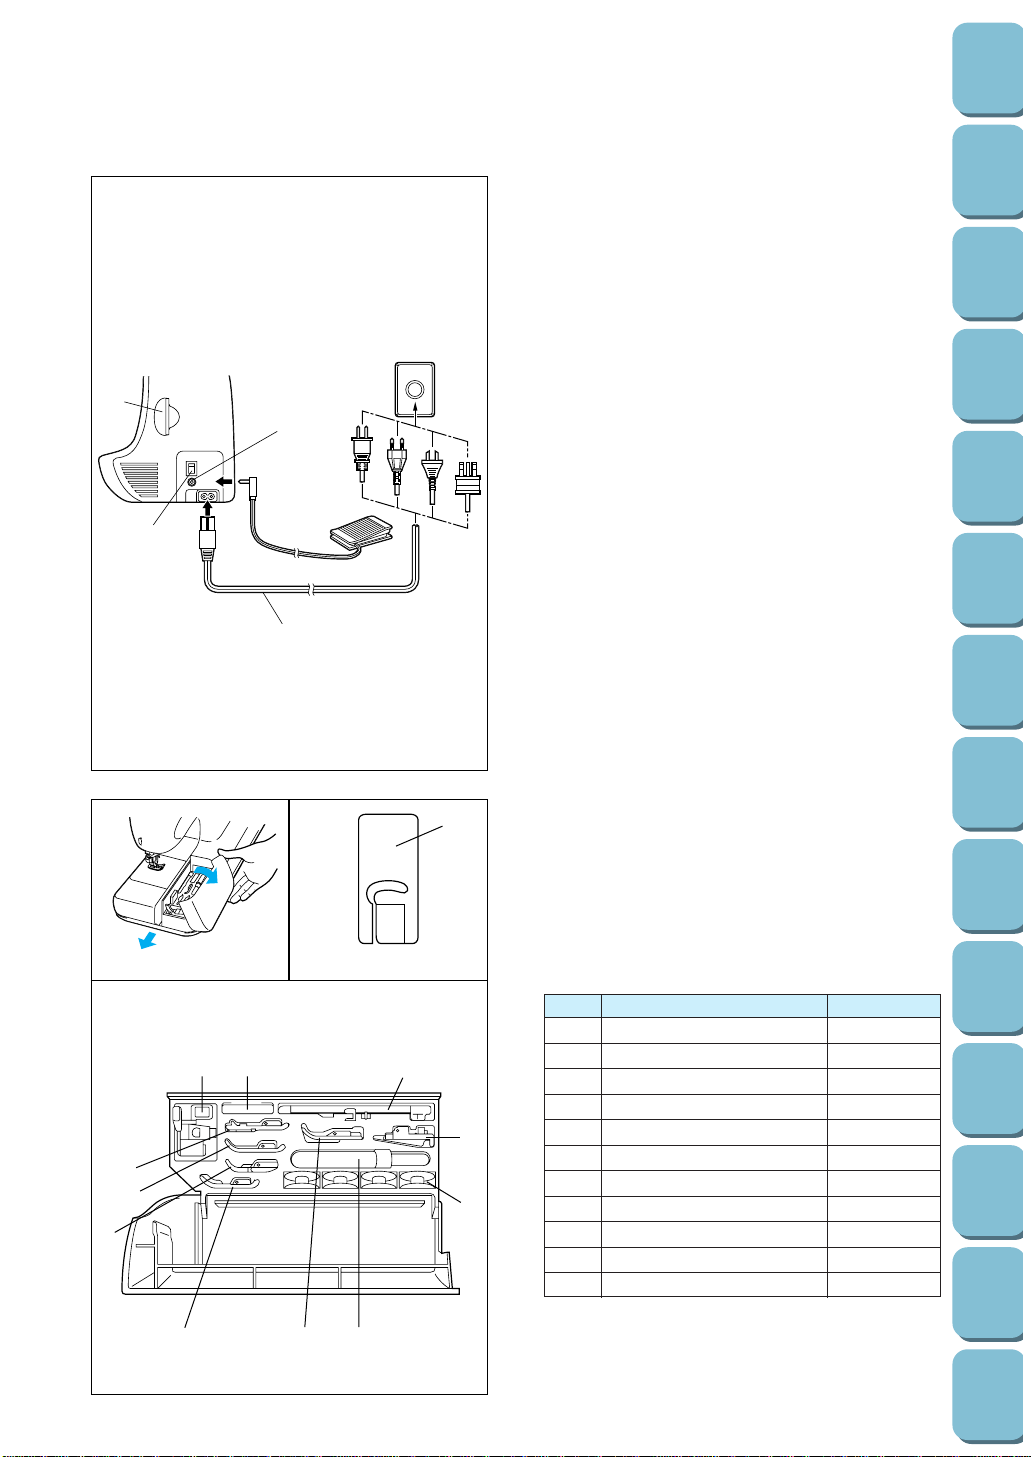
A. MAIN POWER SWITCH AND CONNECTORS
1 Card slot
Slot for memory card insertion.
2 Main power switch
Use to turn on/off the main power.
3 Controller jack
Insert for foot controller operation.
4 Power cord
Use to connect machine to power supply.
CAUTION
– When leaving the machine unattended, the
main switch of the machine must be
switched off or the plug must be removed
from the socket-outlet.
– When servicing the machine, or when
removing covers or changing bulbs, the
machine or the electrical set must be
unplugged.
– For U.S.A. only
This appliance has a polarized plug (one
blade wider than the other). To reduce the
risk of electric shock, this plug is intended
to fit in a polarized outlet only one way.
If the plug does not fit fully in the outlet,
reverse the plug. If it still does not fit,
contact a qualified electrician to install the
proper outlet. Do not modify the plug in
any way.
B. FLAT BED ATTACHMENT WITH
ACCESSORY COMPARTMENT
I Tilt the lid of the accessory compartment
toward you to open.
II Each presser foot has a symbol.
1 Presser foot symbol
III ACCESSORY LIST
The location of each accessory is shown in figure
III.
1 Buttonhole foot “A” X57789-101
2 Embroidery foot “Q” XA5891-101
3 Overcasting foot “G” X51162-001
4 Monogramming foot “N” X53840-301
5 Zipper foot “I” X59370-051
6 Zigzag foot “J” 137748-101
7 Blind stitch foot “R” X56409-001
8 Seam ripper X54243-001
9 Button fitting foot “M” 130489-001
0 Bobbin 136492-101
A Needle set X58358-001
No. Part Name Part Code
*
Always use the plastic bobbin which is supplied
with machine or in accessory compartment
.
*
Always use BROTHER accessories recommended
for this machine.
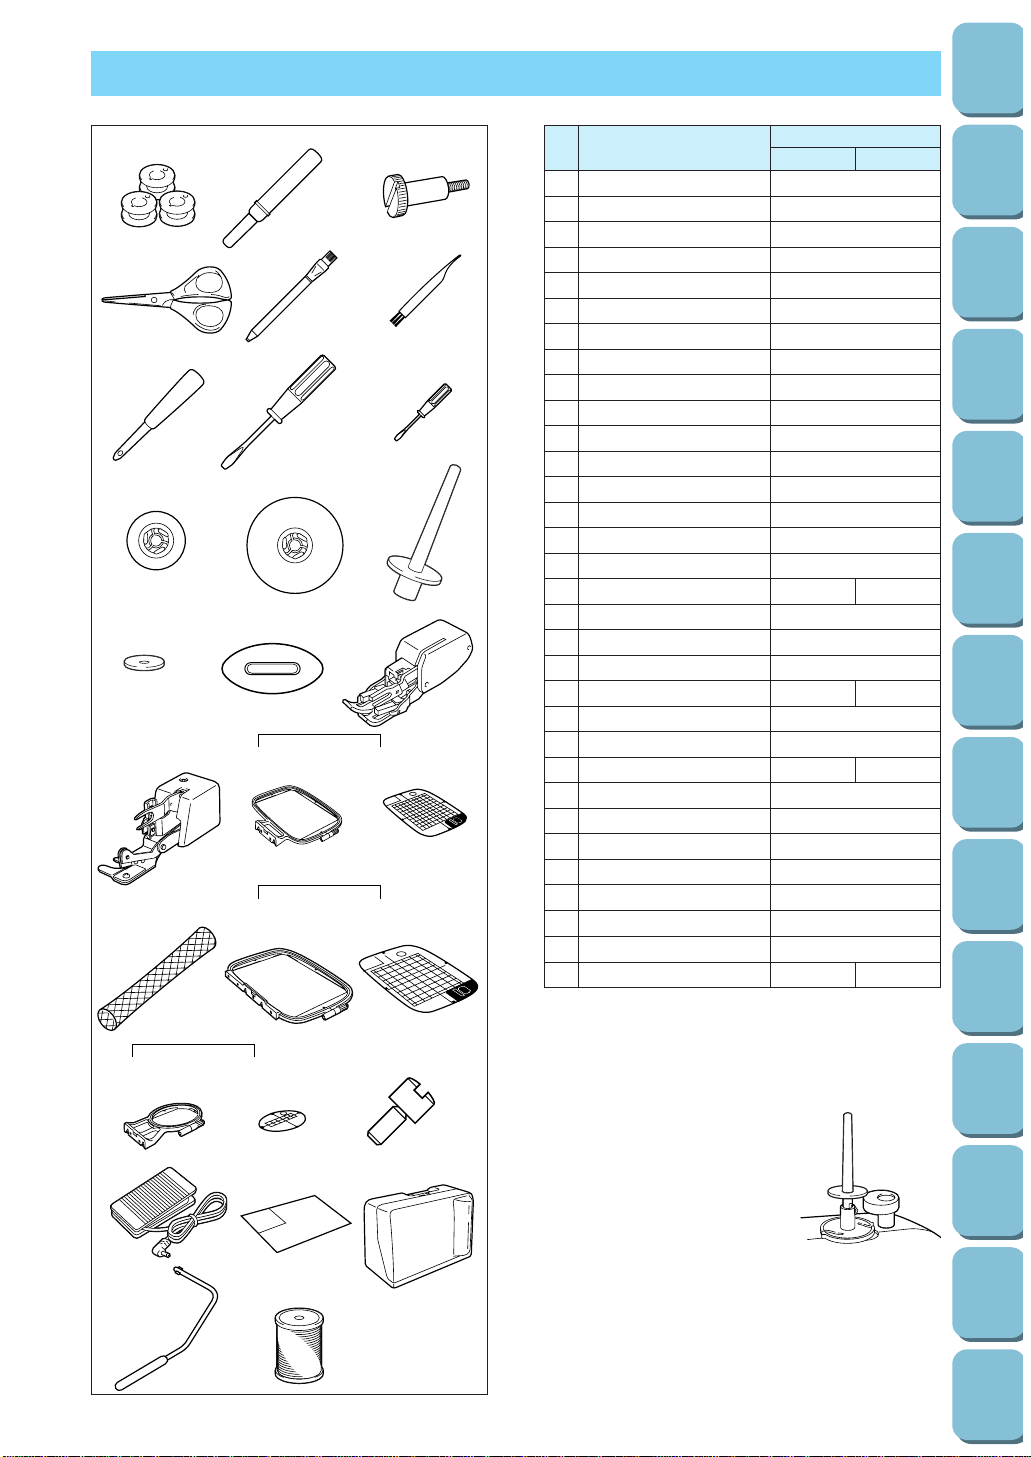
1 Bobbin (3) 136492-101
2 Seam ripper X54243-001
3 Screw XA5904-051
4 Scissors 184783-001
5 Chalk pen 184944-001
6 Cleaning brush XA4527-001
7 Eyelet punch 135793-001
8 Screwdriver (Large) X55467-051
9 Screwdriver (Small) X55468-051
10 Spool cap (Small) 130013-003
11 Spool cap (Large) 130012-003
12 Extra spool pin* XA3336-051
13 Spool felt X57045-001
14 Disc-shaped screwdriver XA2005-051
15 Walking foot* X81064-001
16 Side cutter X80943-001
17 Embroidery set (Regular) SA422 X80903-002
18 Embroidery frame (Regular) XA2171-101
19 Embroidery sheet (Regular) XA2212-001
20 Net* 127610-000
21 Embroidery set (Large) SA423 X80902-002
22 Embroidery frame (Large) XA2168-201
23 Embroidery sheet (Large) XA2209-001
24 Embroidery set (Small) SA421 X80904-102
25 Embroidery frame (Small) XA2174-101
26 Embroidery sheet (Small) XA2215-101
27 Screw* XA4813-051
28 Foot controller 234522-001
29 Pattern Sheet XA4595-001
30 Hard case XA1821-106
31 Knee Lifter XA6941-001
32 Embroidery bobbin thread SA-BTS X81164-001
7
OTHER INCLUDED ACCESSORIES
123
456
789
10 11 12
13 14 15
16 18
17
19
20 22 23
25 26 27
28 29
31 32
30
21
24
No.Part Name
Part Code
U.S.A. Others
* Use the same screw when installing both the
side cutter and the walking foot.
* If using special threads which wind quickly off
the thread spool, place a net on the spool
before using.
* If using the walking foot,
please refer to the
explanatory sheet which is
inserted in the instruction
book.
* The extra spool pin which is
provided as an accessory
should be attached to the
end of the bobbin winder
shaft during use.
Note (For U.S.A. only)
Foot controller: Model J2
This foot controller can be used for this machine
model PC-8500.
Utility
Stitches
Characters
and
Decorative
Stitches
Embroidering
Editing
Embroidery
Patterns
Retrieving
My
Custom
Stitch
TM
Maintenance
Error
Messages
Trouble
shooting
Sewing
Chart
Patterns
(Programmed
in Machine)
Patterns
(Memory
Card)
Sewing
Setting Up
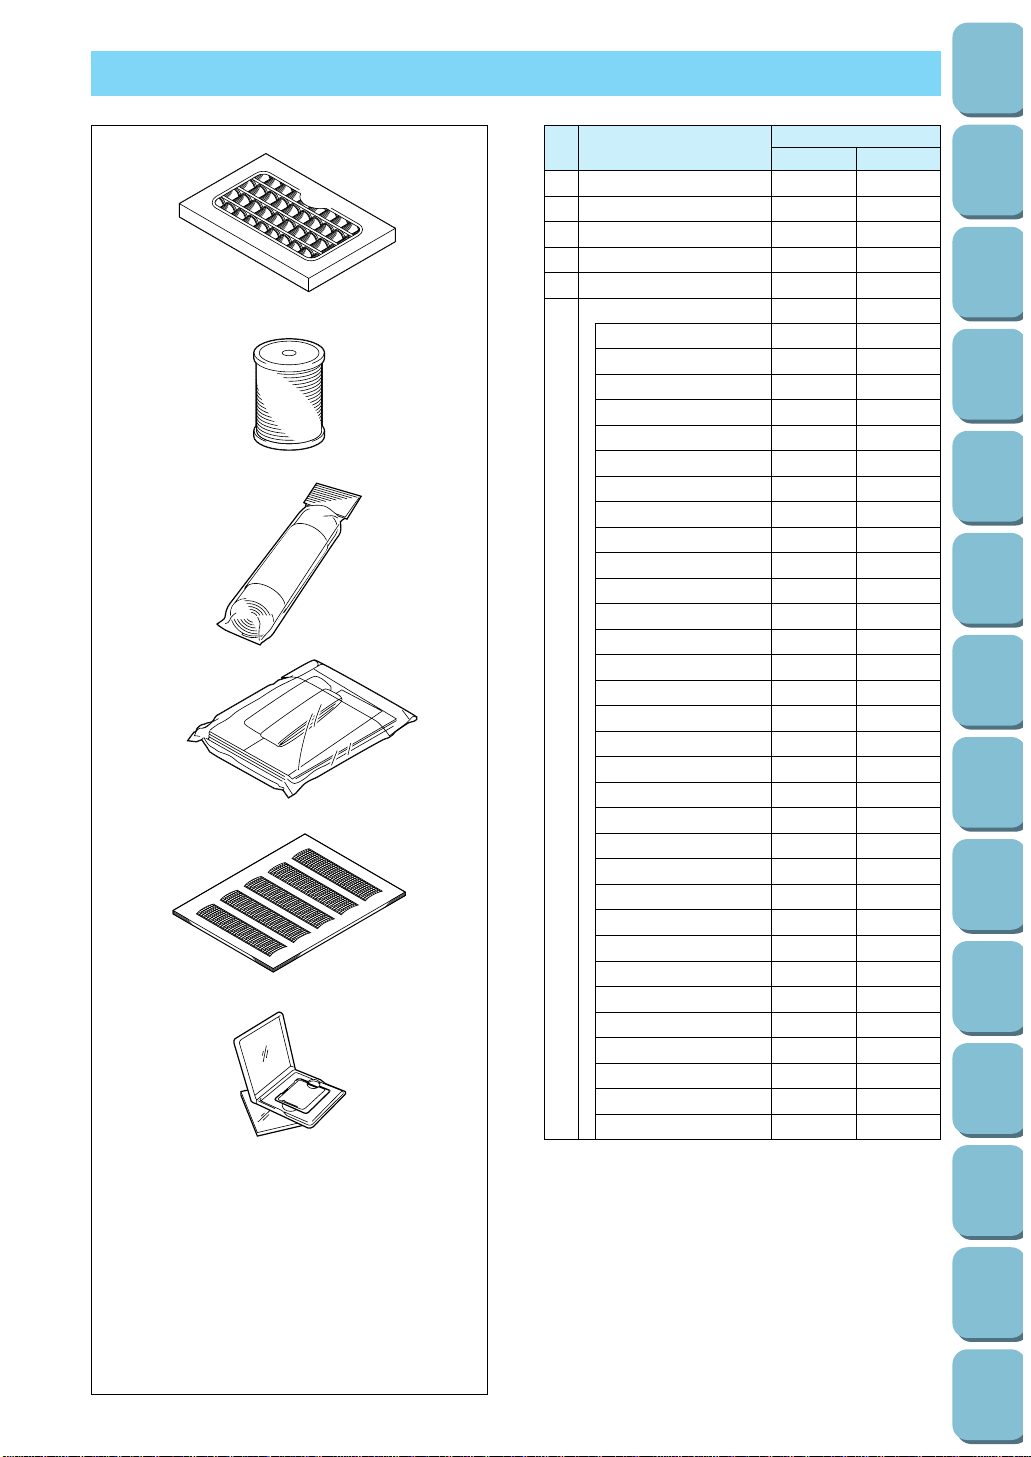
1
Brother poly 40 color thread set
SA740 X80928-100
2
Brother poly #60 bobbin thread
SA-BTS X81164-001
3
Backing material (Stabilizer material)
SA519 X81185-001
4 Country bag SA152 X80922-002
5 Grid sheet set SA500 X80948-001
Memory card*
No. 1 Alphabet SA298 X58317-001
No. 2 Flower SA299 X58321-001
No. 3 Dinosaur SA300 X58362-001
No. 6 Moskowitz’s World SA303 X58497-001
No. 7 Country Life SA304 X59322-001
No. 8 Holiday SA305 X59357-001
6 No. 9 Hobby Craft SA306 X59511-001
No. 10 Monogram Emblem
SA307 X59567-001
No. 11 Frame SA311 XA0257-001
No. 12 Transportation SA312 XA0275-001
No. 13 Sports Emblem SA313 XA0517-001
No. 14 Large Floral SA314 XA1223-001
No. 15 Cute Kids SA315 XA1325001
No. 16 Dogs & Cats SA316 XA1406-001
No. 17 Nintendo SA317 XA1434-001
No. 19 Marine SA319 XA2452-001
No. 20 Petite Designs SA320 XA2869-001
No. 21 Needlework SA321 XA2873-001
No. 26 Snoopy SA326 XA3826001
No. 27 Birds SA327 XA4289001
No. 28 Christmas SA328 XA4502001
No. 29 Lace SA329 XA4664001
No. 30 Wildlife animals SA330 XA4771001
No. 31 Large flower II SA331 XA5037001
No. 32 Musical instrument SA332 XA5386001
No. 33 Trees SA333 XA5567001
No. 35 Cats & dogs II SA335 XA5629001
No. 36 Fruits & vegetables SA336 XA5659001
No. 37 Applique alphabet SA337 XA5753001
No. 38 Angel SA338 XA5781001
No. 39 Doll face SA339 XA5978001
No. 40 Sports 3 SA340 XA6111001
Utility
Stitches
Characters
and
Decorative
Stitches
Embroidering
Editing
Embroidery
Patterns
Retrieving
My
Custom
Stitch
TM
Maintenance
Error
Messages
Trouble
shooting
Sewing
Chart
Patterns
(Programmed
in Machine)
Patterns
(Memory
Card)
Sewing
Setting Up
8
OPTIONS
1
2
3
4
5
6
No. Part Name
Part Code
U.S.A. Others
* This unit cannot be used in conjunction with
the memory card S-1.
WARNING
– Embroidery Card purchased in foreign
countries may not work with your
machine.
9
Utility
Stitches
Characters
and
Decorative
Stitches
Embroidering
Editing
Embroidery
Patterns
Retrieving
My
Custom
Stitch
TM
Maintenance
Error
Messages
Trouble
shooting
Sewing
Chart
Patterns
(Programmed
in Machine)
Patterns
(Memory
Card)
Sewing
Setting Up
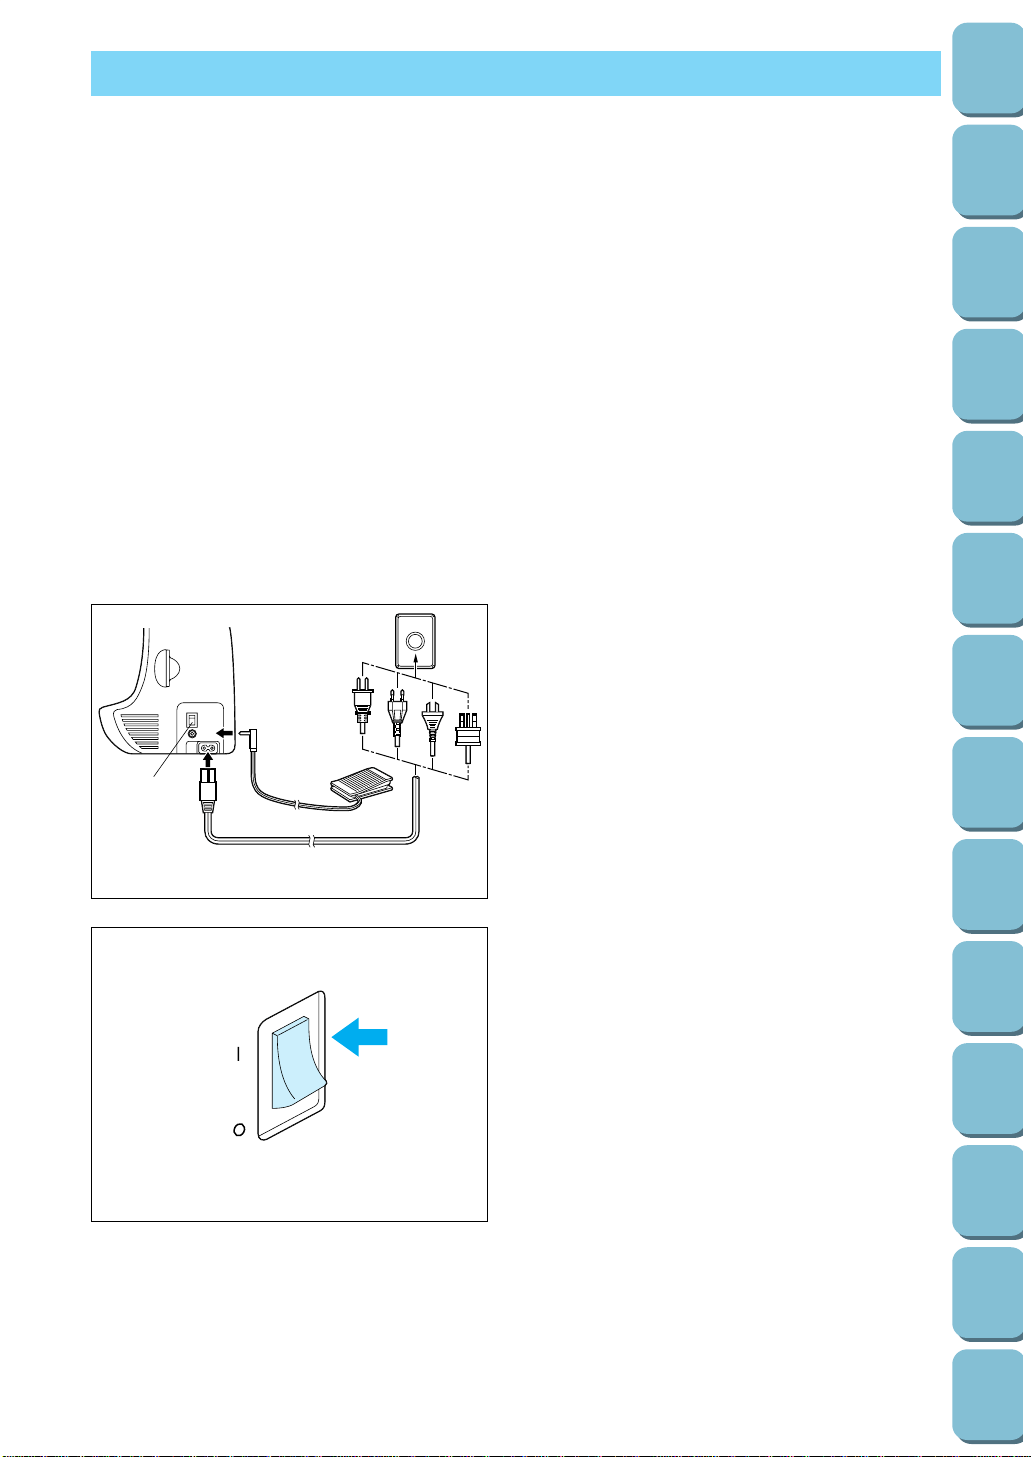
POWER SUPPLY
1
WARNING
– When leaving the machine unattended or when it is not being used, turn off the main power
switch of the machine or remove the plug from the wall outlet.
CAUTION
– Do not use this sewing machine with extension cords or multi-plug adaptors, otherwise a fire or
an electric shock may occur.
– Do not remove the plug from the wall outlet with wet hands, otherwise an electric shock may
occur.
– When unplugging the power cord, turn off the main power switch of the machine, then grasp
the plug and pull to unplug the cord. Pulling on the cord may damage it or cause a fire or an
electric shock.
– Do not allow the power cord to be cut, damaged, modified, forcefully bent, pulled, twisted or
bundled. In addition, do not place heavy objects on the cord or subject it to heat, otherwise the
cord may be damaged or a fire or an electric shock may occur.
If the power cord or plug are damaged, contact your nearest authorized Brother dealer or
service center.
– If the machine is not to be used for a long period of time, unplug the power cord, otherwise a
fire may occur.
1. Insert the plug into a wall outlet.
1 Main power switch
2. Set the main power switch to “ I ”.
3. To turn off the machine, set the main power
switch to “ O ”.
Utility
Stitches
Characters
and
Decorative
Stitches
Embroidering
Editing
Embroidery
Patterns
Retrieving
My
Custom
Stitch
TM
Maintenance
Error
Messages
Trouble
shooting
Sewing
Chart
Patterns
(Programmed
in Machine)
Patterns
(Memory
Card)
Sewing
Setting Up
10
SELECTION KEYS
Screen messages guide you through each operation
UTILITY
STITCH
CHARACTER
DECORATIVE
STITCH
EMBROIDERY
EMBROIDERY
EDIT
OPERATION
GUIDE
MEMORY
RECALL
1
C. SELECTION KEYS
* Depending on the country of destination, the
selection keys may be displayed by means of
characters or by illustrations.
1 “UTILITY STITCH” KEY
Use this key when you sew utility stitches
such as straight stitches, buttonholes, etc.
2 “CHARACTER/DECORATIVE STITCH” KEY
Use this key to sew alphabetical characters
and other decorative stitches.
3 “EMBROIDERY” KEY
Use this key when using a memory card and
when embroidering pre-programmed patterns.
When you insert or remove the memory card
from the machine, the main power switch
should always be turned off.
4 “EMBROIDERY EDIT” KEY
Use this key for embroidering patterns which
are combinations of other patterns.
5 “OPERATION GUIDE” KEY
Use this key if you would like information on
how to use machine functions such as upper
threading, bobbin winding and bobbin thread
setting.
6 “MEMORY RECALL” KEY
Use this key to retrieve combined patterns
which have been saved in memory.
OPERATION BUTTONS
Using the operation buttons
START
STOP
1
2
3
4
1
2
3
4
D. OPERATION BUTTONS
1 “THREAD CUTTER” BUTTON
When you press this button, both upper and
bobbin threads are cut automatically.
2 “NEEDLE POSITION” BUTTON
Press to change the needle position from up
to down or from down to up.
3 “REVERSE STITCH” BUTTON
The reverse stitch button is used to secure
and end stitching with a reverse stitch or
reinforcement stitch. The reverse stitch
function stitches backward. The reinforcement
stitch function stitches three times in the same
position. (See page 38 for full instructions.)
4 “START/STOP” BUTTON
The button illuminates green when the
machine is ready to be started and while
sewing or embroidering. If starting is not
possible, it illuminates red. In addition, it
illuminates orange when the bobbin thread is
being wound onto the bobbin (when the
bobbin winder shaft is to the right).
* Sewing continues at low speed while the
button is pressed.
* The needle will drop to its lowest position
when the machine is stopped.
11
Utility
Stitches
Characters
and
Decorative
Stitches
Embroidering
Editing
Embroidery
Patterns
Retrieving
My
Custom
Stitch
TM
Maintenance
Error
Messages
Trouble
shooting
Sewing
Chart
Patterns
(Programmed
in Machine)
Patterns
(Memory
Card)
Sewing
Setting Up
Utility
Stitches
Characters
and
Decorative
Stitches
Embroidering
Editing
Embroidery
Patterns
Retrieving
My
Custom
Stitch
TM
Maintenance
Error
Messages
Trouble
shooting
Sewing
Chart
Patterns
(Programmed
in Machine)
Patterns
(Memory
Card)
Sewing
Setting Up
12
USING THE SCREEN KEYS
Examples of the keys on LCD
Touch a key on the screen with your finger to
select the pattern which appears inside the key or
to start the function or operation indicated inside
the key.
CAUTION
Be sure to touch the key with your finger only.
Never use a pointed instrument such as a
sharp pencil or a screwdriver or a hard object
to touch the key.
Furthermore, do not press down too hard on
the screen, otherwise problems may result.
“ ”:
Touch this key to return to the previous page.
“ ”:
Touch this key to move to the next page.
“CHECK”:
If an error message appears, touch this to return to the original screen.
“CLOSE”:
If another screen is being displayed over the top of an advice screen, for example, touch this key to
remove the topmost screen.
“RETURN”:
Touch this key to return to the previous screen.
“END”:
Touch this key to stop using the function.
“CONFIRM”:
Touch this key to start a function working.
About the screen
NOTES
– All or parts of the screen may become darker or lighter at times because of changes in the ambient
temperature around the screen. This is normal and is not the sign of a malfunction. Adjust the screen if
it is difficult to read.
– The screen may be dark, immediately after the power is turned on. This is a feature of the light which
illuminates the screen, and is not the sign of a malfunction. The screen will return to its normal level of
brightness after approximately 10 minutes.
13
Utility
Stitches
Characters
and
Decorative
Stitches
Embroidering
Editing
Embroidery
Patterns
Retrieving
My
Custom
Stitch
TM
Maintenance
Error
Messages
Trouble
shooting
Sewing
Chart
Patterns
(Programmed
in Machine)
Patterns
(Memory
Card)
Sewing
Setting Up
If the LCD is hard to see when the power is turned on
UTILITY
STITCH
CHARACTER
DECORATIVE
STITCH
EMBROIDERY
EMBROIDERY
EDIT
OPERATION
GUIDE
MEMORY
RECALL
1. While touching the LCD (anywhere is OK),
turn the power off and then back on again.
* The START/STOP button will not illuminate at
this time.
UTILITY
STITCH
CHARACTER
DECORATIVE
STITCH
EMBROIDERY
EMBROIDERY
EDIT
OPERATION
GUIDE
MEMORY
RECALL
2. Touch any one of the lower three selection
keys (EMBROIDERY EDIT, OPERATION
GUIDE or MEMORY RECALL). The LCD will
become darker each time one of these keys is
touched. If you would like to make the LCD
lighter, touch any one of the upper three
selection keys (UTILITY STITCH,
CHARACTER/DECORATIVE STITCH or
EMBROIDERY).
3. After you have finished adjusting, turn the
power off and back on again once more.
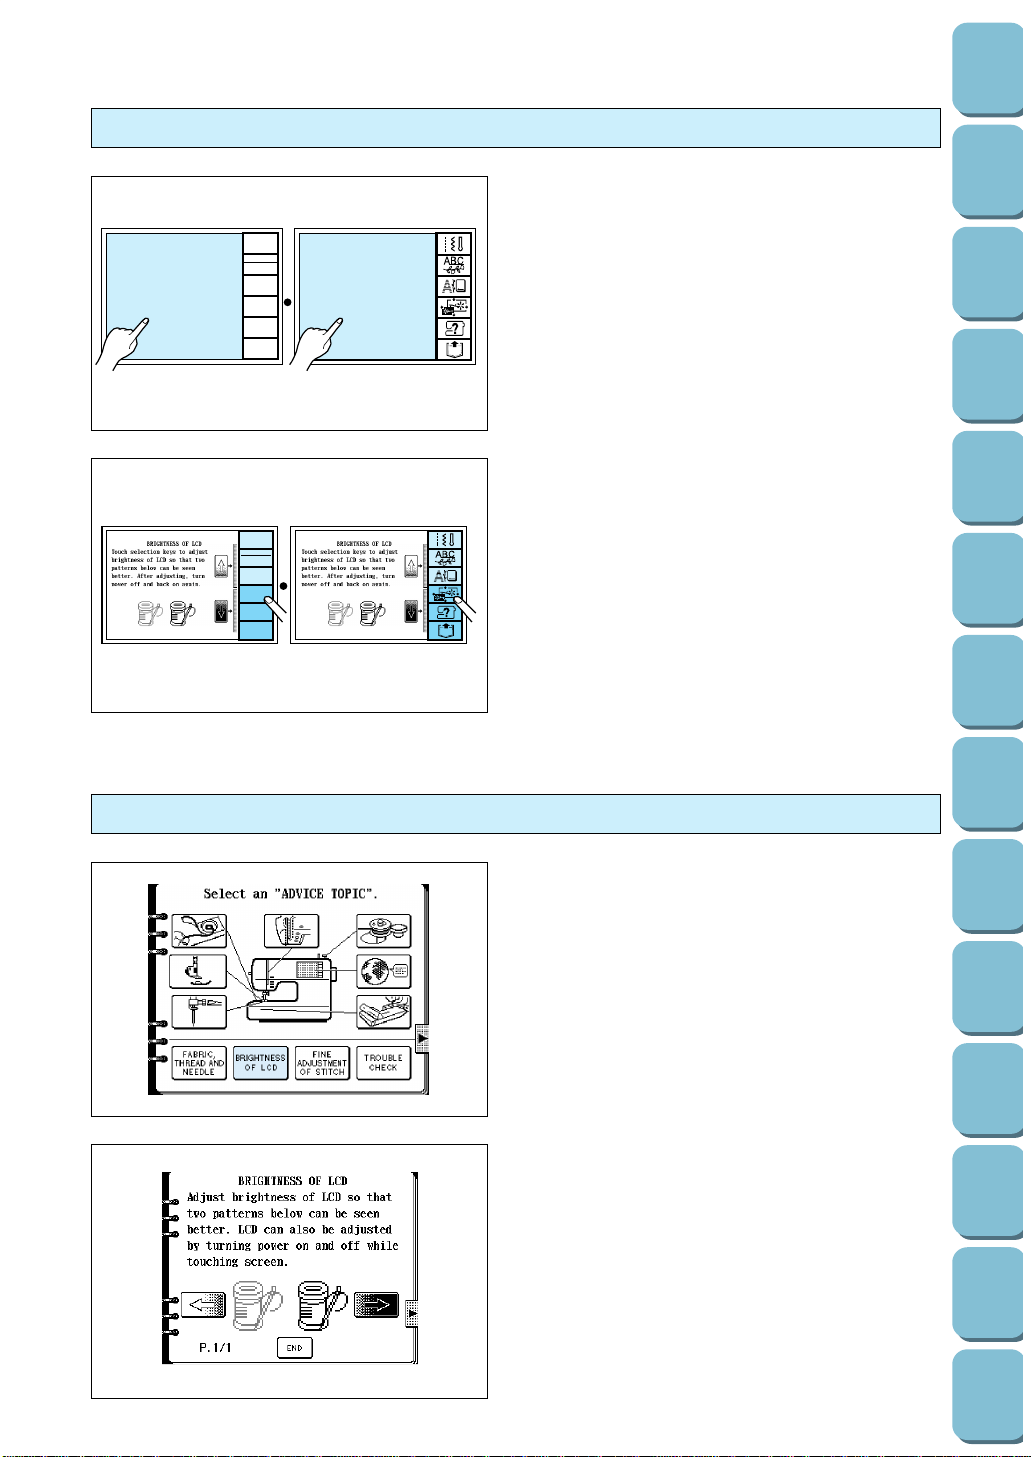
Adjusting the brightness of the LCD.
1. Touch the “OPERATION GUIDE” key.
2. Touch the “BRIGHTNESS OF LCD” key.
1 Touch this key to make contrast less (lighter).
2 Touch this key to make contrast greater
(darker).
3 Touch this key to return to the screen which
was previously being displayed.
12
3
Utility
Stitches
Characters
and
Decorative
Stitches
Embroidering
Editing
Embroidery
Patterns
Retrieving
My
Custom
Stitch
TM
Maintenance
Error
Messages
Trouble
shooting
Sewing
Chart
Patterns
(Programmed
in Machine)
Patterns
(Memory
Card)
Sewing
Setting Up
14
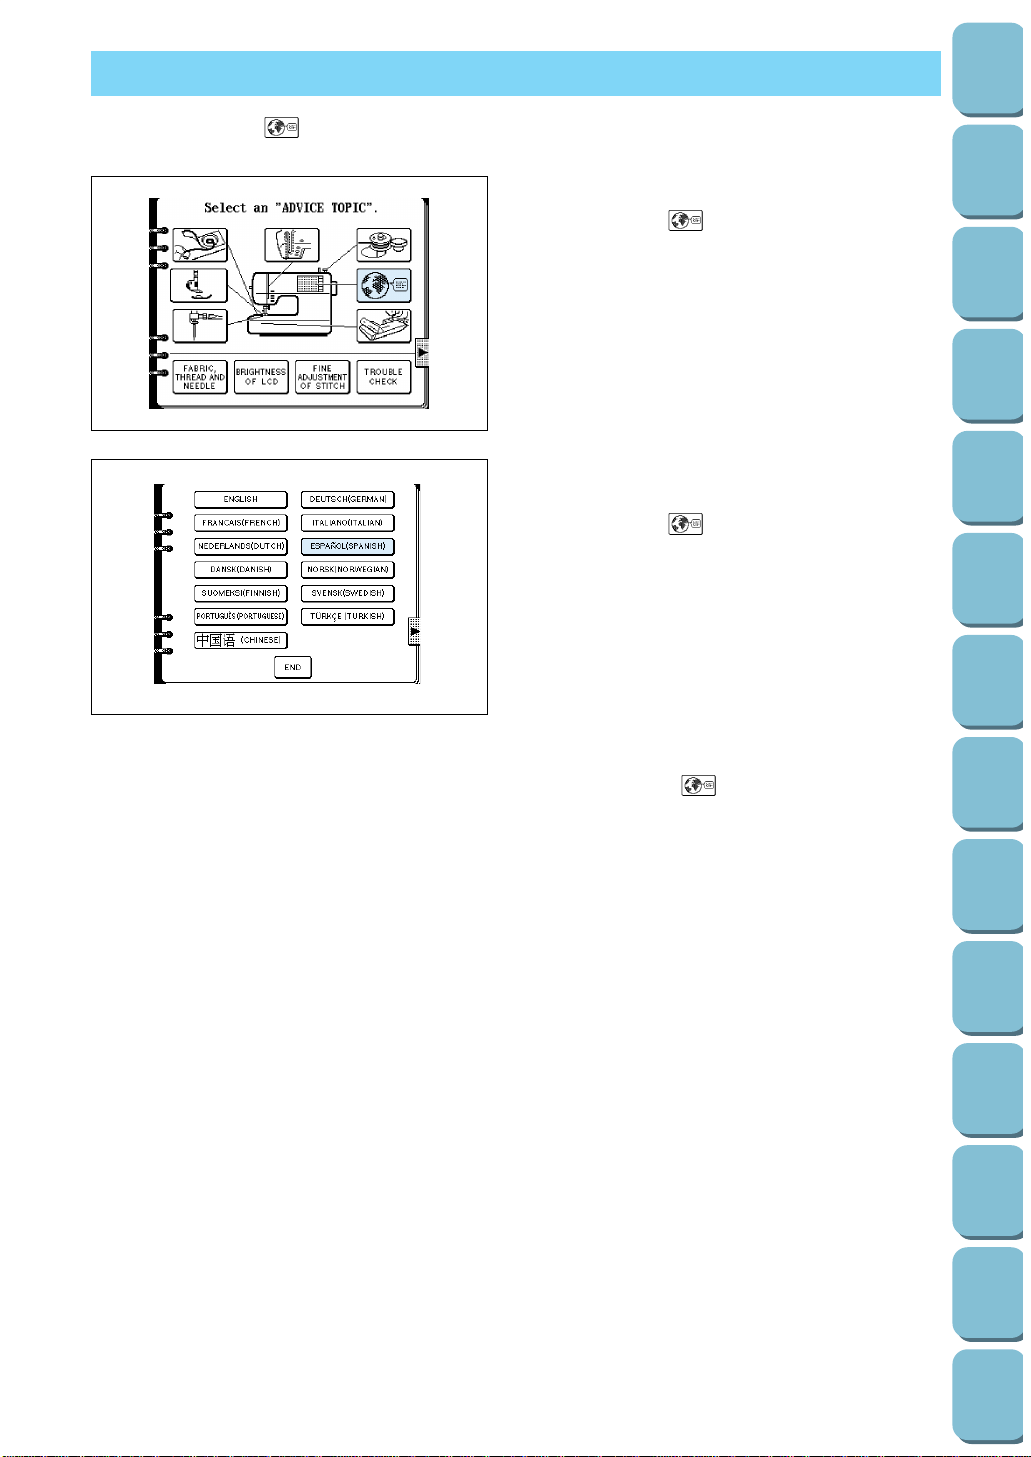
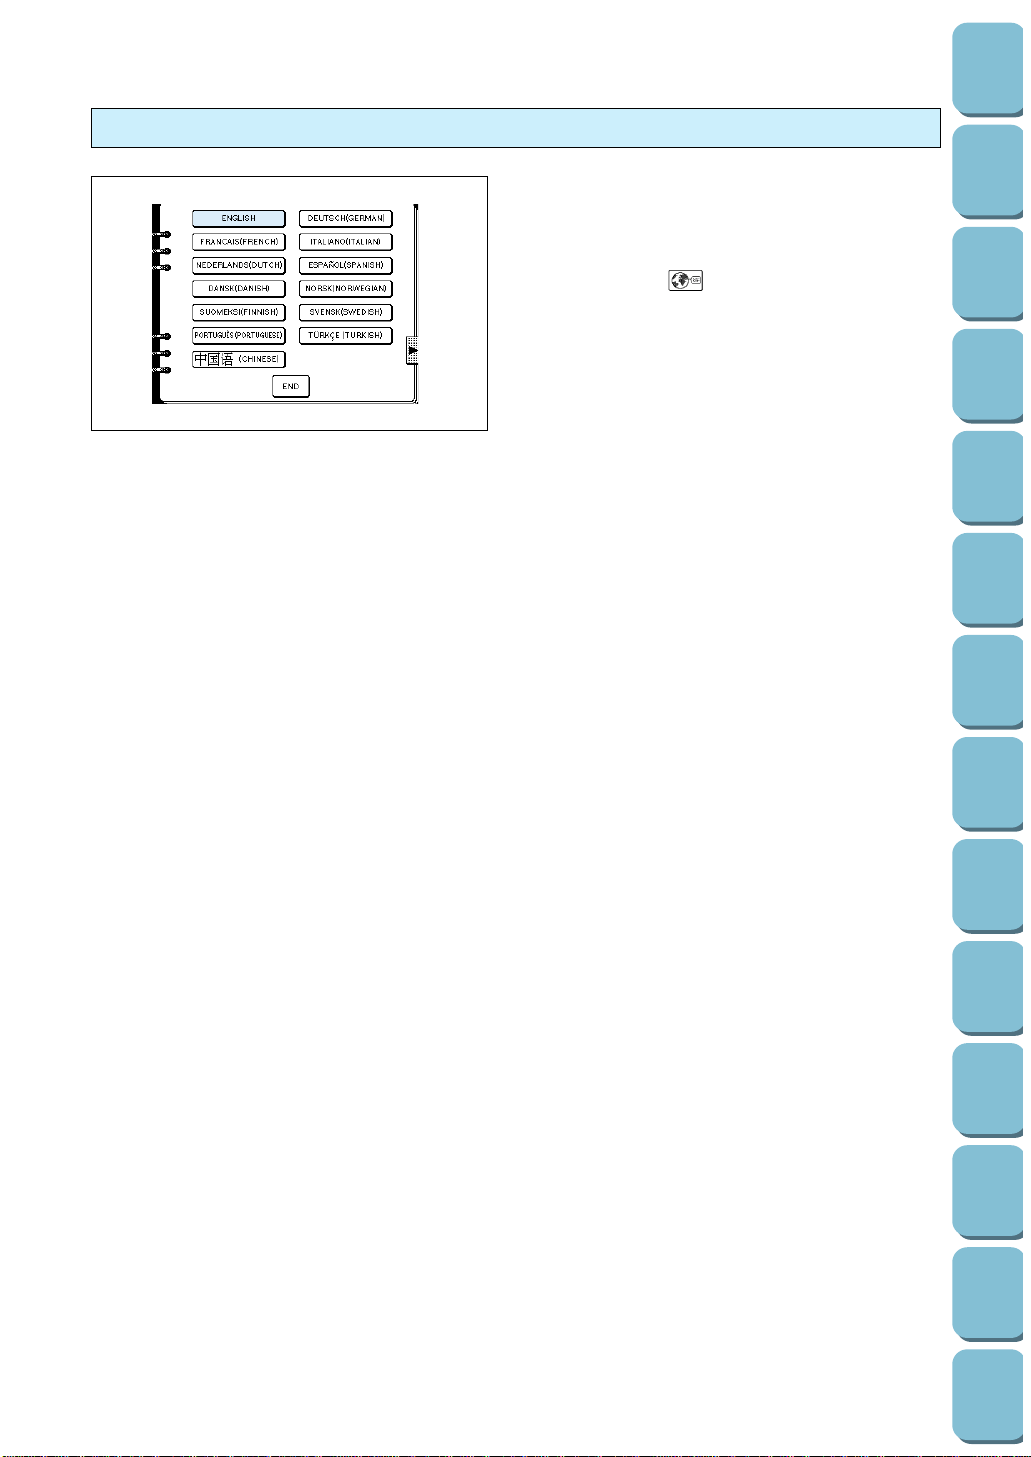
HOW TO USE THE LANGUAGE SELECTION KEY
You can use the “ ” key to easily change the display language for all the keys and
messages on the LCD screen to the language you need.
1. Touch the “OPERATION GUIDE” key.
2. Touch the “ ” key.
3. The language display screen will then appear.
Touch the key which corresponds to the
desired language.
Example: To change the display language to
Spanish
1. Touch the “ ” key.
2. Touch “ESPAÑOL (SPANISH).
This will change the language setting to
Spanish.
3. The display will then return to the screen
which was previously being displayed.
Note
* When the “ ” key is used to set the
display language, error messages will also be
displayed in the language selected.
* The display language can be selected from a
list of 13 languages (English, German,
French, Italian, Dutch, Spanish, Danish,
Norwegian, Finnish, Swedish, Portuguese,
Turkish and Chinese).
15
Utility
Stitches
Characters
and
Decorative
Stitches
Embroidering
Editing
Embroidery
Patterns
Retrieving
My
Custom
Stitch
TM
Maintenance
Error
Messages
Trouble
shooting
Sewing
Chart
Patterns
(Programmed
in Machine)
Patterns
(Memory
Card)
Sewing
Setting Up
How to clear the language selection
Example: To change the display language
from Spanish back to English
1. Touch the “OPERATION GUIDE” key.
2. Touch the “ ” key.
3. Touch the “ENGLISH” key.
This will cancel the Spanish language setting
and return all screen displays and error
messages to the English language.
CAUTION
– This function should not be used as a
translation function.
– If the power supply is turned off, the
current language setting will be retained
and will not be cleared.
Utility
Stitches
Characters
and
Decorative
Stitches
Embroidering
Editing
Embroidery
Patterns
Retrieving
My
Custom
Stitch
TM
Maintenance
Error
Messages
Trouble
shooting
Sewing
Chart
Patterns
(Programmed
in Machine)
Patterns
(Memory
Card)
Sewing
Setting Up
16
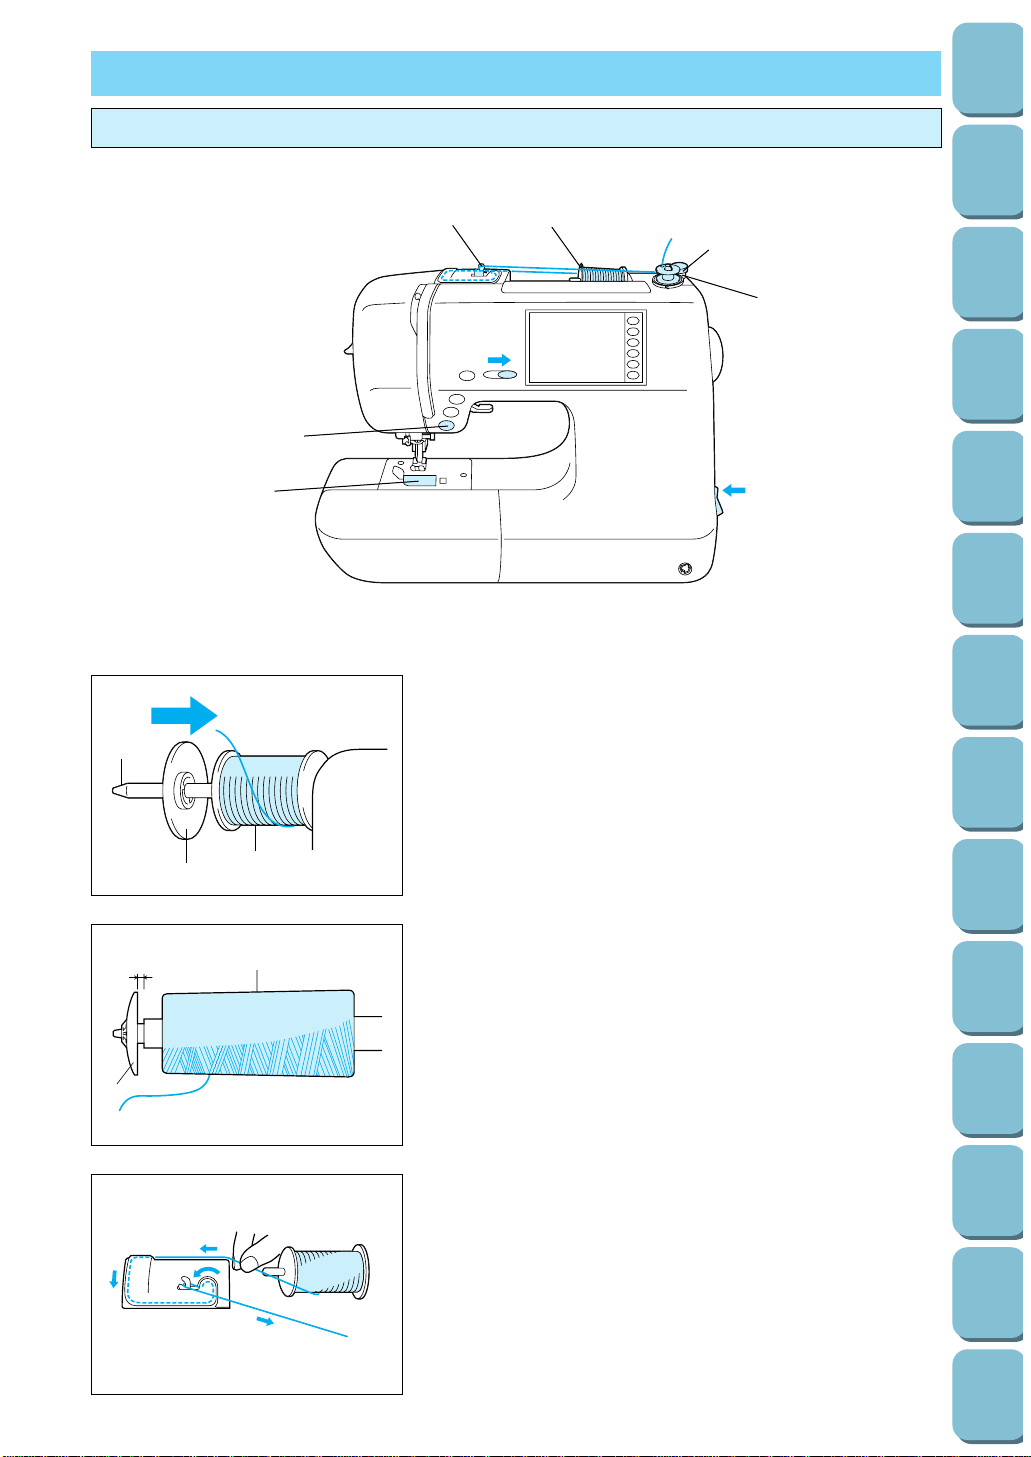
BOBBIN WINDING / BOBBIN THREAD SETTING
Winding the bobbin and setting the bobbin thread
3
7
9
2
5
1
6
4, 8
1
2
3
1
2
3
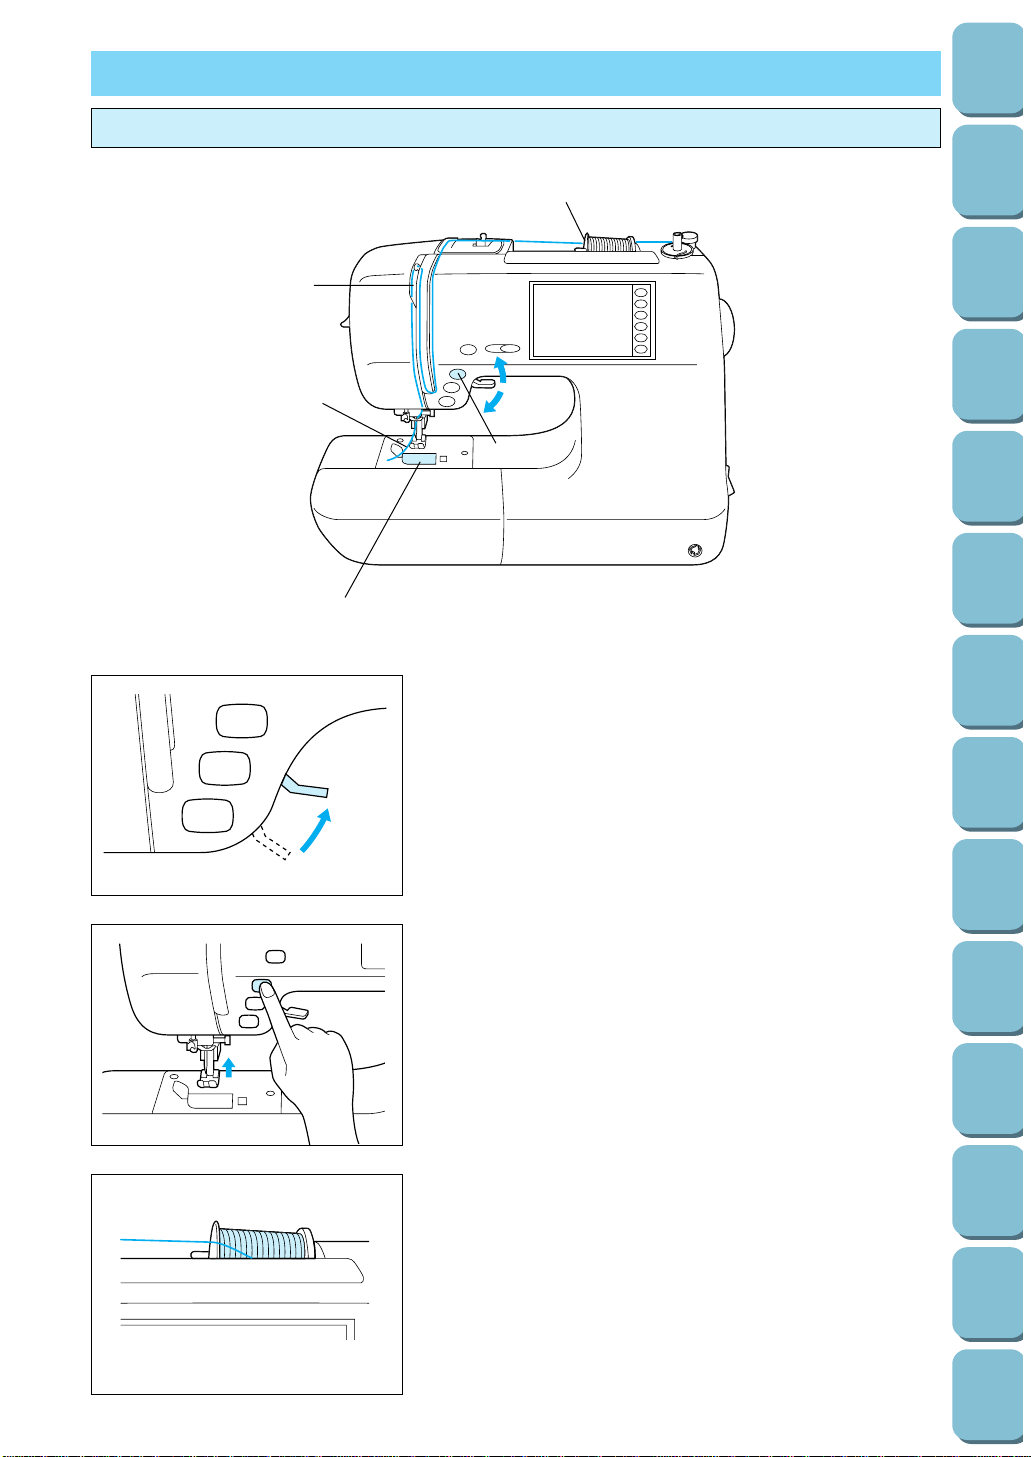
1. Connect the machine to the power supply and turn on the
main power.
2. Place the spool of thread on the spool pin. The thread end
should come from the bottom front of the spool. The spool
cap closest to the thread spool size should be used to hold
the spool securely on the spool pin.
1 Spool cap
2 Spool
3 Spool pin
* The spool cap should be pushed on as far as it will go.
Note
If using a fine thread such as cross wound thread, slightly
separate the spool cap (small) from the spool of thread before
using it.
1 Cross wound thread
2 Spool cap (small)
3 Gap
3. Steady the spool thread in your right hand, take the end of
the thread in your left hand, and pass it through the guides
in the order shown by the numbers.
17
Utility
Stitches
Characters
and
Decorative
Stitches
Embroidering
Editing
Embroidery
Patterns
Retrieving
My
Custom
Stitch
TM
Maintenance
Error
Messages
Trouble
shooting
Sewing
Chart
Patterns
(Programmed
in Machine)
Patterns
(Memory
Card)
Sewing
Setting Up
2
1
2
1
1
1
2
3
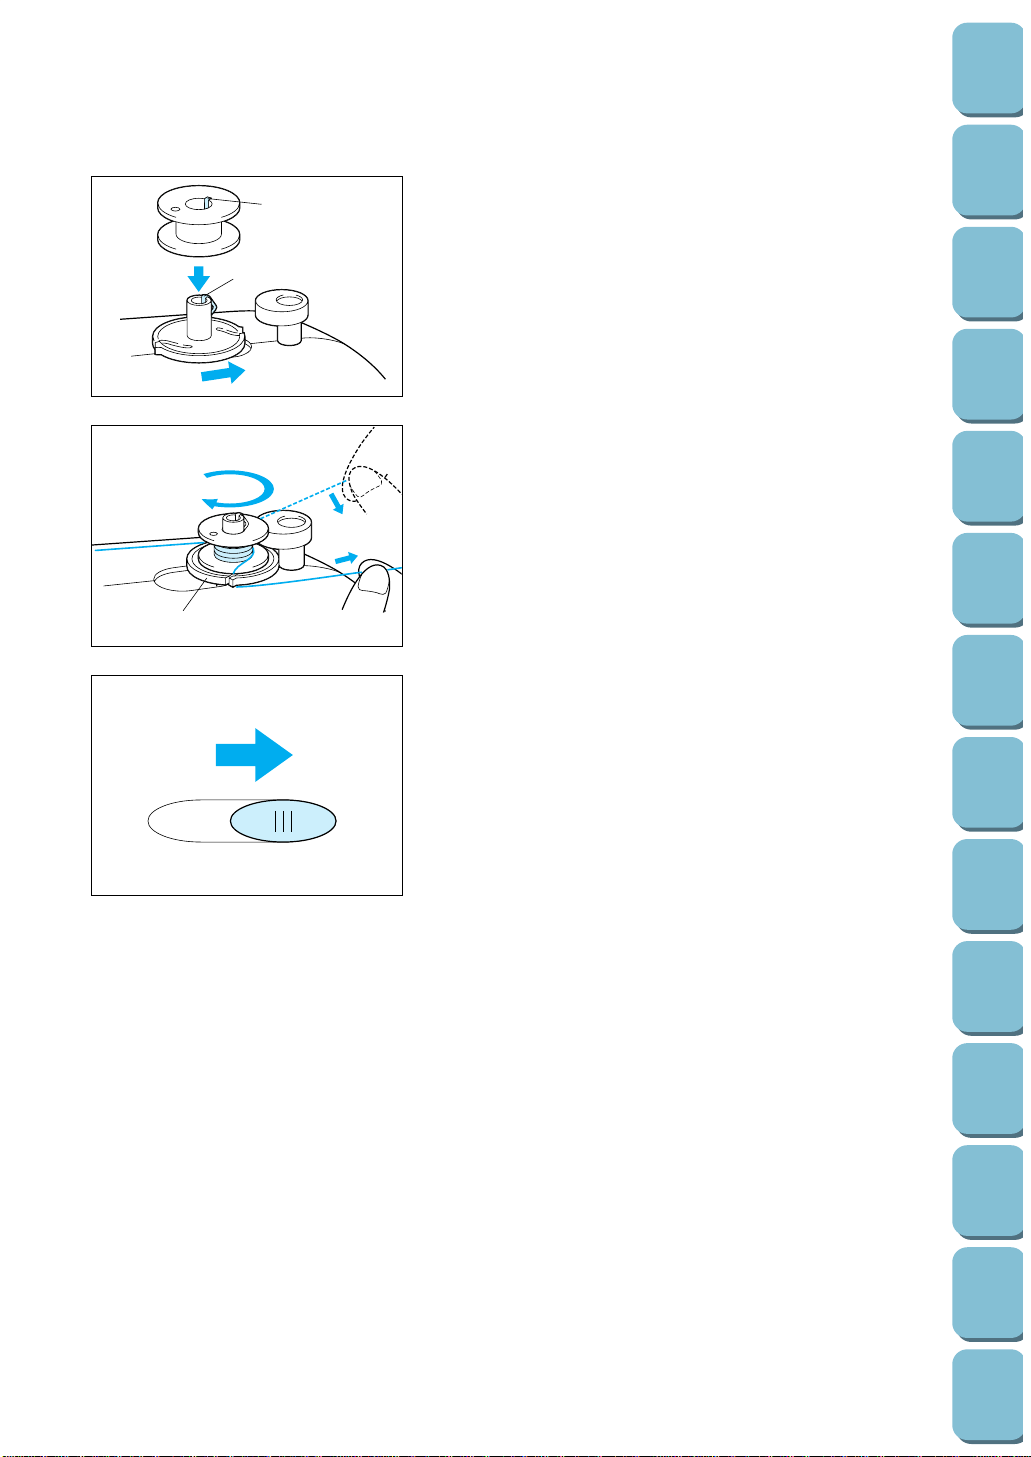
4. Align the groove in the bobbin with the spring on the shaft
and place the bobbin on the bobbin winder shaft. Then,
push the bobbin winder shaft to the right.
1 Spring on the shaft
2 Groove of the bobbin
5. Wind the thread clockwise around the bobbin four or five
times, pass the end of the thread through the slit in the
bobbin winder seat, and then pull the thread in the direction
shown in the illustration. Use the cutter to cut the thread.
1 Bobbin winder seat
6. Slide the speed range control lever to its maximum (as far to
the right as possible).
7. Press the “START/STOP” button. The machine will stop
automatically when the bobbin is full.
8. After the bobbin has stopped moving, press the
“START/STOP” button to stop the machine.
9. Cut the thread, slide the bobbin winder shaft to the left and
remove the bobbin.
Utility
Stitches
Characters
and
Decorative
Stitches
Embroidering
Editing
Embroidery
Patterns
Retrieving
My
Custom
Stitch
TM
Maintenance
Error
Messages
Trouble
shooting
Sewing
Chart
Patterns
(Programmed
in Machine)
Patterns
(Memory
Card)
Sewing
Setting Up
18
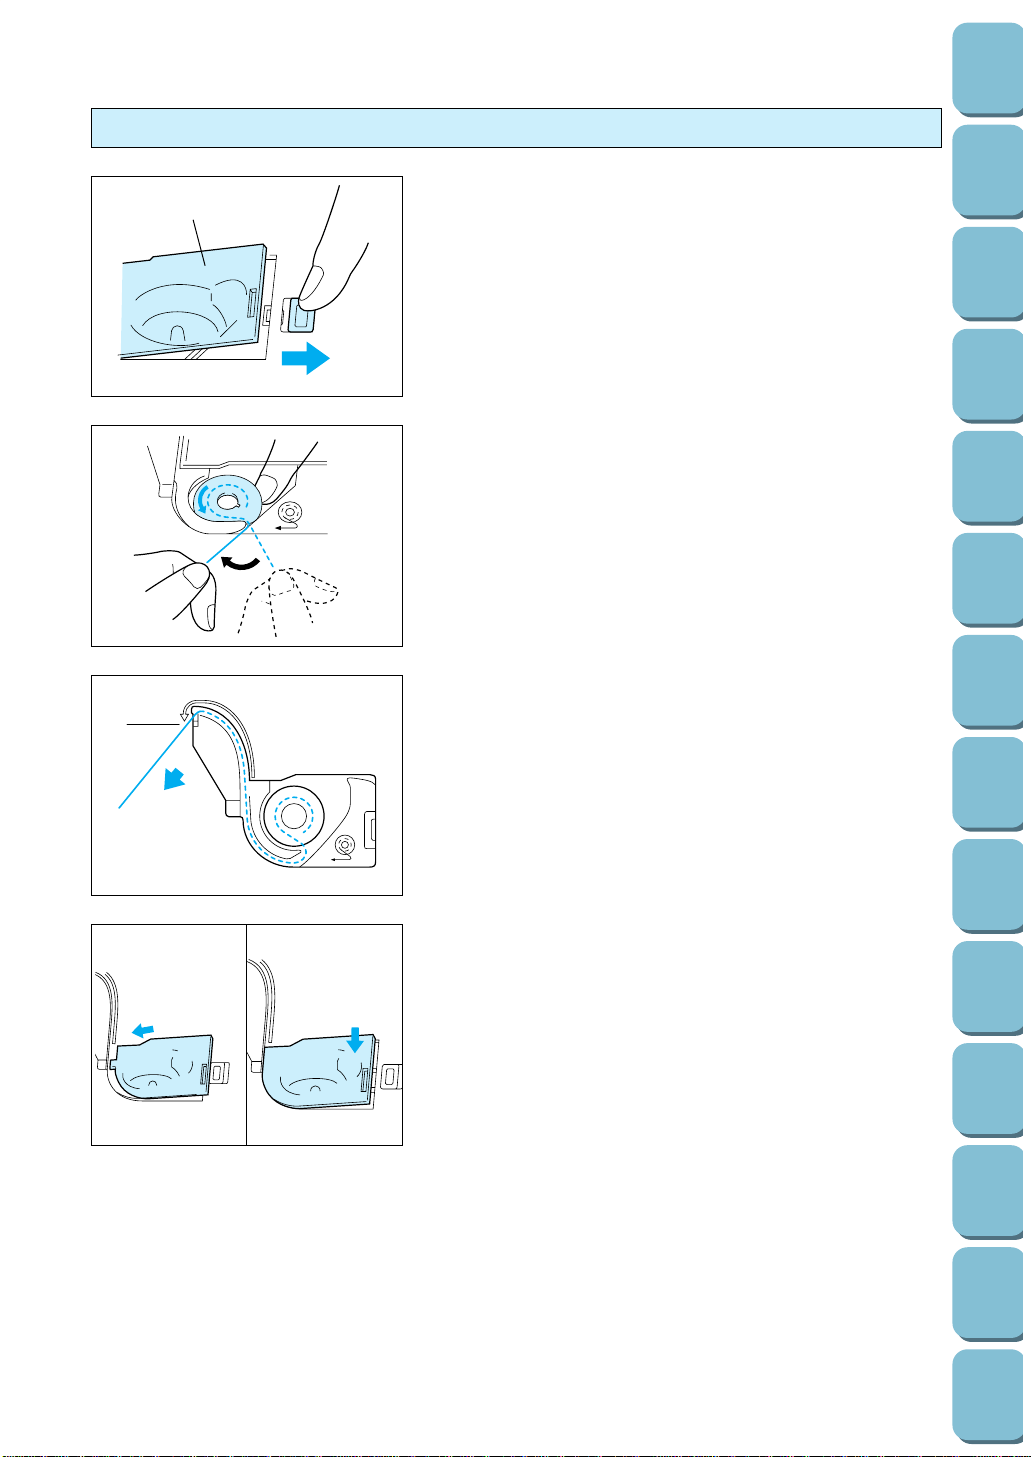
Setting the bobbin
1
2
1
1. Slide open the bobbin cover.
1 Bobbin cover
2 Bobbin cover release button
2. Insert the bobbin into the shuttle with the thread direction as
noted in the diagram.
3. Guide the thread end through the slit, then pull the thread
toward you to cut off any excess thread.
1 Built-in thread cutter
1
2
4. Close the bobbin cover by placing the left end in place and
pressing down lightly on the right end so that it snaps into
place.
* Sewing can begin without pulling out the bobbin thread.
19
Utility
Stitches
Characters
and
Decorative
Stitches
Embroidering
Editing
Embroidery
Patterns
Retrieving
My
Custom
Stitch
TM
Maintenance
Error
Messages
Trouble
shooting
Sewing
Chart
Patterns
(Programmed
in Machine)
Patterns
(Memory
Card)
Sewing
Setting Up
UPPER THREADING
Thread according to number and arrow marks on machine.
4
6
*
3
1
5
2
1. Raise the presser foot lever. (If the presser foot is not
raised, the upper thread cannot be threaded.)
2. Press the “NEEDLE POSITION” button to raise the needle
to the up position.
3. Set the thread spool. The thread end should come from the
bottom front of the spool. The spool cap closest to the
thread spool size should be used to hold the spool securely
on the spool post.
Utility
Stitches
Characters
and
Decorative
Stitches
Embroidering
Editing
Embroidery
Patterns
Retrieving
My
Custom
Stitch
TM
Maintenance
Error
Messages
Trouble
shooting
Sewing
Chart
Patterns
(Programmed
in Machine)
Patterns
(Memory
Card)
Sewing
Setting Up
20
2
1
4
5
4
1
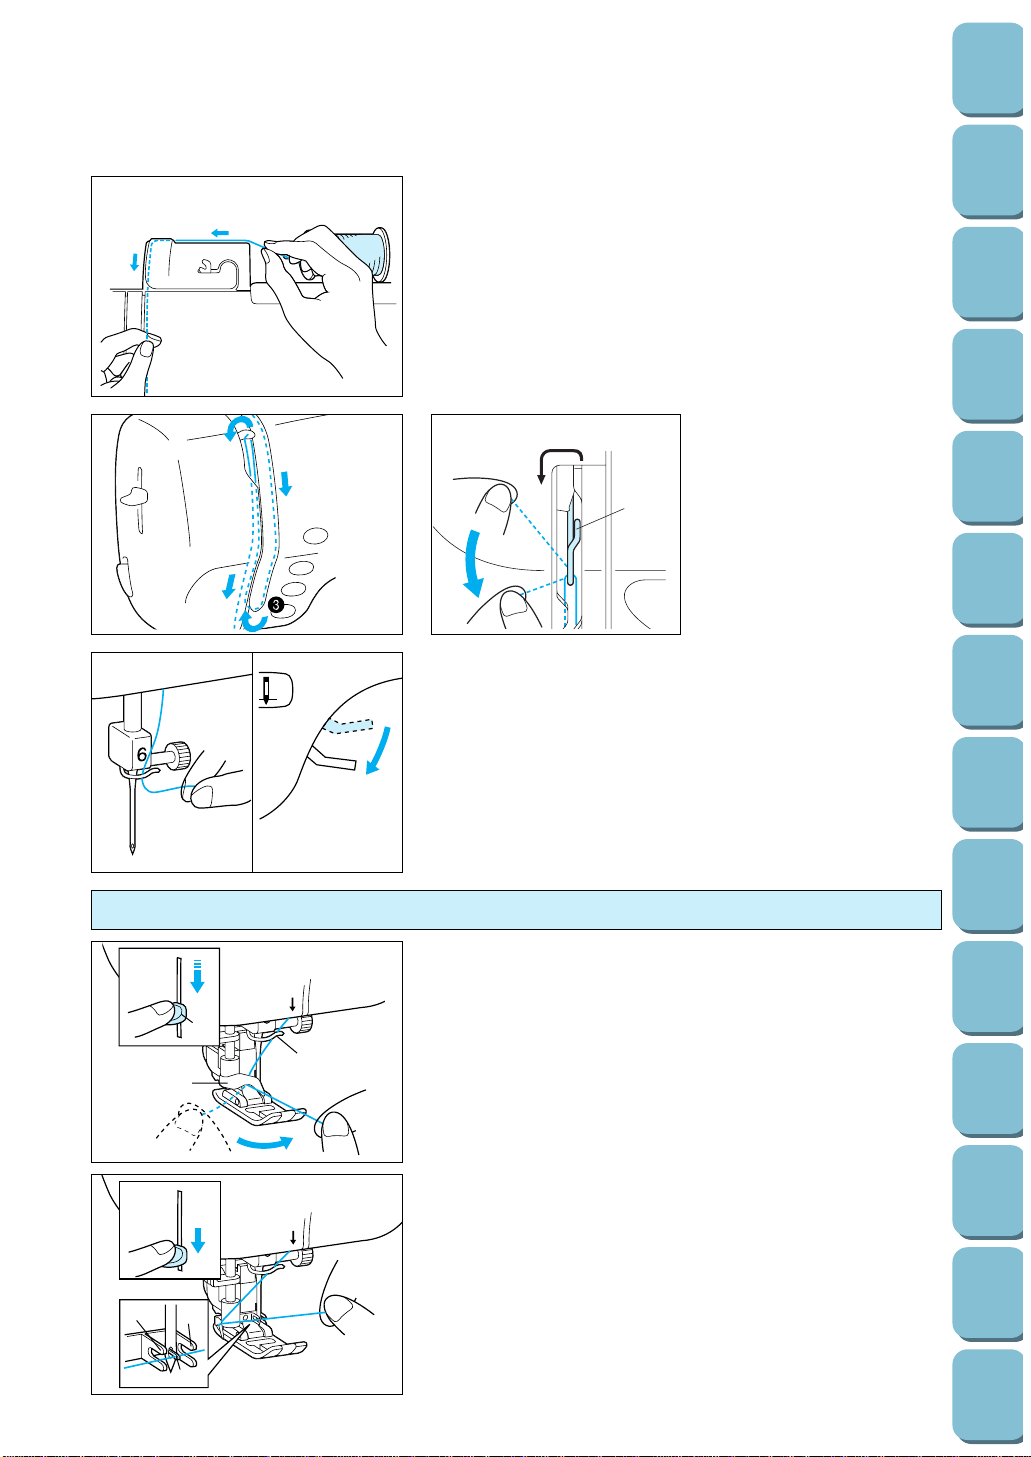
4. Steady the spool thread in your right hand, take the end of
the thread in your left hand, and keep it taut while passing it
through the guides in the order shown by the numbers.
Note
Incorrect threading may cause damage.
5. Lower the presser foot.
6. Thread the needle manually or using the auto-threading
device.
* You do not need to pull the bobbin thread up before you
start sewing.
7. Pass the thread underneath the presser foot and pull it out
from the rear of the machine by about 5 cm.
Note
Always raise the presser foot before removing the upper thread
from the machine or damage may occur to the auto thread
tension unit.
Threading the take-up lever
1 Thread take-up lever
Auto-threading device
5
1
2
3
5
2
11
1. Guide the thread through the wire loop and gently pull the
thread towards you.
1 Needle threader lever
2 Guide (Large hook)
3 Wire loop
* Lowering the presser foot will engage the automatic tension
and will allow you to grip the thread as you proceed.
2. Lower the needle threader lever all the way down using your
left index finger. Check that the thread is held by the guide
(large hook) and that the hook on the needle threader has
passed through the eye of the needle.
1 Second set of hooks
2 Third hook
3. As you lower the needle threader lever drape the thread to
the left and the large hook will catch the thread. When the
needle threader lever is in the lowest position, drape the
thread across the eye of the needle.
Insert the thread firmly to the bottom
of the guide.

21
Utility
Stitches
Characters
and
Decorative
Stitches
Embroidering
Editing
Embroidery
Patterns
Retrieving
My
Custom
Stitch
TM
Maintenance
Error
Messages
Trouble
shooting
Sewing
Chart
Patterns
(Programmed
in Machine)
Patterns
(Memory
Card)
Sewing
Setting Up
5
3
* Rotating your right hand slightly to check that the thread is
engaged.
4. While gently holding the thread, raise the needle threader
lever.
5
5. Pull the thread towards the rear to finish the upper
threading.
6. Pass the thread underneath the presser foot and pull it out
from the rear of the machine by about 5 cm (1-15/16”).
Note
The auto-threading device cannot be used with the
combinations shown at left.
Transparent nylon thread can be used regardless of the chart
providing needle used in 90/14 to 100/16.
Needle Thread (cotton)
65/9 #30, 50, 60
75/11 #30
90/14 #30
100/16 #20
Using the extra spool pin and the net
Extra spool pin
Use when embroidering with metallic thread.
1. Insert the extra spool pin into the end of the bobbin winder shaft.
2. Install the spool felt and the thread spool in that order, and then thread the upper
thread.
1 Insert the extra spool pin into the end of the bobbin winder shaft
2 Spool felt
3 Thread spool
* When setting the thread spool, set it so that the thread winds off from the front of
the spool.
* If using metallic thread, we recommend that you use a 90/14 home sewing
machine needle.
Note
This method keeps the thread from twisting as it comes off the spool pin.
Net
If using special threads which wind quickly off the thread spool, attach a net to the spool before using.
* Cut the net to match the size of the spool.
1 Net
2 Thread spool
3 Spool pin
4 Spool cap
3
1
2
1
2
34
4

Utility
Stitches
Characters
and
Decorative
Stitches
Embroidering
Editing
Embroidery
Patterns
Retrieving
My
Custom
Stitch
TM
Maintenance
Error
Messages
Trouble
shooting
Sewing
Chart
Patterns
(Programmed
in Machine)
Patterns
(Memory
Card)
Sewing
Setting Up
22
START/STOP
“START/STOP” button
1 Place the fabric under the presser foot, lower the presser
foot, and then press the “START/STOP” button. This
machine starts sewing.
* Hold down the “START/STOP” button to sew at a slow
speed.
2. Press the “START/STOP” button to stop this machine.
Foot controller
1
2
Note
Do not allow fabric pieces and dust to collect in the foot
controller. Doing so could cause a fire or an electric shock.
1. With this machine turned off, insert the foot controller plug
into its jack on this machine.
1 Foot controller
2 Foot controller jack
2. Turn on this machine, then slowly depress the foot controller
to start sewing.
* The speed set using the speed range control lever is the
foot controller’s maximum sewing speed.
3. Release the foot controller to stop this machine.
* When the foot controller is being used, the “START/STOP”
button has no effect on the sewing.
Note (For U.S.A. only)
Foot controller: Model J2
This foot controller can be used for this machine model PC-
8500.
23
Utility
Stitches
Characters
and
Decorative
Stitches
Embroidering
Editing
Embroidery
Patterns
Retrieving
My
Custom
Stitch
TM
Maintenance
Error
Messages
Trouble
shooting
Sewing
Chart
Patterns
(Programmed
in Machine)
Patterns
(Memory
Card)
Sewing
Setting Up
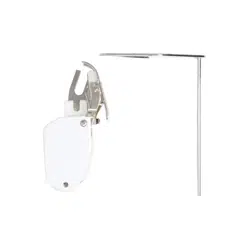
Mounting and Using the Knee Lifter
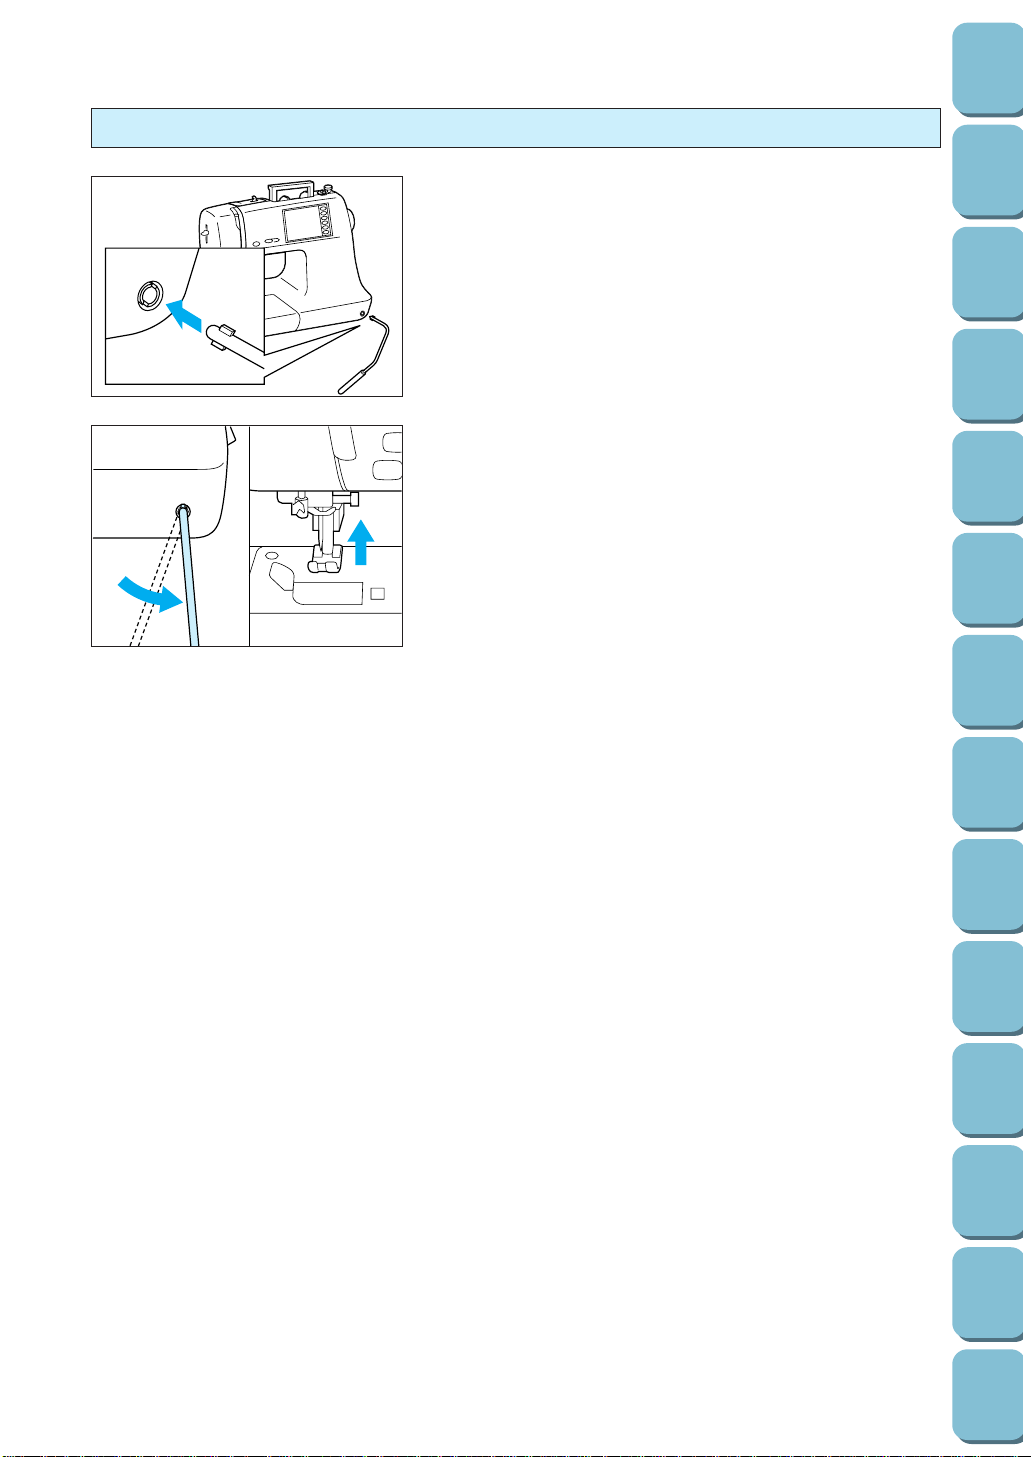
Align the knee lifter with the mounting slot and insert.
Use your knee to raise the knee lifter to the right in order to free
both your hands for other tasks.
24
Utility
Stitches
Characters
and
Decorative
Stitches
Embroidering
Editing
Embroidery
Patterns
Retrieving
My
Custom
Stitch
TM
Maintenance
Error
Messages
Trouble
shooting
Sewing
Chart
Patterns
(Programmed
in Machine)
Patterns
(Memory
Card)
Sewing
Setting Up
STITCH WIDTH AND STITCH LENGTH
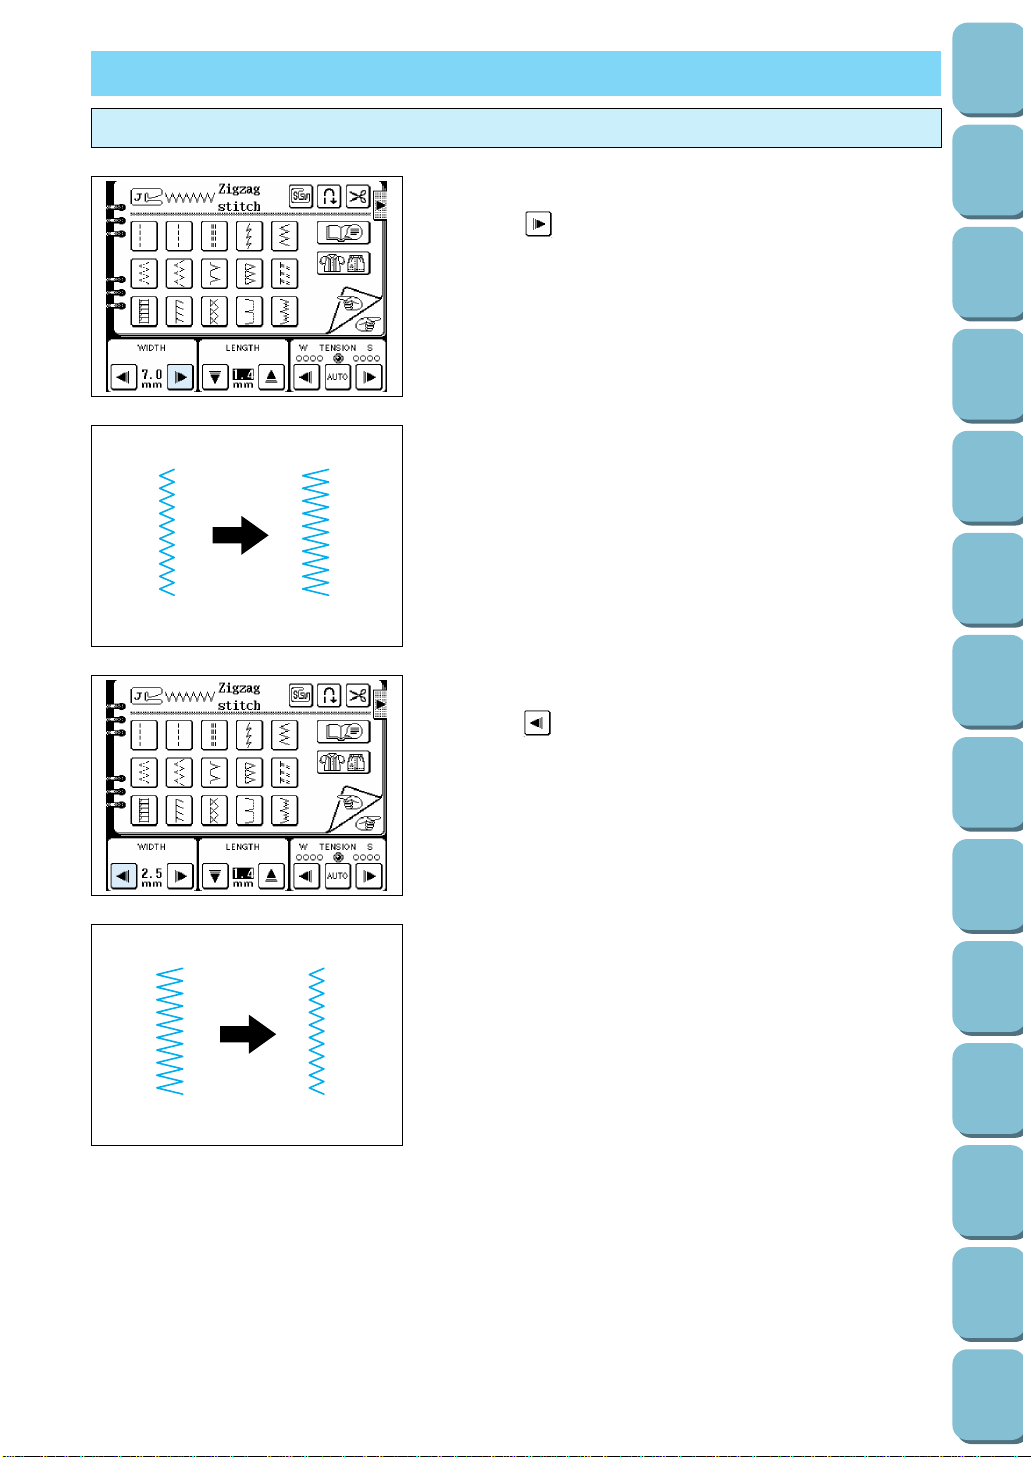
Stitch width
Increasing the stitch width
Touch the “ ” stitch width setting key.
The stitch width setting value will increase each time you touch
the key.
Decreasing the stitch width
Touch the “ ” stitch width setting key.
The stitch width setting value will decrease each time you touch
the key.

Sewing characters and patterns using satin stitches
Touch the “CHARACTER/DECORATIVE STITCH” key from the
selection keys in the right side of the machine. Touch the
“ ” key on the LCD screen.
* If you touch the “CLOSE” key, the display will return to the
previous screen.
Stitch length
Increasing the stitch length
Touch the “ ” stitch length setting key.
The stitch length setting value will increase each time you touch
the key.
25
Utility
Stitches
Characters
and
Decorative
Stitches
Embroidering
Editing
Embroidery
Patterns
Retrieving
My
Custom
Stitch
TM
Maintenance
Error
Messages
Trouble
shooting
Sewing
Chart
Patterns
(Programmed
in Machine)
Patterns
(Memory
Card)
Sewing
Setting Up
26
Utility
Stitches
Characters
and
Decorative
Stitches
Embroidering
Editing
Embroidery
Patterns
Retrieving
My
Custom
Stitch
TM
Maintenance
Error
Messages
Trouble
shooting
Sewing
Chart
Patterns
(Programmed
in Machine)
Patterns
(Memory
Card)
Sewing
Setting Up
Decreasing the stitch length
Touch the “ ” stitch length setting key.
The stitch length setting value will decrease each time you
touch the key.
* When sewing straight stitches, if the fabric thickness is less
than 1 mm, the stitch length is automatically changed to 4.0
mm at the sewing start to prevent gathering, even if you set
the length to 5.0 mm.
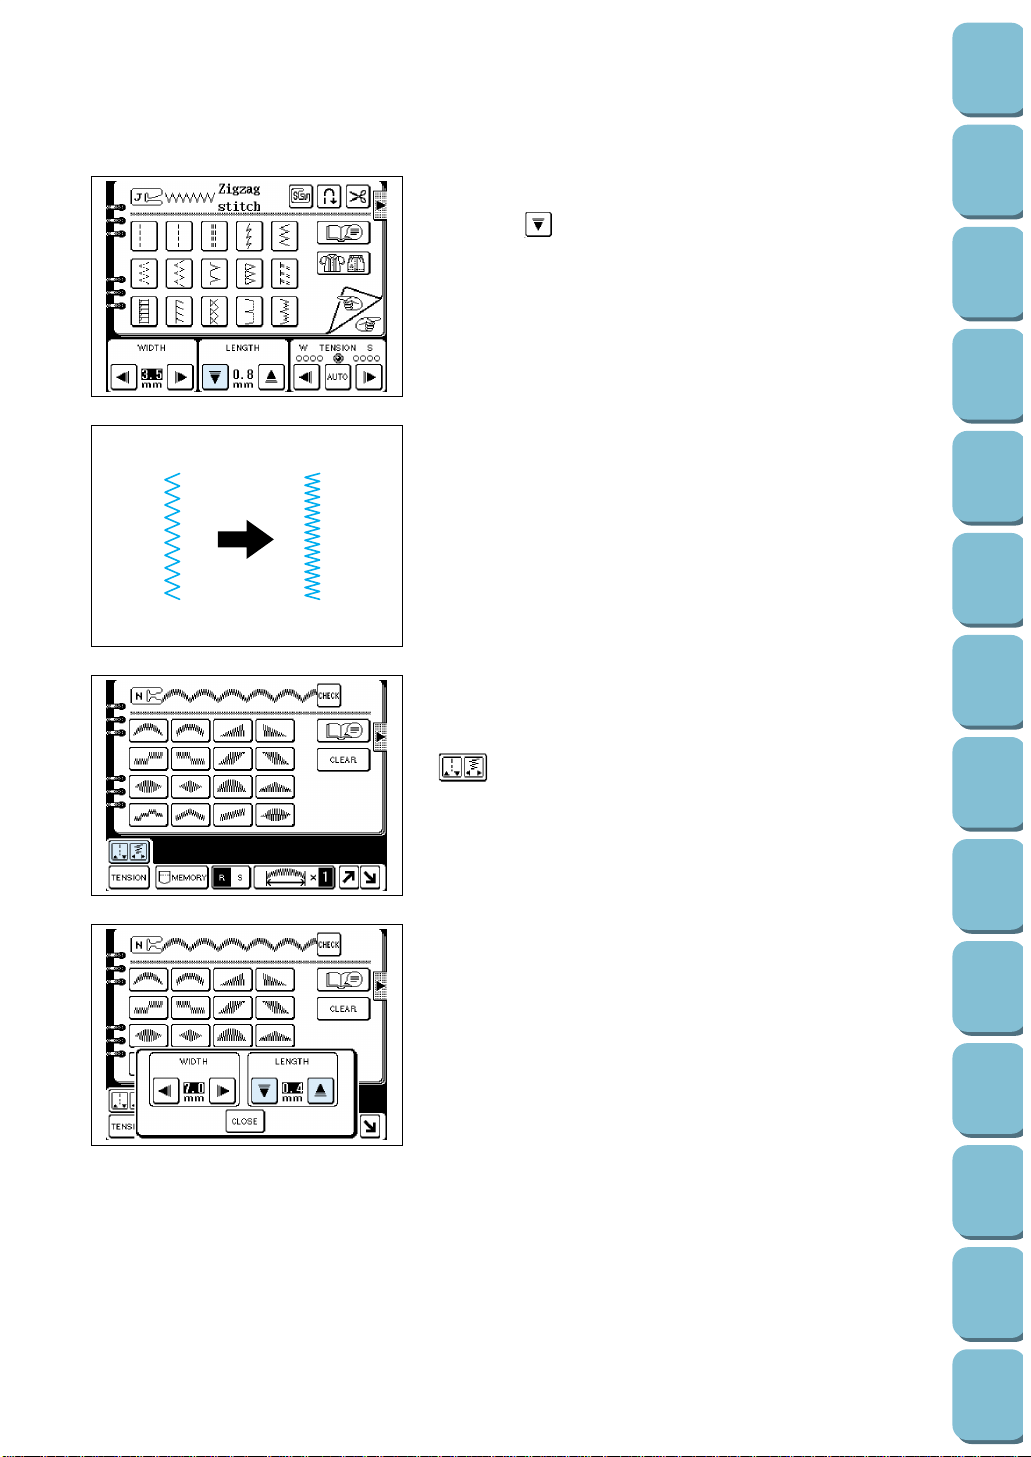
Sewing characters and patterns using satin stitches
Press the “CHARACTER/DECORATIVE STITCH” key from the
selection keys on the right side of the machine. Touch the
“ ” key to adjust.
* If you touch the “CLOSE” key, the display will return to the
previous screen.
7.0 3.0–7.0 0.5 0.3–1.0
(1/4) (1/8–1/4) (1/32) (1/64–1/16)
Darning
7.0 2.5–7.0 2.0 0.4–2.5
(1/4) (3/32–1/4) (1/16) (1/64–1/16)
Bar tack
2.0 1.0–3.0 0.4 0.3–1.0
(1/16) (1/16–1/8) (1/64) (1/64–1/16)
Tape attaching
4.0 0.0–7.0 1.0 0.2–4.0
(3/16) (0.0–1/4) (1/16) (1/61–3/16)
Eyelet
7.0 7.0 6.0 5.0 7.0 7.0 6.0 5.0
(1/4) (1/4–3/16) (1/4) (1/4–3/16)
Button sewing
3.5 2.5–4.5
––
(1/8) (3/32–3/16)
Basting
0.0 0.0–7.0 20 5–30
(0.0) (0–1/4) (13/16)
(3/16–1-3/16)
3.5 2.5–5.0 2.5 1.6–2.5
Applique
(1/8) (3/32–3/16) (3/32) (1/16–3/32)
1.5 0.5–3.5 1.4 0.8–4.0
(1/16) (1/32–1/8) (1/64) (1/16–3/16)
Scallop
5.0 2.5–7.0 0.4 0.1–1.0
(3/16) (3/32–1/4) (1/64) (1/64–1/16)
Smocking stitch
5.0 1.5–7.0 1.6 0.2–4.0
(3/16) (1/16–1/4) (1/16) (1/64–1/16)
5.0 2.5–7.0 2.5 1.0–2.5
(3/16) (3/32–1/4) (3/32) (1/16–3/32)
Patchwork stitch
4.0 0.0–7.0 1.2 0.2–4.0
(1/16) (0.0–1/4) (1/16) (1/64–1/16)
5.0 0.0–7.0 1.2 0.2–4.0
(3/16) (0.0–1/4) (1/16) (1/64–1/16)
5.0 0.0–7.0 2.5 2.5–3.0
Fagoting
(3/16) (0.0–1/4) (3/32) (3/32–1/8)
5.0 2.5–7.0 2.5 1.0–2.5
(3/16) (3/32–1/4) (3/32) (1/16–3/32)
Straight [0.0 0.0–7.0 2.5 0.2–5.0
(Left) (0.0)] (0–1/4) (3/32) (1/64–3/16)
Straight
––
2.5 0.2–5.0
(Middle) (3/32) (1/64–3/16)
[0.0 0.0–7.0 2.5 1.5–2.5
Stretch stitch
(0.0)] (0–1/4) (3/32) (1/16–3/32)
1.0 1.0–3.0 2.5 1.0–4.0
(1/16) (1/16–1/8) (3/32) (1/16–3/16)
Zigzag
3.5 0.0–7.0 1.4 0.0–4.0
(1/8) (0–1/4) (1/16) (0–3/16)
5.0 1.5–7.0 1.0 0.2–4.0
Elastic zigzag
(3/16) (1/16–1/4) (1/16) (1/64–1/16)
5.0 1.5–7.0 1.0 0.2–4.0
(3/16) (1/16–1/4) (1/16) (1/64–1/16)
3.5 2.5–5.0 2.0 1.0–4.0
(1/8) (3/32–3/16) (1/16) (1/16–3/16)
5.0 2.5–5.0 2.5 1.0–4.0
(3/16) (3/32–3/16) (3/32) (1/16–3/16)
5.0 0.0–7.0 2.5 0.5–3.0
Overcasting
(3/16) (0.0–1/4) (3/32) (1/32–1/8)
5.0 3.5–5.0 2.5 1.0–4.0
(3/16) (1/8–3/16) (3/32) (1/16–3/16)
5.0 0.0–7.0 2.5 0.5–3.0
(3/16) (0.0–1/4) (3/32) (1/32–1/8)
4.0 0.0–7.0 4.0 1.0–4.0
(3/16) (0.0–1/4) (3/16) (1/16–3/16)
0.0 +3 – –3 2.0 1.0–3.5
Blind hem stitch
(0.0) (1/16) (1/16–1/8)
5.0 3.0–5.0 0.4 0.2–1.0
(3/16) (1/8–3/16) (1/64) (1/64–1/16)
5.0 3.0–5.0 0.4 0.2–1.0
(3/16) (1/8–3/16) (1/64) (1/64–1/16)
5.0 3.0–5.0 0.4 0.2–1.0
(3/16) (1/8–3/10) (1/64) (1/64–1/10)
Buttonhole 5.0 3.0–5.0 0.4 0.2–1.0
(3/16) (1/8–3/16) (1/64) (1/64–1/16)
6.0 3.0–6.0 1.0 0.5–2.0
(1/4) (1/8–1/4) (1/16) (1/32–1/16)
6.0 3.0–6.0 1.5 1.0–3.0
(1/4) (1/8–1/4) (1/16) (1/16–1/8)
5.0 0.0–6.0 2.0 0.2–5.0
(3/16) (0.0–1/4) (1/10) (1/64–3/16)
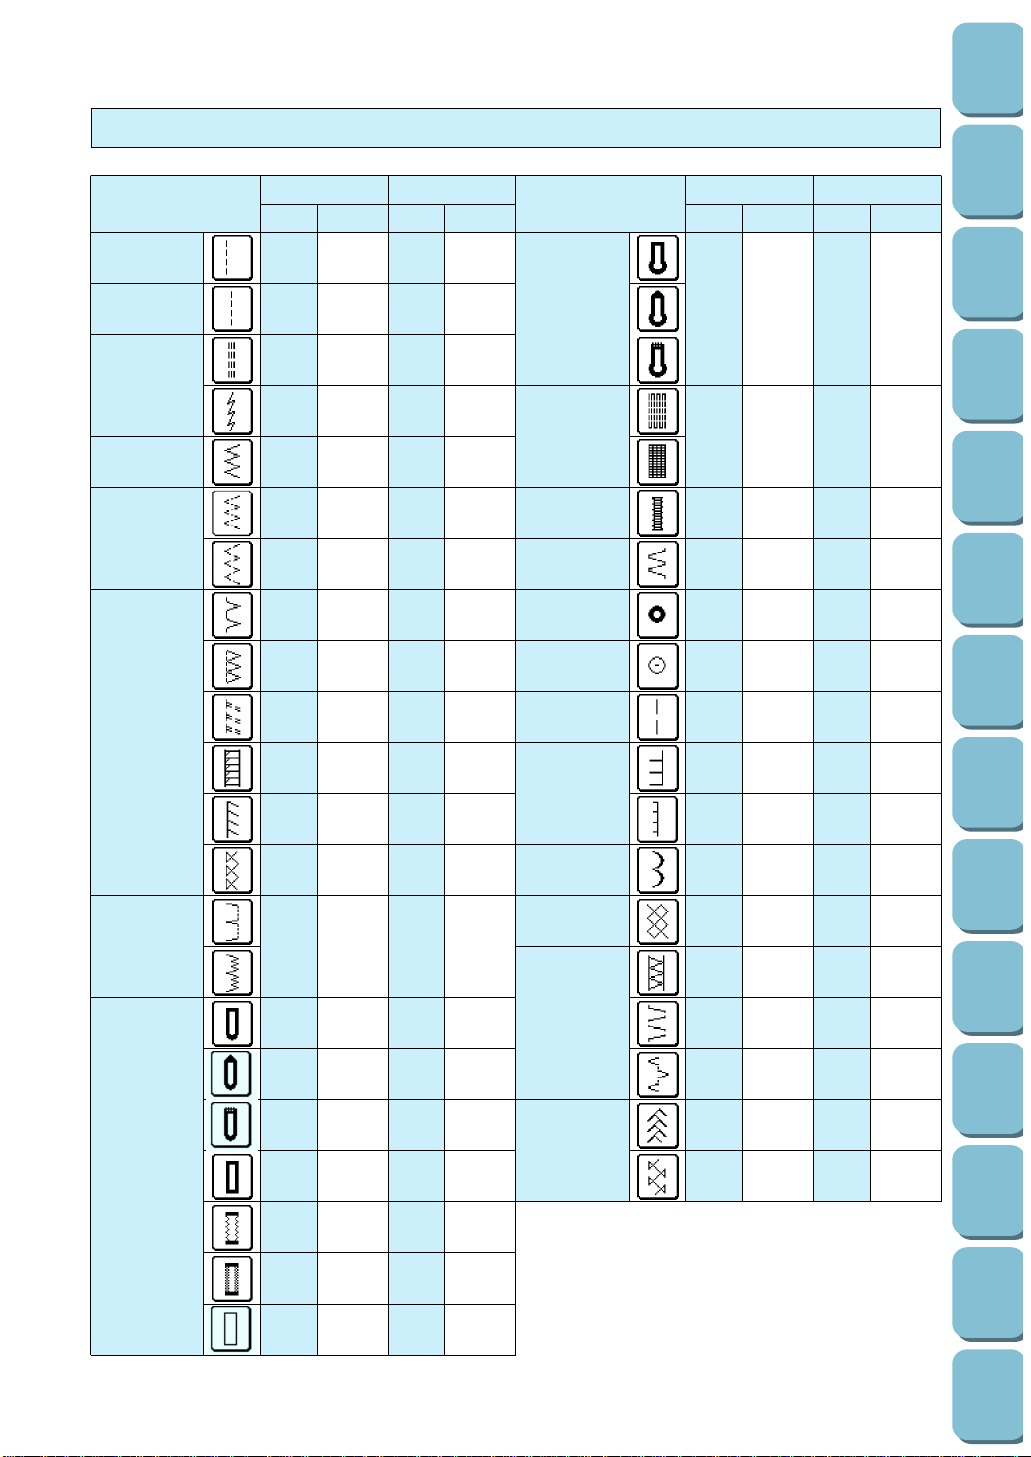
Quick adjustment reference chart for stitch width and stitch length
STITCH
Stitch width [mm (inch.)] Stitch length [mm (inch.)]
Auto. Manual Auto. Manual
STITCH
Stitch width [mm (inch.)] Stitch length [mm (inch.)]
Auto. Manual Auto. Manual
27
Utility
Stitches
Characters
and
Decorative
Stitches
Embroidering
Editing
Embroidery
Patterns
Retrieving
My
Custom
Stitch
TM
Maintenance
Error
Messages
Trouble
shooting
Sewing
Chart
Patterns
(Programmed
in Machine)
Patterns
(Memory
Card)
Sewing
Setting Up

28
Utility
Stitches
Characters
and
Decorative
Stitches
Embroidering
Editing
Embroidery
Patterns
Retrieving
My
Custom
Stitch
TM
Maintenance
Error
Messages
Trouble
shooting
Sewing
Chart
Patterns
(Programmed
in Machine)
Patterns
(Memory
Card)
Sewing
Setting Up
STITCH
Stitch width [mm (inch.)] Stitch length [mm (inch.)]
Auto. Manual Auto. Manual
4.0 0.0–7.0 2.5 1.0–4.0
(3/16) (0.0–1/4) (3/32) (1/16–3/16)
4.0 0.0–7.0 3.0 2.0–4.0
(3/16) (0.0–1/4) (1/8) (1/16–3/16)
5.5 0.0–7.0 1.6 1.0–4.0
Decorative stitch
(3/16) (0.0–1/4) (1/16) (1/16–3/16)
3.5 0.0–7.0 1.6 0.2–4.0
(1/8) (0.0–1/4) (1/16) (1/64–1/16)
0.0 0.0–7.0 2.5 1.0–4.0
(0) (0.0–1/4) (3/32) (1/16–3/16)
5.0 1.5–7.0 1.0 0.2–4.0
(3/16) (1/16–1/4) (1/16) (1/64–3/16)
––––
––––
––––
Lateral sewing
––––
(Straight)
––––
––––
––––
––––
Lateral sewing
––––
(Zigzag)
––––
6.0 1.5–7.0 2.5 1.5–4.0
(1/4) (1/16–1/4) (3/32) (1/16–3/16)
5.0 2.0–7.0 1.6 1.0–4.0
(3/16) (1/16–1/4) (1/16) (1/16–3/16)
Heirloom
5.0 1.5–7.0 4.0 1.5–4.0
(3/16) (1/16–1/4) (3/16) (1/16–3/16)
3.5 1.5–7.0 3.0 1.6–4.0
(1/8) (1/16–1/4) (1/8) (1/16–3/16)
5.0 3.0–7.0 3.5 2.0–4.0
(3/16) (1/8–1/4) (1/8) (1/16–3/16)
*–: Non-adjustable
THREAD TENSION
Correct tension
3
4
1
2
1 Reverse side
2 Surface
3 Upper thread
4 Bobbin thread
* Thread tension is automatically set to the
most appropriate point irrespective of the
chosen fabric and thread.
* Correct tension is important because too
much or too little tension will weaken your
seams or cause your fabric to pucker.
Loosen tension by touching “ ” (Weak).
Touch the “ ” thread tension setting key.
The thread tension value will decrease (become
weaker).
1
4
2
3
1 Bobbin thread
2 Upper thread
3 Surface
4 Locks appear on surface of fabric.
29
Utility
Stitches
Characters
and
Decorative
Stitches
Embroidering
Editing
Embroidery
Patterns
Retrieving
My
Custom
Stitch
TM
Maintenance
Error
Messages
Trouble
shooting
Sewing
Chart
Patterns
(Programmed
in Machine)
Patterns
(Memory
Card)
Sewing
Setting Up

30
Utility
Stitches
Characters
and
Decorative
Stitches
Embroidering
Editing
Embroidery
Patterns
Retrieving
My
Custom
Stitch
TM
Maintenance
Error
Messages
Trouble
shooting
Sewing
Chart
Patterns
(Programmed
in Machine)
Patterns
(Memory
Card)
Sewing
Setting Up
Tighten tension by touching “ ” (Strong).
Touch the “ ” thread tension setting key.
The thread tension value will increase (become
stronger).
Except “UTILITY STITCH”
1. Touch the “TENSION” key.
2. Change the upper thread tension.
* If you touch the “CLOSE” key, the display will
return to the previous screen.
1
2
4
3
1 Upper thread
2 Bobbin thread
3 Reverse side
4 Locks appears on reverse side of fabric.
CHANGING THE PRESSER FOOT
Change the presser foot according to the LCD message
1
2
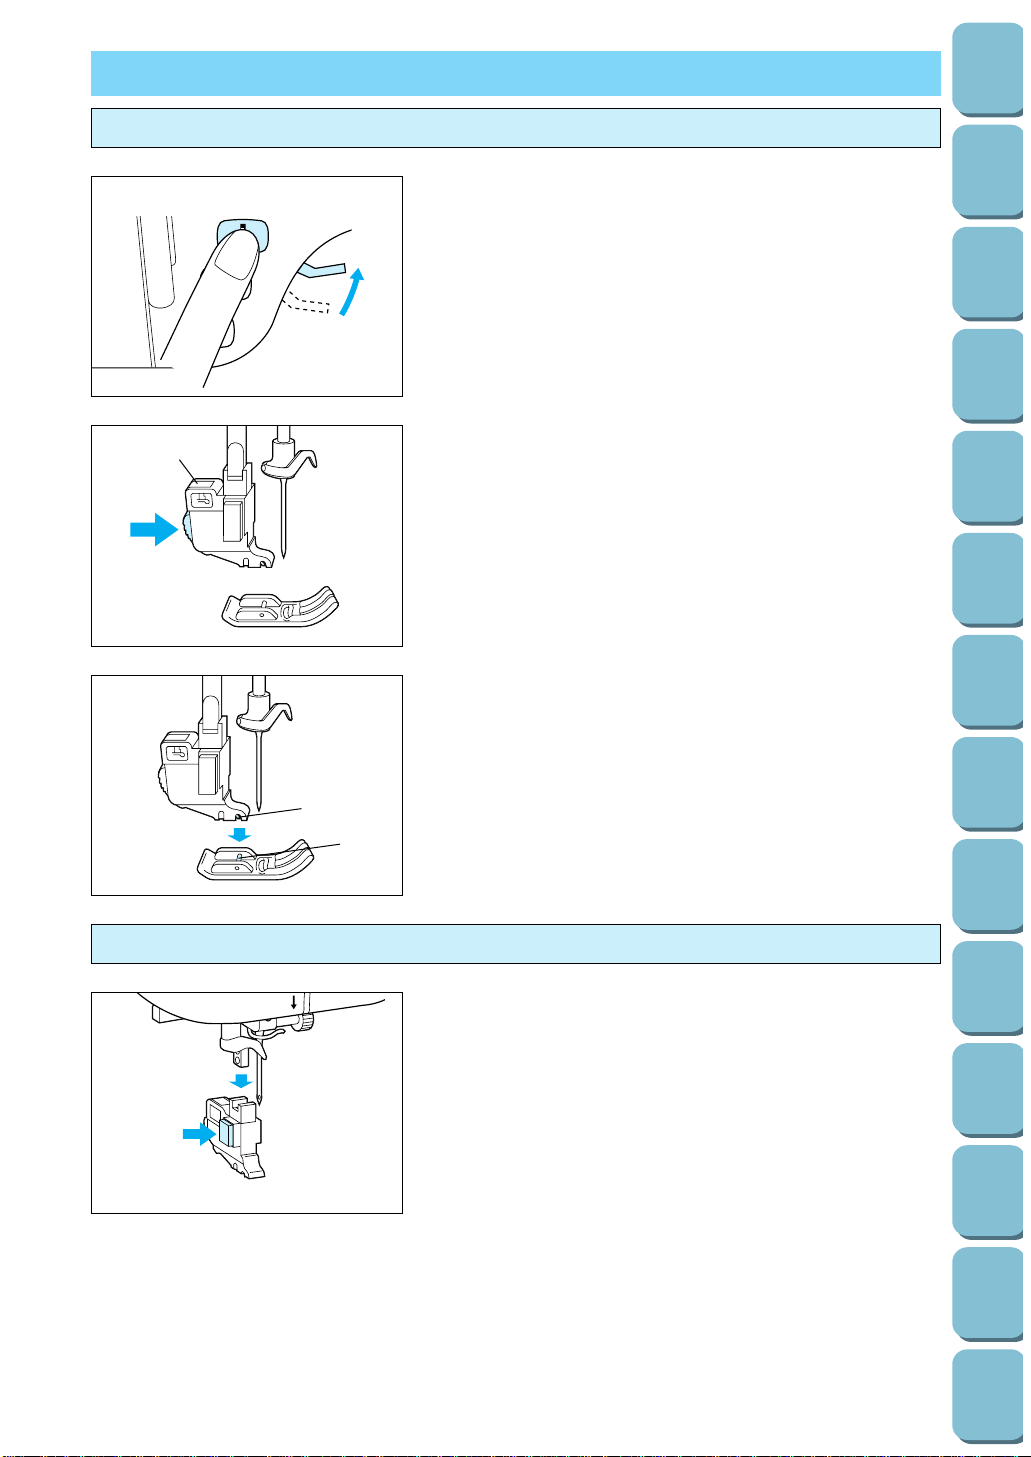
1. Push the “NEEDLE POSITION” button to raise the needle,
and then turn off the power.
2. Raise the presser foot lever.
Installing embroidery foot “Q”
5
1. Push the “NEEDLE POSITION” button to raise the needle,
and then turn off the power.
2. Raise the presser foot lever.
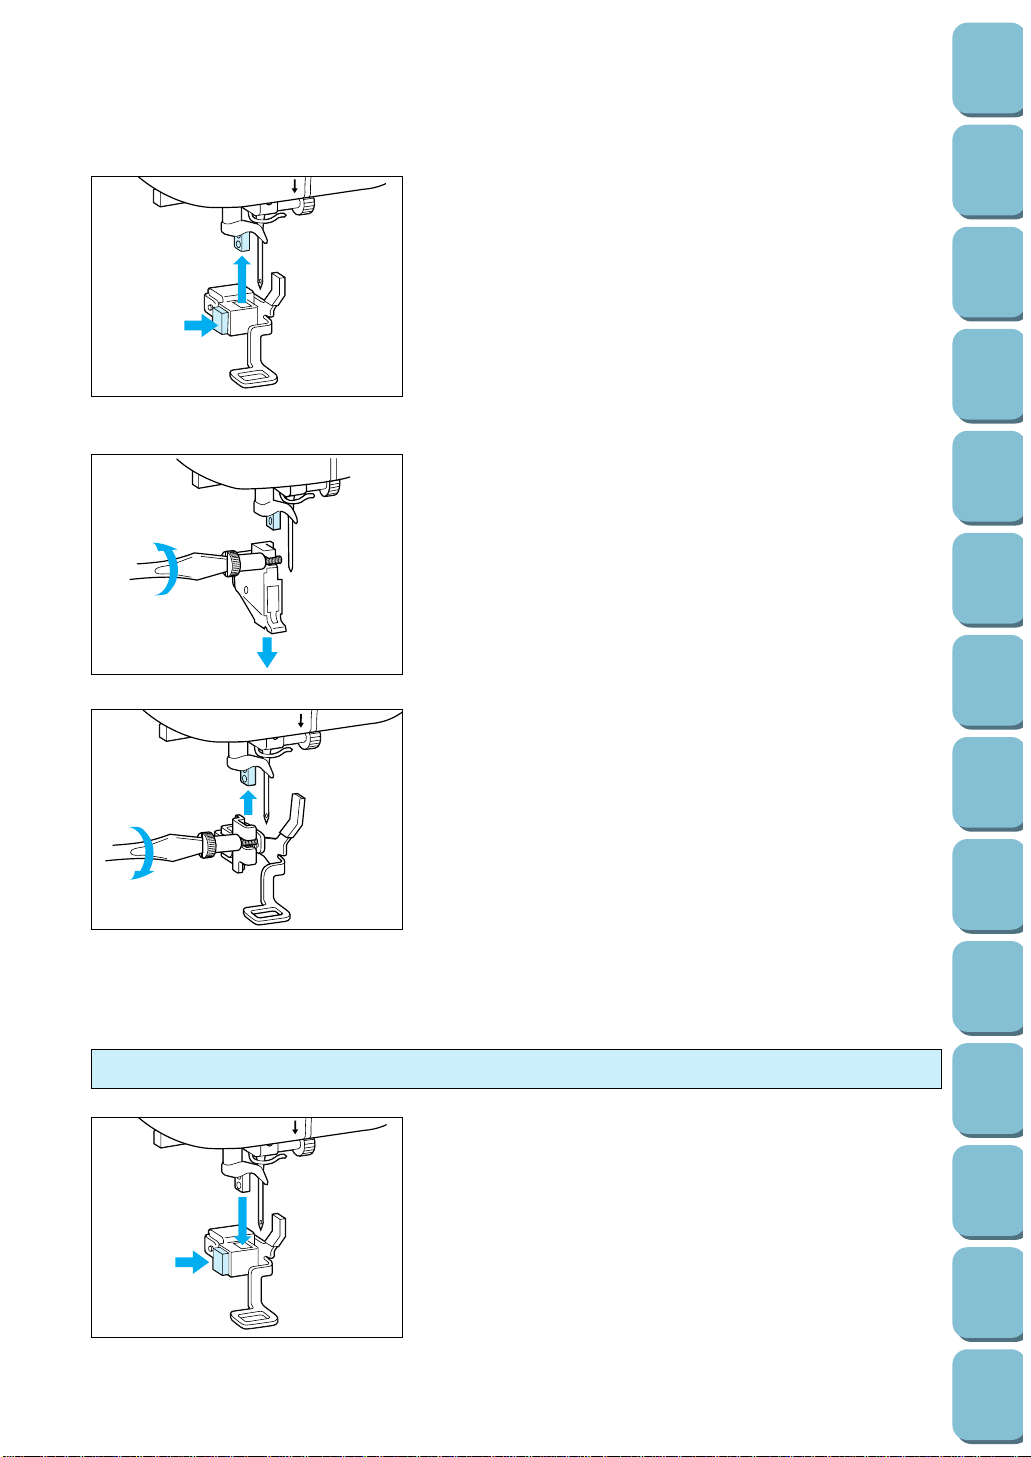
3. While pressing the black button to the left of the presser foot
holder, pull the presser foot holder downward to remove it.
1
3. Press the black button located at the back of the presser
foot holder to release the foot.
1 Presser foot holder
1
2
4. Place the presser foot pin directly below the holder-end and
lower the presser foot lever.
1 Holder-end
2 Foot pin
31
Utility
Stitches
Characters
and
Decorative
Stitches
Embroidering
Editing
Embroidery
Patterns
Retrieving
My
Custom
Stitch
TM
Maintenance
Error
Messages
Trouble
shooting
Sewing
Chart
Patterns
(Programmed
in Machine)
Patterns
(Memory
Card)
Sewing
Setting Up
32
Utility
Stitches
Characters
and
Decorative
Stitches
Embroidering
Editing
Embroidery
Patterns
Retrieving
My
Custom
Stitch
TM
Maintenance
Error
Messages
Trouble
shooting
Sewing
Chart
Patterns
(Programmed
in Machine)
Patterns
(Memory
Card)
Sewing
Setting Up
5
4. Raise the presser foot lever to the highest position. While
pressing the black button to the left of the embroidery foot
“Q”, push embroidery foot “Q” upward with both hands as far
as it will go to install it.
CAUTION
Be careful not to touch the needle during this time,
otherwise injury may result.
1. Press the “NEEDLE POSITION” button to raise the needle,
and then turn off the power.
2. Raise the presser foot lever.
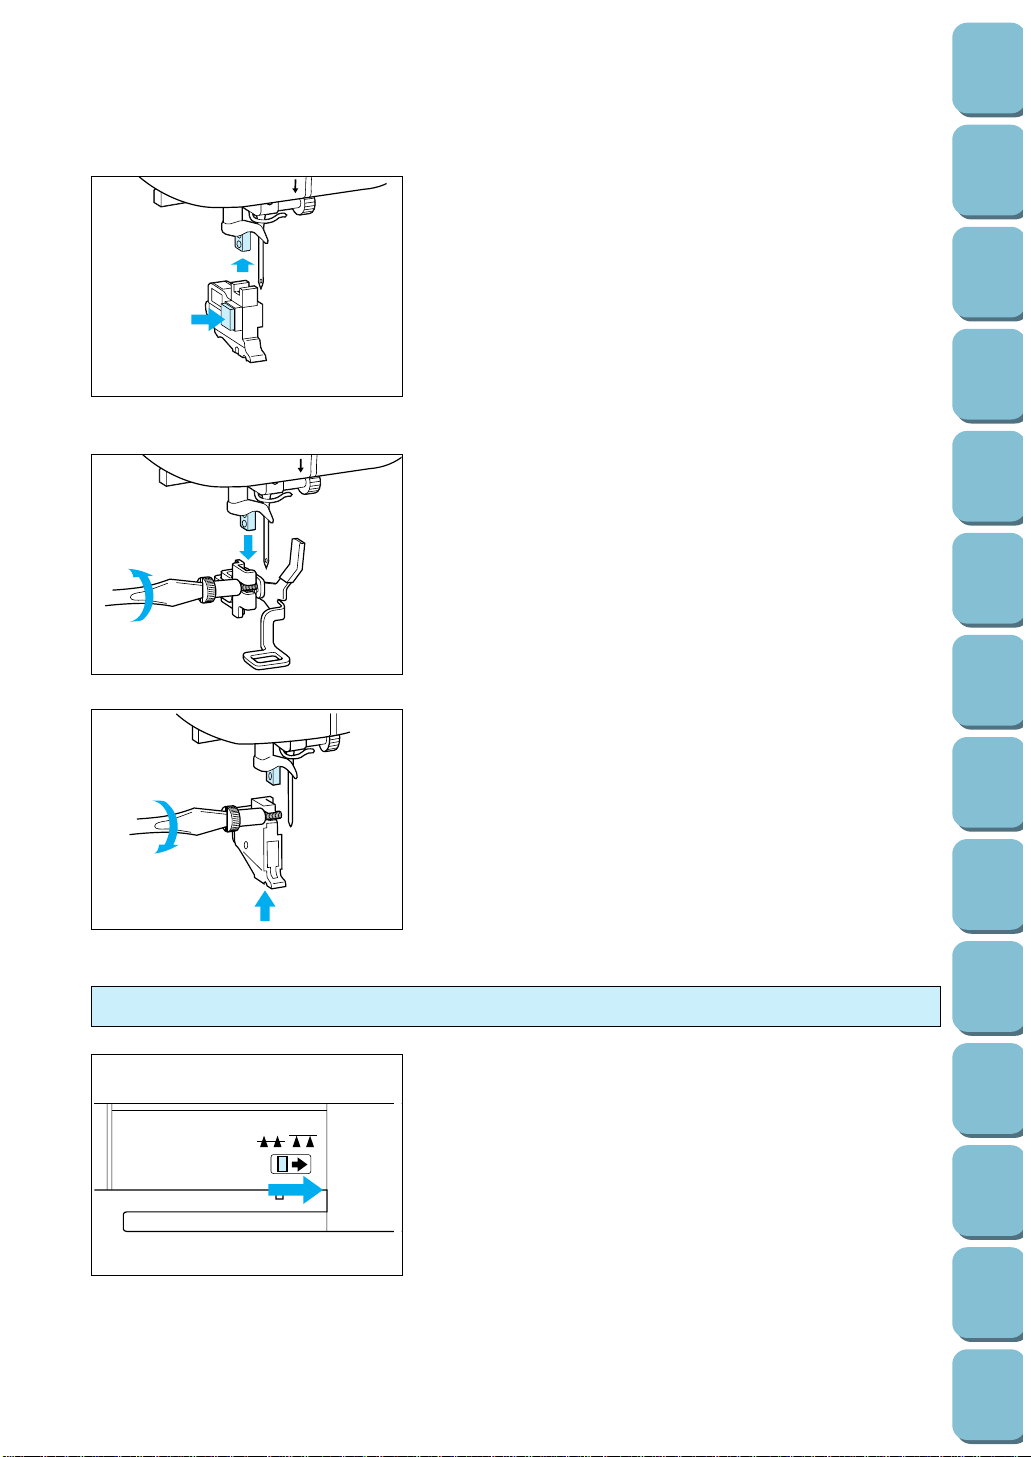
3. Loosen the screw to remove the presser foot holder.
5
4. Attach the embroidery foot “Q”.
5. Set arm of embroidery foot “Q” on needle bar, use the metal
disk provided with your machine (accessory #14 on page 7)
or a screwdriver to tighten the screw firmly.
CAUTION
Be careful not to touch the needle during this time,
otherwise injury may result.
NOTE
– Make sure that there is no gap between the needle bar and
embroidery foot “Q”.
– It is recommended that a 90/14 needle should be used
when embroidering on thicker fabrics or stabilizing products.
(for example denim, puffy foam . .) A 75/11 needle might be
bent or broken, which could result in injury.
5
1. Raise the presser foot lever to the highest position. While
pressing the black button to the left of embroidery foot “Q”,
pull embroidery foot “Q” downward to remove it.
Changing the embroidery foot
Optional
5
2. While pressing the black button to the left of the presser foot
holder, push the presser foot holder upward with both hands
as far as it will go to install it.
CAUTION
Be careful not to touch the needle during this time,
otherwise injury may result.
5
1. Press the “NEEDLE POSITION” button to raise the needle,
and then turn off the power.
2. Raise the presser foot lever.
3. Loosen the screw to remove the embroidery foot “Q”.
4. With the presser foot lever raised, tighten the screw lightly to
attach the presser foot holder.
5. Lower the presser foot lever and use the metal disk
provided with your machine (accessory #14 on page 7) or a
screwdriver to tighten the screw firmly.
CAUTION
Be careful not to touch the needle during this time,
otherwise injury may result.
NOTE
– If the presser foot is not installed correctly, the thread
tension may loosen due to improper presser foot height.
With the accessory compartment off the machine, the feed dog
adjustment lever can be seen on the base of the machine.
Sliding the lever to the right will lower the feed dogs. Feed dogs
are lowered during button sewing as well.
If you are continuing to sew, slide the lever to the left and the
feed dogs will raise.
* When the embroidery unit is on to the machine, the feed
dogs drop automatically.
Feed dog adjustment
33
Utility
Stitches
Characters
and
Decorative
Stitches
Embroidering
Editing
Embroidery
Patterns
Retrieving
My
Custom
Stitch
TM
Maintenance
Error
Messages
Trouble
shooting
Sewing
Chart
Patterns
(Programmed
in Machine)
Patterns
(Memory
Card)
Sewing
Setting Up
Optional
34
Utility
Stitches
Characters
and
Decorative
Stitches
Embroidering
Editing
Embroidery
Patterns
Retrieving
My
Custom
Stitch
TM
Maintenance
Error
Messages
Trouble
shooting
Sewing
Chart
Patterns
(Programmed
in Machine)
Patterns
(Memory
Card)
Sewing
Setting Up
CHANGING THE NEEDLE
Setting the needle securely
6
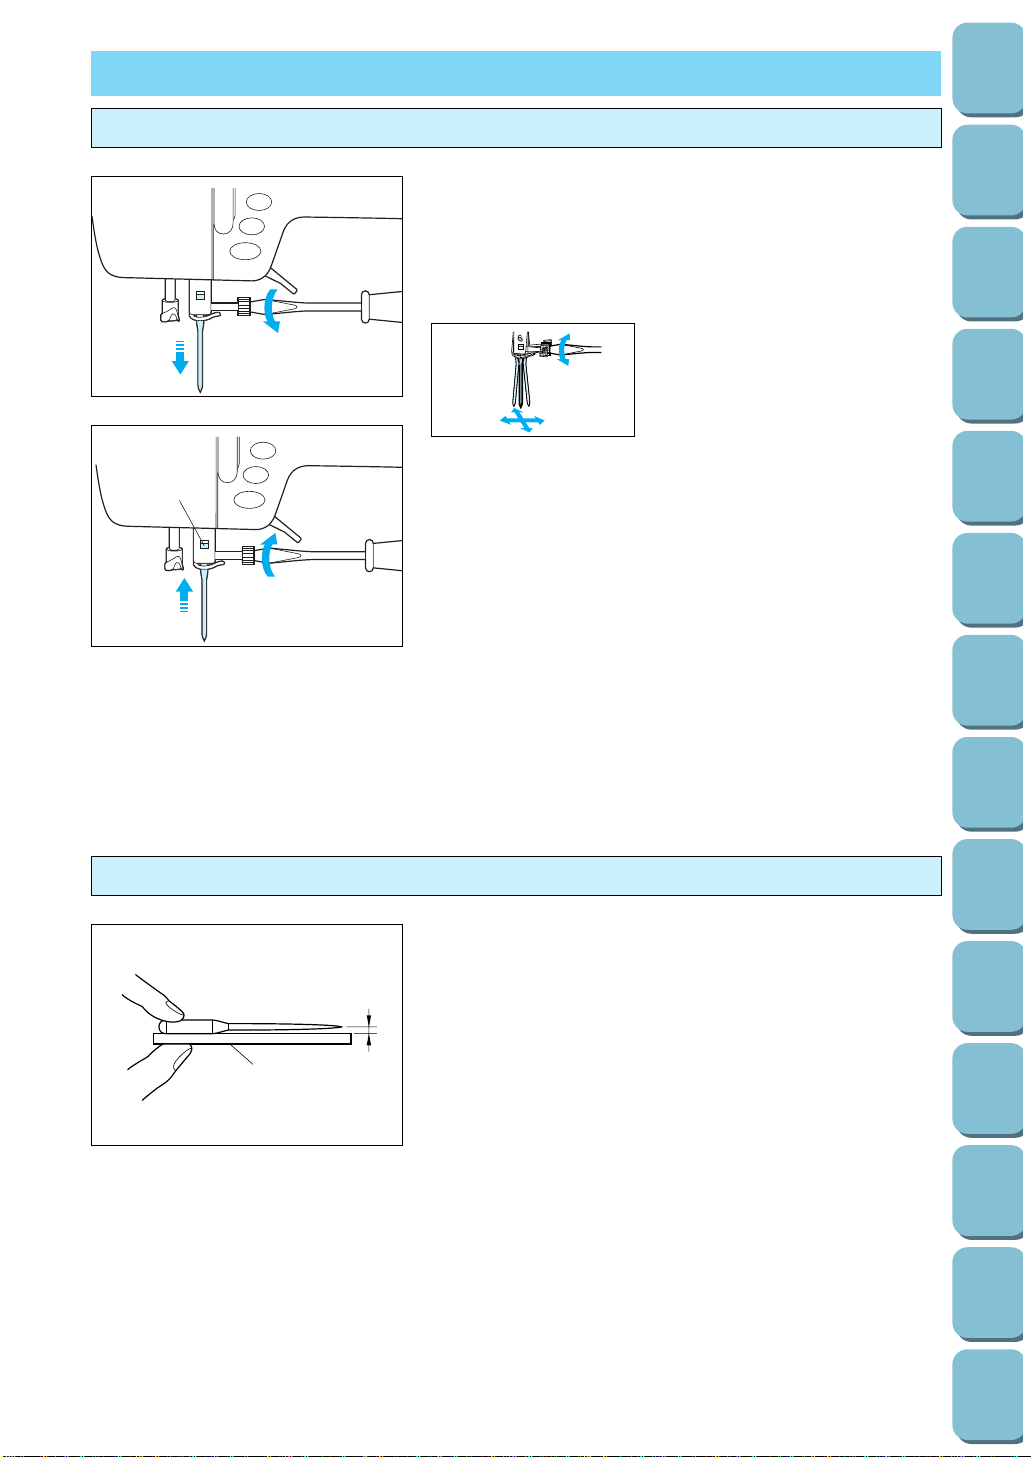
1. Press the “NEEDLE POSITION” button to raise the needle.
2. Turn off the power and lower the presser foot.
3. Loosen the needle clamp screw with a screwdriver.
4. Pull out the needle.
CAUTION
Do not loosen or tighten the needle
clamp screw with a strong force,
otherwise it may be damaged
5. With the flat side of the needle facing the back, insert the
needle as far as it will go up against the needle stopper.
Fasten the screw securely with a screwdriver.
1 Needle stopper
6. Turn the power on.
Checking needle
1
2
Place the needle on a flat surface and check whether the space
between the needle and the flat surface is parallel or not.
If the space is not parallel then the needle is bent and should be
thrown away to prevent damage to your project or to the
machine.
1 Space between the needle and the flat surface
2 Flat surface (needle plate, glass, ruler, etc.)
6
1
MACHINE OPERATION KEYS
This machine contains built-in instructions on how to use the
machine which are based on this operation manual. If you touch
the “OPERATION GUIDE” key, details of basic operations such
as bobbin winding and upper threading will appear on the LCD,
so that you can refer to these instructions while using the
machine.
Example: If you would like to know how to wind the bobbin
thread
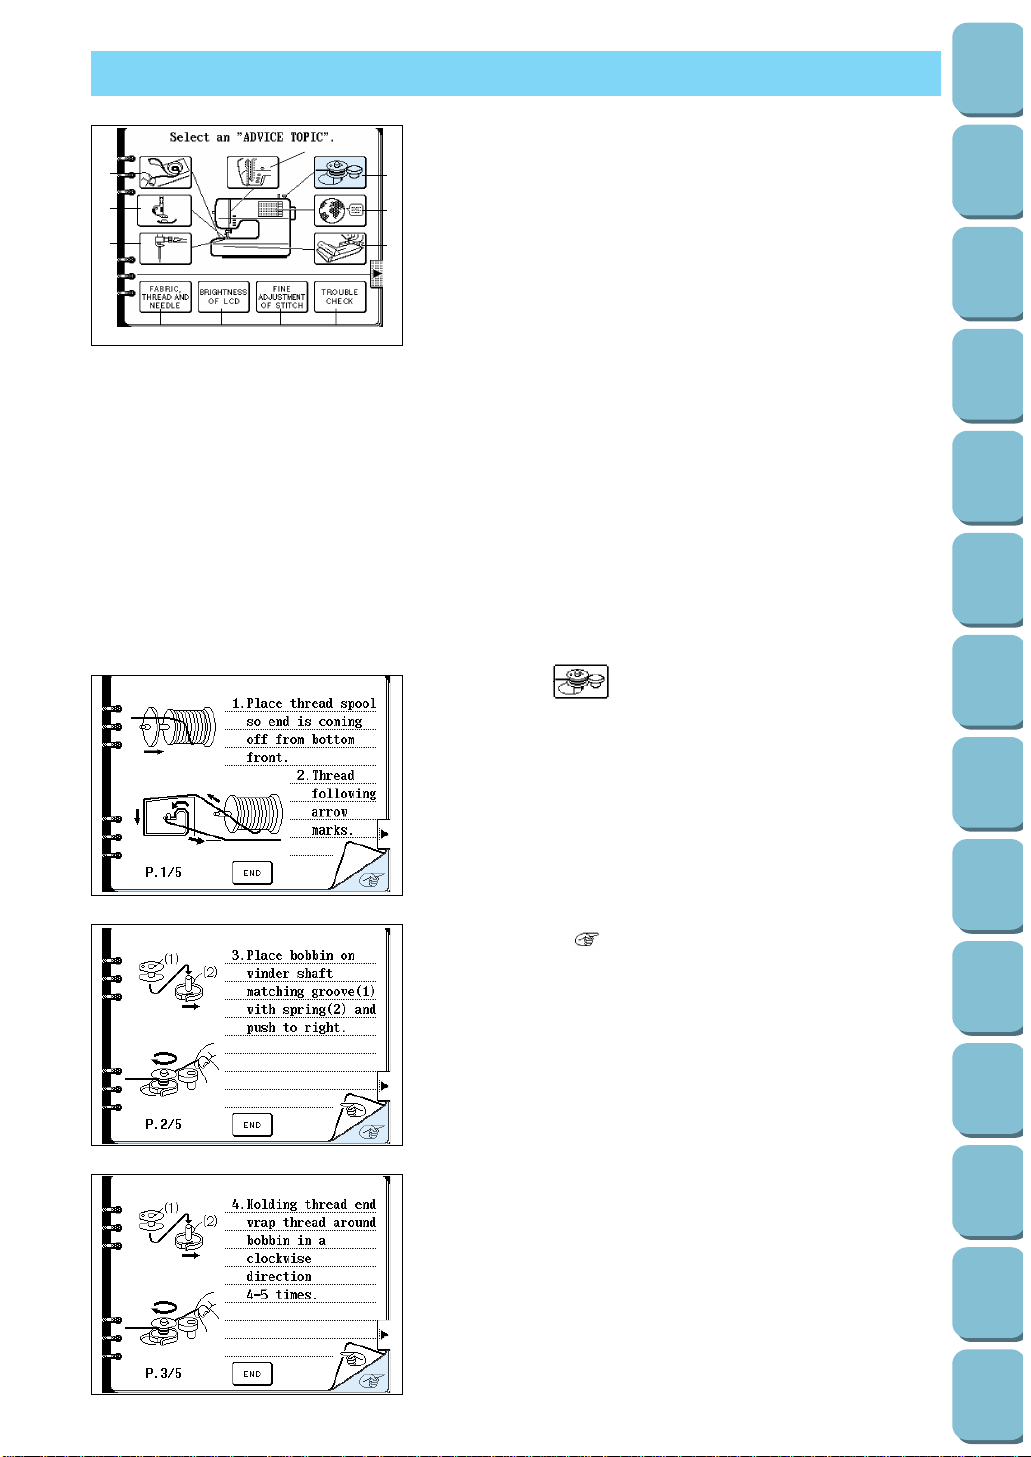
1. Touch the “OPERATION GUIDE” key. A screen such as left
will be displayed.
1 Touch this key to find out how to set the bobbin thread.
2 Touch this key to find out how to replace the presser foot.
3 Touch this key to find out how to replace the needle.
4 Touch this key to find out how to thread the upper thread.
5 Touch this key to find out how to wind the bobbin thread.
6 Touch this key to find out how to select the language.
7 Touch this key to find out how to embroider.
8 Touch this key to find out which thread and needle to use for
different fabrics.
9 Touch this key if the screen is difficult to read.
0 Touch this key if the pattern is distorted.
A Touch this key if a problem occurs while sewing.
2. Touch the “ ” key.
The procedure for winding the bobbin thread onto the
bobbin will be displayed.
3. Touch the “ ” key to display the next part of the
procedure.
Follow the procedure to wind the bobbin thread onto the
bobbin.
* Touch the “END” key to return to the original screen.
1
8
2
3
5
4
6
7
9 0 A
35
Utility
Stitches
Characters
and
Decorative
Stitches
Embroidering
Editing
Embroidery
Patterns
Retrieving
My
Custom
Stitch
TM
Maintenance
Error
Messages
Trouble
shooting
Sewing
Chart
Patterns
(Programmed
in Machine)
Patterns
(Memory
Card)
Sewing
Setting Up
36
Utility
Stitches
Characters
and
Decorative
Stitches
Embroidering
Editing
Embroidery
Patterns
Retrieving
My
Custom
Stitch
TM
Maintenance
Error
Messages
Trouble
shooting
Sewing
Chart
Patterns
(Programmed
in Machine)
Patterns
(Memory
Card)
Sewing
Setting Up
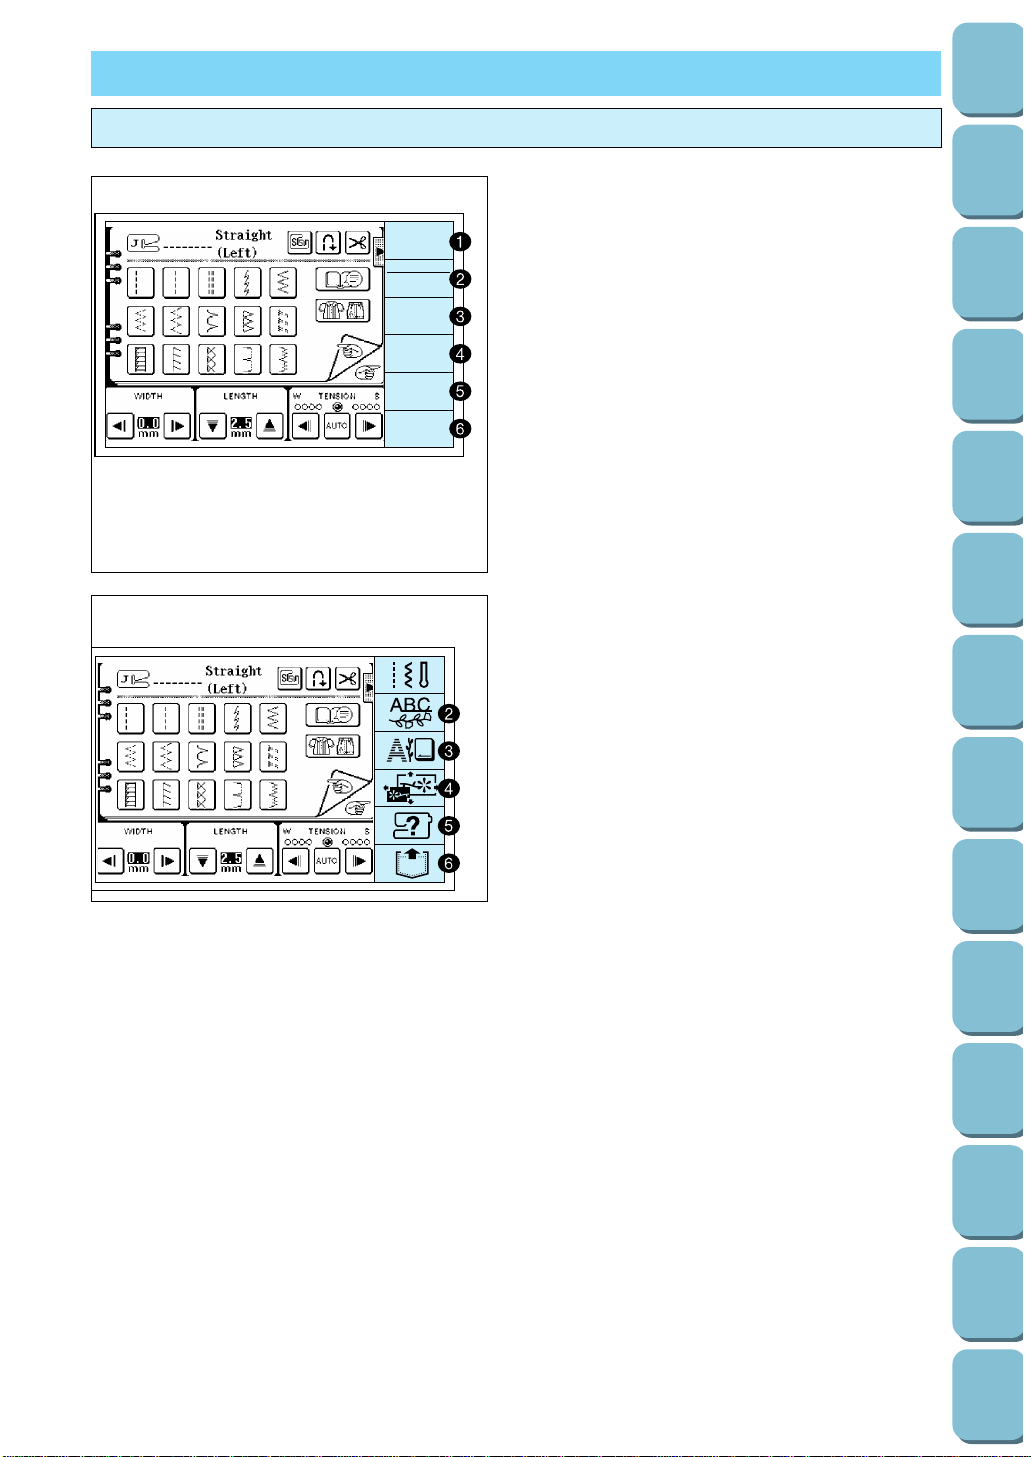
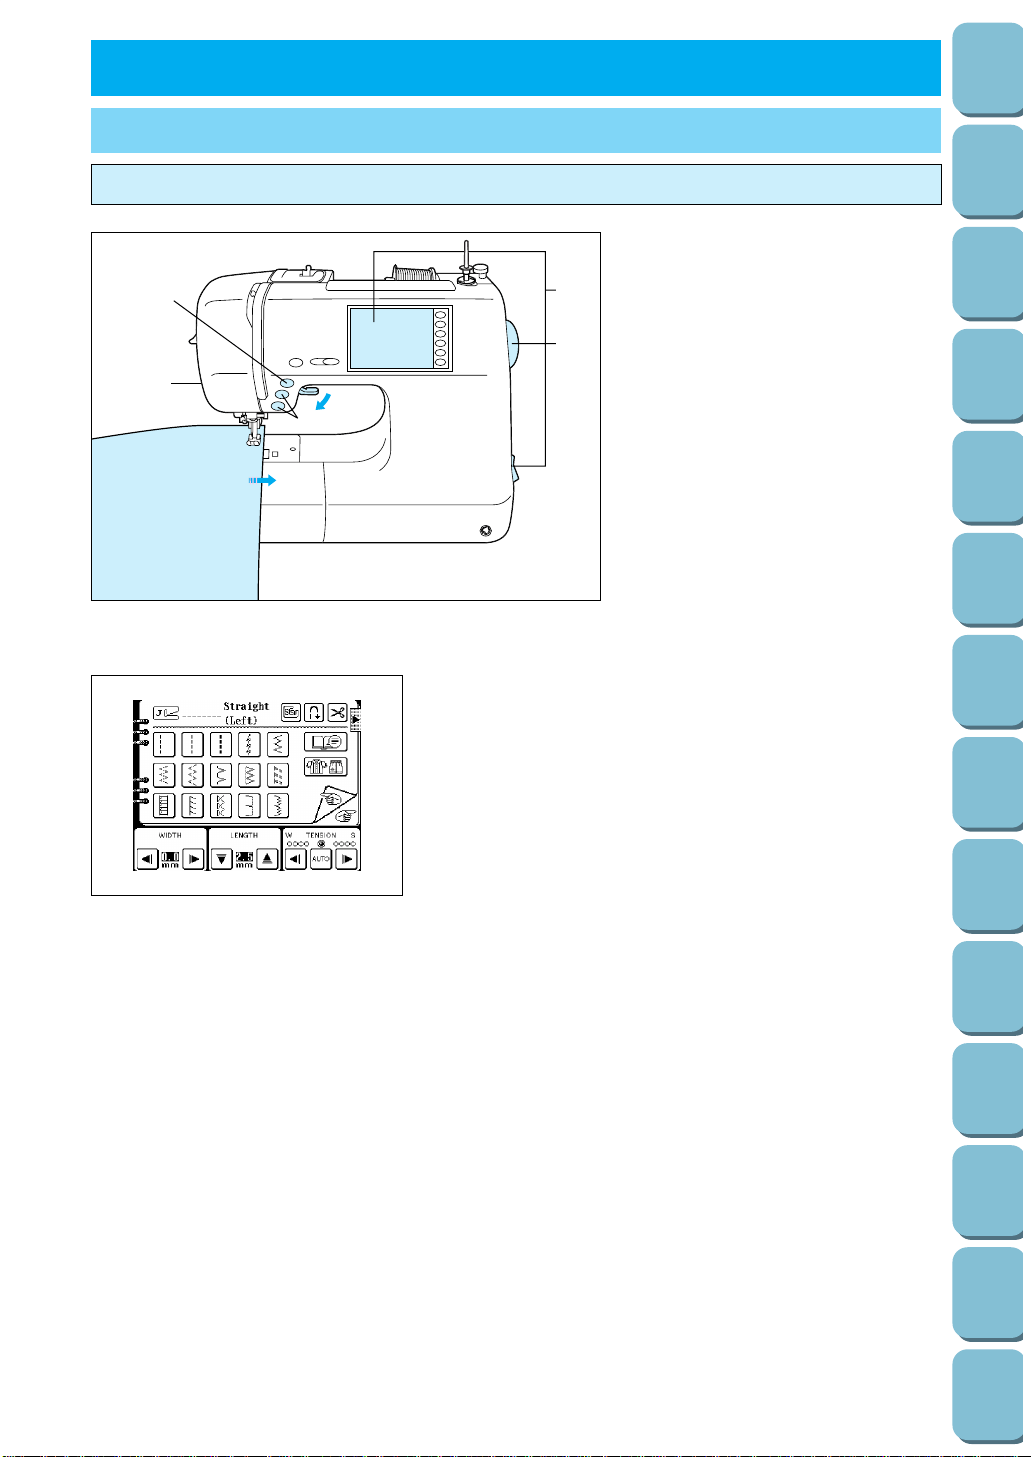
1. SEWING CHAPTER 2
TRIAL SEWING
Sewing by using “UTILITY STITCH”
6
6*
5
4
1
3
2
CAUTION
– Be aware of the needle at all
times while sewing, and keep
your hands away from all
moving parts such as the
needle, balance wheel and
thread take-up lever, otherwise
injury may result.
– Do not pull or push the fabric
too hard while sewing, otherwise
injury may result.
– Never use bent needles. Such
needles can easily break, which
could result in injury.
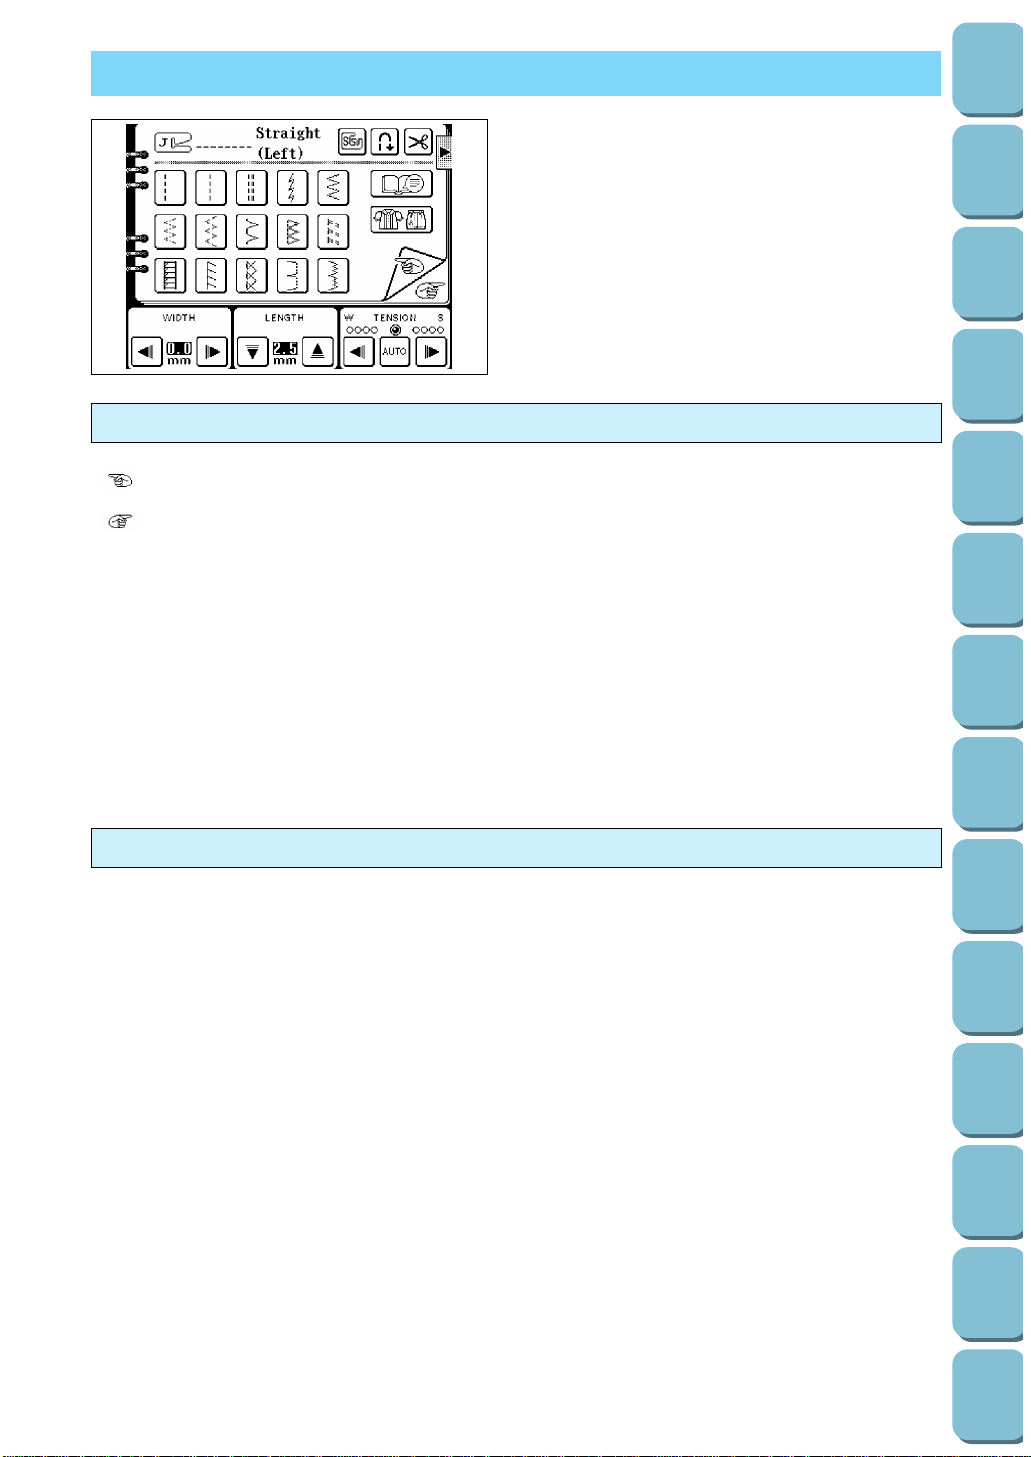
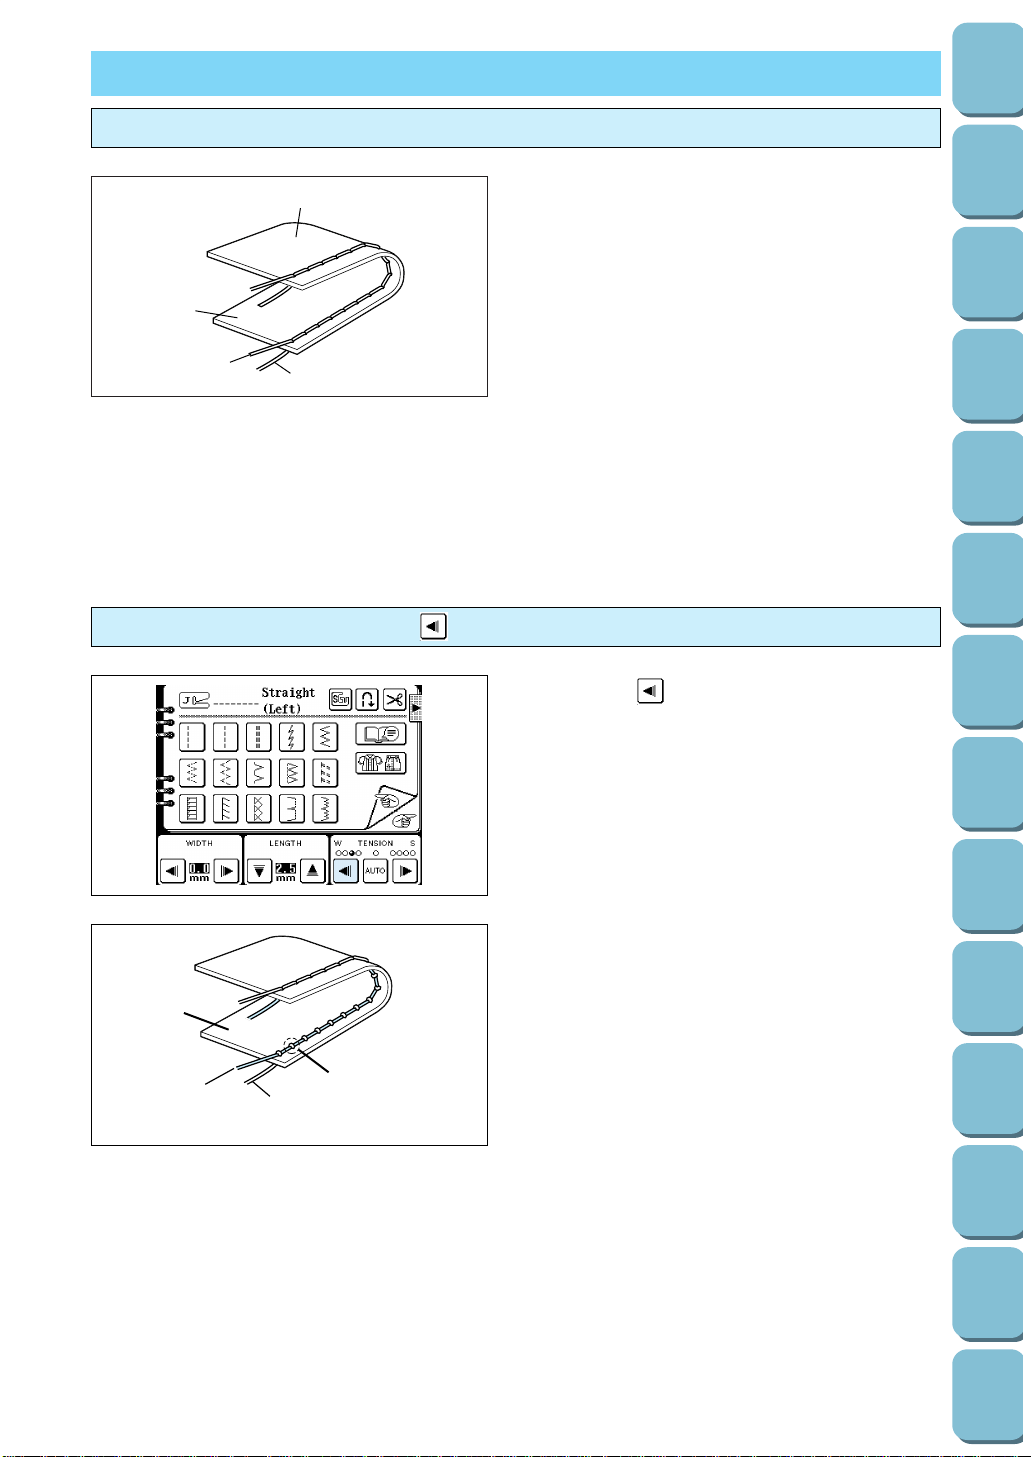
A 75/11 needle is inserted into the machine at the factory.
1. When the machine is turned on, the straight stitch (left) is
always selected.
1 Replace with the presser foot with the letter indicated.
2 This indicates the pattern being selected.
3 If you touch this key before sewing, reverse stitches
(reinforcement stitches) will be sewn automatically. (Refer to
page 38.)
4 If you touch this key before sewing, the thread will be
automatically cut at the finish of sewing. (Refer to page 39.)
5 An advice screen will appear if you touch this key while
sewing. (Refer to page 42.)
6 This selects the appropriate pattern for the sewing
application and also displays the operation steps. (Refer to
page 40.)
7 Touch this key to return to the previous page.
8 Touch this key to move to the next page.
9 Touch these keys to adjust the stitch width setting.
0 Touch these keys to adjust the stitch length setting.
A Touch these keys to change the thread tension.
9
0
A
1234
5
6
7
8
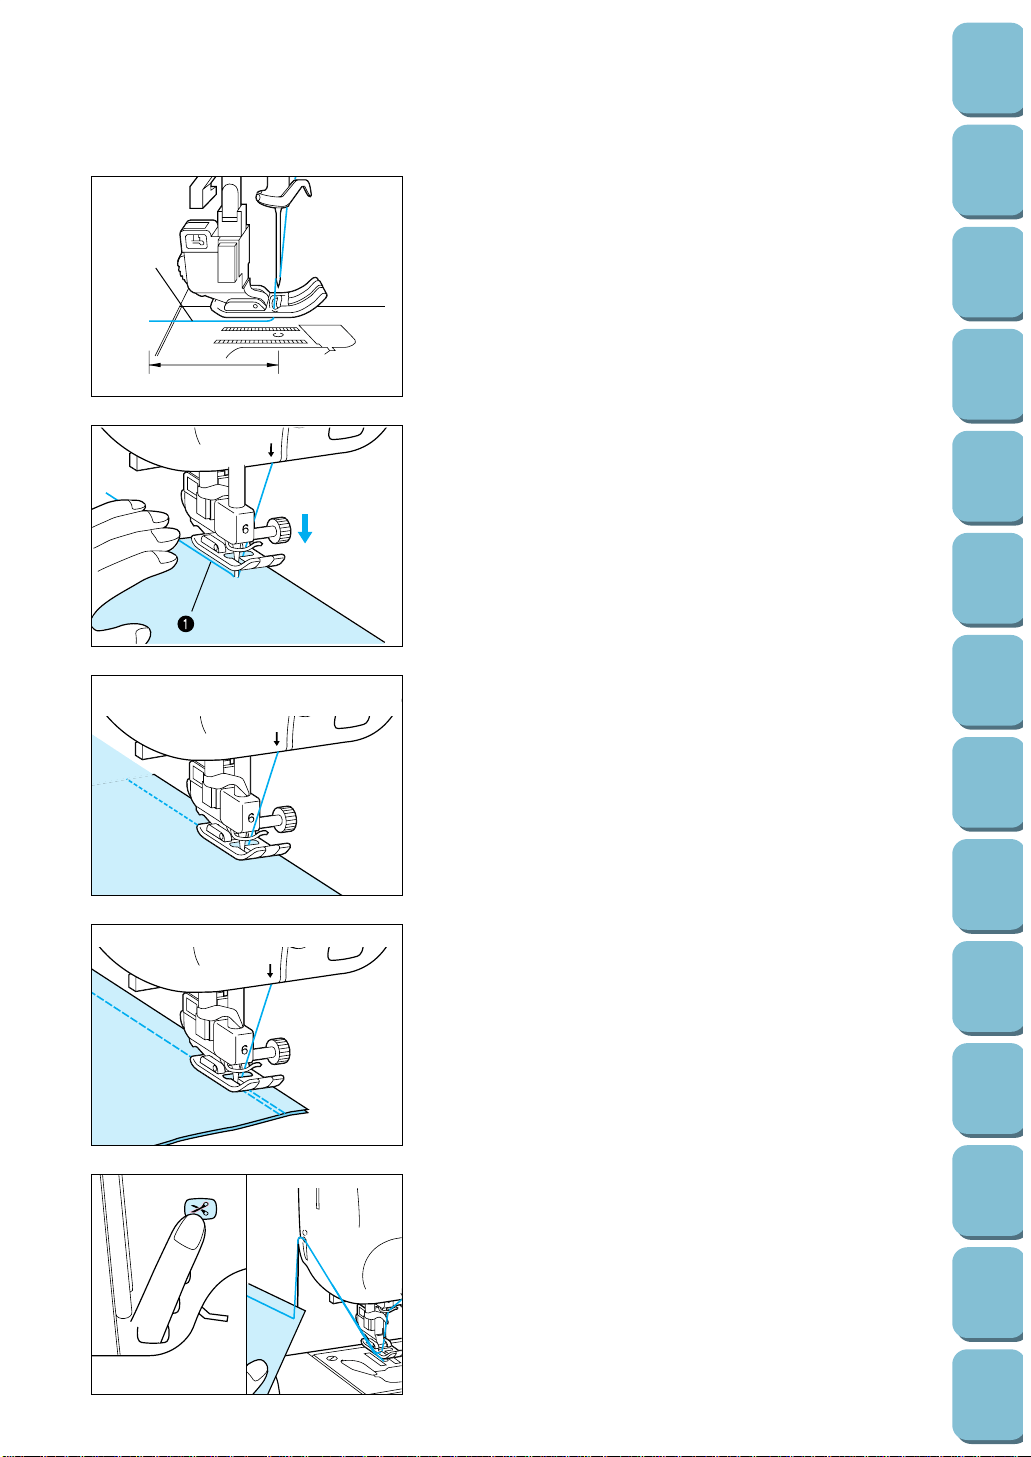
1
2
2. Pass the thread underneath the presser foot and pull it out
from the rear of the machine by about 5 cm.
1 Upper thread
2 5 cm (1-15/16”)
5
3. While holding on the thread tails and the fabric with your left
hand, turn the balance wheel with your right hand to move
the needle to the sewing start position.
1 Thread
* Sewing can begin without pulling out the bobbin thread.
5
3
4. Lower the presser foot. Press the “REVERSE STITCH”
button to sew a reverse stitch, and then press the
“START/STOP” button. The machine will start to run at slow
speed.
5
3
5. When sewing is completed, press the “REVERSE STITCH”
button to sew a reverse stitch.
5
6. Press the “THREAD CUTTER” button to cut the threads .
*6. Cut thick thread (thicker than # 30) with the cutter on the
side of the machine as illustrated.
* BOBBIN THREAD SENSOR
If a warning message appears on the message screen, the
bobbin thread is running out. Replace the bobbin thread at
this time.
37
Utility
Stitches
Characters
and
Decorative
Stitches
Embroidering
Editing
Embroidery
Patterns
Retrieving
My
Custom
Stitch
TM
Maintenance
Error
Messages
Trouble
shooting
Sewing
Chart
Patterns
(Programmed
in Machine)
Patterns
(Memory
Card)
Sewing
Setting Up
38
Utility
Stitches
Characters
and
Decorative
Stitches
Embroidering
Editing
Embroidery
Patterns
Retrieving
My
Custom
Stitch
TM
Maintenance
Error
Messages
Trouble
shooting
Sewing
Chart
Patterns
(Programmed
in Machine)
Patterns
(Memory
Card)
Sewing
Setting Up
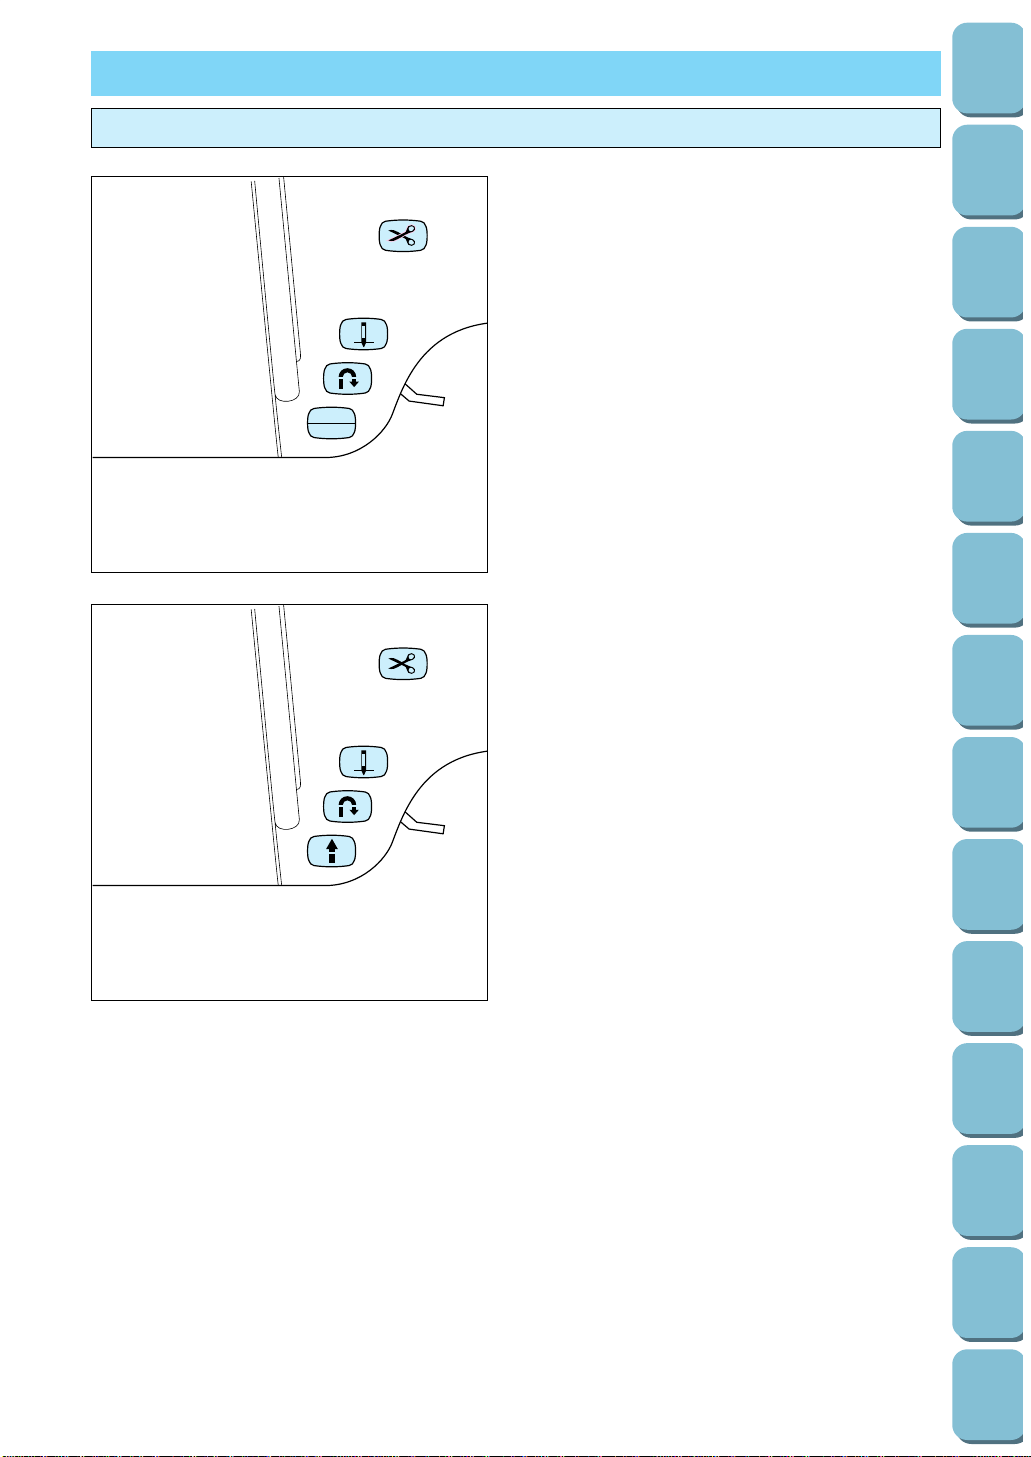
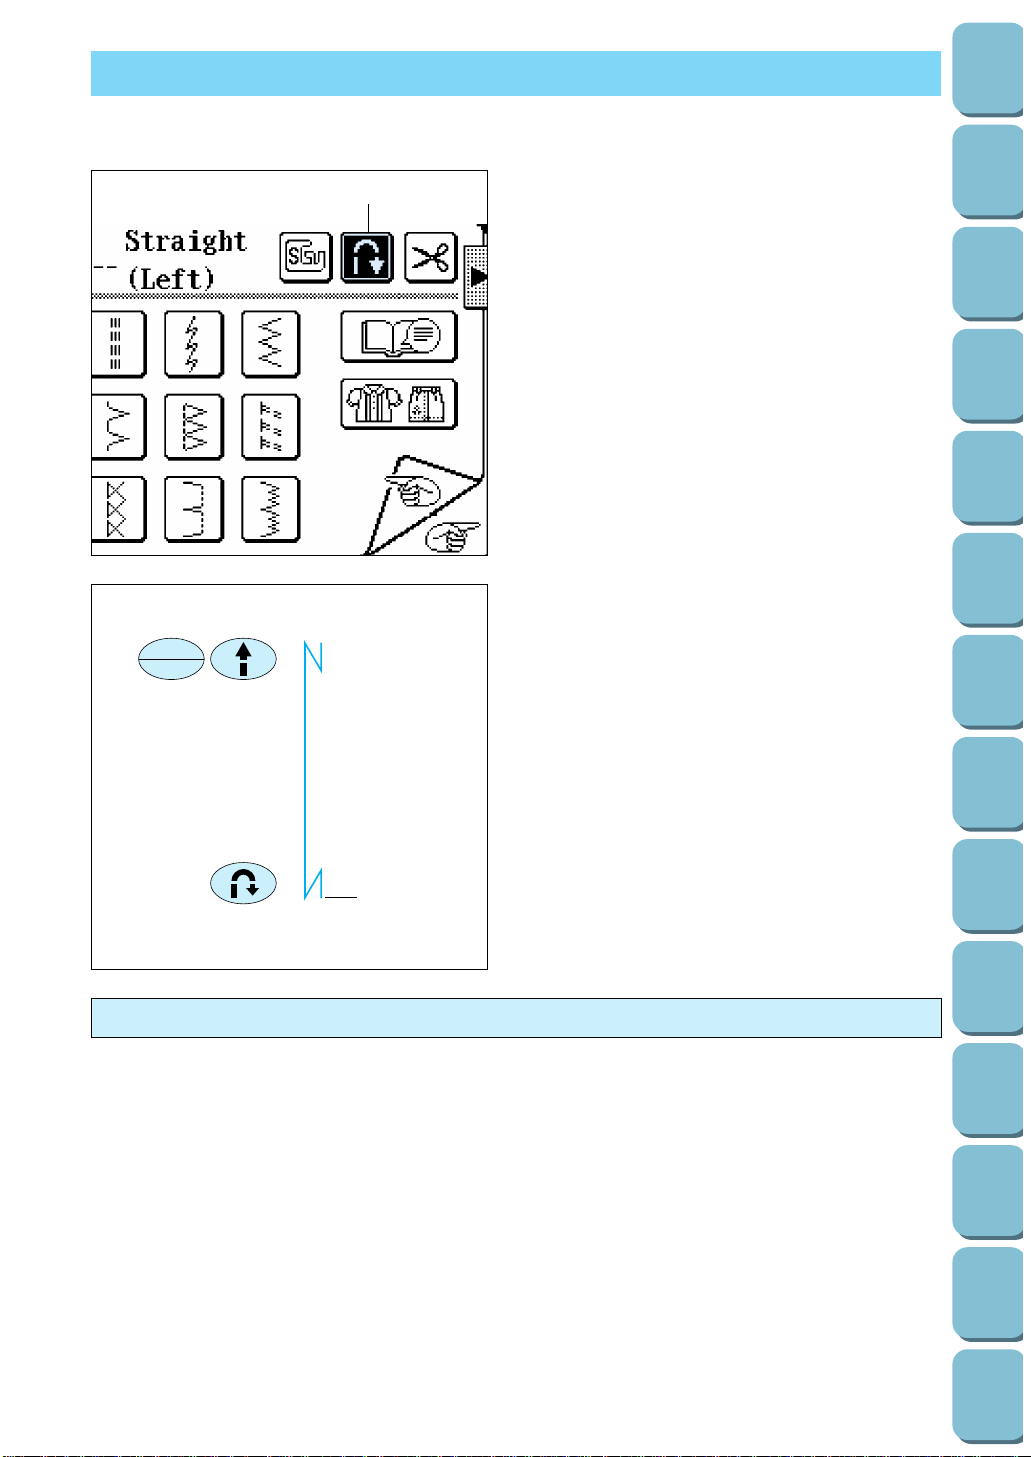
AUTOMATIC REINFORCEMENT STITCHING
1. Select the stitch pattern.
2. Touch the automatic reinforcement stitch key.
1 Automatic reinforcement stitch key
1
START
STOP
3. Press the “START/STOP” button.
A reinforcement stitch will be sewn before
sewing starts. A reinforcement stitch will not
be done if there is a pause in sewing. Press
the “START/STOP” button to pause sewing.
An ending reinforcement stitch will not be
sewn. (The fabric may be turned or adjusted
as required.) Press the “START/STOP” button
again to restart sewing.
4. When sewing is completed, press the
“REVERSE STITCH” button to sew a
reinforcement stitch and stop.
1 Automatically stops.
* Fabric should be placed 3 to 4 stitch lengths
behind the presser foot before sewing the
reinforcement stitch.
Touching the automatic reinforcement stitch key
once again, turns off the automatic reinforcement
stitch operation.
This stitch automatically prevents fraying.
1
Cancelling automatic reinforcement stitching
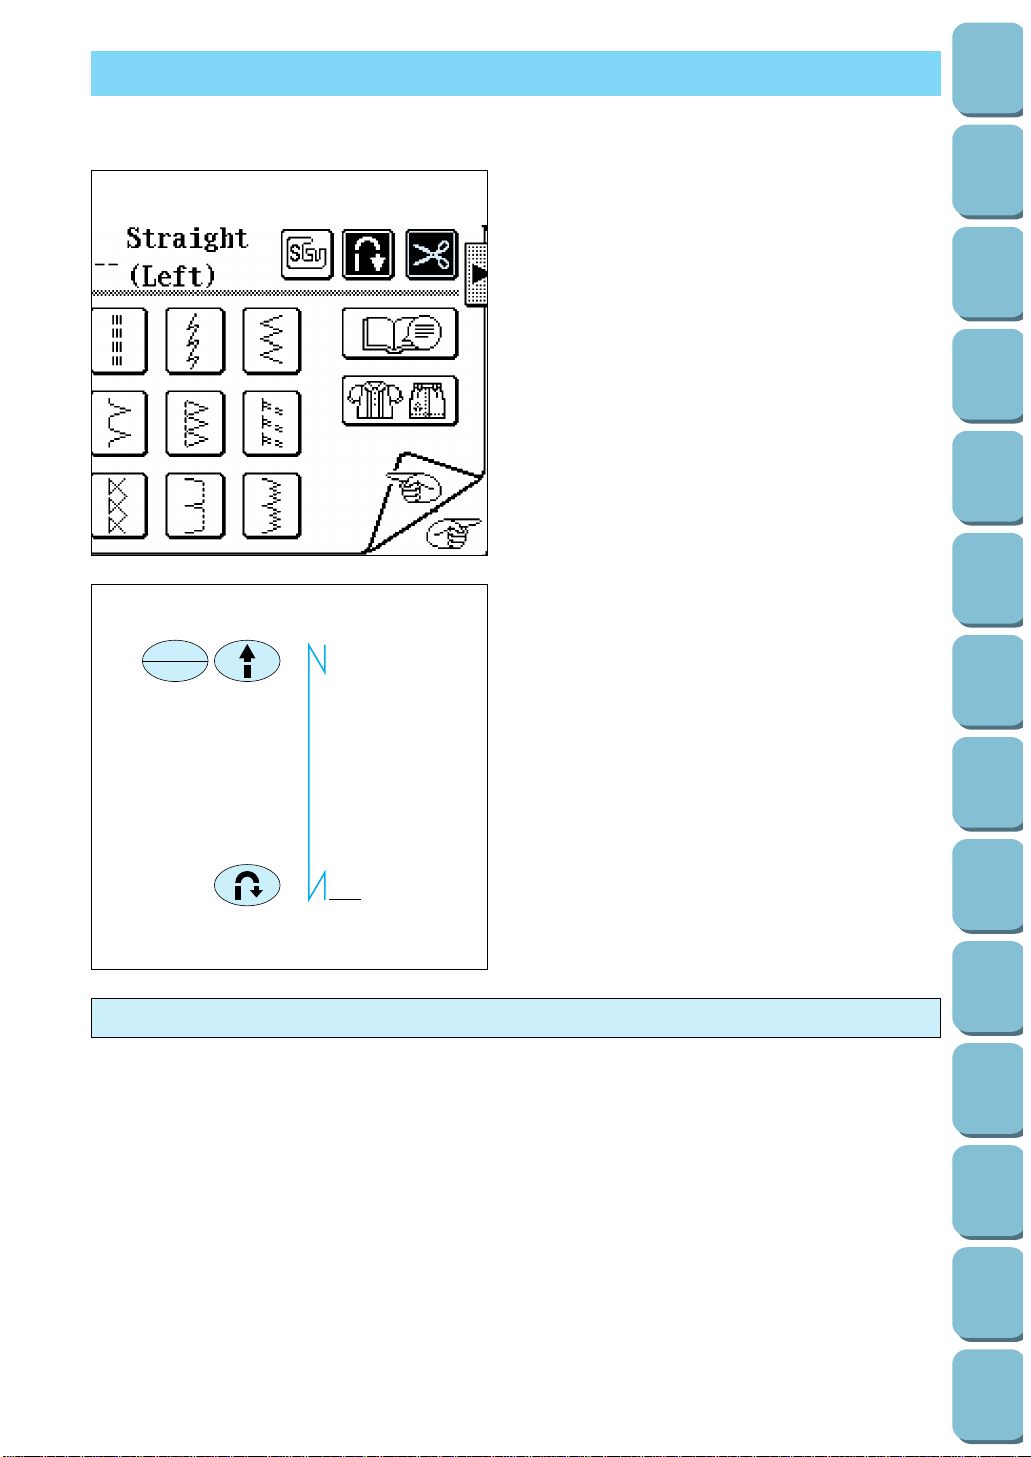
AUTOMATIC THREAD CUTTING
If you set programmed automatic thread cutting
prior to sewing, the machine will automatically
trim the thread when the pattern has been
completed. (Reinforcement stitches are used at
the start and finish of the pattern.)
1. Select the stitch pattern.
2. Touch the automatic thread cutting key.
* Automatic thread cutting and the automatic
reinforcement stitch must be used together.
* Automatic thread cutting is convenient for use
on buttonholes, bar tacking and other areas.
1
START
STOP
3. Press the “START/STOP” button. A
reinforcement stitch will be sewn before
sewing starts.
4. When sewing is completed, press the
“REVERSE STITCH” button to sew a
reinforcement stitch and trim the thread.
1 Automatically trims the thread and stops.
* Fabric should be placed 3 to 4 stitch lengths
behind the presser foot before sewing the
reinforcement stitch.
Touching the automatic thread cutting key again
turns off the automatic thread cutting function.
The thread can be cut automatically.
Cancelling programmed automatic thread cutting
39
Utility
Stitches
Characters
and
Decorative
Stitches
Embroidering
Editing
Embroidery
Patterns
Retrieving
My
Custom
Stitch
TM
Maintenance
Error
Messages
Trouble
shooting
Sewing
Chart
Patterns
(Programmed
in Machine)
Patterns
(Memory
Card)
Sewing
Setting Up
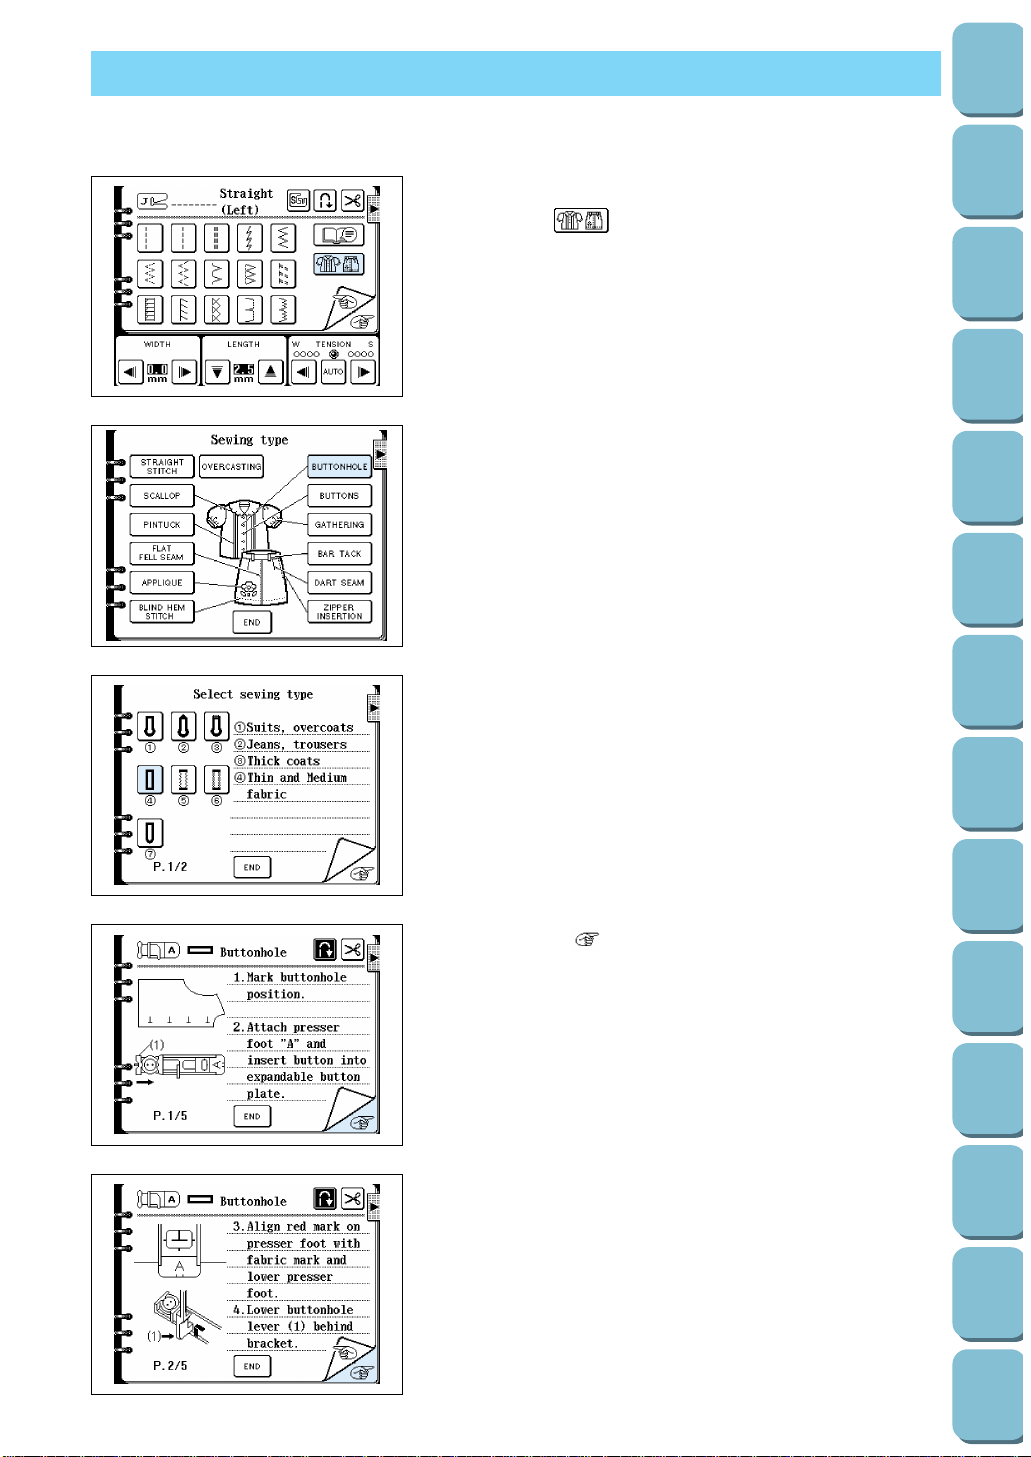
40
Utility
Stitches
Characters
and
Decorative
Stitches
Embroidering
Editing
Embroidery
Patterns
Retrieving
My
Custom
Stitch
TM
Maintenance
Error
Messages
Trouble
shooting
Sewing
Chart
Patterns
(Programmed
in Machine)
Patterns
(Memory
Card)
Sewing
Setting Up
UTILITY STITCH SELECTION
(Example) Buttonholes
1. Touch the “UTILITY STITCH” key.
2. Touch the “ ” key.
3. Touch the “BUTTONHOLE” key.
4. Select the desired application.
The stitches available and sewing procedure appear on the
screen step by step.
5. Touch the “ ” key to display the next part of the
procedure.
Follow the procedure to sew the buttonhole stitches.
* Touch the “END” key to return to the original screen.
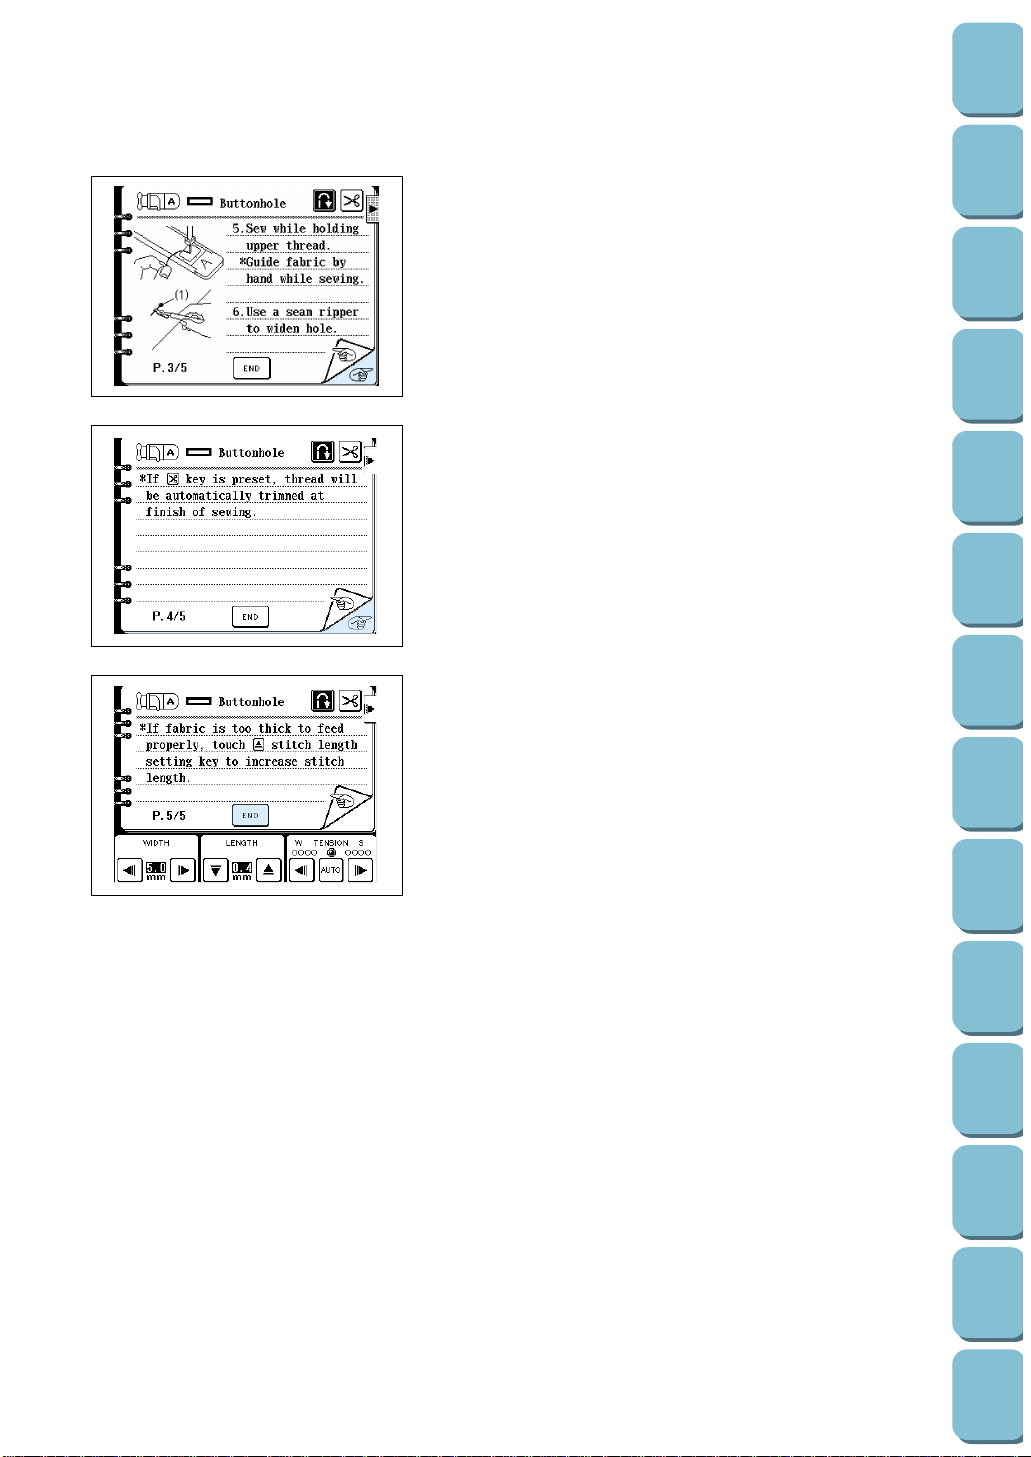

42
Utility
Stitches
Characters
and
Decorative
Stitches
Embroidering
Editing
Embroidery
Patterns
Retrieving
My
Custom
Stitch
TM
Maintenance
Error
Messages
Trouble
shooting
Sewing
Chart
Patterns
(Programmed
in Machine)
Patterns
(Memory
Card)
Sewing
Setting Up
USEFUL SKILLS
The “ ” key
1. Touch the “ ” key. If the “ ” key is touched
while the “ ” stitch is selected, the following screen will be
displayed.
2. Touch the “ ” key to display the next part of the
procedure.
* Touch the “CLOSE” key to return to the original screen.
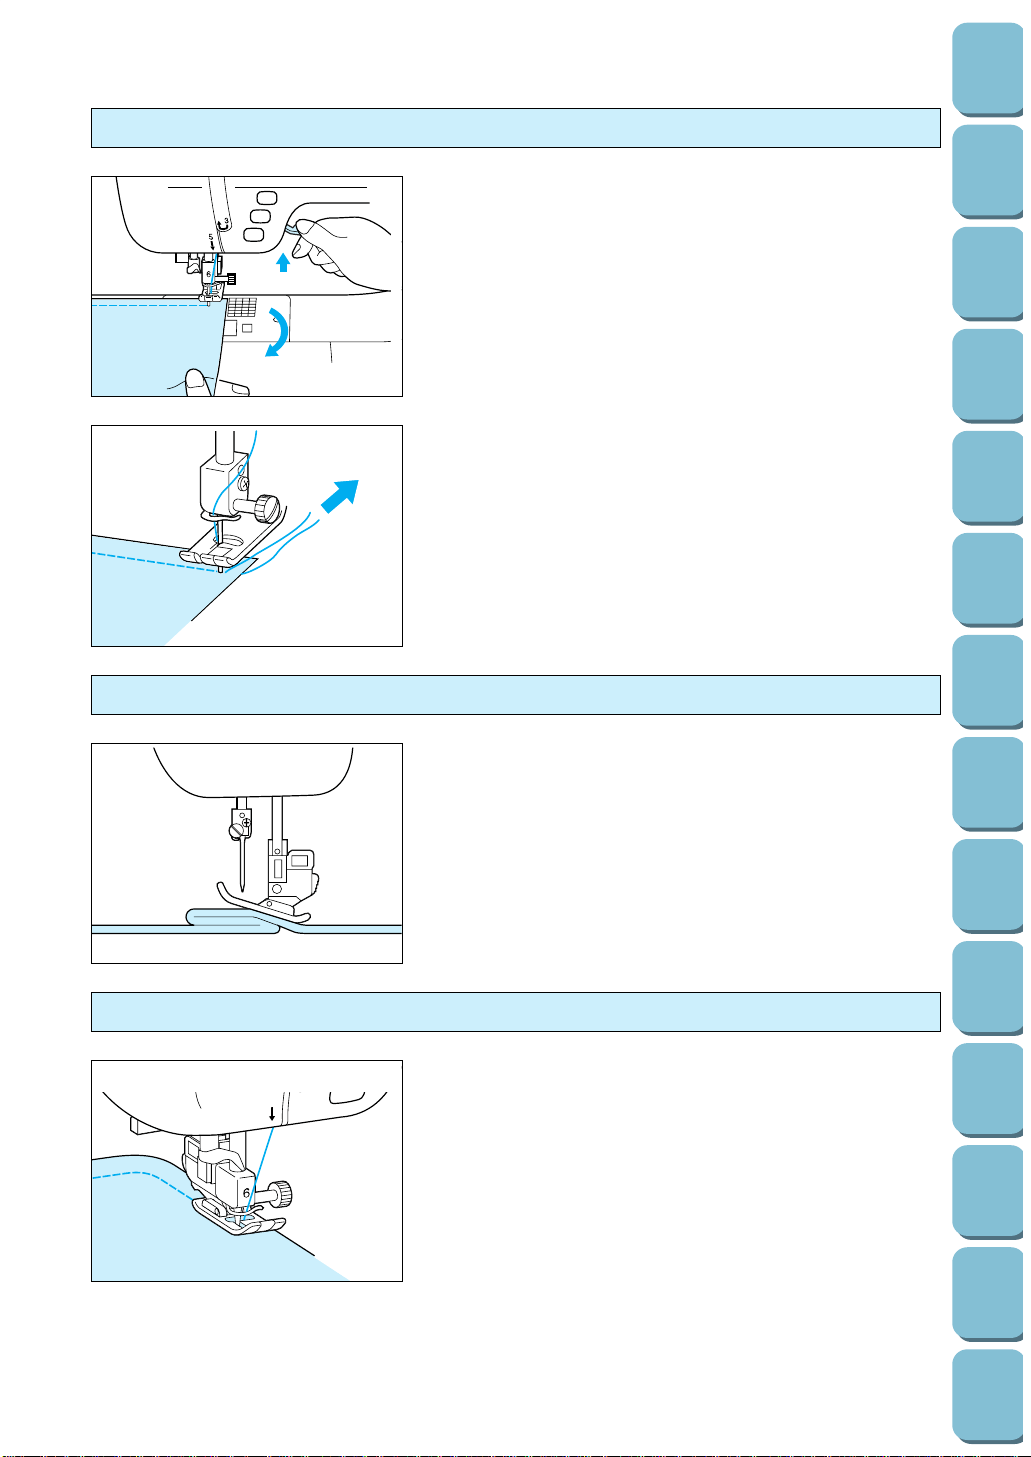
Sewing corners
Keep the needle at the corner of the fabric, then raise the
presser foot and turn the fabric.
Sewing thick seams
When the foot angles up at the approach of a thick seam, lower
the needle and raise the presser foot. Level the presser foot by
placing a “shim” (folded fabric or cardboard) under the back of
the presser foot. Lower presser foot and continue stitching.
Sewing curves
5
3
Sewing a curve with a straight stitch
Sew slowly, while keeping the seams parallel with the fabric
edge as you guide the fabric around the curve.
6
For short stitches which are less than 0.5 cm (3/16”)
Before you begin to sew, set a basting thread at the corner
point. When you change direction at the corner, start sewing as
you pull the basting thread backward.
43
Utility
Stitches
Characters
and
Decorative
Stitches
Embroidering
Editing
Embroidery
Patterns
Retrieving
My
Custom
Stitch
TM
Maintenance
Error
Messages
Trouble
shooting
Sewing
Chart
Patterns
(Programmed
in Machine)
Patterns
(Memory
Card)
Sewing
Setting Up
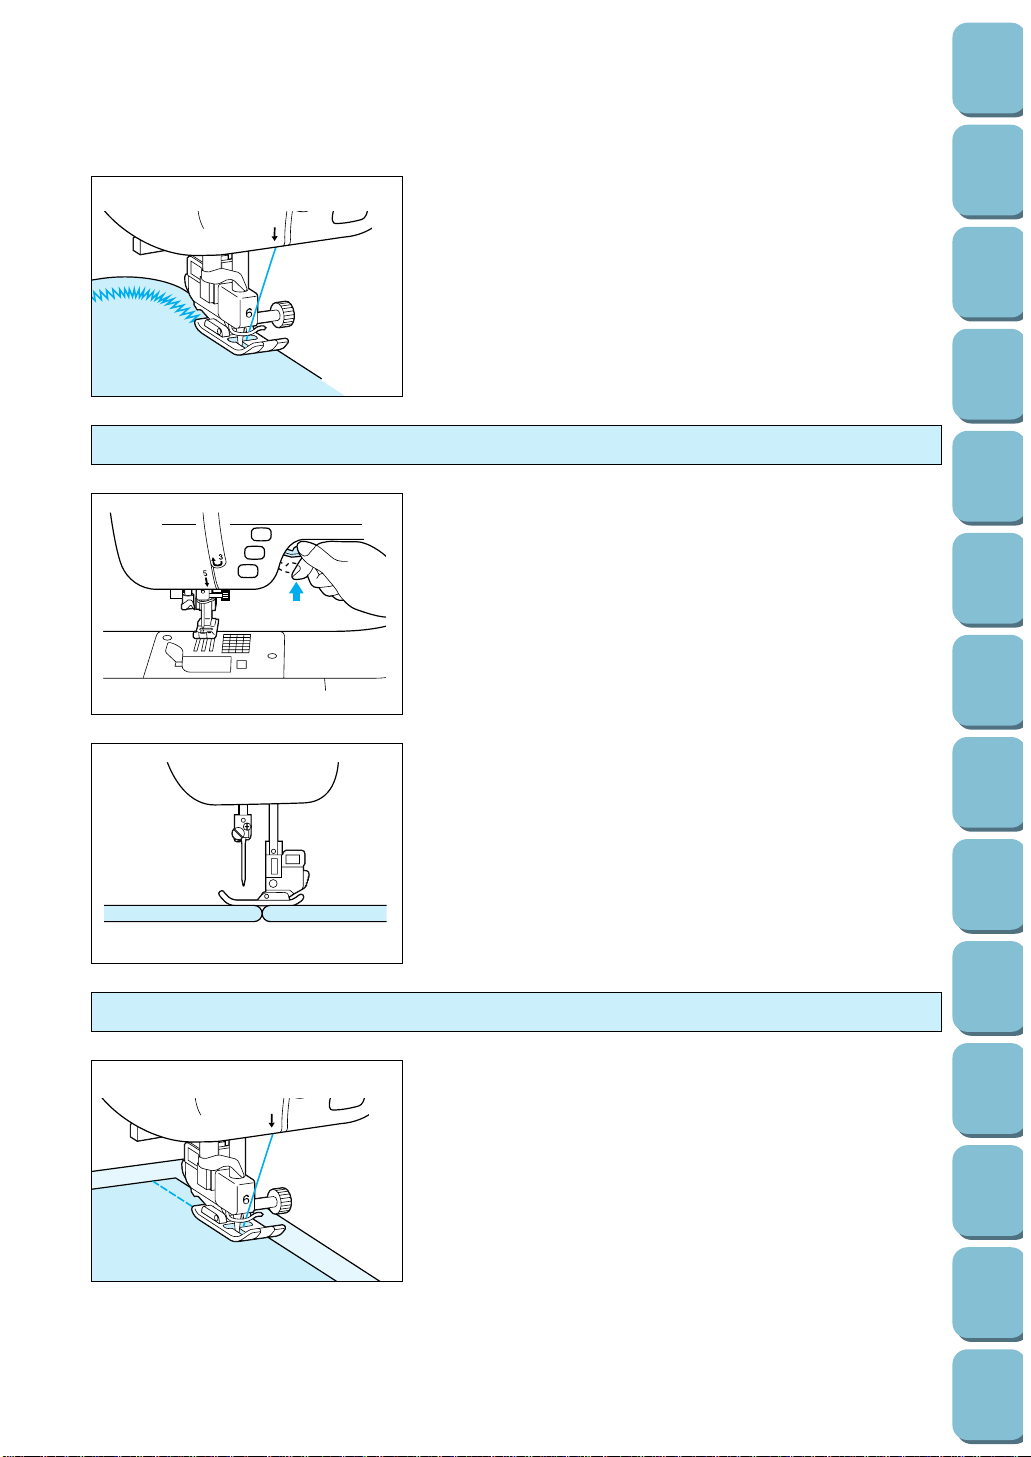
44
Utility
Stitches
Characters
and
Decorative
Stitches
Embroidering
Editing
Embroidery
Patterns
Retrieving
My
Custom
Stitch
TM
Maintenance
Error
Messages
Trouble
shooting
Sewing
Chart
Patterns
(Programmed
in Machine)
Patterns
(Memory
Card)
Sewing
Setting Up
Sewing thick fabric
1. When you raise the presser foot lever further, the presser
foot is raised to a higher position to handle thicker fabrics.
With the presser foot in the up position, raise the presser
foot lever higher to make room for thicker fabrics.
5
3
Sewing a curve with a zigzag stitch
Set the stitch length short in order to obtain a fine stitch. Sew
slowly while keeping the seams parallel with the fabric edge as
you guide the fabric around the curve.
* For sharp corners, temporarily stop sewing while keeping
the needle in the material, then raise the presser foot and
carefully turn the fabric while keeping it level with the
presser foot. Lower the presser foot and continue sewing.
Sewing thin fabric
5
3
Place thin paper or stabilizer material under the fabric, and then
start sewing.
* Use a straight stitch foot (optional accessory item SA108 or
X80823001) to eliminate any puckering. Remember to
select the center needle position. Additional adjustment of
stitch length and tension may be necessary.
2. If the fabric will not feed at the beginning of sewing, place
another piece of fabric with the same thickness at the back
of the material.
* Using a straight stitch foot (optional accessory item SA108
or X80823001) will stop the fabric lifting up and down as the
needle pierces very thick fabrics.
Remember that this foot is only to be used with the straight
stitch in the center needle position.
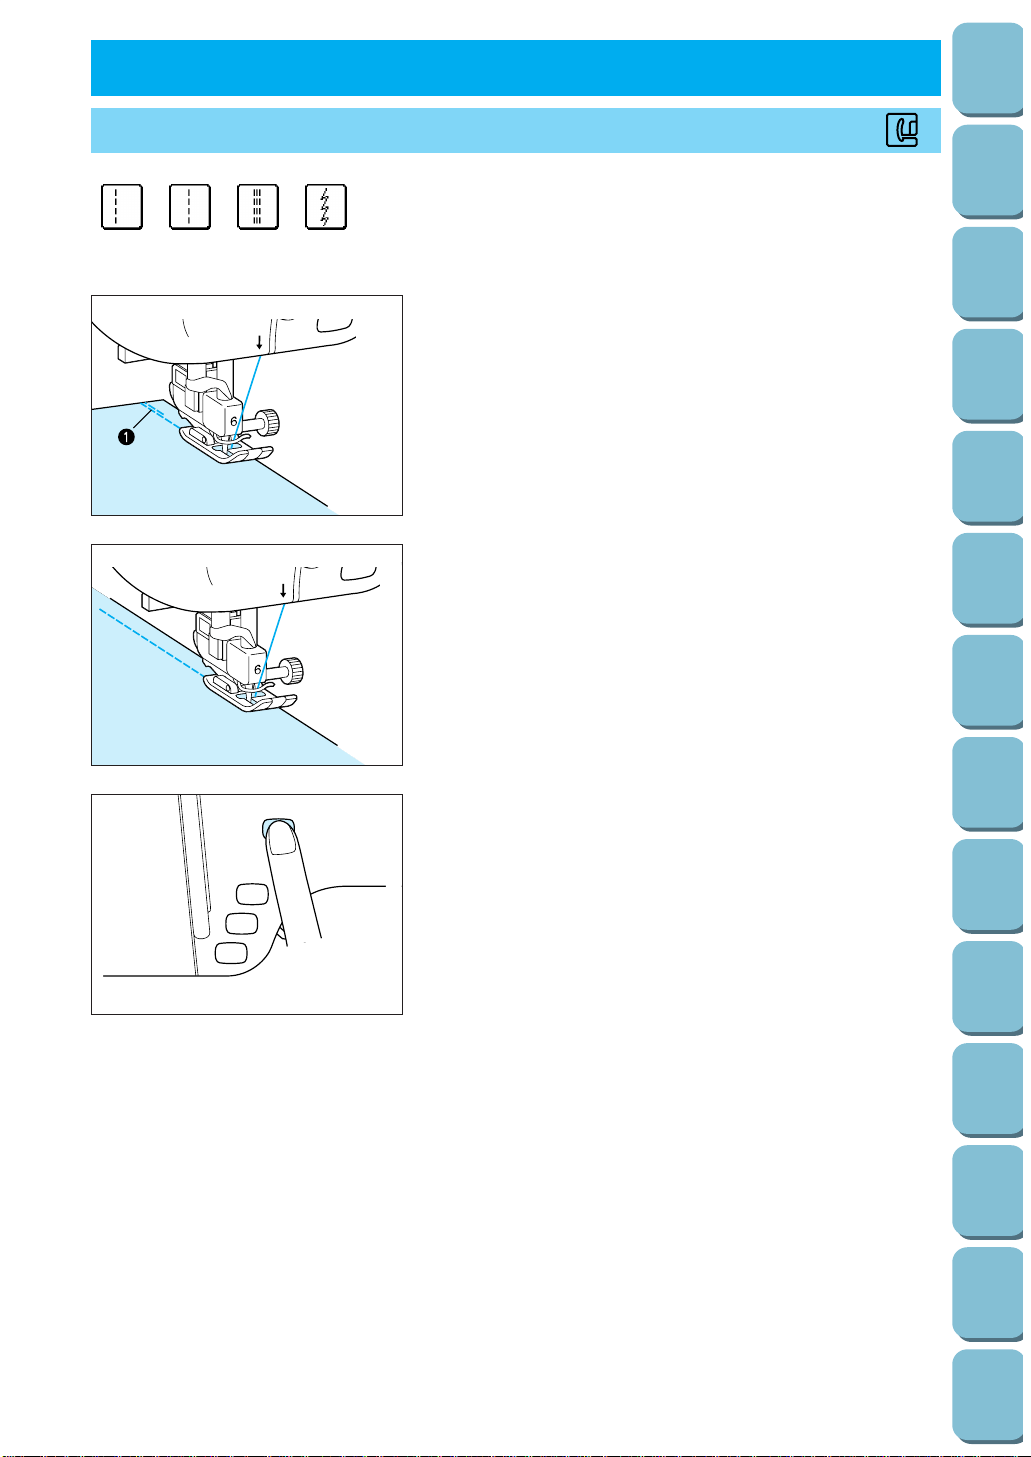
45
Utility
Stitches
Characters
and
Decorative
Stitches
Embroidering
Editing
Embroidery
Patterns
Retrieving
My
Custom
Stitch
TM
Maintenance
Error
Messages
Trouble
shooting
Sewing
Chart
Patterns
(Programmed
in Machine)
Patterns
(Memory
Card)
Sewing
Setting Up
STRAIGHT STITCHES
1 Normal sewing
2 Normal sewing
3 Reinforced sewing
4 Stretch fabric sewing
5
3
1. Baste the fabric or set a pin, sew a reverse stitch at the
start, then start sewing.
1 Reverse stitch at start
* Place the fabric under presser foot while keeping space
from the top edge of the fabric for reverse sewing.
5
3
2. Sew at slow speed near the end and then press the
“REVERSE STITCH” button to sew a reinforcement stitch
and stop.
3. Cut the thread by pressing the “THREAD CUTTER” button.
* When the automatic thread cutting and automatic
reinforcement stitch are preset, reinforcement stitches will
be sewn automatically at the start of sewing. Press the
“REVERSE STITCH” button to sew a reinforcement stitch
and trim the thread automatically at the finish of sewing.
2. UTILITY STITCHES
J
1234
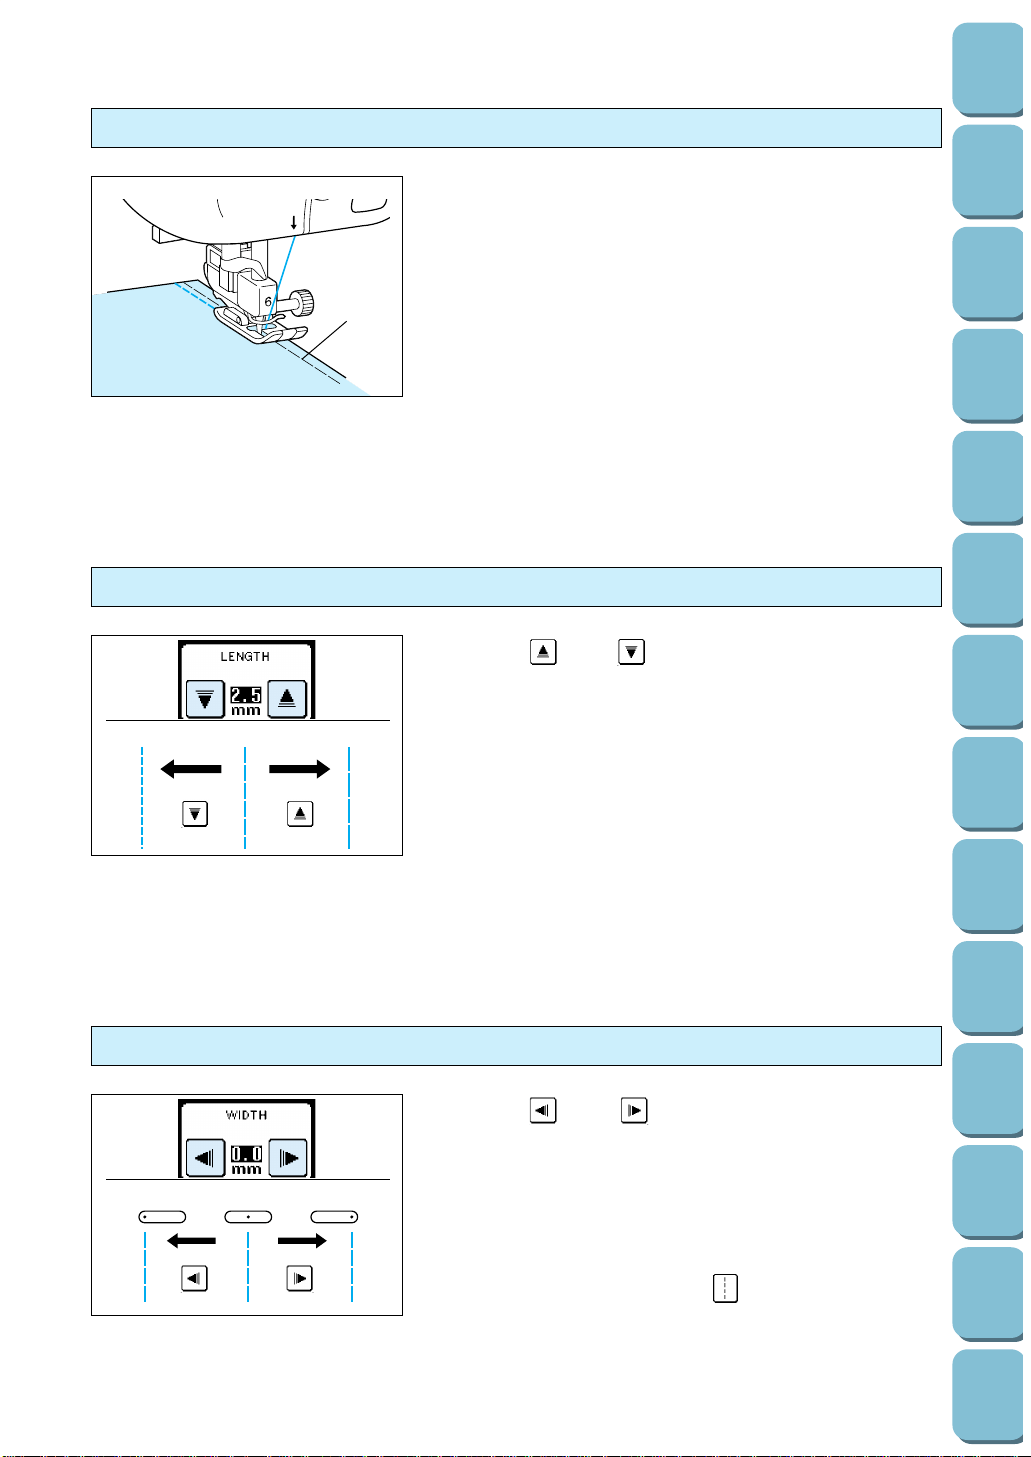
46
Utility
Stitches
Characters
and
Decorative
Stitches
Embroidering
Editing
Embroidery
Patterns
Retrieving
My
Custom
Stitch
TM
Maintenance
Error
Messages
Trouble
shooting
Sewing
Chart
Patterns
(Programmed
in Machine)
Patterns
(Memory
Card)
Sewing
Setting Up
5
3
1
Baste the fabric beforehand and sew along to the basting using
a stretch stitch.
* Do not pull the fabric during sewing.
1 Basting
Changing the stitch length
For reinforcement stitching on stretch fabric
123
Touch the “ ” and “ ” stitch length setting keys to adjust
the stitch length.
1 Longer
2 Original length: 2.5 mm (1”)
3 Shorter
* For thin material which is less than 1 mm (1/16”), the stitch
length will be set to 4.0 mm (3/16”) automatically during
sewing even if you set the length to 5.0 mm (3/16”).
Changing the needle position
123
Touch the “ ” and “ ” stitch width setting keys to adjust
the needle position.
1 Left needle position: 0 mm (0”)
2 Center needle position: 3.5 mm (1/8”)
3 Right needle position: 7.0 mm (1/4”)
* The needle position cannot be changed for the straight
stitch/center position selection “ ”.
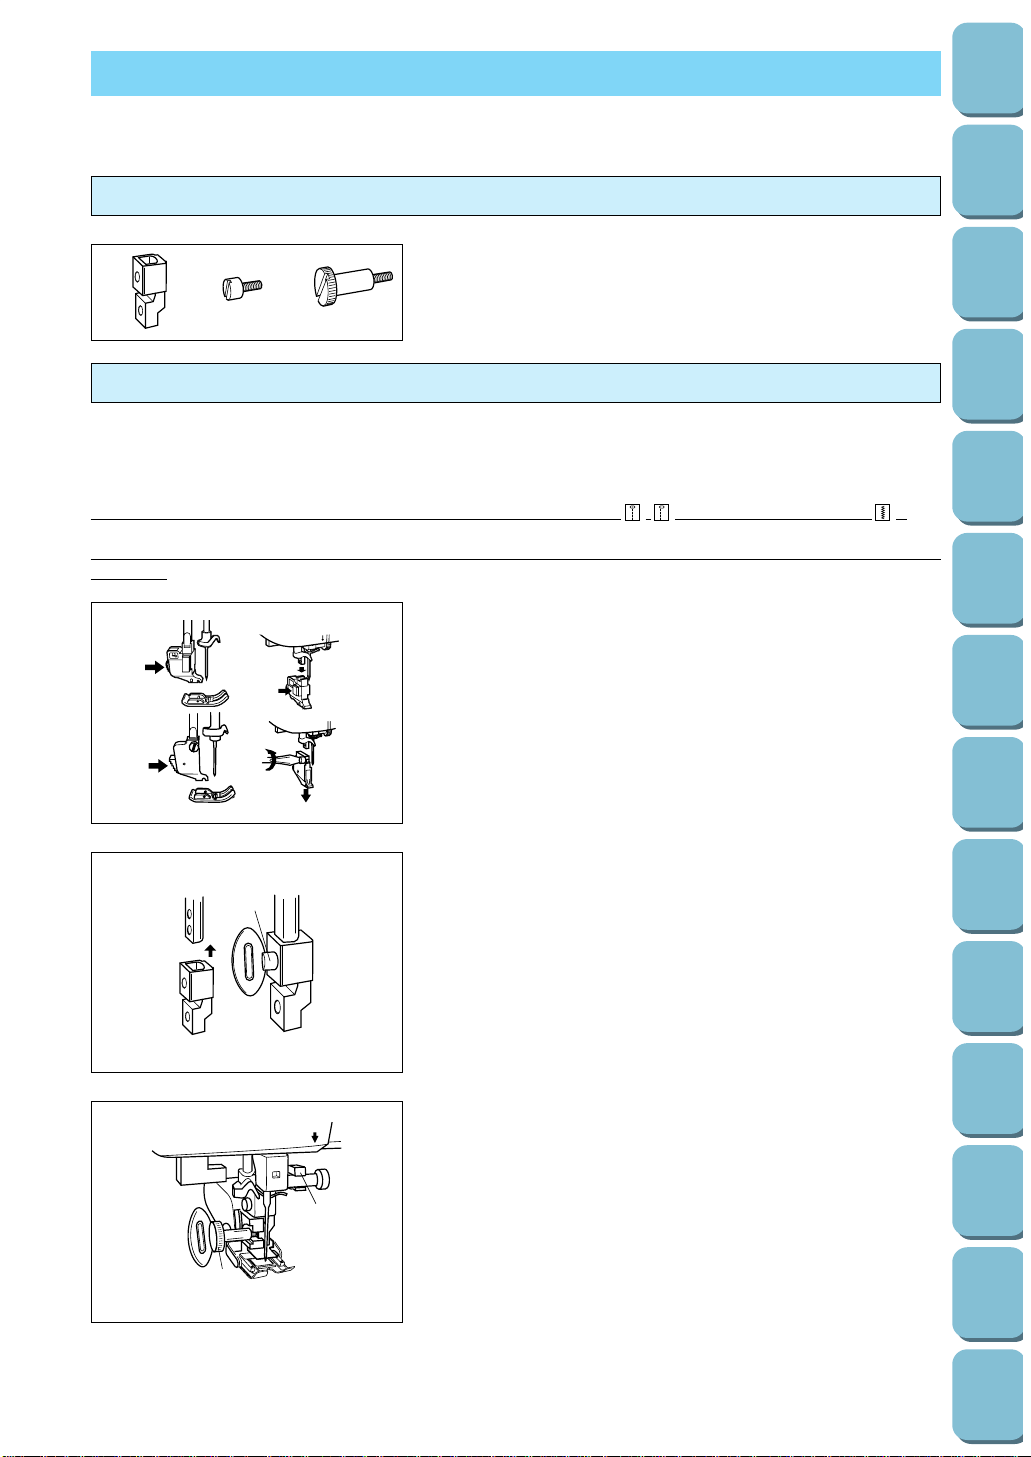
47
Utility
Stitches
Characters
and
Decorative
Stitches
Embroidering
Editing
Embroidery
Patterns
Retrieving
My
Custom
Stitch
TM
Maintenance
Error
Messages
Trouble
shooting
Sewing
Chart
Patterns
(Programmed
in Machine)
Patterns
(Memory
Card)
Sewing
Setting Up
ADAPTER FOR LOW SHANK ATTACHMENTS
This adapter is used for attaching screw-on presser feet to this machine. Following is explanation about
installation of walking foot.
This foot is very useful for sewing materials such as vinyl cloth, synthetic leather, thin leather, etc. These
materials are difficult to be fed when sewing but this foot can prevent such materials from crumpling,
slipping or sticking between presser foot and materials thanks to even feeding upper and lower materials.
You can use walking foot only for sewing STRAIGHT STITCH (
· ) and ZIGZAG STITCH ( ).
You can not use this foot for sewing other patterns including horizontal feed (STRAIGHT & ZIGZAG
STITCH).
1
2
3
1 Adapter
2 Screw (small) *
3 Screw (large) **
Included accessories
5
3
*
**
1
1. Remove the presser foot and the presser foot holder.
2. Attach the adapter for low shank attachments.
* Push the adapter up onto the end of the presser bar as far
as possible.
* Use the metal disk provided with your machine (accessory
#14 on page 7) or screw driver to tighten the screw (small)
firmly.
*
When attaching the adapter, be sure to use the metal disk
or screw driver to tighten the screw firmly. If the screw is not
completely tightened, injuries may occur.
3. Fix the connecting lever of Walking foot to the needle fixing
screw and install Walking foot onto the presser bar. Lower
the presser foot and tighten the presser foot holder screw
(large).
**
Before sewing, be sure to turn the balance wheel toward
you slowly to check that the needle does not touch the
presser foot, otherwise injuries may occur. Please sew with
slow to medium speed.
Installation of walking foot
1 Connection lever
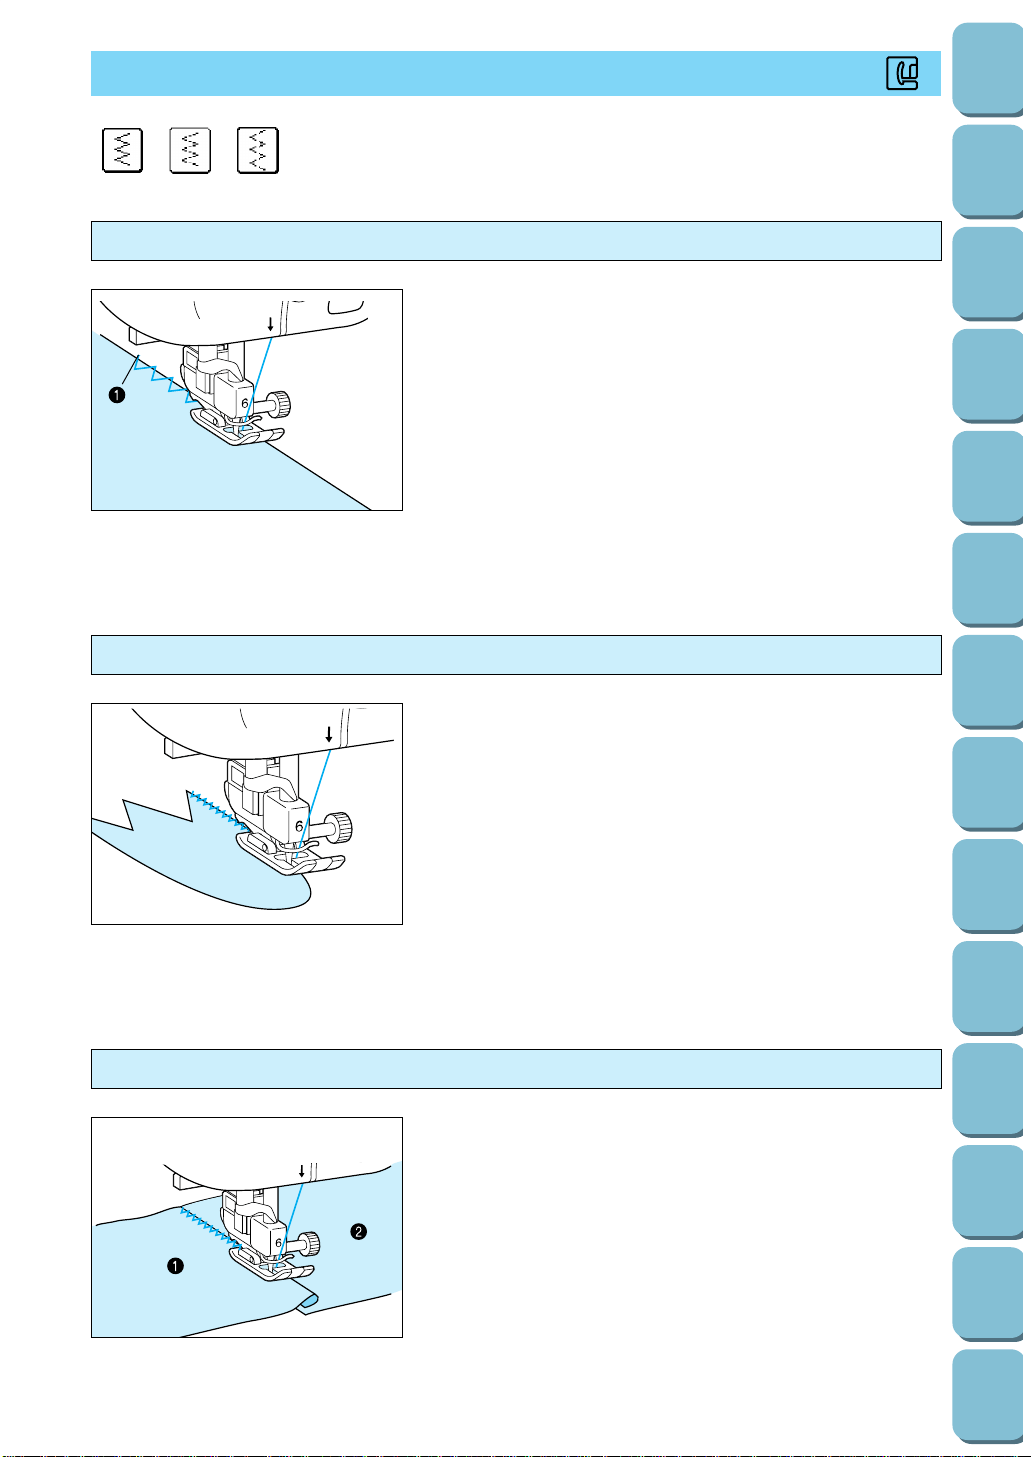
48
Utility
Stitches
Characters
and
Decorative
Stitches
Embroidering
Editing
Embroidery
Patterns
Retrieving
My
Custom
Stitch
TM
Maintenance
Error
Messages
Trouble
shooting
Sewing
Chart
Patterns
(Programmed
in Machine)
Patterns
(Memory
Card)
Sewing
Setting Up
ZIGZAG STITCHES
1 Zigzag stitch
2 Elastic zigzag stitch
3 Elastic zigzag stitch
123
5
Sew the overcasting along the edge of the fabric so that the
right hand side needle drop point is over the edge of the fabric.
1 Needle drop point
Overcasting (using a zigzag stitch)
5
Attach the applique using adhesive or basting, then sew it.
* Sew a zigzag stitch, while positioning the right hand needle
drop point just outside the edge of the fabric.
Applique (using a zigzag stitch)
5
3
Turn back the desired width of fabric and position it over the
lower fabric, then sew so that the stitch bridges both pieces of
fabric.
1 Upper fabric
2 Lower fabric
Patchwork (for crazy quilt)
J
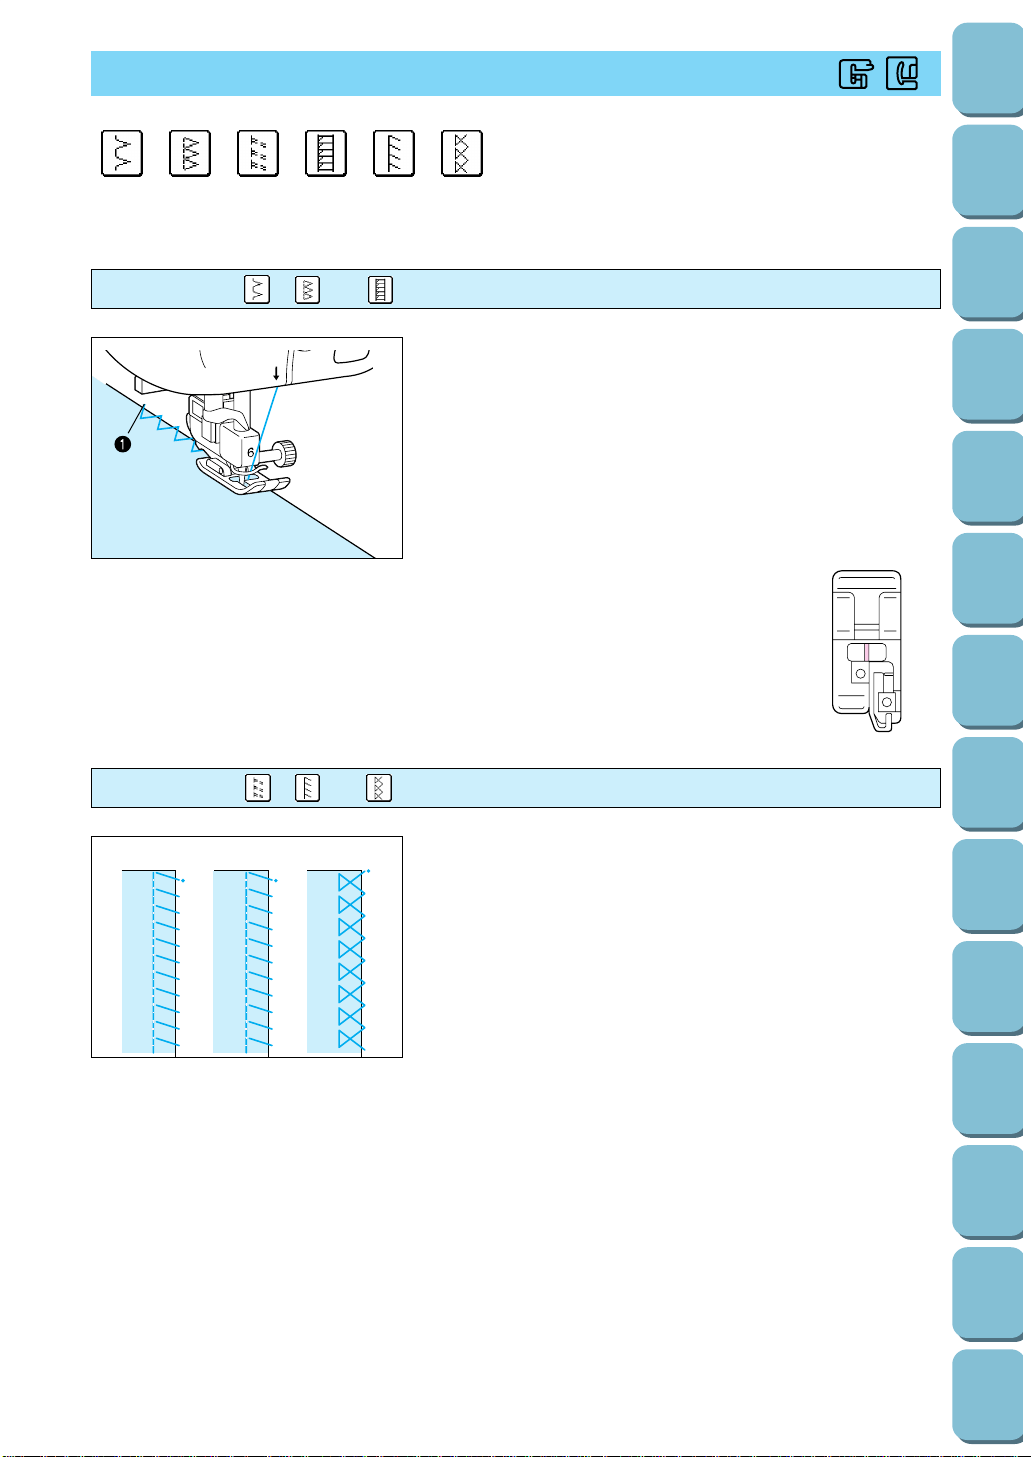
49
Utility
Stitches
Characters
and
Decorative
Stitches
Embroidering
Editing
Embroidery
Patterns
Retrieving
My
Custom
Stitch
TM
Maintenance
Error
Messages
Trouble
shooting
Sewing
Chart
Patterns
(Programmed
in Machine)
Patterns
(Memory
Card)
Sewing
Setting Up
OVERCASTING
1 Thin and medium fabrics
2 Thick fabric
3 Thick and medium stretch fabric
4 Medium stretch fabric
5 Stretch fabric
6 Stretch fabric
J
1234 5 6
5
Sew the fabric while placing fabric edge against the guide of
presser foot “G”.
1 Guide
* When the automatic thread cutting and automatic
reinforcement stitch are preset, a reinforcement stitch will be
sewn automatically at the start of sewing. Press the
“REVERSE STITCH” button to sew a reinforcement stitch
and trim the thread automatically at the finish of sewing.
CAUTION
After the stitch width has been adjusted,
turn the balance wheel by hand and check
that the needle does not touch the presser
foot.
If it does touch, the needle may break and
injury could result.
When using , or stitches
Attach presser foot “J” and let the needle drop slightly past the
edge of the fabric before starting to sew.
* When the automatic thread cutting and automatic
reinforcement stitch are preset, a reinforcement stitch will be
sewn automatically at the start of sewing. Press the
“REVERSE STITCH” button to sew a reinforcement stitch
and trim the thread automatically at the finish of sewing.
When using , or stitches
G
G
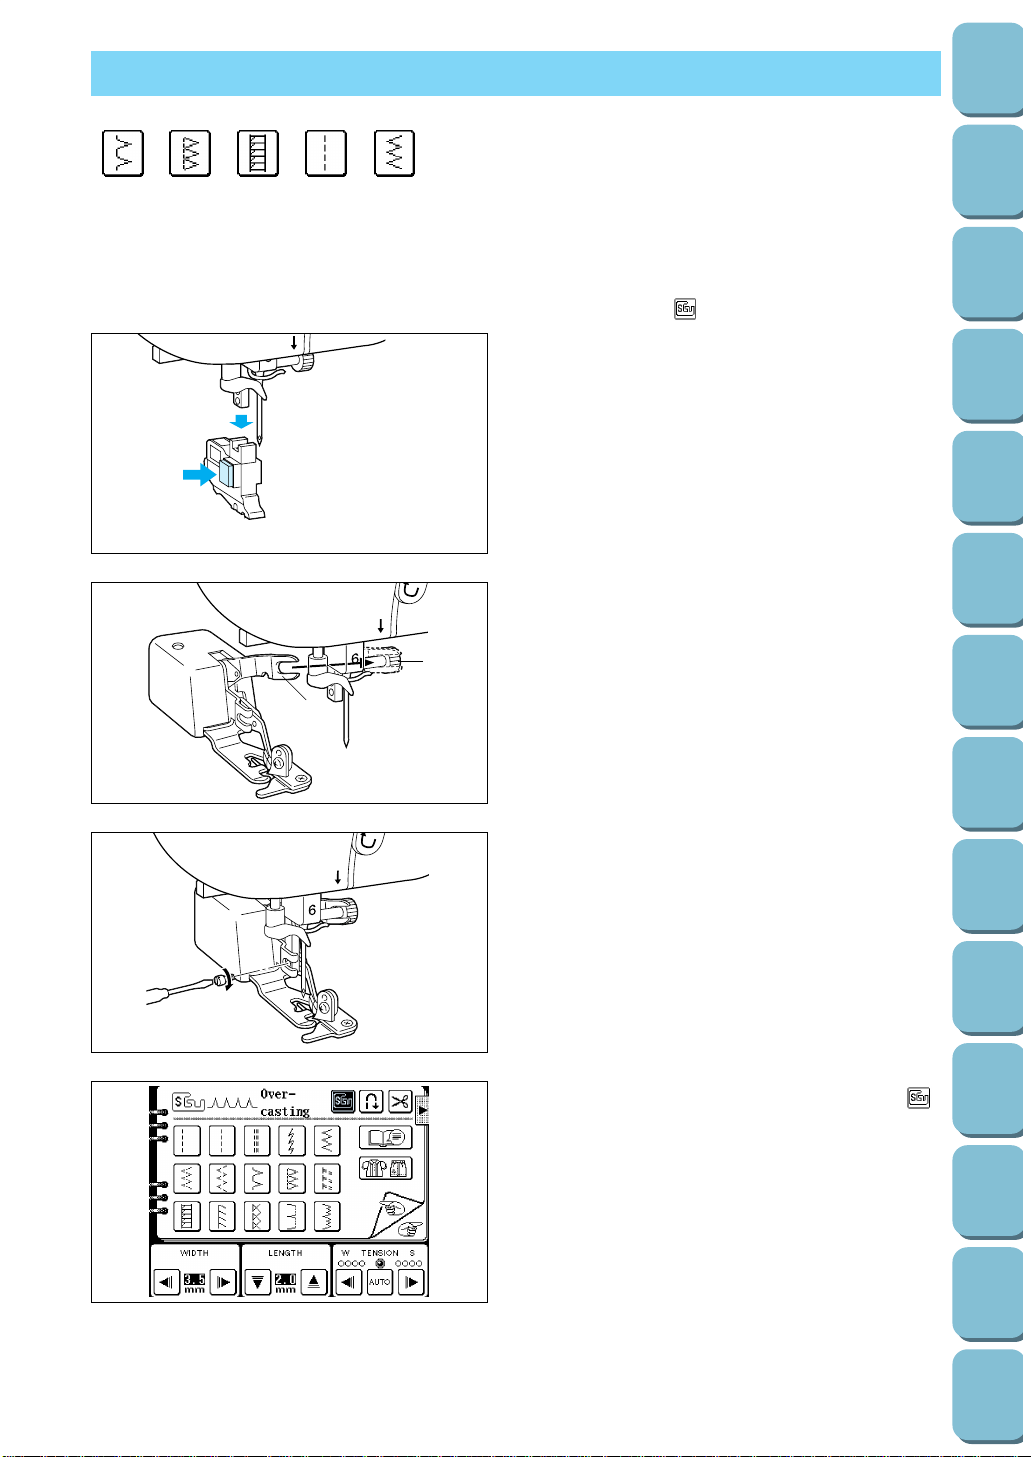
50
Utility
Stitches
Characters
and
Decorative
Stitches
Embroidering
Editing
Embroidery
Patterns
Retrieving
My
Custom
Stitch
TM
Maintenance
Error
Messages
Trouble
shooting
Sewing
Chart
Patterns
(Programmed
in Machine)
Patterns
(Memory
Card)
Sewing
Setting Up
OVERCASTING (When using the side cutter)
1 Thin and medium fabrics
2 Thick fabric
3 Thick and medium stretch fabric
4 Normal sewing
5 Zigzag stitch
By using the side cutter, you can do overcasting
while cutting the fabric.
If using the side cutter, select the pattern and
then touch the “
”
key.
1234 5
5
1. Push the “NEEDLE POSITION” button to
raise the needle, and then turn off the power.
2. Raise the presser foot lever.
3. While pressing the black button to the left of
the presser foot holder, pull the presser foot
holder downward to remove it.
5
3
2
1
4. Set the screw of the needle bar into the fork of
the operating lever.
1 Screw of the needle bar
2 Operating lever
* Make sure that the screw is held firmly by the
fork.
5
3
5. With the presser foot raised, align the presser
foot holder screw hole directly with the notch
in the side cutter, then insert the screw
provided in your accessory bag (accessory #3
on page 7) and lightly tighten it. Lower the
presser foot lever and firmly tighten the screw.
6. Select the pattern and then touch the “ ”
key. The necessary adjustment for the side
cutter will be carried out automatically.

51
Utility
Stitches
Characters
and
Decorative
Stitches
Embroidering
Editing
Embroidery
Patterns
Retrieving
My
Custom
Stitch
TM
Maintenance
Error
Messages
Trouble
shooting
Sewing
Chart
Patterns
(Programmed
in Machine)
Patterns
(Memory
Card)
Sewing
Setting Up
1
7. Make a cut of about 2 cm in the fabric.
1 2 cm
1
3
2
A
5
B
8. Place the fabric as shown left figure B.
–Right side of cut: on top of the guide plate
–Left side of cut: underneath the presser foot
1 Guide plate (lower knife)
2 Presser foot
9. Thread the needle, and then pull out a long
section of the upper thread, pass it below the
presser foot and pull it out in the fabric feed
direction. (See left figure B)
2 Presser foot
3 Upper thread
10.Lower the presser foot lever.
CAUTION
If the width has been adjusted, turn the
balance wheel by hand to check that the
needle does not touch the side cutter. If the
needle touches the side cutter, it may cause
the needle to break.
When sewing straight stitches only
The seam margin should be about 0.5 cm.
1 Seam margin
* Make sure that you touch the “ ” key when
using the side cutter.
* Clean the side cutter after use, otherwise dust
and scraps of thread will build up on it.
* Add a small amount of oil as required to the
cutting edge of the cutter.
5
3
1
Note
–The fabric will not be cut if the whole fabric is
simply spread out underneath the presser foot
guide plate. Set the fabric as explained in step
8. above, and the start sewing.
–Check that the needle is raised when the
presser foot lever is raised.
–One layer of 13-oz denim can be cut.
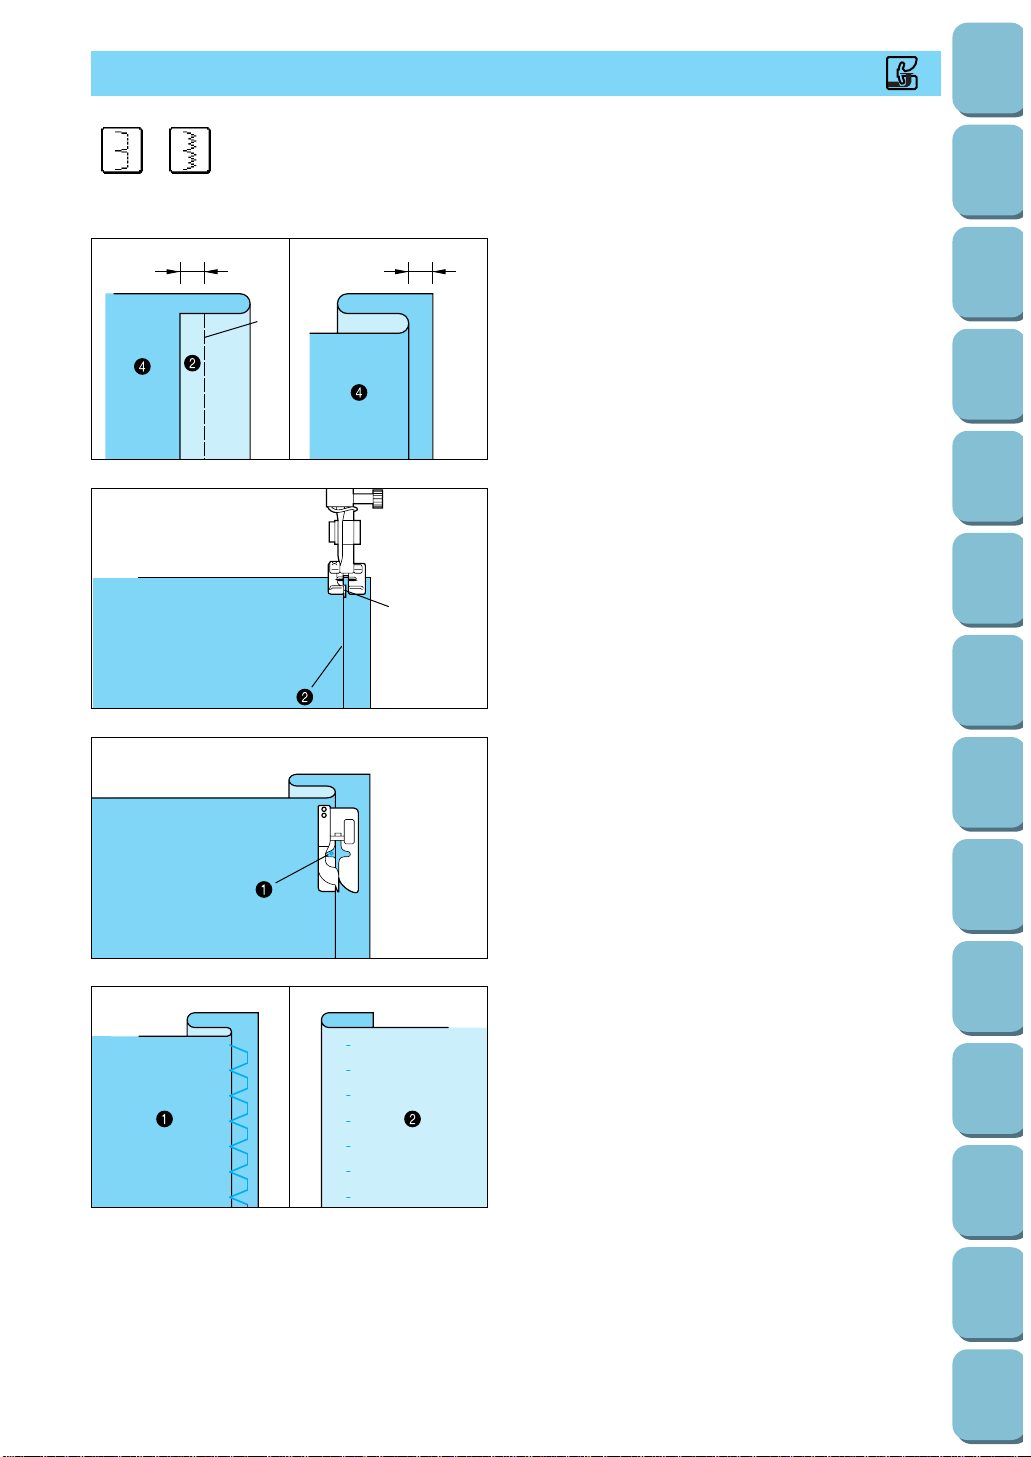
52
Utility
Stitches
Characters
and
Decorative
Stitches
Embroidering
Editing
Embroidery
Patterns
Retrieving
My
Custom
Stitch
TM
Maintenance
Error
Messages
Trouble
shooting
Sewing
Chart
Patterns
(Programmed
in Machine)
Patterns
(Memory
Card)
Sewing
Setting Up
BLIND HEM STITCHES
1 Other fabric
2 Stretch fabric
R
12
13
5
1. Fold the fabric and baste it as illustrated.
1 0.5 cm (3/16”)
2 Surface
3 0.5 cm (3/16”)
4 Reverse side
5 Basting stitch
1
2. Attach presser foot “R”. Lower the presser
foot so that its guide meets the edge of the
folded hem.
1 Guide
2 Folded hem
R
3. Adjust the needle position using the stitch
width setting keys so that needle slightly
catches the fold of the hem, and then sew the
fabric.
1 Needle drop position
* When the automatic thread cutting and
automatic reinforcement stitch are preset, a
reinforcement stitch will be sewn automatically
at the start of sewing. Press the “REVERSE
STITCH” button to sew a reinforcement stitch
and trim the thread automatically at the finish
of sewing.
4. Turn over the fabric and remove the basting
stitch.
1 Reverse side
2 Surface

53
Utility
Stitches
Characters
and
Decorative
Stitches
Embroidering
Editing
Embroidery
Patterns
Retrieving
My
Custom
Stitch
TM
Maintenance
Error
Messages
Trouble
shooting
Sewing
Chart
Patterns
(Programmed
in Machine)
Patterns
(Memory
Card)
Sewing
Setting Up
Adjusting the needle drop position
Touch the “ ” and “ ” stitch width setting
keys to adjust the needle drop position so that
the needle slightly catches the fold of the hem.
A– If the needle catches the fold of hem too
much.
— Touch the “ ” stitch width setting key.
This moves the needle away from the fold.
B– If the needle does not catch the fold of hem
enough.
— Touch the “ ” stitch width setting key.
This moves the needle closer to the fold.
1 Reverse side
2 Surface
A
B
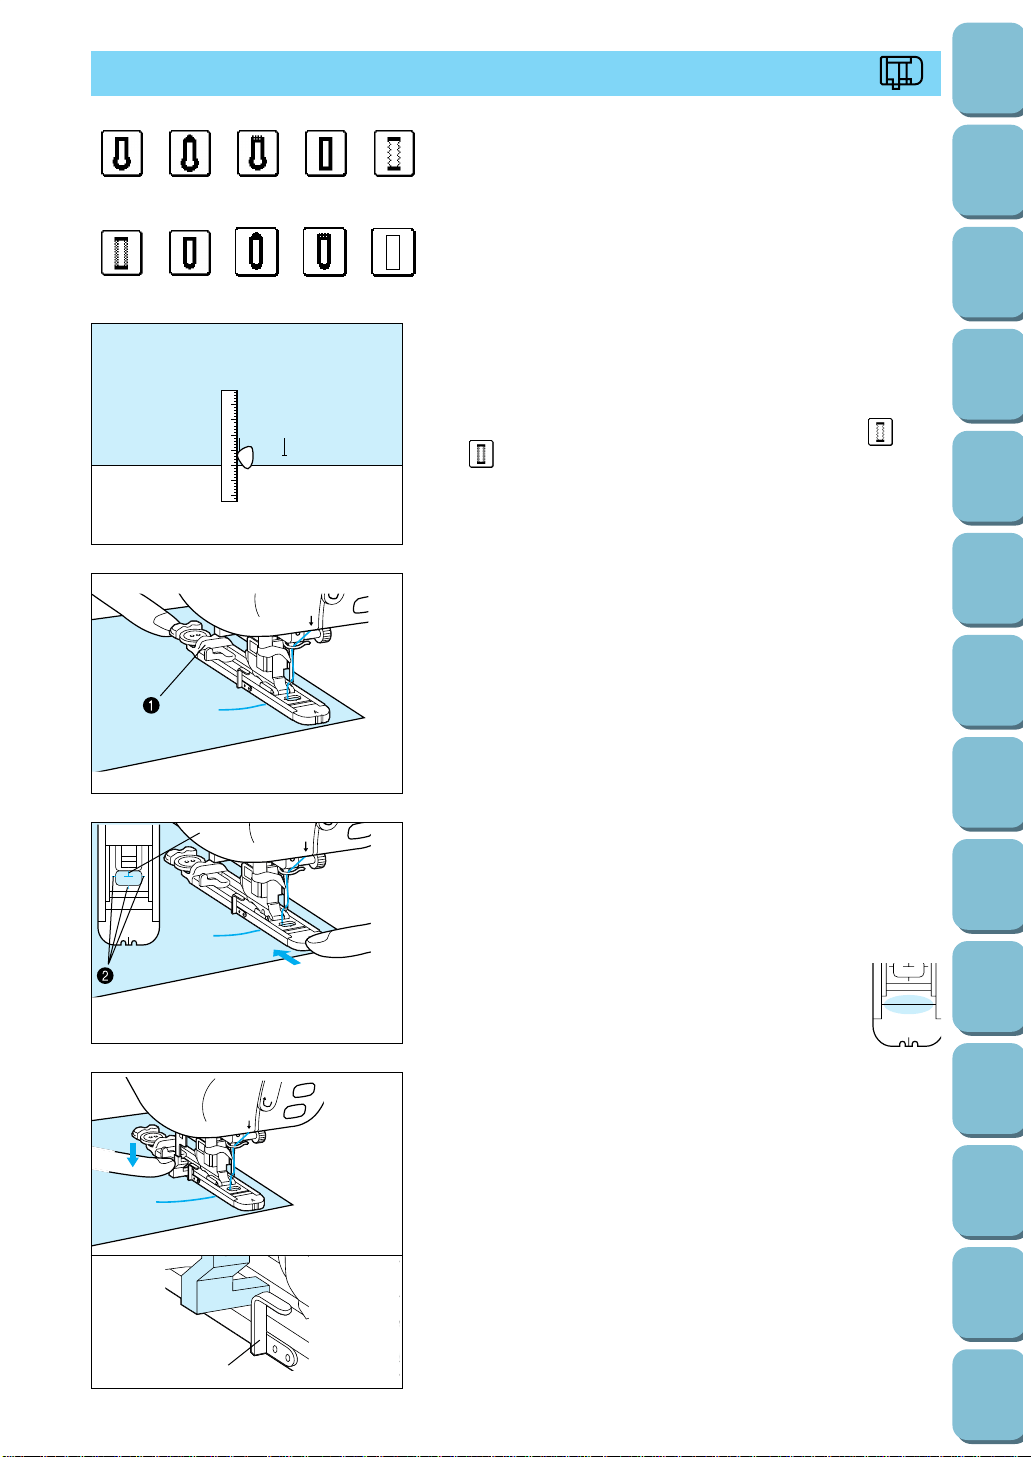
54
Utility
Stitches
Characters
and
Decorative
Stitches
Embroidering
Editing
Embroidery
Patterns
Retrieving
My
Custom
Stitch
TM
Maintenance
Error
Messages
Trouble
shooting
Sewing
Chart
Patterns
(Programmed
in Machine)
Patterns
(Memory
Card)
Sewing
Setting Up
BUTTONHOLE STITCHES
1 Suits, overcoat
2 Jeans, trousers
3 Thick coats
4 Thin or medium fabric
5 Stretch fabric with coarse
weaves
6 Stretch fabric
7 Thin and medium fabric
(for horizontal holes)
8 Jeans, trousers
9 Thick coats
0 The first step in making a
bound buttonhole.
A
1234 5
6789 0
1. Mark the positions of the buttonholes on the fabric.
* The maximum buttonhole length is 3 cm (1-3/16”) (total of
diameter + thickness of button).
* Thick thread (#30) cannot be used in with the “ ” and
“ ” patterns.
5
3
2. Draw out the button holder plate and insert the button.
1 Button holder plate
A
5
1
5
3
3. Raise the presser foot and adjust the fabric so that the red
mark on the foot is over the starting mark of your buttonhole.
Lower the presser foot into position.
1 Mark on fabric for buttonhole position
2 Red mark on presser foot
* After the presser foot lever has been lowered,
set the presser foot so that there is no gap
behind the section marked with an “A”, otherwise
the size of the stitch will not be correct. To do
this, push the presser foot towards the back of
the machine as shown in the left figure.
* Pass the thread underneath the presser foot.
4. Lower the buttonhole lever and position it behind the metal
bracket on the buttonhole foot.
1 Metal bracket on the buttonhole foot
A
1
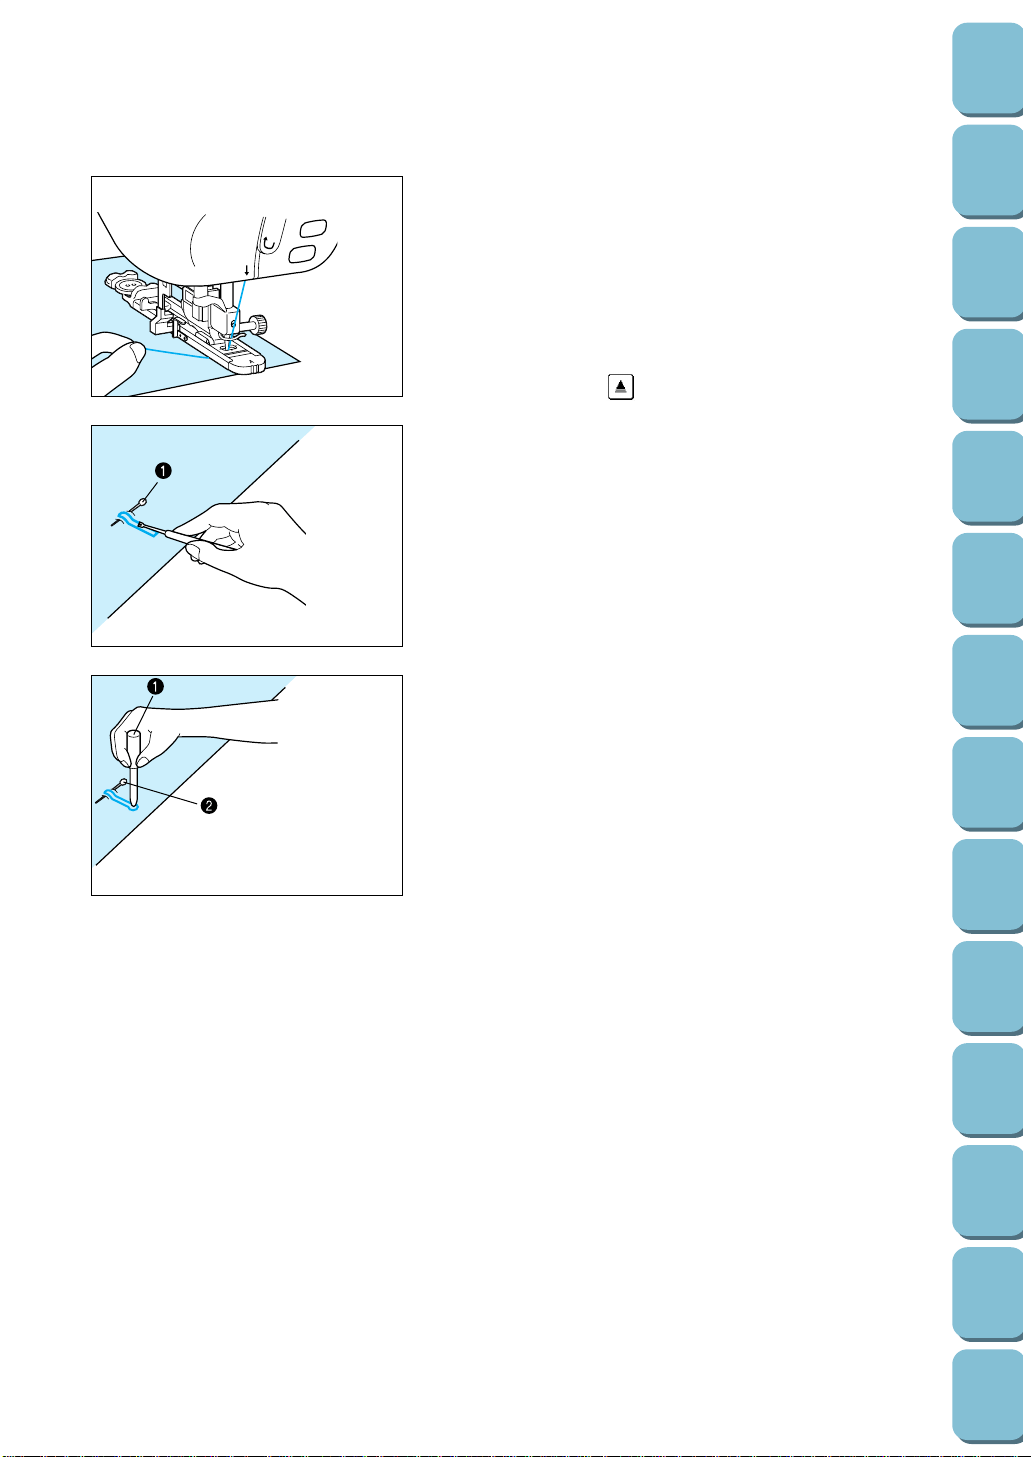
55
Utility
Stitches
Characters
and
Decorative
Stitches
Embroidering
Editing
Embroidery
Patterns
Retrieving
My
Custom
Stitch
TM
Maintenance
Error
Messages
Trouble
shooting
Sewing
Chart
Patterns
(Programmed
in Machine)
Patterns
(Memory
Card)
Sewing
Setting Up
5
3
5. Press the “START/STOP” button to start the machine, while
gently holding the end of the upper thread.
* Gently, feed the fabric by hand.
* The machine will stop with a reinforcement stitch
automatically after sewing is completed.
* If you touch the automatic thread cutting key prior to sewing,
the machine cuts both threads automatically after sewing is
completed.
* If the fabric will not feed (for instance, because it is too
thick), touch the “ ” stitch length setting key to increase
the stitch length.
6. Open the buttonhole.
Normal buttonhole and rounded buttonhole
Insert a pin in front of the inside edge of both bar tacks. Insert
the seam ripper into center of buttonhole. Cut towards the first
pin. Then cut toward the other pin.
1 Pin
Keyhole buttonhole
Make a hole using the small eyelet punch in the key end, insert a
pin into the inside edge of the bar tack. Insert a seam ripper into
the hole made with the eyelet punch and cut towards the pin.
1 Small eyelet punch (accessory #7 on page 7)
2 Pin
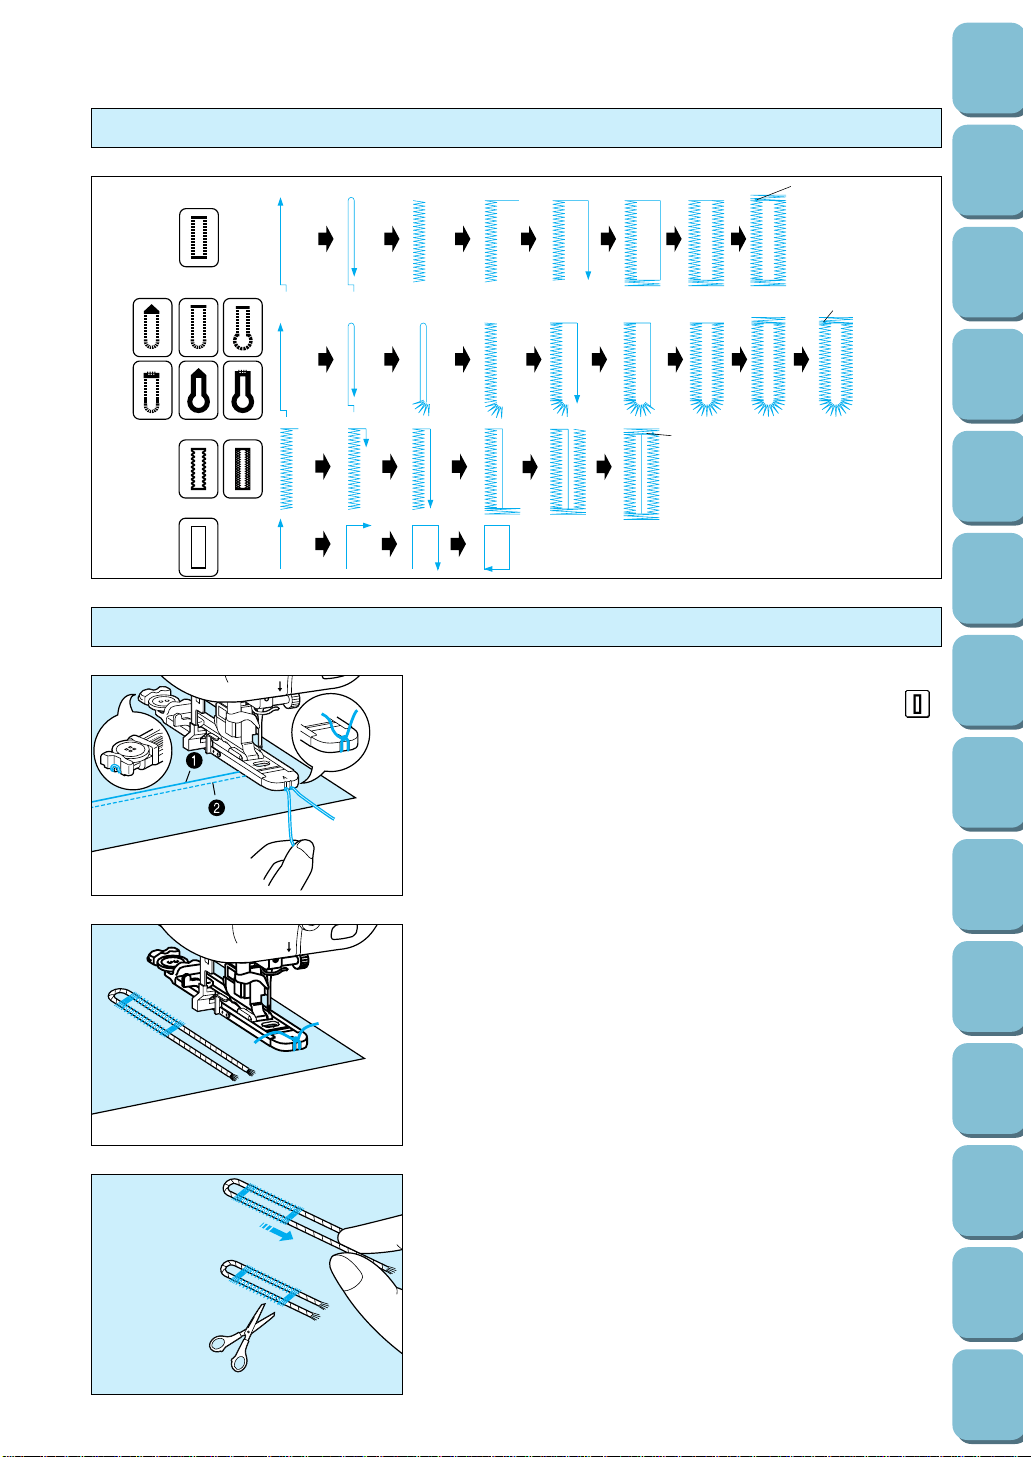
56
Utility
Stitches
Characters
and
Decorative
Stitches
Embroidering
Editing
Embroidery
Patterns
Retrieving
My
Custom
Stitch
TM
Maintenance
Error
Messages
Trouble
shooting
Sewing
Chart
Patterns
(Programmed
in Machine)
Patterns
(Memory
Card)
Sewing
Setting Up
Order of one cycle
1
1
1
1 Reinforcement stitch
Sewing stretch fabrics
5
When sewing buttonholes onto stretch fabric, insert onto stretch
fabric, a gimp thread into the buttonhole seam (“ ”
buttonholes only).
1. Hook the gimp thread onto the end of presser foot “A”, insert
it into the groove at the front of the presser foot and
temporarily tie it there.
1 Upper thread
2 Bobbin thread
5
2. Lower the presser foot and start sewing.
* Set the stitch width to match the diameter of the gimp
thread.
3. Once sewing is completed, pull the gimp thread gently to
remove any slack, and trim any surplus length.
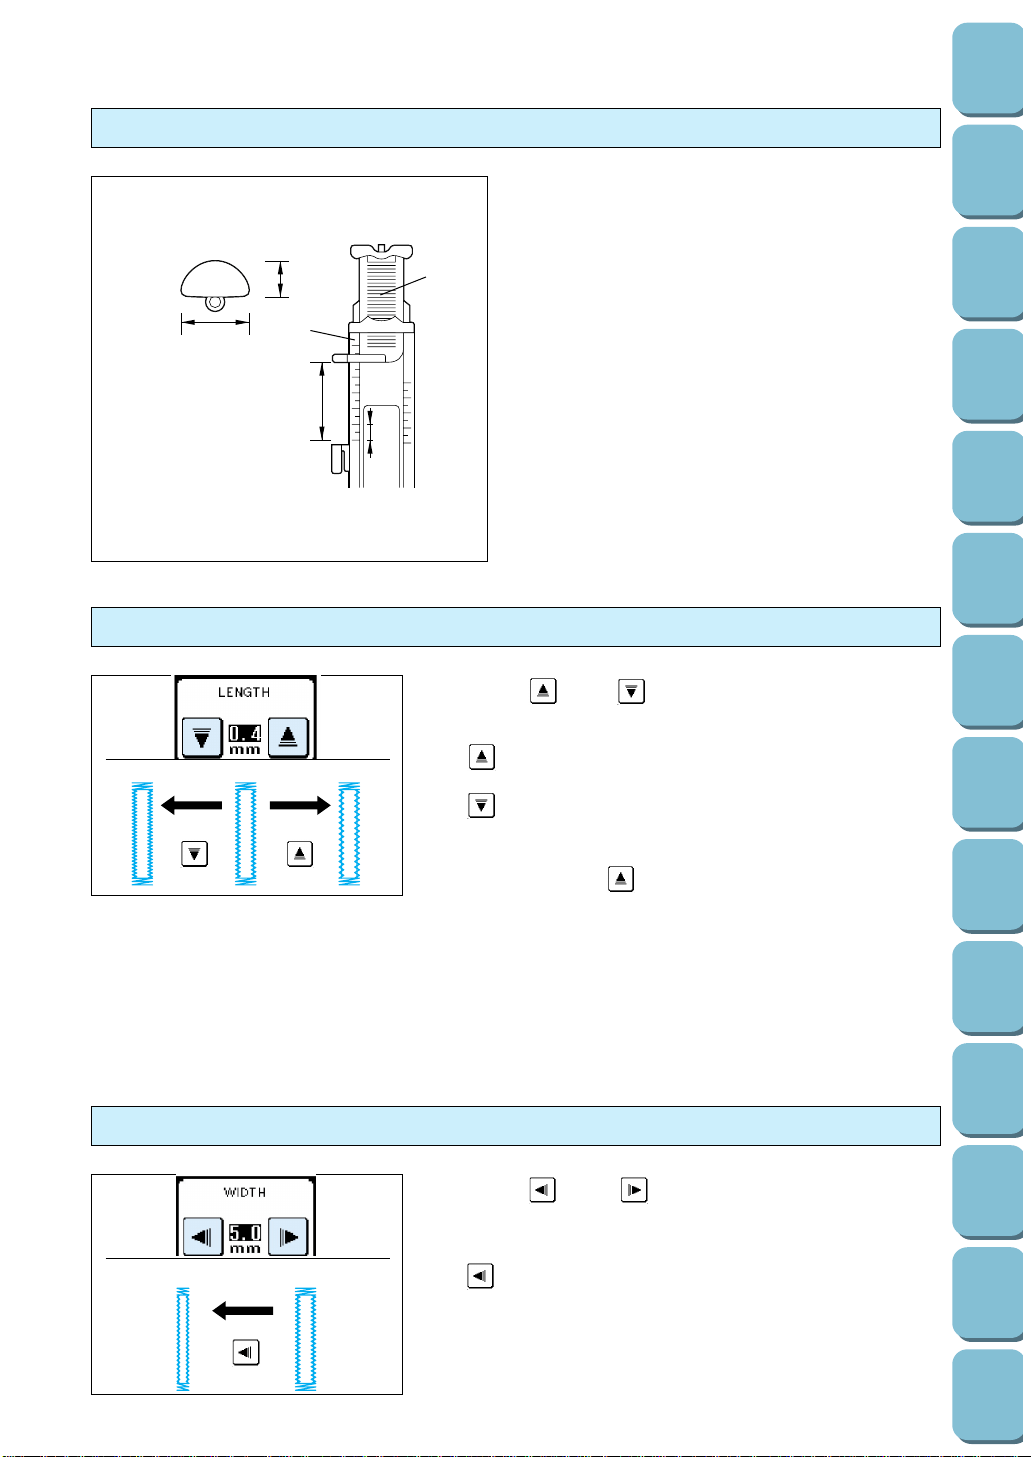
57
Utility
Stitches
Characters
and
Decorative
Stitches
Embroidering
Editing
Embroidery
Patterns
Retrieving
My
Custom
Stitch
TM
Maintenance
Error
Messages
Trouble
shooting
Sewing
Chart
Patterns
(Programmed
in Machine)
Patterns
(Memory
Card)
Sewing
Setting Up
4
1
2
6
5
3
Measure the button diameter + thickness to set
the plate.
Example: For a button with a diameter of 1.5
cm (9/16”) and a thickness of 1 cm
(3/8”), the scale should be set at 2.5
cm (1”)
1 Thickness [1 cm (3/8”)]
2 Diameter [1.5 cm (9/16”)]
3 Button holder plate
4 Scale
5 Diameter + thickness [2.5 cm (1”)]
[0.5 cm (3/16”) in one scale.]
6 0.5 cm (3/16”)
Buttons that do not fit into the guide plate (Odd-shaped buttons)
Changing the stitch length
321
Touch the “ ” and “ ” stitch length setting keys to adjust
the stitch length.
1 “ ”: Longer
2 Normal length 0.4 mm (1/64”)
3 “ ”: Shorter
* If the fabric will not feed (for instance, because it is too
thick), touch the “ ” stitch length setting key to increase
the stitch length.
Changing the stitch width
21
Touch the “ ” and “ ” stitch width setting keys to adjust
the stitch width.
1 “AUTO” width 5.0 mm (3/16”)
2 “ ” : Narrower
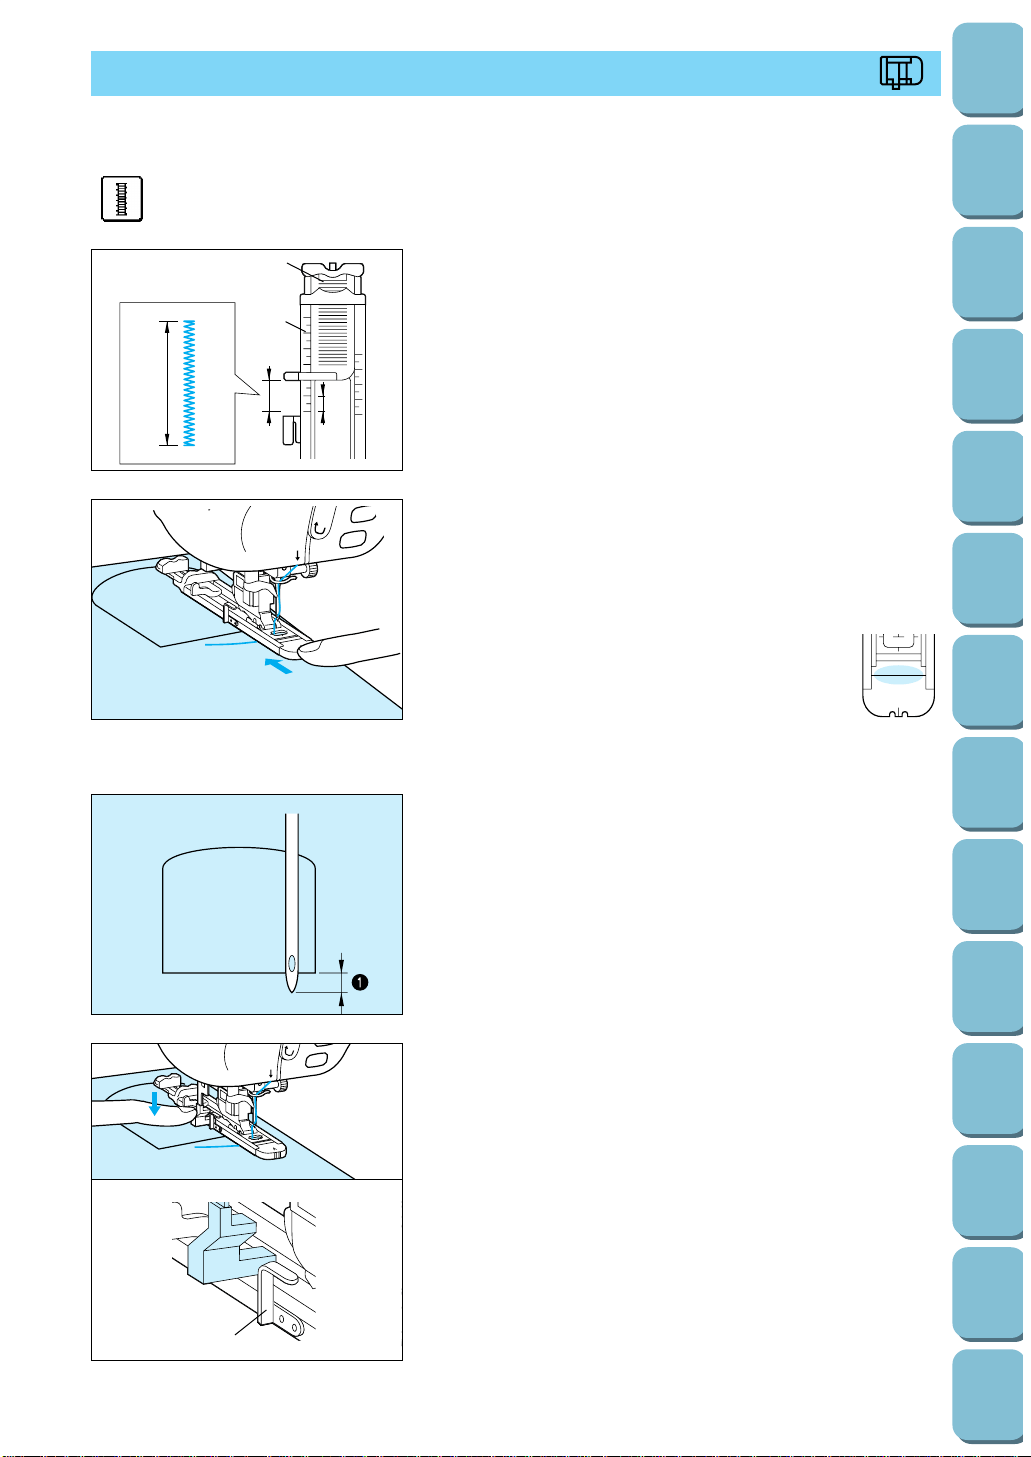
58
Utility
Stitches
Characters
and
Decorative
Stitches
Embroidering
Editing
Embroidery
Patterns
Retrieving
My
Custom
Stitch
TM
Maintenance
Error
Messages
Trouble
shooting
Sewing
Chart
Patterns
(Programmed
in Machine)
Patterns
(Memory
Card)
Sewing
Setting Up
BAR TACKING
Use for reinforcing the openings of pockets, etc.
A
4
3
2
1
1. Attach presser foot “A” and set the size by measuring the
area to be bar tacked.
1 Button holder plate
2 Scale
3 0.5 cm (3/16”)
4 Length of bar tack
* 0.5 to 3 cm (3/16” to 1/2”) is suitable for bar tacking. 0.5 to 1
cm (3/16” to 3/18”) is the normal size.
5
3
2. Position the pocket as illustrated with the top of the pocket
facing you. Stitch down the pocket following the pattern
instructions. To secure the pocket with bar tacking align the
needle drop point with the corner of the pocket to be
stitched and move the pocket back 2 mm (1/16”) as shown
below.
* After the presser foot lever has been lowered,
set the presser foot so that there is no gap
behind the section marked with an “A”, otherwise
the size of the stitch will not be correct. To do
this, push the presser foot towards the back of
the machine as shown in the figure.
* Pass the thread underneath the presser foot.
5
3
1
3. Check the first needle drop point and lower the presser foot.
1 2 mm (1/16”)
4. Lower the buttonhole lever and position it behind the metal
bracket on the buttonhole foot.
1 Metal bracket on buttonhole foot
A
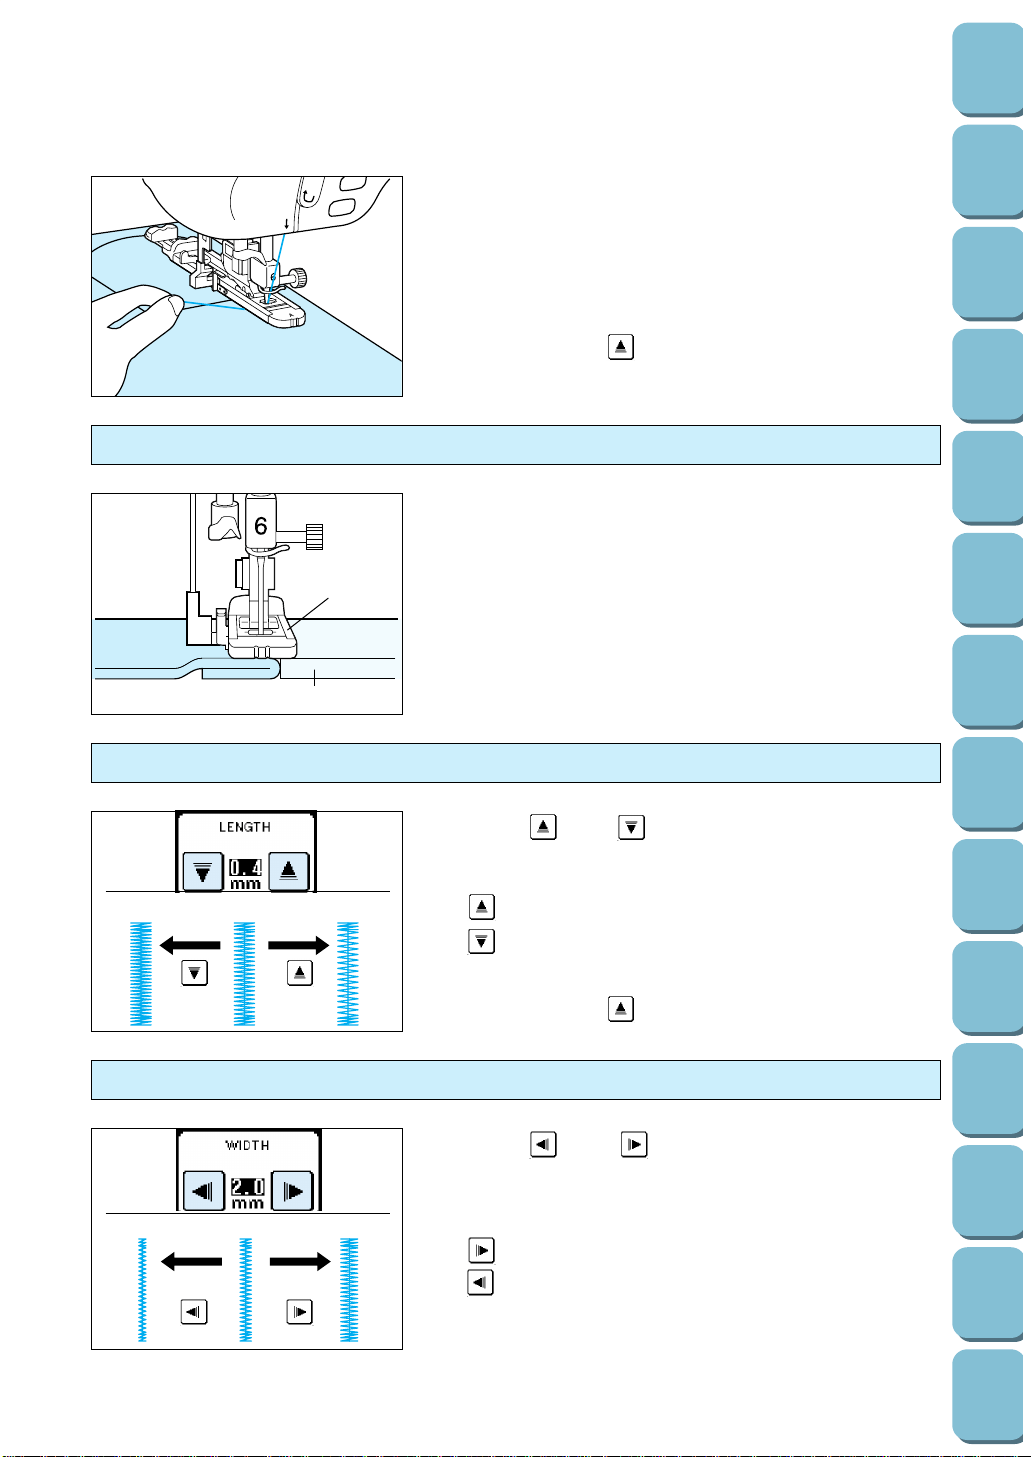
59
Utility
Stitches
Characters
and
Decorative
Stitches
Embroidering
Editing
Embroidery
Patterns
Retrieving
My
Custom
Stitch
TM
Maintenance
Error
Messages
Trouble
shooting
Sewing
Chart
Patterns
(Programmed
in Machine)
Patterns
(Memory
Card)
Sewing
Setting Up
5
3
5. Start the machine while holding the end of the upper thread.
* The machine will sew a reinforcement stitch and stop
automatically after sewing is completed.
* If you touch the automatic thread cutting key prior to sewing,
the machine cuts both threads automatically after sewing is
completed.
* If the fabric will not feed (for instance, because it is too
thick), touch the “ ” stitch length setting key to increase
the stitch length.
Thick fabrics
1
2
Place another piece of fabric or cardboard at the back as thick
as original. This sets the presser foot to the same height and
allows for easier feeding.
1 Presser foot
2 Cardboard
Changing the bar tack stitch length
312
Touch the “ ” and “ ” stitch length setting keys to adjust
the stitch length.
1 “AUTO” length 0.4 mm (1/64”)
2 “ ” : Longer
3 “ ” : Shorter
* If the fabric will not feed (for instance, because it is too
thick), touch the “ ” stitch length setting key to increase
the stitch length.
Changing the bar tack stitch width
123
Touch the “ ” and “ ” stitch width setting keys to adjust
the stitch width.
1 “AUTO” width 2.0 mm (1/16”)
2 “ ”: Wider
3 “ ”: Narrower
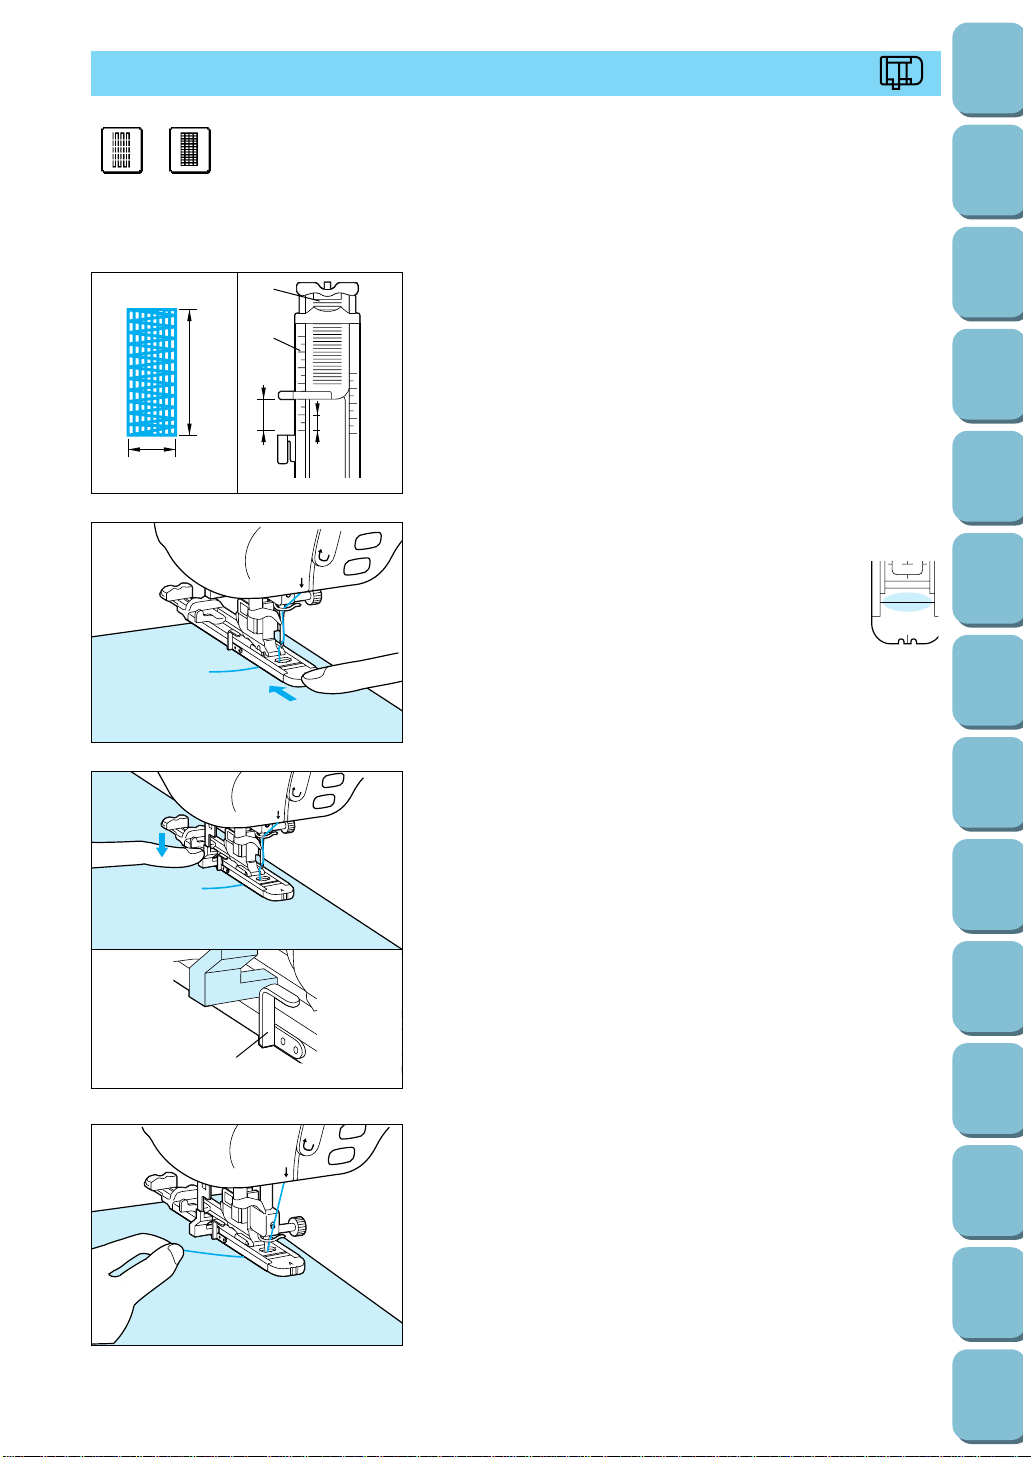
60
Utility
Stitches
Characters
and
Decorative
Stitches
Embroidering
Editing
Embroidery
Patterns
Retrieving
My
Custom
Stitch
TM
Maintenance
Error
Messages
Trouble
shooting
Sewing
Chart
Patterns
(Programmed
in Machine)
Patterns
(Memory
Card)
Sewing
Setting Up
1
2
3
5
4
4
1. Set the stitch length using the scale on presser foot “A”.
1 Scale on the presser foot
2 Button holder plate
3 5 mm (3/16”) at “2” on scale
4 Length of darning is equal to scale setting.
5 Width [7 mm (1/4”)]
* The maximum stitch length for darning is 3 cm (1-3/16”).
5
3
2. Check the needle drop point and then lower the presser foot.
* After the presser foot lever has been lowered,
set the presser foot so that there is no gap
behind the section marked with an “A”, otherwise
the size of the stitch will not be correct. To do
this, push the presser foot towards the back of
the machine as shown in the left figure.
* Pass the thread underneath the presser foot.
5
3
5
3
1
4. Start sewing while holding the upper thread by hand.
* The machine stops automatically after sewing a reinforce-
ment stitch.
* When automatic thread cutting is set, the machine trims
both threads automatically after sewing is completed.
3. Lower the button hole lever to set it behind the metal
bracket.
1 Metal bracket
A
DARNING
1 Medium fabric
2 Thick fabric
A
12

61
Utility
Stitches
Characters
and
Decorative
Stitches
Embroidering
Editing
Embroidery
Patterns
Retrieving
My
Custom
Stitch
TM
Maintenance
Error
Messages
Trouble
shooting
Sewing
Chart
Patterns
(Programmed
in Machine)
Patterns
(Memory
Card)
Sewing
Setting Up
Changing the length of the darning stitch
132
Touch the “ ” and “ ” stitch length setting
keys to adjust the stitch length.
1 “AUTO”: 2.0 mm (1/16”)
2 “ ”: Longer (less dense)
3 “ ”: Shorter (more dense)
* If the fabric will not feed (for instance,
because it is too thick), touch the “ ” stitch
length setting key to increase the stitch
length.
Changing the bar tack stitch width
21
Touch the “ ” and “ ” stitch width setting
keys to adjust the stitch width.
1 “AUTO” : 7.0 mm (1/4”)
2 “ ”: Narrower
Darning stitch cycle
1
1
1 Reinforcement stitch
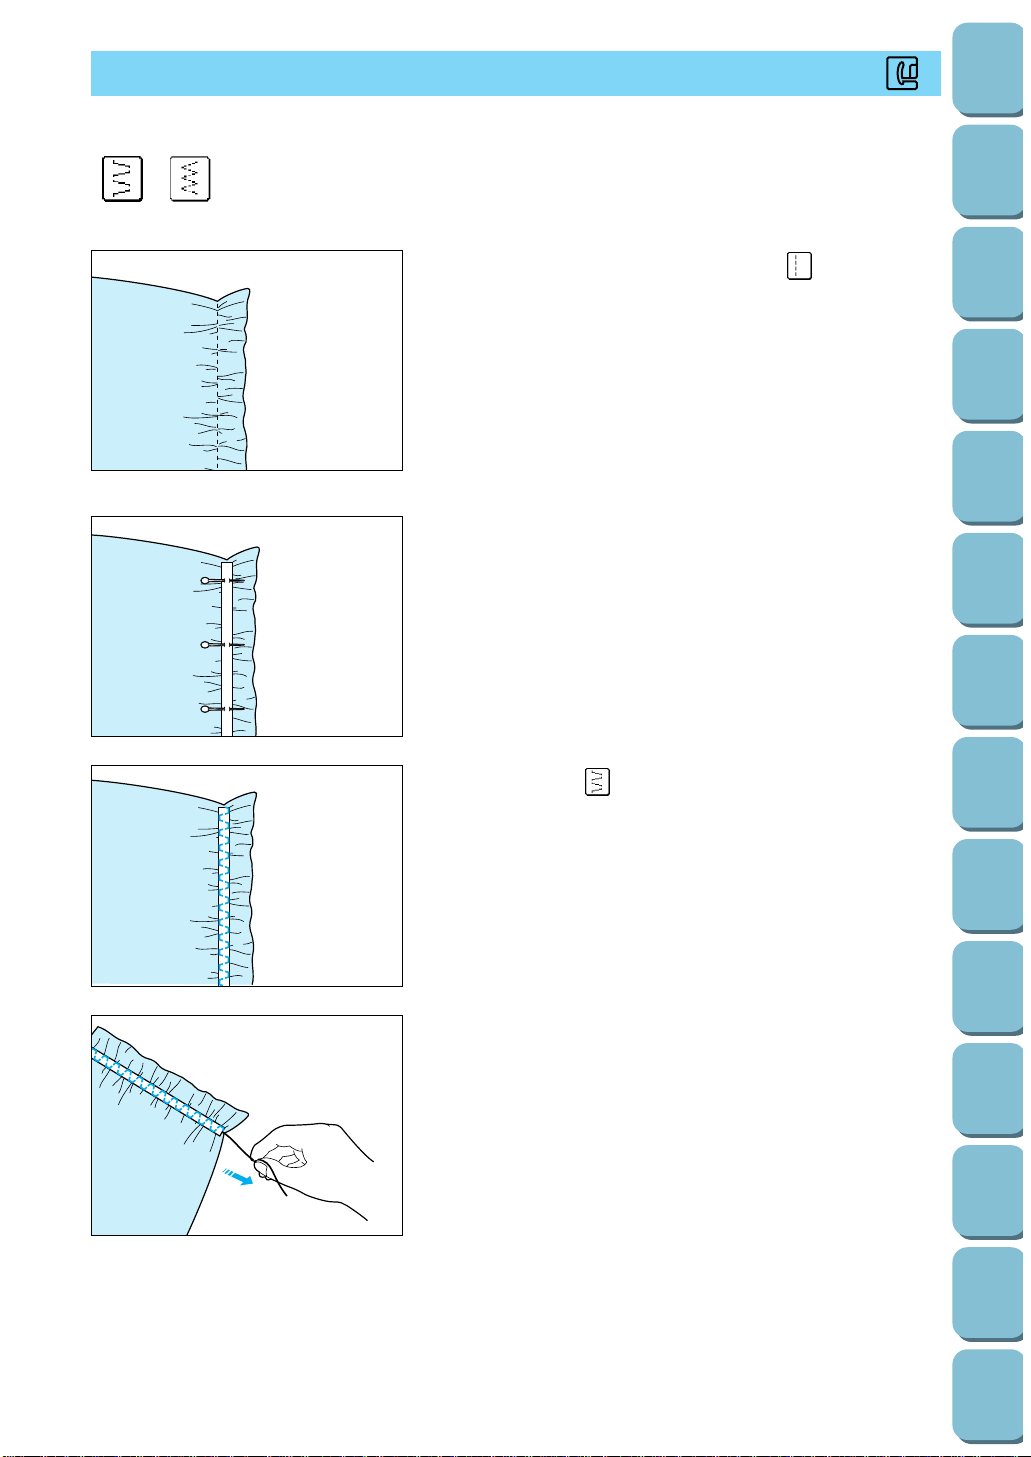
62
Utility
Stitches
Characters
and
Decorative
Stitches
Embroidering
Editing
Embroidery
Patterns
Retrieving
My
Custom
Stitch
TM
Maintenance
Error
Messages
Trouble
shooting
Sewing
Chart
Patterns
(Programmed
in Machine)
Patterns
(Memory
Card)
Sewing
Setting Up
1. Attach presser foot “J”, select pattern “ ”, set the stitch
length to 4.0 mm and set the thread tension to a weak
setting. Then sew a straight stitch.
Pull the bobbin thread to obtain the desired amount of
gather.
Note
Before using the basting stitch, rotate the hand wheel and pull
up the bobbin thread, grasping the top and bobbin thread pull a
length of thread out from the rear of the machine. (Be sure that
the presser foot is lifted.)
2. Place the tape on top of the seam which you have just sewn
and secure it with pins.
3. Select pattern “ ” and then sew along the top of the tape.
4. Pull out the straight stitch thread.
TAPE ATTACHING
1 Patchwork stitch
2 Elastic zigzag stitch
12
J
These stitches are used for attaching tape to thin and medium fabric.
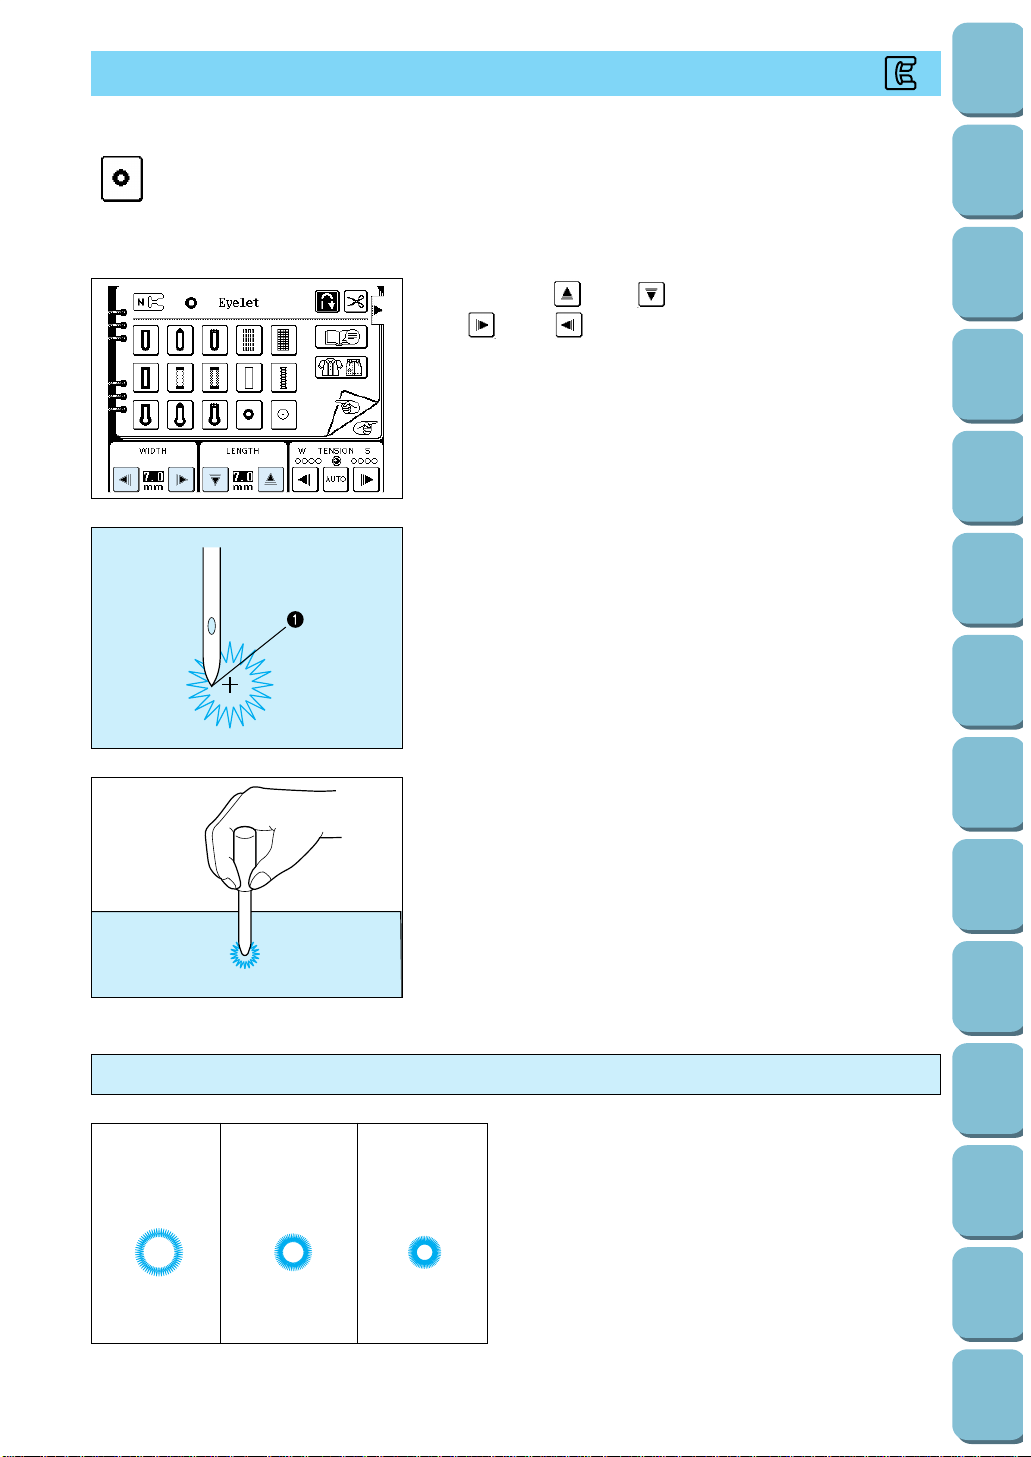
63
Utility
Stitches
Characters
and
Decorative
Stitches
Embroidering
Editing
Embroidery
Patterns
Retrieving
My
Custom
Stitch
TM
Maintenance
Error
Messages
Trouble
shooting
Sewing
Chart
Patterns
(Programmed
in Machine)
Patterns
(Memory
Card)
Sewing
Setting Up
1. Touch the “ ” and “ ” stitch length setting keys and the
“ ” and “ ” stitch width setting keys to set the size of
the eyelet.
2. Attach presser foot “N”, check the needle drop point and
lower the presser foot, then start sewing.
1 Needle drop point
* The machine stops automatically after sewing a
reinforcement stitch.
* When automatic thread cutting is set, the machine trims
both threads automatically after sewing is completed.
3. Make a hole at the center with an eyelet punch.
EYELET STITCH
N
Stitch for making eyelet on belts, etc.
Size of eyelet (Actual size)
ABC
A– Large: 7.0 mm (5/16”)
B– Medium: 6.0 mm (1/4”)
C– Small: 5.0 mm (3/16”)
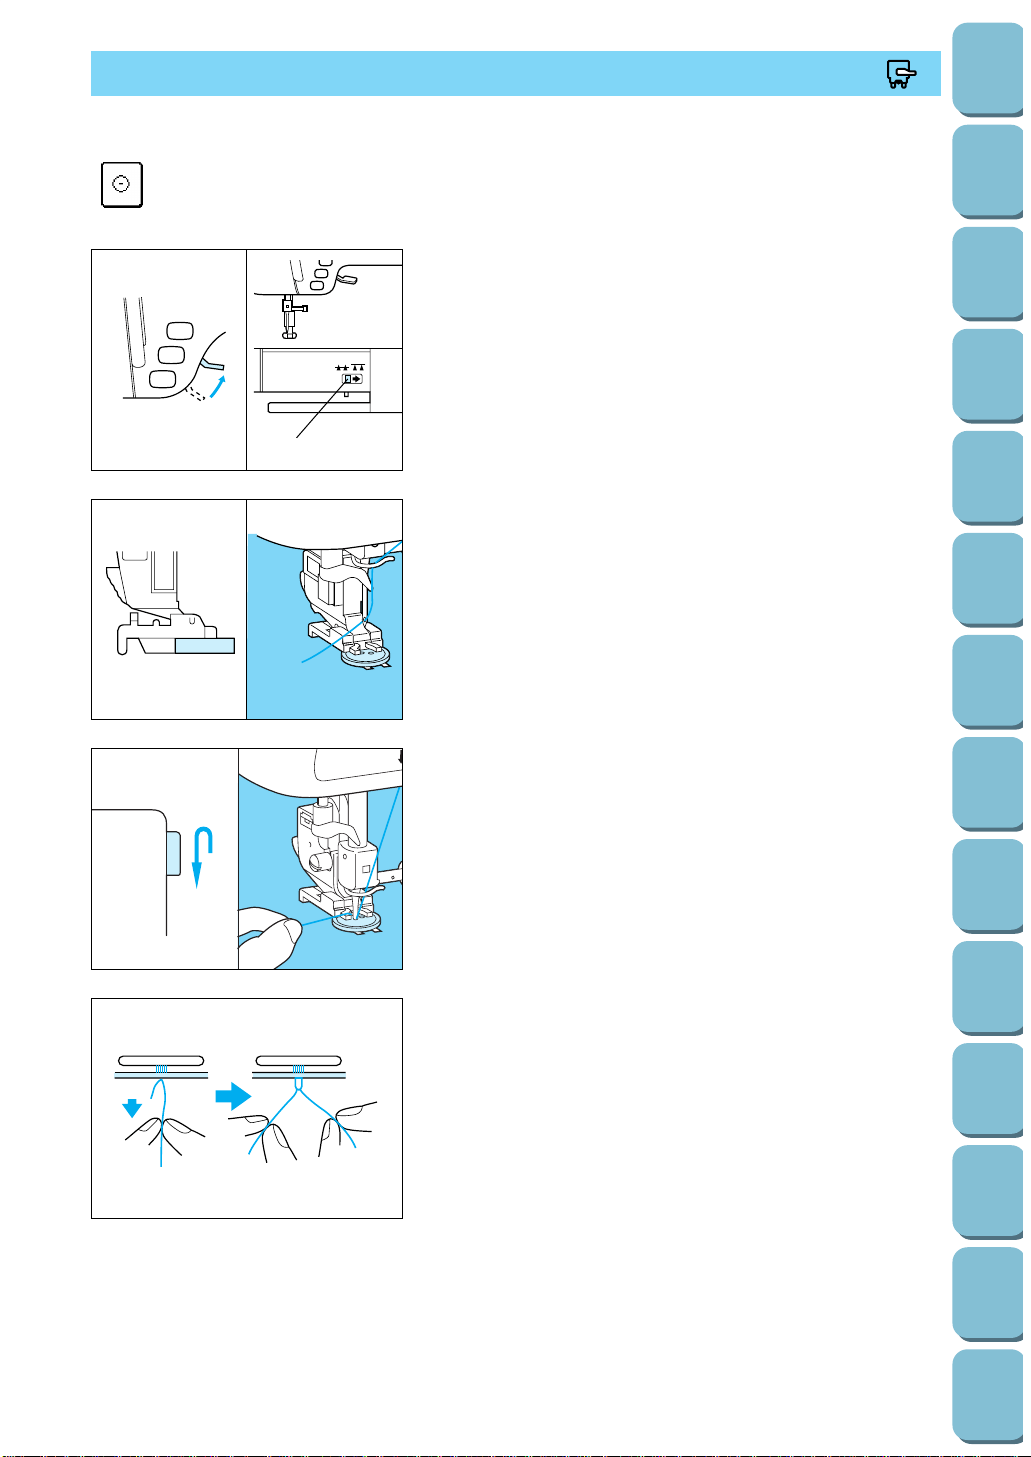
64
Utility
Stitches
Characters
and
Decorative
Stitches
Embroidering
Editing
Embroidery
Patterns
Retrieving
My
Custom
Stitch
TM
Maintenance
Error
Messages
Trouble
shooting
Sewing
Chart
Patterns
(Programmed
in Machine)
Patterns
(Memory
Card)
Sewing
Setting Up
BUTTON SEWING
M
This stitch is used for attaching buttons.
Do not use the automatic thread cutter when attaching buttons,
(the threads will become difficult to handle and tying off will not
be possible).
1
1. Raise the presser foot lever and slide the feed dog
adjustment lever to the right to lower the feed dog.
1 Feed dog adjustment lever
4. Once sewing is completed, return the feed dog to its original
position, pull the bobbin thread at the sewing end down and
pull the upper thread at the sewing end through to the
reverse side of the fabric. Then tie the thread ends together
and cut the threads at the sewing start.
2. Attach button fitting foot “M”, place the button into the
presser foot and then lower the presser foot.
6
3. Turn the balance wheel to check that the needle goes into
each of the holes in the button correctly, and then start
sewing. Once sewing is completed, the machine will stop
automatically.
* If extra attachment strength is needed, carry out the button
sewing operation twice.
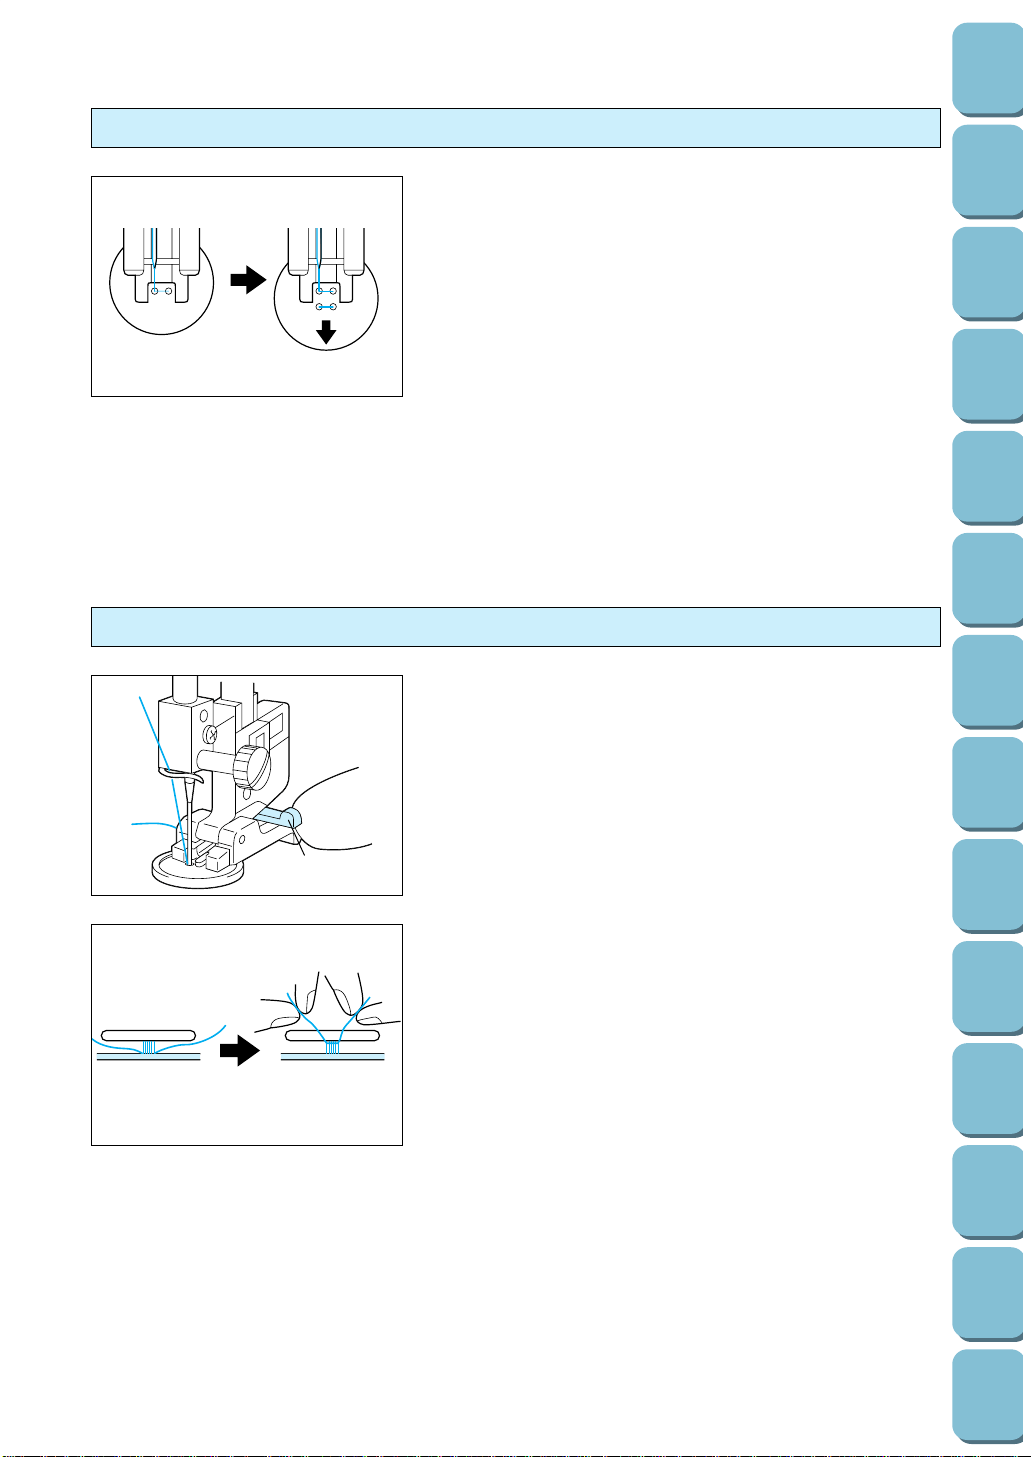
65
Utility
Stitches
Characters
and
Decorative
Stitches
Embroidering
Editing
Embroidery
Patterns
Retrieving
My
Custom
Stitch
TM
Maintenance
Error
Messages
Trouble
shooting
Sewing
Chart
Patterns
(Programmed
in Machine)
Patterns
(Memory
Card)
Sewing
Setting Up
Attaching buttons with four holes
First sew the two holes which are closest to you. Once they
have been sewn, raise the presser foot, move the needle to the
next two holes and then sew them in the same way.
Attaching a shank to the button
6
1
1. Pull the shank lever toward you and then start sewing.
1 Shank lever
2. Hold the upper thread ends at the sewing start and sewing
end which are between the button and the fabric, wind them
around the shank and then tie them firmly together.
3. Tie the ends of the bobbin thread together at the reverse
side of the fabric.
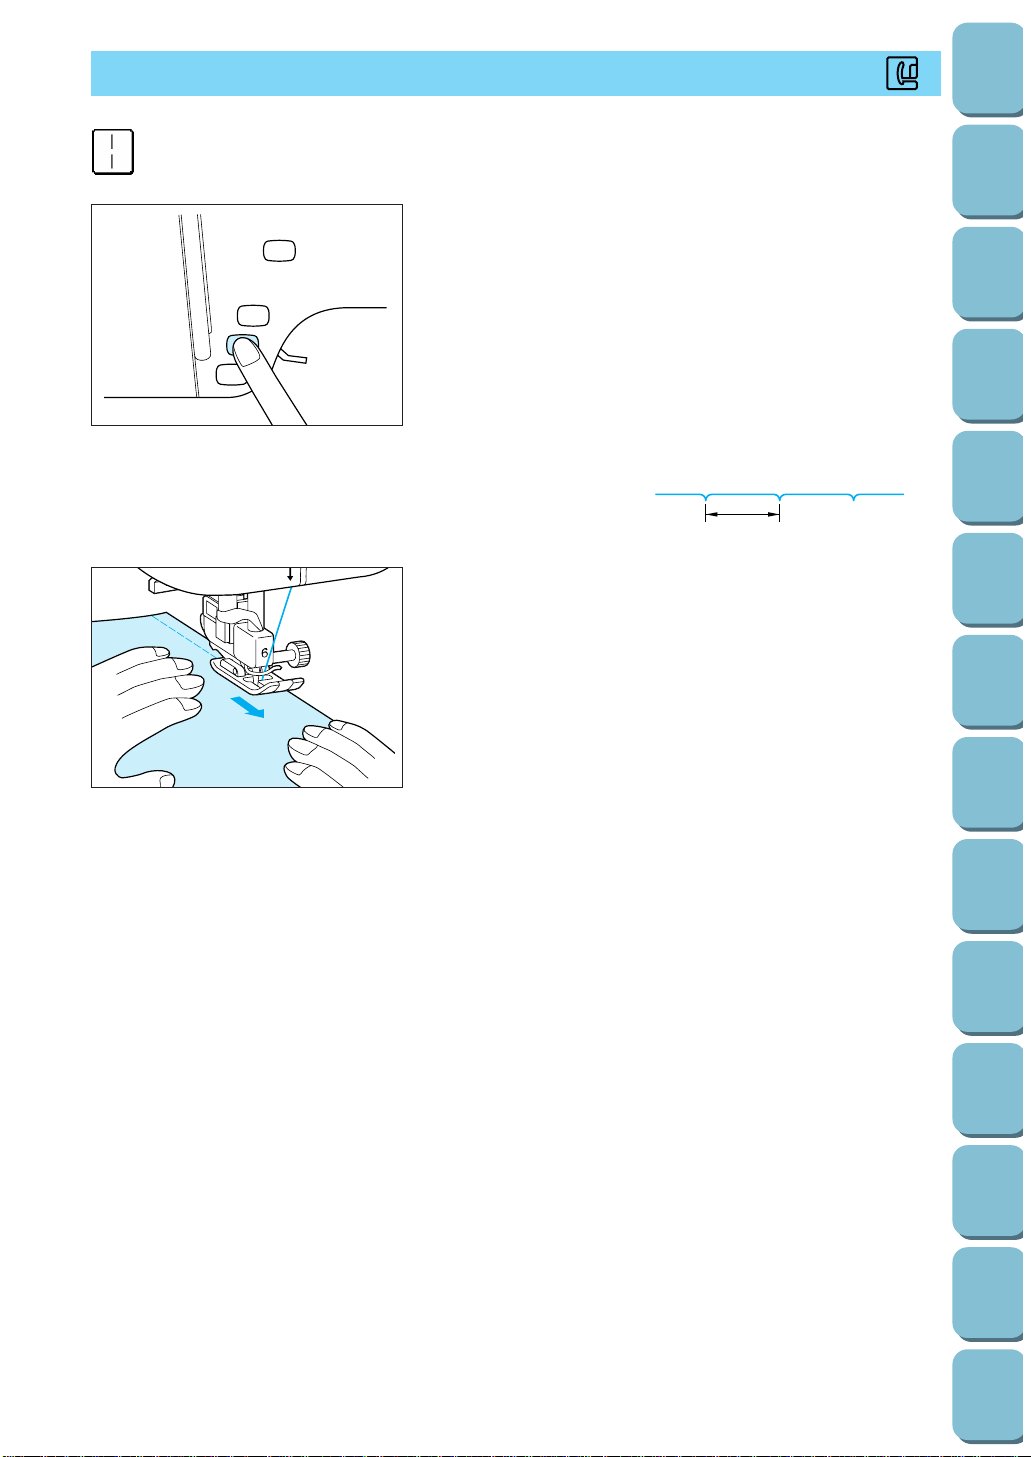
66
Utility
Stitches
Characters
and
Decorative
Stitches
Embroidering
Editing
Embroidery
Patterns
Retrieving
My
Custom
Stitch
TM
Maintenance
Error
Messages
Trouble
shooting
Sewing
Chart
Patterns
(Programmed
in Machine)
Patterns
(Memory
Card)
Sewing
Setting Up
BASTING
1. Attach presser foot “J”. It is suggested that the basting stitch
be started with a reinforcement stitch by pressing the
“REVERSE STITCH” button.
Note
If you do not want to use a reinforcement stitch at the
beginning, you should lift the presser foot, rotate the hand
wheel, pull up the bobbin thread and pull a length of top and
bobbin thread out from the rear of the machine.
* You can change the length of one stitch to between 5 mm
and 30 mm (3/16” to 1-3/16”).
1 5 mm to 30 mm (3/16” to 1-3/16”)
2. Sew while keeping the fabric taut.
3. End sewing with a reinforcement stitch.
J
1

2
3
1. Attach presser foot “J” and sew straight stitches up to the
crotch end. Change to a basting stitch and sew to the top of
the fabric.
1 Crotch end
2 Reverse stitch
3 Basting stitch
4 Reverse side
2. Press the seam allowance open and attach the zipper with a
basting stitch in the middle.
1 Zipper
2 Basting
3 Reverse side
3. Select the “ ” stitch and then touch the “ ” key.
The necessary adjustment for zipper insertion will be carried
out automatically.
5
4. Put the right side of presser foot “I” into the holder. Topstitch
1 cm (3/8”) from the seamed edge of the fabric and then
remove the basting.
1 Surface
Centered application
ZIPPER INSERTION (CENTERED AND SIDE APPLICATION)
Select the pattern and then touch the “ ” key.
I
67
Utility
Stitches
Characters
and
Decorative
Stitches
Embroidering
Editing
Embroidery
Patterns
Retrieving
My
Custom
Stitch
TM
Maintenance
Error
Messages
Trouble
shooting
Sewing
Chart
Patterns
(Programmed
in Machine)
Patterns
(Memory
Card)
Sewing
Setting Up
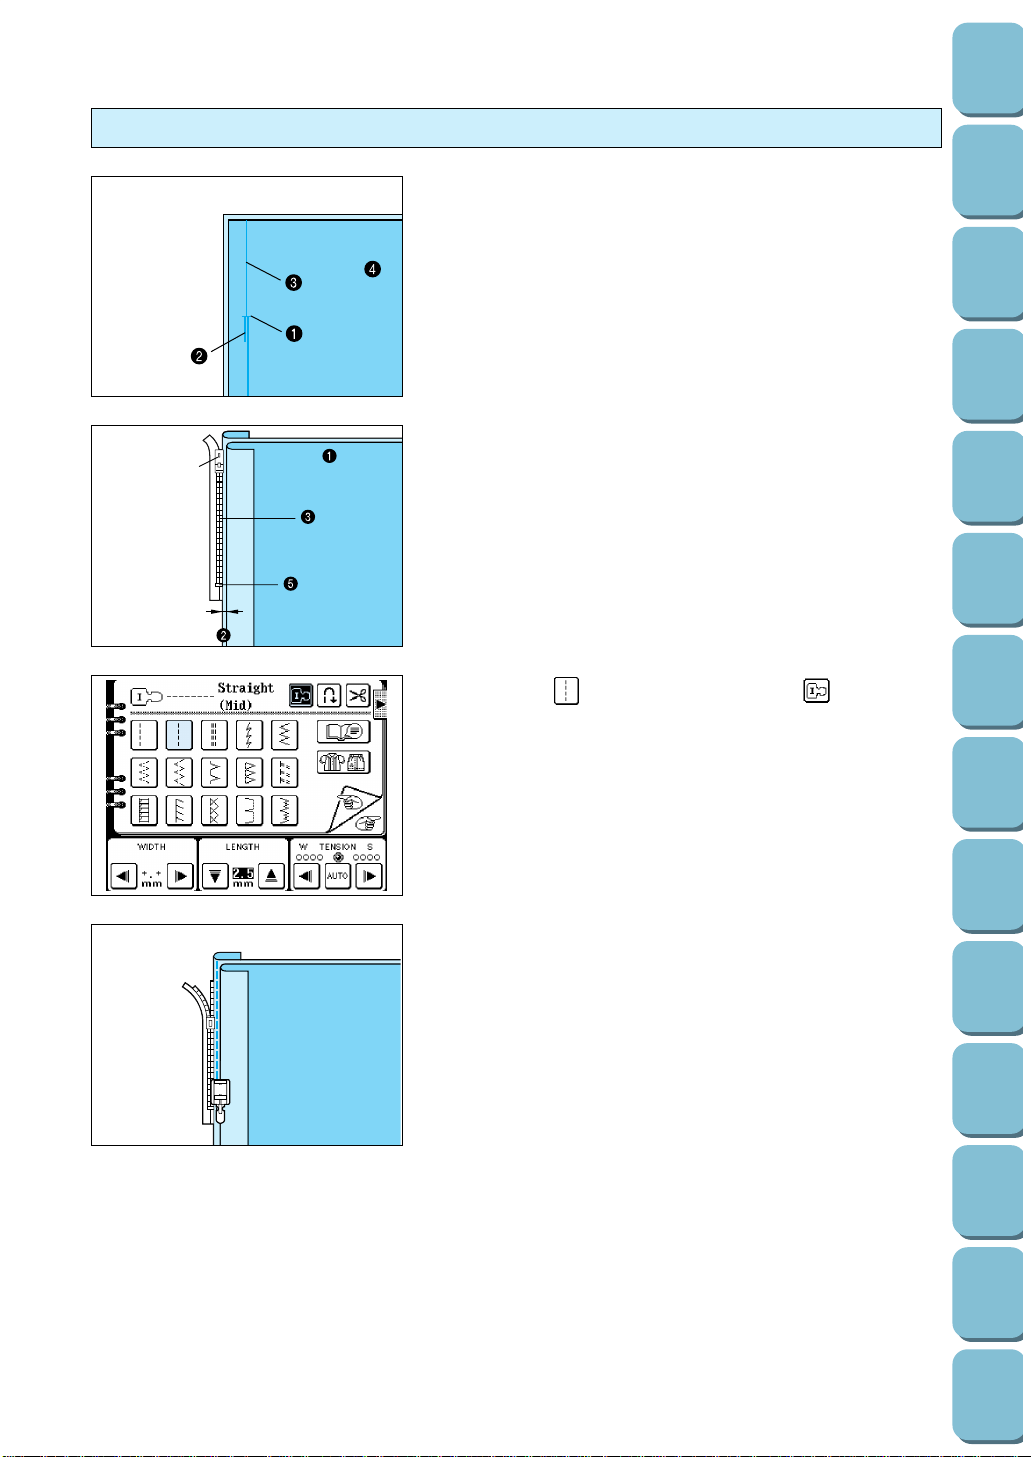
68
Utility
Stitches
Characters
and
Decorative
Stitches
Embroidering
Editing
Embroidery
Patterns
Retrieving
My
Custom
Stitch
TM
Maintenance
Error
Messages
Trouble
shooting
Sewing
Chart
Patterns
(Programmed
in Machine)
Patterns
(Memory
Card)
Sewing
Setting Up
1. Attach presser foot “J” and sew straight stitches up to the
crotch end. Change to a basting stitch and sew to the top of
the fabric.
1 Crotch end
2 Reverse stitch
3 Basting stitch
4 Reverse side
4
2. Press the seam allowance open and align the folded hem
along the teeth of the zipper, while keeping 3 mm (1/8”) for
the sewing space.
1 Reverse side
2 Keep 3 mm (1/8”) for sewing
3 Teeth of zipper
4 Slider on head of zipper
5 Crotch end (Base of zipper)
3. Select the “ ” stitch and then touch the “ ” key.
The necessary adjustment for zipper insertion will be carried
out automatically.
I
4. Put the left side of presser foot “I” into the holder, and then
sew the bottom layer to the crotch end (base of zipper).
* When the automatic thread cutting and automatic
reinforcement stitch are preset, reinforcement stitches will
be sewn automatically at the start of sewing. Press the
“REVERSE STITCH” button to sew a reinforcement stitch
and trim the thread automatically at the finish of sewing.
Side application
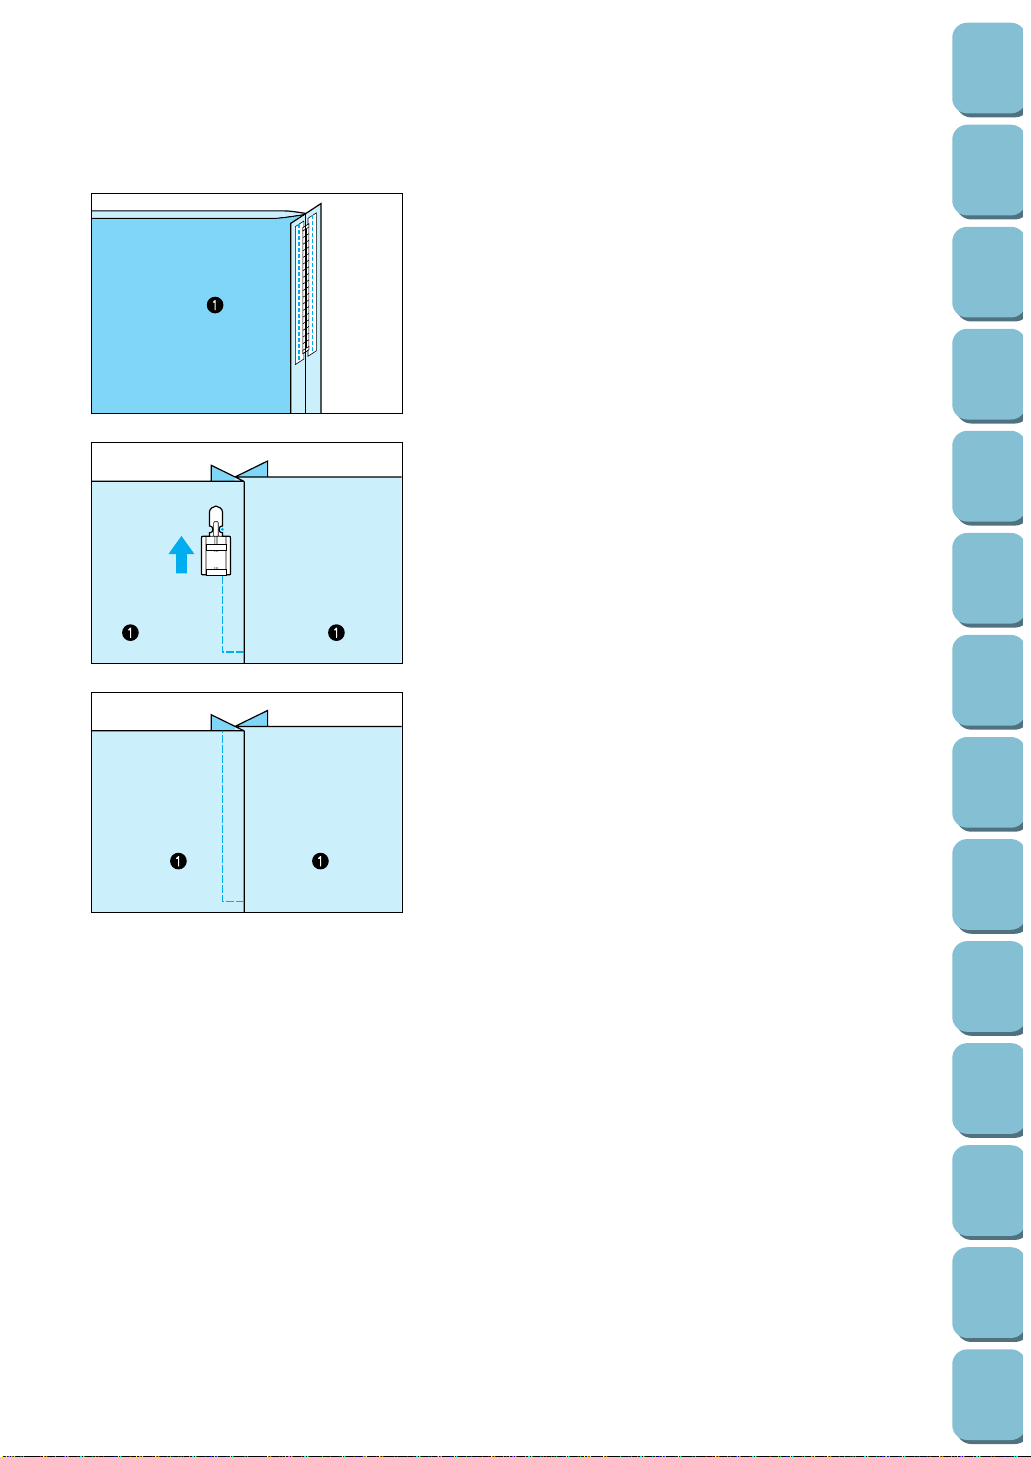
5. Close the zipper and turn over the fabric. Then attach the
other side of the zipper to the fabric.
1 Reverse side
I
6. Turn the fabric over to the right side and sew a straight
stitch 5 cm from the end, stop the machine, lower the
needle, raise the presser foot and then remove the basting
stitches.
1 Surface
7. Move the zipper pull and sew the remaining part.
1 Surface
69
Utility
Stitches
Characters
and
Decorative
Stitches
Embroidering
Editing
Embroidery
Patterns
Retrieving
My
Custom
Stitch
TM
Maintenance
Error
Messages
Trouble
shooting
Sewing
Chart
Patterns
(Programmed
in Machine)
Patterns
(Memory
Card)
Sewing
Setting Up
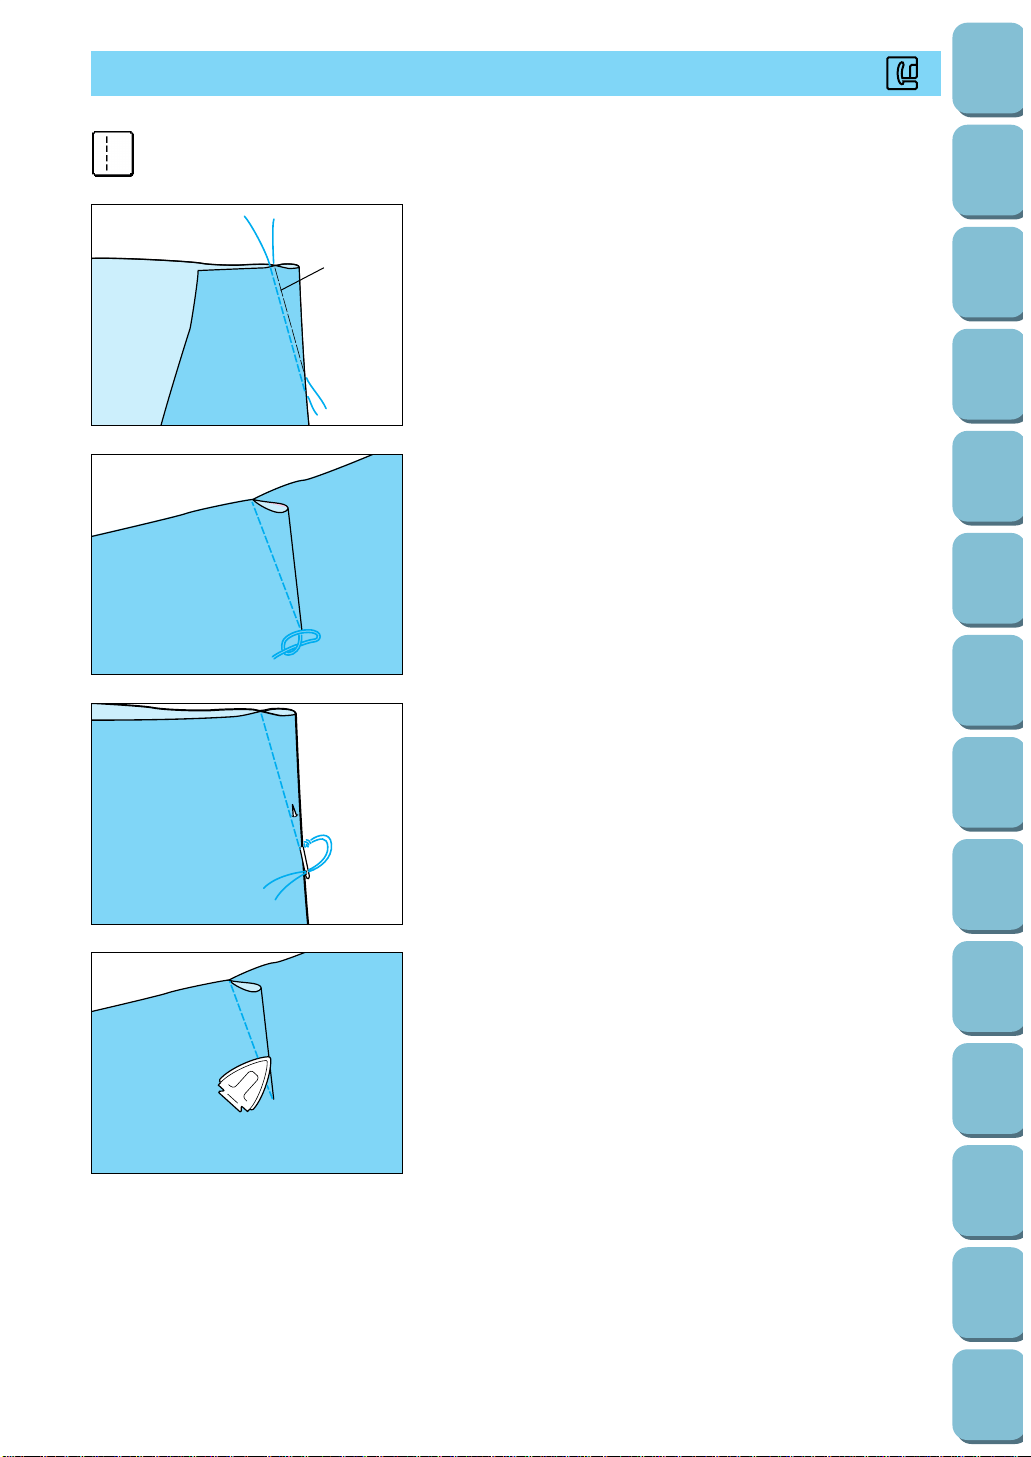
70
Utility
Stitches
Characters
and
Decorative
Stitches
Embroidering
Editing
Embroidery
Patterns
Retrieving
My
Custom
Stitch
TM
Maintenance
Error
Messages
Trouble
shooting
Sewing
Chart
Patterns
(Programmed
in Machine)
Patterns
(Memory
Card)
Sewing
Setting Up
DART SEAM
1
1. Attach presser foot “J”. Sew a reverse stitch at the
beginning of the dart and then sew from the wide end to the
other end without stretching the fabric.
1 Basting
* If automatic reinforcement stitching is preset, a
reinforcement stitch will automatically be sewn at the sewing
start.
2. Do not sew a reverse stitch at end. Cut the thread at the end
leaving 5 cm (1-15/16”), and then tie both ends together.
3. Insert the ends of the thread into the dart with a needle.
4. Iron the dart to one side so that it is flat.
J
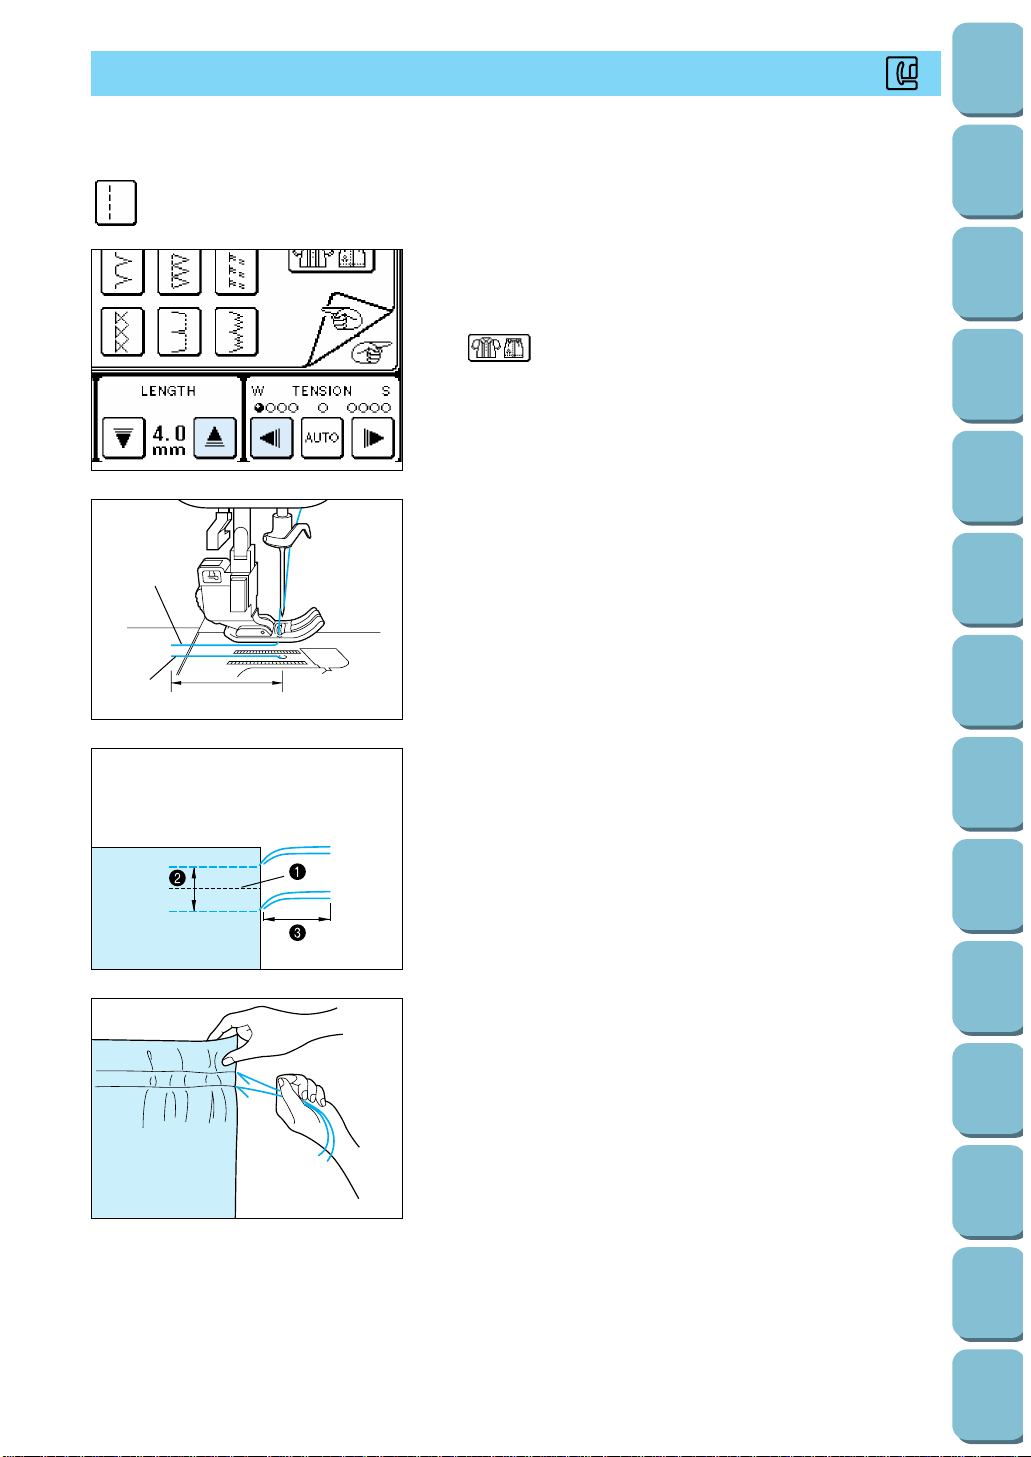
GATHERING
J
Use on waists of skirts, the sleeves of shirts, etc.
1. Set the stitch length to 4.0 mm (3/16”) and the thread
tension to weak.
* If you touch the “GATHERING” key after touching the
“ ” key, the stitch length will be set automatically to
4.0 mm (3/16”) and the thread tension will be set
automatically to weak.
1
2
3
2. Attach presser foot “J”. Pull out the bobbin and upper
threads by 5 cm (1-15/16”).
1 Upper thread
2 Bobbin thread
3 About 5 cm (1-15/16”)
3. Sew two rows of straight stitches parallel to the seam line,
then trim excess thread leaving 5 cm (1-15/16”) .
1 Seam line
2 1.0 to 1.5 cm (3/8” to 9/16”)
3 About 5 cm (1-15/16”)
4. Pull the bobbin threads to obtain the desired amount of
gather, then tie the threads.
71
Utility
Stitches
Characters
and
Decorative
Stitches
Embroidering
Editing
Embroidery
Patterns
Retrieving
My
Custom
Stitch
TM
Maintenance
Error
Messages
Trouble
shooting
Sewing
Chart
Patterns
(Programmed
in Machine)
Patterns
(Memory
Card)
Sewing
Setting Up
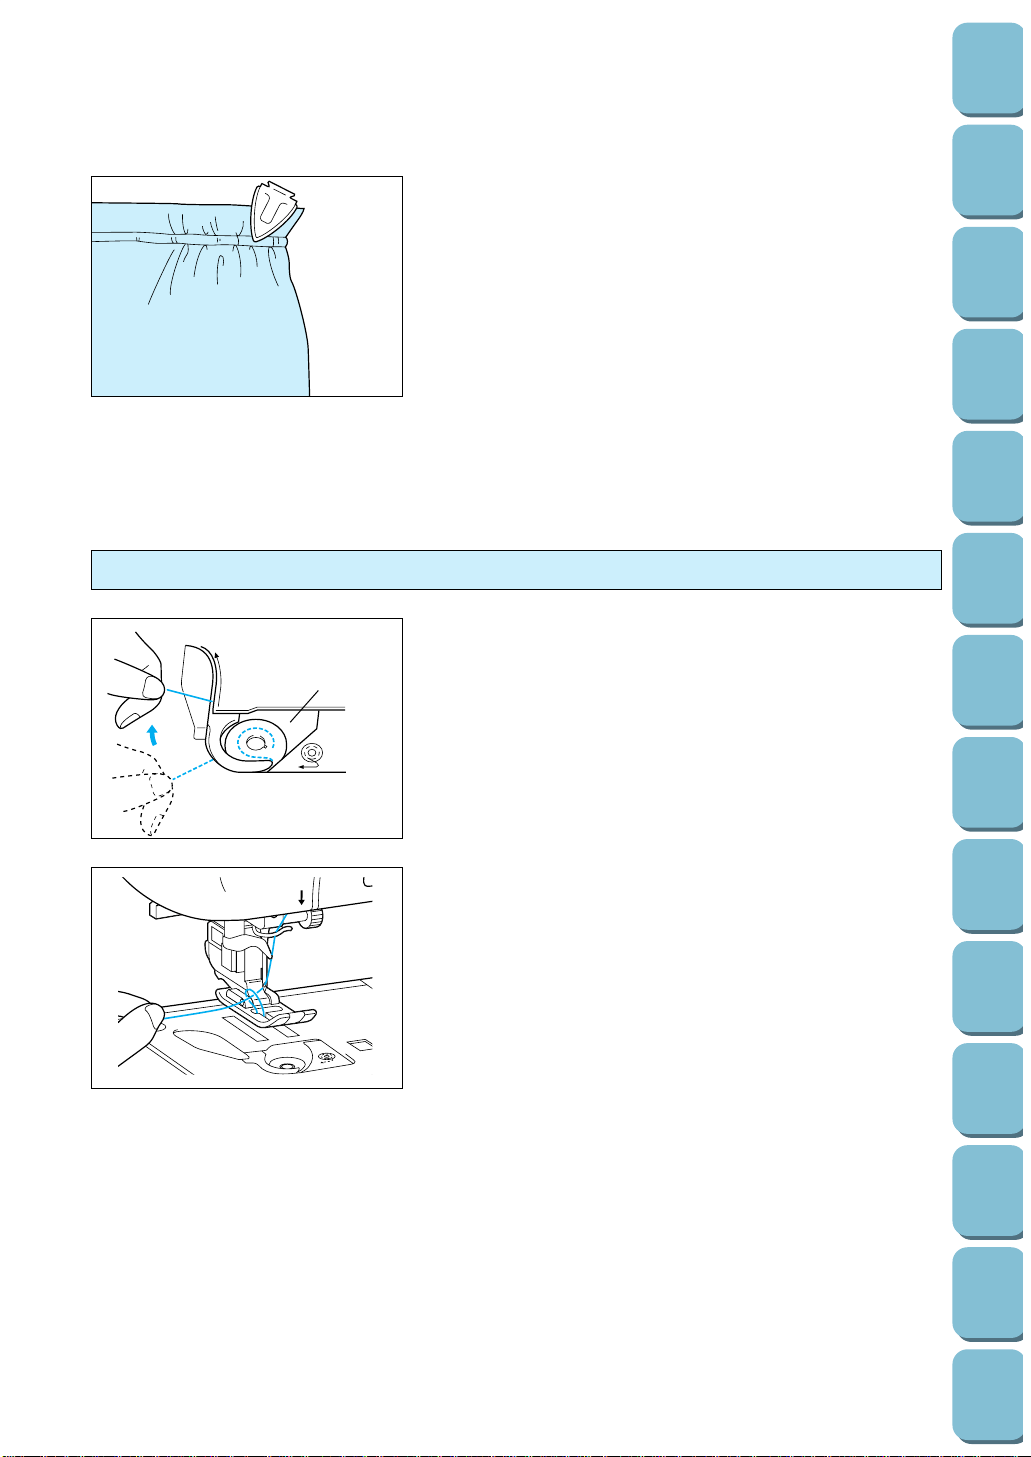
72
Utility
Stitches
Characters
and
Decorative
Stitches
Embroidering
Editing
Embroidery
Patterns
Retrieving
My
Custom
Stitch
TM
Maintenance
Error
Messages
Trouble
shooting
Sewing
Chart
Patterns
(Programmed
in Machine)
Patterns
(Memory
Card)
Sewing
Setting Up
5. Smooth the gathers by ironing them.
1
1. Thread the thread along the groove in the direction of the
arrow, and leave it there without cutting it.
1 Shuttle
* The bobbin cover should still be removed.
5
2. While holding the upper thread, press the “NEEDLE
POSITION” button twice and then pull out the bobbin thread.
3. Replace the bobbin cover.
Pulling out the bobbin thread

PINTUCK
1. Mark along the folds on the reverse side of the fabric.
1 Reverse side
2. Turn the fabric and iron the folded parts only.
1 Surface
3. Select the “ ” stitch and then touch the “ ” key.
* It will not be necessary to adjust the thread tension if
pintucking is selected by pressing the “ ” key.
I
4. Put the right end of presser foot “I” into the holder, and sew
a straight stitch along the fold.
1 Width for pintuck
2 Reverse side
3 Surface
* When the automatic thread cutting and automatic
reinforcement stitch are preset, reinforcement stitches will
be sewn automatically at the start of sewing. Press the
“REVERSE STITCH” button to sew a reinforcement stitch
and trim the thread automatically at the finish of sewing.
Select the “ ” stitch and then touch the “ ” key.
I
73
Utility
Stitches
Characters
and
Decorative
Stitches
Embroidering
Editing
Embroidery
Patterns
Retrieving
My
Custom
Stitch
TM
Maintenance
Error
Messages
Trouble
shooting
Sewing
Chart
Patterns
(Programmed
in Machine)
Patterns
(Memory
Card)
Sewing
Setting Up
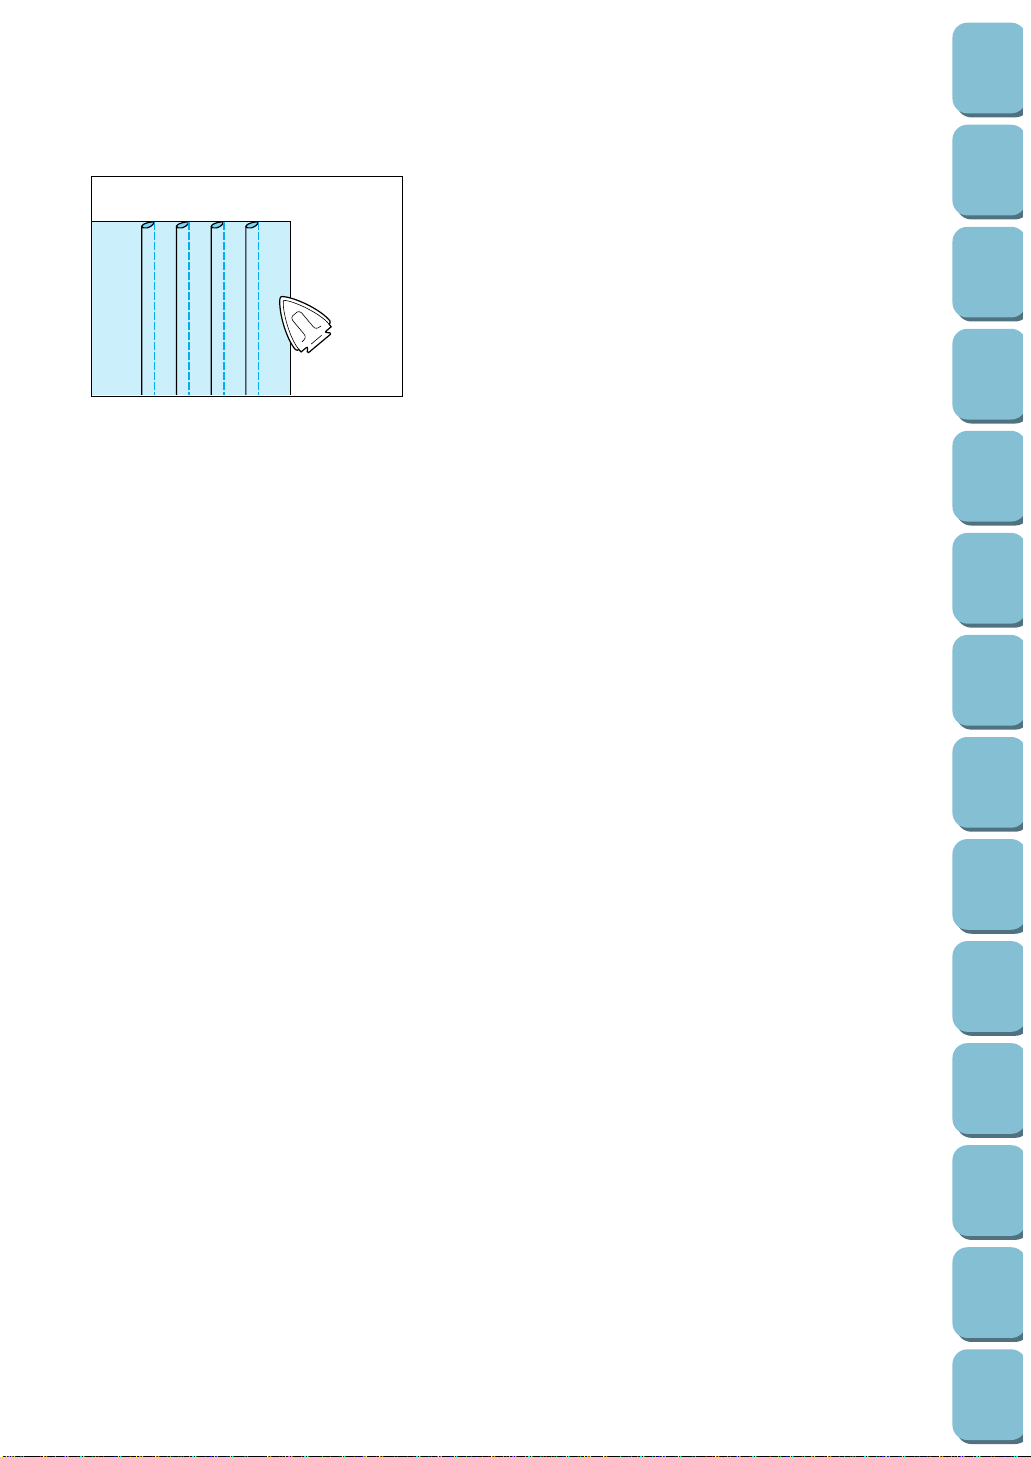
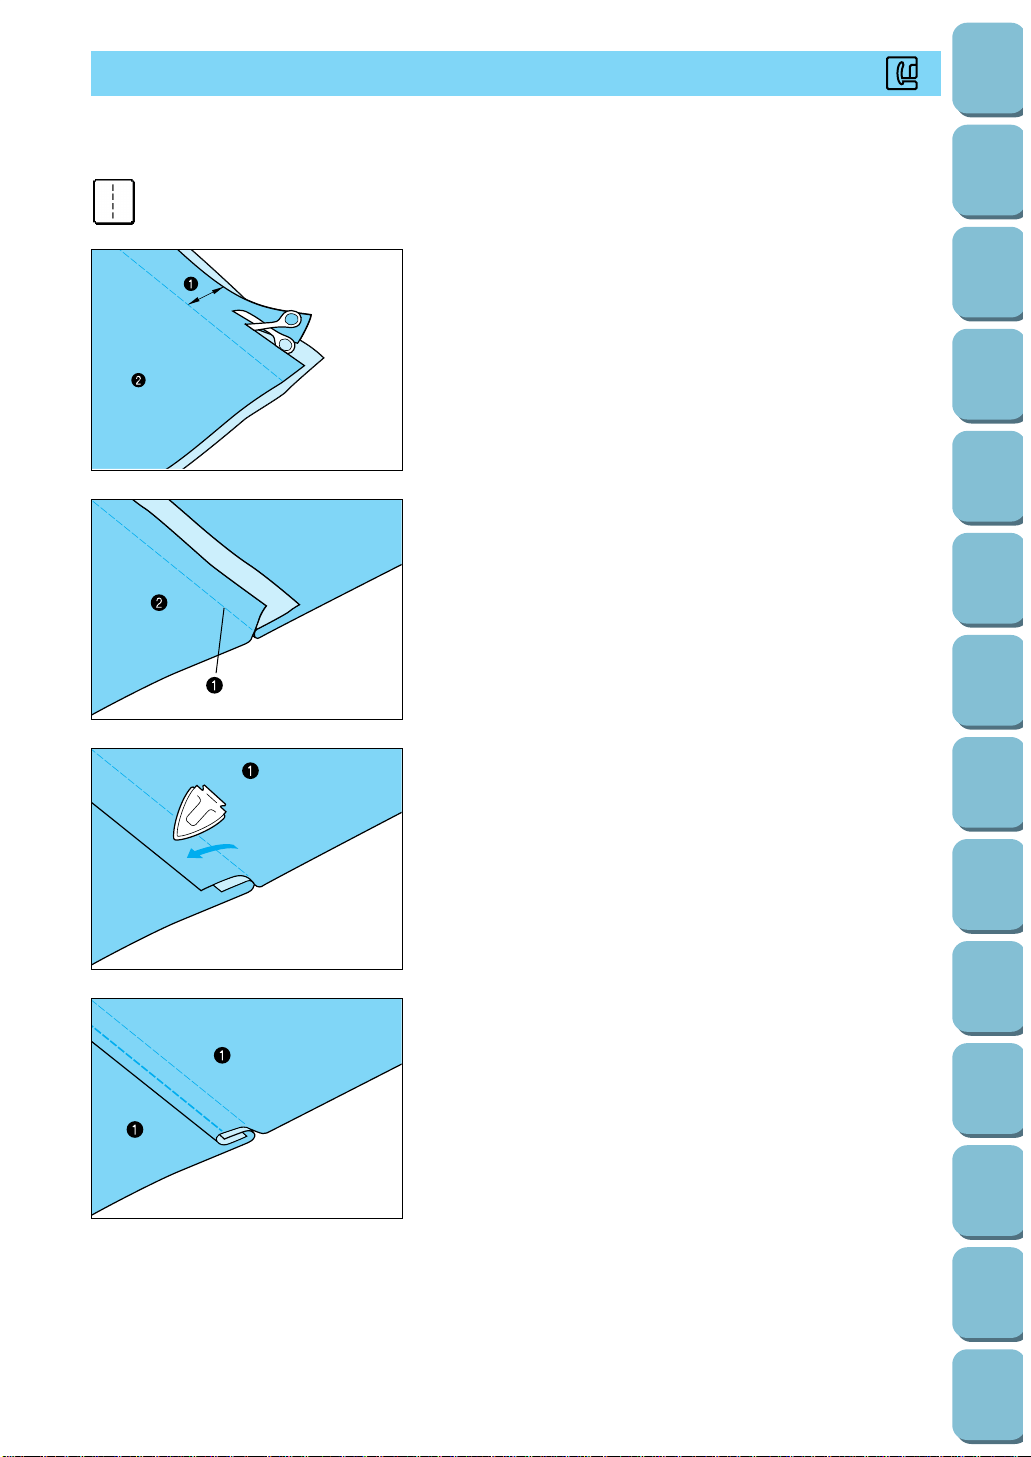
FLAT FELL SEAM
J
Use for reinforcing seams and finishing edges neatly.
1. Attach presser foot “J”. Sew the finish line, then cut half of
the seam allowance from the side that the flat fell seam will
lie.
1 About 1.2 cm (1/2”)
2 Reverse side
* When the automatic thread cutting and automatic
reinforcement stitch are preset, reinforcement stitches will
be sewn automatically at the start of sewing. Press the
“REVERSE STITCH” button to sew a reinforcement stitch
and trim the thread automatically at the finish of sewing.
2. Spread out the fabric along the finish line.
1 Finish line
2 Reverse side
3. Press both seam allowances toward the more narrow (cut
one) side and iron them.
1 Reverse side
4. Fold the longer seam allowance around more narrow one,
and sew the edge of the fold.
1 Reverse side
75
Utility
Stitches
Characters
and
Decorative
Stitches
Embroidering
Editing
Embroidery
Patterns
Retrieving
My
Custom
Stitch
TM
Maintenance
Error
Messages
Trouble
shooting
Sewing
Chart
Patterns
(Programmed
in Machine)
Patterns
(Memory
Card)
Sewing
Setting Up

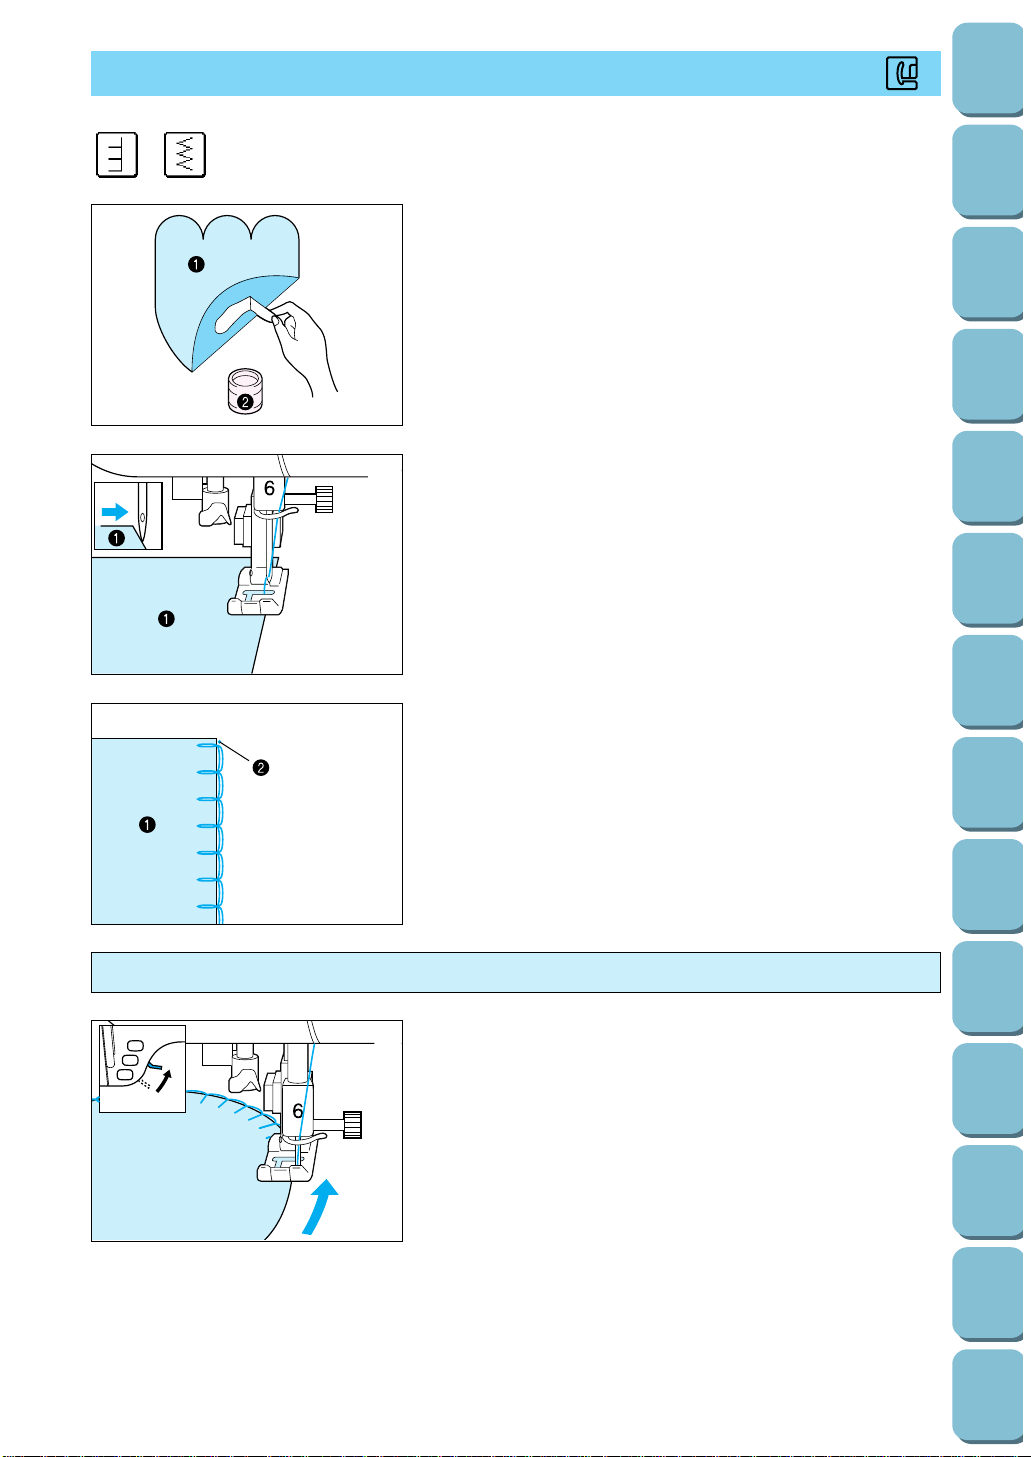
APPLIQUES
1. Attach the applique to the fabric.
1 Applique
2 Fabric glue
* The applique should be attached with fabric glue or a
basting stitch so that it will not move during sewing.
2. Attach presser foot “J”. Make sure that the needle drop point
is just outside the applique and then start sewing.
1 Applique
* When the automatic thread cutting and automatic
reinforcement stitch are preset, reinforcement stitches will
be sewn automatically at the start of sewing. Press the
“REVERSE STITCH” button to sew a reinforcement stitch
and trim the thread automatically at the finish of sewing.
3. Finish
1 Applique
2 Needle drop point
J
Sewing the applique around corners
1. Stop the machine and position the needle just outside the
applique.
2. Raise the presser foot and turn the fabric as needed to keep
the correct needle position.
77
Utility
Stitches
Characters
and
Decorative
Stitches
Embroidering
Editing
Embroidery
Patterns
Retrieving
My
Custom
Stitch
TM
Maintenance
Error
Messages
Trouble
shooting
Sewing
Chart
Patterns
(Programmed
in Machine)
Patterns
(Memory
Card)
Sewing
Setting Up

78
Utility
Stitches
Characters
and
Decorative
Stitches
Embroidering
Editing
Embroidery
Patterns
Retrieving
My
Custom
Stitch
TM
Maintenance
Error
Messages
Trouble
shooting
Sewing
Chart
Patterns
(Programmed
in Machine)
Patterns
(Memory
Card)
Sewing
Setting Up
APPLIQUE QUILTS
1. Trace the pattern onto the applique fabric and then cut
around it.
1 Seam margin (0.3 to 0.5 mm)
Use a blind hem stitch for applique quilts.
2. Place a piece of thick paper cut to the finished size onto the
fabric, and then fold over the seam margin using an iron.
N
123
3. Turn the fabric over and sew basting stitches around the
edge.
Attach monogramming foot “N” and then sew around the
edge, while dropping the needle as close to the edge as
possible.
* When the automatic thread cutting and automatic
reinforcement stitch are preset, reinforcement stitches will
be sewn automatically at the start of sewing. Press the
“REVERSE STITCH” button to sew a reinforcement stitch
and trim the thread automatically at the finish of sewing.
1 Dresden Plate
2 Stained Glass
3 Sunbonnet Sue
N
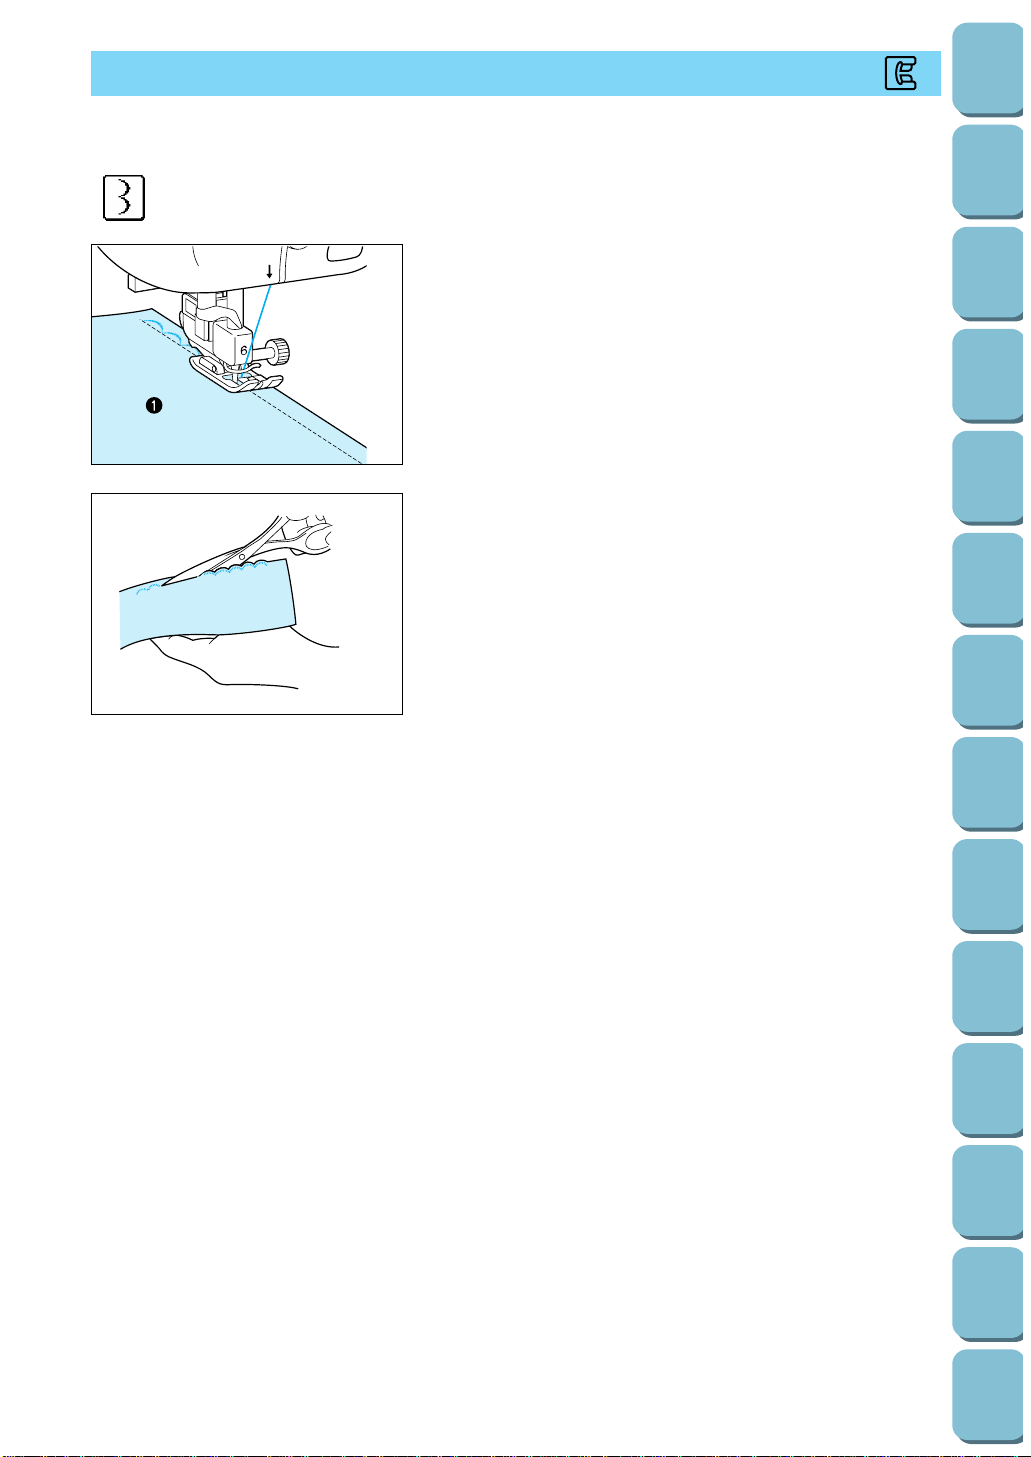
SCALLOP STITCH
N
Stitch for decorating collars of blouses, edges of table cloths, etc.
5
1. Attach presser foot “N”. Sew the remaining edge of the
fabric so that the stitch doesn’t go right to the edge of the
fabric.
1 Surface
* When the automatic thread cutting and automatic
reinforcement stitch are preset, reinforcement stitches will
be sewn automatically at the start of sewing. Press the
“REVERSE STITCH” button to sew a reinforcement stitch
and trim the thread automatically at the finish of sewing.
2. Trim along the stitches carefully so as not to cut the stitches.
* There are products in the marketplace that will “seal” the
trimmed areas. This will give a more finished appearance.
79
Utility
Stitches
Characters
and
Decorative
Stitches
Embroidering
Editing
Embroidery
Patterns
Retrieving
My
Custom
Stitch
TM
Maintenance
Error
Messages
Trouble
shooting
Sewing
Chart
Patterns
(Programmed
in Machine)
Patterns
(Memory
Card)
Sewing
Setting Up
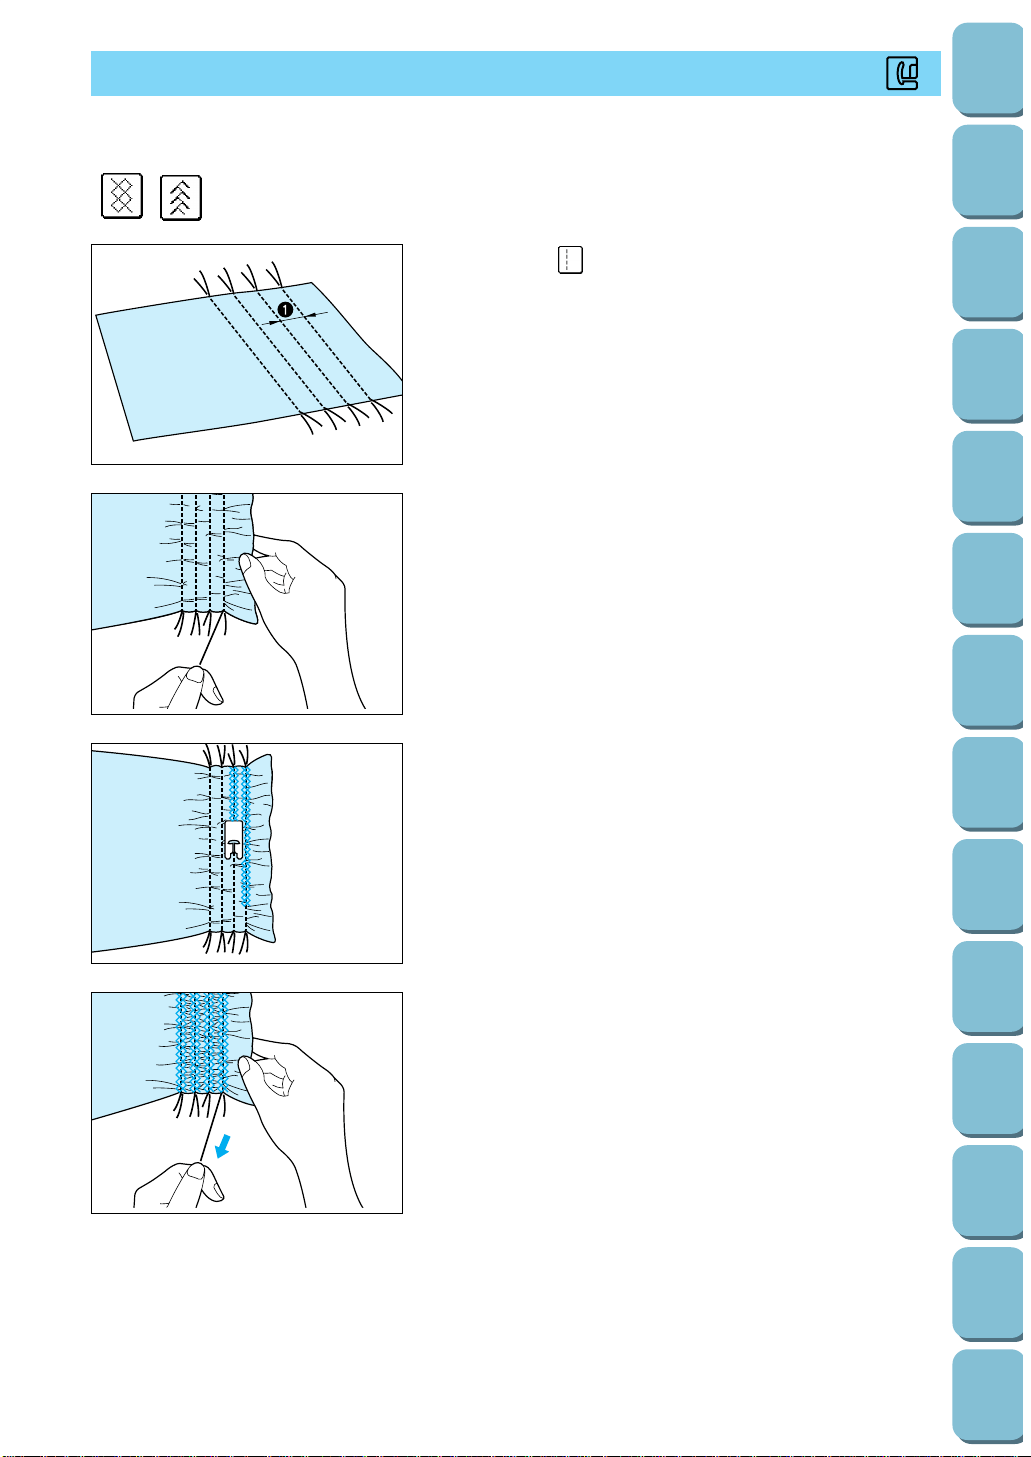
80
Utility
Stitches
Characters
and
Decorative
Stitches
Embroidering
Editing
Embroidery
Patterns
Retrieving
My
Custom
Stitch
TM
Maintenance
Error
Messages
Trouble
shooting
Sewing
Chart
Patterns
(Programmed
in Machine)
Patterns
(Memory
Card)
Sewing
Setting Up
SMOCKING STITCH
J
This stitch is used for decorative stitching on clothing.
1. Select the “ ” stitch, set the stitch length to 4.0 mm and
set the thread tension to a weak setting. Then sew straight
stitches at intervals of 1 cm.
1 About 1 cm (3/8”)
2. Pull the bobbin threads to obtain the desired amount of
gather, and then smooth the gathers by ironing them.
J
3. Attach presser foot “J” and sew over the top of the straight
stitches, selecting from one of the two decorative stitches
shown above.
4. Pull out the straight stitch threads.

PATCHWORK STITCH
3
1. Match the fabric seams right sides together, join together
with a straight stitch. Open seam allowance [about 1 cm
(3/8”)] and press flat.
1 Straight stitch
2 Seam allowance
3 1 cm (3/8”)
4 Reverse side
5
2. Attach presser foot “J”. Set the center of the presser foot on
the seam lines of the joined fabrics and then sew over the
seam, using one of the decorative stitches shown above.
1 Surface
2 Seam
J
81
Utility
Stitches
Characters
and
Decorative
Stitches
Embroidering
Editing
Embroidery
Patterns
Retrieving
My
Custom
Stitch
TM
Maintenance
Error
Messages
Trouble
shooting
Sewing
Chart
Patterns
(Programmed
in Machine)
Patterns
(Memory
Card)
Sewing
Setting Up
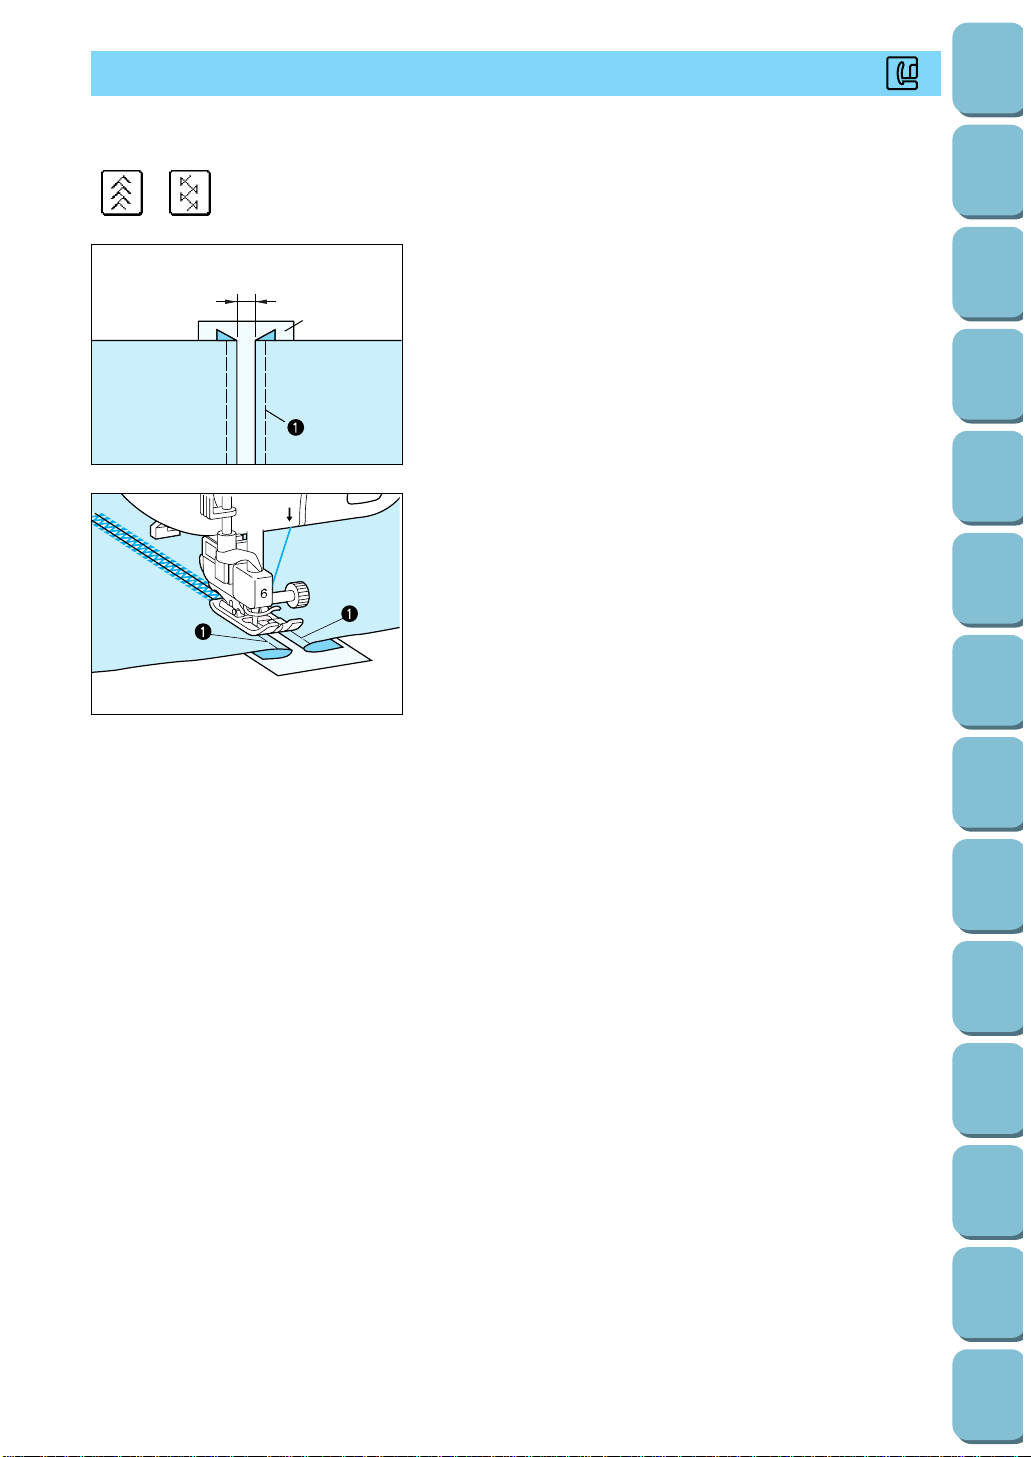
82
Utility
Stitches
Characters
and
Decorative
Stitches
Embroidering
Editing
Embroidery
Patterns
Retrieving
My
Custom
Stitch
TM
Maintenance
Error
Messages
Trouble
shooting
Sewing
Chart
Patterns
(Programmed
in Machine)
Patterns
(Memory
Card)
Sewing
Setting Up
FAGOTING
J
Stitch for fagoting, decoration, etc.
2
3
1. Baste the fabric onto thin paper or water-soluble stabilizer
sheet.
1 Basting stitch
2 0.4 cm (3/16”)
3 Thin paper or stabilizer sheet
5
2. Attach presser foot “J”. Center the presser foot on the paper
between the folded edges of fabric and begin sewing.
1 Basting stitch
* Use thick thread. (#30)
* After sewing, remove the paper.
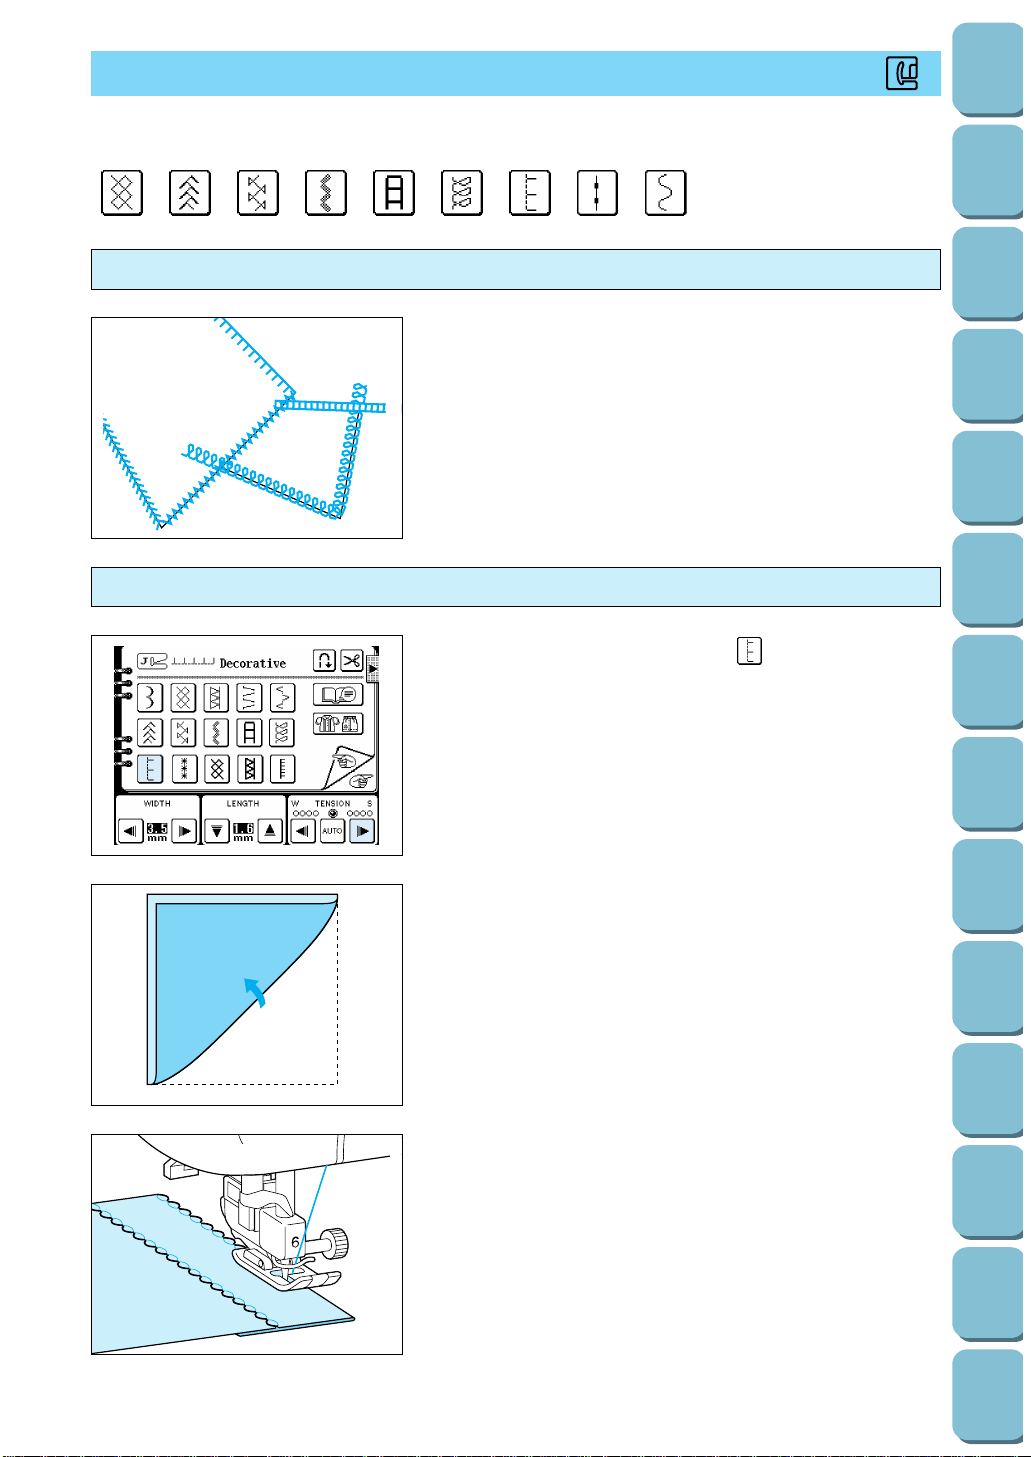
DECORATIVE STITCHING
J
Select the stitch you would like to use.
Decorative stitching
These stitches are used for sewing crazy quilts and for
decorating hems.
Shell tacking
1. Attach presser foot “J”, select “ ” and set the thread
tension to a strong setting.
2. Fold the fabric in half diagonally.
* Use a thin fabric.
5
3. Drop the needle slightly to the outside of the edge of the
fabric, and then start sewing.
4. Open out the fabric and iron the fold down to one side.
83
Utility
Stitches
Characters
and
Decorative
Stitches
Embroidering
Editing
Embroidery
Patterns
Retrieving
My
Custom
Stitch
TM
Maintenance
Error
Messages
Trouble
shooting
Sewing
Chart
Patterns
(Programmed
in Machine)
Patterns
(Memory
Card)
Sewing
Setting Up

84
Utility
Stitches
Characters
and
Decorative
Stitches
Embroidering
Editing
Embroidery
Patterns
Retrieving
My
Custom
Stitch
TM
Maintenance
Error
Messages
Trouble
shooting
Sewing
Chart
Patterns
(Programmed
in Machine)
Patterns
(Memory
Card)
Sewing
Setting Up
HEM-STITCH (HEIRLOOM STITCH)
Use for sewing tablecloths, decorative hems on clothes and decorative stitching
on shirt fronts.
A more attractive finish can be obtained if you use the
“130/705H Wing” needle when sewing these patterns.
If using a wing needle and the stitch width has been set to
manually, check that the needle will not touch the presser foot
before starting sewing by carefully rotating the balance wheel.
“ ” hem-stitching
1. Pull out several threads from one area on a piece of fabric.
This will leave the fabric frayed in this one area. About 5 or
6 threads will leave a 3 mm (1/8”) area.
2. Attach presser foot “N”. With the reverse side of the fabric
facing up, sew one edge of the frayed part.
3. With the back side of the fabric continuing to face you, turn
the fabric and sew the other edge of the frayed part, aligning
the stitches so they are parallel.
4. Illustration of finished product.
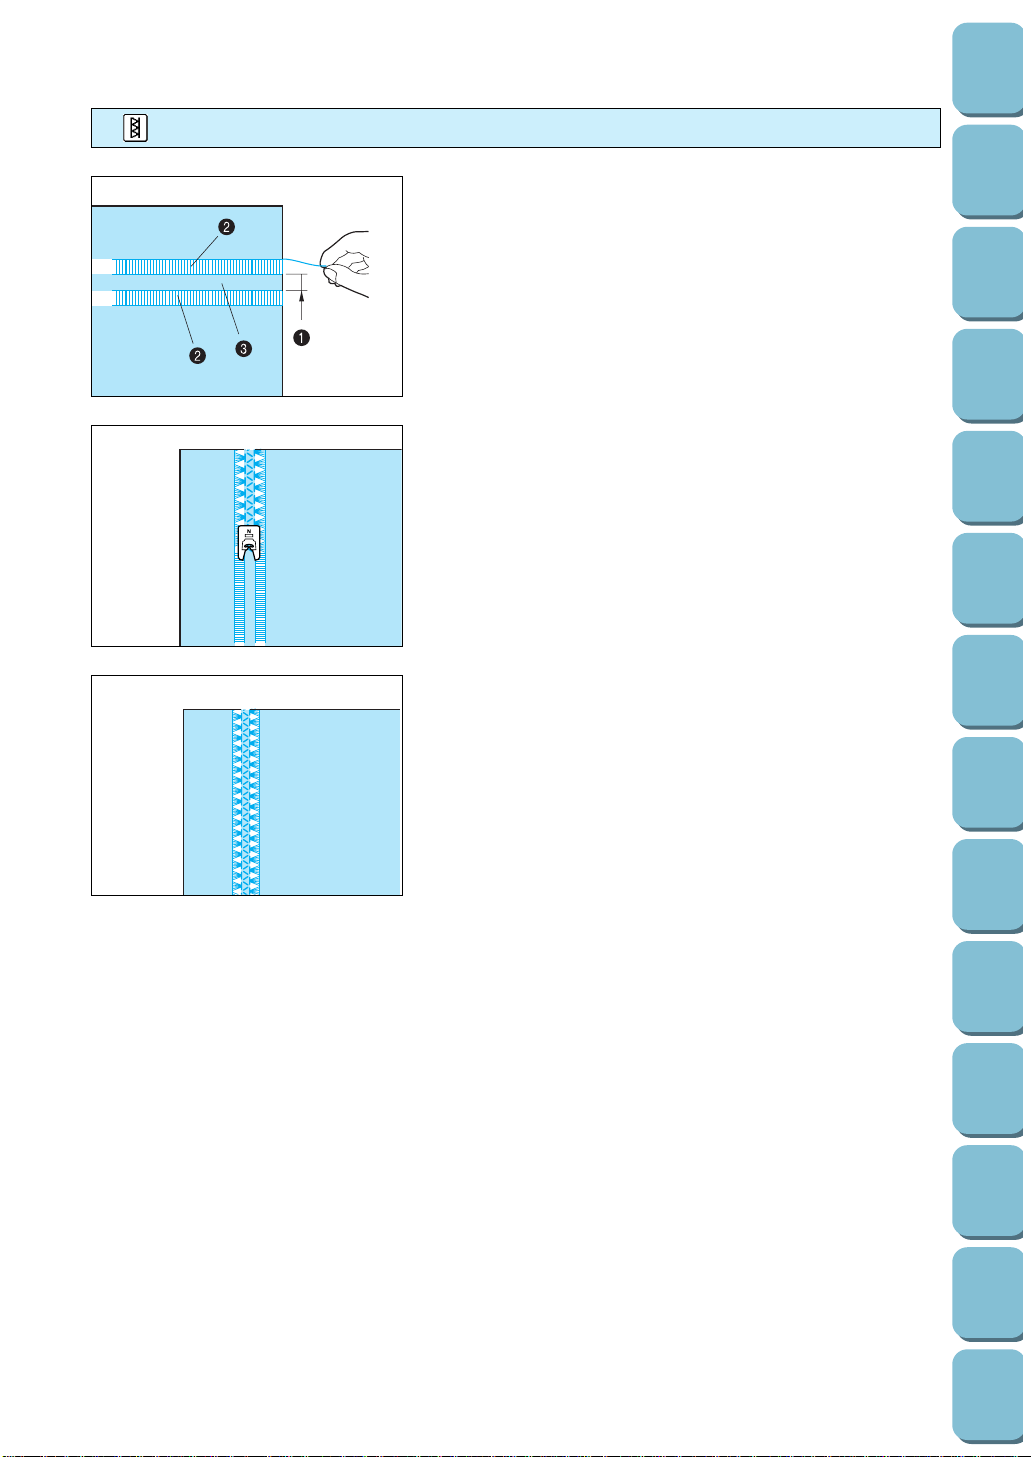
“ ” hem-stitching
1. Pull out several threads from both sides of the 4 mm (3/16”)
part which is not yet frayed.
[Pull out four threads, leave five threads and then pull out
four threads, the width of five threads is approximately 4mm
(3/16”) or less.]
1 Approx. 4.0 mm (3/16”) or less.
2 Four threads (Pull out)
3 Five threads (Leave)
2. Sew the decorative stitch on the center of the five threads
created above.
* Wing needle is a option.
3. Illustration of finished product.
85
Utility
Stitches
Characters
and
Decorative
Stitches
Embroidering
Editing
Embroidery
Patterns
Retrieving
My
Custom
Stitch
TM
Maintenance
Error
Messages
Trouble
shooting
Sewing
Chart
Patterns
(Programmed
in Machine)
Patterns
(Memory
Card)
Sewing
Setting Up
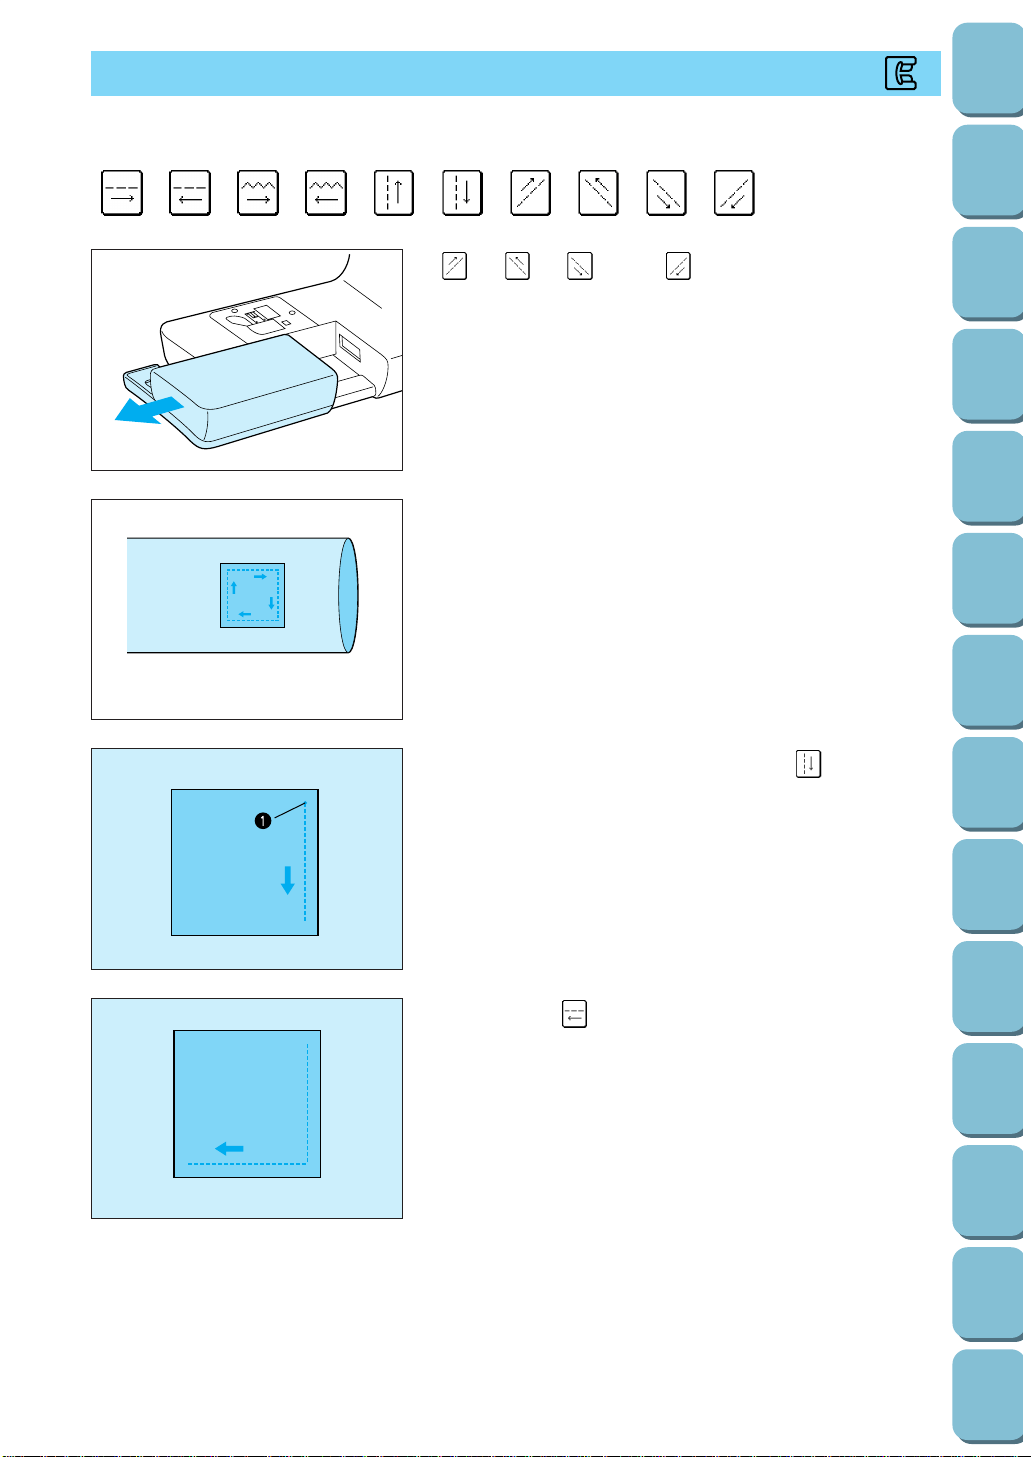
86
Utility
Stitches
Characters
and
Decorative
Stitches
Embroidering
Editing
Embroidery
Patterns
Retrieving
My
Custom
Stitch
TM
Maintenance
Error
Messages
Trouble
shooting
Sewing
Chart
Patterns
(Programmed
in Machine)
Patterns
(Memory
Card)
Sewing
Setting Up
LATERAL SEWING (STRAIGHT/ZIGZAG)
N
Multi-directional sewing on tubular fabrics.
“ ”, “ ”, “ ” and “ ” can also be used to sew
diagonally.
Slide the flat bed attachment off the machine to create the free
arm.
13
4
2
1
1. Attach presser foot “N”. Sew with the “ ” stitch to the
point required.
1 Start point
2
2. Select the “ ” stitch, and then sew until you reach the
desired length.
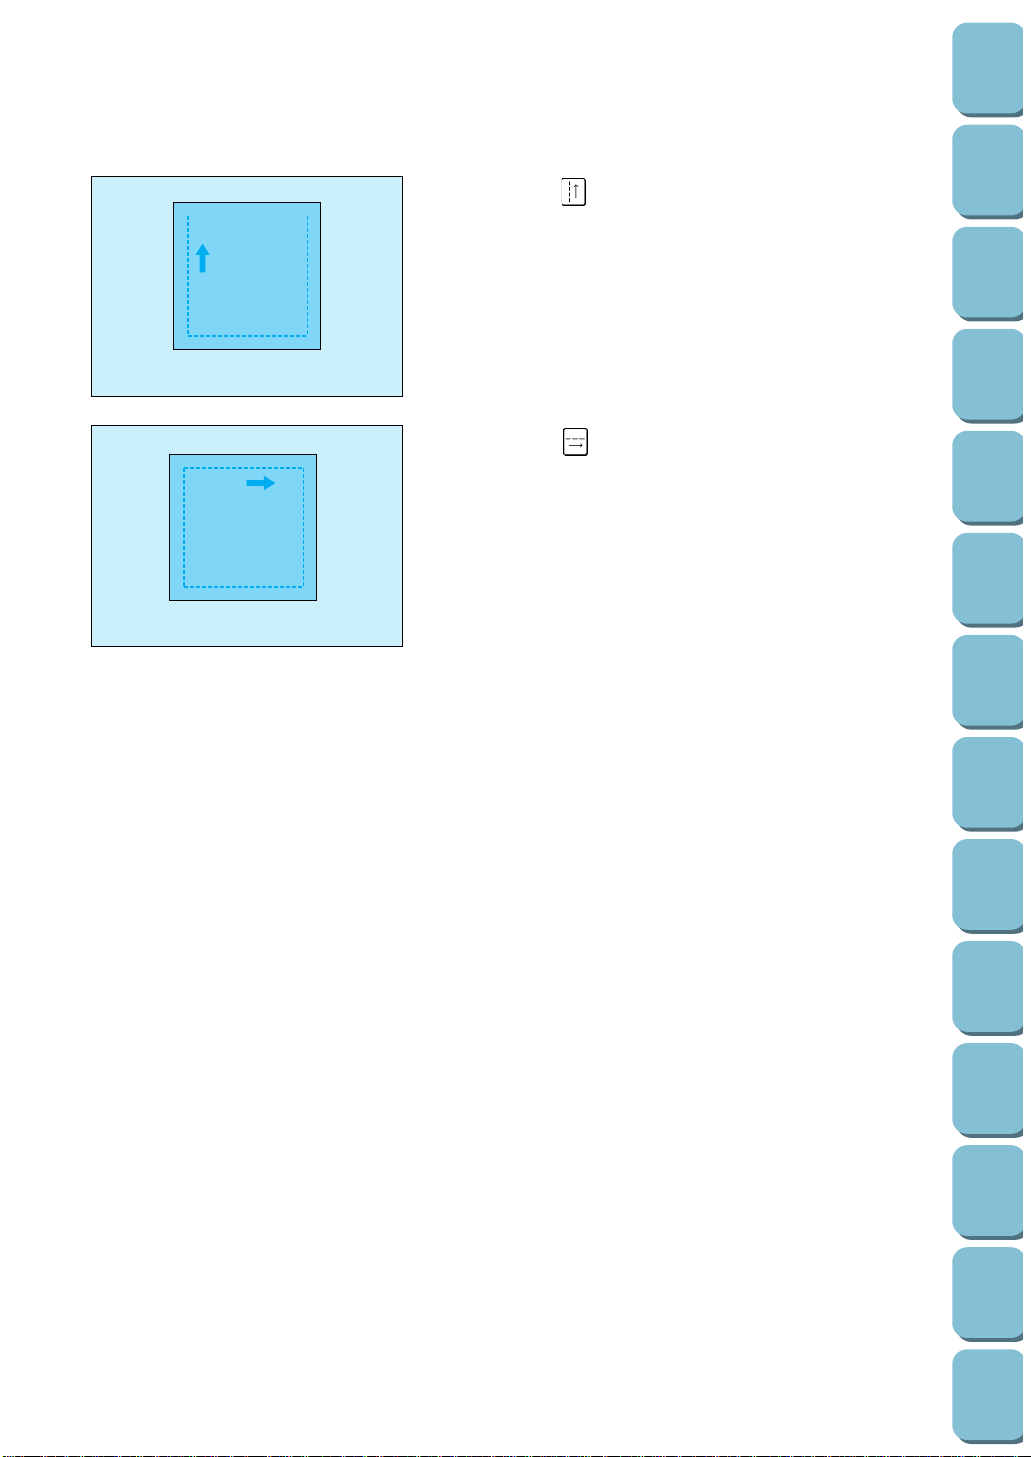
3
3. Select the “ ” stitch again, and press the “REVERSE
STITCH” button.
4
4. Select the “ ”stitch, and then sew until you reach the
starting point.
* Lateral zigzag sewing should be carried out using the same
procedure as lateral straight sewing.
87
Utility
Stitches
Characters
and
Decorative
Stitches
Embroidering
Editing
Embroidery
Patterns
Retrieving
My
Custom
Stitch
TM
Maintenance
Error
Messages
Trouble
shooting
Sewing
Chart
Patterns
(Programmed
in Machine)
Patterns
(Memory
Card)
Sewing
Setting Up
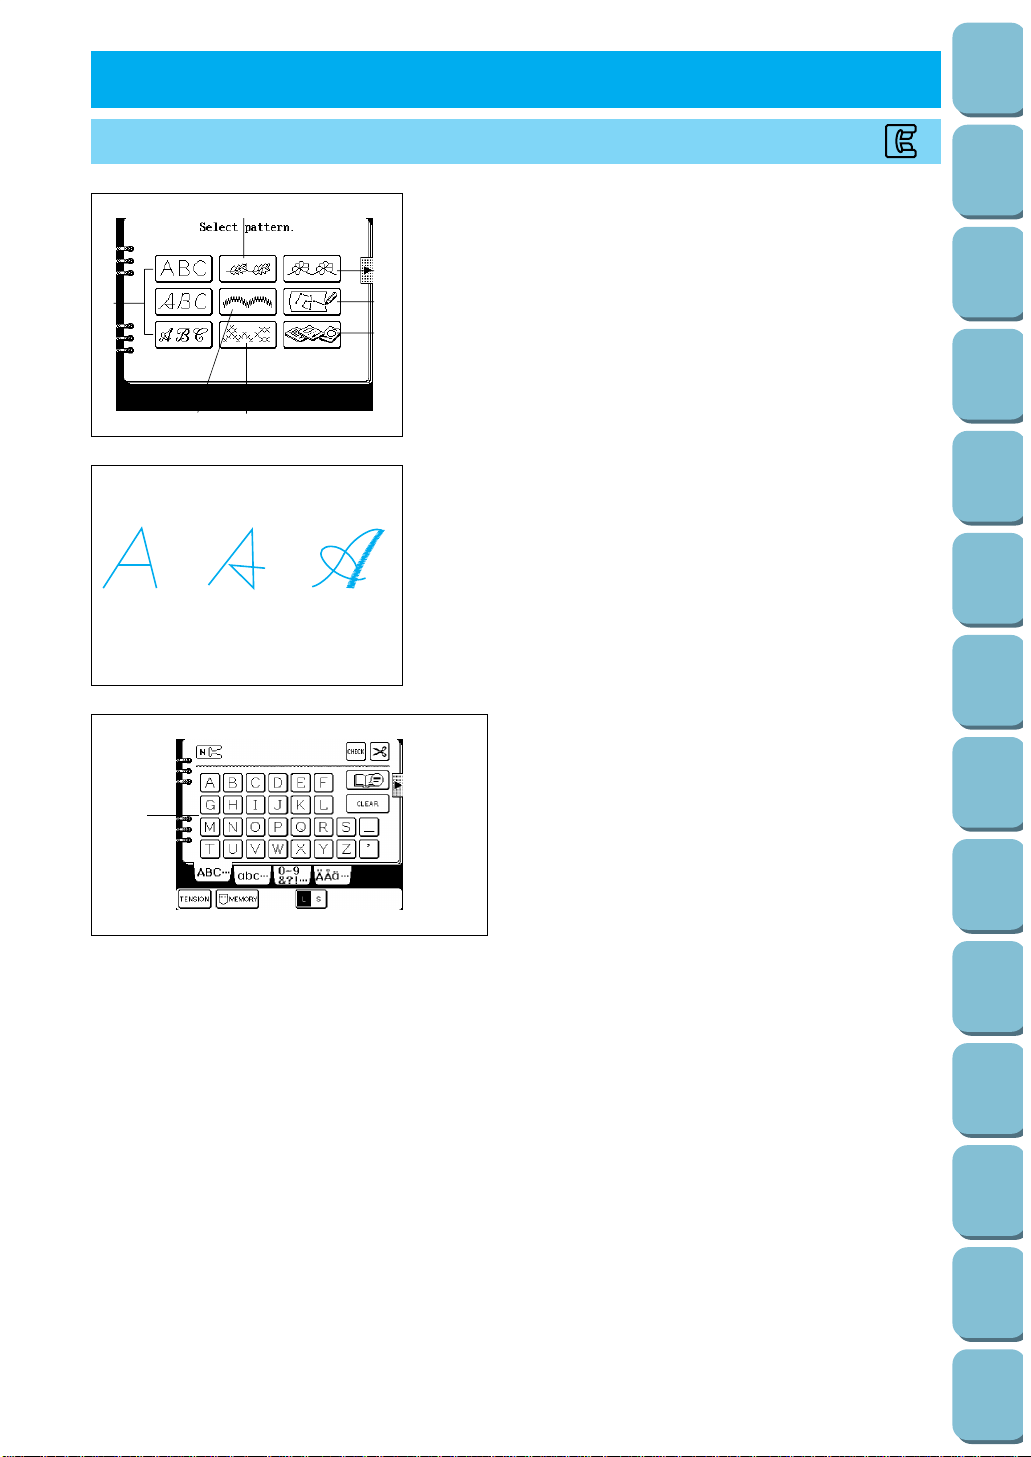
88
Utility
Stitches
Characters
and
Decorative
Stitches
Embroidering
Editing
Embroidery
Patterns
Retrieving
My
Custom
Stitch
TM
Maintenance
Error
Messages
Trouble
shooting
Sewing
Chart
Patterns
(Programmed
in Machine)
Patterns
(Memory
Card)
Sewing
Setting Up
1. Touch the “CHARACTER/DECORATIVE STITCH” key.
1 Alphabetical characters
2 Decorative stitch
3 Satin stitch
4 Cross stitch
5 MY CUSTOM STITCH
TM (Function for creating your own
stitches)
6 Decorative stitch (7 mm width)
7 Card
12 3
2. Select the style.
1 Block style
2 Alphabet
3 Italic style
1 Character selection keys
2 Touch this key to change the thread tension.
3 Touch this key to save a pattern combination
to memory. (Refer to page 100.)
4 Touch this key to change the character size.
(Refer to page 94.)
“L”: Larger
“S”: Smaller
5 Touch this key to cancel your last entry.
6 An advice screen will appear if you touch this
key while sewing. (Refer to page 42.)
7 Touch this key to cut the thread automatically
after sewing is completed. (Refer to page 39.)
8 Touch this key to confirm your entry. (Refer to
page 100.)
3. CHARACTERS AND DECORATIVE STITCHES
CHARACTER SEWING
N
1
2
3
4
5
6
7
8
1
2
6
5
7
43
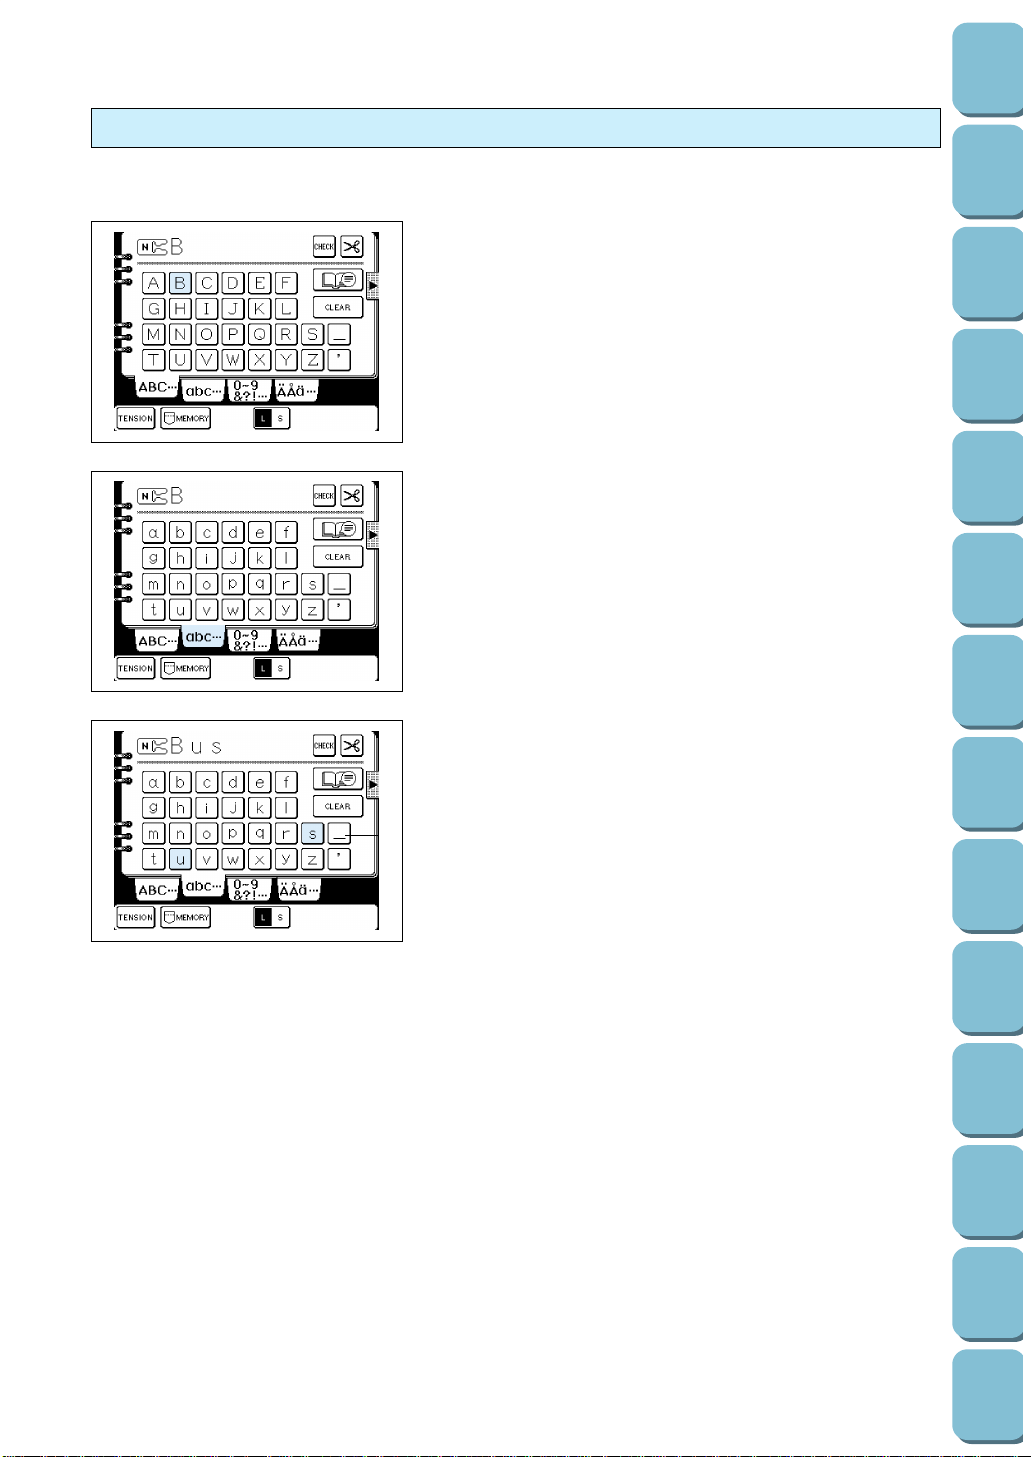
1. Touch “B”.
* If you select the wrong character by mistake, touch the
“CLEAR” key to clear the character selection.
2. Touch “abc. . .” to switch to lower-case.
3. Touch “u” and “s”.
* Any combination of 70 characters or spaces can be
accepted at one time.
1 Space key
Combinations of characters
Try entering “Bus”.
1
89
Utility
Stitches
Characters
and
Decorative
Stitches
Embroidering
Editing
Embroidery
Patterns
Retrieving
My
Custom
Stitch
TM
Maintenance
Error
Messages
Trouble
shooting
Sewing
Chart
Patterns
(Programmed
in Machine)
Patterns
(Memory
Card)
Sewing
Setting Up
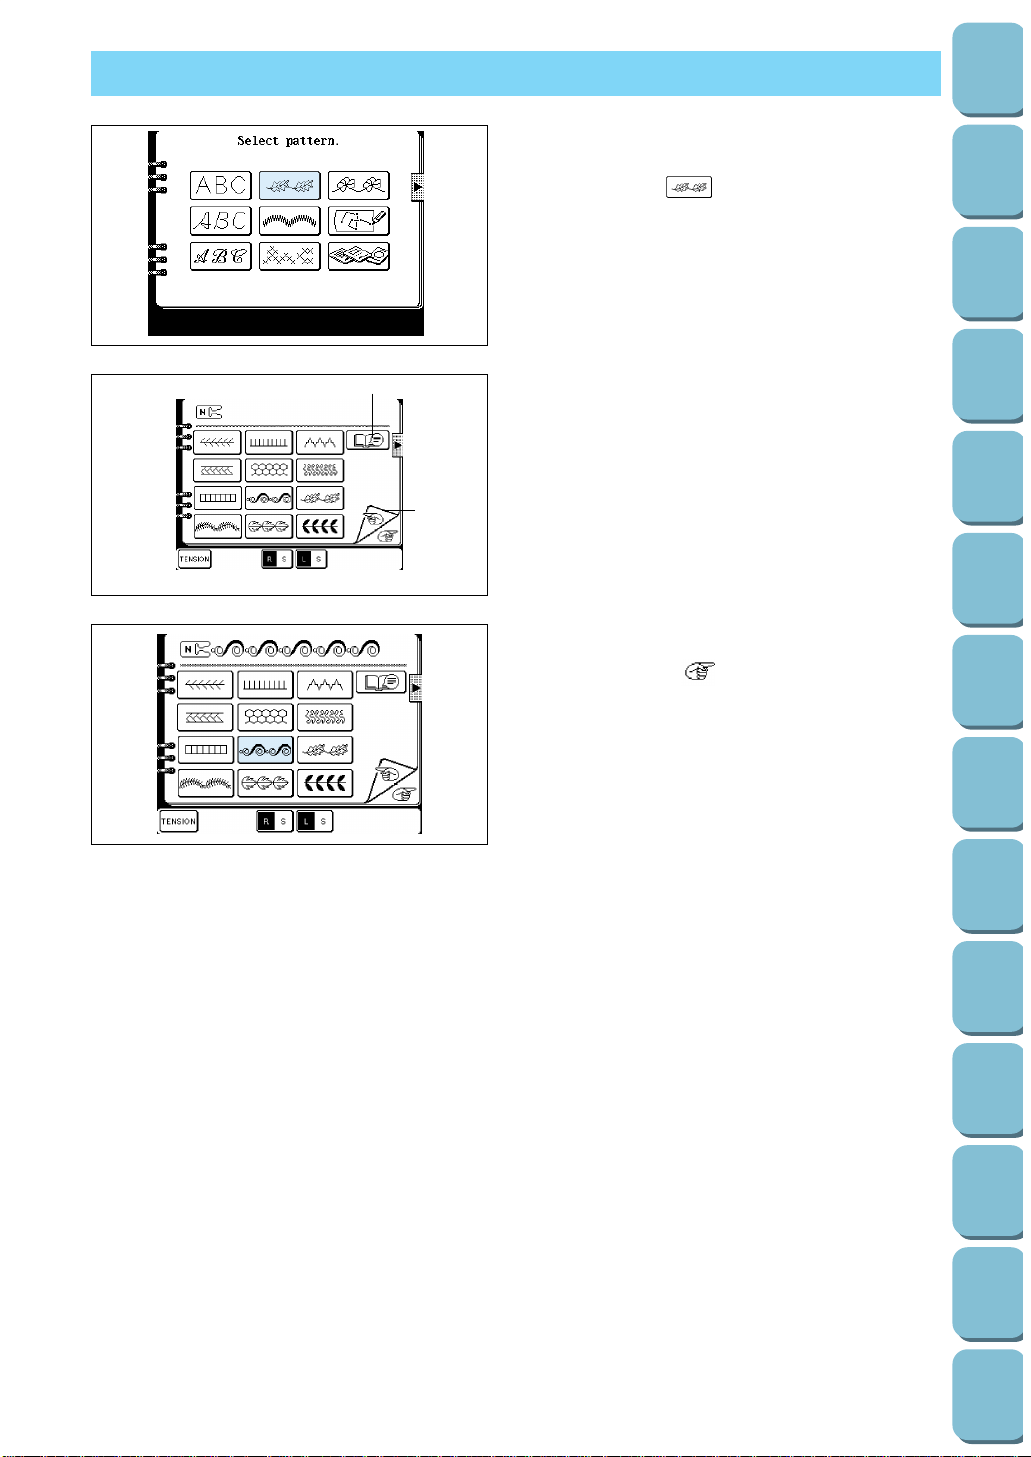
90
Utility
Stitches
Characters
and
Decorative
Stitches
Embroidering
Editing
Embroidery
Patterns
Retrieving
My
Custom
Stitch
TM
Maintenance
Error
Messages
Trouble
shooting
Sewing
Chart
Patterns
(Programmed
in Machine)
Patterns
(Memory
Card)
Sewing
Setting Up
DECORATIVE STITCHES
1. Touch the “CHARACTER/DECORATIVE
STITCH” key.
2. Touch the “ ” key.
The decorative stitch pattern selection screen
will be displayed.
1 Pattern selection keys
2 Touch this key to change the thread tension.
3 Touch this key to select single or repeat
sewing. (Refer to page 94.)
4 Touch this key to change the pattern size.
(Refer to page 94.)
5 Touch this key to move to the next screen.
6 Touch this key to return to the previous
screen.
7 An advice screen will appear if you touch this
key while sewing. (Refer to page 42.)
3. Select the pattern.
* Touch the “ ” key to display the next
decorative stitch pattern selection screen.
1
2
3
4
5
6
7
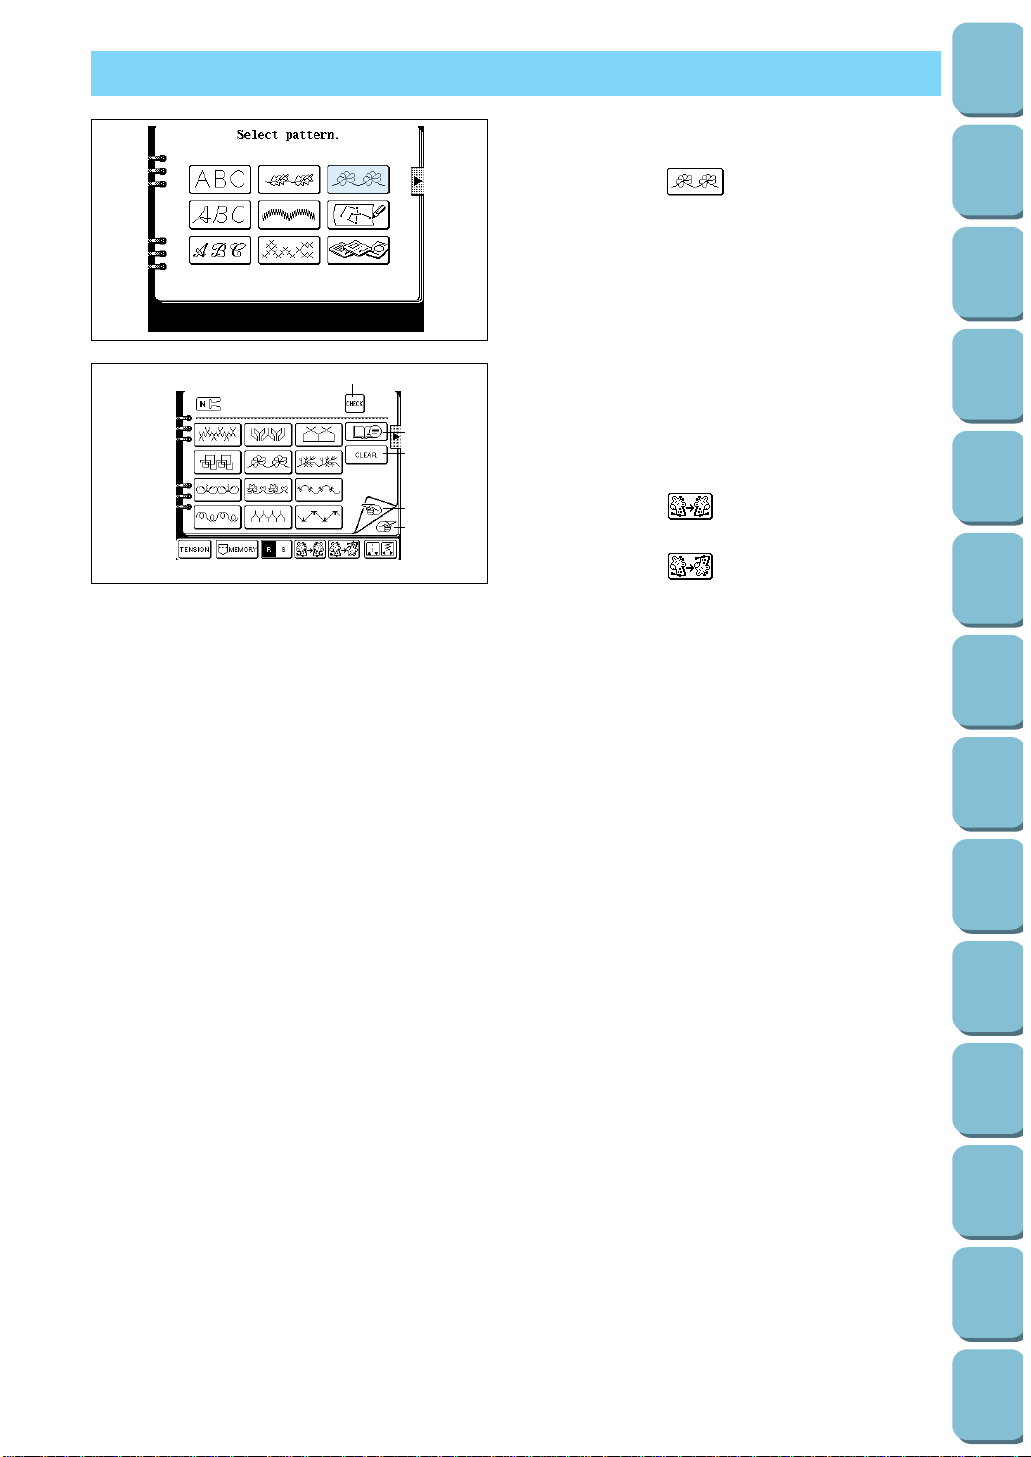
DECORATIVE STITCHES (7 mm)
1. Touch the “CHARACTER/DECORATIVE
STITCH” key.
2. Touch the “ ” key.
The decorative stitch pattern selection screen
will be displayed.
1 Pattern selection keys
2 Touch this key to change the thread tension
3 Touch this key to save a pattern combination
to memory. (Refer to page 100)
4 Touch this key to select single or repeat
sewing. (Refer to page 94)
5 Touch the key to reverse the pattern
horizontally.
6 Touch the key to reverse the pattern
vertically.
7 Touch this key to adjust the stitch width and
stitch length.
8 Touch this key to move to the next screen.
9 Touch this key to move to the previous
screen.
0 Touch this key to cancel your entry.
A An advice screen will appear if you touch this
key while sewing. (Refer to page 42)
B Touch this key to confirm your entry. (Refer to
page 100)
2 3 456 7
8
9
0
A
B
1
91
Utility
Stitches
Characters
and
Decorative
Stitches
Embroidering
Editing
Embroidery
Patterns
Retrieving
My
Custom
Stitch
TM
Maintenance
Error
Messages
Trouble
shooting
Sewing
Chart
Patterns
(Programmed
in Machine)
Patterns
(Memory
Card)
Sewing
Setting Up
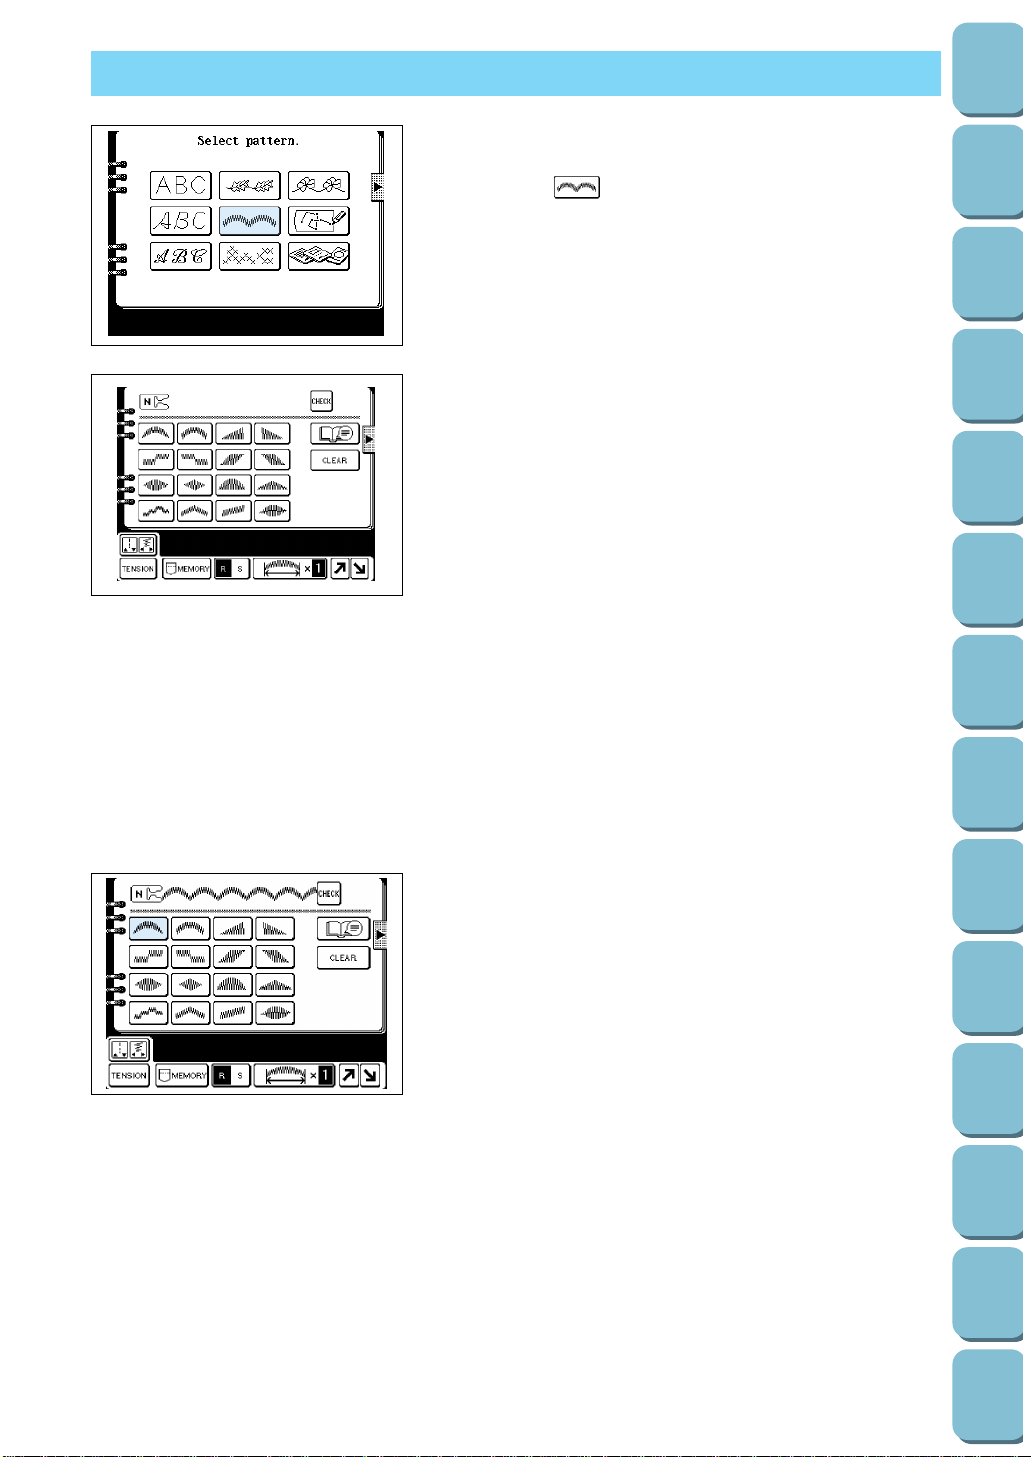
92
Utility
Stitches
Characters
and
Decorative
Stitches
Embroidering
Editing
Embroidery
Patterns
Retrieving
My
Custom
Stitch
TM
Maintenance
Error
Messages
Trouble
shooting
Sewing
Chart
Patterns
(Programmed
in Machine)
Patterns
(Memory
Card)
Sewing
Setting Up
SATIN STITCHES
1. Touch the “CHARACTER/DECORATIVE STITCH” key.
The different types of patterns available will be displayed.
2. Touch the “ ” key.
The satin stitch selection screen will be displayed.
* The thread may easily become knotted when certain types
of fabric or thread are used; therefore, the feed should be
adjusted according to the application.
1 Pattern selection keys
2 Touch this key to adjust the stitch width and stitch length
settings.
3 Touch this key to change the thread tension.
4 Touch this key to save a pattern combination to memory.
(Refer to page 100.)
5 Touch this key to select single or repeat sewing. (Refer to
page 89.)
6 Touch this key if you would like to change the pattern length
without changing the stitch width or stitch length settings.
(Refer to page 95.)
7 Touch this key to move the pattern up by about half of it’s
finished height when sewing. (Refer to page 97.)
8 Touch this key to move the pattern down by about half of it’s
finished height when sewing. (Refer to page 97.)
9 Touch this key to cancel your entry.
0 An advice screen will appear if you touch this key while
sewing. (Refer to page 42.)
A Touch this key to confirm your entry. (Refer to 100.)
3. Touch the pattern that you would like to use. The pattern
you touch will then be selected for use.
* If you select the wrong pattern by mistake, touch the
“CLEAR” key to clear the pattern selection.
* Up to 70 different patterns can be combined into a single
pattern.
1
2
3
4
5
6
7
8
A
0
9
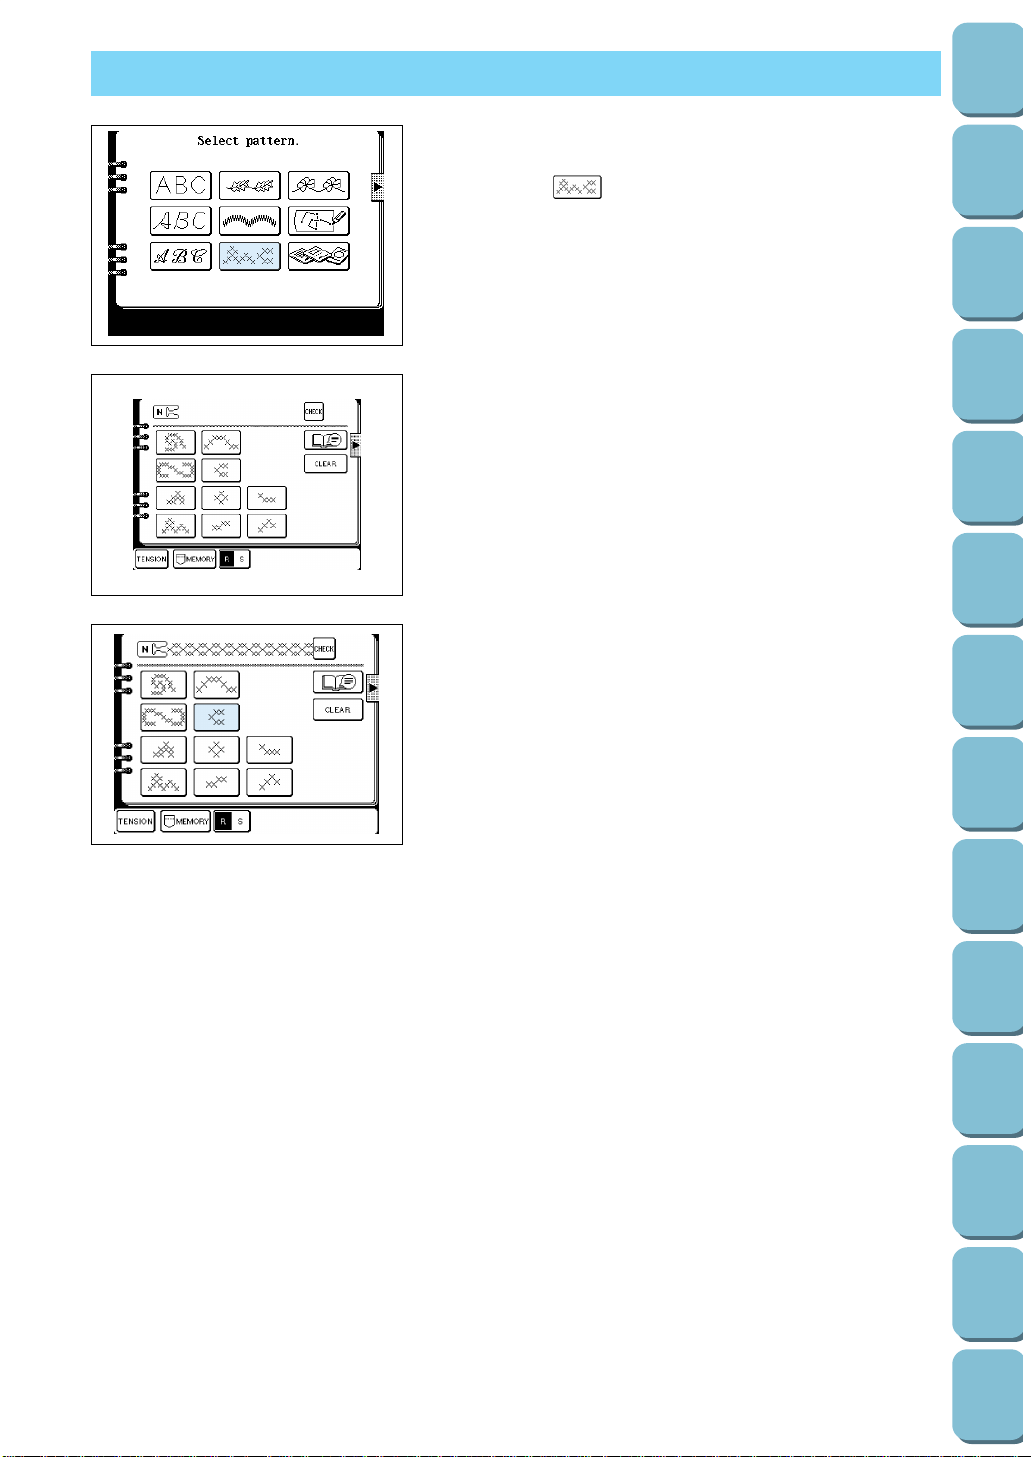
CROSS STITCHING
1. Touch the “CHARACTER/DECORATIVE STITCH” key.
The different types of patterns available will be displayed.
2. Touch the “ ” key.
The cross stitch selection screen will be displayed.
1 Pattern selection keys
2 Touch this key to change the thread tension.
3 Touch this key to save a pattern combination to memory.
(Refer to page 100.)
4 Touch this key to select single or repeat sewing. (Refer to
page 94.)
5 Touch this key to cancel your entry.
6 An advice screen will appear if you touch this key while
sewing. (Refer to page 42.)
7 Touch this key to confirm your entry. (Refer to page 100.)
3. Touch the pattern that you would like to use. The pattern
you touch will then be selected for use.
* If you select the wrong pattern by mistake, touch the
“CLEAR” key to clear the pattern selection.
* Up to 70 different patterns can be combined into a single
pattern.
1
23
4
5
6
7
93
Utility
Stitches
Characters
and
Decorative
Stitches
Embroidering
Editing
Embroidery
Patterns
Retrieving
My
Custom
Stitch
TM
Maintenance
Error
Messages
Trouble
shooting
Sewing
Chart
Patterns
(Programmed
in Machine)
Patterns
(Memory
Card)
Sewing
Setting Up
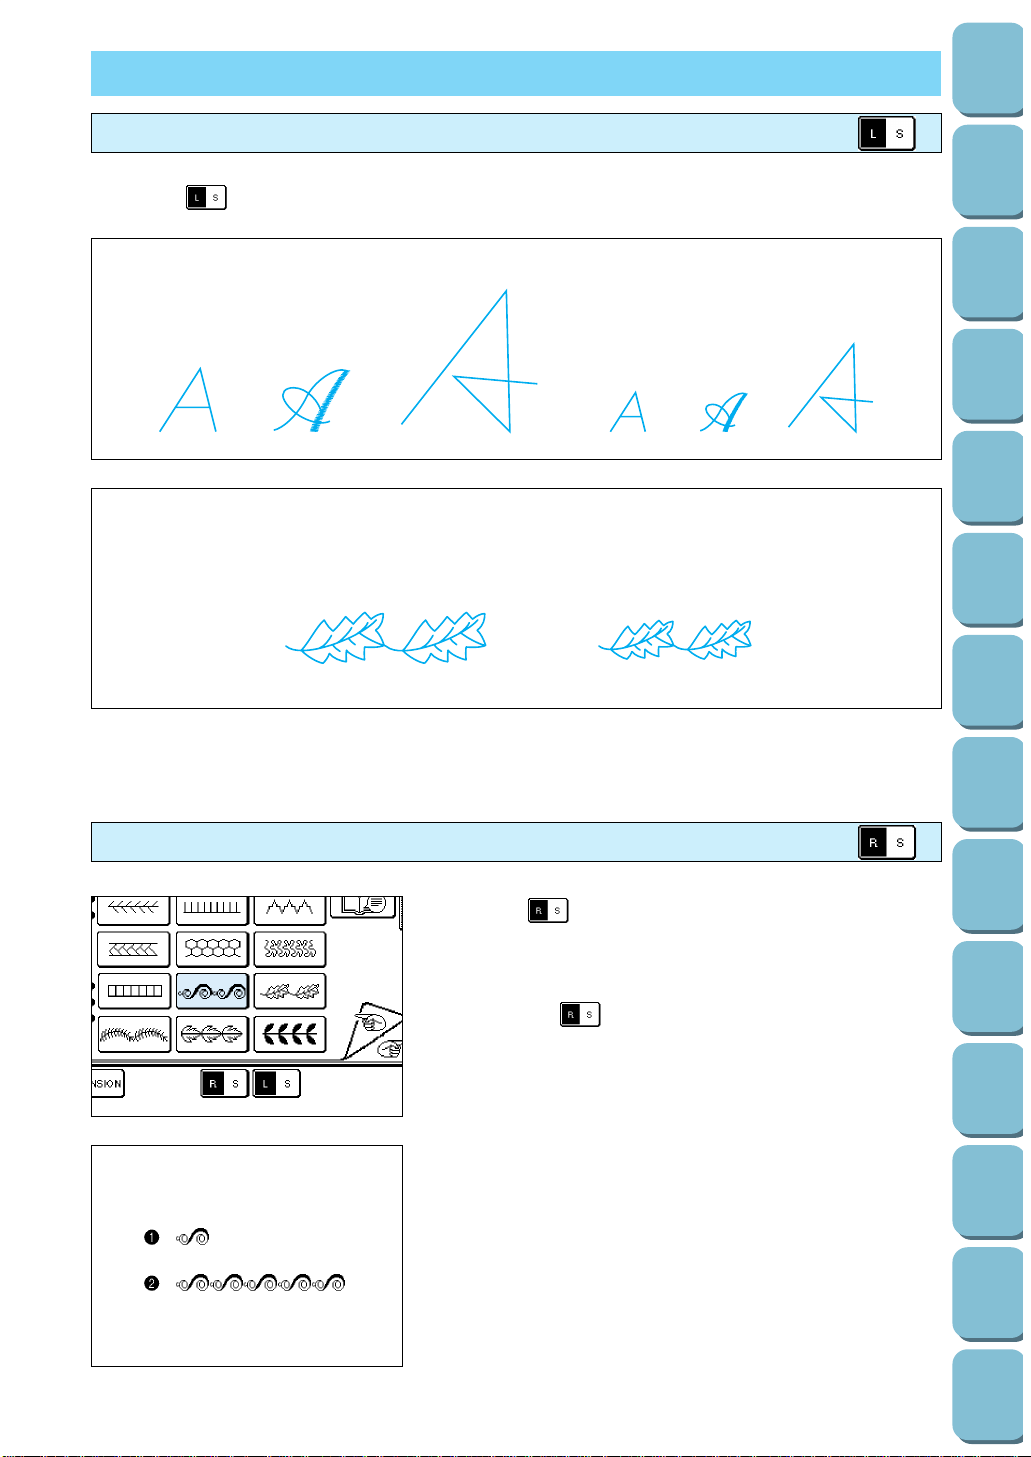
94
Utility
Stitches
Characters
and
Decorative
Stitches
Embroidering
Editing
Embroidery
Patterns
Retrieving
My
Custom
Stitch
TM
Maintenance
Error
Messages
Trouble
shooting
Sewing
Chart
Patterns
(Programmed
in Machine)
Patterns
(Memory
Card)
Sewing
Setting Up
LS
LS
CHARACTER AND DECORATIVE STITCH ADJUSTMENT
Changing the pattern size (Actual size)
Touch the “ ” (large/small) key to change the pattern size.
Single/repeat sewing
Touch the “ ” (repeat/single) key to sew one stitch pattern
only or to repeat same stitch pattern.
1. Select the pattern.
2. Touch the “ ” (repeat/single) key. The selected stitch
pattern will be single.
1 Single sewing
2 Repeat sewing
Note
If “repeat sewing” has been selected, you can switch to “single
sewing” as you approach the end of the next decorative stitch.

For satin stitches, it is possible to use the “ ” key to
change the size of the pattern in five steps without changing the
stitch width or stitch length.
12 3 4 5
1
2
1 Actual size
2 Pattern length
Elongation
1. To change the length of the pattern, touch the “ ”
key to change the number.
* The number shown in the darkened square indicates the
current setting.
2. Select the pattern.
95
Utility
Stitches
Characters
and
Decorative
Stitches
Embroidering
Editing
Embroidery
Patterns
Retrieving
My
Custom
Stitch
TM
Maintenance
Error
Messages
Trouble
shooting
Sewing
Chart
Patterns
(Programmed
in Machine)
Patterns
(Memory
Card)
Sewing
Setting Up
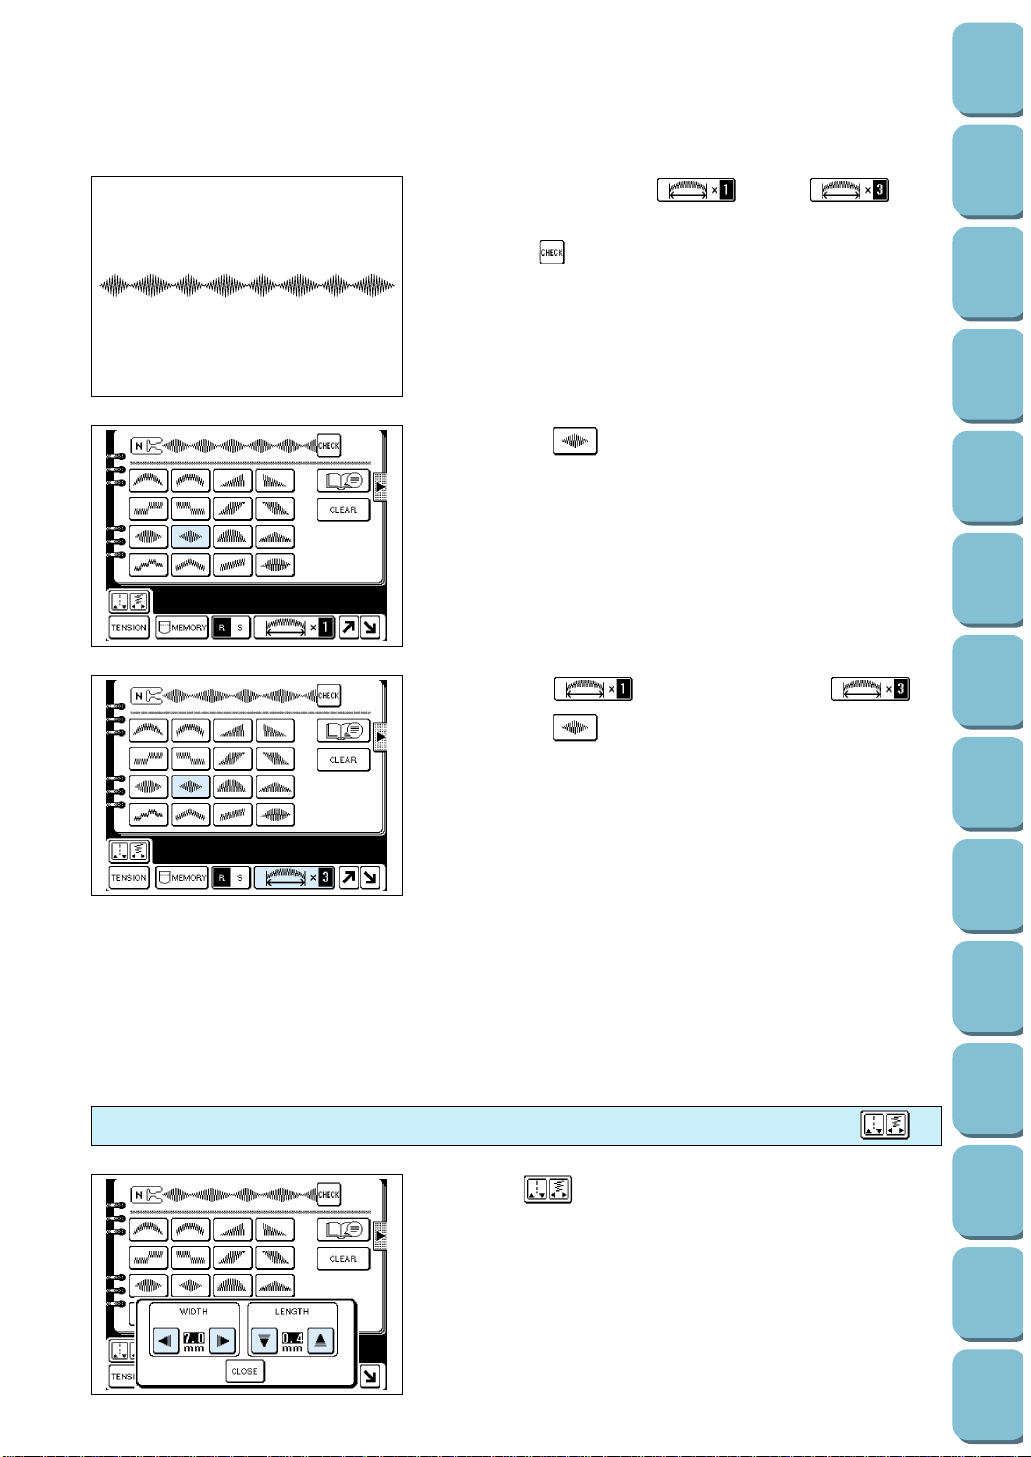
96
Utility
Stitches
Characters
and
Decorative
Stitches
Embroidering
Editing
Embroidery
Patterns
Retrieving
My
Custom
Stitch
TM
Maintenance
Error
Messages
Trouble
shooting
Sewing
Chart
Patterns
(Programmed
in Machine)
Patterns
(Memory
Card)
Sewing
Setting Up
Example: To combine “ ” and “ ”
Note
Pressing the key will provide a confirmation of the selected
stitches.
1. Select the “ ” stitch.
2. Touch the “ ” key twice to switch to “ ”.
3. Select the “ ” stitch.
The thread may easily become knotted when certain types of
fabric or thread are used; therefore, the upper thread tension
should be adjusted according to the application.
Touch the “ ” key.
The stitch width and stitch length setting screen will be
displayed.
Touch the stitch width and stitch length setting keys to change
the settings. (Refer to pages 24 to 26.)
The thread may easily become knotted when certain types of
fabric or thread are used; therefore, the upper thread tension
should be adjusted according to the application.
Changing the stitch length and the stitch width
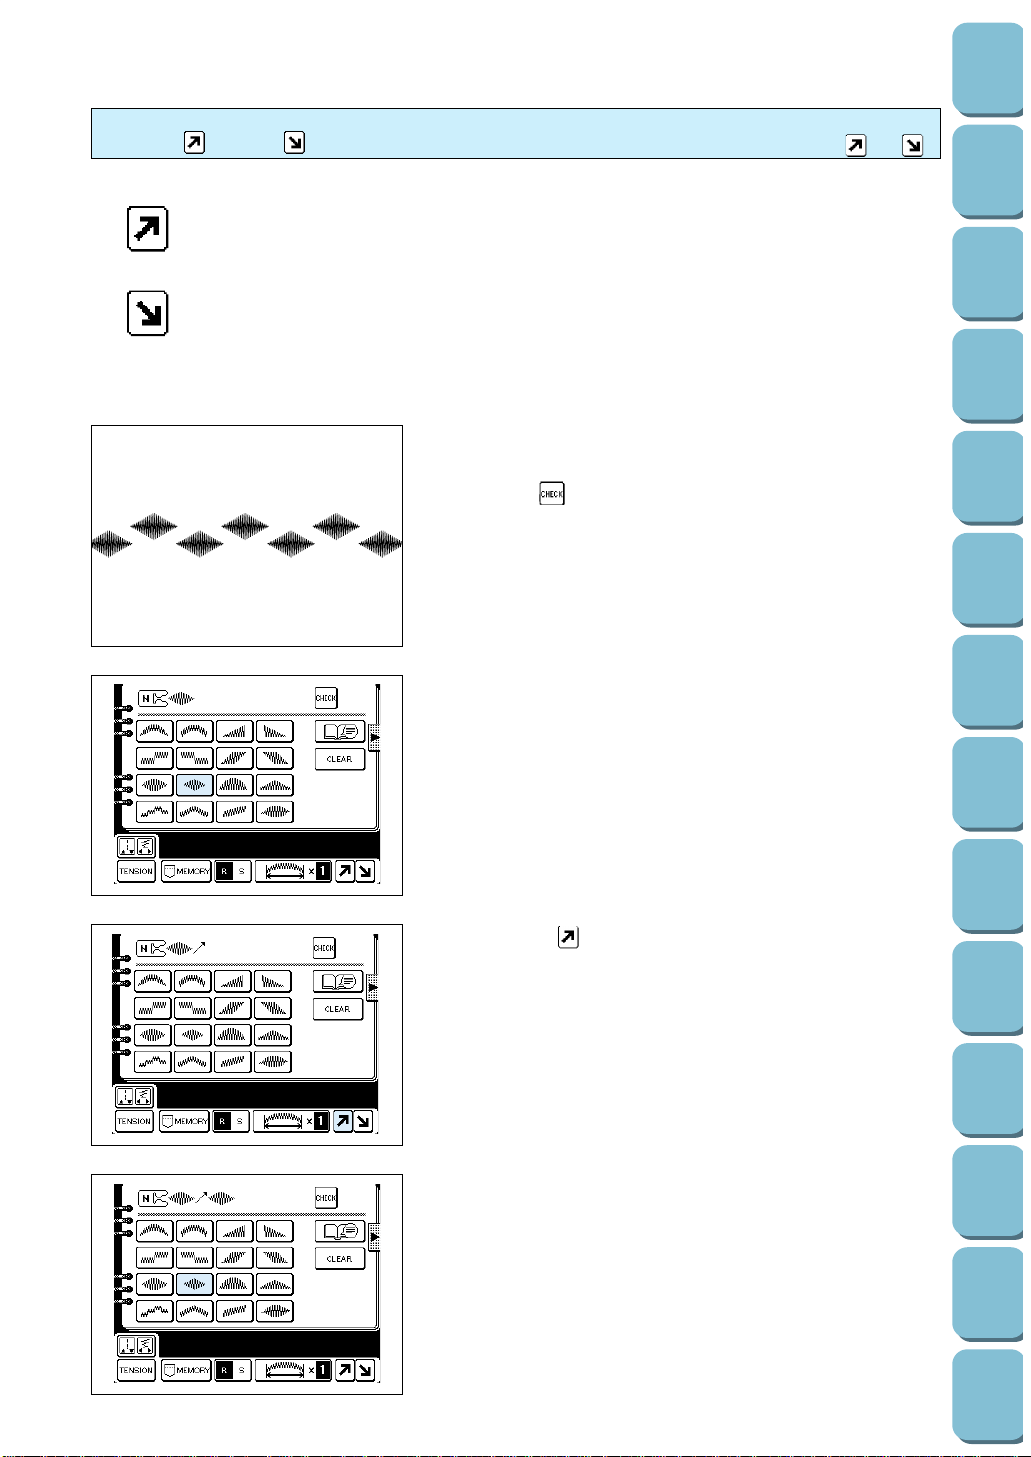
One touch of the “up” key will move the stitch pattern up half of it’s finished height.
One touch of the “down” key will move the stitch pattern down half of it’s finished height.
Example: Satin stitch pattern
Note
Pressing the key will provide a confirmation of the selected
stitches.
1. Select the pattern.
2. Touch the “ ” key. The next pattern will move up half of
it’s finished height.
3. Select the pattern.
Customize patterns by combining satin stitches using
the “ ” and “ ” keys
97
Utility
Stitches
Characters
and
Decorative
Stitches
Embroidering
Editing
Embroidery
Patterns
Retrieving
My
Custom
Stitch
TM
Maintenance
Error
Messages
Trouble
shooting
Sewing
Chart
Patterns
(Programmed
in Machine)
Patterns
(Memory
Card)
Sewing
Setting Up
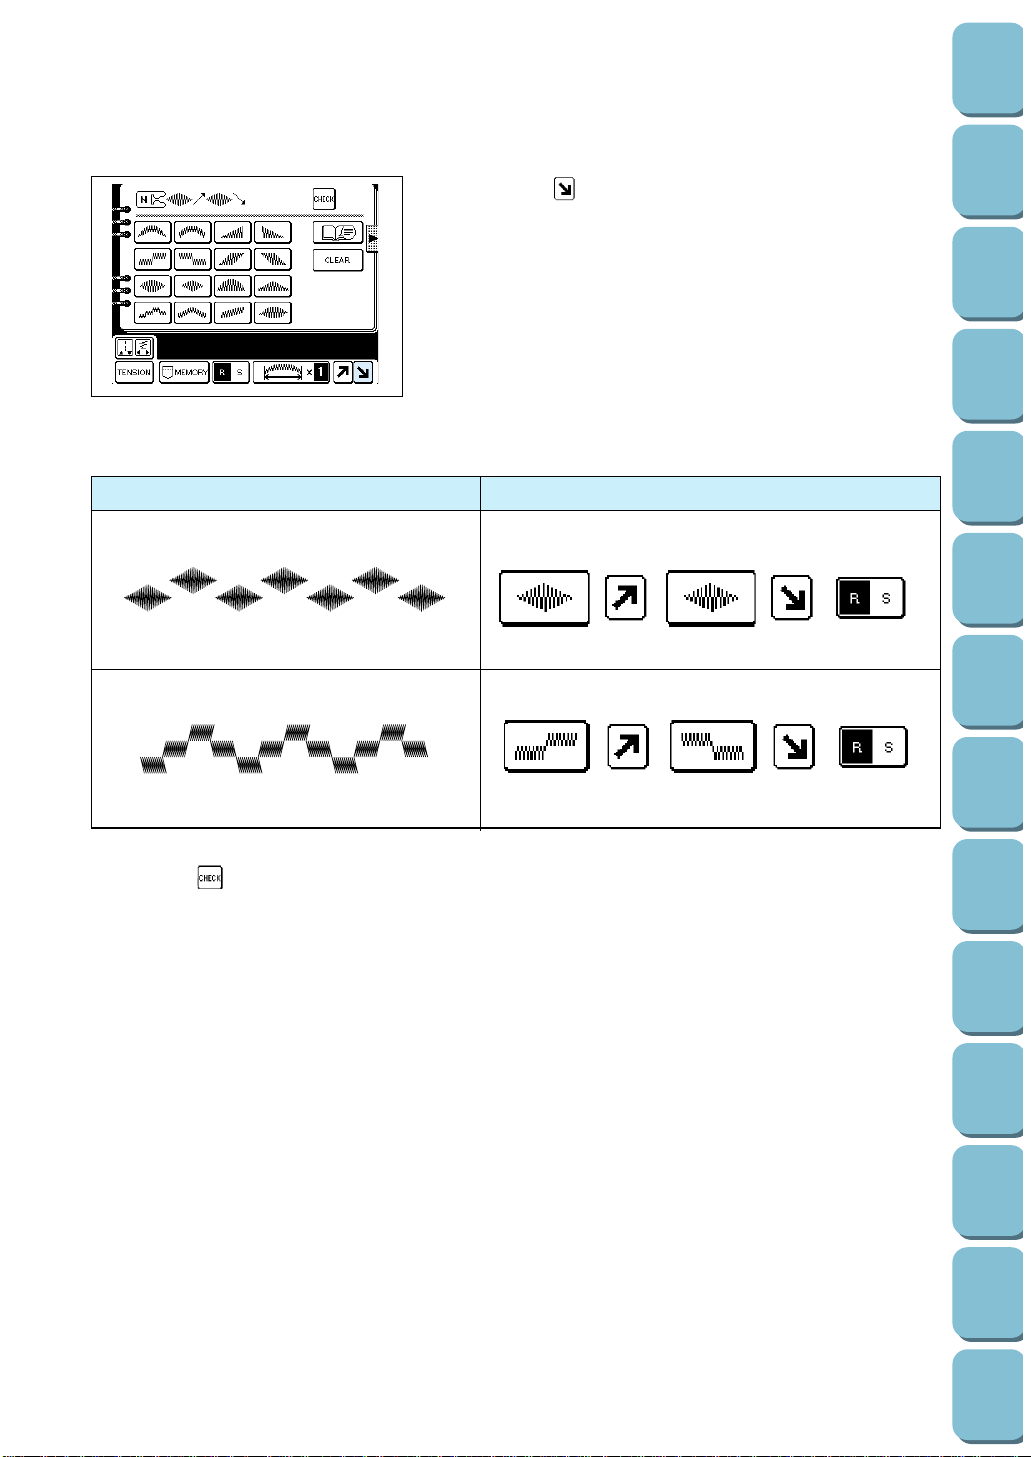
98
Utility
Stitches
Characters
and
Decorative
Stitches
Embroidering
Editing
Embroidery
Patterns
Retrieving
My
Custom
Stitch
TM
Maintenance
Error
Messages
Trouble
shooting
Sewing
Chart
Patterns
(Programmed
in Machine)
Patterns
(Memory
Card)
Sewing
Setting Up
4. Touch the “ ” key. The next pattern will move down half of
it’s finished height.
Making various pattern combinations
Stitch pattern Operation
Note
Pressing the key will provide a confirmation of the selected stitches.
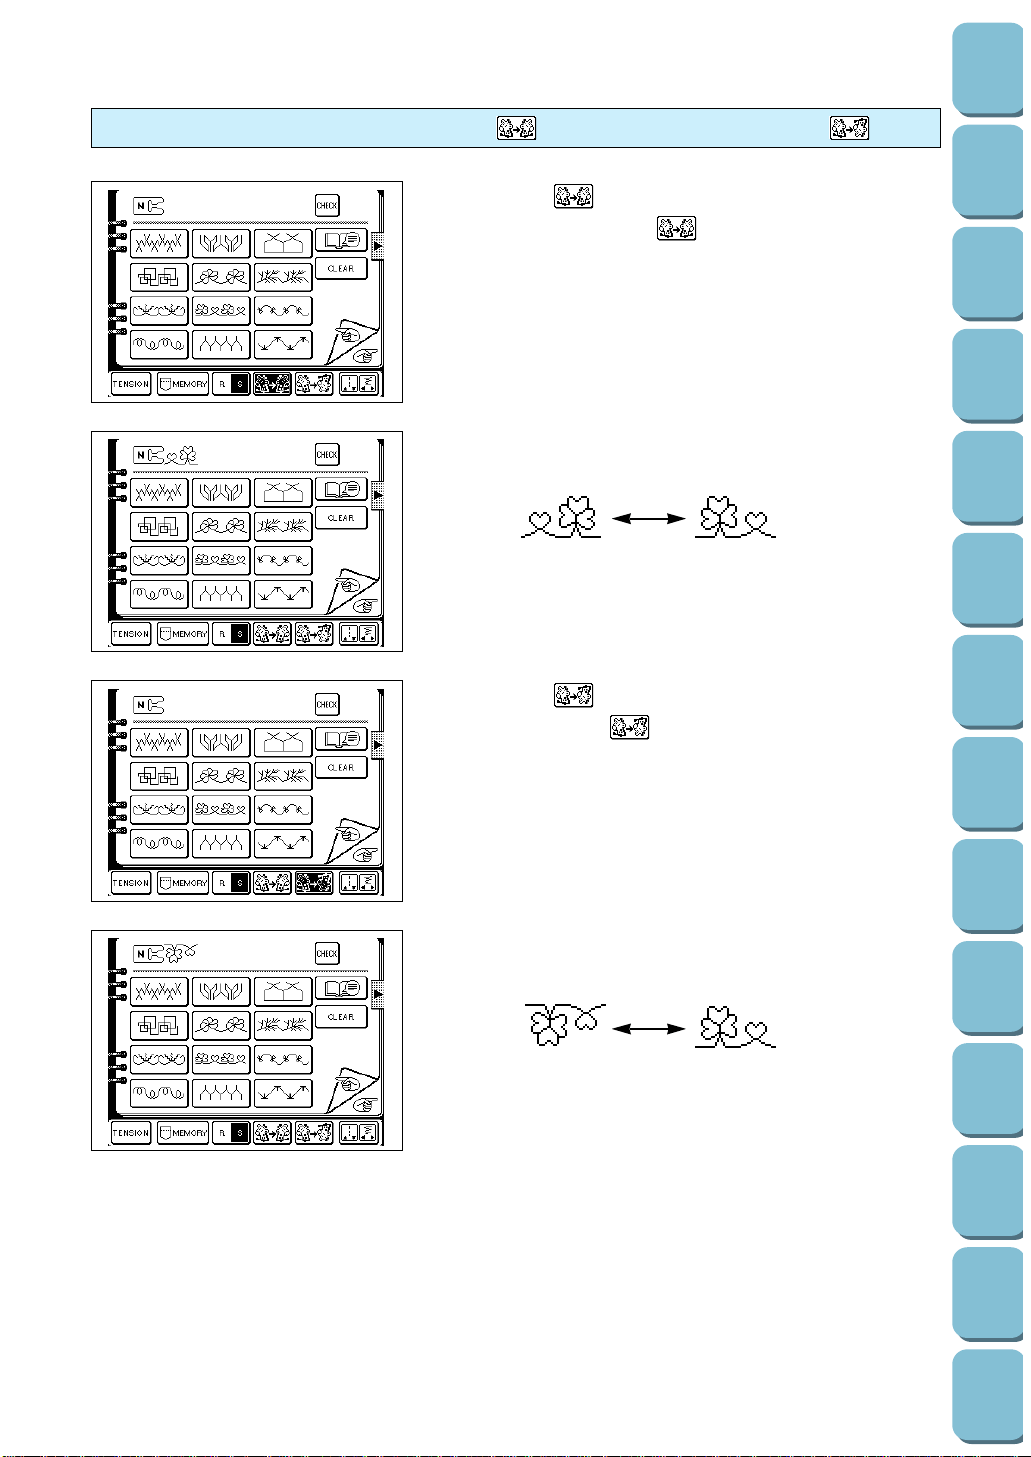
Changing Mirror Image [Left and Right (the “ ” key), and Top and Bottom (the “ ” key)]
1. Touch the “ ” key.
Mirror Imaging with the “ ” Key
2. Patterns selected when this key is activated will be mirror
imaged from left to right.
1. Touch the “ ” key.
Inverting with the “ ” Key
2. Patterns selected when this key is activated will be mirror
imaged from top to bottom.
Mirror Image
Horizontally
(left to right)
Mirror Image
Vertically
(top to bottom)
Normal
Normal
99
Utility
Stitches
Characters
and
Decorative
Stitches
Embroidering
Editing
Embroidery
Patterns
Retrieving
My
Custom
Stitch
TM
Maintenance
Error
Messages
Trouble
shooting
Sewing
Chart
Patterns
(Programmed
in Machine)
Patterns
(Memory
Card)
Sewing
Setting Up

100
Utility
Stitches
Characters
and
Decorative
Stitches
Embroidering
Editing
Embroidery
Patterns
Retrieving
My
Custom
Stitch
TM
Maintenance
Error
Messages
Trouble
shooting
Sewing
Chart
Patterns
(Programmed
in Machine)
Patterns
(Memory
Card)
Sewing
Setting Up
1. Touch the “CHECK” key. Stitch patterns will appear while
moving on the screen.
2. After checking the patterns, touch the “CLOSE” key. The
display will return to the original screen.
Confirming entry of combined stitch patterns
You can save words, your name for example, and patterns that
you use often into the machine’s memory. The memory can
save up to 12 such patterns.
After you have combined characters or patterns, touch the
“ ” key. Once the pattern has been saved, the display
will return to the previous screen. Refer to page 156 for details
on how to retrieve characters and patterns which have been
saved in memory.
CAUTION
Do not turn off the power while the word “Saving” is
displayed on the screen.
If you turn off the power during this time, the data being
stored may be deleted.
* It takes approximately 10 seconds for a pattern to be saved.
For details on retrieving a pattern which has been saved,
refer to page 156.
Saving combined stitch patterns
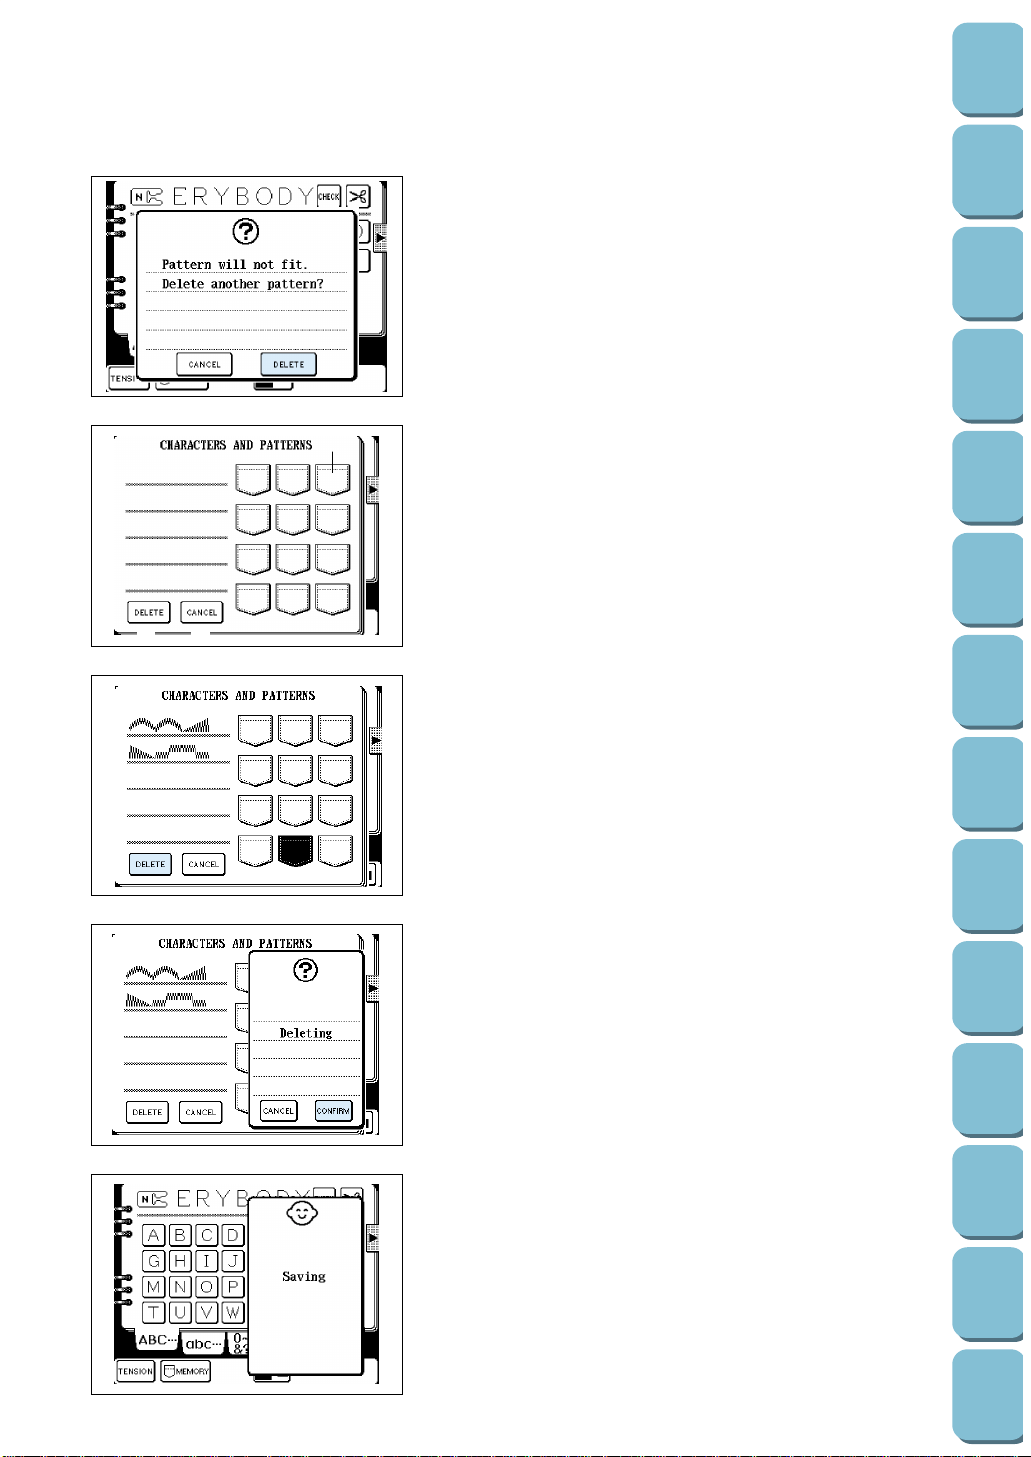
If the memory is full and no more patterns can be saved
To delete a pattern that is already saved in the memory, touch
the “DELETE” key; to cancel the saving of a pattern, touch the
“CANCEL” key.
Erasing a pattern
1. Touch the “DELETE” key.
1 This indicates a pocket which has a pattern saved in it.
2 If you touch pockets, the pattern which is saved in that
pocket will be displayed.
3 Touch this key to delete a saved pattern.
4 Touch this key to cancel the erasing of a saved pattern.
2. Touch a pocket key to select the pattern to delete, and then
touch the “DELETE” key.
3. Touch the “CONFIRM” key.
The new pattern will then be saved automatically.
* To cancel the deleting of a pattern, touch the “CANCEL”
key.
1
43
2
101
Utility
Stitches
Characters
and
Decorative
Stitches
Embroidering
Editing
Embroidery
Patterns
Retrieving
My
Custom
Stitch
TM
Maintenance
Error
Messages
Trouble
shooting
Sewing
Chart
Patterns
(Programmed
in Machine)
Patterns
(Memory
Card)
Sewing
Setting Up
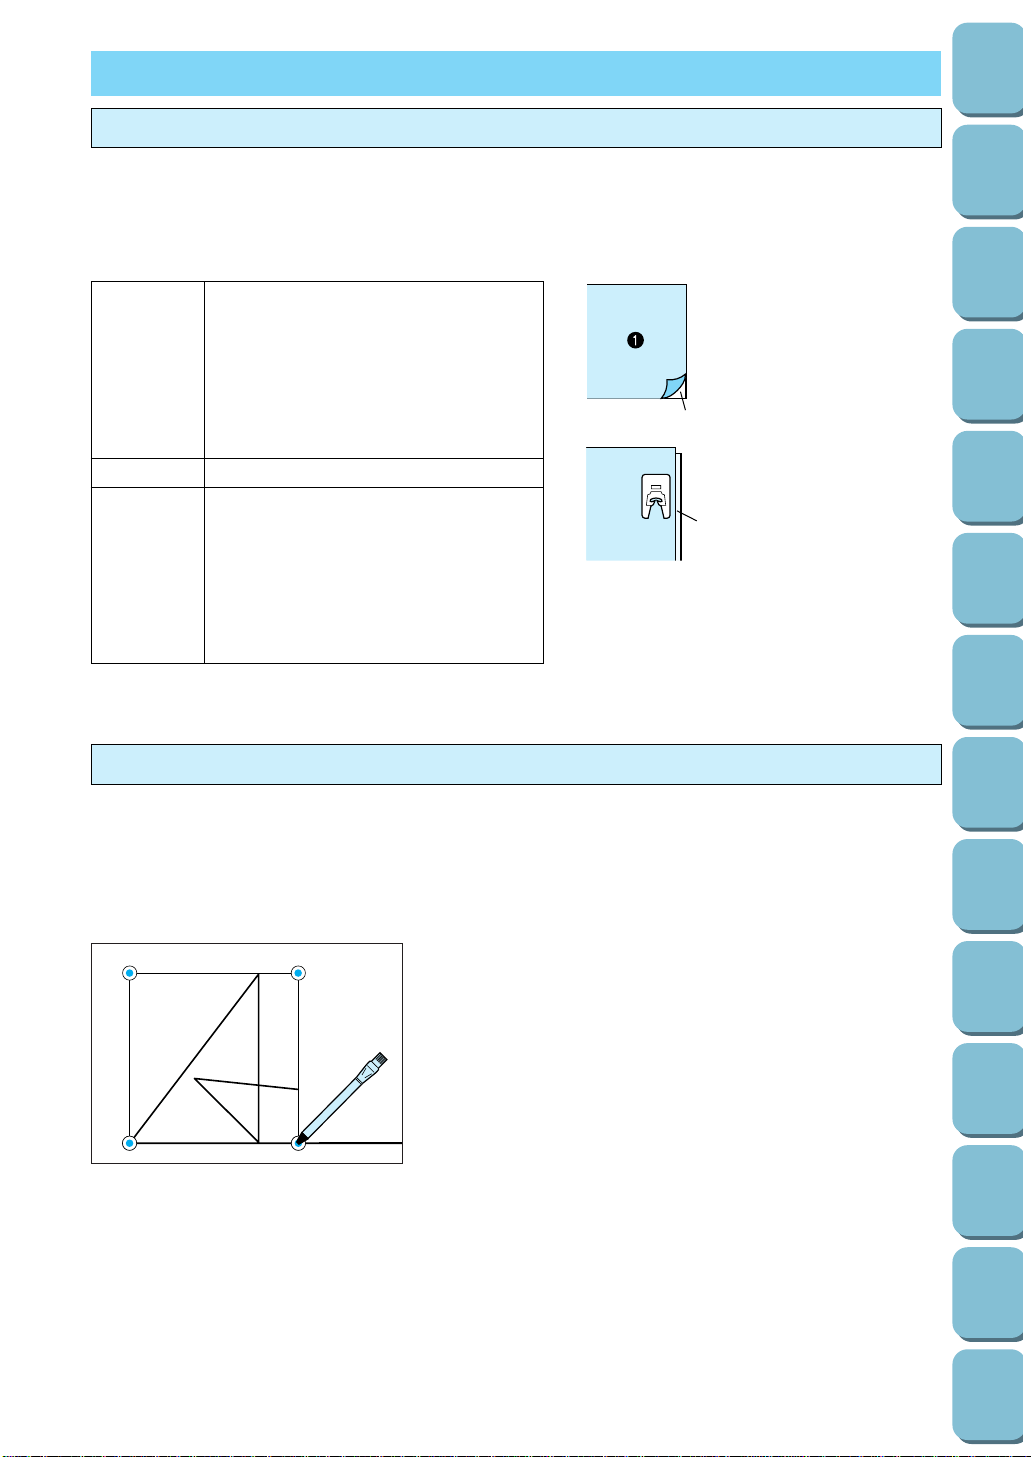
102
Utility
Stitches
Characters
and
Decorative
Stitches
Embroidering
Editing
Embroidery
Patterns
Retrieving
My
Custom
Stitch
TM
Maintenance
Error
Messages
Trouble
shooting
Sewing
Chart
Patterns
(Programmed
in Machine)
Patterns
(Memory
Card)
Sewing
Setting Up
SEWING
1 Fabric
2 Stabilizer
3 Thin paper
Sewing attractive finishes
Refer to the table below and the “RELATED CHART OF SEWING FABRICS, THREADS AND NEEDLES”
for recommended fabrics, threads and needles to use in order to obtain attractive sewing finishes.
Furthermore, fabric pattern slippages may occur when using different fabric thicknesses or types of
stabilizers. Be sure to carry out a test sewing beforehand to check.
FABRIC
THREAD
NEEDLE
When sewing thin or stretch fabrics,
fabrics with coarse weaves, or
characters/decorative stitches stored in
the machine attach interfacing to the
reverse side. If you do not wish to
attach interfacing, place the fabric onto
a thin paper such as tracing paper
before starting to sew. This acts as a
stabilizer.
#50 – #60
Thin and medium fabrics
75/11 (Embroidery)
Thick fabrics
90/14 (Embroidery)
Stretch fabrics
#14 (Golden needle)
2
N
3
1
1. Align the picture on the pattern sheet with the place where
the pattern is to be sewn on the fabric, and use a chalk pen
to make marks on the fabric at the positions of the holes.
* When sewing patterns in mirror image, turn the pattern
sheet upside-down.
1 Initial needle drop point
Using a pattern sheet
You can use the clear plastic pattern sheet which is provided as an accessory to make reference marks on
your material for use in positioning. This is particularly helpful when sewing large characters.
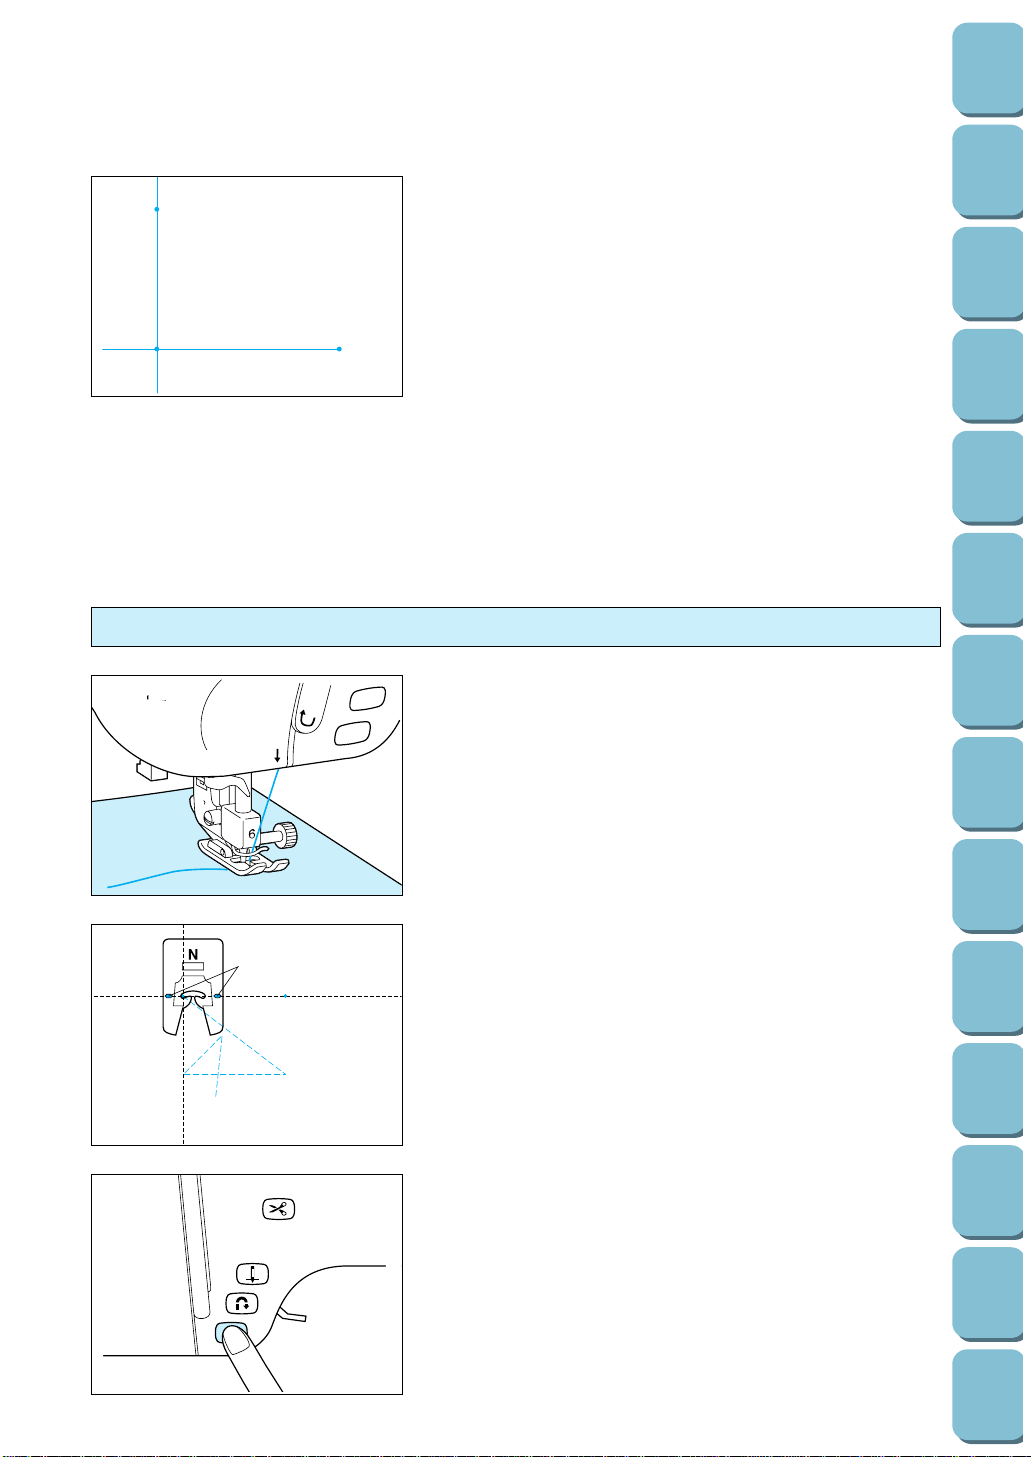
2. Draw lines to join the marks as shown in the illustration.
Sewing
5
3
1. Attach presser foot “N”.
2. Place the fabric under the presser foot, pull the upper thread
out to the side and then lower the presser foot.
1
* If you used the pattern sheet to make positioning marks on
the fabric, place the fabric so that the marks are aligned with
the needle reference points in the presser foot and pull the
upper thread out to the side before lowering the presser
foot.
1 Needle hole reference line
3. Press the “START/STOP” button. Sewing will then start.
103
Utility
Stitches
Characters
and
Decorative
Stitches
Embroidering
Editing
Embroidery
Patterns
Retrieving
My
Custom
Stitch
TM
Maintenance
Error
Messages
Trouble
shooting
Sewing
Chart
Patterns
(Programmed
in Machine)
Patterns
(Memory
Card)
Sewing
Setting Up
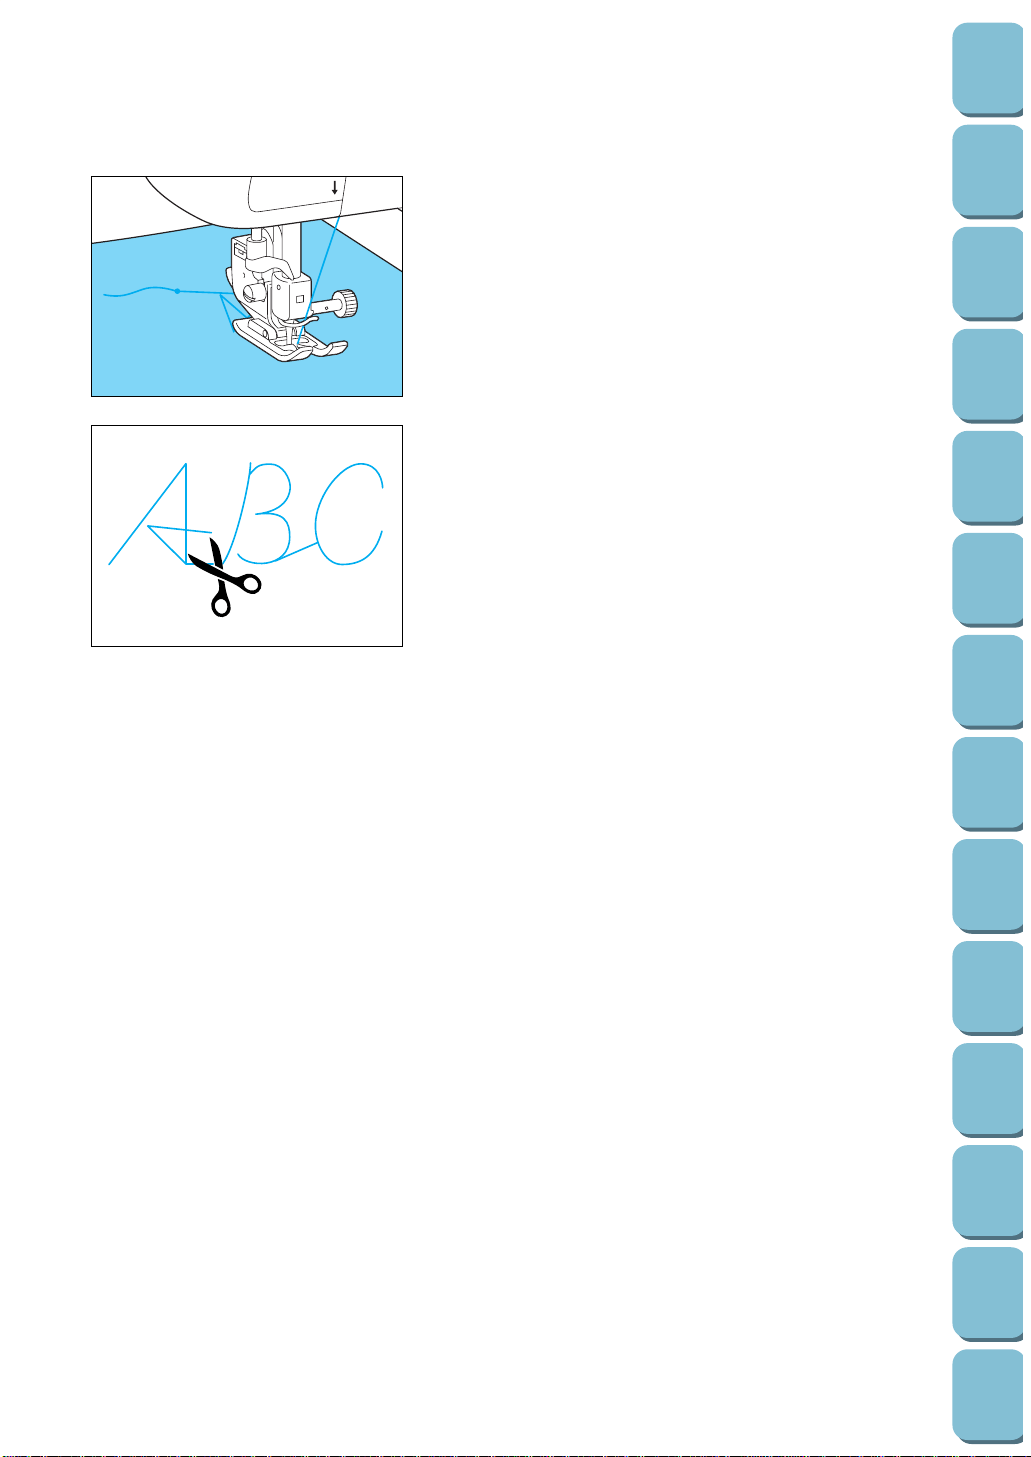
104
Utility
Stitches
Characters
and
Decorative
Stitches
Embroidering
Editing
Embroidery
Patterns
Retrieving
My
Custom
Stitch
TM
Maintenance
Error
Messages
Trouble
shooting
Sewing
Chart
Patterns
(Programmed
in Machine)
Patterns
(Memory
Card)
Sewing
Setting Up
6
5
4. Once sewing of the character has been completed, the
machine will automatically sew a reinforcement stitch and
then stop.
* When the automatic thread cutting is set, the machine trims
both threads automatically after sewing is completed, and
the machine will move on to the next sewing position before
stopping.
* When sewing continuous patterns, press the
“START/STOP” button to stop the machine, and then press
the “REVERSE STITCH” button to sew a reinforcement
stitch.
5. When sewing is completed, trim any excess thread.
CAUTION
When sewing some patterns, the needle will stop in the
raised position while the fabric is fed due to the needle bar
separation mechanism which is used in this machine. At
such times, a clicking sound which is different from the
sound generated during sewing will be heard, but this
sound is normal and is not the sign of a malfunction.

ADJUSTING STITCH PATTERNS
N
A stitch pattern may get deformed due to the weave of thread or cloth. It is a good idea to first make a trial
stitching, and then make adjustments for each stitch pattern if necessary.
1. Touch the “OPERATION GUIDE” key.
2. Touch the “FINE ADJUSTMENT OF STITCH” key.
3. Attach presser foot “N” and then start embroidering. A trial
pattern for adjustment purposes can then be embroidered.
Adjust shape of stitch using the “+” and “–” keys.
* From –9 to +9
4. Touch the “END” key when the adjustment is finished.
Stitch pattern Remedy
Correct shape
Vert. “+”
Vert. “–”
Horiz. “+”
Horiz. “–”
105
Utility
Stitches
Characters
and
Decorative
Stitches
Embroidering
Editing
Embroidery
Patterns
Retrieving
My
Custom
Stitch
TM
Maintenance
Error
Messages
Trouble
shooting
Sewing
Chart
Patterns
(Programmed
in Machine)
Patterns
(Memory
Card)
Sewing
Setting Up
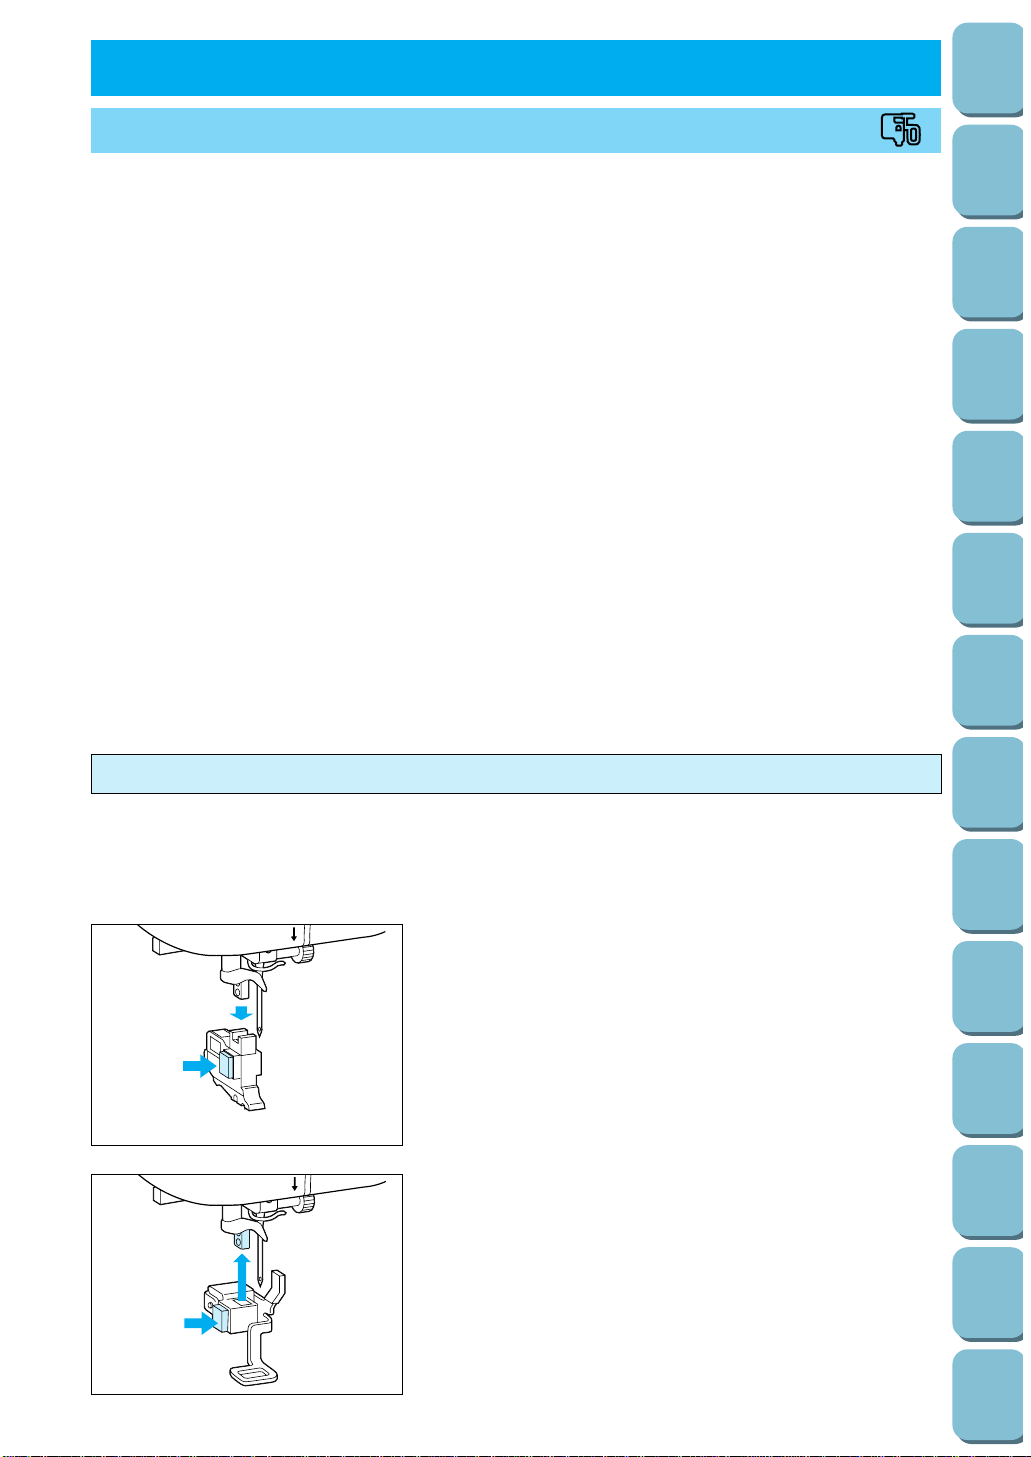
106
Utility
Stitches
Characters
and
Decorative
Stitches
Embroidering
Editing
Embroidery
Patterns
Retrieving
My
Custom
Stitch
TM
Maintenance
Error
Messages
Trouble
shooting
Sewing
Chart
Patterns
(Programmed
in Machine)
Patterns
(Memory
Card)
Sewing
Setting Up
PREPARATION BEFORE SEWING
Q
4. EMBROIDERING
BE SURE TO ATTACH A PIECE OF STABILIZER FABRIC TO THE BACK OF THE
MATERIAL BY IRONING BEFORE STARTING TO EMBROIDER
Using stabilizer fabric is an indispensable part of creating attractive embroidery. It is
particularly important to attach stabilizer fabric to the back of stretch fabrics, thin fabrics
and fabric with coarse weaves. If necessary, two thicknesses of stabilizer fabric can be
attached. If embroidering on fabrics which cannot be ironed, or in places where ironing is
difficult, place the stabilizer fabric underneath the frame before embroidering. Use
stabilizer fabric which is larger in area than the frame, and make sure that the stabilizer
fabric is clamped all the way around by the frame to prevent the fabric from becoming
loose.
NOTES ON THE EMBROIDERY UNIT
(1) Always turn off the main power switch when connecting or removing the embroidery unit and
embroidery card (memory card).
(2) Connect embroidery unit firmly into the plug connector and socket of the machine.
(3) Do not touch the connector of embroidery unit.
(4) You cannot use a foot controller when the embroidery unit is operational.
(5) Always keep the embroidery unit and the memory card in designated cases.
(6) Do not carry the machine while the embroidery unit is connected.
(7) Always set your machine on a level surface.
* The sewing speed is controlled by the machine automatically according to the pattern selected.
5
1. Press the “NEEDLE POSITION” button to raise the needle,
and then turn off the power.
2. While pressing the button to the left of the presser foot
holder, pull the presser foot holder downward to remove it.
5
3. Raise the presser foot lever to the highest position. While
pressing the button to the left of the embroidery foot “Q”,
push embroidery foot “Q” firmly upward with both hands to
install it.
CAUTION
Be careful not to touch the needle during this time,
otherwise injury may result.
Attaching embroidery foot “Q”
CAUTION
Be sure to turn off the power before attaching the embroidery foot “Q”. If the power is left on and
the “START/STOP” button is accidentally pressed, the machine will start operating, which could
result in serious injury.
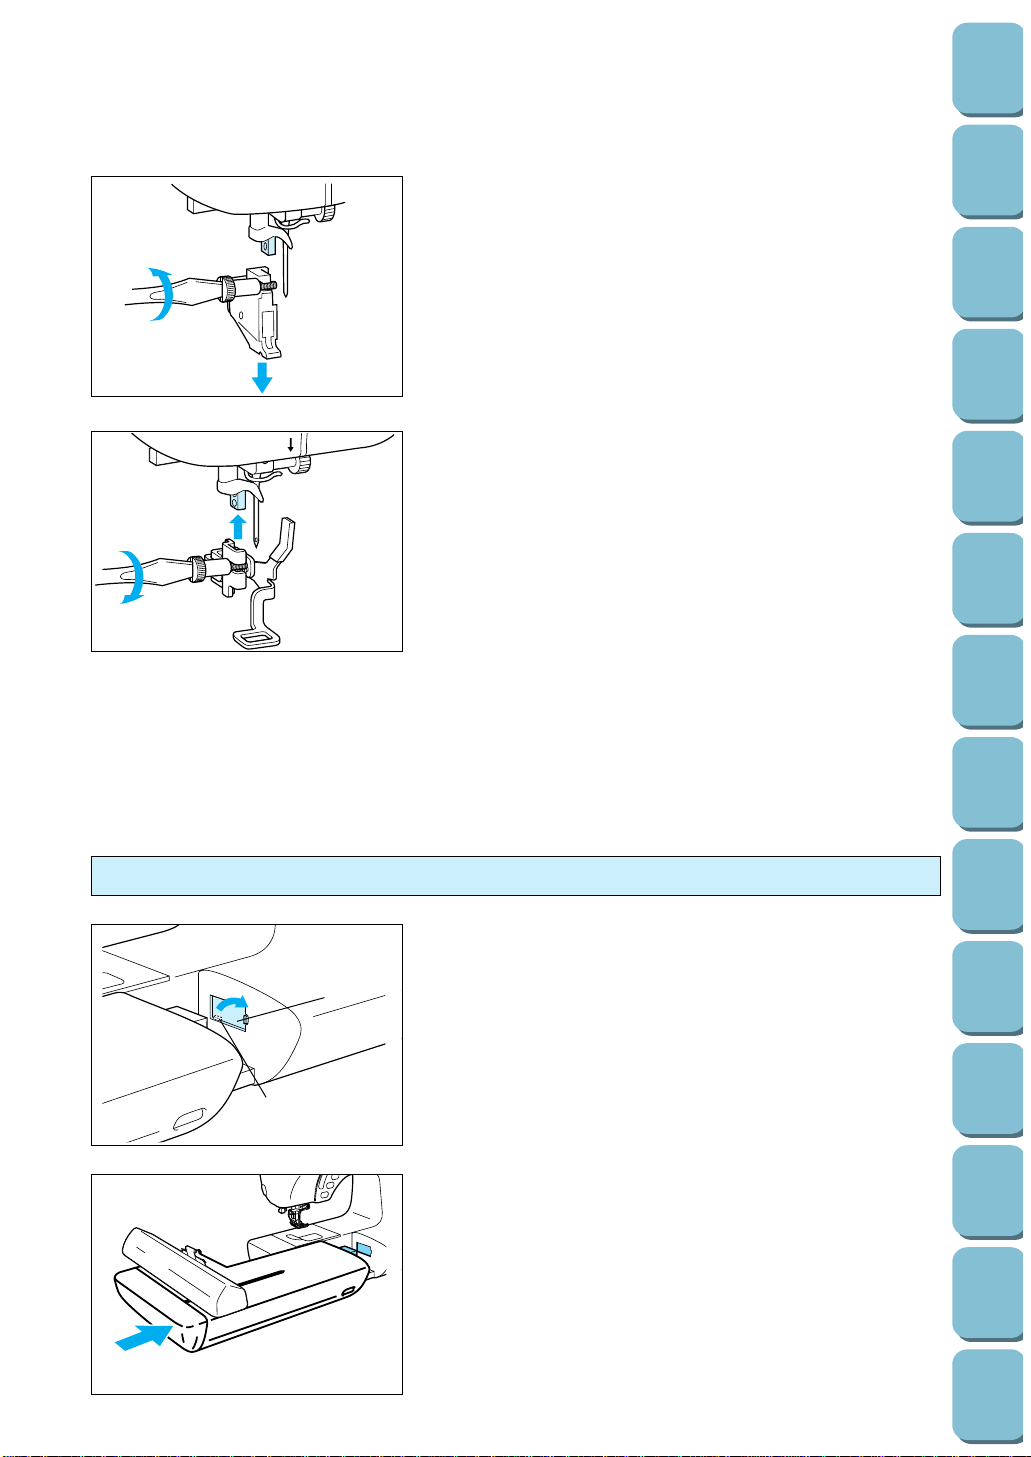
1
2
Always turn off the power supply before carrying out the
procedure below.
1. Turn off the power.
2. Open the cover of the connecting slot by rotating the plastic
bracket in the direction indicated by the arrow.
1 Connecting slot
2 Plastic bracket
* When the embroidery unit is not being used, close the cover
of the connecting slot.
3. Insert the connector of the embroidery unit into the slot and
check that it is connected properly.
* Put the machine on a flat and horizontal surface and slide
the embroidery unit towards the machine.
Fitting embroidery unit
1. Press the “NEEDLE POSITION” button to raise the needle,
and then turn off the power.
2. Raise the presser foot lever.
3. Loosen the set screw to remove the presser foot holder.
5
4. Attach the embroidery foot “Q”.
5. Set arm of embroidery foot “Q” on needle holder, use the
metal disk provided with your machine (accessory #14 on
page 7) or a screwdriver to tighten the screw firmly.
CAUTION
Be careful not to touch the needle during this time,
otherwise injury may result.
NOTE
– Make sure that there is no gap between the needle bar and
embroidery foot “Q”.
– It is recommended that a 90/14 needle should be used
when embroidering on thicker fabrics or stabilizing products.
(for example denim, puffy foam . .) A 75/11 needle might be
bent or broken, which could result in injury.
107
Utility
Stitches
Characters
and
Decorative
Stitches
Embroidering
Editing
Embroidery
Patterns
Retrieving
My
Custom
Stitch
TM
Maintenance
Error
Messages
Trouble
shooting
Sewing
Chart
Patterns
(Programmed
in Machine)
Patterns
(Memory
Card)
Sewing
Setting Up
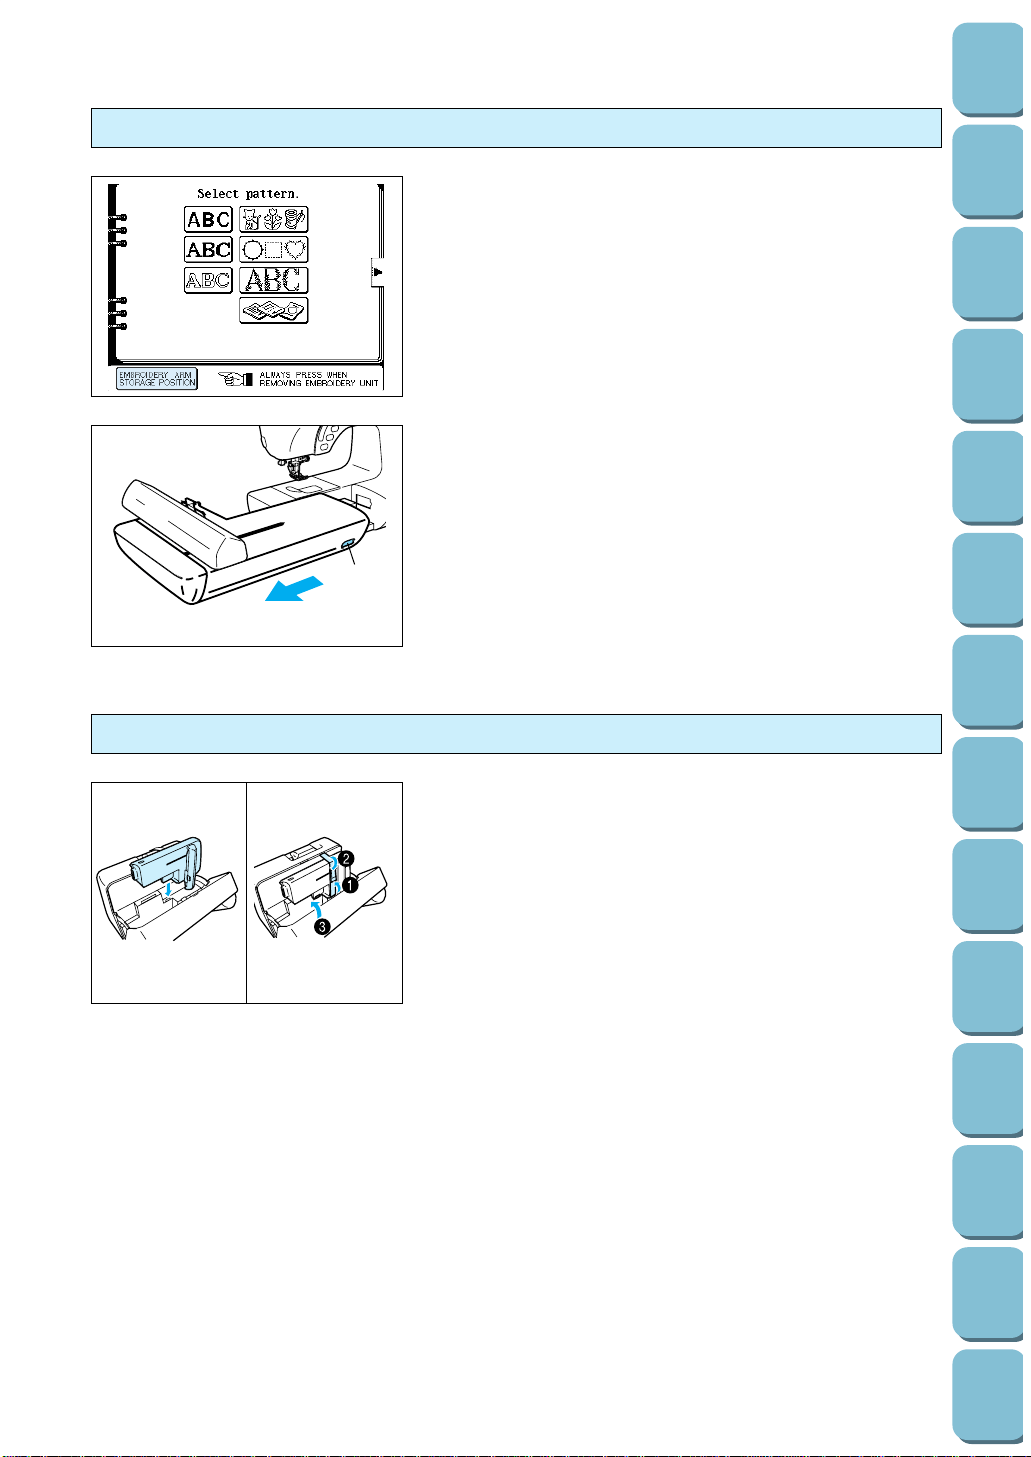
108
Utility
Stitches
Characters
and
Decorative
Stitches
Embroidering
Editing
Embroidery
Patterns
Retrieving
My
Custom
Stitch
TM
Maintenance
Error
Messages
Trouble
shooting
Sewing
Chart
Patterns
(Programmed
in Machine)
Patterns
(Memory
Card)
Sewing
Setting Up
1. Make sure that the embroidery frame has been removed,
touch the “EMBROIDERY” key or the “EMBROIDERY EDIT”
key, and then touch the “EMBROIDERY ARM STORAGE
POSITION” key. The carriage will move to the removal
position.
CAUTION
If the above procedure is not carried out, the embroidery
unit cannot be placed in the case.
1
2. Turn off the power, hold the left side of the embroidery unit,
and while pressing the release button, gently slide the
embroidery unit away from the machine.
1 Release button
CAUTION
Make sure that the power is turned off, otherwise damage
may result.
Removing the embroidery unit
1
2
1 Hook the embroidery unit onto the tab inside the case.
2 Secure the embroidery unit with the band.
3 Close the cover.
Placing the embroidery unit into its case
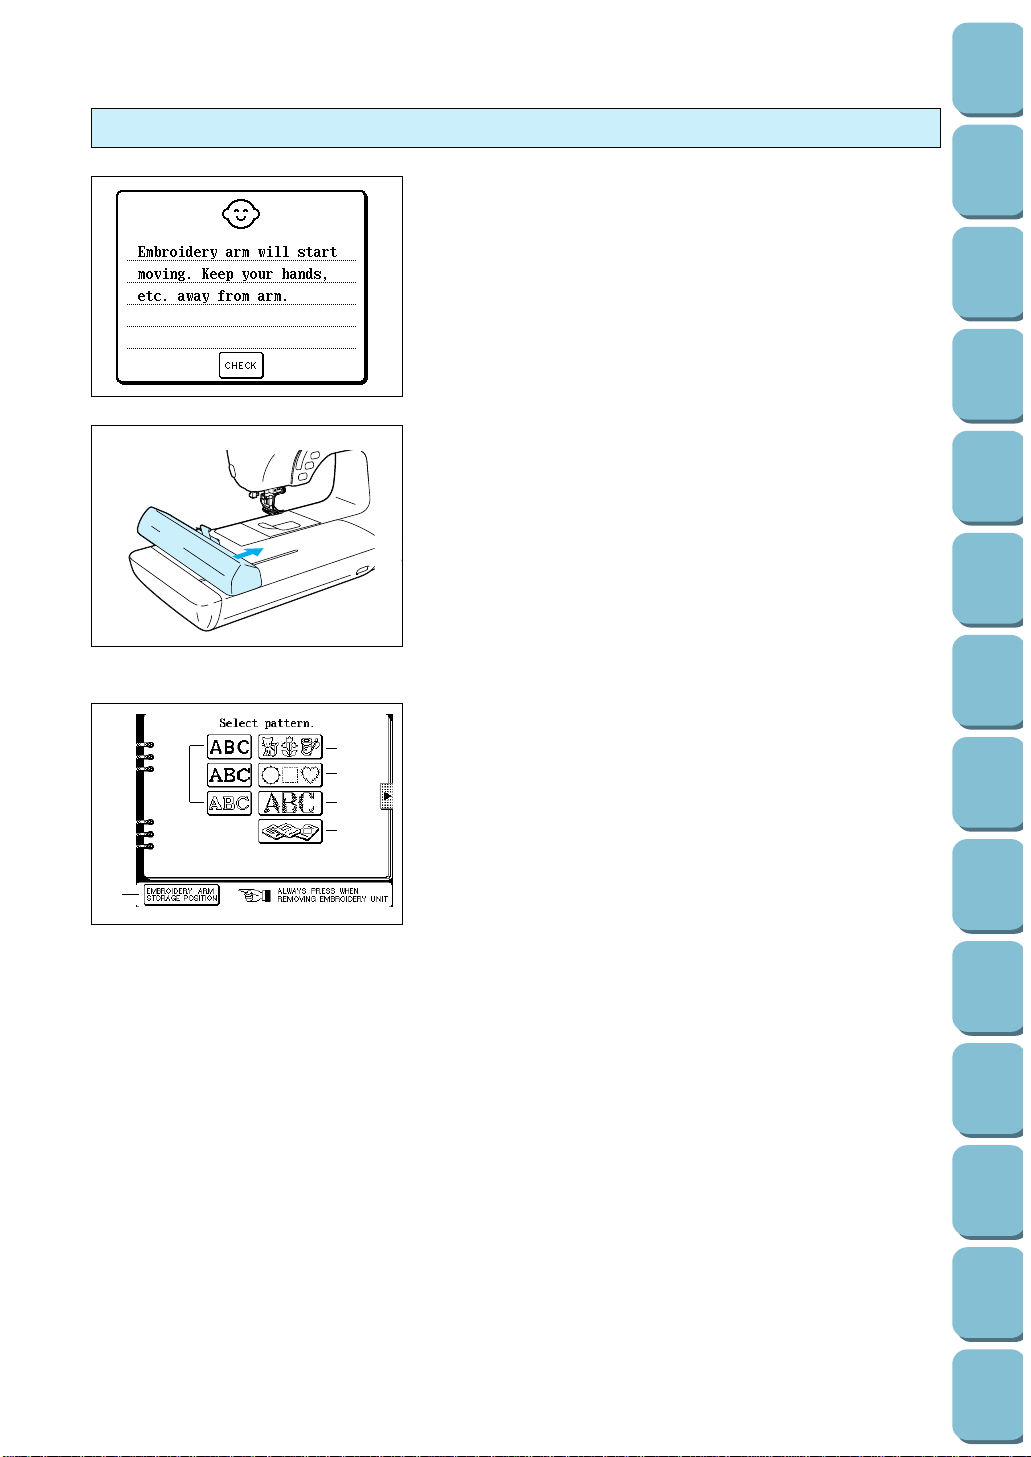
1. Turn on the power. The following display will appear on the
LCD.
* When the buttonhole lever, the needle or the presser foot
lever are lowered or when the bobbin winding shaft is at the
right, an error message will vary depending on which of the
conditions mentioned above is occurring. The display shown
at left will appear after the error condition has been
remedied.
2. Touch the “CHECK” key.
The carriage will move in order to initialize the embroidery
unit.
CAUTION
Do not place your hands near the embroidery arm,
otherwise injury may result. Please note that the
embroidery arm may make an unusual noise while
initialization is being carried out, but this is normal.
If the initialization could not be carried out normally, a
buzzer will sound. If this occurs, make sure that the
embroidery frame is not attached and try again to initialize
the embroidery unit. This is not a malfunction.
The types of patterns available will then be displayed on
the LCD.
1 Alphabetical characters
2 One-point patterns
3 Frame patterns
4 Floral alphabets
5 Patterns found on memory card (optional)
6 Touch to position the embroidery arm for removing unit.
Initializing the embroidery unit
1
2
3
4
5
6
109
Utility
Stitches
Characters
and
Decorative
Stitches
Embroidering
Editing
Embroidery
Patterns
Retrieving
My
Custom
Stitch
TM
Maintenance
Error
Messages
Trouble
shooting
Sewing
Chart
Patterns
(Programmed
in Machine)
Patterns
(Memory
Card)
Sewing
Setting Up
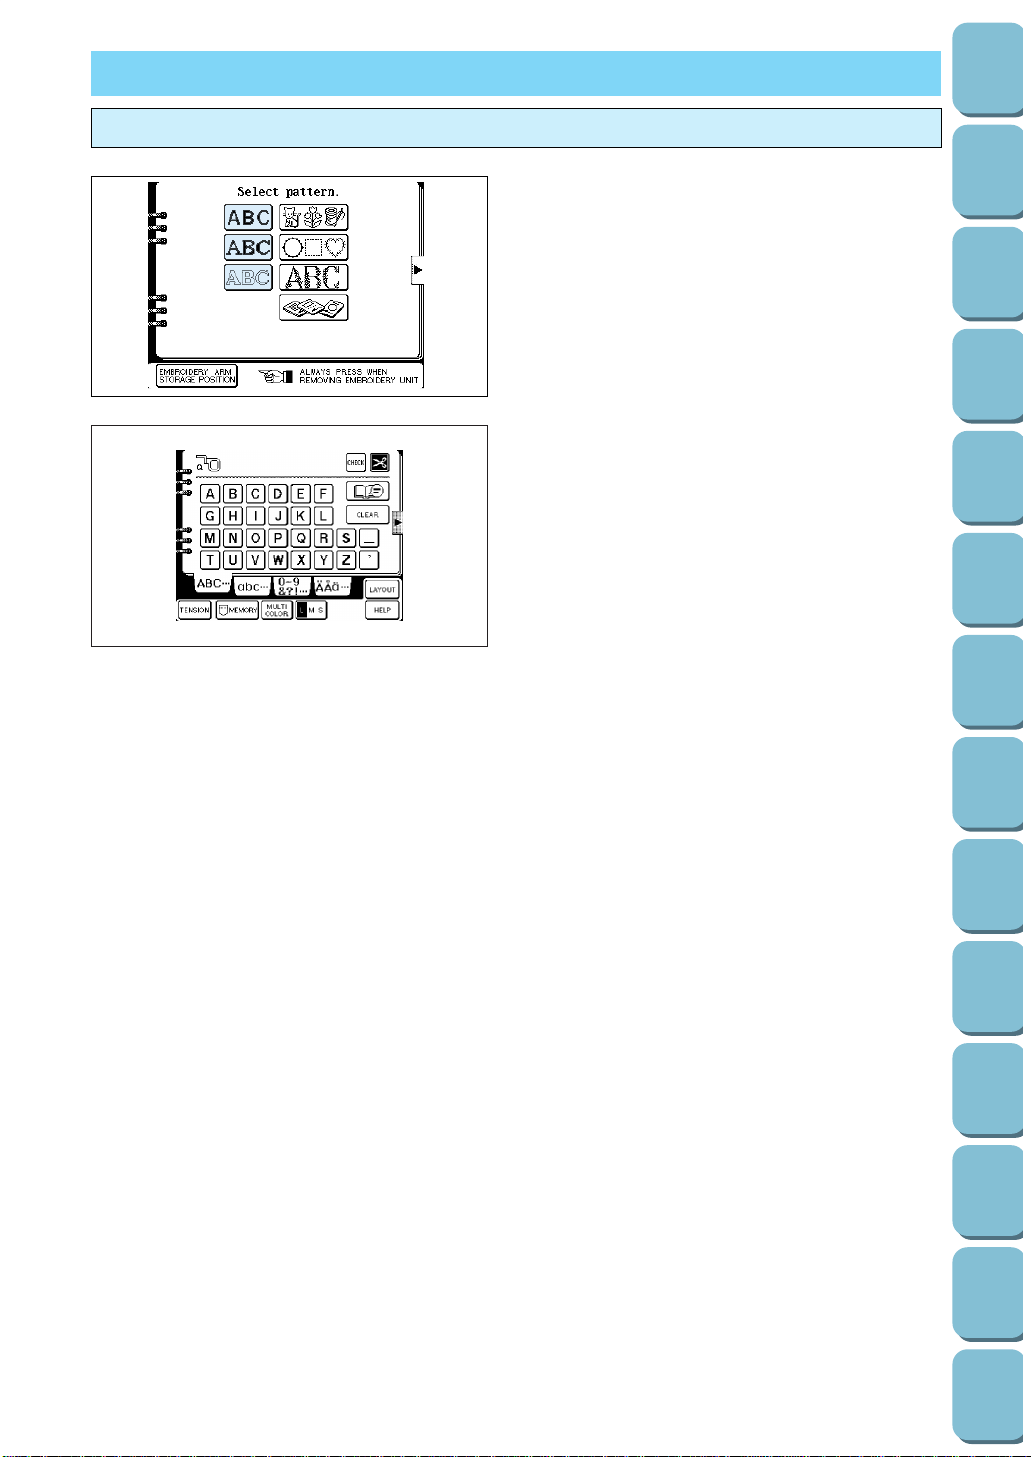
110
Utility
Stitches
Characters
and
Decorative
Stitches
Embroidering
Editing
Embroidery
Patterns
Retrieving
My
Custom
Stitch
TM
Maintenance
Error
Messages
Trouble
shooting
Sewing
Chart
Patterns
(Programmed
in Machine)
Patterns
(Memory
Card)
Sewing
Setting Up
SELECTING AND SEWING PATTERNS
How to combine characters
1. Select the character required.
ABC ABC AABBCC
* If another screen is being displayed, touch the
“EMBROIDERY” key before selecting the
character.
2. Combine characters. (Refer to page 89.)
1 Touch this key to change the thread tension
and the stitch density. (Refer to page 29 and
page 122.)
2 Touch this key when you want to change the
color of each character sewn. When displayed
in reverse, the machine will sew a
reinforcement stitch and stop after each
character is embroidered.
3 Touch this key if the thread breaks during
sewing or if you would like to sew again from
the beginning. (Refer to page 129.)
4 Touch this key to move the sewing position.
(Refer to page 123.)
Selecting alphabetical characters
1
2
3
4
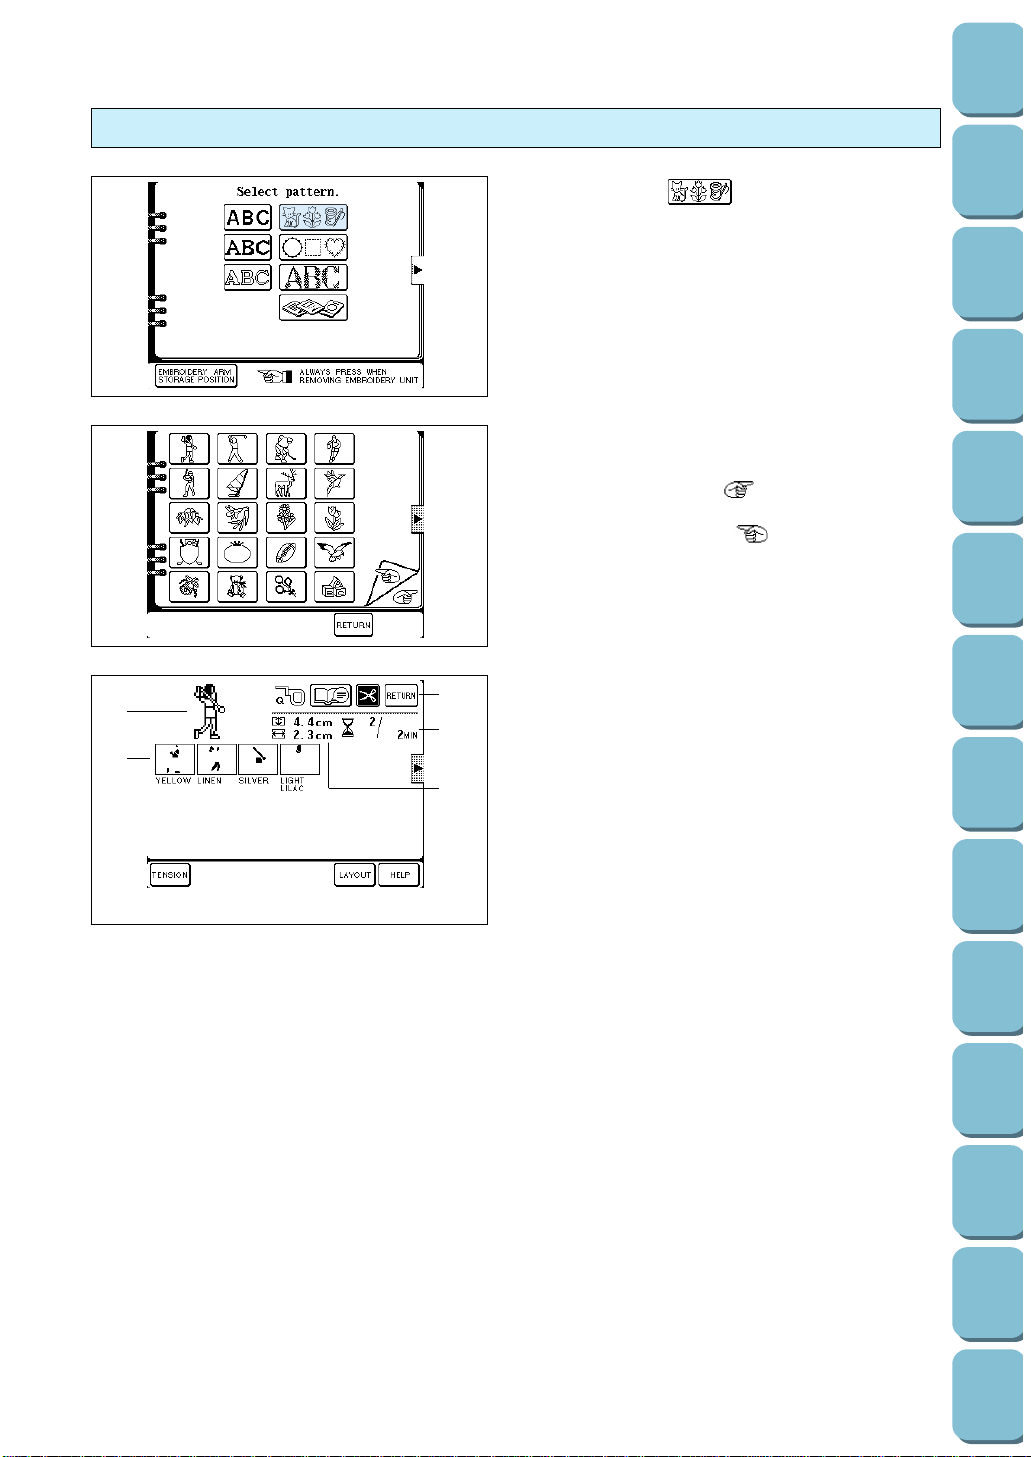
1. Touch the “ ” key.
The one-point pattern selection screen will be
displayed.
* If another screen is being displayed, touch the
“EMBROIDERY” key before touching the one-
point pattern key.
2. Select the desired pattern.
The sewing screen will be displayed.
* If you touch the “ ” key, the next sewing
screen will be displayed.
If you touch the “ ” key, the previous
sewing screen will be displayed.
* If you touch the “RETURN” key, the pattern
selection screen will be displayed.
1 The selected pattern will be displayed.
2 This indicates the order of color changes. The
color displayed below each pattern is for
reference only. For details about the color
change table, refer to page 191.
3 Touch this key to move the sewing position.
(Refer to page 123.)
4 Touch this key if the thread breaks during
sewing or if you would like to sew again from
the beginning. (Refer to page 129.)
5 Touch this key to return to the previous
screen (pattern selection screen).
6 This shows the amount of time required to
embroider the pattern and the total amount of
time remaining. It does not include the time
needed to change colors.
(The totals are calculated and displayed after
a pattern is selected.)
7 This shows the size of the pattern.
Selecting one-point patterns
1
2
34
5
6
7
111
Utility
Stitches
Characters
and
Decorative
Stitches
Embroidering
Editing
Embroidery
Patterns
Retrieving
My
Custom
Stitch
TM
Maintenance
Error
Messages
Trouble
shooting
Sewing
Chart
Patterns
(Programmed
in Machine)
Patterns
(Memory
Card)
Sewing
Setting Up
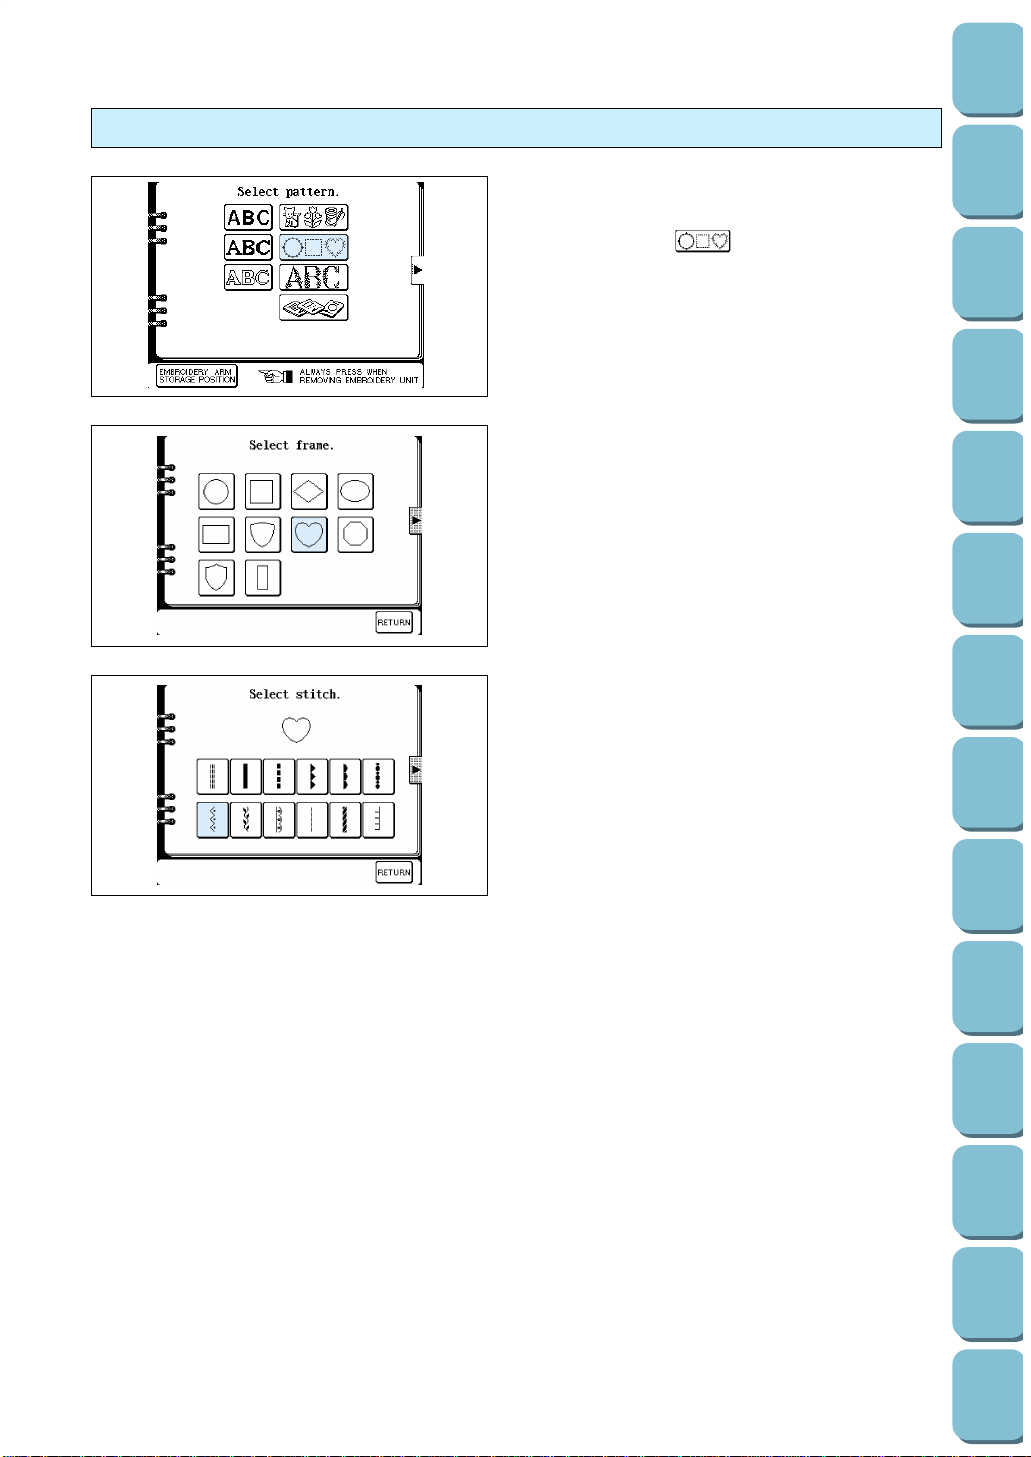
112
Utility
Stitches
Characters
and
Decorative
Stitches
Embroidering
Editing
Embroidery
Patterns
Retrieving
My
Custom
Stitch
TM
Maintenance
Error
Messages
Trouble
shooting
Sewing
Chart
Patterns
(Programmed
in Machine)
Patterns
(Memory
Card)
Sewing
Setting Up
Frame patterns are created by combining the
desired frame and type of stitch.
1. Touch the “ ” key. The frame pattern
selection screen will be displayed.
* If another type of pattern such as characters
was selected previously or if a memory card
has been inserted, touch the “EMBROIDERY”
key first and then touch the frame pattern key.
2. Select the desired shape for the frame. The
frame pattern will be selected and the stitch
pattern selection screen will be displayed.
* If you touch the “RETURN” key, the previous
screen will be displayed.
3. Select the desired type of stitch to form the
frame. The combined pattern is then shown
on the LCD screen.
Selecting frame patterns
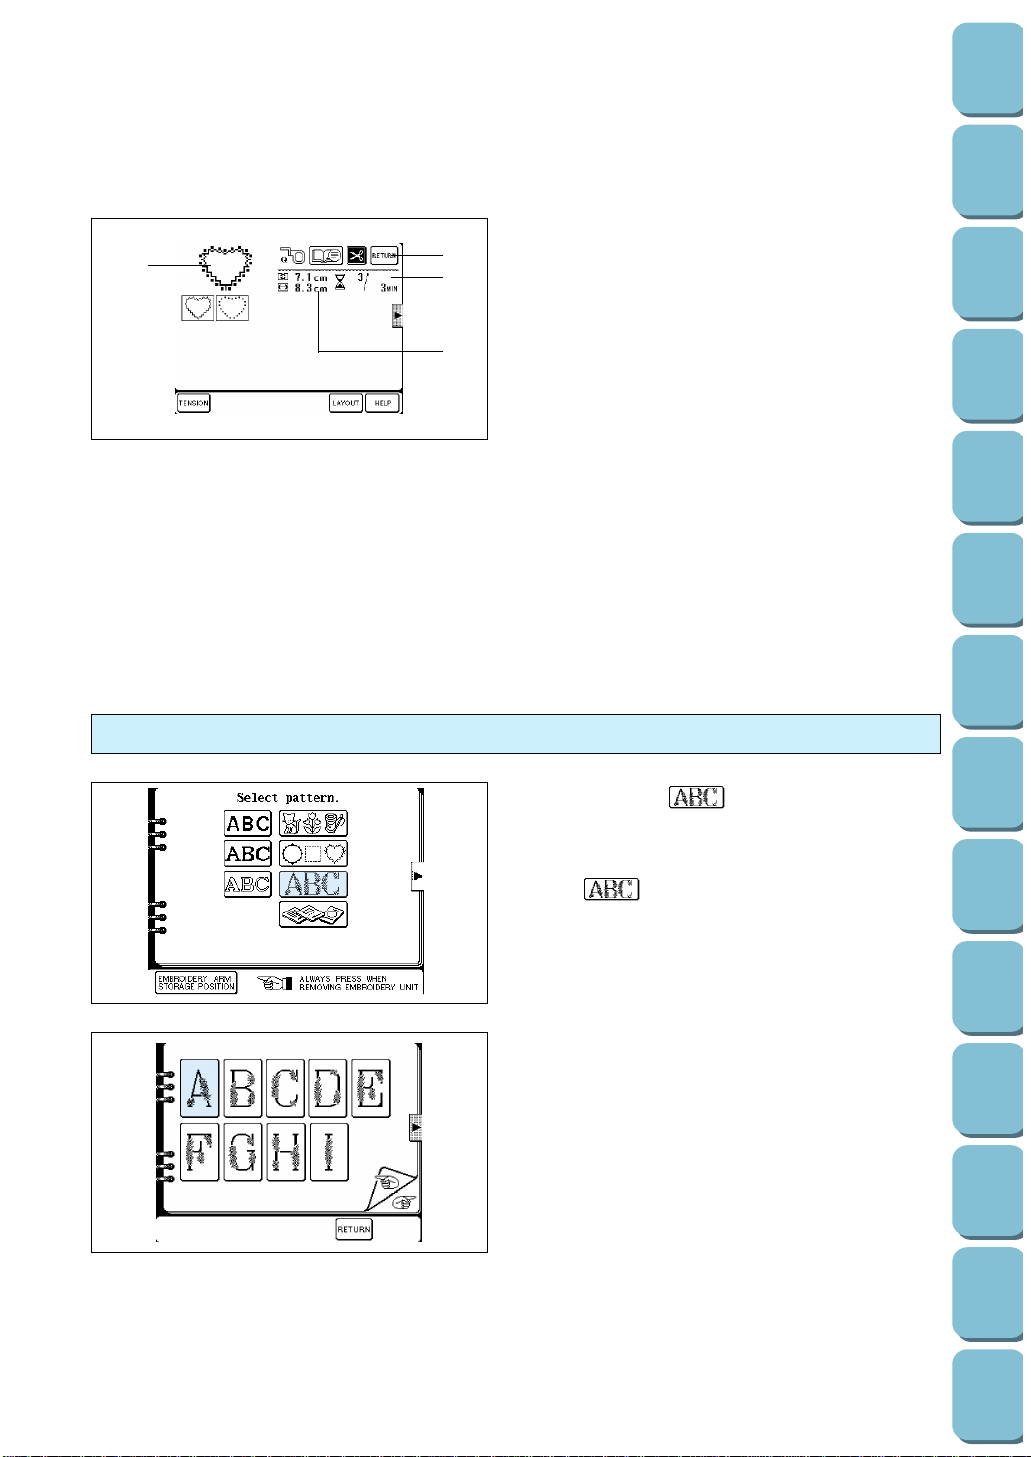
The selected pattern can be changed with the options shown on screen.
1 Indicates the stitch selected for the frame
pattern.
2 This indicates the order of color changes.
3 Touch this key to change the thread tension
and the stitch density. (Refer to page 29 and
page 122.)
4 Touch this key to move the sewing position.
(Refer to page 123.)
5 Touch this key if the thread breaks during
sewing or if you would like to sew again from
the beginning. (Refer to page 129.)
6 Touch this key to return to the previous
screen (pattern selection screen).
7 This shows the amount of time required to
embroider the pattern and the total amount of
time remaining. It does not include the time
needed to change colors.
(The totals are calculated and displayed after
a pattern is selected.)
8 Indicates the current pattern size.
1
2
34
5
6
7
8
1. Touch the “ ” key.
* If another screen is being displayed, touch the
“EMBROIDERY” key before touching the
“ ” key.
2. Select the pattern you require.
3. The sewing screen will be displayed.
* These patterns can also be used to embroider
alphabet characters without embroidering the
flowers.
Selecting floral alphabets
113
Utility
Stitches
Characters
and
Decorative
Stitches
Embroidering
Editing
Embroidery
Patterns
Retrieving
My
Custom
Stitch
TM
Maintenance
Error
Messages
Trouble
shooting
Sewing
Chart
Patterns
(Programmed
in Machine)
Patterns
(Memory
Card)
Sewing
Setting Up
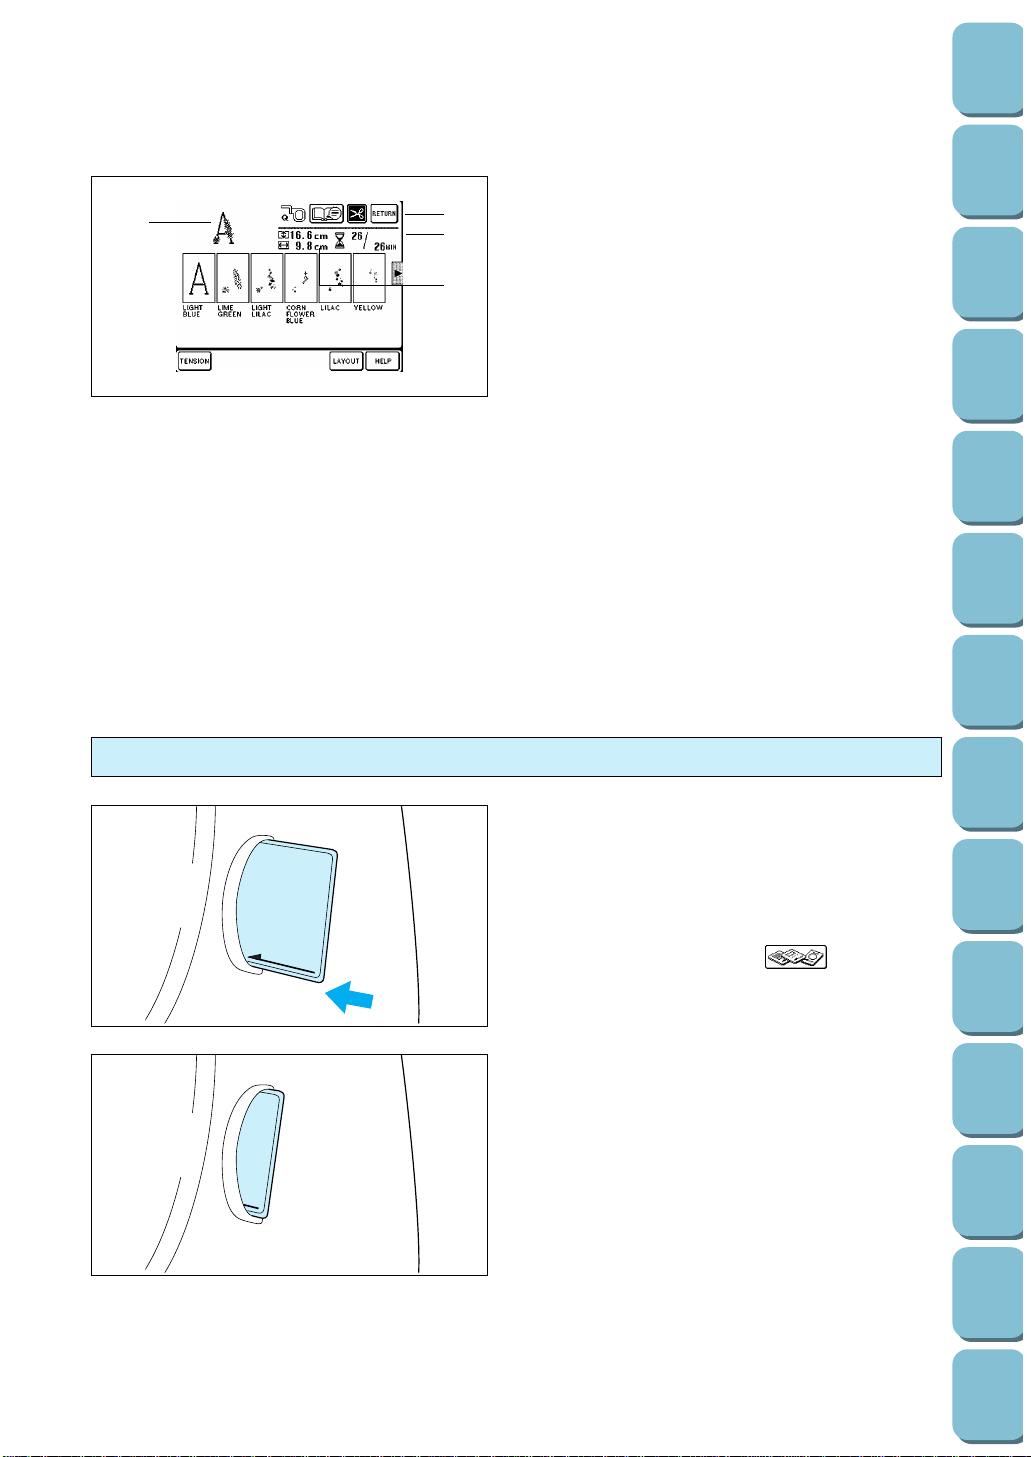
114
Utility
Stitches
Characters
and
Decorative
Stitches
Embroidering
Editing
Embroidery
Patterns
Retrieving
My
Custom
Stitch
TM
Maintenance
Error
Messages
Trouble
shooting
Sewing
Chart
Patterns
(Programmed
in Machine)
Patterns
(Memory
Card)
Sewing
Setting Up
1 Indicates the pattern selected.
2 This indicates the order of color changes. The
color displayed below each pattern is for
reference. For details about the color change
table, refer to page 191.
* If you would like to embroider just the
alphabetical characters, embroider the color
of the alphabet characters only.
3 Touch this key to change the thread tension.
4 Touch this key to move the sewing position.
(Refer to page 123.)
5 Touch this key if the thread breaks during
sewing or if you would like to sew again from
the beginning. (Refer to page 129.)
6 Touch this key to return to the previous
screen (pattern selection screen).
7 This shows the amount of time required to
embroider the pattern and the total amount of
time remaining. It does not include the time
needed to change colors.
(The totals are calculated and displayed after
a pattern is selected.)
8 This shows the size of the pattern.
1
2
34
5
6
7
8
1. Hold the memory card so that the arrow is
facing toward you, and then insert it all the
way into the slot on the right side of the
machine.
CAUTION
– Be sure to insert and remove the memory
card only while “ ” is being
displayed or while the power is turned off.
– Do not insert the card in any direction
other than that described above, and do
not force it into the slot, otherwise the
card or the slot may become damaged.
– Insert so that the card appears as shown
in the illustration at left. If you try to push
the card in any further, the connector will
become damaged.
Selecting patterns from a memory card
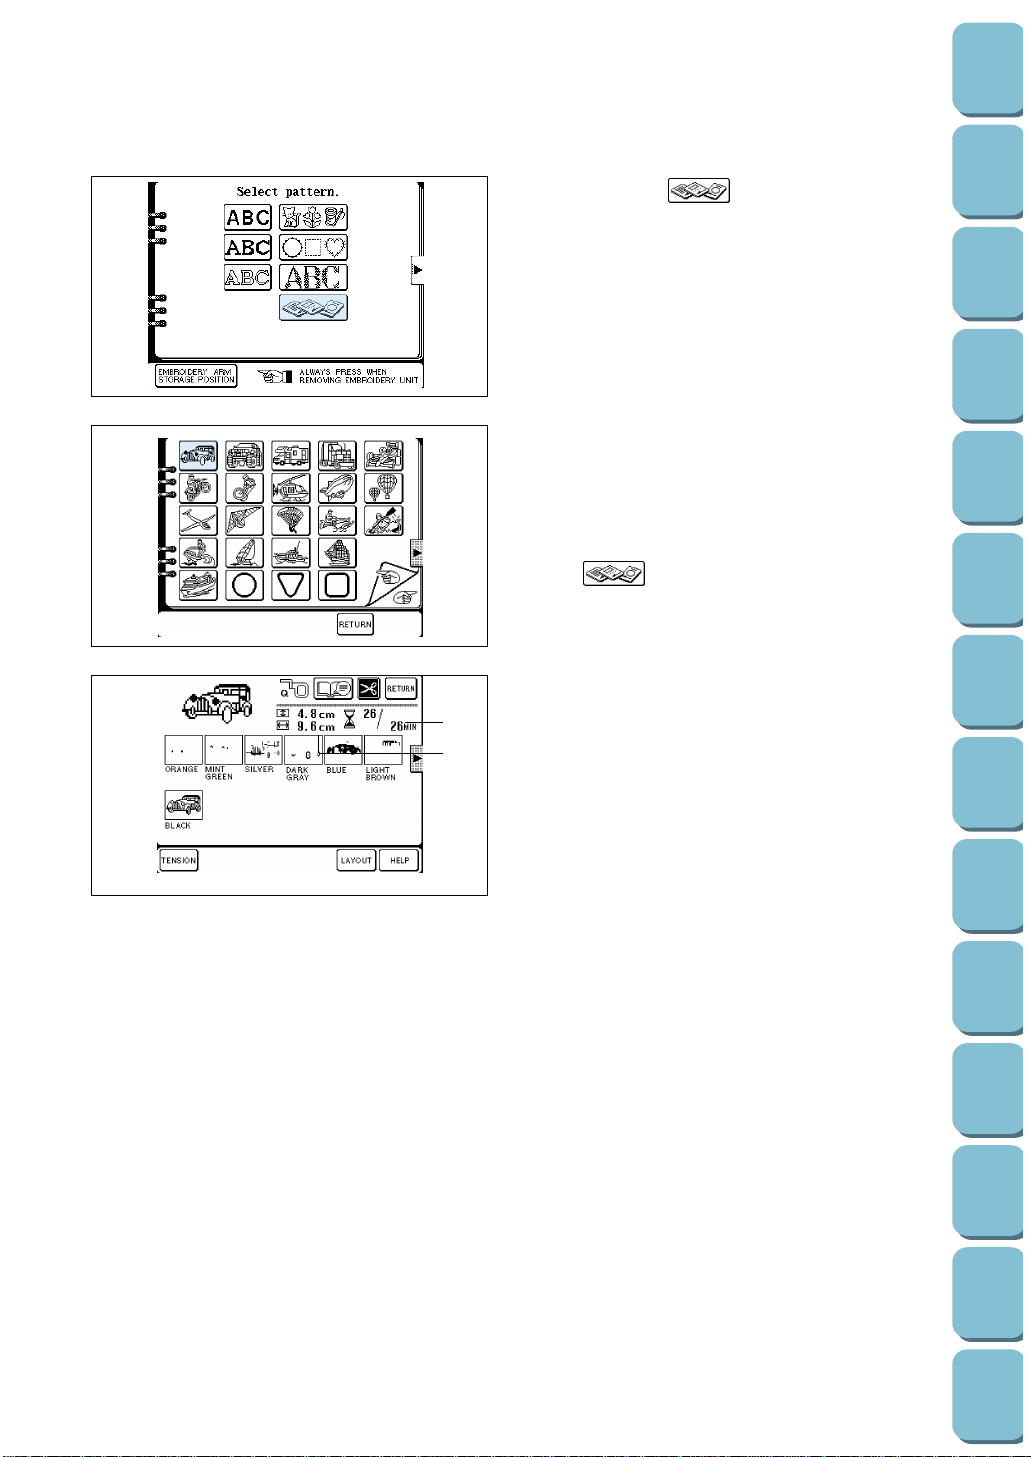
2. Touch the “ ” key.
3. The memory card pattern selection screen will
be displayed. [The illustration at left shows the
Transportation card No.12 (SA312, XA0275-
001) (option).]
* If another screen is being displayed, touch the
“EMBROIDERY” key before touching the
“ ” key.
4. Select the desired pattern.
* If you touch the “RETURN” key, the previous
screen will be displayed.
1 Indicates the selected pattern.
2 This indicates the order of color changes. The
color displayed below each pattern is for
reference.
3 Touch this key to change the thread tension.
4 Touch this key if you would like to move the
sewing position. (Refer to page 123.)
5 Touch this key if the thread breaks during
sewing or if you would like to sew again from
the beginning. (Refer to page 129.)
6 Touch this key to return to the previous
screen (pattern selection screen).
7 This shows the amount of time required to
embroider the pattern and the total amount of
time remaining. It does not include the time
needed to change colors.
(The totals are calculated and displayed after
a pattern is selected.)
8 This shows the size of the pattern.
1
2
34
5
6
7
8
115
Utility
Stitches
Characters
and
Decorative
Stitches
Embroidering
Editing
Embroidery
Patterns
Retrieving
My
Custom
Stitch
TM
Maintenance
Error
Messages
Trouble
shooting
Sewing
Chart
Patterns
(Programmed
in Machine)
Patterns
(Memory
Card)
Sewing
Setting Up
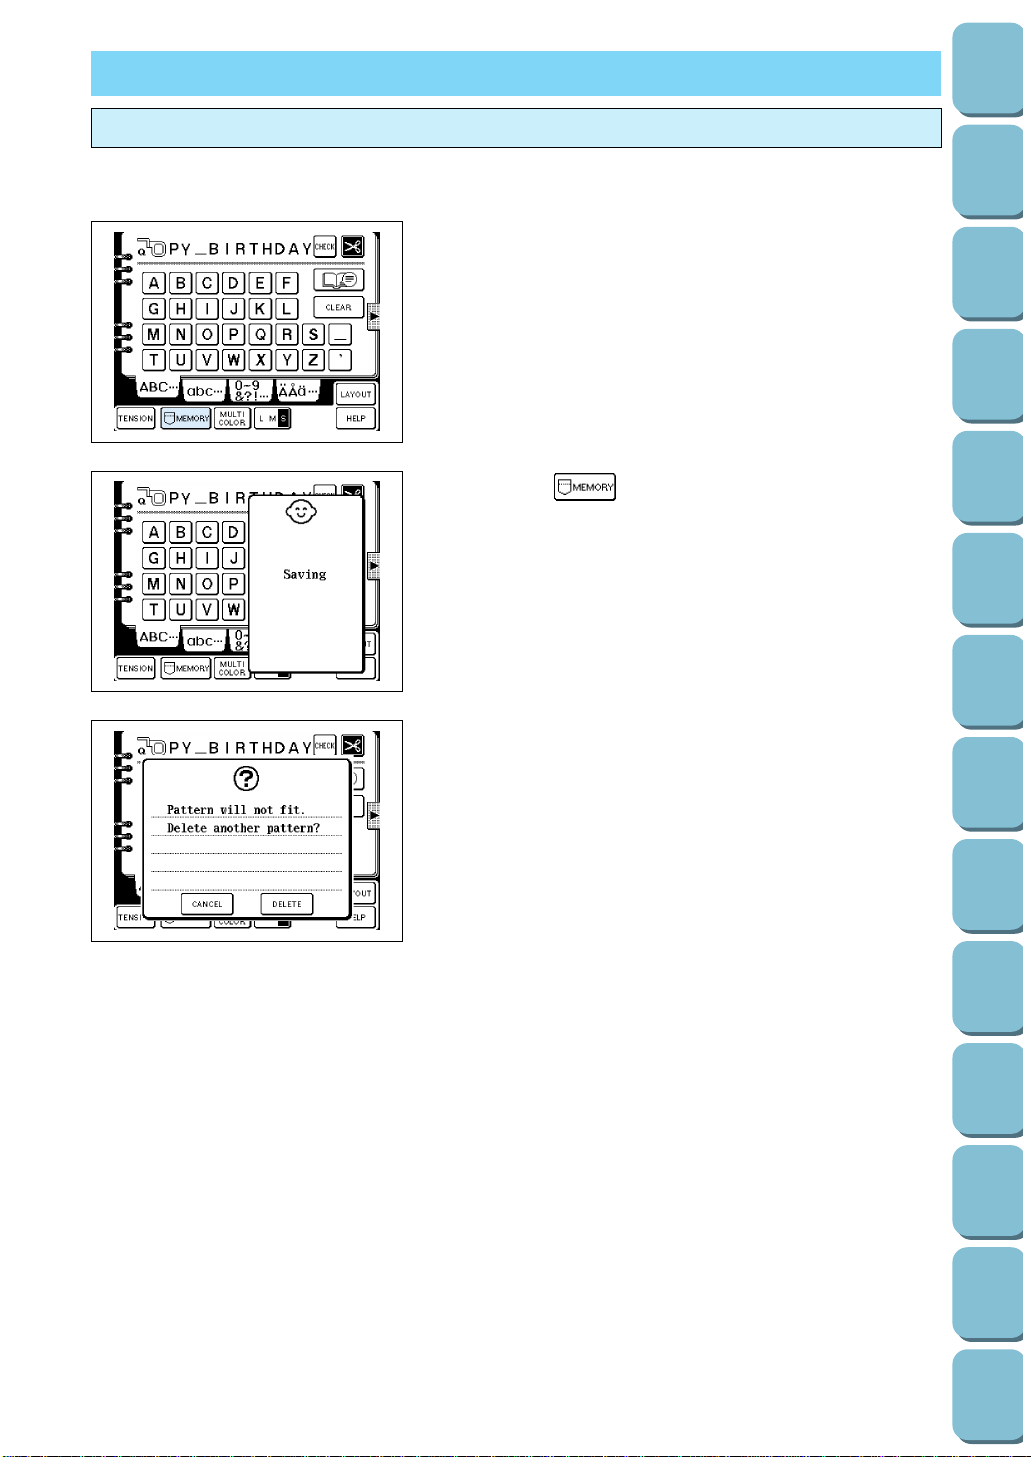
116
Utility
Stitches
Characters
and
Decorative
Stitches
Embroidering
Editing
Embroidery
Patterns
Retrieving
My
Custom
Stitch
TM
Maintenance
Error
Messages
Trouble
shooting
Sewing
Chart
Patterns
(Programmed
in Machine)
Patterns
(Memory
Card)
Sewing
Setting Up
You can combine and save characters and all edited
embroidery patterns.
Example: To save the “HAPPY BIRTHDAY” pattern in
memory address 1.
1. Enter the characters to create the pattern.
2. Touch the “ ” key. Once the pattern has been saved,
the display will return to the previous screen.
* Do not turn off the power while a pattern is being saved
(while “Saving” is displayed).
* It takes approximately 10 seconds for a pattern to be saved.
For details on retrieving a pattern which has been saved,
refer to page 156.
If the pattern cannot be saved Refer to page 100.
MEMORY
Saving a pattern combination in memory
Memorizing combined pattern in memory for later use (12 memories are available)
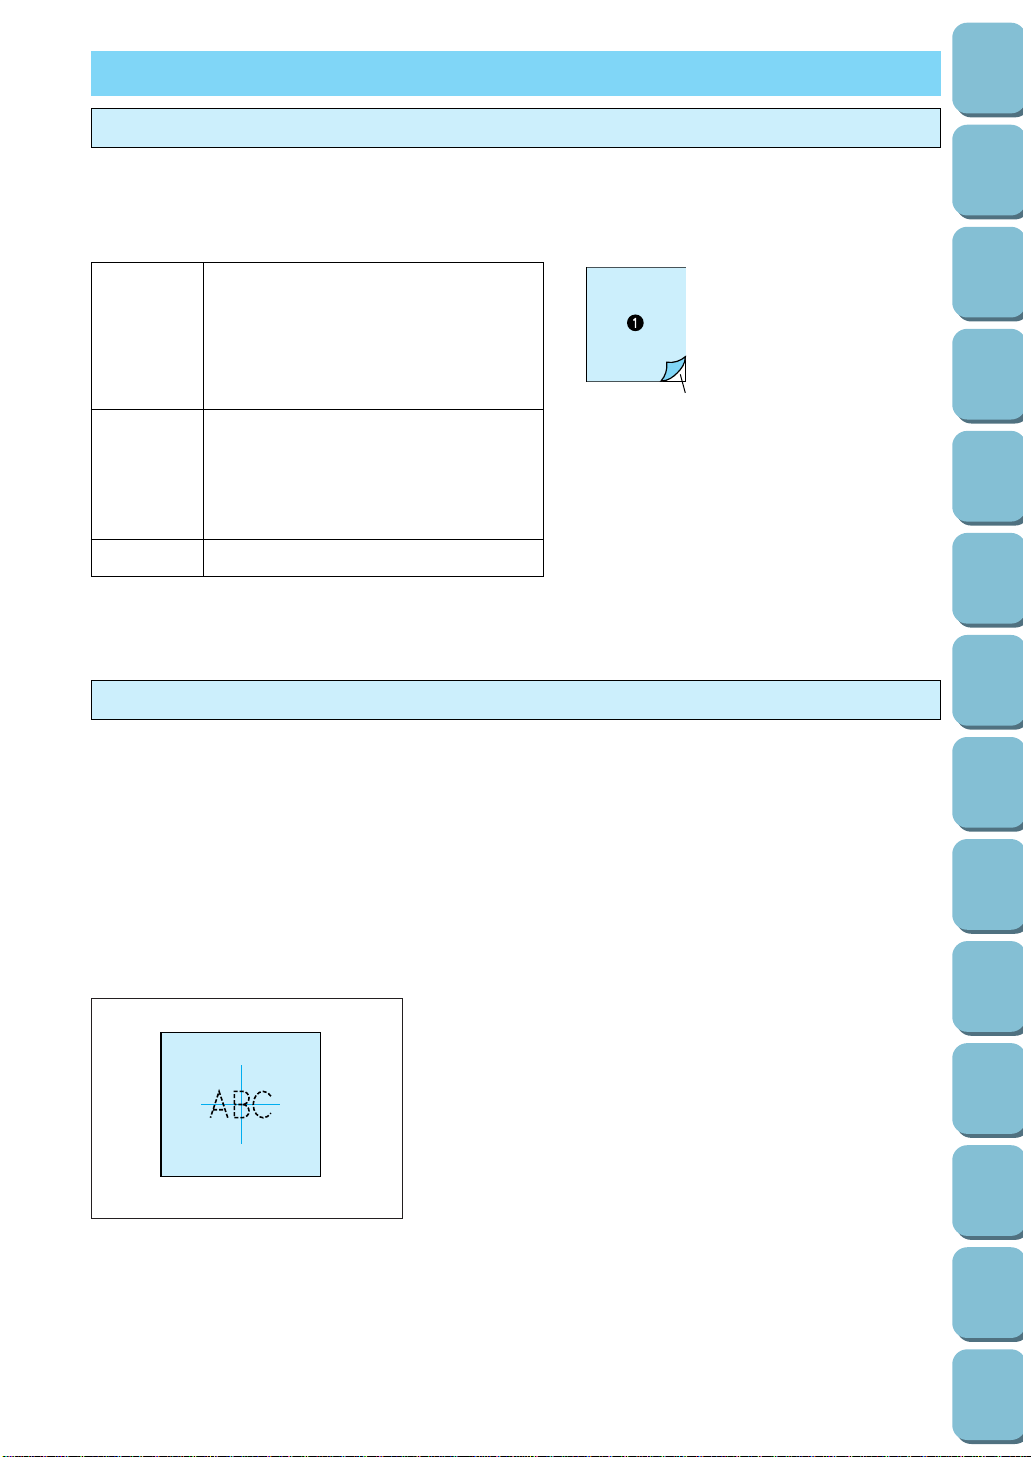
EMBROIDERING
1 Fabric
2 Stabilizer
Embroidering attractive finishes
Refer to the table below and the “RELATED CHART OF SEWING FABRICS, THREADS AND NEEDLES”
to use in order to obtain attractive sewing and embroidery finishes. Pattern slippages may occur when
using different fabric thicknesses or types of stabilizers. Be sure to carry out a test sewing beforehand to
check.
FABRIC
THREAD
NEEDLE
When embroidering fabrics, attach a
non-woven type of stabilizer fabric.
* It is recommended that you use a
special stabilizer fabric for embroi-
dering which can be torn off around
the design when the project is
finished.
Upper thread
Brother poly 40 color thread set (#50)
Refer to page 8.
Bobbin thread
Brother embroidery bobbin thread
Refer to page 8.
75/11 (Embroidery)
2
Setting the fabric into the embroidery frame
Three types of embroidery frames are available: Large, medium and small
Embroidering area for large frame: 18 cm (H)
× 13 cm (W)
Embroidering area for medium frame: 10 cm (H) × 10 cm (W)
Embroidering area for small frame: 2 cm (H) × 6 cm (W) (for embroidering initials)
CAUTION
Depending on the size of the pattern and the position of the pattern to be embroidered, it may not
be possible to use the medium and small frames. When using these frames, be sure to check the
layout screen display (refer to page 123) before starting to embroider any patterns. If the frames
are used by mistake, the presser foot may strike the frames, which could cause injury.
1. Mark the fabric using a chalk pen or fabric marking pen to
indicate the embroidering position.
Always use Brother embroidery bobbin thread.
Adjust thread tension when thread quality is not compatible.
117
Utility
Stitches
Characters
and
Decorative
Stitches
Embroidering
Editing
Embroidery
Patterns
Retrieving
My
Custom
Stitch
TM
Maintenance
Error
Messages
Trouble
shooting
Sewing
Chart
Patterns
(Programmed
in Machine)
Patterns
(Memory
Card)
Sewing
Setting Up

118
Utility
Stitches
Characters
and
Decorative
Stitches
Embroidering
Editing
Embroidery
Patterns
Retrieving
My
Custom
Stitch
TM
Maintenance
Error
Messages
Trouble
shooting
Sewing
Chart
Patterns
(Programmed
in Machine)
Patterns
(Memory
Card)
Sewing
Setting Up
2
3
4
1
1
2. Loosen the adjusting screw and separate the inner and
outer frames. Lay the fabric on top of the outer frame and
secure it between the inner and outer frame, and tighten the
adjusting screw just enough to secure the fabric. Gently
remove the fabric from the frame without loosening the
adjusting screw.
1 Inner frame
2 Outer frame
3 Adjusting screw
4 Loosen
* This precautionary step will help reduce pattern distortion
while embroidering.
* Be sure to align the
▲ mark on the inner frame with the ▼
mark on the outer frame.
1 Tighten
1
2
3. Place the embroidery sheet into the inner frame, while
matching lines on the sheet with mark on fabric.
* For best results lay the outer frame on a flat table surface
and lay the fabric on top of it.
1 Inner frame
2 Standard line
4. Press down into the outer frame so that the mark doesn’t
move out of place.
1 Outer frame
2 Inner frame
3 Surface of fabric
* Press down firmly until the outer frame and inner frame are
at the same height.
1
5. After the fabric is clamped between the inner and outer
frame tighten the adjusting screw by hand.
1 Tighten
* To avoid stripping the screw, do not use a screwdriver to
tighten.
1
2
3
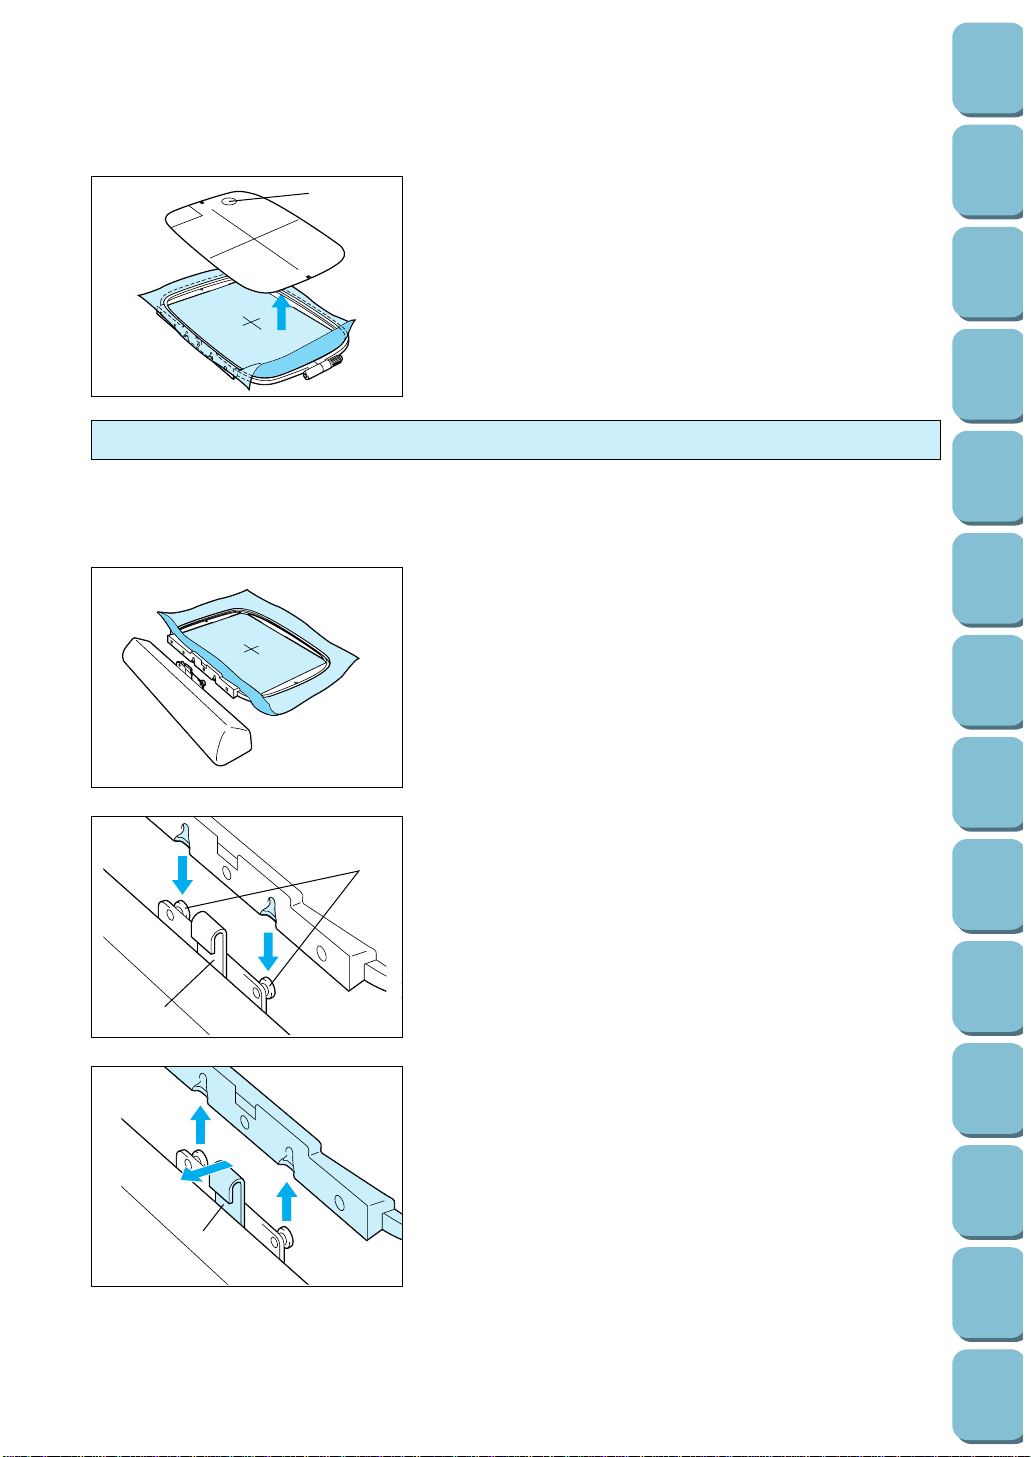
1
6. Remove the embroidery sheet before starting to embroider.
1 Hole for removing
1. Raise the presser foot to its highest position. Then pass the
embroidery frame under the presser foot with the mounting
bracket on the left side and the fabric right side up.
2
1
2. Align the two pins on the embroidery unit frame holder with
the mounting bracket on the frame, and then press the
frame into the embroidery unit frame holder until a click is
heard.
1 Embroidery arm frame holder
2 Pins
* Be sure to insert both pins. If only the forward or the back
pin is inserted, the pattern may not turn out correctly.
1
Removing the embroidery frame
While pushing the lever of the embroidery frame holder to the
left, lift the embroidery frame up to remove it.
1 Lever
Be sure to wait until the embroidery unit has finished
initializing before fitting the embroidery frame. (Refer to
page 109.)
Fitting the embroidery frame to the embroidery unit
119
Utility
Stitches
Characters
and
Decorative
Stitches
Embroidering
Editing
Embroidery
Patterns
Retrieving
My
Custom
Stitch
TM
Maintenance
Error
Messages
Trouble
shooting
Sewing
Chart
Patterns
(Programmed
in Machine)
Patterns
(Memory
Card)
Sewing
Setting Up
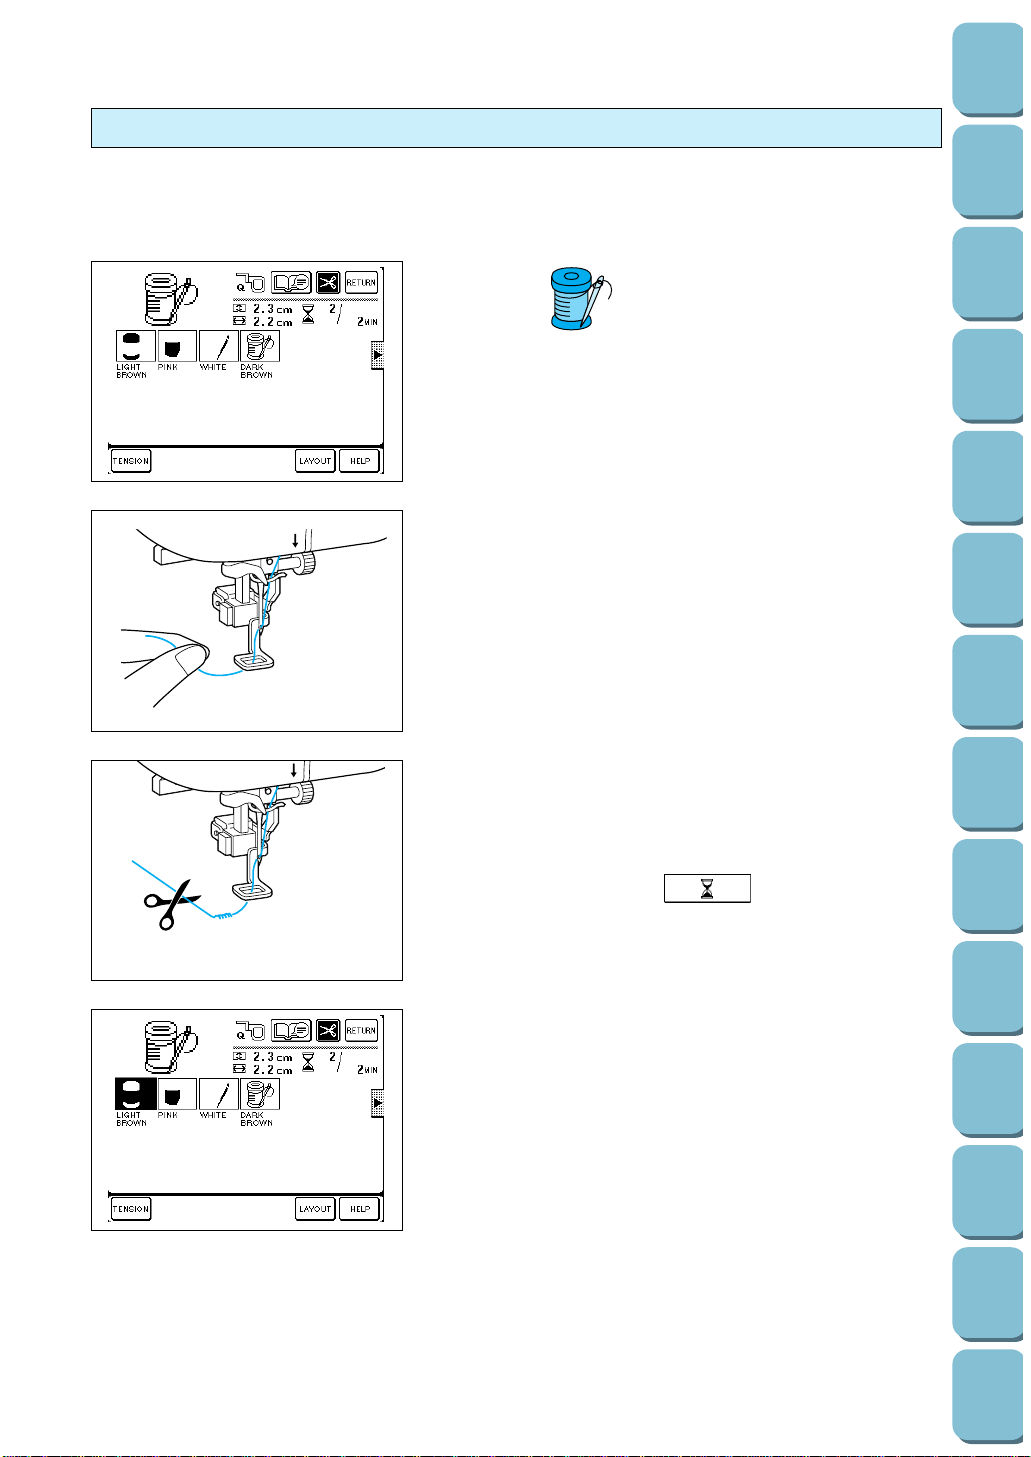
120
Utility
Stitches
Characters
and
Decorative
Stitches
Embroidering
Editing
Embroidery
Patterns
Retrieving
My
Custom
Stitch
TM
Maintenance
Error
Messages
Trouble
shooting
Sewing
Chart
Patterns
(Programmed
in Machine)
Patterns
(Memory
Card)
Sewing
Setting Up
Example:
1. Select the desired pattern.
The order of sewing for each part will be displayed.
* The color displayed below each pattern is for reference.
Some color regions may not have a color displayed below
them; you can sew these parts with any color you like.
5
2. Thread the needle for the first color and pass it through
embroidery foot “Q”. Hold this thread in your left hand while
leaving a certain amount of slack in the thread.
* Be sure to raise the presser foot lever before threading the
needle.
5
3. Lower presser foot lever and start embroidering. After 5 to 6
stitches have been sewn, stop the machine and cut off any
surplus thread from the end of the seam.
* If you are using the embroidery unit, the foot controller
cannot be used at this time.
* Sewing can start even if “ ” is being displayed.
4. Start the machine once more.
The part indicated by (1) in the illustration will be
embroidered and the machine will then stop automatically.
Once embroidering is completed, the display will
automatically move to the left and the next color to be
embroidered will be displayed at the left edge of the screen.
Embroidering
Always use Brother embroidery thread.
Select from different thread qualities to achieve a variety of results.
(1)
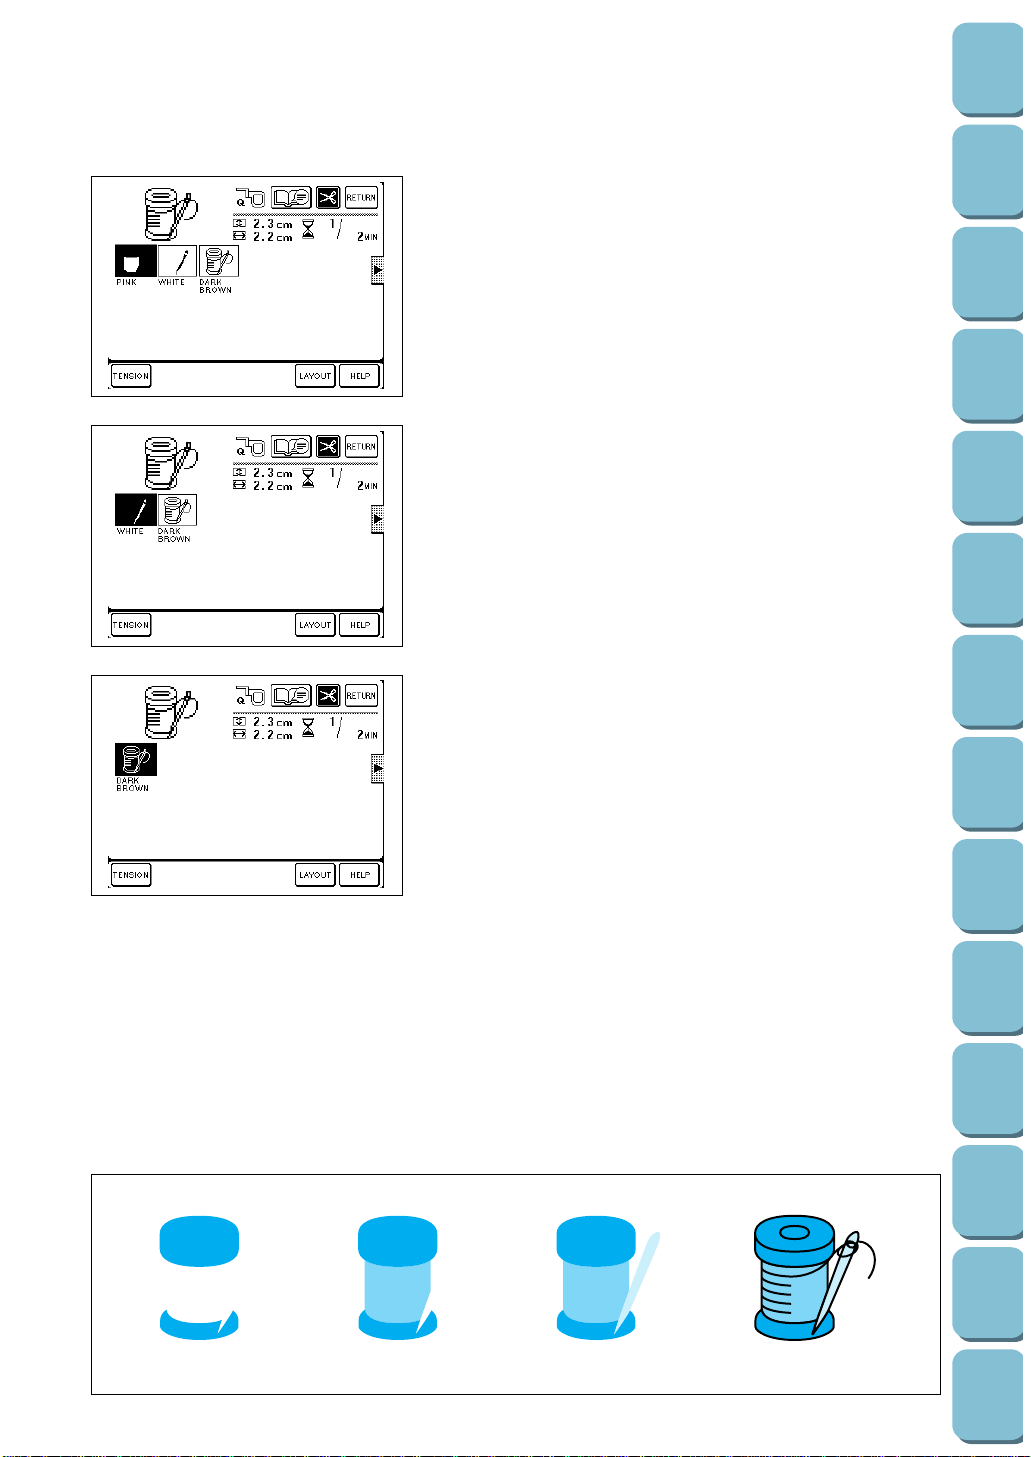
121
Utility
Stitches
Characters
and
Decorative
Stitches
Embroidering
Editing
Embroidery
Patterns
Retrieving
My
Custom
Stitch
TM
Maintenance
Error
Messages
Trouble
shooting
Sewing
Chart
Patterns
(Programmed
in Machine)
Patterns
(Memory
Card)
Sewing
Setting Up
5. Replace the upper thread with the thread for the second
region of color, and then start the machine again. After the
part indicated by (2) has been embroidered, the machine
will once more stop automatically.
6. Replace the upper thread with the thread for the third region
of color, and then start the machine again. After the part
indicated by (3) has been embroidered, the machine will
once more stop automatically.
7. Replace the upper thread with the thread for the fourth
region of color, and then start the machine again. After the
part indicated by (4) has been embroidered, the machine
will once more stop automatically.
The display will return to the original condition.
8. Trim any excess thread.
Embroidering order for pattern parts
(2)
(3)
(4)
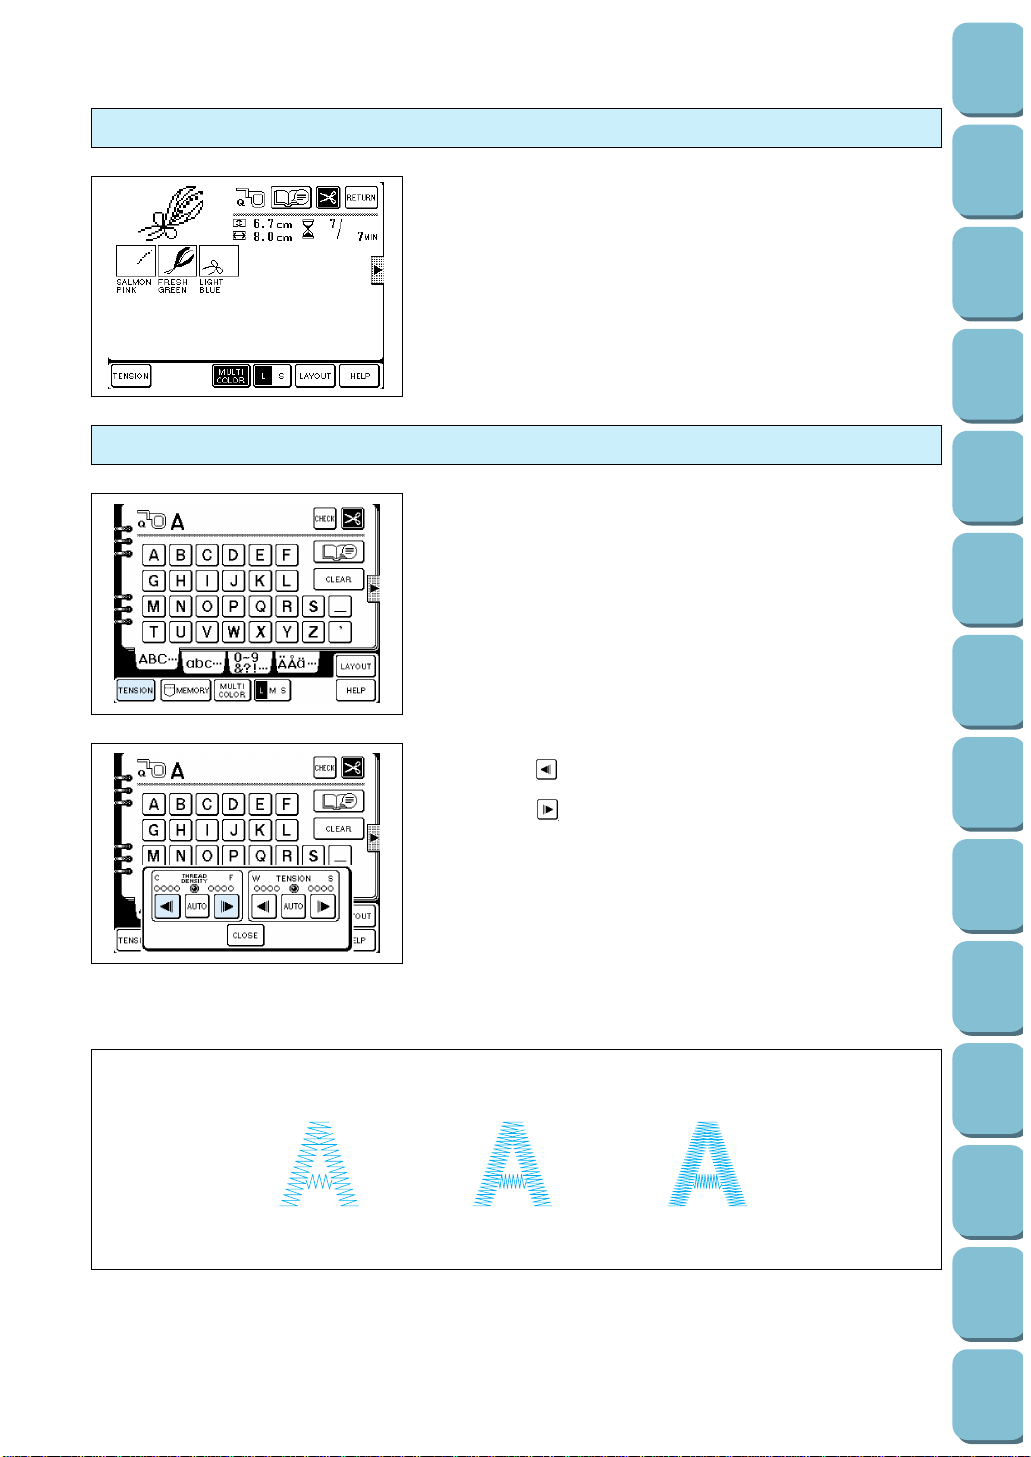
122
Utility
Stitches
Characters
and
Decorative
Stitches
Embroidering
Editing
Embroidery
Patterns
Retrieving
My
Custom
Stitch
TM
Maintenance
Error
Messages
Trouble
shooting
Sewing
Chart
Patterns
(Programmed
in Machine)
Patterns
(Memory
Card)
Sewing
Setting Up
1. Touch the “MULTI COLOR” key to change to the single
color mode. If the “START/STOP” button is pressed, a
single color of the pattern will be embroidered and then the
machine will stop automatically.
2. Trim any excess thread.
* This pattern is the No. 2 FLOWER pattern from the option
card.
Embroidering a single color pattern when “MULTI COLOR” is displayed
The stitch density adjustment is not available for all patterns.
Patterns other than the characters and some frame patterns are
not adjustable.
1. Touch the “TENSION” key.
213
2. The stitch density will become further apart (coarser) each
time the “ ” key is touched.
The stitch density will become closer together (finer) each
time the “ ” key is touched.
1 AUTO
2 Fine (stitches closer together)
3 Coarse (stitches farther apart)
* The normal setting is standard.
Changing the stitch density for characters and some frame patterns
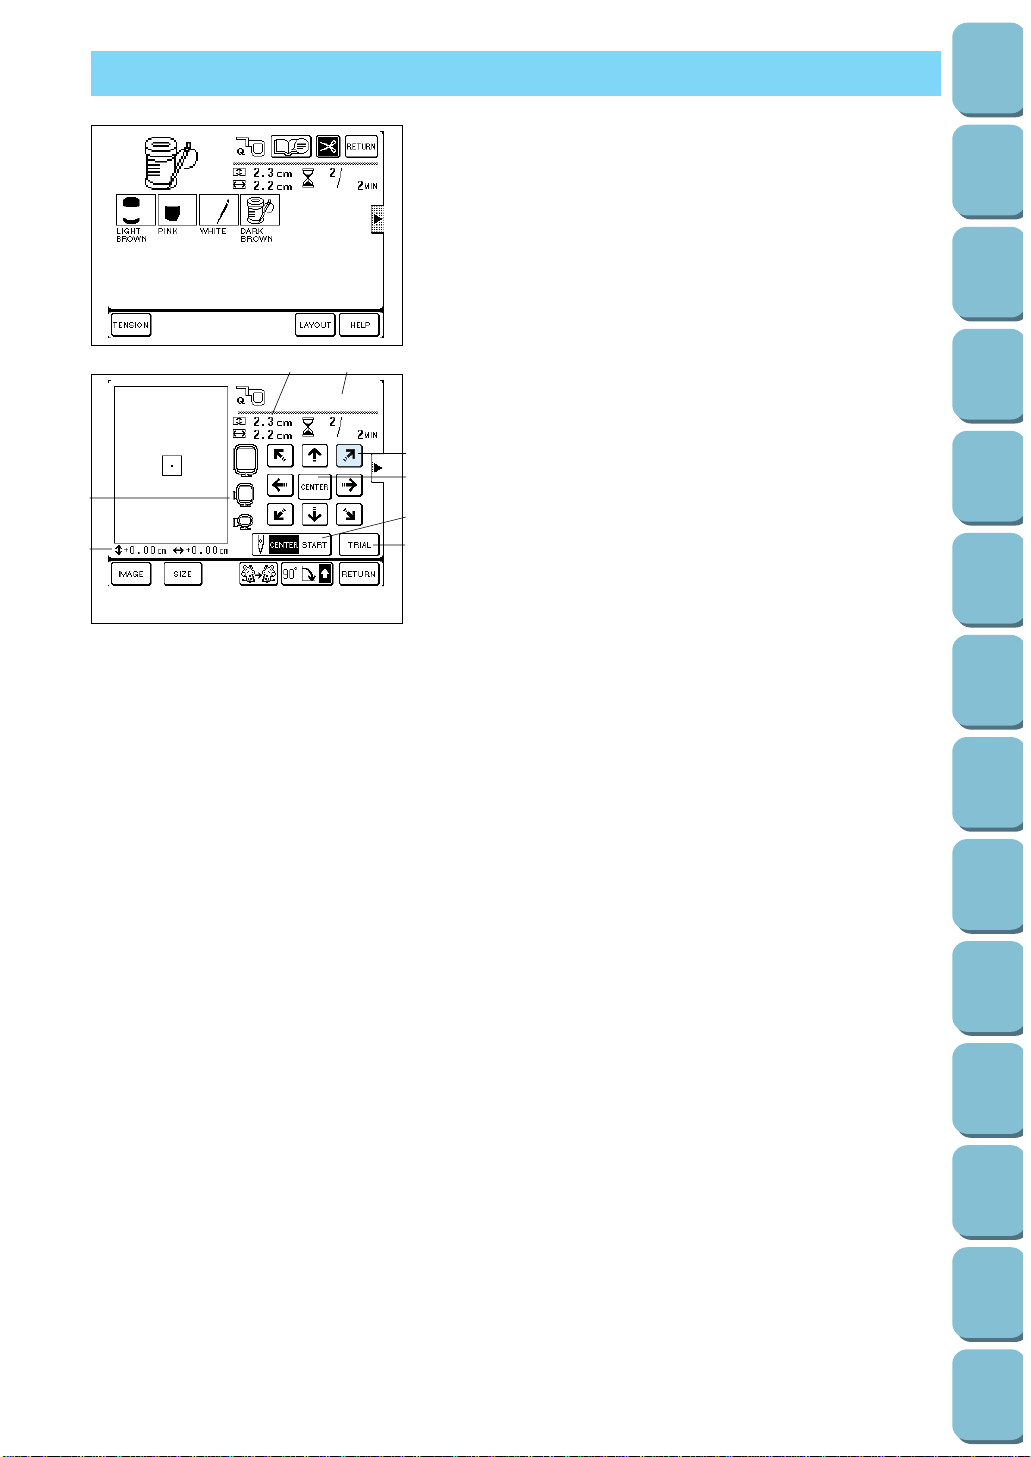
123
Utility
Stitches
Characters
and
Decorative
Stitches
Embroidering
Editing
Embroidery
Patterns
Retrieving
My
Custom
Stitch
TM
Maintenance
Error
Messages
Trouble
shooting
Sewing
Chart
Patterns
(Programmed
in Machine)
Patterns
(Memory
Card)
Sewing
Setting Up
MOVING THE LOCATION (LAYOUT)
The position for embroidering the pattern can be changed by
touching the “LAYOUT” key. This is useful if you want to
embroider a pattern at a location such as in the corner of the
fabric or if you want to align a pattern away from the center of
the embroidery area of the frame.
Touch the “LAYOUT” key. The layout screen will be displayed.
1 Touch these keys to move the embroidering position within
the embroidery area.
2 If you touch this key, the embroidering position will be
returned to the center of the embroidery area.
3 This moves the needle position to the middle of the pattern
or to the sewing start position, etc. Use it when you would
like to set the embroidering position.
4 If you touch this key, the embroidery frame will move so that
you can check the embroidering position.
5 If you touch this key, the pattern image will be displayed.
6 If you touch this key, the pattern will be reversed
horizontally. This function cannot be used with some
patterns.
7 Touch this key to rotate the selected pattern in 90˚ steps.
8 If you touch this key, the display will change from the layout
screen back to the original screen.
9 This displays the different types of embroidery frames that
can be used. (The frames that can be used will be shown in
solid color, and the frames that cannot be used will be
grayed out.)
CAUTION
Do not use any embroidery frames other than those shown
here, otherwise injury could result.
0 This shows the distance from the center when the
embroidering position has been moved.
A Indicates the current pattern size.
B If a character has been selected, this shows details about
the character.
C If you touch this key changing the size of pattern. (Refer to
page 129)
C5678
B
A
1
2
3
4
9
0

124
Utility
Stitches
Characters
and
Decorative
Stitches
Embroidering
Editing
Embroidery
Patterns
Retrieving
My
Custom
Stitch
TM
Maintenance
Error
Messages
Trouble
shooting
Sewing
Chart
Patterns
(Programmed
in Machine)
Patterns
(Memory
Card)
Sewing
Setting Up
CAUTION
After a pattern has been moved, check the display to see which embroidery frames can be used. If
an embroidery frame which is not displayed is used, the embroidery foot may touch the frame, or
personal injury may result.
Moving the embroidery location
1. Touch the arrow key that indicates the direction in which you
would like to move the pattern. The embroidery pattern will
then move.
1 Shows the distance from the center position
* If you touch the “CENTER” key, the embroidering position
will return to the center.
* Use the hole on the embroidery foot as a guide, and never
lower the needle while it is moving.
Example: To move the embroidering position to the upper
right
Touch the “ ” key.
If the “TRIAL” key is touched, the embroidery frame will move
and the presser foot will trace the embroidering area to be used
for the currently selected pattern and size.
* Do not lower the needle. Use the hole of the presser foot as
a guide instead.
Checking the embroidering area
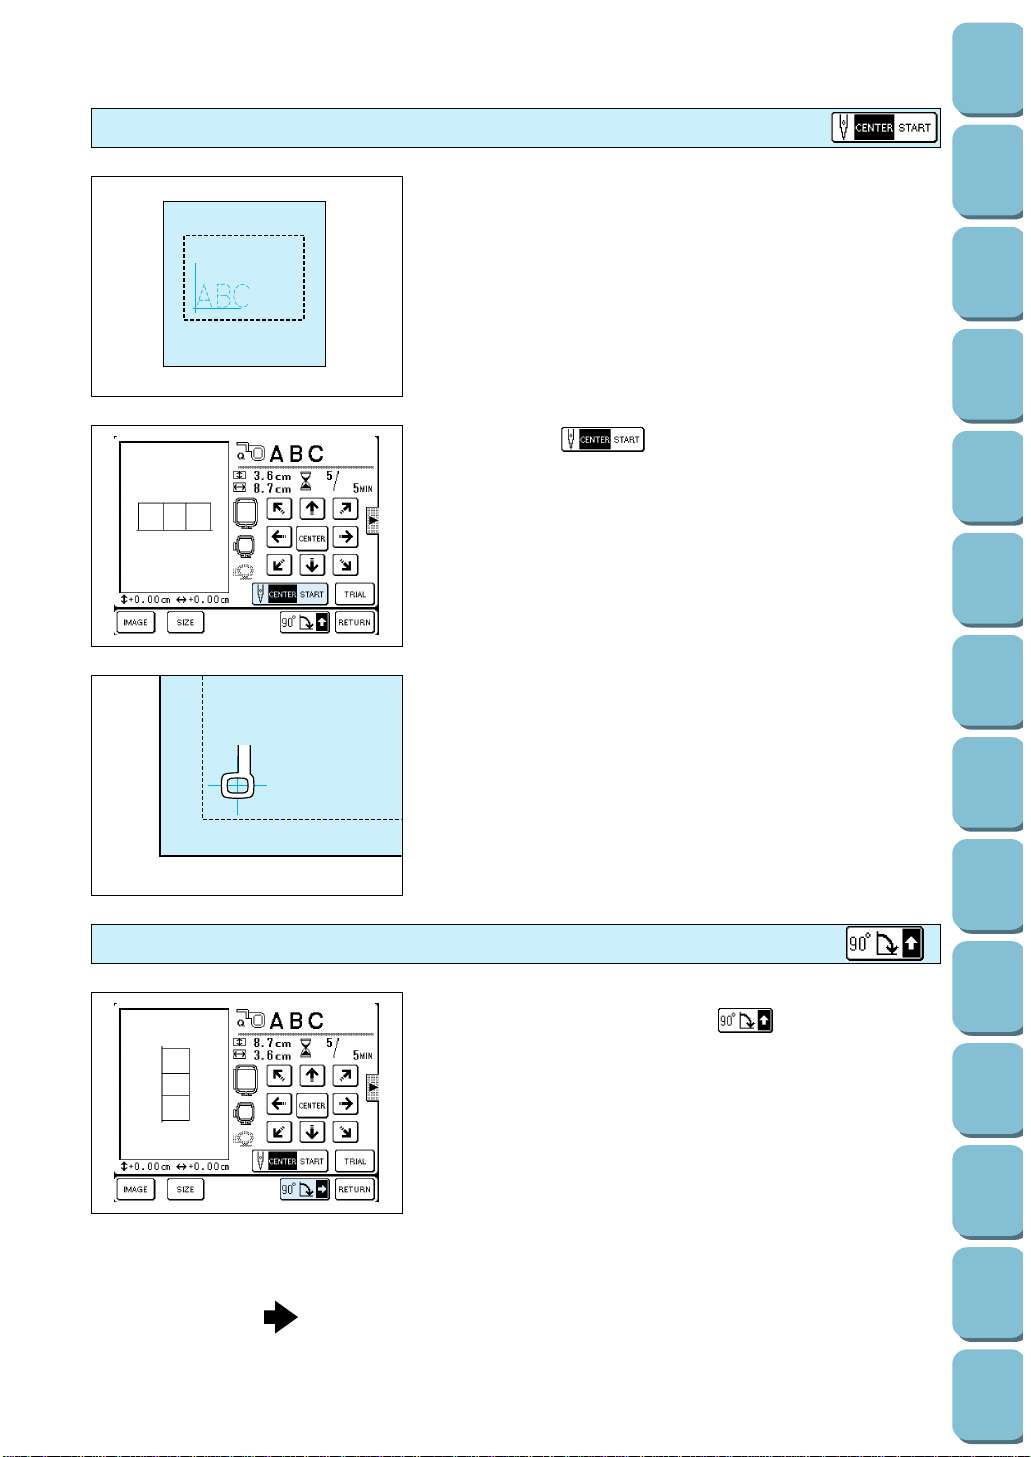
125
Utility
Stitches
Characters
and
Decorative
Stitches
Embroidering
Editing
Embroidery
Patterns
Retrieving
My
Custom
Stitch
TM
Maintenance
Error
Messages
Trouble
shooting
Sewing
Chart
Patterns
(Programmed
in Machine)
Patterns
(Memory
Card)
Sewing
Setting Up
CAUTION
After a starting position has been rotated, check the
display to see which embroidery frames can be used. If an
embroidery frame which is not displayed is used, the
embroidery foot may touch the frame, or personal injury
may result.
1. Make a mark at the starting position on the fabric in the
frame as shown in the illustration. The mark cannot be too
close to the edge of the frame as the presser foot prevents
the needle from getting very close to the frame.
2. Touch the “ ” key. The needle will move to the
starting position. (The embroidery frame will move.)
3. Use the arrow keys to align the mark with the hole in the
embroidery foot, and then start embroidering.
Embroidering from a specific starting point
ABC
ABC
The pattern will be rotated clockwise in 90˚ steps as shown in
the illustration at left each time the “ ” key is touched.
* Some patterns may be too long to be rotated 90°. In such
cases, the patterns can be rotated by 180° only.
CAUTION
After a pattern has been rotated, check the display to see
which embroidery frames can be used. If an embroidery
frame which is not displayed is used, the embroidery foot
may touch the frame, or personal injury may result.
Changing the pattern direction
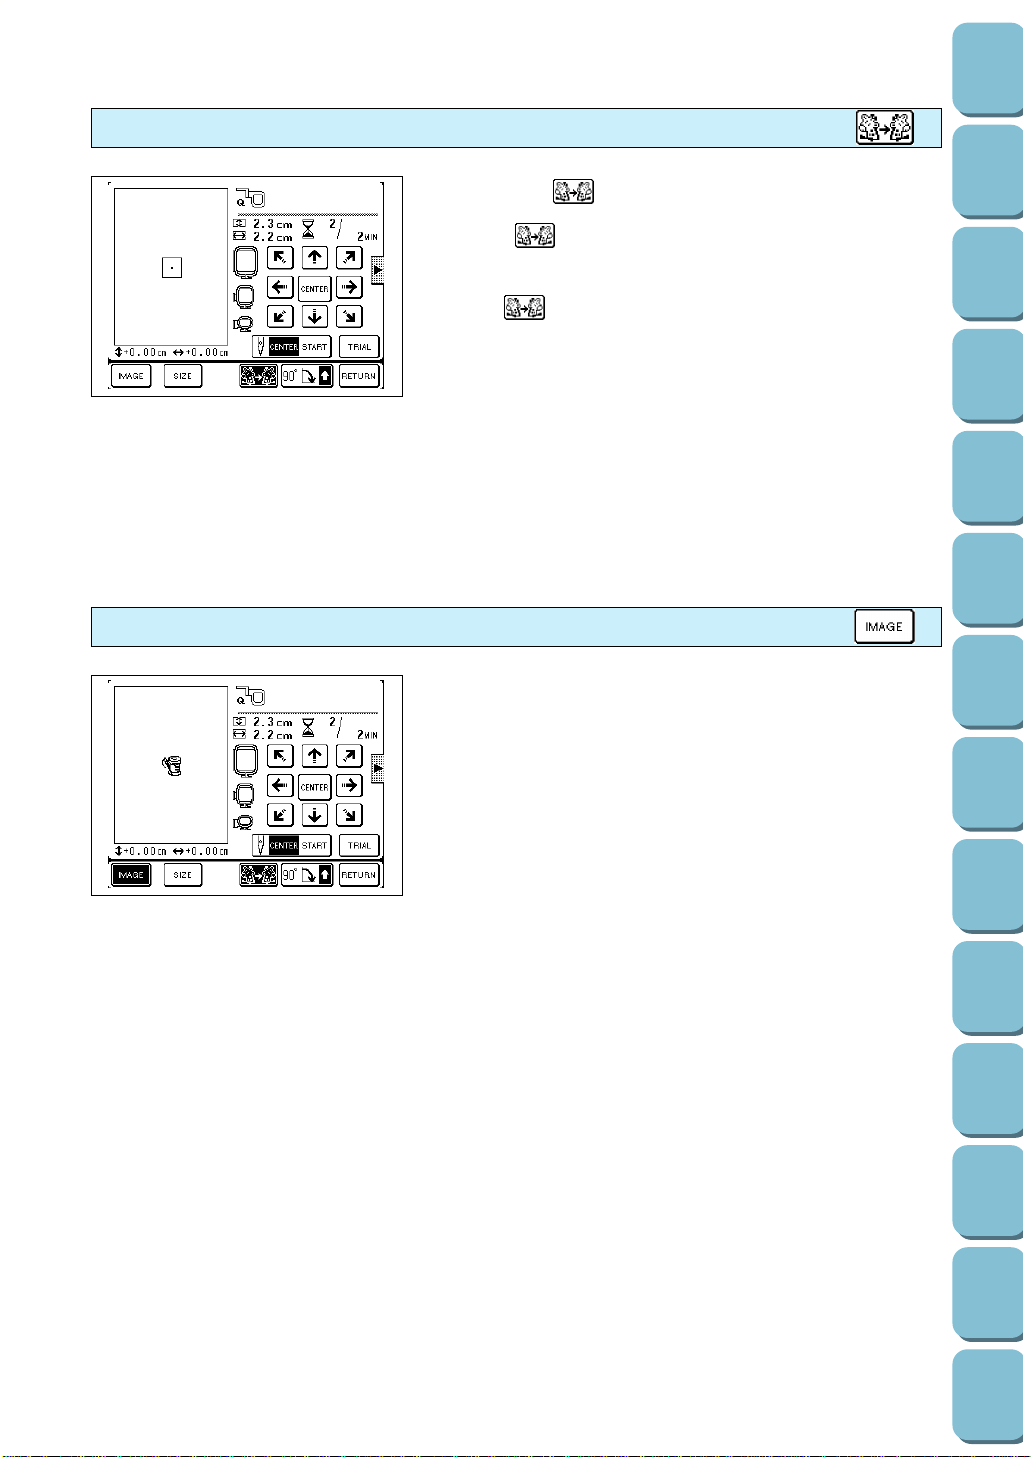
126
Utility
Stitches
Characters
and
Decorative
Stitches
Embroidering
Editing
Embroidery
Patterns
Retrieving
My
Custom
Stitch
TM
Maintenance
Error
Messages
Trouble
shooting
Sewing
Chart
Patterns
(Programmed
in Machine)
Patterns
(Memory
Card)
Sewing
Setting Up
1. Touch the “ ” key to reverse the pattern horizontally.
* If the “ ” key appears on the display in reverse mode, it
indicates that the pattern has been reversed horizontally
showing a mirror image.
* The “ ” key will not be displayed for some patterns.
Reversing patterns
1. If you touch the “IMAGE” key, a scale showing the size of
the pattern will be displayed.
* If you touch this key once more, the display will return to the
original screen.
Using the “IMAGE” key
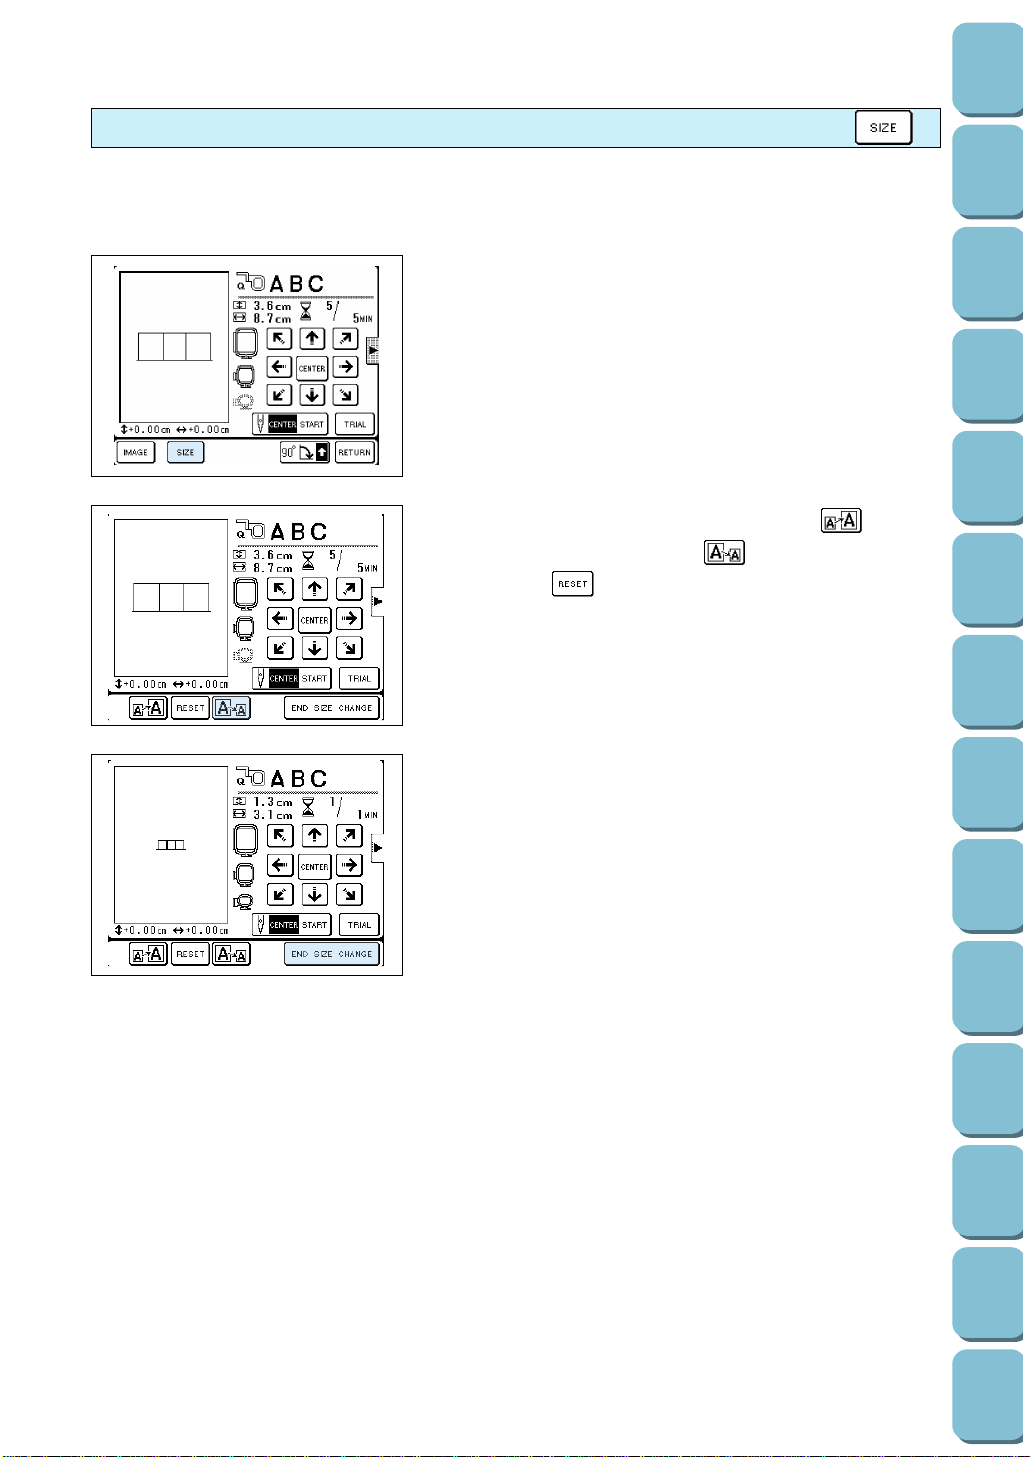
127
Utility
Stitches
Characters
and
Decorative
Stitches
Embroidering
Editing
Embroidery
Patterns
Retrieving
My
Custom
Stitch
TM
Maintenance
Error
Messages
Trouble
shooting
Sewing
Chart
Patterns
(Programmed
in Machine)
Patterns
(Memory
Card)
Sewing
Setting Up
1. Touch the “SIZE” key.
2. To increase the pattern size, touch the “ ” key; to
reduce the size, touch the “ ” key to reset the size
touch the “ ” key.
The size will change each time one of these keys is
pressed.
* The maximum frame pattern size is different for each
pattern.
* Some frame patterns can be enlarged further if they are
rotated 90°.
3. After adjustment is competed, touch the “END SIZE
CHANGE” key.
CAUTION
After the size of a character, frame patterns or embroidery
patterns have been changed, check the display to see
which embroidery frames can be used. If an embroidery
frame which is not displayed is used, the embroidery foot
may touch the frame, or injury may result.
Changing the size of characters, frame patterns and pattern
You can change the size of character and frame patterns to any size you wish.
[When changing character size]
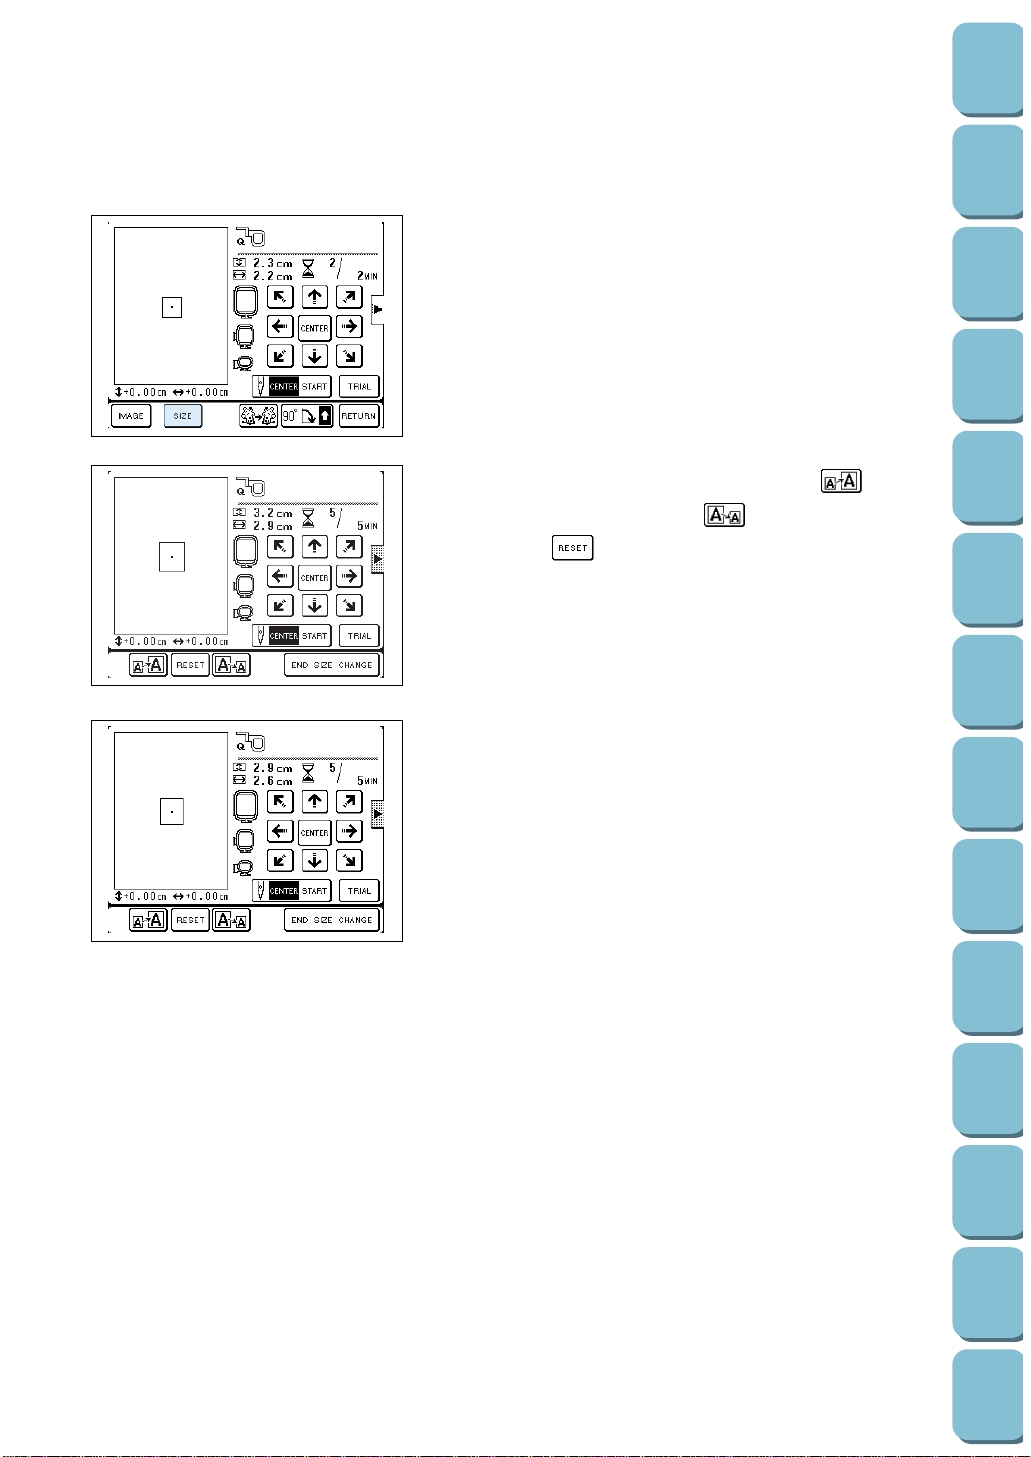
128
Utility
Stitches
Characters
and
Decorative
Stitches
Embroidering
Editing
Embroidery
Patterns
Retrieving
My
Custom
Stitch
TM
Maintenance
Error
Messages
Trouble
shooting
Sewing
Chart
Patterns
(Programmed
in Machine)
Patterns
(Memory
Card)
Sewing
Setting Up
1. Touch the “SIZE” key.
2. To increase the pattern size, touch the “ ” key; to
reduce the size, touch the “ ” key to reset the size
touch the “ ” key.
The size will change each time one of these keys is
pressed.
* The maximum frame pattern size is different for each
pattern.
* Some frame patterns can be enlarged further if they are
rotated 90°.
3. After adjustment is competed, touch the “END SIZE
CHANGE” key.
CAUTION
After the size of a character, frame patterns or embroidery
patterns have been changed, check the display to see
which embroidery frames can be used. If an embroidery
frame which is not displayed is used, the embroidery foot
may touch the frame, or injury may result.
* There are some patterns that cannot be enlarged or
reduced.
* Use the standard needle size if the thread breaks or splits
when using reduced patterns change to a finer needle.
* Use the standard embroidery thread weight, if gaps become
obvious when using enlarged patterns change to a heavier
weight thread.
[When changing frame pattern and patterns size]
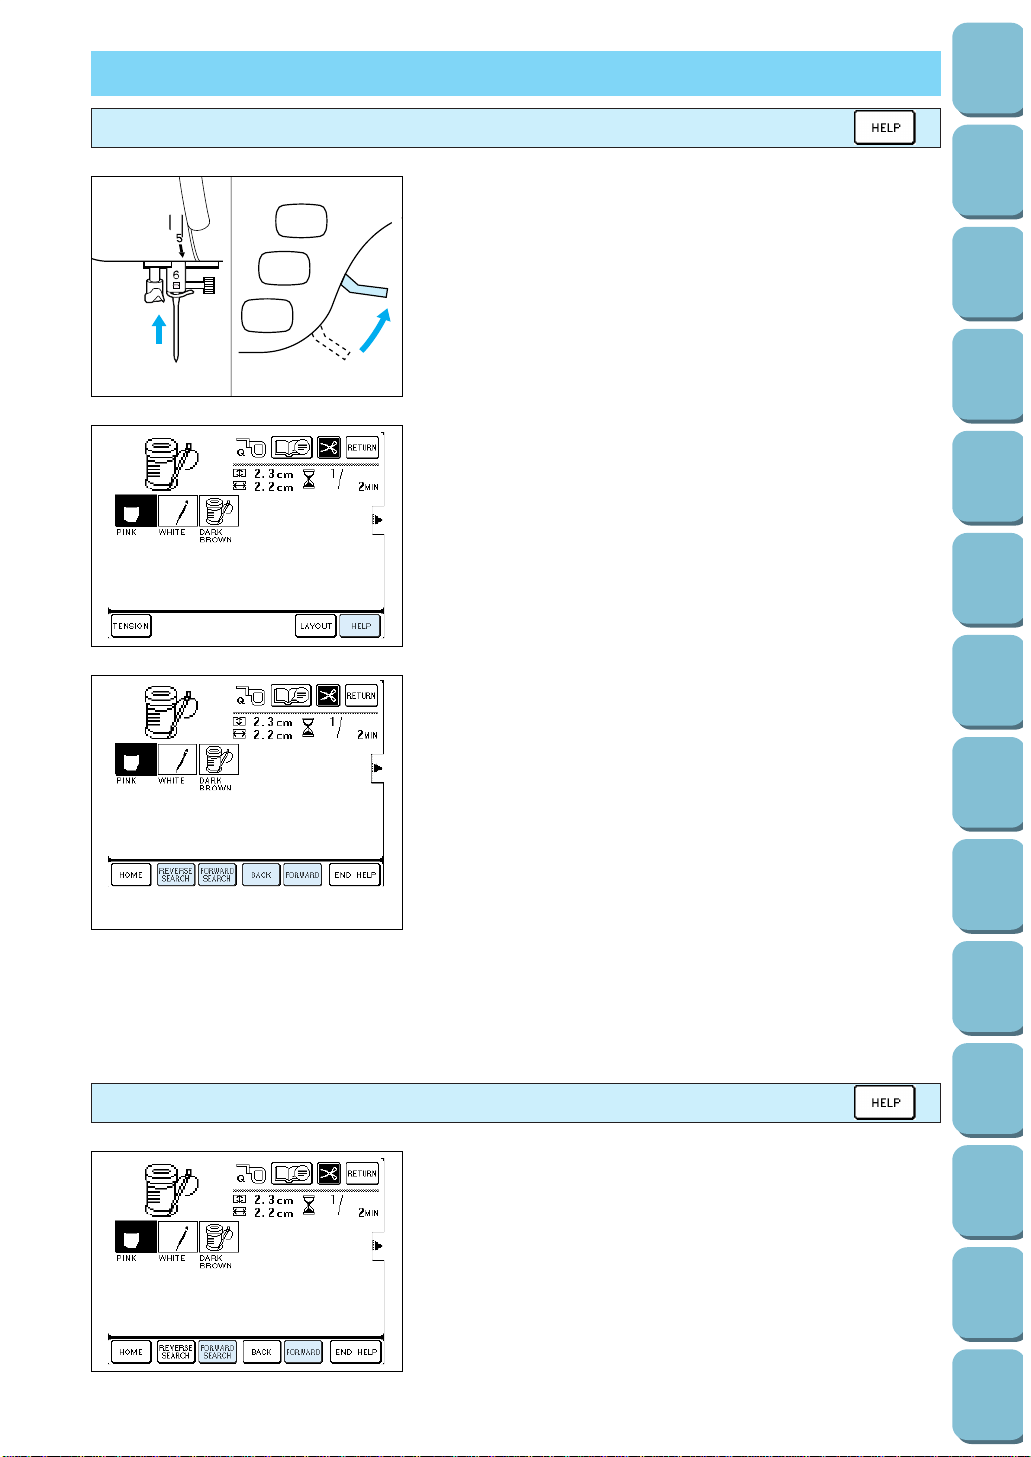
129
Utility
Stitches
Characters
and
Decorative
Stitches
Embroidering
Editing
Embroidery
Patterns
Retrieving
My
Custom
Stitch
TM
Maintenance
Error
Messages
Trouble
shooting
Sewing
Chart
Patterns
(Programmed
in Machine)
Patterns
(Memory
Card)
Sewing
Setting Up
1. Stop the machine, raise the needle and the presser foot
lever and re-thread the upper thread.
If the bobbin thread has broken
1 Cut the upper thread and remove the embroidery frame.
2 Check the under side of the embroidery for any thread
build-up, clean.
3 Reset the bobbin thread and re-attach the embroidery
frame.
2. Touch the “HELP” key.
1
The needle will return to the start position for the whole pattern.
2
The needle will return to the start position for the color (or
character) currently being embroidered (without embroidering).
3
The needle will proceed to the start position for the next color
(or character) to be embroidered (without embroidering).
4
The needle will move back one stitch (without embroidering).
If this key is touched continuously, the needle will move
back in jumps of 17 stitches starting from the 6th stitch.
5
The needle will move forward one stitch (without embroidering).
If this key is touched continuously, the needle will move
forward in jumps of 17 stitches starting from the 6th stitch.
6
The display will return to the original screen (sewing screen).
3. Touch the “BACK” key to move back a short way past the
point where the thread broke.
* If the machine stops moving backward before you reach the
point where you need to resume embroidering, touch the
“REVERSE SEARCH” key and the “FORWARD” key. When
you reach the point at which you would like to resume
embroidering press the “START/STOP” button.
4. Lower the presser foot lever and start embroidering.
* The “START/ STOP” button may not function for a few
seconds after the “FORWARD SEARCH” or “REVERSE
SEARCH” key is touched, however this is not a sign of a
malfunction.
If the thread breaks during embroidering
Example: Continuing to embroider halfway through the
second color
1. Select the pattern and then touch the “HELP” key.
2. Touch the “FORWARD SEARCH” key to move to the start
of the second color.
3. Touch the “FORWARD” key to move forward to a position
slightly before the point where embroidering is to continue.
4. Lower the presser foot and start embroidering.
* When moving the embroidering position on the layout
screen before continuing to embroider the pattern, move the
position on the layout screen by the same amount before
carrying out the above procedure.
Continuing a pattern after the power has been momentarily turned off
ADJUSTMENTS DURING THE EMBROIDERY PROCESS
12345 6
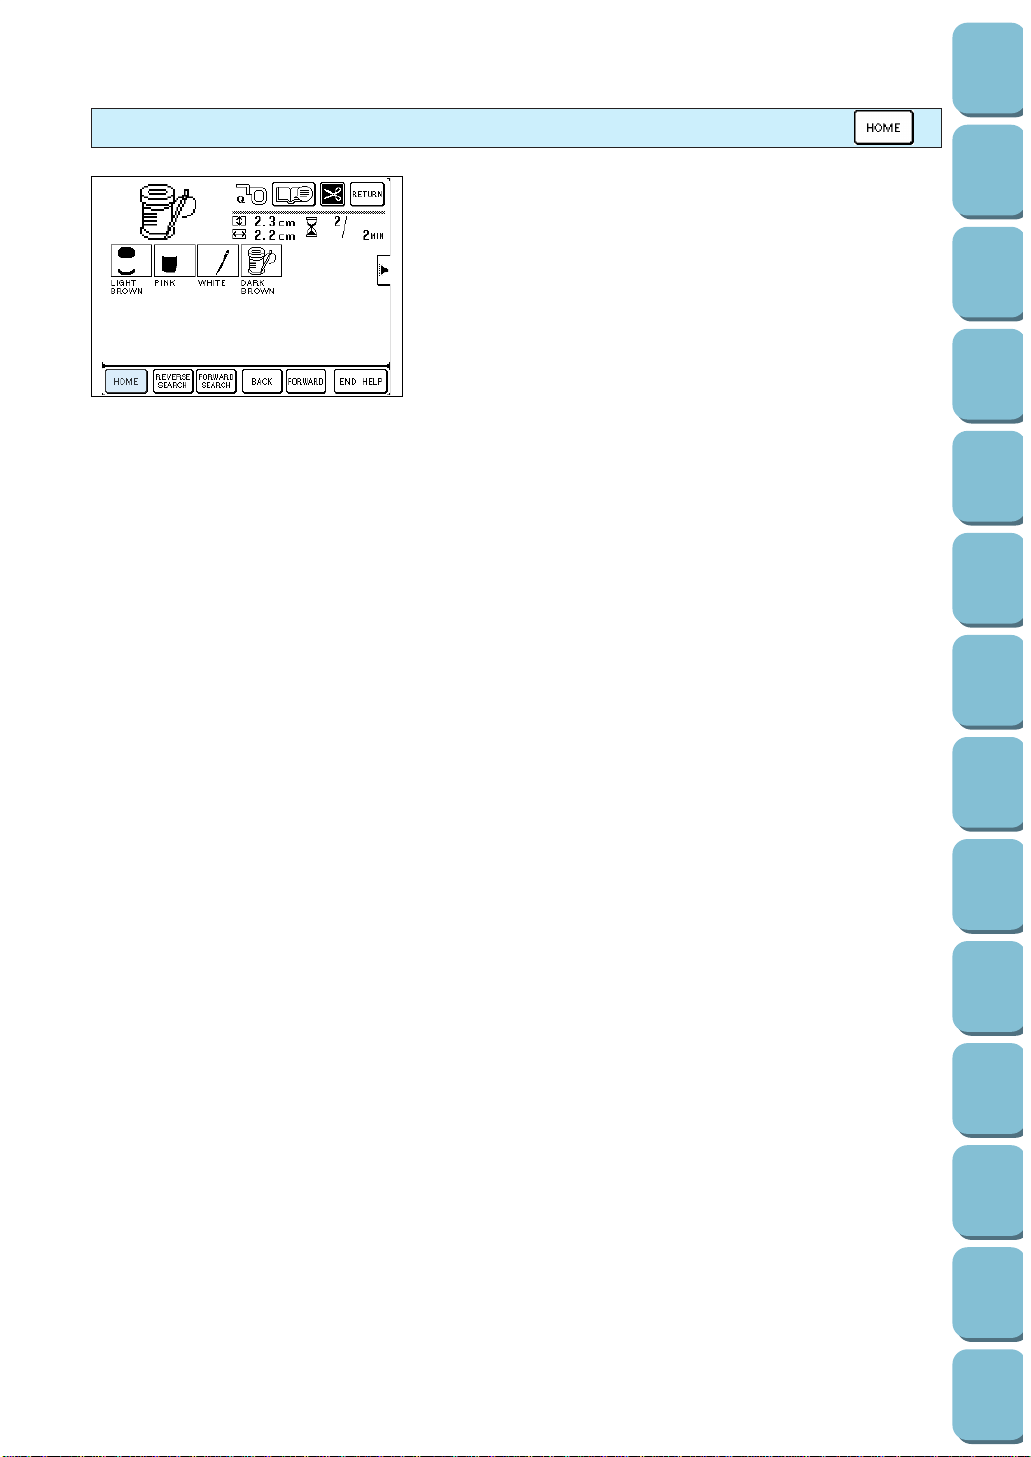
130
Utility
Stitches
Characters
and
Decorative
Stitches
Embroidering
Editing
Embroidery
Patterns
Retrieving
My
Custom
Stitch
TM
Maintenance
Error
Messages
Trouble
shooting
Sewing
Chart
Patterns
(Programmed
in Machine)
Patterns
(Memory
Card)
Sewing
Setting Up
1. Touch the “HOME” key. The needle will return to the
embroidery start position.
2. Lower the presser foot lever and start embroidering.
When sewing again from the beginning
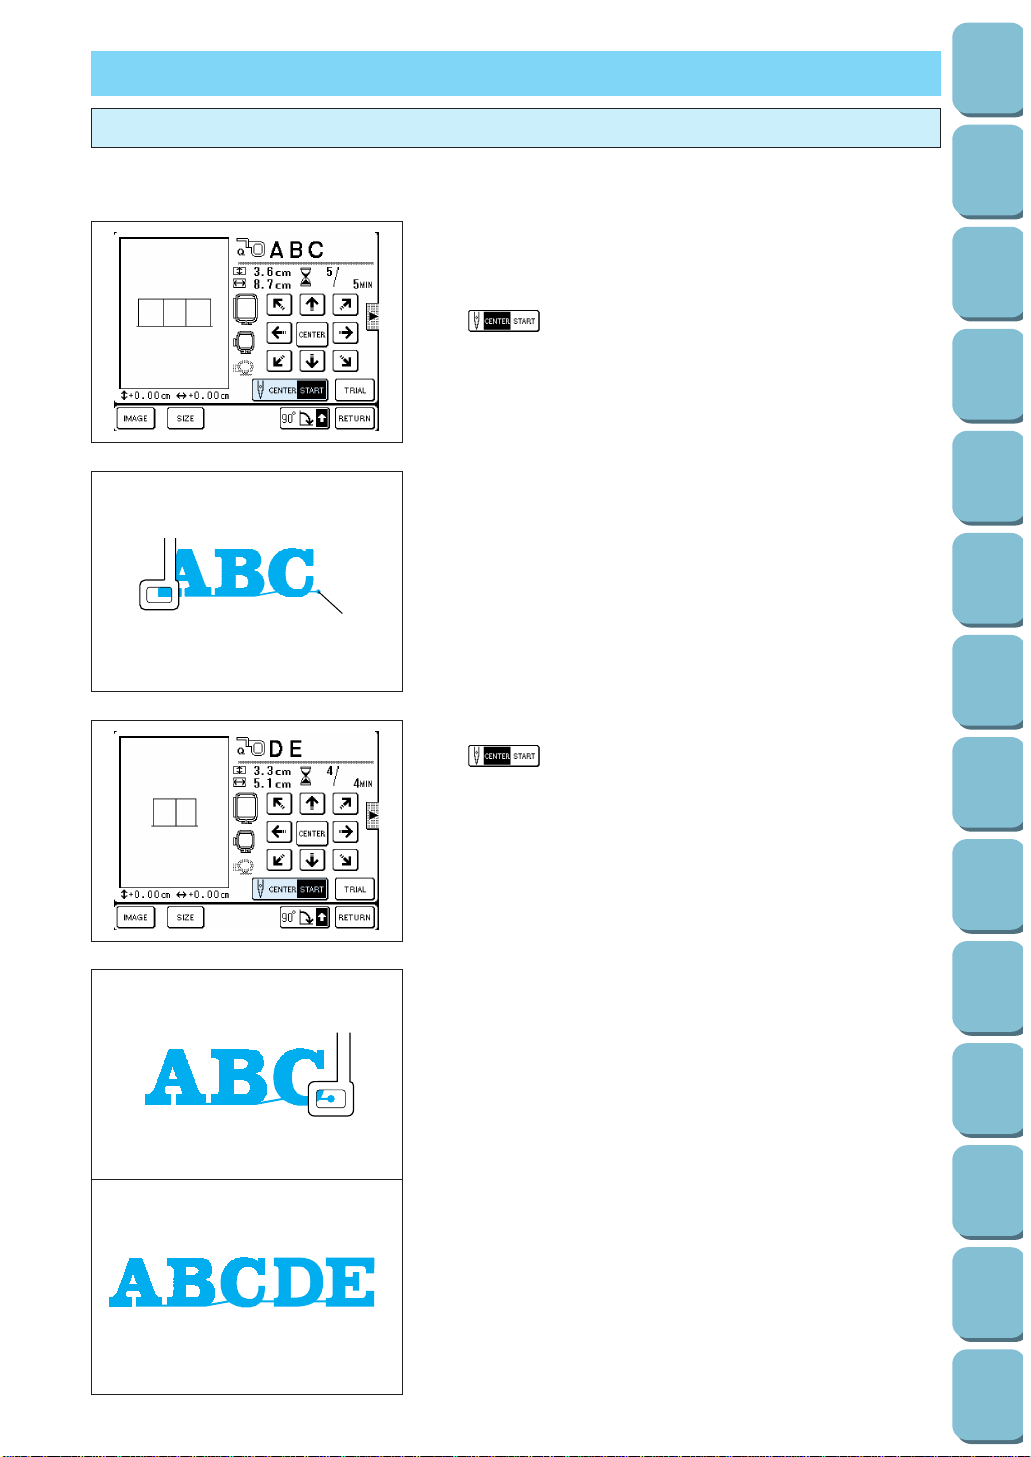
131
Utility
Stitches
Characters
and
Decorative
Stitches
Embroidering
Editing
Embroidery
Patterns
Retrieving
My
Custom
Stitch
TM
Maintenance
Error
Messages
Trouble
shooting
Sewing
Chart
Patterns
(Programmed
in Machine)
Patterns
(Memory
Card)
Sewing
Setting Up
EMBROIDERY APPLICATIONS
Example: Embroidering ABC, then linking DE
1. Touch “A”, “B”, and “C”, touch the “LAYOUT” key to move
the needle to the center position, and then touch the
“ ” key.
1
2. Press the “START/STOP” button and start embroidering.
Once embroidering is completed, move the fabric to the
position where “DE” is to be embroidered.
1 The embroidery end position
* Match the line of embroidery with reference lines on the
embroidery sheet that fits the frame you are using.
3. Select “DE”, then touch the “LAYOUT” key, and touch the
“ ” key to highlight START.
4. Use the arrow keys to move the needle to the embroidery
end position for “ABC”.
5. Press the “START/STOP” button and start embroidering.
Linking characters
Use this feature when the characters cannot be sewn all at once.
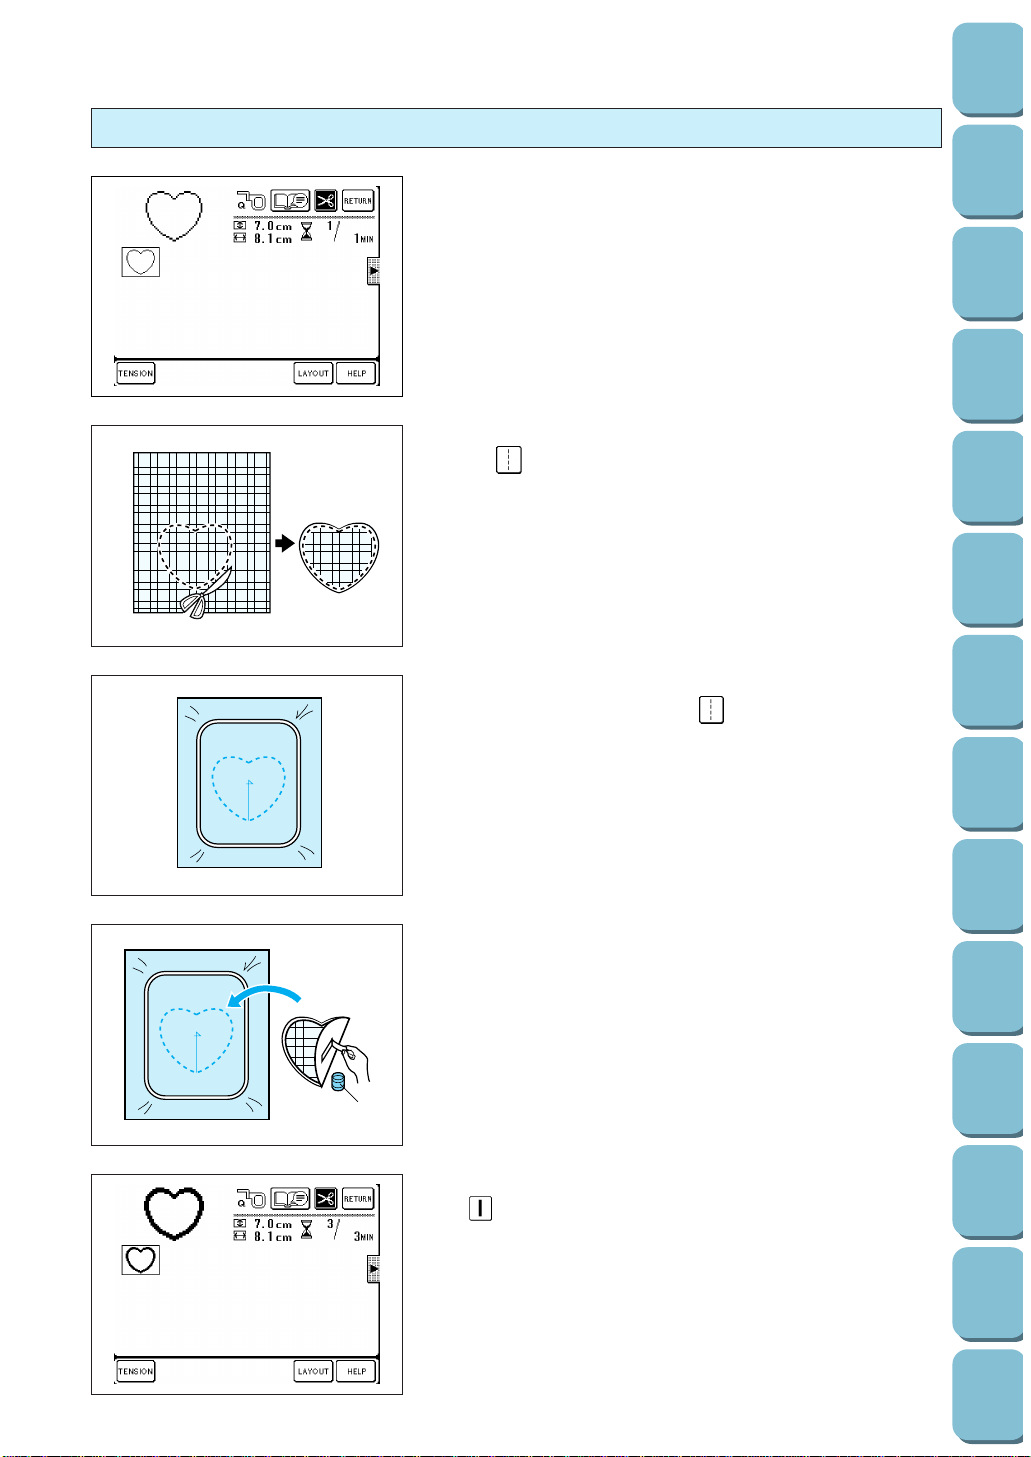
132
Utility
Stitches
Characters
and
Decorative
Stitches
Embroidering
Editing
Embroidery
Patterns
Retrieving
My
Custom
Stitch
TM
Maintenance
Error
Messages
Trouble
shooting
Sewing
Chart
Patterns
(Programmed
in Machine)
Patterns
(Memory
Card)
Sewing
Setting Up
You can use frame patterns with the same shape and size to
sew appliques.
1. Select the applique material for the project, attach a
stabilizer material, place it into the embroidery frame and
attach the embroidery frame to the machine.
2. Select the frame shape to be embroidered and select
the“ ” stitch. Embroider onto the applique material.
Remove the fabric from the embroidery frame.
Cut neatly around the outside of the shape made by the
stitches.
3. Embroider a base fabric in the same way using the same
frame pattern shape and the “ ” stitch as in step 2.
1
4. Apply a thin layer of fabric glue to the rear of the applique
material which is created in step 2, and then attach it to the
base fabric so that it follows the frame shape just stitched.
1 Fabric glue
5. Without changing the frame shape or size, select the
“ ” stitch, and use it to embroider the applique material
onto the project.
Embroidering appliques (using a frame pattern)
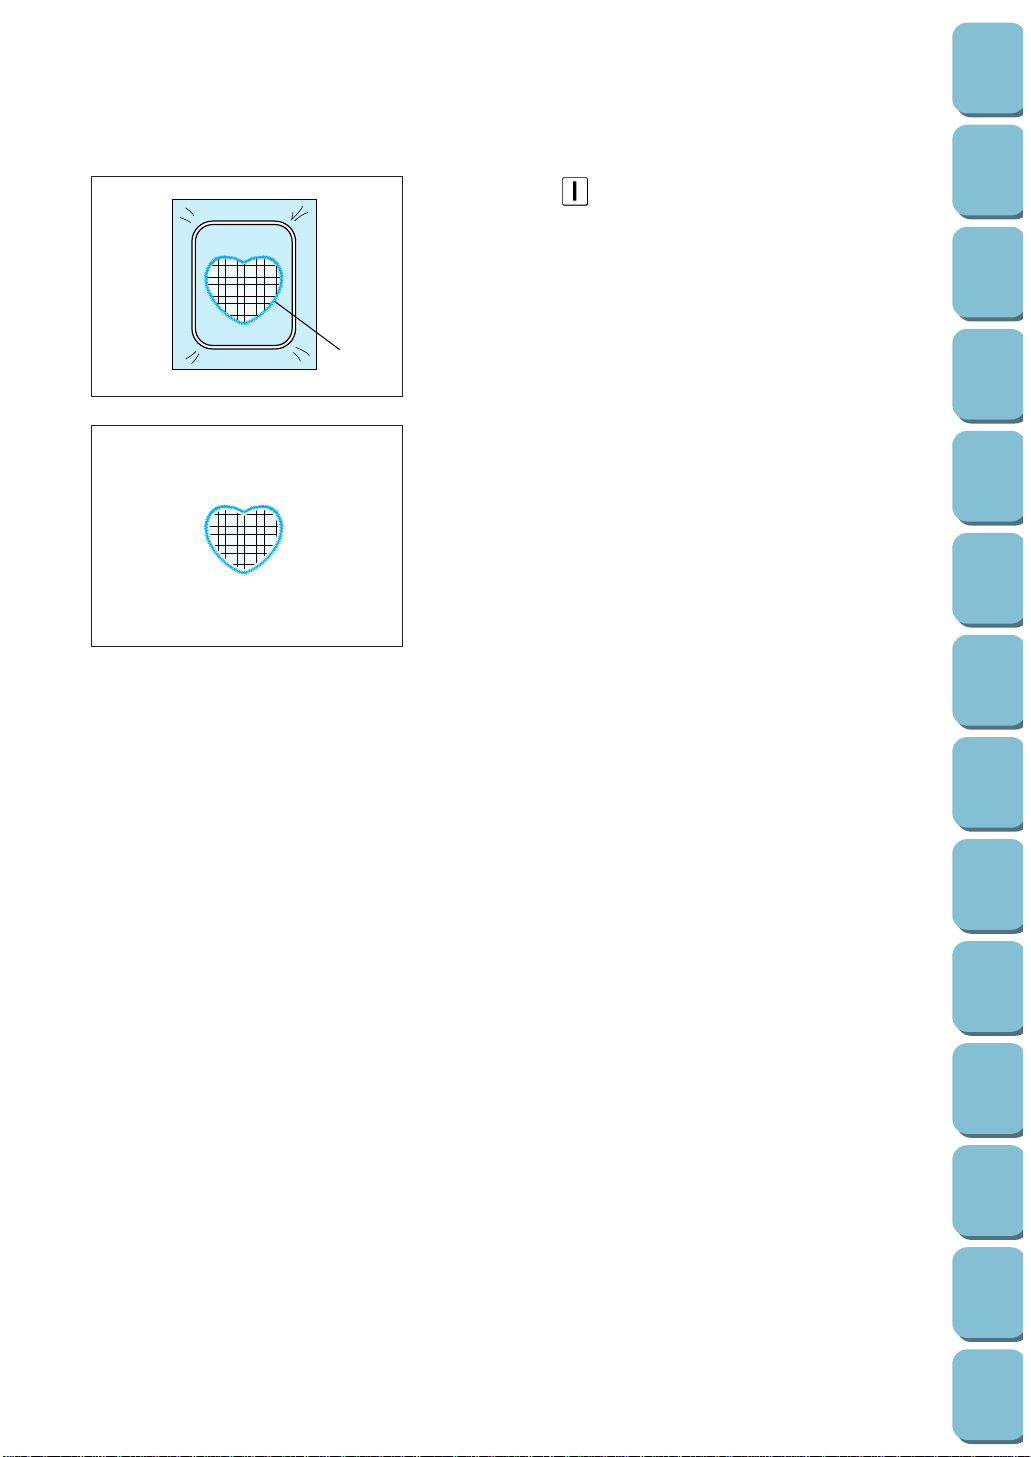
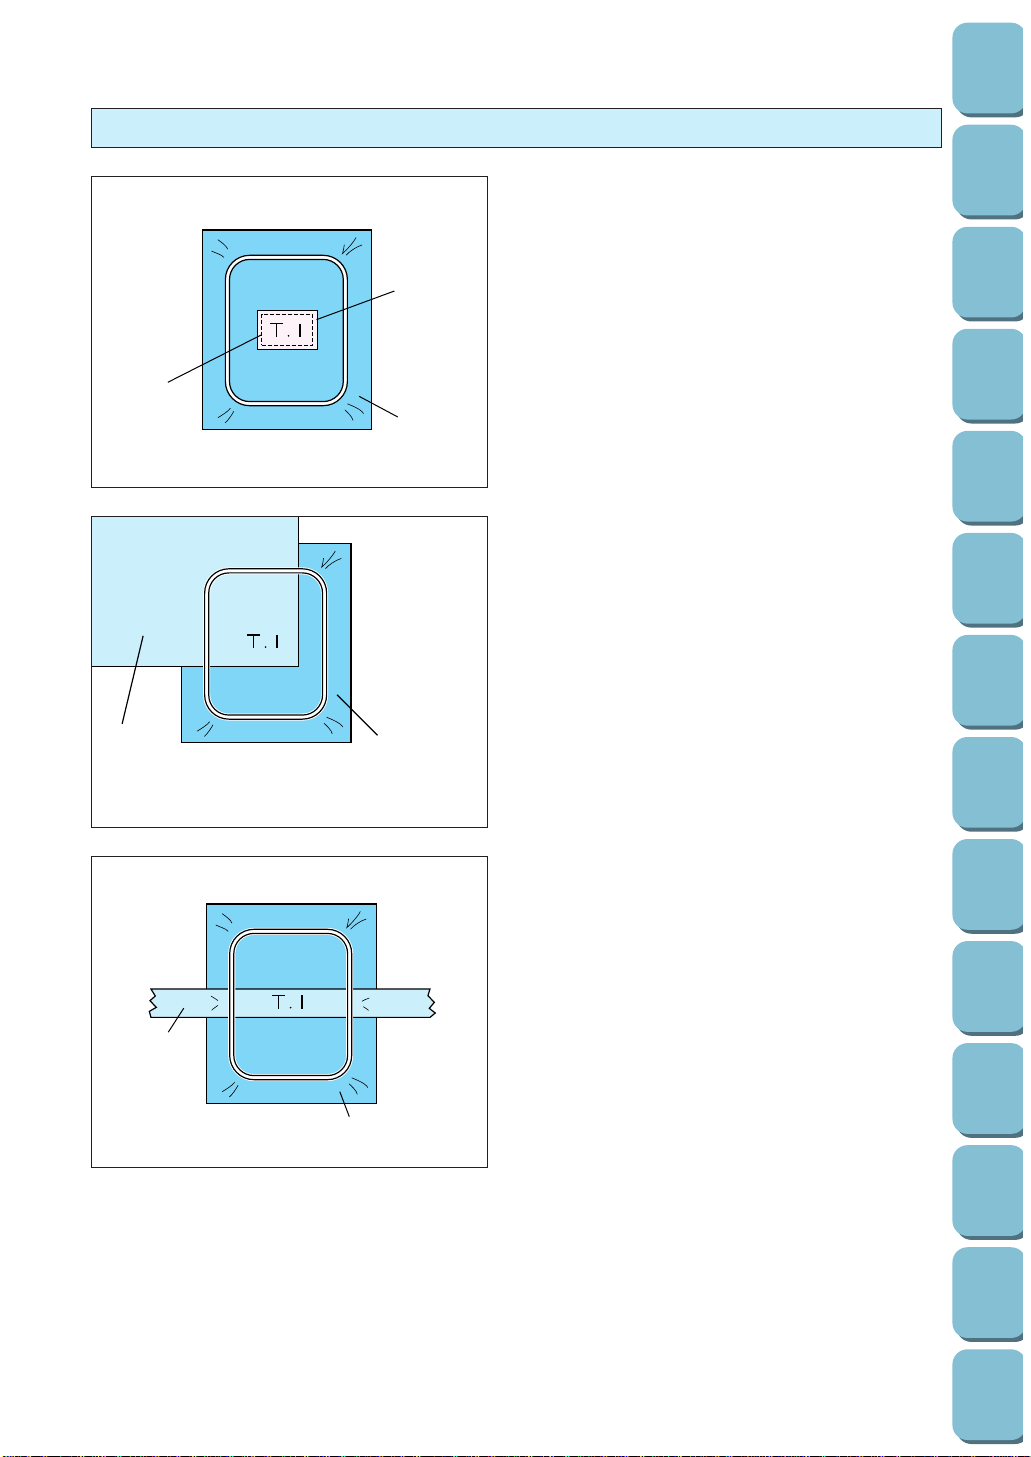
134
Utility
Stitches
Characters
and
Decorative
Stitches
Embroidering
Editing
Embroidery
Patterns
Retrieving
My
Custom
Stitch
TM
Maintenance
Error
Messages
Trouble
shooting
Sewing
Chart
Patterns
(Programmed
in Machine)
Patterns
(Memory
Card)
Sewing
Setting Up
1
2
3
Use stabilizer fabric to provide extra support
while embroidering. After embroidering is
completed, remove the stabilizer fabric carefully.
Use stabilizer fabric which is designed specially
for embroidering.
Case A
1 Fabric
2 Attach the stabilizer fabric by ironing. (If you
do not wish to iron, attach the stabilizer fabric
with a basting stitch.)
3 Stabilizer
2
1
Case B
1 Fabric
2 Stabilizer
1
2
Case C
1 Ribbon (Secure with double-sided tape)
2 Stabilizer
NOTE
Temporary spray on adhesive will also enable
you to tack down unusually shaped objects.
Some glue may get onto the presser foot, needle
and needle plate at this time. Finish embroidering
the applique pattern and then clean away the
glue.
Embroidering onto small pieces of fabric or onto corners
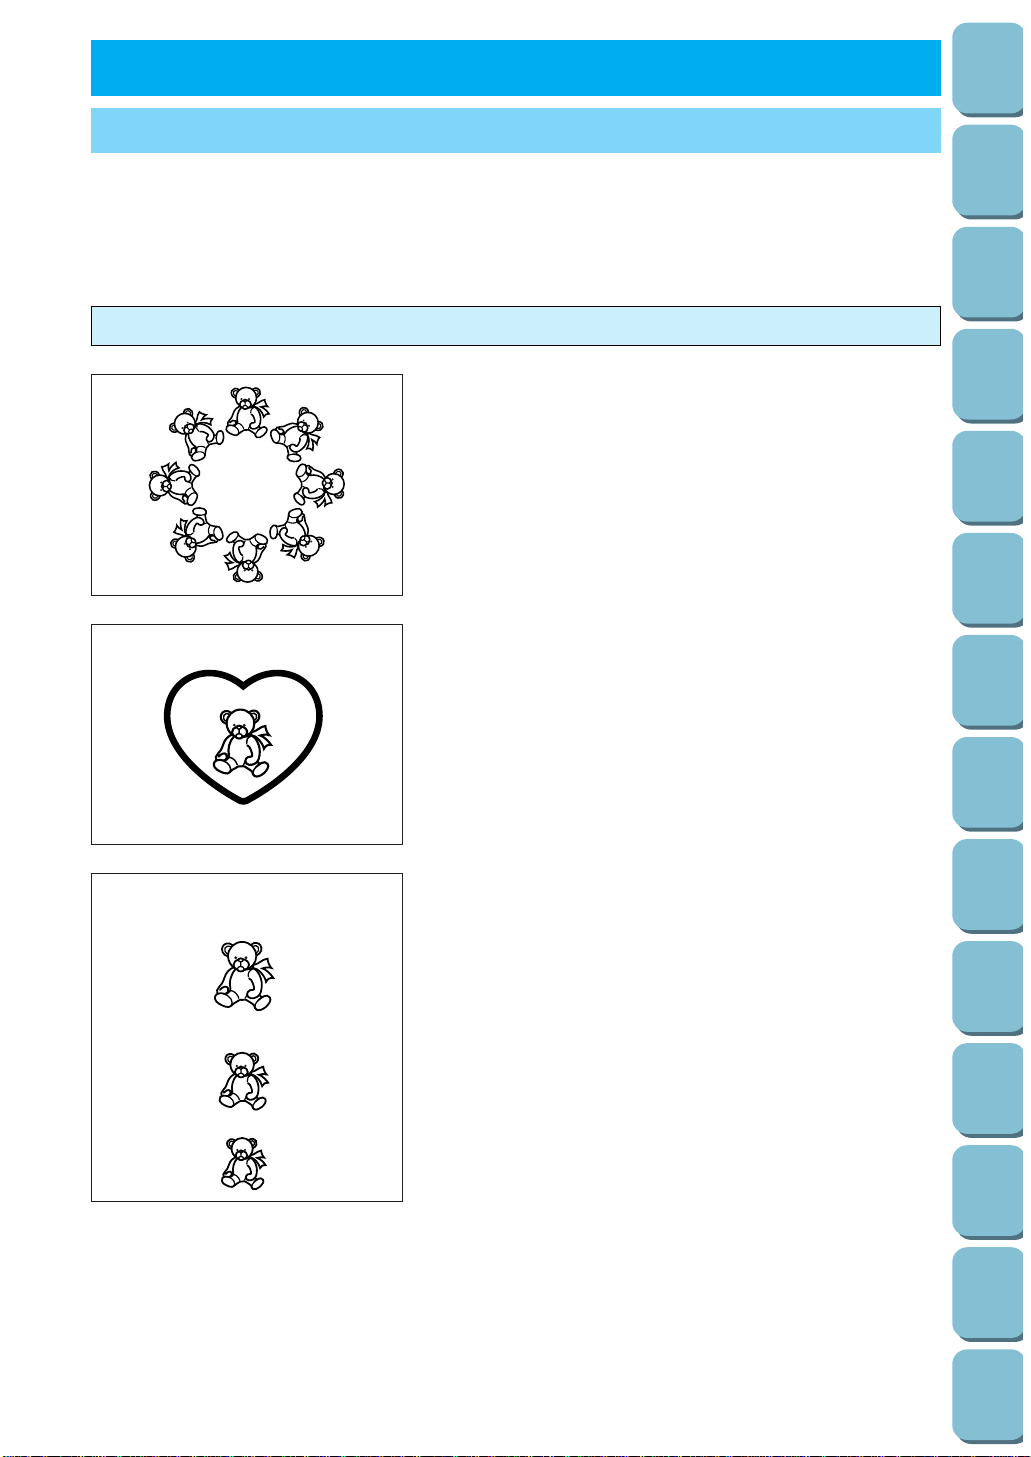
135
Utility
Stitches
Characters
and
Decorative
Stitches
Embroidering
Editing
Embroidery
Patterns
Retrieving
My
Custom
Stitch
TM
Maintenance
Error
Messages
Trouble
shooting
Sewing
Chart
Patterns
(Programmed
in Machine)
Patterns
(Memory
Card)
Sewing
Setting Up
EMBROIDERY EDITING CAPABILITIES
5. EMBROIDERY EDITING
Embroidery editing lets you change the pattern layout by rotating and moving the pattern within an 18 cm
long x 13 cm wide embroidery area. Also positioning is easy when combining one point patterns with
characters and when sewing characters on a curved line. Use the “EMBROIDERY EDIT” key to combine
patterns and characters or two or more patterns so that you can make your very own original emblems or
name tags.
BEAR
Explanation of the Editing Functions
Layout (Movement)
Patterns can be moved to a desired position within the 18 cm
long x 13 cm wide embroidery area by using the edit function
and confirming the position on the liquid crystal display (LCD)
screen.
B
E
A
R
B
E
A
R
Combinations
Combining one-point patterns with border patterns, characters
and embroidery card patterns is easy.
BEAR
BEAR
BEAR
Rotation
Directional position of patterns and characters can be changed
by rotating them in 5-degree steps.
Expansion and Reduction
Up to 50 increments size changes can be made to characters
and border patterns.
Configurations
Up to 6 different types of character configuration can be
selected.
Other Useful Functions
• One-point patterns can be mirror imaged in the left or right
direction.
• The space between characters can widened or closed.
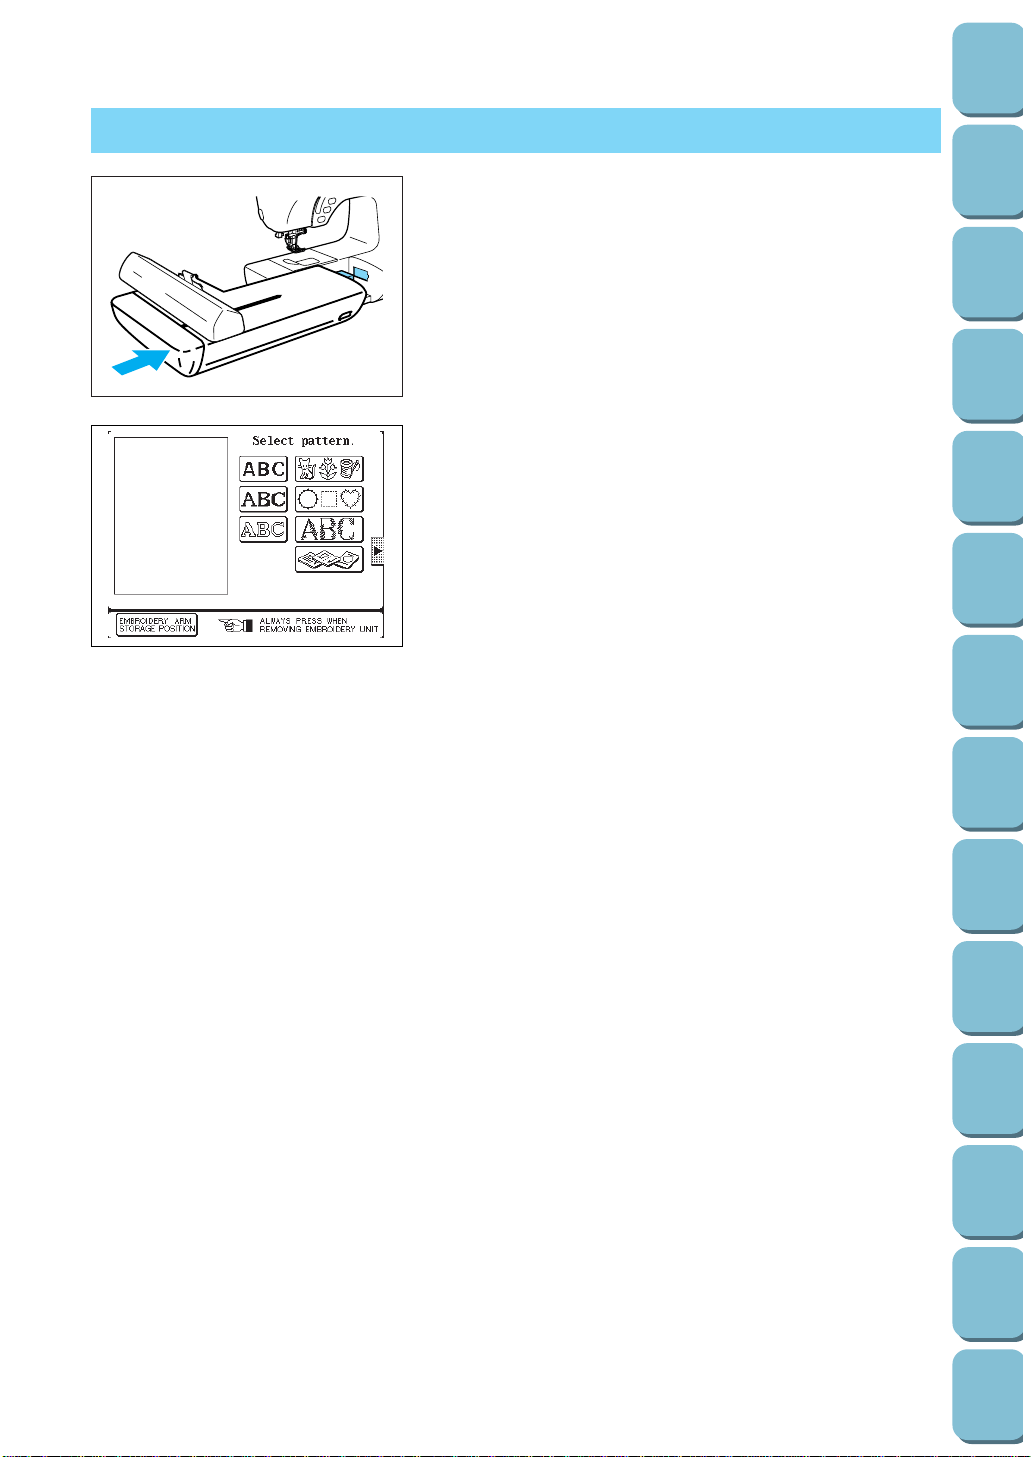
136
Utility
Stitches
Characters
and
Decorative
Stitches
Embroidering
Editing
Embroidery
Patterns
Retrieving
My
Custom
Stitch
TM
Maintenance
Error
Messages
Trouble
shooting
Sewing
Chart
Patterns
(Programmed
in Machine)
Patterns
(Memory
Card)
Sewing
Setting Up
HOW TO EDIT
1. Attach the embroidery unit and make necessary
preparations before Embroidering.
* See pages 106 to 108 for details.
2. Press the “EMBROIDERY EDIT” key to display the following
screen.
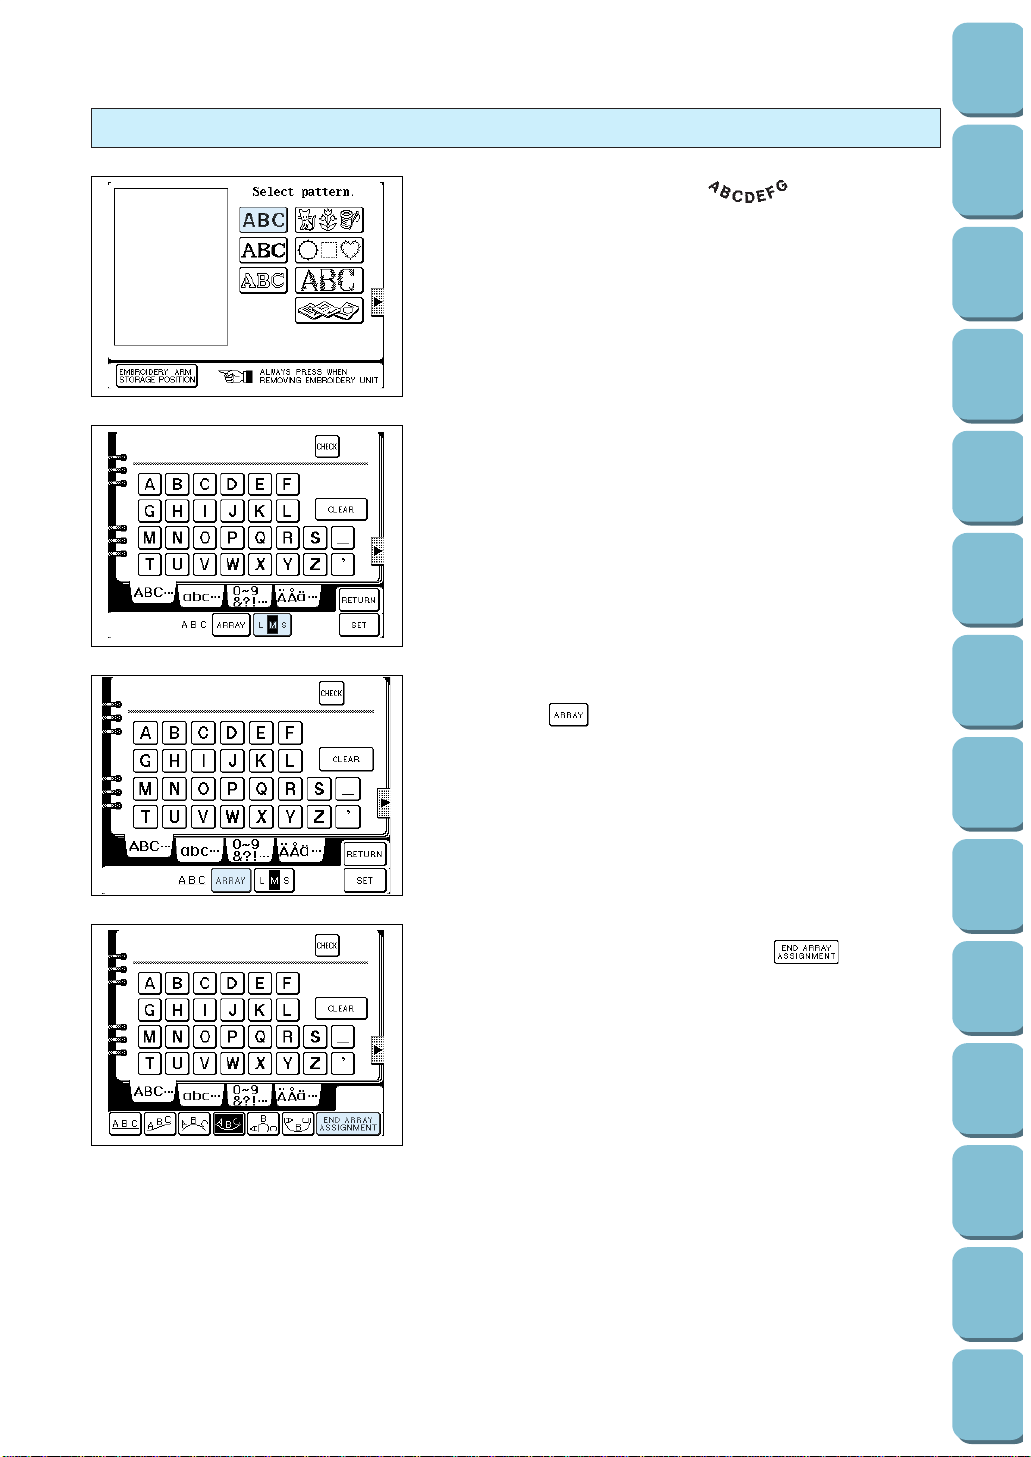
137
Utility
Stitches
Characters
and
Decorative
Stitches
Embroidering
Editing
Embroidery
Patterns
Retrieving
My
Custom
Stitch
TM
Maintenance
Error
Messages
Trouble
shooting
Sewing
Chart
Patterns
(Programmed
in Machine)
Patterns
(Memory
Card)
Sewing
Setting Up
Character Editing
Example: Editing the Alphabet “ ”
1. Select character type.
2. First, designate the character size. (If you select
hiragana/katakana, also designate vertical characters or
horizontal characters at the same time.)
3. Next, select character configuration.
Press the “ ” key.
4. Select configuration type.
After making your selection, press the “ ” key.
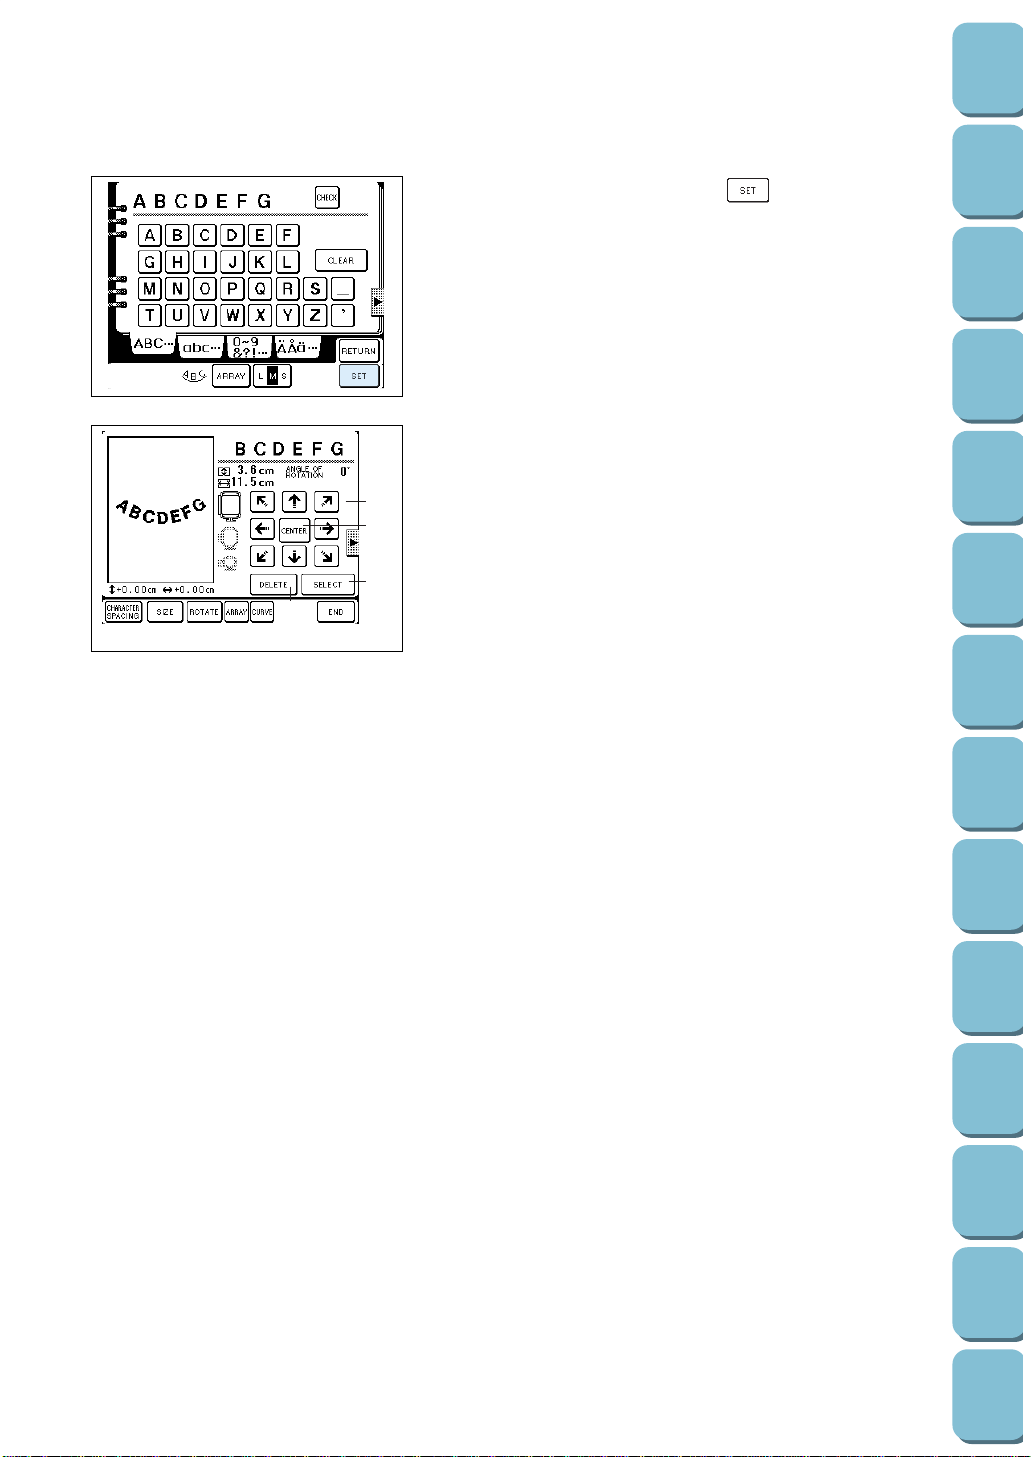
138
Utility
Stitches
Characters
and
Decorative
Stitches
Embroidering
Editing
Embroidery
Patterns
Retrieving
My
Custom
Stitch
TM
Maintenance
Error
Messages
Trouble
shooting
Sewing
Chart
Patterns
(Programmed
in Machine)
Patterns
(Memory
Card)
Sewing
Setting Up
5. Select character, then press the “ ” key.
After a while the characters will be displayed. The characters
will be laid out in the center of the embroidery area.
1
Press these keys to move patterns in the direction of the
arrows. (See page 139 for details.)
2 Press this key to bring the pattern back to the center of the
embroidery area.
3
Press this key to delete the pattern being edited. (See page
141 for details.)
4 Use this key to change the pattern to be edited.
5 Use this key to change character spacing. (See page 139
for details.)
6 Use this key to change character size. (See page 140 for
details.)
7 Use this key to rotate characters to the right or left in 5-
degree steps. (See page 140 for details.)
8 Press this key when you want to change character
configuration. (See page 141 for details.)
9 Press this key when you want to change the extent of a
curve. (See page 141 for details.)
0
Press this key to move to the next stage.
56789
3
0
4
2
1
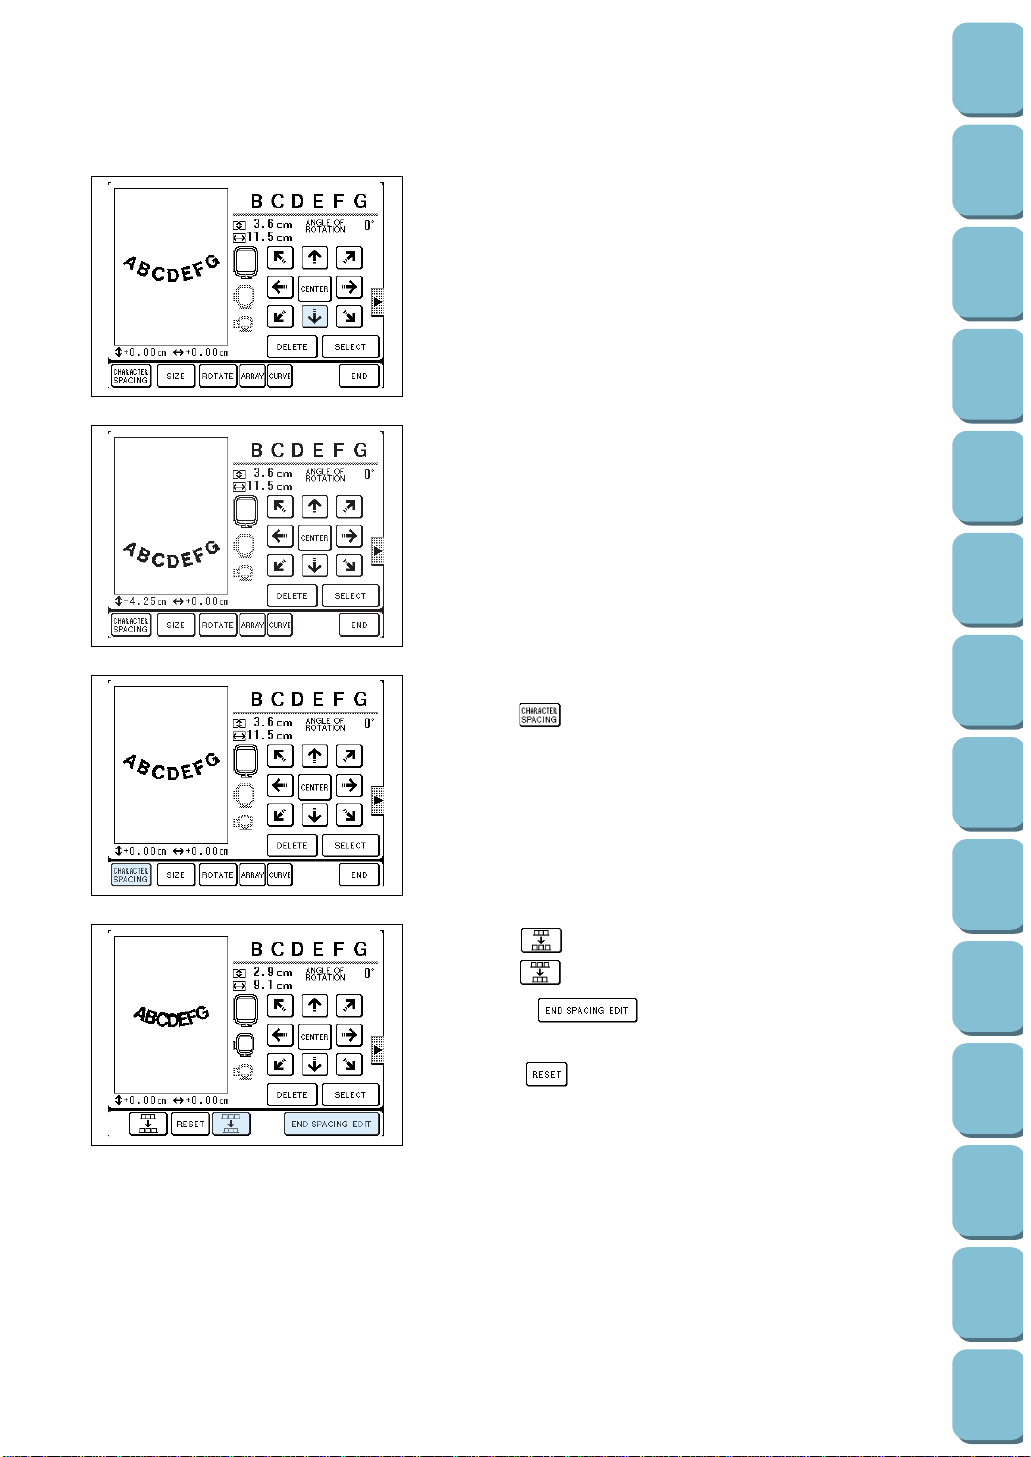
139
Utility
Stitches
Characters
and
Decorative
Stitches
Embroidering
Editing
Embroidery
Patterns
Retrieving
My
Custom
Stitch
TM
Maintenance
Error
Messages
Trouble
shooting
Sewing
Chart
Patterns
(Programmed
in Machine)
Patterns
(Memory
Card)
Sewing
Setting Up
Moving Characters
Press the key marked with the arrow pointing in the direction
you want to move the character.
Spacing Characters
Press the “ ” key to alter character spacing.
Press the “ ” key to open the space between characters.
Press the “ ” key to close the space between characters.
Press the “ ” key when character spacing is
completed.
Press the “ ” key to revert back to the original character
spacing.
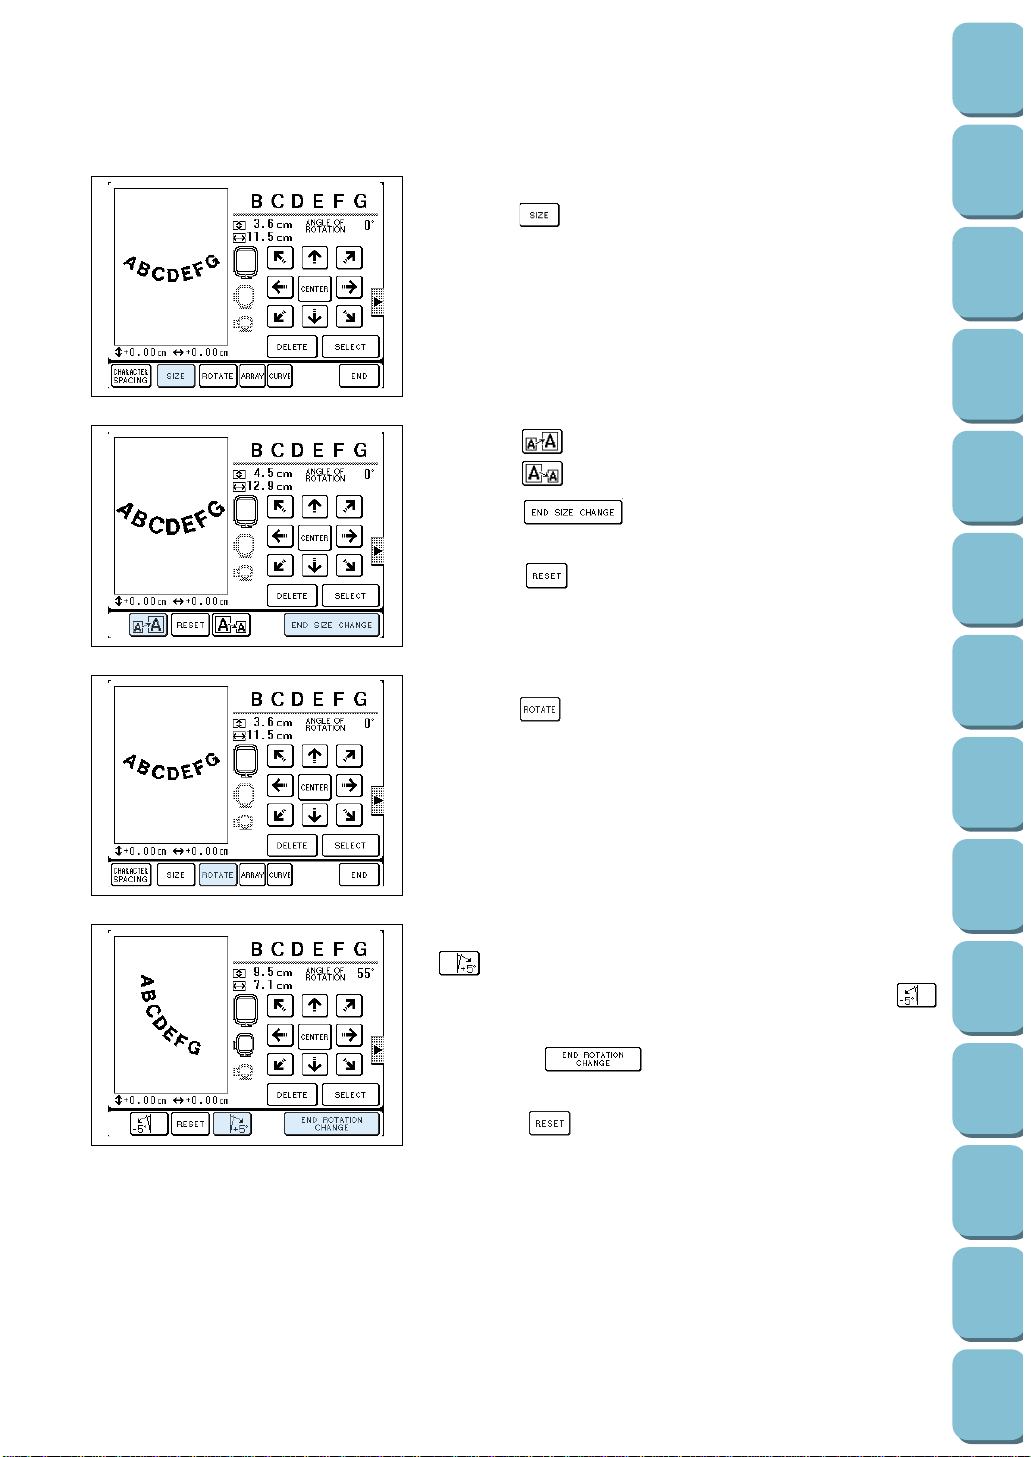
140
Utility
Stitches
Characters
and
Decorative
Stitches
Embroidering
Editing
Embroidery
Patterns
Retrieving
My
Custom
Stitch
TM
Maintenance
Error
Messages
Trouble
shooting
Sewing
Chart
Patterns
(Programmed
in Machine)
Patterns
(Memory
Card)
Sewing
Setting Up
Changing Character Size
Press the “ ” key to alter character sizes.
Press the “ ” key to increase character size.
Press the “ ” key to decrease character size.
Press the “ ” key when Changing of character size
is completed.
Press the “ ” key to revert back to the original character
size.
Rotating Characters
Press the “ ” key to rotate patterns.
The pattern will rotate 5 degrees to the right each time the
“ ” key is pressed.
The pattern will rotate 5 degrees to the left each time the “
”key is pressed.
Press the “ ” key when pattern rotation is
completed.
Press the “ ” key to revert back to the original rotation
angle.
NOTE
The angle of rotation that you have currently selected is
displayed on the screen at this time.
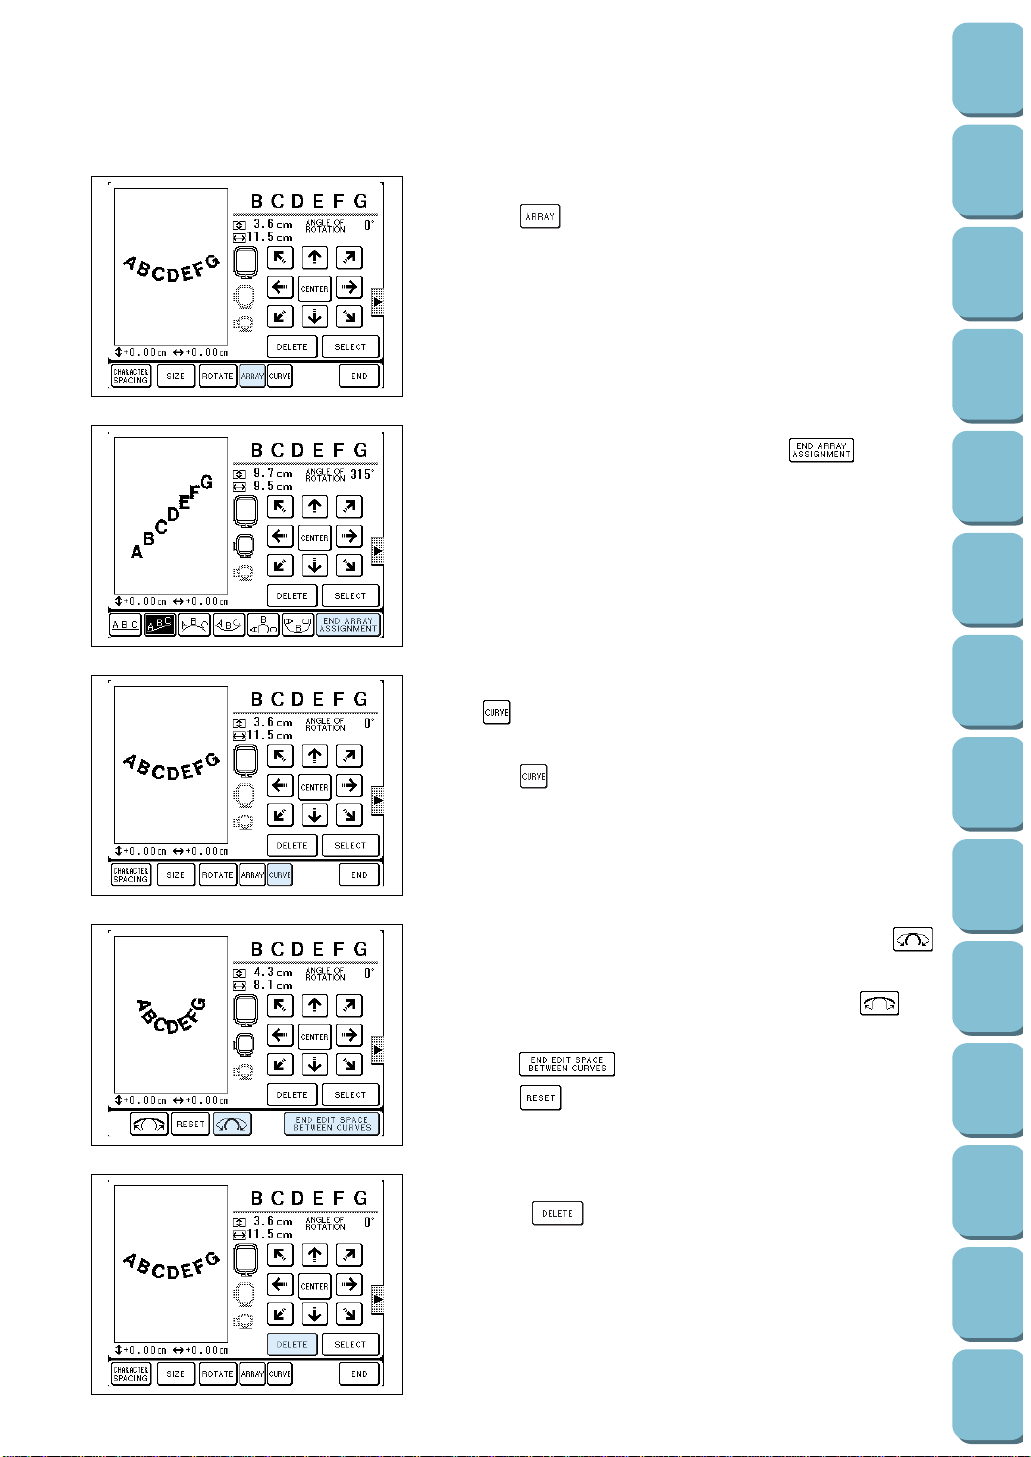
141
Utility
Stitches
Characters
and
Decorative
Stitches
Embroidering
Editing
Embroidery
Patterns
Retrieving
My
Custom
Stitch
TM
Maintenance
Error
Messages
Trouble
shooting
Sewing
Chart
Patterns
(Programmed
in Machine)
Patterns
(Memory
Card)
Sewing
Setting Up
Changing Configurations
Press the “ ” key to change configuration.
Select the type of Configuration.
After selecting configuration type, press the “ ” key.
Changing the Extent of the Curve
The “ ” key is displayed when curve configuration is
selected.
Press the “ ” key.
The curve becomes more pronounced each time the “ ”
key is pressed.
The curve becomes less pronounced each time the “ ” key
is pressed.
Press the “ ” key when curve changing is completed.
Press the “ ” key to revert to the original curve.
Deleting a Pattern being Edited
Press the “ ” key to delete a pattern currently being
edited. The pattern will disappear from the edit screen.
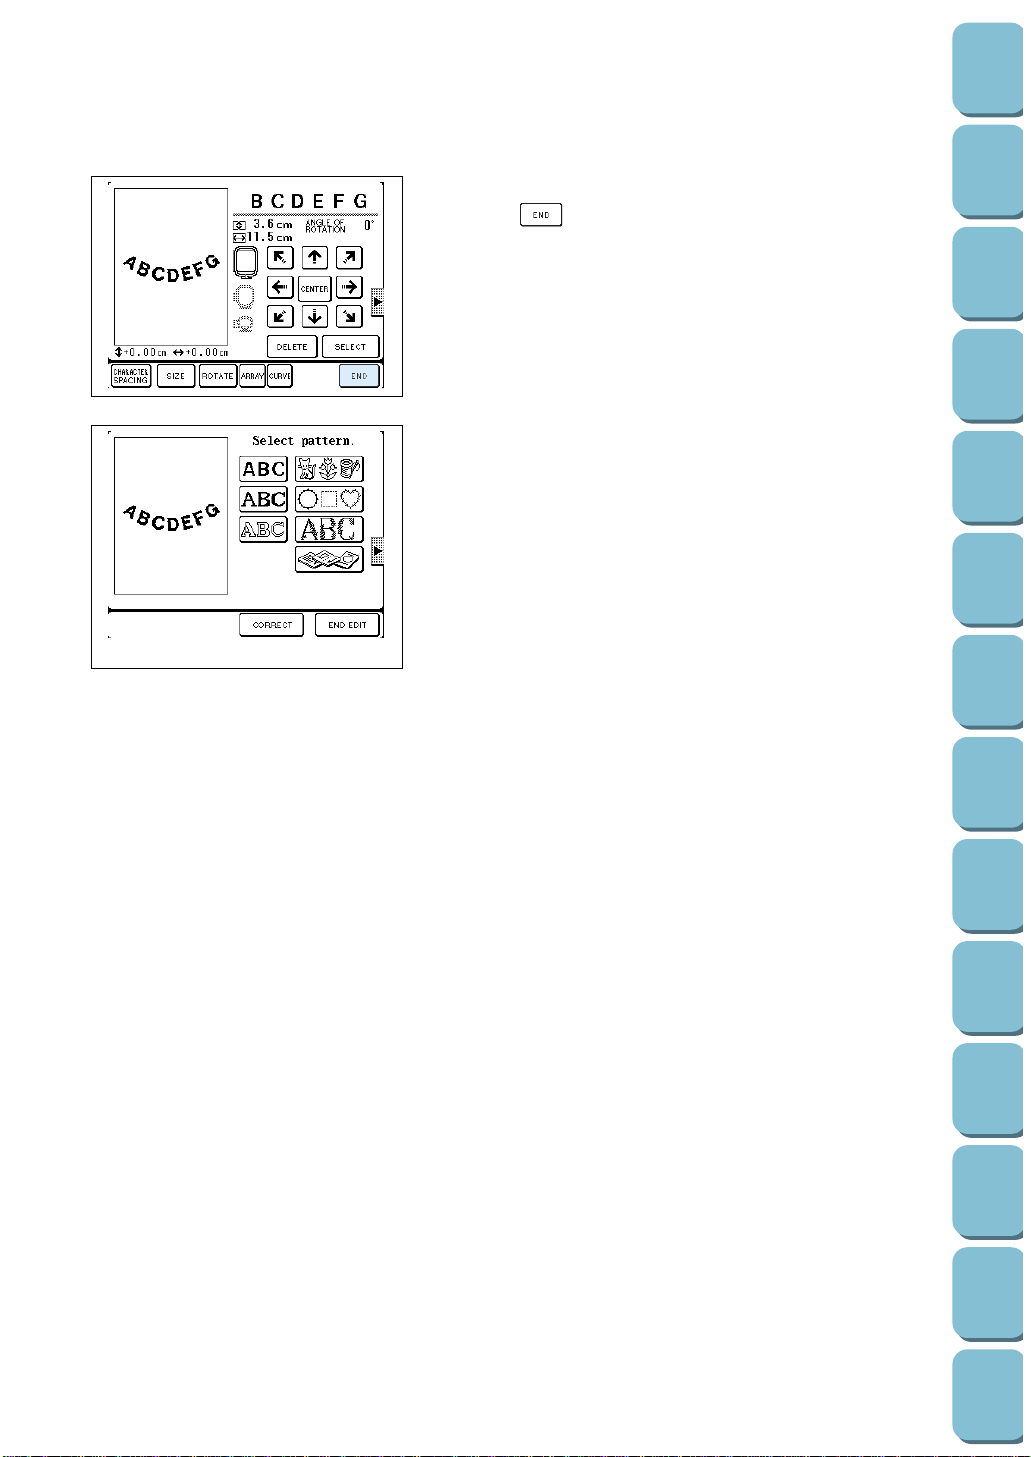
142
Utility
Stitches
Characters
and
Decorative
Stitches
Embroidering
Editing
Embroidery
Patterns
Retrieving
My
Custom
Stitch
TM
Maintenance
Error
Messages
Trouble
shooting
Sewing
Chart
Patterns
(Programmed
in Machine)
Patterns
(Memory
Card)
Sewing
Setting Up
Completing Edit Work
Press the “ ” key when editing is completed.
The edited pattern is displayed on the edit screen. Select
pattern type if another pattern is to be edited at this point.
1 Press this key when you want to correct an edited pattern.
(See page 154 for details.)
2 Press this key when editing is completed.
21
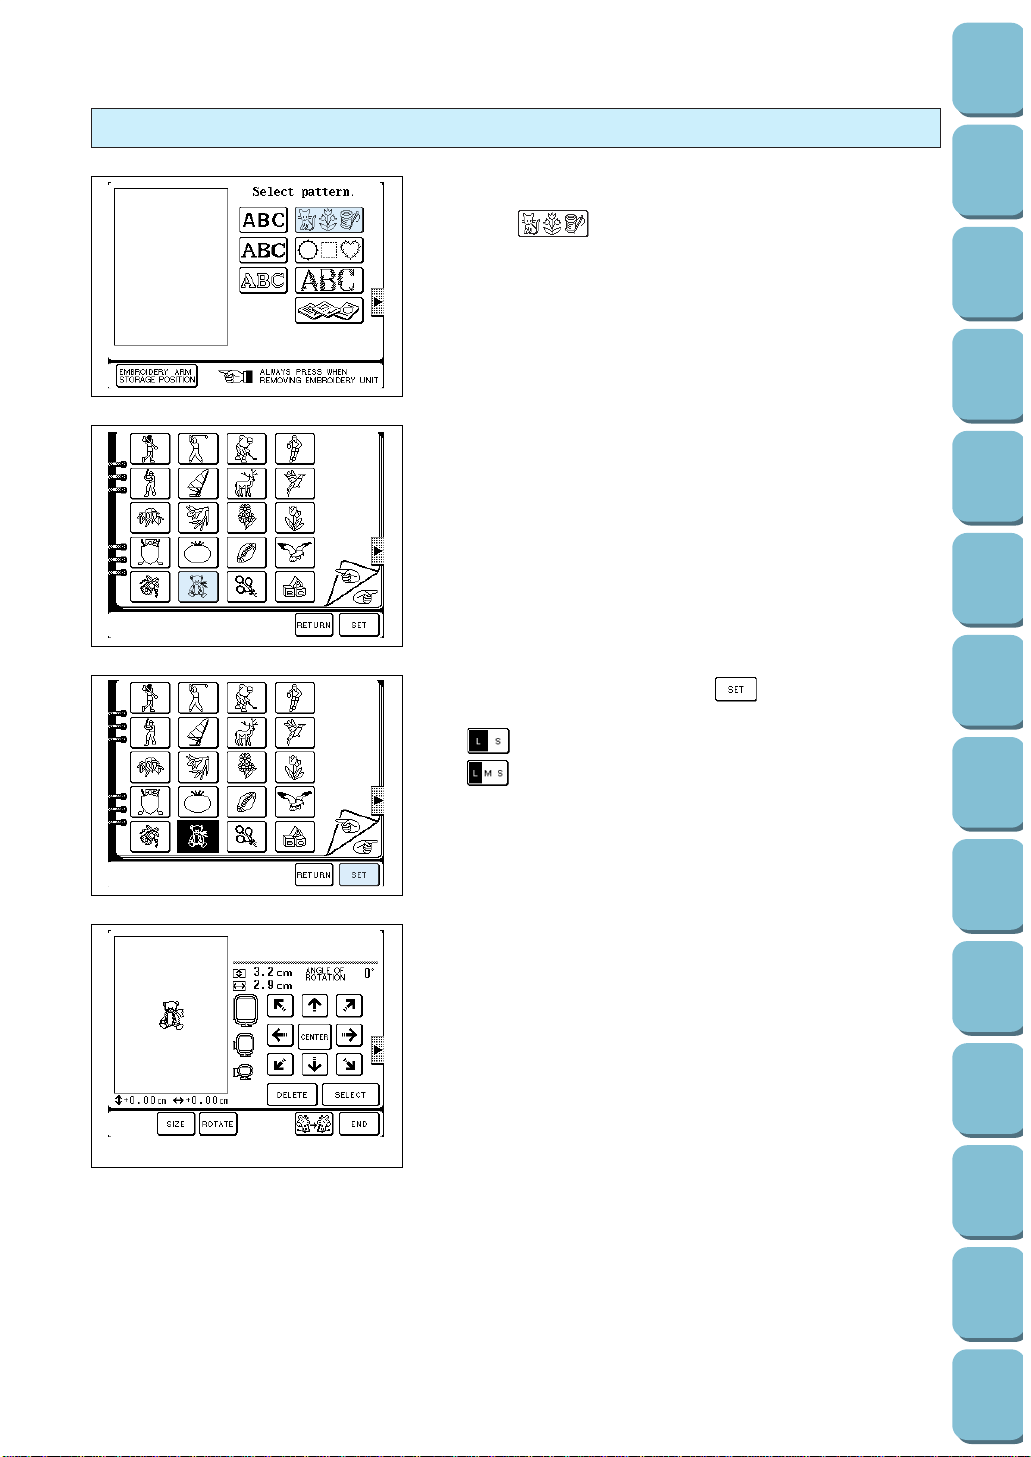
143
Utility
Stitches
Characters
and
Decorative
Stitches
Embroidering
Editing
Embroidery
Patterns
Retrieving
My
Custom
Stitch
TM
Maintenance
Error
Messages
Trouble
shooting
Sewing
Chart
Patterns
(Programmed
in Machine)
Patterns
(Memory
Card)
Sewing
Setting Up
One-point Editing
1. Select the one-point type.
Example:
2. Select embroidery pattern.
3. Designate size, then press the “ ” key.
* “ ” is displayed when there are 2 pattern sizes and
“ ” is displayed when there are 3 pattern sizes. Select a
size.
After a while the characters will be displayed on the edit screen.
1 The pattern changes size of the pattern.
2 The pattern rotates 5 degrees to the left or right with each
press of this key. (See page 140 for details.)
3 Use this key to mirror image the pattern to the left or right.
321
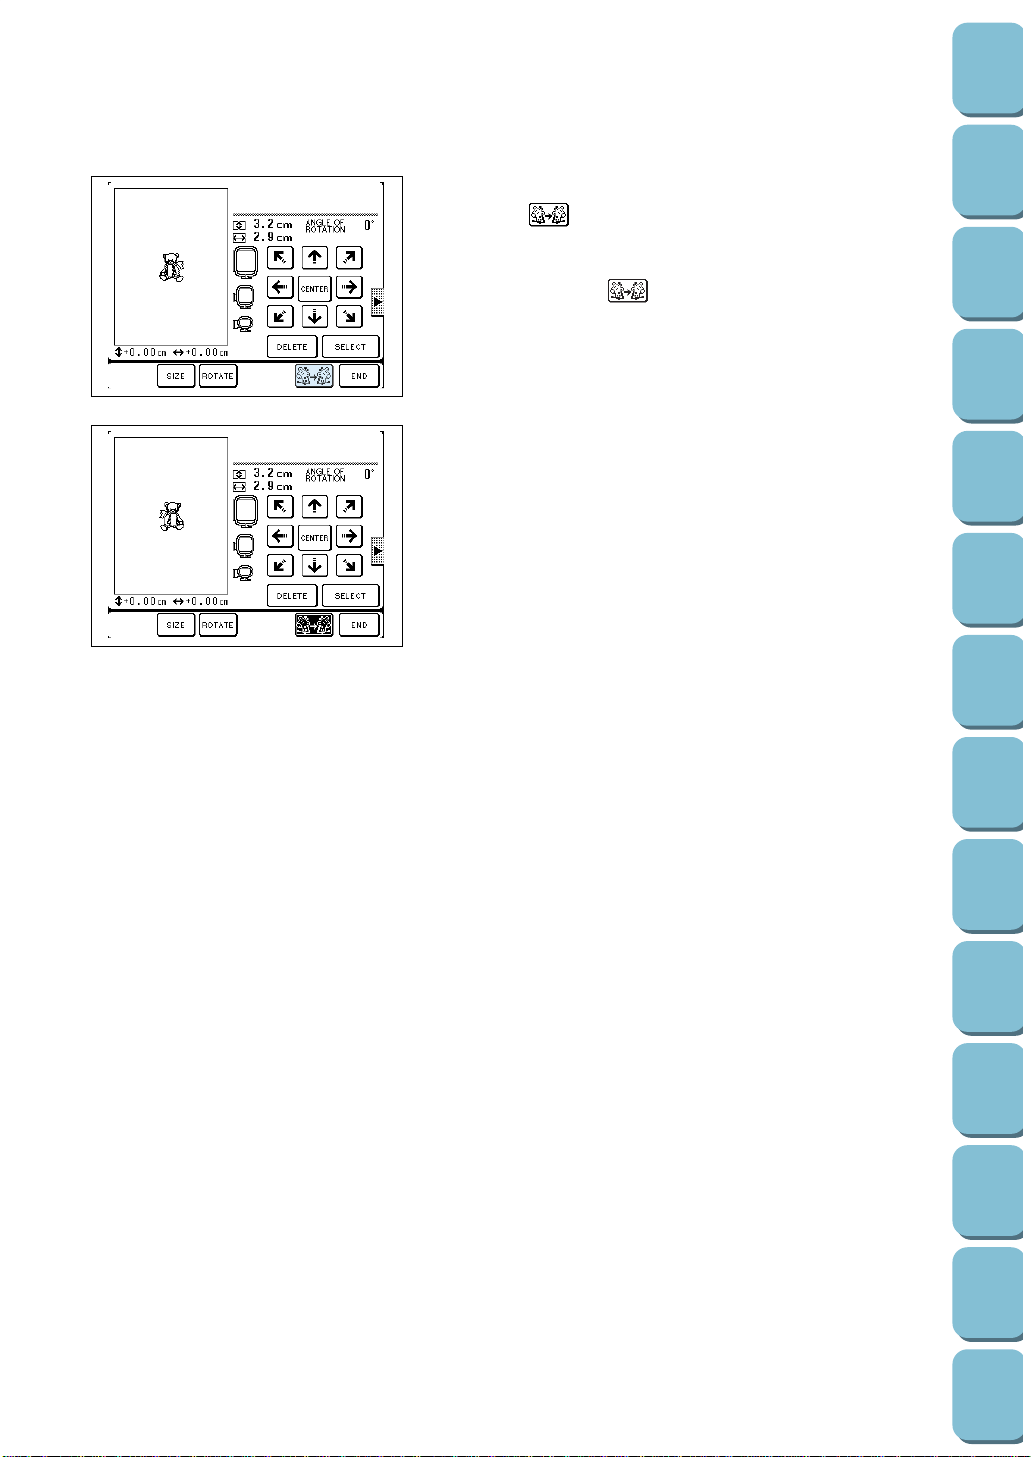
144
Utility
Stitches
Characters
and
Decorative
Stitches
Embroidering
Editing
Embroidery
Patterns
Retrieving
My
Custom
Stitch
TM
Maintenance
Error
Messages
Trouble
shooting
Sewing
Chart
Patterns
(Programmed
in Machine)
Patterns
(Memory
Card)
Sewing
Setting Up
Mirror Imaging Patterns to the Left or Right
Press the “ ” key to mirror image patterns to the left or
right.
* Sometimes the “ ” key is not displayed due to the
pattern selected.
See pages 139 to 142 for details on other editing methods.
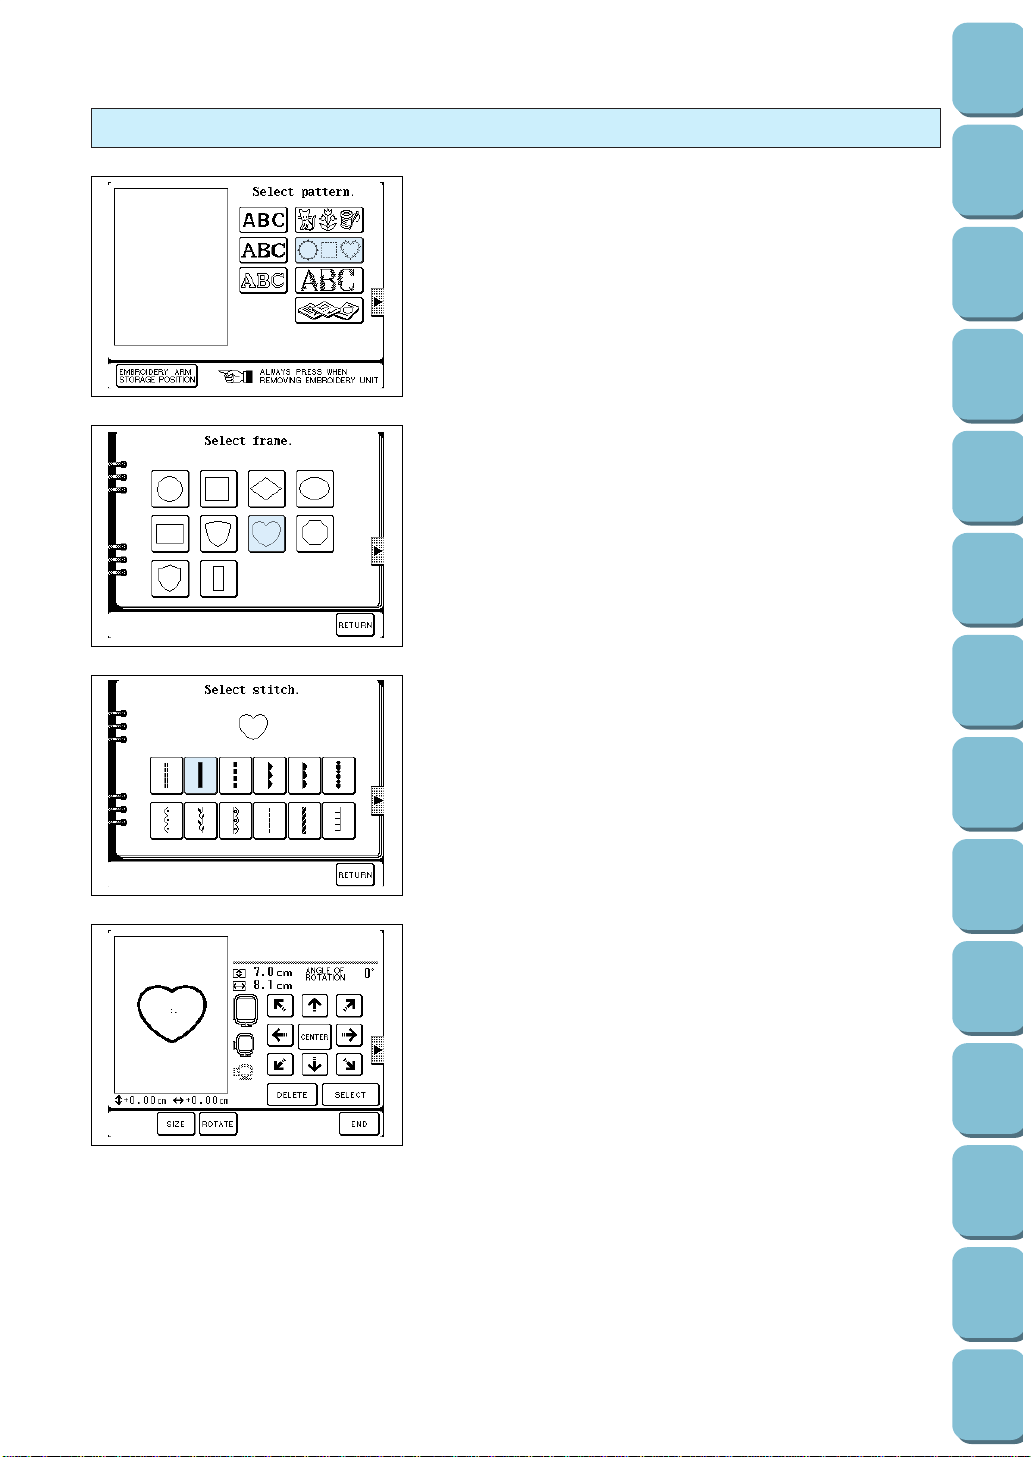
145
Utility
Stitches
Characters
and
Decorative
Stitches
Embroidering
Editing
Embroidery
Patterns
Retrieving
My
Custom
Stitch
TM
Maintenance
Error
Messages
Trouble
shooting
Sewing
Chart
Patterns
(Programmed
in Machine)
Patterns
(Memory
Card)
Sewing
Setting Up
Border Pattern Editing
1. Select border pattern.
2. Select border shape.
3. Select stitching style.
4. The selected border pattern will be displayed on the edit
screen. (See pages 139 to 142 for details on editing
methods.)
1 Use this key to change the size of the pattern. (See page
140 for details.)
2 Use this key to rotate the pattern.
21

146
Utility
Stitches
Characters
and
Decorative
Stitches
Embroidering
Editing
Embroidery
Patterns
Retrieving
My
Custom
Stitch
TM
Maintenance
Error
Messages
Trouble
shooting
Sewing
Chart
Patterns
(Programmed
in Machine)
Patterns
(Memory
Card)
Sewing
Setting Up
Editing Patterns on Embroidery Cards (sold separately)
Example: Editing Patterns on the "Flower Card" (sold
separately)
1. Fully insert the embroidery card (with the card arrow , found
is on the front side, pointing in the direction of the slot) into
the card slot found on the side of your machine.
Note
Do not try to insert the card in any other direction than that
of the card arrow and do not try to forcefully insert the card
as either of these actions may cause damage.
2. Press the “Embroidery Edit” key followed by the “ ”
key to display the pattern selection screen for the
embroidery card.
3. Select a pattern, then edit. (See pages 135 to 142 for details
on editing methods.)
1 Use this key to change size of pattern. (Refer page 140)
2 Use this key to rotate the pattern. (See page 140 for
details.)
3 Use this key to mirror image the pattern to the left or right.
(See page 144 for details.)
Note
Only insert or remove embroidery cards when " " is displayed.
321
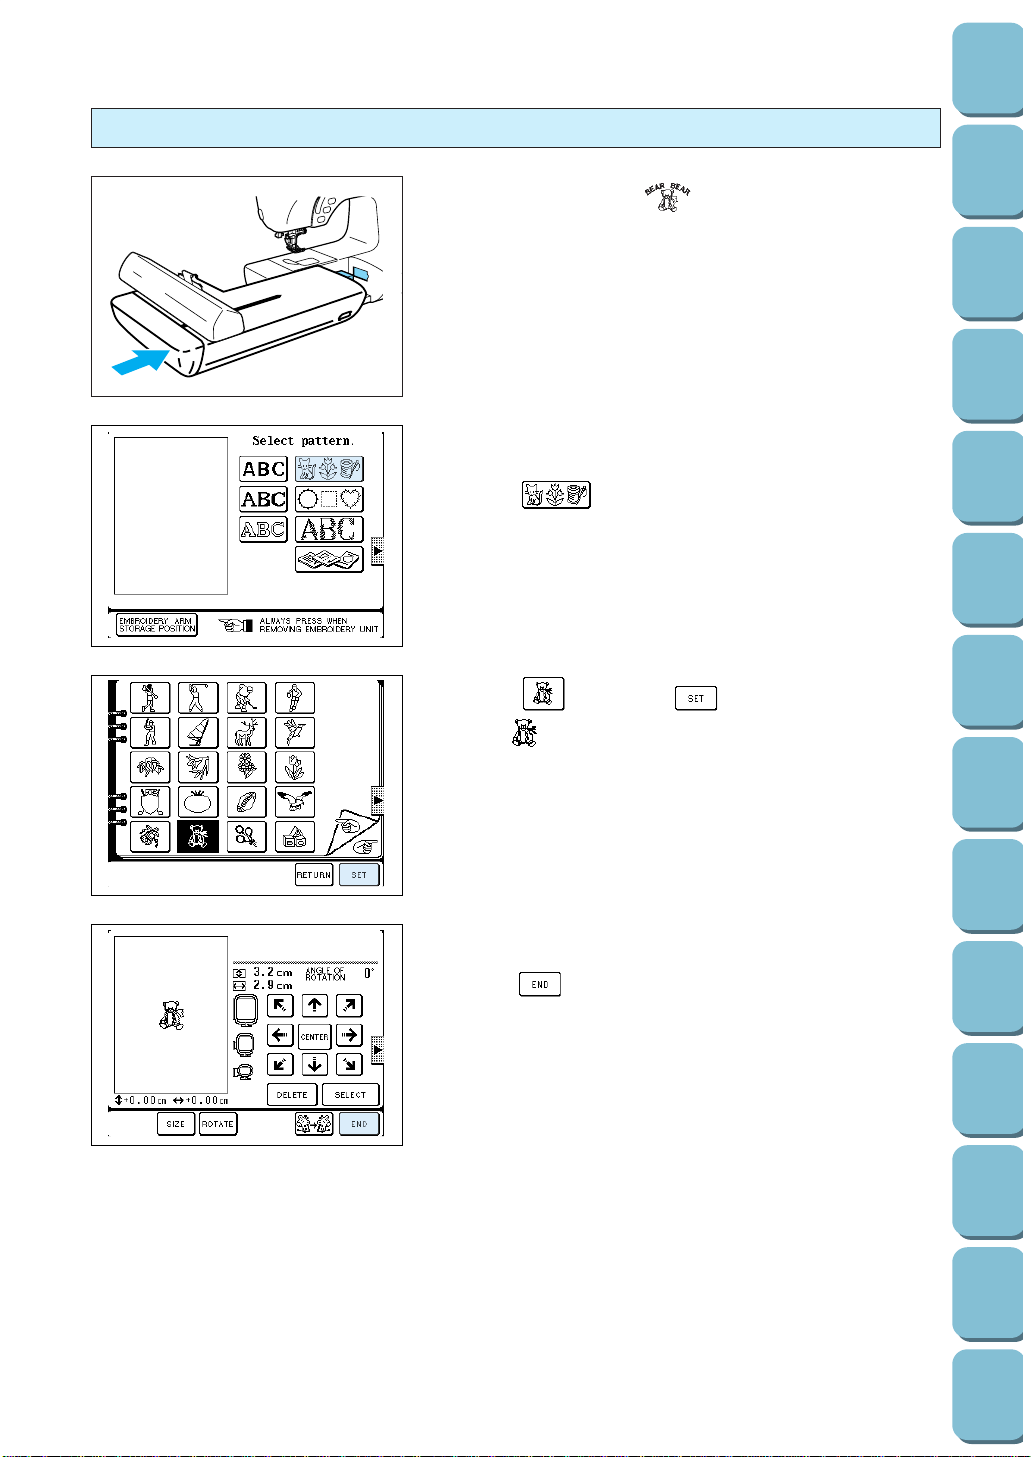
147
Utility
Stitches
Characters
and
Decorative
Stitches
Embroidering
Editing
Embroidery
Patterns
Retrieving
My
Custom
Stitch
TM
Maintenance
Error
Messages
Trouble
shooting
Sewing
Chart
Patterns
(Programmed
in Machine)
Patterns
(Memory
Card)
Sewing
Setting Up
Editing Combinations
Example: Editing the “”alphabet characters with
stitching pattern in one location.
1. Attach the embroidery unit and carry out pre-embroidery
preparations. (See Page 106 to 108 for details.)
2. Press the "Embroidery Edit" key.
The available types of stitching patterns will be displayed.
3. Press “ ”.
4. Select “ ”, and press “ ”.
Item “ ” will be called up.
5. The embroidery pattern will be laid out in the center of the
embroidery area.
Press “ ”.
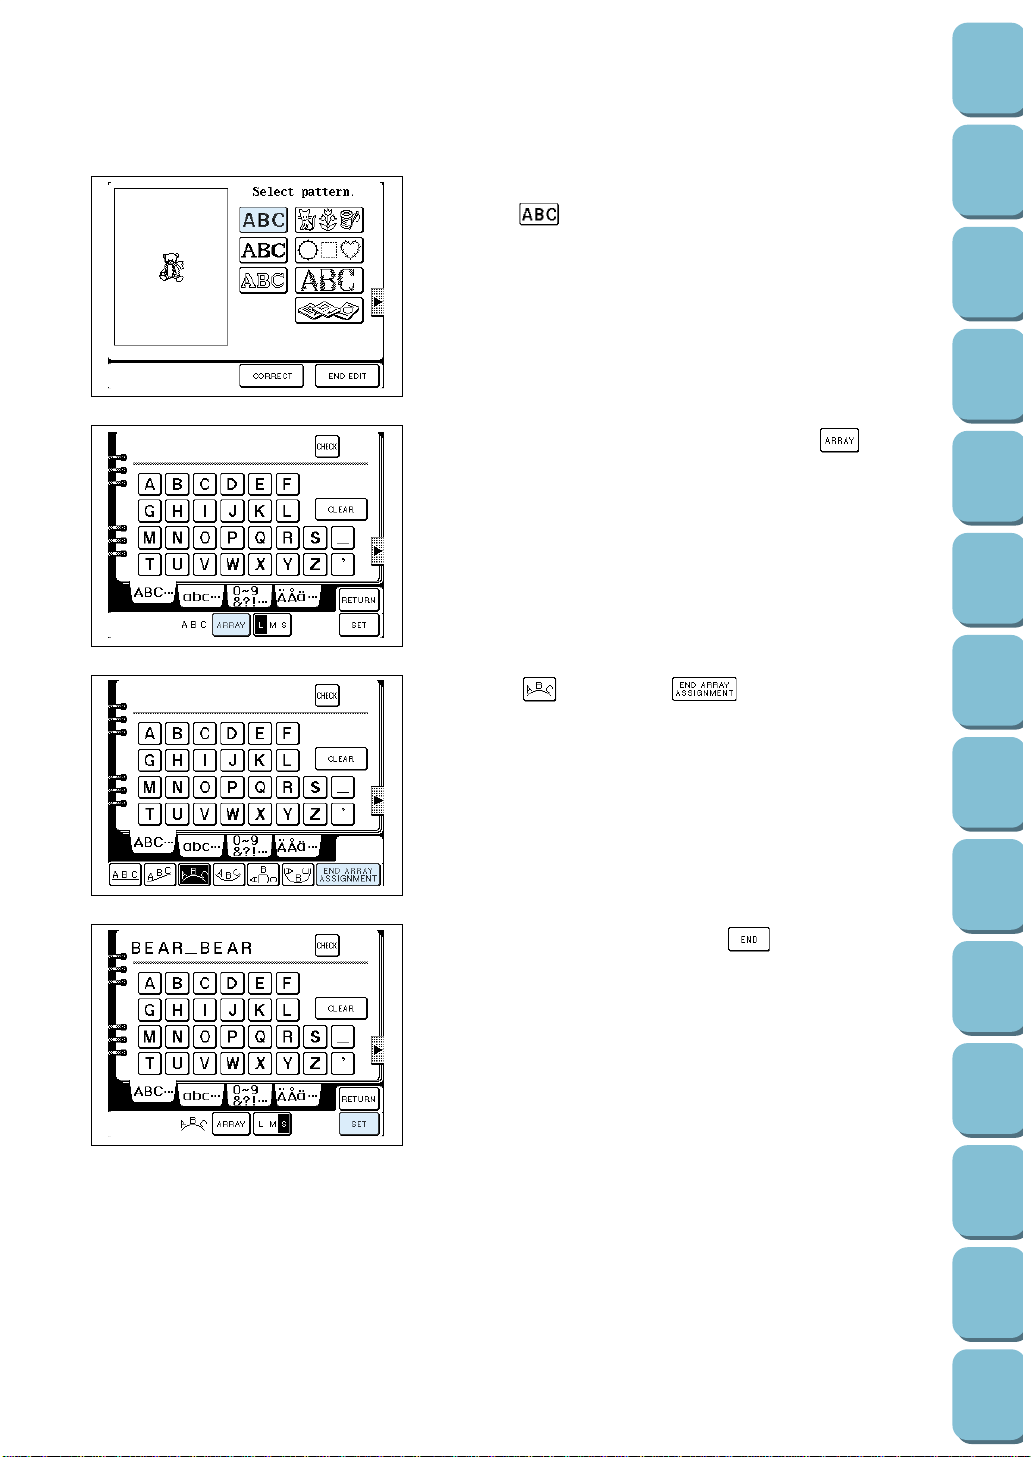
148
Utility
Stitches
Characters
and
Decorative
Stitches
Embroidering
Editing
Embroidery
Patterns
Retrieving
My
Custom
Stitch
TM
Maintenance
Error
Messages
Trouble
shooting
Sewing
Chart
Patterns
(Programmed
in Machine)
Patterns
(Memory
Card)
Sewing
Setting Up
6. Select alphabet characters.
Press “ ”.
7. Specify alphabet character size, then select “ ”.
8. Select “ ”, then press “ ”.
9. Input "BEAR BEAR", then press “ ”.
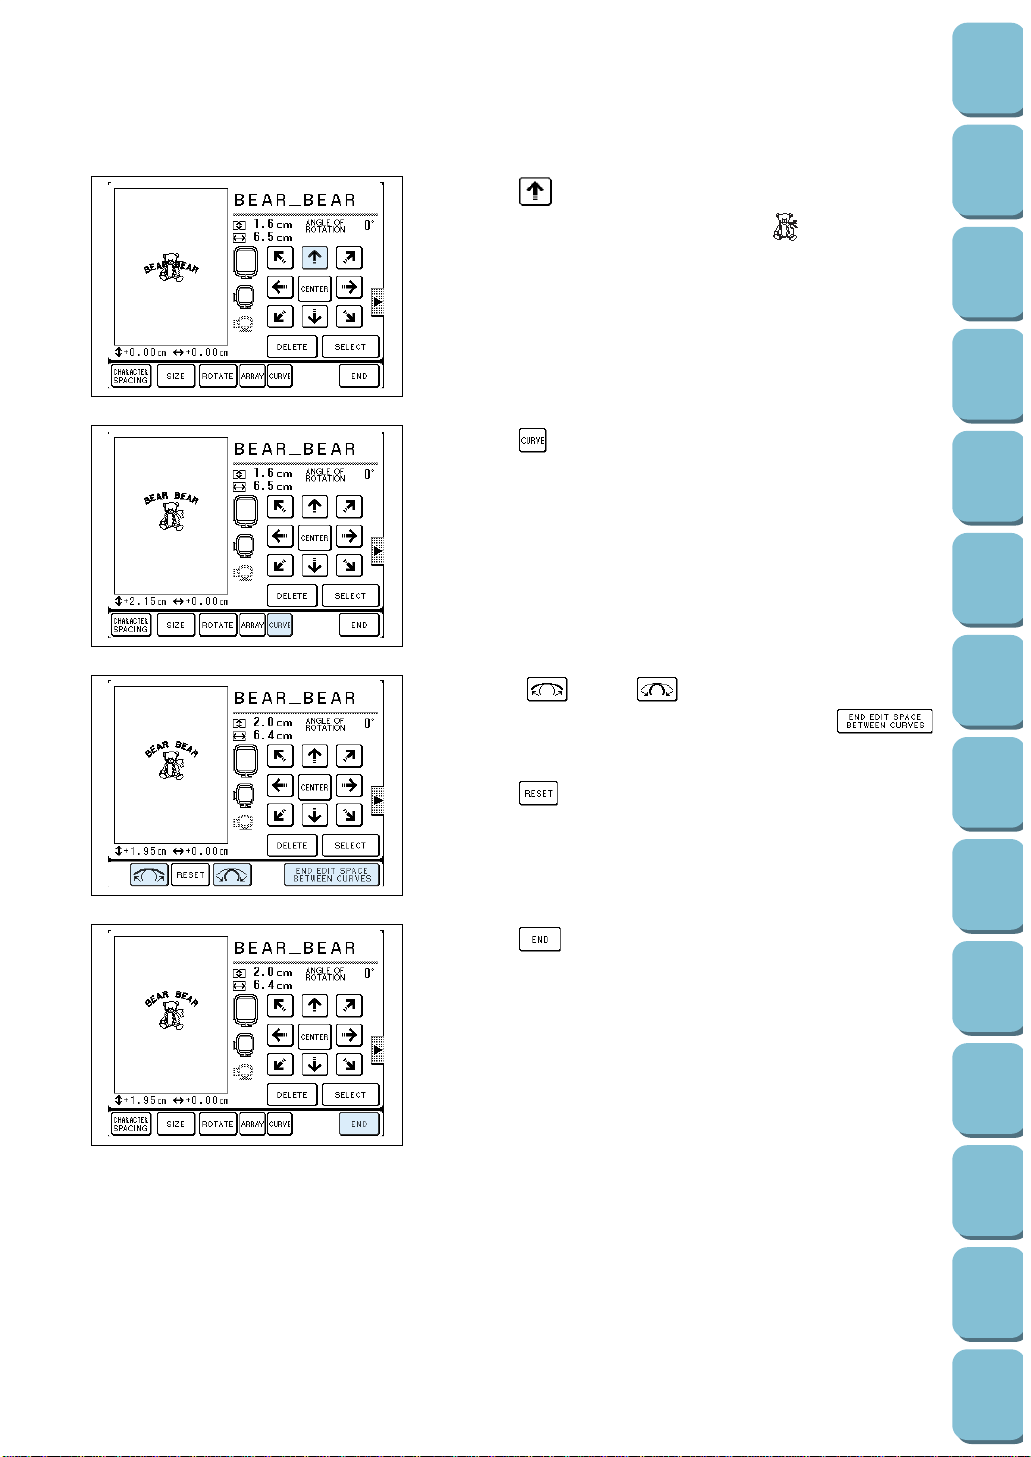
149
Utility
Stitches
Characters
and
Decorative
Stitches
Embroidering
Editing
Embroidery
Patterns
Retrieving
My
Custom
Stitch
TM
Maintenance
Error
Messages
Trouble
shooting
Sewing
Chart
Patterns
(Programmed
in Machine)
Patterns
(Memory
Card)
Sewing
Setting Up
10 Press “ ” to move the alphabet characters upwards to a
position that is well balanced with the “ ”.
11.Press “ ” when you would like to adjust the degree of the
alphabet character array curve.
12.Press “ ” and “ ” to adjust the degree of the
alphabet character array curve, and press “ ”
when all adjustments are completed.
* Press “ ” to return to initial status.
13.Press “ ”.

150
Utility
Stitches
Characters
and
Decorative
Stitches
Embroidering
Editing
Embroidery
Patterns
Retrieving
My
Custom
Stitch
TM
Maintenance
Error
Messages
Trouble
shooting
Sewing
Chart
Patterns
(Programmed
in Machine)
Patterns
(Memory
Card)
Sewing
Setting Up
14.Finish editing.
Press “ ”.
15.The "SEWING" screen will be displayed. (See page 153 for
details on sewing.)

151
Utility
Stitches
Characters
and
Decorative
Stitches
Embroidering
Editing
Embroidery
Patterns
Retrieving
My
Custom
Stitch
TM
Maintenance
Error
Messages
Trouble
shooting
Sewing
Chart
Patterns
(Programmed
in Machine)
Patterns
(Memory
Card)
Sewing
Setting Up
You can save up to 15 different patterns in the memory.
However, if some of the patterns contain large amounts of data,
it may not be possible to save the whole 15 patterns.
1. Touch the “ ”key.
2. The word “SAVING” will appear on the screen. After the
pattern is saved, the display will return to the original
screen.
Refer to page 156 for details on how to retrieve characters
and patterns which have been saved to memory.
* Do not turn off the power while the word “Saving” is
displayed on the screen.
If you turn off the power during this time, the data being
saved may be deleted.
If no more patterns can be saved
There are already 15 patterns in the memory. The data
currently stored has filled the entire memory area. To delete a
pattern that is already saved in the memory, touch the
“DELETE” key. To cancel the saving of a pattern, touch the
“CANCEL” key. The saving process will continue.
SAVING A PATTERN COMBINATION TO MEMORY

152
Utility
Stitches
Characters
and
Decorative
Stitches
Embroidering
Editing
Embroidery
Patterns
Retrieving
My
Custom
Stitch
TM
Maintenance
Error
Messages
Trouble
shooting
Sewing
Chart
Patterns
(Programmed
in Machine)
Patterns
(Memory
Card)
Sewing
Setting Up
Deleting a stored pattern
1. If you touch the “ ” key, a screen similar to the one
shown at the left will be displayed.
1 This indicates a pocket which has a pattern saved in it.
2 This indicates the amount of data in the pattern.
3 This displays the pattern which is saved in that pocket.
4 Touch this key to delete a saved pattern.
5 Touch this key to cancel the deleting of a pattern.
6 This indicates how much data space is needed.
2. Touch the pocket to select the pattern to be deleted, and
then touch the “ ” key.
3. Touch the “ ” key.
If the amount of space needed becomes available then the
new pattern will be saved automatically. If there still is not
enough space to save the pattern, repeat the above
procedure to delete another pattern.
* To cancel the deleting of a pattern, touch the “ ” key.
* Do not turn off the power while the word “Saving” is
displayed on the screen.
If you turn off the power during this time, the data being
saved may be deleted.
3
45 6
2
1
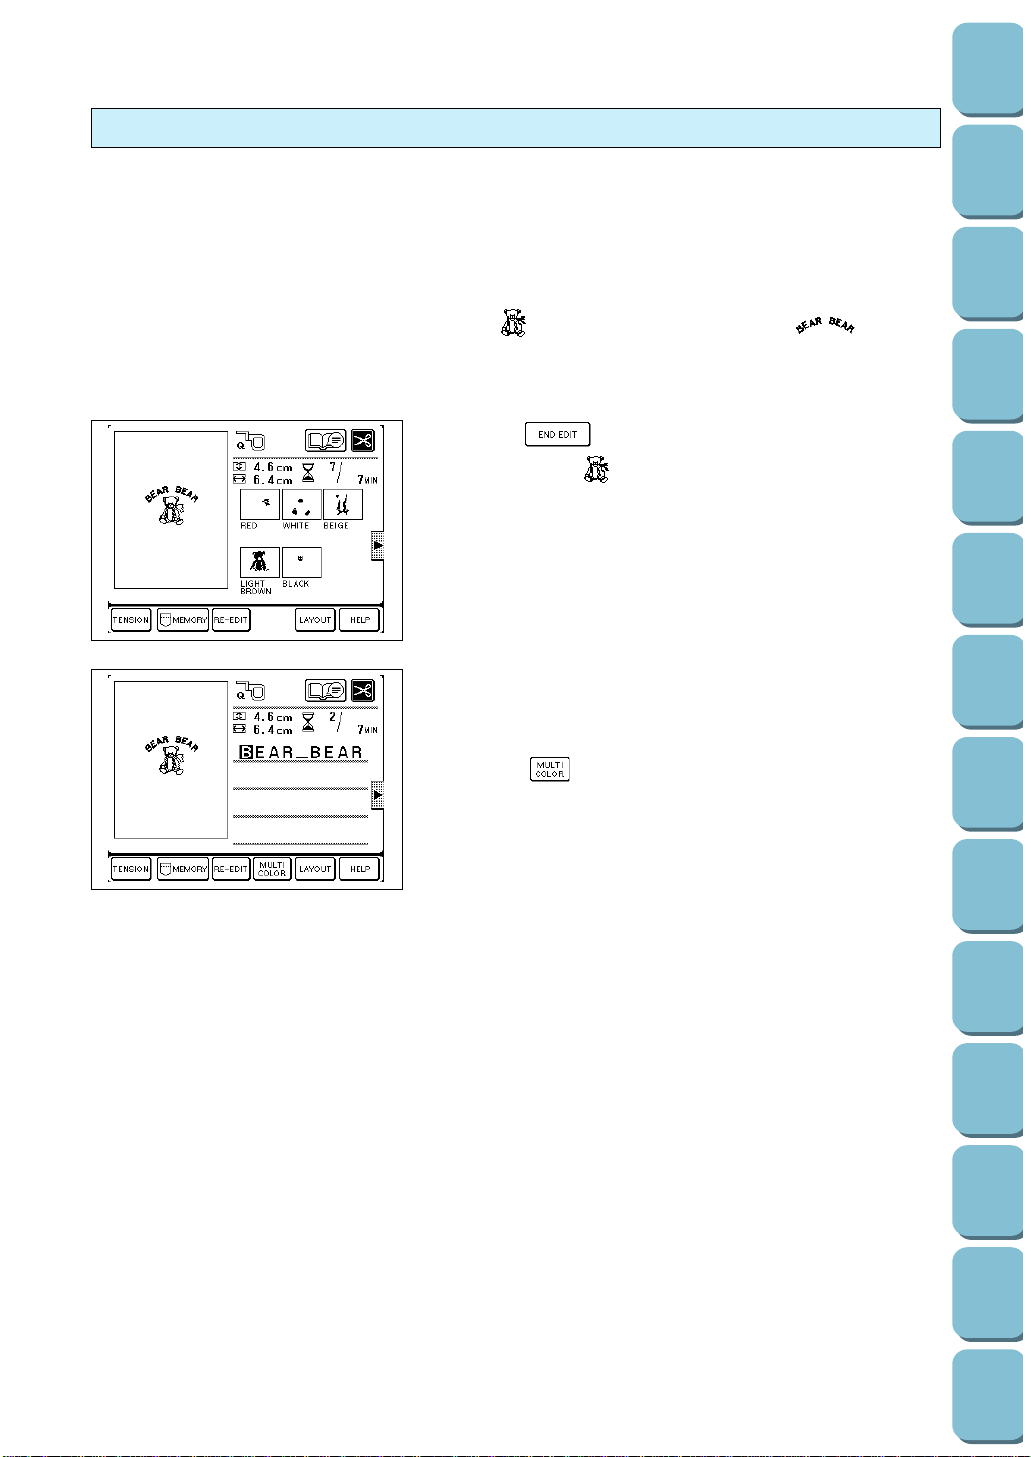
Note: Be sure to thoroughly read page 120 and 121 ("Embroidery" and "Sewing") before sewing.
CAUTION
Always check the layout screen display (see page 117 for details) before using the medium-size
and small-size embroidery frames (sold separately). Misuse will lead to the application of pressure
to the embroidery frame, and may cause injuries.
Start sewing in the edited order. In this case the “ ” stitch pattern followed by the “ ” alphabet
characters.
1. Press “ ” and the next screen will be displayed.
First, sew the “ ”.
Sew in accordance with the order of color changes
displayed.
2. The next screen will be displayed when sewing is
completed.
Next, sew the "BEAR BEAR" alphabet characters.
* Press “ ”, and the machine will stop after each
character is sewn, so that the color can be changed for
individual characters.
Let's Sew
153
Utility
Stitches
Characters
and
Decorative
Stitches
Embroidering
Editing
Embroidery
Patterns
Retrieving
My
Custom
Stitch
TM
Maintenance
Error
Messages
Trouble
shooting
Sewing
Chart
Patterns
(Programmed
in Machine)
Patterns
(Memory
Card)
Sewing
Setting Up
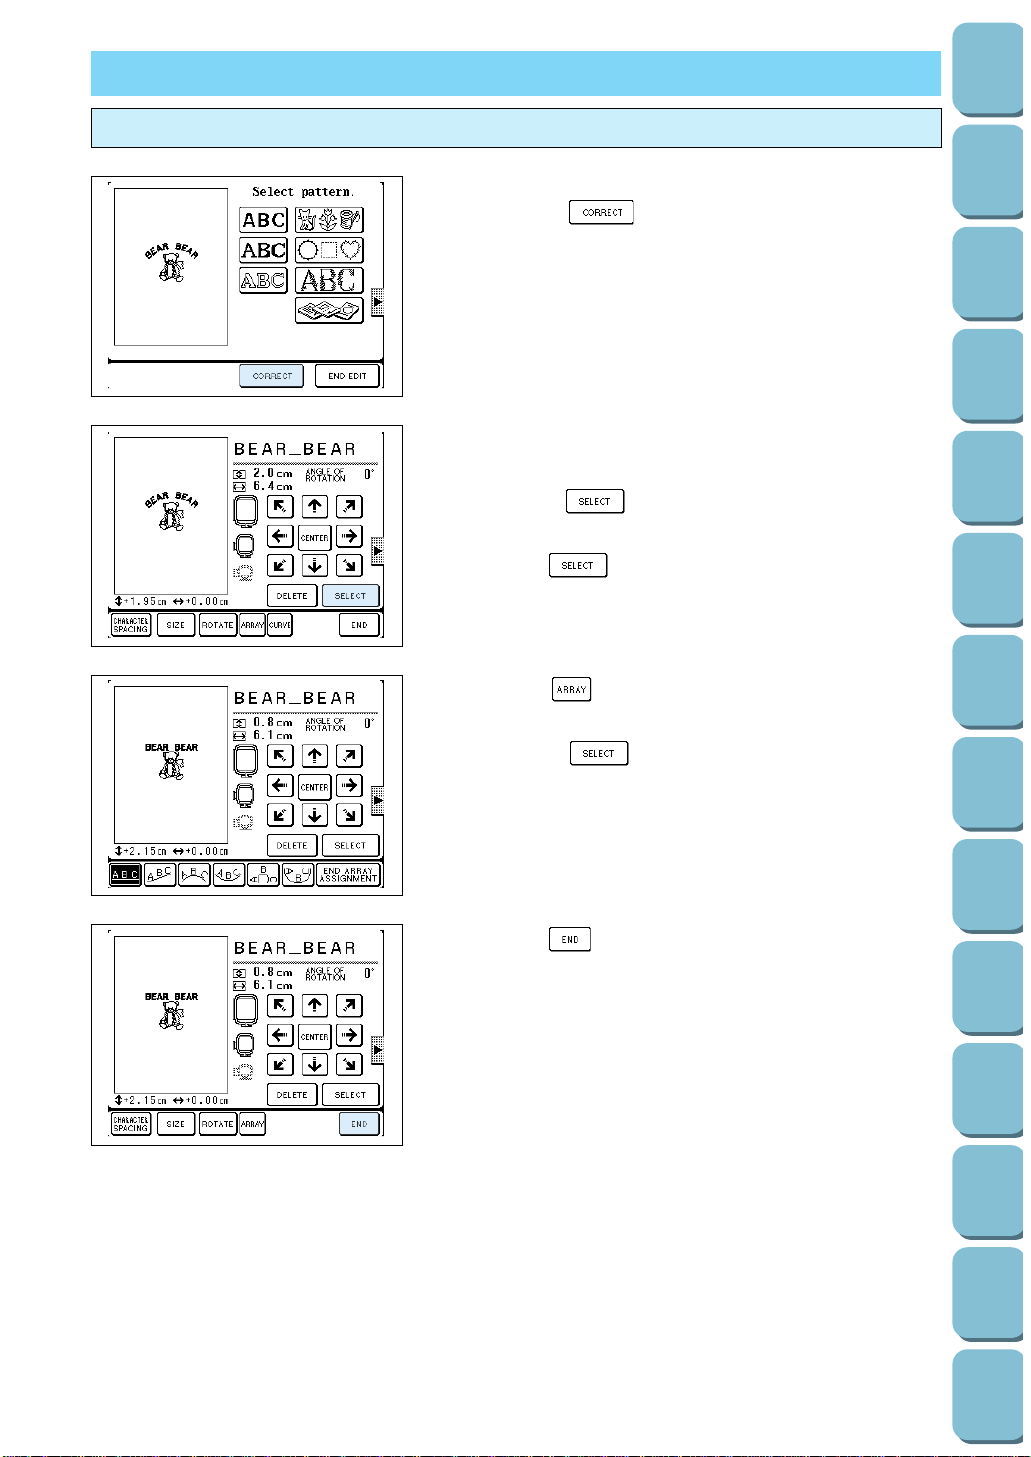
154
Utility
Stitches
Characters
and
Decorative
Stitches
Embroidering
Editing
Embroidery
Patterns
Retrieving
My
Custom
Stitch
TM
Maintenance
Error
Messages
Trouble
shooting
Sewing
Chart
Patterns
(Programmed
in Machine)
Patterns
(Memory
Card)
Sewing
Setting Up
Correcting another stitch pattern during editing
If you want to correct another pattern while using the editing
tool, press the “ ” key when the screen on the left is
being displayed to return to the edit screen.
Example: Changing a Character Configuration when
Editing a Border.
1. Press the “ ” key at the edit screen to enable
selection of edited patterns.
Press the “ ” key, then select a character.
* The selected pattern will appear darker than other patterns.
2. Press the “ ” key, then change the configuration of the
character.
* Press the “ ” key again if you want to make
corrections to another pattern.
3. Press the “ ” key when corrections are completed.
CORRECTING EDITED PATTERNS
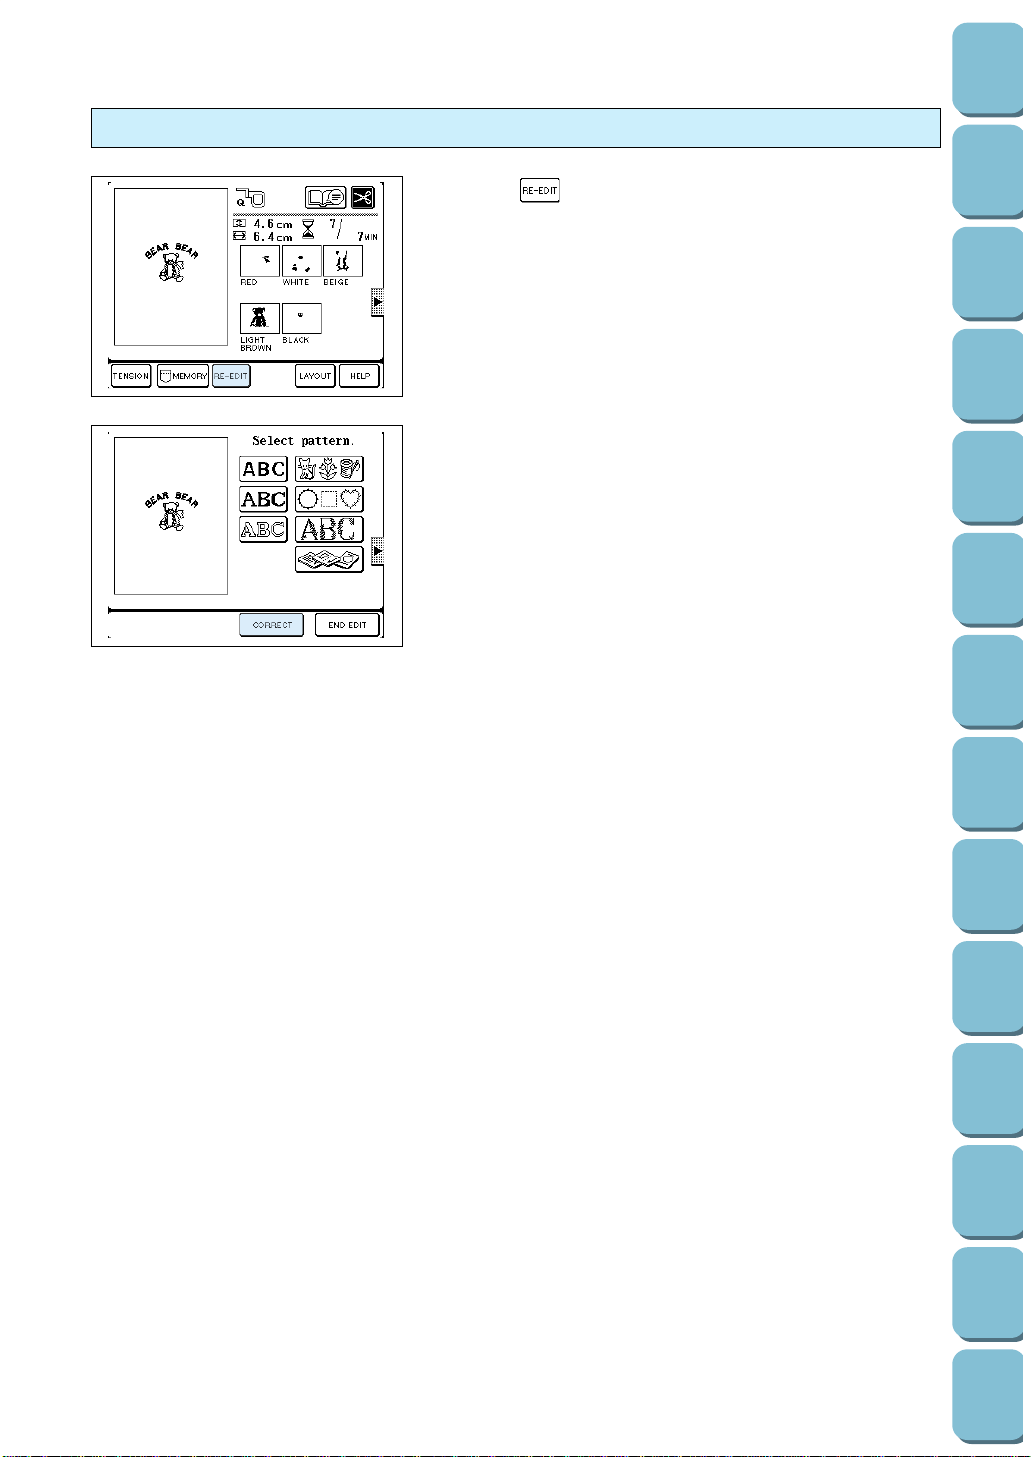
Correcting stitch patterns after editing
Press the “ ” key to make corrections after editing has been
completed. (See page 154 for details on correction methods.)
155
Utility
Stitches
Characters
and
Decorative
Stitches
Embroidering
Editing
Embroidery
Patterns
Retrieving
My
Custom
Stitch
TM
Maintenance
Error
Messages
Trouble
shooting
Sewing
Chart
Patterns
(Programmed
in Machine)
Patterns
(Memory
Card)
Sewing
Setting Up
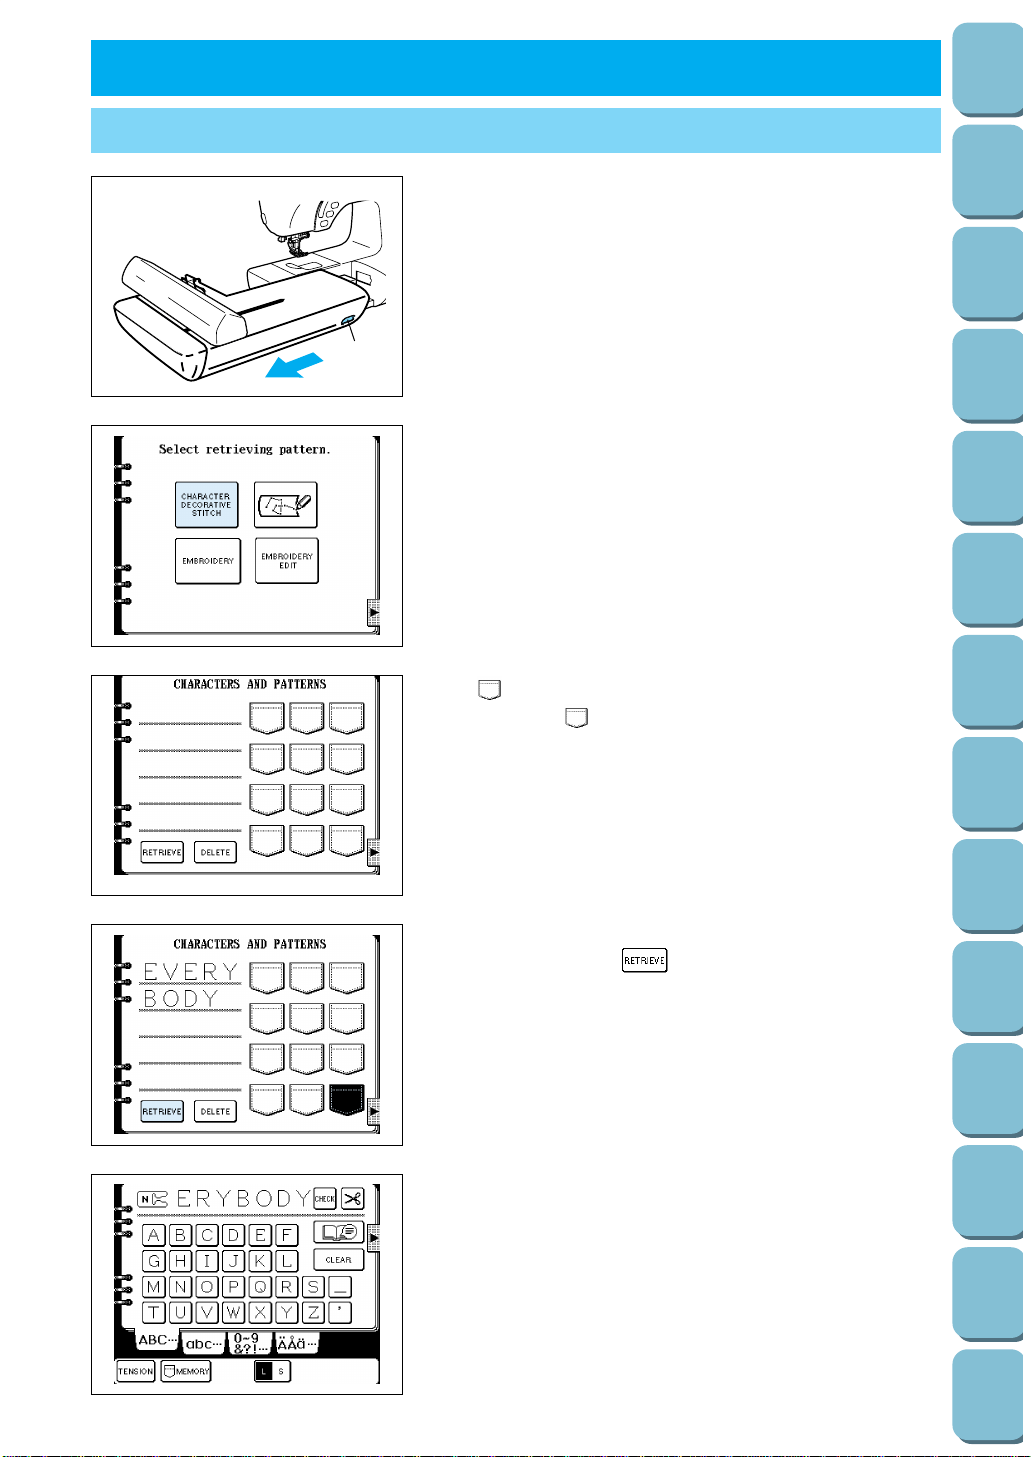
156
Utility
Stitches
Characters
and
Decorative
Stitches
Embroidering
Editing
Embroidery
Patterns
Retrieving
My
Custom
Stitch
TM
Maintenance
Error
Messages
Trouble
shooting
Sewing
Chart
Patterns
(Programmed
in Machine)
Patterns
(Memory
Card)
Sewing
Setting Up
1
This machine has three memory function areas; one is found on
the sewing side of the machine and the other two are found on
the embroidery side of the machine. Sewing function: saves a
variety of characters, patterns, decorative stitches and designs
from MY CUSTOM STITCH
TM (Allows you to create your own
stitches). Embroidery function: saves characters and memory
card patterns when using the embroidery or embroidery edit
function.
Preparation:
Remove the embroidery unit if retrieving patterns saved on the
sewing side of the machine.
1 Release button
* Make sure that the power is turned off before doing this.
1. Touch the “MEMORY RECALL” key.
A screen such as the left will be displayed.
2. Touch the “CHARACTER DECORATIVE STITCH” key.
The “ ” symbol indicates a pocket which has a pattern saved
in it. Touch the “ ” to display the saved pattern.
1 Touch this key to delete the saved pattern.
2 Touch this key to retrieve the saved pattern.
3. Touch the pocket in order to retrieve the desired patterns,
and then touch the “ ” key.
4. The patterns will then be retrieved.
RETRIEVING CHARACTERS AND PATTERNS
6. RETRIEVING
21

Preparation:
Attach the embroidery unit.
* Make sure that the power is turned off before doing this.
1. Touch the “MEMORY RECALL” key.
A screen such as the left will be displayed.
2. Touch the “EMBROIDERY” key.
The “ ” symbol indicates a pocket which has a pattern saved
in it. Touch the pocket to display the saved pattern.
1 The display will indicate that the patterns are saved on the
memory card. Touch after inserting the memory card on
which the pattern is saved.
2 Touch this key to delete the saved pattern.
3 Touch this key to retrieve the saved pattern.
3. Touch the pockets in order to retrieve the desired patterns,
and then touch the “ ” key.
4. The characters or patterns will then be retrieved.
RETRIEVING AN EMBROIDERY PATTERN
32
1
157
Utility
Stitches
Characters
and
Decorative
Stitches
Embroidering
Editing
Embroidery
Patterns
Retrieving
My
Custom
Stitch
TM
Maintenance
Error
Messages
Trouble
shooting
Sewing
Chart
Patterns
(Programmed
in Machine)
Patterns
(Memory
Card)
Sewing
Setting Up
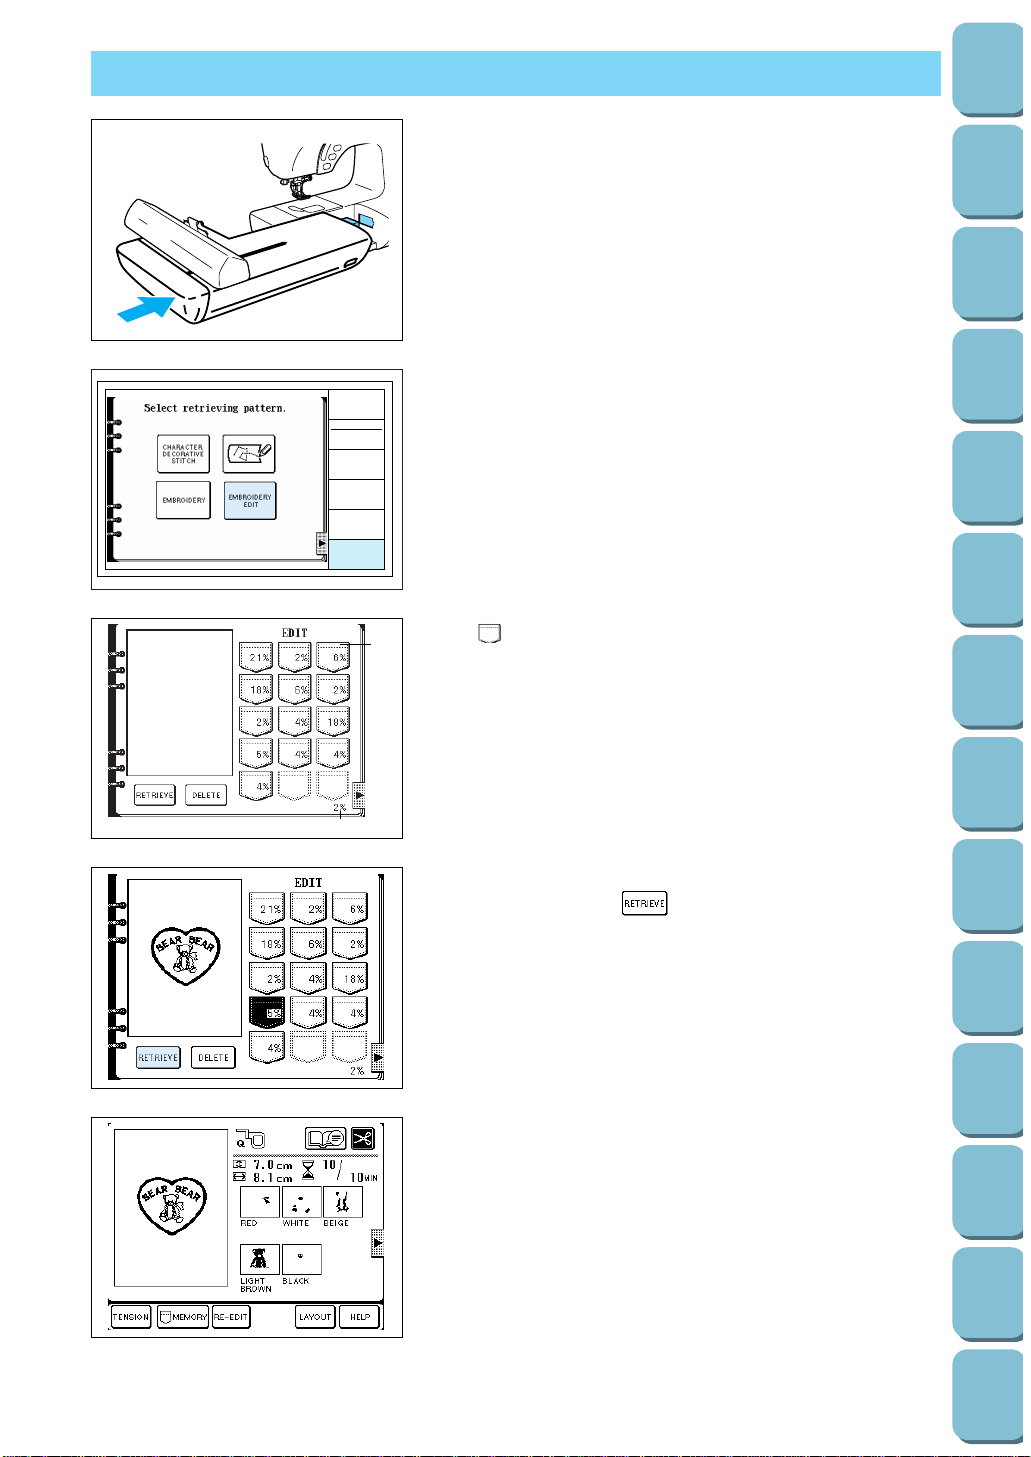
158
Utility
Stitches
Characters
and
Decorative
Stitches
Embroidering
Editing
Embroidery
Patterns
Retrieving
My
Custom
Stitch
TM
Maintenance
Error
Messages
Trouble
shooting
Sewing
Chart
Patterns
(Programmed
in Machine)
Patterns
(Memory
Card)
Sewing
Setting Up
Preparation:
Attach the embroidery unit.
* Make sure that the power is turned off before doing this.
UTILITY
STITCH
CHARACTER
DECORATIVE
STITCH
EMBROIDERY
EMBROIDERY
EDIT
OPERATION
GUIDE
MEMORY
RECALL
1. Touch the “MEMORY RECALL” key.
A screen such as the left will be displayed.
2. Touch the “EMBROIDERY EDIT” key.
The “ ” symbol indicates a pocket which has a pattern saved
in it. Touch the pocket to display the saved pattern.
1 The numbers indicate the amount of data for each pattern.
2 Touch this key to delete the saved pattern.
3 Touch this key to retrieve the saved pattern.
4 This indicates how much data space remains.
3. Touch the pocket in order to retrieve the desired patterns,
and then touch the “ ” key.
4. The patterns will then be retrieved.
* The retrieved patterns can then be re-edited. (Refer to page
155.)
RETRIEVING AN EDITED PATTERN
1
3
24
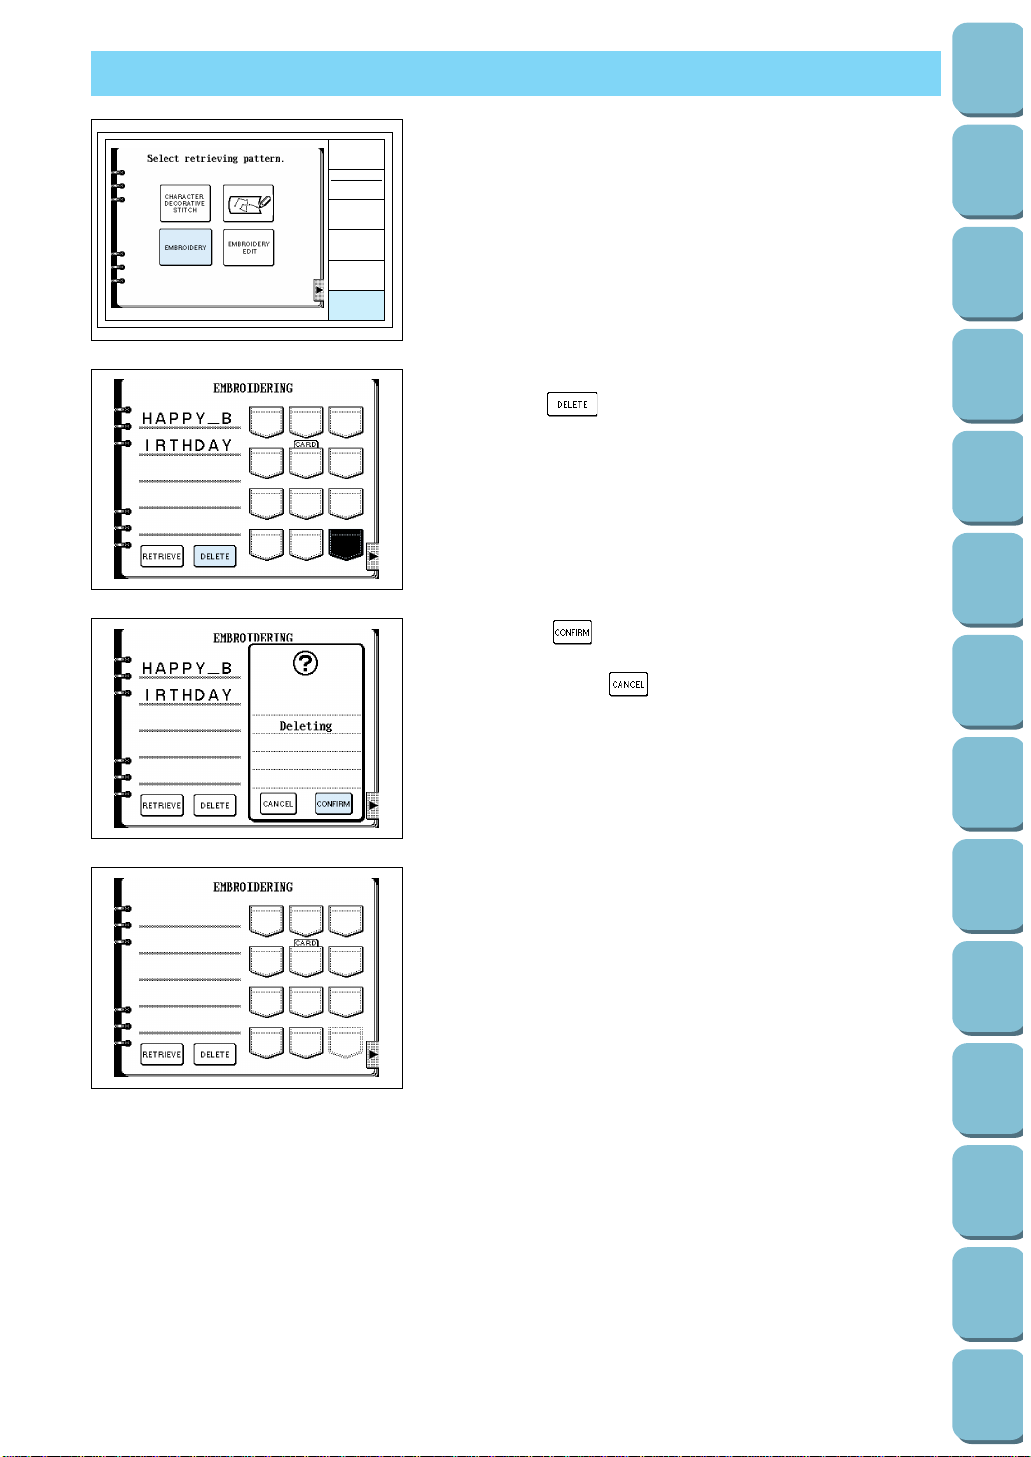
UTILITY
STITCH
CHARACTER
DECORATIVE
STITCH
EMBROIDERY
EMBROIDERY
EDIT
OPERATION
GUIDE
MEMORY
RECALL
Example: Deleting an embroidery pattern
1. Press the “MEMORY RECALL” button.
2. Touch the “EMBROIDERY” key.
3. Touch a pocket to select the pattern to be deleted, and then
touch the “ ” key.
* To delete a pattern which is stored inside a pocket on a
memory card, that particular memory card must be inserted
into the machine at the time.
4. Touch the “ ” key.
* If you touch the “ ” key, the display will return to the
original screen.
DELETING A STORED PATTERN
159
Utility
Stitches
Characters
and
Decorative
Stitches
Embroidering
Editing
Embroidery
Patterns
Retrieving
My
Custom
Stitch
TM
Maintenance
Error
Messages
Trouble
shooting
Sewing
Chart
Patterns
(Programmed
in Machine)
Patterns
(Memory
Card)
Sewing
Setting Up
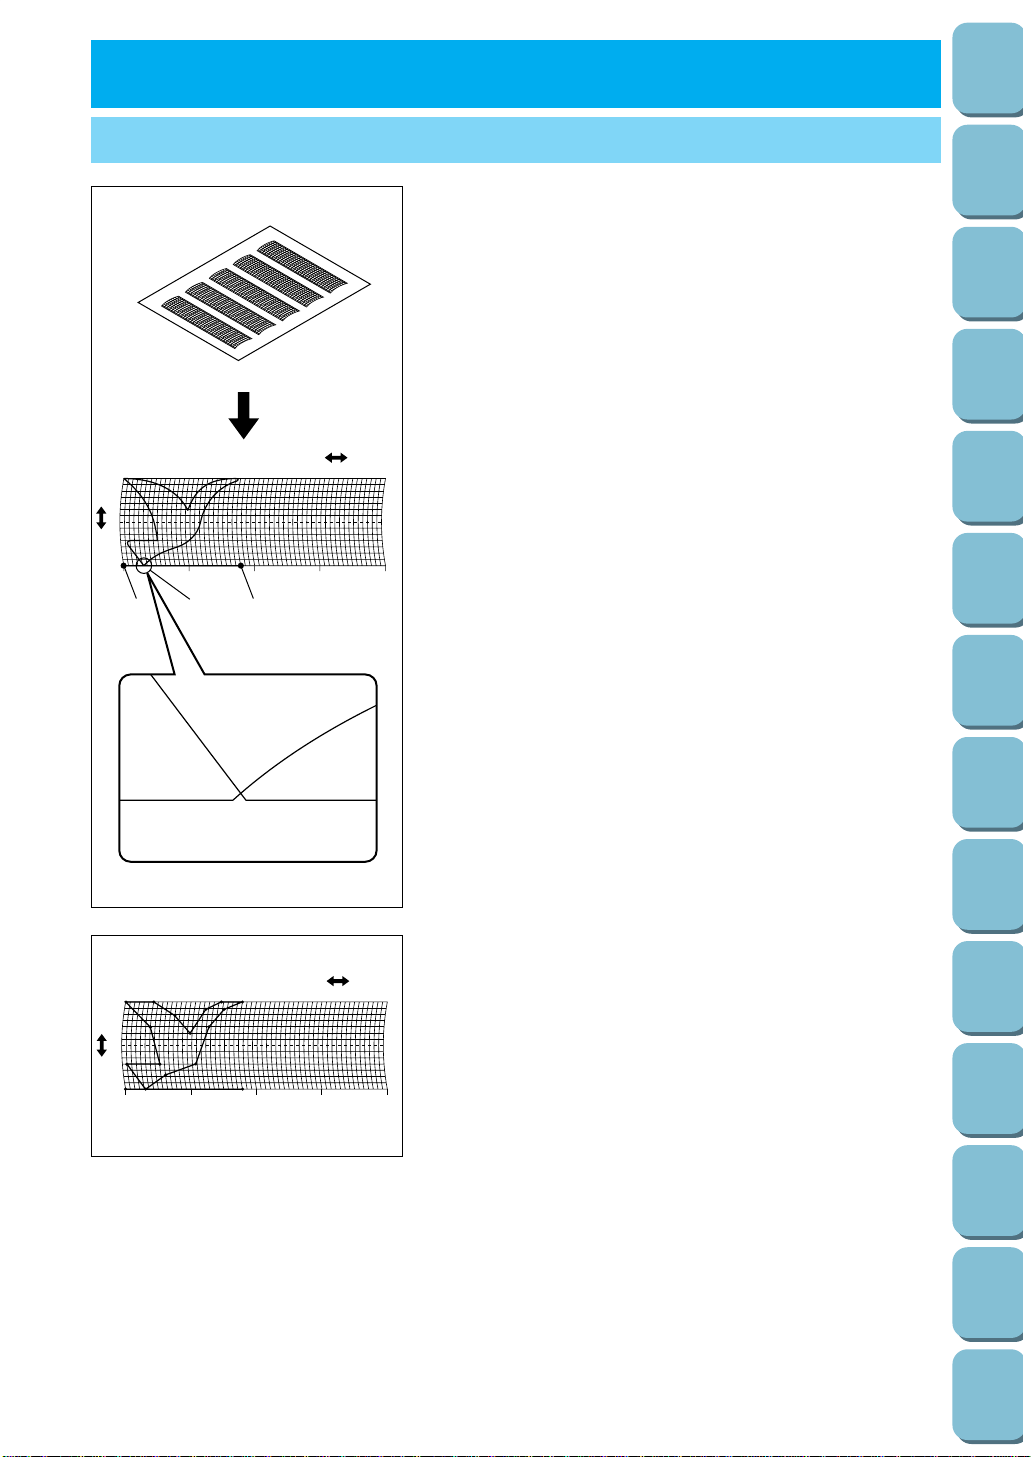
160
Utility
Stitches
Characters
and
Decorative
Stitches
Embroidering
Editing
Embroidery
Patterns
Retrieving
My
Custom
Stitch
TM
Maintenance
Error
Messages
Trouble
shooting
Sewing
Chart
Patterns
(Programmed
in Machine)
Patterns
(Memory
Card)
Sewing
Setting Up
1
3
2
5
0
0 5 10 15 20 25 30 35 40 45 50 55
10
14
0
mm 5mm 10mm 15mm 20mm
You can use the “MY CUSTOM STITCHTM” to sew patterns that
you have drawn yourself.
* Illustrations that are to be used with the “MY CUSTOM
STITCH
TM” can be a maximum of 7 mm wide and 33 mm
long.
* Patterns for the “MY CUSTOM STITCH
TM” can be drawn
more easily if you use the included grid sheet.
1. Draw the illustration onto the grid sheet (SA500, X80948-
001).
1 Start point
2 End point
3 Intersection
* Simplify the drawing so that it can be drawn as a continuous
line. If sewing continuous patterns, the height of the start
point and end point should be the same. You can obtain a
more attractive finish if you make the intersections cross
over to make a closed design.
“Grid sheet”
5
0
0 5 10 15 20 25 30 35 40 45 50 55
10
14
0
mm 5mm 10mm 15mm 20mm
2. Mark coordinate points at each point in the pattern where
the direction of the stitching changes, this will maintain the
shape of the pattern as it is sewn.
MAKING THE ILLUSTRATION
7. MY CUSTOM STITCH
TM
(CREATE YOUR OWN
STITCH DESIGNS)
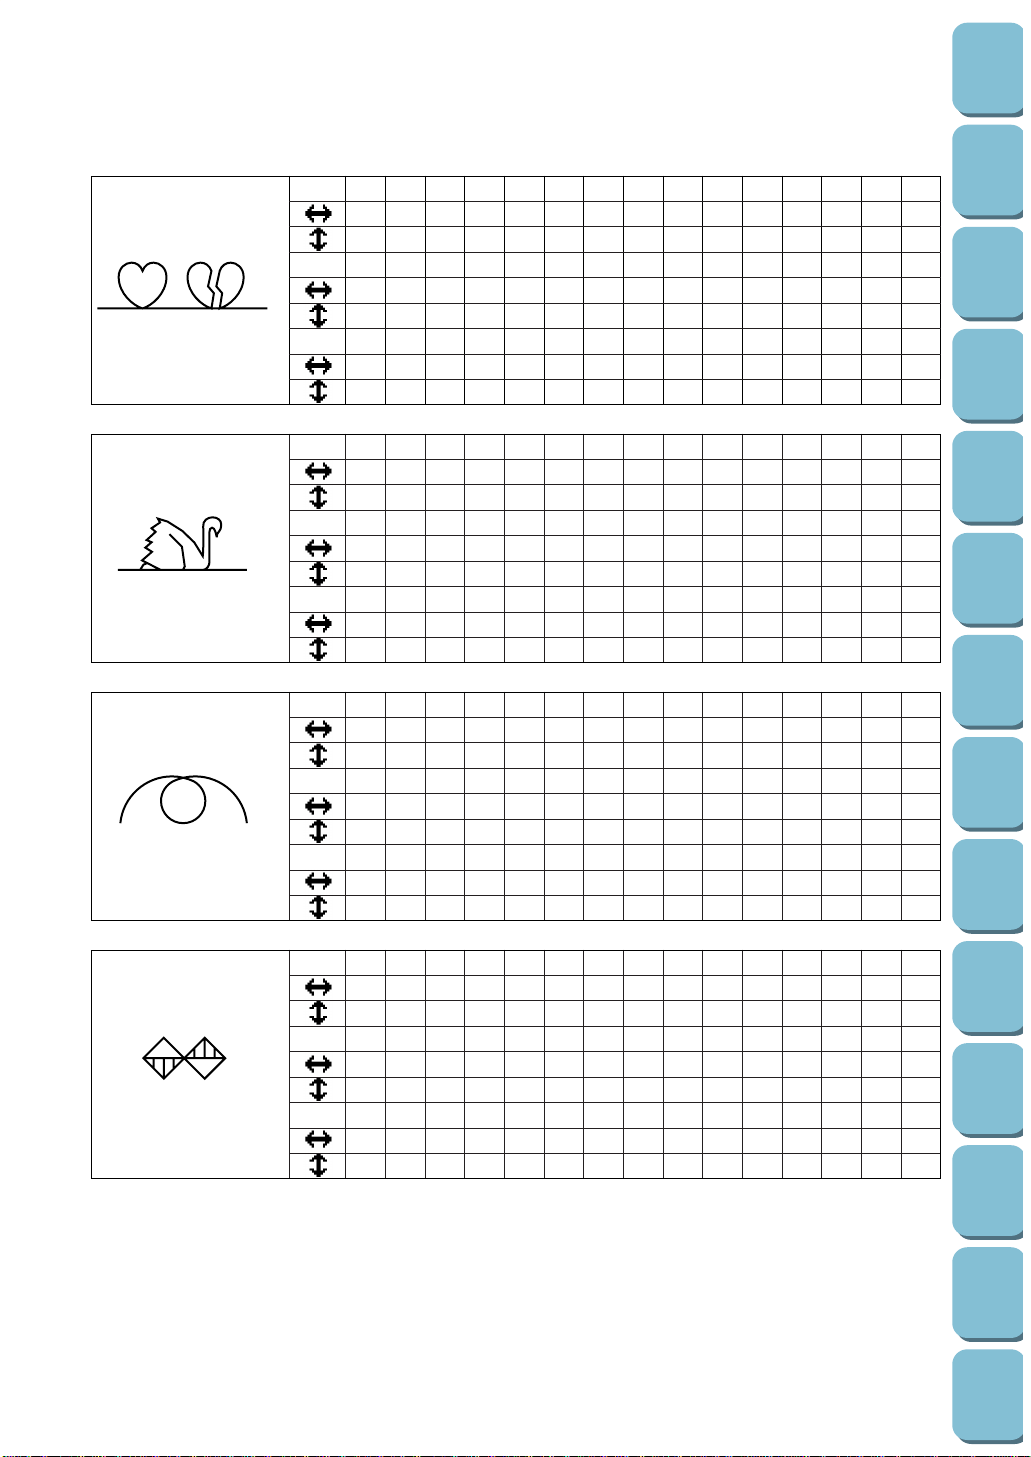
Stitch 1 2 3 456789101112131415
00 12 18 22 23 21 17 14 12 09 06 03 01 03 06
00 00 03 06 10 13 14 13 11 13 14 13 10 06 03
Stitch 16 17 18 19 20 21 22 23 24 25 26 27 28 29 30
12 41 43 40 41 38 35 32 30 32 35 41 45 47 44
00 00 04 07 11 13 14 13 10 06 03 00 00 04 07
Stitch 31 32 33 34 35 36 37 38 39 40 41 42 43 44 45
45 47 50 54 56 55 51 45 70
11 13 14 13 10 06 03 00 00
Stitch 1 2 3 4 5 6 7 8 9 10 11 12 13 14 15
00 30 32 32 32 33 35 35 37 35 32 30 30 29 26
00 00 01 07 10 12 11 08 12 14 14 11 05 03 08
Stitch 16 17 18 19 20 21 22 23 24 25 26 27 28 29 30
24 18 13 12 13 10 12 08 12 07 12 06 10 05 10
10 13 14 14 12 11 10 09 08 06 06 03 02 00 02
Stitch 31 32 33 34 35 36 37 38 39 40 41 42 43 44 45
16 19 23 22 17 22 23 19 42
01 00 00 06 10 06 00 00 00
Stitch 1 2 3 4 5 6 7 8 9 10 11 12 13 14 15
00 03 05 08 12 17 20 24 27 29 31 32 30 27 24
00 05 08 11 13 14 14 13 12 11 09 06 03 01 00
Stitch 16 17 18 19 20 21 22 23 24 25 26 27 28 29 30
21 18 16 15 15 16 18 21 25 28 33 37 41 43 44
00 01 03 05 08 10 12 13 14 14 13 11 08 05 00
Stitch 31 32 33 34 35 36 37 38 39 40 41 42 43 44 45
Stitch 1 2 3 4 5 6 7 8 9 10 11 12 13 14 15
00 05 04 05 08 07 08 11 11 11 16 11 07 04 00
07 07 03 07 07 00 07 07 03 07 07 03 00 03 07
Stitch 16 17 18 19 20 21 22 23 24 25 26 27 28 29 30
04 07 11 16 21 20 21 24 23 24 27 27 27 32 27
11 14 11 07 07 11 07 07 14 07 07 11 07 07 11
Stitch 31 32 33 34 35 36 37 38 39 40 41 42 43 44 45
23 20 16 20 23 27 32
14 11 07 03 00 03 07
161
Utility
Stitches
Characters
and
Decorative
Stitches
Embroidering
Editing
Embroidery
Patterns
Retrieving
My
Custom
Stitch
TM
Maintenance
Error
Messages
Trouble
shooting
Sewing
Chart
Patterns
(Programmed
in Machine)
Patterns
(Memory
Card)
Sewing
Setting Up

162
Utility
Stitches
Characters
and
Decorative
Stitches
Embroidering
Editing
Embroidery
Patterns
Retrieving
My
Custom
Stitch
TM
Maintenance
Error
Messages
Trouble
shooting
Sewing
Chart
Patterns
(Programmed
in Machine)
Patterns
(Memory
Card)
Sewing
Setting Up
Preparation
If the embroidery unit is attached, remove.
* Turn off the power supply before removing the embroidery
unit.
1. Touch the “CHARACTER/DECORATIVE STITCH” key.
2. Touch the “ ” key.
The input screen will be displayed.
1 Display the pattern input area. “ ” indicates the pattern
width, and “ ” indicates the pattern length.
2 Touch this key to select whether to sew one stitch or three
stitches between the two points.
3 Touch this key to clear points which have been input.
4 Touch these keys to move the position to input a point.
5 Touch this key to set a point.
6 Touch this key to correct a point which has been input.
7 Touch this key to complete the entry and move on to the
sewing screen.
3. To input the stitch which you have drawn on the grid sheet.
First, select whether to sew one stitch or three stitches with
the “ ” key between each point. To sew one stitch,
touch the key so that it appears as “ ”; to sew three
stitches, touch the key so that it appears as “ ”.
(This can be set between each point.)
4. Use the arrow keys to set the coordinates on the input
screen to the same coordinates as the points which were
made on the grid sheet as described in step 2 on page 160.
5. If you touch the arrow keys, the point indicated by the “ ”
will move in the direction of the arrow touched. If you touch
“SET”, a point will be entered.
Repeat the above operation as many times as required to
input the stitch you have drawn on the grid sheet onto the
screen as a continuous line.
* If you make a mistake in entering, touch the “DELETE” key
to clear the last point entered.
6. Once you have finished creating the stitch, touch the “END”
key.
GENERATING THE DATA
1
67
4
1
32

7. The sewing screen will then be displayed.
* Touch the “RE-EDIT” key to return to the input screen and
make changes to your own stitch.
* If entering a one-point pattern and sewing the pattern
continuously, make sure that you input the data for the
linking stitch so that the patterns do not overlap.
1 Linking stitch
* If you have entered points which are too close together the
fabric may not feed properly. Edit the points to make the
space between each point larger.
1
163
Utility
Stitches
Characters
and
Decorative
Stitches
Embroidering
Editing
Embroidery
Patterns
Retrieving
My
Custom
Stitch
TM
Maintenance
Error
Messages
Trouble
shooting
Sewing
Chart
Patterns
(Programmed
in Machine)
Patterns
(Memory
Card)
Sewing
Setting Up
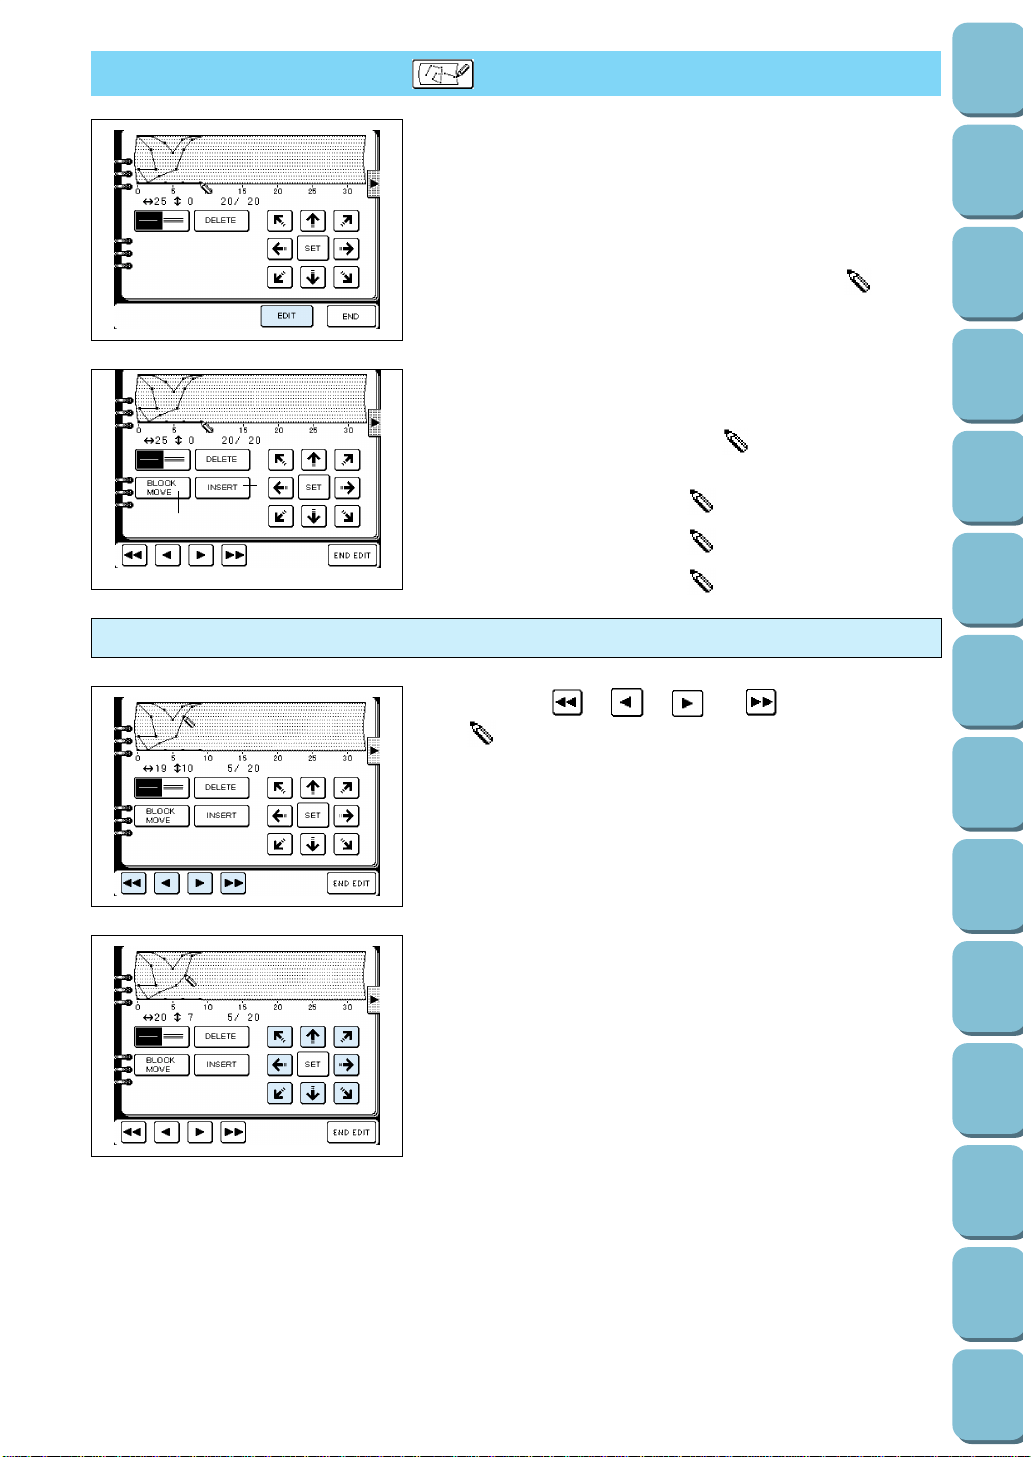
164
Utility
Stitches
Characters
and
Decorative
Stitches
Embroidering
Editing
Embroidery
Patterns
Retrieving
My
Custom
Stitch
TM
Maintenance
Error
Messages
Trouble
shooting
Sewing
Chart
Patterns
(Programmed
in Machine)
Patterns
(Memory
Card)
Sewing
Setting Up
1. Touch the “EDIT” key.
The edit screen will be displayed. Move the “ ” to the
location of the point you would like to correct and then make the
correction.
1 Touch this key to move part of or all of the pattern.
2 Touch this key if you would like to insert a point.
3 Touch this key to move the “ ” back to the starting
position.
4 Touch this key to move the “ ” back one point.
5 Touch this key to move the “ ” forward one point.
6 Touch this key to move the “ ” to the last point.
EDITING AN EXISTING “ ”
3
2
1
564
1. Touch the “ ”, “ ”, “ ” or “ ” key to move the
“ ” to the point which you would like to move.
2. Touch any of the 8 directional arrow keys to move the point.
Moving a point
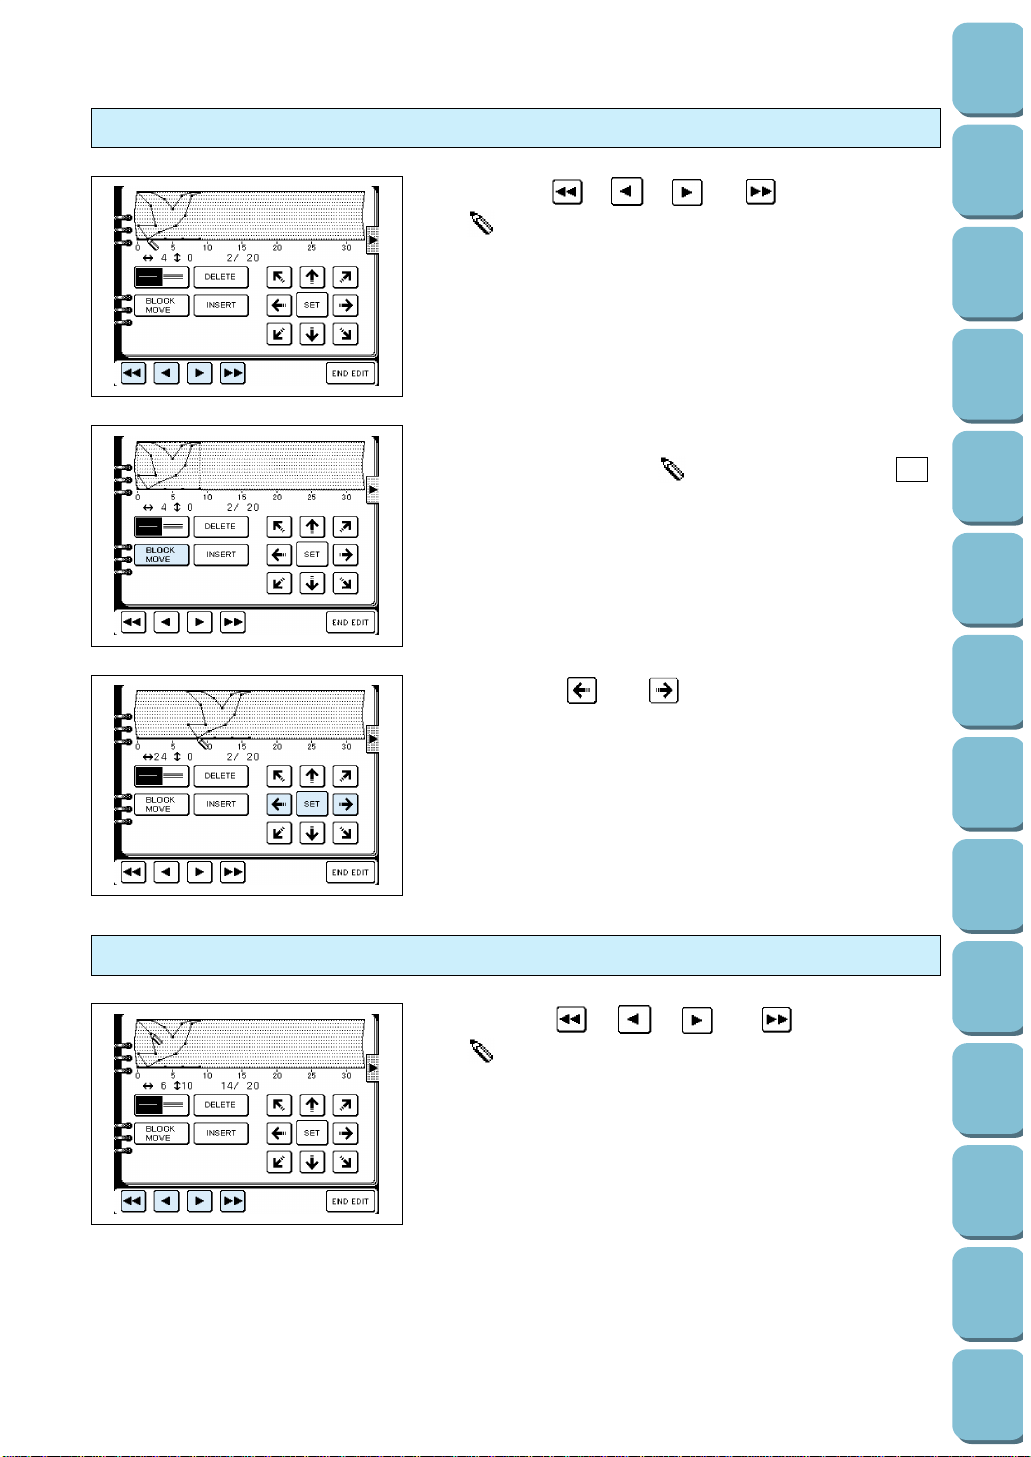
3. Touch the “ ” or “ ” key to move to the desired
position, and then touch the “SET” key.
1. Touch the “ ”, “ ”, “ ” or “ ” key to move the
“ ” to the start point which you would like to move.
2. Touch the “BLOCK MOVE” key.
The points behind the “ ” will be enclosed by a “ ”.
(This indicates the area which is to be moved.)
Moving part or all of a pattern
1. Touch the “ ”, “ ”, “ ” or “ ” key to move the
“ ” to the point before the place where you would like to
enter a new point.
Inserting new points
165
Utility
Stitches
Characters
and
Decorative
Stitches
Embroidering
Editing
Embroidery
Patterns
Retrieving
My
Custom
Stitch
TM
Maintenance
Error
Messages
Trouble
shooting
Sewing
Chart
Patterns
(Programmed
in Machine)
Patterns
(Memory
Card)
Sewing
Setting Up
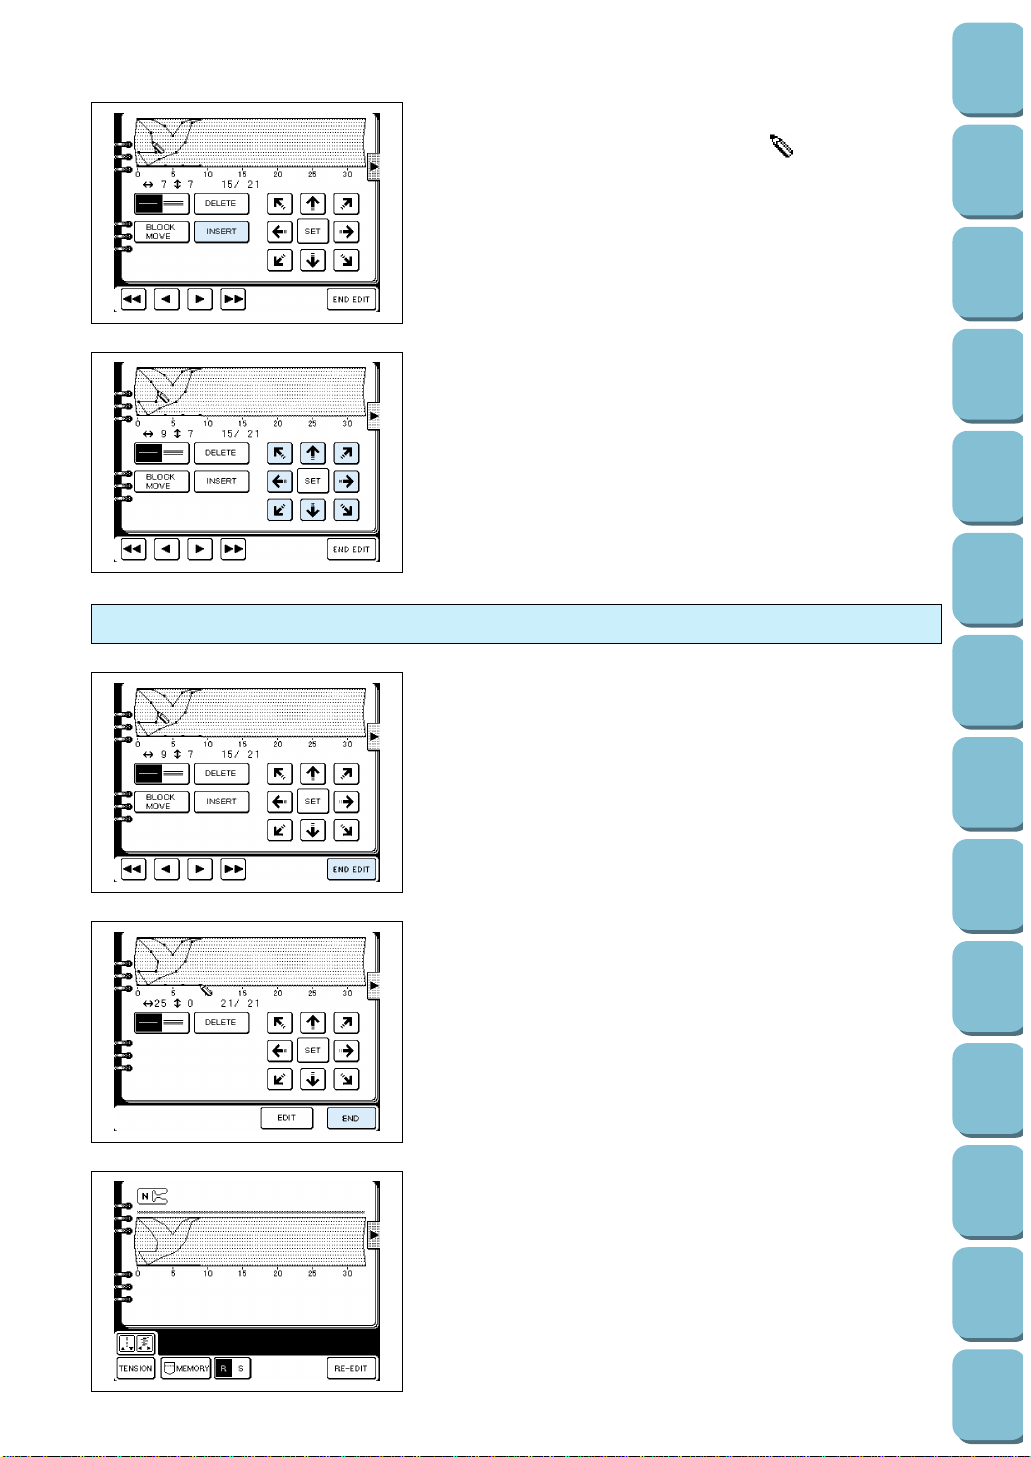
166
Utility
Stitches
Characters
and
Decorative
Stitches
Embroidering
Editing
Embroidery
Patterns
Retrieving
My
Custom
Stitch
TM
Maintenance
Error
Messages
Trouble
shooting
Sewing
Chart
Patterns
(Programmed
in Machine)
Patterns
(Memory
Card)
Sewing
Setting Up
2. Touch the “INSERT” key.
A new point will be inserted and the “ ” will move to this
newly- inserted point.
3. Use any of the 8 directional arrow keys to move the desired
point.
4. Touch the “SET” key when you are finished making the
changes at this coordinate point.
* Repeat step 1, 2, 3, 4 for additional editing.
3. The sewing screen will then be displayed.
1. Touch the “END EDIT” key.
The display will return to the input screen. You can then
continue to enter the pattern.
2. Touch the “END” key.
Once you have finished editing
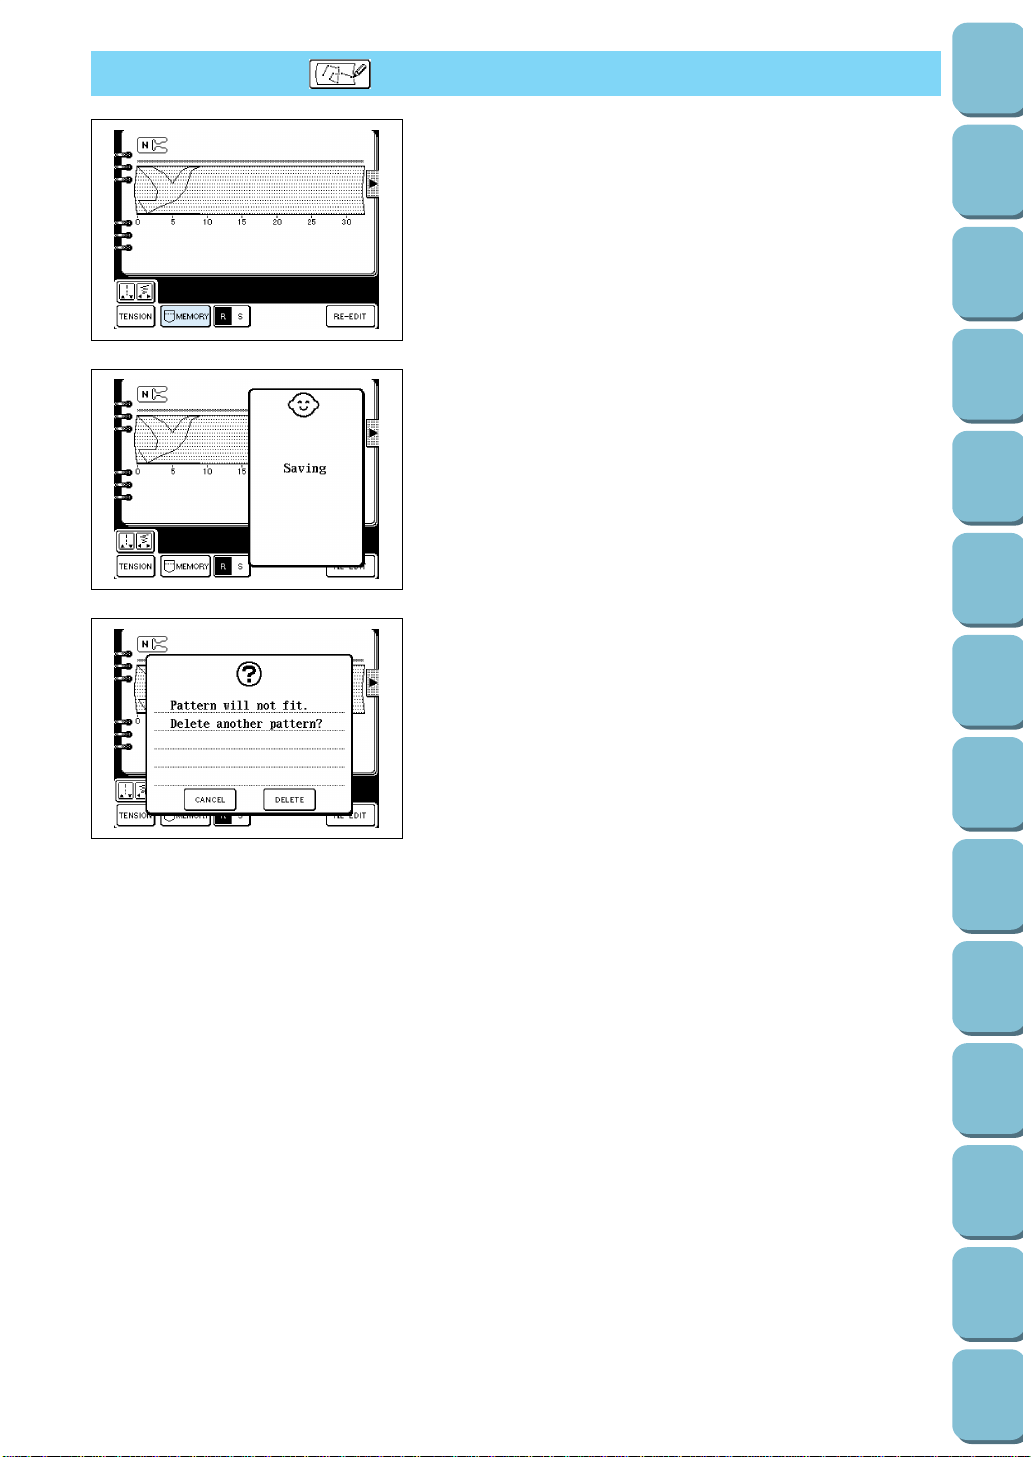
Up to five patterns can be stored, Touch the “MEMORY” key. (It
will take approximately 10 seconds for the pattern to be stored.)
Once the pattern has been stored, the display will return to the
previous screen.
Refer to the next page for details on how to retrieve a pattern
which has been stored.
CAUTION:
Do not turn off the power while the word “Saving” is
displayed. The data being stored may be deleted.
Refer to page 101 for details on what to do if the pattern cannot
be stored because the memory is already full.
STORING THE “ ” WHICH YOU HAVE ENTERED
167
Utility
Stitches
Characters
and
Decorative
Stitches
Embroidering
Editing
Embroidery
Patterns
Retrieving
My
Custom
Stitch
TM
Maintenance
Error
Messages
Trouble
shooting
Sewing
Chart
Patterns
(Programmed
in Machine)
Patterns
(Memory
Card)
Sewing
Setting Up
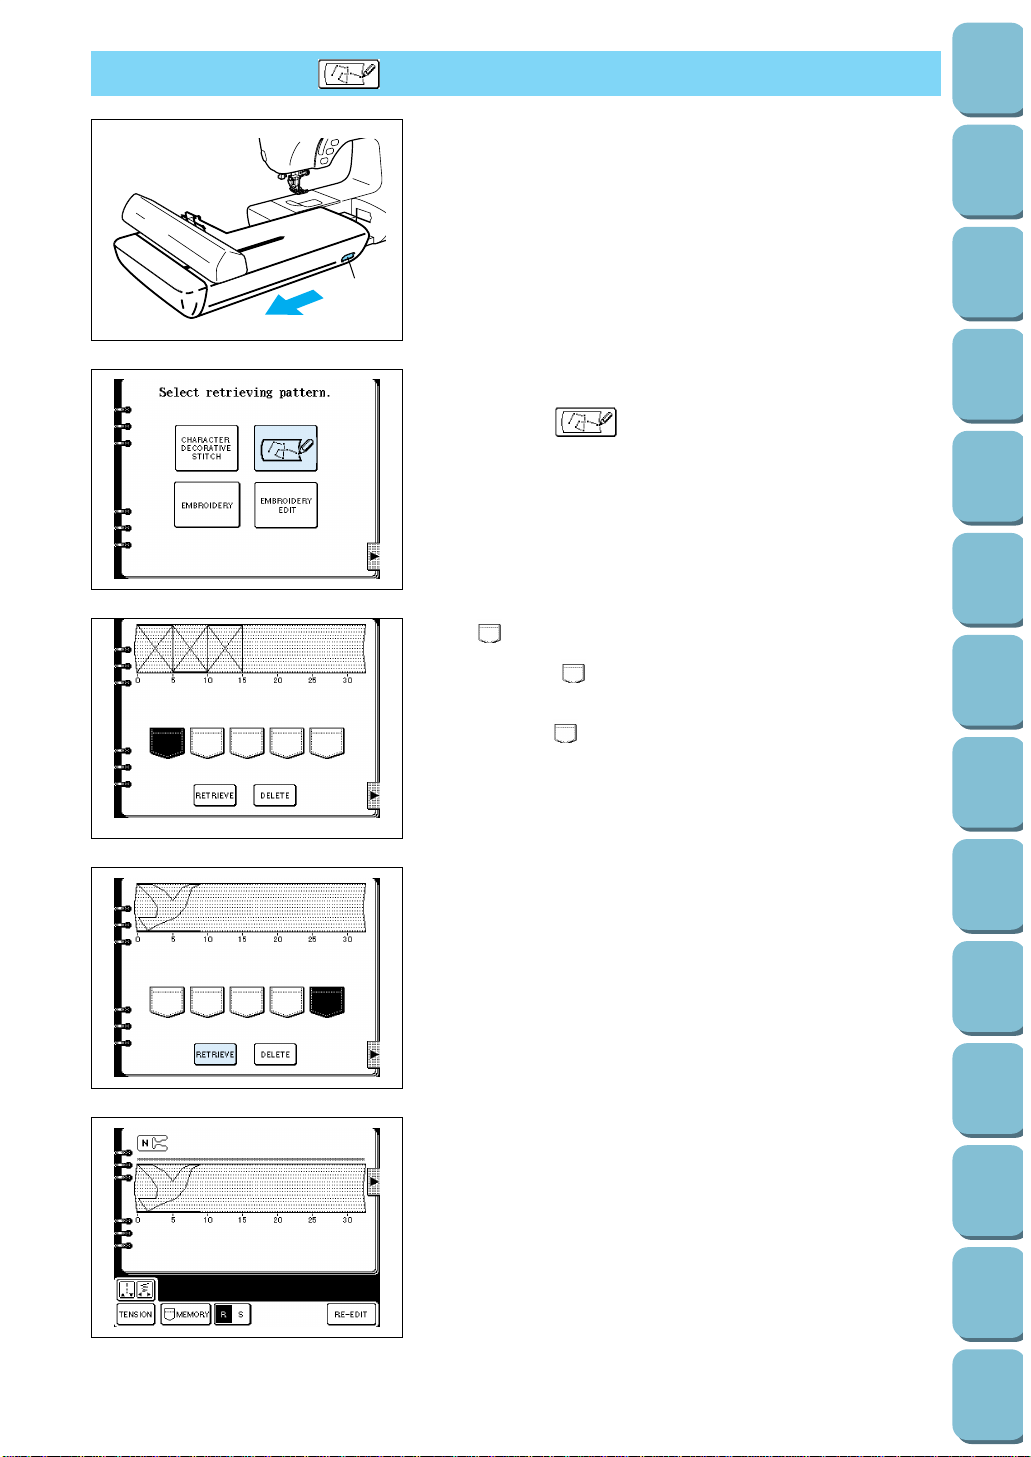
168
Utility
Stitches
Characters
and
Decorative
Stitches
Embroidering
Editing
Embroidery
Patterns
Retrieving
My
Custom
Stitch
TM
Maintenance
Error
Messages
Trouble
shooting
Sewing
Chart
Patterns
(Programmed
in Machine)
Patterns
(Memory
Card)
Sewing
Setting Up
1
Preparation
If the embroidery unit is attached, remove it.
1 Release button
* Turn off the power supply before removing the embroidery
unit.
1. Touch the “MEMORY RECALL” key.
2. Touch the “ ” key.
The “ ” indicates a pocket which has a pattern saved in it.
If you touch a “ ”, the pattern which is saved in that pocket
will be displayed.
3. Touch a “ ” to select a saved pattern and have it
displayed.
1 Touch this key to delete a saved pattern.
2 Touch this key to retrieve a saved pattern.
4. Touch the “RETRIEVE” key to make the selected stitch
available for sewing.
* To delete a pattern touch the “DELETE” key.
5. The sewing screen for that stitch will then be displayed.
RETRIEVING A “ ”
1
2

CAUTION
Disconnect the power cord from the wall socket before cleaning the screen, otherwise injury and
electric shocks may result.
If the front panel is dirty, wipe it gently with a soft, dry cloth. Do not use any organic solvents or detergents.
Cleaning the screen
CAUTION
Disconnect the power cord from the wall socket before cleaning the machine surface, otherwise
injury and electric shocks may result.
If the surface of the machine is dirty, lightly soak a cloth in neutral detergent, squeeze it out firmly and then
wipe the surface. After cleaning it once in this way, wipe it again with a dry cloth.
Cleaning the machine surface
CAUTION
Disconnect the power cord from the wall socket before cleaning the shuttle, otherwise injury and
electric shocks may result.
Sewing performance will suffer and bobbin thread detection will become unreliable if dust collects in the
shuttle. It should be kept clean at all times.
Cleaning the shuttle
CLEANING
MAINTENANCE
169
Utility
Stitches
Characters
and
Decorative
Stitches
Embroidering
Editing
Embroidery
Patterns
Retrieving
My
Custom
Stitch
TM
Maintenance
Error
Messages
Trouble
shooting
Sewing
Chart
Patterns
(Programmed
in Machine)
Patterns
(Memory
Card)
Sewing
Setting Up
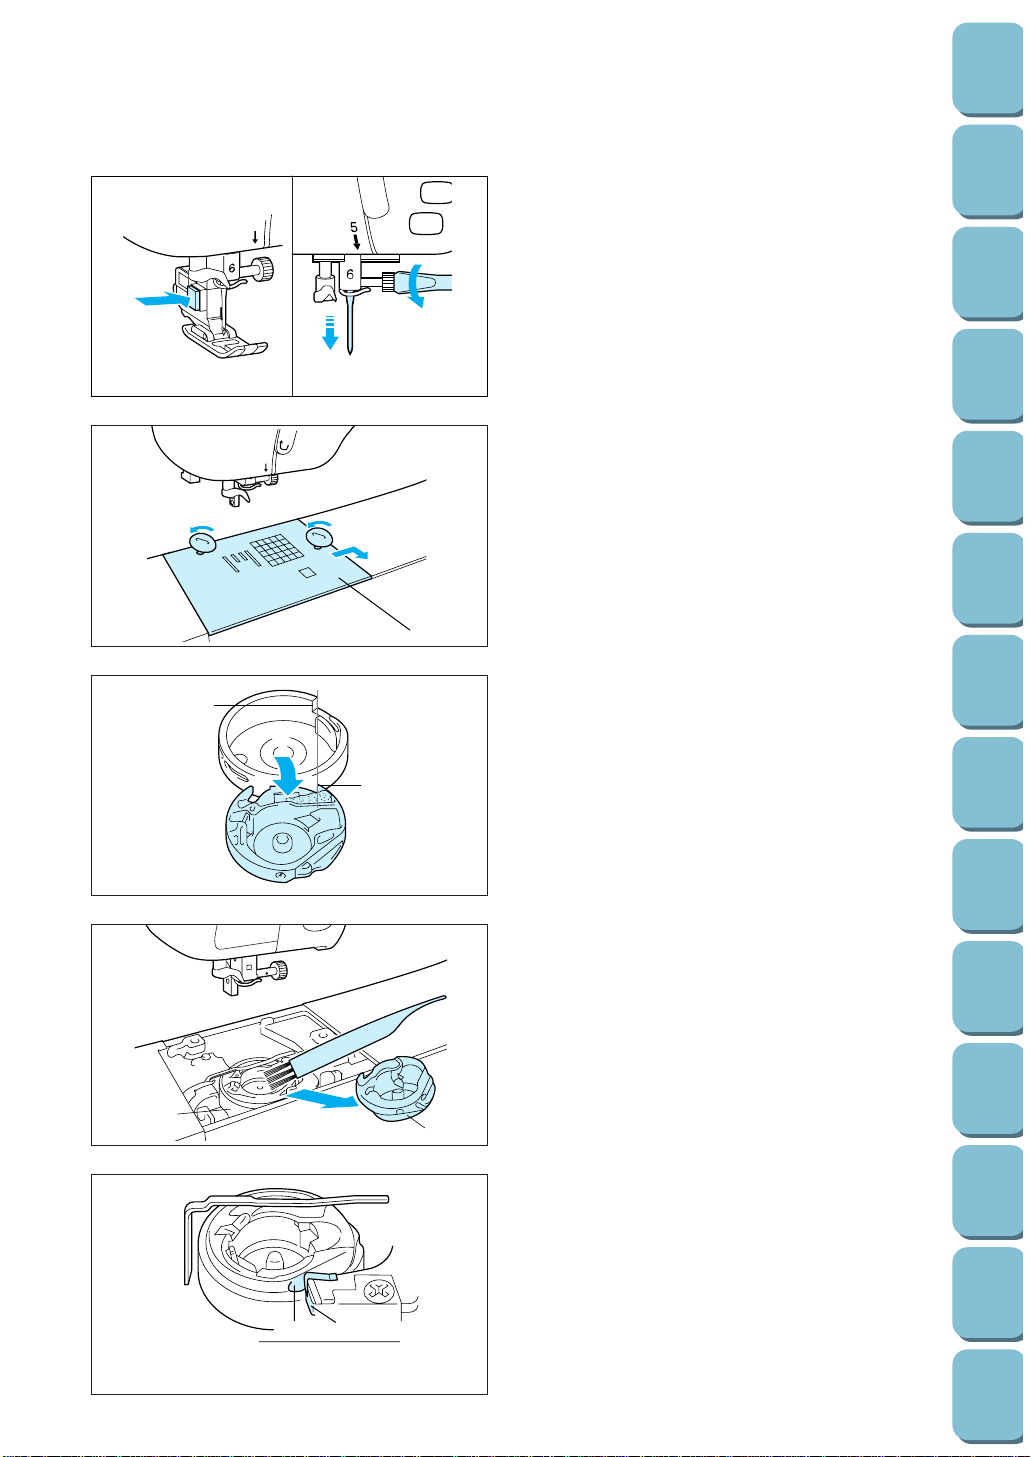
170
Utility
Stitches
Characters
and
Decorative
Stitches
Embroidering
Editing
Embroidery
Patterns
Retrieving
My
Custom
Stitch
TM
Maintenance
Error
Messages
Trouble
shooting
Sewing
Chart
Patterns
(Programmed
in Machine)
Patterns
(Memory
Card)
Sewing
Setting Up
5
Always keep the machine clean.
1. Turn off the power and remove the presser
foot holder and the needle.
5
3
1
2. Loosen the screws. Using the metal disk
provided.
3. Remove the needle plate.
1 Needle plate
4. Turn the balance wheel towards you, and
align the notch of shuttle with the shelf of race
edge angle, and remove the shelf of race.
1 Notch of shuttle
2 Shelf of race
6
5
2
1
12
5. Take out the shuttle.
6. Remove accumulated lint and thread from the
inner shuttle and race with a brush or a
vacuum cleaner.
1 Race
2 Shuttle
7. Set the shuttle by aligning the shuttle
projection with spring of the stopper.
1 Projection
2 Spring
* Lint and dust accumulated in the race will
sometimes cause poor stitching or
malfunction of bobbin thread sensor.
1
2
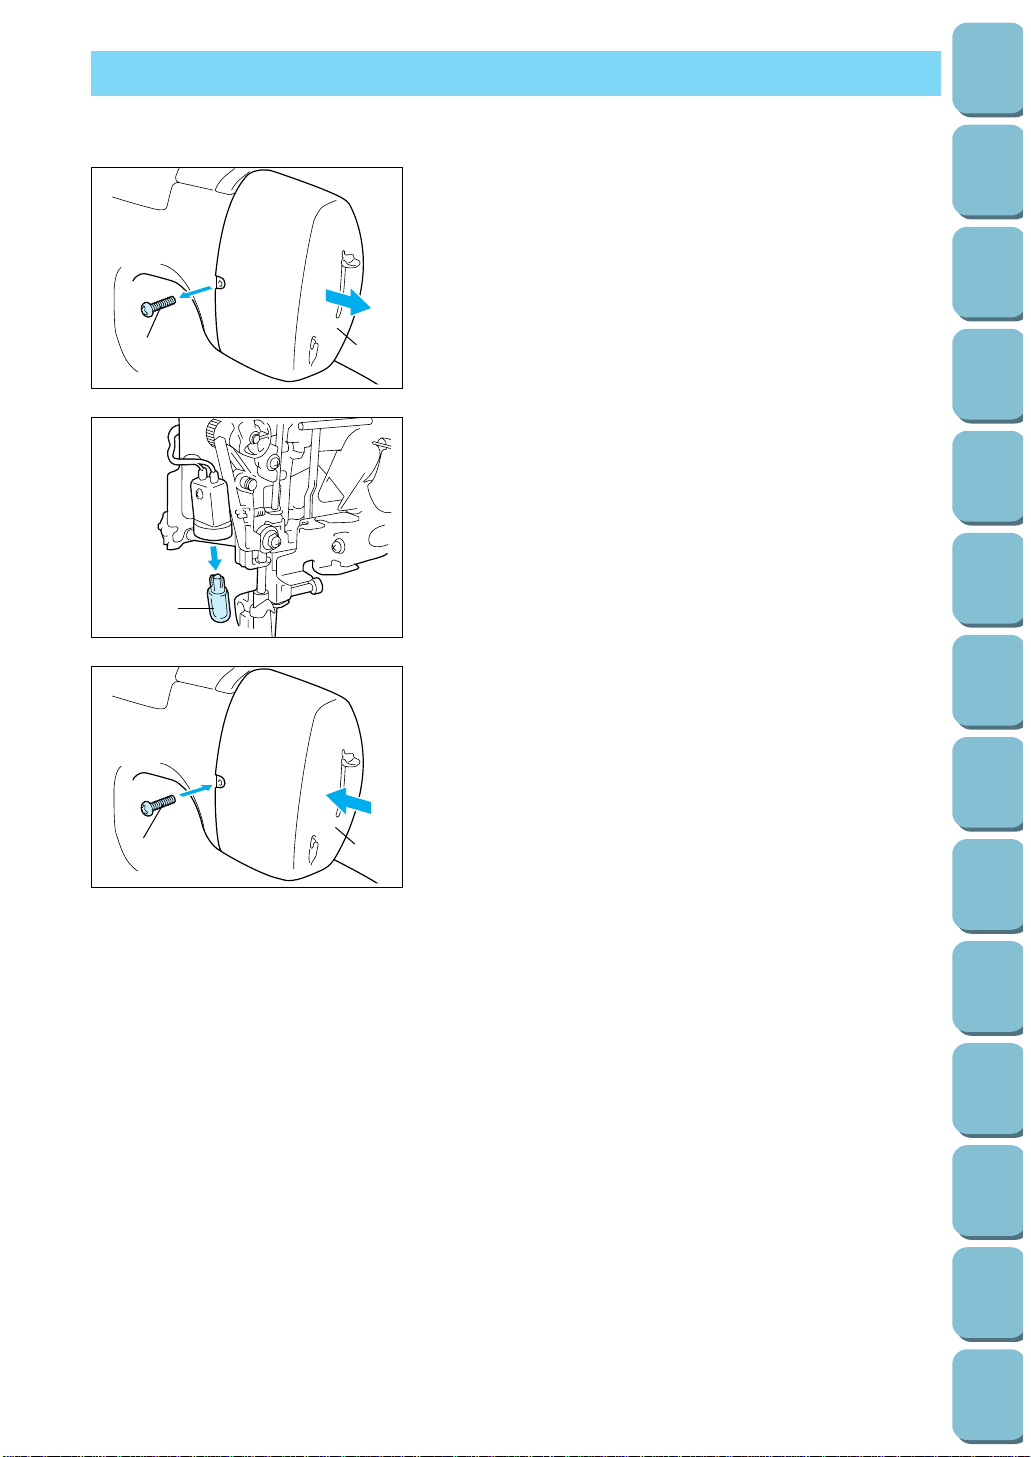
CHANGING THE LIGHT BULB
When replacing the light bulb
1
2
1. Turn the power off.
* The power cord plug must be removed from the electric
outlet prior to changing the bulb.
2. Loosen the screw on the reverse side of sewing head.
3. Remove the end cap.
1 Screw
2 End cap
1
4. Replace the snap-in the light bulb with a new one.
1 Light bulb
* Light bulbs are available through your dealer. (12V, 5W/
Parts code XA2037001)
1
2
5. Set the end cap.
6. Tighten the screw.
1 Screw
2 End cap
171
Utility
Stitches
Characters
and
Decorative
Stitches
Embroidering
Editing
Embroidery
Patterns
Retrieving
My
Custom
Stitch
TM
Maintenance
Error
Messages
Trouble
shooting
Sewing
Chart
Patterns
(Programmed
in Machine)
Patterns
(Memory
Card)
Sewing
Setting Up
172
Utility
Stitches
Characters
and
Decorative
Stitches
Embroidering
Editing
Embroidery
Patterns
Retrieving
My
Custom
Stitch
TM
Maintenance
Error
Messages
Trouble
shooting
Sewing
Chart
Patterns
(Programmed
in Machine)
Patterns
(Memory
Card)
Sewing
Setting Up
RELATED CHART OF SEWING FABRICS, THREAD AND NEEDLE
Sewing fabrics
Thread
Size of needle
Medium
Thin
Thick
Broad cloth
Taffeta
Flannel, Gabardine
Lawn
Georgette
Challis, Satin
Denim
Corduroy
Tweed
Jersey
Tricot
Type
Cotton
Silk
Cotton
Silk
Cotton
Silk
Silk
Size
60-80
60-80
50-80
60-80
60-80
50-80
30-50
50
50
30
30
11-14
9-11
14-16
Synthetic
mercerized
Synthetic
mercerized
Synthetic
mercerized
Synthetic
mercerized
Thread for knitStretch
Golden needle
11-14
14-16In case of top stitch thread
* For sewing on the popular stretch variety of fabrics, embroidery and decorative stitch sewing, the
“Golden needle” should be used.
* Today there are many different types of needles to suit a variety of sewing needs. Be sure to select the
correct needle for a specific sewing project. For example, there are needles for denim material or
needles for sewing with metallic threads.
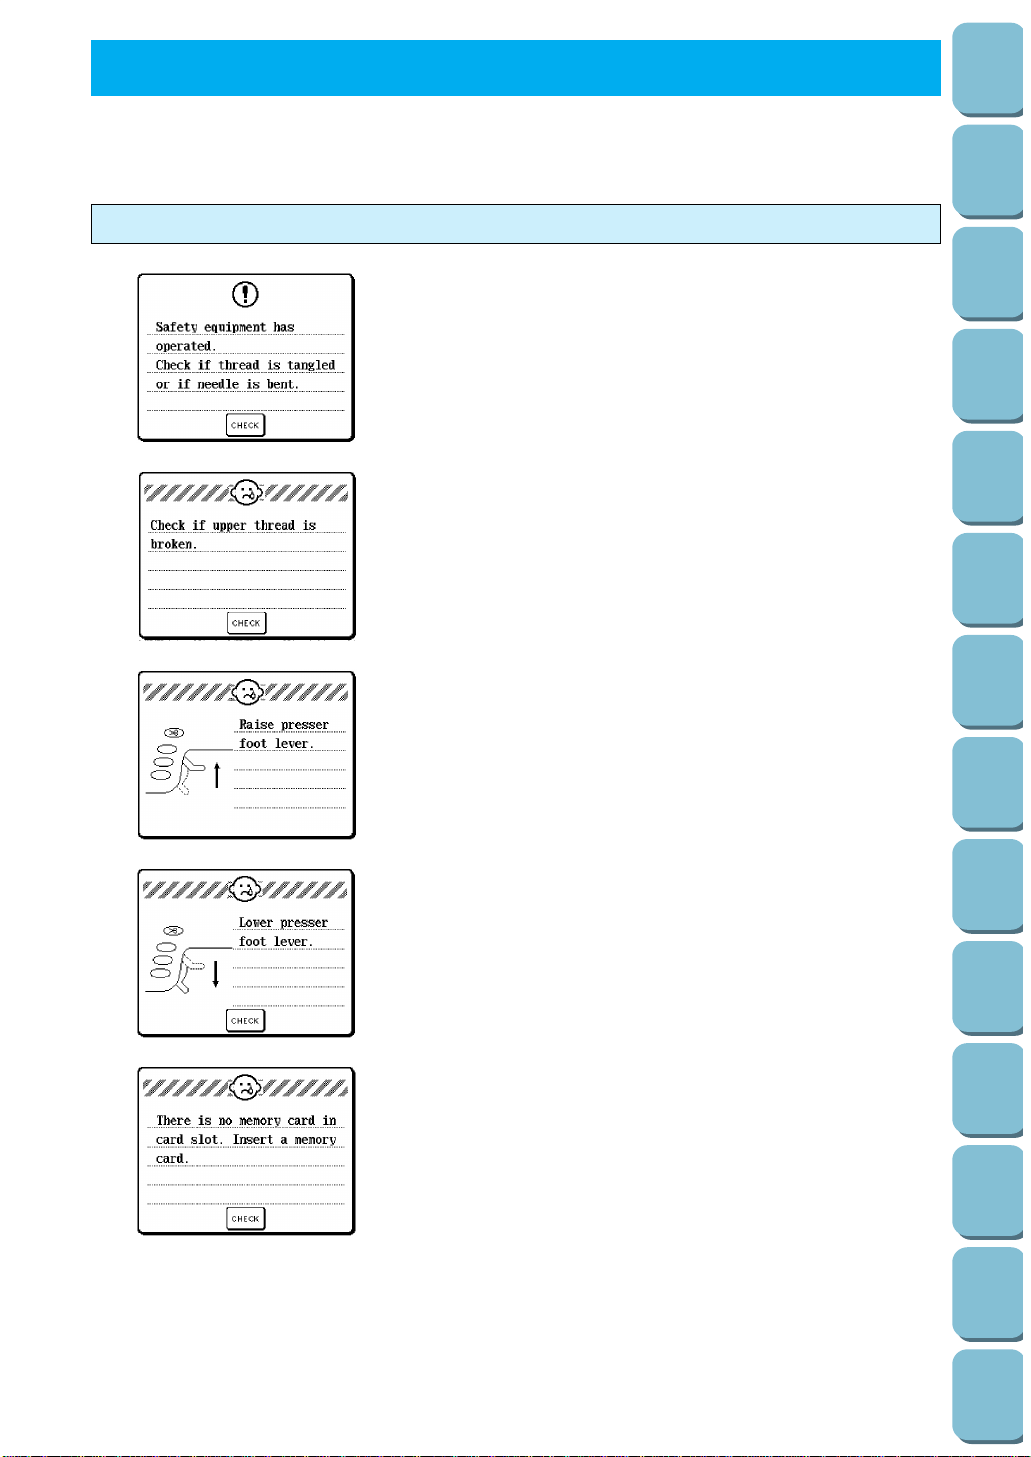
This message is displayed if motor is locked.
This message is displayed when the machine finds that the
upper thread is cut.
This message is displayed when the embroidery unit is trying to
initialize while the embroidery foot is lowered.
This message is displayed when the “START/STOP” or
“AUTOMATIC THREAD CUTTER” button is pressed while the
presser foot or embroidery foot is raised.
This message is displayed if the “CARD” key is touched while
there is no memory card inserted into the slot.
Warning messages
ERROR MESSAGES
If the machine is not properly set and the “START/STOP” button is pressed, or a correction of your
operating procedure is required, the machine will not start and it will instruct you with an alarm and warning
message on the LCD.
173
Utility
Stitches
Characters
and
Decorative
Stitches
Embroidering
Editing
Embroidery
Patterns
Retrieving
My
Custom
Stitch
TM
Maintenance
Error
Messages
Trouble
shooting
Sewing
Chart
Patterns
(Programmed
in Machine)
Patterns
(Memory
Card)
Sewing
Setting Up
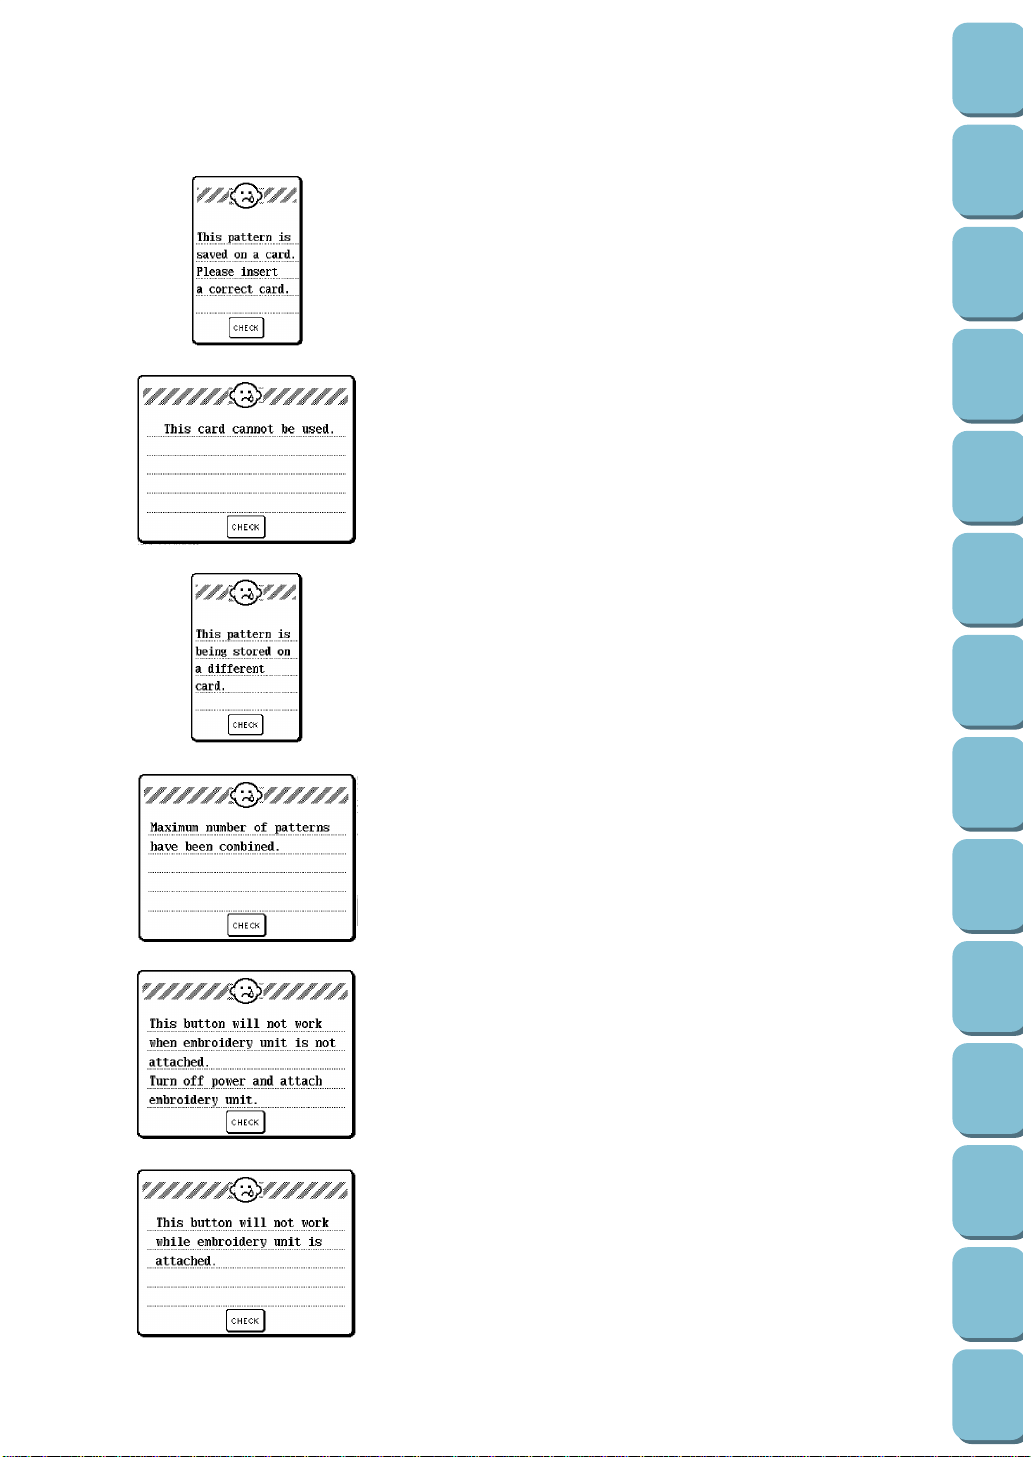
174
Utility
Stitches
Characters
and
Decorative
Stitches
Embroidering
Editing
Embroidery
Patterns
Retrieving
My
Custom
Stitch
TM
Maintenance
Error
Messages
Trouble
shooting
Sewing
Chart
Patterns
(Programmed
in Machine)
Patterns
(Memory
Card)
Sewing
Setting Up
This message is displayed when trying to retrieve a pattern from
a memory card and that memory card is not inserted.
This message is displayed when the “CARD” key is touched
while a memory card that cannot be read by this machine is
inserted.
This message is displayed when you have tried to retrieve a
pattern from one memory card while a different memory card
was inserted into the slot.
This message is displayed when you have tried to combine
more than 71 patterns.
This message is displayed when the “EMBROIDERY” key or
“BASIC SEWING” key is pressed when in utility stitch mode.
This “REVERSE STITCH” button is pressed in embroidery
mode.
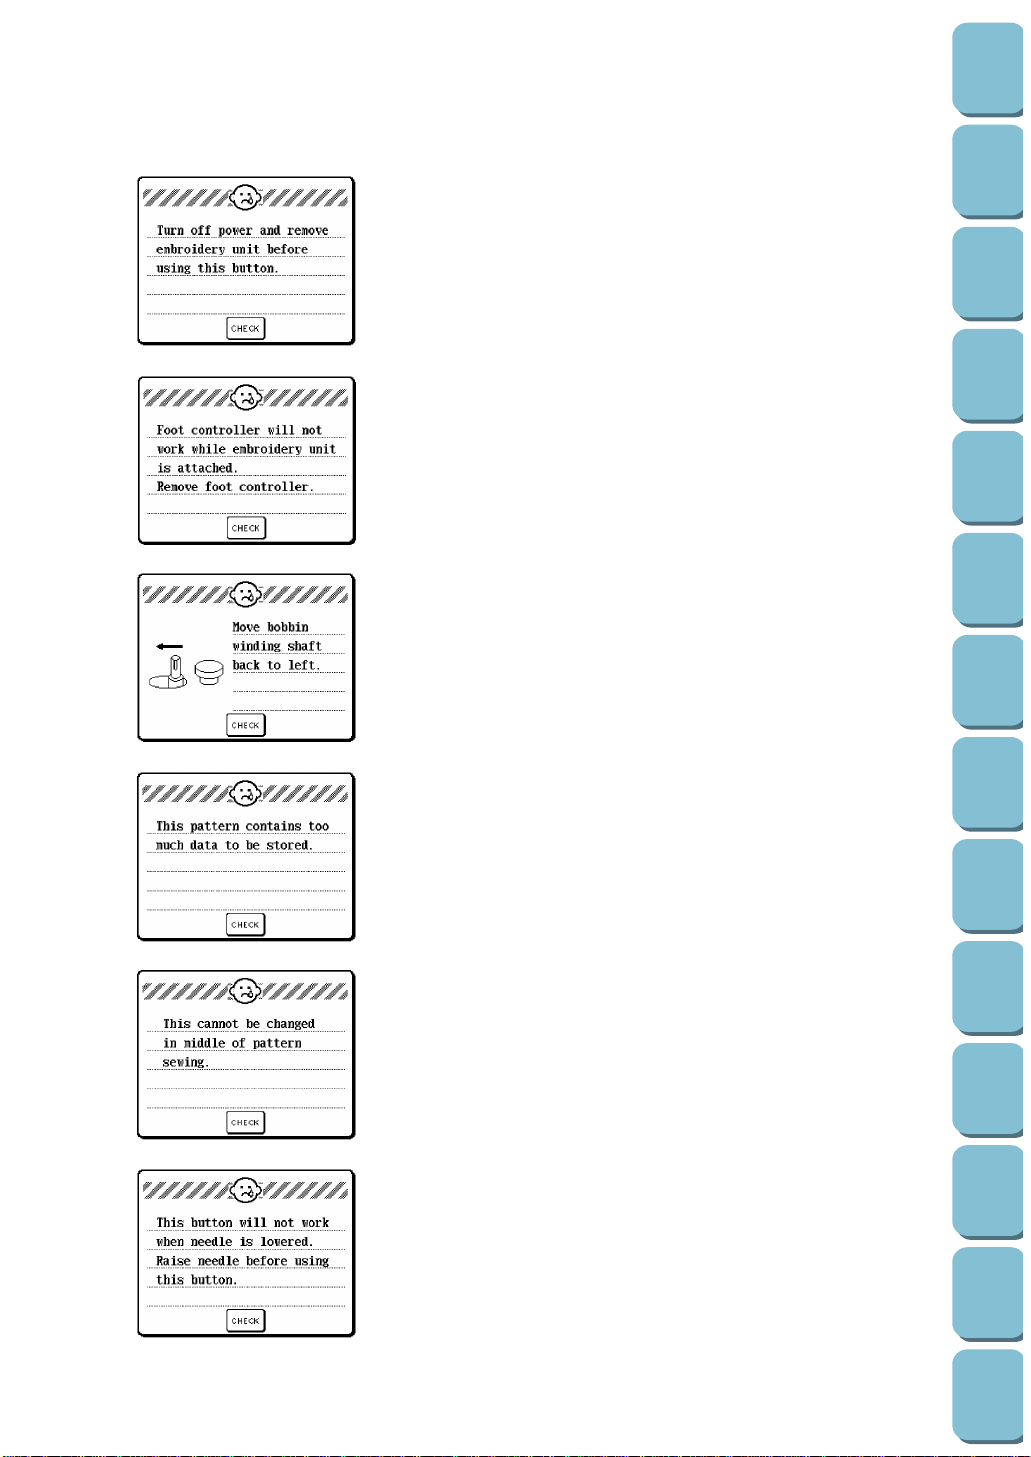
175
Utility
Stitches
Characters
and
Decorative
Stitches
Embroidering
Editing
Embroidery
Patterns
Retrieving
My
Custom
Stitch
TM
Maintenance
Error
Messages
Trouble
shooting
Sewing
Chart
Patterns
(Programmed
in Machine)
Patterns
(Memory
Card)
Sewing
Setting Up
This message is displayed if the “UTILITY STITCH” or
“CHARACTER/DECORATIVE STITCH” keys are touched while
in embroidering mode.
This message is displayed when the foot controller is used
while the embroidery unit is connected.
This message is displayed when the “NEEDLE POSITION” or
“AUTOMATIC THREAD CUTTER” button is pressed while the
bobbin winding shaft is pushed to the right.
This message is displayed if the sizes of the patterns you are
editing exceed the maximum size limit.
This message is displayed when the “MULTI COLOR” or
“LAYOUT” key is touched during embroidering or if the machine
is stopped between color changes.
This message is displayed when a key on the screen is touched
while the needle is down.
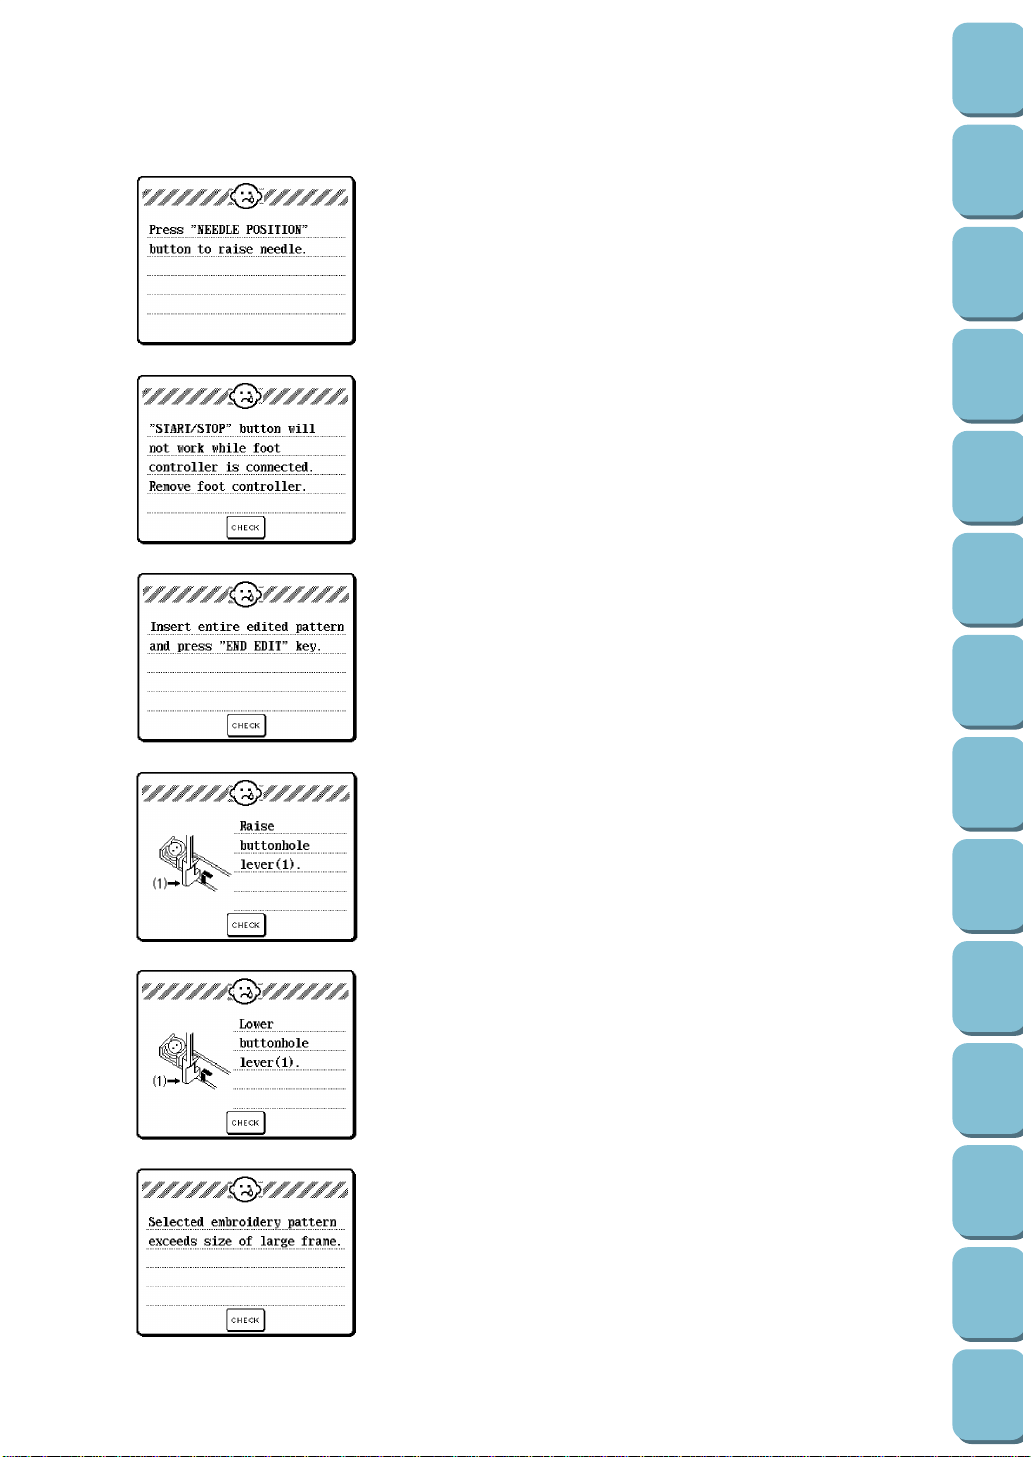
176
Utility
Stitches
Characters
and
Decorative
Stitches
Embroidering
Editing
Embroidery
Patterns
Retrieving
My
Custom
Stitch
TM
Maintenance
Error
Messages
Trouble
shooting
Sewing
Chart
Patterns
(Programmed
in Machine)
Patterns
(Memory
Card)
Sewing
Setting Up
This message is displayed when the embroidery unit is attached
while the needle is lowered.
This message is displayed if the “START/STOP” button is
pressed while the foot controller is still connected.
This message is displayed if the “START/STOP” button is
touched when in editing mode.
This message is displayed if a non-buttonhole pattern is
selected and the “START/STOP” button or “REVERSE
STITCH” button is pressed while the buttonhole lever is
lowered.
This message is displayed if a buttonhole pattern is selected
and the “START/STOP” button or “REVERSE STITCH” button
is pressed while the buttonhole lever is raised.
This message is displayed when the embroidery pattern is
larger than the embroidery frame.
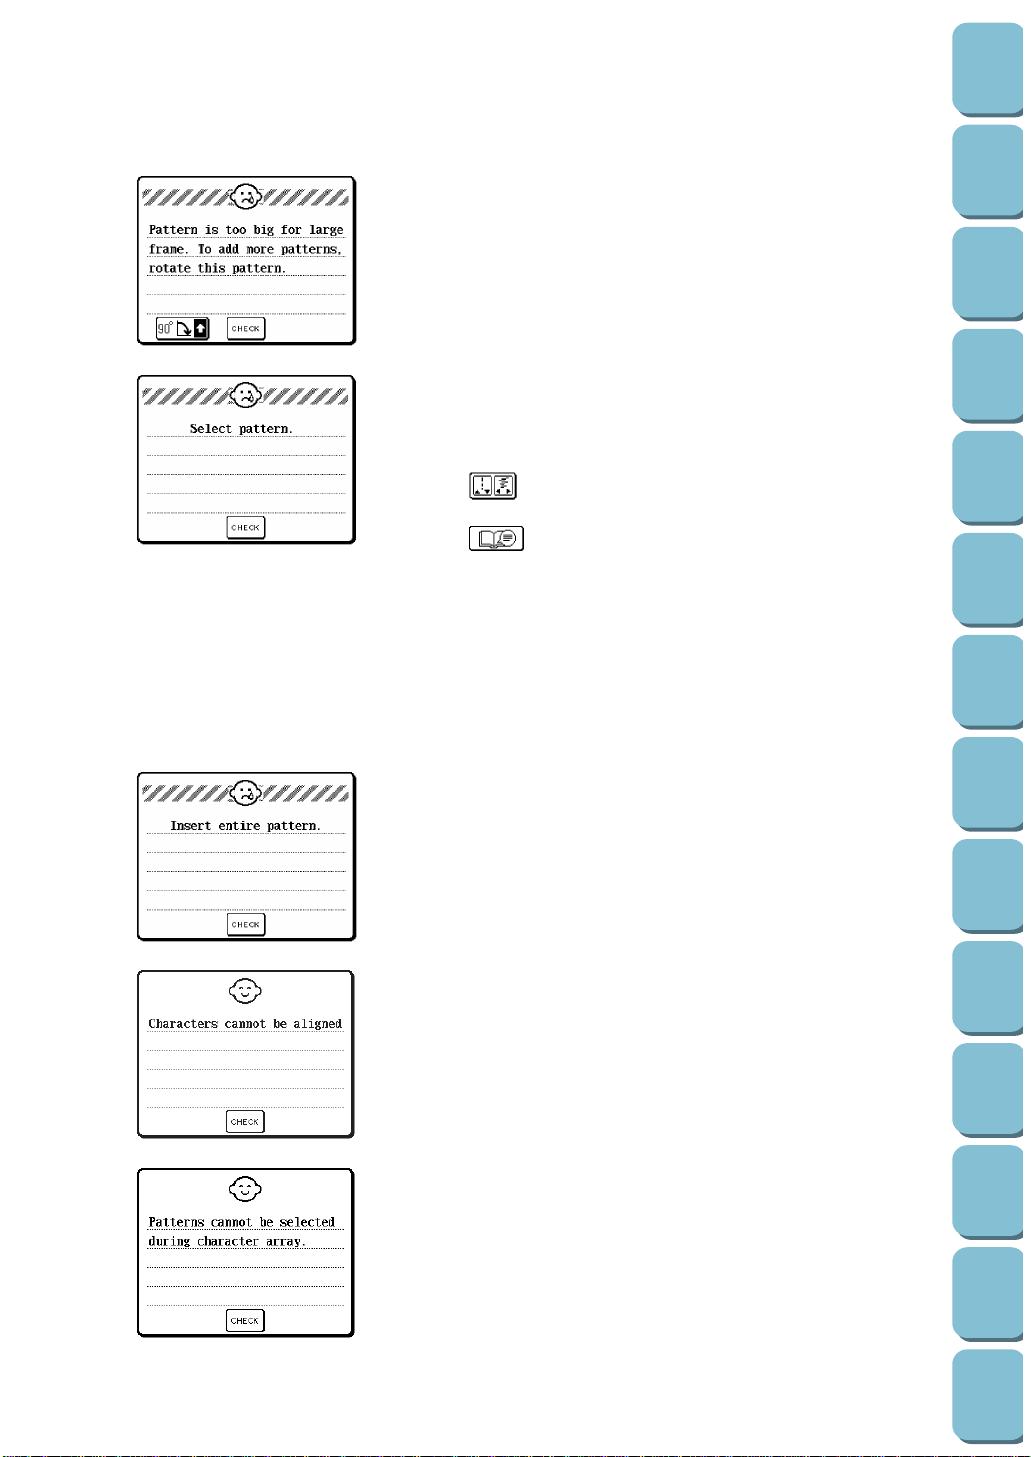
177
Utility
Stitches
Characters
and
Decorative
Stitches
Embroidering
Editing
Embroidery
Patterns
Retrieving
My
Custom
Stitch
TM
Maintenance
Error
Messages
Trouble
shooting
Sewing
Chart
Patterns
(Programmed
in Machine)
Patterns
(Memory
Card)
Sewing
Setting Up
This message is displayed in embroidery mode when the
combination of characters is too big to fit within the embroidery
frame. You can continue to add characters if you rotate the
pattern 90˚.
This message is displayed when any of the following are
pressed, while no pattern has been selected.
● “START/STOP” button
● “REVERSE STITCH” button
● “ ” key
● “TENSION” key
● “ ” key
● “SET” key
This message is displayed if the frame pattern for embroidering
has not been completely input, and when the “START/STOP”
button is pressed when in editing mode.
This message is displayed when curve configuration can not be
performed because there are too many characters.
This message is displayed when a pattern is selected during
character configuration.
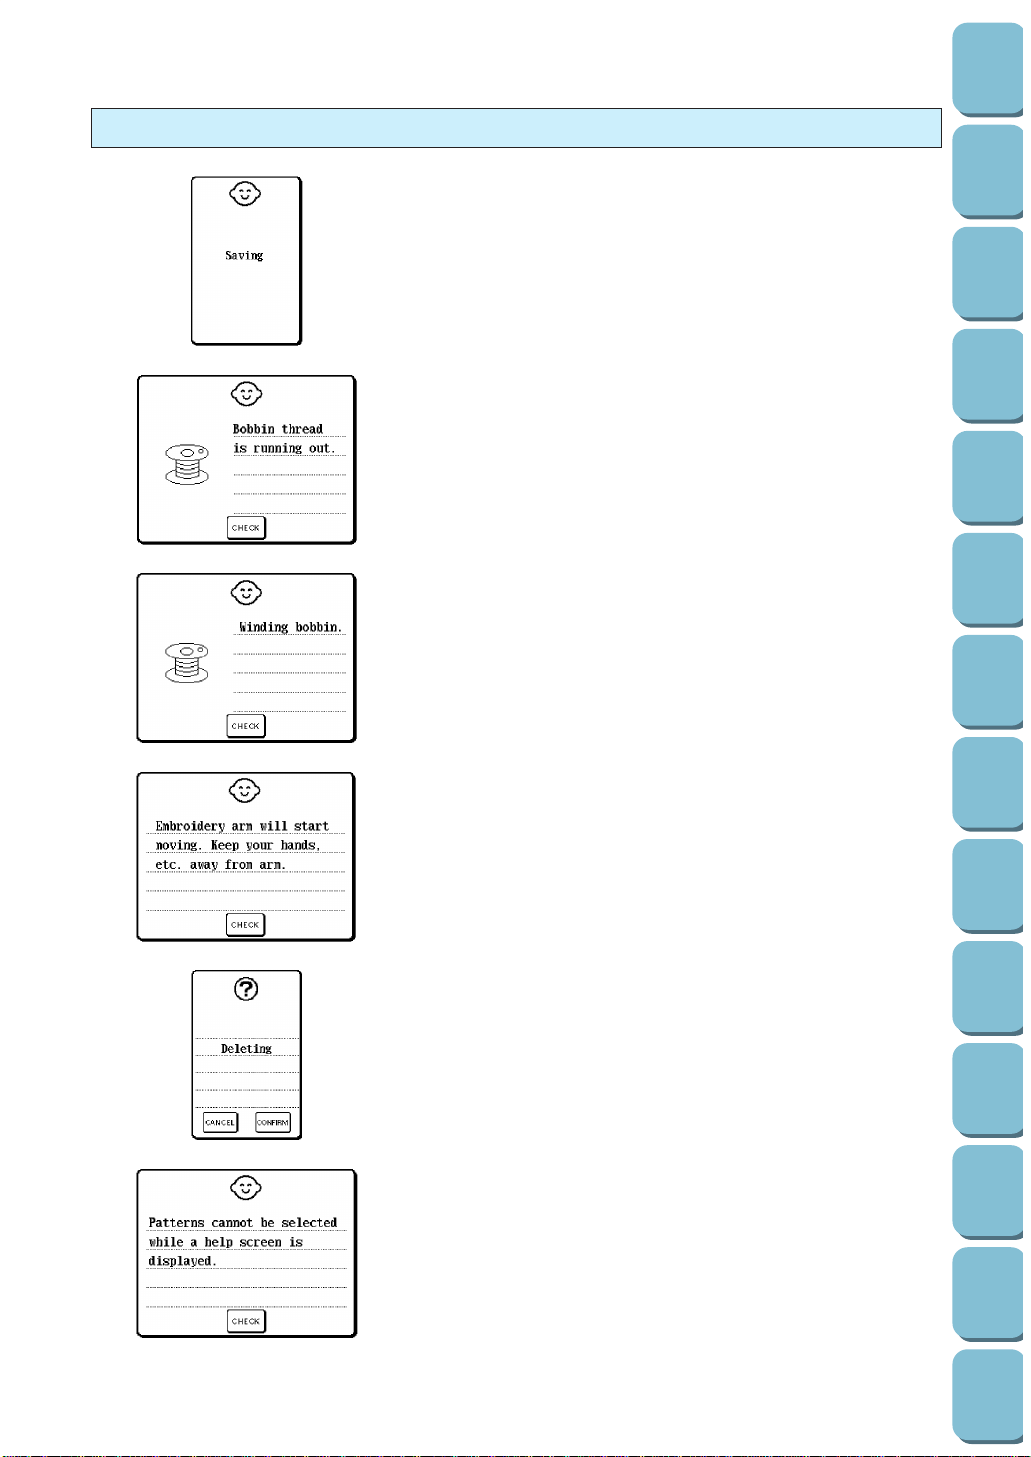
178
Utility
Stitches
Characters
and
Decorative
Stitches
Embroidering
Editing
Embroidery
Patterns
Retrieving
My
Custom
Stitch
TM
Maintenance
Error
Messages
Trouble
shooting
Sewing
Chart
Patterns
(Programmed
in Machine)
Patterns
(Memory
Card)
Sewing
Setting Up
This message is displayed while a pattern is being saved into
memory.
This message is displayed when the machine detects that the
bobbin thread is running out.
This message is displayed during bobbin winding.
This message is displayed while the embroidery unit is
initializing.
This message is displayed when a pattern which is stored in
memory is deleted.
This message is displayed if a pattern is selected while a help
topic is being displayed.
Instruction messages
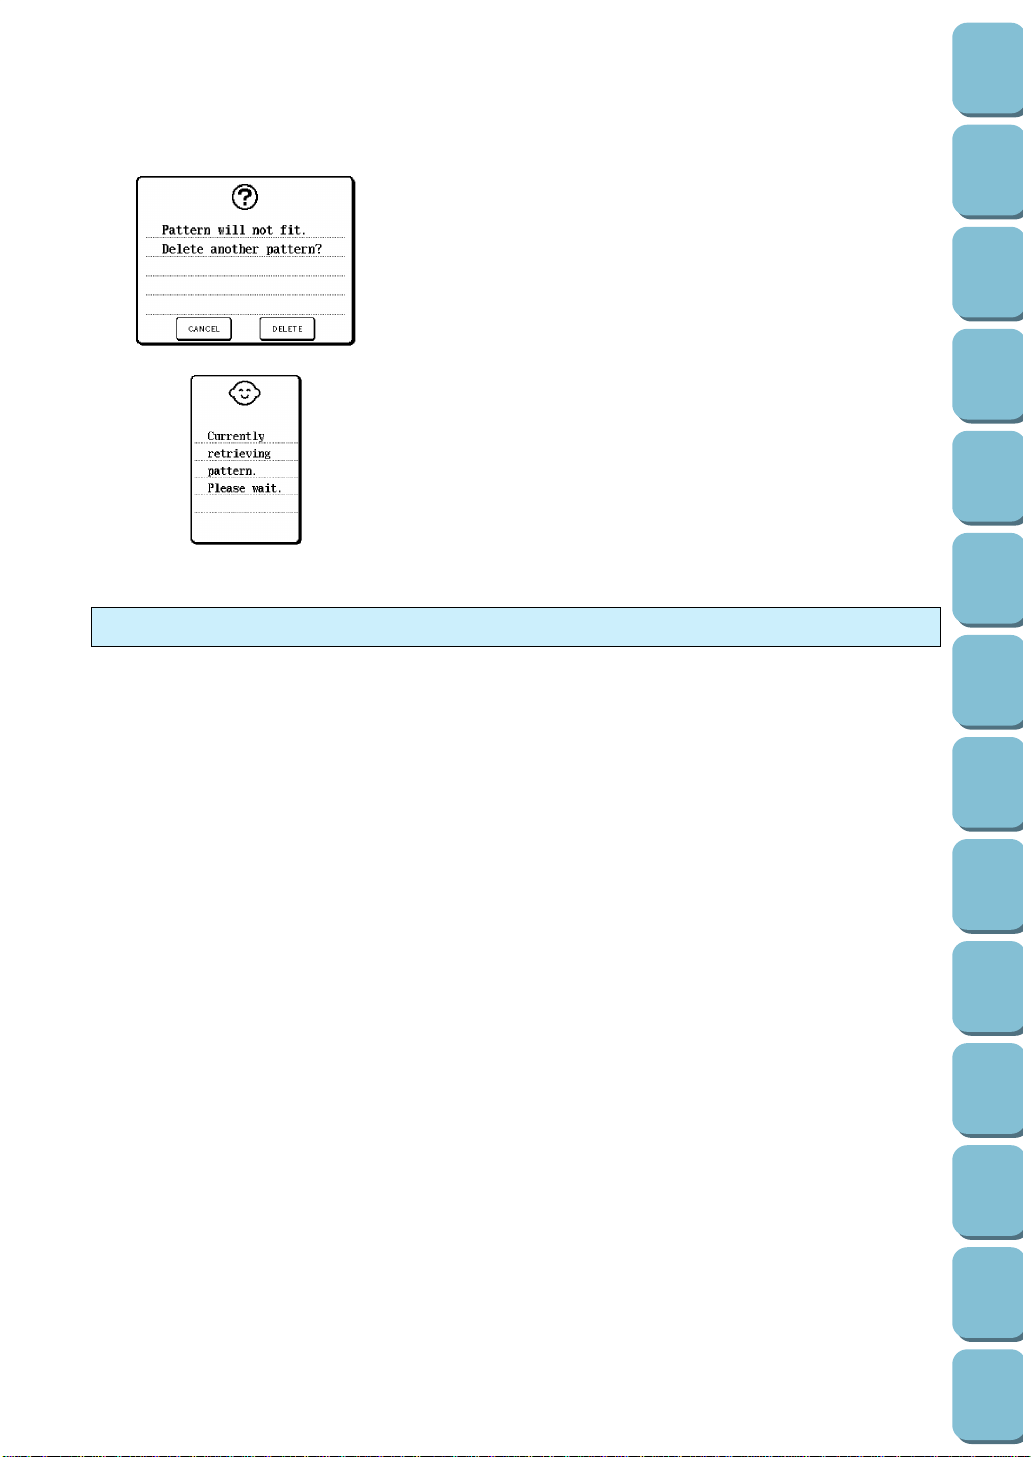
179
Utility
Stitches
Characters
and
Decorative
Stitches
Embroidering
Editing
Embroidery
Patterns
Retrieving
My
Custom
Stitch
TM
Maintenance
Error
Messages
Trouble
shooting
Sewing
Chart
Patterns
(Programmed
in Machine)
Patterns
(Memory
Card)
Sewing
Setting Up
● Proper operation: One beep
Incorrect operation: Two or four beeps
This message is displayed when the memory is full and no
more patterns can be stored.
This message is displayed when a pattern is being retrieved in
embroidery mode.
Alarms
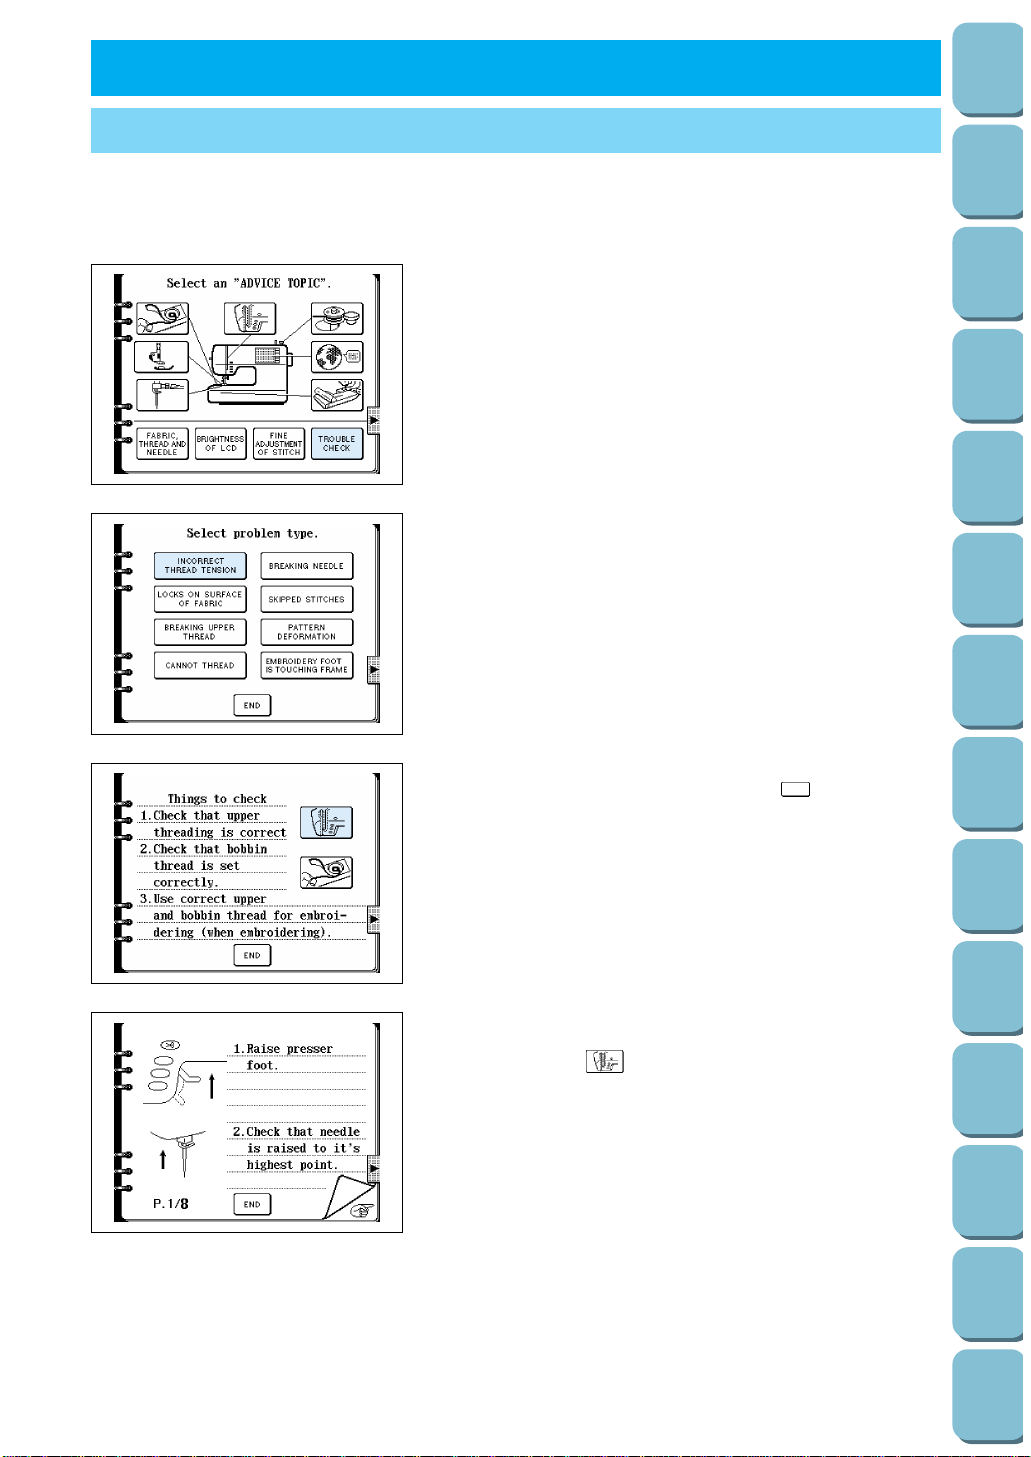
180
Utility
Stitches
Characters
and
Decorative
Stitches
Embroidering
Editing
Embroidery
Patterns
Retrieving
My
Custom
Stitch
TM
Maintenance
Error
Messages
Trouble
shooting
Sewing
Chart
Patterns
(Programmed
in Machine)
Patterns
(Memory
Card)
Sewing
Setting Up
This machine is equipped with an easy to use trouble check function which provides assistance when
there is a problem with sewing.
Touch the applicable heading and check the cause of the problem.
USING THE “OPERATION GUIDE” KEY
TROUBLESHOOTING
1. Touch the “OPERATION GUIDE” key and then touch
the “TROUBLE CHECK” key.
2. Select the heading which corresponds to the problem you
are having.
3. Check the information displayed. If you are not sure of the
correct method of operation, touch the “ ” key beside the
check heading. The method of operation will then be
displayed in steps.
Example:
If you touch the “ ” key, the upper threading method is
explained.
* Touch the “END” key to return to the original screen.

181
Utility
Stitches
Characters
and
Decorative
Stitches
Embroidering
Editing
Embroidery
Patterns
Retrieving
My
Custom
Stitch
TM
Maintenance
Error
Messages
Trouble
shooting
Sewing
Chart
Patterns
(Programmed
in Machine)
Patterns
(Memory
Card)
Sewing
Setting Up
Before calling for service, check the following items. If the problem still persists, contact the place of
purchase or your nearest Brother dealer.
Trouble with threads and stitches
Symptom
1. Upper thread breaks
2. Bobbin thread breaks
3. Skipped stitches
4. Fabric puckers
5. Inability to thread needle
6. Inability for thread tension control
Probable cause
1. Upper threading is not correct.
2. Upper thread is tangled.
3. Spool of thread is not correctly set.
4. Correct needle is not used.
5. Shuttle is damaged.
1. Upper thread is tangled.
2. Bobbin is not threaded properly in the
shuttle.
1. Needle is not correctly inserted.
2. Correct needle is not used.
3. The combination of fabric, thread and
needle is not correct.
4. Dust is clinging under the needle plate.
5. Upper threading is not correct.
1. Threading is not correct
2. Correct needle is not used.
3. Combination of fabric, thread and
needle is not correct.
4. Check if thread tension is set at
“AUTO” position,
1. Needle position is not collect.
2. Hook of needle threader does not fit
into the eye of the needle.
1. Upper threading is not correct.
2. Set of bobbin thread is not correct.
3. Combination of fabric, thread and
needle is not correct.
4. Check if the thread tension is set at
“AUTO” position.
Remedy
1. Re-thread upper thread.
2. Remove thread ends in the race or
shuttle.
3. Set spool of thread correctly.
4. Change to proper needle.
5. Contact service center.
1. Remove thread ends in the race or
inner shuttle or from around spool pin.
2. Set bobbin properly and pull out the
bobbin thread.
1. Insert needle properly.
2. Change to proper needle.
3. Check the “RELATED CHART OF
SEWING FABRICS, THREAD AND
NEEDLE” on page 172.
4. Remove dust by cleaning with a brush.
5. Re-thread upper thread.
1. Re-thread upper and bobbin thread
correctly.
2. Change to proper needle.
3. Check “RELATED CHART OF
SEWING FABRICS, THREAD AND
NEEDLE” on page 172.
4. Refer to “THREAD TENSION” on page
29.
1. Set needle at proper position using
“NEEDLE POSITION” button.
2. Set needle at proper position using
“NEEDLE POSITION” button.
1. Re-thread upper thread.
2. Set bobbin properly and pull out the
bobbin thread.
3. Check “RELATED CHART OF
SEWING FABRICS, THREAD AND
NEEDLE” on page 172.
4. Refer to “THREAD TENSION” on page
29.
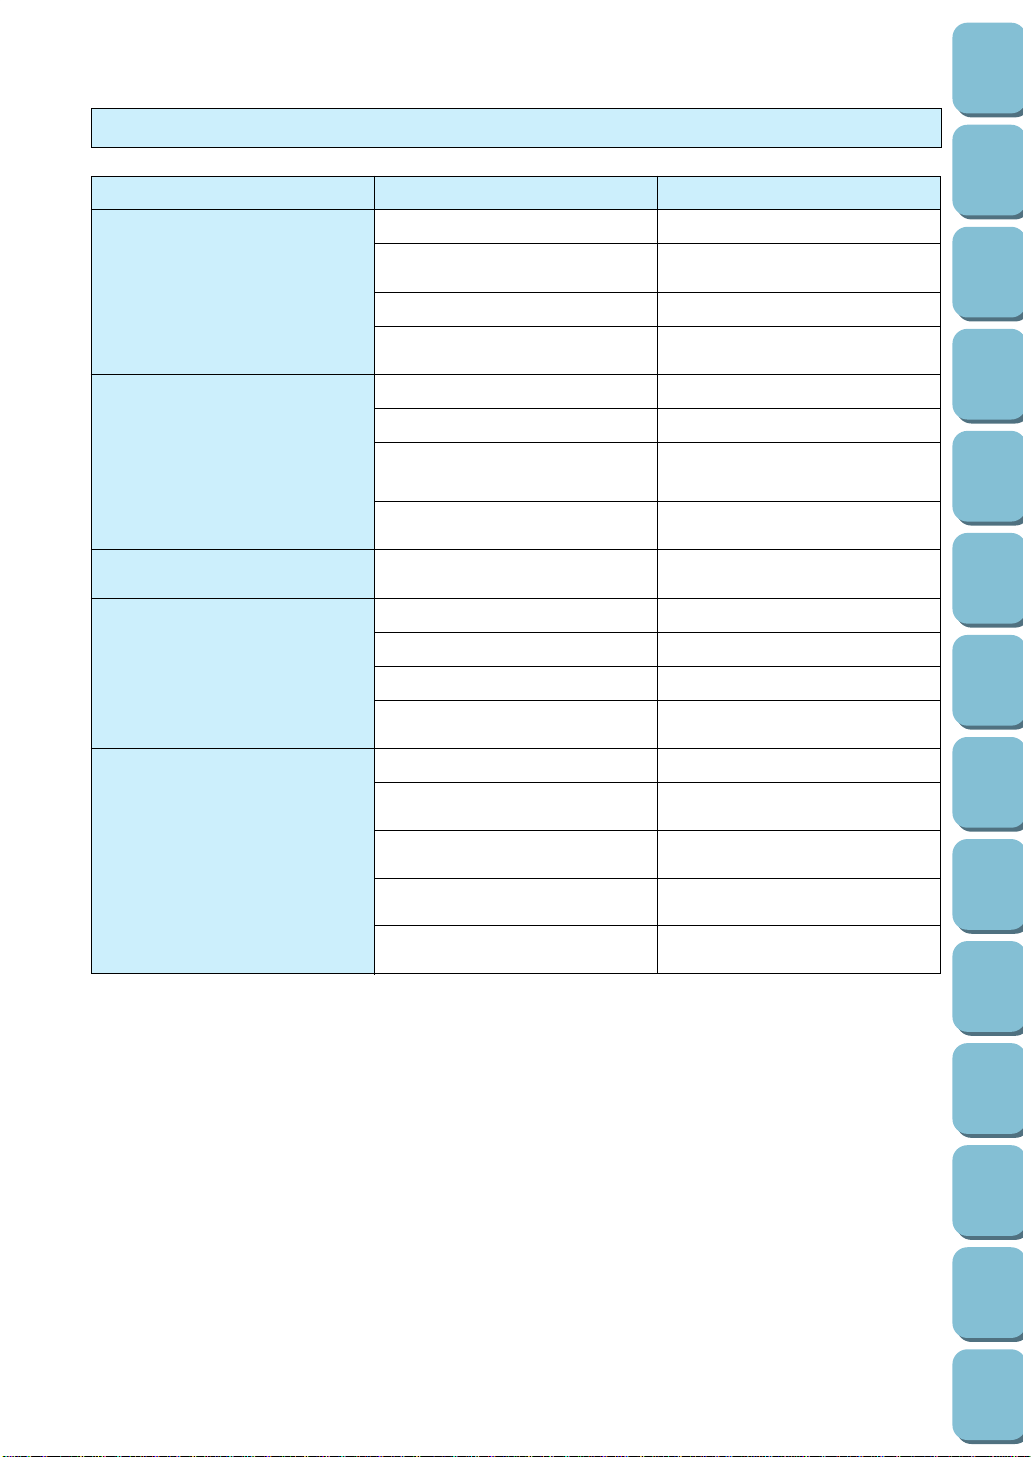
182
Utility
Stitches
Characters
and
Decorative
Stitches
Embroidering
Editing
Embroidery
Patterns
Retrieving
My
Custom
Stitch
TM
Maintenance
Error
Messages
Trouble
shooting
Sewing
Chart
Patterns
(Programmed
in Machine)
Patterns
(Memory
Card)
Sewing
Setting Up
Symptom
1. Fabric is not fed properly
2. Needle breaks
3. Machine is noisy, slow speed, thread
trimming is not good
4. Machine does not start
5. Embroidery unit does not work
Remedy
1. Set stitch length properly.
2. Change presser foot to correct one.
3. Change to proper needle.
4. Remove thread-ends in the race or
inner shuttle.
1. Set needle properly.
2. Change to proper needle.
3. Check the “RELATED CHART OF
SEWING FABRICS, THREAD AND
NEEDLE” on page 172.
4. Sew without pulling but just guide the
fabric.
1. Remove dust by cleaning with a brush.
1. Press “START/STOP” button.
2. Turn the power on.
3. Lower the presser foot.
4. Refer to “ERROR MESSAGES” on
page 173.
1. Turn the power on.
2. Connect embroidery unit properly to
the machine.
3. Turn off the power then insert the
memory card.
4. Refer to “ERROR MESSAGES” on
page 173.
5. Refer to page 109.
Probable cause
1. Stitch length is set at no feeding.
2. The combination of selected stitch and
presser foot is not correct.
3. Correct needle is not being used.
4. Thread is entangled.
1. Needle is not correctly inserted.
2. Correct needle is not used.
3. The combination of fabric, thread and
needle is not correct.
4. The fabric is pulled too much.
1. Dust is clinging under the needle plate.
1. “START/STOP” button is not pressed.
2. Main power switch is in the off position.
3. Presser foot is not lowered.
4. Check error messages.
1. Power switch is in the off position.
2. Embroidery unit is not correctly
connected to the machine.
3. Memory card is not inserted.
4. Check error messages.
5. The embroidery unit was not correctly
initialized.
Mechanical trouble
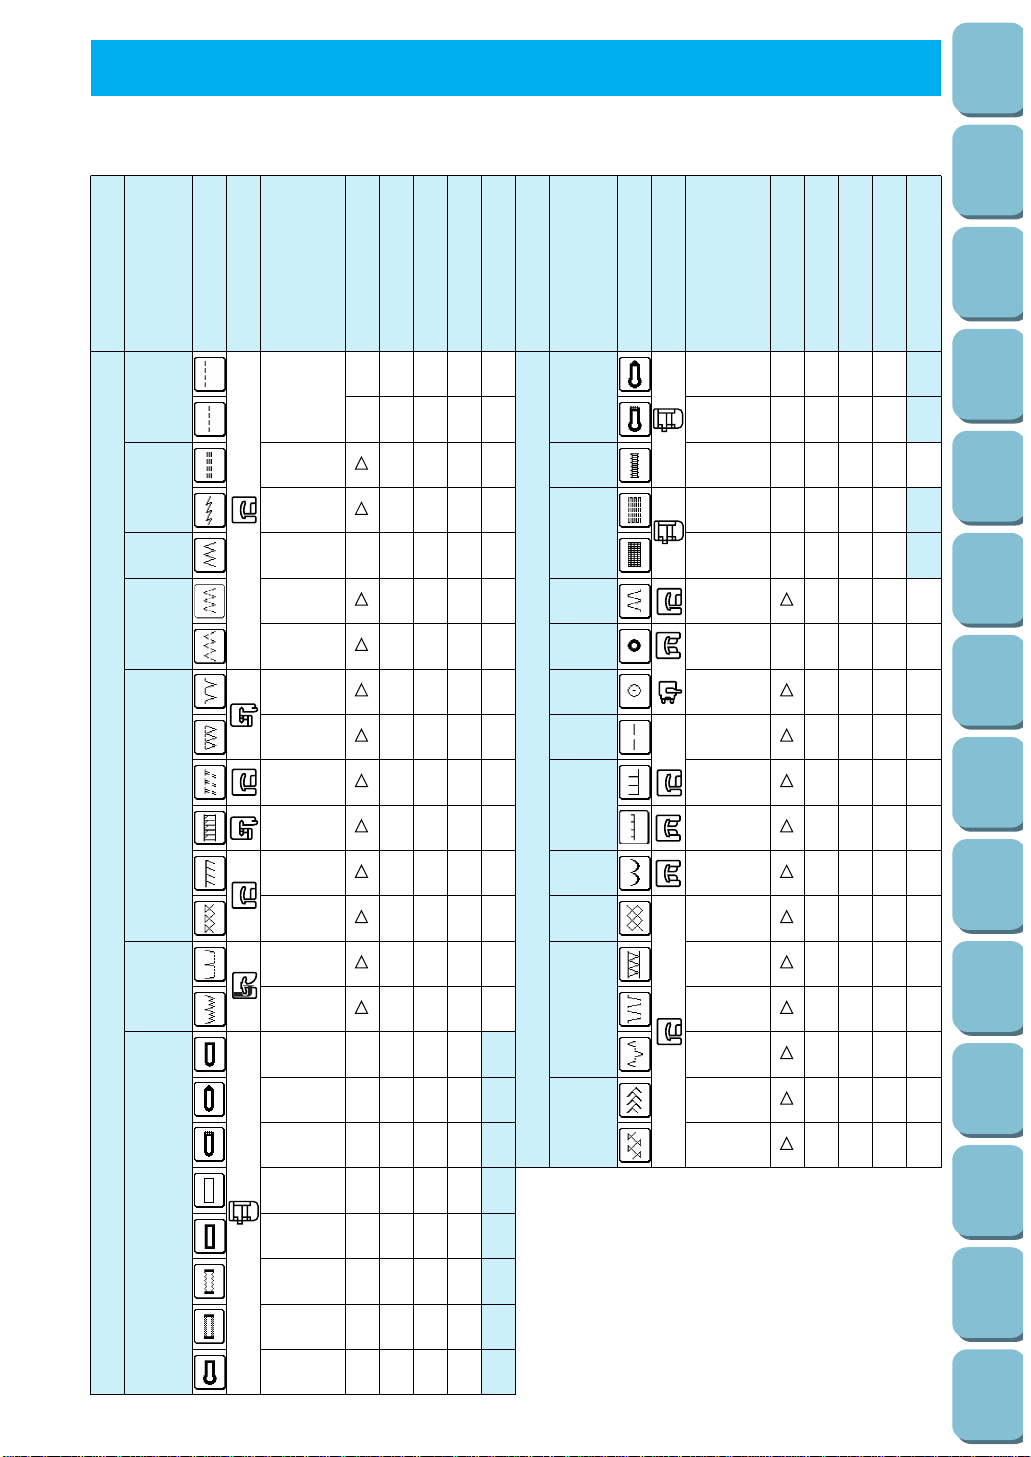
183
Utility
Stitches
Characters
and
Decorative
Stitches
Embroidering
Editing
Embroidery
Patterns
Retrieving
My
Custom
Stitch
TM
Maintenance
Error
Messages
Trouble
shooting
Sewing
Chart
Patterns
(Programmed
in Machine)
Patterns
(Memory
Card)
Sewing
Setting Up
..CT
..CT
..CT
..CT
..CT
..CT
LSCT
. –CT
..CT
..CT
..CT
..CT
..CT
..CT
..CT
..CT
..CT
.. . CT
SEWING CHART
J
A
G
J
N
M
J
N
N
J
G
J
J
R
A
SELECT KEY
NAME OF PATTERN
PATTERN
TYPE OF PRESSER
FOOT
USE
REINFORCEMENT
STITCH KEY
STITCH WIDTH BY
STITCH ADJUSTING KEY
STITCH LENGTH BY
STITCH ADJUSTING KEY
AUTOMATIC THREAD
CUTTING
AUTOMATIC REINFORCE-
MENT STITCHING
UTILITY STITCH
UTILITY STITCH
SELECT KEY
NAME OF PATTERN
PATTERN
TYPE OF PRESSER
FOOT
USE
REINFORCEMENT
STITCH KEY
STITCH WIDTH BY
STITCH ADJUSTING KEY
STITCH LENGTH BY
STITCH ADJUSTING KEY
AUTOMATIC THREAD
CUTTING
AUTOMATIC REINFORCE-
MENT STITCHING
STRAIGHT
DARNING
STITCH
BUTTONHOLE
STITCH
TAPE
ATTACHING
EYELET
BUTTON
SEWING
BASTING
APPLIQUE
SCALLOP
SMOCKING
PATCHWORK
STITCH
FAGOTING
General
sewing,
gather,
Pintuck, etc.
Darning of
medium fabric
Darning of
thick fabric
Attaching tape to
thin and medium
stretch fabric
For making
eyelet on belt,
etc.
Attaching
buttons
Basting
Appliques
Appliques
Decorating collar
of blouse, edge
of handkerchief
Smocking,
decorative
stitching
Patchwork
stitches, decorative
stitching
Patchwork
stitches, decorative
stitching
Patchwork
stitches, decorative
stitching
Fagoting,
decorative
stitching
Fagoting,
decorative
stitching
General
sewing for
reinforcement
Overcasting,
Patchwork
Overcasting (medium,
thick and stretch fabrics)
Tape attaching, darning
Overcasting (medium
and stretch fabrics)
Tape attaching, darning
Reinforcing of
thin and
medium fabric
Reinforcing of
thick fabric
Reinforcing of medium
stretch fabric and thick
fabric, decorative stitching
Reinforcing of
medium, thick and
easily-frayable fabric
Reinforcement
of stretch
fabric
Reinforcement
of stretch
fabric
Reinforcement
of skirts
Reinforcement
of skirts with
stretch fabric
Buttonholes
for blouses
and shirts
Buttonholes
for pajamas
and shirts
Buttonholes
for stretch
fabric
Buttonholes
for stretch
Buttonholes
for suits and
overalls
Straight stitching (attaching
sleeves, reinforcing,
sewing stretch fabrics)
STRETCH
STITCH
ZIGZAG
ELASTIC
ZIGZAG
STITCH
OVERCASTING
STITCH
BLIND
HEM
STITCH
BUTTONHOLE
STITCH
R ..CT
R–. CT
..CT
..CT
R ..CT
..CT
..CT
..CT
..CT
..CT
..CT
..CT
..CT
..CT
..CT
..CT
..CT
..CT
..CT
..CT
..CT
..CT
..CT
Buttonholes
for jeans and
trousers
Buttonholes
for thick coats
Reinforcement
at opening of
pocket, etc.
BAR TACK
Buttonholes
for jeans and
trousers
Buttonholes
for thick coats
Buttonholes for
first step in
making a bound
A
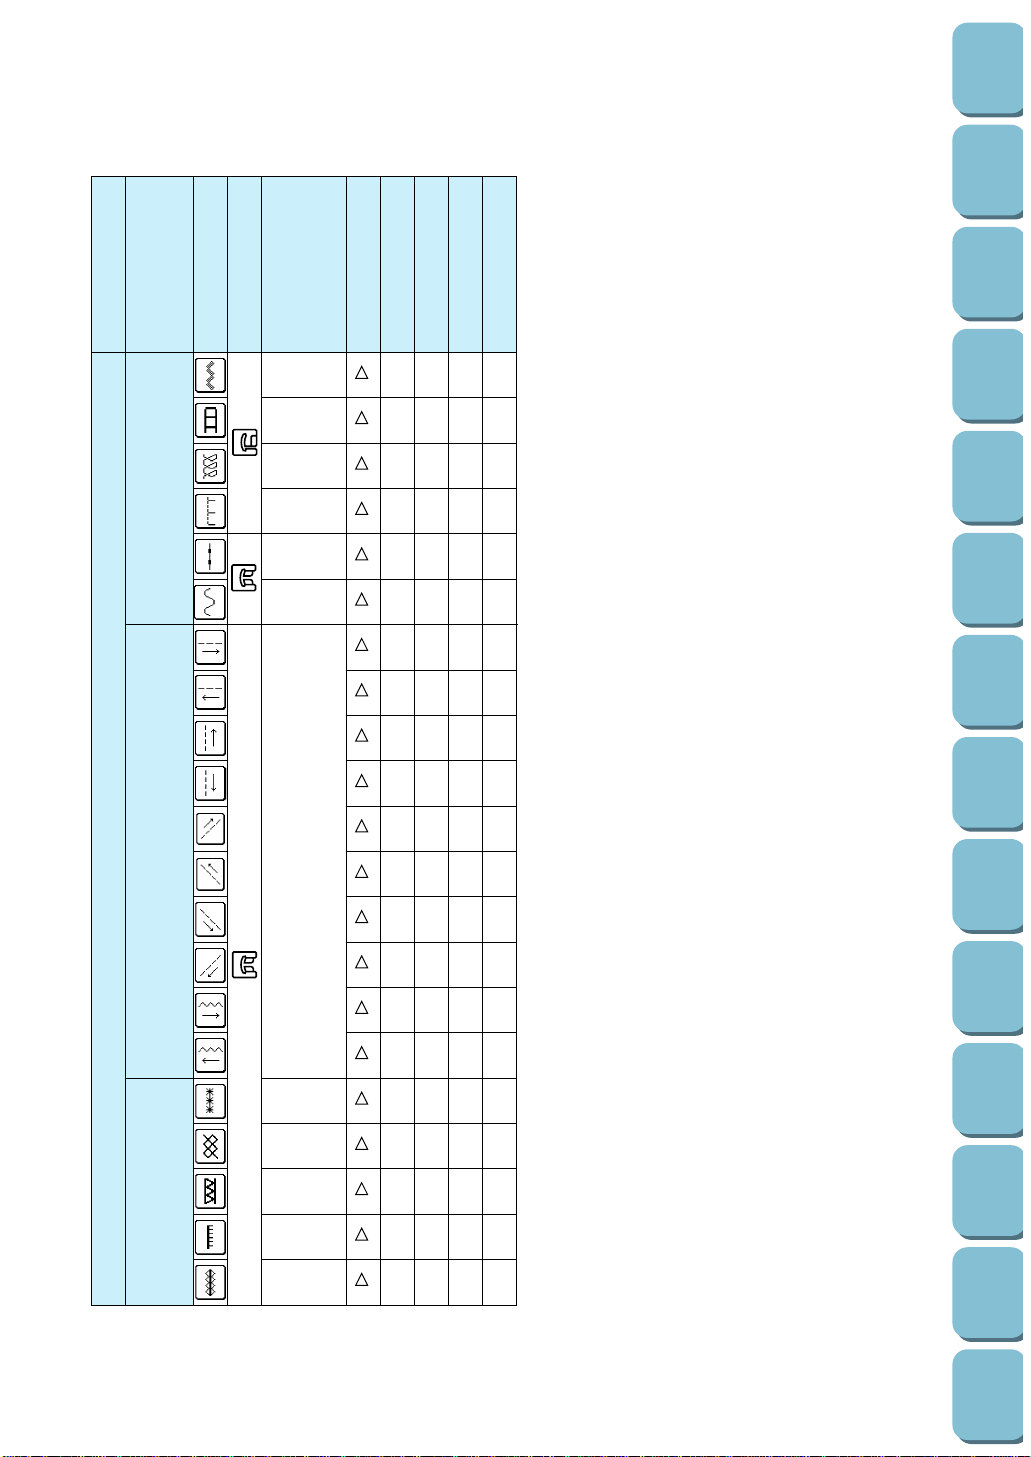
184
Utility
Stitches
Characters
and
Decorative
Stitches
Embroidering
Editing
Embroidery
Patterns
Retrieving
My
Custom
Stitch
TM
Maintenance
Error
Messages
Trouble
shooting
Sewing
Chart
Patterns
(Programmed
in Machine)
Patterns
(Memory
Card)
Sewing
Setting Up
Decorative stitching
for cuffs made from
stretch fabric
Decorative stitching
for cuffs made from
stretch fabric
..CT
..CT
..CT
..CT
..CT
..CT
––CT
––CT
––CT
––CT
––CT
––CT
––CT
––CT
––CT
––CT
..CT
..CT
..CT
..CT
..CT
J
N
N
SELECT KEY
NAME OF PATTERN
PATTERN
TYPE OF PRESSER
FOOT
USE
REINFORCEMENT
STITCH KEY
STITCH WIDTH BY
STITCH ADJUSTING KEY
STITCH LENGTH BY
STITCH ADJUSTING KEY
AUTOMATIC THREAD
CUTTING
AUTOMATIC REINFORCE-
MENT STITCHING
UTILITY STITCH
DECORATIVE
STITCH
Decorative
stitching
Decorative
stitching
Decorative
stitching
For attaching
applique on
tubular part
Decorative
hems
Decorative
hems
Decorative
hems
Decorative
hems
Decorative
hems
Decorative stitching
of thin to medium
stretch fabric
LATERAL
SEWING
HEIRLOOM
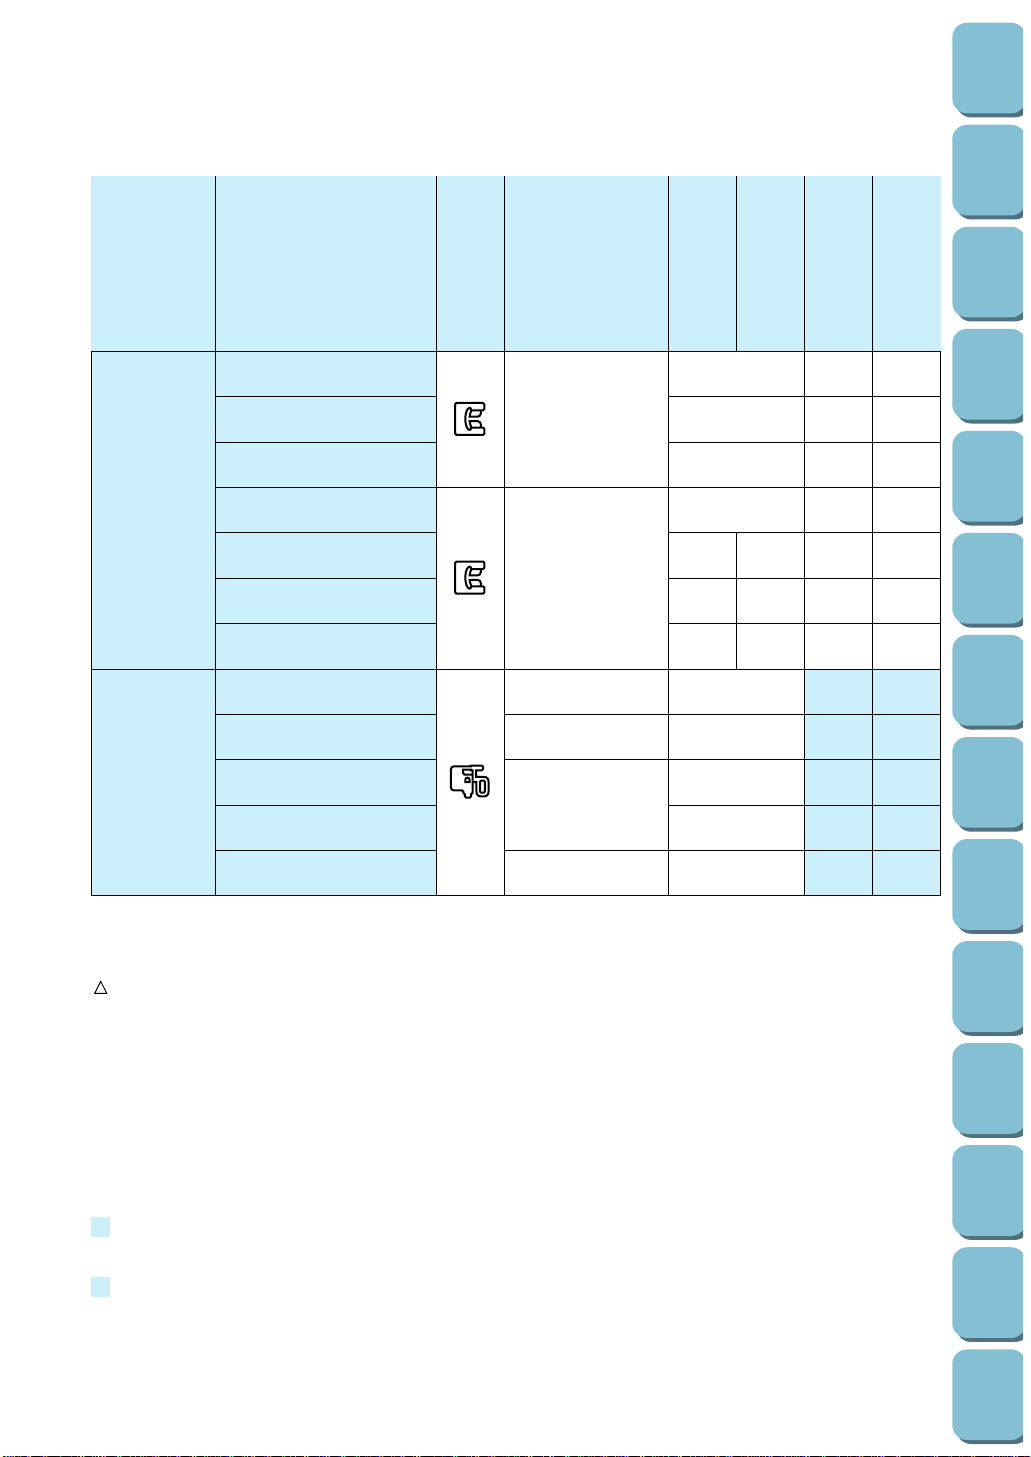
185
Utility
Stitches
Characters
and
Decorative
Stitches
Embroidering
Editing
Embroidery
Patterns
Retrieving
My
Custom
Stitch
TM
Maintenance
Error
Messages
Trouble
shooting
Sewing
Chart
Patterns
(Programmed
in Machine)
Patterns
(Memory
Card)
Sewing
Setting Up
L, S C T
L,S C T
L, S C T
L, S – –
.. ––
––––
.. ––
–CT
–CT
–CT
–CT
–CT
ALPHABET (BLOCK)
ALPHABET
ALPHABET (Italic)
DECORATIVE STITCH
SATIN STITCH
CROSS STITCH
DECORATIVE 7 mm WIDTH
ALPHABET
FRAME PATTERN
ONE-POINT PATTERN
FLORAL ALPHABET
EMBROIDERY
CHARACTERS
Character sewing
Decorative stitch
Character sewing
Frame pattern
Patterns
Characters
MEMORY CARD
(SOLD SEPARATELY)
R : Reverse sewing while the “REVERSE STITCH” button is pressed.
: When the “REVERSE STITCH” button is pressed, the machine will sew three reinforcement
stitches and stop.
. : Adjustable
– : Non-adjustable
L, M, S or L, S:
Pattern size can be changed
L (Large)
M (Medium)
S (Small)
T : When the automatic reinforcement stitch is preset, reinforcement stitches will be sewn automatically
at the start of sewing. Press the “REVERSE STITCH” button to sew a reinforcement stitch
automatically at the finish of sewing.
T : Reinforcement stitches will be sewn automatically at the start of sewing. Press the “REVERSE
STITCH” button to sew a reinforcement stitch automatically at the finish of sewing.
C : Programmed automatic thread cutting is available.
C : Automatic thread cutting is available.
N
N
Q
SELECT KEY
NAME OF PATTERN
TYPE OF PRESSER
FOOT
USE
STITCH WIDTH BY
STITCH ADJUSTING
KEY
STITCH LENGTH BY
STITCH ADJUSTING
KEY
AUTOMATIC THREAD
CUTTING
AUTOMATIC
REINFORCEMENT
STITCHING

186
Utility
Stitches
Characters
and
Decorative
Stitches
Embroidering
Editing
Embroidery
Patterns
Retrieving
My
Custom
Stitch
TM
Maintenance
Error
Messages
Trouble
shooting
Sewing
Chart
Patterns
(Programmed
in Machine)
Patterns
(Memory
Card)
Sewing
Setting Up
Utility stitches
Character sewing
PATTERNS (PROGRAMMED IN MACHINE)
Alphabet (Block style)
Size “L” (Large) : 11 mm (7/16”), “S” (Small) : 7 mm (1/4”)
Alphabet (Italic style)
Size “L” (Large) : 11 mm (7/16”), “S” (Small) : 7 mm (3/8”)

187
Utility
Stitches
Characters
and
Decorative
Stitches
Embroidering
Editing
Embroidery
Patterns
Retrieving
My
Custom
Stitch
TM
Maintenance
Error
Messages
Trouble
shooting
Sewing
Chart
Patterns
(Programmed
in Machine)
Patterns
(Memory
Card)
Sewing
Setting Up
Satin stitches
Cross stitches
Size cannot be changed.
Alphabet (Cursive hand writing style)
Size “L” (Large) : 27 mm (1”), “S” (Small) : 15 mm (3/8”)
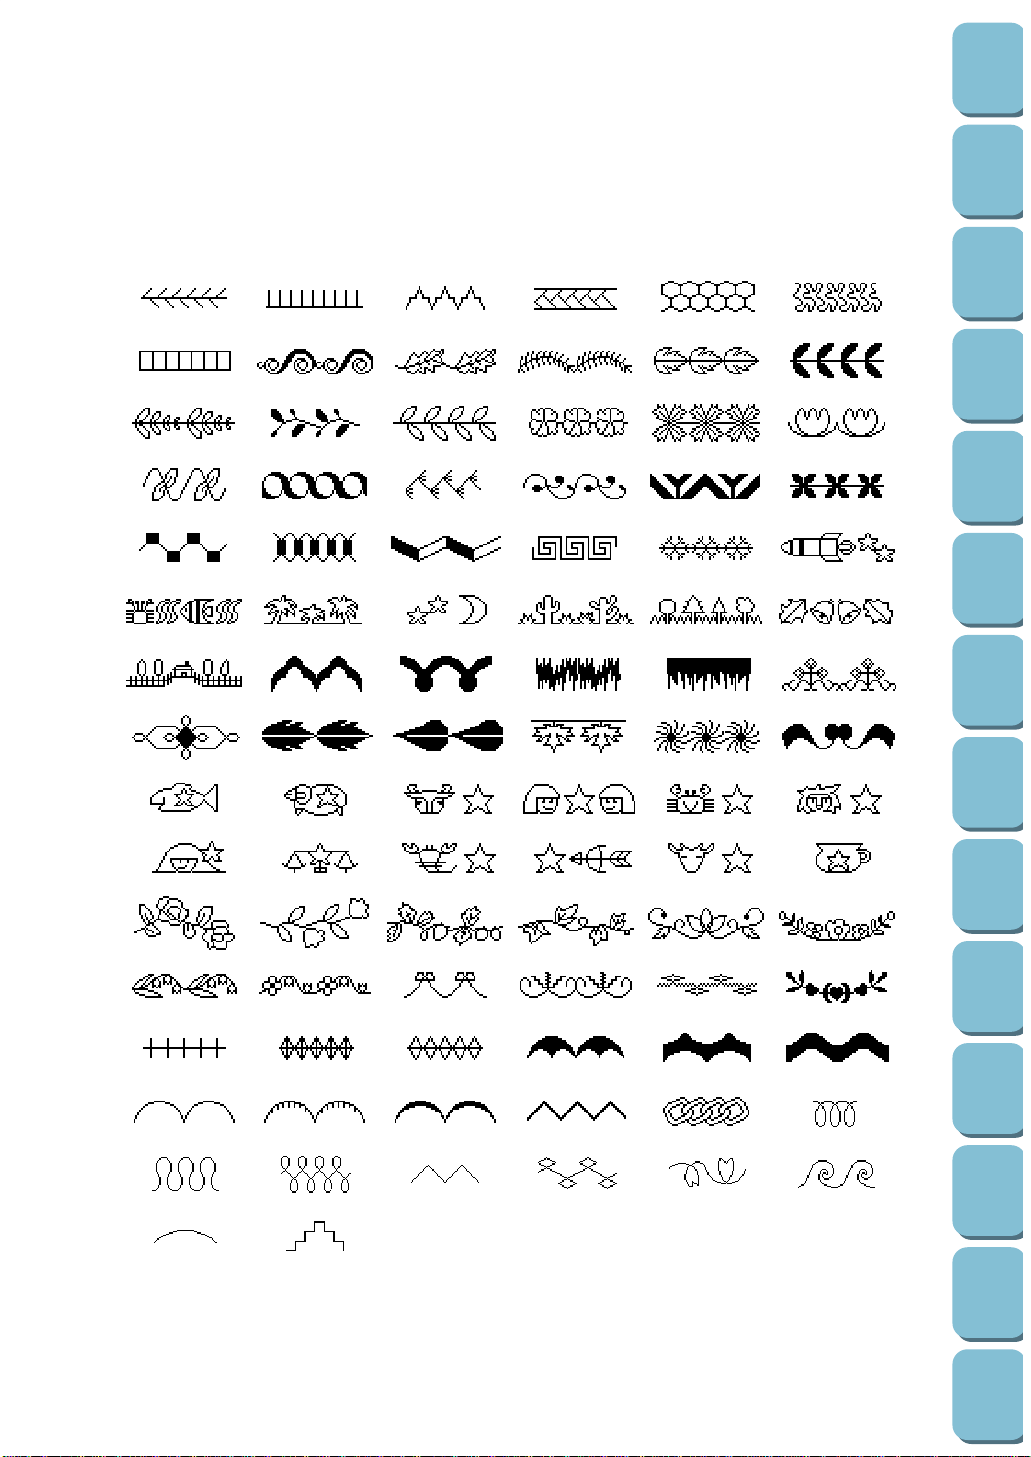
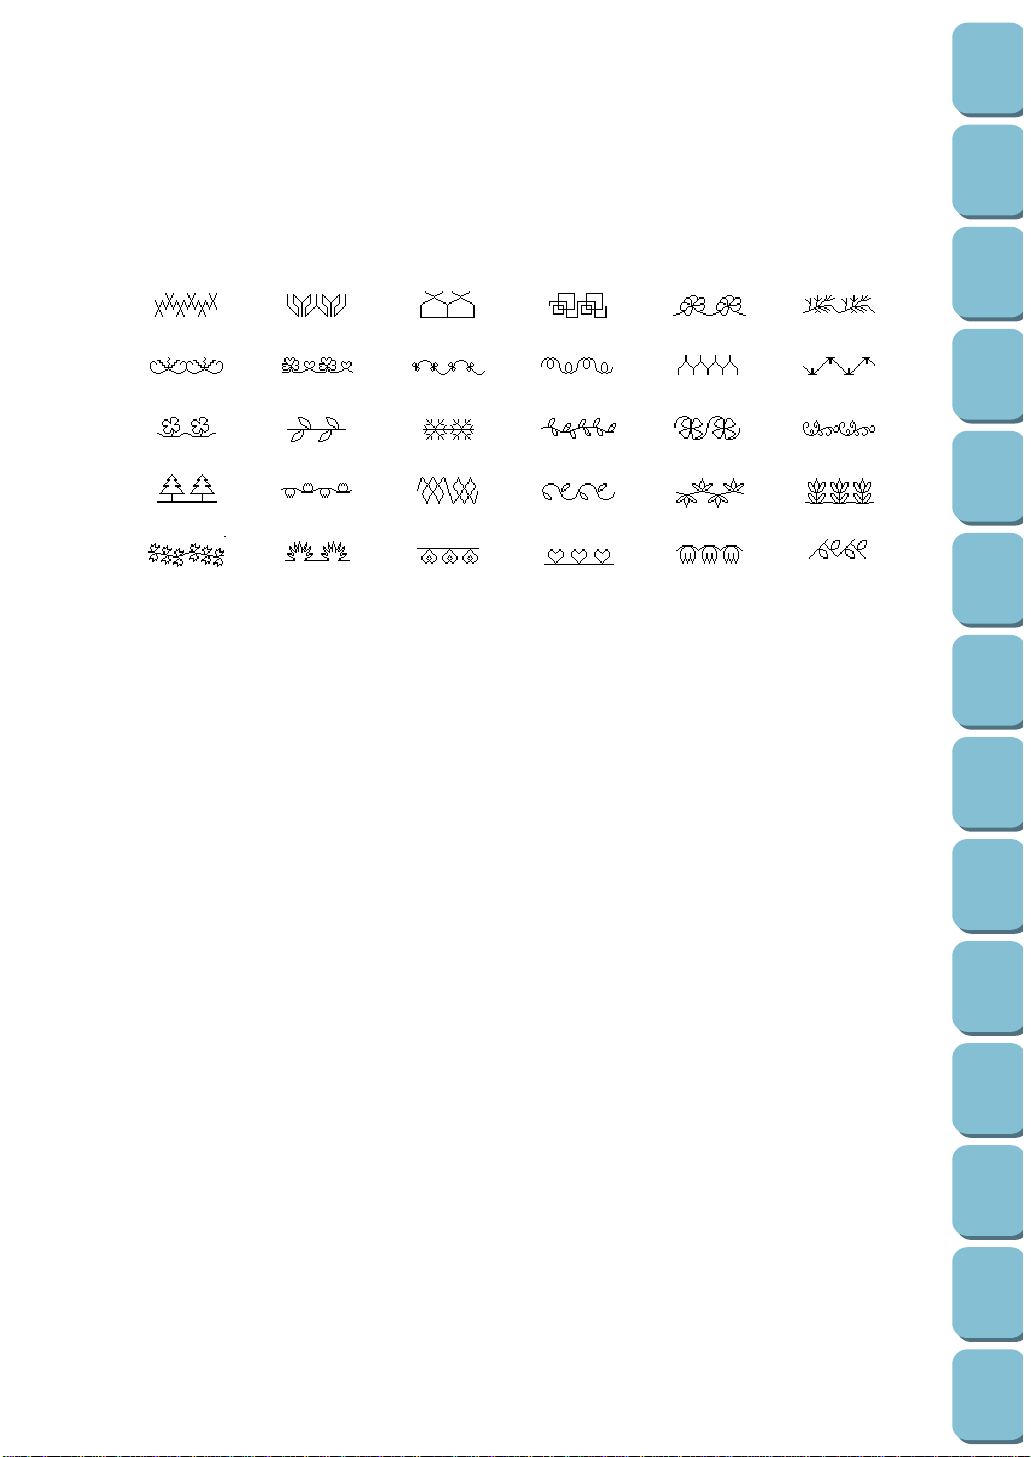
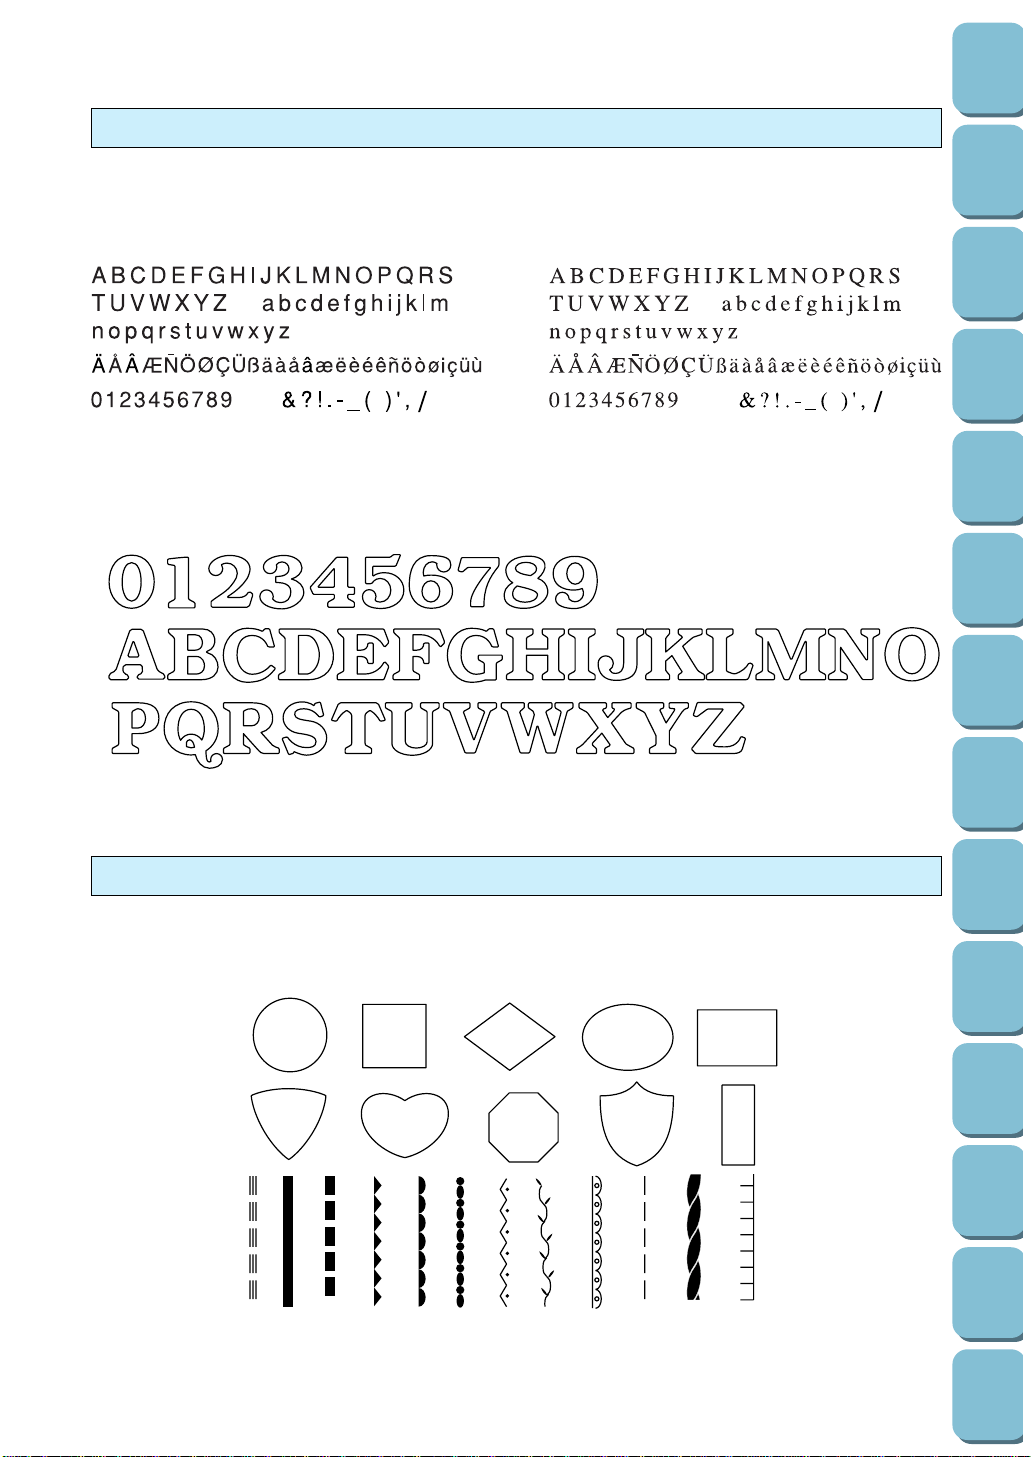
190
Utility
Stitches
Characters
and
Decorative
Stitches
Embroidering
Editing
Embroidery
Patterns
Retrieving
My
Custom
Stitch
TM
Maintenance
Error
Messages
Trouble
shooting
Sewing
Chart
Patterns
(Programmed
in Machine)
Patterns
(Memory
Card)
Sewing
Setting Up
Character embroidery chart
Sizes: [L] 30 mm (1-3/16”), [M] 15 mm (9/16”), [S] 7.5 mm (1/4”).
Frame pattern embroidery chart
Sizes can be enlarged or reduced.
Frames
Stitch
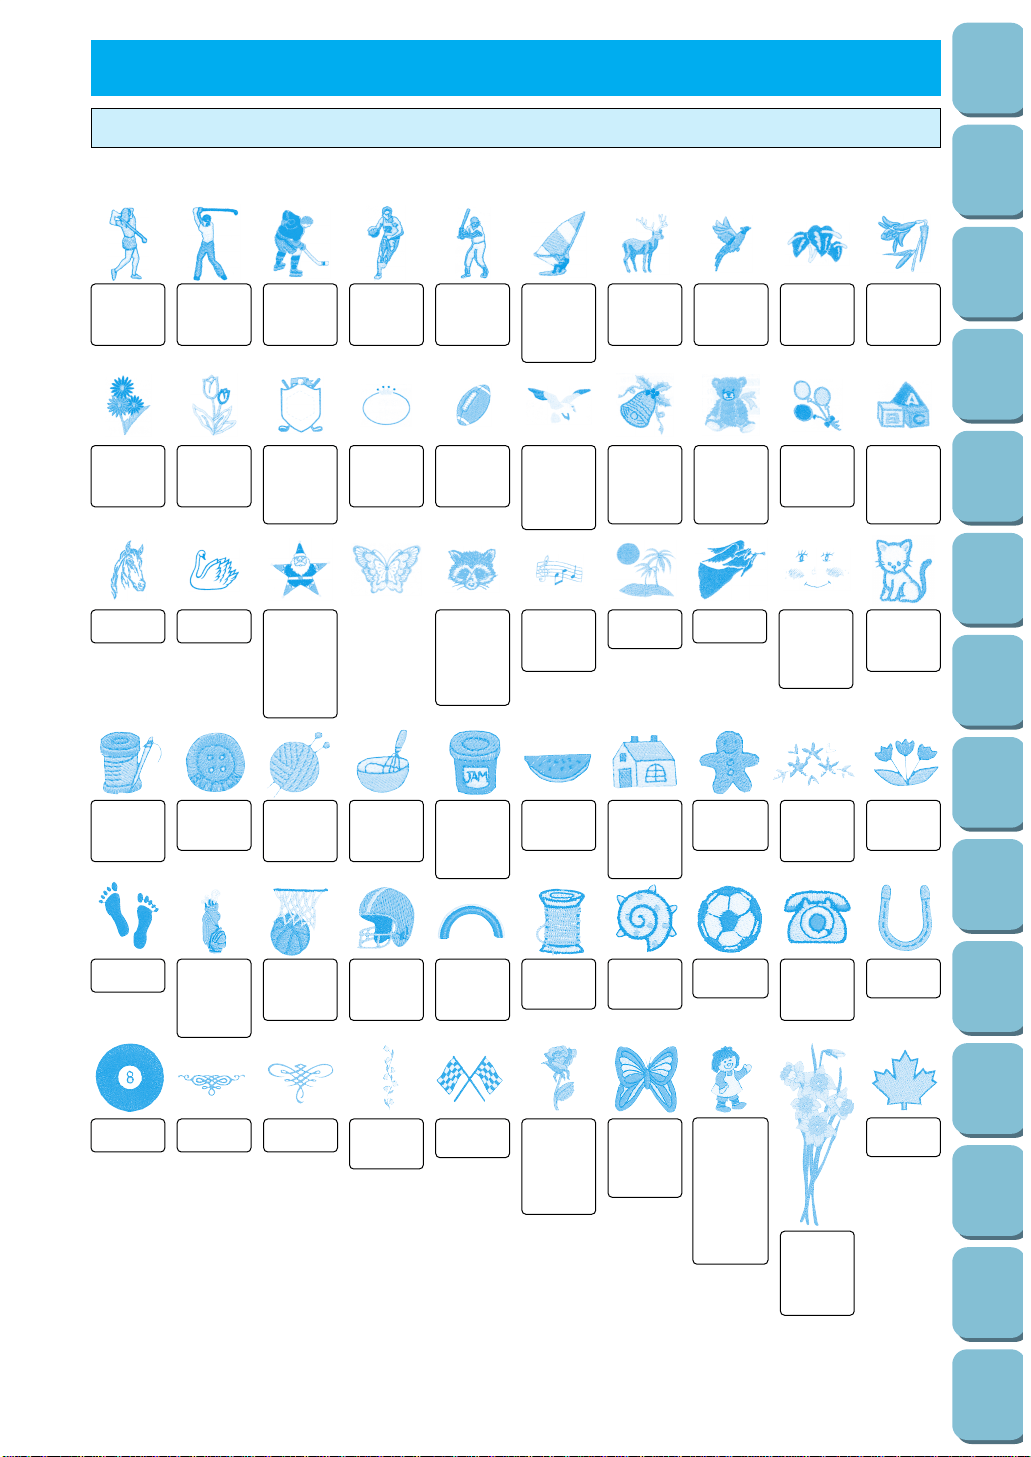
191
Utility
Stitches
Characters
and
Decorative
Stitches
Embroidering
Editing
Embroidery
Patterns
Retrieving
My
Custom
Stitch
TM
Maintenance
Error
Messages
Trouble
shooting
Sewing
Chart
Patterns
(Programmed
in Machine)
Patterns
(Memory
Card)
Sewing
Setting Up
One point mark embroidery pattern
<Embroidering times: 2 - 31 min. (It does not include the time needed to change colors.)>
1...019
2...707
3...085
1...323
2...085
3...001
4...058
1...086
2...058
3...707
1...070
2...085
3...086
4...323
1...513
2...001
3...208
4...058
1...001
2...800
3...515
4...058
5...900
1...205
2...307
3...005
4...810
1...339
2...214
3...307
4...001
1...800
2...405
3...307
4...900
1...307
2...205
3...214
4...900
1...214
2...070
3...001
4...707
1...001
2...070
3...307
4...214
5...800
1...010
2...339
3...214
4...707
1...208
2...507
3...030
4...405
1...085
2...030
3...513
4...205
1...085
2...513
3...507
4...205
1...030
2...507
3...085
4...208
1...507
2...205
3...030
4...513
1...001
2...058
3...208
4...707
5...007
1...502
2...085
3...208
1...900
2...614
3...534
1...339
2...001
3...900
1...079
2...515
3...328
4...058
5...800
1...800
2...001
3...843
4...323
5...900
1...800
2...205
3...405
4...800
5...900
1...058 1...800 1...614
1...843
2...208
1...307
2...800
3...058
4...086
5...214
1...205
2...001
3...405
4...800
5...124
6...001
7...800
8...900
1...205
2...019
3...800
4...900
1...800
2...513
3...900
1...001
2...010
3...323
4...513
5...058
1...085
2...323
3...058
1...086
2...205
3...534
4...019
1...513
2...030
3...058
1...900
1...900
2...205
3...800
4...323
5...900
1...339
2...058
3...843
4...900
1...405
2...900
3...005
4...704
1...405
2...507
3...800
4...205
1...843
2...900
3...019
1...205
2...019
3...900
1...001
2...900
1...079
2...800
3...208
4...900
1...005
2...707
1...513
2...507
1...900 1...614
1...086
1...001
2...515
3...507
1...001
2...900
1...513
2...328
3...515
4...085
5...086
6...079
7...515
1...513
2...030
3...205
4...339
5...900
1...405
2...001
3...800
4...900
5...001
6...307
7...405
8...900
9...307
10
...800
11
...900
1...515
2...513
3...001
4...208
5...205
6...513
1...001
2...405
3...017
4...208
5...205
6...900
Patterns which are stored in the machine or memory cards are for home use only. These patterns are not
to be used for any activity other than home use.
PATTERNS (MEMORY CARD)
1...001
2...704
3...704
4...707
5...707
6...010
7...900
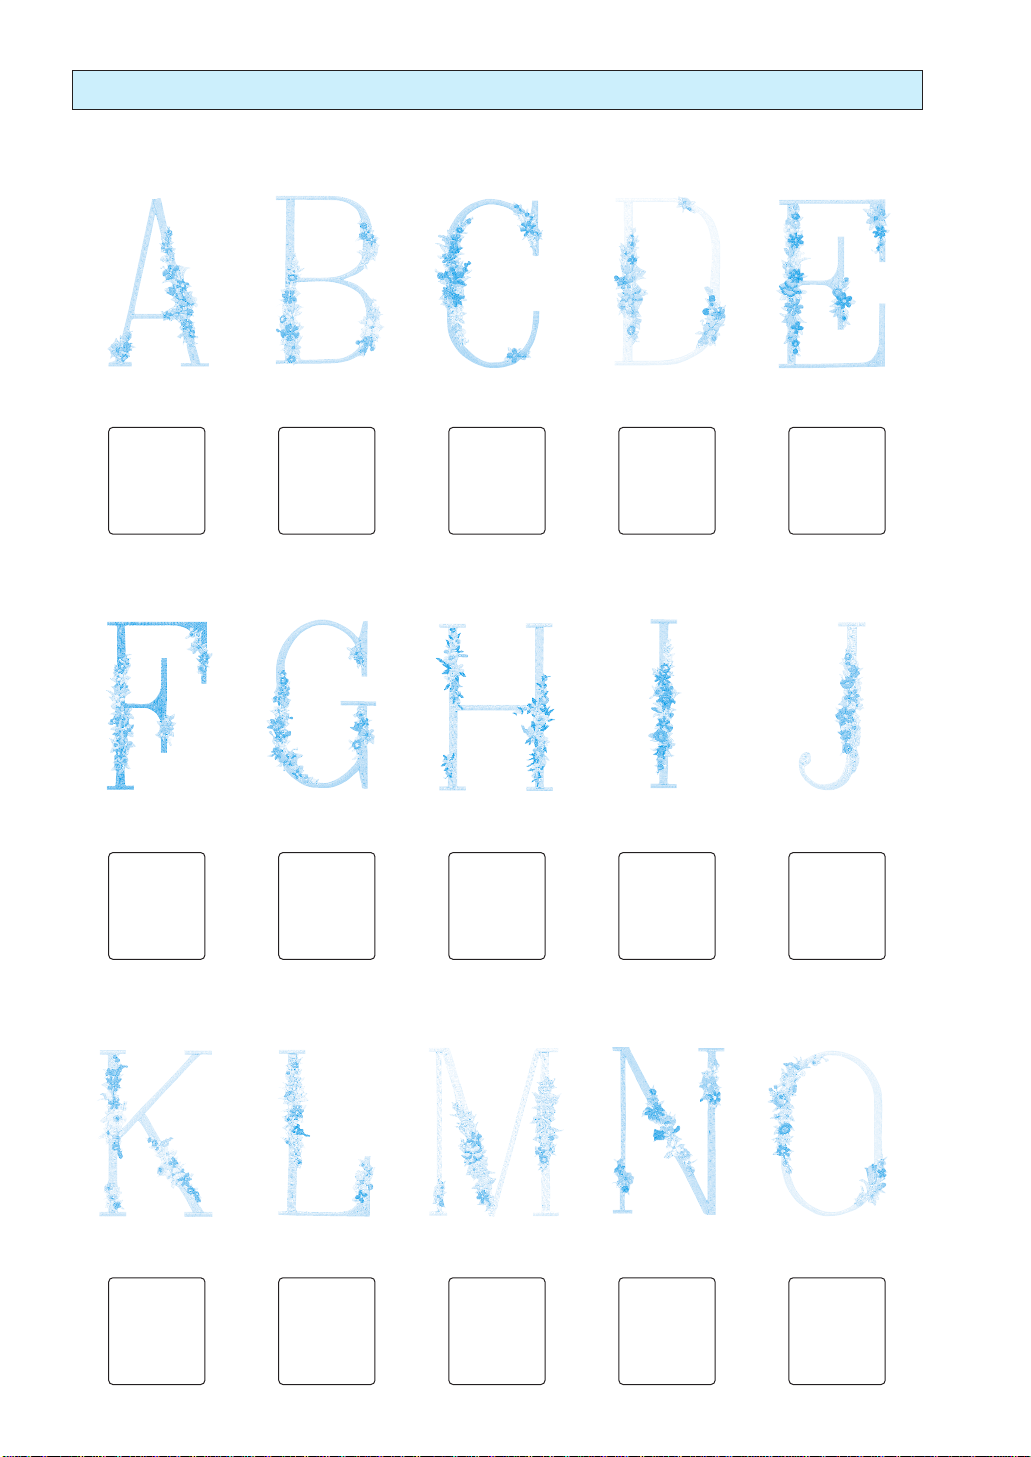
Floral alphabet
1 ..... 017
2 ..... 513
3 ..... 810
4 ..... 070
5 ..... 612
6 ..... 205
1 ..... 017
2 ..... 513
3 ..... 810
4 ..... 205
5 ..... 070
6 ..... 612
1 ..... 017
2 ..... 513
3 ..... 810
4 ..... 205
5 ..... 612
6 ..... 070
1 ..... 017
2 ..... 513
3 ..... 205
4 ..... 810
5 ..... 612
6 ..... 070
1 ..... 017
2 ..... 513
3 ..... 810
4 ..... 070
5 ..... 612
6 ..... 205
1 ..... 017
2 ..... 513
3 ..... 070
4 ..... 810
5 ..... 205
6 ..... 612
1 ..... 017
2 ..... 513
3 ..... 205
4 ..... 612
5 ..... 070
6 ..... 810
1 ..... 017
2 ..... 513
3 ..... 612
4 ..... 810
5 ..... 205
6 ..... 070
1 ..... 017
2 ..... 513
3 ..... 612
4 ..... 810
5 ..... 070
6 ..... 205
1 ..... 017
2 ..... 513
3 ..... 612
4 ..... 810
5 ..... 070
6 ..... 205
1 ..... 017
2 ..... 513
3 ..... 810
4 ..... 612
5 ..... 205
6 ..... 070
1 ..... 017
2 ..... 513
3 ..... 810
4 ..... 205
5 ..... 612
6 ..... 070
1 ..... 017
2 ..... 513
3 ..... 205
4 ..... 612
5 ..... 810
6 ..... 070
1 ..... 017
2 ..... 513
3 ..... 070
4 ..... 810
5 ..... 612
6 ..... 205
1 ..... 017
2 ..... 513
3 ..... 612
4 ..... 810
5 ..... 070
6 ..... 205

1 ..... 017
2 ..... 513
3 ..... 810
4 ..... 070
5 ..... 205
6 ..... 612
1 ..... 017
2 ..... 513
3 ..... 810
4 ..... 070
5 ..... 205
6 ..... 070
1 ..... 017
2 ..... 513
3 ..... 612
4 ..... 070
5 ..... 810
6 ..... 205
1 ..... 017
2 ..... 513
3 ..... 810
4 ..... 612
5 ..... 205
6 ..... 070
1 ..... 017
2 ..... 513
3 ..... 810
4 ..... 205
5 ..... 612
6 ..... 070
1 ..... 017
2 ..... 513
3 ..... 810
4 ..... 612
5 ..... 070
6 ..... 205
1 ..... 017
2 ..... 513
3 ..... 810
4 ..... 070
5 ..... 612
6 ..... 205
1 ..... 017
2 ..... 513
3 ..... 612
4 ..... 810
5 ..... 070
6 ..... 205
1 ..... 017
2 ..... 513
3 ..... 070
4 ..... 810
5 ..... 205
6 ..... 612
1 ..... 017
2 ..... 513
3 ..... 070
4 ..... 810
5 ..... 612
6 ..... 205
1 ..... 017
2 ..... 513
3 ..... 810
4 ..... 205
5 ..... 612
6 ..... 070