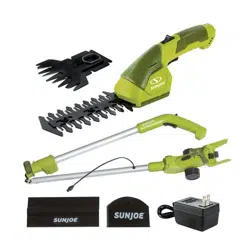
This cordless grass shear + hedge trimmer comes completely assembled with the grass shear blade pre-installed.
CAUTION! Wear protective gloves before handling the blades.
WARNING! Make sure the unit is powered off before handling the blades.
Fitting and Changing the Blades
The grass shear + hedge trimmer is equipped with two interchangeable blades that are designed for do-it-yourself grooming projects around your garden. The hedge trimmer blade is used to cut hedges and shrubs (Fig. 1) while the grass shear blade is used to cut grass and hedges where finer detail is required (Fig. 2).
1. To fit or change the blade, place the grass shear + hedge trimmer on a hard surface. Turn the unit upside down in one hand and use the other hand to gently lift the tab of the blade cover. Slide the tab back until the cover can be removed (Fig. 3).
2. Gently remove the blade by lifting the end tip of the blade off of the grass shear + hedge trimmer unit (Fig. 4)
3. Insert the desired blade into the base of the motor housing (Fig. 5).
NOTE: You may need to manually move the blade or gear shaft in order to align the gear shaft with the gear in the center of the unit.
4. Align the gear shaft in the middle of the blade with the gear in the middle of the unit. Align four lugs so that the blade lays flat against the housing for a secure fit (Fig. 6).
5. Once the blade is in position, replace the blade cover by aligning the cover with the slots on the base of the motor housing and push forward on the blade cover until it slides and clicks into place (Fig. 7).
NOTE: If you have any questions, please call the Snow Joe® + Sun Joe® customer service department at 1-866-SNOWJOE (1-866-766-9563) for assistance.
Telescoping Pole Assembly (Optional)
1. Unlock the telescoping lock by flipping it up (open), and insert the lower pole into the upper pole. Make sure the groove in the end of the lower pole is facing the opposite direction of the telescoping lock. Keep the power cord inside of the pole tubes (Figs. 8 – 9).
2. When the pole reaches the desired length, latch the telescoping lock by pushing it back down (Fig. 10).
Attaching the Telescoping Pole (Optional)
WARNING! Make sure the power ON/OFF switches in both the unit and the telescoping pole are in OFF position before attaching the telescoping pole.
1. Turn the telescoping pole upside down. Press the end of the cutting head lock; the front part of the lock will go up (Fig. 11).
2. While pressing the cutting head lock, align the grass shear + hedge trimmer with the pole head, and insert the grass shear + hedge trimmer into the opening of the pole head. Release the cutting head lock when the grass shear + hedge trimmer fits into place (Fig. 12).
3. Insert the connecting cord into the telescoping pole socket on the handle of the grass shear + hedge trimmer (Fig. 13).
4. To disconnect the grass shear + hedge trimmer from the telescoping pole, unplug the connecting cord from the telescoping pole socket, and remove the grass shear + hedge trimmer from the pole head while pressing the cutting head lock (Fig. 14).
Before Using
Charging Procedure
The battery charger supplied matches the lithium-iON battery installed in the tool. Do not use other battery chargers. The lithium-iON battery is protected against deep discharging. When the battery is empty, a protective circuit will automatically switch OFF the machine. The blade will no longer move and a slight whistling sound will be heard.
Charge the battery for 3 to 5 hours then use it until it runs down (i.e. the tools starts to operate slowly). Recharge for 3 to 5 hours again before resuming operation.
WARNING! Continued and excessive overuse of the ON/OFF trigger switch can permanently damage the lithiumiON battery.
CAUTION! This charger does not automatically turn off when the battery is fully charged. Please take care not to leave the grass shear + hedge trimmer plugged into the charger. Switch off or unplug the charger at the mains when charging is complete.
NOTE: The charge level indicator LED light will illuminate red when the charger is plugged in and is charging the grass shear + hedge trimmer. The middle LED light will turn green when the grass shear + hedge trimmer is fully charged.
The charging process starts as soon as the charger is plugged into both the proper electrical outlet and the tool.
During the charging procedure, the handle of the tool will feel slightly warm to the touch. This is normal.
When no further use is planned for an extended period of time, disconnect the battery charger from the outlet and the unit.
Do not use the tool during the charging procedure.
Battery Charging
The length of service between each charging varies depending on the type of work you are doing. The battery in this grass shear + hedge trimmer has been designed to provide maximum trouble-free life. However, like all batteries, it will eventually wear out. To obtain the longest possible battery life, we suggest the following:
Store and charge your grass shear + hedge trimmer in a cool area. Temperatures above or below normal room temperature will shorten battery life.
Never store the grass shear + hedge trimmer with the battery in a discharged condition. Recharge the unit immediately after it is discharged.
All batteries gradually lose their charge. The higher the temperature is, the faster they lose their charge. If you store your grass shear + hedge trimmer for long periods of time without using it, recharge the battery every 6 months. This will extend battery life.
NOTE: The grass shear + hedge trimmer has been shipped in a low charge condition and should be fully charged before use.
1. Plug the charger adaptor into an appropriate AC power outlet. Connect the AC adaptor charger plug into the charging socket of the grass shear + hedge trimmer (Fig. 15).
2. LED no.1 will illuminate red when charging. LED's 2 and 3 will not illuminate when charging (Fig. 16).
3. The battery will take approximately 3 hours to charge. Charging may take up to 5 hours due to the level of charge left in the battery and the ambient temperature.
NOTE: A charge level indicator LED light will always be illuminated when the charger is plugged in and the mains power is turned on. The charge indicator indicates the charge status of the grass shear + hedge trimmer as shown below:
Condition
Colour of LED's
LED's Illuminated
Charging
Red
1- Red, 2- Not illuminated, 3- Not illuminated
Fully Charged
Green
1- Not illuminated, 2- Green, 3- Not illuminated
Low Charge
Yellow
1- Not illuminated, 2- Not illuminated, 3- Yellow
Operation
IMPORTANT! The product is intended for light-duty trimming of shrubs and lawn edges for residential properties.
NOTE: Charge the battery for 3 to 5 hours then use it until it runs down (i.e. the tool will only slowly operate and the yellow charger indicator will be illuminated). Recharge for 3 to 5 hours again before resuming operation.
WARNING! The blades continue to move for a few seconds after the tool is switched OFF. Turn OFF the tool and wait until the blades come to a complete stop before adjusting or cleaning.
CAUTION! Never touch the blade rail while the tool is in operation and be aware of the sharp edges even when the grass shear + hedge trimmer is not in use.
NOTE: Do not touch the rotating blades.
Pole Length Adjustment (Optional)
1. Loosen the telescopic lock by flipping it up (Fig. 17).
2. Pull the lower pole out or push it together to adjust to the desired length (Fig. 18).
3. Tighten the telescopic lock by latching it back down (Fig. 19).
NOTE: The cam-lock nut may need to be loosened slightly in order to adjust the telescoping pole length (Fig. 20). Use pliers or hex key wrench, as needed.
Cutting Head Angle Adjustment (Optional)
The telescoping pole is equipped with an adjustable head which can be rotated to 5 different angles: -90°, -45°, 0°, 45°, 90° (Fig. 21). Follow the instructions to adjust the angle.
1. Pull the angle unlock button backward and hold it in position (Fig. 22).
2. Turn the cutting head slightly clockwise or counterclockwise (Fig. 23).
3. When the cutting head clips in the desired angle, release the angle lock button.
WARNING! Always ensure the cutting head is in one of the five positions. Never adjust it into an intermediate position.
WARNING! Always ensure the angle unlock button snaps back into place after adjusting the angle. Leaving the pole head unlocked during operation is dangerous (Fig. 24)
The telescoping pole's cutting head can also be set to 7 vertical angles: -90°, -67.5°, -45°, -22.5°, 0°, 22.5°, 45° (Fig. 25). Follow the instructions to adjust the angle.
4. Rotate the cutting head to the desired cutting angle while pressing the angle adjustment button (Fig. 26).
5. Release the button when the cutting head is fixed into the desired angle.
Starting + Stopping
1. To power ON, push and hold the safety lock-off button with your thumb, while pressing the ON/OFF trigger switch with your forefinger. Once the trigger switch engages, you can release the safety lock-off button and proceed with operation (Fig. 27).
NOTE: The safety lock-off button reduces the risk of accidental starting.
2. To power OFF, simply release the ON/OFF trigger switch (Fig. 26).
3. If using the telescoping pole, push and hold the safety lock-off button on the handle with your thumb, while depressing the ON/OFF trigger switch on the handle with your forefinger. Once the trigger switch engages, you can release the safety lock-off button and proceed with operation (Fig. 28).
4. To power OFF, simply release the ON/OFF trigger switch.
CAUTION! Do not force the blades through dense growth. If the blades slow down, then reduce your cutting pace. Should the blades jam, release the trigger immediately. Do not use your fingers to free up jammed blades. Jammed blades can release suddenly causing serious injury.
CAUTION! Always ensure proper footing and balance in a clean and clear work environment before switching on the grass shear + hedge trimmer.
NOTE: The yellow charge indicator LED light will illuminate when the battery is running low and requires charging.
Trimming Tips
WARNING! Only use the hedge trimmer blade for this operation. Never use the telescoping pole with the hedge trimmer for trimming hedges.
NOTE: Try to keep the cutting device angled at approximately 15° to the cutting surface (Fig. 29).
Shaping – A hedge should be trimmed to achieve a trapezoidal form; it should widen toward the bottom on both sides. Shaping a hedge in this manner improves the penetration of light to the lower extremities. A general guideline is to slant the hedge approximately 4 in. (10 cm) for each 39 in. (1 m) of hedge height.
Cutting Sequence – First cut both sides; start at the bottom and work towards the top. This prevents cuttings from falling into an area that you have yet to trim.
Trimming the Top – Where the branches have grown extremely long, cut back the hedge in several stages. The shorter cuttings obtained are best suited for composting.
Pruning Thick Branches – When older hedges are to be cut a substantial amount, use pruning shears or some other device to trim thicker branches (greater than 0.3 in. [8 mm] in diameter) to the desired length before starting work with the hedge trimmer. To shape precisely, run a taught line between the extreme edges of the hedge and then trim along the length of the line. Ensure that the blade does not come into contact with any object made of hard material that could damage it, such as fencing wire or metallic plant supports.
Shearing Tips
WARNING! Only use the grass shear blade for this operation.
NOTE: Use the telescoping pole for shearing grass at lower position if necessary. Adjust the pole length and pole head angle according to the intended use before operation.
1. Avoid shearing grass in a stooped or bent over position for lengthy periods of time. If prolonged stooping or bending is unavoidable, then regularly interrupt by standing upright and successively bending backwards several times.
2. Pay attention when performing work close to trees and bushes. The cutting device can damage sensitive bark, and damage fence posts.
3. Do not move the product too fast as this will result in ineffective cutting and possible damage.
4. Walk, never run, when using the product with the telescope pole.
5. Cut repeatedly from up and down in layers when the grass is very high (Fig. 30).
6. Keep the cutting device at an angle of about 10° to the ground when shearing. Avoid touching the ground as this can ruin the lawn and damage the product
7. Let the cutting device do the work. Let it work at its own pace, never press it into the area to be cut.
8. Carefully maneuver the product around objects, such as trees and bushes, ensuring it does not come into contact with them. Avoid that the cutting device comes in contact with sensitive plants.
9. Our Environment – At Snow Joe® + Sun Joe®, we care about the environment and consider what we may do to protect it. If you share this concern, you may already be aware of the suggestions below; if not, please consider them as a small step in protecting our future.
Don't throw your clippings in a trash bag; where possible, dispose of your garden waste in a landfill. Alternatively, many communities provide a collection point where you can dispose of your garden waste in an environmentally friendly manner.
Maintenance
WARNING! Always switch the product off and let the product cool down before performing inspection, maintenance and cleaning work.
Keep the ventilation vents of the tool clean at all times. If possible, prevent foreign matter from entering the vents.
If the enclosure of the trimmer requires cleaning, do not use solvents to clean it. Only use a moistened soft cloth. Never let any liquid get inside the tool; and never immerse any part of the tool into a liquid.
The blade rail should be cleaned and treated with light machine oil or spray lubricant (such as WD40, CRC 5.56 or RP7) after each use. When a job lasts for a long period of time, it is recommended that the blade rail also be treated with spray lubricant at regular intervals during operation.
Inspect the product before each use for worn and damaged parts. Do not operate it if you find broken and worn parts.
Blade Maintenance
To ensure years of efficient and trouble-free operation, blade cleaning should be performed if sap and debris have builtup, or if you live in an area where the soil is sandy. Cleaning unusually heavy deposits may require removal of the blades.
NOTE: Snow Joe® + Sun Joe® will not be held responsible for any damage or injuries caused by repair of the trimmer by an unauthorized person or by mishandling of the trimmer.
1. Keep the cutting blades clean and free of debris. Remove trimmings.
2. Apply a small amount of suitable lubricant on the blades to retain a good cutting performance (Fig. 31).
3. Keep the blades sharp. Have a worn or damaged cutting device replaced with a new one of the same type by a qualified specialist. Spare parts may be ordered online at snowjoe.com or via phone by contacting the Snow Joe® + Sun Joe® customer service center at 1-866-SNOWJOE (1-866-766-9563).
Storage
When the tool will not be used for several months, it is ideal to leave the battery connected to the charger. For optimal storage, proceed as follows:
Fully charge the battery.
Clean the product as describe above.
Assemble the blade covers over the blades (Fig. 32).
Store the tool in a secure and dry location. The storage temperature must always remains in the range of 41 °F (5 °C) to 104 °F (40 °C).
Before using the tool after prolonged storage, fully recharge the battery
Battery Caution + Disposal
Always dispose of your battery pack according to federal, state, and local regulations. Contact a recycling agency in your area for recycling locations.
CAUTION! Even discharged battery packs contain some energy. Before disposing, use electrical tape to cover the terminals to prevent the battery pack from shorting, which could cause a fire or explosion.
WARNING! To reduce the risk of injury or explosion, never burn or incinerate a battery pack even if it is damaged, dead, or completely discharged. When burned, toxic fumes and materials are emitted into the surrounding atmosphere.
Batteries vary according to device. Consult your manual for specific information.
Install only new batteries of the same type in your product (where applicable).
Failure to insert batteries in the correct polarity, as indicated in the battery compartment or manual, may shorten the life of the batteries or cause batteries to leak.
Do not mix old and new batteries.
Do not mix Alkaline, Standard (Carbon-Zinc), or Rechargeable (Nickel Cadmium, Nickel Metal Hydride, or Lithium-Ion) batteries.
Do not dispose of batteries in fire.
Batteries should be recycled or disposed of as per state and local guidelines.
Optional Accessories
WARNING! ALWAYS use only authorized Snow Joe® + Sun Joe® replacement parts and accessories. NEVER use replacement parts or accessories that are not intended for use with this cordless grass shear + hedge trimmer. Contact Snow Joe® + Sun Joe® if you are unsure whether it is safe to use a particular replacement part or accessory with your cordless grass shear + hedge trimmer. The use of any other attachment or accessory can be dangerous and could cause injury or mechanical damage.
NOTE: Accessories are subject to change without any obligation on the part of Snow Joe® + Sun Joe® to provide notice of such changes. Accessories can be ordered online at snowjoe.com or via phone by contacting the Snow Joe® + Sun Joe® customer service center at 1-866-SNOWJOE (1-866-766-9563).