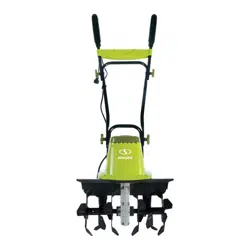
Read the owner’s manual and safety instructions carefully before operating the electric tiller + cultivator. Compare the illustration below to the electric tiller + cultivator in order to familiarize yourself with the location of the various controls and adjustments. Save this manual for future reference.
1. Carefully remove the electric tiller + cultivator and check to see that all of the above items are supplied.
2. Inspect the product carefully to make sure no breakage or damage occurred during shipping. If you find damaged or missing parts, DO NOT return the unit to the store. Please call the Snow Joe® + Sun Joe® customer service center at 1-866-SNOWJOE (1-866-766-9563).
NOTE: Do not discard the shipping carton and packaging material until you are ready to use the electric tiller + cultivator. The packaging is made of recyclable materials. Properly dispose of these materials in accordance with local regulations or save the packaging for long-term product storage.
IMPORTANT! The equipment and packaging material are not toys. Do not let children play with plastic bags, foils, or small parts. These items can be swallowed and pose a suffocation risk!
Assembly
WARNING! Do not connect to the power supply until assembly is complete. Failure to comply could result in accidental starting and serious personal injury.
WARNING! Before performing any maintenance, make sure the tool is unplugged from the power supply. Failure to heed this warning could result in serious personal injury.
WARNING! To prevent serious personal injury, make sure the switch is in the OFF (O) position, the unit is unplugged, and the tines have come to a complete stop before inspecting, cleaning, or servicing the unit.
WARNING! The product must be fully assembled before operation. Do not use a product that is only partially assembled or assembled with damaged parts.
Follow the assembly instructions step-by-step and use the pictures provided as a visual guide to easily assemble the product.
Connecting the Handles
NOTE: Small parts can easily get lost during asembly or when making adjustments to the machine. To avoid this, secure all small parts that are removed from the machine and keep them accessible.
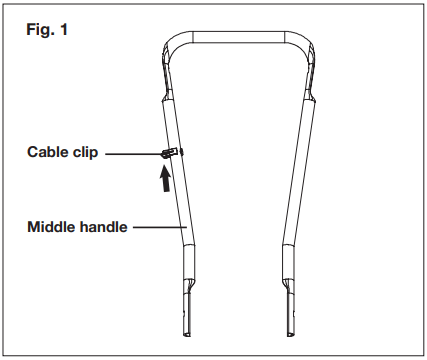
1. Attach the cable clip on the middle handle bar (Fig. 1).
2. Remove the bolts from the knobs and keep them handy.
3. Secure the middle handle to the lower handle using the first set of knobs and bolts (A). Tighten the knobs on each side to ensure a secure fit (Fig. 2).
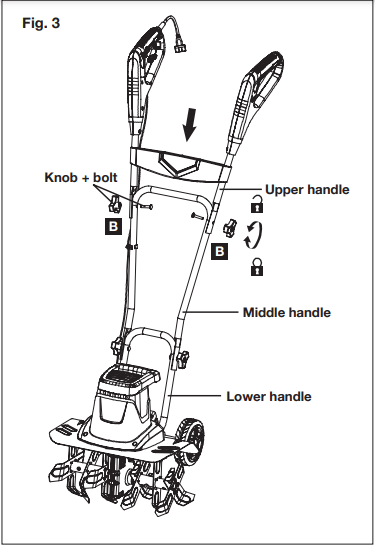
4. Connect the upper handle to the middle handle using the second set of knobs and bolts (B). Tighten the knobs on each side to ensure a secure fit (Fig. 3).
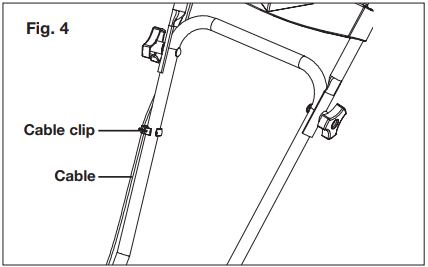
5. Secure the cable inside the cable clip (Fig. 4).
WARNING! Make sure all handle knobs are properly tightened before using the electric tiller + cultivator.
Operation
Intended Use
The TJ603E electric tiller + cultivator is designated with a rated input power consumption of 1440 Watts.
Designed for small gardens and flower beds, this electric tiller + cultivator effectively loosens and turns over new soil. It may also be used to mix coarse soil with fertilizer, peat, and compost. This product may not be used to till extremely dry or wet soil.
The use of this product in rain or wet conditions is prohibited.
For safety reasons, it is essential to read the entire instruction manual before first use and to observe all the instructions contained within this manual.
This product is intended for private domestic use only. It is not intended for any commercial trade use. It must not be used for any purposes other than those described.
Connecting to Power Supply
NOTE: For safety reasons, this product is equipped with a short power cord. Do not connect the electric tiller + cultivator directly to the power supply using this power cord. A proper extension cord is required for operation. Observe the technical requirements for this product when purchasing an extension cord.
WARNING! For your safety, it is required that the plug attached to this electric tiller + cultivator be connected to an approved extension cord. The extension cord must be suitable for outdoor use, with all sockets protected against water splashing. Ensure the extension cord is of the proper size and type for your product (≥ 1.5 mm²). Always use a residual-current device (RCD), or residual-current circuit breaker (RCCB) protected power supply.
1. Connect the electric tiller + cultivator to a working 120 V outlet using a heavy-duty outdoor extension power cord, such as the Snow Joe® + Sun Joe® Power Joe SJTW-A 14-gauge 50-foot extension cord with lighted end (Model PJEXT50-B). Visit snowjoe.com to order online or call 1-866-SNOWJOE (1-866-766-9563) to order by phone.
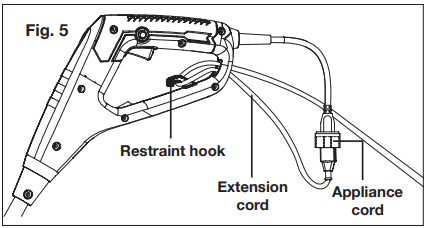
2. Make a loop in the extension cord and push it up through the hole in the handle and around the cord restraint hook (Fig. 5), then connect the extension cord to the appliance cord.
WARNING! Check the voltage to ensure it complies with the information on the rating label.
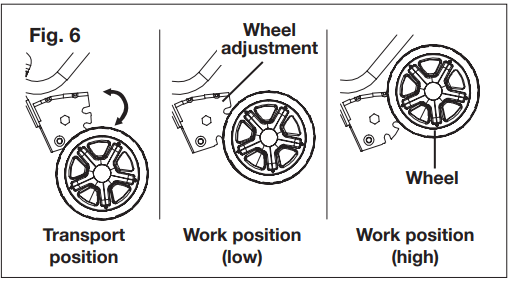
Wheel Adjustment
WARNING! Always switch the product off and disconnect it from the power supply before making any adjustments.
The wheels can be adjusted to 3 different positions to control the cultivating depth.
1. Pull the wheel and move it to the desired position; let go of the wheel and make sure it locks into position (Fig. 6). Be sure to set both wheels to the same height.
WARNING! Always ensure the wheels are securely locked. Do not attempt to use the product with the wheels in unlocked positions.
Powering ON + OFF
WARNING! Rotating tines may cause serious injury. The tines will continue to turn for a few seconds after the tool has been switched OFF. Do not touch the rotating tines. Contact with hot components (i.e. motor housing, gear box, etc.) on the machine may cause burns. Allow the machine to cool before handling.
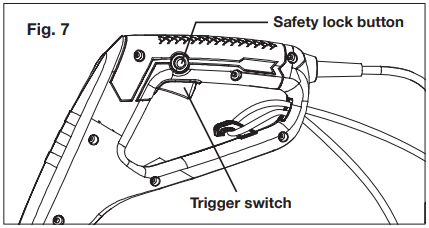
1. To turn the tool ON, push and hold the safety lock button with your thumb and then squeeze the trigger switch with your fingers. Once the tool is running, release the safety lock button (Fig. 7).
2. To switch OFF, release the trigger switch (Fig. 7).
Operating Tips
Before each use, check the product, its power cord and plug, and any other accessories for damage. Do not use the product if it is damaged or shows wear.
Double check that the accessories and attachments are properly fitted.
Always hold the product by its handles. Keep the handles dry to ensure a secure grip.
Ensure that the air vents are always unobstructed and clear. Clean them if necessary with a soft brush. Blocked air vents may lead to overheating and damage the product.
Switch the product off immediately if you are disturbed while working by other people entering the working area. Always let the product come to a complete stop before averting your attention.
Do not overwork yourself. Take regular breaks to ensure you can concentrate on the task at hand and have full control over the product.
WARNING! In some countries, regulations define restrictions for use of such products, including the times and days when operation is permissible. Ask your community for detailed information and observe these regulations in order to preserve a peaceful neighborhood and avoid committing administrative offences.
Tilling
Make sure that the work area is clear of stones, sticks, wire, or other objects that could damage the product or its engine.
Do not till very wet soil because wet soil tends to stick to the working tool, preventing proper tine rotation; it could also cause you to slip and fall.
Always maintain a firm grip on the product. For better guidance, apply light pressure to the handles.
WARNING! Do not place hands, feet, or any other part of the body or clothing near the rotating tines or any other moving part. The tines begin to rotate forward once the trigger switch is depressed. The tines continue to rotate until the trigger switch is released. Failure to avoid contact with the rotating tines could cause serious personal injury.
Do not try to till too deeply or force the product into soil that is extremely hard or resistant.
Walk the product through the soil at a normal pace and in as straight a line as possible.
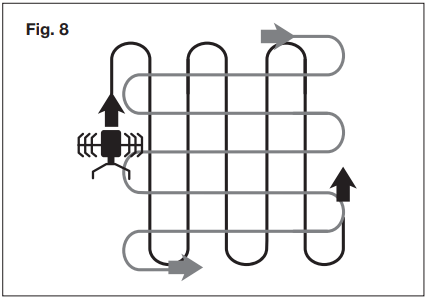
Till in slightly overlapping rows. To till most effectively, follow the pattern indicated in Fig. 8. Start by moving the tiller + cultivator up and down in vertical lines, then work horizontally from left to right. This will keep the rows even and ensure that all the ground is tilled without missing any spots.
Pay special attention when changing direction. Apply light pressure to the handle in order to lift the tines and facilitate the turn. Turn the product around using the wheels as a guide. Gradually release pressure on the handle and move the tines back to the ground.
WARNING! Stop the motor if the product strikes a foreign object. Switch the product off, disconnect it from the power supply, and let it cool completely. Inspect the product thoroughly for damage and have any damage repaired before restarting.
Extensive vibration of the product during operation is an indication of damage. Immediately stop the motor and promptly inspect and repair the tool.
After Use
• Switch the product off, disconnect it from the power supply, and let it cool completely.
• Check, clean, and store the product as described below.
Care + Maintenance
The Golden Rules for Care
WARNING! Always switch the product off, disconnect the product from the power supply, and let the product cool completely before inspecting, cleaning, or performing any other maintenance task.
• Keep the product clean. Remove any debris after each use and before storage.
• Regular and proper cleaning will help ensure safe use and prolong the life of the product.
• Inspect the product before each use for worn and damaged parts. If you find broken and/or worn parts, do not use the tool.
WARNING! Only perform the repairs and maintenance work described in this manual. Any other work must be performed by a qualified technician.
General Cleaning
• Clean the product with a dry cloth. Use a brush for areas that are hard to reach.
• Be sure to clean the air vents after every use with a cloth and brush.
• Remove stubborn dirt with high pressure air (max. 3 bar).
NOTE: Do not use chemical, alkaline, abrasive, or other aggressive detergents or disinfectants to clean this product as such substances might damage the tool's surfaces.
• Check for worn or damaged parts. Replace worn parts as necessary or contact the Snow Joe® + Sun Joe® customer service center at 1-866-SNOWJOE (1-866-766-9563) for repair before using the product again.
Cleaning the Underbody + Working Tool
WARNING! Wear safety gloves when working on or near the working tool. Use appropriate tools (e.g a wooden stick) when necessary; never use your bare hands!
• Keep the underbody and tines clean and free of debris. Use a brush or another implement to remove soil from the working tool.
• All nuts and bolts must be checked periodically for tightness before operation. After prolonged use, especially in sandy soil conditions, the working tool will become worn and lose some of its original shape. Tilling efficiency will be reduced and the working tool should be replaced.
• Have worn or damaged working parts replaced with new ones of the same type by a qualified technician.
• To prolong the life span of the working tool and the product, lubricate the tines after each use.
Maintenance
WARNING! Unexpected tine movement may cause personal injury. Before servicing, repairing, or inspecting the unit, turn the motor OFF and disconnect the extension cord. Wait for the tines to completely stop rotating before conducting inspection, cleaning, or maintenance.
Before and after each use, check the product and accessories (or attachments) for wear and damage. When necessary, only use identical replacement parts that are approved by the manufacturer.
WARNING! Contact with hot components (e.g. motor housing, gear box, etc.) on the machine may cause burns. Allow the machine to cool off before handling.
IMPORTANT!
• Wear protective gloves when cleaning or maintaining the machine.
• Do not use cleaning fluids or solvents or spray the machine down with water (especially water under pressure) when cleaning the machine.
NOTE: After each use, follow these steps to properly clean the unit:
1. Remove soil, dirt, and foliage stuck in the tines, drive shaft, tool surface, and vents with a brush or dry cloth.
2. Spray or rub biodegradable oil onto the tines.
3. Clean soiled grips with a damp cloth.
Always inspect the machine for damaged and worn parts after each use. Check that safety features (i.e. labels, guards, etc.) are in place. Check that nuts, bolts, and screws are tight.
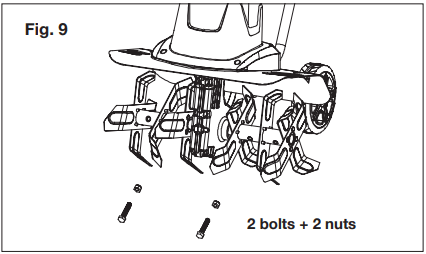
Changing the Tines
NOTE: The machine is fitted with six tilling blades that can easily be changed in pairs. Both of the steel blade tine pairs can be fitted on the left or right, as required. Always change both tine pairs at the same time to avoid imbalance and damage to the machine. To replace the tines, follow the steps below:
1. While standing on a flat and stable surface, switch off the unit and remove the plug from the extension cord.
2. Remove the 2 bolts and 2 nuts, then remove the steel blade tines (Fig. 9).
3. Clean the drive shaft with biodegradable oil (Fig. 10).
4. Place the new tines onto the drive shaft so that the holes on the axles line up with the holes on the drive shaft (Fig. 10).
5. Insert the 2 bolts through the holes and secure them with the 2 nuts (Fig. 10).
IMPORTANT: The tines must be set in the correct turning direction. Note the way the old tines came off and replace the new ones exactly the same way
Power Cord
If the power cord is damaged, it must be replaced in order to avoid a safety hazard. Contact your authorized Snow Joe® + Sun Joe® dealer or call the Snow Joe® + Sun Joe® customer service center at 1-866- SNOWJOE (1-866-766-9563).
Repair
This product does not contain any parts that can be repaired by the consumer. Contact an authorized Snow Joe® + Sun Joe® dealer or call the Snow Joe® + Sun Joe® customer service center at 1-866-SNOWJOE (1-866-766-9563) for assistance.
Storage
Examine the electric tiller + cultivator thoroughly for worn, loose, or damaged parts. Should you need to repair or replace a part, contact an authorized Snow Joe® + Sun Joe® dealer or call the Snow Joe® + Sun Joe® customer service center at 1-866-SNOWJOE (1-866-766-9563) for assistance.
Examine the extension cord thoroughly for signs of excess wear or damage. If it is worn or damaged, replace it immediately.
Disconnect the extension cord from the electric tiller + cultivator before storing.
Clean the product as described above.
Store the product and its accessories in a dark, dry, frost-free, and well-ventilated place.
Always store the product in a place that is inaccessible to children.
The ideal storage temperature is between 50ºF (10°C) and 86ºF (30°C).
We recommend using the original package for storage or covering the product with a suitable cloth or enclosure to protect it against dust.
Transportation
Switch the product off and disconnect it from the power supply. Ensure that the wheels are set to the transport position (see Fig. 6, pg. 9).
Always carry the product by its transport handle.
If you are transporting the tiller + cultivator in a vehicle, brace it properly to protect it from heavy impact or strong vibrations.
Secure the product to prevent it from falling over or slipping.