User manual Electric Dethatcher and Scarifier
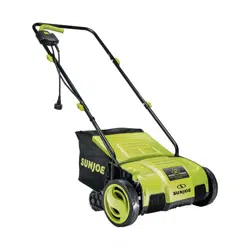
Know Your Electric Scarifier + Dethatcher
Read the owner’s manual and safety instructions carefully before operating the scarifier + dethatcher. Compare the illustration below to the dethatcher in order to familiarize yourself with the location of the various controls and adjustments. Save this manual for future reference and reread it prior to each dethatching session.
-127304.png)
1. ON/OFF switch lever
2. Safety lock button
3. Extension cord restraint holder
4. Upper handle
5. Upper handle knob and bolt (2)
6. Appliance cord
7. Middle handle bar (2)
8. Cable clip (2)
9. Lower handle knob and bolt (2)
10. Thatch bag cover
11. Lower handle bar (2)
12. Thatch collection bag
13. Rear wheel (2)
14. Front wheel (2)
15. Raking depth adjustment lever
16. Air vent
Unpacking
Carton Contents
- Scarifier + dethatcher housing
- Handle knob and bolt (4)
- Upper handle
- Middle handle bar (2)
- Lower handle bar (2)
- Phillips screw (2)
- Bolts + spring washer (2)
- Thatch collection bag
- Extension cord restraint holder
- Cable clip (2)
- Scarifying cylinder (Pre-assembled)
- Raking cylinder
- Manual and registration card
- Carefully remove the electric scarifier + dethatcher and check to see that all of the above items are supplied.
- Inspect the product carefully to make sure no breakage or damage occurred during shipping. If you find damaged or missing parts, DO NOT return the unit to the store. Please call the Snow Joe® + Sun Joe® customer service center at 1-866-SNOWJOE (1-866-766-9563).
NOTE: Do not discard the shipping carton and packaging material until you are ready to use the electric scarifier + dethatcher. The packaging is made of recyclable materials. Properly dispose of these materials in accordance with local regulations or save the packaging for long-term product storage.
IMPORTANT! The equipment and packaging material are not toys. Do not let children play with plastic bags, foils, or small parts. These items can be swallowed and pose a suffocation risk!
Intended Use
- This scarifier + dethatcher is designated with a rated input of 1560 watts. Depending on the fitted cutting device, this machine is either intended for scarifying and removing thatch from lawns or raking in domestic and hobby gardens.
- When used as a scarifier, this machine works by scratching through and between the grass with specially adapted prongs that collect and remove any unwanted parts from the lawn while leaving the grass blades intact. At the same time the machine scarifies the ground resulting in a better aeration.
- When used as a dethatcher the fine needles will scratch the surface of the lawn while simultaneously picking up light debris for better oxygen absorption, airing and drainage.
- This machine is not to be used in wet weather conditions and may not be used to mow dry, wet or unusually high grass, e.g., pasture grass or for shredding leaves.
- This machine is intended for private domestic use only, not for any commercial trade use. It must not be used for any purposes other than those described.
Assembly
WARNING! Do not connect the scarifier + dethatcher to the power supply until assembly is complete. Failure to comply could result in accidental starting and severe personal injury.
Always wear gloves during assembly.
Connecting the Handle Bars
1. Insert the lower handle into the motor housing and secure it with the two Phillips screws (Figs. 1 & 2).
-894484.png)
2. Secure the two middle handle bars to the lower handle bars using the first set of knobs and bolts. Tighten the knobs on each side to ensure a secure fit (Fig. 3).
-13644.png)
3. Hang the extension cord restraint holder on the upper handle (Fig. 4).
4. Connect the upper handle to the middle handle bars using the second set of knobs and bolts. Tighten the knobs on each side to ensure a secure fit (Figs. 4 & 5)
-604834.png)
5. Fix the cord with cord clips to the middle and lower right handle bars (Fig. 6).
-156943.png)
Thatch Collection Bag Assembly
WARNING! Do not attempt to use the product without the thatch collection bag attached. This could pose a danger of flying debris.
WARNING! The product must be switched off and the cutting device must have stopped rotating before you attach or empty the thatch collection bag.
WARNING! Never use the scarifier without the thatch collection bag securely fitted
NOTE: A full thatch collection bag will reduce the perfomance of this product.
Attach the thatch collection bag to the lawn scarifier + dethatcher before operation.
1. Lift the thatch collection bag cover, and hang the thatch collection bag to the mounting hooks (Fig. 7).
-52542.png)
Removing + Emptying the Thatch Collection Bag
Empty the thatch collection bag frequently during use. Do not wait until it is completely full. We recommend emptying it when it is half full.
- Lift the thatch collection bag cover and pull the thatch collection bag off the mounting hooks to remove it.
- Empty the bag's contents into a suitable waste receptacle. Mount the bag back into position before resuming work.
Operation
Cutting Depth Adjustment
WARNING! The unit must be switched off and disconnected from the power supply before adjusting the tine settings.
Adjust the depth according to the needs of your lawn. The most suitable depth depends on the kind of lawn and the actual height of the grass.
1. Push the depth adjustment lever towards the wheel, then move it forward or backward to adjust the cutting depth (Fig. 8).
-566943.png)
2. Adjust the lever to one out of five stages. Read the adjusted depth from the scale (Fig. 9).
-804495.png)
Power Connection
Push a loop of the extension cord through the slot on the extension cord restraint holder from the opposite side of the restraint holder (Fig. 10). Insert the appliance cord into a proper outdoor extension cord (see Extension Cord Chart on page 2).
-806688.png)
-960740.png)
Starting + Stopping
WARNING! Before switching on the lawn scarifier + dethatcher, make sure that it is not in contact with any foreign objects. Keep your feet and hands a safe distance away from the rotating tines and the ejector opening. Failure to comply with these warnings can result in severe personal injury.
1. To start, press and hold the safety lock button while pulling the switch lever toward you. Once the machine powers on, release the safety lock button and proceed with operation (Fig. 11).
2. To stop the lawn scarifier + dethatcher, release the switch lever.
-155975.png)
WARNING! The tine cylinder continues to run for a brief period after the unit has been switched off. Do not tilt or carry the unit while the motor is still running and do not touch the cylinder while it is still rotating. Failure to comply could result in severe personal injury.
Overload Protection
The overload protection will be activated in the following circumstances:
- A build up of scarified material around the cutting device.
- If the material scarified is larger than the motor capacity.
- Where there is too much resistance against the cutting device.
When the circuit breaker has been activated switch off the product and disconnect from the power supply.
Let the product cool down and eliminate the cause before using the product again.
General Operation
WARNING! If the product strikes a foreign object stop the motor. Switch the product off, disconnect it from the power supply and let it cool down. Inspect the product thoroughly for damage. Have any damage repaired before restarting.
WARNING! Extensive vibration of the product during operation is an indication of damage. The product should be promptly inspected and repaired.
- Check the machine, its power cord and plug as well as accessories for damage before each use. Do not use the machine if it is damaged or shows wear.
- Double check that accessories are properly fixed.
- Push the machine forward by its handle. Keep the handle dry to ensure safe support.
- Ensure that the air vents are always unobstructed and clear. Clean them if necessary with a soft brush. Blocked air vents may lead to overheating and damage the product.
- Switch the machine off immediately if you are disturbed while working by other people entering the working area.
- Always let the machine come to complete stop before putting it down.
- Do not overwork yourself. Take regular breaks to ensure you can concentrate on the work and have full control over the machine.
- Mow the lawn before working and fertilize afterwards.
- Make sure that the lawn is clear of stones, sticks, wire, or other objects that could damage the machine or its motor.
- Select the suitable cutting depth for the actual grass height.
- Do not work with this machine on a wet lawn because it tends to stick to the underbody of the machine, preventing the proper discharge of collected material, and it could also cause you to slip and fall.
- Slowly push the machine forward. Move the machine at appropriate speed. Do not move it too fast to prevent the discharge from getting blocked and engine from useless overloading.
- Work in slight overlapping rows. The most effective pattern for scarifying/raking lawns is straight lines along one of the sides. This will keep the rows even and ensures that all the lawn is scarfied/raked without missing any spots (Fig. 12).
-487107.png)
- Circle around flower beds. When reaching a flower bed in the middle of the lawn, make a row or two around the circumference of the bed.
- Pay special attention when changing direction.
Scarifying
Consider the weather when scarifying. Scarify the lawn with an increased depth setting during spring time between April and May as the lawn is better able to recover during this season. During a wet summer scarify again in late summer with a decreased depth setting. Do not scarify during periods of hot weather condition. During a dry rainless summer do not scarify a second time in autumn.
Raking
In order for a healthy lawn to develop in the spring, it is necessary for greater amounts of air to penetrate the area around the roots of the grass. We recommend aerating the lawn every 4 – 6 weeks depending on the state of your lawn.
Maintenance
WARNING! Before carrying out any repairs or servicing work, you must ensure that the machine has been disconnected from the power supply. Repairs and maintenance work other than described within this instruction manual may be performed only by qualified specialist!
Service + Storage
To ensure long and reliable service, carry out the following maintenance regularly. Servicing and cleaning work on the machine and the removal of the guards may only be carried out after the motor has been switched off and the plug disconnected from the power supply.
- Keep all nuts, bolts and screws tight to be sure the product is in a safe working condition.
- Allow the product to cool before storing in any enclosure.
- Check the thatch collection bag frequently for wear or deteriotation.
- Examine the product regularly and replace worn or damaged parts for safety.
- Check that covers and guards are undamaged and correctly fitted. Carry out necessary maintenance or repairs before using the machine.
- If the cutting device should happen to fail despite the care taken in manufacturing and testing, repair should be carried out by an authorized repair facility.
- Do not clean the machine while it is running.
- Ensure that all the fastening elements (screws, nuts, etc.) are tight at all times so that you can safely work with the machine.
- Check the machine frequently for signs of wear. Replace worn or damaged parts.
- Store your machine in a dry place. To ensure a long service life all screws and bolts should be cleaned and then oiled.
- Clean the machine with a brush or cloth. Do not use any solvents or water to remove dirt.
- The component that is subject to most wear is the cutting device. You should therefore check the condition of the cutting device and its mounting at regular intervals.
- If the cutting device is worn or blunt it must be replaced immediately.
- If the machine starts to suffer from excessive vibrations, this means that the cutting device has not been balanced correctly or has suffered deformation due to impacts. In this case it must be repaired or replaced.
Replacing/Changing Cutting Device
WARNING! Always switch the machine off, disconnect it from power supply and let it cool down before changing/ replacing the cutting device.
WARNING! Cutting devices are very sharp and become hot during use. Handle them carefully.
WARNING! Wear safety gloves when handling cutting devices in order to avoid injuries like burns and cuts.
WARNING! Make sure all bolts are completely tightened before operating the machine. Don't operate the machine if any bolts are missing, loose, or damaged.
The product has two functions, scarifying or raking. The scarifying cylinder is preassembled on the machine. The raking cylinder is included in the supply box. The cylinder can be changed according to the application (Fig. 13).
-347435.png)
1. Remove the thatch collection bag.
2. Place the machine upside down on a flat stable surface to access the underbody.
3. Loosen the two bolts with a suitable wrench, remove them together with the spring washers and the attached cutting device (Fig. 14).
-881577.png)
4. To remove the cutting device, first lift the bearing and then pull it out from the drive shaft.
5. Align and insert the respective cutting device: Slide the hex nut into the socket of the drive shaft and fix the bearing to the support with the bolts and spring washers (Fig. 15)
-132625.png)
NOTE: If you have any questions, please call the Snow Joe® + Sun Joe® customer service center at 1-866-766-9563 (1-866-SNOWJOE) for assistance
After Use
- Switch the machine off, disconnect it from the power supply and let it cool down.
- Check, clean and store the machine as described below.
Thatch Collection Bag
- Inspect the thatch collection bag before each use. Do not use it if you find any damage.
- Clean the thatch collection bag after operation. Let the thatch collection bag dry thoroughly before storing to avoid mildew.
Transportation
- Switch the product off and disconnect it from power supply before transporting it anywhere.
- Attach transportation guards, if applicable.
- Adjust the cutting depth to the transportation stage (refer to “CUTTING DEPTH ADJUSTMENT” on page 9).
- Always transport the product by its handle.
- Protect the product from any heavy impact or strong vibrations which may occur during transportation in vehicles.
- Secure the product to prevent it from slipping or falling over.
Troubleshooting
WARNING! Only perform the steps described within these instructions! All further inspection, maintenance and repair work must be performed by an authorized service center or a similarly qualified specialist if you cannot solve the problem yourself!
Suspected malfunctions, disturbances or damages are often due to causes that the user can fix themselves. Follow the below troubleshooting guidelines when check
| Problem |
Possible Cause |
Solution |
| Motor does not start |
a) Not connected to power supply
b) Power cord or plug is defective
c) Other electrical defect to the product
d) Lock-off button not pressed
|
a) Connect to power supply
b) Contact an authorized service agent
c) Contact an authorized service agent
d) Press lock-off button first, then the start/stop lever |
| Product does not reach full power |
a) Extension cord not suitable for
operation with this product
b) Power source (e.g. generator) has too low voltage
c) Air vents are blocked |
a) Use a proper extension cord
b) Connect to another power source
c) Clean the air vents |
| Unsatisfying result |
a) Cutting device worn
b) Scarified material exceeds capacity
c) Scarifying depth is incorrect |
a) Replace the tine cylinder (see page 11)
b) Only scarify materials according to capacity of the product
c) Adjust depth |
Service and Support
If your AJ801E electric scarifier + dethatcher requires service or maintenance, please call 1-866-SNOWJOE (1-866-766-9563) for assistance.
Model and Serial Numbers
When contacting the company, reordering parts or arranging service from an authorized dealer, you will need to provide the model and serial numbers, which can be found on the decal located on the housing of the unit. Copy these numbers into the space provided below.
-73653.png)
Optional Accessories
WARNING! ALWAYS use only authorized Snow Joe® + Sun Joe® replacement parts and accessories. NEVER use replacement parts or accessories that are not intended for use with this electric scarifier + dethatcher. Contact Snow Joe® + Sun Joe® if you are unsure whether it is safe to use a particular replacement part or accessory with your electric scarifier + dethatcher. The use of any other attachment or accessory can be dangerous and could cause injury or mechanical damage.
| Accessories |
Item |
Model |
-785706.png) |
Replacement Dethatcher Tines |
AJ801E-DTNS |
| Replacement Scarifier Blade |
AJ801E-SCRF |
| Snow Joe® + Sun Joe® SJTW-A 14-gauge 50-foot extension cord with lighted end |
PJEXT50-B |
NOTE: Accessories are subject to change without any obligation on the part of Snow Joe® + Sun Joe® to provide notice of such changes. Accessories can be ordered online at sunjoe.com or via phone by contacting the Snow Joe® + Sun Joe® customer service center at 1-866-SNOWJOE (1-866-766-9563).