Operating instruction
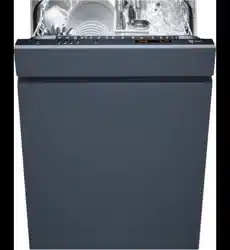
Adora SL design-integrated, fully integrated
Dishwasher

2
© V-ZUG Ltd, CH-6301 Zug, 2017

3
Contents
1
Safety precautions 5
2
Appliance description 9
2.1
Construction......................................................... 9
2.2
Operating and display elements....................10
3
Programme overview 11
3.1
Programme ........................................................11
3.2
Additional functions .......................................... 12
3.3
EcoManagement ............................................... 12
4
Operation 13
4.1
Preparing the appliance ..................................13
4.2
Dish washing tips..............................................13
4.3
Hints on loading the cutlery drawer * ........... 14
4.4
Loading tips for the upper basket .................14
4.5
Loading tips for the lower basket .................. 17
4.6
Detergent............................................................20
4.7
Selecting a programme ...................................22
4.8
Delayed start......................................................24
4.9
Interrupting a programme ...............................24
4.10
Aborting a programme before time............... 25
4.11
Operation with the childproof lock
activated .............................................................25
4.12
End of programme ........................................... 26
4.13
EcoManagement statistics .............................. 26
5
User settings 27
5.1
Overview of user settings................................27
5.2
Changing user settings....................................27
5.3
Language............................................................ 28
5.4
Contrast ..............................................................28
5.5
Acoustic signal ..................................................28
5.6
All in 1.................................................................28
5.7
Water hardness .................................................28
5.8
Rinse agent dosage ......................................... 29
5.9
Water hardness unit ..........................................29
5.10
DryPlus ................................................................29
5.11
RinsePlus ............................................................29
5.12
Hot water connection........................................29
5.13
OptiStart...............................................................30
5.14
EcoManagement................................................30
5.15
Clear counter......................................................30
5.16
Childproof lock...................................................30
5.17
Heat pump (depending on model) ................30
5.18
Automatic door opener ....................................31
5.19
Temperature unit................................................31
5.20
Interior light .........................................................31
5.21
Tank storage duration.......................................31
5.22
Emptying the tank in the event of a
power failure.......................................................31
5.23
Automatic standby.............................................32
5.24
Factory setting....................................................32
6
Care and maintenance 32
6.1
Cleaning the interior and exterior ...................32
6.2
Cleaning the spray arms..................................33
6.3
Cleaning the filter system.................................33
6.4
Refilling with regeneration salt ........................33
6.5
Filling with rinse agent......................................34
6.6
Draining the storage tank ................................34
7
Trouble-shooting 35
7.1
Error messages..................................................35
7.2
Other possible problems .................................37
7.3
Unsatisfactory washing results .......................38
7.4
In the event of a power failure ........................39
8
Accessories and spare parts 39
9
Technical data 41
9.1
Consumption data .............................................42


5
1 Safety precautions
Read the operating instructions be-
fore using the appliance for the first
time.
1.1 General safety precautions
▪ This appliance can be used
by children aged8 and above
and by persons with reduced
physical, sensory or mental
capabilities, or lack of experi-
ence and/or knowledge,
provided they are supervised
or have been instructed on
the safe use of the appliance
and have understood the haz-
ards involved. Children must
not play with the appliance.
Cleaning and user mainten-
ance shall not be undertaken
by children without supervi-
sion.
▪ If an appliance is not
equipped with a mains cable
and a plug or other means for
disconnecting from the mains
with a contact opening on
each pole complying with the
conditions of overvoltage cat-
egory III for full isolation, an
isolating device must be in-
corporated into the perman-
ently installed electrical install-
ation in accordance with the
installation regulations.
▪ If the mains cable of this ap-
pliance is damaged, it must
be replaced by the manufac-
turer or its Customer Services
or a similarly qualified person
in order to avoid hazard.
1.2 Appliance-specific safety
precautions
▪ Never use a steam cleaner to
clean the appliance.
▪ If the appliance is installed on
a carpeted floor ensure that
the ventilation openings on
the base of the appliance are
not obstructed.
▪ Only leave the appliance door
open in the at-rest position.
An open appliance door
poses a danger of tripping or
injury. Do not sit or rest on
the appliance door or use it
as a storage surface.
▪ CAUTION: Knives and other
items with sharp points must
be placed with the point

1 Safety precautions
6
downwards or placed hori-
zontally in the basket.
▪ CAUTION: Do not drop or in-
sert knives, forks or other
sharp items in the opening of
the door lock.
▪ No detergent must enter the
opening of the door lock. This
can cause the door lock to
malfunction.
▪ The appliance is only suitable
for washing household dishes
and cutlery with water and
standard dishwasher deter-
gent. The appliance is for use
in the home and for the inten-
ded purpose only. No liability
is assumed for any damage
caused by improper or incor-
rect use.
▪ Capacity: 13 or 14 interna-
tional place settings (with cut-
lery drawer *).
*Depending on model
▪ This appliance is designed to
be used for household and
similar purposes such as:
staff kitchens in shops, offices
and other commercial
premises; agricultural proper-
ties; by customers in hotels,
motels and other residential
facilities; in bed-and-breakfast
hotels.
1.3 Correct use
▪ Any repairs, modifications or manipula-
tions to the appliance, especially any elec-
trically live parts, may only be carried out
by the manufacturer, its Customer Ser-
vices or a similarly qualified person. Re-
pairs if carried out incorrectly may cause
serious injury, damage to the appliance
and fittings, as well as affect the function-
ing of the appliance. If the appliance is
not working properly or in case of a repair
order, follow the instructions given in the
«Service & Support» section. Please con-
tact our Customer Services if necessary.
1.4 Instructions for use
Switching off the power to the appli-
ance disables the built-in overflow
protection system.
Dishwasher detergents are strongly
alkaline. They can be extremely
dangerous if swallowed. Avoid con-
tact with the skin and eyes and keep
children away from the dishwasher
when the door is open. Check that
the detergent receptable is empty
after completion of the wash cycle.
▪ If the appliance is visibly damaged, do not
use it. Contact our Customer Services.
▪ If the appliance is not operating properly,
disconnect it from the power supply im-
mediately.
▪ Use original spare parts only.
▪ Retain these operating instructions for fu-
ture reference.
1 Safety precautions
7
▪ Avoid opening the appliance door unne-
cessarily during operation. The dishes and
water may be hot – scalding hazard! The
steam that escapes can damage wood
combination fascias. Spectacles can
steam up, impairing your vision.
▪ Do not wash objects that are soiled with
inflammable or corrosive solvent, paint,
wax, chemicals (acids or alkaline solu-
tions) or iron chippings or that can shed
fibres in the appliance.
▪ Packaging material, e.g. plastic film and
polystyrene, can be dangerous for chil-
dren. Danger of suffocation! Keep pack-
aging material away from children.
1.5 Transport and installation
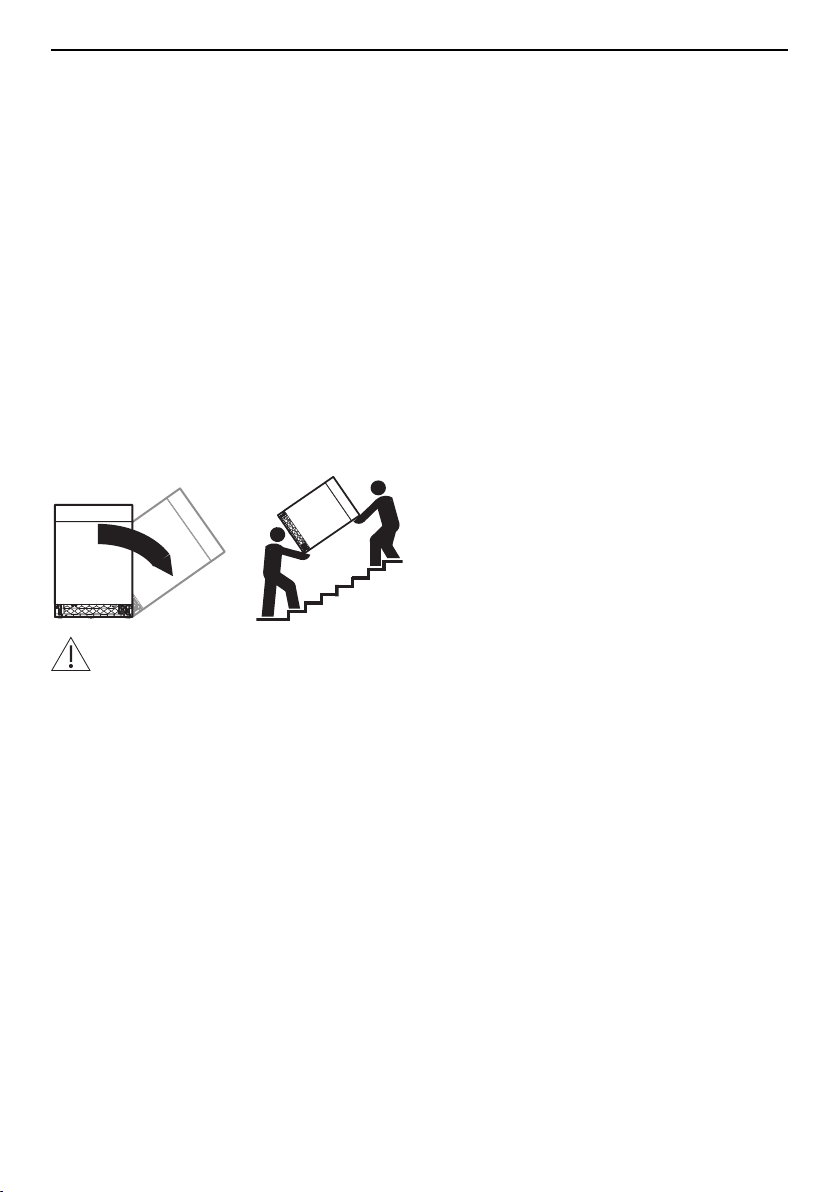
Front
Tilt max. 90° to the right!
Transport the appliance in an upright position
only! Transporting it in any other position will
result in damage to the appliance! When car-
ried carefully without being shaken, the appli-
ance may be tilted a maximum of 90° to the
left (viewed from the front).
1.6 How to avoid damaging the
appliance
▪ Before closing the appliance door and
starting a programme ensure that there
are no foreign objects (e.g. nails or paper
clips) or pets in the appliance. Foreign ob-
jects can damage parts of the appliance
as well as the dishes.
▪ Never fill the rinse agent reservoir or the
regeneration salt reservoir with detergent!
If this were to happen, however, do not
operate the appliance under any circum-
stances, as this could cause expensive
damage to it. Call Customer Services.
▪ Do not lean on any part of the appliance –
risk of accident!
▪ Turn off the water tap during longer ab-
sences.
▪ The appliance must be connected to the
mains supply to ensure appliance protec-
tion (overflow protection, among other
things).

1 Safety precautions
8
1.7 Using for the first time
After changing the location of an ap-
pliance that has a heat pump, it
must be left to stand in the normal
operating final position for around 2
hours before it can be operated
again.
The appliance must be installed and
connected to the electricity supply
by a qualified fitter/electrician in ac-
cordance with the separate installa-
tion instructions.
Before operating the newly installed appli-
ance for the first time, the following steps
should be taken:
Before using for the first time
▸ Switch on the power and turn on the water
tap.
▸ Set (see page 28) the water hardness.
▸ Fill the salt reservoir with approximately
1.0l water and 1 kg regeneration salt.
Wipe away any excess salt on the edge of
the salt reservoir.
▸ Fill the rinse agent reservoir with rinse
agent.
▸ Run the programme without dishes to
protect the appliance from corrosion from
any excess salt and to remove traces of
grease left behind from the manufacturing
process.
The refill indicator can flash during the first
few wash cycles. goes out when the salt
concentration in the reservoir is evenly dis-
tributed.
1.8 Notes on using the
operating instructions
Graphical operating instructions can be
downloaded on the internet from
www.vzug.ch.
Symbols used
Denotes important safety precau-
tions.
Failure to observe said precautions can res-
ult in injury or in damage to the appliance or
fittings!
Validity
The product family (model number) corres-
ponds to the first alphanumerics on the iden-
tification plate. These operating instructions
apply to:
Model Type Product range
Adora
60 SL
(EURO
60)
GS60SLZGVi
GS60SLZGdiB
GS60SLZGViB
41061
41085
41086
Adora
60 SLWP
(EURO
60)
GS60SLZWPVi
41082
Variations depending on the model are noted
in the text.
Modifications
Text, diagrams and data correspond to the
technical standard of the appliance at the
time these operating instructions went to
press. The right to make technical modifica-
tions for the purpose of the further develop-
ment of the appliances is reserved.
2 Appliance description
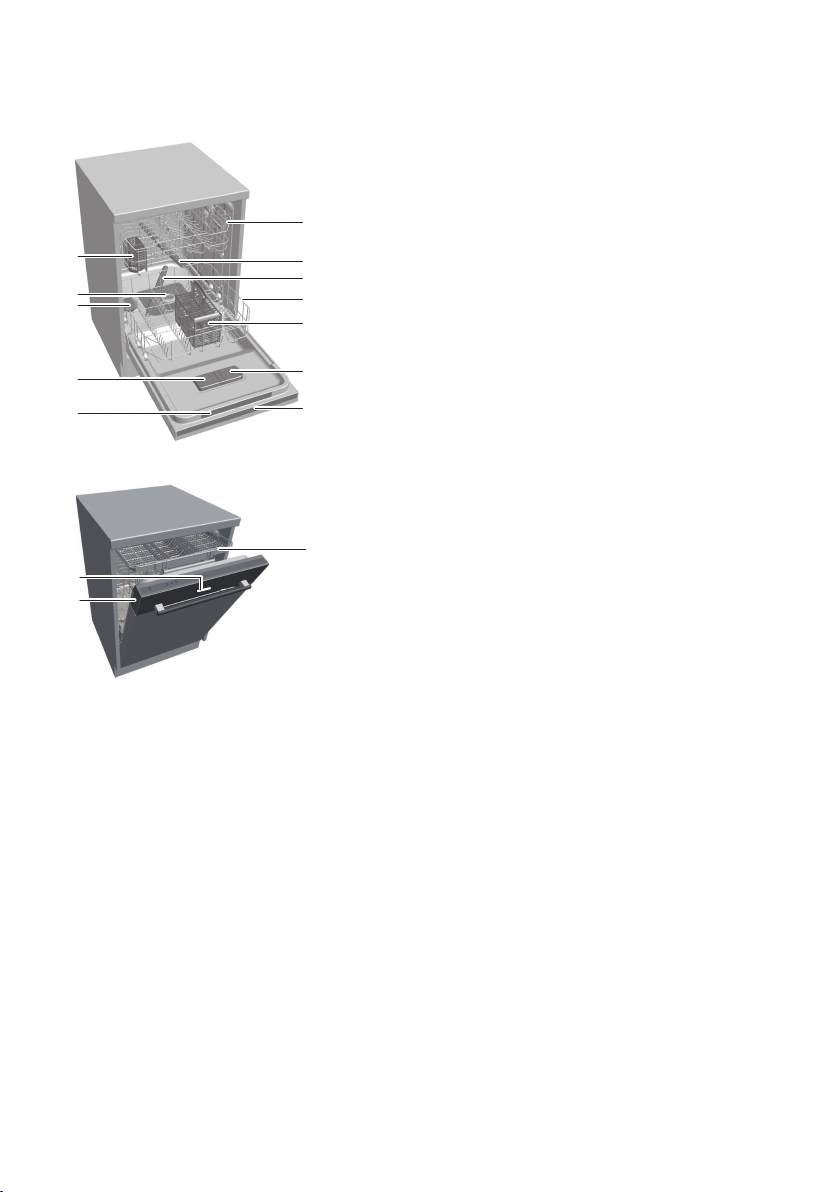
2.1 Construction
2
3
1
4
8
7
6
9
5
10
2
1
1
Baskets
2
Spray arms
3
Cutlery basket
4
Rinse agent reservoir
5
Operating and display elements
6
Quick operating instructions
7
Detergent dispenser
8
Salt reservoir
9
Filter system
10
«Small» cutlery basket *
11
12
13
11
Cutlery drawer *
12
Function light *
13
Plain text display on glass panel *
* Depending on model
9
2 Appliance description
2.2 Operating and display elements
4
32
1
1
1
1 Buttons 2 Programme symbols 3 Additional function sym-
bols/Indicator symbols
Programme selec-
tion
Eco programme Energy saving/
OptiStart
EcoManagement Automatic Partial load
SteamFinish Daily quick Rinse agent
refill indicator
Partial load Sprint «All in 1» detergent
Delayed start Intensive SteamFinish
End of programme Silent Salt refill indicator
Party
Extra programmes
4 Display Acoustic signal Function light
(depending on model)
▪ Programme name with
duration/temperature
▪ Programme progress
and time remaining
▪ Additional functions
▪ Hints and trouble-
shooting
An acoustic signal is emit-
ted at the end of the pro-
gramme and in the event
of a malfunction.
▪ Illuminates during the pro-
gramme sequence.
▪ Flashes during the final dry-
ing phase.
10
3 Programme overview
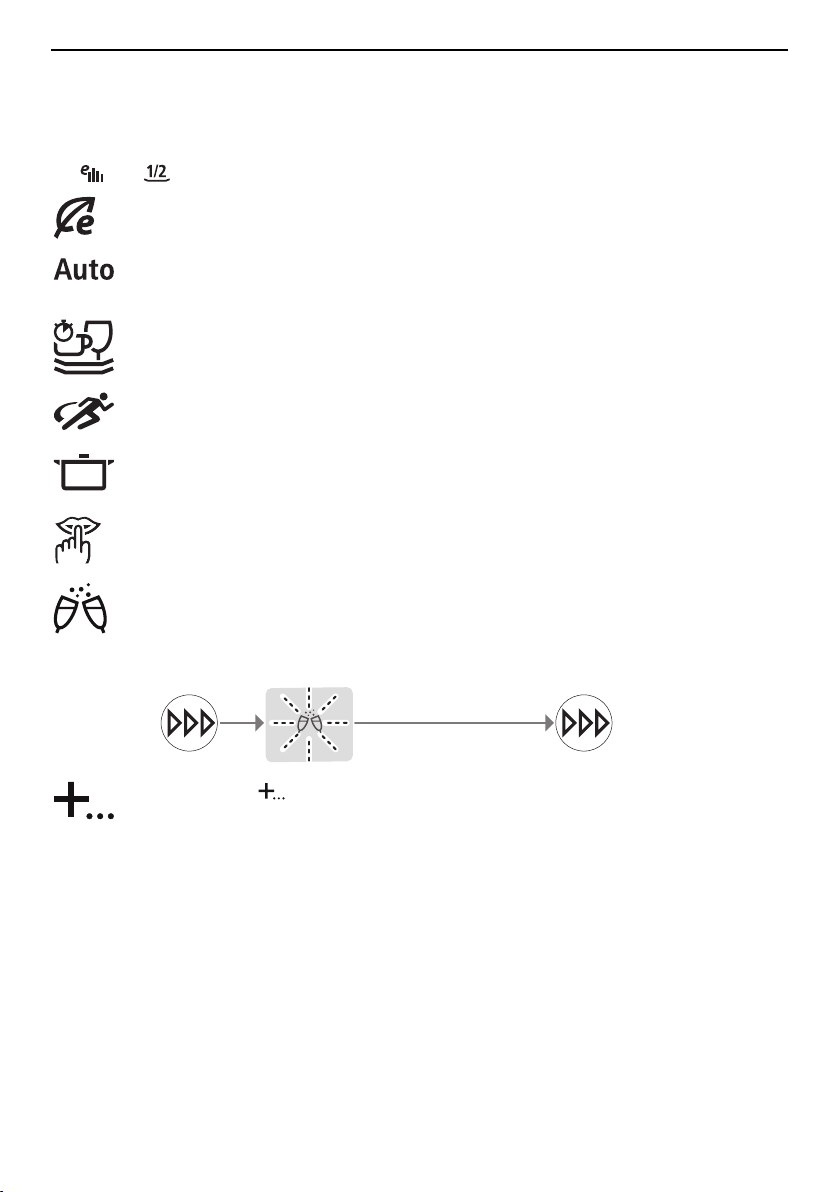
3 Programme overview
3.1 Programme
Programme time, water consumption and energy consumption can be reduced by selecting
the and additional functions.
Eco programme: The most efficient programme in terms of water and energy
consumption for normally dirty dishes (declaration programme).
Automatic: Optimum cleaning with minimal water and energy consumption. Not
for burnt-on or dried leftovers.
Daily quick: Quick programme for normally soiled daily dishes. Cleans with high
spray pressure.
Sprint: For slightly dirty dishes such as drinks glasses or coffee cups and sau-
cers. Not suitable for slowly dissolving tabs.
Intensive: For very dirty dishes, particularly with starchy leftovers (mashed
potato, rice etc.).
Silent: Exceptionally quiet programme for washing the dishes at night. Suitable
for normally soiled dishes.
Party: Quick wash programme for lightly soiled dishes that need to be cleaned
quickly, e.g. at a party or an aperitif. Not suitable for tabs. Only use detergent in
powder or gel form.
Programme start after heat-up phase:
Heating up for 10 mins.
The flashing symbol indicates that one of the following programmes has
been selected. The selected programme is shown in the display.
Glass: Gentle programme for glasses.
Fondue/Raclette: For very dirty dishes, including burned-on food. Only use
dishes that are suitable for dishwashers. If necessary, put detergent in the pre-
rinsing compartment.
Hygiene: For items with higher hygiene requirements (baby bottles, chopping
boards etc.). Clean the filter system before starting the programme.
Machine care: The appliance, in particular the storage tank, is hygienically
rinsed. Before starting the programme, clean the filter system and add dish-
washer cleaner according to the manufacturer’s instructions.
11
3 Programme overview
Pre-rinsing: Prevents dirt drying on if the wash programme is not going to be
started until later.
3.2 Additional functions
Depending on the user settings, select between two functions.
1 ×
Energy saving: The wash temperature is reduced by 5 °C, lowering en-
ergy consumption by about 10 %. Gentle on glasses. The programme
time is shortened slightly.
Appliances with a heat pump: overall energy consumption is reduced by
up to 30 %, however the programme time is extended.
2 ×
OptiStart: If the «OptiStart» user setting is active, a delayed start is set.
During the delayed start, the dishes are soaked and this improves the
cleaning results and reduces the energy consumption.
SteamFinish: During rinsing, steam is generated, which settles on the
glasses and leads to optimum drying results. The programme takes around
15 minutes longer.
Partial load: For a small load of dishes. The amount of water used is re-
duced by up to 6l and the duration of the programme is shortened by up to
36minutes. Depending on the programme selected and the electrical con-
nection, the time saving may be less than 36 minutes.
Delayed start: Allows you to wash during off-peak hours (e.g. at off-peak
electricity rates). A delayed start of between 30 minutes and 24hours can
be set.
3.3 EcoManagement
Only active if «EcoManagement» is turned on in the user settings.
EcoManagement provides information on the energy and water consump-
tion of the appliance and supports the sustainable use of energy. The fol-
lowing consumption information can only be retrieved when no pro-
gramme is running:
▪ Energy and water consumption of the last programme
▪ Total energy and water consumption
▪ Average energy and water consumption of the last 25 programmes
The energy and water consumption of a programme is displayed during
programme selection. At the end of a programme, the energy and water
consumption of the last programme run is displayed.
The values can vary according to programme, load, additional functions and
user settings.
12

4 Operation
4 Operation
4.1 Preparing the appliance
After changing the location of an appliance that has a heat pump, it must be left to
stand in the normal operating final position for around 2 hours before it can be op-
erated again.
▸ Remove any coarse or hard pieces of food or foreign objects (such as toothpicks) left on
the dishes.
▸ Load the baskets. After loading, check that the spray arms can turn freely.
4.2 Dish washing tips
General notes
▪ Do not overload the baskets.
▪ Dishes, pots and pans with heavily burned-on food debris stuck to them should be soaked
in water first.
▪ Load beverage and food containers such as cups, glasses, pots, etc. with the opening fa-
cing downwards so that the water can drain off.
▪ When loading, ensure glasses do not touch so as to prevent damage and water spots.
▪ When cleaning range hood grease filters, select the programme and use the maximum
amount of detergent.
Dishes
Not all table- and kitchenware are dishwasher safe.
▪ Clean wooden or plastic parts that are sensitive to damage from heat and detergent suds
by hand.
▪ Pottery has a tendency to crack or chip.
▪ The printing on glass and porcelain is hard-wearing only to a point and eventually over time
can wear off.
▪ Glassware, depending on the type and the detergent being used, can become cloudy.
Check with your glassware supplier as to whether your glassware is dishwasher safe.
▪ Stress and tension in thick cut crystal glasses and dishes can cause cracking.
▪ Do not wash dishes with adhesive labels on them. Adhesive labels can come off and clog
up the filter system.
▪ Objects made of silver, copper and tin tend to discolour, turning brown or black.
▪ Spots tend to form on aluminium. Wash aluminium separately or by hand.
13
4 Operation
4.3 Hints on loading the cutlery drawer *
* Depending on model
▸ Where possible, load spoons with handles
between the tines.
▸ With thick-handled spoons or if the side is
raised (see below), place the mouthpiece
between the tines.
▸ Tall glasses: Raise the right side by 2cm
or push it into the middle.
If tall glasses hit the cutlery drawer frame, they could get damaged.
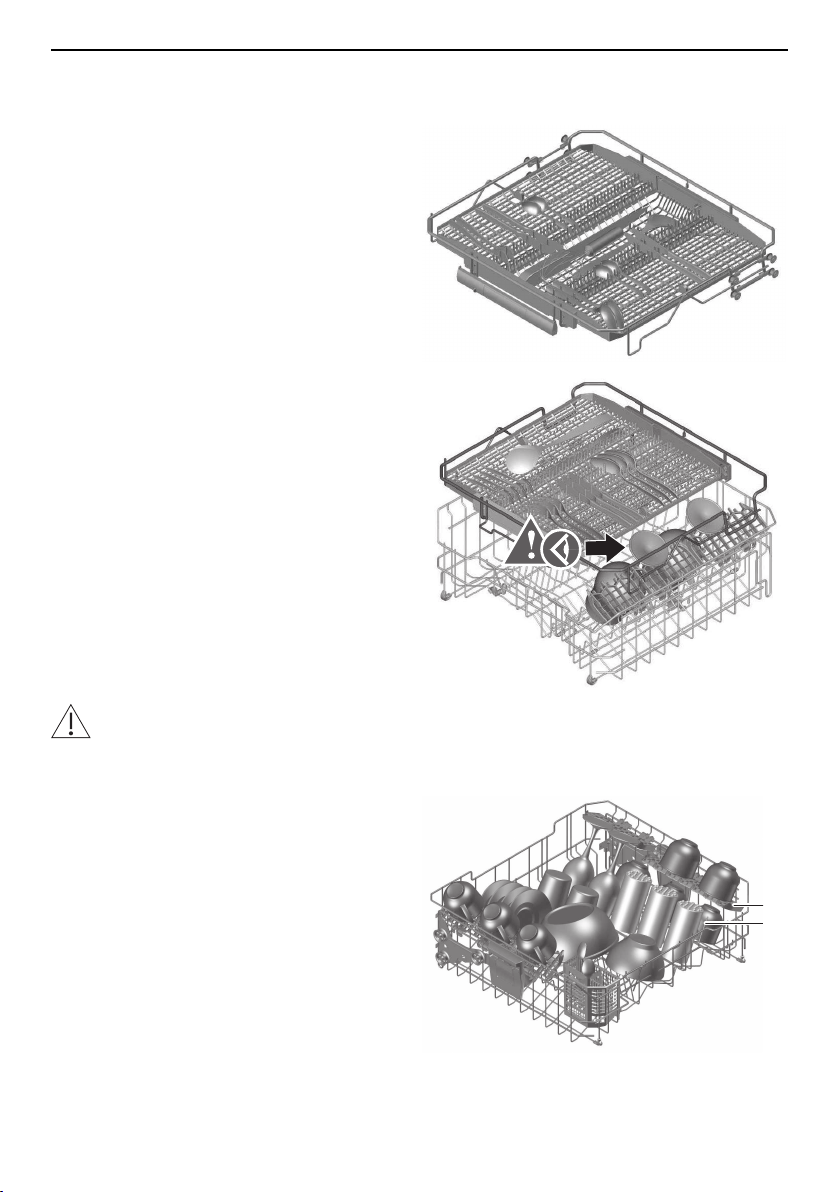
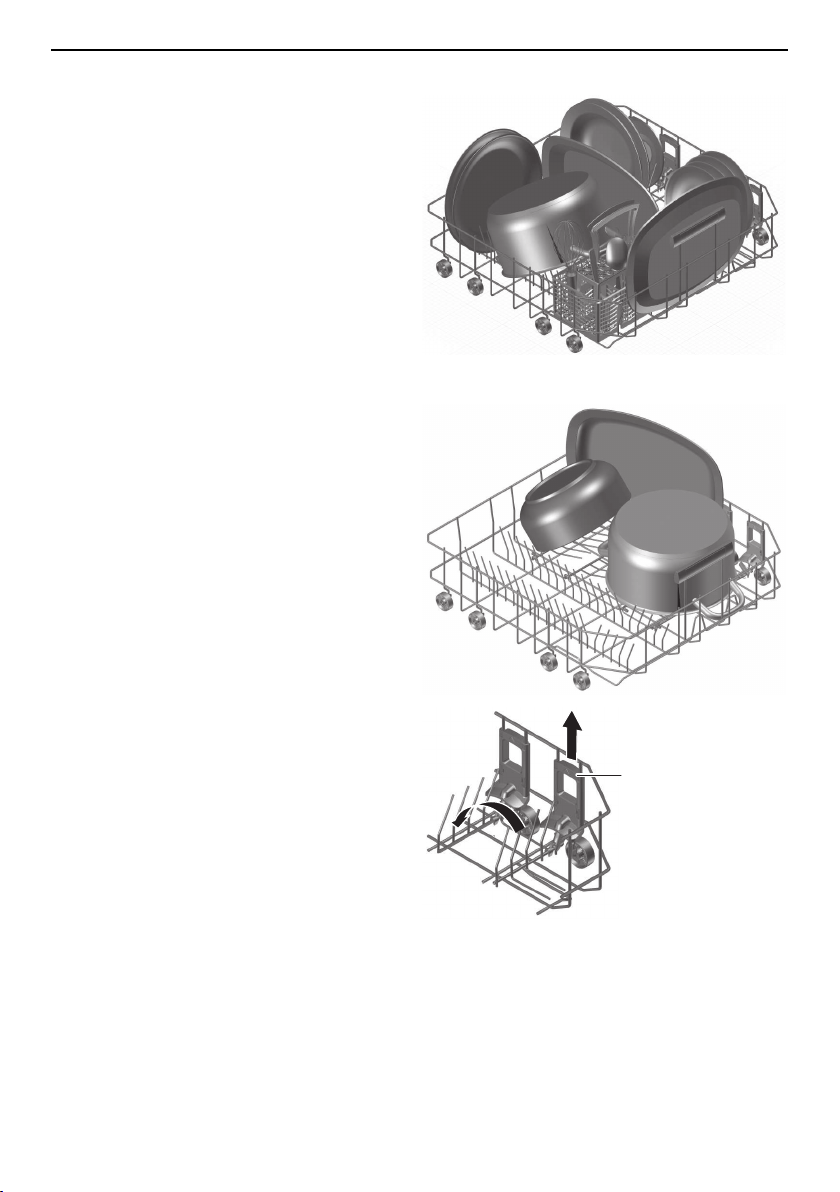
4.4 Loading tips for the upper basket
▸ Arrange smaller items such as saucers,
glasses, cups and dishes.
▸ If using the fold-down racks 1, stagger the
items.
▸ Rest glasses on the fold-down glass holder
2.
1
2
14
4 Operation
Glass holder
Particularly suitable for tall glasses.
▸ Push the glass holders 1 gently down or,
alternatively, pull them up until they en-
gage.
1
Easy prongs
For placing drinking glasses, baby bottles,
vases and carafes anywhere in the basket.
▸ Put easy prong 1 over basket prongs.
▸ Use 2 easy prongs for wider vessels.
1
Racks
The racks 1 can also be used as glass hold-
ers. Remove the racks to accommodate tall
glasses.
1
15
4 Operation
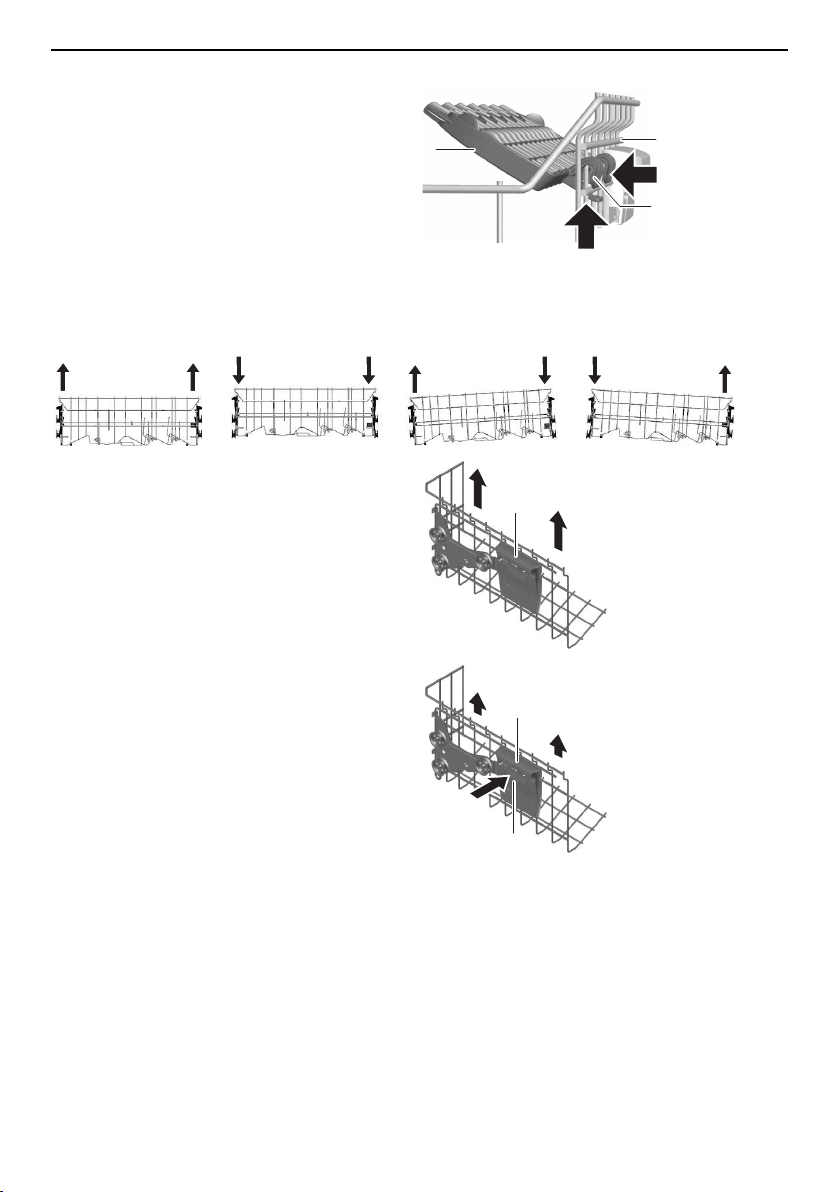
Dismantling/Adjusting the height of the racks
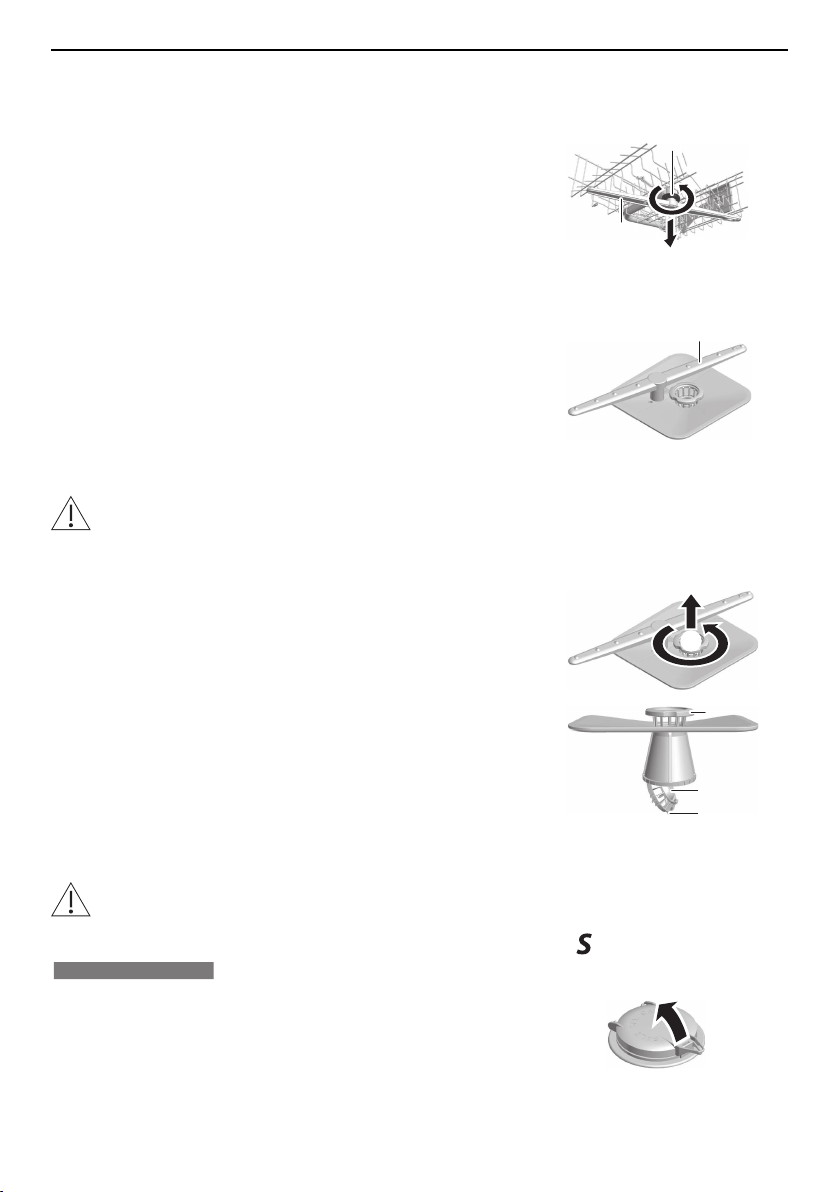
Push the rack 1 up by the hooks 2.
Push the rack inward and then out.
▸ Hook the rack in the higher position 3, if re-
quired.
2.
1.
3
2
1
Adjusting the upper basket
The height of the upper basket can be adjusted by around 2–4 cm (depending on model). It
can be inclined in various ways.
▸ To raise: Hold the upper basket at the
sides by the grips 1 and raise it into the po-
sition required.
1
▸ To lower: Hold the upper basket at the
sides by the grips 1.
▸ Raise the upper basket slightly and press
the button 2 at the same time. The locking
device is released.
▸ Lower the upper basket into the position re-
quired, release the button and engage the
basket.
▸ Put plastic bowls in the upper basket.
1
2
16
4 Operation
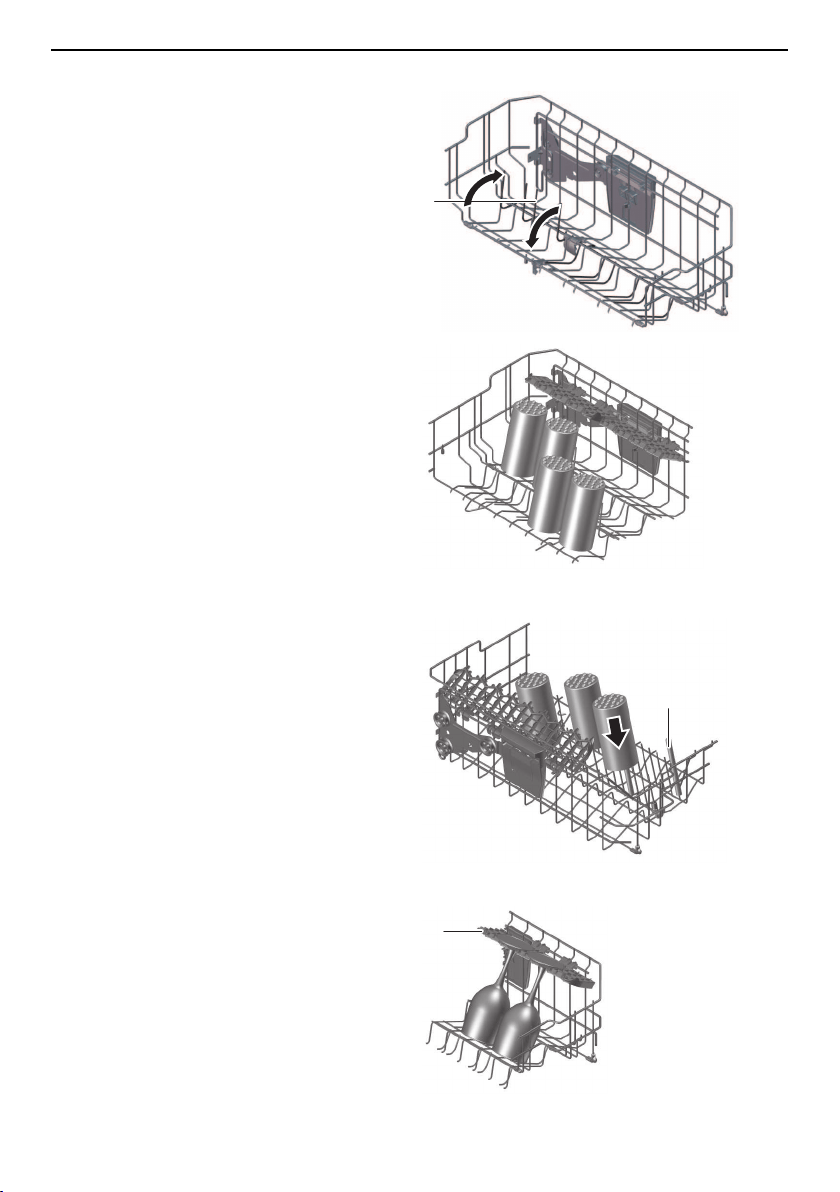
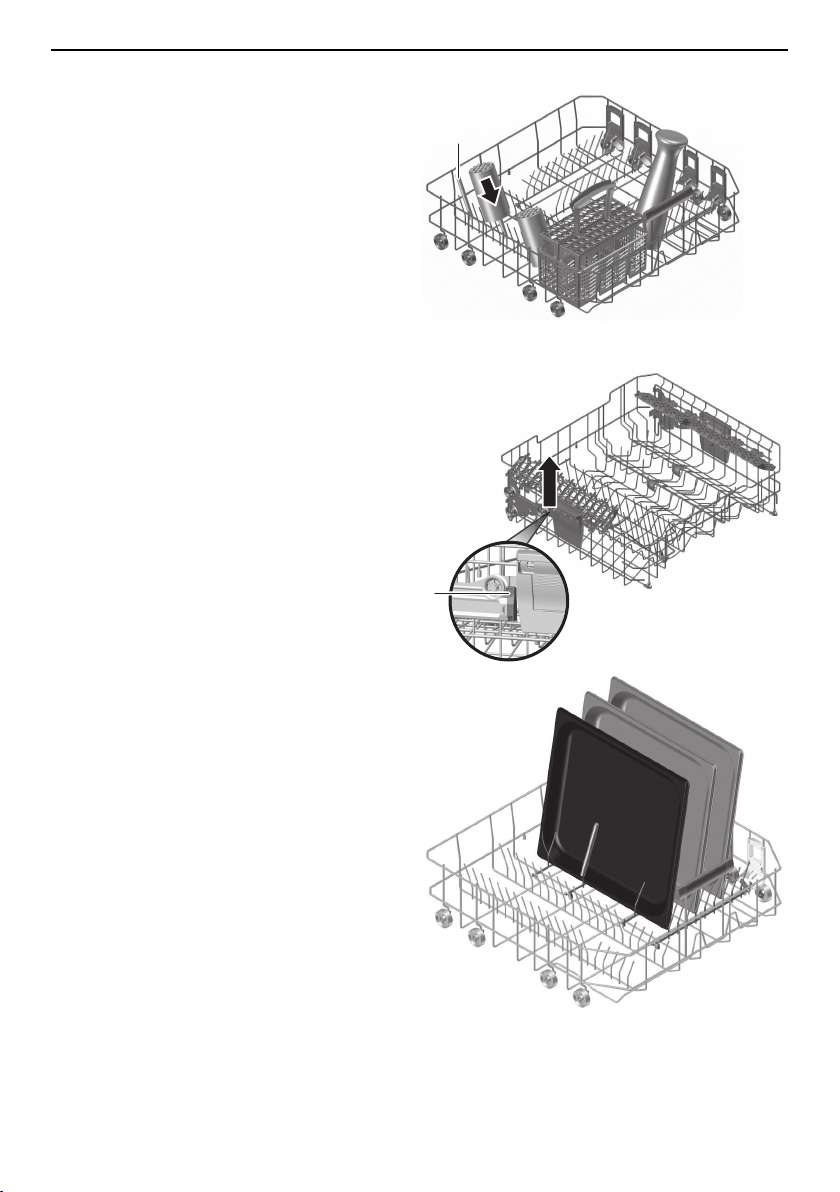
4.5 Loading tips for the lower basket
▸ Load larger items such as plates, bowls,
platters, pots and pans.
▸ Load wide items (soup plates, lids, etc.) at
the back on the right.
Fold-down tines
For a larger area for loading e.g. large plates,
pans, dishes or a number of cups and
glasses.
Cooking trays can be placed between the
prongs. Use easy prongs for greater stability.
▸ Pull up the locking grip 1 at the side.
▸ Fold the tines down.
1
17
4 Operation
Easy prongs
For placing drinking glasses, baby bottles,
vases and carafes anywhere in the basket.
▸ Put easy prong 1 over basket prongs.
▸ Use 2 easy prongs for wider vessels.
1
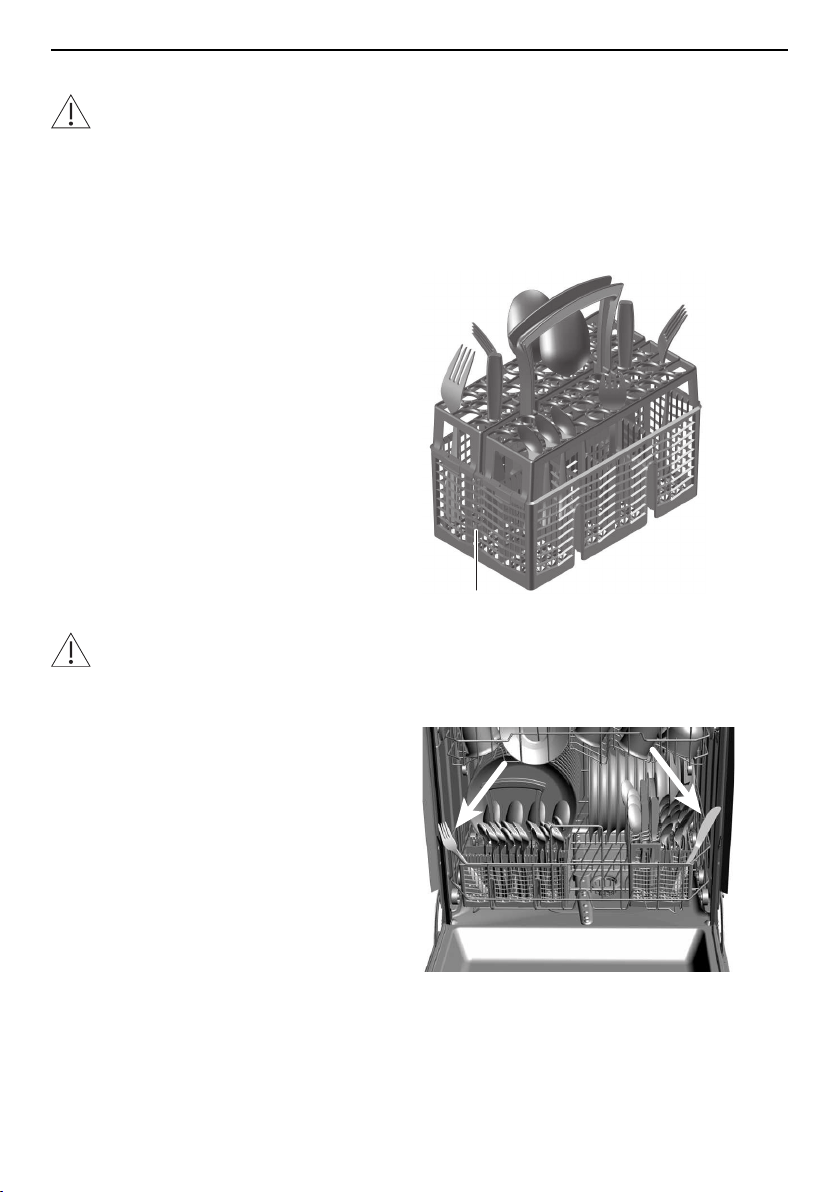
Cleaning baking and steaming trays
The upper basket has to be removed for lar-
ger trays.
▸ Slide the upper basket out as far as pos-
sible.
▸ Remove the basket safety lock 2 by push-
ing it upwards.
▸ Pull the upper basket out of its guides.
▸ Load baking trays, using easy prongs for
greater stability.
2
▸ When the upper basket is put back, the basket safety lock 2 must be returned to the lock-
ing position.
18
4 Operation
Cutlery basket
To avoid injury, place knives and cutlery with sharp edges or points into the cut-
lery basket in such a way that they do not stick out (points facing downwards).
Do not drop or insert knives, forks or other sharp items in the opening of the door
lock. Risk of damage to the appliance!
Knives and cutlery with sharp edges or points may also be placed horizontally in the upper
basket.
▸ Place the cutlery basket over the folded-
down prongs anywhere in the basket.
▸ Distribute cutlery loosely in the basket, with
handles pointing down (except for knives
and the like). Spoons should not be stuck
together.
▸ To prevent items of cutlery sticking to-
gether, water spots during drying, and
smaller items slipping through the basket,
put the inserts 1 supplied on the cutlery
basket.
1
When closing the appliance door, ensure no items of cutlery are sticking out of the
tub or are trapped. The leak tightness of the appliance cannot otherwise be as-
sured.
19
4 Operation
4.6 Detergent
Choice of detergent
Never use washing-up liquid. Heavy foaming can cause malfunctions. Strictly ob-
serve the dosage instructions printed on the packaging and contact the detergent
manufacturer if you have any questions. Using too high or low a dosage can cause
damage to the appliance.
▸ Only use detergent specially formulated for dishwashers.
Tabs may not dissolve properly at a wash temperature of below 55 °C, affecting the cleaning
performance of the appliance.
NOTE! The «Party» programme is not suitable for the use of tabs! Only use detergent in
powder or gel form!
Combination cleaning products ( tabs/powder)
Continue to use regeneration salt and rinse agent for a good cleaning performance.
▸ Set to
All in 1 ON
in the user settings. The programmes and displays are adapted
to suit the detergent.
When the or refill indicators flash, continue to refill with regeneration salt or
rinse agent.
▸ If, after washing and drying, the results are not satisfactory, use conventional cleaning
products. Set to
All in 1 OFF
in the user settings. For complaints, contact the de-
tergent manufacturer.
20
4 Operation
Adding the detergent
No detergent must enter the opening of the door lock. This can cause the door
lock to malfunction.
Powder
▸ Open the detergent dispenser by pushing
the release catch in the direction of the ar-
row.
▸ Add the detergent to the detergent com-
partment. For dosage, follow the detergent
manufacturer’s instructions.
▸ Observe the «20 and 30 ml» level marks 1.
▸ For heavier soiling, add approximately 1
teaspoon of detergent to the
pre-rinsing compartment 2.
▸ Close the cover.
1
2
Tabs
▸ Place the tab 3 flat in the detergent com-
partment.
3
21
4 Operation
4.7 Selecting a programme
▸ Press the button repeatedly until the required pro-
gramme symbol flashes.
▸ Select additional functions as necessary.
▸ Close the appliance door.
The programme starts immediately. The function light goes on (depending on
the model).
If the appliance door is not closed within 15 seconds, all the information, symbols and the
display go out, and an acoustic signal sounds twice. The programme has to be selected
again. Press the button at any time to cancel the programme selected.
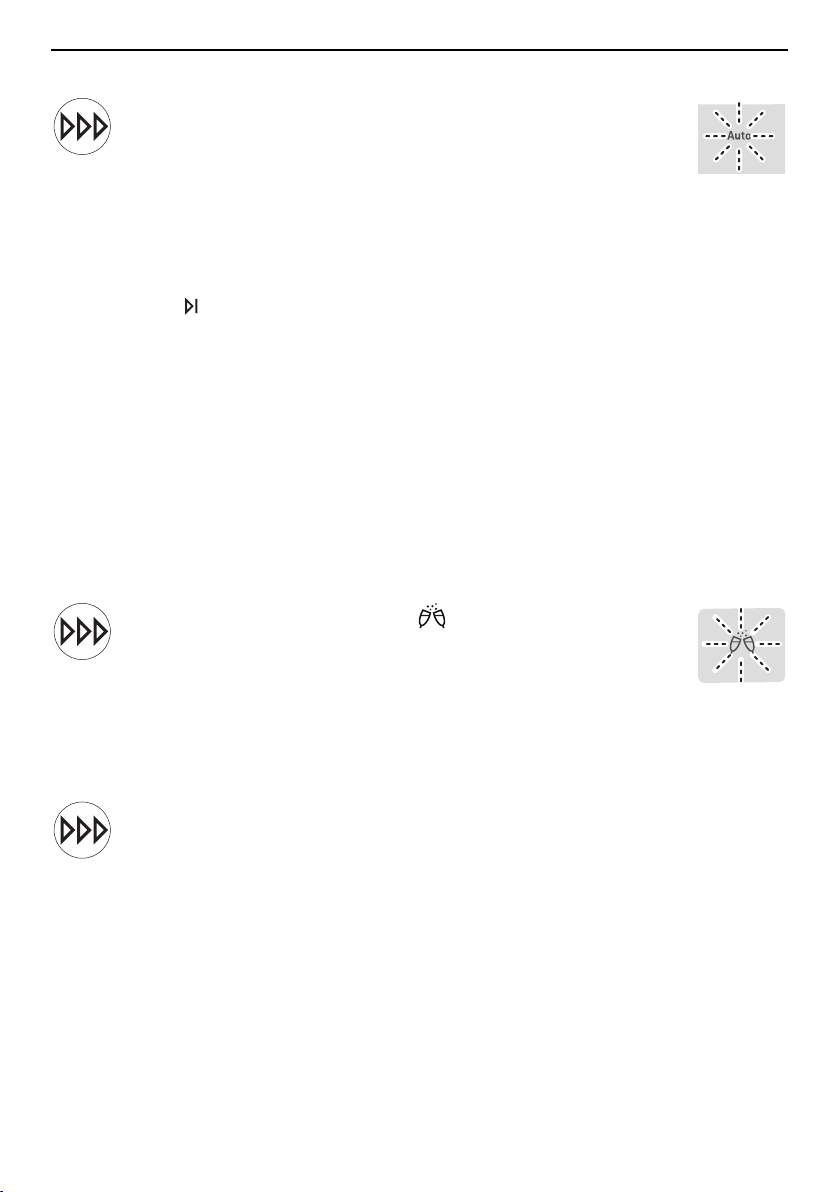
Special «Party» programme sequence
Loading with aperitif dishes
With the «Party» programme, the basket can be fully loaded. It is only suitable for lightly soiled
dishes:
▪ wine, champagne and drinking glasses
▪ coffee and tea cups
▪ slightly greasy plates
▪ cutlery.
NOTE! Not suitable for dishes with dried-on food or moderately to heavily soiled dishes!
Heating up the appliance
▸ Press the button repeatedly until flashes.
▸ Close the appliance door.
The appliance heats up for about 10 minutes. Then,
depending on the model, either «Load/Unload» or a
flashing function light is shown in the display.
Starting the «Party» programme
▸ Load the dishes and add the detergent in powder or gel form.
NOTE! Not suitable for tabs!
▸ Press the button to start the programme.
The programme runs for about 11 minutes.
▸ When the programme finishes, unload the damp dishes and dry them off by
hand.
▸ Load the next batch of dishes, if any.
▸ Add the detergent.
NOTE! Detergent must be added to the detergent dispenser before each wash
cycle!
22

4 Operation
▸ Press the button to start the programme again.
A total of up to 5wash cycles can be carried out in succession. After this, the
programme is automatically aborted. The programme can be aborted at any
time with the button.
If the appliance door is left open for too long, the programme is aborted.
Scalding hazard! If the device is connected to a hot water supply, the water can
become hotter than 51°C between cycles.
NOTE! Between the individual wash cycles, the hot water remains in the appliance. If the ap-
pliance door is kept closed, the water stays hot for up to 5 hours and is used for the next wash
cycle.
NOTE! If you use the «Party» programme frequently, we recommend that you enable
RinsePlus (see page 29) in the user settings. This extends the duration of the relevant wash
cycles slightly.
Selecting additional function
Additional functions can be selected within 15 seconds of selecting a programme.
e.g.
▸ Press the required additional function button. The cor-
responding symbol illuminates.
▸ Close the appliance door.
The programme starts.
NOTE! The additional function cannot be selected with the «Hygiene» and «Machine
care» programmes. The additional and functions cannot be selected with the «Pre-
rinsing» programme.
Saving additional functions
When an additional function is saved, it is automatically active during programme selection.
▸ Select the programme.
▸ Press the additional function button for 5 seconds. The selection is saved.
▸ To cancel the additional function, press the additional function button for 5
seconds.
The symbol flashes briefly and an acoustic signal sounds to confirm that the
additional function has been saved or deselected.
23

4 Operation
4.8 Delayed start
The delayed start allows you to wash during off-peak hours (e.g. at off-peak electricity rates). It
can be set within 15 seconds of selecting a programme.
A delayed start of between 30 minutes and 24hours can be set.
Setting
▸ Select a programme.
▸ Repeatedly press or hold down the button until the required delayed start
duration appears in the display.
▸ Press the button to select OptiStart, if required.
During the delayed start, the dishes are soaked and this improves the
cleaning results and reduces the energy consumption.
▸ Close the appliance door.
If a delayed start has been set, the waiting time can be reduced by pressing
the delayed start button.
The display goes dark *. The countdown to the set delayed start begins.
When the delayed start duration is up, the programme selected starts auto-
matically. No acoustic signal is emitted at the end of the programme.
Dishes can be loaded at any time during the delayed start.
* Depending on model
Cancelling a delayed start
▸ Open the appliance door.
▸ Repeatedly press or hold down the button until the delayed start is cleared
and the programme phase is displayed.
▸ Close the appliance door.
The programme starts immediately.
4.9 Interrupting a programme
The dishes and water may be hot. Scalding hazard!
▸ Open the appliance door carefully.
This interrupts the programme. The programme sym-
bol flashes. The following alternate in the display:
Close door
/
Cleaning 1h05
24
4 Operation
4.10 Aborting a programme before time
The dishes and water may be hot. Scalding hazard!
▸ Carefully open the appliance door.
This interrupts the programme. The programme symbol flashes.
▸ Press the button for 2 seconds.
The water is pumped out. The display shows altern-
ately:
Programme aborted
/
please wait ...
An acoustic signal sounds 5 times. The display and
symbols go out.
4.11 Operation with the childproof lock activated
The childproof lock must be overridden each time before selecting the programme.
▸ Open the appliance door.
In the display appears for 15 seconds:
Childproof lock
▸ Hold the button depressed and at the same time press the button.
The childproof lock is overridden. The appliance can
now be used as normal.
EcoManagement data can be retrieved without overriding the childproof lock.
25
4 Operation
4.12 End of programme
The appliance door must not be closed when
Automatic door opening
Do not close the door!
is shown in the display. The door opener could otherwise be
damaged!
A 5× acoustic signal is emitted at the end of the programme.
If the appliance door remains closed, final drying starts: The display illuminates or the func-
tion light flashes for up to 90 minutes (depending on model). If
Automatic door opening YES
is
set in the user settings, the appliance door opens automatically during the drying or final
drying phase.
After final drying, 3 long acoustic signals are emitted.
If «EcoManagement» is turned on in the user settings, the energy and water consumption
of the programme is displayed, e.g.:
1.2 kWh
15
For optimum drying results, unload the appliance after the final drying phase is finished.
When the final drying phase has finished, all the displays go out and the appliance enters the
energy-saving stand-by mode.
Unloading
▸ Unload the appliance. Unload the lower basket first.
▸ Periodically check the filter system and clean if necessary.
4.13 EcoManagement statistics
Displaying consumption information
▸ Touch the button.
Total
Total
Last programme
1,2 kWh
12
Last programme
∅ consumption
1.2 kWh/Charge
∅ consumption
237 kWh
3047
12 /Charge
The consumption data of the last pro-
gramme run is displayed, e.g.:
26
5 User settings
5 User settings
5.1 Overview of user settings
Hold the button depressed for 5 seconds
* Depending on the model
** Factor setting
• OFF **
• ON
• OFF
• ON **
• 7 selectable levels
• OFF **
• ON
• Select desired language
• OFF
• LOW **
• HIGH
• 13 selectable levels (°fH) **
• 13 selectable levels (°dH)
• AUTOMATIC **
• OFF
• 1..2..12
• °fH **
• °dH
• NO **
• YES
• NO HEATING
• OFF **
• ON
RinsePlus OFF
OptiStart ON
Language ENGLISH
Contrast
Acoustic signal LOW
All in 1 OFF
Rinse agent AUTOMATIC
Water hardness unit °fH
Water hardness 26–30 °fH
Hot water NO
DryPlus OFF
Storage duration of the tank 36h
Automatic door opening YES
Interior illumination 10min
Clear counter NO
EcoManagement ON
Heat pump * ON
Childproof lock OFF
Temperature unit °C
Factory settings NO
Automatic stand-by ON
• NO **
• YES
• OFF
• 12h, 24h, 36h **
• NO
• YES **
• OFF
• 1,2,5,10**,20 min
• OFF
• ON **
• NO **
• YES
• OFF
• ON **
• OFF
• ON **
• OFF **
• ON
• °C **
• °F
• OFF **
• ON
User settings
Emptying tank OFF
5.2 Changing user settings
▸ Hold the button depressed for about 5 seconds until the following appears in the dis-
play:
User settings
▸ Press the button repeatedly until the required user setting appears in the display.
▸ Press the button to change the user setting.
▸ To save the changes, press the button re-
peatedly until the following appears in the display:
Configuration saved
If no button is pressed within the next 15 seconds, the user settings are saved and the dis-
play goes out.
27
5 User settings
5.3 Language
The language in the display can be
changed.
5.4 Contrast
Factory setting:
▸ Increase contrast: Press the button.
▸ Decrease contrast: Press the button.
The contrast of the display can be set to
7 levels.
5.5 Acoustic signal
Factory setting: LOW
Possible settings:
▪ OFF
▪ LOW
▪ HIGH
There are 3 settings for the acoustic sig-
nal.
In the event of a malfunction, an acoustic
signal is emitted even in the off mode.
5.6 All in 1
Factory setting: OFF
Possible settings:
▪ OFF
▪ ON
The programmes must be adapted for
use with detergent with integrated salt
and rinse agent function. The duration of
very short programmes is extended be-
cause such detergent takes longer to
dissolve.
products are not suitable for all degrees of water hardness. Follow the detergent
manufacturer’s instructions. When the or refill indicators flash, continue to re-
fill with regeneration salt or rinse agent.
5.7 Water hardness
Factory setting: 26–30 °fH
Possible settings:
▪ 13 levels from 0–120 °fH
▪ 13 levels from 0–65 °dH
The water hardness setting can be
changed to suit local conditions. Contact
your local water authority for the relevant
information.
Water hardness levels
°fH 0
–
5
6
–
10
11
–
15
16
–
20
21
–
25
26
–
30
31
–
35
36
–
40
41
–
50
51
–
60
61
–
70
71
–
80
81
–
120
°dH 0
–
3
4
–
6
7
–
9
10
–
12
13
–
14
15
–
16
17
–
19
20
–
22
23
–
27
28
–
32
33
–
38
39
–
45
46
–
65
28

5 User settings
5.8 Rinse agent dosage
Factory setting: AUTOMATIC
Possible settings:
▪ AUTOMATIC
▪ OFF
▪ 1...2...12
The rinse agent dosage is automatically
adjusted to the load and the water hard-
ness. If the drying result is unsatisfactory,
the dosage can be set manually to one
of 12 levels.
5.9 Water hardness unit
Factory setting: °fH
Possible settings:
▪ °dH
▪ °fH
The unit of water hardness can be set to
the French degree of water hardness
(°fH) or the German degree of water
hardness (°dH).
5.10 DryPlus
Factory setting: OFF
Possible settings:
▪ OFF
▪ ON
If DryPlus is turned on, the drying tem-
perature is increased. This extends the
drying time.
5.11 RinsePlus
Factory setting: OFF
Possible settings:
▪ OFF
▪ ON
If RinsePlus is turned on, the amount of
water used with each programme is in-
creased. This extends the programme
time.
5.12 Hot water connection
Factory setting: NO
Possible settings:
▪ NO
▪ YES
▪ NO HEATING
If the appliance has a hot water connec-
tion, optimum use is made of the hot wa-
ter available.
«NO HEATING» setting: only enable if the
temperature of the inlet water is at least
60 °C. The dishes may not be com-
pletely dry by the end of the programme.
Leave the dishes in the appliance (e.g.
overnight) to dry.
29

5 User settings
5.13 OptiStart
Factory setting: ON
Possible settings:
▪ ON
▪ OFF
If the user setting is turned on, the addi-
tional function «OptiStart» can be selec-
ted by pressing the button during
programme selection.
5.14 EcoManagement
Factory setting: ON
Possible settings:
▪ ON
▪ OFF
EcoManagement provides information on
the energy and water consumption of the
appliance.
If set to «OFF», EcoManagement can be
turned off.
5.15 Clear counter
Factory setting: NO
Possible settings:
▪ YES
▪ NO
With «YES», all EcoManagement con-
sumption values are reset to «0».
5.16 Childproof lock
Factory setting: OFF
Possible settings:
▪ ON
▪ OFF
The childproof lock prevents a pro-
gramme from being started accidentally.
If the childproof lock is enabled, a pro-
gramme can only be started by pressing
two buttons simultaneously.
5.17 Heat pump (depending on model)
Factory setting: ON
Possible settings:
▪ OFF
▪ ON
The heat pump may also be switched on
depending on the wash temperature. En-
ergy consumption is reduced and the
programme duration extended. The pro-
gramme duration also varies according
to the settings (user settings, additional
functions).
If several programmes are started one
after the other, the heat pump may re-
main switched off.
30

5 User settings
5.18 Automatic door opener
Factory setting: YES
Possible settings:
▪ YES
▪ NO
The appliance door opens slightly auto-
matically during the drying or final drying
phase to save energy.
If automatic door opening is turned off,
the programme time is extended by
10minutes.
5.19 Temperature unit
Factory setting: °C
Possible settings:
▪ °C
▪ °F
The unit of temperature can be set to de-
grees Celsius (°C) or degrees Fahrenheit
(°F).
5.20 Interior light
Factory setting: 10 min
Possible settings:
▪ OFF
▪ 1, 2, 5, 10, 20 min
From a certain door opening angle, the
interior is illuminated for the set duration.
▸ Press the button to switch the illu-
mination off before time.
5.21 Tank storage duration
Factory setting: 36 h
Possible settings:
▪ OFF
▪ 12 h, 24 h, 36 h
The last rinse water is retained and used
for the next programme. If no pro-
gramme is started, the water is pumped
off after the duration set. In the display
appears:
Emptying the tank...
.
Once the tank has been filled around 20
times, it is rinsed automatically and, as a
result, the programme time is extended
by about 30 minutes. In the display ap-
pears briefly:
with rinsing of the tank
.
5.22 Emptying the tank in the event of a power failure
Factory setting: OFF
Possible settings:
▪ OFF
▪ ON
With «OFF», only in the case of the Eco
programme is the tank not emptied after
a power failure.
31

6 Care and maintenance
5.23 Automatic standby
Factory setting: ON
Possible settings:
▪ OFF
▪ ON
If the user setting is turned on, the in-
formation in the display goes out at the
end of the programme.
If the user setting is turned off, the in-
formation can be displayed by operating
the appliance door. Afterwards press any
button and the display goes out.
5.24 Factory setting
Factory setting: NO
Possible settings:
▪ YES
▪ NO
With «YES», the factory settings can be
restored.
6 Care and maintenance
6.1 Cleaning the interior and exterior
Cleaning the interior
Using the correct dosage of detergent will automatically clean the interior of the appliance.
The appliance should be additionally cleaned twice a year with dishwasher cleaner.
▸ Follow the instructions for the dishwasher cleaner.
▸ Select the «Machine care» programme, because dishwasher cleaners require higher tem-
peratures for optimum cleaning effect.
Cleaning the exterior
▸ Do not use abrasive or caustic cleaning agents.
▸ Do not use scouring pads, steel wool, etc. Otherwise the surface will be damaged.
▸ Remove any soiling or excess cleaning solution immediately. Only use washing-up liquid or
glass cleaner.
▸ Clean the surfaces with a soft, damp cloth only – for metal surfaces rub in the direction of
the polish lines.
▸ Clean the operating panel with a damp cloth and then wipe dry. Only use washing-up liquid
or glass cleaner.
▸ Regularly clean the door seal and edges with a soft, damp cloth.
32
6 Care and maintenance
6.2 Cleaning the spray arms
Upper spray arm
▸ Remove the upper basket.
1
2
▸ Release bayonet fastener 1 in an anti-clockwise direction and
remove.
▸ Remove the spray arm 2 from the shaft and rinse well under
running water.
▸ Check the nozzles.
Lower spray arm
▸ Hold the spray arm 3 in the middle and pull hard upwards.
3
▸ Rinse the spray arm well under running water.
▸ Check the nozzles.
▸ Clean the filter system and the coarse filter at the same time.
6.3 Cleaning the filter system
Only use soft materials for cleaning beneath the filter system. Never use metal ob-
jects.
An incorrectly assembled filter system can cause the appliance to malfunction.
▸ Open the appliance door and pull out the lower basket.
2
1
3
1
▸ Release the filter system in fine filter 1 in an anti-clockwise dir-
ection and remove.
▸ Open the coarse filer 2 by pressing on closing lug 3 and
clean the filter system under running water using a brush.
▸ Remove any coarse debris.
▸ Replace the filter system and turn the fine filter 1 as far as it
will go in a clockwise direction.
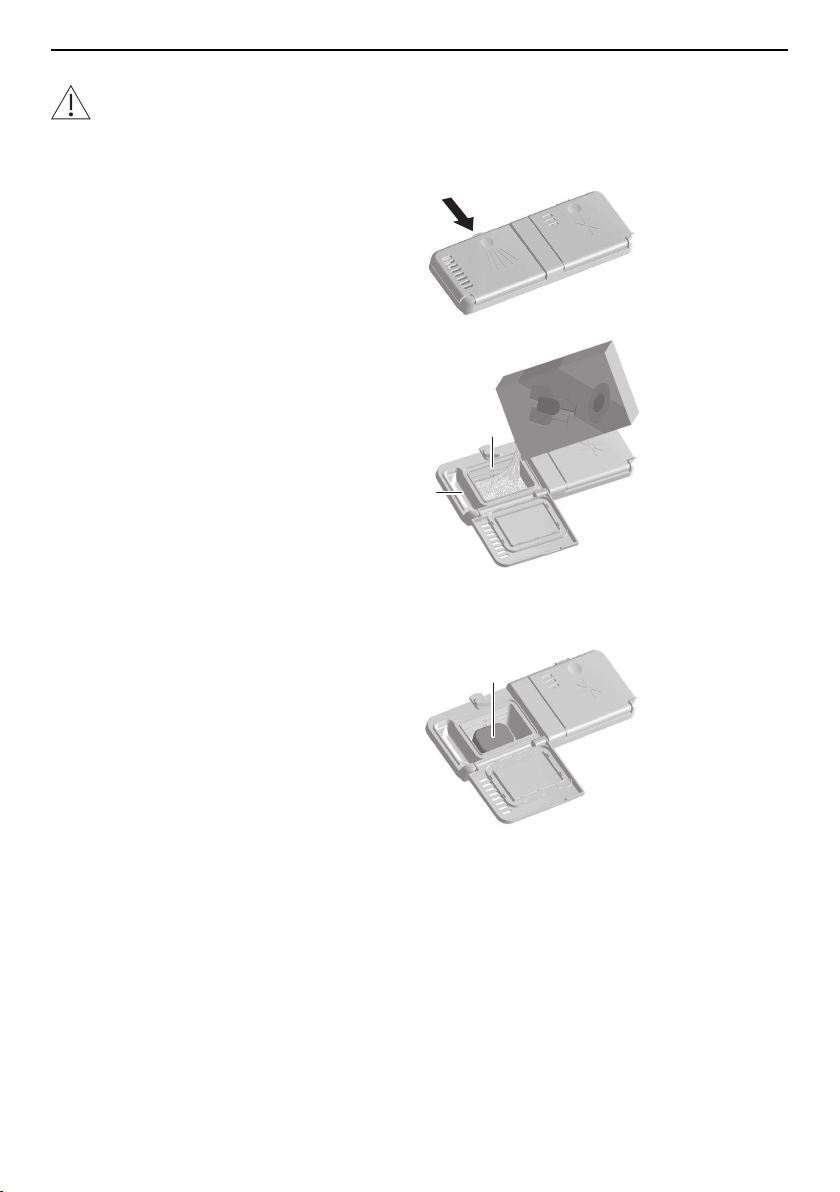
6.4 Refilling with regeneration salt
Never put detergent in the salt reservoir.
When the supply of regeneration salt is used up, the refill indicator flashes and
Refill salt
appears in the display.
▸ Open the appliance door and remove the lower basket.
▸ Open the cover on the salt reservoir by lifting up the grip.
33

6 Care and maintenance
▸ Fill with 1 kg standard regeneration salt. During the initial set-
up, add an additional 1 l water.
▸ Wipe away any excess salt on the edge of the salt reservoir.
▸ Close the cover and engage the latch.
▸ Run the «Pre-rinsing» programme without dishes to protect the
appliance from corrosion from any excess salt.
Approximate consumption of regeneration salt
A = Hardness of the water supply
B = Number of rinsing cycles per kg salt
A °fH
0
–
5
6
–
10
11
–
15
16
–
20
21
–
25
26
–
30
31
–
35
36
–
40
41
–
50
51
–
60
61
–
70
71
–
80
81
–
120
°dH
0
–
3
4
–
6
7
–
9
10
–
12
13
–
14
15
–
16
17
–
19
20
–
22
23
–
27
28
–
32
33
–
38
39
–
45
46
–
65
B
∞ 680 360 250 150 125 100 85 60 45 35 28 20
6.5 Filling with rinse agent
Never fill the rinse agent reservoir with detergent! Wipe away any spilt rinse agent.
Risk of foaming. Follow the manufacturer’s safety instructions and warnings.
Rinse agent prevents water spotting after final rinsing (rinsing with rinse agent).
When the supply of rinse agent is used up, the refill indicator flashes and
Refill rinse agent
appears in the display.
▸ Open the rinse agent reservoir by pushing the release catch in
the direction of the arrow.
▸ Fill with rinse agent up to the «max» mark
(1.3dl = about 35 wash cycles).
▸ Close the cover.
▸ Wipe away any spilt rinse agent.
6.6 Draining the storage tank
The storage tank must be emptied before disconnecting the appliance from the power supply
(e.g. in the case of holiday homes, changing tenants).
▸ With the appliance switched off, hold the button depressed for 5 seconds. The tank is
emptied.
34

7 Trouble-shooting
7 Trouble-shooting
You may be able to eliminate the following problems yourself. If not, write down the complete
error message and the serial number (FN) on the identification plate of your appliance and
call Customer Services.
7.1 Error messages
▪ In the event of a malfunction, an acoustic signal is emitted for 1 minute.
Display Possible cause Solution
A0
Foaming?
▪ High-foaming detergent
was used.
▪ Spilt rinse agent.
▪ Washing-up liquid was
used.
▸ Wipe away spilt rinse agent with a
cloth.
▸ Get rid of the foam with approximately
1dl vinegar.
▸ Cancel the error message by pressing
the button.
▸ Select the «Pre-rinse» programme.
A1
Check filter system
▪ Filter system is not fitted.
▪ Filter system is not cor-
rectly locked.
▸ Check the filter system, insert it and
turn the fine filter handle clockwise as
far as it will go.
A2
Check water outlet
▪ Filter system is blocked.
▪ Drain hose is bent or
kinked.
▪ Drain pump or siphon is
blocked.
▪ Excessive foaming due to
rinse agent spillage.
▸ Clean the filter system.
▸ Fix the problem.
▸ Cancel the error message by pressing
the button.
▸ Restart the programme.
A7
Heat pump fault
▪ Problem with the heat
pump.
▸ Cancel the error message by pressing
the button.
The appliance can still be used. The heat
pump is not used for the time being.
A9
Check water inlet
▪ Water tap is turned off.
▪ Water inlet filter is
blocked.
▪ Interruption in the water
supply.
▪ Water pressure is too
low.
▸ Fix problem or wait until water supply
is restored.
▸ Cancel the error message by pressing
the button.
▸ Restart the programme.
F8 / E18
See instructions /
FN XXXXX XXXXXX
▪ Water intake is hotter
than 79 °C (hot water
connection).
▸ Have a plumber reduce the temperat-
ure of the water intake.
35
7 Trouble-shooting
Display Possible cause Solution
F../E…
See instructions /
FN XXXXX XXXXXX
▪ Various situations can
lead to an «F» message.
▸ Cancel the error message by pressing
the button.
If the error message persists:
▸ Switch the power supply off for about
1 minute.
▸ Switch the power supply back on
again.
▸ Cancel the error message by pressing
the button.
▸ Restart the programme.
▸ If the error appears again, note down
the error message and FN.
▸ Turn off the water tap and the power
supply.
▸ Call Customer Services.
U../E..
See instruction
▪ Faulty electrical connec-
tion.
▪ Overvoltage
▸ Cancel the error message by pressing
the button.
If the error message persists:
▸ Switch the power supply off for about
1 minute.
▸ Switch the power supply back on
again.
▸ Cancel the error message by pressing
the button.
▸ Restart the programme.
▸ If the error appears again, note down
the error message and FN.
▸ Disconnect the power supply.
▸ Have the electrical installation checked
by an expert.
36
7 Trouble-shooting
7.2 Other possible problems
Problem Possible cause Solution
The appliance
does not start.
▪ This can have various causes. ▸ Close the appliance door.
▸ Plug the appliance into the
mains socket.
▸ Check the fuses.
▸ See the «Operation with child-
proof lock activated» section.
▪ «Demo mode» is activated. ▸ Open the appliance door.
▸ Hold the and buttons
down and at the same time
press the button.
The display shows: «Demo
mode ON»
▸ Press the button.
The display shows: «Demo
mode OFF»
▸ Cancel the message by press-
ing the button.
The appliance
starts to smell.
▪ This can have various causes. ▸ Clean the filter system.
▸ Add dishwasher cleaner and
run the «Machine care» pro-
gramme.
▸ Select a more powerful pro-
gramme.
▸ Add enough regeneration salt.
▸ Reduce the tank storage dura-
tion (e.g. 12h).
The time display
freezes for up to 4
minutes at the be-
ginning of the pro-
gramme or during
the wash cycle.
▪ Water softener is being rinsed
through after regeneration.
▪ The duration of the programme
and the time display are auto-
matically adjusted to how dirty
the dishes are.
▸ No action is required.
37
7 Trouble-shooting
7.3 Unsatisfactory washing results
Problem Solution
The dishes are not
clean.
▸ Select a more powerful programme.
▸ Load the baskets differently, avoiding blind spots.
▸ Clean the filter system and re-insert correctly.
▸ Check to see whether the spray arms are clogged or dirty.
▸ Use the correct amount of detergent or use a different kind of deter-
gent.
▸ Check the water hardness setting.
▸ Refill the salt reservoir with regeneration salt.
There is a white
film on the dishes.
▸ Clean the appliance with dishwasher cleaner.
▸ Refill the salt reservoir with regeneration salt and run the Pre-rinsing
programme without dishes.
▸ Use the correct amount of detergent or use a different kind of deter-
gent.
▸ Refill the rinse agent.
▸ Increase the rinse agent dosage setting.
▸ Check the water hardness setting.
▸ If not using detergent, set to
All in 1 ON
in the user
settings.
There are streaks
or milky spots on
the dishes.
▸ Reduce the rinse agent dosage setting.
▸ If not using detergent, set to
All in 1 OFF
in the user set-
tings.
The dishes are wet
and dull or have
water marks on
them.
▸ Refill the rinse agent.
▸ Increase the rinse agent dosage setting.
▸ Use a different rinse agent.
▸ Do not open the appliance door until the end of the programme
when a triple acoustic signal is emitted and the display or function
light goes out (depending on model).
▸ If not using detergent, set to
All in 1 OFF
in the user
settings.
There are rust
spots on the items
being washed.
The rust stems from another source e.g. the cutlery, pans, water pipe.
The appliance is made of rust-free steel.
▸ Refill the salt reservoir with regeneration salt and run the «Pre-rins-
ing» programme without dishes.
The detergent is
not fully dissolved.
▸ Check to see whether the spray arms are clogged or dirty.
▸ Use a different kind of detergent.
▸ Check the detergent dispenser cover.
▸ Check whether the filter system is clogged.
38
8 Accessories and spare parts
Problem Solution
There is discolour-
ing of the baskets
and plastic parts in-
side the appliance.
Dishes were washed that still had discolouring food leftovers on them
(e.g. tomato or curry sauce). The discolouration may fade after a few
wash cycles.
7.4 In the event of a power failure
▪ Any programme that is running will be interrupted. After the cause of the power supply fail-
ure has been resolved, the programme is resumed.
▪ The fault indication system is interrupted.
8 Accessories and spare parts
Please give product family of the appliance and exact designation of the accessory or spare
part when ordering parts.
Accessories
«Small» cutlery basket
«Large» cutlery basket
Cup support
39
8 Accessories and spare parts
Lower basket for glasses
Vario cutlery basket insert
Lower basket for glasses
Racks
Set of 4 easy prongs
Spare parts
Filter system
40

9 Technical data
9 Technical data
Dimensions SMS 55 SMS 55
Extra height
EURO 60 EURO 60
Extra height
EURO 60 WP
Appliance height (incl.
slide plate 3mm)
762mm 827mm 762mm 827mm –
Appliance height (incl.
adjustable plinth)
– 848–893mm 783–828mm 848–893mm 866–911mm
Appliance width 546mm 546mm 596mm 596 mm 596mm
Appliance depth 572mm 572mm 572mm 572 mm 572mm
Appliance weight 42–48kg 63kg
Plumbing in Electrical connection
Cold or hot water up to 60 °C: G¾" See identification plate:
▸ Open the appliance door.
– Identification plate is located on
left-hand side on edge of tub.
Permitted pressure of water sup-
ply:
0.1–1.0MPa
(1–10bar)
Max. pumping height: 1.2m
Ambient conditions
Minimum ambient temperature: +10°C
Safety concept
Provided power is going to the appliance, the electronic control unit monitors the appliance.
Any malfunctions are indicated by error messages.
Overflow protection
The overflow protection system does not work in the event of a power failure. Turn
off the water tap during longer periods without operation.
The electronic control unit monitors the water level in the appliance. In the event of a malfunc-
tion, the drain pump turns on, stopping the supply of water to the appliance.
41

9 Technical data
9.1 Consumption data
The consumption data refer to a one-phase connection 220–240 V 2 N.
The consumption values represent typical value ranges. The values can vary according to
load, water inlet temperature and process control (e.g. regeneration, etc.).
V = Pre-rinsing T = Drying
R = Cleaning D = Duration
Z = Intermediate rinsing W = Water
G = Rinsing with rinse agent E = Energy
The stated programme times and consumption values serve as a guide. The values can also
vary according to the selection of additional functions, the load, the degree of soiling of the
load, the type and amount of cleaner, the water inlet temperature, the electrical connection
and specific programme sequences (e.g. regeneration).
Appliance without a heat pump
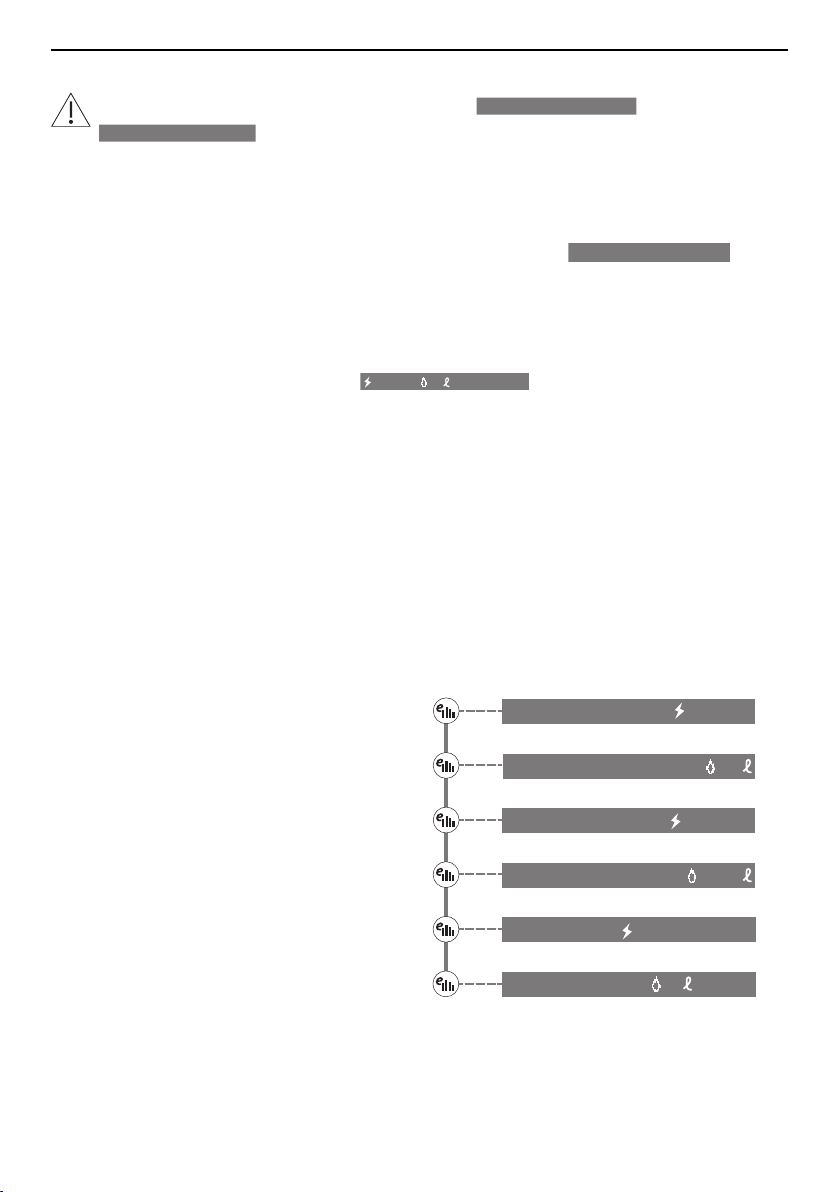
Programme V
[°C]
R
[°C]
Z G
[°C]
T D * W
[l]
E
[kWh]
Eco programme Yes 50 Yes 40 Yes 2h15
–
2h30
9.3 0.52
Automatic If re-
quired
(cold)
50–60 If re-
quired
55 Yes 0h55
–
1h50
5
–
17
0.60
–
1.20
Daily quick If re-
quired
(35)
60 Yes 60 Quick
wash
0h47 11
–
16
0.9
–
1.2
Sprint No 55 No 50 Quick
wash
0h20 8 0.8
Intensive If re-
quired
(35)
65 Yes 60 Yes 1h40 16
–
22
1.2
–
1.4
Silent If re-
quired
(cold)
60 Yes 60 Yes 2h50 8
–
14
1.1
–
1.2
Party No 55 No 50 No 0h11
(–5h20)**
4
(–24)**
0.8
(–2.4)**
Glass care No 45 Yes 55 Yes 0h50 9
–
11
0.8
42

9 Technical data
Programme V
[°C]
R
[°C]
Z G
[°C]
T D * W
[l]
E
[kWh]
Fondue/Raclette Soaking
(35)
65 Yes 60 Yes 2h15 11
–
18
1.3
–
1.5
Hygiene 55 70 60 65 Yes 1h40 12
–
15
1.7
Machine care No 70 60 65 Yes 1h50 15
–
19
1.35
Pre-rinsing Cold No No No No 0h15 1
–
4
0.05
* Duration without final drying time. The programme time depends on the following conditions:
▪ * Connected load (in the case of a one-phase connection, the programme time is extended
by up to 15minutes)
▪ Storage duration of the tank (with automatic rinsing of the tank, the programme time is ex-
tended by up to 30minutes)
** Depending on whether programme is run once or max. 5 times.
Appliance with heat pump
Programme V
[°C]
R
[°C]
Z G
[°C]
T D * W
[l]
E
[kWh]
Eco programme Yes 50 Yes 40 Yes 2h30 11.3 0.32
Automatic If re-
quired
(cold)
50–60 If re-
quired
55 Yes 0h55
–
1h50
5
–
18
0.55
–
1.1
Daily quick If re-
quired
(35)
60 Yes 60 Quick
wash
0h45 11
–
17
0.8
–
1.1
Sprint No 55 No 50 Quick
wash
0h18 9 0.75
Intensive If re-
quired
(35)
65 Yes 60 Yes 1h37 16
–
23
1.1
–
1.3
Silent If re-
quired
(cold)
60 Yes 60 Yes 2h50 8
–
15
1.1
43

9 Technical data
Programme V
[°C]
R
[°C]
Z G
[°C]
T D * W
[l]
E
[kWh]
Party No 55 No 50 No 0h11
(–5h20)**
4
(–25)**
0.8
(–2.4)**
Glass care No 45 Yes 55 Yes 0h48 9
–
12
0.75
Fondue/Raclette Soaking
(35)
65 Yes 60 Yes 2h12 11
–
19
1.2
–
1.4
Hygiene 55 70 60 65 Yes 1h37 12
–
16
1.4
–
1.6
Machine care No 70 60 65 Yes 1h50 15
–
19
1.3
Pre-rinsing Cold No No No No 0h15 1
–
4
0.05
* Duration without final drying time. The programme time depends on the following conditions:
▪ * Connected load (in the case of a one-phase connection, the programme time is extended
by up to 15minutes)
▪ Running time of the heat pump
▪ Storage duration of the tank (with automatic rinsing of the tank, the programme time is ex-
tended by up to 30minutes)
** Depending on whether programme is run once or max. 5 times.
9.2 Note for testing institutes
The note for testing institutes can be obtained from the internet:
www.vzug.com/testinstitute.
9.3 Noise measurement
See the 'Note for testing institutes' section.
44

10 Disposal
10 Disposal
10.1 Packaging
Never allow children to play with packaging material due to the danger of injury or
suffocation. Store the packaging material in a safe location or dispose of it in an
environmentally-friendly way.
10.2 Safety
Render the appliance unusable to prevent accidents caused by improper use (e.g. through
children playing):
▸ Disconnect the appliance from the mains. With a fixed appliance, this is to be carried out
by a qualified electrician. Then cut the mains cable off flush with the appliance.
▸ Remove or disable the lock on the appliance door.
10.3 Disposal
▪ The «crossed‐out wheeled bin» symbol requires the separate collection of waste elec-
trical and electronic equipment (WEEE). Such equipment can contain hazardous, environ-
mentally harmful materials.
▪ These appliances are to be handed over to a designated collection point for the recycling
of electrical and electronic equipment and must not be disposed of with unsorted house-
hold waste. And in this way, you will be helping to protect resources and the environment.
▪ For more information, please contact the local authorities.
10.4 Note on heat pump
This appliance is CFC-free. It contains fluorinated greenhouse gas covered by the Kyoto Pro-
tocol.
Heat pump Hermetically closed
Greenhouse gas R134a
Load capacity [kg] 0.175
GWP [(kg CO
2
)/(kg greenhouse gas)] 1430
Total GWP [t CO
2
] 0.250
45

46
11 Notes

47

Quick start guide
Please first read the safety
precautions in the operating
instructions!
▸ Open the appliance door.
▸ Load the dishes.
▸ Add the detergent.
▸ Select the programme.
▸ Select any additional function(s) required.
▸ Close the appliance door. The programme
starts immediately.
▸ If an signal is sounds 3 times, open the
appliance door and unload the dishes.
Services & support
Register your appliance today online via
our website at www.vzug.com and benefit
from the best possible support in the event
of a malfunction – including during the
manufacturer's 2-year warranty period. You
will require the serial number (FN) and ap-
pliance designation to register your appli-
ance. You will find them on the identifica-
tion plate of your appliance.
You can make your own note of the FN and
appliance designation or note them on the
service sticker which comes with the appli-
ance:
FN: ______________________________
Appliance: ________________________
Your repair order
You can find the telephone number of the
nearest V-ZUG service centre to you under
www.vzug.com →Service →Service hotline.
General queries, accessories and service
agreement
V-ZUG will be happy to help you with any
general administrative or technical queries,
to accept your orders for accessories and
spare parts and to inform you about our
progressive service agreements.
V-ZUG Ltd, Industriestrasse 66, CH-6301 Zug
[email protected], www.vzug.com
1017258-R05