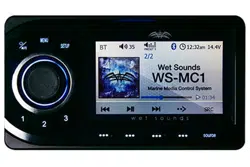
BASIC CONTROLS

1. Main Control Knob (MCK)
This allows adjustment of Main Volume. When the MCK is pressed, all audio zones are displayed.
To adjust a zone, select it by pressing either the MCK or the corresponding button below the display (6). The MCK will adjust the zone that is highlighted GREEN.
Continue to press the MCK until all zones are highlighted BLUE, indicating that the MAIN volume is being adjusted. The proportions of the levels selected in the individual zones will be held when the MAIN volume is adjusted.
2. POWER/MUTE
Press & hold this button for power on/off.
Short press this button to MUTE/unmute the volume of all zones.
The MC-MD will confirm the volume is muted in the display.
Allows access to functions that are different on each SOURCE.
4. SETUP
Allows access to controls that affect all functions of the MC1, press the SETUP button until the options appear. Turn the MCK or press the ^ v buttons (6) below the display. When the desired option is highlighted, select it by either pressing the MCK, or the ENTER button below the display.
AUDIO Selecting this will allow access to:
EQUALIZATION Allows adjustment of BASS/MID TREBLE for all audio zones of the MC1
BALANCE Allows adjustment between left & right of each zone individually
ZONES Selecting this allows access to each audio zone. The options are:
RENAME Allows a customized label (8 characters max) to be applied to each zone.
To change the characters, rotate the MCK until the desired letter or number is displayed, then press the MCK to move to the next character & repeat the process. Once the zone label is changed, press the MCK repeatedly until all 8 characters have been changed (a blank space is available). Once the zone is renamed, the MC1 will confirm the action via the display. All zones are capable of being renamed with a custom label.
ENABLE/DISABLE When a zone is disabled, it will no longer appear on the screen.
LIGHTING Allows access to each lighting zone. The options are:
RENAME Allows a customized label (8 characters max) to be applied to each zone.
To change the characters, rotate the MCK until the desired letter or number is displayed, then press the MCK to move to the next character & repeat the process. Once the zone label is changed, press the MCK repeatedly until all 8 characters have been changed (a blank space is available). Once the zone is renamed, the MC1 will confirm the action via the display. All zones are capable of being renamed with a custom label.
ENABLE/DISABLE When a zone is disabled, it will no longer appear on the screen.
BLUETOOTH Displays a list of Bluetooth devices available for connection to the MC1.
To connect, disconnect, or delete a displayed device, rotate the MCK until the desired device is highlighted, then choose Connect, Disconnect, or Delete using the buttons (6) below the display.
Make sure the Bluetooth on the device is enabled (through the device’s settings).
The MC1 will confirm the action via the display.
LEVEL ADJUST Allows individual volume level adjustment of the Bluetooth Audio and the Auxiliary inputs. Ideally all input sources in a system are the same volume level, but if not this adjustment might be needed if the output level of the Bluetooth Audio or the Auxiliary sources are louder than the other sources.
LABEL PRESETS Allows the 3 shortcut keys to have customized labels applied (up to 8 characters).
SHORTCUT KEYS Allows any source to be assigned to the 3 shortcut keys. Once in the Shortcut key mode, use the MCK to select from the available sources, then use the buttons below the display to assign the sources to SC1, SC2, or SC3. After the Shortcut keys are set up, pressing these buttons will select the source set to that key.
LCD BRIGHTNESS Allows adjustment of the brightness of the display. Adjustment is made by either rotating the MCK, or using the buttons (6) below the display.
CLOCK Selecting this allows the clock to be set. Adjustment is made by either rotating the MCK, or using the buttons below the display.
DAY NIGHT MODE Allows the ability to scroll through the display options of DAY (white screen/black characters) NIGHT (black screen/ white characters) or AUTO.
In AUTO mode, the display is in DAY mode until the vessel’s lights are turned on, then the display goes into NIGHT mode.
PLEASE NOTE – in order for the AUTO function to operate properly, the Orange wire in the MC-BB harness labeled DIM INPUT must be wired to a circuit in the vessel that gets +12V whenever the main lighting switch is turned on.
AUTO DIMMER Allows two options: When ON is selected, the display on the MC-MD is controlled by the dimming switch on the vessel.
PLEASE NOTE – in order for this function to operate properly, the Orange wire in the MC-BB harness labeled DIM INPUT must be wired to a circuit in the vessel that gets +12V whenever the main lighting switch is turned on. When OFF is selected, the dimming circuit of the vessel will not affect the display of the MC-MD.
SOFTWARE Allows access to the software menu of the MC1:
VERSION Displays what version of the operating software is currently running on the MC1.
UPDATE Allows the operating software of the MC1 to be updated while still installed in the vessel.
5. SOURCE
Allows access to seven different sources by pressing the buttons below the display (6):
RADIO OPERATION Press SOURCE, then RADIO. BAND button:
Selects FM1/FM2/AM/Weather Band.
PRESETS Press PRESET to display what stations are set, then rotate the MCK to highlight a selection, then press the MCK to select that station.
To manually set a preset, tune to the station, press PRESET, then press & hold either the MCK or the ENTER button. The MC1 will confirm the selection.
MANUAL TUNE Press & hold the BAND button until the Manual Tune displays, then tune using the multifunction buttons below the display.
AUTO STORE Press MENU, then select Auto Store The MC1 will automatically tune to & store presets in the memory.
LOCAL/DISTANT STATION Press MENU, then select Local Seek Choose Off/On.
RADIO BROADCAST DATA SYSTEM Press MENU, then select RBDS Choose Off/On.
Note – not all FM Radio stations support RBDS, so availability of this feature may be limited.
RADIO REGION The MC1 is defaulted to receive broadcasts in the USA region, but Russia, Latin America, Asia, Japan, Middle East, Australia & Europe regions are also available through this setting.
USB Operation Press SOURCE, then USB.
Please note – if there is nothing plugged into the USB port on the MC-BB, this selection will not be possible. The USB port on the MC-BB is capable of both connecting & charging Apple devices & charging most Android devices. PLAY/PAUSE, Forward/Reverse Track, Shuffle & Repeat features are all available via the buttons below the display (6).
Press the MENU button to search for Playlists, Artists, Albums, Genres, Songs, Composers, Audiobooks, or Podcasts. The MC1 can display either ALL or will search alphabetically. In addition to connectivity with IOS sources, the MC-1 also allows music files (MP3 format only) to be read directly from a USB/Thumb Drive.
BLUETOOTH AUDIO Operation Follow the instructions above to connect the desired Bluetooth device to the MC1.
Press SOURCE, then BT AUDIO. PLAY/PAUSE, Forward/Reverse Track, Shuffle & Repeat are all available via the buttons below the display (6).
Press the MENU button to search for Playlists, Artists, Albums, Genres, Songs, Composers, Audio books, or Podcasts. The MC-1 can display either ALL or will search alphabetically in each category
AUXILIARY INPUT Operation Press SOURCE, then AUX to allow access to the 3.5mm auxiliary input on the MC-BB. This can be used to allow connection of a variety of audio sources.
PANDORA® This feature allows the control of the Pandora® application from the MC1 directly (Android users are limited to Bluetooth connection only, while IOS users can use both USB and Bluetooth). The Pandora® app will need to be started on your device first, then press SOURCE, then PANDORA® on the MC1.
Features
“Looking Glass“ Allows all the stations you have created on Pandora® to be displayed.
Rotate the MCK to scroll through, then press to select.
>II pressing this pauses the Pandora® stream. Pressing it again will restart the Pandora® stream.
>>I Pressing this forwards to the next song on the Pandora® Stream.
**> Allows access to more features. The “Bookmark”, “Thumbs Up” & “Thumbs Down” buttons help you customize your Pandora® experience.
LIGHTING The MC1 allows the control of up to 4 Zones of RGB LED lighting when used with the optional WS-4Z-RGB-BB Controller.
You must have this accessory to be able to control RGB LEDs with the MC1.
Operation Press SOURCE (2X), then LIGHTING to access the lighting control screen.
Select which zone you want to control by using the buttons below the display (6), then rotate the MCK to select the feature you want to adjust, then press the MCK to select it.
Power Mode Selecting this enables access to the Power/Mode feature. This allows you to quickly turn on/off either the zone selected, or all zones. The MODE feature allows the choice of a variety of LED effects:
- Solid - RGBs remain continuously lit at one selected color.
- Fade - RGBs fade from zero illumination to full illumination based on the rate chosen.
- Music - RGBs react to the beat of the music - Please make sure that the AUX out (3.5mm) on the MC- BB is connected to the music input of the WS-4Z-RGB-BB to make this feature function.
- Strobe – RGBs flash continuously.
- Change – RGBs alternate colors.
Each zone will display the Power & Mode status on the main Lighting Display screen. For instance, if Zone 1 is showing “ON/Change” that indicates that Zone 1 is turned on & will be alternating RGB colors.
Color Selecting this enables the color selection screen for one zone. Rotate the MCK to highlight the desired RGB color & press the MCK to select it. The color chosen will be displayed for each zone on the main lighting control screen.
Fade Rate Selecting this enables control of the rate of fade when the fade effect is chosen.
Intensity Level Allows the adjustment of the output (or brightness) of that zone’s RGBs.